Job Costing Overview (New)
Job Costing Workflow Overview
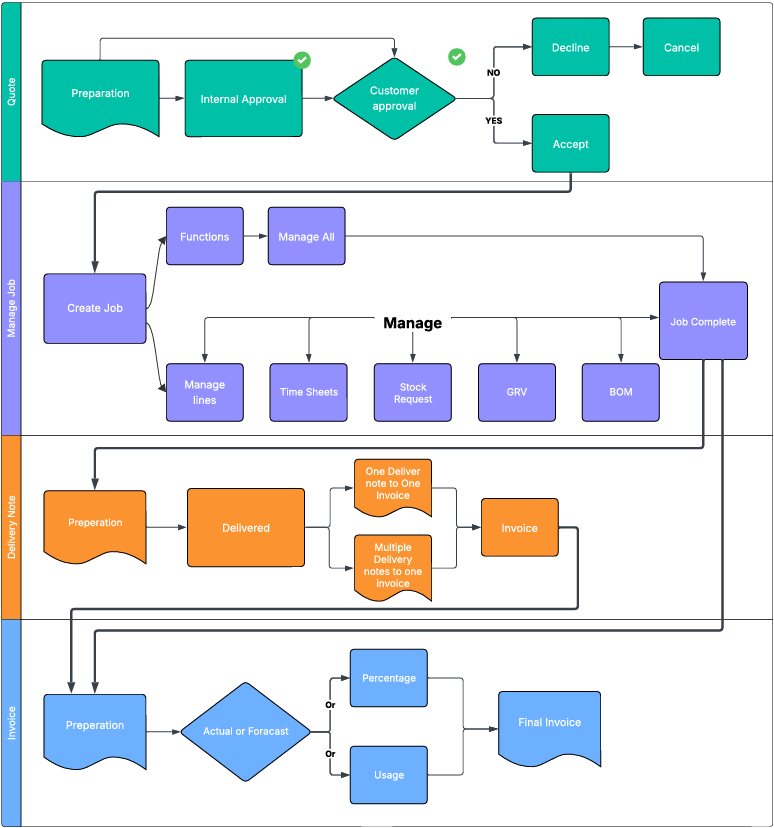
Quote
Every job begins with a Quote, which provides the estimated cost of the work and serves as the basis for customer approval. Once approved, the quote can be promoted to a Managed Job—the central stage where production activities are tracked, coordinated, and monitored.
From there, you have two workflow options:
- Option 1: Proceed to a Delivery Note if items need to be dispatched, followed by an Invoice.
- Option 2: Go directly from Managed Job to Invoice if no delivery documentation is required.
Alternatively, you can initiate a job directly from the Managed Job stage. In this case, the system will automatically generate a corresponding quote, ensuring every job remains linked to a quote—regardless of where it begins.
Invoicing can be structured in two primary formats: percentage-based or usage-based. Each format can be further refined into actual or forecasted (predicted) invoicing. Multiple invoices can be issued under either approach, depending on project needs or billing cycles.
Manage Job
The Managed Job stage is the operational heart of your workflow—where production activities are created, tracked, and coordinated. You can initiate a job directly from this stage, and the system will automatically generate a corresponding Quote, ensuring every job remains linked to a quote regardless of where it begins. This maintains traceability and financial alignment across all job types.
Once a job is created, you have two management options:
- Manage All Lines as a Single Function:
This approach is ideal for smaller jobs with limited complexity. It allows you to control all job components in one place, streamlining updates and reducing overhead. However, caution is advised for larger jobs, as this method can obscure individual line-level visibility and make it harder to track progress or isolate issues. - Manage Job Line by Line:
Recommended for larger or multi-phase jobs, this method gives you more control over each line item. You can monitor progress, allocate resources, and adjust timelines independently, ensuring better oversight and flexibility throughout the job lifecycle.
Within the Managed Job stage, you can also access and update key operational modules:
- Time Sheets: Record labour hours and assign them to specific job lines or phases. This supports accurate cost tracking and resource planning.
- Stock Requests: Generate requests for items not currently in stock. These requests trigger procurement workflows to ensure materials are available when needed.
- GRV (Goods Received Voucher): Use GRVs to document partial dispatches, especially useful when some items are ready for delivery while others remain in production.
- BOM (Bill of Materials): Manage and update BOMs to reflect the materials required for each job line. This ensures production teams have clear visibility into what’s needed and when.
Together, these tools provide a robust framework for managing jobs of any size, supporting both operational efficiency and financial accuracy
Delivery Note
Once a job, or part of a job is complete and ready for dispatch, a Delivery Note can be prepared to document the items being sent. This note serves as the formal record of what’s leaving your premises and when.
You can choose between two dispatch-to-invoice workflows:
- One Delivery Note to One Invoice: Ideal for single shipments or straightforward billing.
- Multiple Delivery Notes to One Invoice: Useful for staged deliveries that are consolidated into a single invoice for streamlined billing.
This flexibility ensures your dispatch and invoicing processes stay aligned with the pace and structure of the job.
Invoice
Invoicing can be structured in two primary formats: percentage-based or usage-based. Each format can be further refined into actual or forecasted (predicted) invoicing. Multiple invoices can be issued under either approach, depending on project needs or billing cycles.
Invoicing can be structured around two distinct approaches. Forecasted and Actual, each with its own implications for cost control and client expectations.
- Forecasted Invoicing - Forecasted invoicing is based on the original quote accepted by the client. This quote sets a fixed financial boundary for the job. Any costs incurred beyond the quoted amount are absorbed by the company, as the client has agreed to the scope and price upfront. This model is ideal for projects with clearly defined deliverables and minimal expected variation.
- Usage/Actual Invoicing - Actual invoicing reflects the real costs incurred during the job. It’s typically used for charge-up jobs, where billing is based on time, materials, or usage. If costs exceed the original quote, this is treated as scope creep, usually due to client-driven changes or additions. These adjustments are communicated and invoiced accordingly.
- Invoices reflect real item costs, similar to a traditional invoice format.
- You can compare quoted item costs and selling prices against actuals and invoiced amounts.
- This model is ideal for jobs with variable scope or evolving material requirements.
- Percentage-Based Invoicing - Percentage invoicing allows you to bill progressively over the life of a job. It’s especially useful for long-term or multi-phase projects.
- You can issue an invoice before the job starts, based on an agreed percentage.
- Costs are tracked against the quote, allowing you to compare estimated vs actuals.
- This approach helps maintain monthly profit and loss consistency, supporting smoother financial reporting.
Case Studies
Basic Job Costing Case
Quote Creation
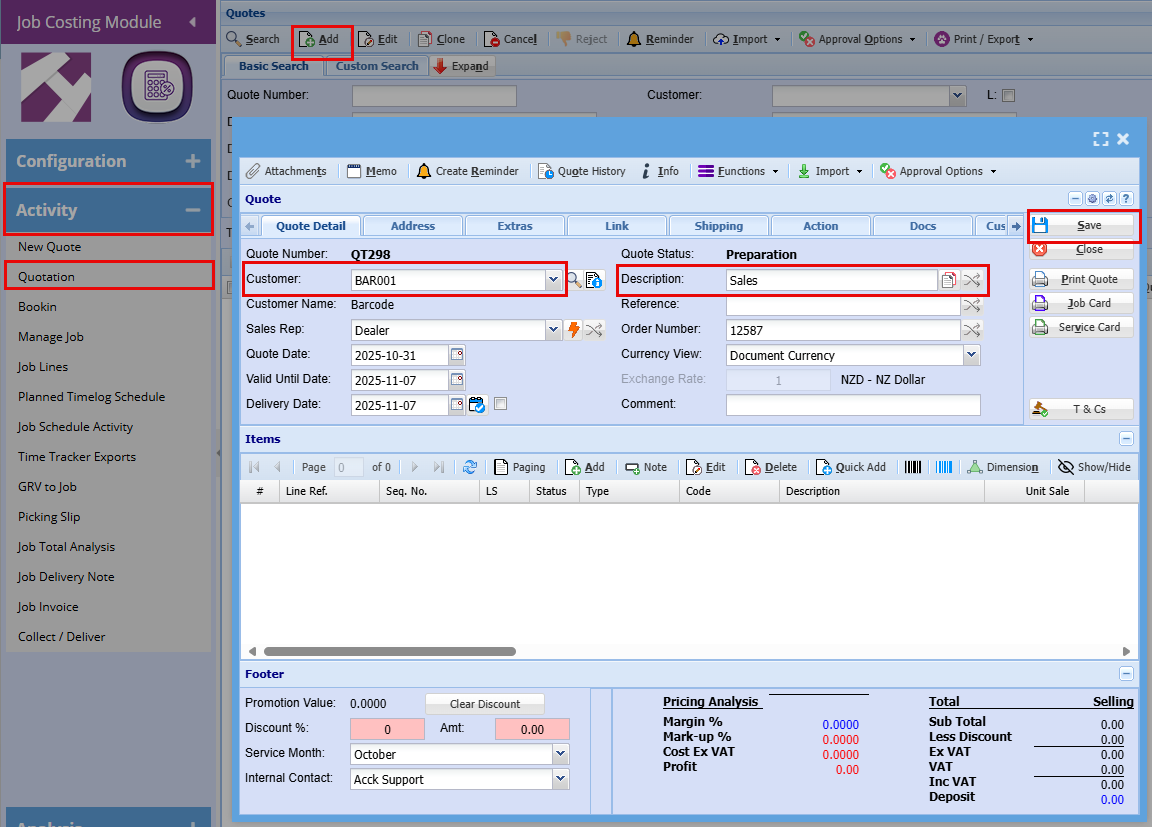
Job Costing > Activity > Quote
Before adding your line items to your quote, take a moment to review the key tabs across the top of your page, some of these tabs may contain important options you may want to configure or define first for a basic Quote.

Quote Detail Tab:
- Click "Add"
- Enter the Customer name and Description.
- Click "Save"(By clicking save you activate the button allowing you to "Add" a line item.)
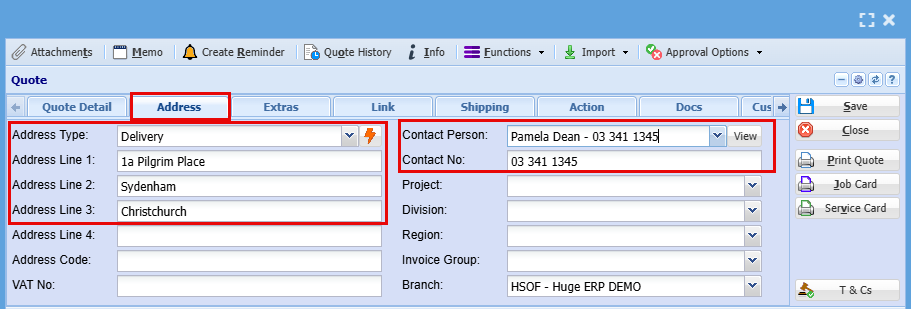
Address Tab:
- Use this tab to update the job address if required.
- Select the contact person for the quote from the dropdown list.
- If the contact does not exist yet, click the View button to add a new contact on the fly
Note: if details are edited on the quote, this will only apply to the specific quote and not update the debtor setup unless the debtor setup is access and updated as well.
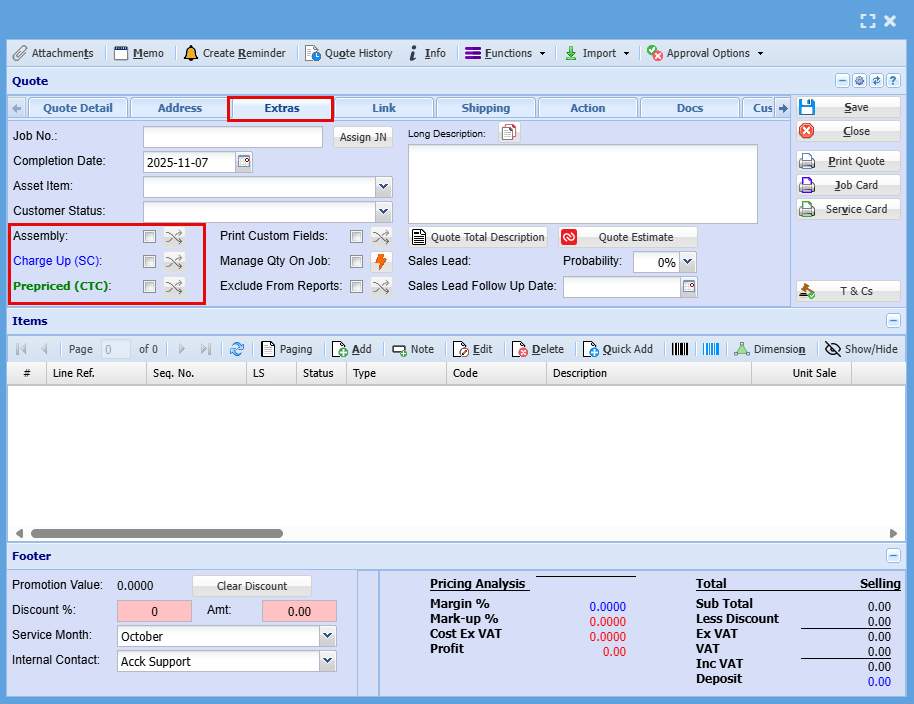
Extras Tab:
Select the billing method that applies to this job
Among the top tabs, click on the "Extras" tab.
- Tick the box that applied to your customer.
- Click "Save"
| Assembly | “Assembly” refers to an internal process where components or materials are prepared, combined, or staged before installation or delivery. It’s not billed separately to the customer but contributes to your overall job cost. |
| Charge Up (SC) | Charge Up (SC)” means the customer is billed for actual time and materials used, including any extras beyond the initial scope. Charge Up allows you to invoice for additional costs incurred during the job. |
| Prepaid (CTC) |
"Prepaid” refers to the quoted amount for the job, the fixed charge agreed to by the customer. You can’t invoice beyond this amount, so any extra time, materials, or costs that exceed the quote become your internal expense, or ‘Cost to Company (CTC) |
Adding Line Items to a Quote.
- Click the "Add" button located halfway down the page

- From the dropdown menu, choose the relevant item (Stock, Service, or Custom Items.)

- Once selected, check the basic fields:
1 Select Item
2 Check description as this can be changed at this point
3 Add Quantity
4 Check Cost of Item
5 Check your markup
6 Check Sell Price - click Save & Close to confirm your choice
- Add as many as items as needed
| Stock Item |
Select your stock item from the drop-down menu |
| Description |
At this stage you can change the Description if needed |
| Qty |
Add the Quantity you require of this item |
| Cost Per Unit |
Check the cost of this item |
| Mark up % |
At this stage you can increase your profit % |
| Selling Ex GST |
Price does not include the 15% Goods and Services Tax. You add GST on top of the listed amount. |
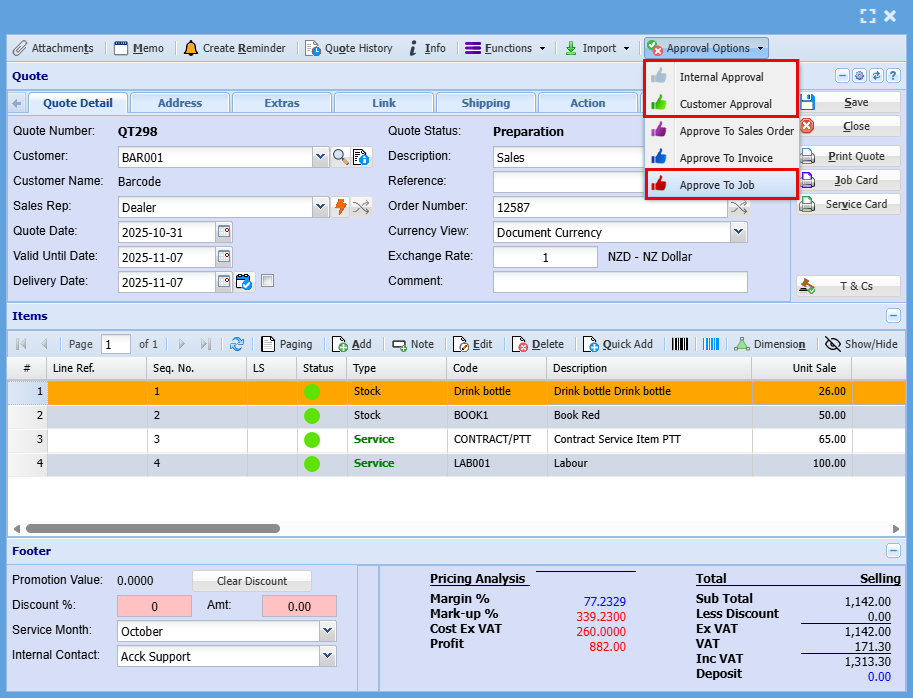
You can now submit this quote for customer approval.
At the top of the quote, you'll find Approval Options. From here, you can either send the quote for internal approval before forwarding it to the customer, or send it directly to the customer. Once customer approval is received, use the same dropdown menu to promote the quote to a Job.
Once you click Approve to Job you will have the below Approve Quote to Job screen pop us.
You will always need an Order number, here you will also make sure you have selected weather this is a Charge Up (Scope Creep) or a prepriced (Cost to company) job.
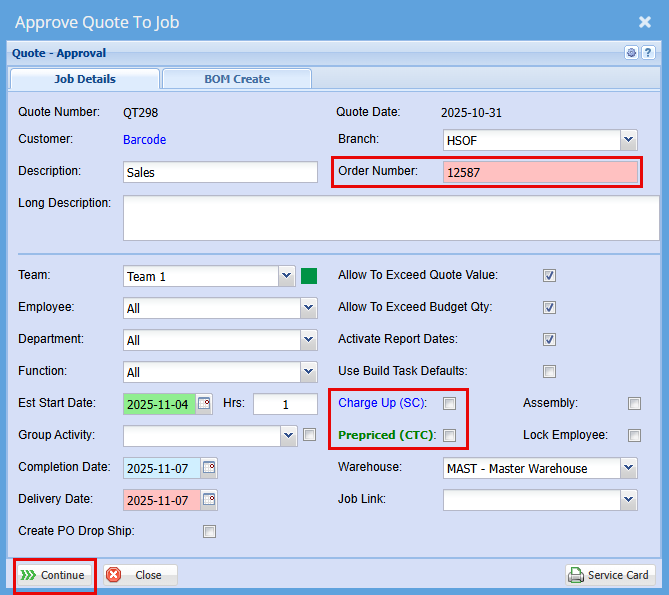
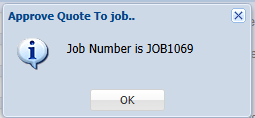
- Click Continue to create the job
Job Management
Job Costing > Activity > Manage Job
- Type in your Job number
Click Search
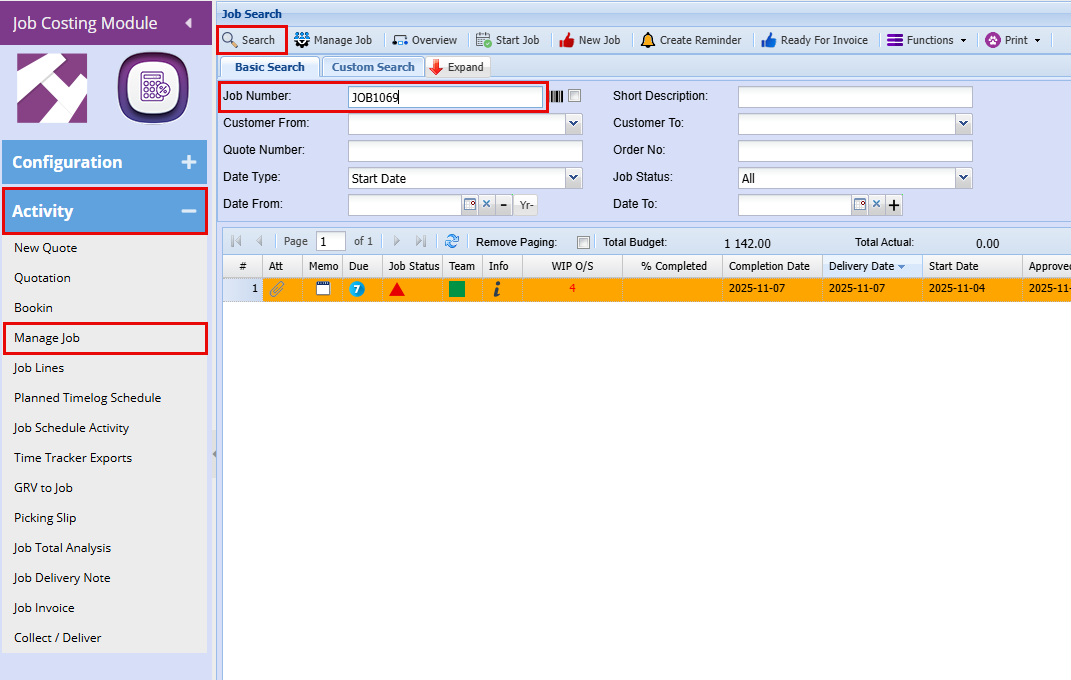
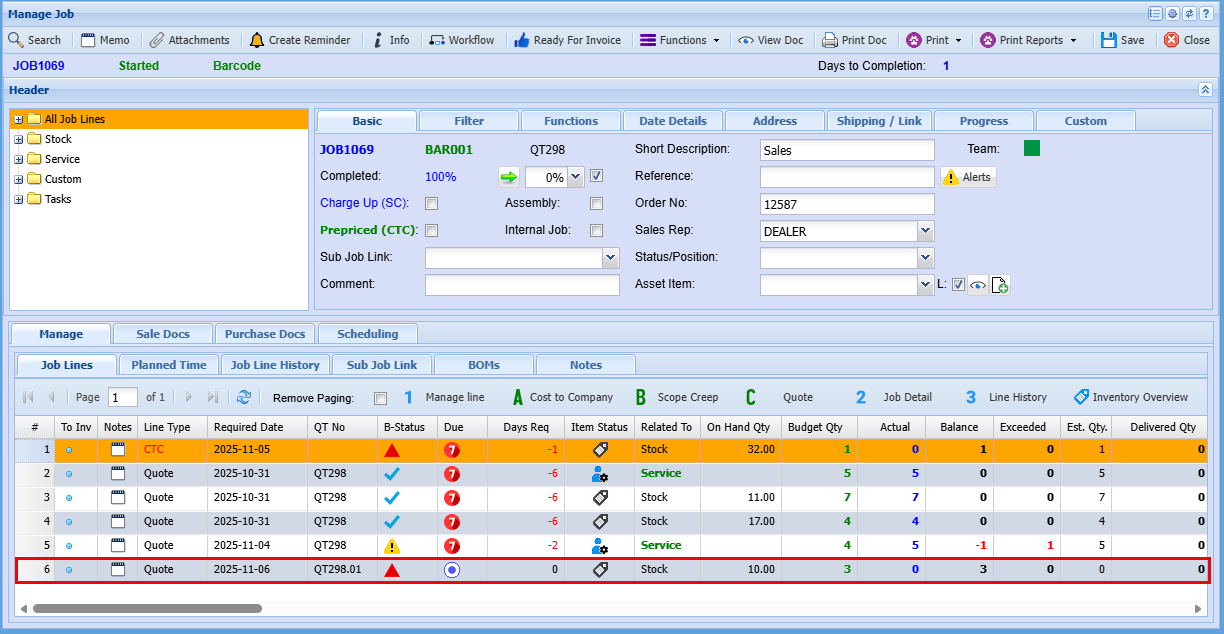
Each job line consists of multiple columns, with each column providing specific details about the job.
You can rearrange the columns in the order that the information is most relevant to you by simply dragging and dropping them into your preferred order as shown below.
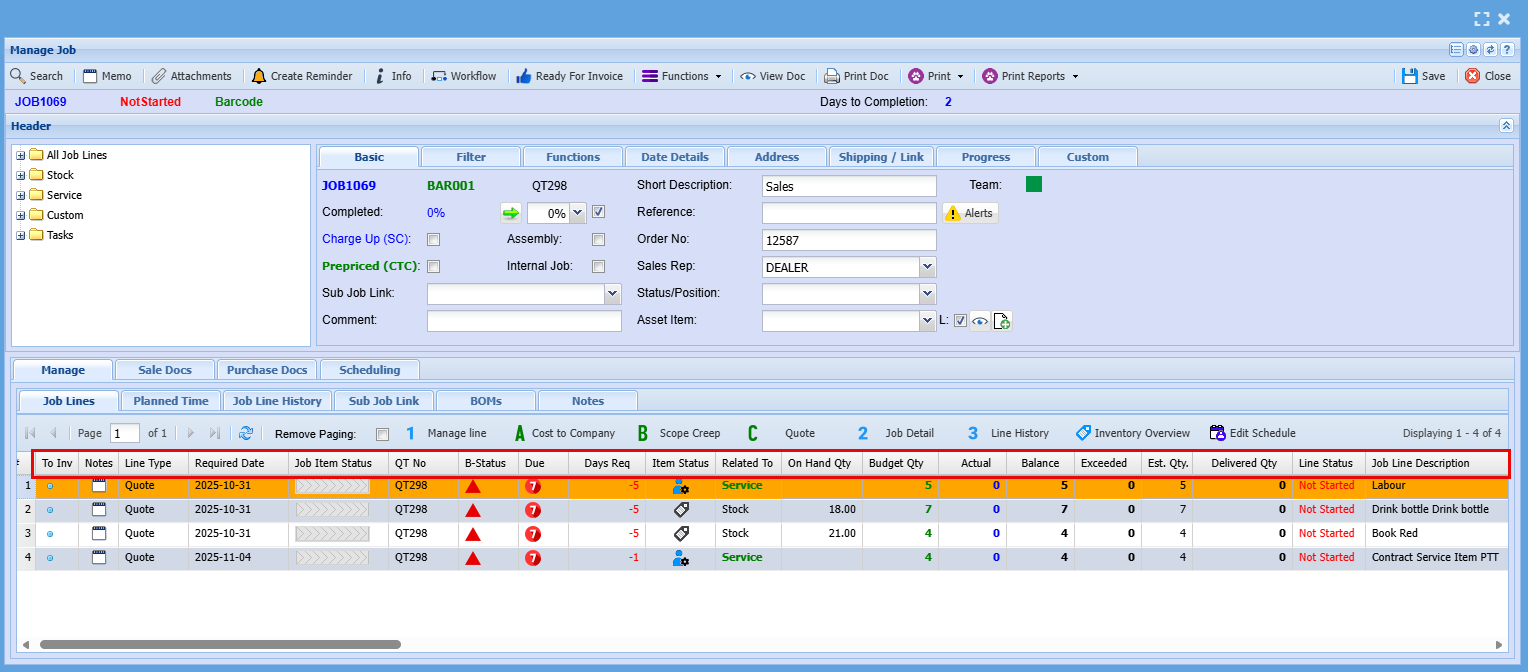
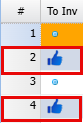
| To Invoice | You can click on the dot to change the icon to a thumbs up to send this line for invoicing |
| Notes | You can add notes for internal records. |
| Line Type | This refers to where the line came from, the example above is from a Quote but can come from a CTC (Cost to Company) or a SC (Scope Creep) |
| Required Date | This is the date the Job is to be completed by |
| Job Item Progress | This is used for Production Tracking |
| QT No. | This is the Quote number the line was added from |
| B-Status | This will show a different icon to show whether the Job has been started, in progress or completed |
| Due | Will show you how many days are given to complete Job |
| Days Required | This will show you have may days is needed to complete this Job Line Item |
| Item Status | This will show if the line is a Stock, Service or Custom Item using Icons |
| Related To | This will show if the line is a Stock, Service or Custom Item |
| On Hand Qty | This will show you how many of the specific item you have on hand to do the job, it will highlight if you do not have enough stock to complete the job |
| Budget Qty | This shows you what you had initially quoted |
| Actual | This Quantity indicates the quantity used for the job |
| Balance | This is the Quantity that is left over from the Budget Quantity |
| Exceeded | This will show you the quantity you have exceeded over the Budget Quantity |
| Est Qty | This is usually the same as tour Budget Qty |
| Delivered Qty | This is how many of this line item has been completed and actually dispatched to the customer |
| Line Status | This speaks to the Job Item Status and B-Status which shows job progress |
| Job Line Description | This is the description form the quote detailing what the line item is |
Manage Job by Line
Managing one line at a time within a workflow keeps you in control by ensuring each task is handled deliberately and accurately. This method reduces errors, simplifies troubleshooting, and creates a clear audit trail. It’s the recommended approach for maintaining consistency, accountability, and professional standards across every job.
- Double click on a job line
- Update your usage amount for this item
As shown below the main things you will be looking at is the following
| Available Stock Qty | Shows you all available stock |
| Budget Qty | This is what was Quoted |
| Actual Qty | This is how many have been used |
| Balance Qty | This is how many you have left to use from your Quote amount |
| Usage | This is an open field where you will put in the quantity being used |
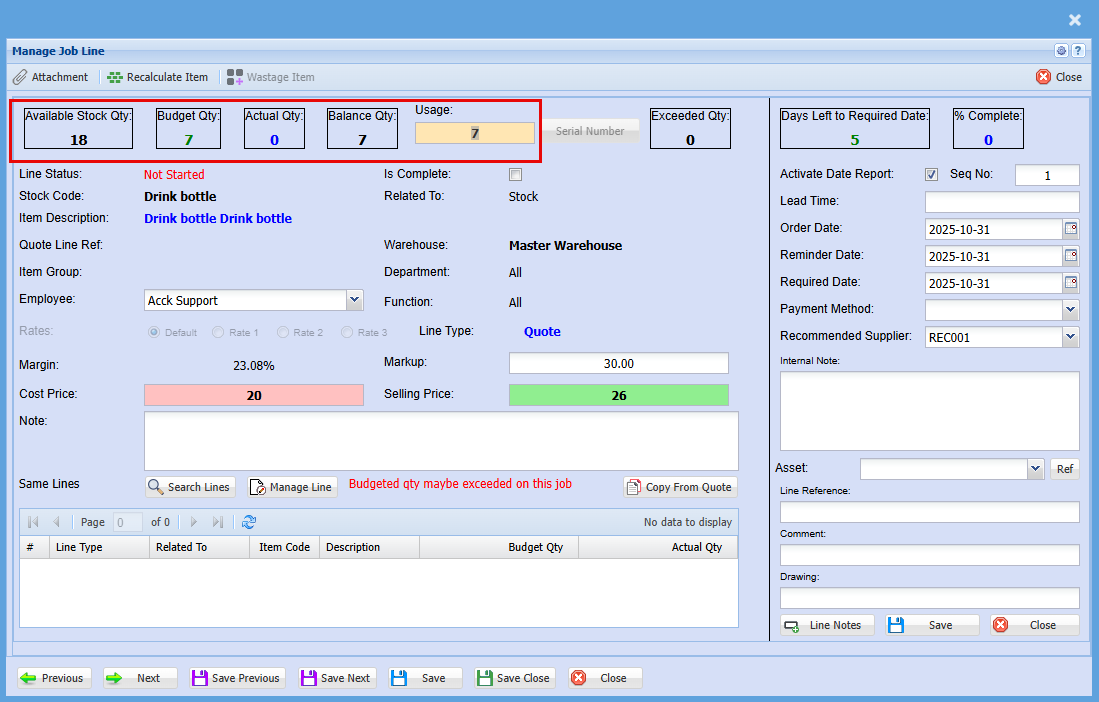
- Click Save and Close
You can now see that the line is active, and you’ll notice updated quantities and statuses reflecting the latest changes.
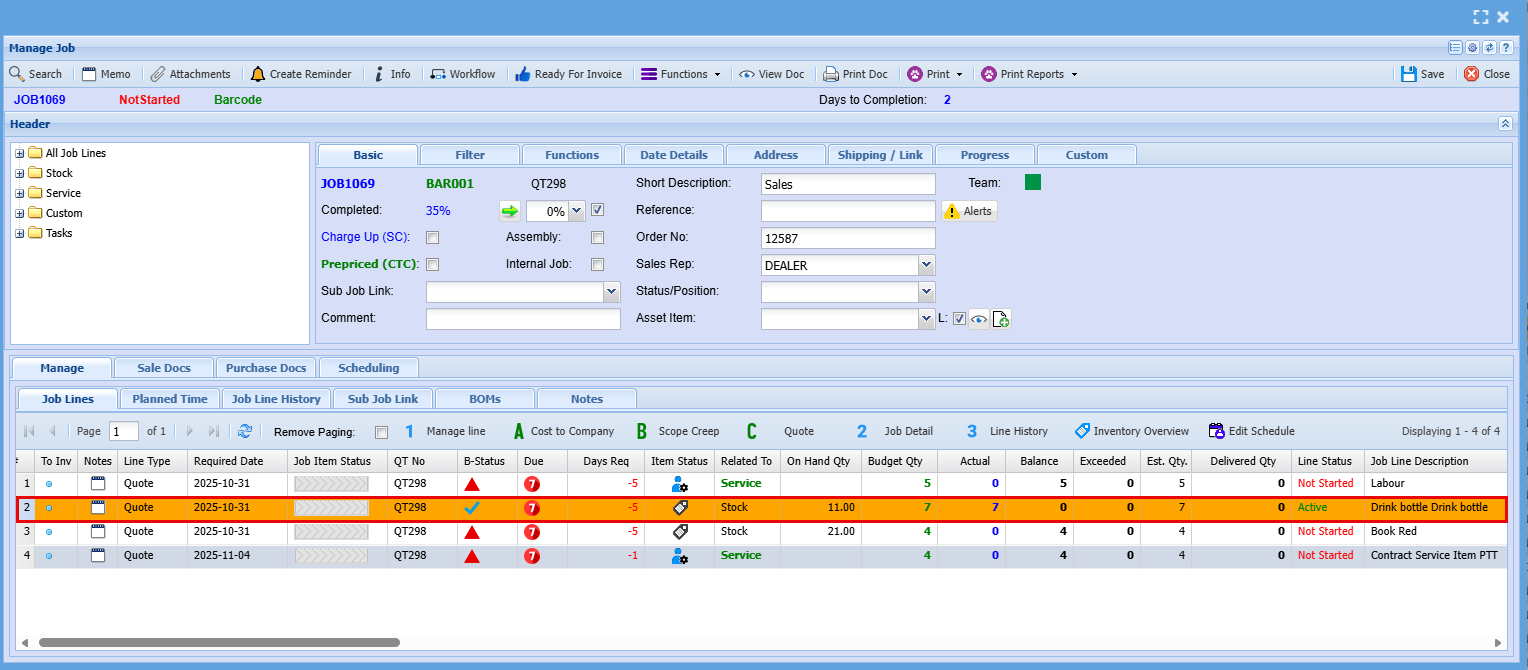
If you've made an error and need to adjust the quantity, simply double-click the Job Line again. To decrease the quantity, enter a minus sign (–) in front of the amount you're reducing, as shown below.

Adding a New Line to a Job
To add a new item to a job, you have three options:
- Scope Creep – This can be added manually and will be charged to the customer. It’s recorded as a cost to company and included in the overall job cost.
- Cost to Company – Also added manually, this option absorbs the cost internally without charging the customer. It’s useful for goodwill gestures or internal adjustments.
- Quote – If the customer has accepted a quote for the additional work, it follows the same process as the initial quote but is linked to the existing job rather than creating a new one.
See below where you will find these options.
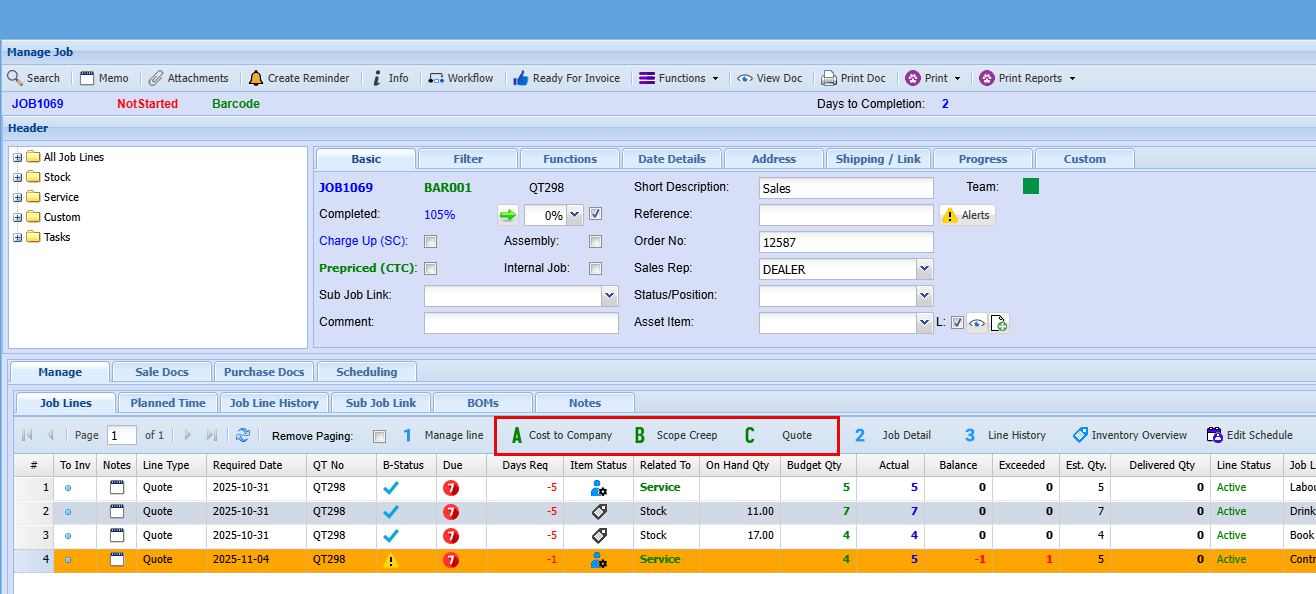
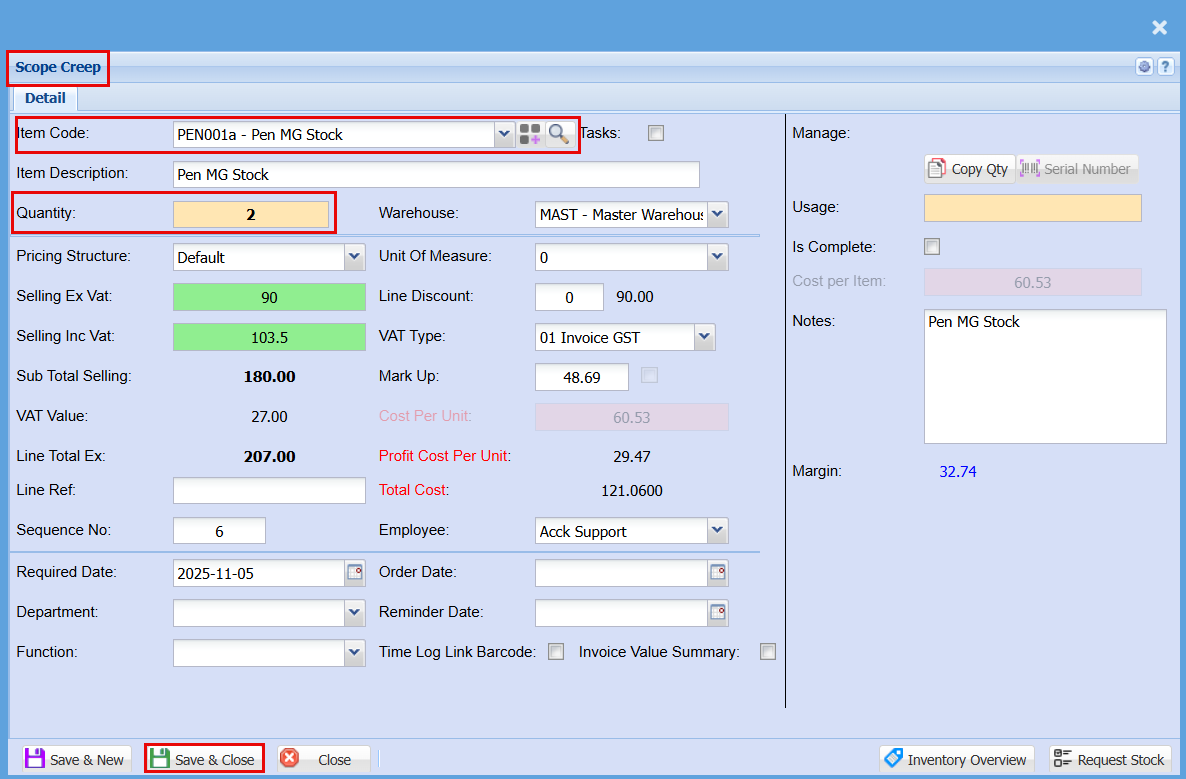
The screen to add Scope Creep or Cost to Company looks the same and essentially works the same.
- Click on Scope Creep or Cost to Company

- Select your Item from the dropdown menu
- Add your Quantity
- Click Save & Close

To add a new line to the job from Quote:
- Click on Quote

Creating a quote from within a Job similarly to starting one via Job Costing > Activity > Quote in the main menu. However, because it originates from a job, it will automatically be linked to that job. This connection is visible in the Extras tab.
Quotes created this way will also include a “.1” suffix after the original quote number, this indicates that the quote is an extension or variation of the original, tied directly to the job.
If you create a quote from the main menu instead, it will generate a new quote number. You can still manually link it to a job by entering the job number, but creating it from within the job acts as a convenient shortcut.
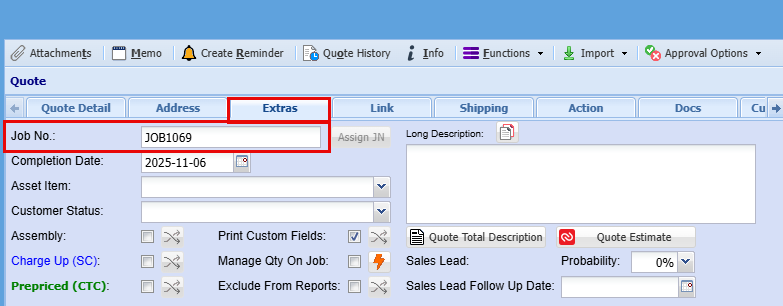
Once customer approval is received and the quote is approved to the job, the corresponding line will be added to the job record. The quote number will appear with a “.1” suffix appended to the original quote number, this provides a quick visual cue that the item represents additional work beyond the original quote.
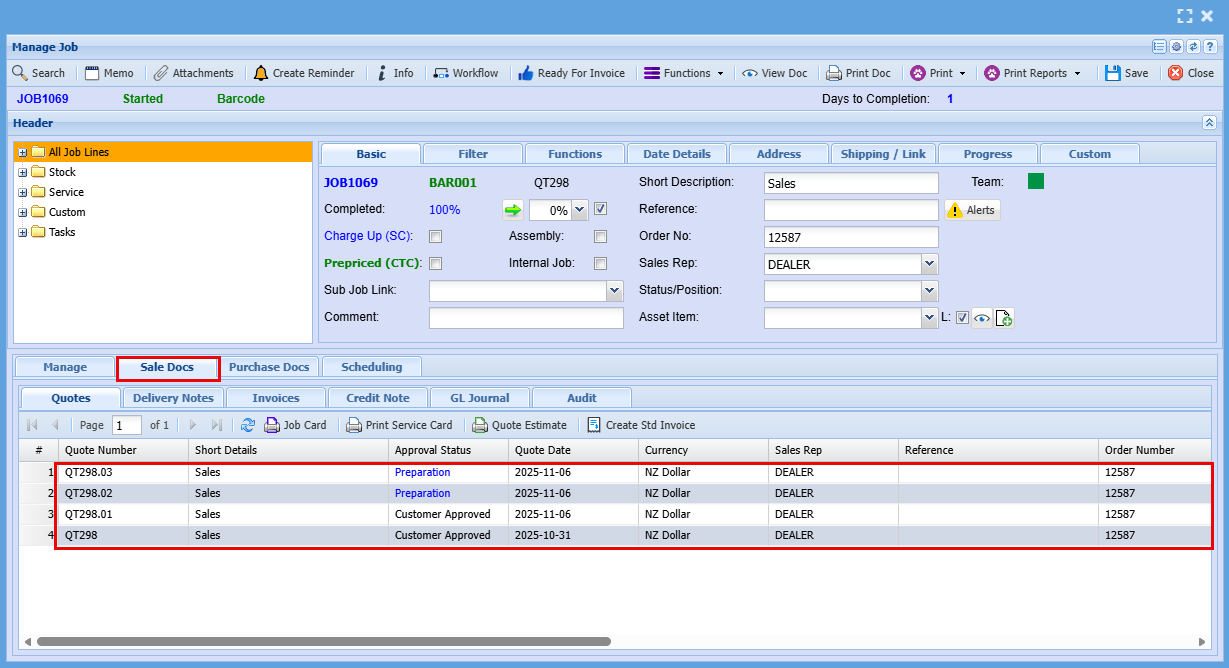
Viewing the Quotes on a Job
To view all quotes on a job clock on the "Sales Docs" tab. Here you will see any outstanding quote as well as quotes that have been approved.
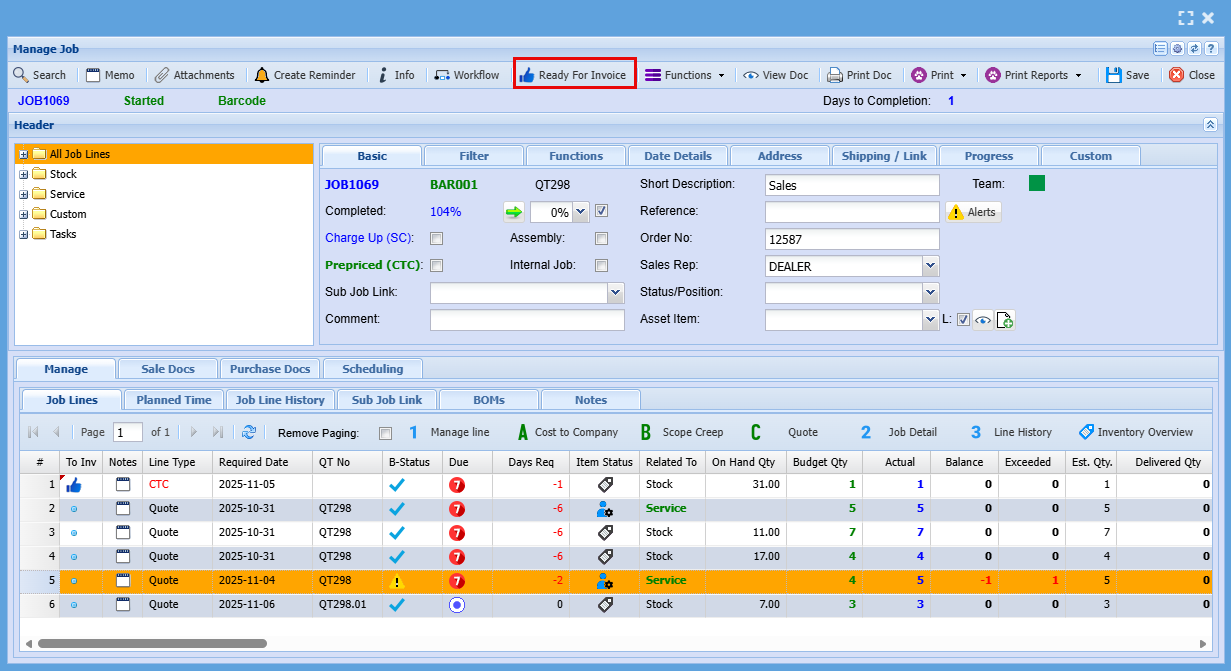
Sent job to Invoice
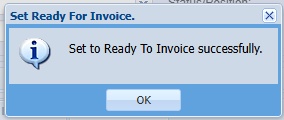
Once the job is fully completed and all line items have been managed, you can click the “Thumbs Up” icon at the top tabs, labeled “Ready to Invoice.”
Invoicing
- As a fully Completed Job
- Line by Line
Invoicing a fully completed job
Once the job is fully completed and all line items have been managed, you can click the “Thumbs Up” icon at the top tabs, labeled “Ready to Invoice.”
Invoicing a Job by Line/s
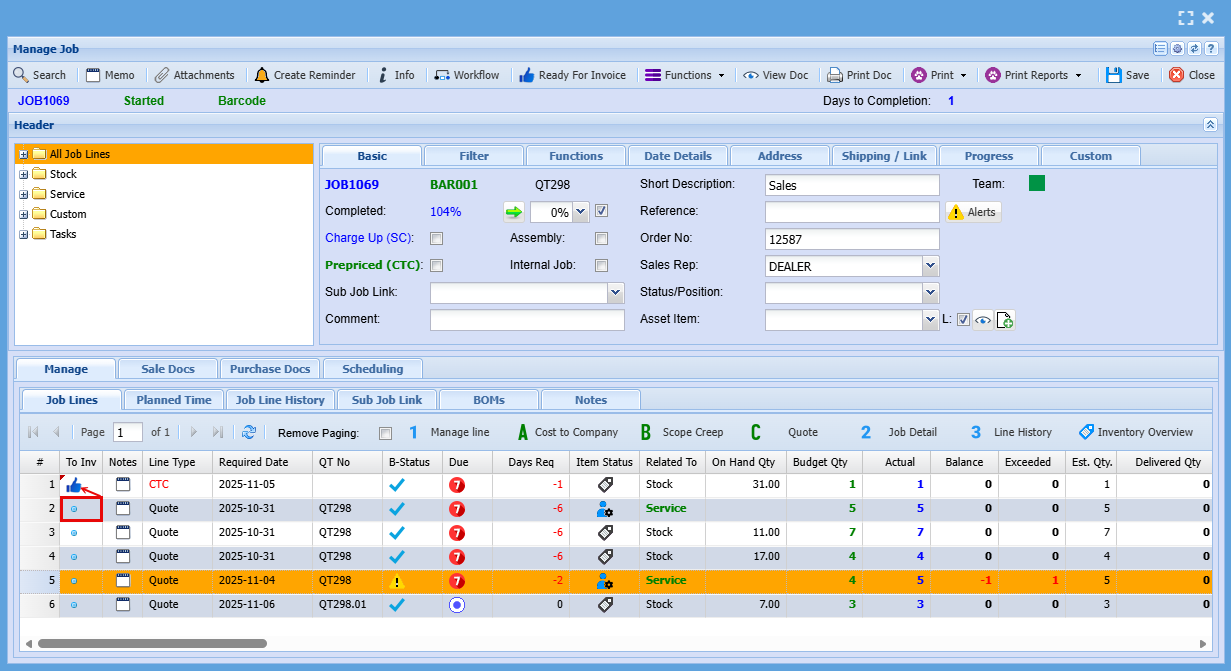
For line-by-line invoicing, each line item includes a dot under the “To Inv” column. Clicking this dot will change it to a “Thumbs Up” icon, indicating that the item is ready to be invoiced. Once selected, the line will be moved over to the invoice.
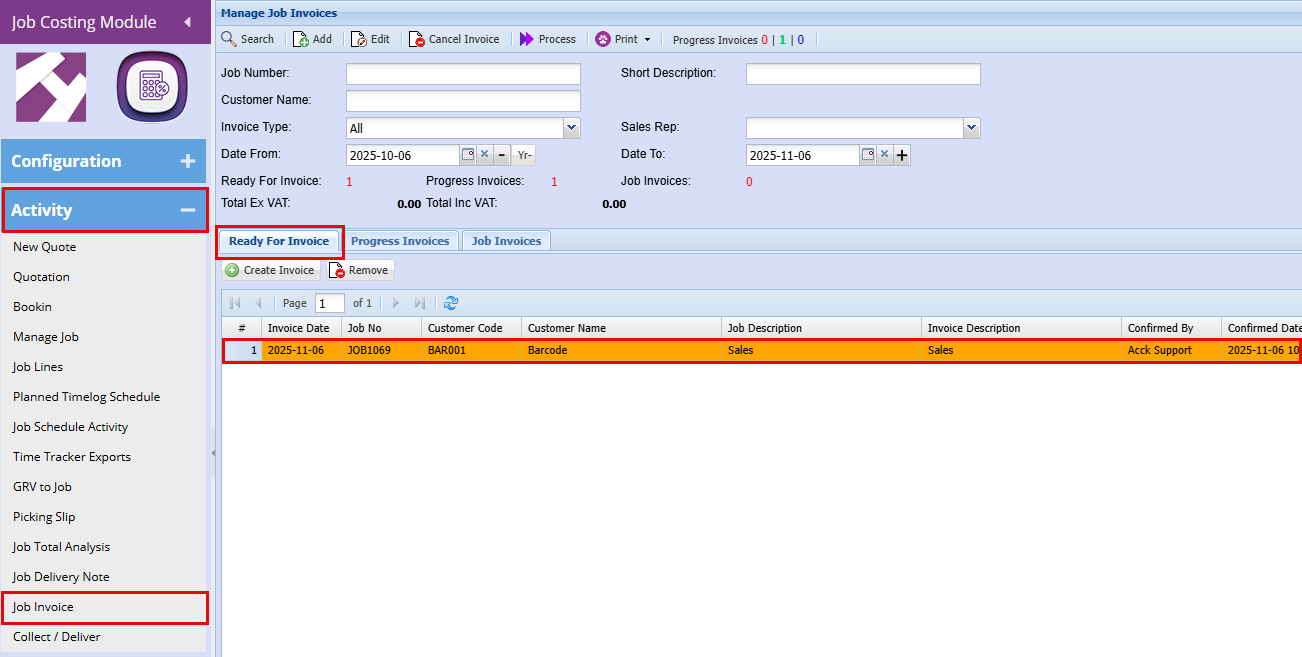
To invoice a Job go to Job Invoice
Job Costing > Activity > Job Invoice
You will see that your invoice is sitting in the "Ready For Invoice" tab
- Double click on the invoice line to open the invoice
You will then need to choose what type of Invoice you are creating
- Percentage-Based Invoicing - Percentage invoicing enables you to specify a billing amount and include a summary description, while concealing detailed line items. This approach facilitates progressive billing over the duration of a project: for example, when a client pays 25% upfront to initiate work, followed by three equal monthly payments covering the remaining 75%. This does not look at what has or has not been managed on a job.
- Usage/Actual Invoicing - Usage or Actual Invoicing allows you to bill based on real-time job progress, capturing actual hours worked, materials used, or completed tasks. It displays detailed line items and supports flexible billing as the job evolves—ideal for time-and-materials work or projects with variable scope and deliverables.
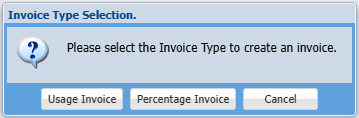
Once an invoice type, either Usage or Percentage, is selected for a job, it becomes fixed and cannot be changed. This selection determines how the job will be invoiced through to completion. After choosing the invoice type, the next screen will display the job number and confirm the selected invoicing method
Next, indicate whether this is the final invoice by ticking the Final Invoice box.
- If you do not tick "Final Invoice," the job will remain open. You will also be able to do multiple invoices on this job.
- If you do tick "Final Invoice" and all work is complete, the system will automatically check for any open documents related to the job and alert you. These documents must be closed or cancelled before the invoice can be processed.
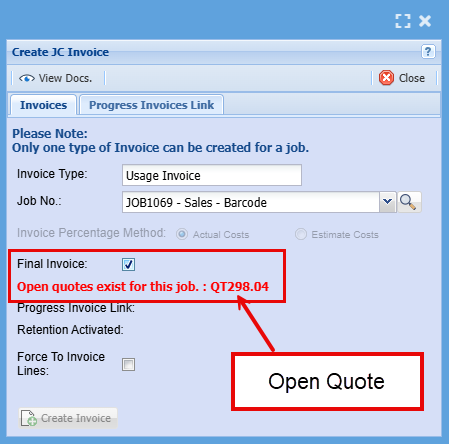

- Click Create Invoice
- Click Continue
Once you create a final invoice you will not be able to open the Job in Manage Job
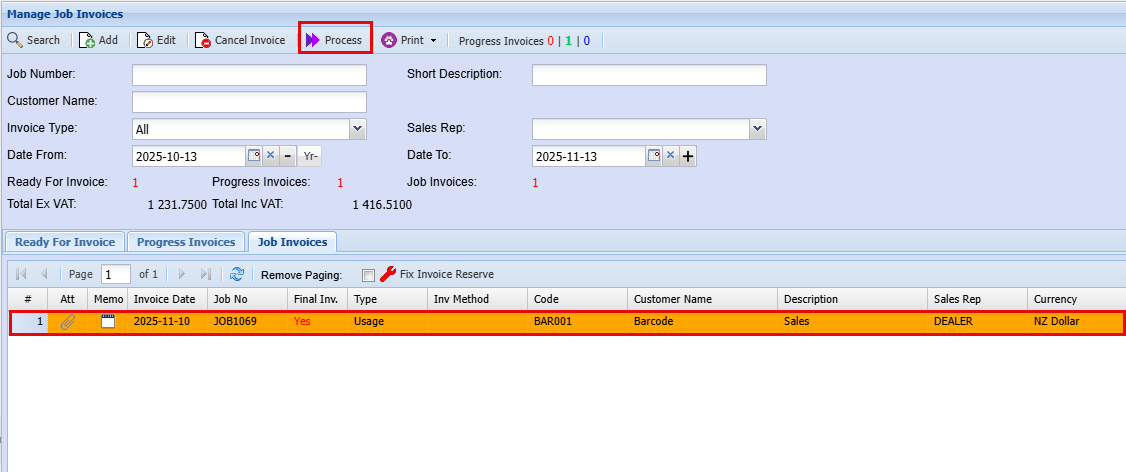
The invoice will now appear under the "Job Invoices" tab, having moved from the "Ready For Invoice" tab. In the "Final Inv." column, you'll see either "Yes" or "No" based on your earlier selection. This view also confirms the invoicing method chosen, either Usage or Percentage.
- Double Click on the Invoice line to open the invoice
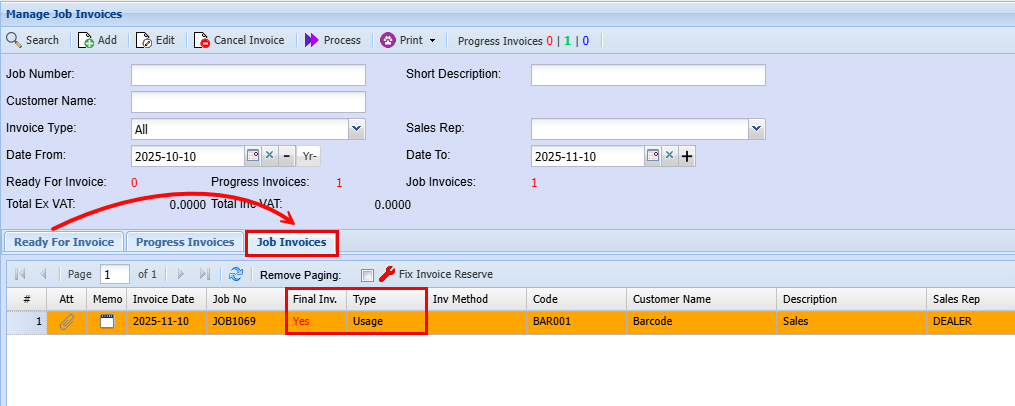
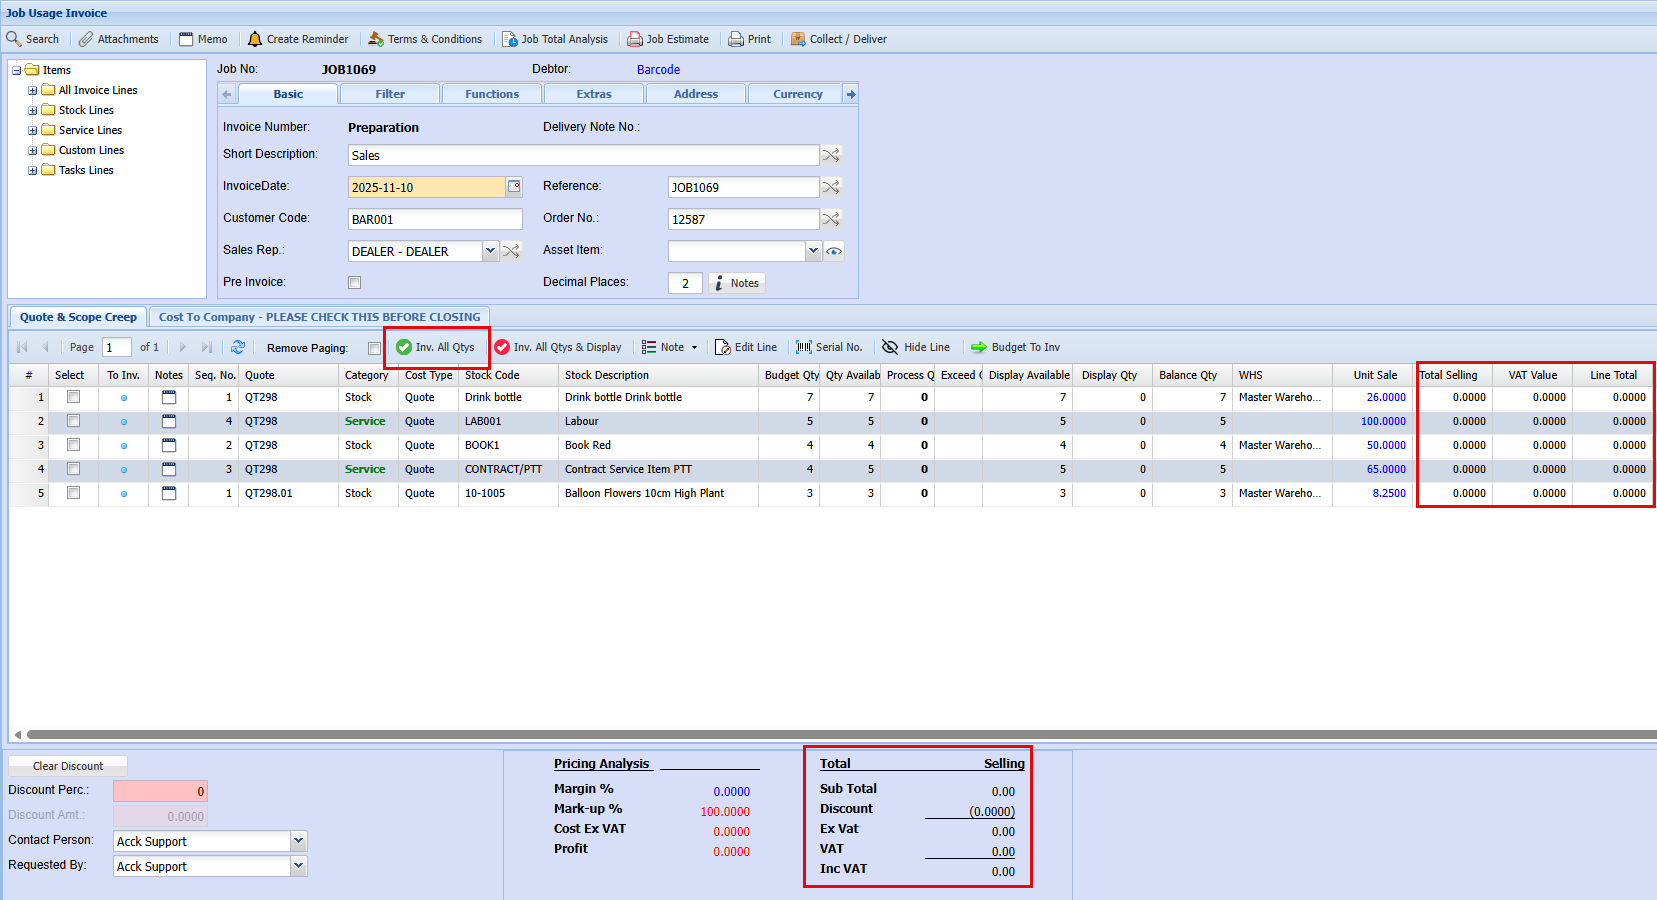
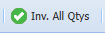
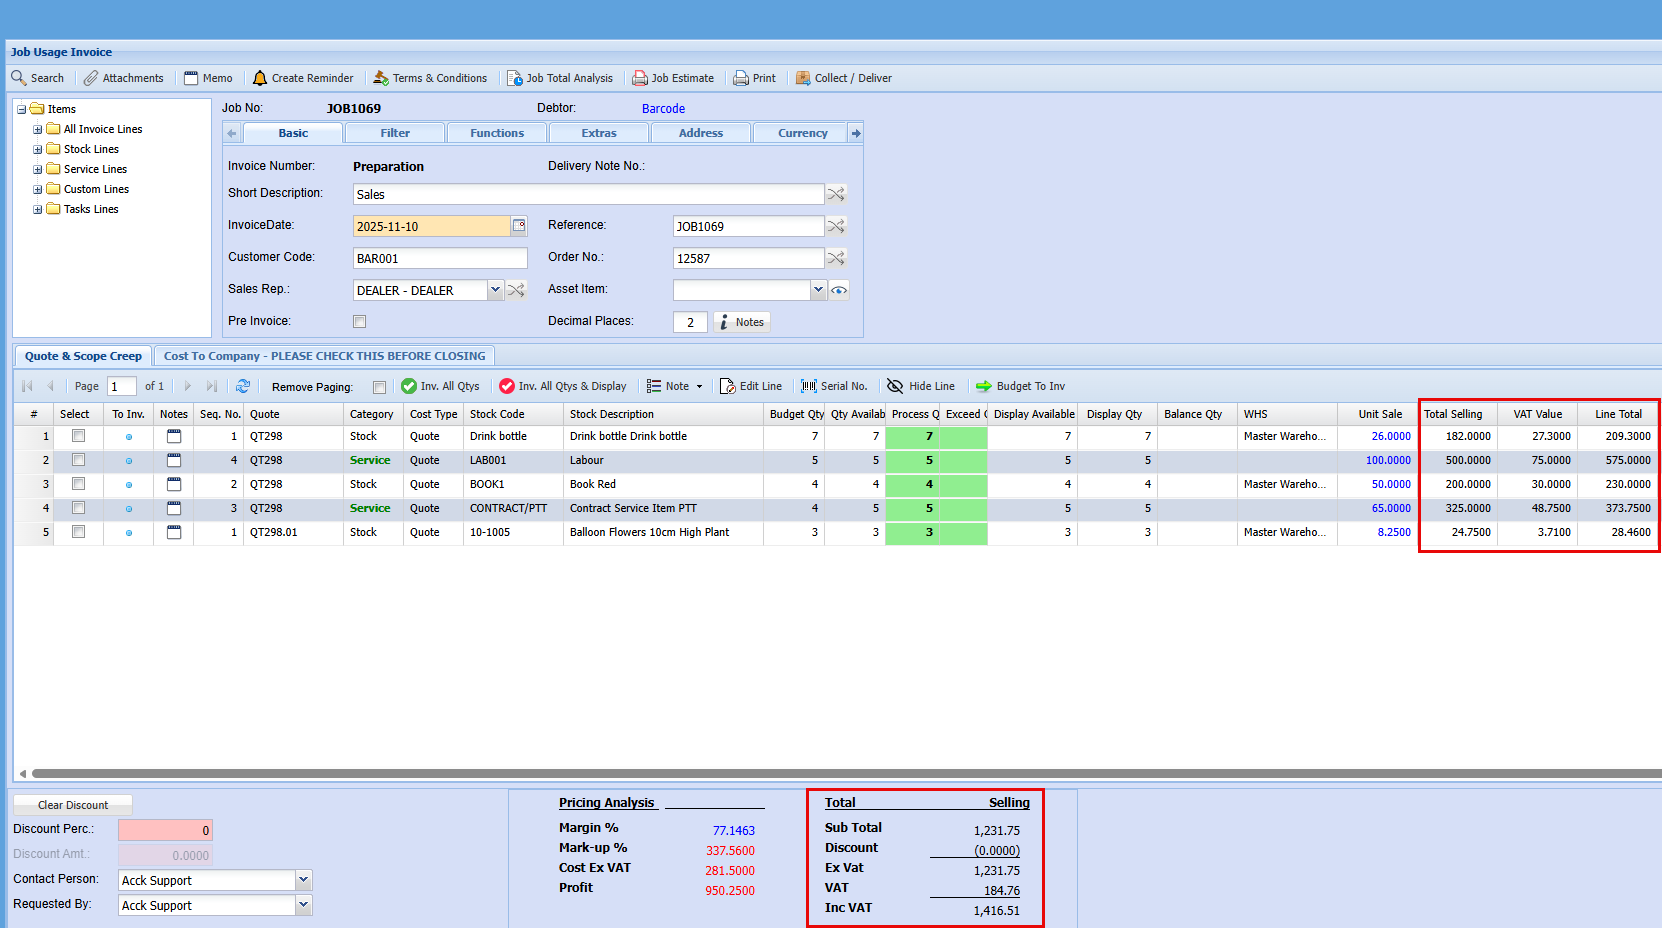
At this stage, all values are set to zero, prompting you to specify what you’d like to invoice. For a straightforward job, simply click the green "Invoice All Qtys" button to proceed as shown in the below screenshot.
|
|
By clicking "Inv. All Qtys" to add total to your invoice it will add all lines including all Cost to Company (CTC) Lines. These can be deleted in added accidently |
|
|
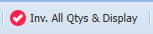
By selecting "Inv. All Qtys & Display," you’ll be able to choose which items appear on the invoice with or without a dollar value. To configure these display settings, click on the second tab labeled "Cost To Company." |
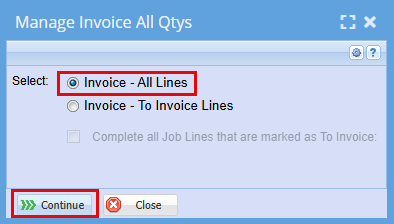
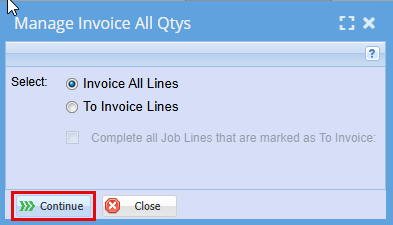
The below Manage Invoice All Qtys window will pop up:
- You will then select "Invoice - All Lines"
- Click Continue
|
Invoice - All Lines
|
You would select All Lines to be invoiced if you selected the be button to invoice your job |
|
Invoice - To Invoice Lines
|
If you’ve marked specific lines for invoicing using the thumbs-up icon in the "To Inv" column, proceed by selecting the "To Invoice Lines" option to generate an invoice for only those approved items. |

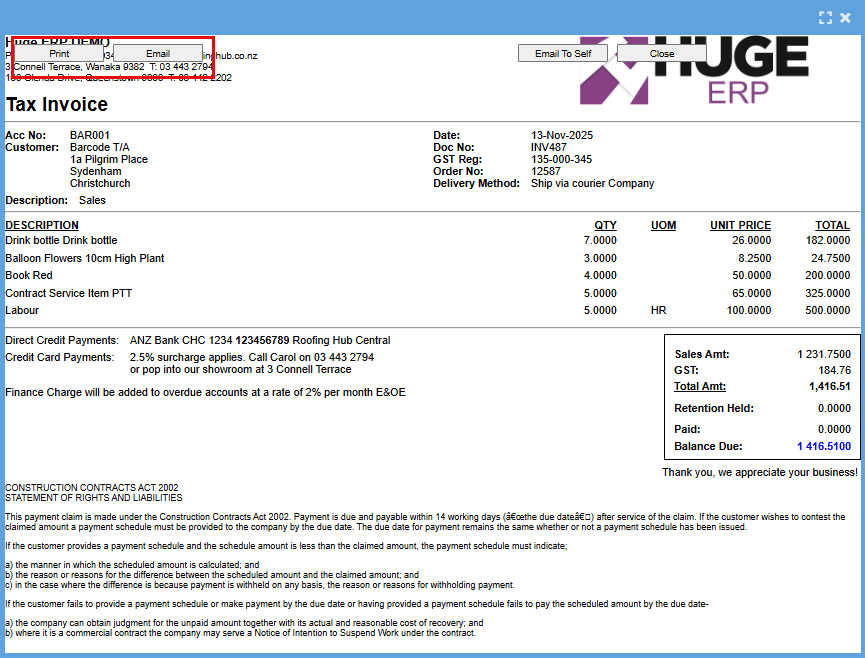
Once you have clicked "Continue" you will see that the values have pulled through from the Job.
At this point you can make any necessary changes to this invoice before finalizing it.
Reminder: If you've selected "Final Invoice," no further invoices can be generated for this job. Any managed lines that are not invoiced at this stage will be written off automatically by the system (CTC). However, if you've chosen to invoice only selected lines, you can adjust the quantities here, and any remaining balance will be available for invoicing at a later stage.
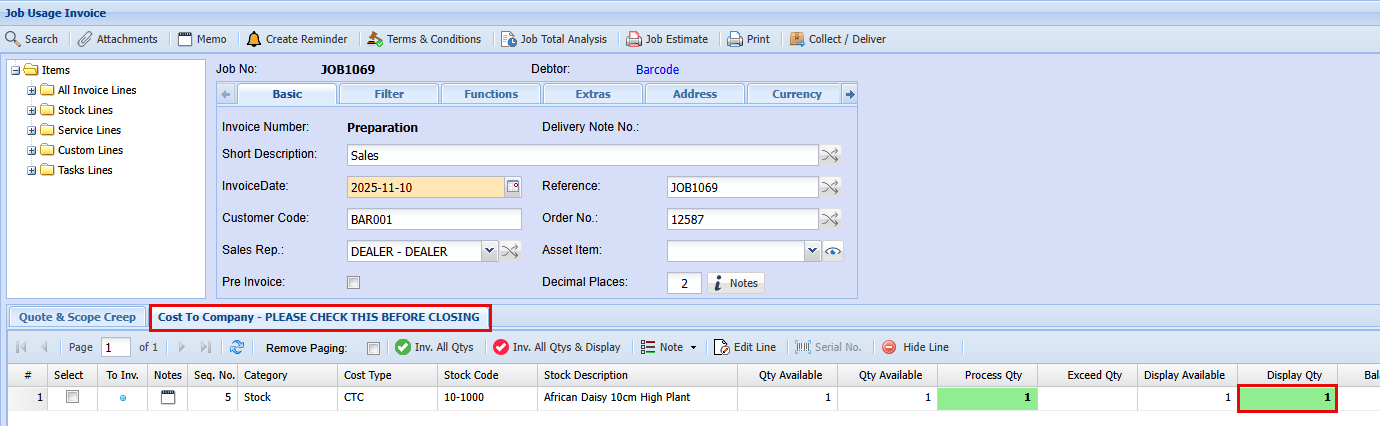
Before proceeding with this invoice, please review the Cost to Company (CTC) tab. To display specific lines on the invoice, enter a value in the corresponding "Display Qty" field. Note: this will show the line items without revealing any cost or sell price.
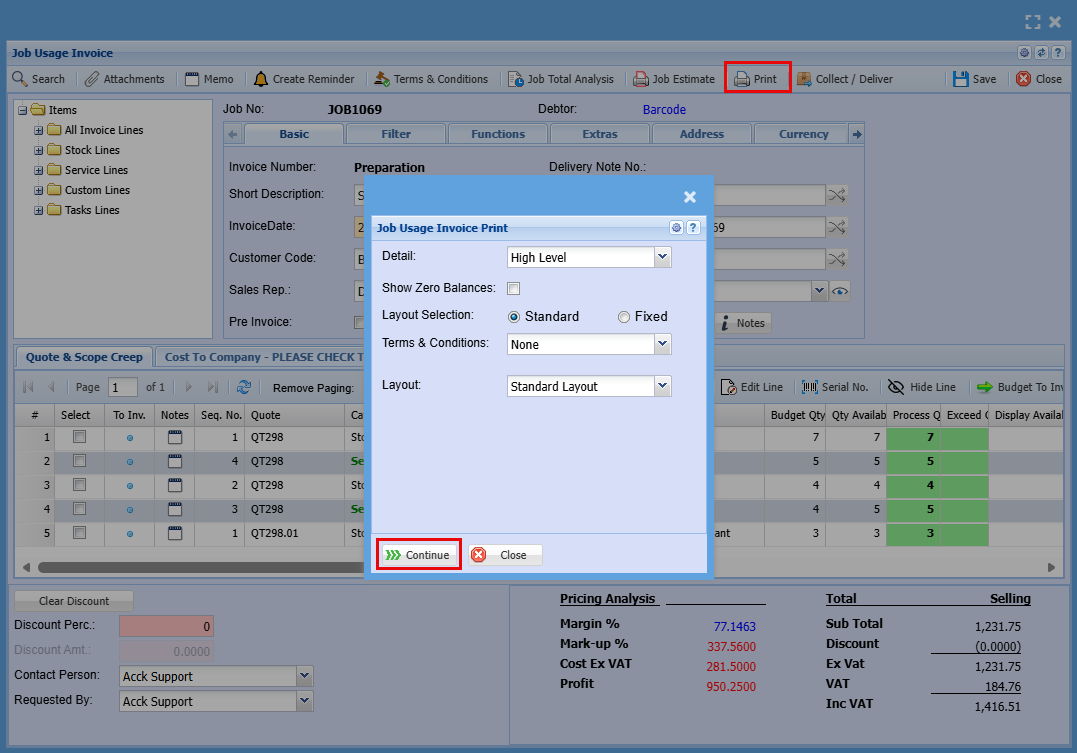
To view the invoice to check how it will be displaced
- Click the "Print" button at the top and
- Click "Continue" on the "Job Usage Invoice Print" Screen
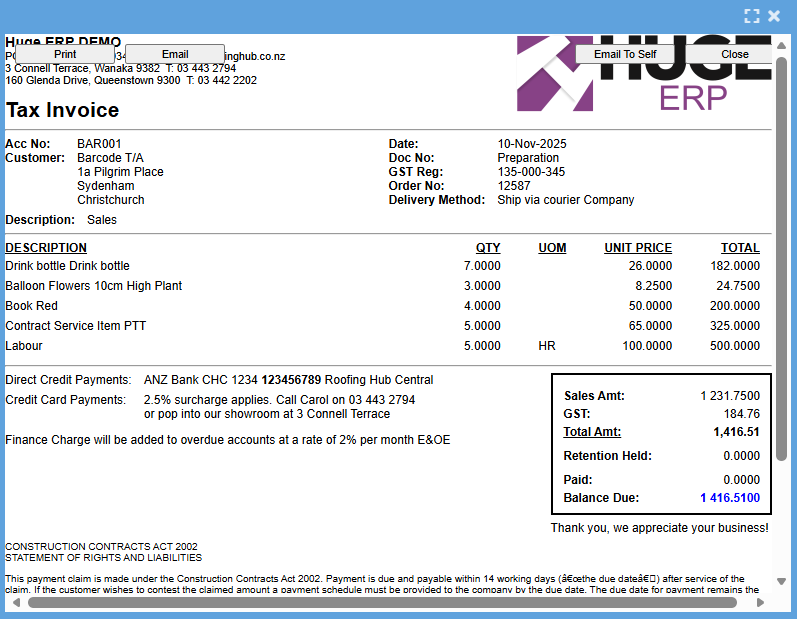
You will now be able to see as shown below what the invoice will look like when sent out.
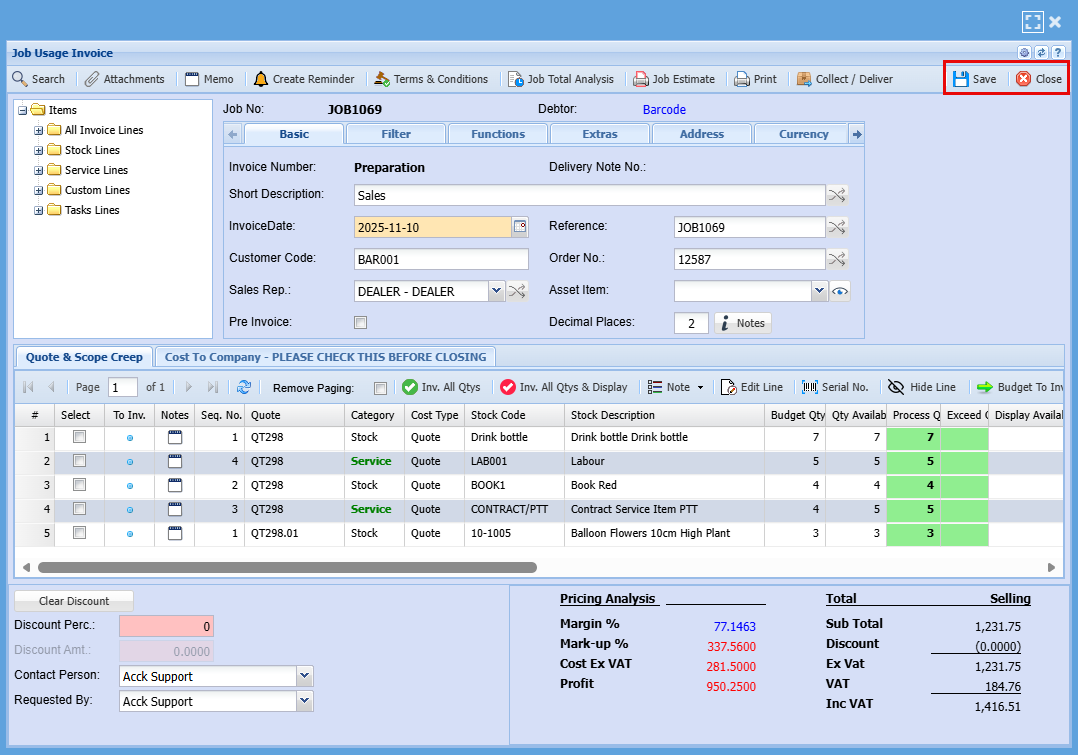
Once you are happy with it all
- Click "Save"
- Click "Close"
- Highlight the line of the invoice you want to process and send out.
- Click "Process" at the top of the screen
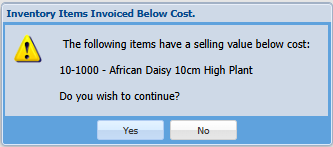
If an item on the invoice is marked as "Cost to Company"—meaning it's not charged to the customer—you’ll see the following prompt to confirm.
- Click "Yes"
And then you will get the next screen
- Click "Continue"
You'll see the screen below indicating that the system is compiling and processing all transactions related to this invoice.
- Click "Continue"
This is the final screen where you can make any last adjustments to your invoice.
- Click "Continue"
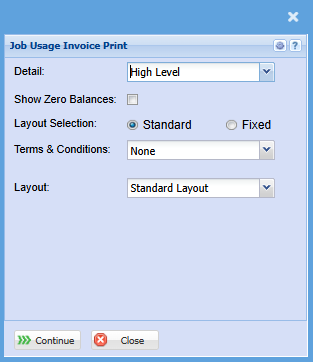
| Details | This changes the view of your invoice when clicking print |
| Show Zero Balances | |
| Layout Selection | |
| Terms & Conditions | |
| Layout |
The invoice is now finalized and ready to be sent to your customer for payment. Once issued, it will automatically close the associated job.
Click "Print" or "Email" to send this final invoice out to the customer
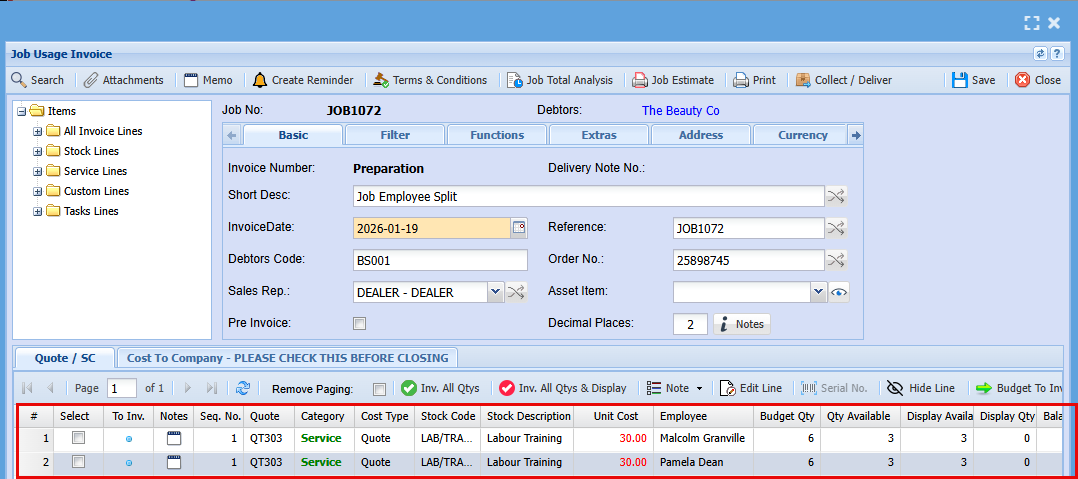
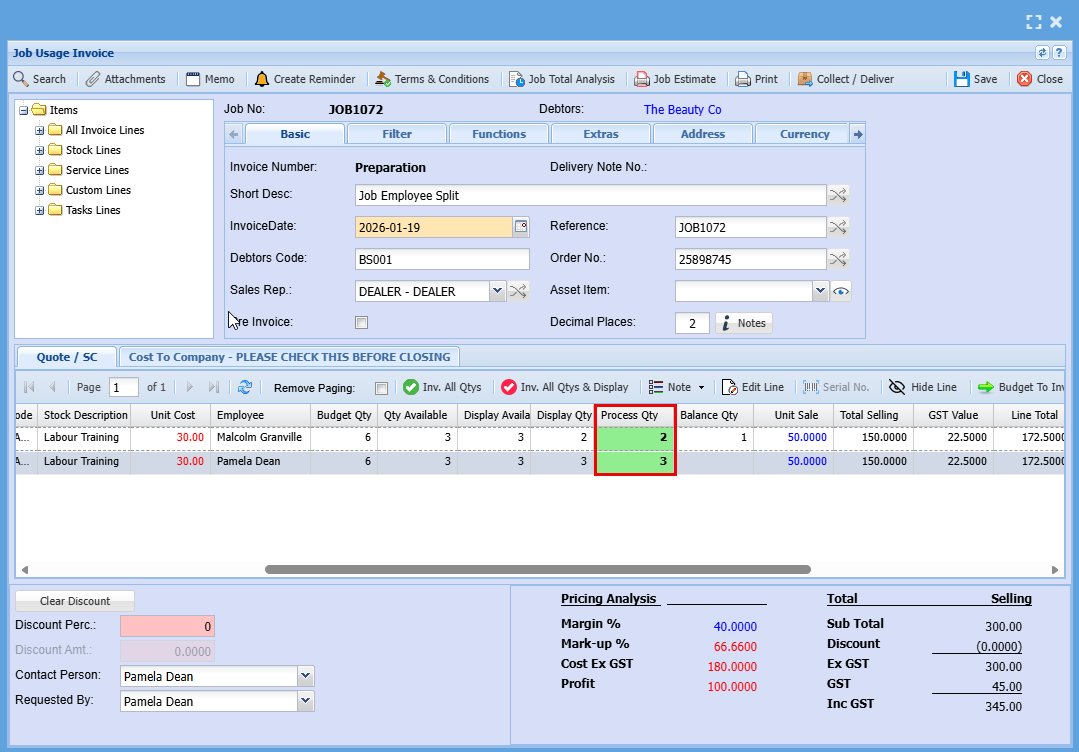
Job Invoice - Split by Employee

When invoicing you will get the below screen. Here you will need to tick the "Split by Employee" box which will then separate the employees on the invoice.
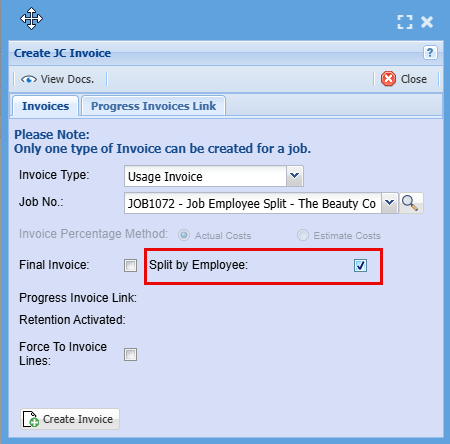
The invoice will have a column now that will show the name of the employees and how many hours they did on the job.
In order to discount the hours or change the hours for this invoice you will need to click Invoice All Quantities (Inv. All Qtys)
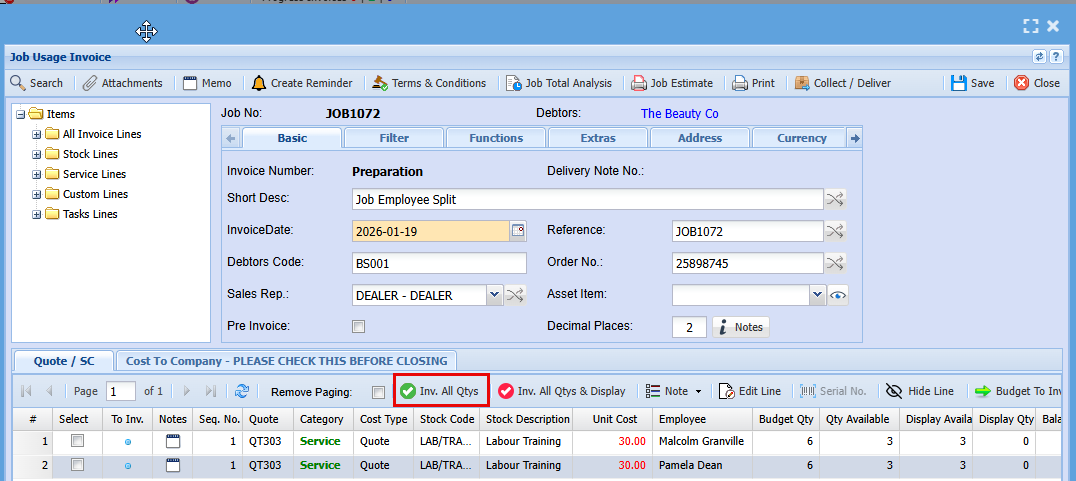
- Click Continue
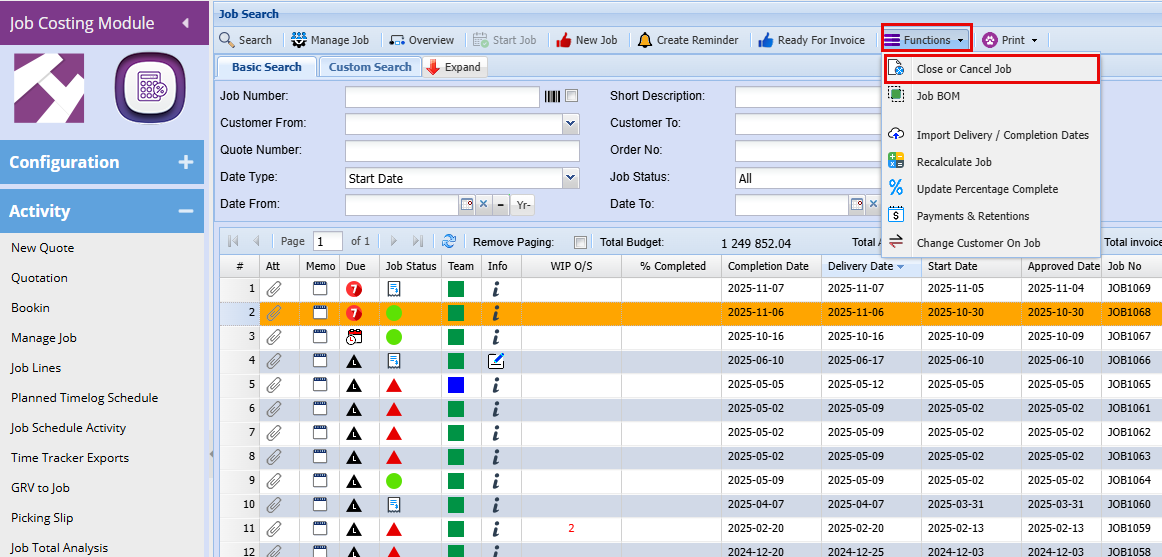
Closing Jobs
A job is automatically closed upon issuing a final invoice. However, if invoicing is complete and the job remains open due to outstanding purchase orders or quotes, it can be manually closed as needed.
Job Costing > Activity > Manage Job
- Close all the open documents (Quotes, PO, Delivery Notes)
- Highlight the job line you want to close
- Click "Functions" dropdown at the top left of the screen
- Click "Close or Cancel Job"
Tabs and Screens Further Explained
Quote Screen
- Extras Tab
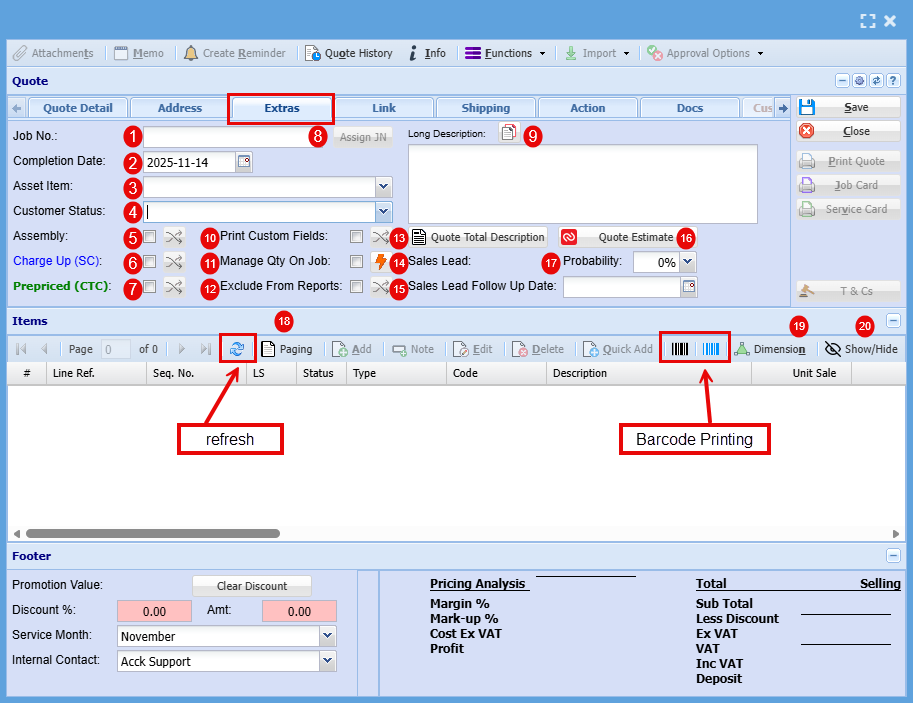
| 1 | Job Number | Clicking 'Assign JN' at this stage will generate a Job Number for the quote, which will automatically carry over once the quote is approved and converted into a actual job. |
| 2 | Completion Date | This is the date that you are expected to be able to complete this Job |
| 3 | Asset Item | |
| 4 | Customer Status | |
| 5 | Assembly | “Assembly” refers to an internal process where components or materials are prepared, combined, or staged before installation or delivery. It’s not billed separately to the customer but contributes to your overall job cost. |
| 6 | Charge Up (SC) | Charge Up (SC)” means the customer is billed for actual time and materials used, including any extras beyond the initial scope. Charge Up allows you to invoice for additional costs incurred during the job. |
| 7 | Prepaid (Cost to Company) | "Prepaid” refers to the quoted amount for the job, the fixed charge agreed to by the customer. You can’t invoice beyond this amount, so any extra time, materials, or costs that exceed the quote become your internal expense, or ‘Cost to Company (CTC) |
| 8 | Assign JN | Clicking 'Assign JN' at this stage will generate a Job Number for the quote, which will automatically carry over once the quote is approved and converted into a actual job. |
| 9 | Long Description | Here you can write a description of the job being done. |
| 10 | Print Custom Fields | |
| 11 | Manage Qty on Job | |
| 12 | Exclude from Reports | |
| 13 | Quote Total Description | |
| 14 | Sales Lead | If this quote originated from a tracked Sales Lead, the associated Sales Lead number will be displayed here. Updating the Probability percentage will automatically sync the change with the corresponding Sales Lead. |
| 15 | Sales Lead Follow up Date | Updating the Follow up the system will automatically sync the change with the corresponding Sales Lead follow up date. |
| 16 | Quote Estimate | |
| 17 | Probability | If this quote originated from a tracked Sales Lead, the associated Sales Lead number will be displayed here. Updating the Probability percentage will automatically sync the change with the corresponding Sales Lead. |
| 18 | Paging | If your line items span multiple pages and require navigation using the page up/down arrows, clicking the Paging Box will disable paging, allowing you to scroll through all items in a continuous view. |
| 19 | Dimension | |
| 20 | Show/Hide |
- Link Tab
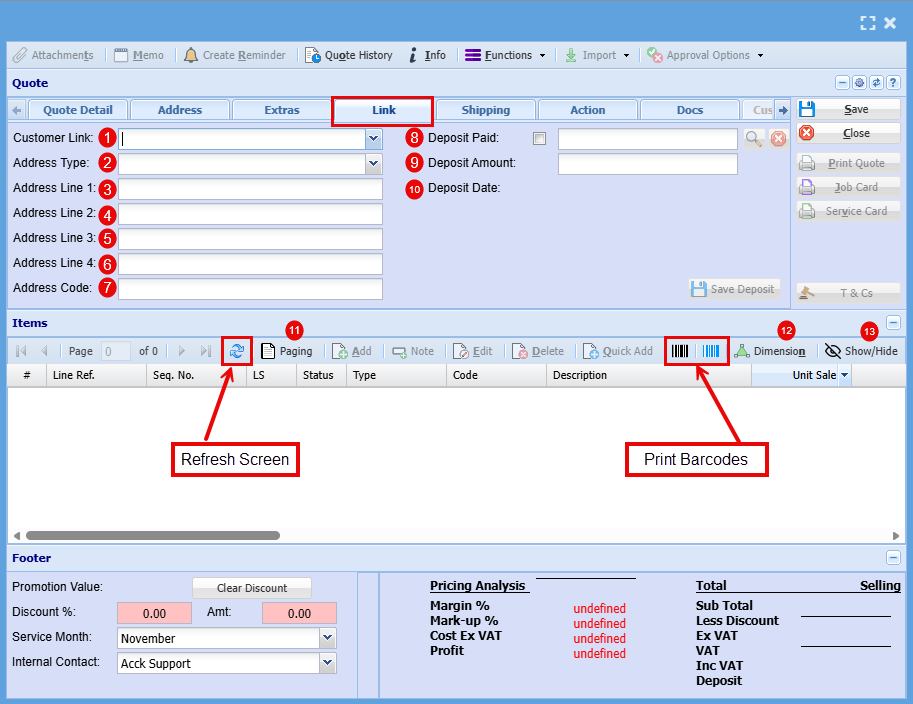
| 1 | Customer Link |
|
| 2 | Address Type | |
| 3-6 | Address line 1-4 | |
| 7 | Address code | |
| 8 | Deposit Paid | If a customer has paid a deposit, this can be added to the quote and taken off of the total cost of the job. |
| 9 | Deposit Amount | |
| 10 | Deposit Date | |
| 11 | Paging | If your line items span multiple pages and require navigation using the page up/down arrows, clicking the Paging Box will disable paging, allowing you to scroll through all items in a continuous view. |
| 12 | Dimension | |
| 13 | Show/Hide |
- Shipping Tab

| 1 | Shipping Method | |
| 2 | Shipping Date | |
| 3 | Send Email | |
| 4 | Shipping Location | |
| 5 | Internal Delivery | |
| 6 | Delivery Company | |
| 7 | Tracking Number | |
| 8 | Frozen | |
| 9 | Paging | If your line items span multiple pages and require navigation using the page up/down arrows, clicking the Paging Box will disable paging, allowing you to scroll through all items in a continuous view. |
| 10 | Dimension | |
| 11 | Show/Hide |
- Action Tab
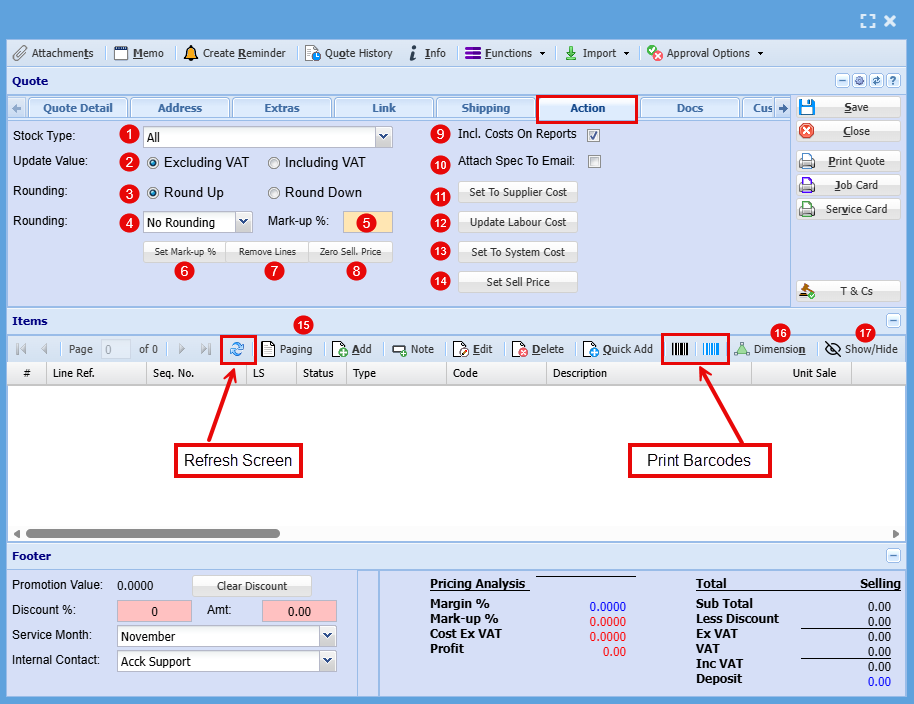
| 1 | Stock Type | |
| 2 | Update Value | |
| 3 | Rounding | |
| 4 | Rounding | |
| 5 | Mark-Up % | |
| 6 | Set Mark-Up % | |
| 7 | Remove Lines | |
| 8 | Zero Sell, Price | |
| 9 | Incl. Cost on Reports | |
| 10 | Attach Specs to Email | |
| 11 | Set to Supplier Costs | |
| 12 | Update Labour Cost | |
| 13 | Set to System cost | |
| 14 | Set Sell Price | |
| 15 | Paging | If your line items span multiple pages and require navigation using the page up/down arrows, clicking the Paging Box will disable paging, allowing you to scroll through all items in a continuous view. |
| 16 | Dimension | |
| 17 | Show/Hide |
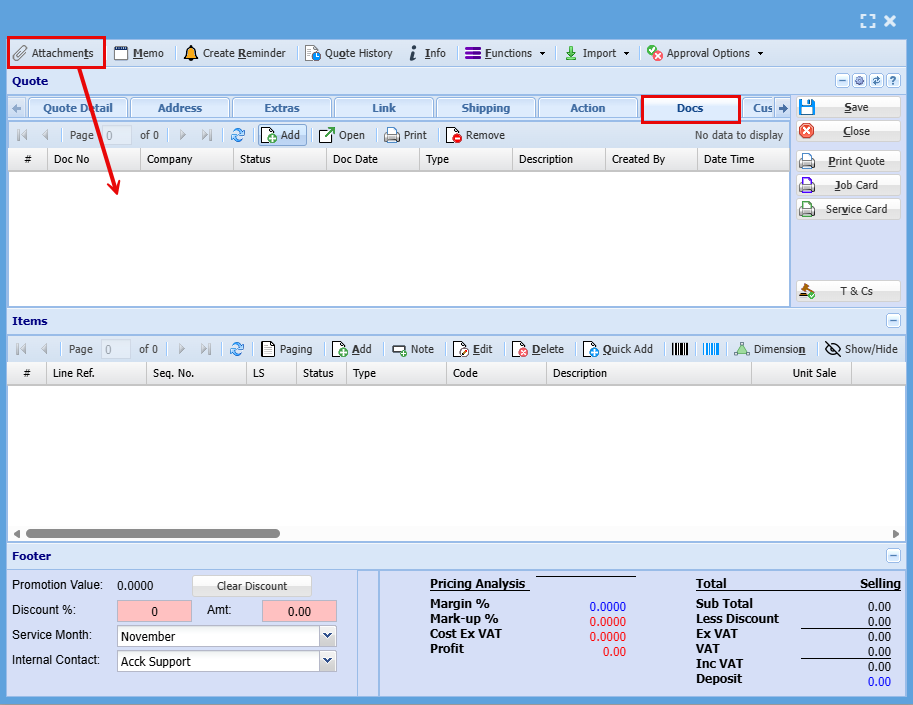
- Docs Tab
This tab provides instant access to upload documents in any format (PDF, Word, Excel, etc.) or retrieve relevant files previously attached to this quote.
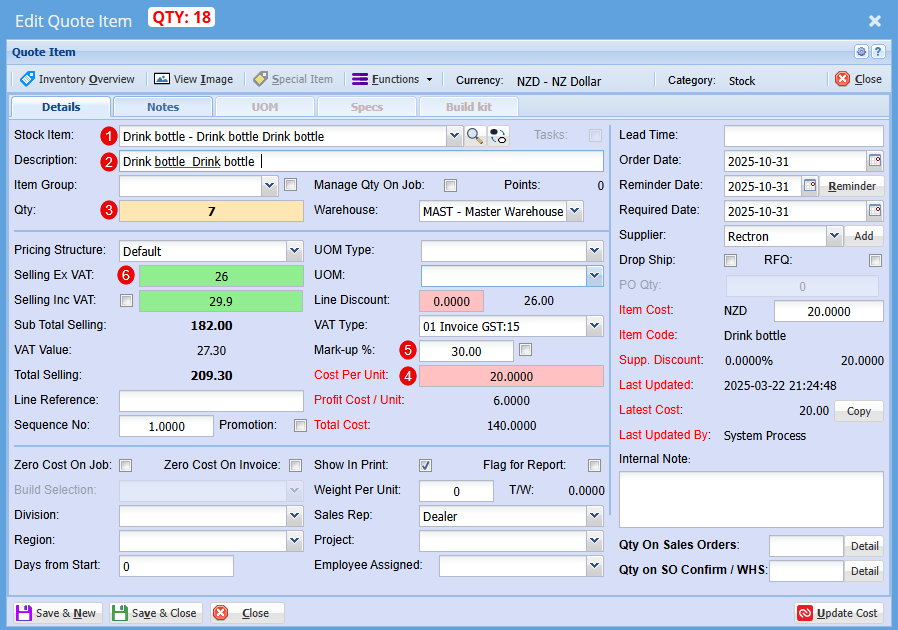
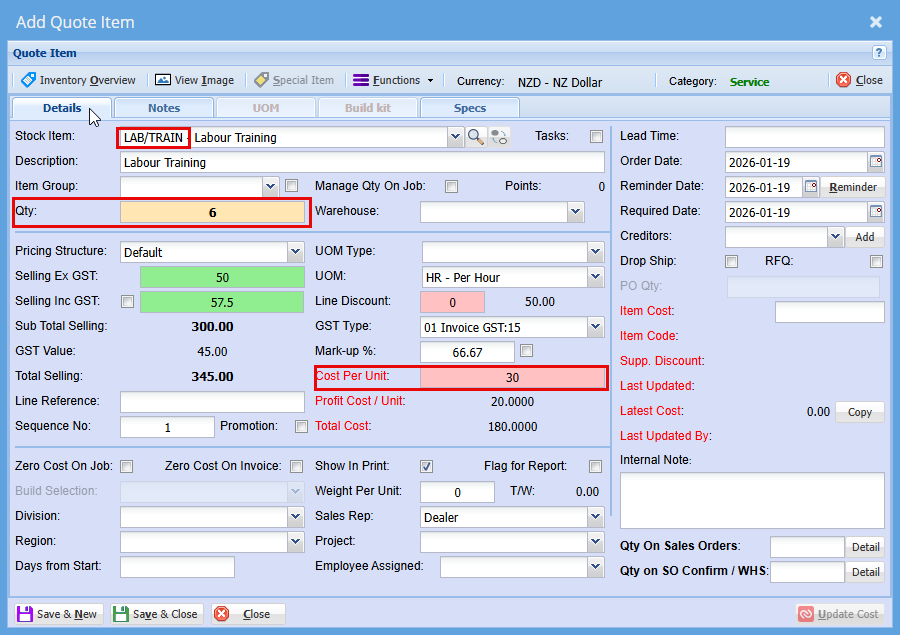
Adding an Item to a quote
- Additional options on a Quote Item
This screen also allows you to capture key information for each job or task line.

| 1 | Stock Item |
Select your stock item from the drop-down menu |
| 2 | Description |
At this stage you can change the Description if needed |
| 3 | Qty |
Add the Quantity you require of this item |
| 4 | Manage Qty on Job |
|
| 5 | Warehouse |
Select the Warehouse you wish to sell this item form |
| 6 | Selling Ex GST |
Price per item does not include the 15% Goods and Services Tax. You add GST on top of the listed amount. |
| 7 | Selling Inc GST |
Price per item includes the 15% Goods and Services Tax. The GST is already built into the total amount shown. |
| 8 | Sub Total Selling |
Total price of total quantity of item that does not include the 15% Goods and Services Tax. You add GST on top of the listed amount. |
| 9 | VAT (GST) Value |
Total GST only on total quantity of items |
| 10 | Selling Total |
Total price of total quantity of item includes the 15% Goods and Services Tax. The GST is already built into the total amount shown. |
| 11 | Line Reference |
|
| 12 | Sequence No. |
You can change the Sequence in the quote for this item |
| 13 | UOM Type |
These are custom configuration settings applied during setup, tailored specifically to your product formats (e.g., Per Roll, Per Unit, Pack). |
| 14 | UOM |
These are custom configuration settings applied during setup, tailored specifically to your product formats (e.g., 1000 per roll, 6 per pack). |
| 15 | Line Discount |
You can apply a discount to this item |
| 16 | VAT (GST)Type |
If this item is GST exempt or a Non-GST item it can be changed here |
| 17 | Mark up % |
At this stage you can increase your profit % |
| 18 | Cost Per Unit |
This is the total cost to produce or buy one item. It helps you set prices and track profitability. |
| 19 | Profit Cost/Unit | This is how much profit you make on each item sold after subtracting its cost. |
| 20 | Total Cost | This s the full amount spent to produce or purchase a set of items or complete a job. |
| 21 | Zero Cost on Job |
These ticks will be automatically on or off based on the setup if the item. When the item is promoted to a Job, its initial cost is cleared and recalculated progressively as the job is built—ensuring you have an accurate final cost at completion. |
| 22 | Zero Cost on Invoice |
As with the Cost on job, these ticks will be automatically on or off based on the setup if the item. When the item is promoted to a Job, its initial cost is cleared and recalculated progressively as the job is built—ensuring you have an accurate final cost at completion. |
| 23 | Show on Print |
|
| 24 | Flag for Report |
|
| 25 | Division |
Select a division within of a company that focuses on one area of work. |
| 26 | Region |
Select a region the job will fall under, it can include multiple cities or towns and often has its own local government or identity. |
| 27 | Days from Start | Use this field to schedule when this item should begin—set as a number of days from the job’s start date. |
| 28 | Weight Per Unit | This is determined at setup |
| 29 | Sales Rep | You are able to allocate someone who promotes and sells a company’s products or services to customers. They often handle quotes, follow-ups, and customer relationships, helping drive revenue and build trust. |
| 30 | Project | You can Link a quote to a specific project |
| 31 | Employee Assigned | Refers to the specific person responsible for completing a task or project. It helps track accountability, scheduling, and communication. |
| 32 | Lead Time | This is the amount of time between starting a process and completing it. It usually refers to how long it takes from placing an order to receiving the goods or service. |
| 33 | Order Date | This is the day a customer places an order for goods or services. |
| 34 | Reminder Date | This is the day you plan to check in after sending the quote. |
| 35 | Required Date | This is the day the customer wants the goods or service delivered |
| 36 | Supplier | This is the company that provides goods or services to another business |
| 37 | Drop Ship |
Ticking this box enables you to generate a Purchase Order on the fly—complete with all relevant details, so you don’t need to build one from scratch when drop-shipping an item. |
| 38 | RFQ (Request for Quote) |
Ticking this box allows you to generate a Request for Quote on the fly—pre-filled with all relevant details, so you don’t need to start from scratch when requesting updated pricing for an item. |
| 39 | PO Qty |
Enter the quantity here for which you want to generate a Purchase Order or Request for Quote. |
| 40 | Item Cost |
This shows the actual cost of the item |
| 41 | Item Code |
This is the suppliers item code |
| 42 | Supplier Discount |
Shows if you received a discount on this item when purchased form supplier |
| 43 | Last Updated |
This is the date the cost was last updated for this item |
| 44 | Latest Cost |
Similar to Item cost, this shows the actual cost of the item at that date |
| 45 | Internal Note | Here you can include private comment or detail added to a job, quote, or project that’s meant for your team, not the customer. |
Approve Quote to Job Screen
- Job Details Tab
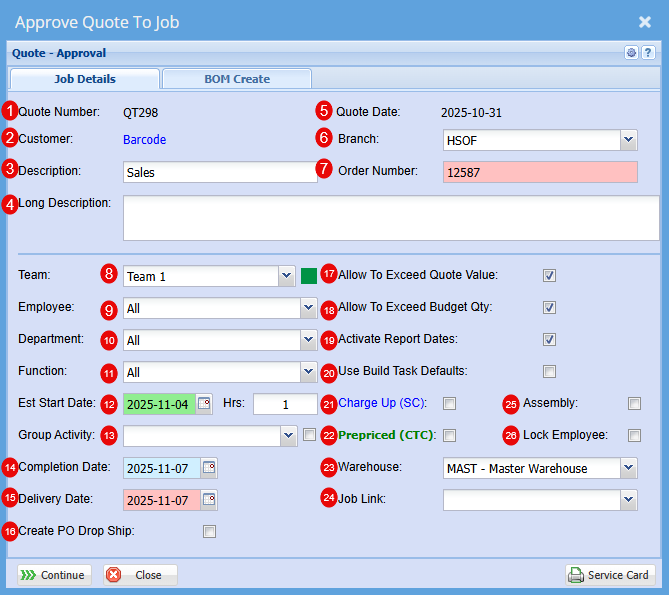
| 1 | Quote Number | This is the Quote number linked |
| 2 | Customer | Customers Name |
| 3 | Description | This will be specific to the Job as an easy identifier in a list |
| 4 | Long Description | Here you can be more specific to the job |
| 5 | Quote Date | This is the date of the Quote |
| 6 | Branch | You can select a specific branch that this is linked to if you had these set up at the start |
| 7 | Order Number | Customer Order Number |
| 8 | Team | You can select a team if these have been setup |
| 9 | Employee | Refers to the specific person responsible for completing a task or project. It helps track accountability, scheduling, and communication. |
| 10 | Department | Add a department if this has been setup for your company |
| 11 | Function | |
| 12 | Est Start Date | Date estimated for Job to start |
| 13 | Group Activity | |
| 14 | Completion Date | Date Estimated for Job to be completed |
| 15 | Delivery Date |
Date that the item is expected to be delivered to your customer |
| 16 | Create PO Drop Ship | This is to allow you to create a PO from the Job once its started. |
| 17 | Allow to Exceed Quote Value | Ticking this box allows actual job costs to exceed the quoted value. This is helpful when unexpected expenses arise during production or service delivery, and you want the system to continue tracking costs without treating the quote as a strict limit. If left unticked, a new quote must be created to include any additional costs. |
| 18 | Allow to Exceed Budget Qty | Ticking this box allows the actual quantity used in the job to exceed the budgeted amount. This is useful when additional units are required during production or service delivery. If left unticked, you’ll need to produce a new quote to add more units. |
| 19 | Activate Report Dates | This will allow you to be able to report on this job |
| 20 | Use Build Task Defaults |
When you create a build task default, you can specify alternative warehouses or item sources. Once a quote is converted into a job, the system will apply the defaults set in your build template. This ensures that materials are drawn from the designated warehouse rather than the main warehouse, allowing for more precise inventory control—especially when working with a master warehouse setup. |
| 21 | Charge Up (SC) | Charge Up (SC) means the customer is billed for actual time and materials used, including any extras beyond the initial scope. Charge Up allows you to invoice for additional costs incurred during the job. |
| 22 | Prepaid (CTC) |
Prepaid refers to the quoted amount for the job, the fixed charge agreed to by the customer. You can’t invoice beyond this amount, so any extra time, materials, or costs that exceed the quote become your internal expense, or ‘Cost to Company (CTC) |
| 23 | Warehouse | All stock will come from the Warehouse selected here |
| 24 | Job Link | You may find that you already have a job for this customer, and this is a sub job, to can select this job form the drop-down menu link to two or more jobs. |
| 25 | Assembly | “Assembly” refers to an internal process where components or materials are prepared, combined, or staged before installation or delivery. It’s not billed separately to the customer but contributes to your overall job cost. |
| 26 | Lock Employee | You can lock the employee assigned to this job so it cannot be changed without your knowledge. |
No Comments