
Sales lead Process
CRM Module> Activity> Sales Leads
A Sales Lead is a person or organisation that has shown interest in purchasing a product or service and has the authority to do so. This represents the first stage of the sales process.
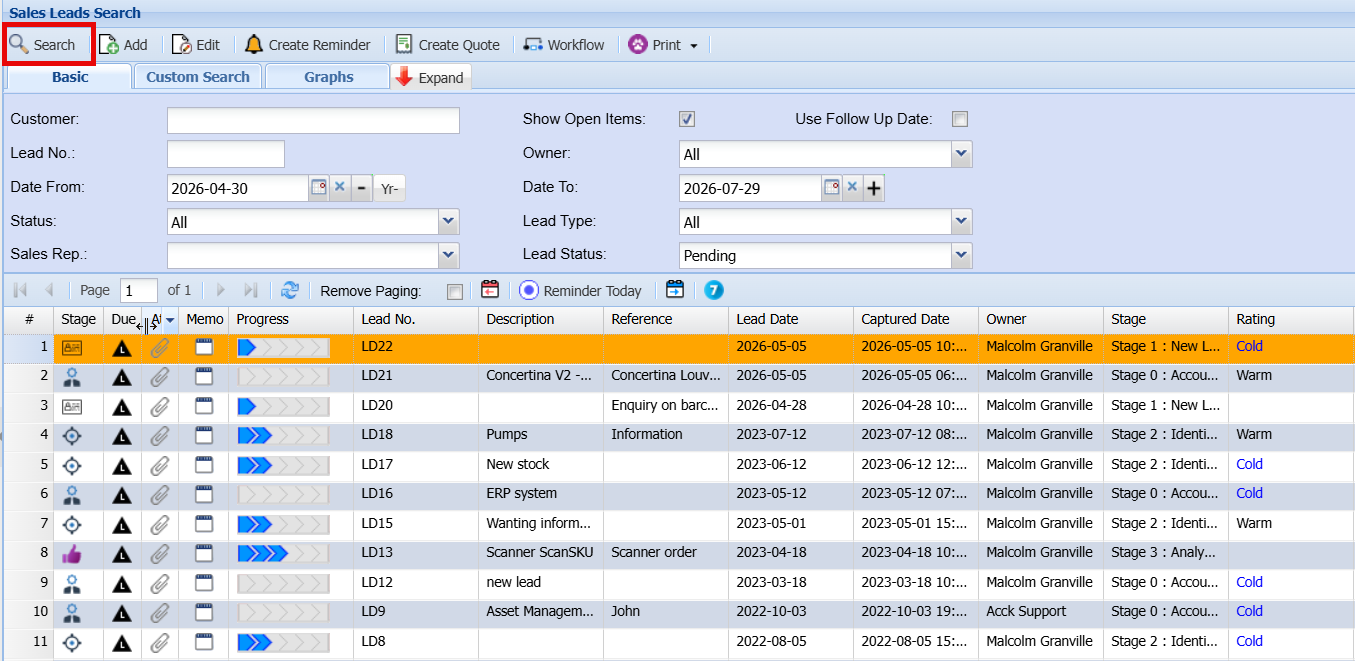
Creating a new prospect
The Add Lead screen is used to capture and manage all relevant information for a new Sales Lead. Below is an explanation of each field and function.
CRM Module> Activity> Sales Leads
- Click Add
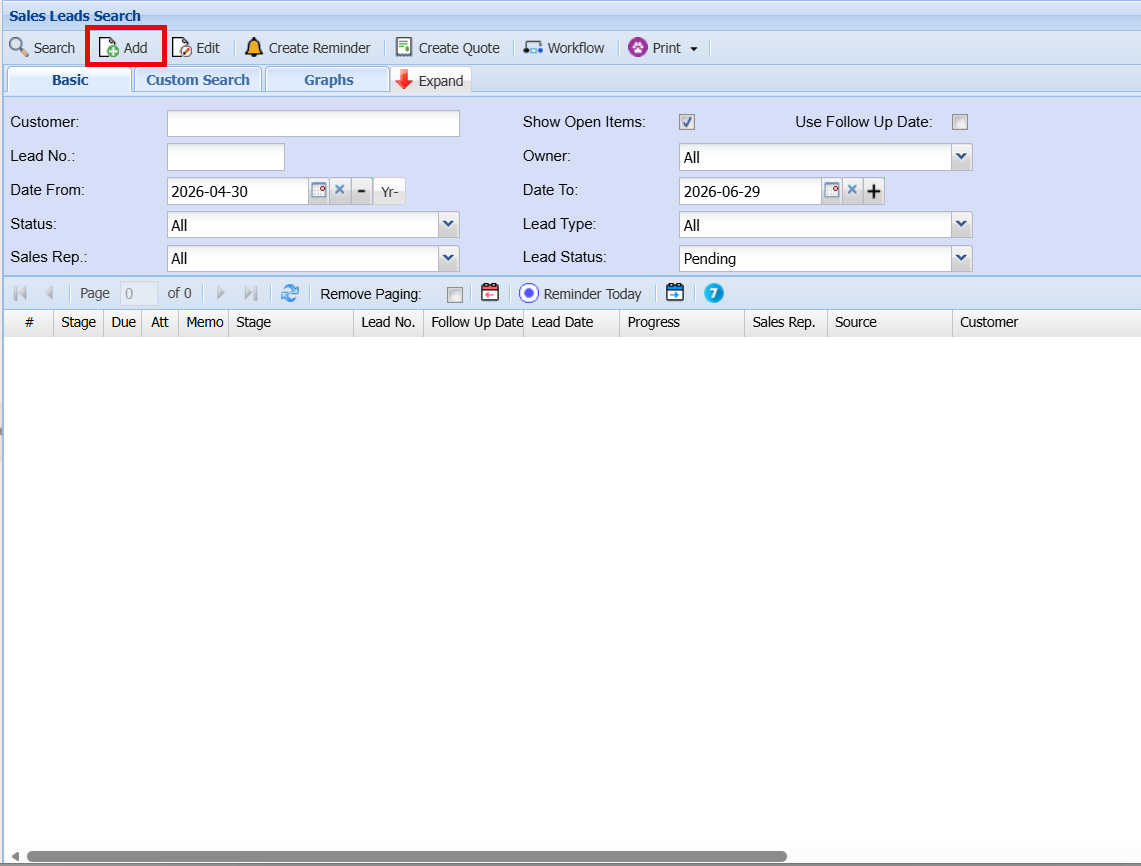
Add Sales Lead Screen
If the customer already exists and is interested in additional business, you can either enter their name or select it from the Customer dropdown list.
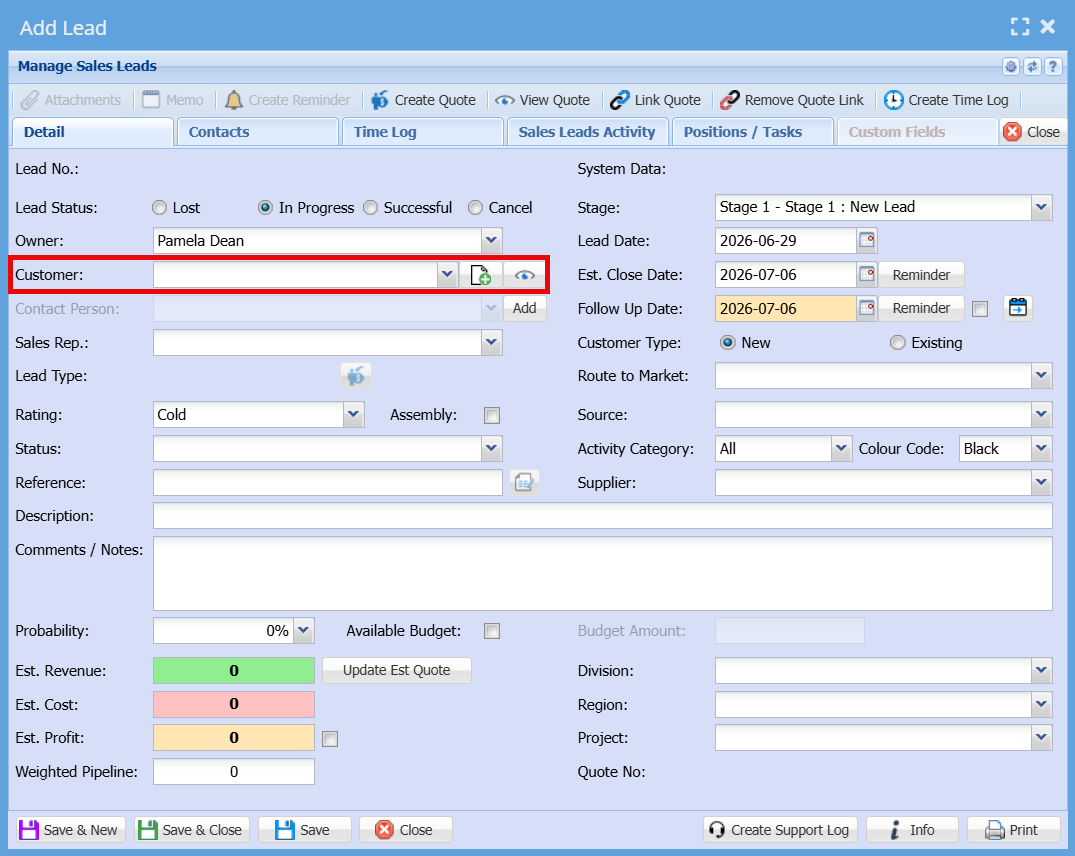
General Information
| Owner | The person responsible for managing and progressing the lead. |
| Customer |
The individual or organisation interested in your product or service.
|
| Contact Person | Displays or allows selection of the contact linked to the chosen customer. |
| Sales Rep | The sales representative responsible for the lead and associated commission. |
Lead Details
| Stage | Defines the current stage of the lead (e.g. New Lead, Qualified, etc.). |
| Lead Date | The date the lead was first identified. |
| Follow Up Date | The date scheduled for the next action or follow-up. |
| Est. Close Date | The expected date the sale will be finalised. |
| Customer Type | Indicates whether the customer is New or Existing. |
| Rating | Classifies the lead as Hot, Warm, or Cold based on likelihood. |
| Status | Specifies the current status of the lead (e.g. In Progress, Lost, Successful). |
| Reference | Enter any relevant reference number or identifier. |
| Description | Provide a brief summary of the opportunity. |
| Comments / Notes | Add detailed notes or additional information about the lead. |
Classification Fields
| Route to Market | Select how the lead was brought in (e.g. direct, partner, online). |
| Source | Indicates where the lead originated from. |
| Activity Category | Categorises the type of sales activity. |
| Colour Code | Assign a colour to visually identify or prioritise the lead. |
| Division / Region / Project | Assign organisational structure details for reporting purposes. |
Financial Information
| Probability (%) | The estimated chance of closing the deal. |
| Estimated Revenue | Expected income from the lead. |
| Estimated Cost | Anticipated cost associated with fulfilling the sale. |
| Estimated Profit | Calculated or entered expected profit. |
| Weighted Pipeline | A calculated value based on revenue and probability. |
| Available Budget | Indicates if a budget is confirmed and allows entry of the budget amount. |
Tabs
| Contacts Tab | Displays all contact persons linked to this Sales Lead. |
| Sales Leads Activity Tab |
Tracks activities related to the lead.
|
Action Buttons
| Save & New | Save the current lead and open a new blank form. |
| Save & Close | Save the lead and exit the screen. |
| Save | Save changes without closing the screen. |
| Close | Exit the screen without saving changes. |
Contacts Tab
The Contacts tab within the Edit Lead screen displays and manages all contact persons linked to the selected Sales Lead.
- Time logs help monitor effort spent on each Sales Lead and support productivity tracking.
- This feature can also assist with billing where time-based charges apply.
- Keeping time logs updated ensures accurate reporting and accountability.
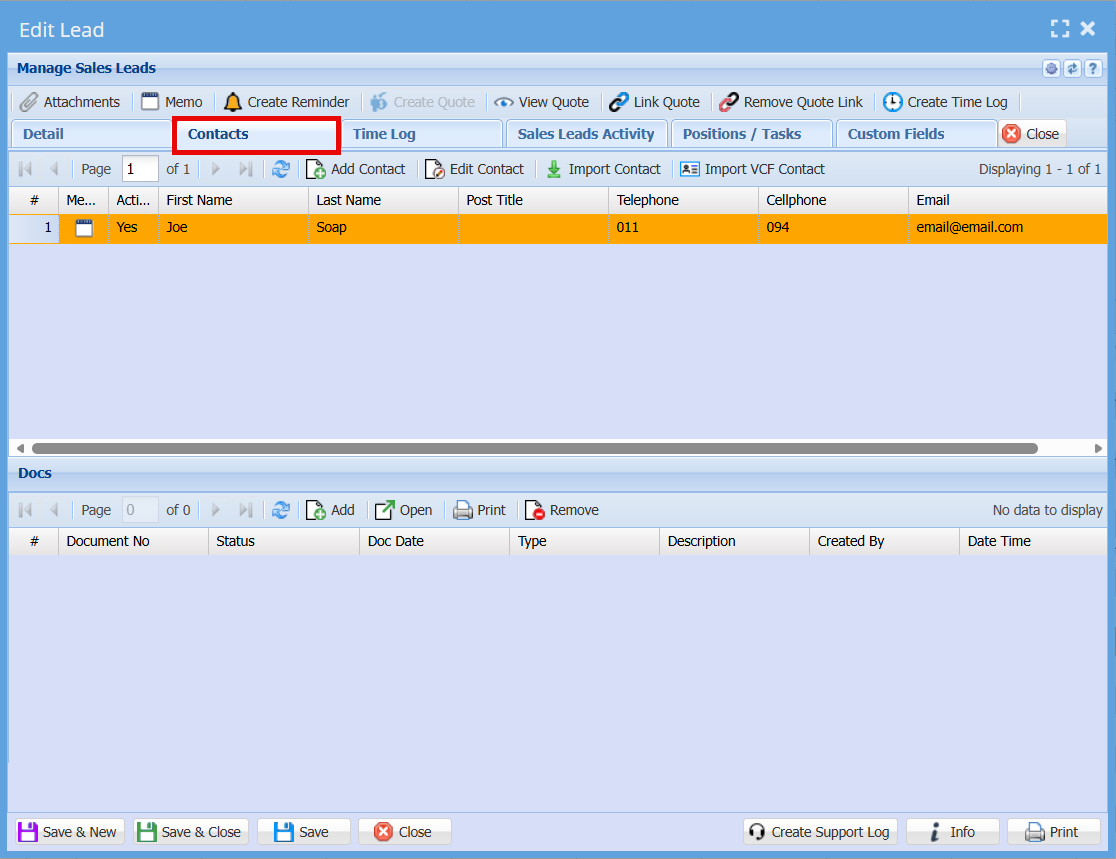
The grid shows a list of all contacts associated with the lead, including key details such as:
- First Name and Last Name
- Position/Title
- Telephone and Cellphone numbers
- Email Address
- Active status (indicates whether the contact is currently active)
Each row represents an individual contact linked to the Sales Lead.
Action Buttons
Located above the contact grid:
-
Add Contact
Allows you to create and link a new contact to the Sales Lead. -
Edit Contact
Enables you to update the details of a selected contact. -
Import Contact
Import contact information from an external source. -
Import VCF Contact
Upload and import contacts from a VCF (vCard) file.
Documents Section (Docs)
The lower section of the screen displays documents linked to the Sales Lead, such as files or attachments.
Available actions include:
- Add – Attach a new document
- Open – View a selected document
- Print – Print the document
- Remove – Delete the selected document
If no documents are linked, the grid will display “No data to display.”
Additional Notes
- Contacts linked here are directly associated with the selected Sales Lead and can be used for communication and tracking purposes.
- Keeping contact details up to date ensures accurate follow-ups and reporting.
Time Log
The Time Log tab allows users to view and manage time entries linked to the selected Sales Lead. This feature is useful for tracking time spent on activities related to the lead.
- Time logs help monitor effort spent on each Sales Lead and support productivity tracking.
- This feature can also assist with billing where time-based charges apply.
- Keeping time logs updated ensures accurate reporting and accountability.
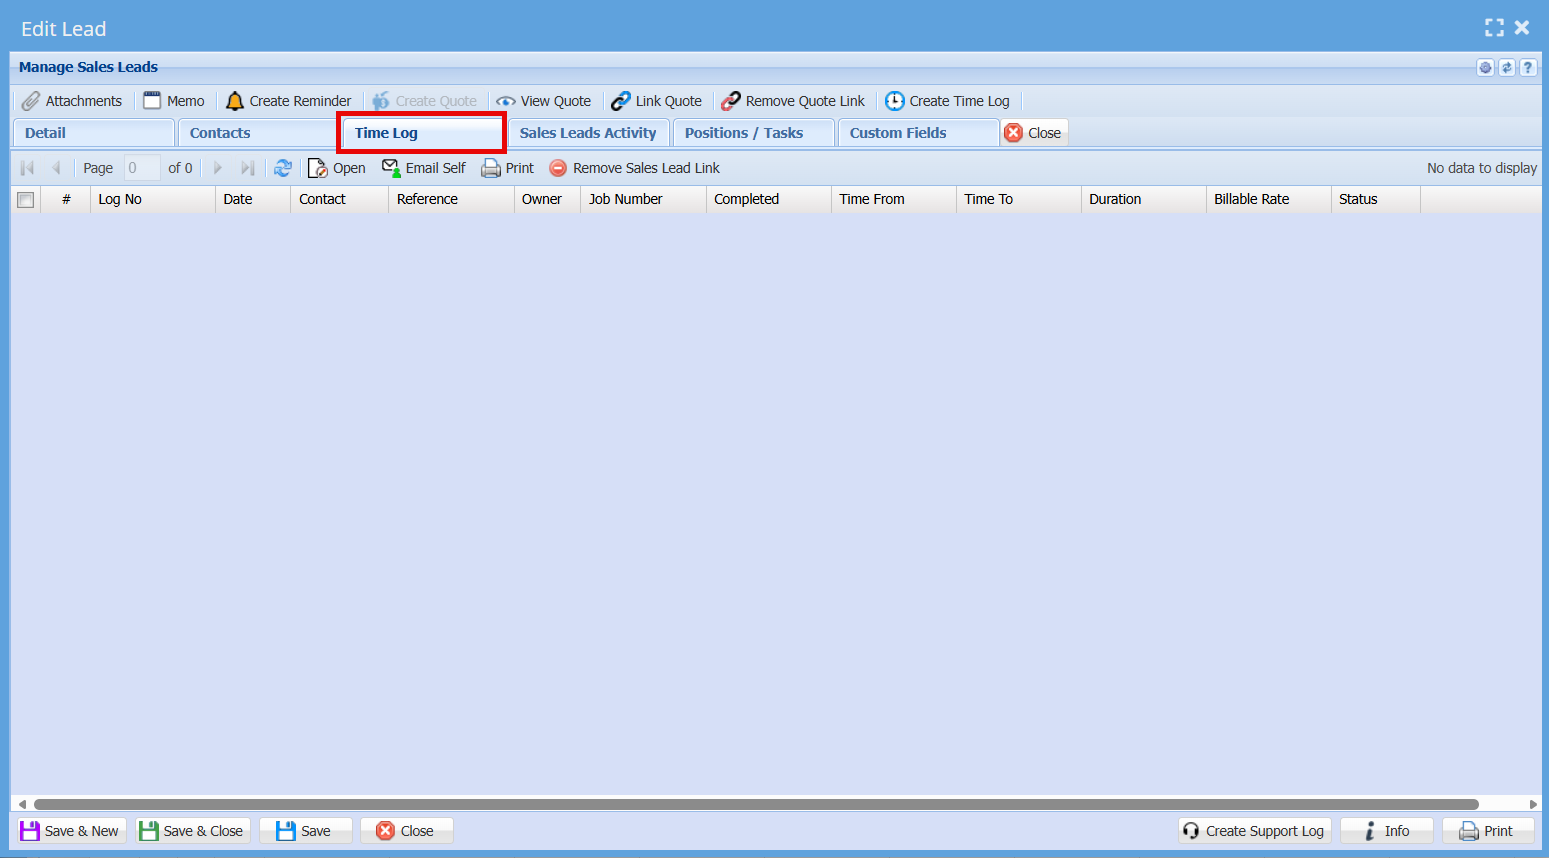
Time Log Grid
The grid displays a list of all recorded time entries. Each entry includes the following information:
- Log No – Unique reference number for the time entry
- Date – The date the activity took place
- Contact – The contact person associated with the activity
- Reference – Additional reference or description for the entry
- Owner – The user who created or is responsible for the time log
- Job Number – Linked job or project reference (if applicable)
- Completed – Indicates whether the activity has been completed
- Time From / Time To – Start and end times of the activity
- Duration – Total time spent on the activity
- Billable Rate – Rate applied if the time is billable
- Status – Current status of the time entry
If no time entries have been recorded, the grid will display “No data to display.”
Action Buttons
Located above the grid, the following options are available:
-
Open
View or open the selected time log entry. -
Email Self
Send the time log details to your own email for reference. -
Print
Print the selected time log entry or list. -
Remove Sales Lead Link
Unlink the selected time log entry from the Sales Lead. -
Create Time Log (available on the top ribbon)
Create a new time entry linked to the Sales Lead.
No Comments