Asset Actions Setup
Setup the various actions that can occur against an Asset for Asset item
To set an action against an asset go to
Asset Tracker Module> Configuration> Asset Action
Then click add and the screen below will appear. To edit an asset action, highlight the asset action you want to edit then click edit
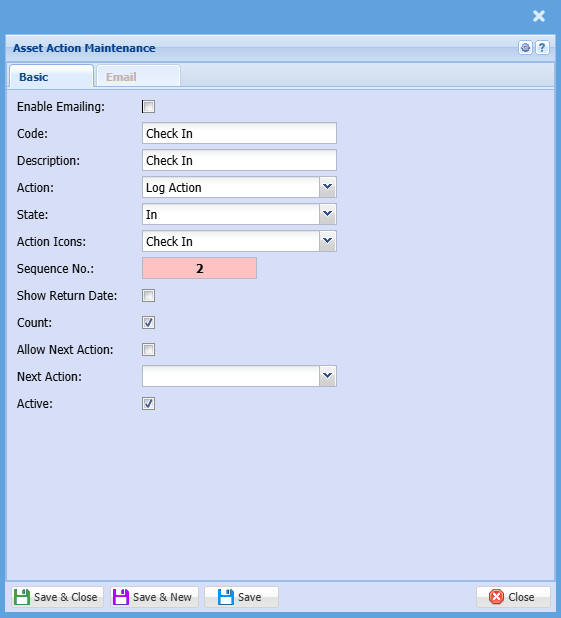
| Enable Emailing | Put a tick on to enable emailing |
| Code | Enter a code for the action |
| Description | Enter a description for the action |
| Action | Various actions can be done on an asset, log action, invoice, credit note, checklist, support log |
| State | There are four states to which an asset can be assigned, in, pending all, out and Disposed |
| Action icons | Set up an icon for the action |
| Sequence No | This is the sort order for the action drop down (You may want more frequently used actions at the top of the list) |
| Show return date |
This should be off for any state that is 'in' and should be on for any state that is 'out'. When this is off, selecting an action will not save the return date. |
| Count | Put a tick on if you want the system to automatically count your assets |
| Allow Next Action | Put this tick on to allow next action |
| Next Action | Select the next action on the drop down menu selection |
| Active | Put a tick if it is an active action, and do not put a tick if it is inactive |
Asset Action Grid
Go through the various actions and clean up the actions that you will not be using
We recommend the following actions remain in the system:
- Available
- Check-In
- Check Out
- Dispose (Works when you write off the asset and creates a stock level adjustment)
- Sell (This works when you sell the asset and create an invoice)
- Audit (Users this when you create your fixed asset audit, it will mark the items as being audited)
- Bookin (Works with booking in feature in job costing)
- .Bookout (Works with booking out feature in job costing)

No Comments