Manage Job Screen Explained
Job Search ButtonScreen
Searching for Jobs - Job Costing > Activity > Manage Job
This area only searches for Jobs with a Job status of
- Not Started
- Started
- In Progressing
Search Button

After selecting or entering the relevant filters (such as job number, customer, date range, or status), clicking Search will display all jobs that match those criteria in the results grid below.
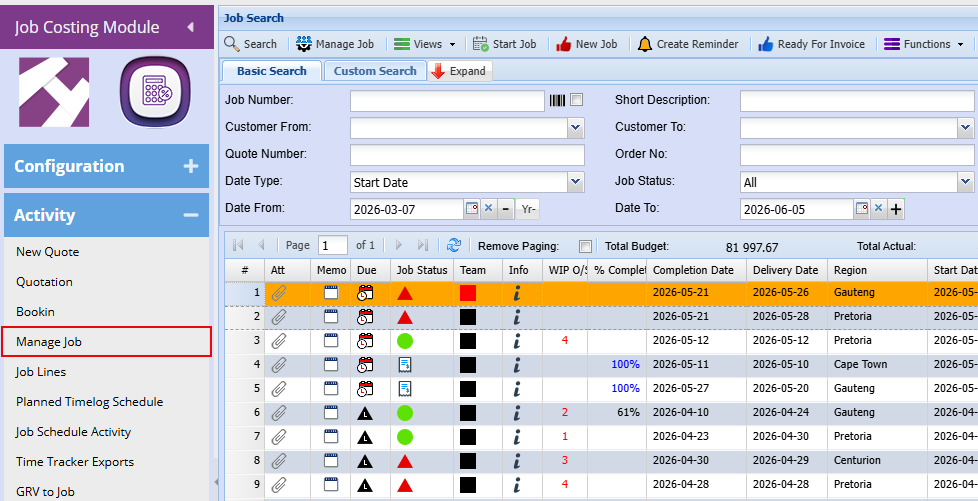
| Job Number |
If you know the exact job reference
|
|
Customer From / To
|
Filter jobs for a specific customer or range of customers
|
| Quote Number |
Locate jobs linked to a specific quote
|
|
Order Number
|
Search using the related order reference
|
|
Short Description
|
Search by keywords describing the job
|
|
Date Type
|
Choose which date you want to filter by (e.g., Start Date)
|
|
Date From / Date To
|
Define a date range to refine results
|
|
Job Status
|
Filter by status (e.g., All, Active, Completed)
|
Expanded Search Fields
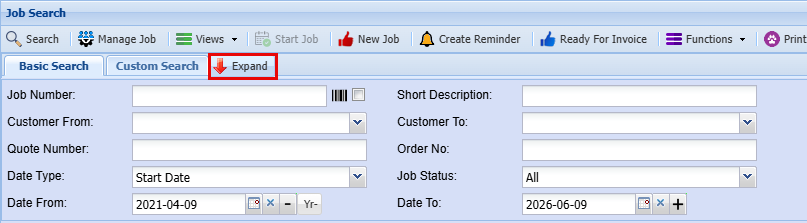
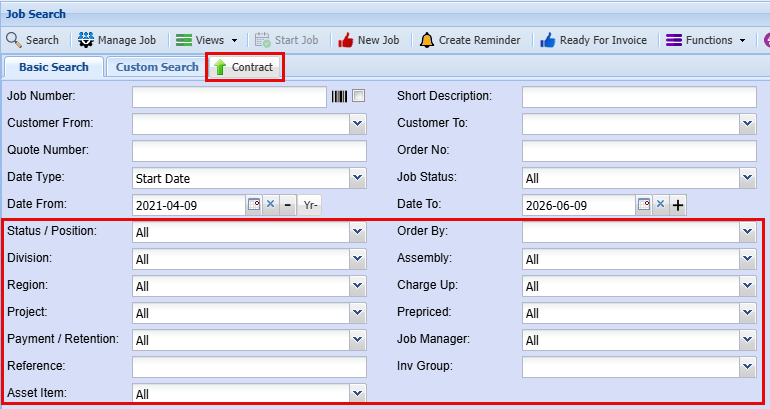
|
Status / Position
|
Filter jobs based on their current status or stage within the workflow
|
|
Division
|
Search for jobs linked to a specific business division
|
|
Region
|
Narrow results by geographic location or branch
|
|
Project
|
Locate jobs associated with a particular project |
|
Payment / Retention
|
Filter based on payment terms or retention details
|
|
Reference
|
Search using any external or internal reference number
|
|
Asset Item
|
Find jobs linked to a specific asset or item
|
|
Order By
|
Sort the results based on selected criteria (e.g., date, job number)
|
|
Assembly
|
Filter jobs related to specific assemblies or grouped components
|
|
Charge Up
|
Identify jobs based on charge-up rules or settings
|
|
Prepriced
|
Filter jobs that have predefined pricing applied
|
|
Job Manager
|
Search for jobs assigned to a specific manager
|
|
Invoice Group (Inv Group)
|
Locate jobs grouped for invoicing purposes
|
These additional filters are especially useful when:
- Working with large volumes of jobs
- Needing to pinpoint very specific records
- Performing reporting or detailed analysis
They allow users to move beyond basic searches and fine-tune results with greater accuracy and control.
Manage Job Button

The Manage Job button (highlighted in the toolbar at the top) is used to open a selected job into the full job management screen.
Views Button

- Overview Option
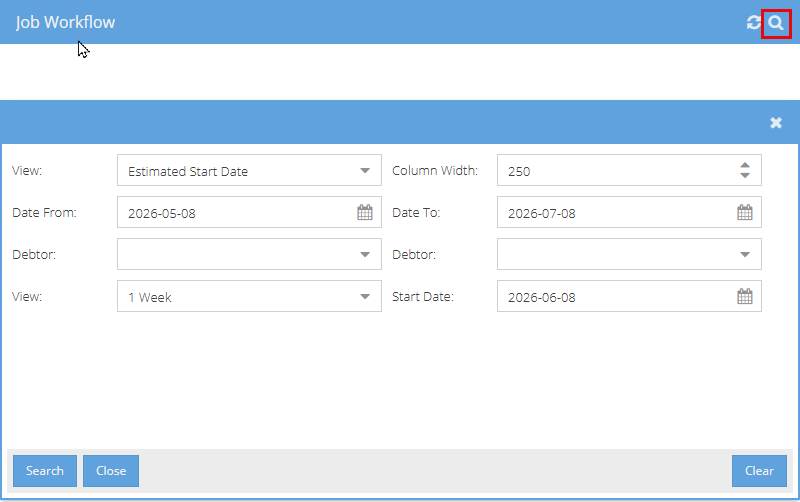
This screen allows you to control how the Job Workflow overview is displayed, helping you plan and track jobs over a selected time period.
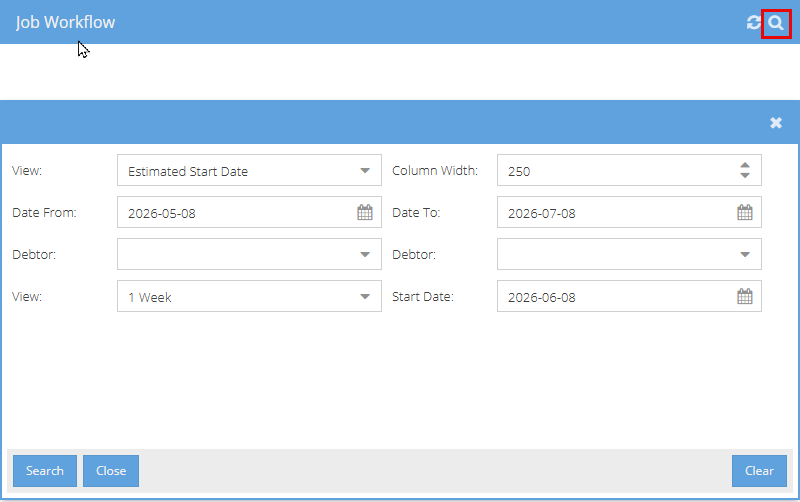
This screen allows you to control how the Job Workflow overview is displayed, helping you plan and track jobs over a selected time period.
|
View |
The first View dropdown lets you choose which date the workflow is based on: - Estimated Start Date This determines how jobs are positioned and displayed in the workflow timeline. |
|
Column Width |
- This setting controls the width of the columns in the workflow display. Useful for adjusting the layout to fit your screen or improve readability. |
|
Date Range (Date From / Date To) |
- Defines the overall date range of jobs to include in the workflow. - Only jobs within this selected period will be displayed. |
|
Debtor Filter |
- Used to filter jobs for a specific customer (debtor). |
|
View (Duration) |
The second View option controls how far ahead you can plan: - You can display the workflow for up to 12 weeks in advance This helps with forward planning and scheduling. |
|
Start Date |
- Defines the starting point of the workflow view - This is typically set to today’s date, but can be adjusted if needed |
|
Action Buttons |
- Search – Applies the selected filters and displays the workflow - Close – Exits the screen - Clear – Resets all fields |
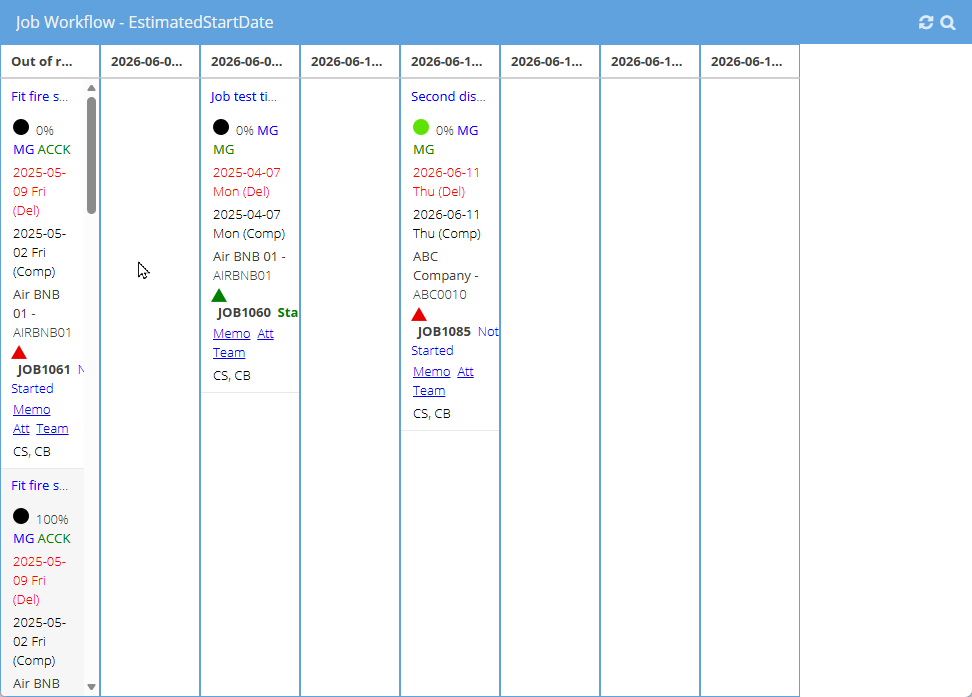
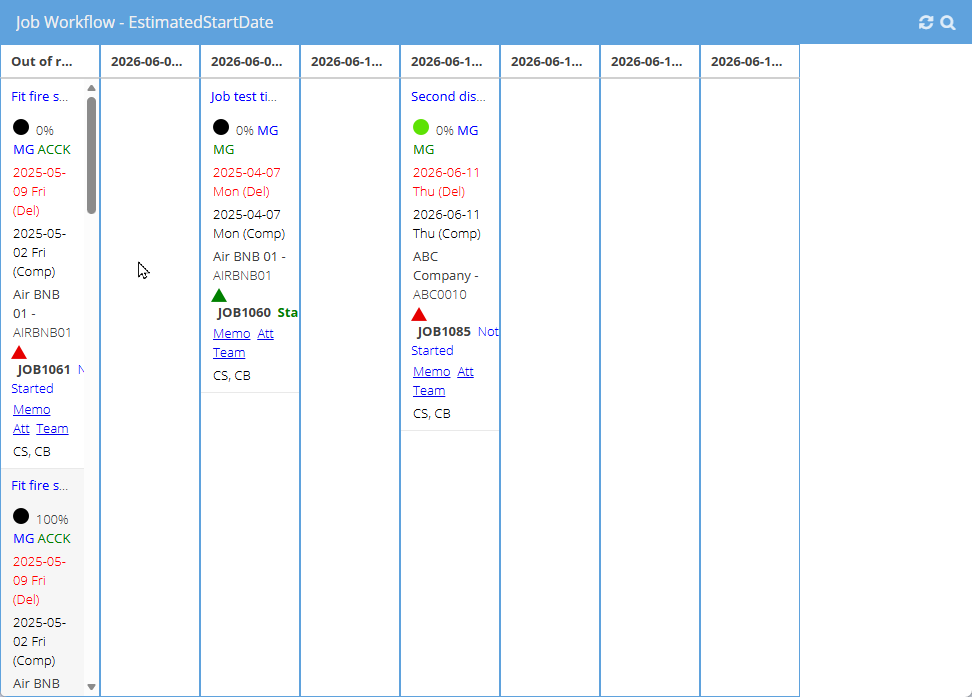
Once you have applied your desired filters and clicked Search, the results screen will appear as shown below.
This screen displays the results of your search in a workflow (timeline) view, organised by date.
Each column represents a specific date, and the jobs returned from your search criteria are displayed under their scheduled or estimated start dates.
Key Features:
Job Display – Each job appears as a card showing key details such as:
- Job name or description
- Job number
- Status indicators (icons and colours)
- Start and completion dates
- Assigned team
Date-Based Layout – Jobs are arranged in columns by date, making it easy to see what work is scheduled on each day.
Drag-and-Drop Functionality – Users can click and drag jobs from one date column to another to reschedule or reorganise the workflow.
Visual Status Indicators – Colours and icons provide a quick view of job progress, delays, or completion status.
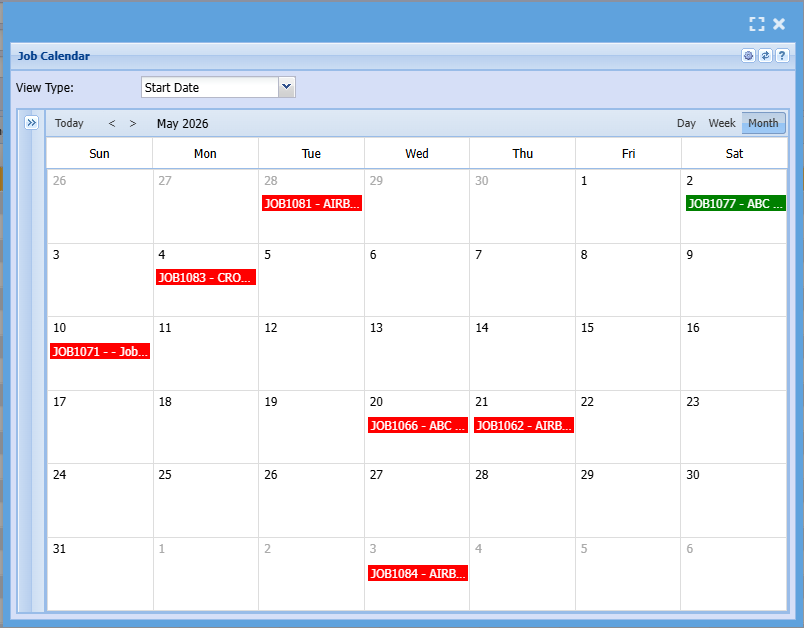
- Calendar Option
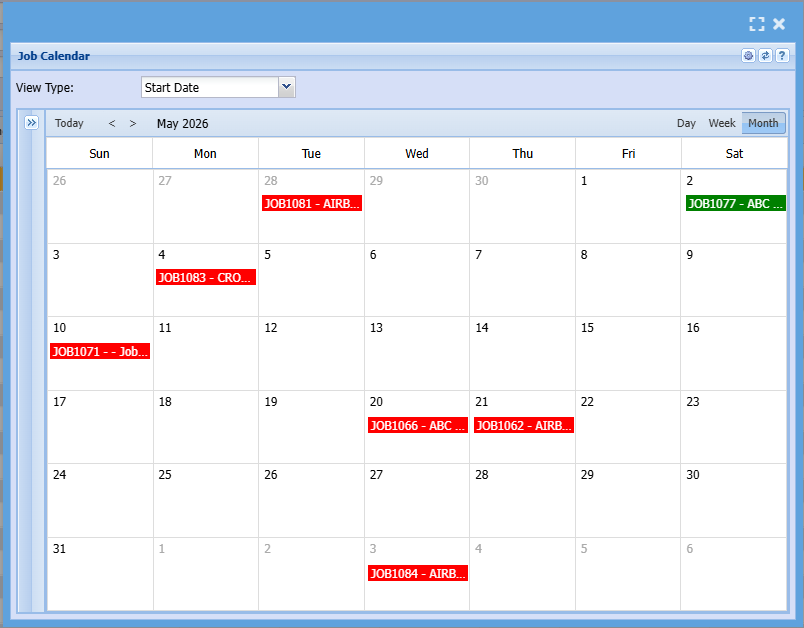
The Calendar View displays jobs in a familiar calendar layout, making it easy to see when work is scheduled across specific days.
- Day – View jobs scheduled for a single day
- Week – See jobs across a full week
- Month – Get an overview of jobs across the entire month
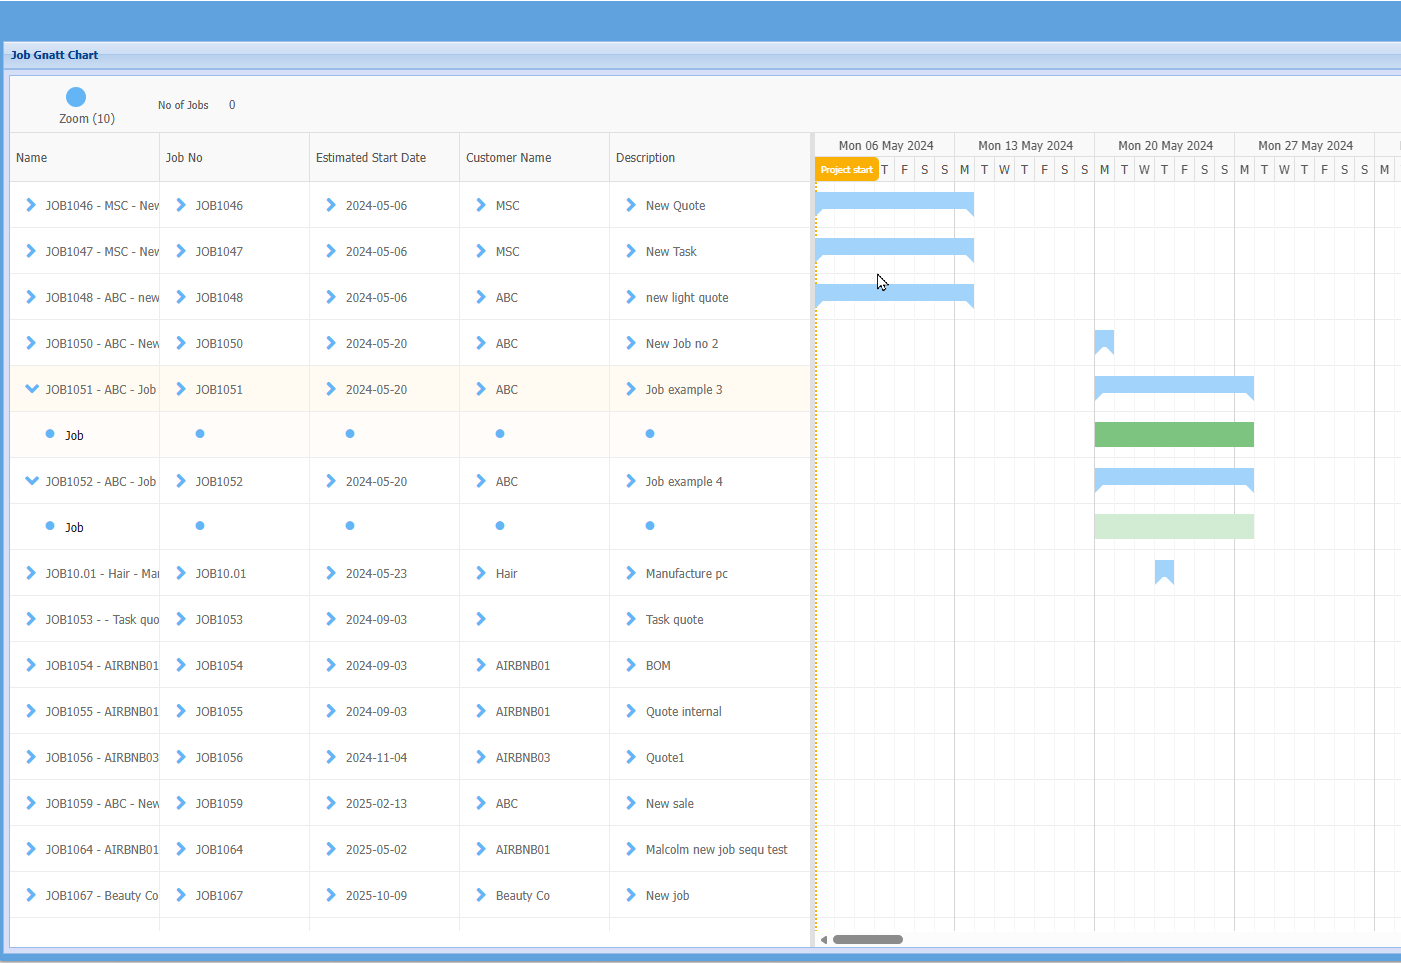
- Gantt Chart View
The Gantt Chart View provides a detailed timeline of all jobs, allowing users to visually track progress, duration, and scheduling across a timeline.
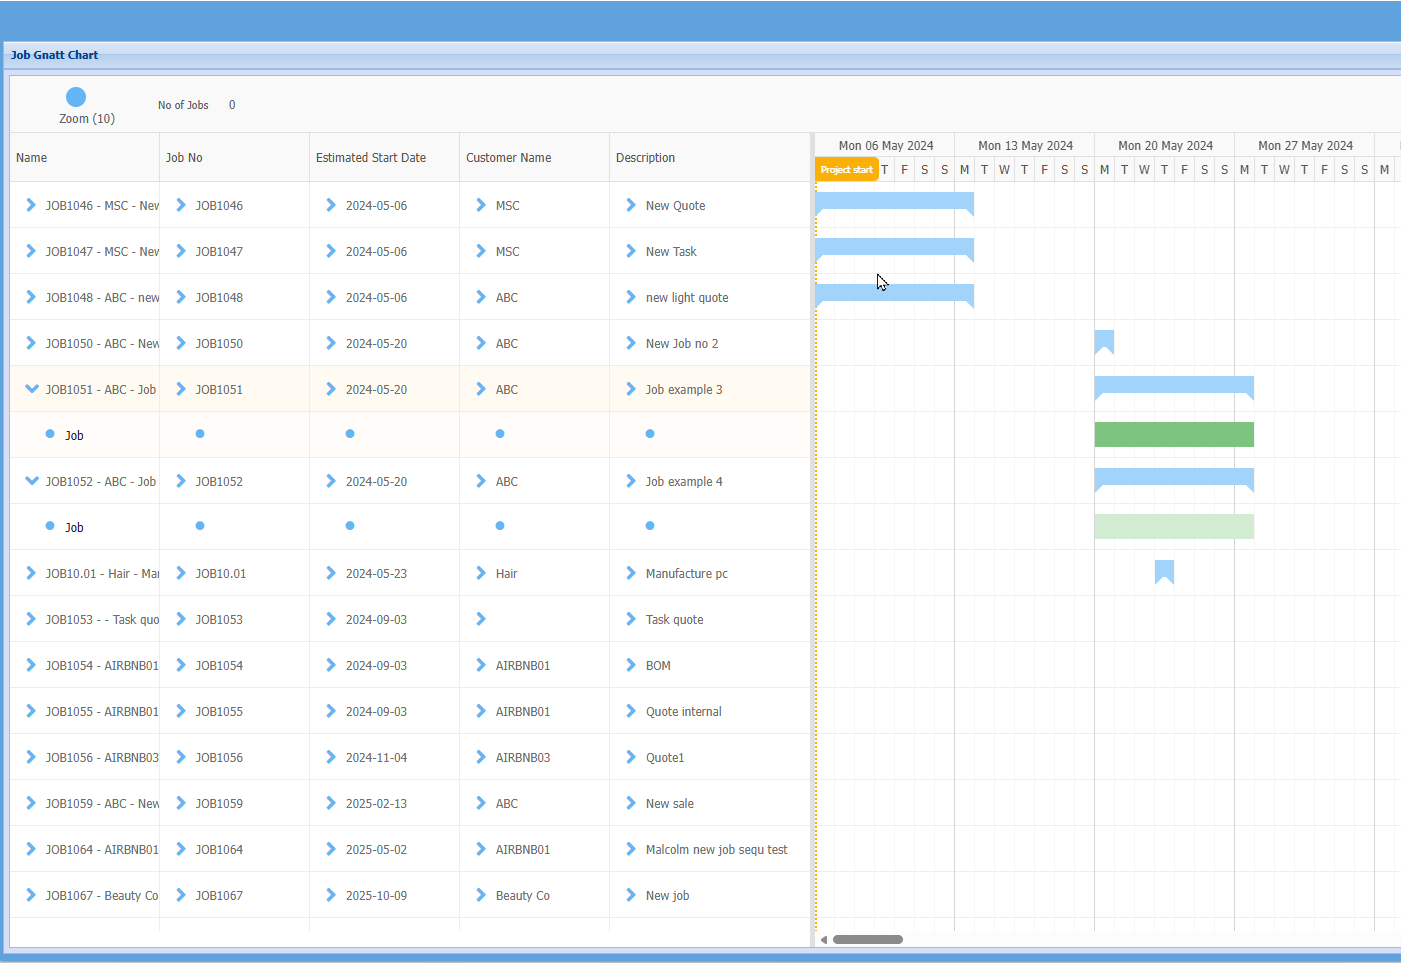
- Timeline Display – Each job is represented as a horizontal bar stretched across the dates it is scheduled for, making it easy to see how long a job will take and when it is due.
- Job Details Panel – On the left-hand side, key information is displayed in columns, including:
Job Name
Job Number
Estimated Start Date
Customer Name
Description
- Date Grid (Right Side) – The timeline on the right shows days and weeks, with job bars positioned according to their scheduled start and end dates.
- Visual Progress Tracking – The length and position of each bar clearly indicate:
Job duration
Overlaps with other jobs
Gaps in scheduling
- Drag-and-Drop Functionality – Jobs can be moved along the timeline to adjust scheduling, allowing users to easily reschedule or reorganise workloads.
- Zoom Option – The zoom control allows users to adjust how much detail is displayed in the timeline (e.g., viewing a shorter or longer time period).
Start Job Button

- In most cases, a job will start automatically as soon as a job line is managed or worked on.
- However, there may be situations where you want to start the job before managing any lines.
In this case, you can simply:
- Select the job from the list
- Click the Start Job button
This will activate the job without needing to work on any job lines first.
New Job Button

When this option is selected, a new job is started “on the fly,” allowing users to quickly set up and begin working on a job straight away.
- Direct Job Creation – Create a job immediately without needing an existing quote
- Automatic Background Process – The system will automatically create a blank quote in the background
- Linked Records – This quote is linked to the job and can be accessed later under the Quotes section
- Flexible Workflow – Ideal for situations where work needs to begin quickly without following the full quote-to-job process
Create Reminder Button
The Create Reminder button allows you to set a reminder for a selected job.

To use this feature:
-
- Select a job from the list
- Click Create Reminder
- Enter the reminder details (e.g., date, time, and notes)
This is useful for setting follow-ups, deadlines, or any important actions related to a job.
Ready for Invoice
The Ready for Invoice button is used to mark a job as ready to be invoiced.
When selected, it simply adds a thumbs-up icon to the job in the results grid, providing a clear visual indicator that the job is complete and ready for billing.
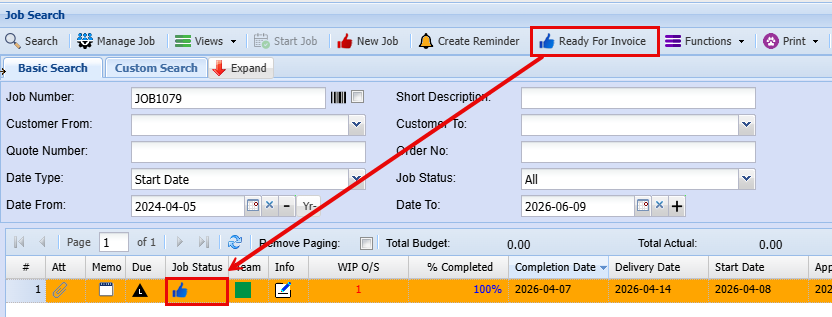
- Visual Indicator – Adds a thumbs-up icon to the job line
- Quick Status Update – Clearly shows that the job is ready to be invoiced
- No Complex Process – This is a simple flag and does not generate an invoice automatically
- Easy Tracking – Helps users quickly identify which jobs are ready for the invoicing stage
Functions Button
The Functions tab provides access to a range of additional actions that can be performed on a selected job. These are typically used for maintenance, updates, or managing specific job settings.
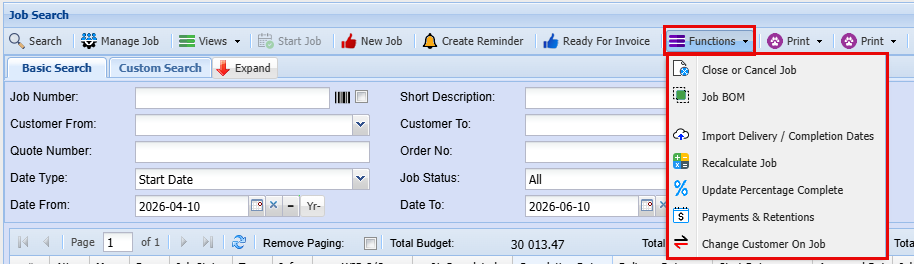
| Close or Cancel Job |
Allows you to close a completed job or cancel a job that is no longer required
|
| Job BOM |
Opens or manages the materials associated with the job
|
| Import Delivery / Completion Dates |
Used to update job delivery or completion dates in bulk
|
|
Recalculate Job |
Refreshes and recalculates job costs and related figures to ensure accuracy
|
|
Update Percentage Complete |
Updates the job’s progress bar percentage based on current activity
|
| Payment / Retention |
Manages payment details, including any retention amounts held or released
|
| Change Customer on Job |
Allows you to update or correct the customer linked to the job
|
Job Search WIP O/S
On one of the columns, there is a field that is called WIP O/S
This means Work In Progress Outstanding items in not started state
This will count the number of line items in the job that are in a Not started state.
This number indicates that there are items within the job that are not managed and therefore not in WIP
The text value will display in red
If there is no lines and the value is zero, the field will be blank
.png)
Views Button

Overview View
This screen provides a comprehensive overview of all current and future jobs, allowing you to monitor progress, track statuses, and manage workload across teams.
This screen is used to plan and manage team workloads across jobs and dates. It provides a visual schedule that helps you track where each job sits and how teams are allocated over time.
Key Features
Team-Based Scheduling
Each row represents ateam(e.g. Team 1, Team 2, etc.).Jobs are assigned to teams and displayed ascoloured barsacross the calendar.
Timeline View
The grid is organised bydays and weeks, allowing you to see:When jobs are scheduledHow long each job will takeAny overlaps or gaps in scheduling
Drag-and-Drop Functionality
Jobs can be easilymoved between teams or datesby dragging and dropping.This allows you to:Adjust schedules if a job isrunning behind or aheadReallocate work between teams to balance capacityQuickly respond to changes in production or priorities
Visual Job Tracking
Each job is shown as a labelled block (e.g.ROOFING – JOB1083).The length of the block represents theduration of the task.Colours help visually distinguish between jobs or job types.
This screen is typically used by planners or managers to:
Allocate jobs to specific teamsMonitor daily and weekly workloadsAdjust schedules in real timeKeep production aligned with deadlines
Calendar View
Gantt View
This screen provides a timeline view of current and future jobs, helping you track when jobs are planned to start and how they are spread over time.
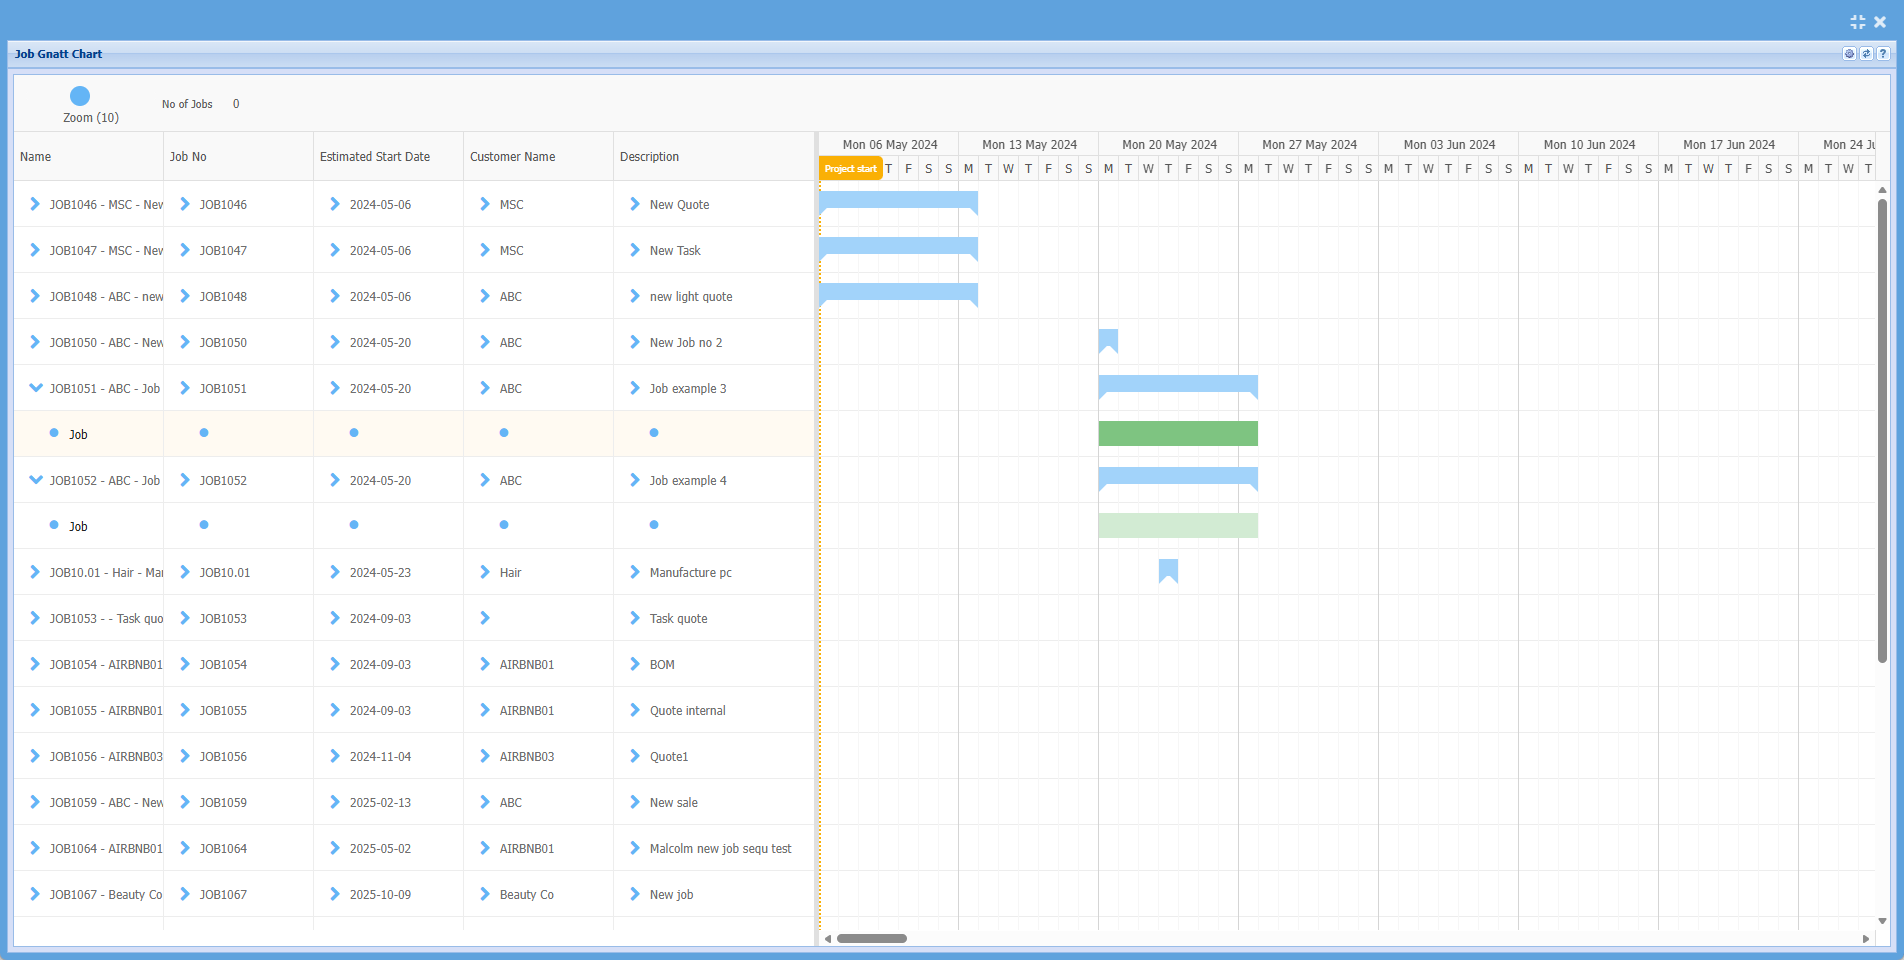
Left Panel – Job Details
Each row represents a job, with key information including:
Name– Job number and short descriptionJob No– Unique job referenceEstimated Start Date– When the job is scheduled to beginCustomer Name– Who the job is forDescription– Summary of the work
Right Panel – Timeline (Gantt View)
Displays jobs visually across acalendar timeline (by month/quarter)Each job is shown as ablue barThe position of the bar shows:When the job is scheduledHow long the job is expected to run
The“Project Start” markerhighlights the beginning of the selected timeline period
Key Features
- Visual Planning
Quickly seecurrent jobs vs upcoming jobsIdentify gaps, overlaps, or busy periods
- Timeline Scaling
TheZoom sliderallows you to adjust how much detail is shown (more detail or broader view)
- Job Tracking
Easily monitor:Jobs starting soonJobs scheduled later in the yearWorkload distribution over time
Clicking a job (via the arrow icon) allows you todrill into job details
This screen is ideal for:
High-level planningReviewingfuture workloadCheckingjob timing and sequencingSupporting scheduling decisions before assigning teams/resources