Company Details
In the company profiles you will find the basic information required to input your company information. This is also the section where the logo appears on the company details will be printed in your documents like invoice.
Video training manual 2016 Part 1 - Click Here
Video training manual 2016 Part 2 - Click Here
System Configuration > Administration > Company Profiles
Basic Tab
In this tab of company details, fill in all your information on your company.
You will notice that there is no logo present and when you click on the Company Image drop down arrow it is blank.
This will show when you go to the attachments tab to upload a logo.
This logo will be displayed on all the outgoing source documents.
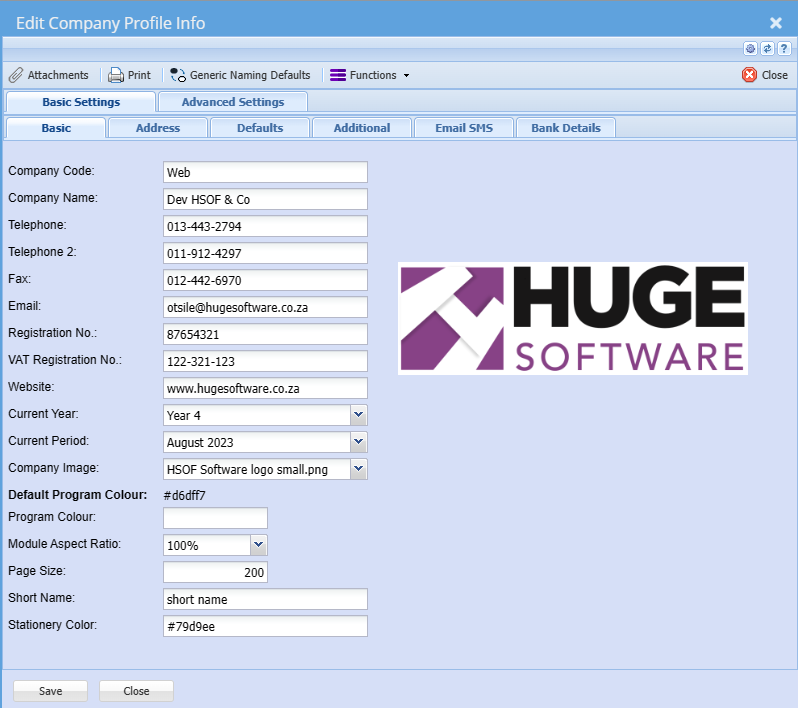
| Company code | Enter code to identify the company. This is also used for exports |
| Company Name | Enter your legal company name which will appear on all documents |
| Telephone | Enter the company telephone number |
| Telephone 2 | Enter the secondary company telephone number |
| Fax | Enter the fax number of the company |
|
Enter the email of the company. This email is also used for the automatic outbound emails as their return address |
|
| Registration number | Enter the legal registration of the company |
| Tax registration number | Enter the tax registration number for the company (VAT or GST) |
| Website | Enter your website address |
| Current year | Select the current year |
| Current period |
Select the current period This is used for reporting as the default period Saves you having to keep changing the dates on your reports |
| Company image | Select the company image that will appear on all documents |
| Default program colour |
#d6dff7 This is the default colour for the system |
| Program colour |
Select a colour to distinguish your company, should you be using multiple companies Requires the html code for the colour |
| Module expect ratio | Opens the module pages in 100 percent full screen |
| Page size |
Set as 100 records in a grid This can be changed to view more records in each search grid |
| Short name |
Select a short name for the company Used in calendar views and exports |
| Stationery colour | Select a stationery colour which best matches your logo for outgoing stationery |
Address Tab
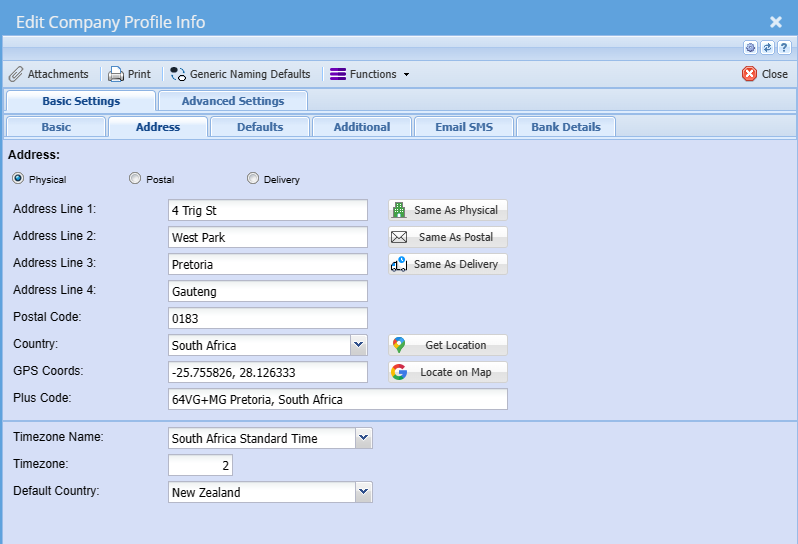
| Physical address | Enter the physical address or legal entity address for company |
| Postal address | Enter the postal address for the company |
| Delivery address | Enter the delivery address for the company |
| Country | Select the country that you are in |
| GPS Coordinates |
Enter the GPS coordinations for the company One can use the button for locate on map, however this needs to be set up first |
| Plus code | Enter the plus code for the company which can be found on Google map search |
| Time zone name |
Select the time zone country Used when entering system log times |
| Time zone | Enter the hours from time zone default |
| Default country |
Select the default country This default country is also used to populate the debtors and creditors address country |
| Same as physical | When in an address section, use this button to copy the physical address |
| Same as postal | When in an address section, use this button to copy the postal address |
| Same as delivery | When in an address section, use this button to copy the delivery address |
| Get location |
Use this button to get your GPS location and plus code This needs to be set up first |
| Locate on map | Click on this button to open up Google Maps to view the location of the company |
Defaults Tab
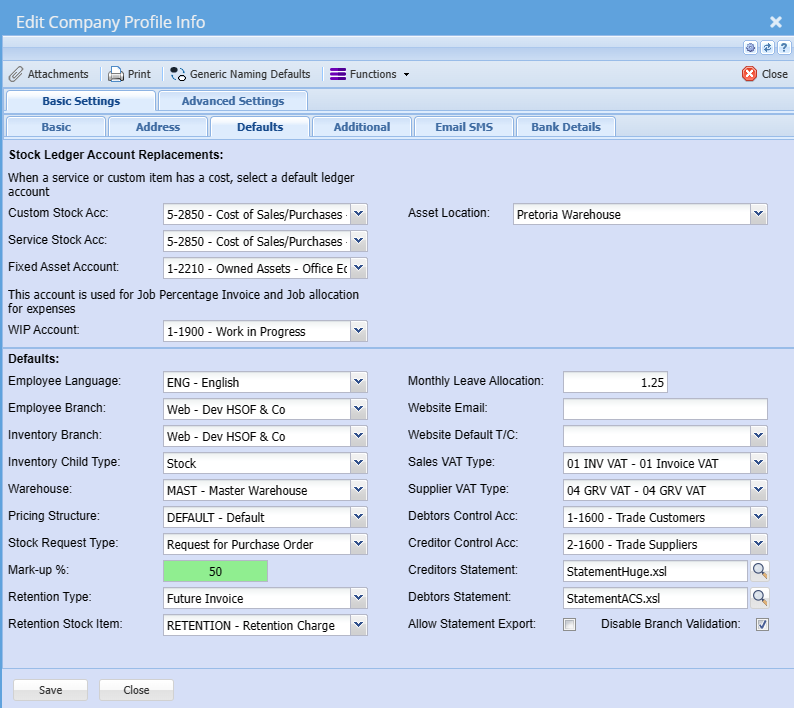
Stock Ledger Account Replacements
These accounts are used to be the defaults when new inventory items are created.
These accounts will always replace the stock control account,
These settings mainly are used when new items are created.
| Custom stock account | Select the default cost of sales account |
| Service stock account | Select the default cost of sales account |
| Fixed asset account | Select a default fixed asset account |
| Asset location | Select the default asset location |
| WIP account (Work In Progress) | Select the default work in progress Ledger account |
Defaults
These defaults are used widely across the system when new items are created.
These values are also used for any imports where a user has not specified a specific value.
| Employee language | |
| Employee branch | |
| Inventory branch | |
| Inventory child type | |
| Warehouse | |
| Pricing structure | |
| Stock request type | |
| Markup percentage | |
| Retention type | |
| Retention stock item | |
| Monthly leave allocation | |
| Website email | |
| Website default T/C (Terms & Conditions) | |
| Sales Tax type | |
| Supplier Tax type | |
| Debtors control account | |
| Creditors control account | |
| Creditors' statement | |
| Debtors statement | |
| Allow statement export | |
| Disable branch validation |
Defaults:
Inventory Branch - If the User is part of the branch selected, this will mean that when new inventory items are created the default branch will be the one selected. This enables the system to sort inventory by branch and only allow users to see those inventory codes linked to the branch selected.
Employee Branch - If the User is part of the branch selected, this will mean that when this employee creates a new employee the default branch will be the one selected.
Tax Type - The tax type selected here for the branch will mean that when new inventory items are created the default tax type will be the one selected.
System Currency - Once you have set your default System Currency all conversions will be based off this Currency.
When setting up Multi-currency rates your System Currency should have a rate of 1 (one).
The system currency is set up when you first install the accounting package. It cannot be changed afterwards.
Markup % - The markup percentage selected here for the branch will mean that when new inventory items are created the default mark up for inventory will be the percentage number entered.
Employee Language - If the User is part of the branch selected, this will mean that when this employee creates a new employee the default Language will be the one selected.
Pricing Structure - The pricing structure selected here for the branch will mean that when new inventory items are created the default pricing structure will be the one selected.
Inventory Child Type - The inventory child type assists the user from entering line inventory items to default to this inventory category
Example – If your business is mostly stock – select stock category, If your business is mostly in the service industry and your inventory setup is mostly service – select service category.
Current Year - Select the year to which reports will default to, normally current.
It is suggested to change this on an annual basis so your report defaults will read current
Current Period - Select the period to which reports will default to, normally current.
It is suggested to change this on a monthly basis so your report defaults will read current
Default Warehouse - This is the default warehouse that the system will use when entering documents example invoice stock lines.
We assume it to be a master warehouse where all stock is received
Note: If you do not have multi-warehouse module all stock will come in and out of Master warehouse
Stock ledger Accounts replacements
Custom Stock Acc - Select a ledger account here.
This is where your custom type inventory has a cost attached to it.
The ledger account updated cannot be stock control ledger account as this is not a stock item.
Only stock items should update the stock control account. The account selected here will replace the stock control ledger account and assign the costs to that account.
This default account will automatically be inserted when you created a custom inventory item.
You can, however, override the account at the inventory setup level
Service Stock Acc - Select a ledger account here.
This is where your Service type inventory has a cost attached to it.
The ledger account updated cannot be stock control ledger account as this is not a stock item. Only stock items should update the stock control account.
The account selected here will replace the stock control ledger account and assign the costs to that account.
This default account will automatically be inserted when you created a service inventory item.
You can, however, override the account at the inventory setup level
DM Terms & Cond - Stands for Debtors Module Terms and Conditions – The item selected here means that when creating a quote, sales order, invoice or credit note it will insert your standard terms and conditions.
You can, however, override the account at the creation of the document level.
CM Terms & Cond - Stands for Creditors Module Terms and Conditions – The item selected here means that when creating a Purchase Order, Goods Received notes or Goods Returned notes it will insert your standard terms and conditions. You can, however, override the account at the creation of the document level.
Help Name Space - There is a separate installation of a full on-line help file which contains movie files of the manual. Enter the name-space that the installation was created in. You only need to install one help file and setup all new companies to point to the 1 help install.
Job Invoice Type - When using job costing module and you are creating an invoice for the job you can automatically set up the default invoice type.
This can be percentage or usage, set the default that your business mostly uses. You can, however, override the invoice type at the creation of the job invoice.
Use Template Task -When using job costing module and you are authorizing a quote to job status. This setting will automatically be set for you
You can, however, override the choice at the authorization process.
Allow to Exceed - When using job costing module and you are authorizing a quote to job status.
This setting will automatically be set for you.
You can, however, override the choice at the authorization process.
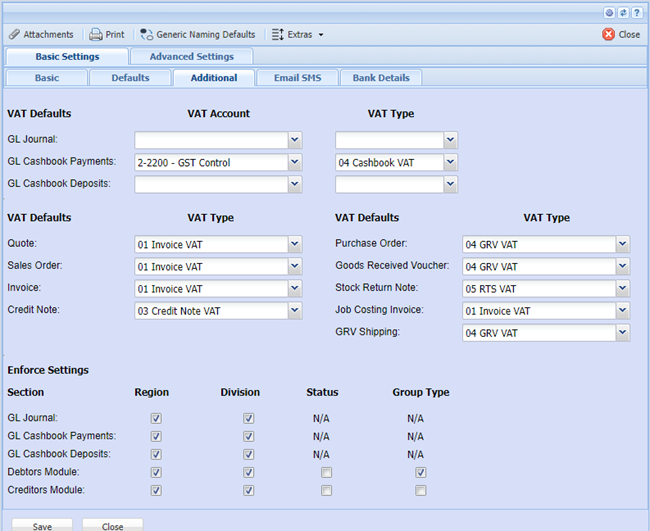
Additional Tab
Enforce settings - if you need to enforce division sand Regions in some modules the enforce activation is done here by adding a tick on
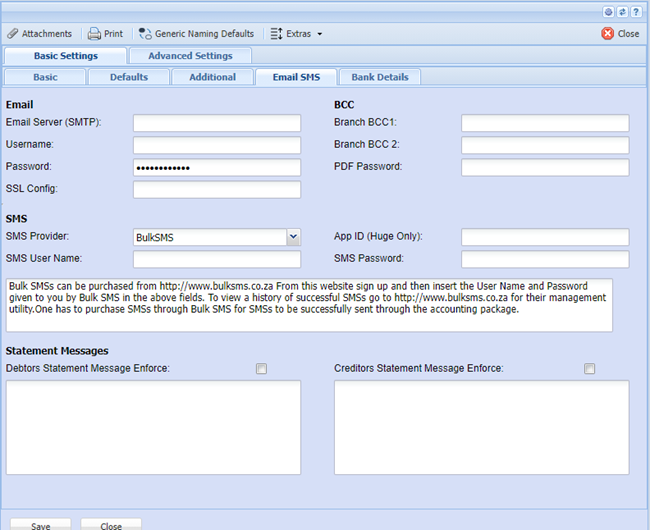
Email SMS Tab
To enable e-mailing documents out of webaccounting the SMTP settings and Sms configurations are done here
we advice companies to utilise their own service providers.
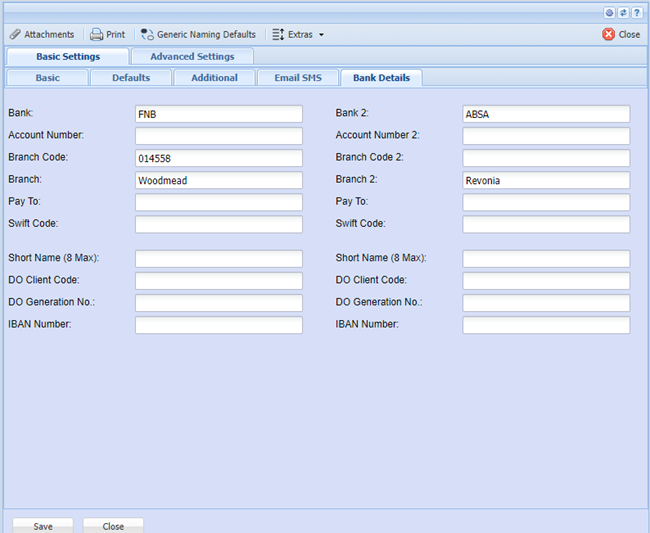
Bank Details Tab
Under the Bank Details tab please fill in your company Bank Details.
Note: This will appear on your documents, for example invoice.
Attachments Tab
Under the Attachments tab, this is where you can insert and upload any type of document into the company details. We give you some categories to upload your documents to.
To insert an attachment, click on the insert attachment button.
The following screen will appear, select the Attachment type and then type in a name that is applicable to you. Then click on the Browse button to find your file which you would like to Attach
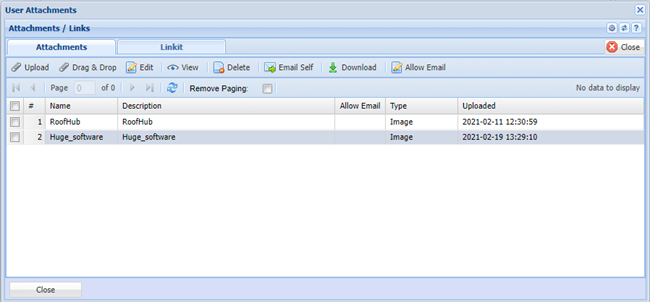
Note: When you upload a file, the accounting package takes a copy of the file and puts this into an accounting package file called Uploads.
We also change the file name for security reasons.
Once the file has being uploaded it will appear under the Attachment type with the Date and time it was captured along with the capturer, Your attachment name and the file name.
To view the attachment, you highlight the file you wish to view and click on View Attachments button.
This will download and open the file up in your browser and specific program it was saved in.
To remove attachments from the list, highlight the file in the list and click on the delete button.
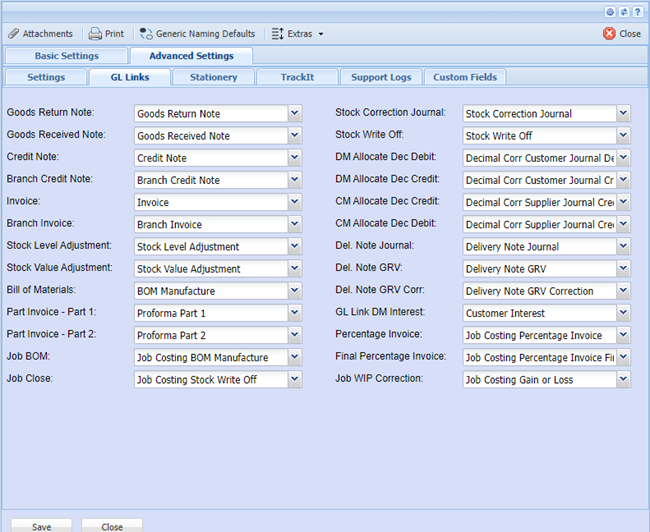
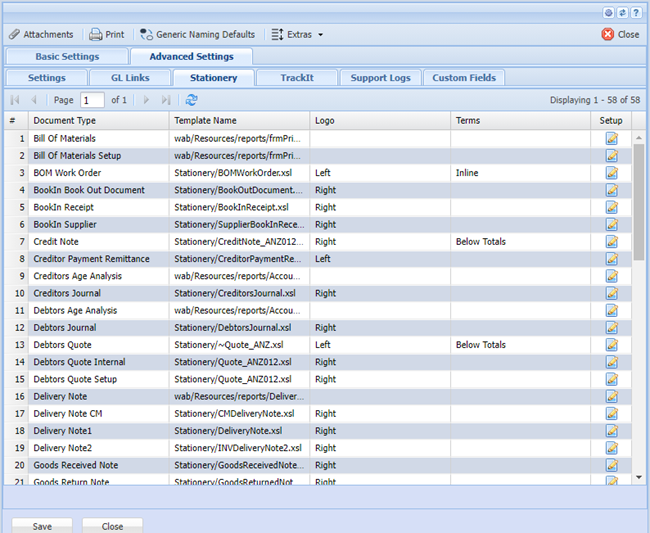
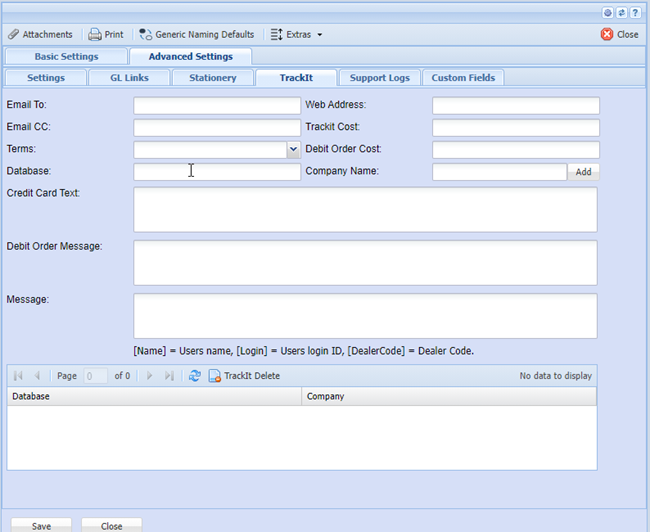
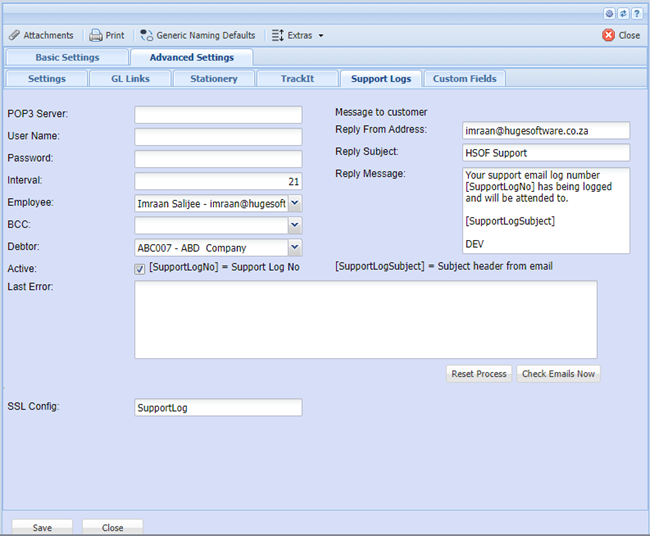
Advanced Settings
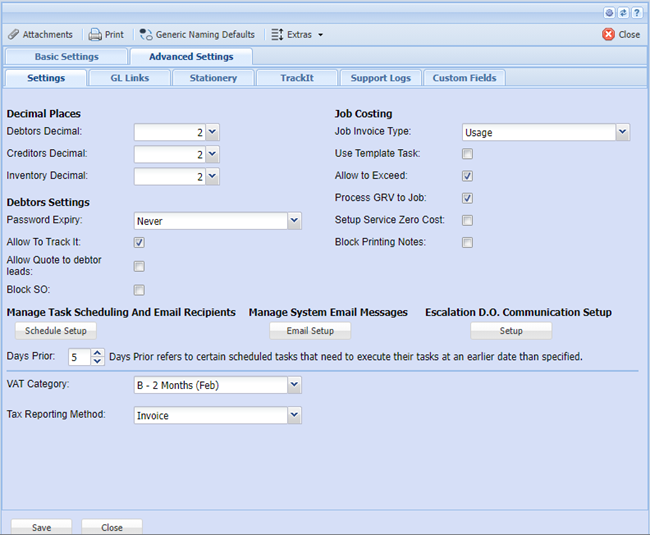
GL Links
Stationery
TrackIt
Support Logs
Custom Fields Tab
Under the Custom Fields tab, this is where you can insert predefined user fields. Add as many custom fields as you require for additional information.

Decimals Tab
Decimal Places - You can set your decimal places to read up to 9 digits long.
Note: When you Process anything into your books the system will retain the original decimal places you specified.
Decimal Places – affects General Ledger, Debtors and Job costing Modules
CM Decimal Places - Affects the Creditors Module only
IM Decimal Places - Affects the Inventory Module only
Restore Button under the Extras tab
This button is used whenever you need to restore your company backups. When restoring under the Backups menu item, it will ask you for the password. This password is also required should you need to download a backup off-site.
Note: For security reasons this password is only valid once and does not remain in memory.
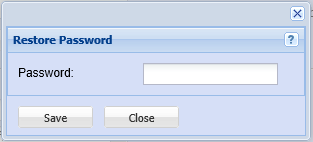
To setup your temporary password click on the Restore Password Button
Type in your password and click on Save and then on close
Decimal Places
The package processes 9 decimal places by default into the database. Viewing of decimal places is set under the System Configuration Administration Company Profiles.
There are 3 settings for decimal places within the system.
1.Decimal Places – This will set the viewing of the decimal place for the following modules
a.General Ledger
b.Debtors
c.Job Costing
1.CM Decimal Places – This will set the viewing of the decimal place only for the Creditors Module (CM = Creditors Module).
2.IM Decimal Places – This will set the viewing of the decimal place only for the Inventory Module (IM = Inventory Module).
The viewing of decimal places is rounded up. Example 50.855 – if the decimal ends with a 5 and you are viewing 2 decimals then the figure will be 50.86.
The package balances up to 9 decimal places accurate, which means should your trial balance seem out of balance, change your decimal places to view more decimals and rerun the report.
NOTE:
When changing decimal places you will have to log out of the system and then log back in for the decimals to take affect.
Reset Company
WARNING: Do not use this button unless you want all your data reset to zero. This is used when you have multiple companies to setup which use the same master information as your current company.
Basically you will back up the company, set up a new company and restore the backup. Then click on this button to reset
The following menu will come up, tick the necessary Modules to reset and click on Continue button. The system will asks whether you are sure before you proceed. Once this has being done only a backup will help restore your data.
Ensure you have a backup before proceeding.