Advanced Stock Item Add
GeneralAdding Detailsan Tabitem
OnceTo youcreate havea addednew orinventory createditem, click on the basicAdd item setup, you can at any time edit the item with additional settings.button
InFill thisin manual we will cover an explanation and purposes of these setups
Stock Category
the stock category field as another means to group your stock listing
For instance, one could possibly have multiple group codes that are linked toall the samerelevant Stockinformation Category.
Thus, reports can be filtered either byon the higherinventory level (stock category) and sub sorted by the lower level being group code
Priority Levels
Priority levels allows one to categorize the stock master into various priority categoriesitem.
You couldwill forhave instanceto categorisefill in the stockcategory listtype byexample, Faststock, movingservice or custom.
| Stock |
physical items
|
| Service | labour can be
|
| Custom | works the same as Service type. You can put sub-contractors work under this. This will |
| Fixed |
this type of inventory is only used to |
ThisNote: indicatorThe catersinventory forcode limitingcan itemsbe thatchanged areat seenany on sales documents such as Quotes, Sales Orders and invoices.time.
Again, if one is in the manufacturing industry for instance, you typically will not sell raw materials or components that make up the finished product, hence you would want to hide these raw material items from sales transactions.
Also, by hiding these items you limit the search on sales documents. note you could have thousands of raw material items that go into the manufacturing process of the resultant or finished product, then hiding these items, makes searches easier and less time consuming for the user.
Sync to WebShop
This indicator caters for the selected item to be sync'd to the online WebShop platforms such as Shopify, etc
if this indicator is active, then item is sync and visible on the WebShop platform
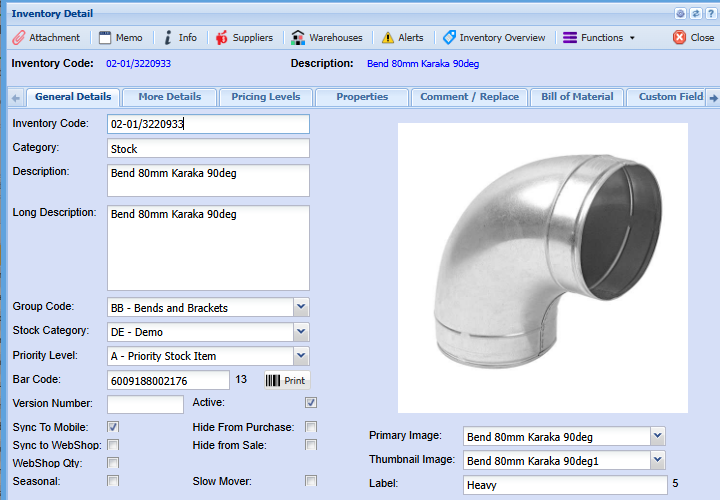
General Details Tab
In the General Details tab fill in the static information.
.png)
| Inventory Code | this is a unique code that identifies the Inventory Item. The Code field can be Alpha Numeric and over 200 Characters long. |
| Category | select the type of inventory item that is being created. There are four options, stock, service, custom and fixed asset. |
| Description | this is the name of the inventory item. The Description field can be Alfa Numeric and over 500 Characters long. |
| Long Description | this is extra information on the inventory item. You can have a very descriptive note on the item. This can be automatically copy when doing your lines in the document. |
| Primary Image | this is a drop down and only shows Images which have being uploaded as attachments. You can select a default image against the customer to show on the right-hand side. |
| Priority Level | to select priority level form the drop down arrow |
| Group Code | to select group code from the drop down arrow |
| Active | select if this item is active or not. To make an item inactive the item must have zero inventory on hand in all warehouses. |
| POS Item | tick if inventory item is a POS item |
| Internal Ref ID | Customer reference number for item |
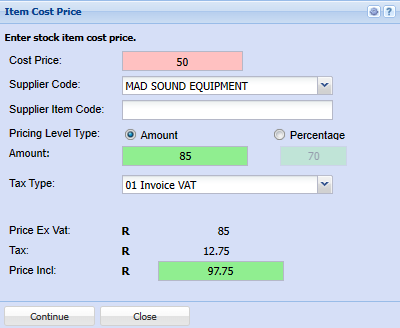
Cost Price Pop-up Screen
Enter the Item cost Price. Note if you do not enter a cost price at this stage, you will not be able to simply edit or add a cost price for a stock item later.
Select the selling price type
Enter either the mark up percentage or the selling price amount
Percentage option: if you use the percentage pricing level type, note that the selling price will auto adjust as the average cost price of the item changes.
Select the default supplier
More Details Tab
.png)
| Unit of Measurement | this indicates the unit of measure of items. Case Lots uses this for its multiplication. |
| Default Supplier | set this drop down which is populated by the supplier’s button to your most commonly used supplier. |
| Tax Type | set a default tax type for this inventory item. |
| Account Type | only used in Custom and Service type items. This account replaces the inventory account and puts costs to the ledger account set here. Do not use inventory account when setting up your custom and service items. |
| Bar Code | insert a Bar Code for the item |
| Bin | Bin Location – Put in a note of the location of your inventory |
| Weight per unit | setup your weight per unit. You can select the stationery layout with weights column which will multiple the quantity by the weight and give you the total weight per line product. |
| Default Supplier Cost | tick this if you want to default your costing methods on the supplier cost. |
| Pricing Override |
You can choose a pricing override for an item if you wish to run a special on this product. You will need to specify the start and end date of the special. The system will automatically revert back to the default pricing structure when the date of the special has come to an end. |
| Serial No Tracking | tick if item code must be serial number tracked |
Pricing Levels tab
You will have to setup a Pricing level for this item before closing. To setup a pricing level click on the Add button.
In this area, the cost price is important if it is an inventory type, if you do not put in a value of cost you will only be able to change this cost price via an Inventory Value Adjustment. This cost price is affect by your costing methods setup in System Configuration under Reference Values.
You will have to put in a Tax Type for this item before saving. In order to see the other tabs you will have to save this item.
.png)
| Cost Price | this is the cost price of the item. |
| Stock | this is grayed out because it is governed by accounting costing methods found in the setting Reference Values under System Configuration. There are two types of costing methods |
Average costing or latest costing methods. The average costing method is the most commonly used?
| Service | this cost is open and the user can put in a cost value there which will be carried across when doing invoices. Use costing in service only if you are an advanced accounting user. Instead leave the cost at zero. |
| Custom | this cost is open and the user can put in a cost value there which will be carried across when doing invoices. This cost works on latest costing method and will be updated when this custom type item is used in a Goods Received Voucher. |
In this area you can setup two ways to work out your end selling price
| Amount | put in the amount you wish to sell the product at on an exclusive basis. The system will always bring up this selling price when selling irrespective of your cost price. |
| Percentage | you can create a percentage markup from your cost price. This percentage will change the selling price dependent on your cost price. |
.png)
The difference between the two above is that should you chose Percentage this is good when a product is governed by currency rates and you do not want to lose profits.
Once you have select your pricing level you will need to select a Default pricing level for this item.
Currency Pricing
This section allows the user to setup multiple currency pricing per item
The multicurrency pricing will work as follows; you add the excluding value for the item that you want to sell at for that particular currency.
When it comes to the documents for example an invoice, when you add the item the system will check whether the customer is a dollar or multicurrency customer.
If the system sees that there is a currency pricing set up for that currency, it will use that price on the invoice.
.png)
Custom Fields tab
If configured you are able to select from drop down option
.png)
Bill of Materials tab
Activate bill of material - Please Note; only tick the Bill of Material box if this inventory item will be the result of a manufacturing process. However this item can be a contributing item (recipe item) to another Bill of Material and in itself be a Bill of Material item.
Basically, if the item is not an item that you ever manufacture, but instead purchase from a supplier, then the box should be not be ticked.
.png)
Properties Tab
ThisAdd windowthe has additional filtering and categorisation options such as Brand, Make and Model
These filters work in conjunction with each other
Refer to Brand Make Model setup
There are also 7 additional customizable fields which can be renamed to descriptionsdimensions of yourthe choiceinventory and used accordingly for purposes specific to your business.item
.png)
ReplacementComment or Replace Item Tab
The 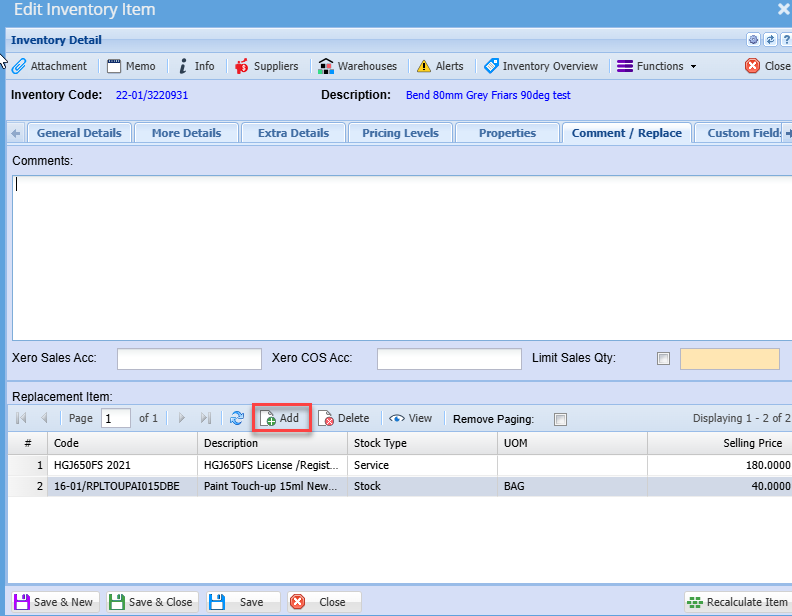
ThisReplace featuretab allows onea user to link alternate or replacementadd items to asubstitute product.on the transaction documents
ifFor therethis areto itemswork thatyou areneed similarto orset thatit serveup theunder samethis purposetab for instance in the manufacturing process, then one can link these items.first
to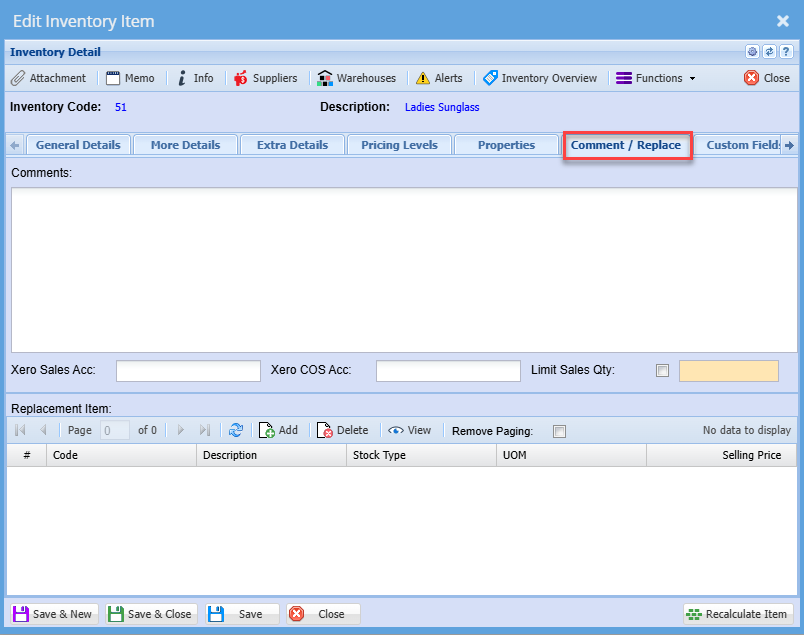
You replacementcan items,add clickall relevant comments about the Add button and search the require item(s)
Save and close
The user can also have options to activate other fields by ticking the boxesitem on the rightcomments handsection pageand Xero accounts if linked to your Xero system.
To add a replacement item click on Add
Then the screen below will pop up
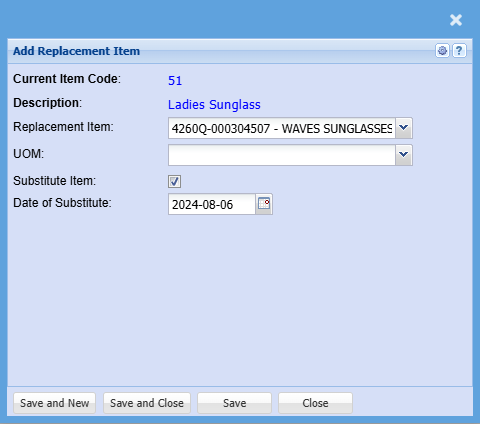
| Current Item Code | This is the main item that you need to add a substitute item for |
| Description | This will prepopulate |
| Replacement Item |
Select the item you want to add as a substitute for the main item You can add as many substitute for an item |
| UOM | Select the unit of measure if it is a unit of measure item |
| Substitute Item | Put a tick on the substitute item to make it active |
| Date of Substitute | Add a date of substitute |
To add a substitute item to a transaction click here
Spec tab
To add the specifications of the item
.png)
| Reload Spec button | to reload the spec |
| Save Spec button | to save specs |
| Preview Spec button | allows the user to preview the spec |
| Export to PDF button | to export the spec onto a PDF file |
| Show Sample button | shows the sample of the text |
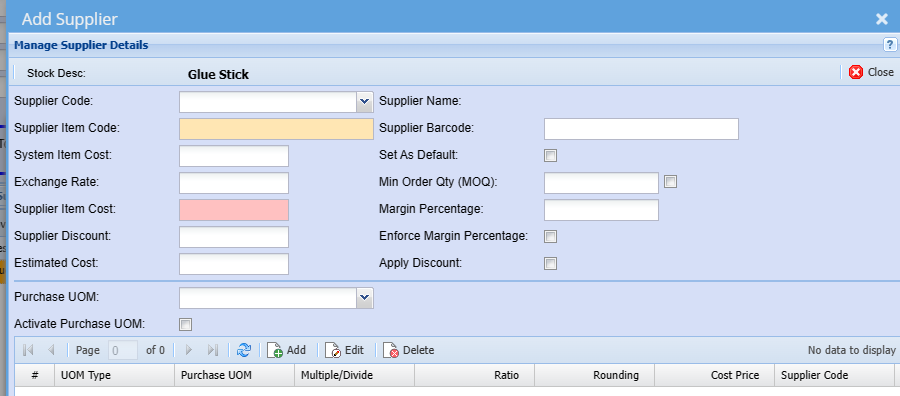
Supplier’s button
On the inventory items you will need to select the various suppliers where you purchase this item from.
.png)
In this area we cater for multiple suppliers to one inventory item. This is handy so you can see what the cost price is that you purchase this item from the various suppliers. You will also be able to see the supplier item code and when the last time any changes done to this supplier was made.
Last Updated field is changed in two ways:
| 1 | When a Goods Received Note comes in and updates the price and date |
| 2 | When the user manually changes the details. |
Note: This price has nothing to do with the cost price of the item, these prices have to do with the actual supplier price which he will give the item to you at.
To linkcreate a new supplier,supplier click on the Add button
Fill in the Supplier item code, select the unit of measure and put in the price of the item that thisyour supplier charges.will sell it to you at.
Note: Prices are exclusive.
Warehouses button
If you have the Multi warehouse Module you will be able to associate multiple warehouses to this item.items.
Shows the warehouses associated with that Inventory Item
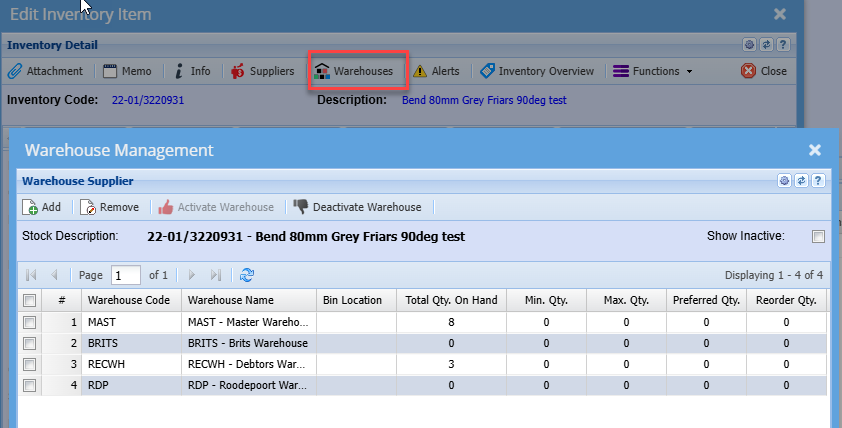
.png)
This is where warehouseswarehouse suppliers are linkedcreated and various values are managed.
The grid will display all warehouses associated with this stock item.
The columns, Bin Location, Min Qty., Max Qty., Preferred Qty. and Reorder Qty. can be edited on the grid.
| Definition of Active or Inactive Warehouse | Active or Inactive warehouse means that this warehouse which is associated with the selected stock item can be either activated or deactivated. When deactivated the warehouse will still exist for all other stock items |
| Show Inactive tick box | Placing a tick in this box will display all inactive warehouses, removing the tick will display all active warehouses associated with this stock item |
| Add button | to |
| Remove button | removes the currently selected |
| Activate Warehouse button | To activate a warehouse the system |
| Deactivate Warehouse button | To deactivate a warehouse the system checks that there is no quantity on hand or quantity in WIP for this item. |
Attachments
ThisIn this window we allow for unlimited amount of uploads of documents to be attached to the Inventory item. You can attach pictures, Excel sheets, Word Documents and any file you wish.
.png)
When you click on the Upload button Attachments Button the following will come up.
In this area we allow you to categorize your documents, name the file and then chose the file.
Once you click on the upload button it will take a copy of your file to the server. This means whenever you are in Huge ERP you will be able to view the file anywhere
.png)
Branches button
You are able to allocate an inventory code to a branch.
Click on the Functions drop down and select Branches

Double click the required branch or click once on the Branch in the left grid.
then click the Add Branch button, to move the branch to the selected grid on the right.
.png)
Should you be running multi-branch you can select the branch that these items are linked to.
When searching inventory items, the system will then look at the logged in user's branch access and only items that are associated to the users branch access will be returned.
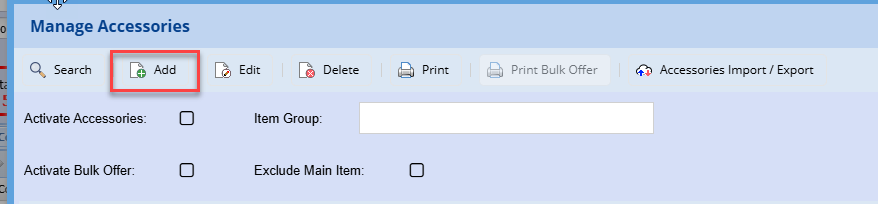
AccessoriesWarehouse button
AccessoriesShows the warehouses associated with that Inventory Item
This is awhere featurewarehouse thatsuppliers allowsare onecreated toand linkvarious multiplevalues itemsare to be sold as a bundle.managed.
The actualgrid bundlewill display all warehouses associated with this stock item.
The columns, Bin Location, Min Qty., Max Qty., Preferred Qty. and Reorder Qty. can be edited on the grid.
| Definition of Active or Inactive Warehouse | Active or Inactive warehouse means that this warehouse which is associated with the selected stock item can be
|
| Show Inactive tick box | |
| Add button | to insert a new warehouse supplier. |
| Remove button | removes the currently selected warehouse supplier. |
| Activate Warehouse button | To activate a warehouse the system check that the warehouse is |
| Deactivate Warehouse button | To deactivate a warehouse the system checks that there is no quantity on
|
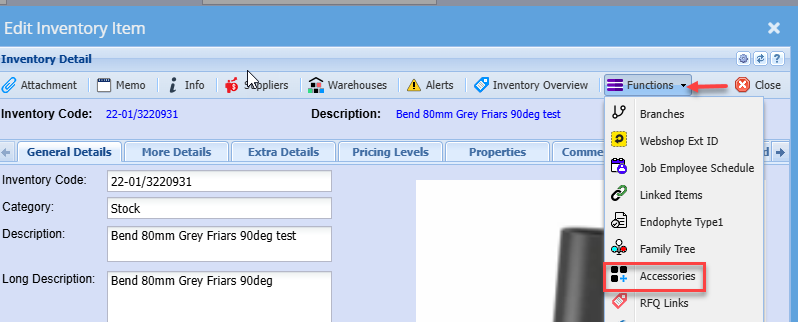

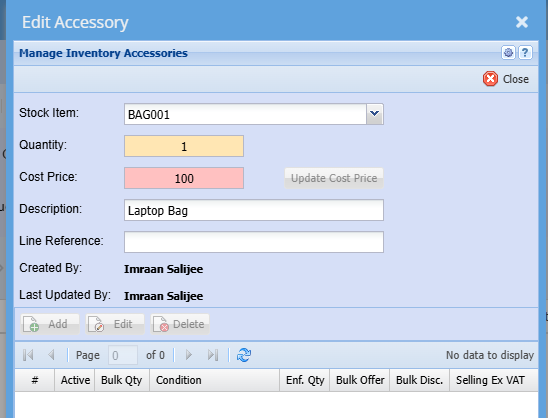
Add and enter the respective details
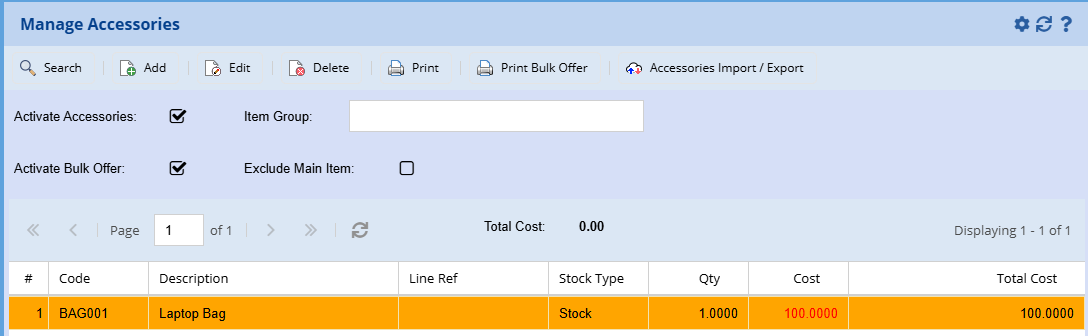
Exclude Main Item: if you wish to exclude the main item on the order or invoice