# Trouble Shooting
# Error Codes
#### Login Error Codes
|
|
|
| Error Code
| Description
|
|
|
|
| **Code1**
| Error trying to retrieve User Details.
|
| **Code2**
| Could not retrieve User Details.
|
| **Code2**
| Invalid Password entered.
|
| **Code3**
| Error trying to retrieve User ID.
|
| **Code4**
| Could not retrieve User ID.
|
| **Code5**
| Could not retrieve User Detail. User has been deleted.
|
| **Code6**
| Could not retrieve User Detail. User not active.
|
| **Code7**
| User Account has been locked.
|
| **Code9**
| User already logged in
|
| **Code10**
| Could not update User Login details.
|
| **Code11**
| Error trying to retrieve Company Details.
|
| **Code12**
| Could not retrieve Company Details.
|
Note: Close all open windows, then open one window to clear internet cache. Close browser window and reopen after clearing internet cache
See sections for MS Edge and Google Chrome
---
### Microsoft Edge Browser
Open up your browser
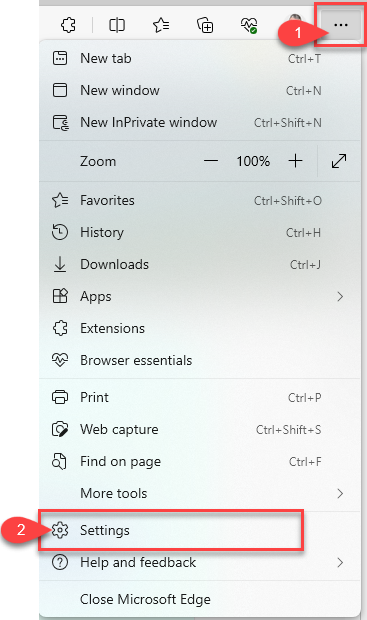
Click on the three dots to open up settings
Click on settings
[](https://hugeerp10.co.za/hsofmanual/uploads/images/gallery/2023-08/OHEimage.png)
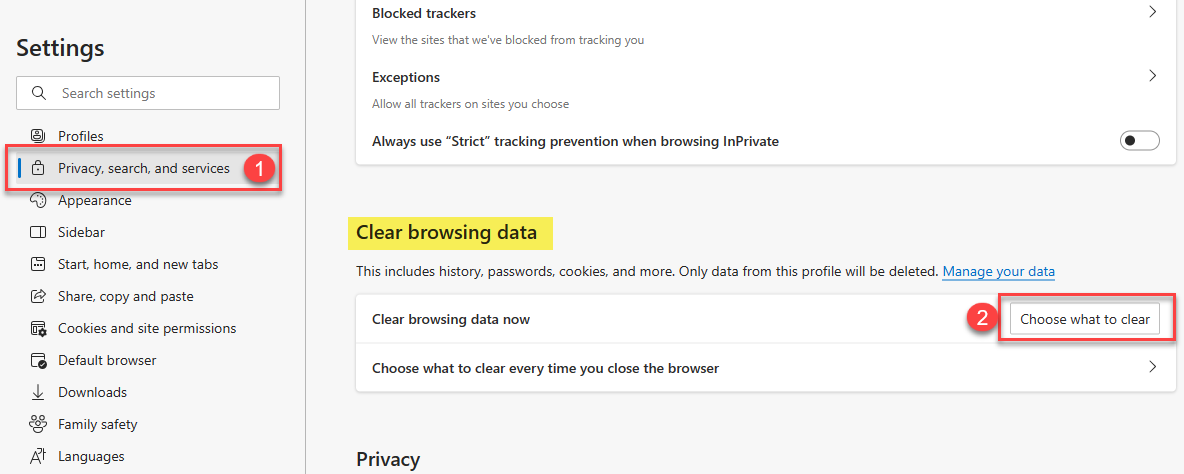
Click on privacy, search and services
Click on Choose what to clear button
[](https://hugeerp10.co.za/hsofmanual/uploads/images/gallery/2023-08/298image.png)
##### Clear internet cache
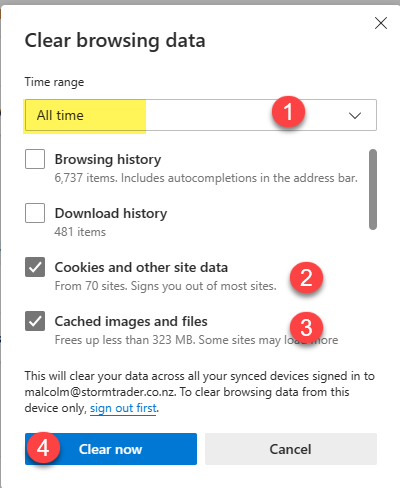
Ensure that the Time range is set to **All Time**
Ticks need to be put on for:
1. Cookies and other site data
2. Cached images and files
Optional is the browsing history and download history
Click on Clear now button
Important note: Close all browsers and log onto the system
[](https://hugeerp10.co.za/hsofmanual/uploads/images/gallery/2023-08/fgHimage.png)
---
### Google Chrome Browser
Open up your browser
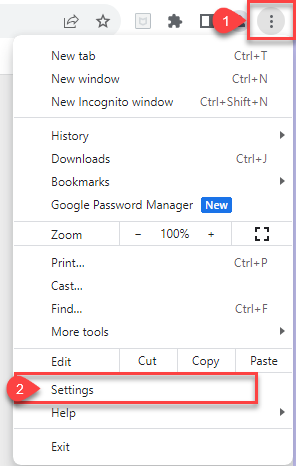
Click on the three dots to open up settings
Click on settings
[](https://hugeerp10.co.za/hsofmanual/uploads/images/gallery/2023-08/bLhimage.png)
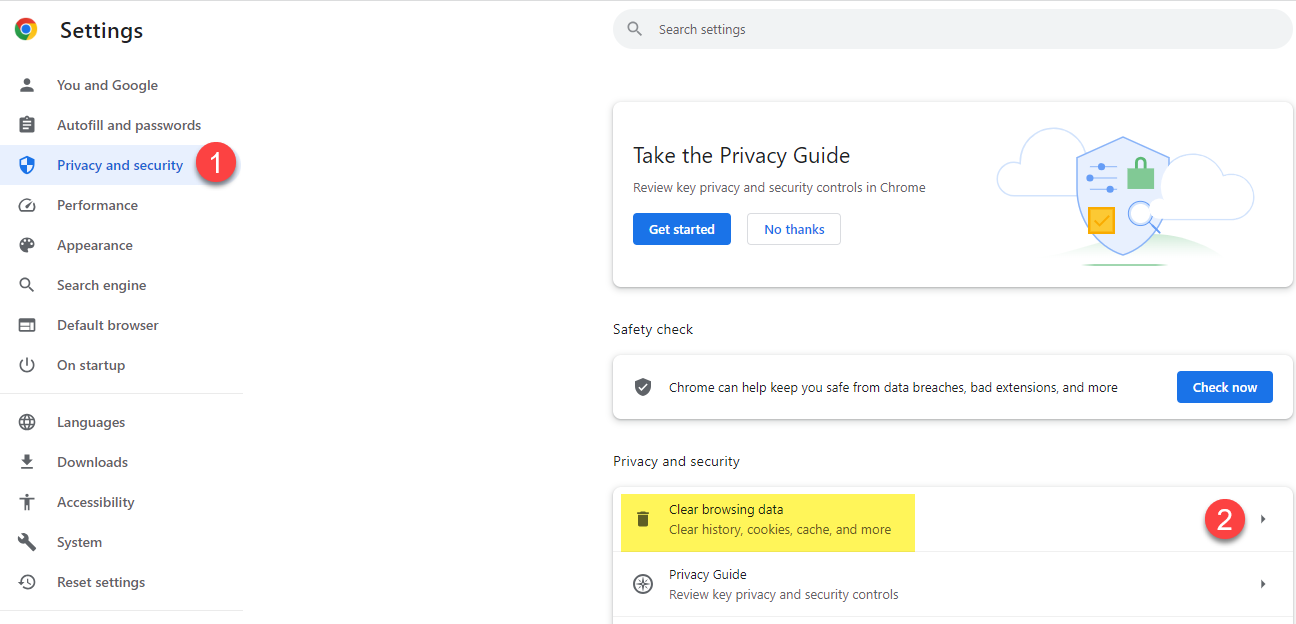
Click on Privacy and Security
Click on Clear browsing data
[](https://hugeerp10.co.za/hsofmanual/uploads/images/gallery/2023-08/BFnimage.png)
##### Clear internet cache
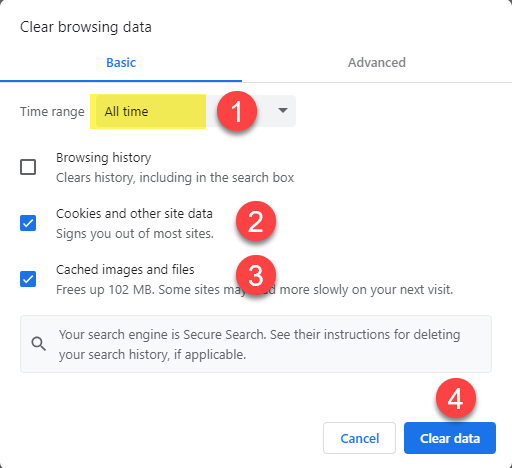
Ensure that the Time range is set to **All Time**
Ticks need to be put on for:
1. Cookies and other site data
2. Cached images and files
Optional is the browsing history and download history
Click on Clear data button
Important note: Close all browsers and log onto the system
[](https://hugeerp10.co.za/hsofmanual/uploads/images/gallery/2023-08/LQSimage.png)
# Teamviewer Download for Support
To allow the support consultants to assist you, you can go to the website to download a TeamViewer support link
### Huge Software in South Africa
[www.hugesoftware.co.za](https://www.hugesoftware.co.za/)
[](https://hugeerp10.co.za/hsofmanual/uploads/images/gallery/2026-07/Z5fimage.png)
---
### ERP Solutions in New Zealand and Australia
[www.erpsolutions.co.nz](https://www.erpsolutions.co.nz)
TeamViewer Quick Support - [https://get.teamviewer.com/hugeerpquick](https://get.teamviewer.com/hugeerpquick)
[](https://hugeerp10.co.za/hsofmanual/uploads/images/gallery/2026-07/Zngimage.png)
# Shortcut on Desktop
Right Click on your desktop, click on New and then onto Short cut.
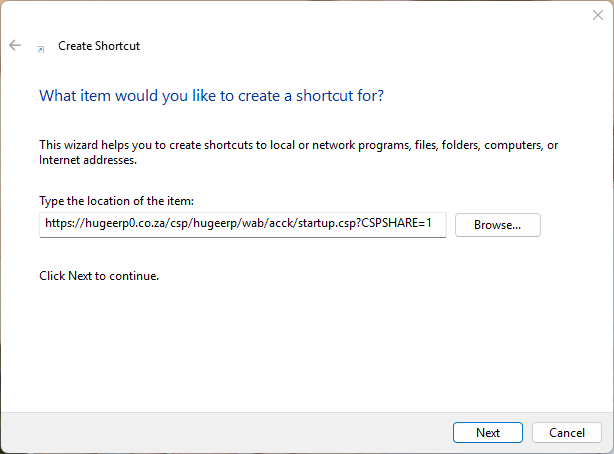
Enter the path to the Web Accounting System.
[http://servername/csp/namespace/wab/index.csp](http://servername/csp/namespace/wab/index.csp)
| servername | Path of your server either by name or IP Address (your IT person should be able to give this to you) |
| namespace | Name of the data base created on the server for the company |
Type in the address in this space
.png)
Enter the path for the server
[](https://hugeerp10.co.za/hsofmanual/uploads/images/gallery/2026-07/yZFimage.png)
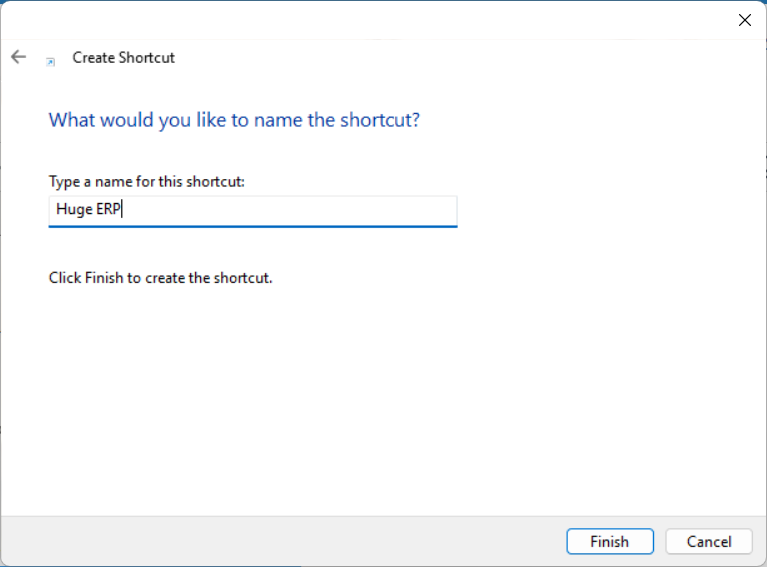
Click on next and rename the shortcut
[](https://hugeerp10.co.za/hsofmanual/uploads/images/gallery/2026-07/tMLimage.png)
[](https://hugeerp10.co.za/hsofmanual/uploads/images/gallery/2026-07/ts4image.png)
# Office 365 Email Setup
Sending out emails from Huge ERP (Webaccounting). Huge ERP (Webaccounting) is not a mail server but sends requests with the emails to an external mail.
There are many email SMTP servers out in the market. However, it causes the emails to be marked as spam. There are several setups that need to be done against the domain and other areas to try and resolve this.
One way to do this is through Office 365 exchange mail settings.
However, it means only users that have email addresses of the domain will be able to send the email. This is a good thing as it looks only at the authorised users.
Office 365 setup
You must be an administrator for office 365 to set this up.
Log into your office 365 account.
Go to the Exchange admin center
Then to mail flow and to connectors and add new
.png)
Adding a new connector
.png)
.png)
Enter the IP address of the server where Huge ERP (Webaccounting) is hosted
……0/24 with a /24 at the end
.png)
Huge ERP setup
In Huge ERP System configuration company profiles
Enter the email server
Yourdomainname-co-nz.mail.protection.outlook.com
.png)
---
##### Recommended
Further protection in Office 365 setup is to set up using the SSL email function.
What needs to be done here is to set up an email address with a username and password in Office 365.
Then allow the user to send on behalf of users.
Office 365 mailbox setup
.png)
Set up the mailbox delegation to have the users in Huge ERP (Webaccounting) be set up as the Send As and Send on Behalf etc added.
This means that when you send an email from Huge ERP (Webaccounting) it will put the send from of the user
.png)
Huge ERP setup for SSL secure
Enter the email address for the setup office 365 email
Enter the SSL Config – EMAIL (confirm with Huge ERP for this name)
.png)
# Google Gmail Setup
#### Google Gmail setup for SMTP relay
When you use your Gmail to reroute your emails through the system, you will need to white-list the IP address that our server relays
Add an IP address to your whitelist
Sign in to your Google Admin console.
Sign in using your administrator account (does not end in @gmail.com).
From the Admin console Home page, go to Apps - then G Suite - then Gmail and the advanced settings.
Tip: To see Advanced Settings, scroll to the bottom of the Gmail page.
On the left, select the top-level organization, typically your domain.
In the Spam, phishing, and malware section, scroll to the Email whitelist setting. Or, in the search field, enter email whitelist.
Enter the IP address of the sending mail servers you want to whitelist. To add more than one IP address, enter an IP range in Classless Inter-Domain Routing (CIDR) notation or separate each IP address with a comma.
Note: Be sure to enter public IP addresses, as private IP addresses are not accepted.
At the bottom of the Gmail Advanced settings page, click Save.
It can take up to 24 hours for any changes to take effect. You can track changes in the Admin audit log.
# Barcode Printing Setup
Install the driver software
[Click here](https://www.seagullscientific.com/support/downloads/drivers/godex/download)
.png)
In printing preferences for the printer use the following settings:
Changing the width and Height of the label
.png)
Label size changes
.png)
.png)
(turning the darkness up this high or at all may not be required, but the barcodes that was printing were faded until we adjusted this setting)
.png)
To print the barcode the button highlighted below is clicked. The size of the barcode and text is currently set specifically for the label and printer as set up above.
.png)
In the print dialog:
1. Select the printer
2. Select the paper size as the “Stock” defined in the printer preferences
Use default for margins and scale and set layout to portrait
.png)
# Excel Files Open
#### Export files to open as Excel files
When trying to open up files downloaded from the system, it tries to open up XML files in the browser. This does not render correctly.
This happens if this is the first time one is using the system or Microsoft upgrades or upgraded to Windows 11 and now all your defaults are back to standard.
The XML file is trying to open in MS Edge.
Methods to read file
##### Method 1
Download the file, go to Save as to your local hard drive.
Then open up Excel and then find the file to open. Open up file.
.png)
Save the file to the harddrive
.png)
---
##### Method 2
You can set your Windows to open up XML files as an Excel file in Windows apps.
Steps
Download a file from the system as per Method 1
Find the file via windows explorer
Right click on file
Go to look for another app on this PC, if you cannot find Excel as per number 1 below
Click on number 2 to Choose another app in order to find Excel
This may require some assistance from your IT department as there are various versions of Excel and they are located in different places in Windows.
Find Excel.exe
Set for default
.png)
Scroll down to Look for another app on this PC
.png)
Once you find the Excel.exe
Click on Open
.png)
After you have opened up the Excel file, close it down again
Right click on the XML file
This time you will see the Excel icon
Before you click on this, click on Choose another app
But before you click on this
Put a tick on - Always open file with this app
Then click on Excel
---
##### Method 3
Set the default for file type .xml
.png)
Once you find the Excel.exe
Click on Open
.png)
# Window Hiding
##### When a Window Opens Off-Screen
This issue usually occurs when switching from using the laptop screen only to connecting the laptop to an office monitor. A browser or application window may open outside the visible display area, making it difficult to access or move.
It commonly happens with Google Chrome and Microsoft Edge, especially after changing monitor settings or reconnecting an external display.
##### How to Bring the Window Back Into View
1. Select the affected application from the taskbar so that it is active.
2. Press **Alt + Spacebar** on your keyboard to open the window menu.
3. Select **Move**. If needed, press **M** on the keyboard to choose the Move option.
4. Use the arrow keys to bring the window back onto the visible screen.
5. Press **Enter**, or click the mouse, once the window is visible and positioned correctly.
6. Double-click the window title bar to maximise it.
##### .png)
##### If the Issue Continues
You may need to repeat these steps a few times. Once the window is displaying correctly, restart the laptop while the monitor is connected so that the application opens in the correct position the next time.
# PDF Statement Fix
#### Post status reset
Updated 2014 issue
There has been changes to statement layouts for PDF. To fix this follow the instructions below.
Log into the system and go to** System Config Module>Administration>Company Profiles **, amend the Head office company.
Click on the More Options button, select the Statement.xsl in the drop down for Statement template.
Click on Save and Close, Save on the next window. Log out of the system and back in for the changes to take effect.
.png)
# Job Manage Utility Fix
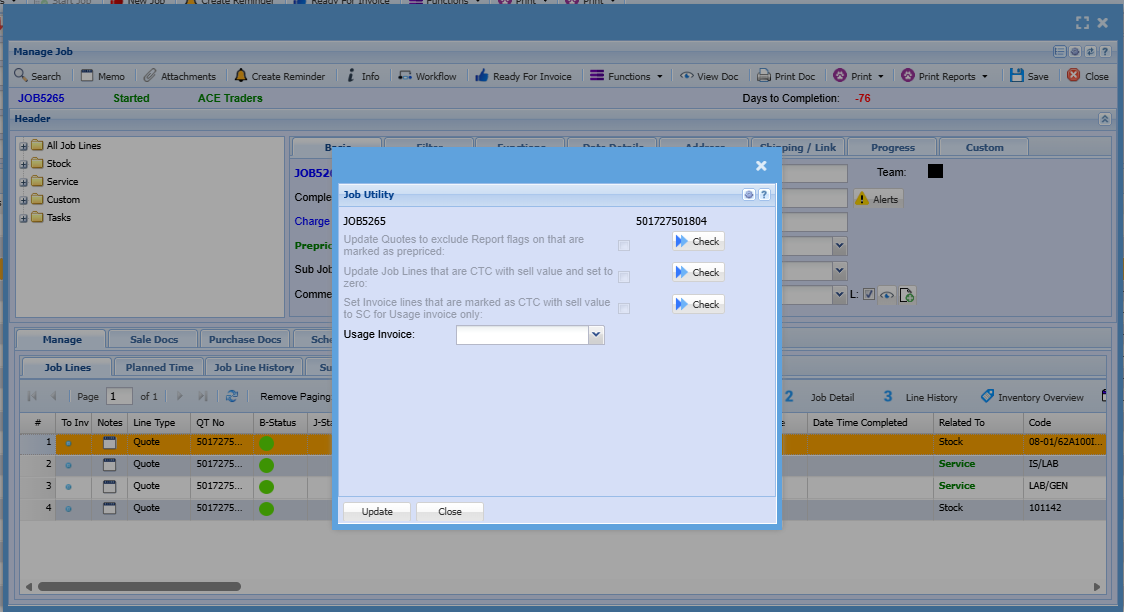
**Update quotes to exclude Reports flag on that are marked as prepriced**
This flags the quotes with the Exclude from Reports tick box
In each of the first query, you need to note the quote numbers to update
Rules
Only sub quotes with . numbers are applicable
Any quotes that have the Charge up and prepriced ticked are excluded
Any quotes that have the prepriced ticked and not the charge up tick are eligible for the query update.
Run query for each quote that means the condition
**Update Job lines that are CTC with sell value and set to zero**
This sets CTC lines that have a selling value to zero for both job lines and job history lines
The second query checks for any job lines that are marked as CTC and have a sell price in them.
If any are found, then tick the box to run the queries
There are two queries to run for the job
**Set Invoice lines that are marked as CTC with sell value to SC for Usage invoice only**
This changes usage invoice lines that are CTC which have a sell value to SC line
It also sets the SC line to display quantity based on quantity to sell
This is to ensure that the invoice displays the correct lines to match to the total of the invoice
The third query
This is specific to only usage invoices on this job
In order to active the check button, one must select an invoice to update which searches for usage invoices only linked to this job
[](https://hugeerp10.co.za/hsofmanual/uploads/images/gallery/2026-04/Qtlimage.png)
# Post Status Reset
This occurs when a transaction could not be posted for some reason:
Examples
1\. Journal is out of balance
2\. Ledger account is blocked
3\. Financial period is blocked
Log into the system and go to one of the transactions in Activity, example General Ledger Journal or Cashbook, Invoice or Credit Note, Goods Received Voucher or Stock Return, Stock Takes, Stock Value or Stock Level Adjustments.
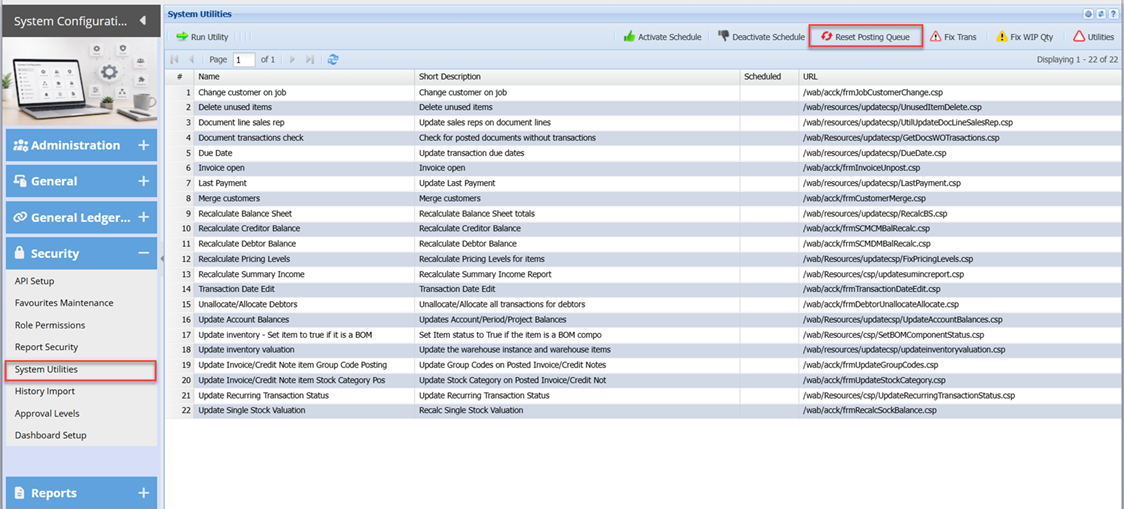
Should the post status not want to reset, there is a force reset
**System Configuration> Security> System Utilities**
[](https://hugeerp10.co.za/hsofmanual/uploads/images/gallery/2026-07/pZFimage.png)
# Own Server
#### Own Server minimum requirements
Should you decide to run your own server, here are the minimum server requirements.
####
#### Server Software
Latest is best, however Server 2019 standard upwards
We recommend Server 2025 Standard Edition x64
MS Server 2016 Std X64 (Not recommended as it will become obsolete)
MS Server 2019 Std X64
MS Server 2022 Std X64
MS Server 2025 Std X64
16 Gig RAM minimum (Anything higher is great)
300Gig of Harddrive space is best (Anything higher is great)
Could work on 100Gig of free harddrive space (not recommended)
####
#### Computer Desktop
The system can work on Desktop software, however it must be professional
Windows 11 Professional X64 is recommended.
Similar requirements as above
16Gig RAM and minimum of 100Gig free harddrive space.
Microsoft desktop version is limited for 3 to 5 user access and then it will log out users from the system at random.
This is because you are using a desktop as a server which is not recommended.