Stock
Stock Module
- Inventory Menu Group
- Inventory Enquiry
- BookIn
- Stock Count
- Stock Transfer
- Stock Take
- Stock Count - Receive Stock
- Stock Count - Invoice
- Stock weight change
- Stock Level Adjust
- Serial number scanning
- Batch Number Scanning
Inventory Menu Group
1. Inventory
2. Bookin
3. Stock Count
4. Stock Transfer
5. Stock Request
.png)
Inventory Enquiry
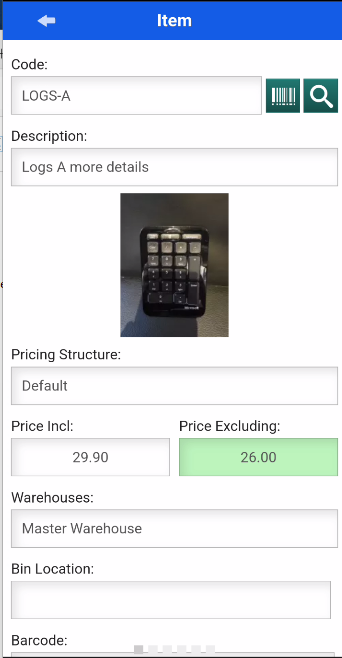
The inventory enquiry gives information about an item
Video training 202402 - Webatar_inventory_enquiry.mp4
- Price
- Location
- Brand, Make and Model
- Quantity on Hand
- Multiple pricing levels
- Stock Movement by a specific period
- Images and photos
- Item Accessories
Item Information

Taking a Photo
Taking a Photo on your device to upload to the system
Video Training 202402 - Inventory_Photo.mp4
BookIn
BookIn an item for repair
.png)
| Client | Add in your client |
| Contact | Add or Search the contact details |
| Description | Add in a description |
| Reference | Add in your reference |
| Date | the date |
| Asset | add or search your Asset item |
Stock Count
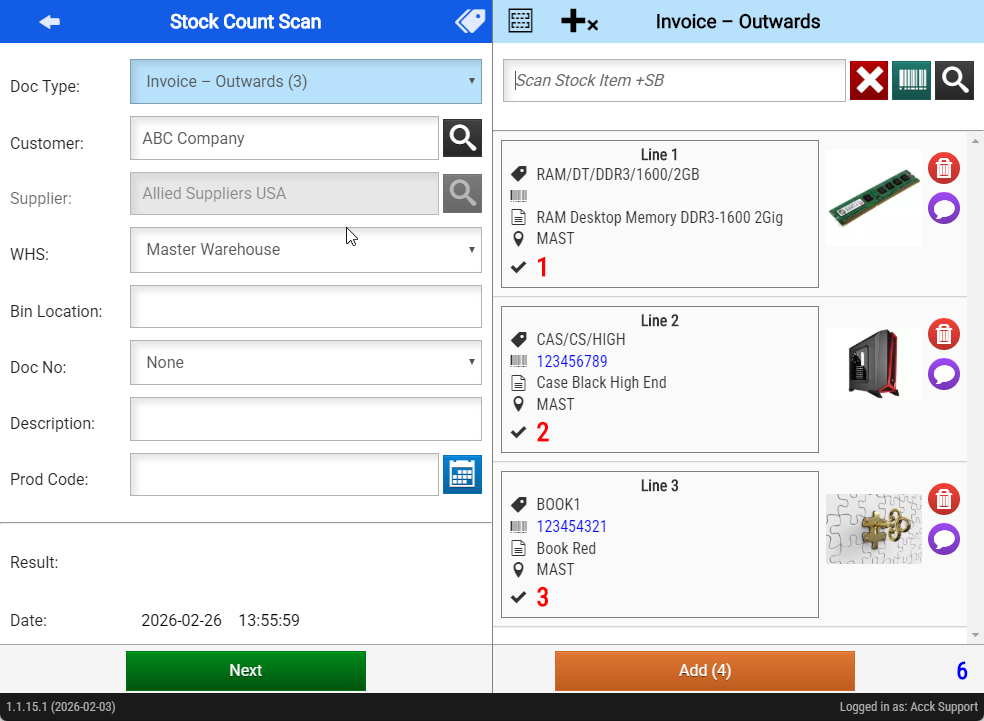
Create a stock count for stock in and stock out
Video Training 202402 - Stock_Count_InOut.mp4
Create counts for
- Stock Count
- Stock Takes
- Stock Receive - GRV incoming stock
- Stock Return - Out going stock back to supplier
- Invoice - Out going stock to a customer
- Credit Note - Incoming stock from a customer
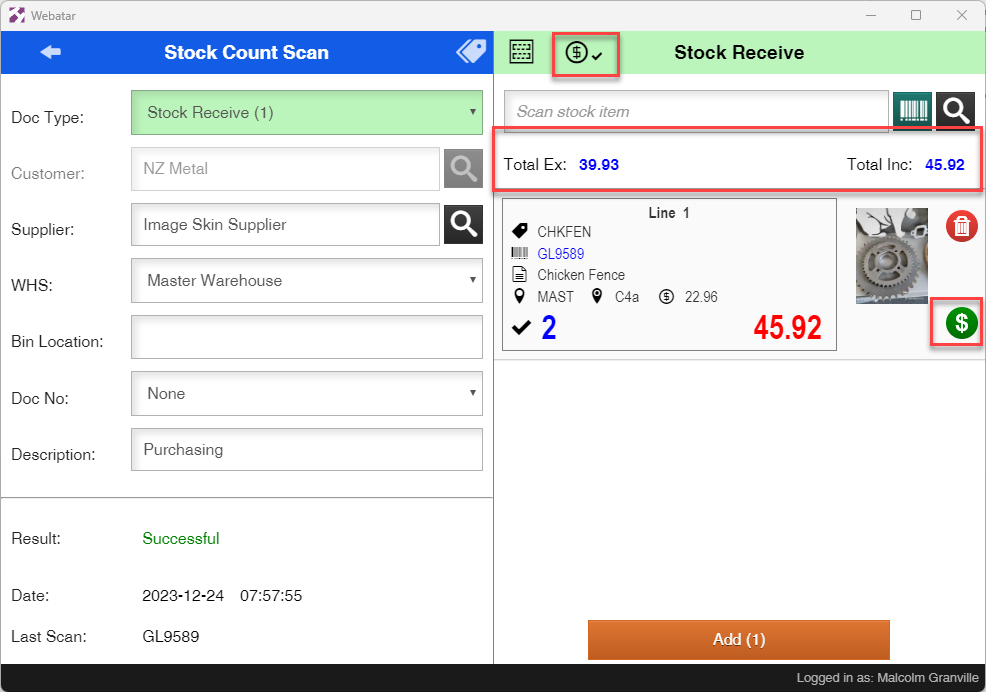
Stock count with pricing
Stock count caters for pricing for
Video training 2023/12 - Stock_Count_GRV_Pricing.mp4
- Invoice and credit note
- GRV and stock return
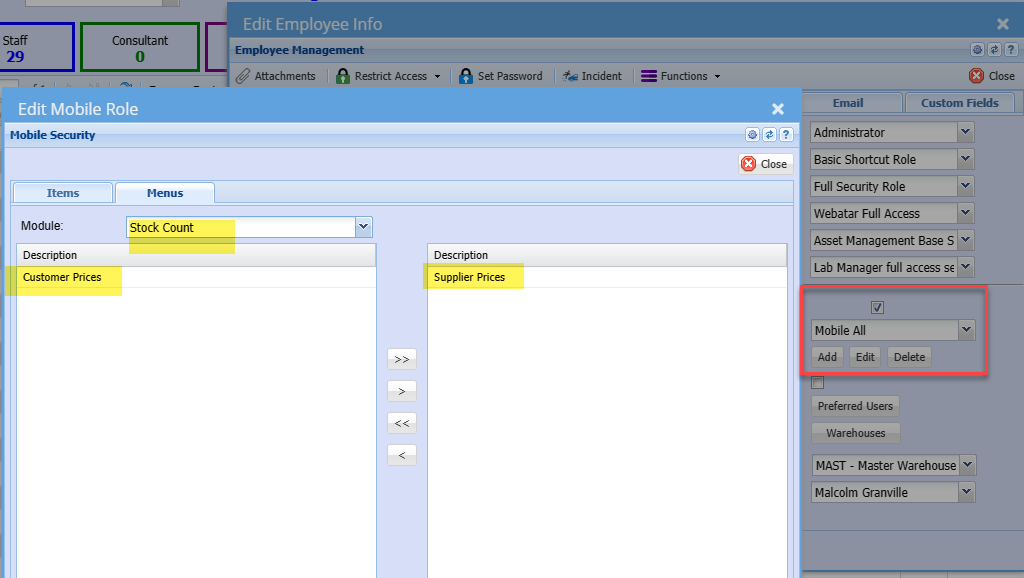
In order to see pricing, set up the security in Webatar for customer pricing and supplier cost prices
Stock Transfer
Stock Transfer (warehouse transfer)
stock can be transferred from one warehouse to another using Stock Transfer within the Webatar App
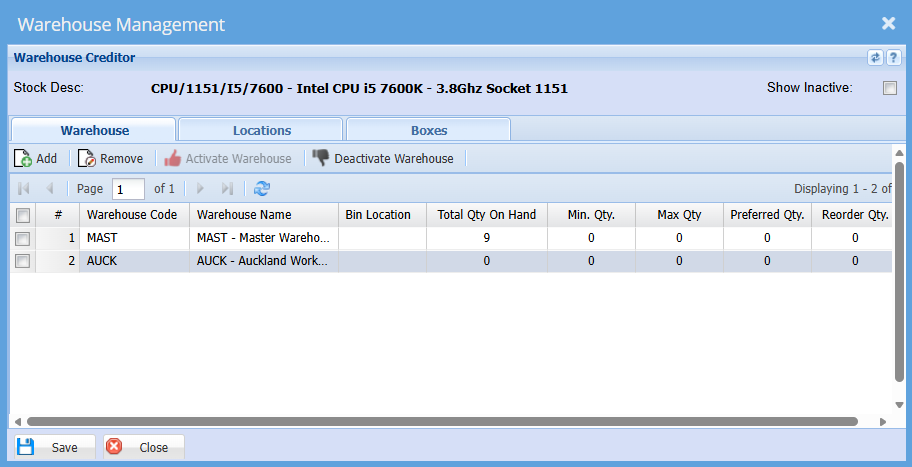
Before you can transfer a stock item from one warehouse to another, the item must be linked to both warehouses. This is completed during the item setup process.
Inventory Module > Configuration > Inventory Setup
- Double click on the item
- Click on "Warehouses" tab at the top
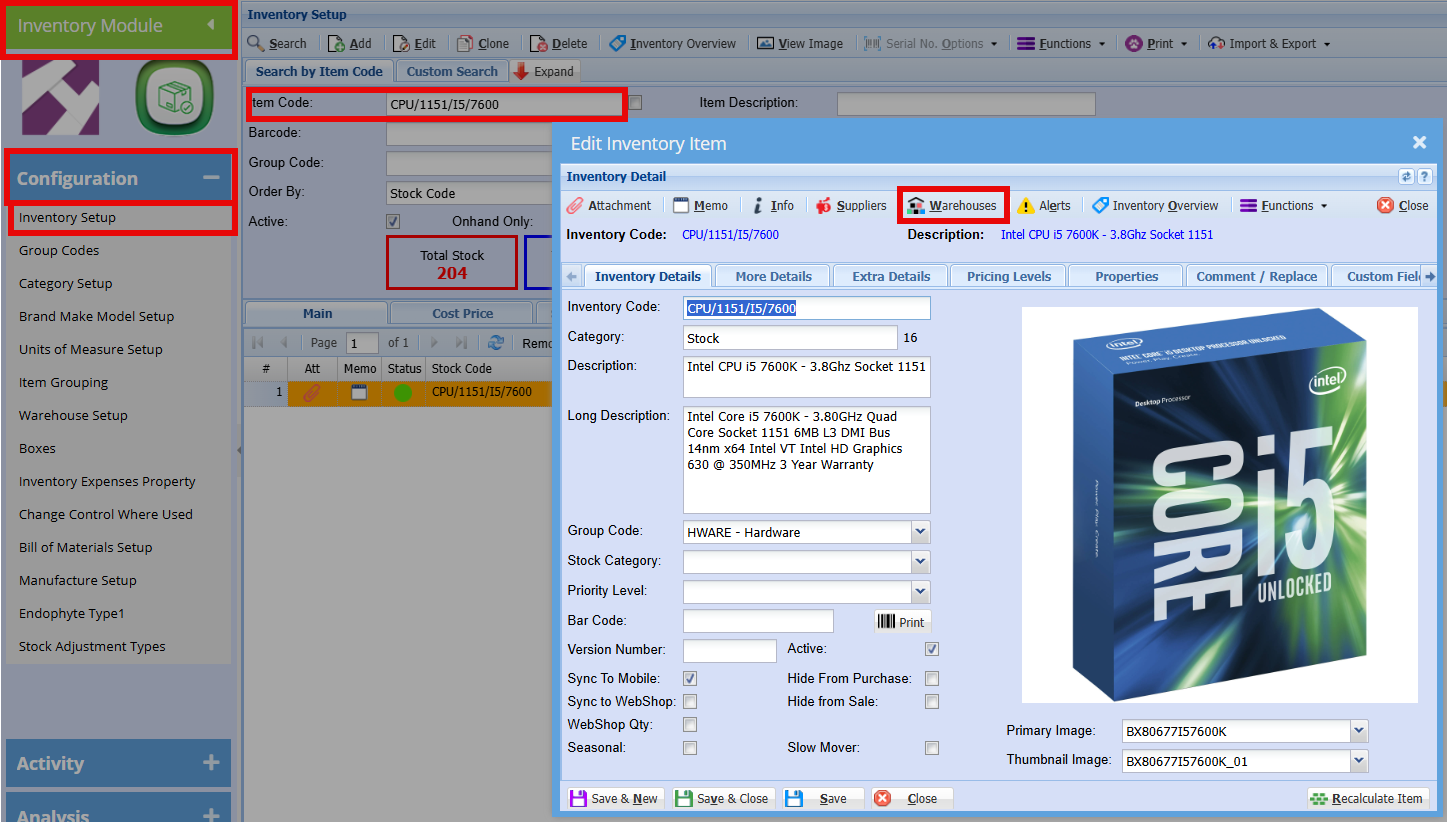
Here you can add the warehouses where this item is currently stored or could potentially be stored.
Create a Stock Transfer Document
- Tap on the + sign in the top right-hand corner.
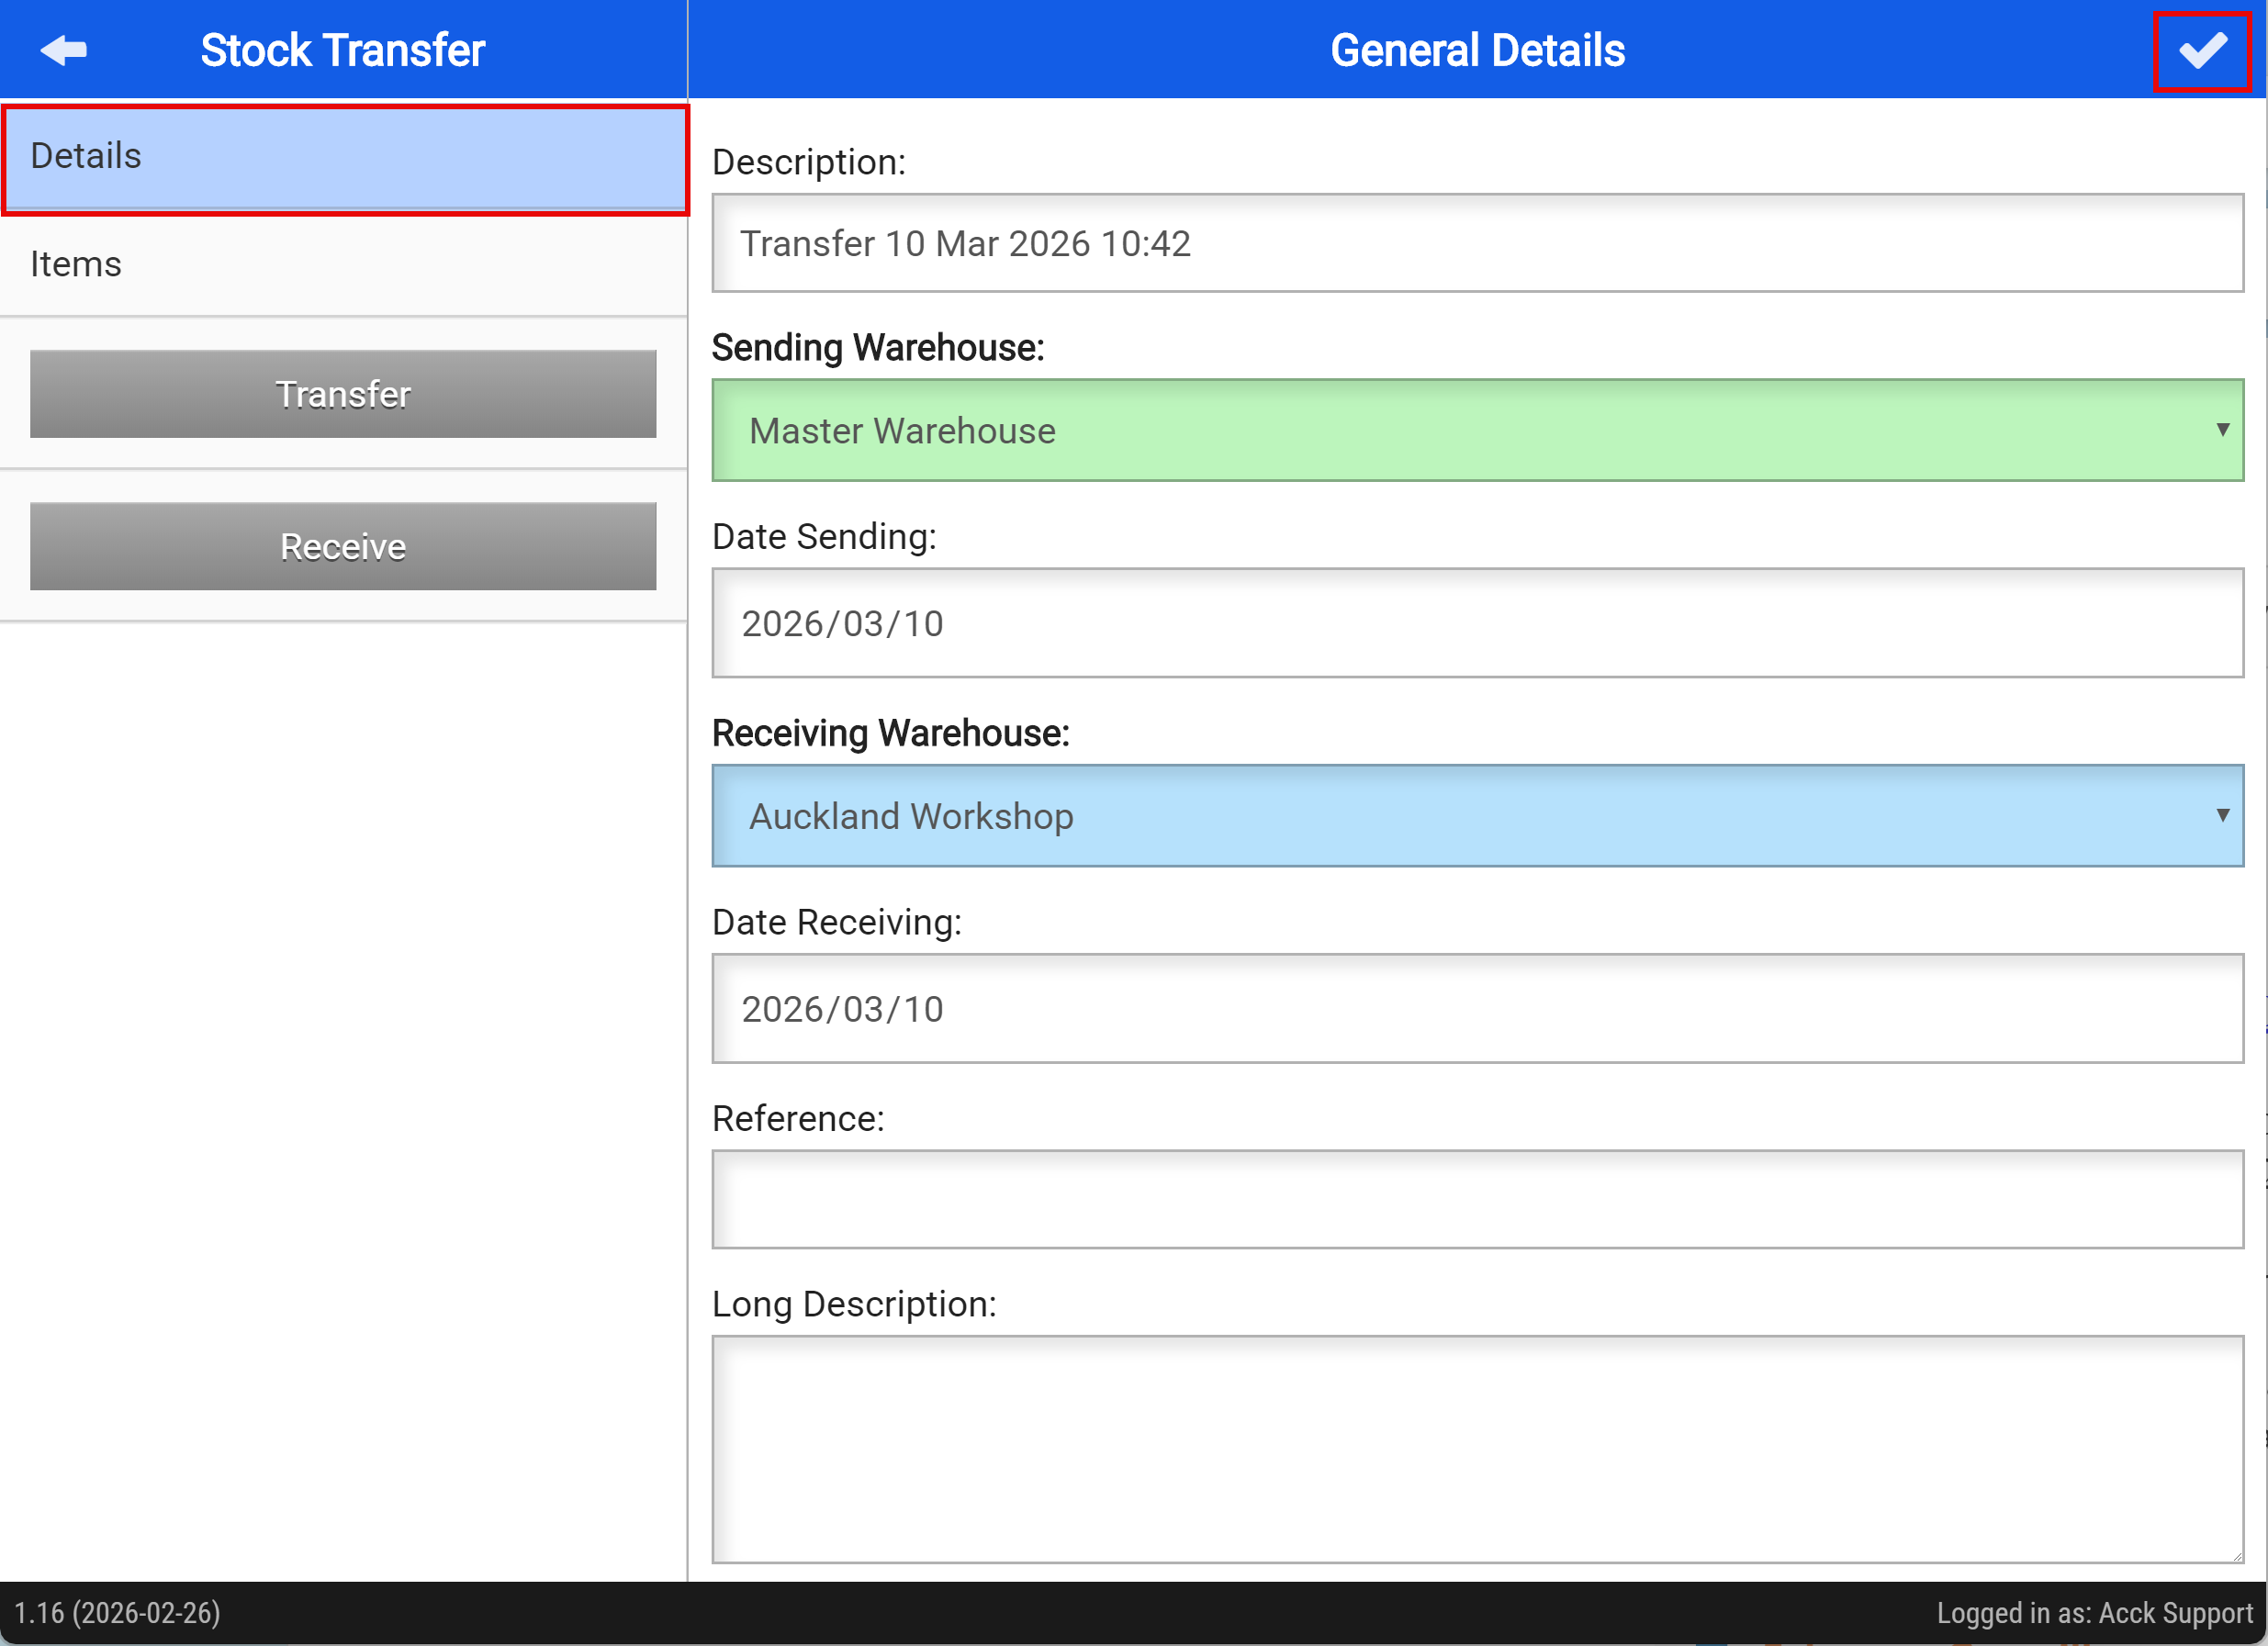
Add the Details for the Stock Transfer
- Add a description for the stock transfer
- Select the warehouse you are sending the stock from
- Choose the date for the stock transfer
- Select the warehouse that will receive the stock
- Enter a reference, if required
- Add an additional description, if needed
- Save your changes by tapping the tick button at the top right
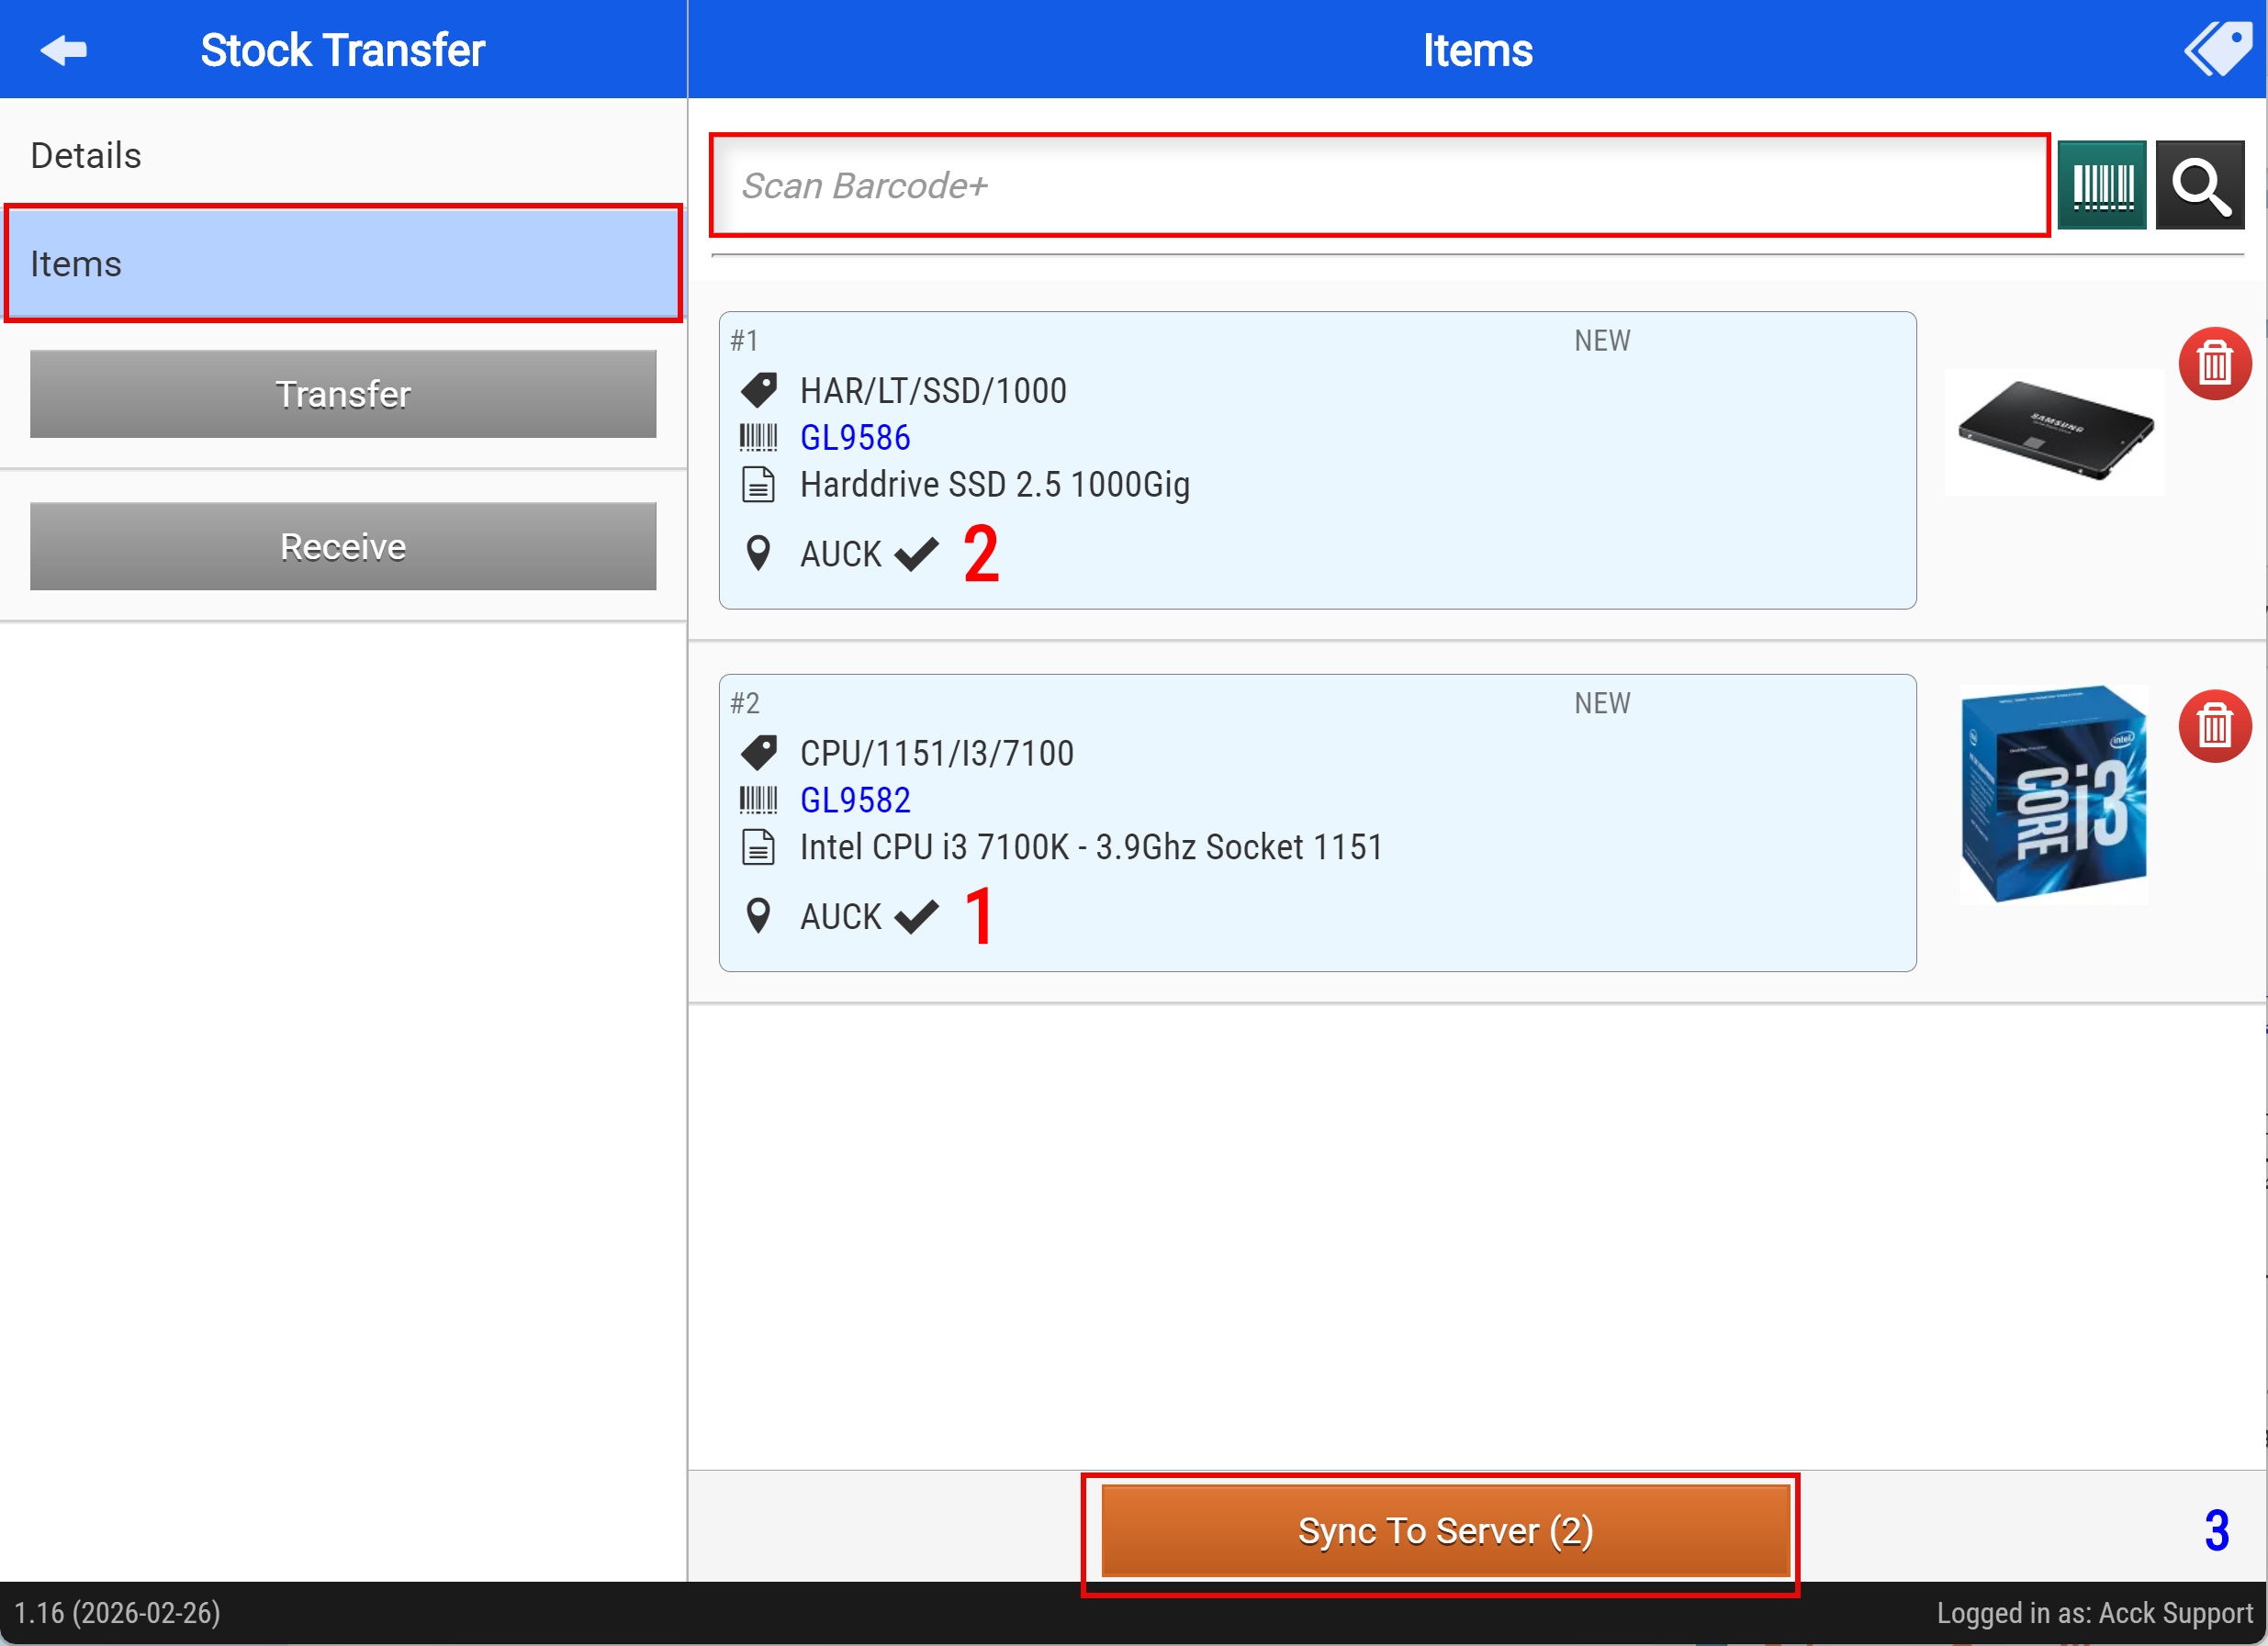
Add Items to your Stock transfer
- Click on the items tab
- Scan the items you are wanting to transfer
- Tap "Sync to Server" when you have added all the items to be transferred
Clicking "Sync to Server" will activate the "Transfer" button
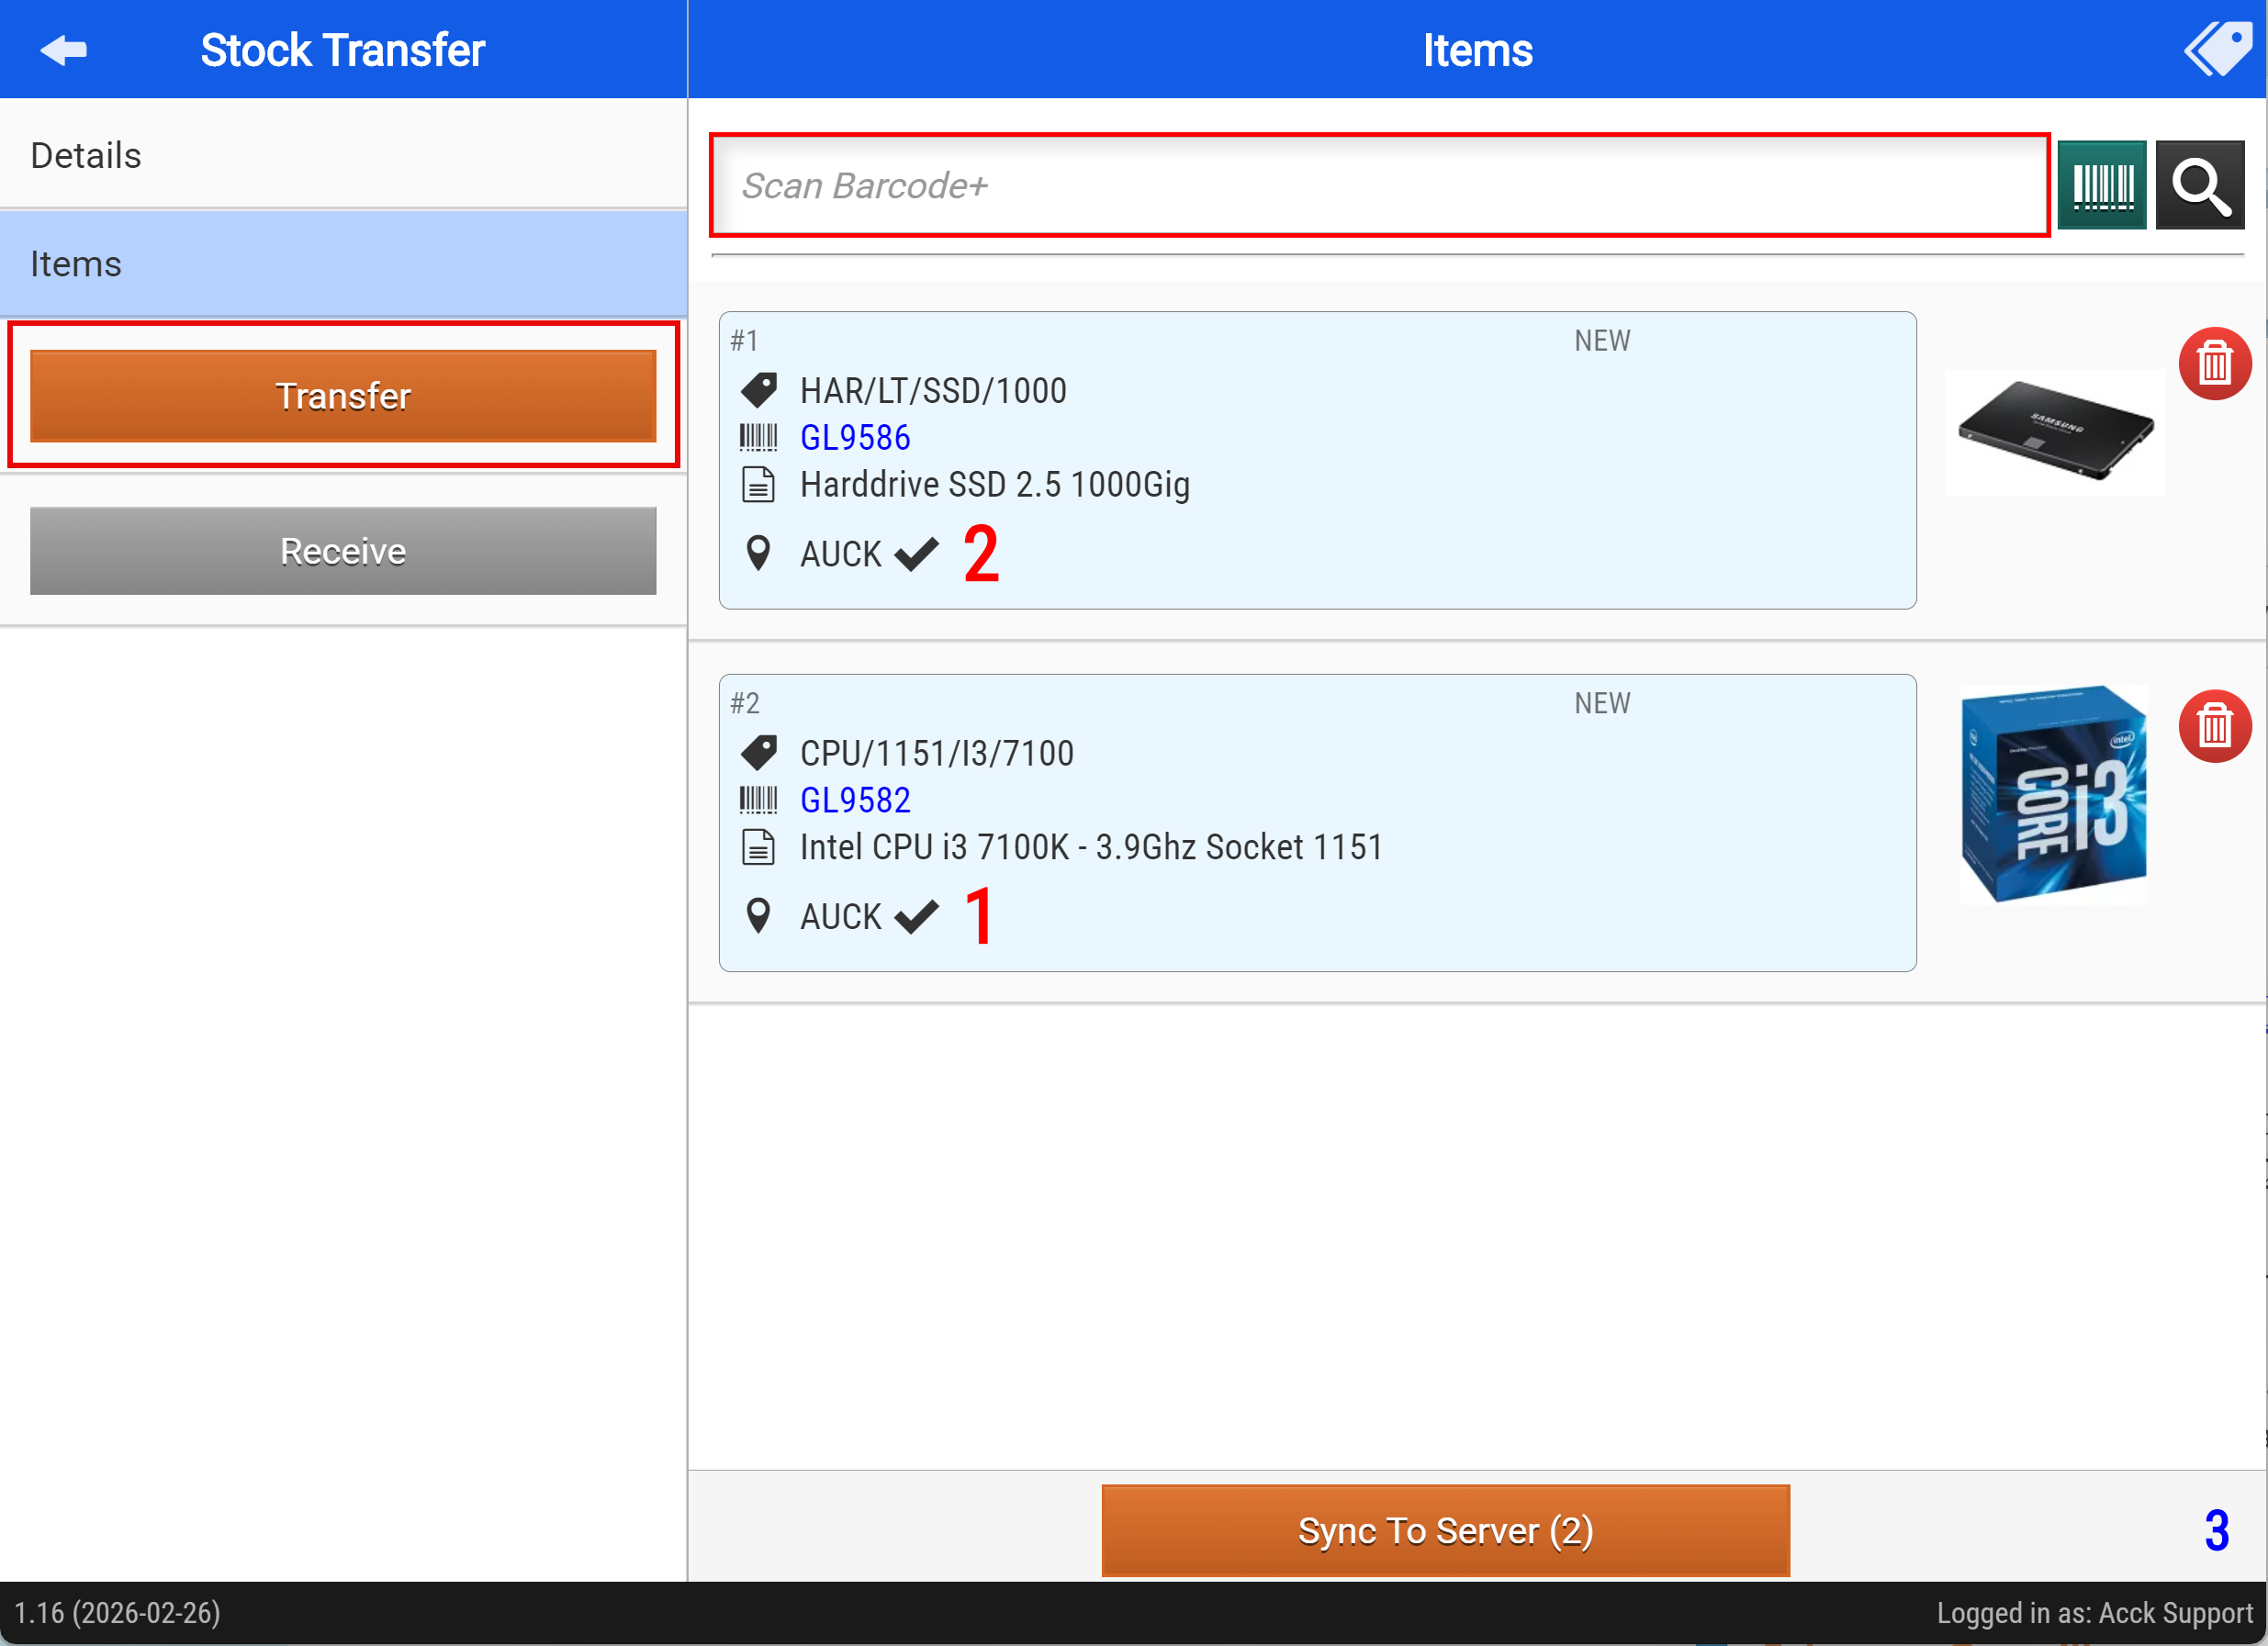
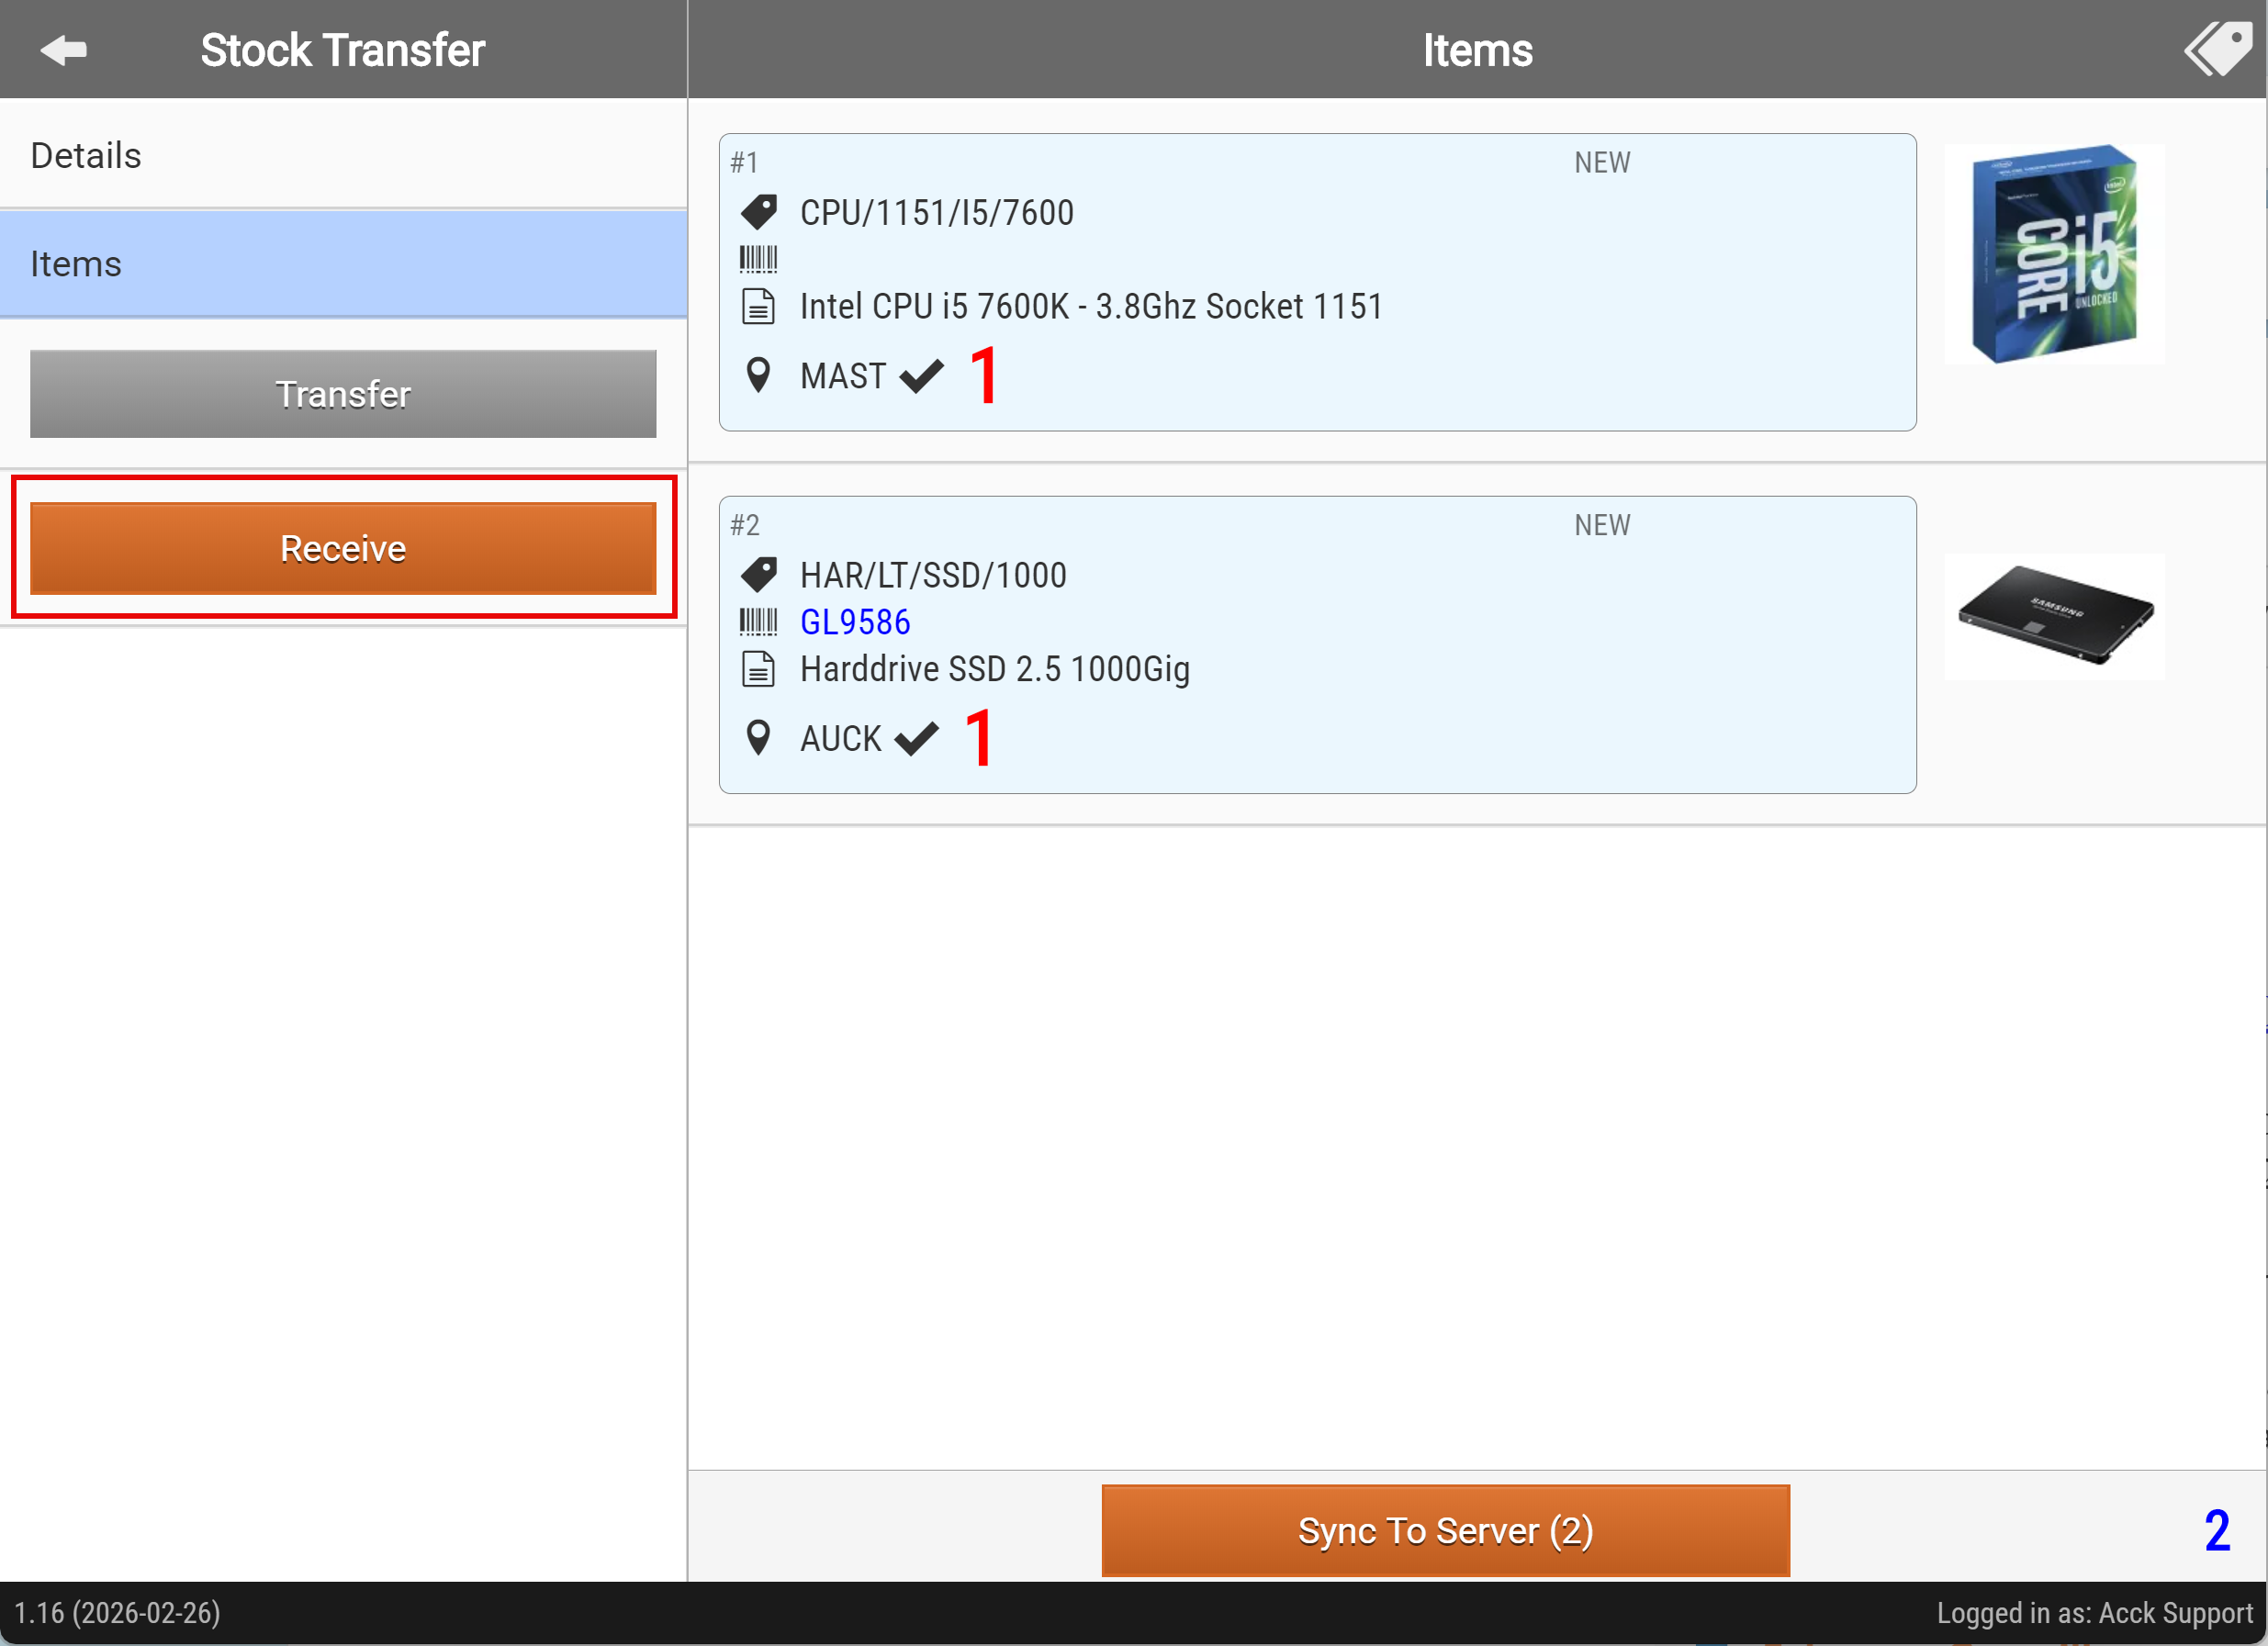
- Clicking "Transfer" will activate the "Receive" button
Once the stock arrives at the receiving warehouse, they can confirm the delivery by clicking the “Receive” button.
Stock Take
Running a Stock Take with the Webatar app
Video training manual 202311 - Stock_Take_Webatar.mp4
Some basic steps are required
- Create and activate a stock take
- Open up the Webatar app and sync
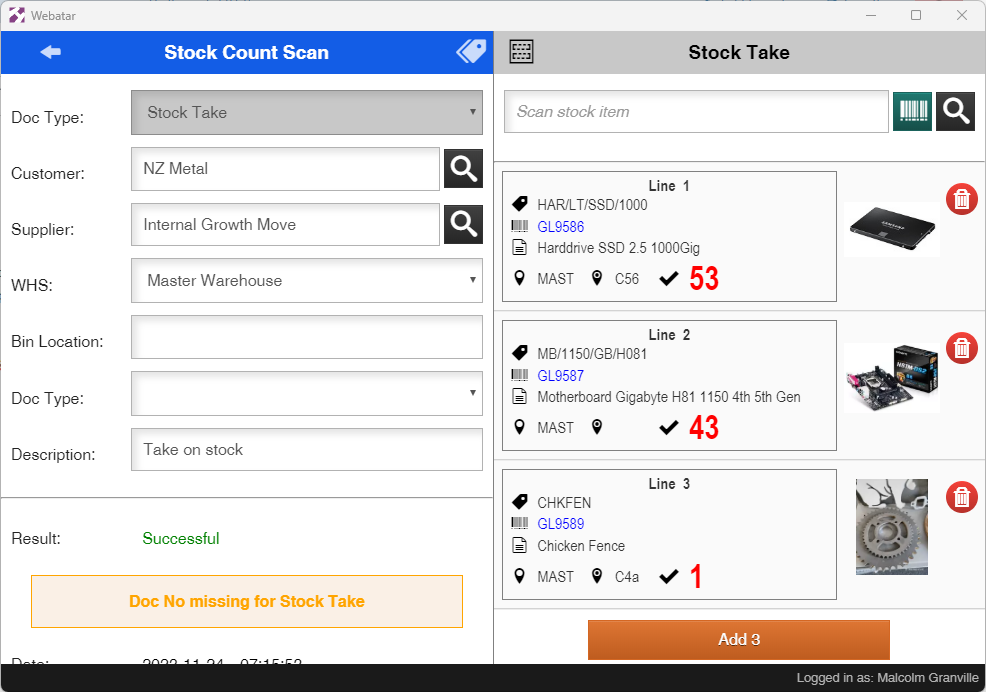
- Scan and count stock
- Complete stock take
- Close and Open the Webatar app and sync
Create and activate a stock take
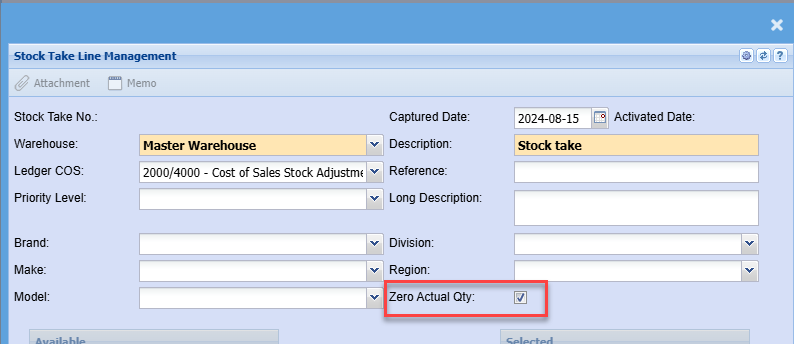
Go to main system to activate stock take
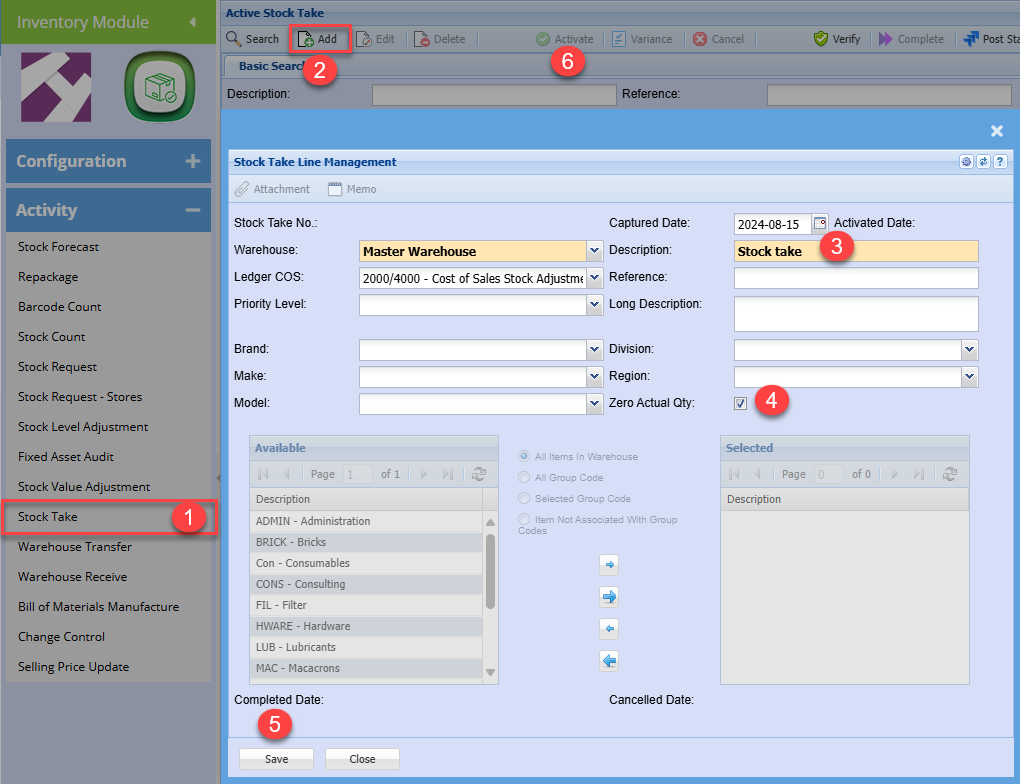
When activating the stock take in main system, it is recommended to tick the zero actual Qty.
Zero actual quantity sets all stock to zero quantity forcing one to count all stock
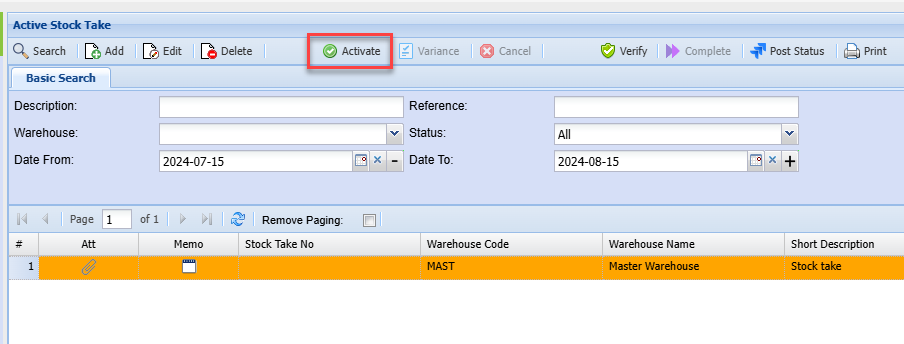
Activate the stock take
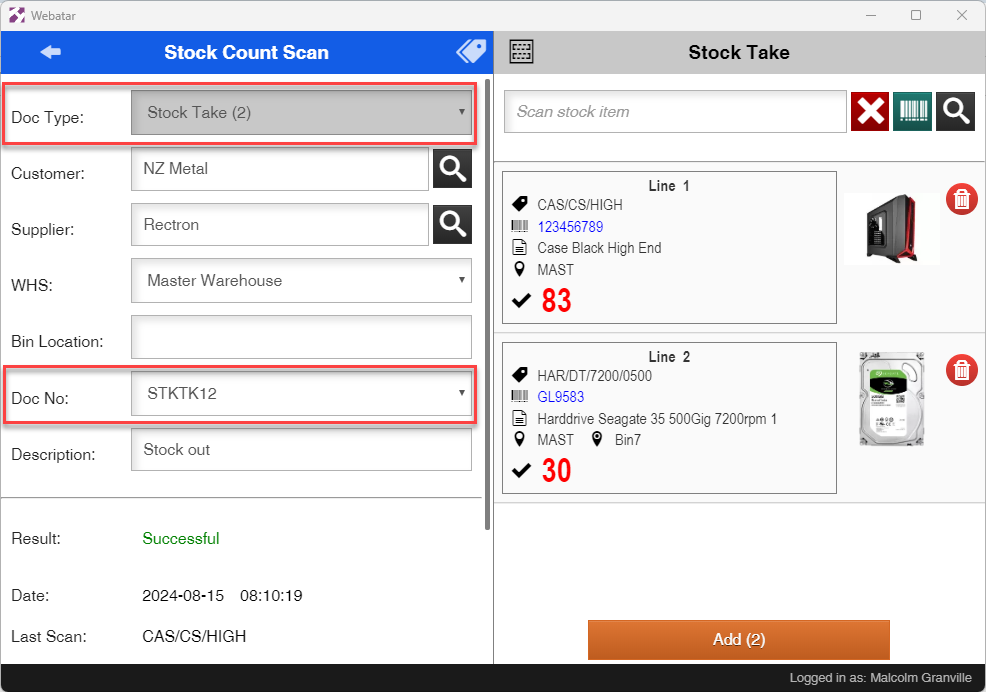
On the Webatar app, sync to server to retrieve the stock take active number
Setting a document number for stock take allows the count to update the stock take directly after sync.
stock take counts will always increment quantities on the stock take.
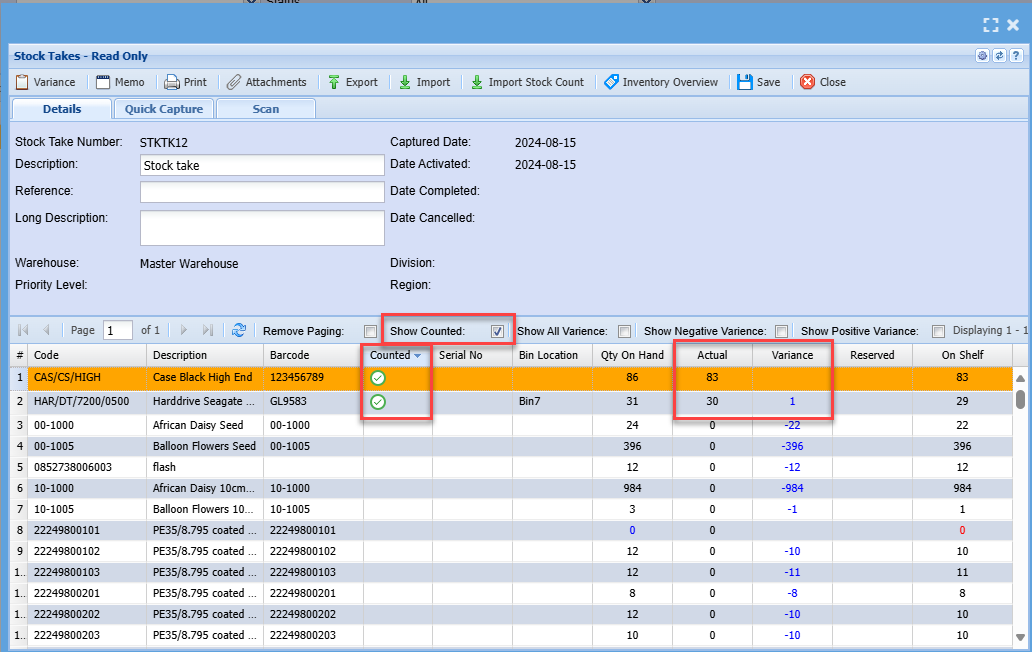
View counts in stock take
To view counts, click on show countered tick box.
By default counted items will disappear off the list.
If a count is incorrect corrected in the stock take by double clicking on the line.
Correcting a count
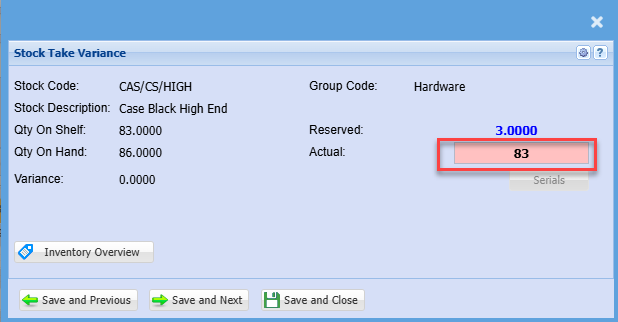
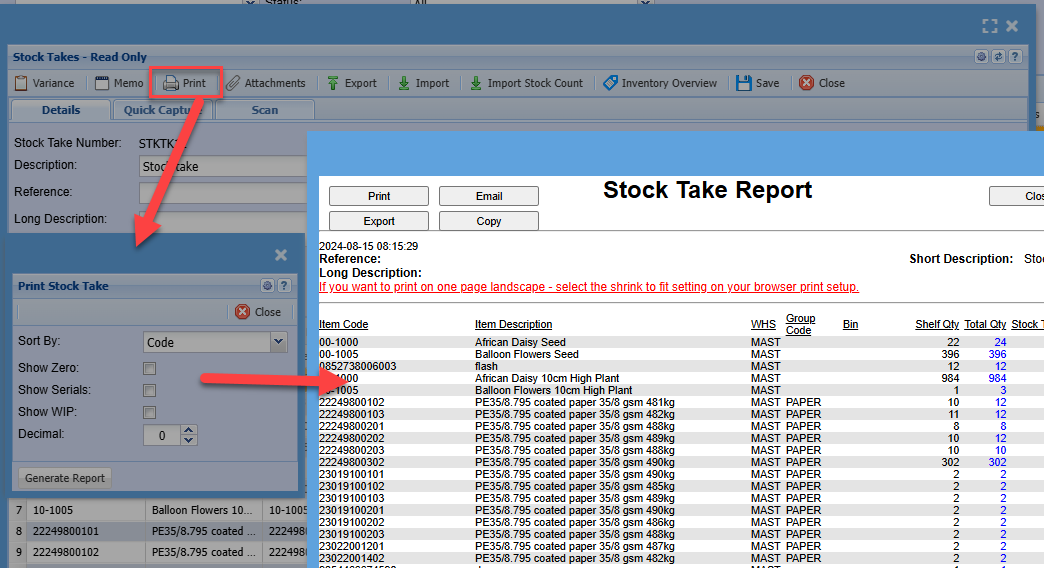
Print out the count to view what has changed
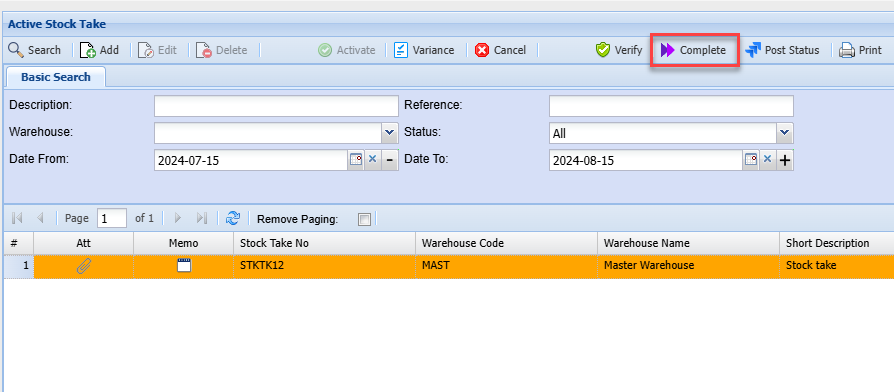
Complete the stock take by clicking on process
View all movement taken place
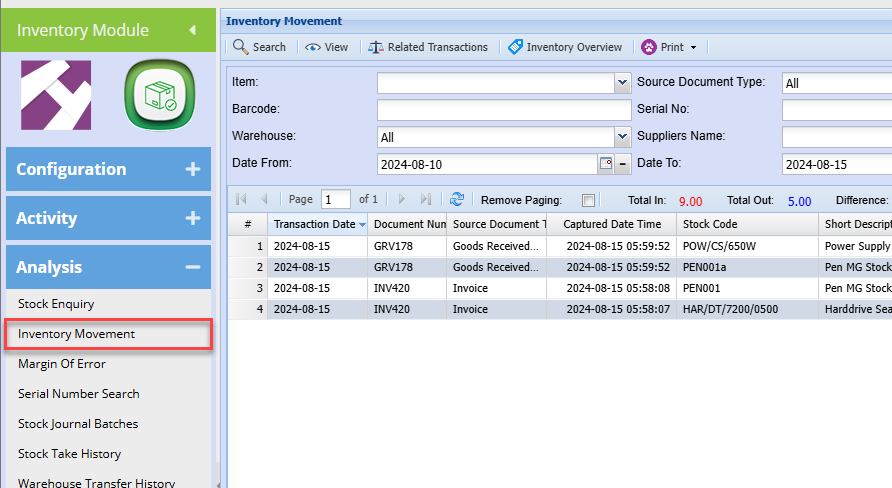
Stock Count - Receive Stock
Create a Stock Count and Receive Stock
There are two methods for Receiving stock, link to each video manual 202311 below
- Receive stock (Quantity only) - Stock_Count_Receive_Stock.mp4
- Receive stock and update prices (Quantity and price) - Stock_Count_GRV_Price.mp4
The methods above require a system change in order to run processes.
Receive stock and update prices require two steps
Process actions
| None | Logs stock count only |
| Create | Logs stock count and creates document |
| Process | Logs stock count and creates document and processes document |
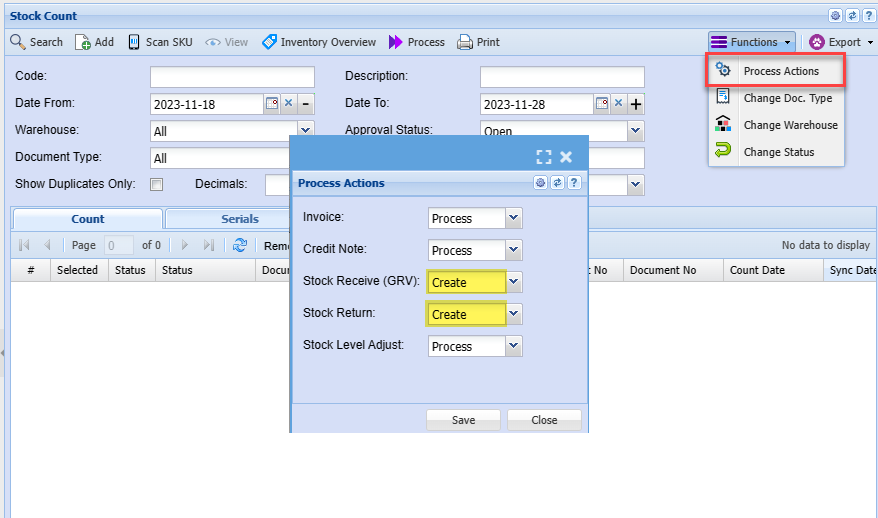
Webatar App Stock Receive

Stock Count - Invoice
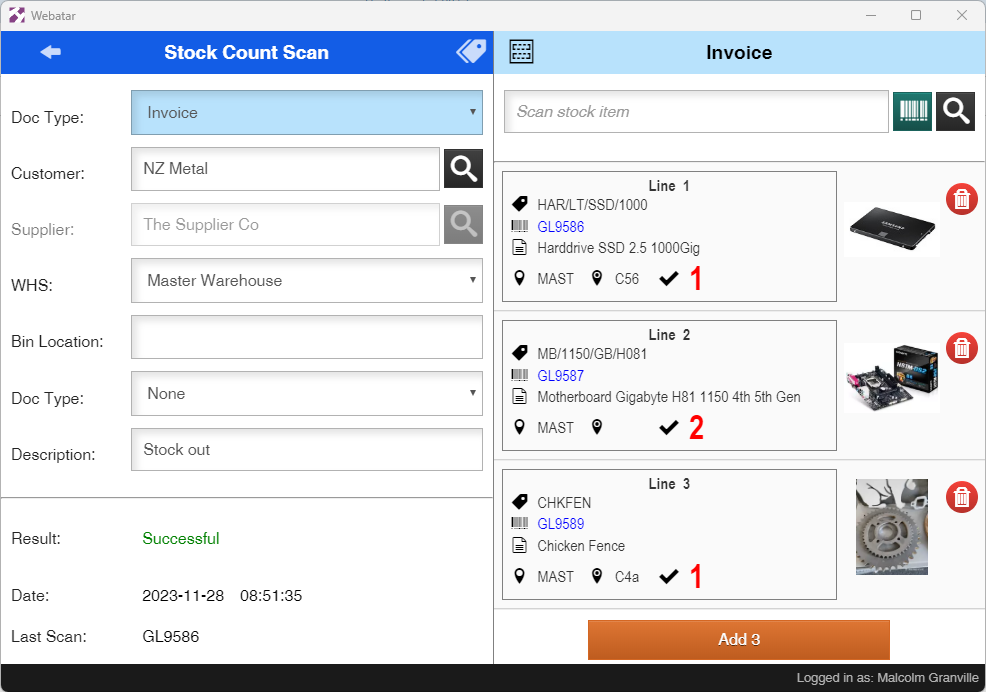
Stock Count invoice stock out
Training video - Stock_Count_Invoice_Stock.mp4
Webatar App Stock Count - Invoice
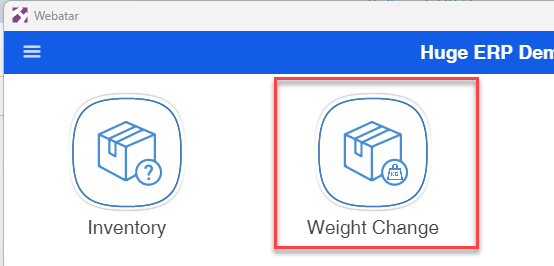
Stock weight change
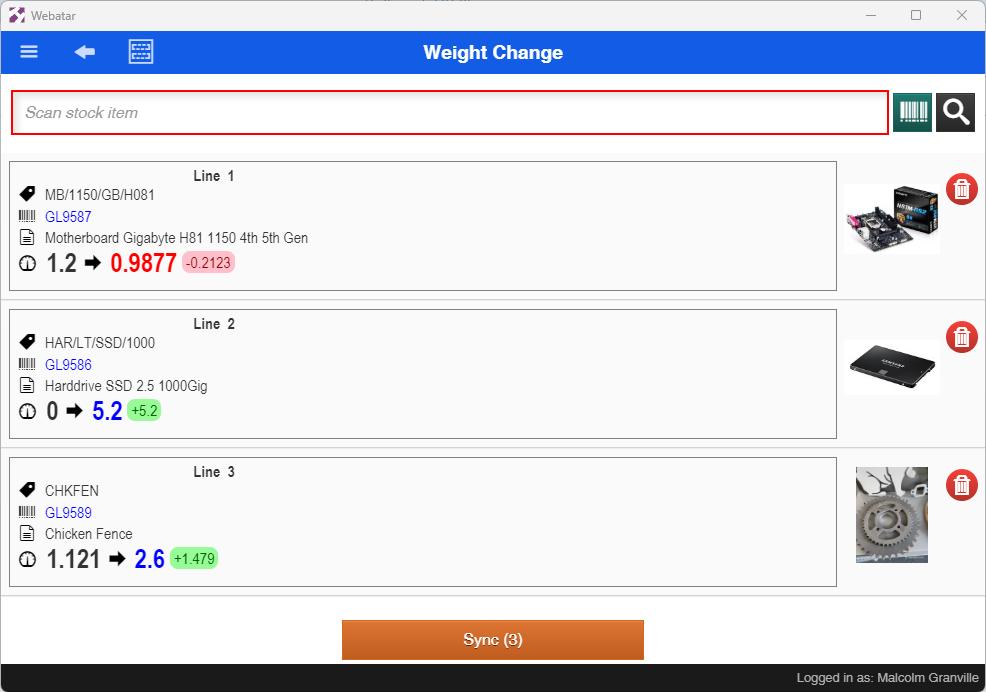
Stock Weight change app in Webatar
Scan or search for the stock item that requires changing
After the scan, the weight change option will appear.
Change your weight and click accept
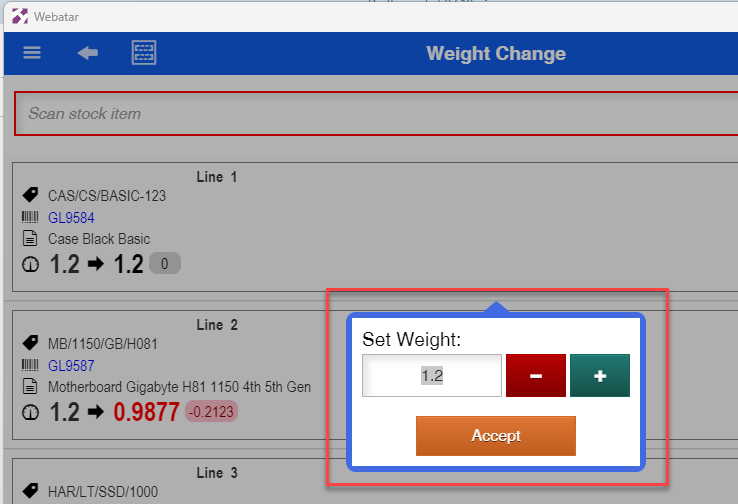
Stock items will be shown on weight change up or down from previous weight.
Security setup
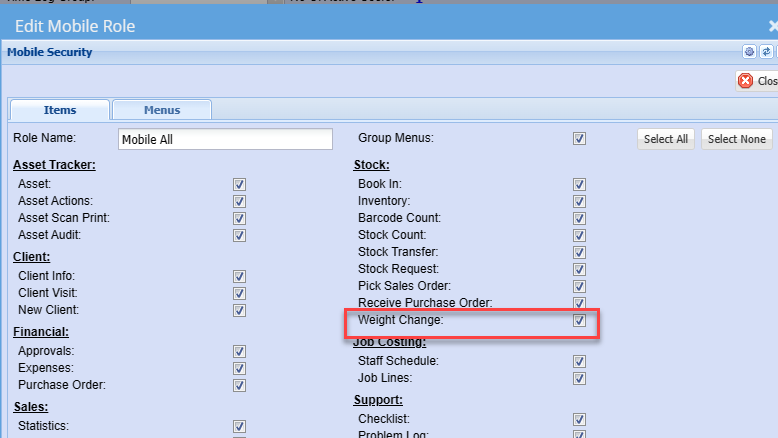
Setup the security at the user in the main system
System Configuration >General>User setup
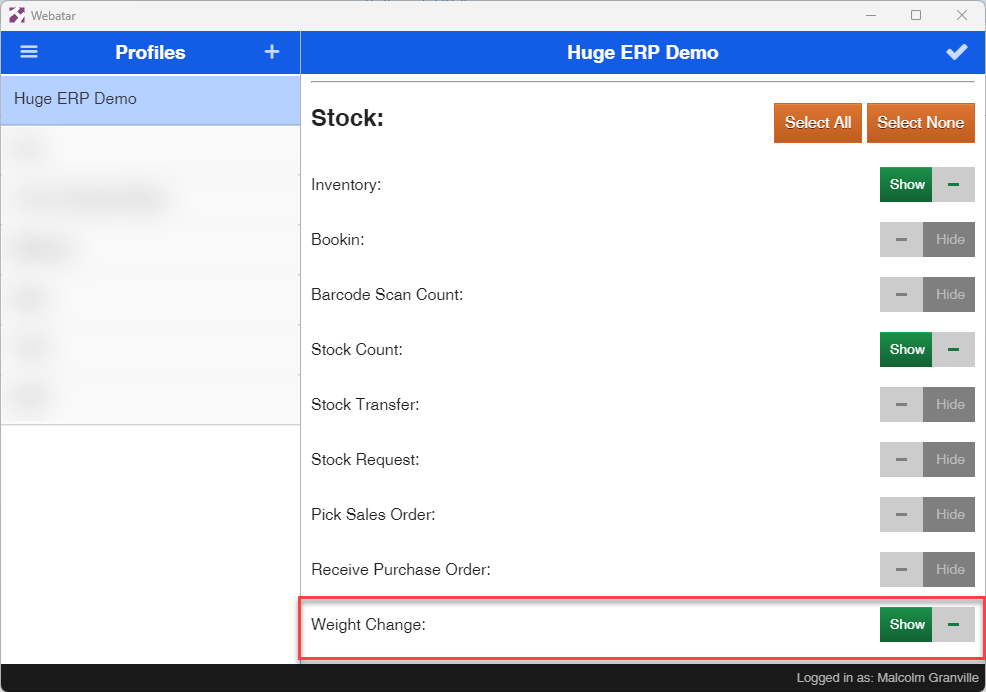
Webatar Mobile access security
Stock Level Adjust
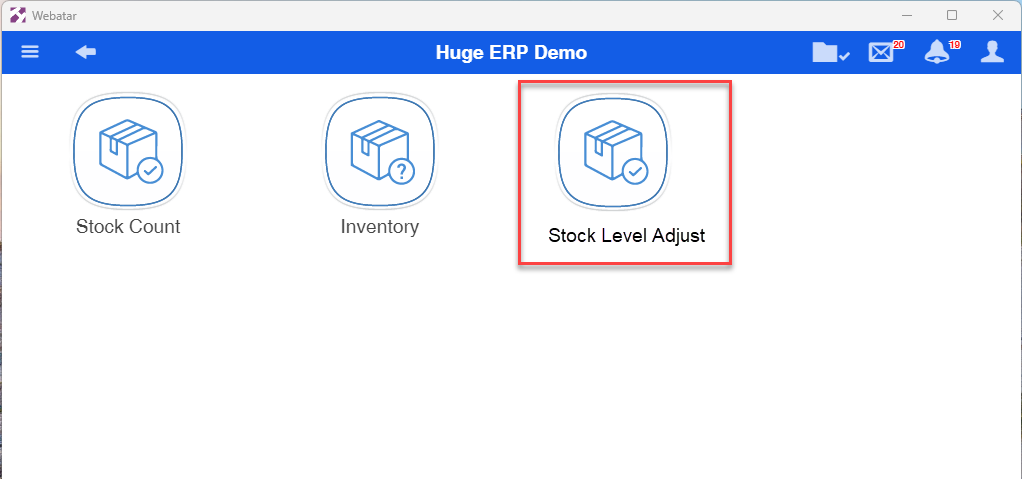
Increasing or decreasing stock levels from Webatar App
Module access setup
New module falls under the Stock Group
System Configuration > General > User Setup
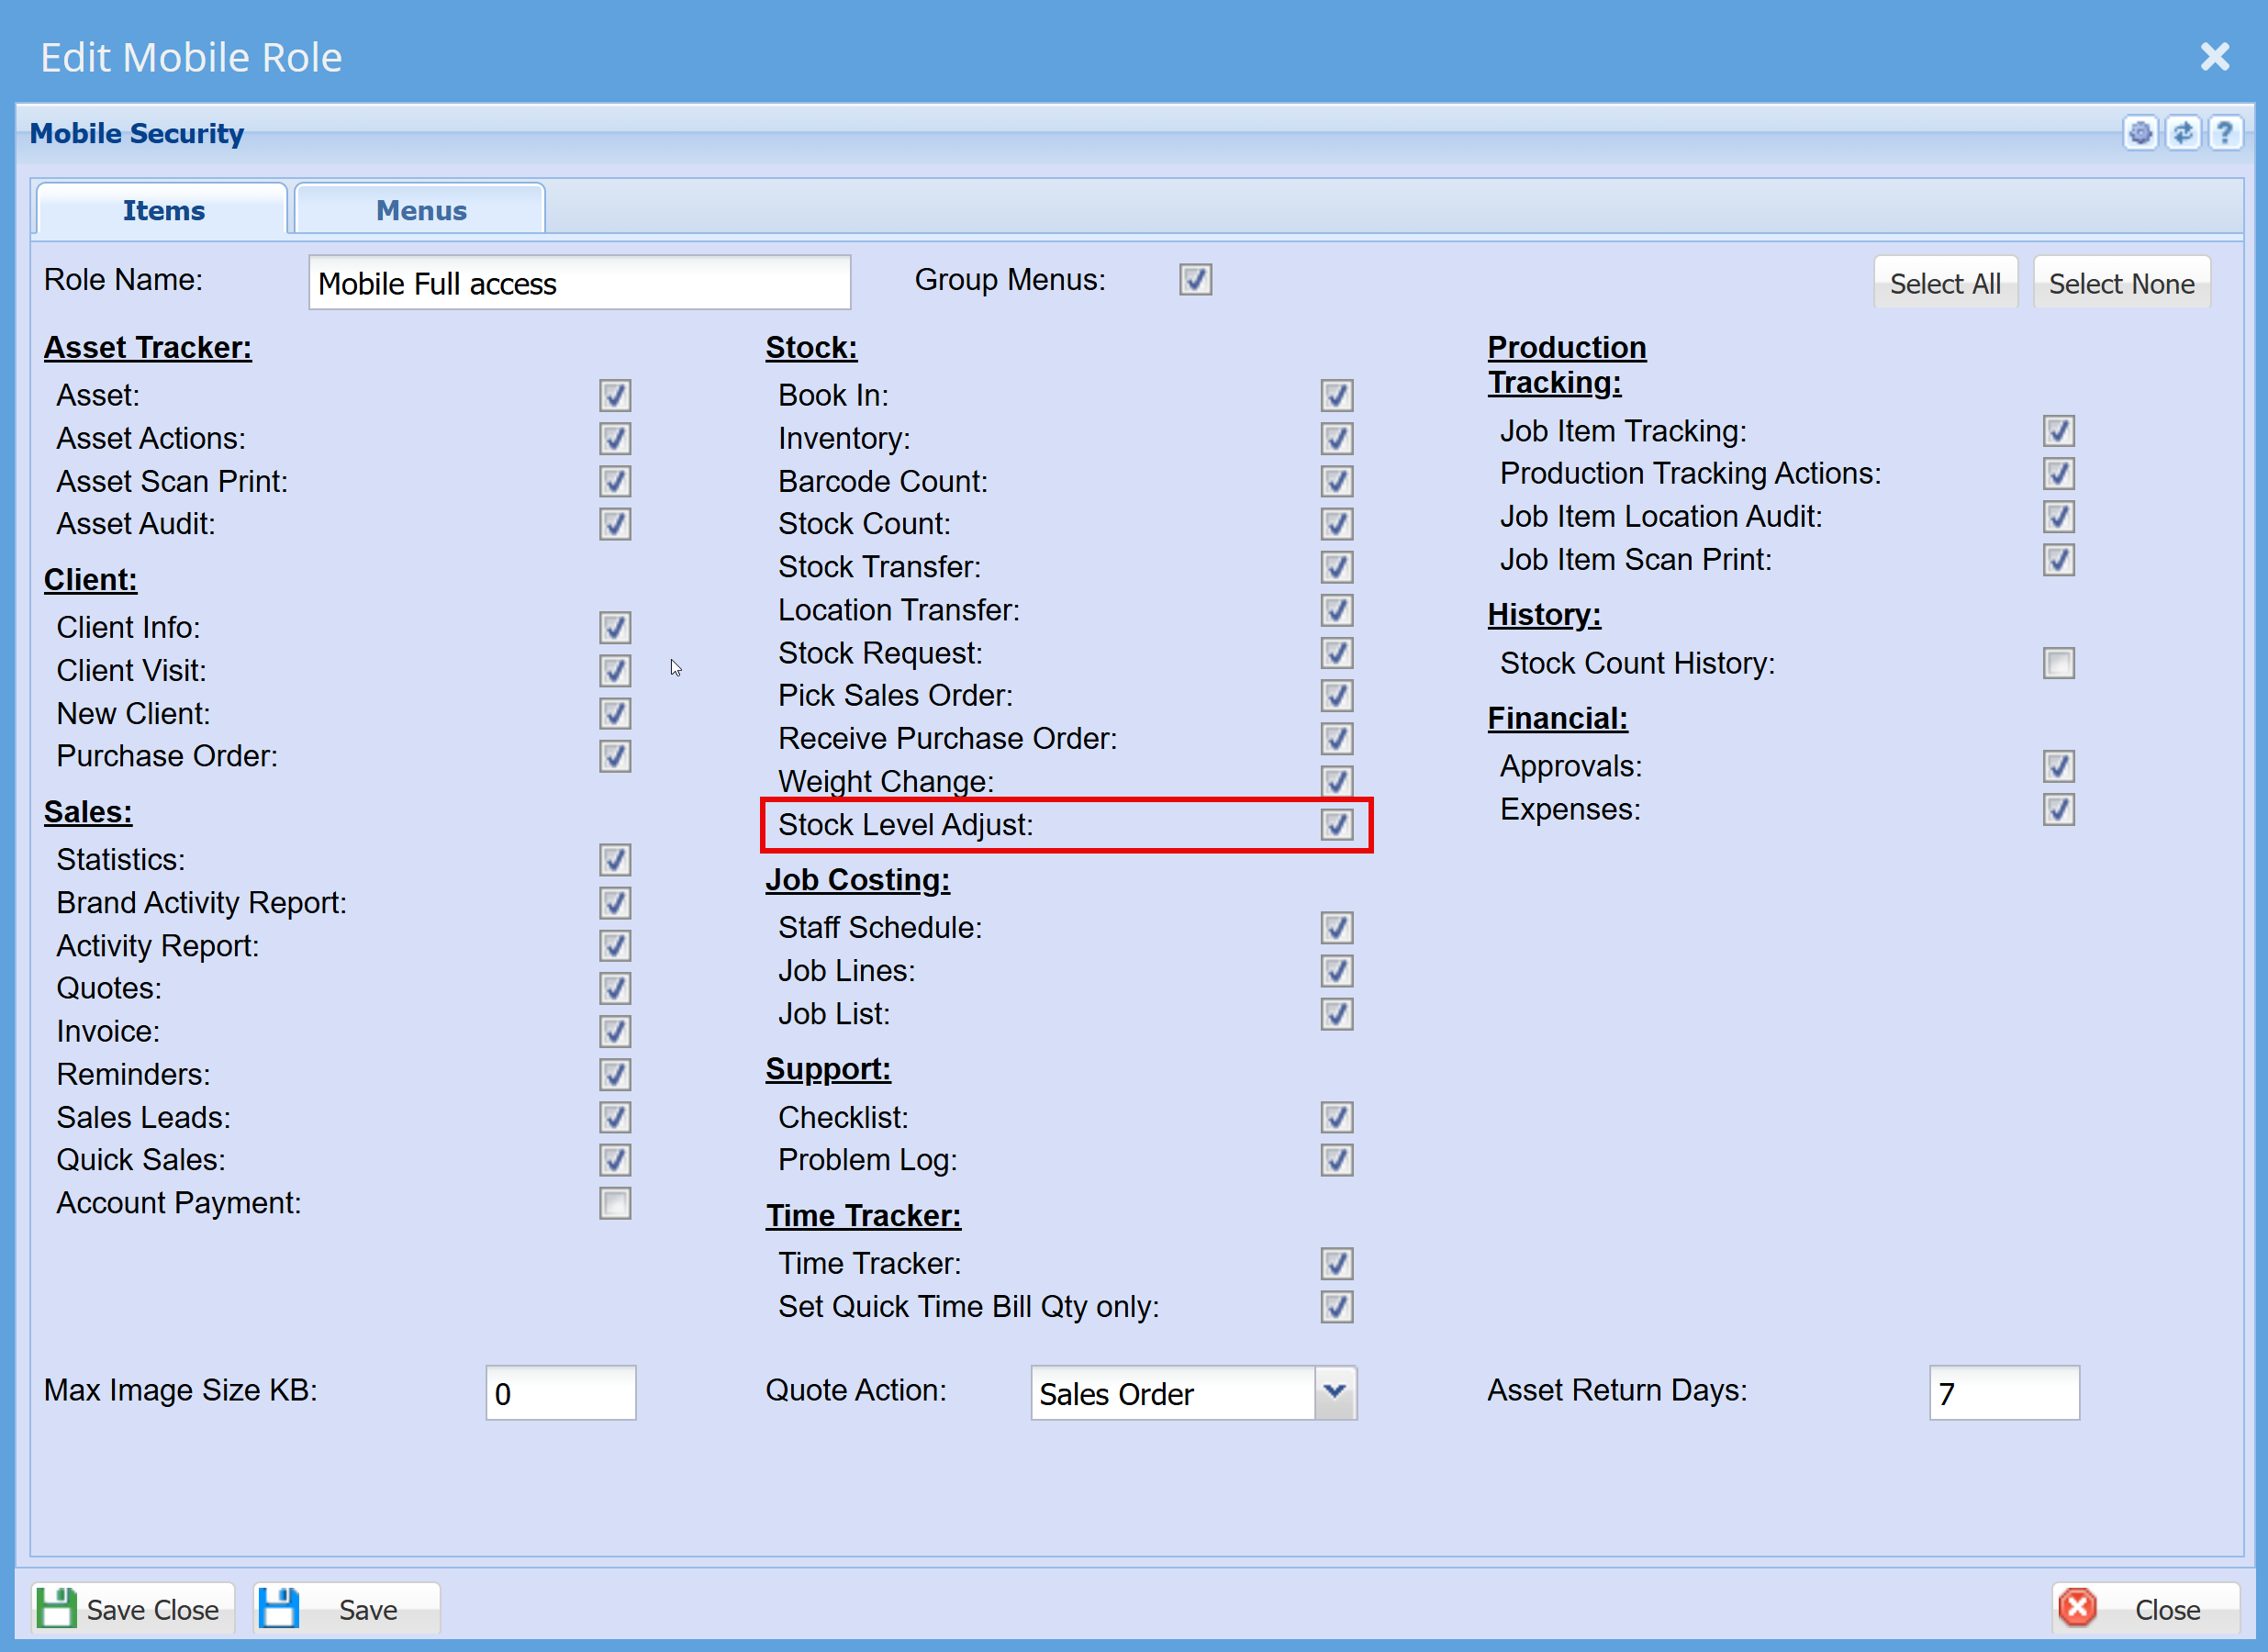
- Go to the "Module Access" tab
- Click on "Edit" at the mobile Role
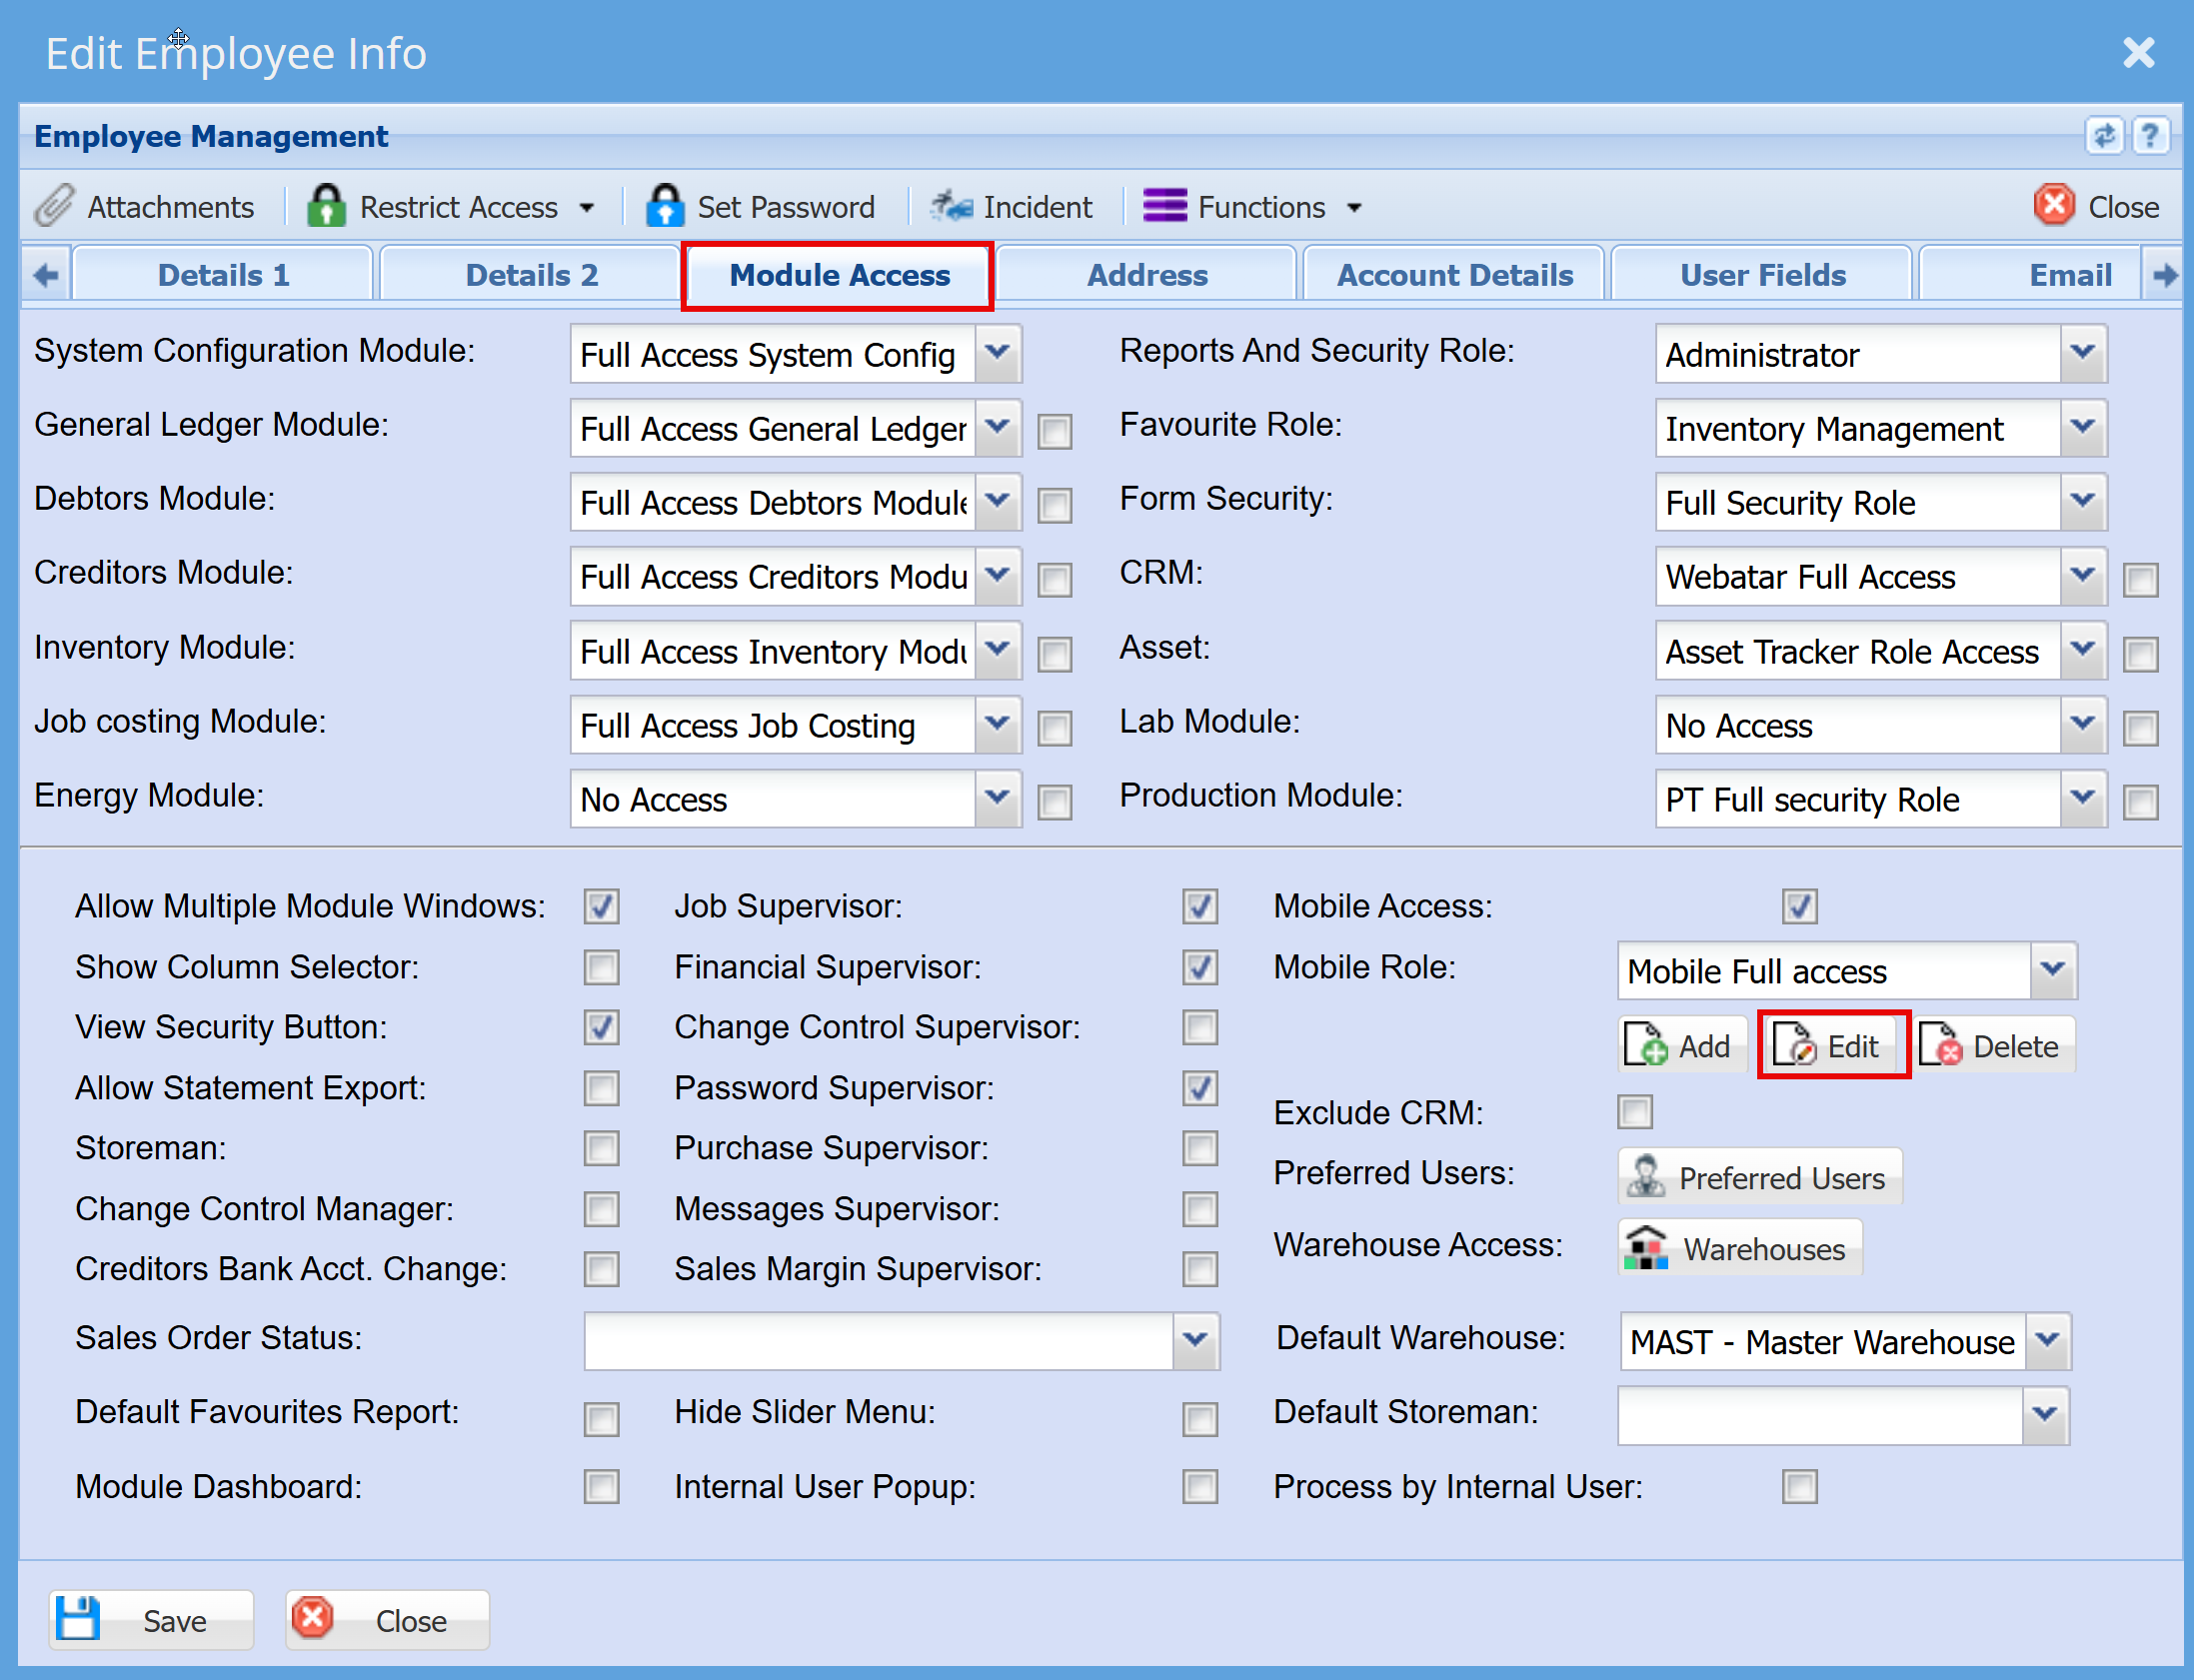
- Tick the "Stock Level Adjustment" box
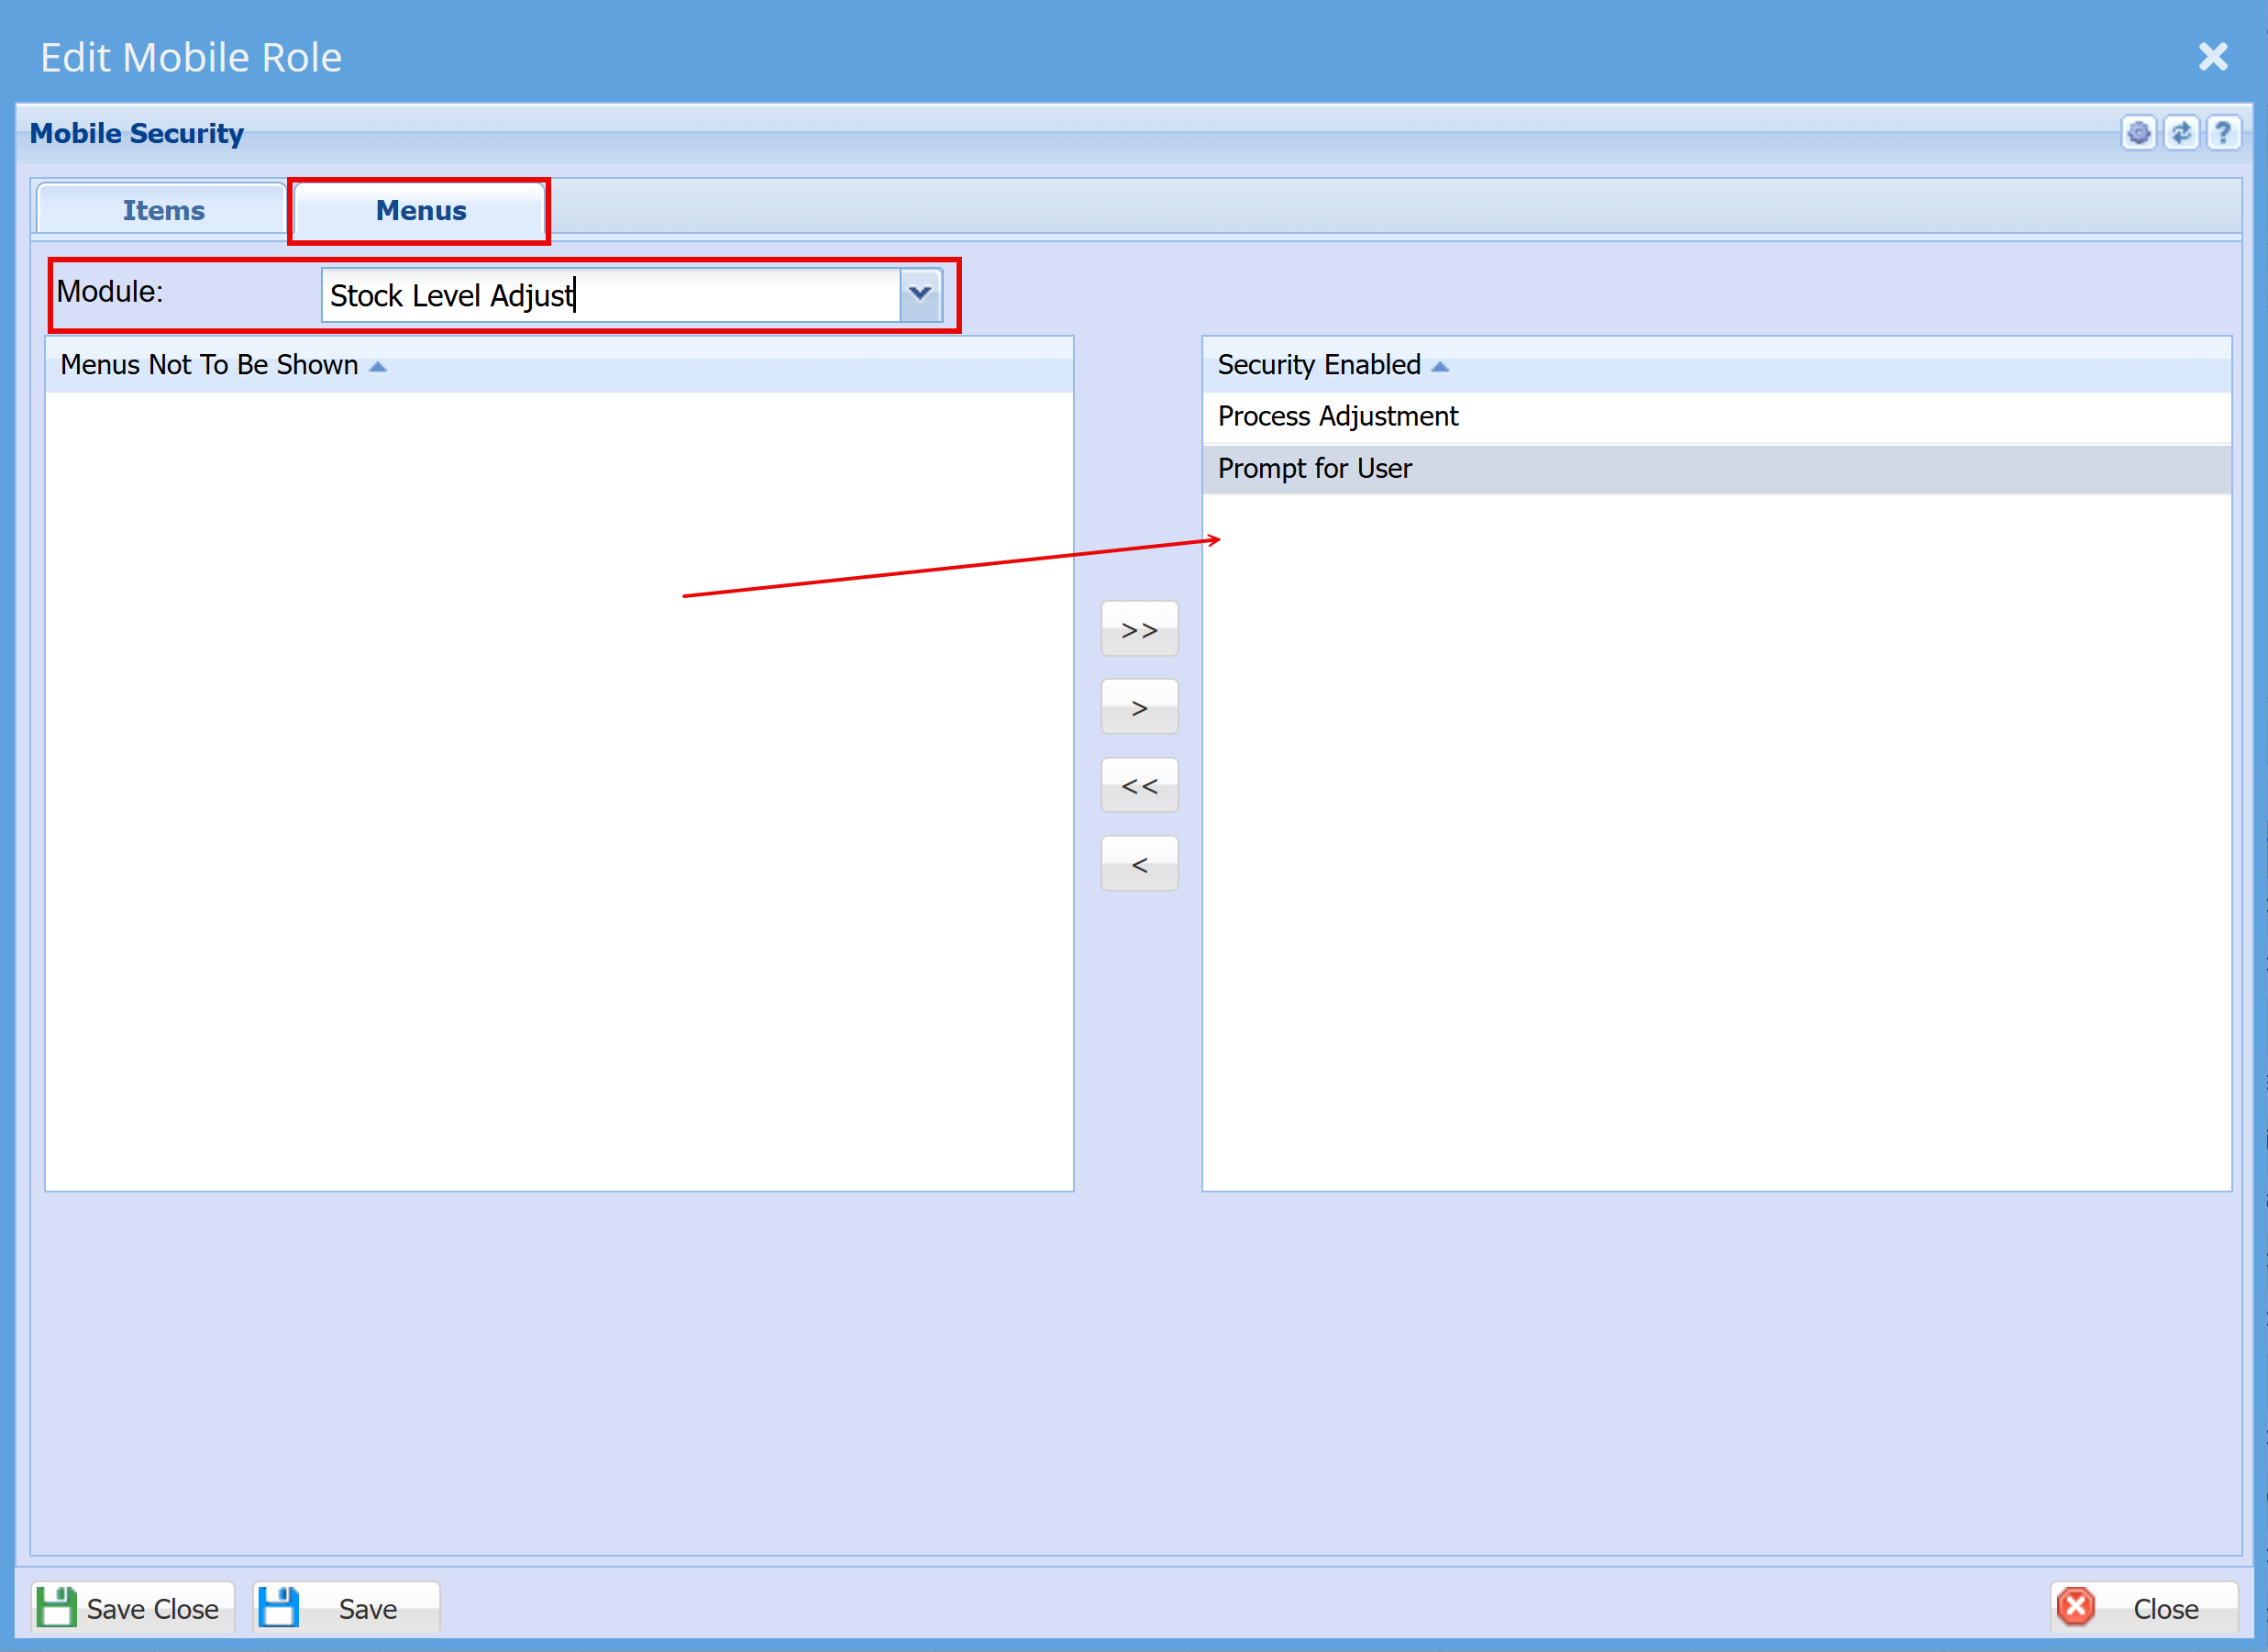
| Prompt for User | Logs which user captured the stock level and processes this user as the posted user |
| Process adjustment |
Means that when we sync to server you process the adjustment at the same time
It processes adjustment is off, then only save the adjustment.
|
Webatar Security setup
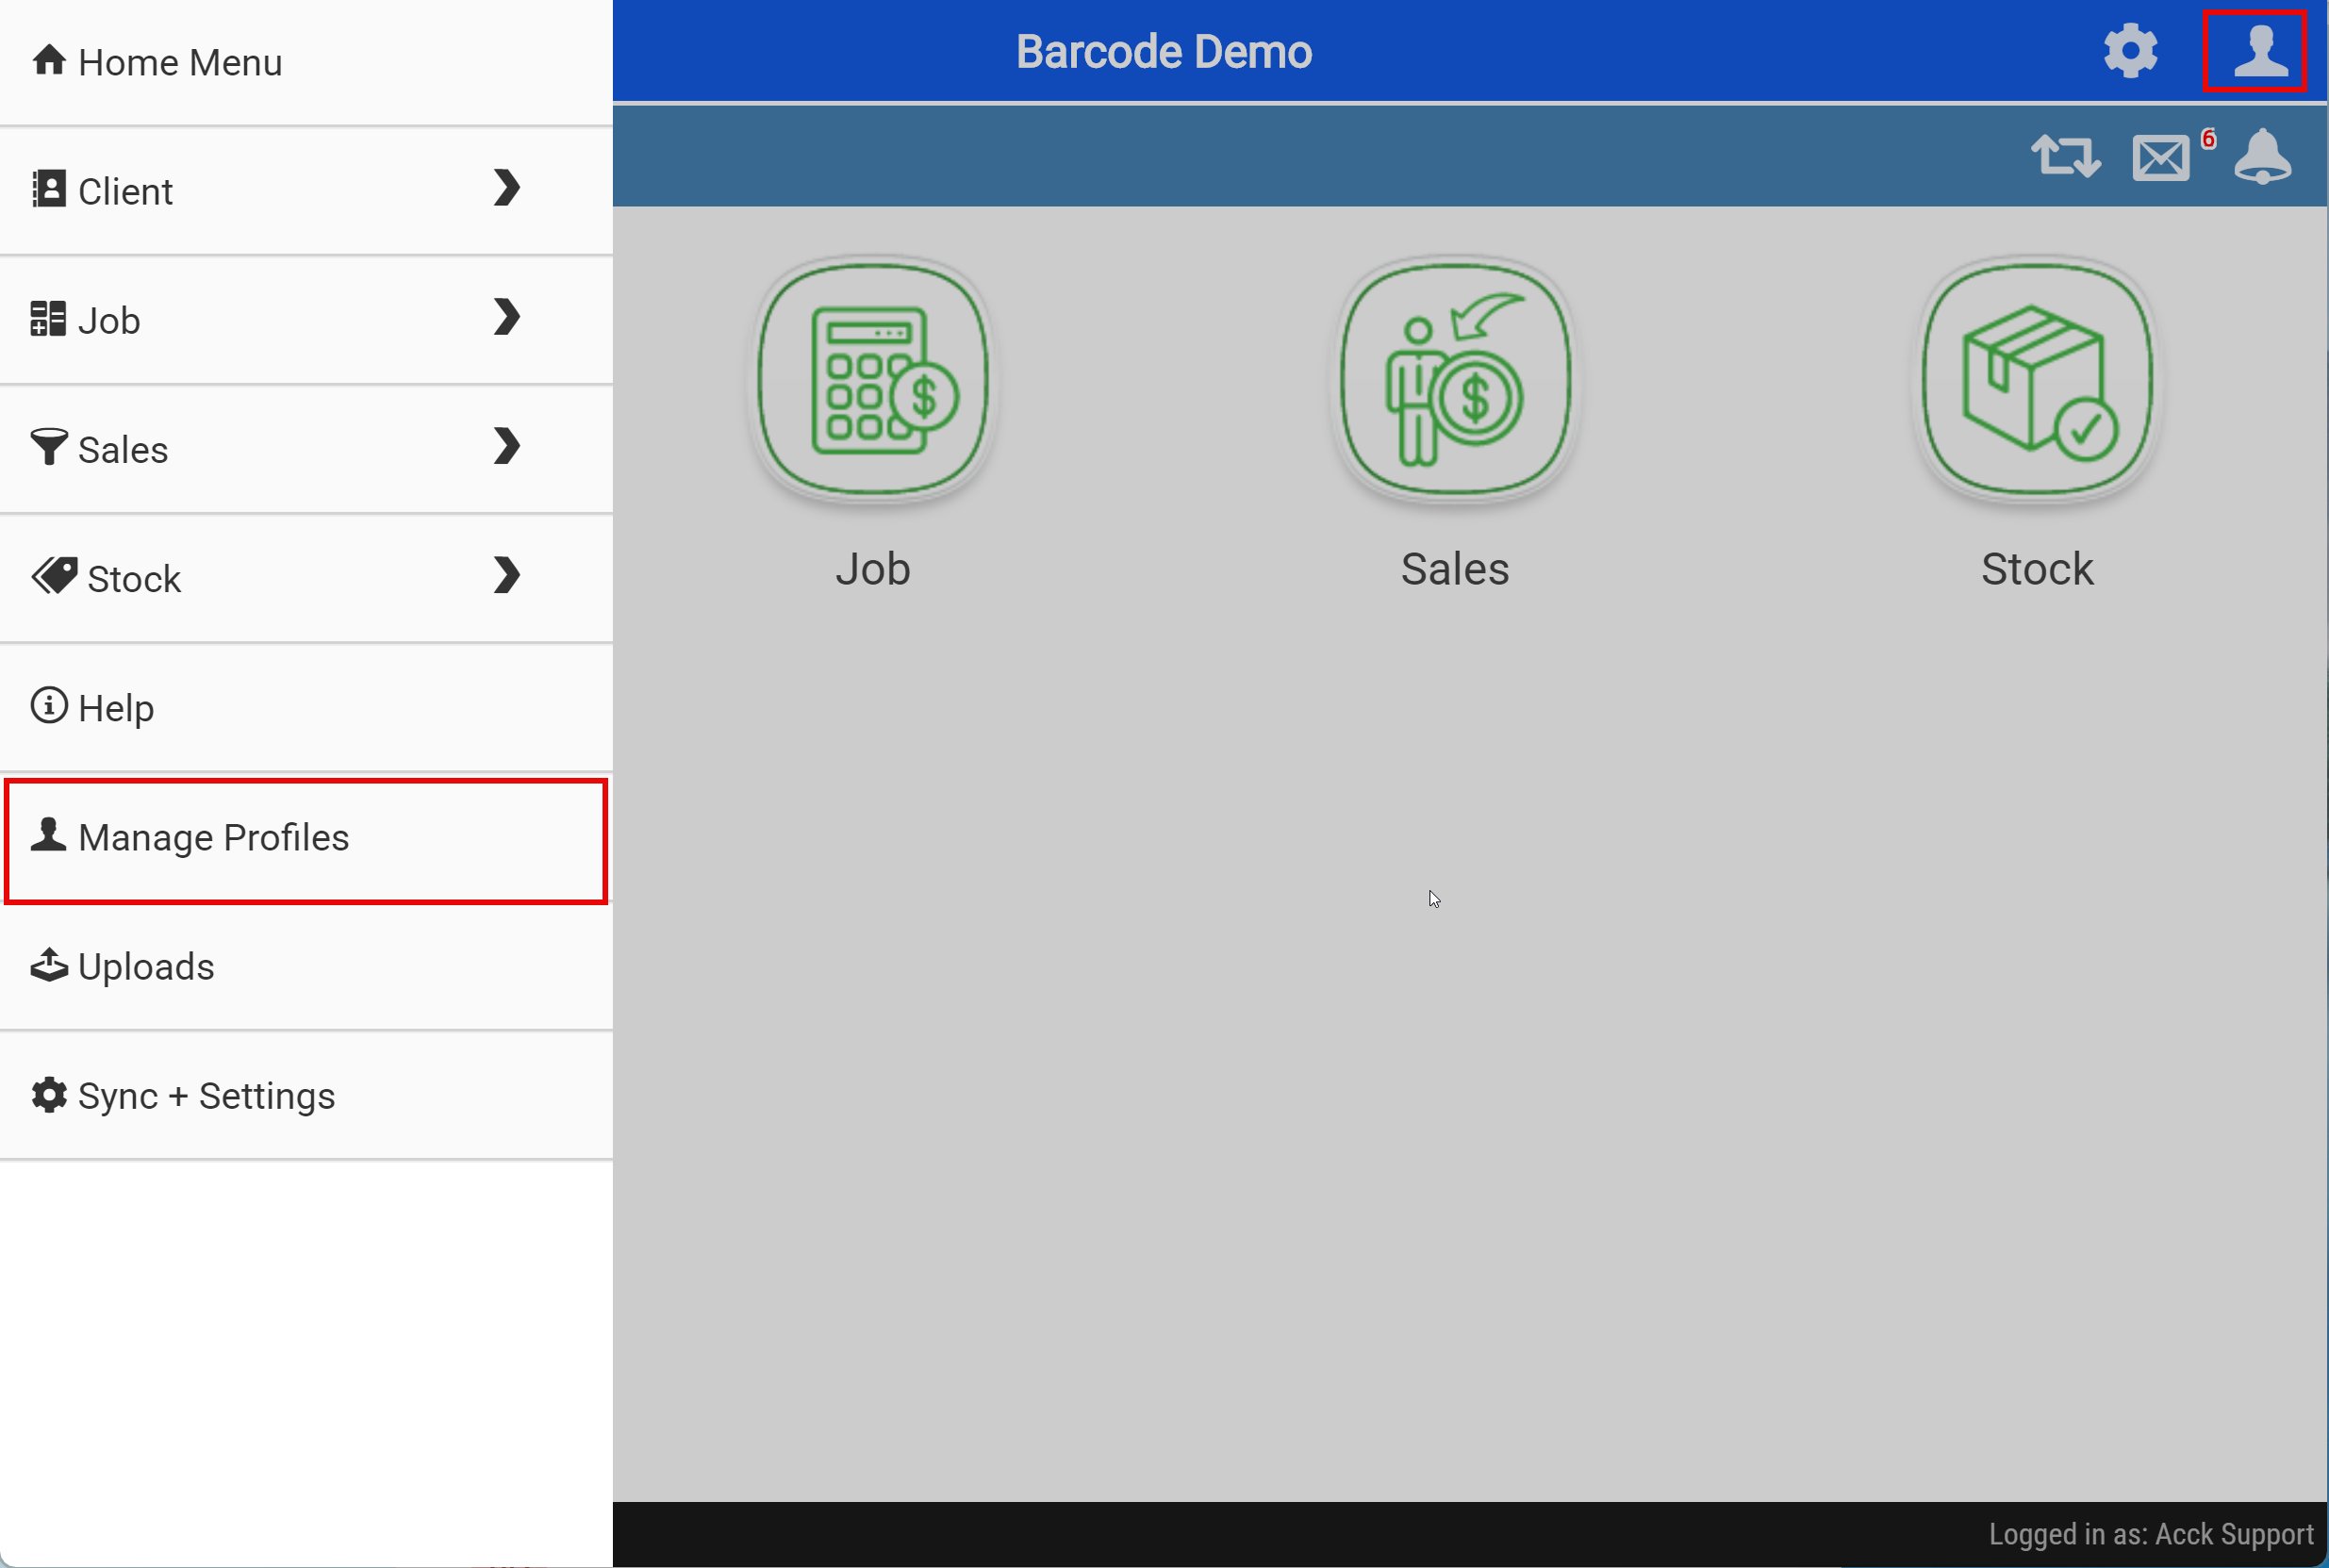
- Login to the Webatar App
- Click on "Manage Profile"
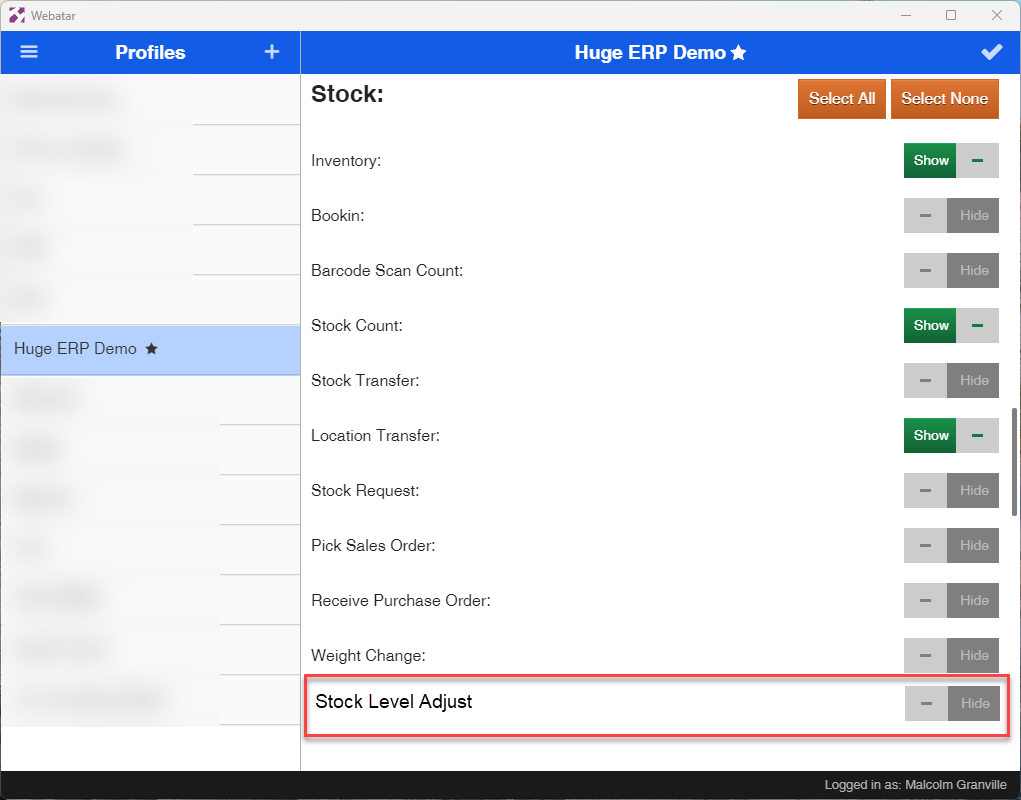
- Scroll down to "Stock"
- Toggle the "Stock Level Adjustment" to "Show" to activate the Stock level adjustment
- Tap the "Tick" at the top right of the page to save the changes
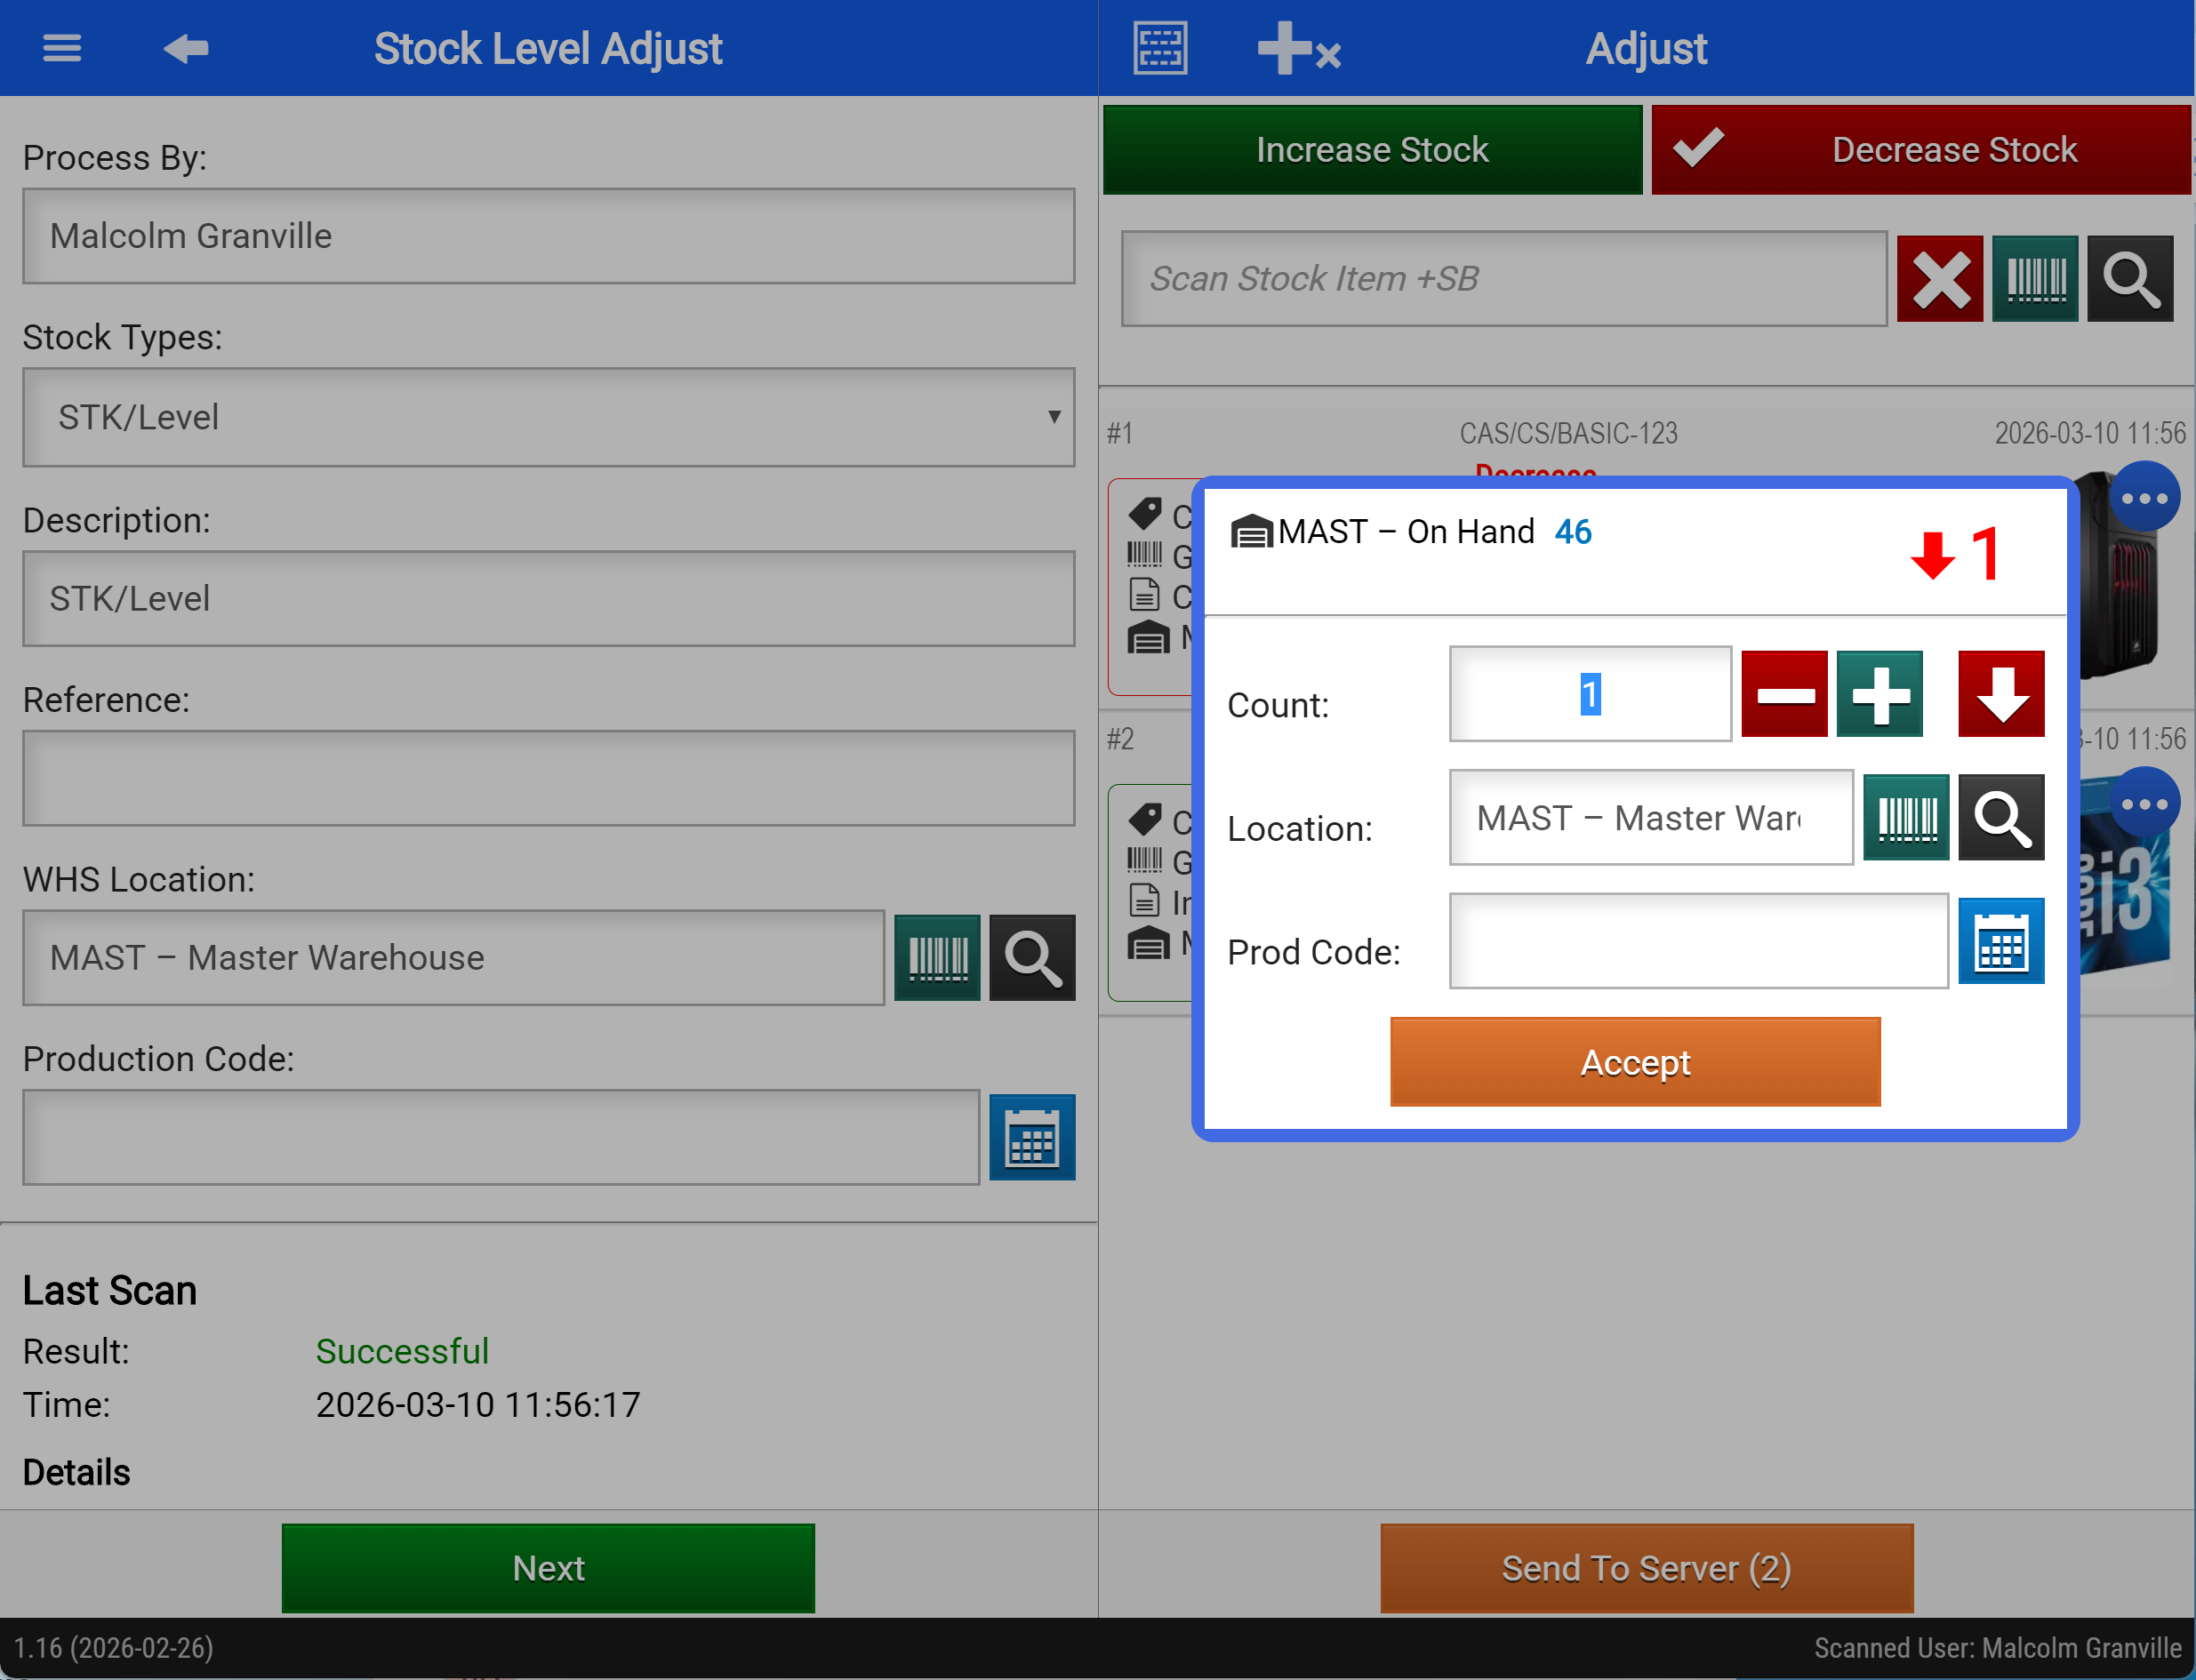
Main system stock level adjustment
The main system used is the stock level adjustment journal
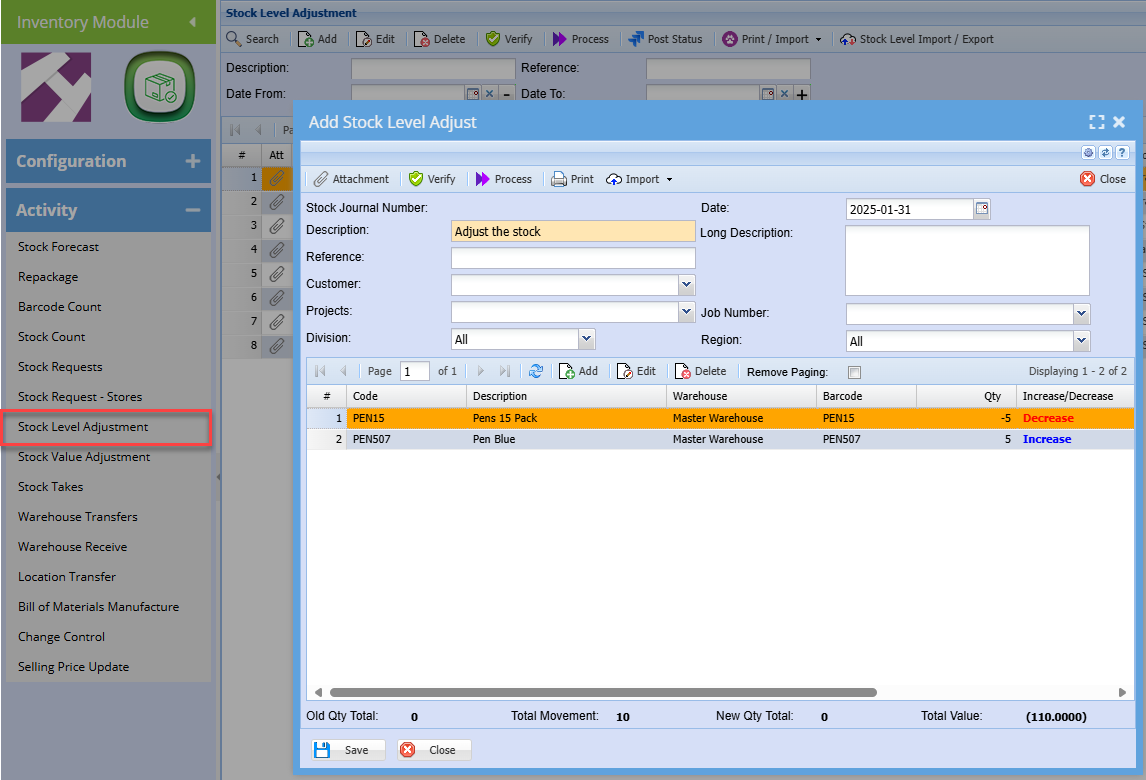
Webatar stock adjust document
| Increase stock button | This is the default setting, when this is active all scanned stock is assigned Increase |
| Decrease stock button | When clicking on Decrease stock and it is active, any stock scanned will be marked as decrease |
| Warehouse | When switching warehouses, it will apply the warehouse to the new scanned items |
| Send to Server | This will either save the stock level or process the stock level adjustment based on the security setup |

Editing an item
| Increase / Decrease | Click on the button to change increase or decrease of item |
| Count | Set the count by manually entering a number or using the + and - button to change count |
| Location | Change the warehouse of the item |
| Accept | Accept the changes |
| Send to Server | Sync your stock level adjustment to the main system |
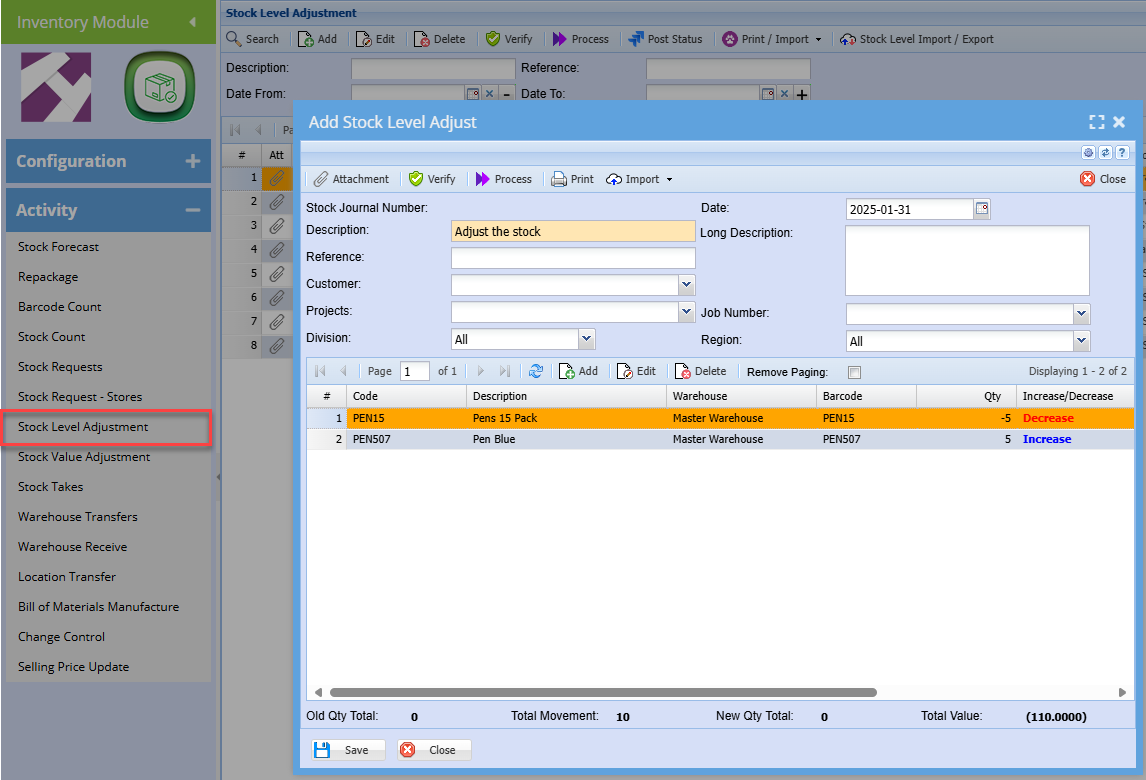
Main system
The stock level adjustment will create a document in the main system with stock level adjustment
Inventory > Activity > Stock Level Adjustment
- Click search to see your stock level adjustment after clicking "Send to Server"
Serial number scanning
The Webatar app allows one to scan via serial numbers
Only outwards serial number will check database to see if the serial number exists.
Inwards serial numbers do not check database, but will create new serial numbers.
Only Serial numbers that are In Stock will sync to the device.
Serial numbers sync is off by default. To turn it on, click the toggle for "Sync Serial Numbers" in the Advanced section of the Settings/Offline Sync panel:
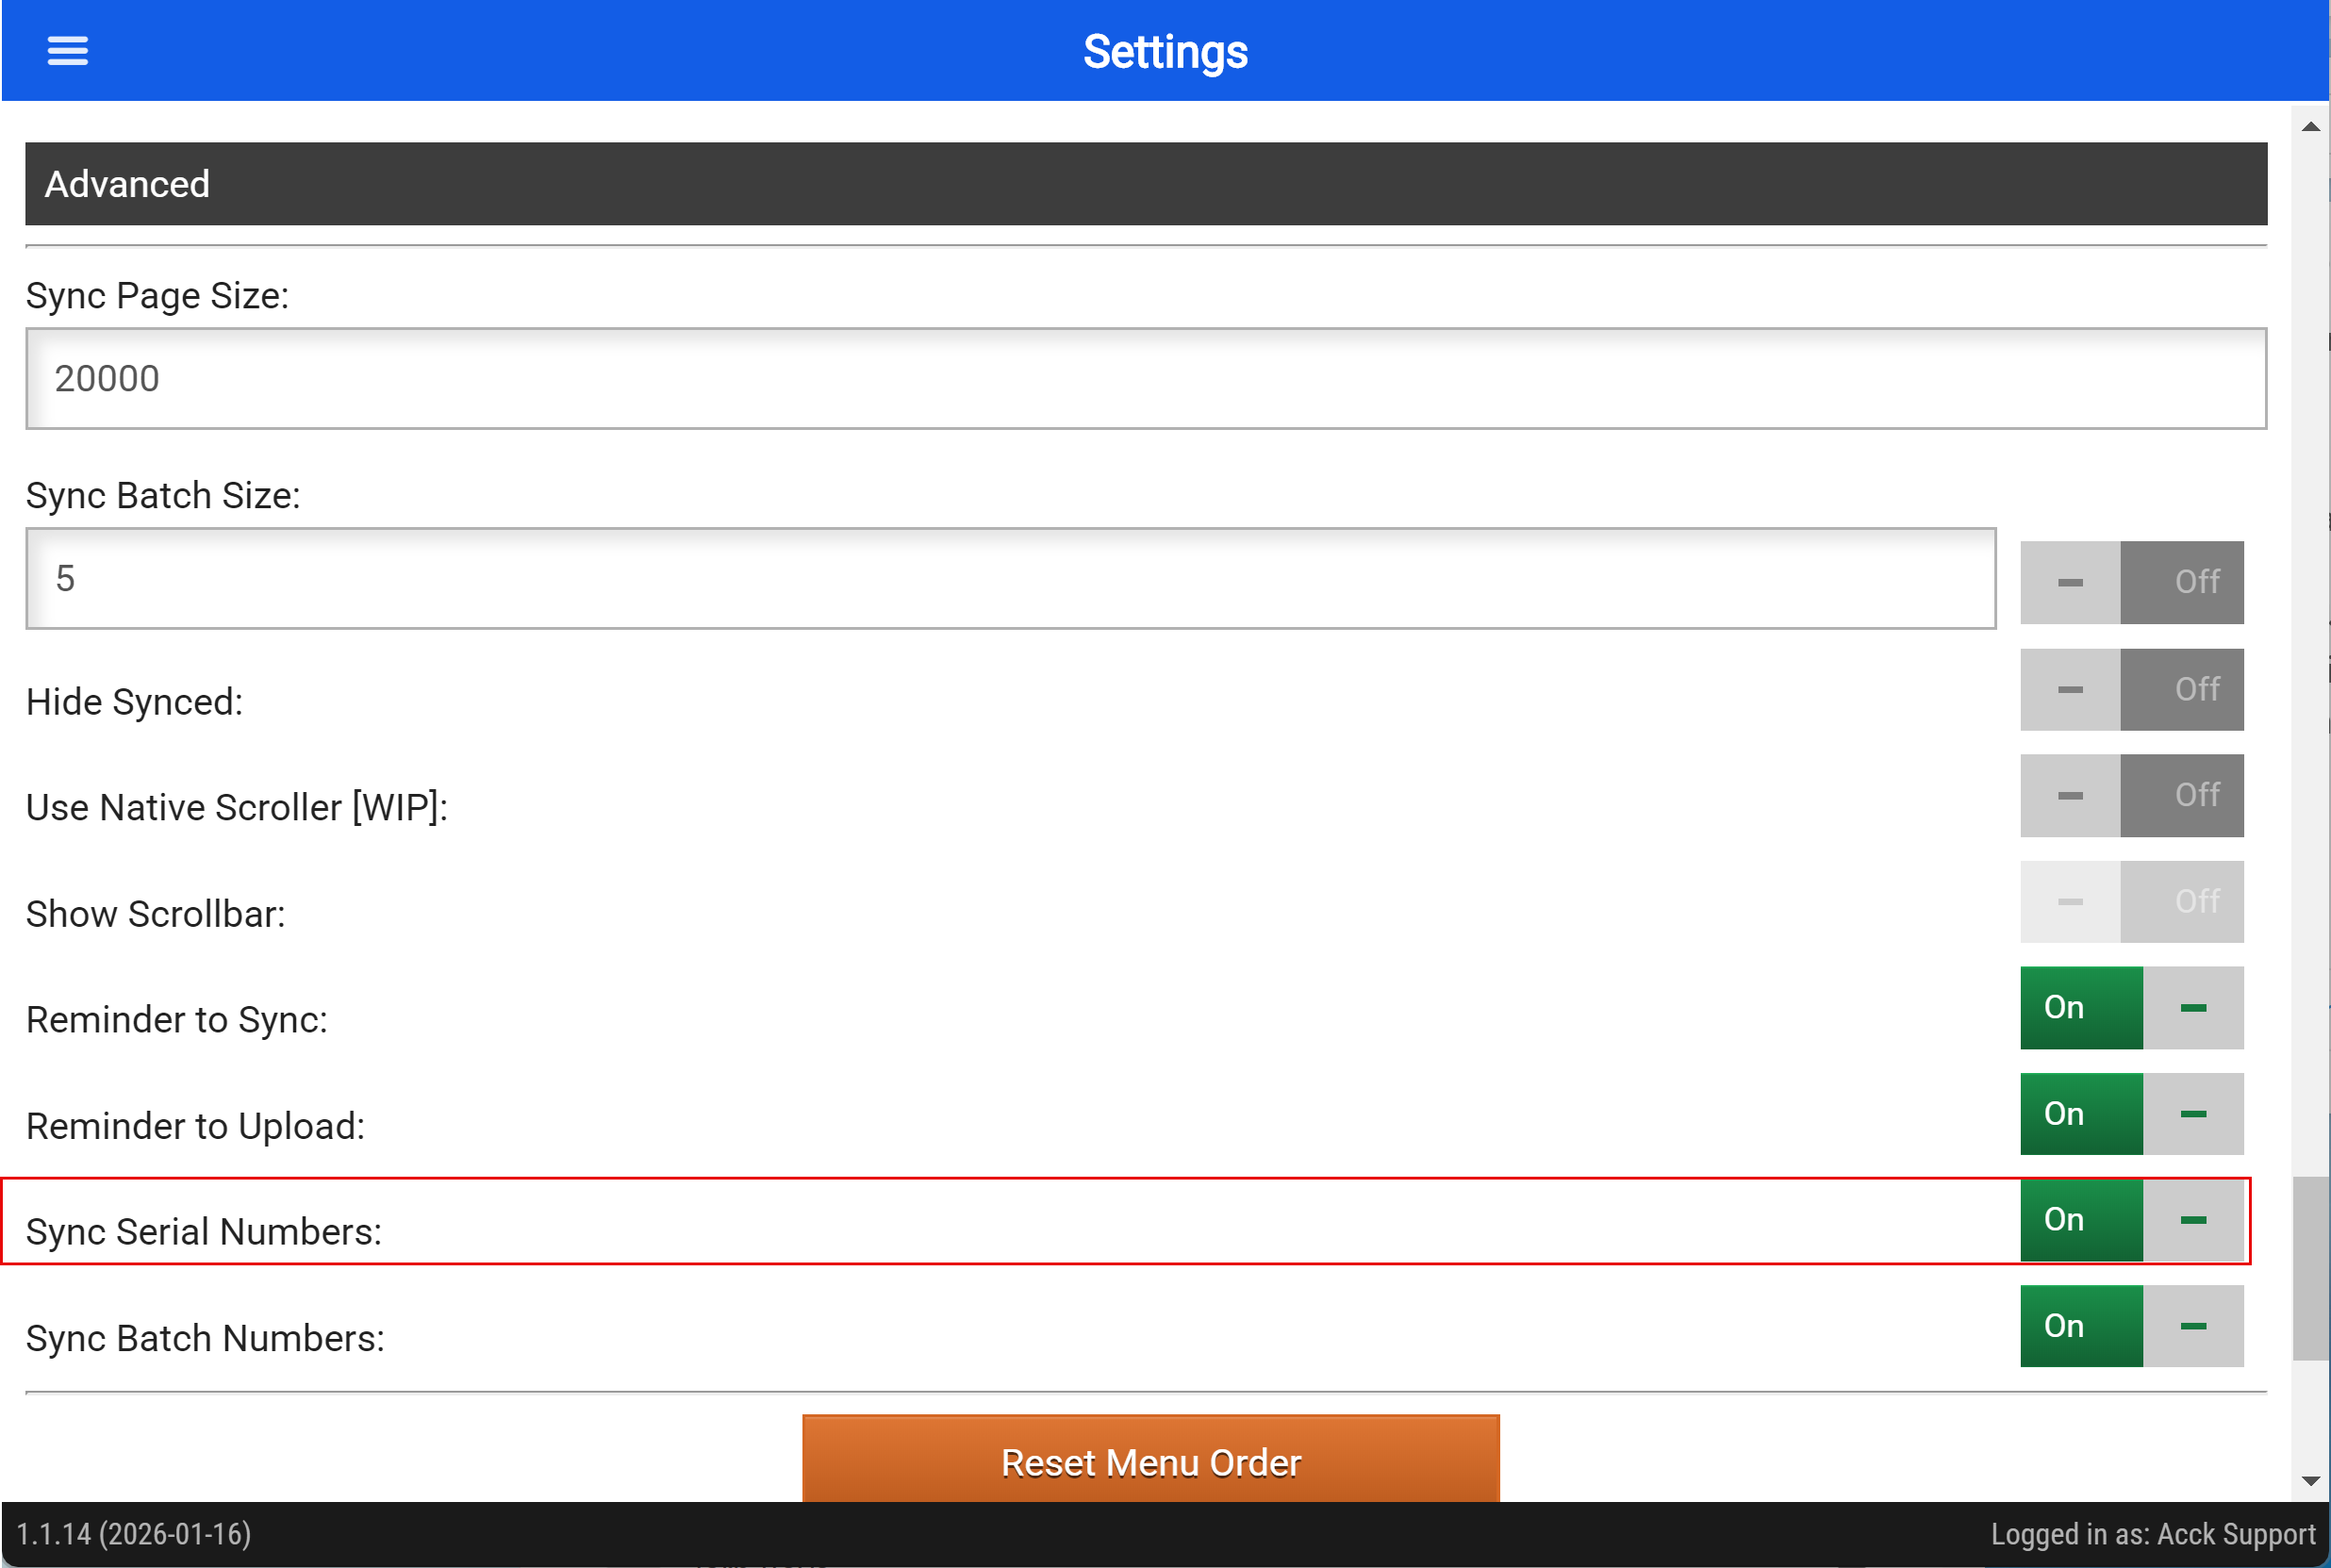
If Sync is Off for serial numbers, then the Skipped message will show on sync, otherwise it will sync:

Serial number scanning is only enabled if the Serial Numbers are synced and not skipped. When active and scanning for an item, the synced Serial Numbers will be searched if the scanned text does not match the barcodes or stock codes of any synced Stock Items.
If a serial number matching the scanned text is found, then its stock item will be added to the stock count and the serial number will be added to the item, incrementing the count.
When serial number scanning is enabled the scan field placeholder text will have a plus sign added to the end of it.
If a serial number is scanned as a Stock Item and is not found in the app's database, then an error will show. One cannot scan OUT a serial number a stock item that does not exist or references a stock item that does not exist.
In the Stock Count scan module serial number scanning is performed for the following document types:
- Invoice - Outwards
- Stock Return - Outwards
- Stock Take.
For other document types Serial Numbers can still be added, but will need to be added by scanning the Stock Code or Barcode of the Serial Item itself.


Duplicate serial numbers
The app will display a prompt if it finds more than one product for the scanned serial number.
If the same serial number is used more than once for two distinct products, then before the item can be added to the list a dialog will show from which one is selected. Tapping outside of the box or tapping the Cancel button will cancel the action. Products which already have the same serial number added will be filtered out. If there are no available products, then instead of showing the dialog an error message will show indicating this.


Scanning Serial into the Serial Numbers List of the Product
When scanning serial numbers directly to the item from the serial number list for the item, any serial number can be added provided they are not already in the list. When the serial number is synced for the product there will be an icon to indicate this.
If a synced serial number is that exists for another product is scanned, then this is prevented and an error will show.

Enter Serial Numbers prompt behaviour
When scanning a serial item by its product's stock code or barcode then the Enter Serial Numbers prompt will show with or without serial number scanning enabled.
When scanning a synced serial number while serial number scanning is enabled then after the product for the serial number is added the prompt will show but only if the Count Prompt button is turned on.

As with scanning serial numbers into the serial number list of a product, scanning a synced serial number from another product is prevented and an error message will show:

When a synced serial number for the product is scanned then an icon will appear next to the scanned text to indicate this:

Batch Number Scanning
The Webatar app allows one to scan via Batch numbers
Only outwards batch number will check database to see if the batch number exists.
Inwards batch numbers do not check database but will create new batch numbers.
Only existing batch numbers that exist will sync to the device.
Batch numbers sync is off by default. To turn it on, click the toggle for "Sync Batch Numbers" in the Advanced section of the Settings/Offline Sync panel:
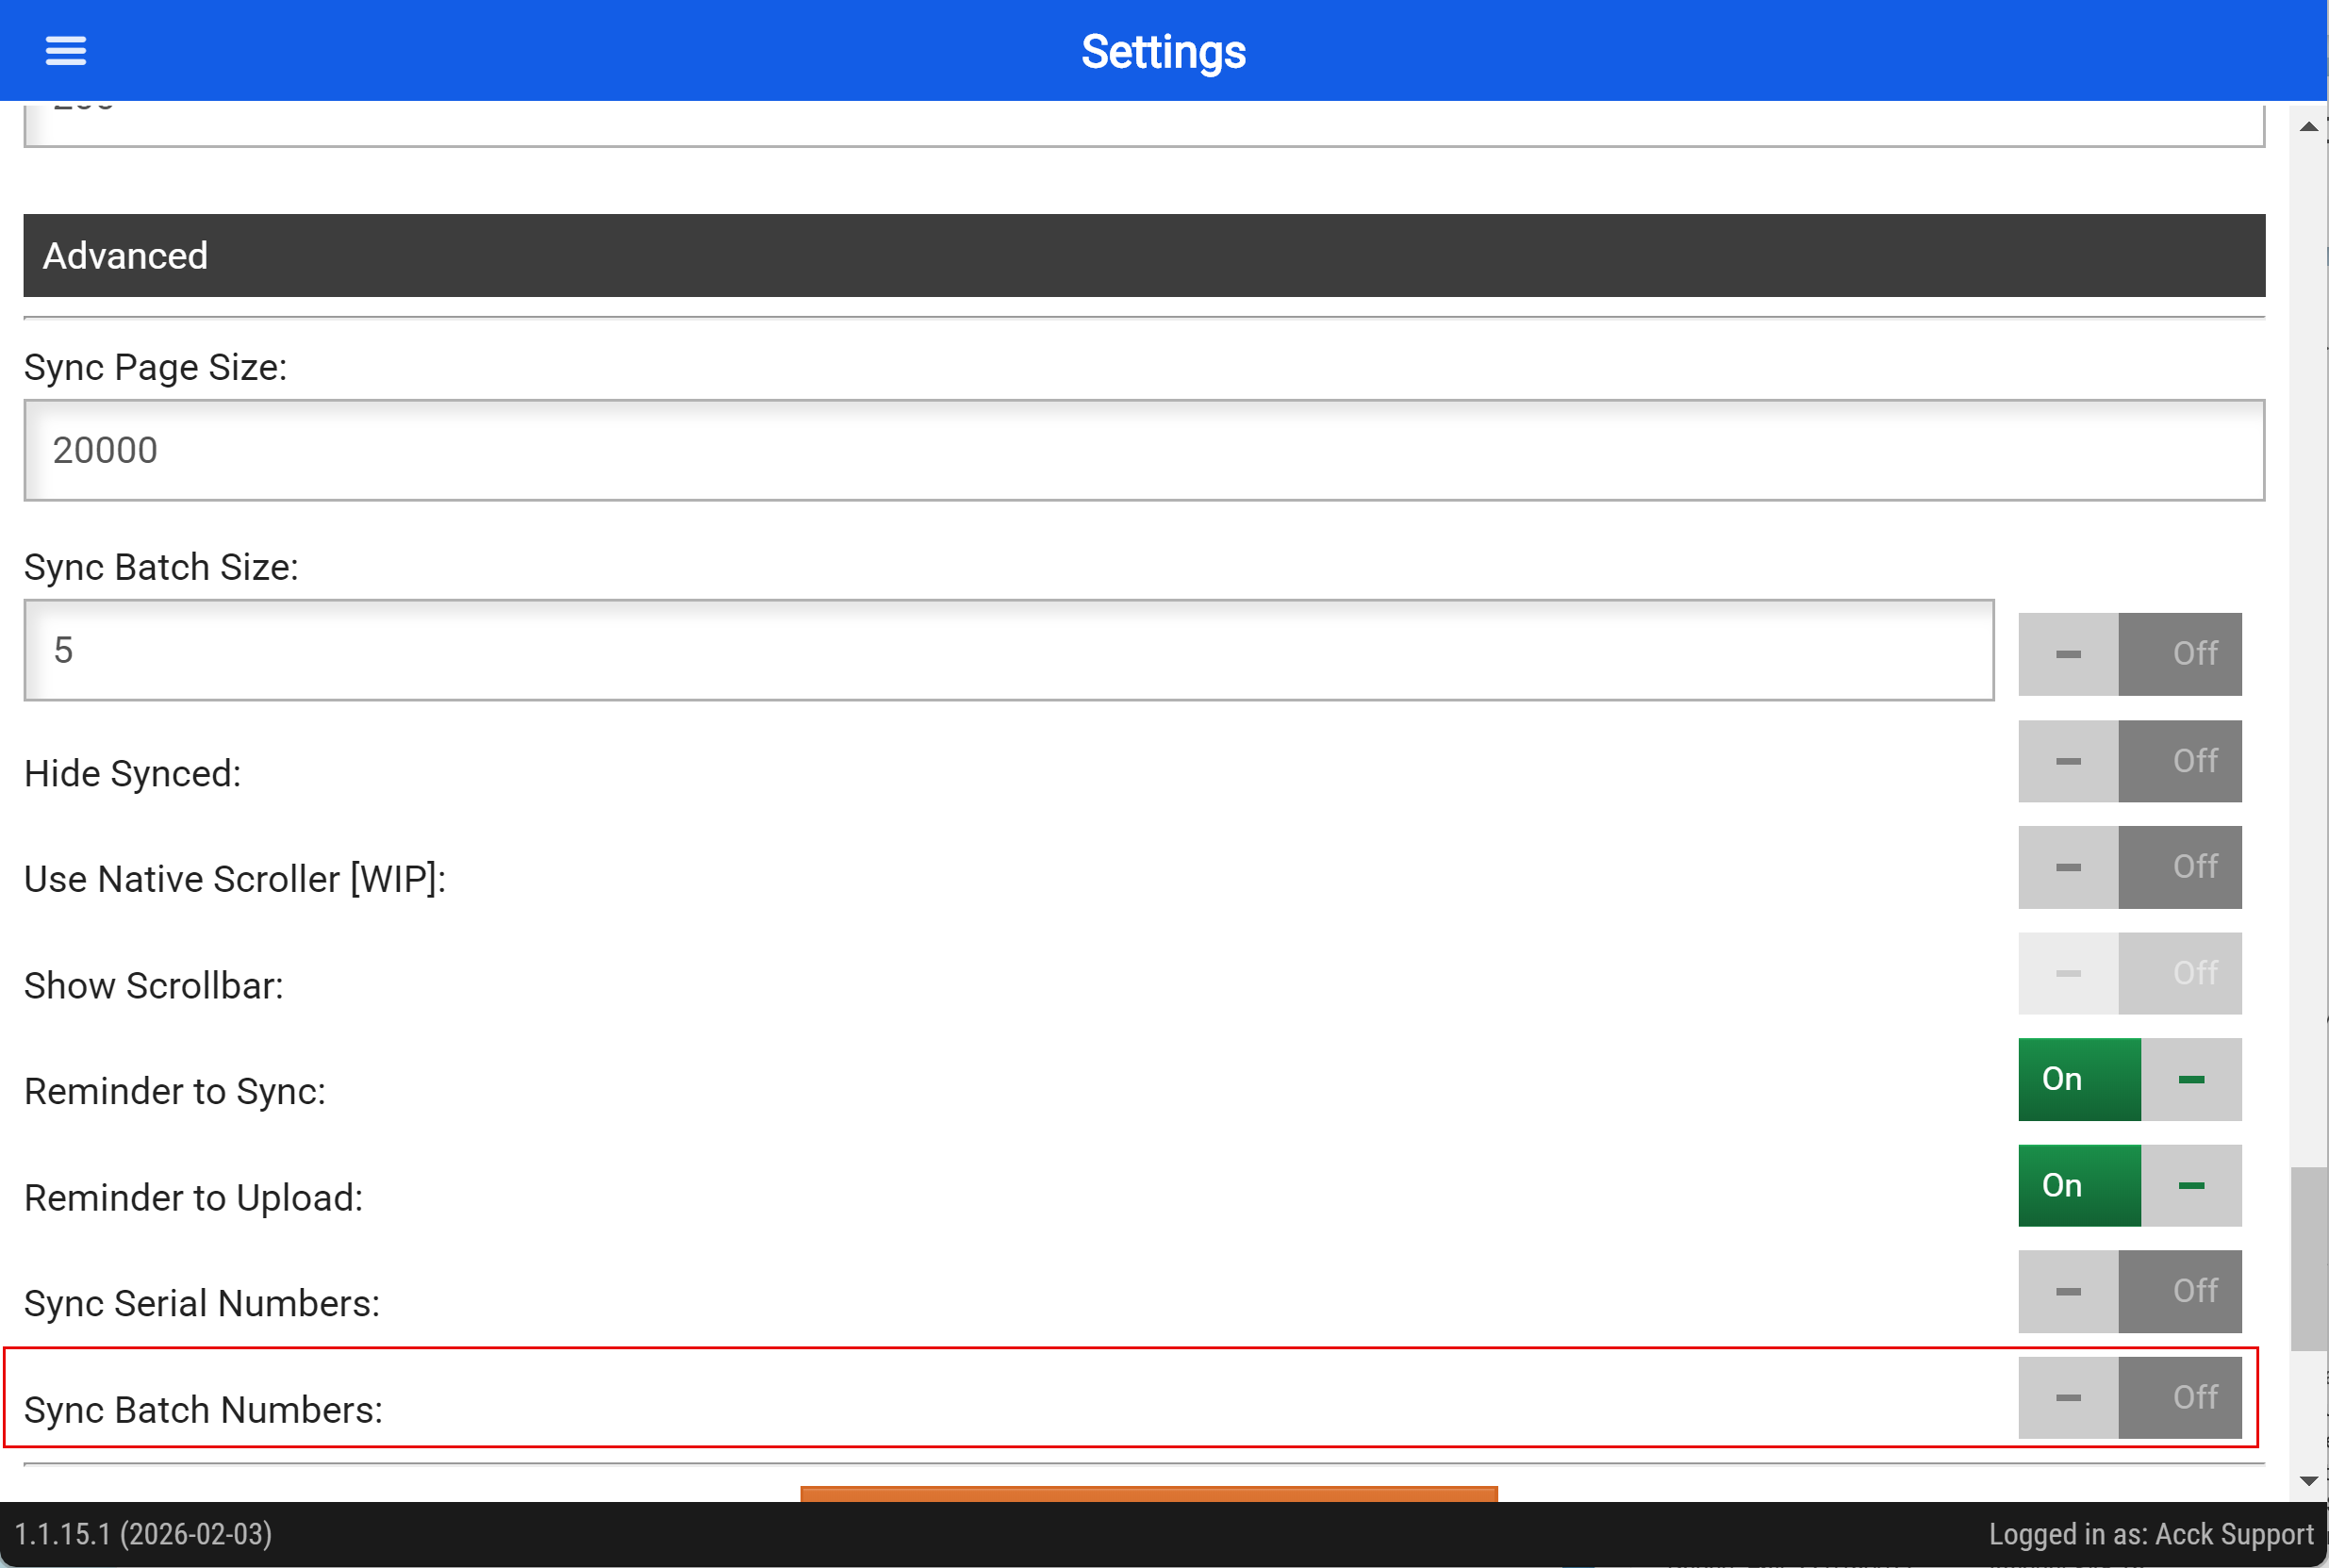
If Sync is Off for batch numbers, then the Skipped message will show on sync, otherwise it will sync:
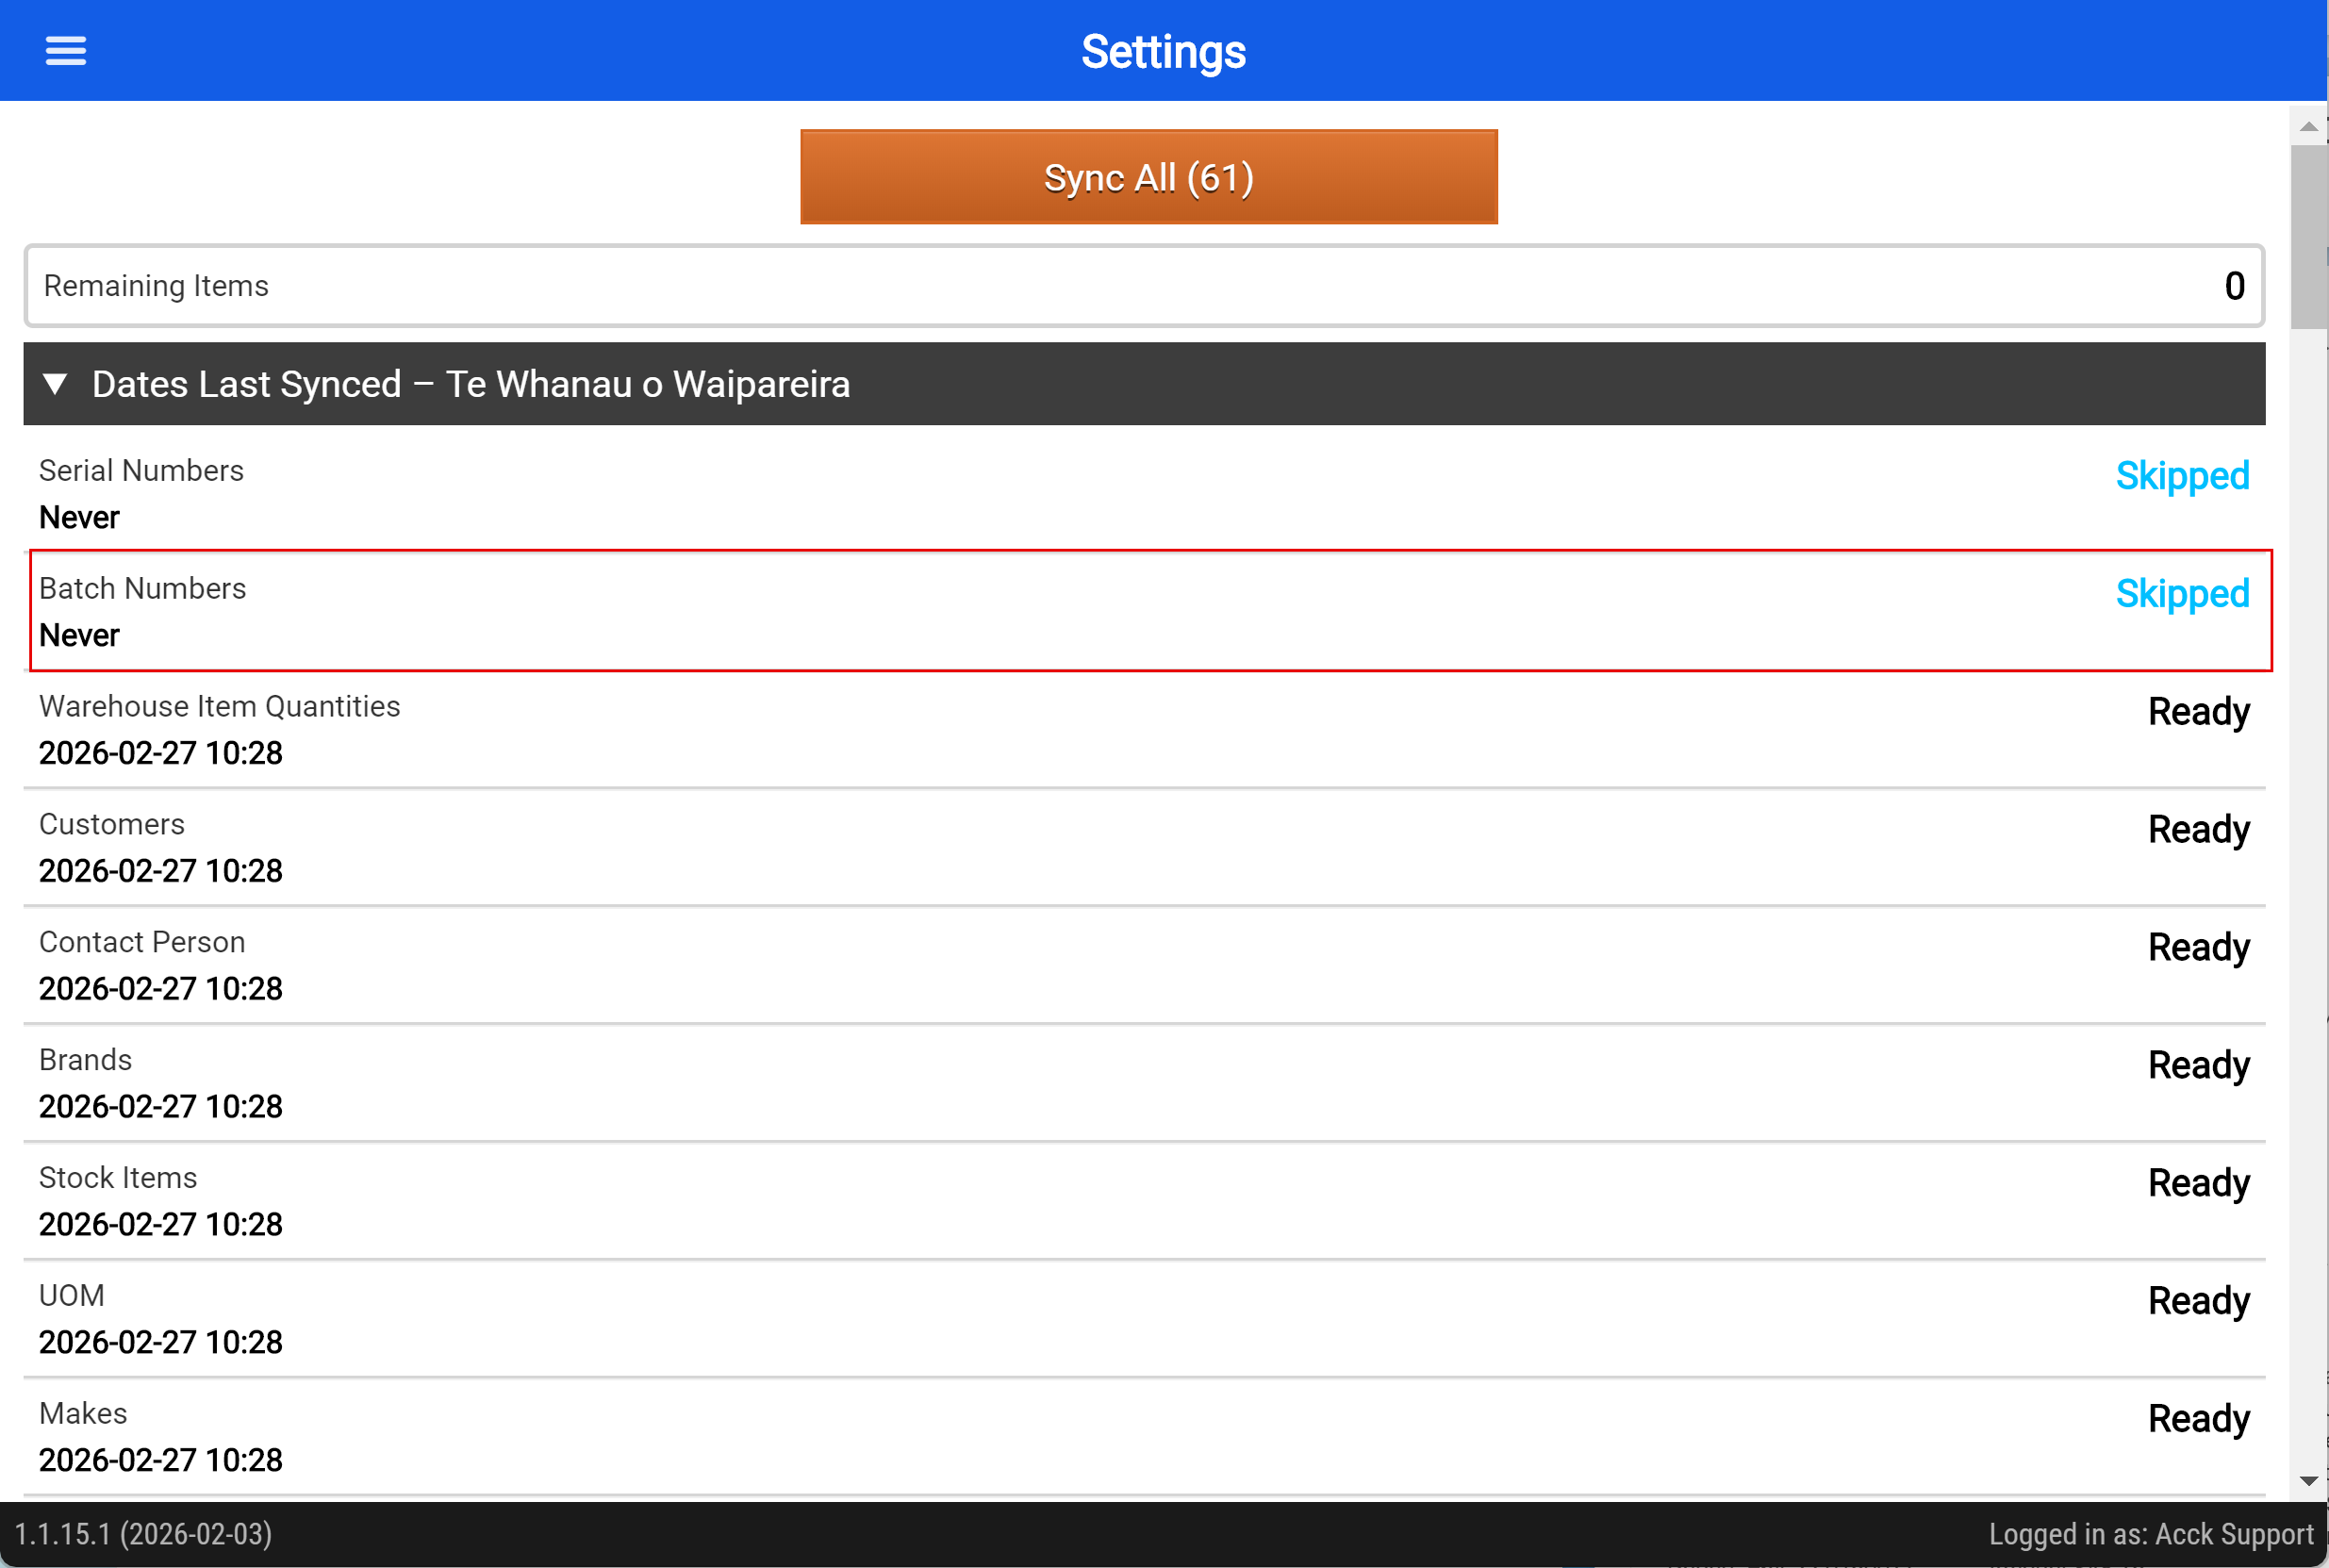
Batch number scanning is only enabled if the Batch Numbers are synced and not skipped. When active and scanning for an item, the synced Batch Numbers will be searched if the scanned text does not match the barcodes or stock codes of any synced Stock Items.
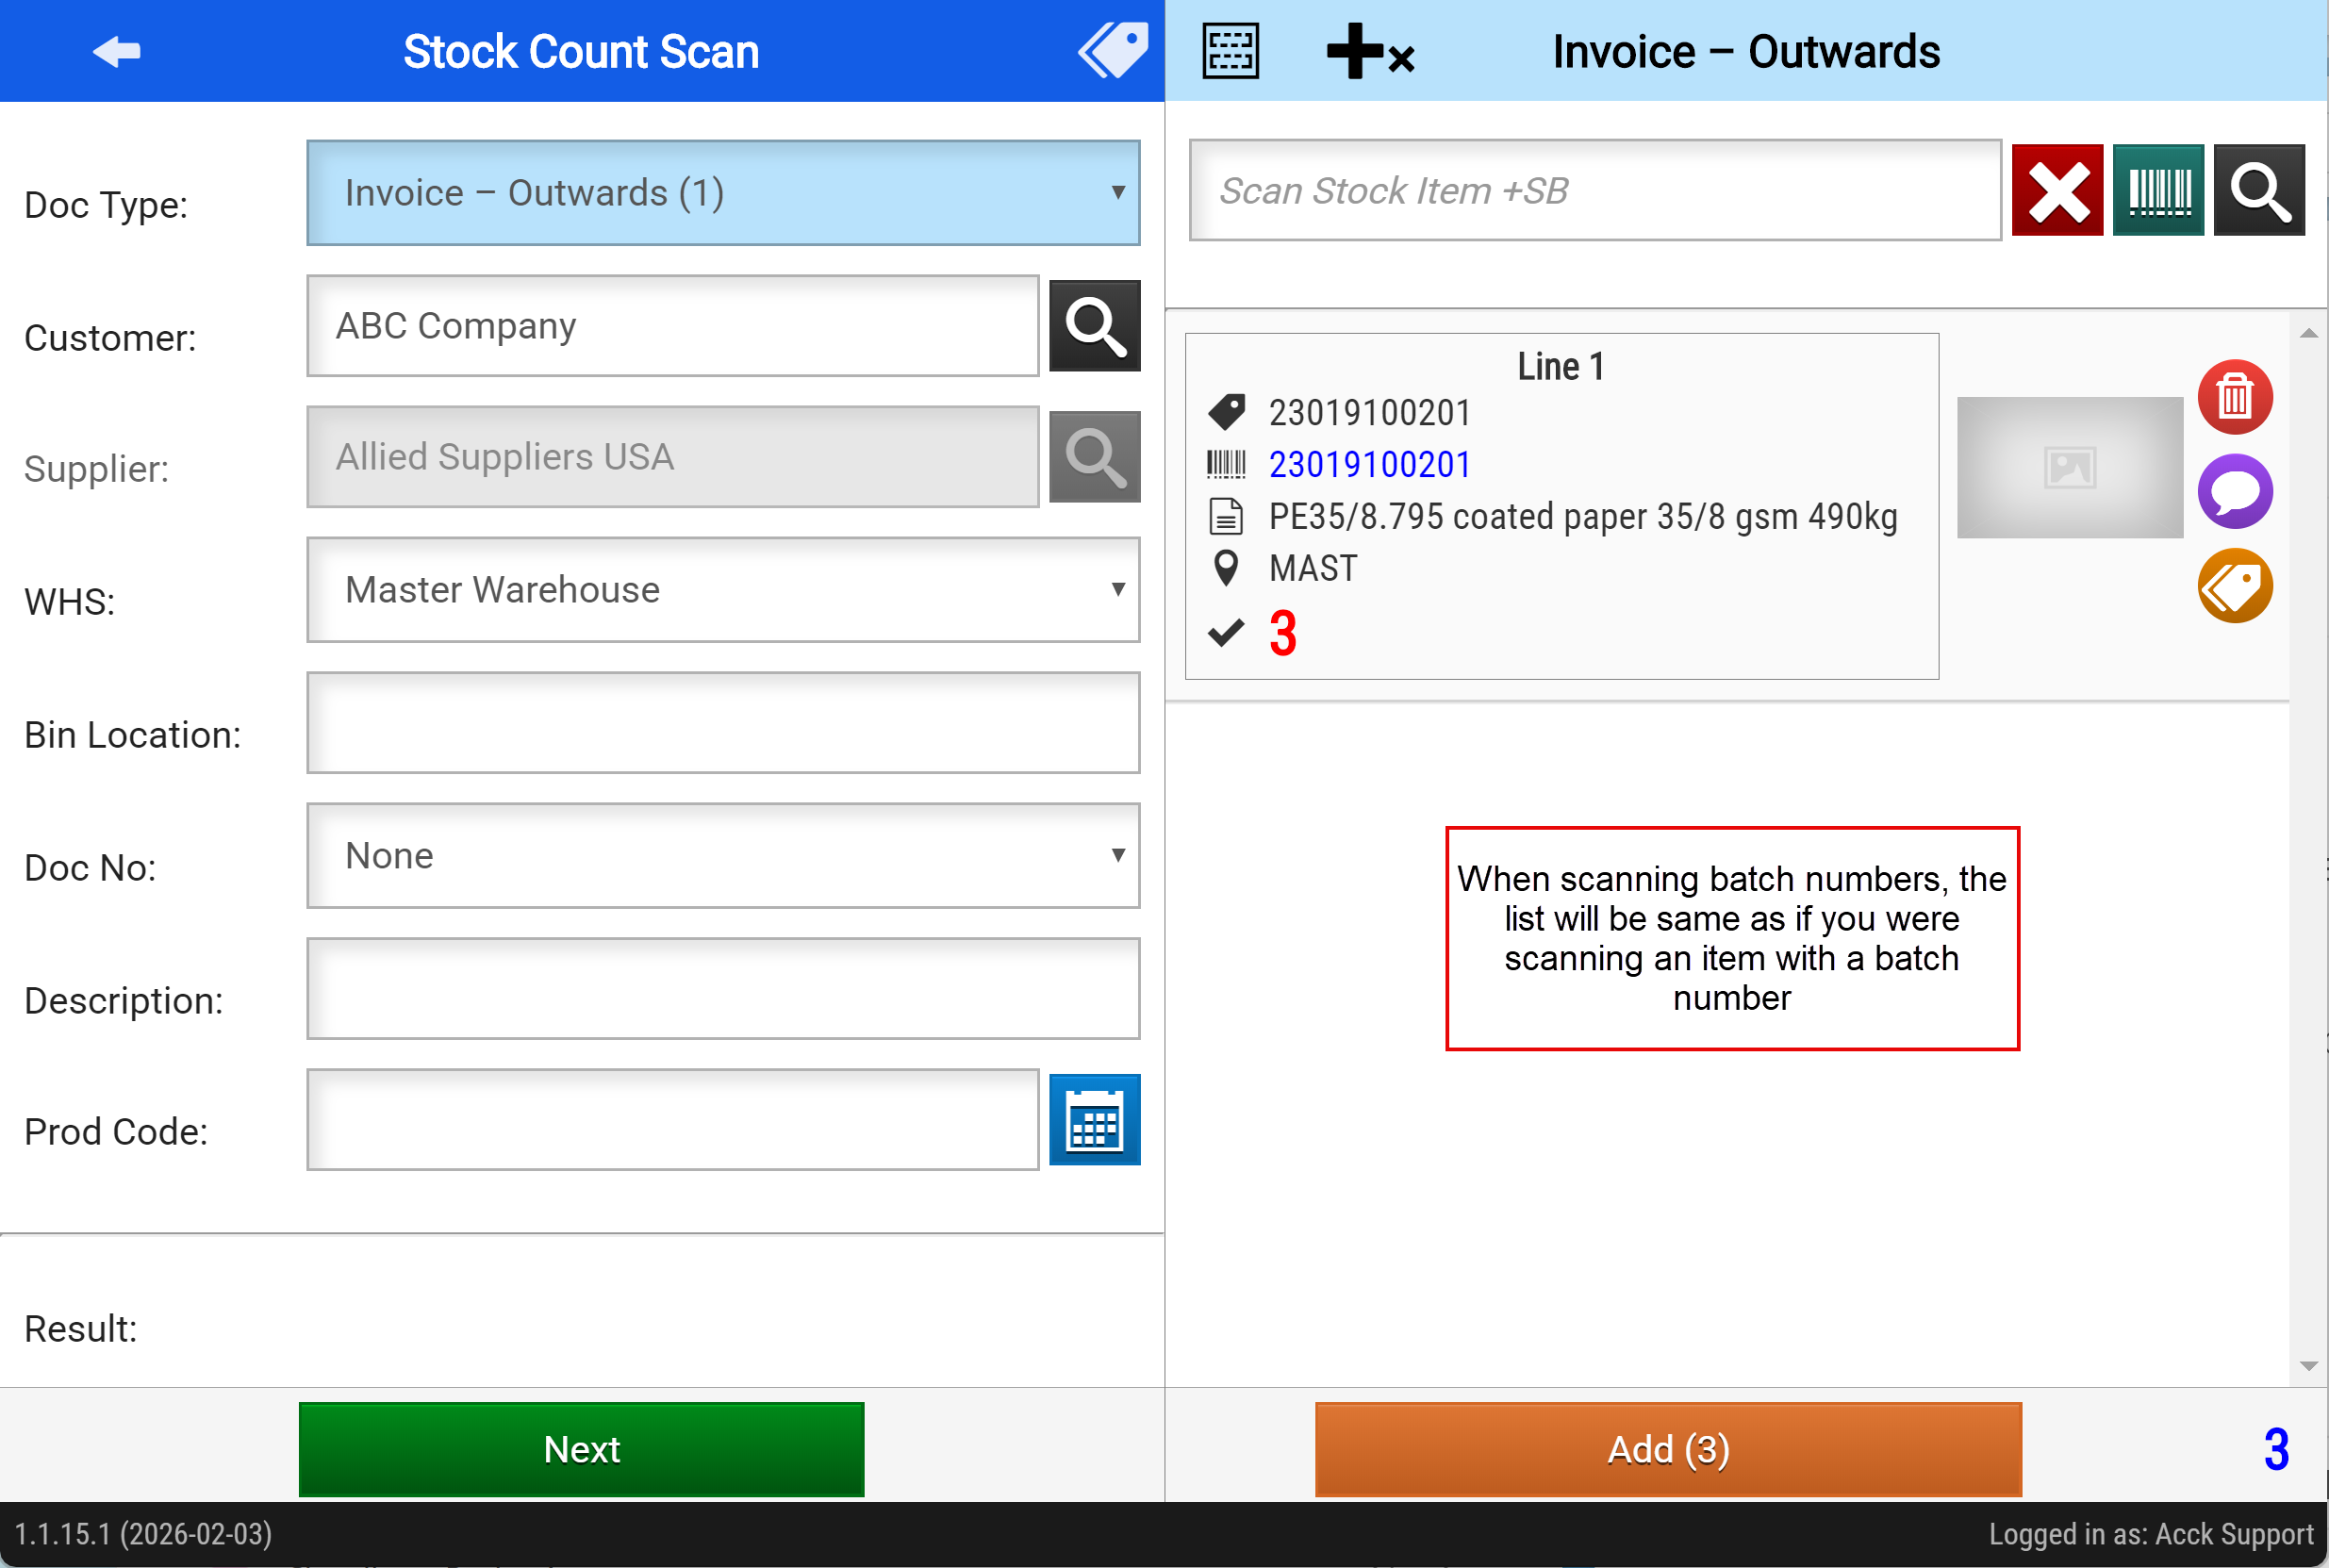
If a batch number matching the scanned text is found, then its stock item will be added to the stock count and the batch number will be added to the item, incrementing the count.
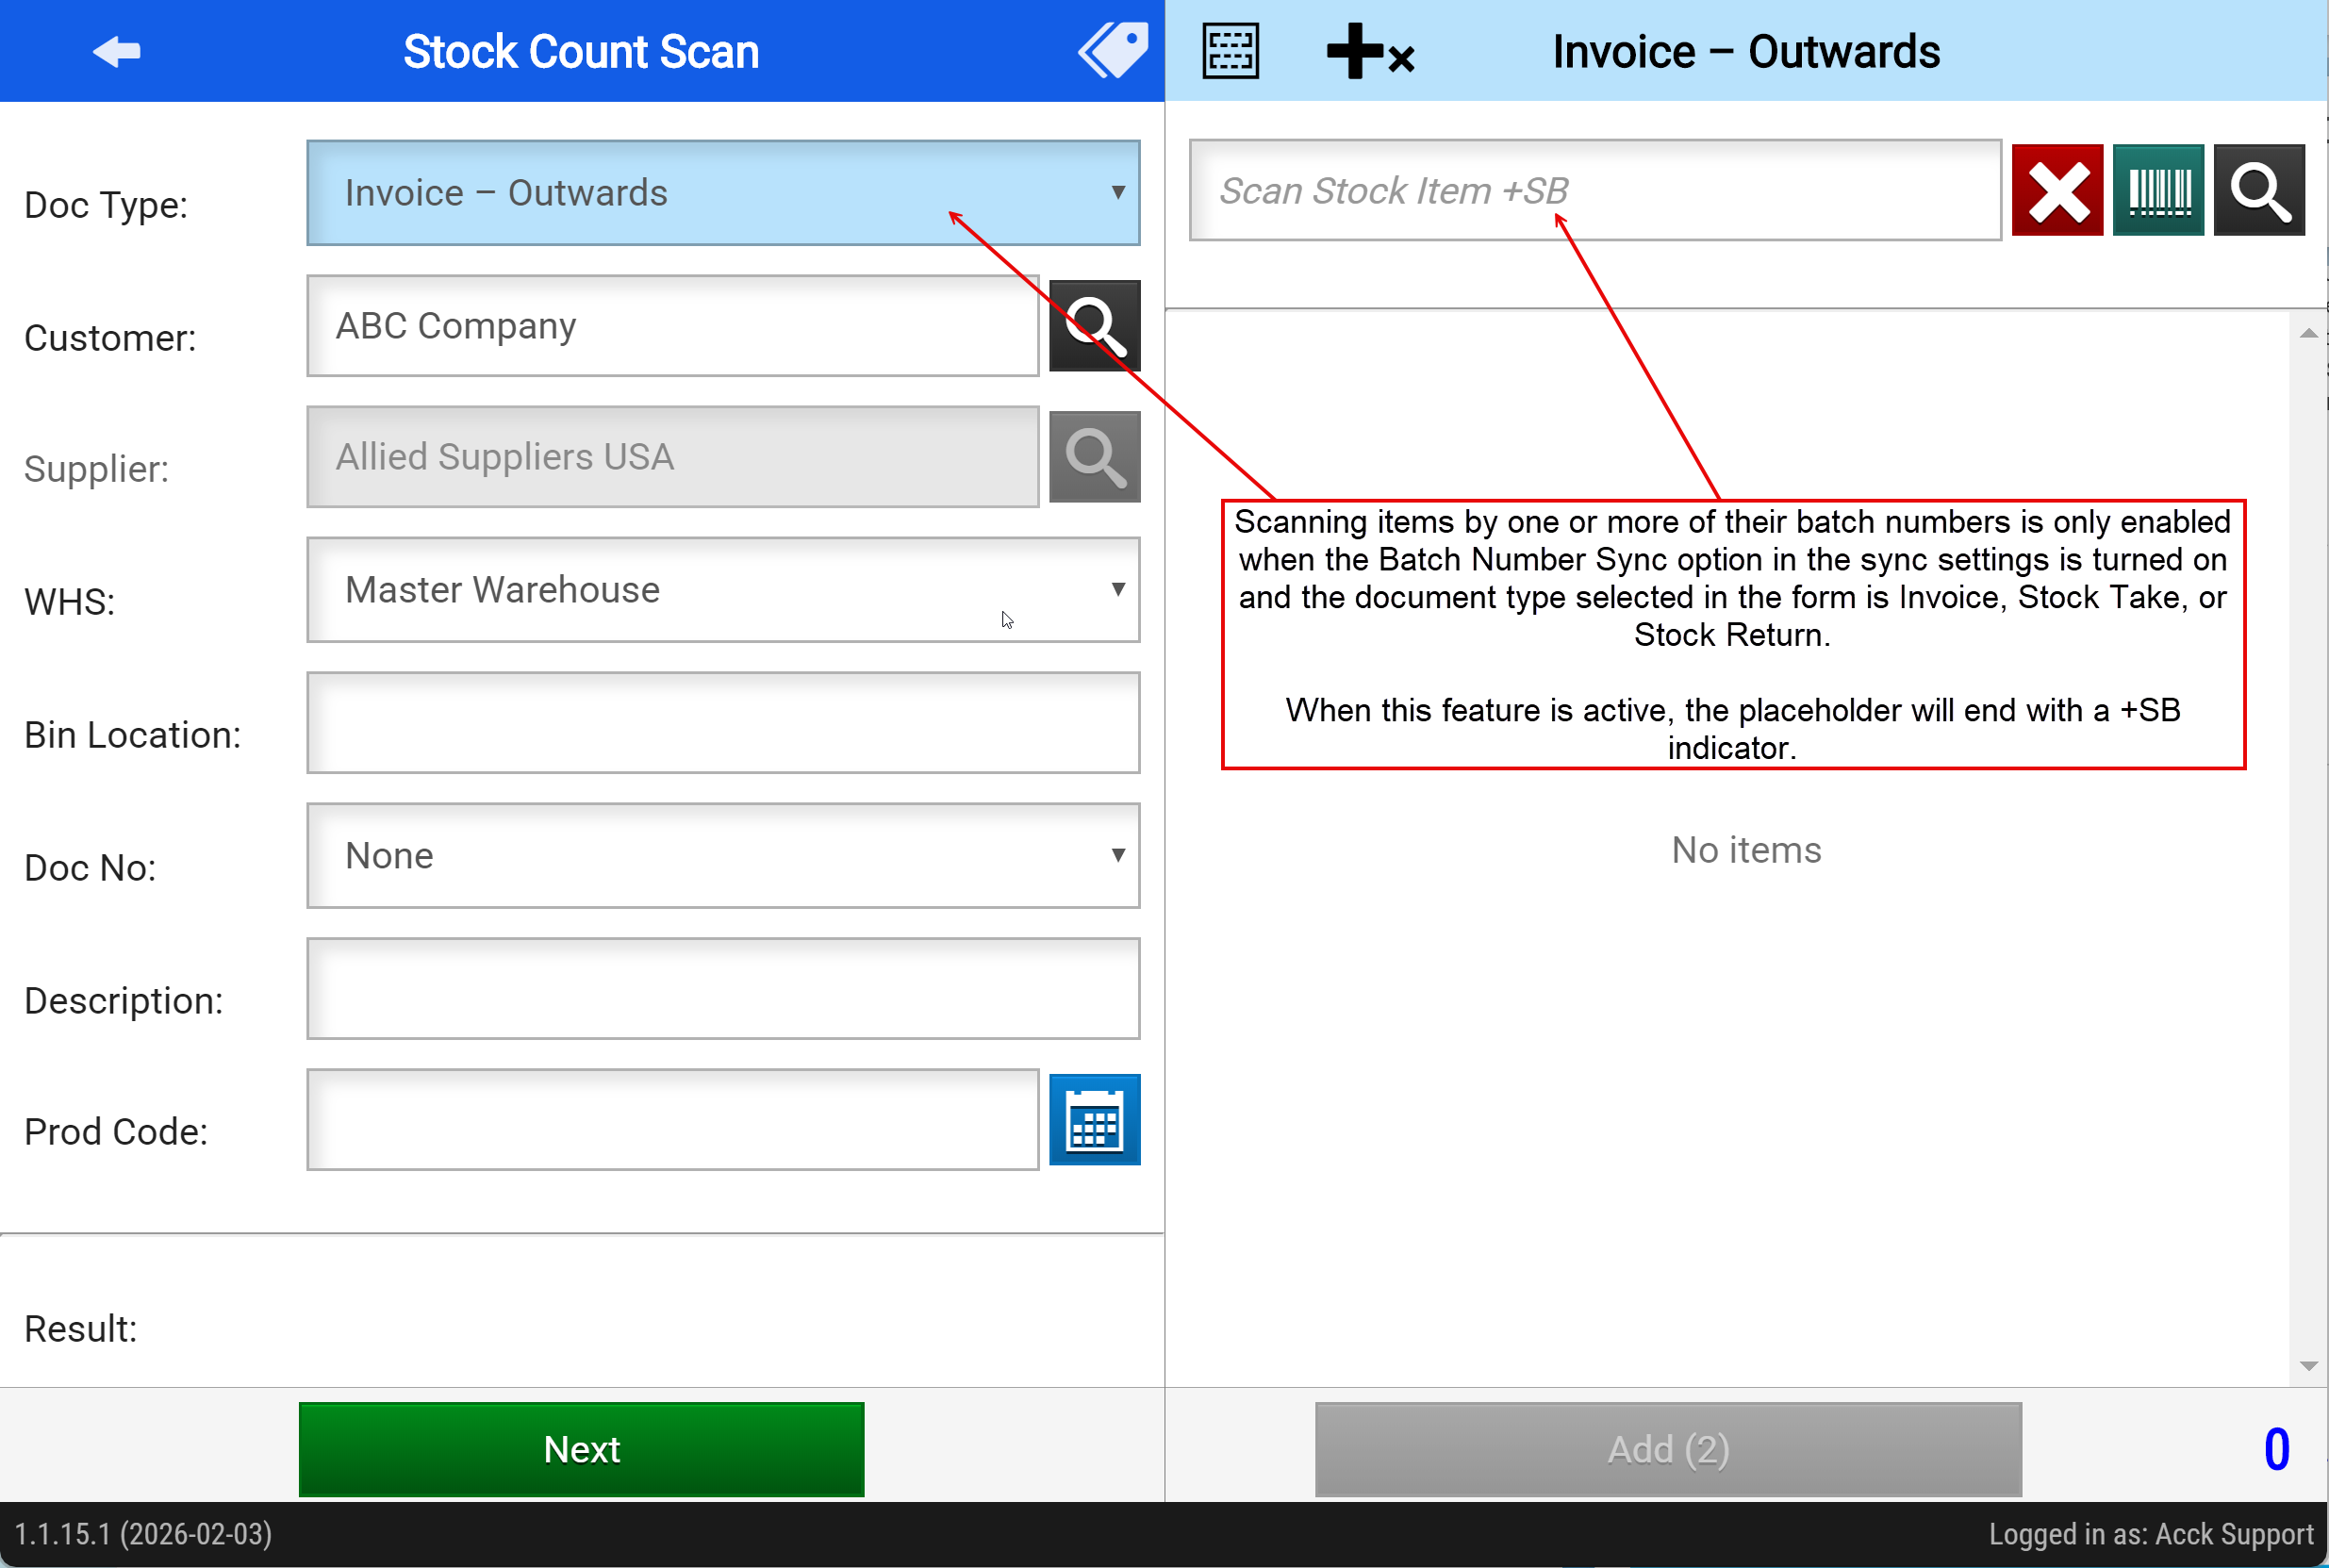
When batch number scanning is enabled the scan field placeholder text will have a plus sign and SB (+SB) added to the end of it.
If a batch number is scanned as a Stock Item and is not found in the app's database, then an error will show. One cannot scan OUT a batch number a stock item that does not exist or references a stock item that does not exist.
In the Stock Count scan module batch number scanning is performed for the following document types:
- Invoice - Outwards
- Credit Note - Inwards
- Stock Return - Outwards
- Stock Receive - Inwards
- Stock Take.
- Stock Count