Security
- API Setup
- Favorites Maintenance
- Security Role Permissions
- Report Security
- System Recalculations
- System Recalculations
- Posting queue reset
- Merge Customers
- Change Customer on Job
- Due Date
- Last Payment
- Change Transaction Dates
- Invoice Open
- History Import
- Approval Levels
- Dashboard Setup
API Setup
API Setup
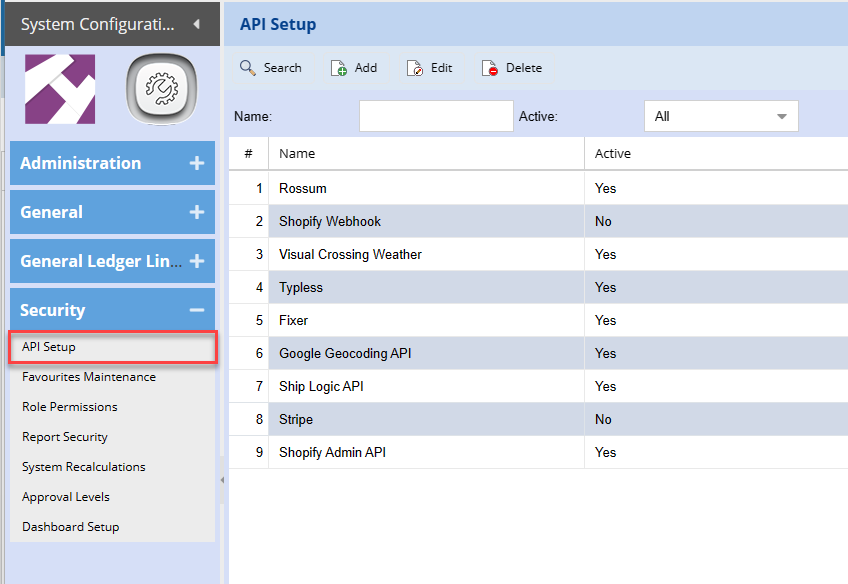
System Configuration>Security>API Setup
The term API is an acronym for Application Programming Interface
Huge ERP is able to interact with various software intermediaries.
Such as Shopify, Hawk, WooCommerce and Mailchimp etc.
View information about all the various APIs on API Connections
Favorites Maintenance
Favorites Maintenance
Video training manual 2016 - Click Here
System Configuration> Security> Favorites Maintenance
This setup provides ease of access to the users frequented menus in various modules
.png)
Add Role
A user role will have to be first defined and added.
.png)
Refresh the page and open up the favourites menu again and it can now be selected from the Role drop down
Module - You will see a list of the available modules to select from
once the module has been selected ,a menu group for that module will be available to select from.
.png)
You can then select the menu items that you wish the Auditors Role users will access.
Once the setup is done
this will need to be activated in the user setup
System configuration>General > User Setup> Amend User
go to module access and on the shortcut role select Auditors.
.png)
When this user access Huge ERP (Webaccounting) and Clicks on the favorites module
.png)
.png)
Sorting menus in sequence
Enter on grid and change the sequence number that you want the favorites list to appear to the user.
.png)
Security Role Permissions
Security Role Permissions
System Configuration> Security> Role Permissions
To create a new role permission, first select the Module that you want the role permission to fall under. Click on the Insert button
.png)
Enter a name that you can identify the role permission.
.png)
After clicking OK, Select the new Role created. We have to first setup the menu groups under that module and then the menu Items to be viewed by that role. Select the Menu Group which you want the user to see.
.png)
.png)
When the user logs in he will only see that menu item under the inventory module.
Role Permissions
Video training manual 2016 - Click Here
System Configuration> Security> Role Permissions Role Permissions is a setup that allows the administrator to control the user permission to menu items
.png)
On Our Webatar Module
We have created a Security Role called Tester.
We will be giving access on the activity menu group by moving the menu we want to the right box (selected)
Report Security
Report Security
Video training manual 2016 - Click Here
System Configuration> Security> Report Security
This is where the permissions for reports are set
| On the permissions button | You will allow or restrict certain user roles to access certain reports. |
Click on Permissions button.
.png)
| Search | To search by selected criteria: User Role, Category and Report Description. |
| User Role | The security role of the user where the administrator will select which reports the user has access to. |
| Select All | Selects all reports |
| Unselect All | Unselects all reports |
| Add Security Role | Allows the administrator to create a new security permissions role for a particular user/ group of users. |
| Allows the administrator to print the role list |
The Administrator will have an option to print All reports, print only the selected reports or to group the reports by selected on top
Reports
The system has many reports broken down into categories.
The main categories are as follows:
| Auditors Reports | |
| Creditors | |
| CRM | |
| Debtors | |
|
Financial Reports |
|
| Favourites | |
| General Ledger | |
| General | |
| Inventory | |
| Job Costing | |
| Lab | |
| Serial Numbers | |
| Assets | |
| VAT / GST |
User Reports Maintenance
Maintaining and adding new reports.
This can only be done by Huge Software developers
It is a function to add in new reports and define what the report is all about
.png)
Add report
This form is used to insert or maintain existing reports.
| Category | enter the category that the report falls under |
| Description | enter the description of the report |
| File Name | enter the file name, the height and the Width. |
| Note | a note could describe what the report is about the save the changes made to the report. |
Edit report
This form is used to insert or maintain existing reports.
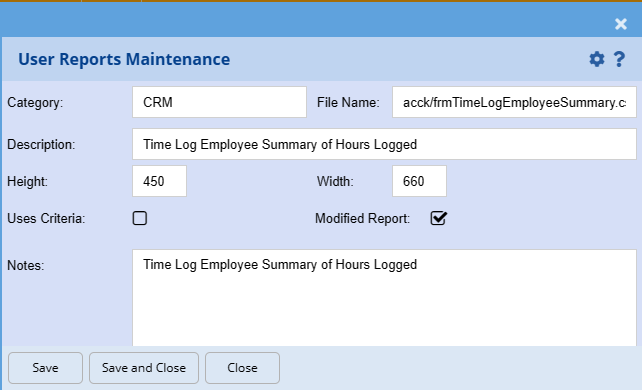
| Category | enter the category that the report falls under |
| Description | enter the description of the report |
| File Name | enter the file name, the height and the Width. |
| Note | a note could describe what the report is about the save the changes made to the report. |
Delete Report
.png)
System Recalculations
System Recalculations
System Configuration> Security> System Recalculations
We run recalculations to eliminate errors or to include additional data.
.png)
|
Scheduled System Recalculations |
|
|
2. Recalculate Balance Sheet |
01:00 am |
|
3. Recalculate Creditor Balances |
01:15 am |
|
4. Recalculate Debtor Balances |
01:30 am |
|
6. Recalculate Summary Income |
01:45 am |
|
7. Update Account Balances |
02:00 am |
The recalculation can be run whenever the balance is out.
Activate schedule
Deactivate schedule
Reset posting queue
Posting queue reset
Video training manual 2016 - Click Here
.png)
Merge Customers
This utility allows you to merge customers.
When somebody has duplicated a customer and has put transactions against it, you can merge the transactions of the customer to the new customer.
Once you have completed the merge, it is recommended thank you delete the duplicated customer.
.png)
Source Customer
Find the customer that is duplicated, enter the customer in this section.
This will be the customer that you will delete after you have merged it.
Merge to customer
This is the customer that you want as the main customer.
Enter both the source and the merge to customer and then click on confirm to reassign all customer transactions.
.png)
Change Customer on Job
Use this utility to change a wrong customer on a job to the correct customer .
This will change all the quotes and job to the new customer
.png)
Find the job number that has the wrong customer.
Select a new customer that you want the job to go to and click on the button called change.
This will change any invoices against the job.
Note that this will not allow you to change the customer if there are any invoices that are allocated.
Unallocated payment to invoice before running this utility.
.png)
Due Date
Use this utility to update all the debtors and creditors transaction with the due date.
This will help to update past transactions to have a due date against them.
You can also use this utility to update the transactions for due date if you have changed the terms of the customer or supplier .
.png)
This will run automatically when you click Run Utility
.png)
Last Payment
Use this utility to update Debtors and Creditors last payment date.
This will update the tables so that when you run the age analysis report for the last payment date , this will appear there.
.png)
Change Transaction Dates
Change transaction dates of processed documents.
Helps to not have to do a credit note and reissue invoice.
WARNING
Use this new feature with care.
It allows one to change the transaction date of posted documents.
This will update the document, general ledger transactions and tax tables.
Not recommended if you have submitted Taxes (VAT or GST) to government organizations.
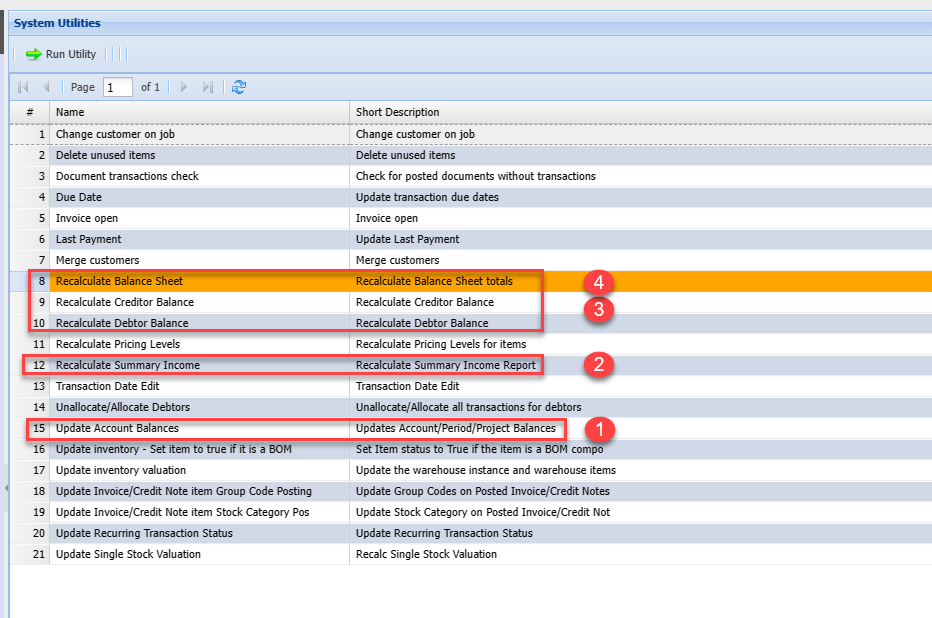
Balances recalculations to be run after changes
If you are changing transactions in different periods, run the system recalculations to update balances in those periods.
Go to System Utilities (system recalculations)

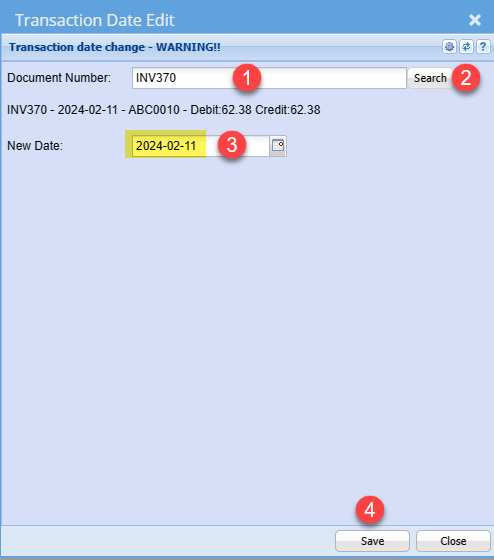
Enter the exact document number, it must include full document number - INV370
- Enter the document number
- Click on Search to find document
- Change to new date
- Click on Save to update transaction
Recalculate balances
After updating a date of a transaction, run recalculations to update balances.
There is a possibility that your reports will be out of sync
User log
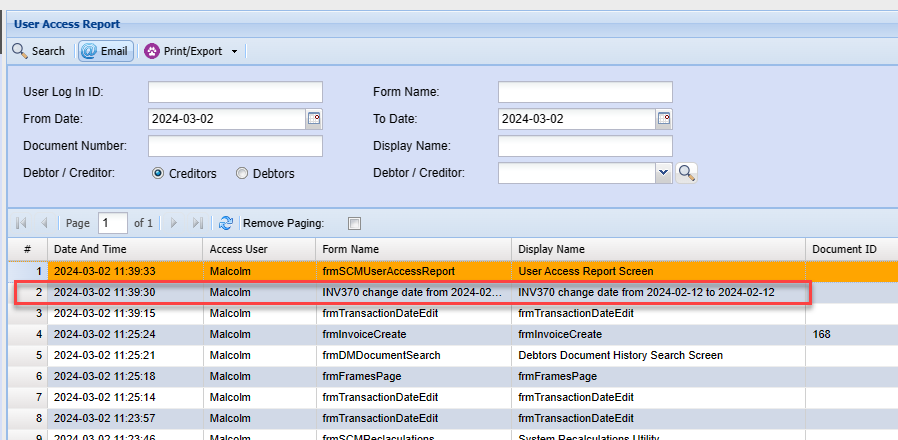
The change will be logged in the user log as proof a user changed a date on a document
Invoice Open
This is a utility that allows a posted invoice to be reopened and edited.
Warning
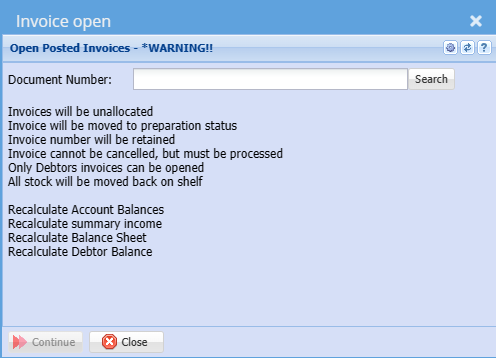
The utility will do the following
- Make a PDF invoice and store in folder
- Un allocate the invoice
- Delete General Ledger transactions
- Delete VAT / GST tables
- Delete mirror table
- Delete allocations table
- Delete stock movement
- Recalculate each stock item
- Make a user log entry
This utility is specific to Debtors invoices only, no job invoices and no other documents.
Recommended to do the following after invoice re opened.
This can be done at the end of the day
Reports maybe out of sync if the following utilities are not run before running reports
- Recalculate Account Balances
- Recalculate summary income
- Recalculate Balance Sheet
- Recalculate Debtor Balance
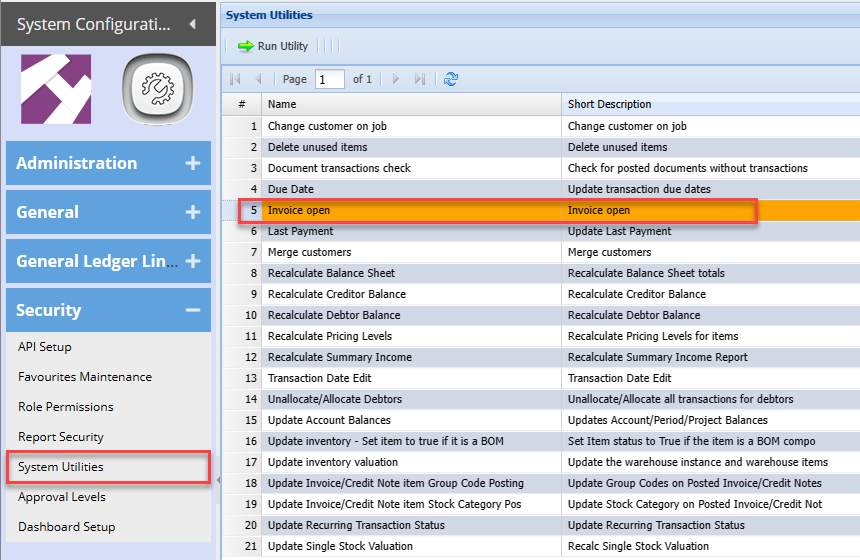
Access the system via the System Utilities (System Recalculations)
Enter your invoice number in full
Click on Search
Click on Continue to complete
After the invoice has been re opened, find it in the Debtors Module > Activity > Invoice
This will be displayed as a preparation invoice, which can be edited and reprocessed.
The Invoice cannot be cancelled as it has reserved the invoice number. it must be processed
A copy of the invoice is kept in the back ground folders for audit purposes.
A user log is created to log who re opened an invoice and which invoice was re opened.
New transactions and stock movements will take place when processing the invoice.
History Import
History Import
System Configuration>Security>History Import
This feature has been discontinued.
For Trial Balance past transactions, use General Ledger Journal CSV imports
.png)
Approval Levels
Approval Levels
System Configuration> Security> Approval Levels
This is the setup for the flow of actions required from various personal to bring a purchase order into effect.
Webaccounting allows for Amount - based authorization levels.
Click Add
.png)
The Systems caters for Purchase Order or Expense.
| Document Type | Select Purchase Order on the drop down. |
| Value From | Enter the start value of the Purchase Order. |
| Value To | This is the limit value for the Purchase Order. |
Dashboard Setup
Dashboard Setup
System Configuration> Security> Dashboard Setup
Dashboards allow one to view information on screen either via grid, bar graph or line graph.
There are multiple different types of dashboards.
Dashboards can be on a timer basis and put up on a wall for people to see.
Dashboards can have 3 different views
| 1 | One quadrant full screen. |
| 2 | Two quadrants duel screen |
| 3 | Four quadrants |
They are dashboards for sales, general Ledger and suppliers. Each of the dashboards have specific criteria’s which can be modified
.png)
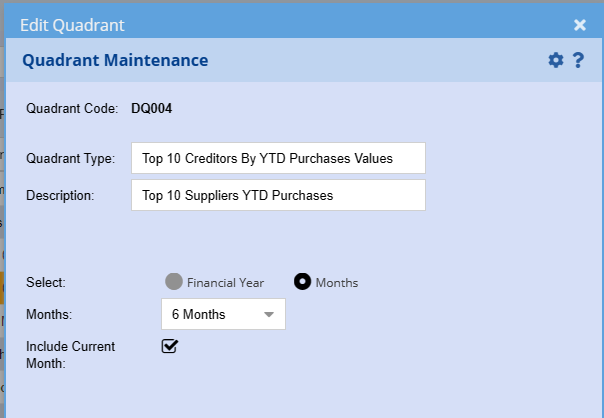
Dashboard Quadrant Maintenance
There are multiple dashboards that can be added to be used in your dashboard
Click on Add to define which dashboard you want and define your criteria
Each dashboard has its own criteria to match your requirements
Sales Projected Dashboard
Video manual - Click Here
This looks at the projected sales for the current month
Invoices processed less credit notes processed plus invoices in preparation plus invoices in recurring plus sales orders and quotations equal Total
.png)
.png)
.png)
.png)
Total Daily Sales
This looks at the total sales per day for the current month
Invoices processed less credit notes processed equal Total
Total daily sales can be viewed by Bar or line graph
.png)
Graph view sample
.png)
Monthly Total Sales
This is displayed as a Donut Effect
Input your monthly target
Select the size of the Donut in percentage
Select a Donut colour
.png)