# General

General

# Barcodes

# Barcodes

<span class="ts0">In this section we cover printing and scanning of barcodes</span>

<span class="ts0"> </span>1.<span class="ts0">Printing barcodes direct from system</span>

2.<span class="ts0">Scanning using ScanSKU device</span>

<span class="ts0"> </span>

<span class="ts21">Printing barcodes setup</span>

<span class="ts0">Look under Trouble shooting </span>[Barcode print setup](https://hugeerp0.co.za/csp/webhelp/topics/idh-topic10570.htm)

<span class="ts0"> </span>

<span class="ts21">Scanning using ScanSKU</span>

<span class="ts0">View various video files for setups</span>

# Barcode Labels

<span class="ts0">The system allows for printing barcodes directly</span>

<span class="ts0"> </span><span class="ts0">The areas these are possible are</span>

1.<span class="ts0">Inventory setup barcode single print</span>

2.<span class="ts0">Inventory setup search screen, multiple barcode and single barcode print</span>

3.<span class="ts0">Purchase Order edit screen</span>

4.<span class="ts0">Receive stock edit screen</span>

<span class="ts0"> </span><span class="ts0">Multiple print barcodes are limit to the number of items shown on the grid.</span>

<span class="ts0">If you are viewing 100 records, print will only work on the 100 records displayed</span>

<span class="ts0"> </span><span class="ts0">Single item print</span>

<span class="ts0"> </span>![](https://hugeerp0.co.za/csp/webhelp/topics/images/image(3340).png)

<span class="ts0"> </span><span class="ts0">Purchase Order</span>

<span class="ts0"> </span>![](https://hugeerp0.co.za/csp/webhelp/topics/images/image(3341).png)

<span class="ts0"> </span><span class="ts0"> </span><span class="ts0">Receive Stock</span>

<span class="ts0"> </span>![](https://hugeerp0.co.za/csp/webhelp/topics/images/image(3342).png)

<span class="ts0"> </span>

<span class="ts0"></span>

# Barcode Labels Integration

The system now allows you to print barcodes.

You will see the barcode icon across the system.

[![image.png](https://hugeerp10.co.za/hsofmanual/uploads/images/gallery/2024-01/scaled-1680-/IYuimage.png)](https://hugeerp10.co.za/hsofmanual/uploads/images/gallery/2024-01/IYuimage.png)

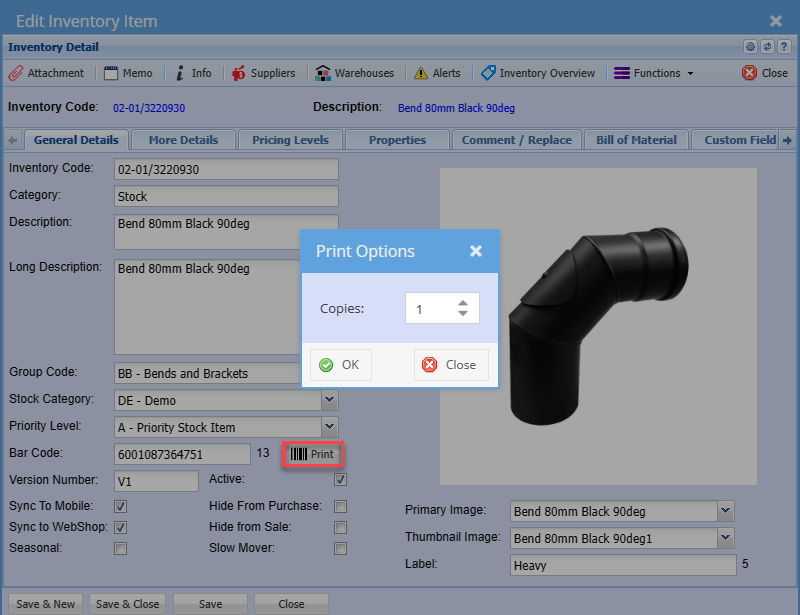
For example, on the inventory module, when you click on the print button a prompt will appear, allowing you to specify the number of copies you wish to generate.

When you click OK a physical printing of a barcode label, displays the layout containing information specific to the selected item.

For this feature to work you need to set up a barcode template in the system configurations

The places that we currently integrate with are:

- Inventory set up
- Assets scanning
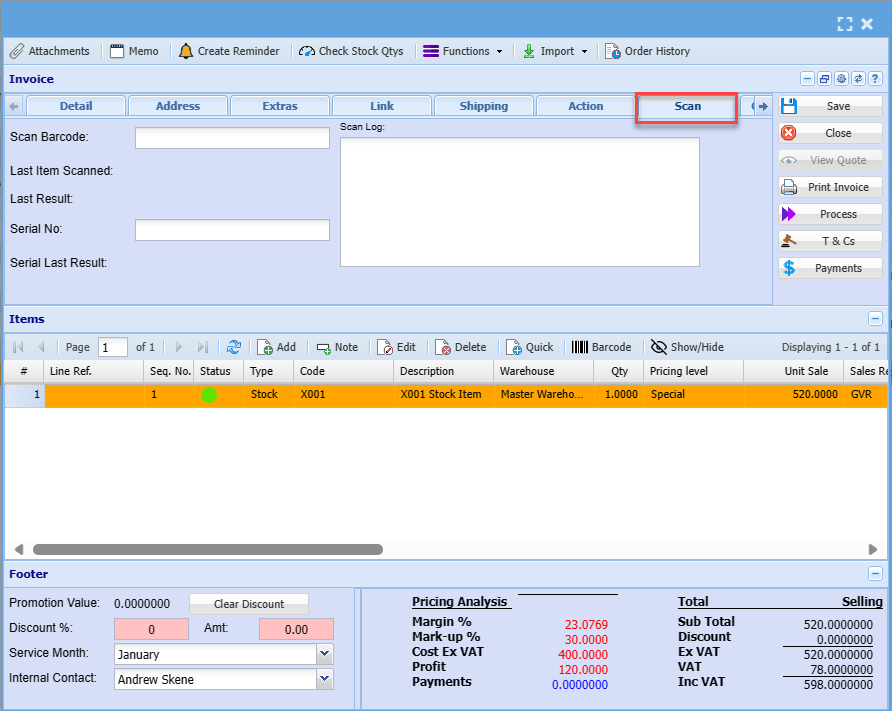
- Barcode printing Scan
- Debtor documents

[![image.png](https://hugeerp10.co.za/hsofmanual/uploads/images/gallery/2024-01/scaled-1680-/MlAimage.png)](https://hugeerp10.co.za/hsofmanual/uploads/images/gallery/2024-01/MlAimage.png)
# Barcode scanners Integration

<span style="color: rgb(50, 49, 48); font-family: 'Segoe UI', sans-serif; font-size: 10pt;">The Barcode Scanning feature allows you to scan items in various sections of the system and you can also receive scans.</span>

<span style="color: rgb(50, 49, 48); font-family: 'Segoe UI', sans-serif; font-size: 10pt;">You can scan items into the system and the system will automatically add them for you. </span>

<span style="color: rgb(50, 49, 48); font-family: 'Segoe UI', sans-serif; font-size: 10pt;">The barcode scan helps to eliminate capturing errors and increases productivity.</span>

[![image.png](https://hugeerp10.co.za/hsofmanual/uploads/images/gallery/2024-01/scaled-1680-/SVwimage.png)](https://hugeerp10.co.za/hsofmanual/uploads/images/gallery/2024-01/SVwimage.png)

# ScanSKU Device Barcode

# ScanSKU Device

<span class="ts0">The device is an external purchase to use with the software</span>

<span class="ts0"> </span><span class="ts0">The device is uses three basic apps</span>

1. <span class="ts0"> </span><span class="ts0">Stock Take count used for Purchase Orders, Sales orders, stock count and stock take</span>
2. <span class="ts0">ScanSKU lookup</span>
3. <span class="ts0">Picking slip for Sales order</span>

<span class="ts0"> </span>

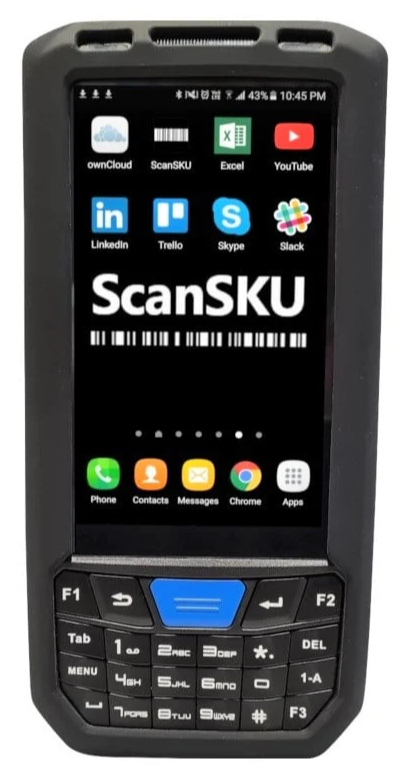
[![R-Series.png](https://hugeerp10.co.za/hsofmanual/uploads/images/gallery/2024-02/scaled-1680-/r-series.png)](https://hugeerp10.co.za/hsofmanual/uploads/images/gallery/2024-02/r-series.png)

---

#### Setup device

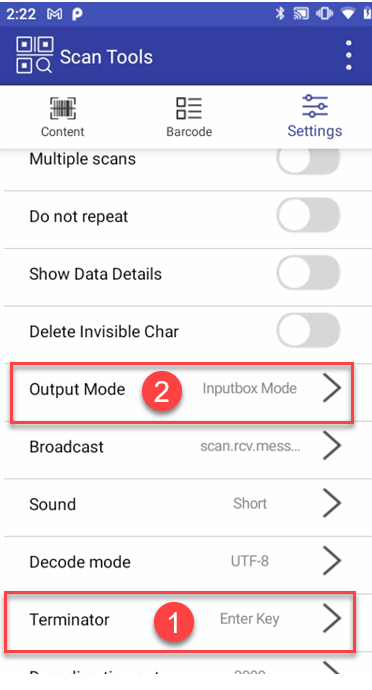
There are two basic setups required

1. Keyboard Mode
2. Enter key

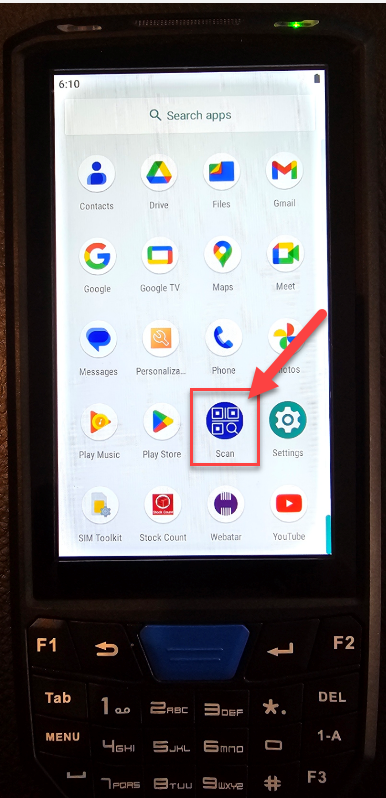
Under apps, go to Scan app

[![image.png](https://hugeerp10.co.za/hsofmanual/uploads/images/gallery/2024-02/scaled-1680-/Khgimage.png)](https://hugeerp10.co.za/hsofmanual/uploads/images/gallery/2024-02/Khgimage.png)
Click on Settings and find the two settings

Output Mode - must be Keyboard

Terminator - must be Enter Key

[![image.png](https://hugeerp10.co.za/hsofmanual/uploads/images/gallery/2024-02/scaled-1680-/YXjimage.png)](https://hugeerp10.co.za/hsofmanual/uploads/images/gallery/2024-02/YXjimage.png)
# ScanSKU General Setup

<span class="ts10">Video training manual 2021 - </span>[Click Here](https://vimeo.com/655200842)

<span class="ts0"> </span>

<span class="ts0">This section gives informaiton on the ScanSKU device and basic setup</span>

<span class="ts0"> </span>![](https://hugeerp0.co.za/csp/webhelp/topics/images/image(3382).png)

# ScanSKU Scan Setting

<span class="ts10">Video training manual 2021 - </span>[Click Here](https://vimeo.com/655200953)

<span class="ts0"> </span>

<span class="ts0">Setting up the scan setting to allow for enter after scan</span>

<span class="ts0"> </span>![](https://hugeerp0.co.za/csp/webhelp/topics/images/image(3383).png)

# ScanSKU Lookup

<span class="ts10">Video training manual 2021 - </span>[Click Here](https://vimeo.com/655200899)

<span class="ts0"> </span>

<span class="ts0">This allows one to view data on the device of products</span>

<span class="ts0"> </span>![](https://hugeerp0.co.za/csp/webhelp/topics/images/image(3384).png)

# ScanSKU Stock Take

<span class="ts10">Video training manual 2021 - </span>[Click Here](https://vimeo.com/655201044)

<span class="ts0">This shows one how to use the ScanSKU stock take function for scanning of stock for</span>

<span class="ts0"> </span>1.<span class="ts0">Stock take</span>

2.<span class="ts0">Stock counts</span>

3.<span class="ts0">Purchase Order receiving goods</span>

4.<span class="ts0">Sales orders</span>

<span class="ts0"> </span>![](https://hugeerp0.co.za/csp/webhelp/topics/images/image(3385).png)

<span class="ts0"> </span><span class="ts0"> </span><span class="ts0">When first going into the stock take</span>

<span class="ts0">Click on Lock Location tick on, so that you don't have to continue to enter the Scan Location</span>

<span class="ts0">Enter MAST for Master warehouse or the warehouse code that is going to be scanned.</span>

<span class="ts0"> </span>![](https://hugeerp0.co.za/csp/webhelp/topics/images/image(3736).png)

<span class="ts0"> </span><span class="ts0">Click on the Barcode text field</span>

<span class="ts0">1.</span> <span class="ts0">Click on the SCAN on the device to scan barcode</span>

 <span class="ts0">Barcode will then populate</span>

<span class="ts0">2.</span> <span class="ts0">Enter quantity for count</span>

 <span class="ts0">If number does not come up, click on Input Quantity field</span>

<span class="ts0">3.</span> <span class="ts0">Click on the tick to accept</span>

<span class="ts0">4.</span> <span class="ts0">Click on the Add SKU to accept count</span>

<span class="ts0"> </span><span class="ts0"> </span>![](https://hugeerp0.co.za/csp/webhelp/topics/images/image(3737).png)

<span class="ts0"> </span><span class="ts0">1.</span> <span class="ts0">Clicking on the Add SKU to Accept</span>

<span class="ts0">2.</span> <span class="ts0">The screen will go green once it is accepted</span>

<span class="ts0">3.</span> <span class="ts0">It will now show below on list</span>

<span class="ts0">4.</span> <span class="ts0">Then you are ready to scan next item</span>

<span class="ts0"> </span>![](https://hugeerp0.co.za/csp/webhelp/topics/images/image(3738).png)

<span class="ts0"> </span><span class="ts0">Click on View Data button to view all SKUs scanned</span>

<span class="ts0">Rotate device for a landscape view as it is much easier to see the products.</span>

<span class="ts0">Click on the return to stock take button, to continue stock take.</span>

<span class="ts0"> </span>![](https://hugeerp0.co.za/csp/webhelp/topics/images/image(3739).png)

<span class="ts0"> </span><span class="ts0">Once you are done with the stock take, you will need to email the file</span>

<span class="ts0">Click on Save and Email data</span>

<span class="ts0"> </span>![](https://hugeerp0.co.za/csp/webhelp/topics/images/image(3740).png)

<span class="ts0"> </span><span class="ts0">Name the file to be emailed</span>

<span class="ts0"> </span>![](https://hugeerp0.co.za/csp/webhelp/topics/images/image(3741).png)

<span class="ts0"> </span><span class="ts0"> </span> <span class="ts0">Email file to your email address</span>

<span class="ts0">1. Enter your email address</span>

<span class="ts0">2. Put in a subject line</span>

<span class="ts0">3. Send file</span>

<span class="ts0"> </span><span class="ts0"> </span><span class="ts0"> </span>

![](https://hugeerp0.co.za/csp/webhelp/topics/images/image(3742).png)

<span class="ts0"> </span><span class="ts0"> </span><span class="ts0">After file is emailed, clear the data for a new bulk scan or for next stock take</span>

<span class="ts0">After you have cleared the data, close the window and reopen</span>

<span class="ts0"> </span>![](https://hugeerp0.co.za/csp/webhelp/topics/images/image(3743).png)

<span class="ts0">After you have cleared your data, log back into stock take</span>

<span class="ts0"> </span>![](https://hugeerp0.co.za/csp/webhelp/topics/images/image(3385).png)

<span class="ts0"> </span>

<span class="ts0"> </span>

<span class="ts0"> </span>

<span class="ts0"></span>

# ScanSKU Picking

<span class="ts10">Video training manual 2021 - </span>[Click Here](https://vimeo.com/655201004)

<span class="ts0"> </span><span class="ts0">This section shows you how to scan for stock on an existing sales order</span>

<span class="ts0"> </span>![](https://hugeerp0.co.za/csp/webhelp/topics/images/image(3386).png)

# Upgrade instructions for ScanSKU G-Series barcode scanners

##### Click on the below link and follow the instruction to update the firmware for the Scansku G-Series Scanner

[G-Series - ScanSKU Flash Tool.zip](https://riskitsys-my.sharepoint.com/:u:/g/personal/travis_barcodeproducts_co_nz/ER3l0lz3B8dCpFzWY5fLK6UBl_JfiWfOSJ6tgF0lTkOCzA "G-Series - ScanSKU Flash Tool.zip")

1. Download and extract all or unzip the software from the shared link. Move folder “ScanSKU Flash Tool” to the root folder directory C:

[![image.png](https://hugeerp10.co.za/hsofmanual/uploads/images/gallery/2025-10/scaled-1680-/image.png)](https://hugeerp10.co.za/hsofmanual/uploads/images/gallery/2025-10/image.png)
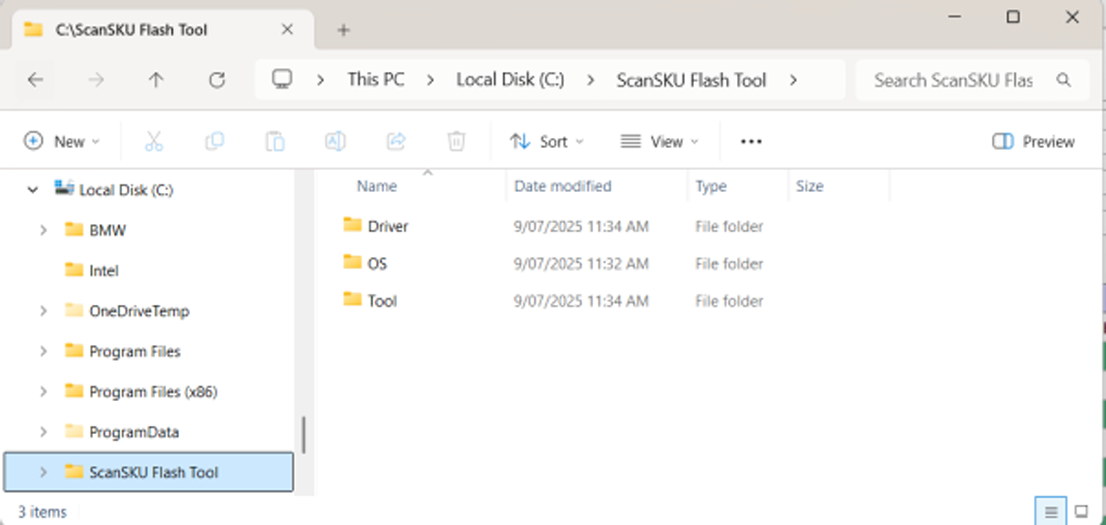
2\. Go to the “Tool” directory, click on the “Flash\_tool.exe”. If the file is hidden, use the search tool.

3\. The first time the Flash Tool opens, the “Scatter-loading File” is blank. Select Choose, search in the “OS” directory and select the “MT6765\_Android\_scatter.txt” file.

[![image.png](https://hugeerp10.co.za/hsofmanual/uploads/images/gallery/2025-10/scaled-1680-/Xlrimage.png)](https://hugeerp10.co.za/hsofmanual/uploads/images/gallery/2025-10/Xlrimage.png)
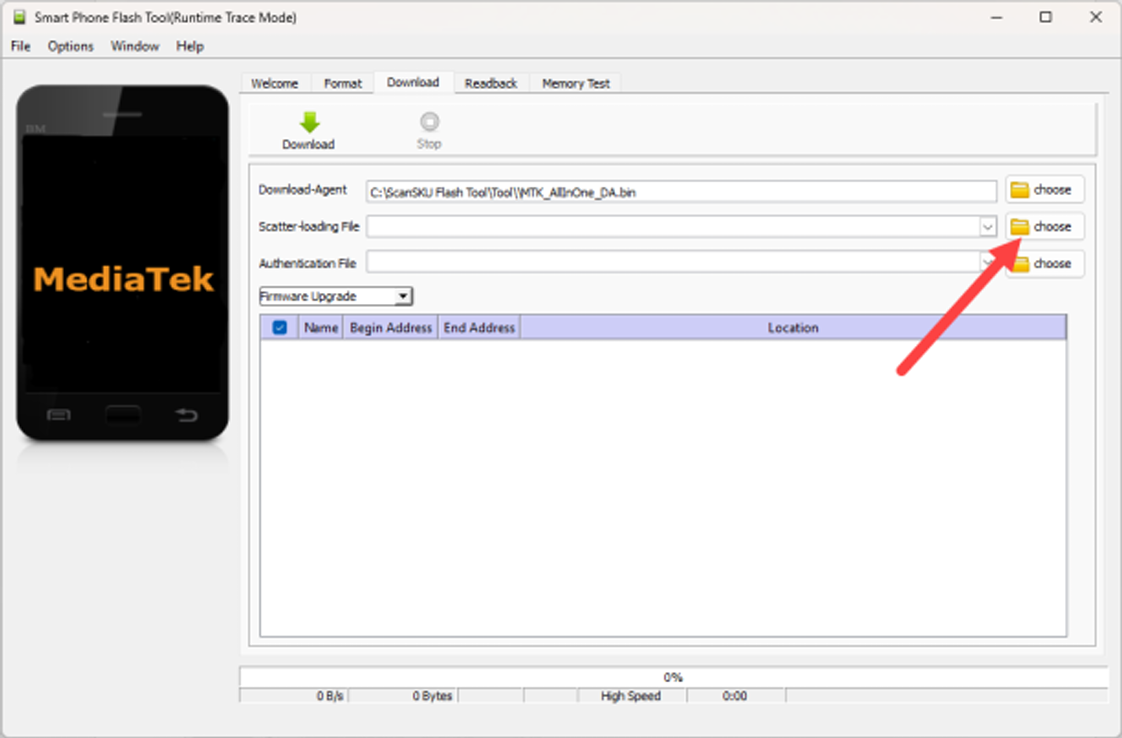
4\. The window below will appear with all the files selected.

[![image.png](https://hugeerp10.co.za/hsofmanual/uploads/images/gallery/2025-10/scaled-1680-/7fHimage.png)](https://hugeerp10.co.za/hsofmanual/uploads/images/gallery/2025-10/7fHimage.png)
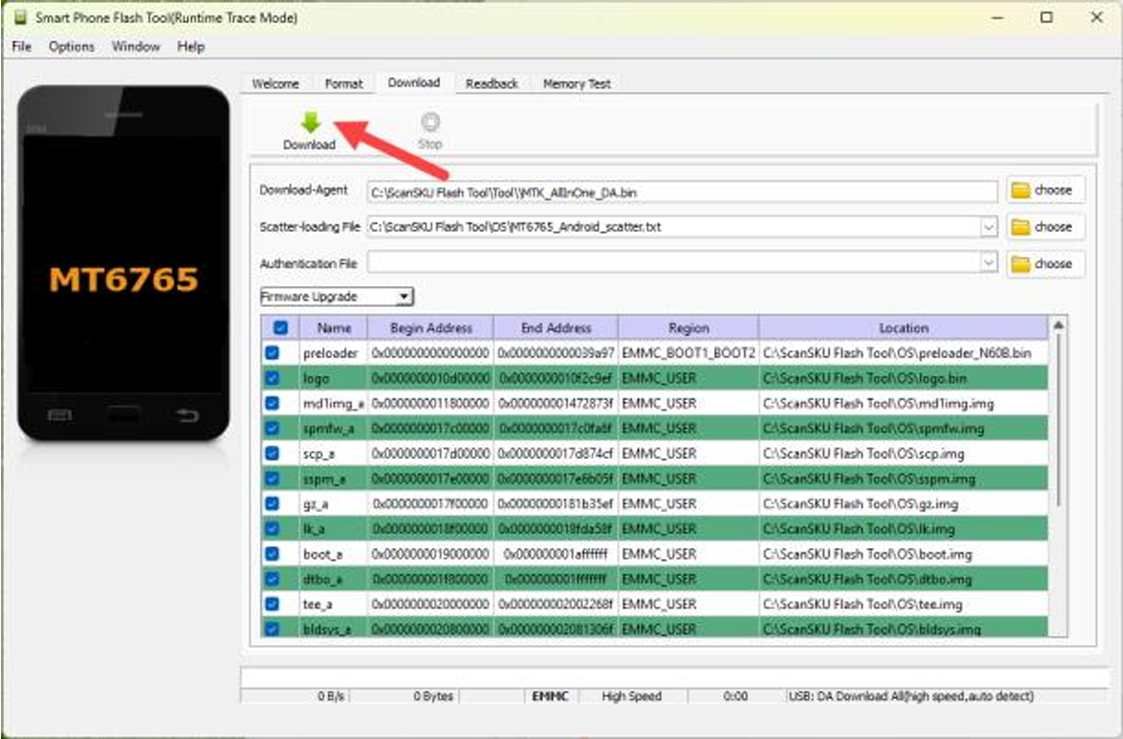
5\. Click the “Download” arrow.

6\. The window will grey out, and the app is ready to download the software

[![image.png](https://hugeerp10.co.za/hsofmanual/uploads/images/gallery/2025-10/scaled-1680-/dy4image.png)](https://hugeerp10.co.za/hsofmanual/uploads/images/gallery/2025-10/dy4image.png)
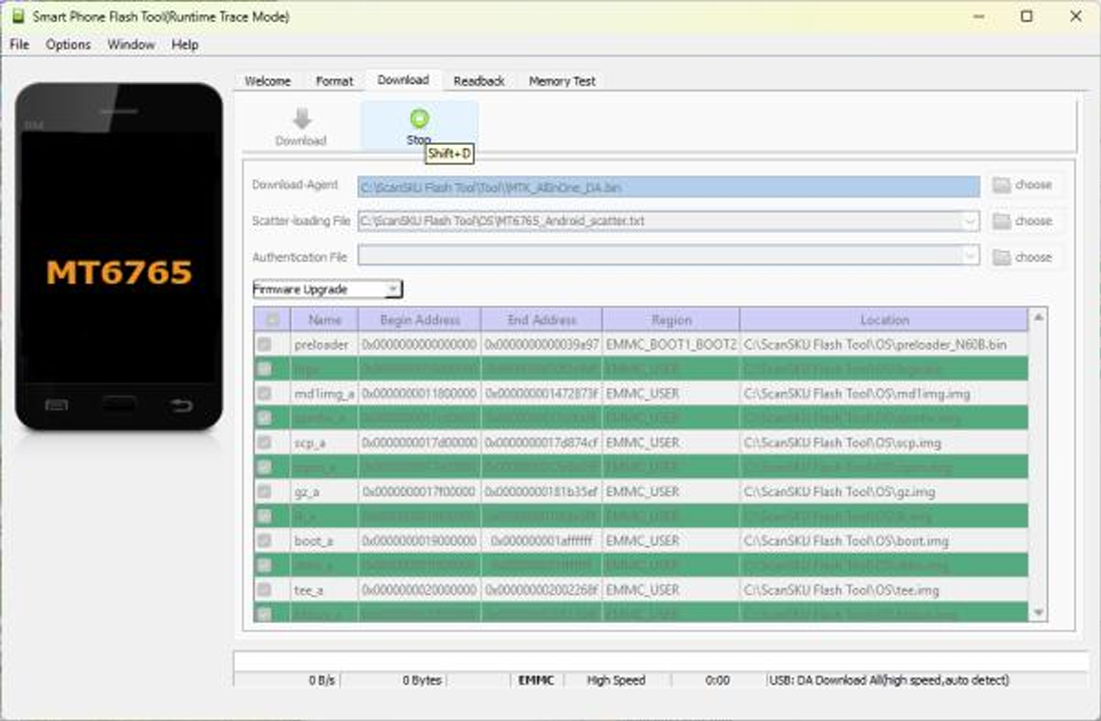
7\. Power off the scanner.

8\. Press and hold the "Volume Up" &amp; "Left Scan" buttons simultaneously.

9\. Plug in the USB cable that is connected to the workstation running the Upgrade App.

10\. Keep holding buttons for 2-3 sec.

11.Upgrade activity should be seen below the green and white area.

[![image.png](https://hugeerp10.co.za/hsofmanual/uploads/images/gallery/2025-10/scaled-1680-/qyximage.png)](https://hugeerp10.co.za/hsofmanual/uploads/images/gallery/2025-10/qyximage.png)
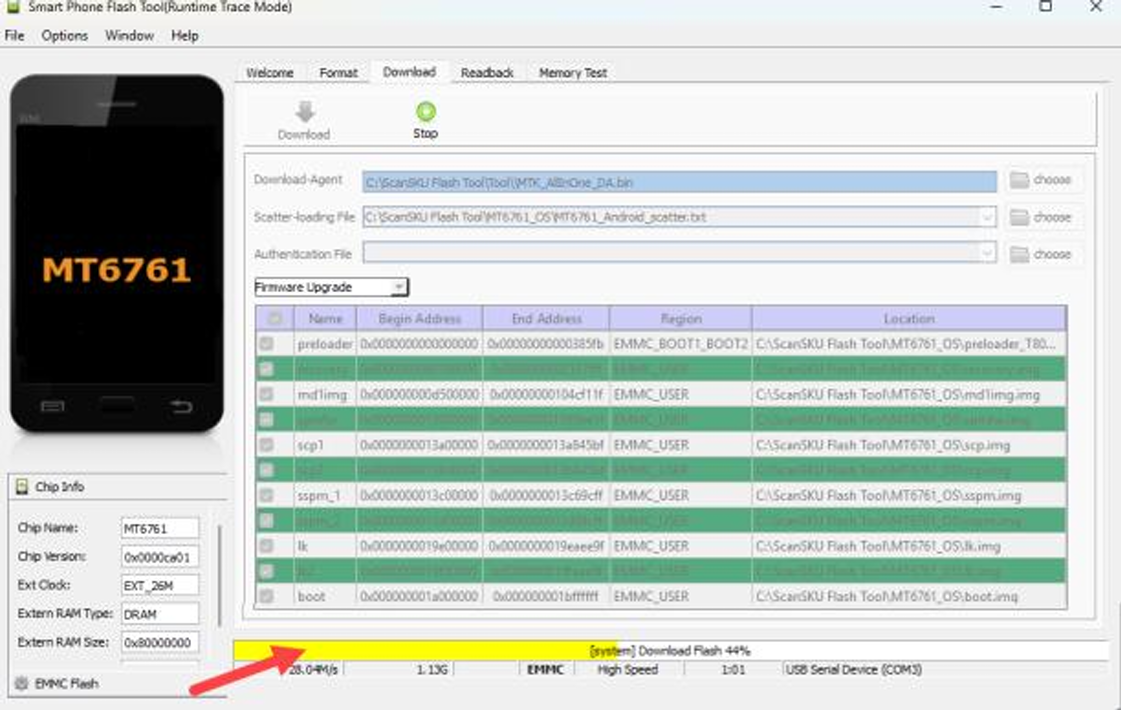
12\. Wait until it is finished downloading.

[![image.png](https://hugeerp10.co.za/hsofmanual/uploads/images/gallery/2025-10/scaled-1680-/dN7image.png)](https://hugeerp10.co.za/hsofmanual/uploads/images/gallery/2025-10/dN7image.png)
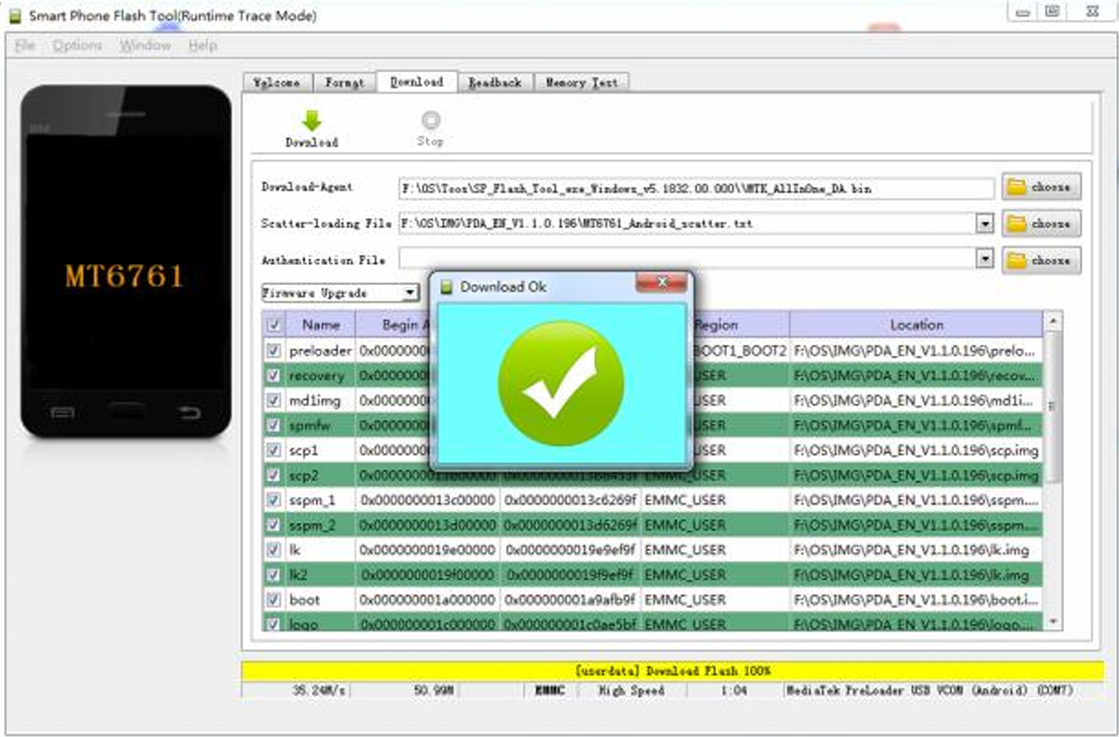
13.Click the white X in the red box to close Download Ok.

14.Unplug the USB cable.

15\. Power on the scanner to boot.

16\. Set up the scanner from scratch.

**To upgrade another scanner, go to step 5**

# Scansku Hard Reset Devices

##### Hard Reset Scansku C61

<span data-olk-copy-source="MessageBody" style="color: #000000; font-family: arial, sans-serif;">Please follow below steps to factory <span class="markgk2nx76e2" data-markjs="true" data-ogab="" data-ogac="" data-ogsb="" data-ogsc="">reset</span> your device:</span>

<span style="color: #000000; font-family: arial, sans-serif;">1. turn off your device</span>

<span style="color: #000000; font-family: arial, sans-serif;">2. press power button and Volume- together, then release power button first, the release volume key, you will see a menu.  
3\. Using volume keys to select "recovery mode", use the power key to confirm. </span>

<span style="color: #000000; font-family: arial, sans-serif;">4. You will see an Android robot, then holding the power key , then press and release volume+, you will see a menu. </span>

<span style="color: #000000; font-family: arial, sans-serif;">5.find "factory <span class="markgk2nx76e2" data-markjs="true" data-ogab="" data-ogac="" data-ogsb="" data-ogsc="">reset</span>" option, then use the power key to confirm. </span>

---

##### Hard Reset Scansku R Series

<div class="x_elementToProof" data-olk-copy-source="MessageBody" id="bkmrk-1.-turn-the-device-o">1. Turn the device off. If it won’t turn off, remove the battery from the back and re-insert it. </div><div class="x_elementToProof" id="bkmrk--1">  
</div><div class="x_elementToProof" id="bkmrk-2.-hold-down-the-pow">2. Hold down the power button (lower button on right side) and volume up button (middle button on left side) at the same time. Keep holding till it enters a black ‘boot’ screen with words such as ‘recovery'. You might have to try a couple of times as you have to get the timing of holding the buttons right. You can remove the battery before each time to turn off and try again. </div><div class="x_elementToProof" id="bkmrk--2">  
</div><div class="x_elementToProof" id="bkmrk-when-you-get-to-that">When you get to that screen. </div><div class="x_elementToProof" id="bkmrk--3">  
</div><div class="x_elementToProof" id="bkmrk-1.-use-the-volume-up">1. Use the volume up button to cycle through the 3 options to get to ‘recovery mode’. Use the volume down button to select it. </div><div class="x_elementToProof" id="bkmrk--4">  
</div><div class="x_elementToProof" id="bkmrk-2.-an-android-image-">2. An Android image will appear with "No Command". Hold down the power button and volume up button at the same time then let go of both at the same time </div><div class="x_elementToProof" id="bkmrk--5">  
</div><div class="x_elementToProof" id="bkmrk-3.-it-should-now-go-">3. It should now go to another screen with a list of options. Select ‘wipe data/factory <span class="mark9oxa388dc" data-markjs="true" data-ogab="" data-ogac="" data-ogsb="" data-ogsc="">reset</span>’. Do this by using the volume down button to scroll down and power button to select </div><div class="x_elementToProof" id="bkmrk--6">  
</div><div class="x_elementToProof" id="bkmrk-4.-next-screen%2C-cycl">4. Next screen, cycle down to ‘Yes’ line and follow instructions to <span class="mark9oxa388dc" data-markjs="true" data-ogab="" data-ogac="" data-ogsb="" data-ogsc="">reset</span> it. </div>---

##### Hard Reset Scansku G- Series

1\. Shut down the scanner  
2\. Press the power button+left scan button to enter Boot Mode  
3\. Press the left scan button to switch the Recovery Mode option, and then press the right scan button to confirm. Enter Android Recovery mode.  
4\. Press the left or right scan key to switch to the Wipe data/factory reset menu. Press the power button to confirm.  
5\. Continue pressing the left scan button to select "Yes", and press the power button to confirm.

---

##### Hard Reset Scansku C66 Series

---

##### Hard Reset Scansku V Series

<div data-olk-copy-source="MessageBody" id="bkmrk-1.-shut-down-the-sca">1. Shut down the scanner  
2. Press the left scan button and power button to enter Boot Mode</div><div id="bkmrk-3.-press-the-left-sc">3. Press the left scan button and scroll to the Recovery Mode option, and then press the right scan button to confirm. </div><div id="bkmrk-4.-select-enter-wipe">4. Select Enter Wipe data/factory reset menu. Press the power button to confirm.</div>---

<div id="bkmrk--11"></div>

# Document Functions

This section gives useful information on various areas in the system

# Searching Inactive Records

<span class="ts12">There is a way to search for customers, suppliers, inventory and GL accounts marked inactive in the various analysis screens.</span>

<span class="ts12">So on the following analysis sections, add in a tick box that when ticked only searches for those items that are marked inactive</span>

<span class="ts12">This is relevant for</span>

1. <span class="ts12">Debtors / Customer analysis</span>
2. Creditors / Supplier analysis
3. Inventory analysis
4. GL account analysis

e.g To get to the analysis, go to any module mentioned above&gt; Click analysis then click the document analysis (Debtor Analysis)

[![image.png](https://hugeerp10.co.za/hsofmanual/uploads/images/gallery/2024-07/scaled-1680-/e78image.png)](https://hugeerp10.co.za/hsofmanual/uploads/images/gallery/2024-07/e78image.png)
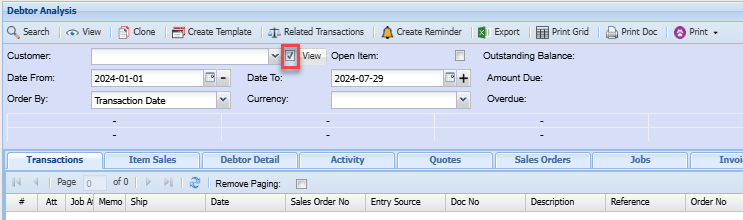
Click on the tick box shown above

When selecting a debtor/customer, creditor/supplier, or any of the mentioned documents, the drop-down menu will only show inactive customers, suppliers, inventory item codes, or GL analysis

# Document Management Spec

<span class="ts0">The purpose of Document Management is to help customers add attachments to the system that are not linked to any transaction documents.</span>

<span class="ts0">Some examples are as follows</span>

- <span class="ts0">VAT / GST returns with all of its attachments</span>
- Supplier monthly statements
- Customer contracts
- Customer payment advises
- Company document legal information which I would put under system configuration
- The general company contracts like insurance I would put under the General Ledger

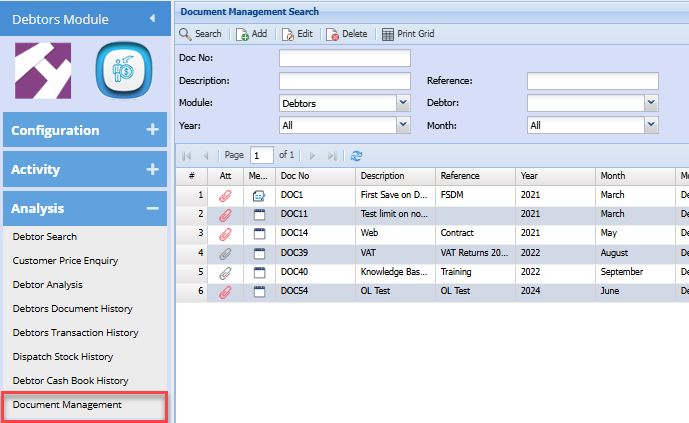
<span class="ts0">This will be available on all modules under the analysis section.</span>

<span class="ts0">The document number that is produced will be the line ID in the table with a prefix of DOC</span>

<span class="ts0">When you go into the specific module the search criteria for a module will automatically populate.</span>

<span class="ts0">This will be greyed out by default and to enable it you need to go to with additional security on the top right-hand corner.</span>

<span class="ts0">Again this is similar to how the report list works when you go into the modulator defaults to the module.</span>

<span class="ts0">The drop-down will have additional security based on whether the user has access to that module.</span>

<span class="ts0">It doesn't matter what type of security a user has as long as they have security to that module </span>

<p class="callout info"><span class="ts0">The delete function doesn't delete the item but just flags it as deleted and then the search will not search for deleted items</span></p>

<span class="ts0">If somebody deletes the document, we need to record this under the user management section.</span>

<span class="ts0">You can find the document management menu under the following modules:</span>

- <span class="ts0">System configuration</span>
- General Ledger6
- Debtors/ Customer
- Creditors/ Supplier
- Inventory
- ob costing
- CRM
- TrackIT

[![image.png](https://hugeerp10.co.za/hsofmanual/uploads/images/gallery/2024-07/scaled-1680-/CzAimage.png)](https://hugeerp10.co.za/hsofmanual/uploads/images/gallery/2024-07/CzAimage.png)
---

#### <span class="ts0">Add</span>

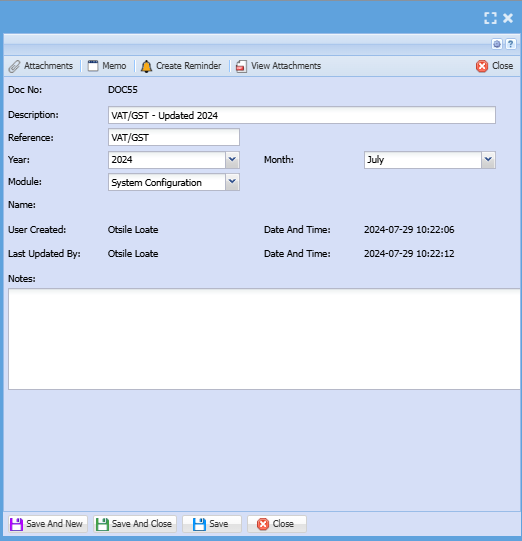
<span class="ts0">To add a new document to the system, click add </span>

[![image.png](https://hugeerp10.co.za/hsofmanual/uploads/images/gallery/2024-07/scaled-1680-/HNjimage.png)](https://hugeerp10.co.za/hsofmanual/uploads/images/gallery/2024-07/HNjimage.png)

<table border="1" id="bkmrk-doc-no-the-document-" style="border-collapse: collapse; width: 100%; height: 177.6px;"><colgroup><col style="width: 27.8052%;"></col><col style="width: 72.17%;"></col></colgroup><tbody><tr style="height: 29.6px;"><td style="height: 29.6px;">**Doc No**</td><td style="height: 29.6px;">The document number is system-generated</td></tr><tr style="height: 29.6px;"><td style="height: 29.6px;">**Description**</td><td style="height: 29.6px;">Enter a description for the document you wish to manage</td></tr><tr style="height: 29.6px;"><td style="height: 29.6px;">**Reference**</td><td style="height: 29.6px;">Enter reference</td></tr><tr style="height: 29.6px;"><td style="height: 29.6px;">**Year**</td><td style="height: 29.6px;">Select the year </td></tr><tr style="height: 29.6px;"><td style="height: 29.6px;">**Month**</td><td style="height: 29.6px;">Select the month for the document</td></tr><tr style="height: 29.6px;"><td style="height: 29.6px;">**Module**</td><td style="height: 29.6px;">Select the module you want to save the document under on the drop-down selection</td></tr></tbody></table>

<span class="ts0">The user that created this and the date and the time that it was created are recorded.</span>

<p class="callout info"><span class="ts0">The last updated by with date and time which effectively records who made changes on this when they click on save or save and close</span></p>

<span class="ts0"></span>

# Line Item Note - Hover over

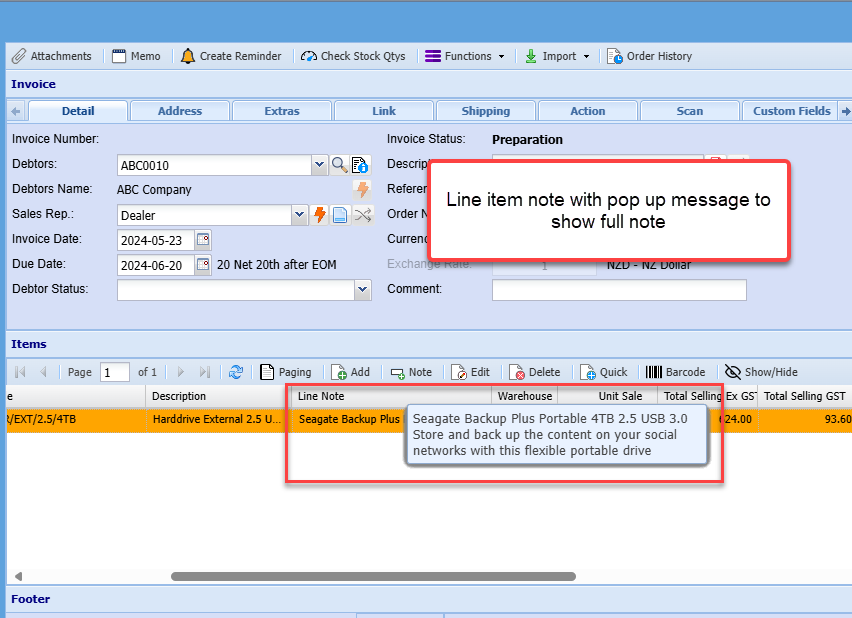
Line item note on the document grid with hover over allows users to see additional information about a specific line item without having to click on it

The feature is implemented under debtors/ customers and creditors/ suppliers transaction documents

[![image.png](https://hugeerp10.co.za/hsofmanual/uploads/images/gallery/2024-07/scaled-1680-/9Fvimage.png)](https://hugeerp10.co.za/hsofmanual/uploads/images/gallery/2024-07/9Fvimage.png)
# Substitute Item on Sales Documents

You can substitute an item on sales documents

You first need to set it up [here](https://hugeerp10.co.za/hsofmanual/books/aim-configuration/page/advanced-stock-item-add#bkmrk-%C2%A0-24 "Substitude item")

Once it has been set up

Add the sales document as per normal, then a pop-up will appear confirming that the item has a replacement and asking if you want to change the item to a replacement.

You need to click Yes to change to a replacement or No to leave it as it is

[![image.png](https://hugeerp10.co.za/hsofmanual/uploads/images/gallery/2024-08/scaled-1680-/jb9image.png)](https://hugeerp10.co.za/hsofmanual/uploads/images/gallery/2024-08/jb9image.png)
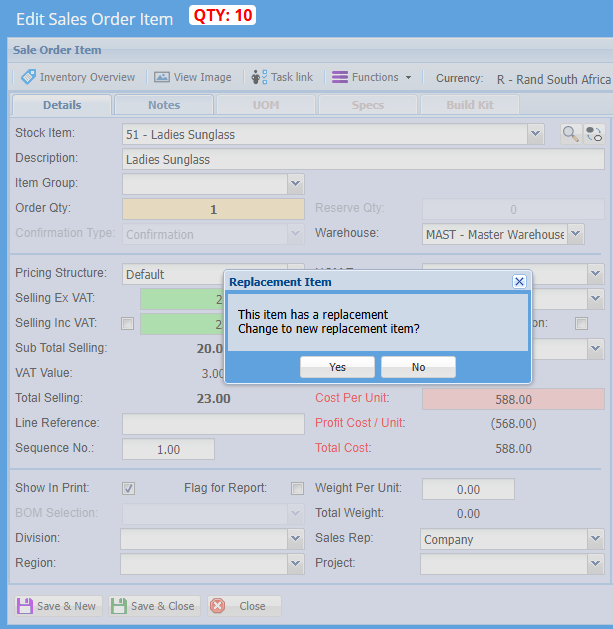
Once complete click save and new to add a new item line or click save and close.

Should you have saved the item as it is and later on realize that you don't have enough of the initial item and want to change to a replacement item click on the change icon below:

[![image.png](https://hugeerp10.co.za/hsofmanual/uploads/images/gallery/2024-08/scaled-1680-/Mcfimage.png)](https://hugeerp10.co.za/hsofmanual/uploads/images/gallery/2024-08/Mcfimage.png)
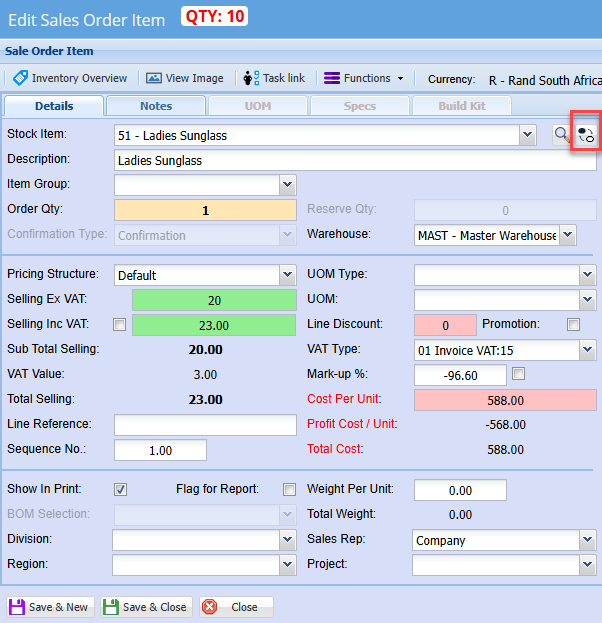
The screen below will appear and you can select the replacement product

[![image.png](https://hugeerp10.co.za/hsofmanual/uploads/images/gallery/2024-08/scaled-1680-/Dwvimage.png)](https://hugeerp10.co.za/hsofmanual/uploads/images/gallery/2024-08/Dwvimage.png)
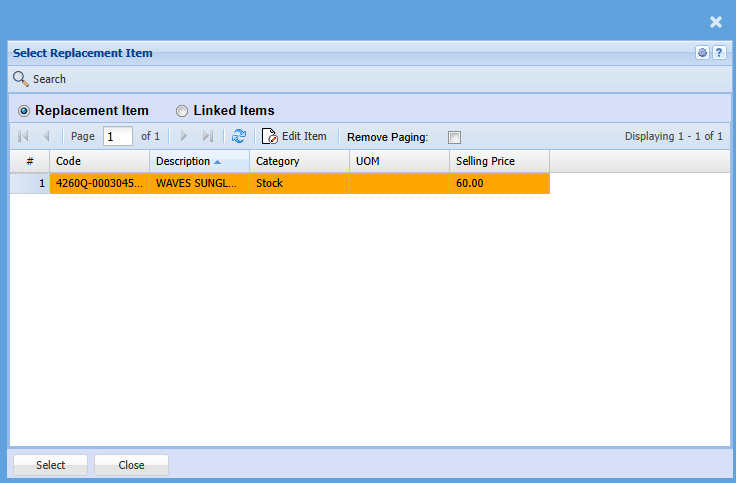
Click select then it will take you back to the item line screen.

You can add notes, change warehouse if required and update quantity as per normal

Then click save and new to add another item line or save and close when completed

Then action the sales document

# Linked Documents on Transactions Document

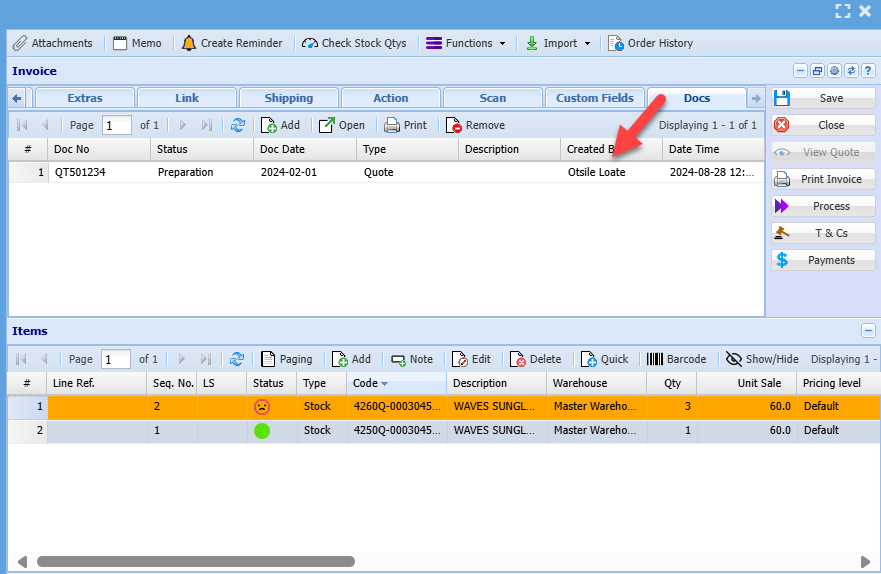
<span style="font-size: 11pt;">You can manually link other documents to an existing document or the system will automatically link certain documents</span>

<span style="font-size: 11pt;">Go into any transaction document</span>

<span style="font-size: 11pt;">Double-click on the one you wish to link a document to, the go-to Docs and link a document</span>

[![image.png](https://hugeerp10.co.za/hsofmanual/uploads/images/gallery/2024-08/scaled-1680-/0Fwimage.png)](https://hugeerp10.co.za/hsofmanual/uploads/images/gallery/2024-08/0Fwimage.png)

<span style="font-size: 11.0pt; mso-fareast-font-family: 'Times New Roman'; color: black;">  
</span>

# Getting Started

# Find Your Way Around

### <span class="ts4">Main Modules</span>

<span class="ts6">The main </span><span class="ts6">system </span><span class="ts6">screen consists of </span><span class="ts6">8</span><span class="ts6"> modules. In the security setup you can limit users from gaining access to the </span><span class="ts6">each </span><span class="ts6">module.</span>

<span class="ts6">We have also added quick access to your CRM functions such as time logs and support logs ,sales leads and reminders.</span>

![](https://hugeerp0.co.za/csp/webhelp/topics/images/image(3926).png)

#### <span class="ts0">Modules:</span>

<span class="ts0"> </span><span class="ts0">1. General Ledger</span>

<span class="ts0">2. Debtors / Receivables / Customers</span>

<span class="ts0">3. Creditors / Payables / Suppliers</span>

<span class="ts0">4. Inventory / Stock / Service</span>

<span class="ts0">5. Job Costing</span>

<span class="ts0">6. Webatar</span>

<span class="ts0">7. Trackit</span>

<span class="ts0">8. System Configuration</span>

### <span class="ts4">Menu Groups</span>

<span class="ts6">Once you click onto one of the icons for example General Ledger, the following screen will appear. In this area you will see Menu Groups which are divided into the following</span>

<span class="ts6">Configuration – This is where you setup and maintain your data relevant to the module you have accessed.</span>

<span class="ts6">Activity – This is where all the actions happen in the module, for example in the General Ledger this is where the Cashbook and Journals are done.</span>

<span class="ts6">Analysis – This is where you can view your data on screen as to what has happened when you posted your information.</span>

<span class="ts6">Reports – This is where you will pull and print the reports relevant to the module.</span>

![](https://hugeerp0.co.za/csp/webhelp/topics/images/image(3927).png)

### <span class="ts4">Menu Items</span>

<span class="ts6">When you click on one of the Menu Groups, it will open up more Menu Items which are applicable for the menu Group and Module.</span>

![](https://hugeerp0.co.za/csp/webhelp/topics/images/image(3928).png)

### <span class="ts8"> </span><span class="ts4">Menu Items Opened</span>

<span class="ts6">Once you have clicked on the desired menu Item it will open the relevant activity.</span>

<span class="ts6">You will notice that the page is divided in three sections.</span>

1.<span class="ts6">Header</span><span class="ts6"> Functions</span>

2.<span class="ts6">Header</span>

3.<span class="ts6">Detail</span>

<span class="ts6">Header Functions</span>

<span class="ts6">Allows user to Post, print and insert documents.</span>

<span class="ts9"> </span><span class="ts6">Header</span>

<span class="ts6">In this area you will be able to stipulate your search criteria to bring back the relevant data in the Detail Section.</span>

<span class="ts6">Detail</span>

<span class="ts6">In the area information will appear based on your search</span>

![](https://hugeerp0.co.za/csp/webhelp/topics/images/image(3929).png)

### <span class="ts4">Information on Module</span>

<span class="ts6">In the top area of page, this area will give you which module you are accessing and the build number of the package.</span>

<span class="ts6">In the lower area of the page, this area will give you the following information:</span>

<span class="ts6">User </span> <span class="ts6">– Who is logged in</span>

<span class="ts6">Role </span> <span class="ts6">– What security access does the user have for this module</span>

<span class="ts6">Company </span> <span class="ts6">– What company set of books are you accessing.</span>

<span class="ts6">Branch </span> <span class="ts6">– What Branch are you accessing from.</span>

# First Time Login

<span class="ts10">Video training manual 2016 - </span>[Click Here](https://vimeo.com/357006162)

<span class="ts0"> </span>[![image.png](https://hugeerp10.co.za/hsofmanual/uploads/images/gallery/2023-08/scaled-1680-/ejKimage.png)](https://hugeerp10.co.za/hsofmanual/uploads/images/gallery/2023-08/ejKimage.png)

<span class="ts0"></span>

# Grid Columns

<span class="ts0">Resizing or finding hidden columns</span>

<span class="ts0">1.</span> <span class="ts0">Reset your grid view</span>

<span class="ts0">2.</span> <span class="ts0">Or check for the hidden column</span>

<span class="ts0"> </span>![](https://hugeerp0.co.za/csp/webhelp/topics/images/image(552).png)

<span class="ts0"> </span><span class="ts0">Check for hidden column</span>

<span class="ts0">Go to one of the column headers and where the arrow appears, click on the drop down, then down to columns.</span>

<span class="ts0">This will show you the active and hidden columns, check that the credit column is ticked</span>

![](https://hugeerp0.co.za/csp/webhelp/topics/images/image(553).png)

<span class="ts0"> </span>

<span class="ts0"> </span><span class="ts0">Reset your grid, go to the top right hand corner of your window.</span>

<span class="ts0">Click on the two arrows which will reset your grid back to default.</span>

<span class="ts0">Reopen the module to view the columns</span>

![](https://hugeerp0.co.za/csp/webhelp/topics/images/image(554).png)

<span class="ts0"> </span>

<span class="ts0"></span>

# Keyboard shortcut keys

<span class="ts10">Video training manual 2019 - </span>[Click Here](https://vimeo.com/375566064)

<span class="ts0">The system caters for shortcut keys so as to reduce the use of the mouse</span>

<span class="ts0">See below shortcut keys</span>

<p class="callout warning"><span class="ts0">Not all windows are configured for keyboard keys</span></p>

#### <span class="ts0">Basic keys</span>

<table border="1" id="bkmrk-move-between-fields-" style="border-collapse: collapse; width: 70.1235%;"><colgroup><col style="width: 36.6843%;"></col><col style="width: 27.516%;"></col><col style="width: 35.7997%;"></col></colgroup><tbody><tr><td>**Move between fields**</td><td>Tab</td><td>Buttons and fields</td></tr><tr><td>**Backwards move**</td><td>Shift + Tab</td><td>Buttons and fields</td></tr><tr><td>**Add**</td><td>Insert</td><td>Add</td></tr><tr><td>**Delete line record**</td><td>Delete</td><td>Delete record</td></tr><tr><td>**Help**</td><td>Alt + H</td><td>Help manual</td></tr><tr><td>**Select record**

</td><td>Enter</td><td>Select record in dropdown

Select button

Run search in search window

</td></tr><tr><td>**Move in dropdown**

</td><td>Up and down arrow keys</td><td>Move in dropdown

</td></tr></tbody></table>

#### Function keys

<div id="bkmrk-search-alt-%2B-f-find-"><table class="tbl4" style="width: 84.321%; height: 919.282px;"><tbody><tr class="row0" style="height: 29.7969px;"><td class="cell0" style="width: 30.9384%; height: 29.7969px;">**<span class="ts12">Search</span>**

</td><td class="cell1" style="width: 19.088%; height: 29.7969px;"><span class="ts12">Alt + S</span>

</td><td class="cell2" style="width: 49.827%; height: 29.7969px;"><span class="ts12">Search</span>

</td></tr><tr><td style="width: 30.9384%;">**<span class="ts12">Find</span>**

</td><td style="width: 19.088%;"><span class="ts12">Crtl + F</span>

</td><td style="width: 49.827%;"><span class="ts12">Find</span>

</td></tr><tr class="row0" style="height: 29.7969px;"><td class="cell0" style="width: 30.9384%; height: 29.7969px;">**<span class="ts12">Add</span>**

</td><td class="cell1" style="width: 19.088%; height: 29.7969px;"><span class="ts12">Alt + A</span>

</td><td class="cell2" style="width: 49.827%; height: 29.7969px;"><span class="ts12">Add</span>

</td></tr><tr style="height: 29.7969px;"><td style="width: 30.9384%; height: 29.7969px;">**<span class="ts12">Quick Add</span>**

</td><td style="width: 19.088%; height: 29.7969px;"><span class="ts12">Alt + Q</span>

</td><td style="width: 49.827%; height: 29.7969px;"><span class="ts12">Quick Add</span>

</td></tr><tr class="row0" style="height: 29.7969px;"><td class="cell0" style="width: 30.9384%; height: 29.7969px;">**<span class="ts12">Edit</span>**

</td><td class="cell1" style="width: 19.088%; height: 29.7969px;"><span class="ts12">Alt + E</span>

</td><td class="cell2" style="width: 49.827%; height: 29.7969px;"><span class="ts12">Edit</span>

</td></tr><tr style="height: 29.7969px;"><td style="width: 30.9384%; height: 29.7969px;">**<span class="ts12">Delete</span>**

</td><td style="width: 19.088%; height: 29.7969px;"><span class="ts12">Alt + X</span>

</td><td style="width: 49.827%; height: 29.7969px;"><span class="ts12">Delete Button</span>

</td></tr><tr class="row0" style="height: 29.7969px;"><td class="cell0" style="width: 30.9384%; height: 29.7969px;">**<span class="ts12">Save</span>**

</td><td class="cell1" style="width: 19.088%; height: 29.7969px;"><span class="ts12">Alt + S</span>

</td><td class="cell2" style="width: 49.827%; height: 29.7969px;"><span class="ts12">Save</span>

</td></tr><tr class="row0" style="height: 29.7969px;"><td class="cell0" style="width: 30.9384%; height: 29.7969px;">**<span class="ts12">Close</span>**

</td><td class="cell1" style="width: 19.088%; height: 29.7969px;"><span class="ts12">Alt + C</span>

</td><td class="cell2" style="width: 49.827%; height: 29.7969px;"><span class="ts12">Close</span>

</td></tr><tr class="row0" style="height: 46.5938px;"><td class="cell0" style="width: 30.9384%; height: 46.5938px;">**<span class="ts12">Save and Close</span>**

</td><td class="cell1" style="width: 19.088%; height: 46.5938px;"><span class="ts12">Alt + V</span>

<span class="ts12">Alt + Y</span>

</td><td class="cell2" style="width: 49.827%; height: 46.5938px;"><span class="ts12">Yes</span>

</td></tr><tr class="row0" style="height: 29.7969px;"><td class="cell0" style="width: 30.9384%; height: 29.7969px;">**<span class="ts12">Save and New</span>**

</td><td class="cell1" style="width: 19.088%; height: 29.7969px;"><span class="ts12">Alt + N</span>

</td><td class="cell2" style="width: 49.827%; height: 29.7969px;"><span class="ts12">New</span>

</td></tr><tr style="height: 29.7969px;"><td style="width: 30.9384%; height: 29.7969px;">**<span class="ts12">Print</span>**

</td><td style="width: 19.088%; height: 29.7969px;"><span class="ts12">Alt + P</span>

</td><td style="width: 49.827%; height: 29.7969px;"><span class="ts12">Print</span>

</td></tr><tr class="row0" style="height: 30.5938px;"><td class="cell0" style="width: 30.9384%; height: 30.5938px;">**<span class="ts12">Tabs - Tab 1 Main</span>**

</td><td class="cell1" style="width: 19.088%; height: 30.5938px;"><span class="ts12">Alt + 1</span>

</td><td class="cell2" style="width: 49.827%; height: 30.5938px;"><span class="ts12"><span style="font-size: 11.0pt; font-family: 'Calibri',sans-serif; mso-ascii-theme-font: minor-latin; mso-fareast-font-family: Calibri; mso-fareast-theme-font: minor-latin; mso-hansi-theme-font: minor-latin; mso-bidi-font-family: 'Times New Roman'; mso-bidi-theme-font: minor-bidi; mso-ansi-language: EN-NZ; mso-fareast-language: EN-US; mso-bidi-language: AR-SA;">Selects 1st Tab</span></span>

</td></tr><tr class="row0" style="height: 30.5938px;"><td class="cell0" style="width: 30.9384%; height: 30.5938px;">**<span class="ts12">Tabs - Tab 2</span>**

</td><td class="cell1" style="width: 19.088%; height: 30.5938px;"><span class="ts12">Alt + 2</span>

</td><td class="cell2" style="width: 49.827%; height: 30.5938px;"><span class="ts12"><span style="font-size: 11.0pt; font-family: 'Calibri',sans-serif; mso-ascii-theme-font: minor-latin; mso-fareast-font-family: Calibri; mso-fareast-theme-font: minor-latin; mso-hansi-theme-font: minor-latin; mso-bidi-font-family: 'Times New Roman'; mso-bidi-theme-font: minor-bidi; mso-ansi-language: EN-NZ; mso-fareast-language: EN-US; mso-bidi-language: AR-SA;">Selects 2nd Tab</span></span>

</td></tr><tr style="height: 30.5938px;"><td class="cell0" style="width: 30.9384%; height: 30.5938px;">**<span class="ts12">Tabs - Tab 3</span>**

</td><td class="cell1" style="width: 19.088%; height: 30.5938px;"><span class="ts12">Alt + 3</span>

</td><td class="cell2" style="width: 49.827%; height: 30.5938px;"><span class="ts12"><span style="font-size: 11.0pt; font-family: 'Calibri',sans-serif; mso-ascii-theme-font: minor-latin; mso-fareast-font-family: Calibri; mso-fareast-theme-font: minor-latin; mso-hansi-theme-font: minor-latin; mso-bidi-font-family: 'Times New Roman'; mso-bidi-theme-font: minor-bidi; mso-ansi-language: EN-NZ; mso-fareast-language: EN-US; mso-bidi-language: AR-SA;">Selects 3rd Tab</span></span>

</td></tr><tr style="height: 29.7969px;"><td class="cell0" style="width: 30.9384%; height: 29.7969px;">**<span class="ts12">Tabs - Tab 4</span>**

</td><td class="cell1" style="width: 19.088%; height: 29.7969px;"><span class="ts12">Alt + 4</span>

</td><td class="cell2" style="width: 49.827%; height: 29.7969px;"><span class="ts12">4th Tab</span>

</td></tr><tr style="height: 29.7969px;"><td class="cell0" style="width: 30.9384%; height: 29.7969px;">**<span class="ts12">Tabs - Tab 5</span>**

</td><td class="cell1" style="width: 19.088%; height: 29.7969px;"><span class="ts12">Alt + 5</span>

</td><td class="cell2" style="width: 49.827%; height: 29.7969px;"><span class="ts12">5th Tab</span>

</td></tr><tr style="height: 29.7969px;"><td class="cell0" style="width: 30.9384%; height: 29.7969px;">**<span class="ts12">Tabs - Tab 6</span>**

</td><td class="cell1" style="width: 19.088%; height: 29.7969px;"><span class="ts12">Alt + 6</span>

</td><td class="cell2" style="width: 49.827%; height: 29.7969px;"><span class="ts12">6th Tab</span>

</td></tr><tr style="height: 29.7969px;"><td class="cell0" style="width: 30.9384%; height: 29.7969px;">**<span class="ts12">Tabs - Tab 7</span>**

</td><td class="cell1" style="width: 19.088%; height: 29.7969px;"><span class="ts12">Alt + 7</span>

</td><td class="cell2" style="width: 49.827%; height: 29.7969px;"><span class="ts12">7th Tab</span>

</td></tr><tr style="height: 29.7969px;"><td class="cell0" style="width: 30.9384%; height: 29.7969px;">**<span class="ts12">Tabs - Tab 8</span>**

</td><td class="cell1" style="width: 19.088%; height: 29.7969px;"><span class="ts12">Alt + 8</span>

</td><td class="cell2" style="width: 49.827%; height: 29.7969px;"><span class="ts12">8th Tab</span>

</td></tr><tr class="row0" style="height: 29.7969px;"><td class="cell0" style="width: 30.9384%; height: 29.7969px;">**<span class="ts12">Memo</span>**

</td><td class="cell1" style="width: 19.088%; height: 29.7969px;"><span class="ts12">Alt + M</span>

</td><td class="cell2" style="width: 49.827%; height: 29.7969px;"><span class="ts12">Memo</span>

</td></tr><tr class="row0" style="height: 46.5938px;"><td class="cell0" style="width: 30.9384%; height: 46.5938px;">**<span class="ts12">Attachment</span>**

</td><td class="cell1" style="width: 19.088%; height: 46.5938px;"><span class="ts12">Alt + T</span>

<span class="ts12">Alt + D</span>

</td><td class="cell2" style="width: 49.827%; height: 46.5938px;"><span class="ts12">Document</span>

</td></tr><tr class="row0" style="height: 29.7969px;"><td class="cell0" style="width: 30.9384%; height: 29.7969px;">**<span class="ts12">Reminder</span>**

</td><td class="cell1" style="width: 19.088%; height: 29.7969px;"><span class="ts12">Alt + R</span>

</td><td class="cell2" style="width: 49.827%; height: 29.7969px;"><span class="ts12">Reminder</span>

</td></tr><tr style="height: 29.7969px;"><td style="width: 30.9384%; height: 29.7969px;">**<span class="ts12">Alert</span>**

</td><td style="width: 19.088%; height: 29.7969px;"><span class="ts12">Alt + W</span>

</td><td style="width: 49.827%; height: 29.7969px;"><span class="ts12">Alert</span>

</td></tr><tr class="row0" style="height: 46.5938px;"><td class="cell0" style="width: 30.9384%; height: 46.5938px;">**<span class="ts12">Process</span>**

</td><td class="cell1" style="width: 19.088%; height: 46.5938px;"><span class="ts12">Alt + O</span>

<span class="ts12">Alt + G</span>

</td><td class="cell2" style="width: 49.827%; height: 46.5938px;"><span class="ts12">Go</span>

</td></tr><tr style="height: 29.7969px;"><td style="width: 30.9384%; height: 29.7969px;">**<span class="ts12">Barcode Print</span>**

</td><td style="width: 19.088%; height: 29.7969px;"><span class="ts12">Alt + B</span>

</td><td style="width: 49.827%; height: 29.7969px;"><span class="ts12">Barcode Print</span>

</td></tr><tr style="height: 29.7969px;"><td style="width: 30.9384%; height: 29.7969px;">**<span class="ts12">First button row</span>**

</td><td style="width: 19.088%; height: 29.7969px;"><span class="ts12">Alt + 0</span>

</td><td style="width: 49.827%; height: 29.7969px;"><span class="ts12">Focus on Attachment or first button on top row</span>

</td></tr><tr style="height: 29.7969px;"><td style="width: 30.9384%; height: 29.7969px;">**<span class="ts12">Function button row</span>**

</td><td style="width: 19.088%; height: 29.7969px;"><span class="ts12">Alt + 9</span>

</td><td style="width: 49.827%; height: 29.7969px;"><span class="ts12">Focus on Add</span>

</td></tr><tr style="height: 30.5938px;"><td style="width: 30.9384%; height: 30.5938px;">**<span class="ts12">First grid line focus</span>**

</td><td style="width: 19.088%; height: 30.5938px;"><span class="ts12">Alt + I</span>

</td><td style="width: 49.827%; height: 30.5938px;"><span class="ts12"><span style="font-size: 11.0pt; font-family: 'Calibri',sans-serif; mso-ascii-theme-font: minor-latin; mso-fareast-font-family: Calibri; mso-fareast-theme-font: minor-latin; mso-hansi-theme-font: minor-latin; mso-bidi-font-family: 'Times New Roman'; mso-bidi-theme-font: minor-bidi; mso-ansi-language: EN-NZ; mso-fareast-language: EN-US; mso-bidi-language: AR-SA;">Highlights First Line on the Grid</span></span>

</td></tr><tr style="height: 30.5938px;"><td style="width: 30.9384%; height: 30.5938px;">**<span class="ts12">Close Button Focus</span>**

</td><td style="width: 19.088%; height: 30.5938px;"><span class="ts12">Alt + T</span>

</td><td style="width: 49.827%; height: 30.5938px;"><span class="ts12"><span style="font-size: 11.0pt; font-family: 'Calibri',sans-serif; mso-ascii-theme-font: minor-latin; mso-fareast-font-family: Calibri; mso-fareast-theme-font: minor-latin; mso-hansi-theme-font: minor-latin; mso-bidi-font-family: 'Times New Roman'; mso-bidi-theme-font: minor-bidi; mso-ansi-language: EN-NZ; mso-fareast-language: EN-US; mso-bidi-language: AR-SA;">Focus on Close Button</span></span>

</td></tr><tr style="height: 30.5938px;"><td style="width: 30.9384%; height: 30.5938px;">**<span class="ts12">Authorise Sales Order</span>**

</td><td style="width: 19.088%; height: 30.5938px;"><span class="ts12">Alt + Z</span>

</td><td style="width: 49.827%; height: 30.5938px;"><span class="ts12"><span style="font-size: 11.0pt; font-family: 'Calibri',sans-serif; mso-ascii-theme-font: minor-latin; mso-fareast-font-family: Calibri; mso-fareast-theme-font: minor-latin; mso-hansi-theme-font: minor-latin; mso-bidi-font-family: 'Times New Roman'; mso-bidi-theme-font: minor-bidi; mso-ansi-language: EN-NZ; mso-fareast-language: EN-US; mso-bidi-language: AR-SA;">Authorise document</span></span>

</td></tr></tbody></table>

</div>Keyboard keys will be indicated with a bold letter and underscore

An example of this is Debtors setup ([View keys](https://hugeerp10.co.za/hsofmanual/books/adm-configuration/page/debtor-search))

[![image.png](https://hugeerp10.co.za/hsofmanual/uploads/images/gallery/2024-11/scaled-1680-/uRnimage.png)](https://hugeerp10.co.za/hsofmanual/uploads/images/gallery/2024-11/uRnimage.png)

---

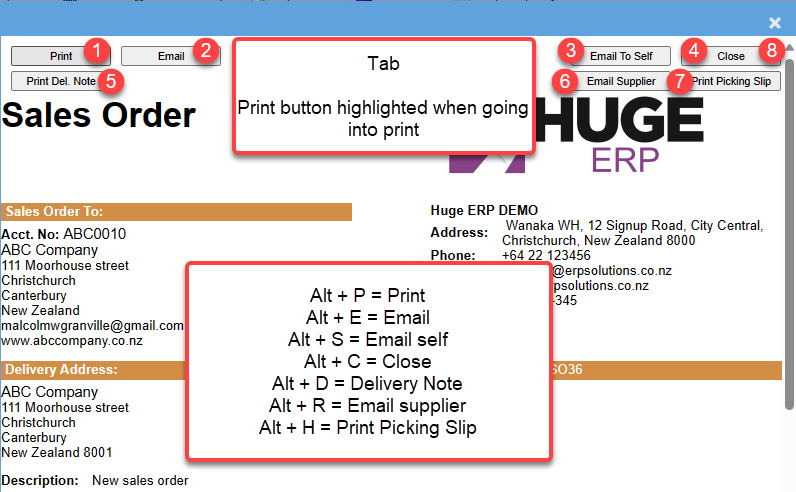
#### Print Keys

Focus on Print - click enter to print

Tab between buttons

<table border="1" id="bkmrk-print-alt-%2B-p-print-" style="border-collapse: collapse; width: 67.6543%;"><colgroup><col style="width: 44.7898%;"></col><col style="width: 21.755%;"></col><col style="width: 33.2724%;"></col></colgroup><tbody><tr><td>**Print**</td><td>Alt + P</td><td>Print</td></tr><tr><td>**Email**</td><td>Alt + E</td><td>Email</td></tr><tr><td>**Email Self**</td><td>Alt + S</td><td>Email Self</td></tr><tr><td>**Close**</td><td>Alt + C</td><td>Close window</td></tr><tr><td>**Delivery Note**</td><td>Alt + D</td><td>Print delivery note</td></tr><tr><td>**Email Supplier**</td><td>Alt + R</td><td>Email supplier</td></tr><tr><td>**Picking Slip**</td><td>Alt + H</td><td>Print Picking Slip</td></tr></tbody></table>

[![image.png](https://hugeerp10.co.za/hsofmanual/uploads/images/gallery/2024-01/scaled-1680-/5i4image.png)](https://hugeerp10.co.za/hsofmanual/uploads/images/gallery/2024-01/5i4image.png)

# Froala HTML Editor Info

<span class="ts0">This function allows users to enter information into a word type environment.</span>

<span class="ts0">Text can be changed, images inserted and many other functions.</span>

<span class="ts0">These are available in the following sections</span>

1. <span class="ts0">Support log ticket</span>
2. <span class="ts0">Quote</span>
3. <span class="ts0">Manage Job</span>
4. <span class="ts0">Policy doc</span>
5. <span class="ts0">Time Log</span>
6. <span class="ts0">Sales lead</span>
7. <span class="ts0">Pre-inspection checklist</span>
8. <span class="ts0">Book-In</span>

![](https://hugeerp0.co.za/csp/webhelp/topics/images/image(2821).png)

# Desktop Shortcut Creation

<span class="ts10">Video training manual - </span>[Click Here](https://vimeo.com/356999073)

<span class="ts19"> </span><span class="ts0">Shows how to create a shortcut on the desktop</span>

<span class="ts0"> </span>

<span class="ts0">Replace the http://localhost with the online company access. This will look something like this https://webaccounting1.co.za</span>

<span class="ts0"> </span>

<span class="ts0">The fulll path can be https://webaccounting1.co.za/csp/ca1000506/wab/acck/startup.csp</span>

<span class="ts0"> </span>

<span class="ts0"> </span>

<span class="ts0"></span>

# Form Colours

<span class="ts20">Each window will have a certain colo</span><span class="ts0">u</span><span class="ts20">r scheme .</span>

<span class="ts20">For customer documents we will have three colo</span><span class="ts0">u</span><span class="ts20">rs,</span>

1.<span class="ts0">Light Yellow ( #ffe6b3 )</span><span class="ts20"> </span><span class="ts0">for quantity (Bold and centre)</span>

2.<span class="ts0">Light g</span><span class="ts20">reen </span><span class="ts0">( #90EE90 ) </span><span class="ts20">for selling price</span>

3.<span class="ts0">Rosy Brown ( #FFC1C1 )</span><span class="ts20"> for cost</span><span class="ts0"> price</span>

<span class="ts0">I</span><span class="ts20">n most cases numbers are always right aligned, however in some of the forms the amounts </span><span class="ts0">will be centre aligned </span><span class="ts20">for easy reading and editing</span>

![](https://hugeerp0.co.za/csp/webhelp/topics/images/image(2423).png)

# Date Buttons

#### <span class="ts2">Date Search Quick Buttons</span>

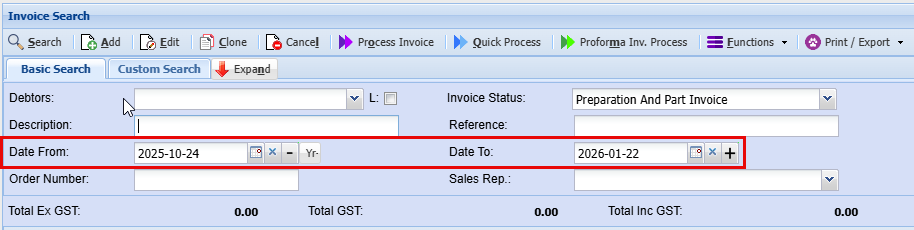
<span class="ts0"> </span><span class="ts0">In most of the Date from searches, there will be three buttons next to the date</span>

[![image.png](https://hugeerp10.co.za/hsofmanual/uploads/images/gallery/2026-01/scaled-1680-/6Hiimage.png)](https://hugeerp10.co.za/hsofmanual/uploads/images/gallery/2026-01/6Hiimage.png)

<table border="1" id="bkmrk-the-x-button-will-cl" style="border-collapse: collapse; width: 100%; height: 89.3907px;"><colgroup><col style="width: 6.56607%;"></col><col style="width: 93.4339%;"></col></colgroup><tbody><tr style="height: 29.7969px;"><td style="height: 29.7969px;">[![image.png](https://hugeerp10.co.za/hsofmanual/uploads/images/gallery/2026-01/scaled-1680-/j31image.png)](https://hugeerp10.co.za/hsofmanual/uploads/images/gallery/2026-01/j31image.png)

</td><td style="height: 29.7969px;"><span class="ts0">The **X** button will clear the date which will search ALL records in the past. Should you continue to click on the - button, it will keep going back a month at a time.</span></td></tr><tr style="height: 29.7969px;"><td style="height: 29.7969px;">[![image.png](https://hugeerp10.co.za/hsofmanual/uploads/images/gallery/2026-01/scaled-1680-/VnVimage.png)](https://hugeerp10.co.za/hsofmanual/uploads/images/gallery/2026-01/VnVimage.png)

</td><td style="height: 29.7969px;"><span class="ts0">The **-** button will first take the date on the date display to the first of the following month.</span></td></tr><tr style="height: 29.7969px;"><td style="height: 29.7969px;">[![image.png](https://hugeerp10.co.za/hsofmanual/uploads/images/gallery/2026-01/scaled-1680-/DV8image.png)](https://hugeerp10.co.za/hsofmanual/uploads/images/gallery/2026-01/DV8image.png)

</td><td style="height: 29.7969px;">The **Yr-** button will take the date back 12 months</td></tr><tr><td>[![image.png](https://hugeerp10.co.za/hsofmanual/uploads/images/gallery/2026-01/scaled-1680-/p6kimage.png)](https://hugeerp10.co.za/hsofmanual/uploads/images/gallery/2026-01/p6kimage.png)

</td><td>The **+** Button will just forward a month </td></tr></tbody></table>

# Email Confirmation and Errors

<span class="ts0">The system sends out emails to an email server which can either be a SMTP server, Exchange Server or Gmail email server.</span>

<span class="ts0">When you send the email it routes it to one of these Mail servers and once the Mail server accepts it we log an entry that it was successfully sent and received by the Mail server .</span>

<span class="ts0">From there the Mail server sends it out to the particular person, however we do not know whether or not it was successfully received to that particular person .</span>

<span class="ts0"> </span>

<span class="ts0">The best way to check whether an email has gone out to that person is to copy yourself in on the Mail that has been sent. You set this up once and it will remember that setting for you .</span>

<span class="ts0">When emailing your document, click on Users and move your name over to the right box.</span>

<span class="ts0"> </span>![](https://hugeerp0.co.za/csp/webhelp/topics/images/image(2508).png)

<span class="ts0"> </span><span class="ts0"> </span><span class="ts0">To check the status of the emails sent, click on your username on the top right hand corner of the module and select printing status.</span>

<span class="ts0"> </span>![](https://hugeerp0.co.za/csp/webhelp/topics/images/image(2894).png)

<span class="ts0"> </span><span class="ts0">When you are in this menu, the search will be specific to you, click on search button to see all the emails sent out .</span>

<span class="ts0">Should there be an error on the sending out of the email, highlight that error and click on view to see the details .</span>

<span class="ts0">Then we can troubleshoot where the problem could be as to why the email did not get sent out.</span>

<span class="ts0"> </span>![](https://hugeerp0.co.za/csp/webhelp/topics/images/image(2571).png)

<span class="ts0"> </span>Error message

<span class="ts0"> </span>![](https://hugeerp0.co.za/csp/webhelp/topics/images/image(2507).png)

# Landing Page Dashboards

# Landing Page Dashboards

This is a small dashboards that showers the modules that a you have access too

If you do not have access to a module it will not appear on this list

[![image.png](https://hugeerp10.co.za/hsofmanual/uploads/images/gallery/2023-11/scaled-1680-/Zvsimage.png)](https://hugeerp10.co.za/hsofmanual/uploads/images/gallery/2023-11/Zvsimage.png)
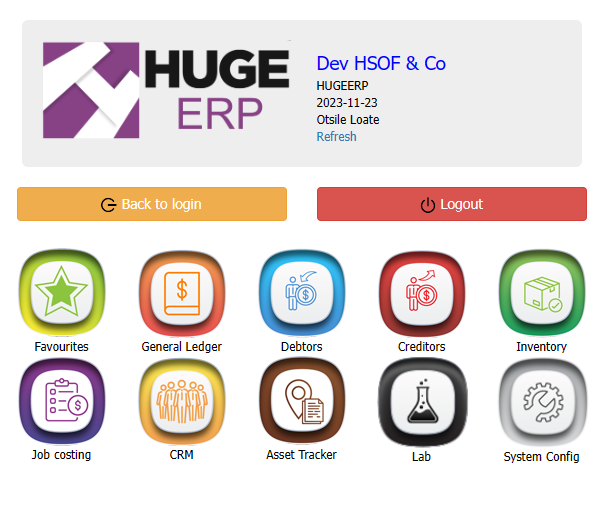
<span class="ts0"> Modules Defined:</span>

<table border="1" id="bkmrk-favourites-general-l" style="border-collapse: collapse; width: 100%; height: 500.4px;"><colgroup><col style="width: 23.7319%;"></col><col style="width: 76.2434%;"></col></colgroup><tbody><tr style="height: 29.6px;"><td style="height: 29.6px;">**Favourites**</td><td style="height: 29.6px;">This module takes you to your customised access</td></tr><tr style="height: 80px;"><td style="height: 80px;">**General Ledger**</td><td style="height: 80px;">The General Ledger module is vital for financial management, providing accurate data for decision-making, compliance and reporting.

The General Ledger module is a core part of your organization's financial system, supporting various accounting functions

</td></tr><tr style="height: 80px;"><td style="height: 80px;">**Debtors/ Customers**</td><td style="height: 80px;">Debtors / Customer module handles customer transactions, invoicing, and accounts receivable

The debtors/ Customer module is crucial for tracking sales, issuing invoices, recording payments and managing customer accounts efficiently

</td></tr><tr style="height: 82.8px;"><td style="height: 82.8px;">**Creditors/ Suppliers**</td><td style="height: 82.8px;">The creditor/ Suppliers module handles invoices and oversees accounts payable

 The creditors/ Suppliers modoule tracks purchases, processes invoices, records payments, ensuring accurate supplier records, timely payments and effective financial management

</td></tr><tr style="height: 80px;"><td style="height: 80px;">**Inventory**

</td><td style="height: 80px;">The inventory module manages the handling of goods from acquisition to distribution

The Inventory module ensures real-time tracking, order fulfillment, and supplier management, enhancing efficiency and minimizing errors for businesses

</td></tr><tr style="height: 29.6px;"><td style="height: 29.6px;">**Job Costing**</td><td style="height: 29.6px;">A Job Costing module is a feature in accounting and project management software that helps businesses track costs for specific projects or jobs

It's beneficial in project-based industries like construction and consulting, allowing accurate monitoring of expenses and better financial control

</td></tr><tr style="height: 29.6px;"><td style="height: 29.6px;">**CRM**</td><td style="height: 29.6px;">The Customer Relationship Module is crucial for managing customer interactions, tracking time and resolving support log tickets</td></tr><tr style="height: 29.6px;"><td style="height: 29.6px;">**Asset Tracker**</td><td style="height: 29.6px;">Asset Tracker module is used for managing equipment, vehicles, inventory, or valuable items, providing real-time location and status updates

Asset Tracker technology enhances efficiency, reduces operational costs and improves overall asset management.

</td></tr><tr style="height: 29.6px;"><td style="height: 29.6px;">**Lab**</td><td style="height: 29.6px;">  
</td></tr><tr style="height: 29.6px;"><td style="height: 29.6px;">**System Configuration**</td><td style="height: 29.6px;">System configurations involves setting up various parameters and settings to tailor your software to the specific needs and processes of your organisation.</td></tr></tbody></table>

# Module Colours Defined

**<span class="ts11">System Configuration Module</span>**

<span class="ts12">SCM - S (Grey)</span>

![](https://hugeerp0.co.za/csp/webhelp/topics/images/image(2561).png)

**<span class="ts13"> </span><span class="ts14">General Ledger</span>**

<span class="ts12">GL - G (Orange)</span>

![](https://hugeerp0.co.za/csp/webhelp/topics/images/image(2562).png)

<span class="ts0"> </span>**<span class="ts14">Debtors / Customer /Receivable Module</span>**

<span class="ts12">DM - D (Blue)</span>

<span class="ts13"> </span>![](https://hugeerp0.co.za/csp/webhelp/topics/images/image(2563).png)

<span class="ts0"> </span>**<span class="ts14">Creditors / Suppliers / Payables Module</span>**

<span class="ts12">CM - C (Red)</span>

<span class="ts13"> </span>

![](https://hugeerp0.co.za/csp/webhelp/topics/images/image(2564).png)

**<span class="ts0"> </span><span class="ts14">Inventory / Stock / Service Module</span>**

<span class="ts12">IM - I (Green)</span>

![](https://hugeerp0.co.za/csp/webhelp/topics/images/image(2565).png)

<span class="ts0"> </span>**<span class="ts0"> </span><span class="ts14">Job Costing Module</span>**

<span class="ts12">JCM - J (Purple)</span>

![](https://hugeerp0.co.za/csp/webhelp/topics/images/image(2566).png)

**<span class="ts0"> </span><span class="ts0"> </span><span class="ts14">TrackIT / Cardex Module</span>**

<span class="ts12">TM - T (</span><span class="ts12">Brown</span><span class="ts12">) TrackIT</span>

![](https://hugeerp0.co.za/csp/webhelp/topics/images/image(2567).png)

**<span class="ts0"> </span><span class="ts14">CRM (Customer Relationship Management) Module</span>**

<span class="ts12">W - W (</span><span class="ts12">Gold)</span><span class="ts12"> Webatar</span>

<span class="ts13"> </span>![](https://hugeerp0.co.za/csp/webhelp/topics/images/image(2568).png)

# Reminders

reminder detail that helps the user to interact with debtors and has four buttons

# Creating Reminders

#### Reminders

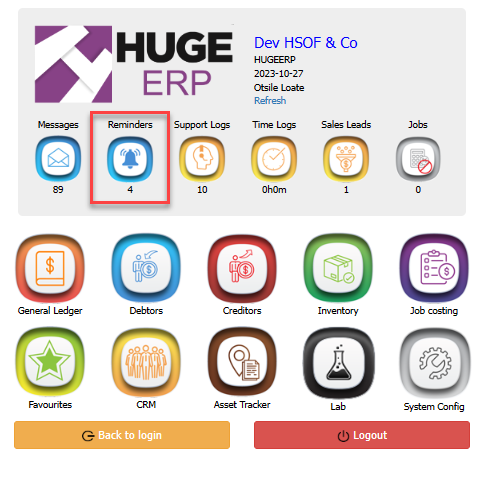
Reminders are essential to ensure no critical tasks or important dates are overlooked. Whether it's managing deadlines, tracking project milestones or staying on top of compliance requirements, reminders simplify the process and help you maintain better control over your business operations.

You can find reminders on your landing page or click on any module on the landing page and the reminders will appear on the top bar.

[![image.png](https://hugeerp10.co.za/hsofmanual/uploads/images/gallery/2023-10/scaled-1680-/Rflimage.png)](https://hugeerp10.co.za/hsofmanual/uploads/images/gallery/2023-10/Rflimage.png)
[![image.png](https://hugeerp10.co.za/hsofmanual/uploads/images/gallery/2023-10/scaled-1680-/TjFimage.png)](https://hugeerp10.co.za/hsofmanual/uploads/images/gallery/2023-10/TjFimage.png)

#### Adding a Reminder

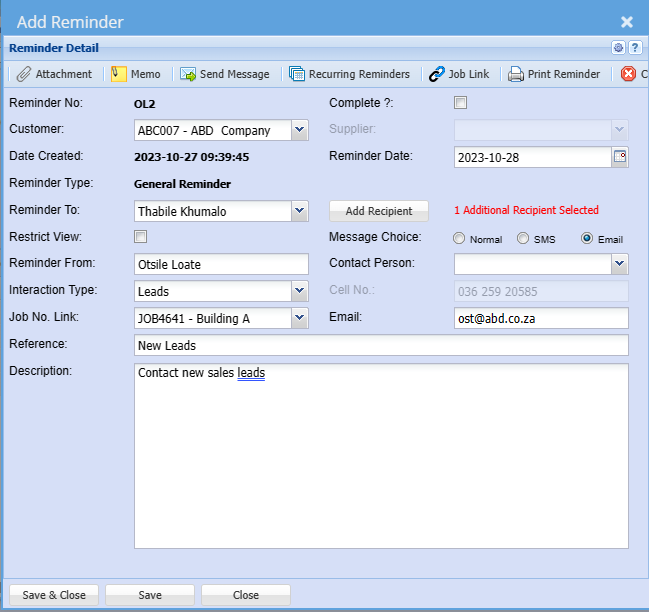
**<span style="color: rgb(45, 194, 107);">Reminders &gt; Add &gt; Add Reminder</span>**

[![image.png](https://hugeerp10.co.za/hsofmanual/uploads/images/gallery/2023-10/scaled-1680-/cLzimage.png)](https://hugeerp10.co.za/hsofmanual/uploads/images/gallery/2023-10/cLzimage.png)

<table border="1" id="bkmrk-reminder-number-the-" style="border-collapse: collapse; width: 100%; height: 696.688px;"><colgroup><col style="width: 25.4635%;"></col><col style="width: 74.5365%;"></col></colgroup><tbody><tr style="height: 29.7969px;"><td style="height: 29.7969px;">**Reminder Number**</td><td style="height: 29.7969px;">The reminder number is generic</td></tr><tr style="height: 29.7969px;"><td style="height: 29.7969px;">**Customer**</td><td style="height: 29.7969px;">Select a debtor/ customer</td></tr><tr style="height: 29.7969px;"><td style="height: 29.7969px;">**Date Created**</td><td style="height: 29.7969px;">Date created is the date you created the reminder on</td></tr><tr style="height: 29.7969px;"><td style="height: 29.7969px;">**Reminder Type**</td><td style="height: 29.7969px;">Is generic</td></tr><tr style="height: 35.3906px;"><td style="height: 35.3906px;">**Reminder To**</td><td style="height: 35.3906px;"><span class="ts0">The person to whom the reminder is directed to</span>

</td></tr><tr style="height: 29.7969px;"><td style="height: 29.7969px;">**Restrict View**</td><td style="height: 29.7969px;"><span class="ts0">Restrict the people who will have access to view the reminder by ticking the box</span><span class="ts0">Reminder to</span></td></tr><tr style="height: 29.7969px;"><td style="height: 29.7969px;">**Reminder From**</td><td style="height: 29.7969px;">The person sending the reminder</td></tr><tr style="height: 29.7969px;"><td style="height: 29.7969px;">**Interaction Type**</td><td style="height: 29.7969px;">Select the correct interaction type for your reminder on the dropdown</td></tr><tr style="height: 29.7969px;"><td style="height: 29.7969px;">**Job Number: Link**</td><td style="height: 29.7969px;">Link a job number if you use job costing</td></tr><tr style="height: 29.7969px;"><td style="height: 29.7969px;">**Reference**</td><td style="height: 29.7969px;"><span class="ts0">Short descripting of the reminder</span></td></tr><tr style="height: 29.7969px;"><td style="height: 29.7969px;">**Description**</td><td style="height: 29.7969px;"><span class="ts0">Full description of the reminder</span></td></tr><tr style="height: 29.7969px;"><td style="height: 29.7969px;">**Complete**</td><td style="height: 29.7969px;">Only put a tick on complete once the reminder is no longer valid</td></tr><tr style="height: 29.7969px;"><td style="height: 29.7969px;">**Supplier**</td><td style="height: 29.7969px;">  
</td></tr><tr style="height: 29.7969px;"><td style="height: 29.7969px;">**Reminder Date**</td><td style="height: 29.7969px;">This is the date the reminder will be sent out </td></tr><tr style="height: 29.7969px;"><td style="height: 29.7969px;">**Add Recipient**</td><td style="height: 29.7969px;"><span class="ts0">Add the recipient of the reminder</span></td></tr><tr style="height: 124.953px;"><td style="height: 124.953px;">**Message Choice**</td><td style="height: 124.953px;">Choose how you want the reminder to be sent to a recipient

If you are sending a reminder to yourself or someone in your organisation leave message choice as normal

If you are sending to an external cellphone number or email address then select the correct choice

</td></tr><tr style="height: 29.7969px;"><td style="height: 29.7969px;">**Contact Person**</td><td style="height: 29.7969px;">Select a contact person on the dropdown if this is an external reminder</td></tr><tr style="height: 29.7969px;"><td style="height: 29.7969px;">**Cell Number**</td><td style="height: 29.7969px;">Add cellphone number you want the reminder to be sent to</td></tr><tr style="height: 29.7969px;"><td style="height: 29.7969px;">**Email**</td><td style="height: 29.7969px;">Add the email address you want the reminder to be sent to</td></tr></tbody></table>

Reminder Navigation Buttons

<table border="1" id="bkmrk-recurring-reminders-" style="border-collapse: collapse; width: 100%; height: 89.3625px;"><colgroup><col style="width: 24.3501%;"></col><col style="width: 75.6499%;"></col></colgroup><tbody><tr style="height: 29.7875px;"><td style="height: 29.7875px;">**Recurring Reminders**</td><td style="height: 29.7875px;">You can click recuring reminders to setup recurring reminders</td></tr><tr style="height: 29.7875px;"><td style="height: 29.7875px;">**Job Link**</td><td style="height: 29.7875px;">Click a Job Link to a Job Number you selected</td></tr><tr style="height: 29.7875px;"><td style="height: 29.7875px;">**Print Reminder**</td><td style="height: 29.7875px;">Click print reminder to print a reminder or to email a copy </td></tr></tbody></table>

---

#### Recurring Reminders

Recurring Reminders serve as notifications that inform you about upcoming, regular activities that need to be performed within the Huge ERP system.

Recurring reminders serve as a digital assistant, helping you keep track of critical, ongoing tasks such as inventory replenishment, expiring quotes, sales leads follow-ups financial reporting and maintenance schedules.

[![image.png](https://hugeerp10.co.za/hsofmanual/uploads/images/gallery/2023-10/scaled-1680-/wCeimage.png)](https://hugeerp10.co.za/hsofmanual/uploads/images/gallery/2023-10/wCeimage.png)
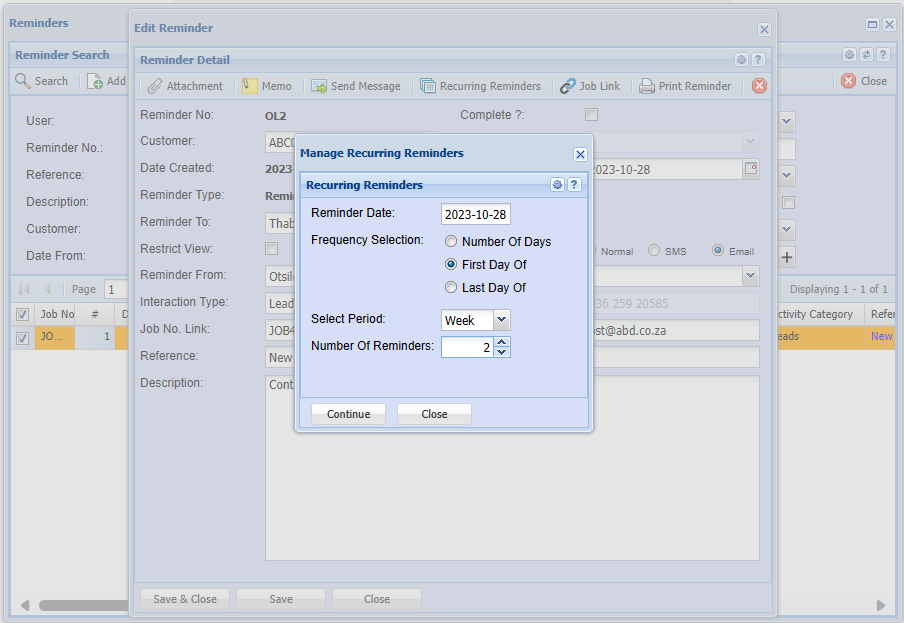
<table border="1" id="bkmrk-reminder-date-remind" style="border-collapse: collapse; width: 100%; height: 135px;"><colgroup><col style="width: 27.688%;"></col><col style="width: 72.312%;"></col></colgroup><tbody><tr style="height: 29.6px;"><td style="height: 29.6px;">**Reminder Date**</td><td style="height: 29.6px;">Reminder Date will populate from the reminder detail screen</td></tr><tr style="height: 29.4px;"><td style="height: 29.4px;">**Frequency Selection**</td><td style="height: 29.4px;">Select the frequency of the reminder </td></tr><tr style="height: 29.6px;"><td style="height: 29.6px;">**Select Period** </td><td style="height: 29.6px;">Select the duration of the recurring reminders</td></tr><tr style="height: 46.4px;"><td style="height: 46.4px;">**Number of Reminders**</td><td style="height: 46.4px;">Select the number of days that you wish to have the reminder repeated and the number of occurrences that the reminder must be repeated </td></tr></tbody></table>

# Security

# View Security Button

This only applies to users who have access to view the security button

The security button is found under each menu, on the top right

[![image.png](https://hugeerp10.co.za/hsofmanual/uploads/images/gallery/2024-08/scaled-1680-/2SQimage.png)](https://hugeerp10.co.za/hsofmanual/uploads/images/gallery/2024-08/2SQimage.png)

First one needs to give administrator access to this button from the module access screen

<span style="color: rgb(45, 194, 107);">**Go to System Configuration Module&gt; General User Setup**</span>

If the user already exists, search for the user you would love to give access to then double-click or click edit

The screen below will be displayed

Click on the Access Module Tab

Then put a tick on View Security

[![image.png](https://hugeerp10.co.za/hsofmanual/uploads/images/gallery/2024-08/scaled-1680-/zAcimage.png)](https://hugeerp10.co.za/hsofmanual/uploads/images/gallery/2024-08/zAcimage.png)
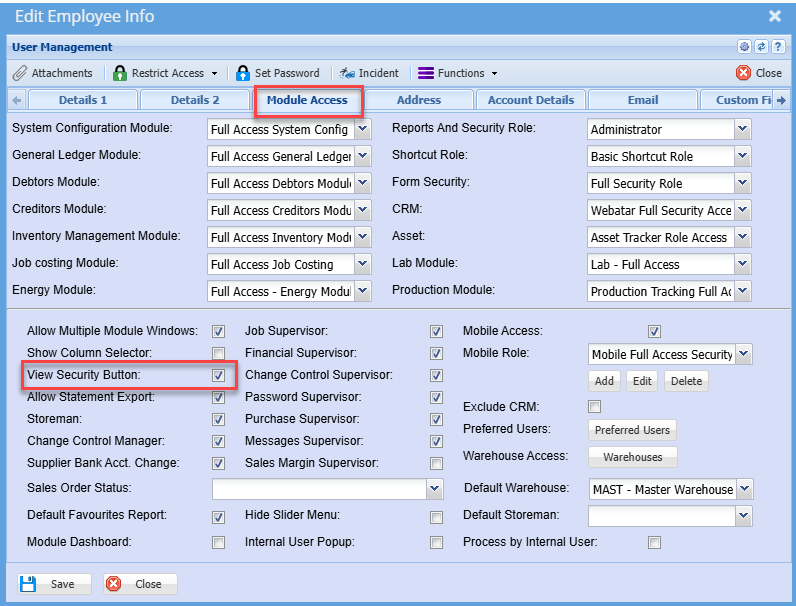
Once the security has been set the user will need to logout then login so the change can apply

When logging back in the user will see the security icon at the top right corner of almost each screen

Here is an example of how it works on the invoice screen

Go to <span style="color: rgb(45, 194, 107);">**Debtors Module&gt; Activity&gt; Invoices**</span>

Then click on the security icon in the top right corner and the screen below will appear

You can edit a new role or add a new one

You can also see other security roles on the drop down menu selection and from menu

You can select anyone you want to create or edit a role for

[![image.png](https://hugeerp10.co.za/hsofmanual/uploads/images/gallery/2024-08/scaled-1680-/fQmimage.png)](https://hugeerp10.co.za/hsofmanual/uploads/images/gallery/2024-08/fQmimage.png)
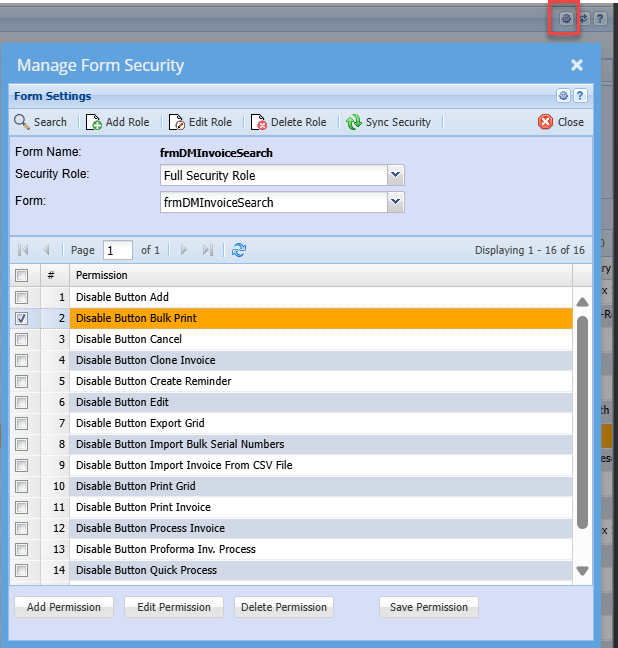
Once complete and the permission is saved

If editing an existing role the permission will apply

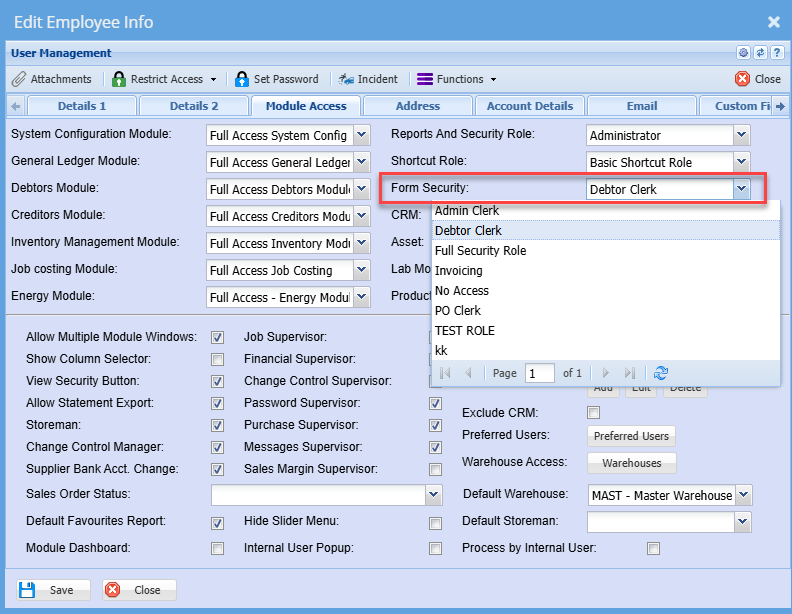
If its a new role then you need to apply the role on the user setup screen

[![image.png](https://hugeerp10.co.za/hsofmanual/uploads/images/gallery/2024-08/scaled-1680-/fnyimage.png)](https://hugeerp10.co.za/hsofmanual/uploads/images/gallery/2024-08/fnyimage.png)
# Adding Build Kit To Documents

<span lang="EN-US" style="mso-ansi-language: EN-US;">To add the build to documents involves the same process as adding items or template task</span>

<span lang="EN-US" style="mso-ansi-language: EN-US;">The advantage of using Build kits as opposed to using template tasks is that the quantity of the build can be amended</span>

<span lang="EN-US" style="mso-ansi-language: EN-US;"> e.g </span><span lang="EN-US" style="mso-ansi-language: EN-US;">Go to<span style="color: rgb(45, 194, 107);"> **Debtors Module&gt; Activity&gt; Quotation**</span></span>

<span lang="EN-US" style="mso-ansi-language: EN-US;">Create a new quote as normal. For more info on how to create a quotation click [here](https://hugeerp10.co.za/hsofmanual/books/bdm-activity/page/basic-add-quotation "Add Quote")</span>

<span lang="EN-US" style="mso-ansi-language: EN-US;"> </span><span lang="EN-US" style="mso-ansi-language: EN-US;">You will note there are 2<span style="mso-spacerun: yes;"> </span>options returned:</span>

1. <span lang="EN-US" style="mso-ansi-language: EN-US;">The stock item – which is the resultant BOM item</span>
2. And the Custom Item which is the build Kit item

[![image.png](https://hugeerp10.co.za/hsofmanual/uploads/images/gallery/2024-08/scaled-1680-/3RTimage.png)](https://hugeerp10.co.za/hsofmanual/uploads/images/gallery/2024-08/3RTimage.png)
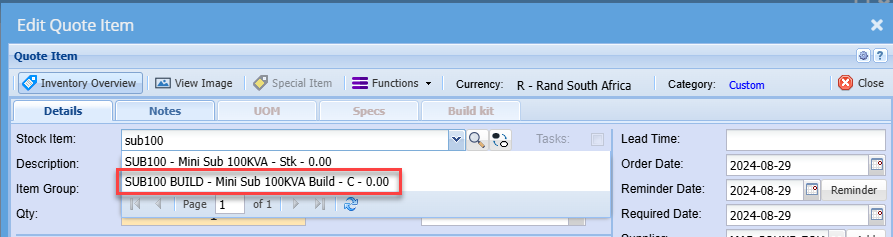
<span lang="EN-GB" style="mso-no-proof: yes;">Since we intend to manufacture the item, we will use the Build item as this will return the default components required as per the BOM recipe.</span>

<span lang="EN-GB" style="mso-no-proof: yes;">We can then choose to edit, add or remove items</span>

[![image.png](https://hugeerp10.co.za/hsofmanual/uploads/images/gallery/2024-08/scaled-1680-/RFgimage.png)](https://hugeerp10.co.za/hsofmanual/uploads/images/gallery/2024-08/RFgimage.png)

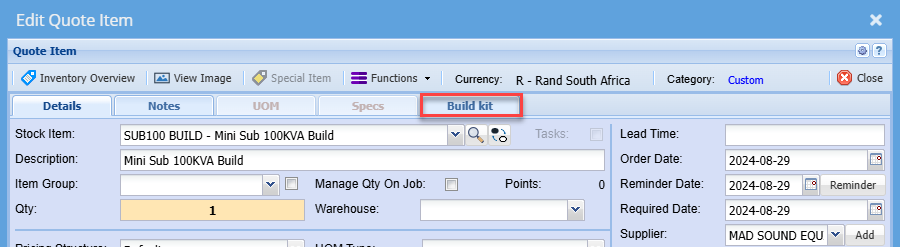
<span lang="EN-GB" style="mso-no-proof: yes;">Once you have selected the build item, you will notice the Build Kit tab becomes active. This is because we have set this item as a Build Kit in the item setup.</span>

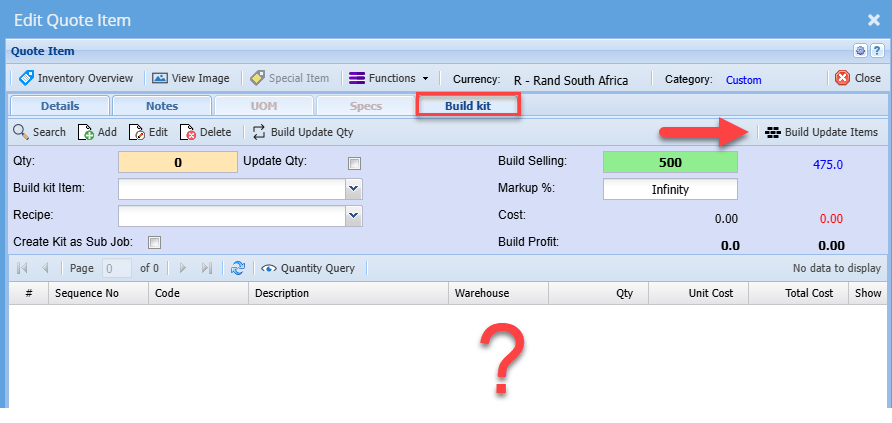
<span lang="EN-GB" style="mso-no-proof: yes;">Click the Build Kit Tab</span>

<span lang="EN-GB" style="mso-no-proof: yes;">The grid will be blank initially.</span>

[![image.png](https://hugeerp10.co.za/hsofmanual/uploads/images/gallery/2024-08/scaled-1680-/dW7image.png)](https://hugeerp10.co.za/hsofmanual/uploads/images/gallery/2024-08/dW7image.png)

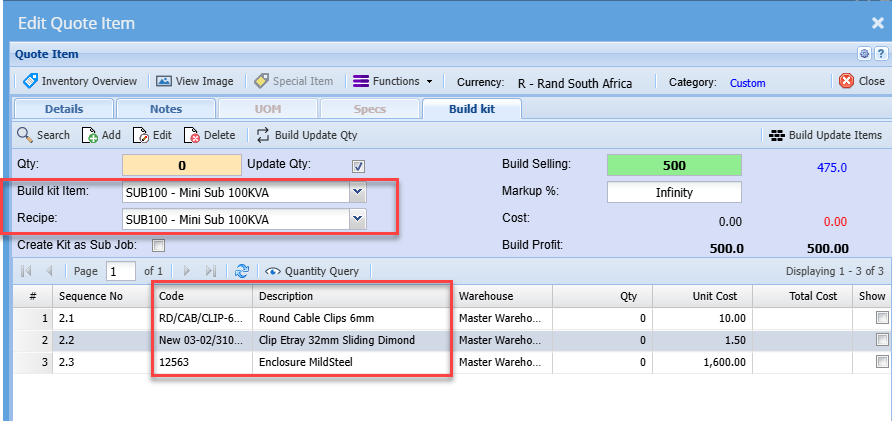
<span lang="EN-GB" style="mso-no-proof: yes;">To populate the component items, click the Build update items button</span>

<span lang="EN-GB" style="mso-no-proof: yes;">The items will then be displayed on the grid</span>

[![image.png](https://hugeerp10.co.za/hsofmanual/uploads/images/gallery/2024-08/scaled-1680-/rDqimage.png)](https://hugeerp10.co.za/hsofmanual/uploads/images/gallery/2024-08/rDqimage.png)

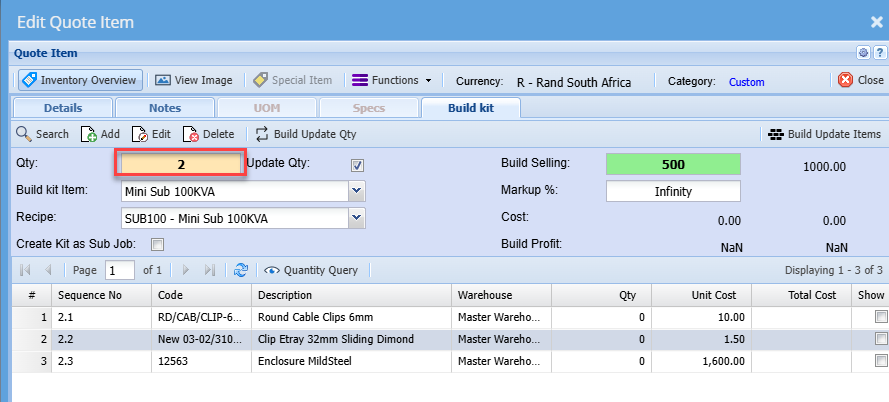
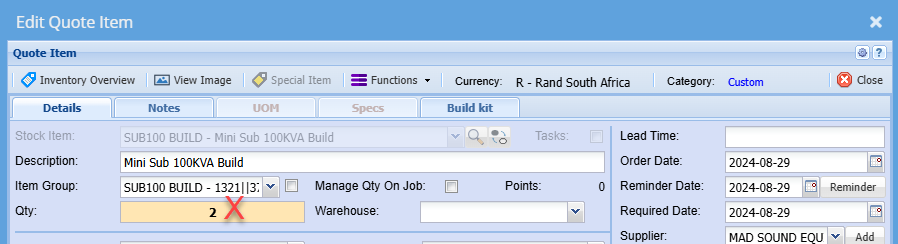
<p class="callout info"><span lang="EN-GB" style="mso-no-proof: yes;">If you need to build more than 1 of these items, then you will need to change the quantity on this screen. This will automatically update the quantity on the detail tab screen. ( where you usually edit quantities)</span></p>

[![image.png](https://hugeerp10.co.za/hsofmanual/uploads/images/gallery/2024-08/scaled-1680-/XK1image.png)](https://hugeerp10.co.za/hsofmanual/uploads/images/gallery/2024-08/XK1image.png)

<p class="callout warning"><span lang="EN-GB" style="mso-no-proof: yes;">Do not change the quantity on the normal item line under the details tab as one would typically do with standard items, because that will not update the required quantity of the build and subsequently not update the respective quantities of the components required.</span></p>

[![image.png](https://hugeerp10.co.za/hsofmanual/uploads/images/gallery/2024-08/scaled-1680-/lfvimage.png)](https://hugeerp10.co.za/hsofmanual/uploads/images/gallery/2024-08/lfvimage.png)

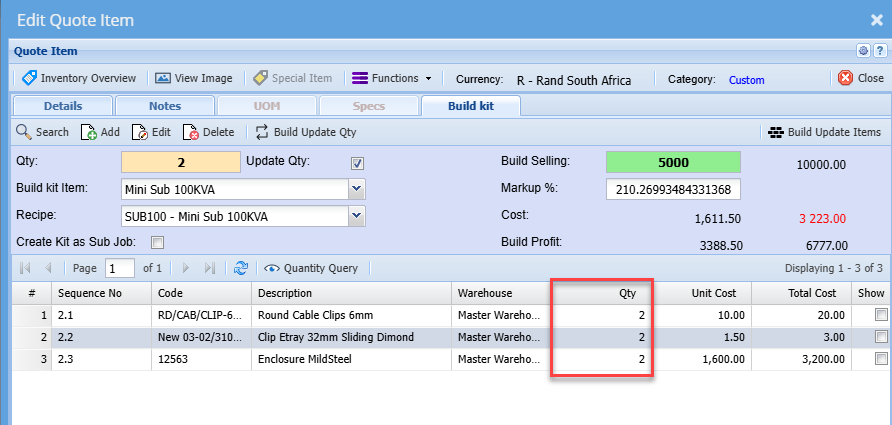
<p class="callout info"><span lang="EN-GB" style="mso-no-proof: yes;">Once you have entered the required quantity of the item on the Build Kit tab, click the **Build update Qty** button</span></p>

<span lang="EN-GB" style="mso-no-proof: yes;">This will update the quantities of the component items required to manufacture the quantity specified of the resultant item (Build)</span>

[![image.png](https://hugeerp10.co.za/hsofmanual/uploads/images/gallery/2024-08/scaled-1680-/EB8image.png)](https://hugeerp10.co.za/hsofmanual/uploads/images/gallery/2024-08/EB8image.png)

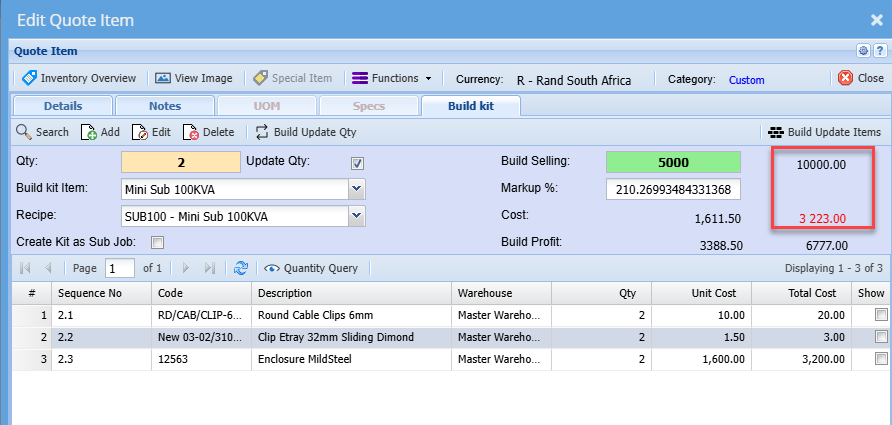
<span lang="EN-GB" style="mso-no-proof: yes;">You will also note the selling and cost prices are updated accordingly</span>

[![image.png](https://hugeerp10.co.za/hsofmanual/uploads/images/gallery/2024-08/scaled-1680-/NIdimage.png)](https://hugeerp10.co.za/hsofmanual/uploads/images/gallery/2024-08/NIdimage.png)

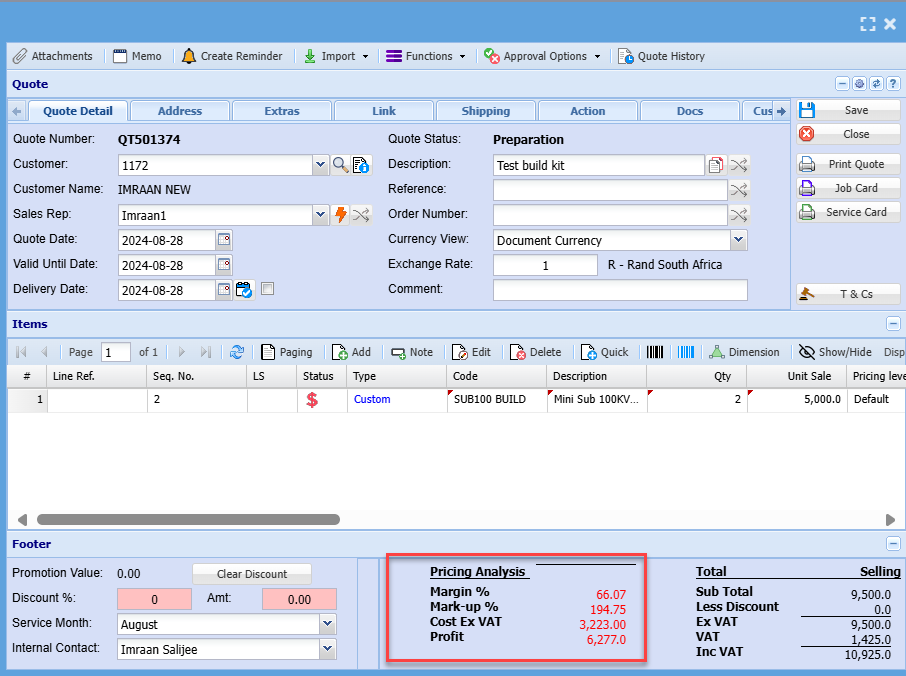
<span lang="EN-US" style="mso-ansi-language: EN-US;">Click Save and Close</span>

<span lang="EN-US" style="mso-ansi-language: EN-US;">This will return you to the main screen, where you can see the costs, markups, etc. as normal.</span>

[![image.png](https://hugeerp10.co.za/hsofmanual/uploads/images/gallery/2024-08/scaled-1680-/sLyimage.png)](https://hugeerp10.co.za/hsofmanual/uploads/images/gallery/2024-08/sLyimage.png)

---

#### <span lang="EN-US" style="mso-ansi-language: EN-US;">Printing the Quote</span>

<span lang="EN-US" style="mso-ansi-language: EN-US;">There are 2 options to print the quote</span>

<span style="text-decoration: underline;"><span lang="EN-US" style="mso-ansi-language: EN-US;">Option 1</span></span>

- <span lang="EN-US" style="mso-ansi-language: EN-US;">Displaying only a single line item for the build</span>
- This option is used in instances where the client does not need to see the individual component

[![image.png](https://hugeerp10.co.za/hsofmanual/uploads/images/gallery/2024-08/scaled-1680-/Y9fimage.png)](https://hugeerp10.co.za/hsofmanual/uploads/images/gallery/2024-08/Y9fimage.png)
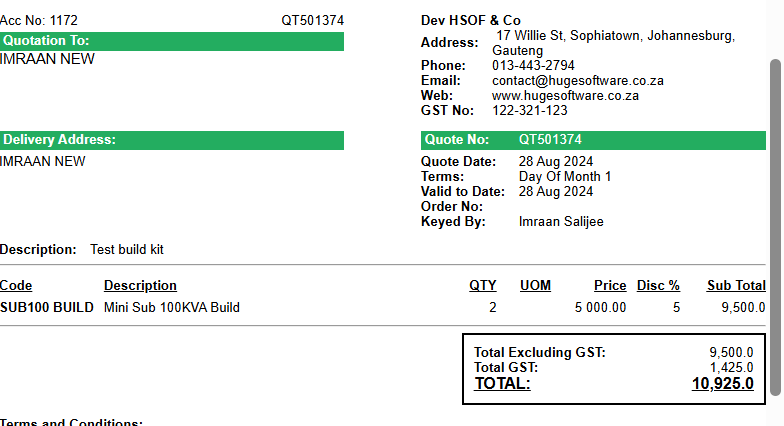
<span style="text-decoration: underline;">Option </span>

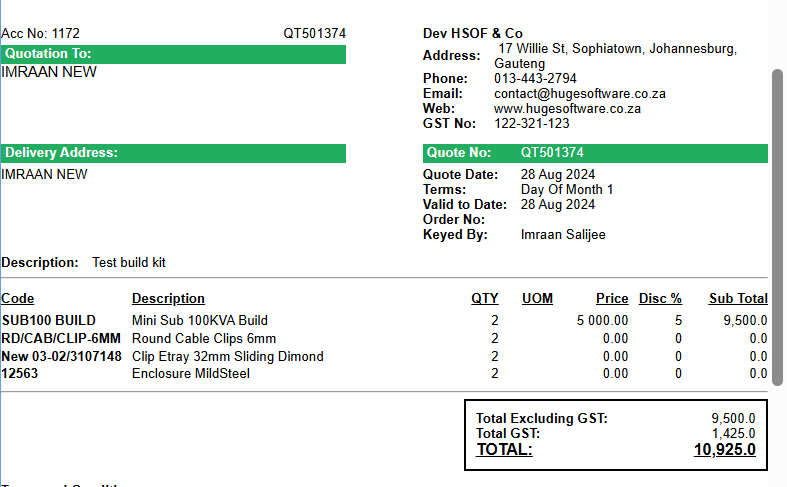
<span lang="EN-US" style="mso-ansi-language: EN-US;">Displaying all or part of the component items as well on the quote</span>

<span lang="EN-US" style="mso-ansi-language: EN-US;">This option displays the build item with full prices but also shows the component items used in the build</span>

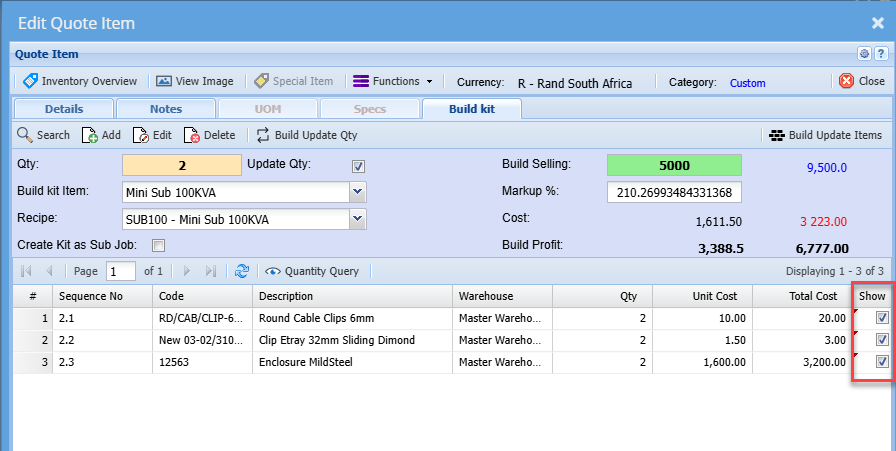
<span lang="EN-US" style="mso-ansi-language: EN-US;">To print the quote using this option, you will need to indicate the items you wish to display on the quote.</span>

<span lang="EN-US" style="mso-ansi-language: EN-US;">To do this, edit the item line.</span>

<span lang="EN-US" style="mso-ansi-language: EN-US;">Click the Build Kit tab</span>

<span lang="EN-US" style="mso-ansi-language: EN-US;">Tick the box next to the items you wish to display on the quote</span>

<span lang="EN-US" style="mso-ansi-language: EN-US;">Save and close</span>

[![image.png](https://hugeerp10.co.za/hsofmanual/uploads/images/gallery/2024-08/scaled-1680-/m6Iimage.png)](https://hugeerp10.co.za/hsofmanual/uploads/images/gallery/2024-08/m6Iimage.png)

<span lang="EN-US" style="mso-ansi-language: EN-US;">When you print the quote, notice all the components selected will be displayed and the values of the individual components will be zero</span>

[![image.png](https://hugeerp10.co.za/hsofmanual/uploads/images/gallery/2024-08/scaled-1680-/KHyimage.png)](https://hugeerp10.co.za/hsofmanual/uploads/images/gallery/2024-08/KHyimage.png)

<span lang="EN-US" style="mso-ansi-language: EN-US;">You can now send the quote off to the client <span style="mso-spacerun: yes;"> </span>and upon approval, promote the quote to sales order or invoice or Job as normal.</span>

# Calculator

At the top of your screen of any module, you will have direct access to the Microsoft office calculator.

[![image.png](https://hugeerp10.co.za/hsofmanual/uploads/images/gallery/2025-01/scaled-1680-/zknimage.png)](https://hugeerp10.co.za/hsofmanual/uploads/images/gallery/2025-01/zknimage.png)

Since Huge ERP is a browser-based software, it doesn't have permission to directly call functions within Windows, as this would violate Microsoft's security protocols. Thus, when you attempt to use the calculator, a pop-up will appear. To proceed, check the “Always allow” box and click “Open.” If you clear your cache, you may need to repeat this process each time you access the calculator.

[![image.png](https://hugeerp10.co.za/hsofmanual/uploads/images/gallery/2025-01/scaled-1680-/gRnimage.png)](https://hugeerp10.co.za/hsofmanual/uploads/images/gallery/2025-01/gRnimage.png)
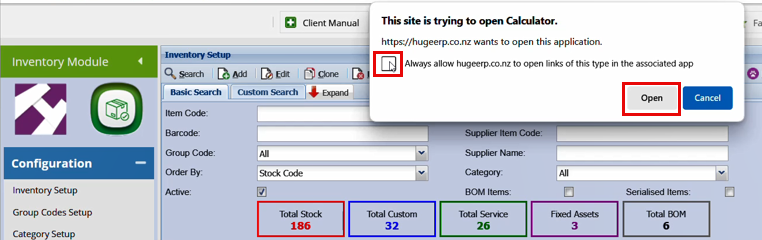
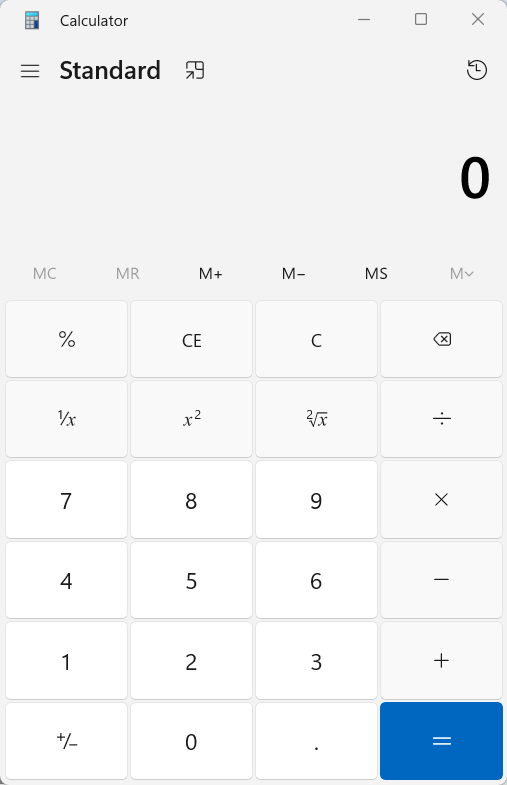
Once you click Open, you will see the Windows calculator pop up in a new window.

[![image.png](https://hugeerp10.co.za/hsofmanual/uploads/images/gallery/2025-01/scaled-1680-/hbRimage.png)](https://hugeerp10.co.za/hsofmanual/uploads/images/gallery/2025-01/hbRimage.png)