# ScanSKU Device Barcode
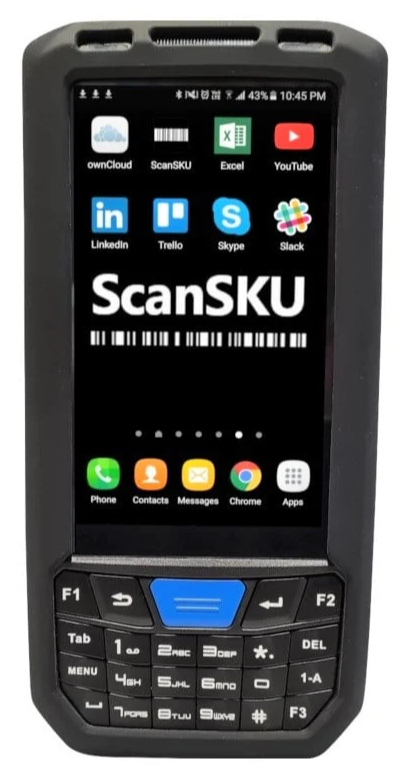
# ScanSKU Device
The device is an external purchase to use with the software
The device is uses three basic apps
1. Stock Take count used for Purchase Orders, Sales orders, stock count and stock take
2. ScanSKU lookup
3. Picking slip for Sales order
[](https://hugeerp10.co.za/hsofmanual/uploads/images/gallery/2024-02/r-series.png)
---
#### Setup device
There are two basic setups required
1. Keyboard Mode
2. Enter key
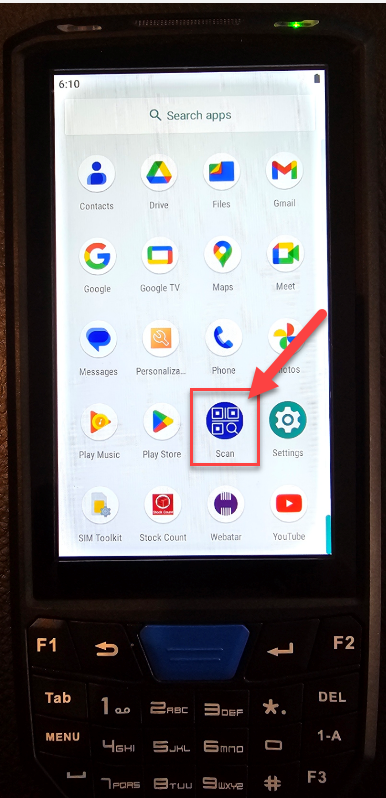
Under apps, go to Scan app
[](https://hugeerp10.co.za/hsofmanual/uploads/images/gallery/2024-02/Khgimage.png)
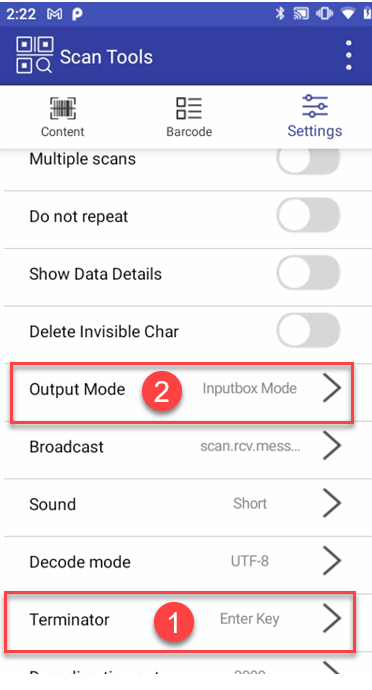
Click on Settings and find the two settings
Output Mode - must be Keyboard
Terminator - must be Enter Key
[](https://hugeerp10.co.za/hsofmanual/uploads/images/gallery/2024-02/YXjimage.png)
# ScanSKU General Setup
Video training manual 2021 - [Click Here](https://vimeo.com/655200842)
This section gives informaiton on the ScanSKU device and basic setup
.png)
# ScanSKU Scan Setting
Video training manual 2021 - [Click Here](https://vimeo.com/655200953)
Setting up the scan setting to allow for enter after scan
.png)
# ScanSKU Lookup
Video training manual 2021 - [Click Here](https://vimeo.com/655200899)
This allows one to view data on the device of products
.png)
# ScanSKU Stock Take
Video training manual 2021 - [Click Here](https://vimeo.com/655201044)
This shows one how to use the ScanSKU stock take function for scanning of stock for
1.Stock take
2.Stock counts
3.Purchase Order receiving goods
4.Sales orders
.png)
When first going into the stock take
Click on Lock Location tick on, so that you don't have to continue to enter the Scan Location
Enter MAST for Master warehouse or the warehouse code that is going to be scanned.
.png)
Click on the Barcode text field
1. Click on the SCAN on the device to scan barcode
Barcode will then populate
2. Enter quantity for count
If number does not come up, click on Input Quantity field
3. Click on the tick to accept
4. Click on the Add SKU to accept count
.png)
1. Clicking on the Add SKU to Accept
2. The screen will go green once it is accepted
3. It will now show below on list
4. Then you are ready to scan next item
.png)
Click on View Data button to view all SKUs scanned
Rotate device for a landscape view as it is much easier to see the products.
Click on the return to stock take button, to continue stock take.
.png)
Once you are done with the stock take, you will need to email the file
Click on Save and Email data
.png)
Name the file to be emailed
.png)
Email file to your email address
1. Enter your email address
2. Put in a subject line
3. Send file
.png)
After file is emailed, clear the data for a new bulk scan or for next stock take
After you have cleared the data, close the window and reopen
.png)
After you have cleared your data, log back into stock take
.png)
# ScanSKU Picking
Video training manual 2021 - [Click Here](https://vimeo.com/655201004)
This section shows you how to scan for stock on an existing sales order
.png)
# Upgrade instructions for ScanSKU G-Series barcode scanners
##### Click on the below link and follow the instruction to update the firmware for the Scansku G-Series Scanner
[G-Series - ScanSKU Flash Tool.zip](https://riskitsys-my.sharepoint.com/:u:/g/personal/travis_barcodeproducts_co_nz/ER3l0lz3B8dCpFzWY5fLK6UBl_JfiWfOSJ6tgF0lTkOCzA "G-Series - ScanSKU Flash Tool.zip")
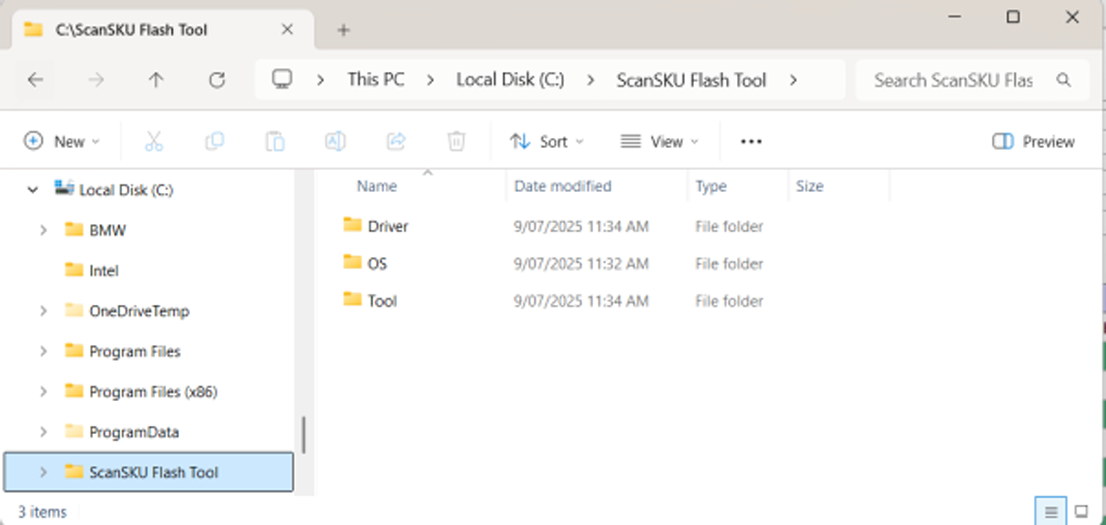
1. Download and extract all or unzip the software from the shared link. Move folder “ScanSKU Flash Tool” to the root folder directory C:
[](https://hugeerp10.co.za/hsofmanual/uploads/images/gallery/2025-10/image.png)
2\. Go to the “Tool” directory, click on the “Flash\_tool.exe”. If the file is hidden, use the search tool.
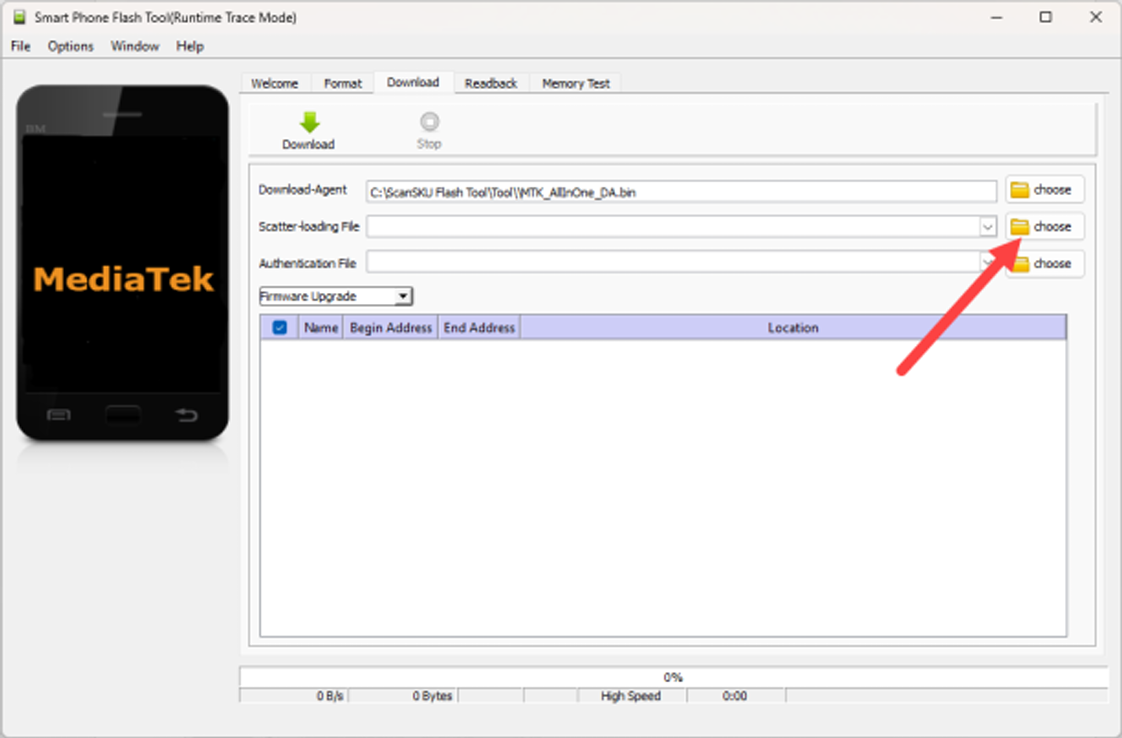
3\. The first time the Flash Tool opens, the “Scatter-loading File” is blank. Select Choose, search in the “OS” directory and select the “MT6765\_Android\_scatter.txt” file.
[](https://hugeerp10.co.za/hsofmanual/uploads/images/gallery/2025-10/Xlrimage.png)
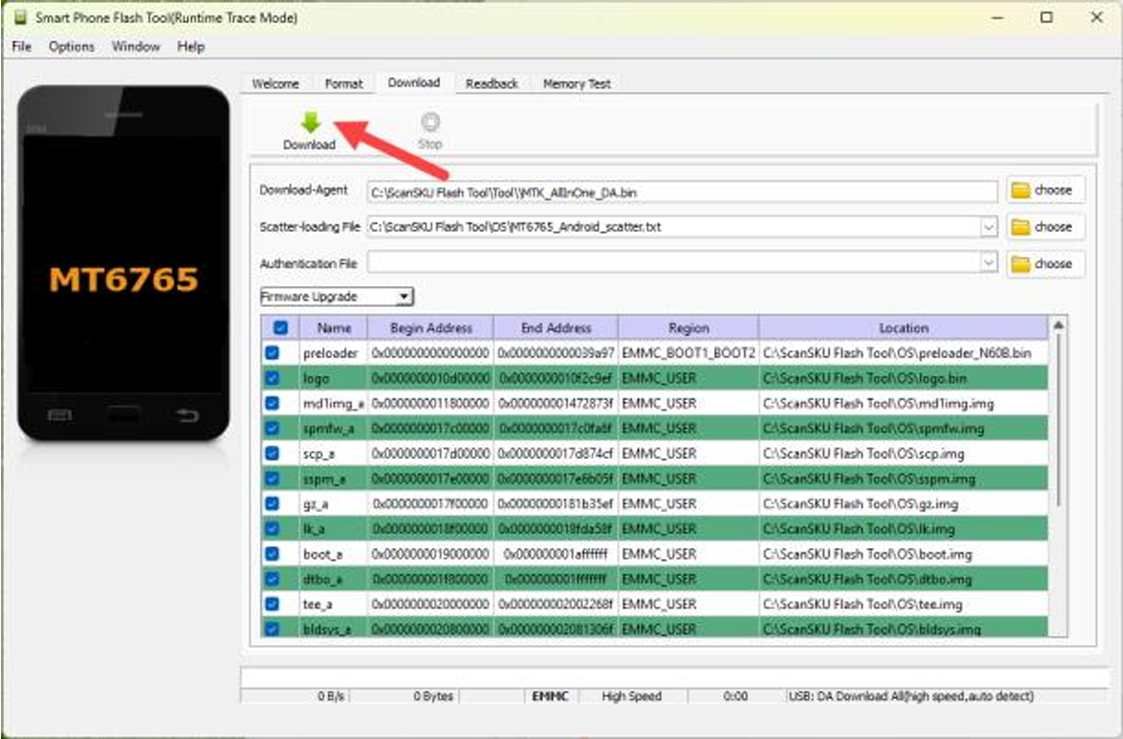
4\. The window below will appear with all the files selected.
[](https://hugeerp10.co.za/hsofmanual/uploads/images/gallery/2025-10/7fHimage.png)
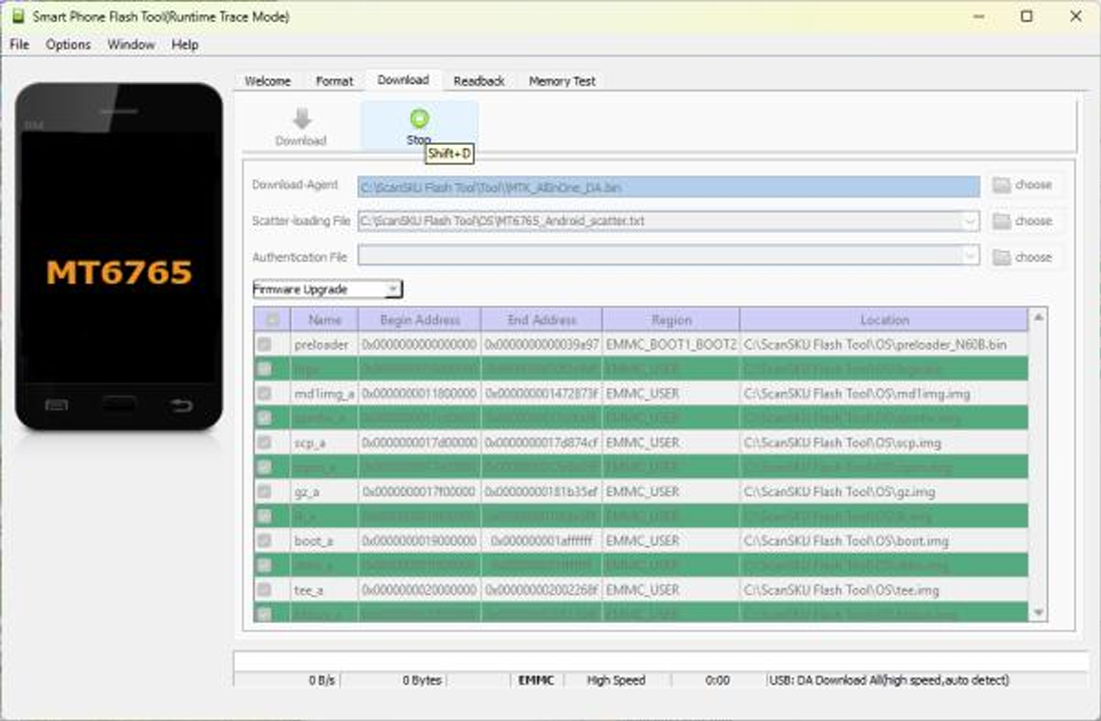
5\. Click the “Download” arrow.
6\. The window will grey out, and the app is ready to download the software
[](https://hugeerp10.co.za/hsofmanual/uploads/images/gallery/2025-10/dy4image.png)
7\. Power off the scanner.
8\. Press and hold the "Volume Up" & "Left Scan" buttons simultaneously.
9\. Plug in the USB cable that is connected to the workstation running the Upgrade App.
10\. Keep holding buttons for 2-3 sec.
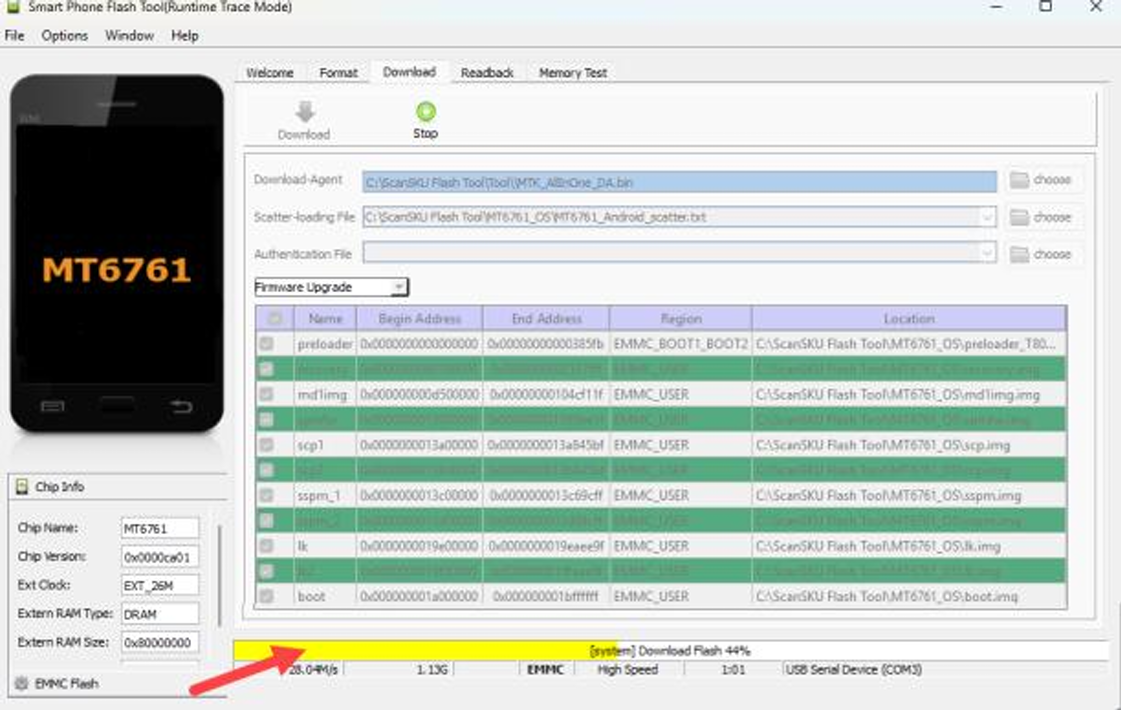
11.Upgrade activity should be seen below the green and white area.
[](https://hugeerp10.co.za/hsofmanual/uploads/images/gallery/2025-10/qyximage.png)
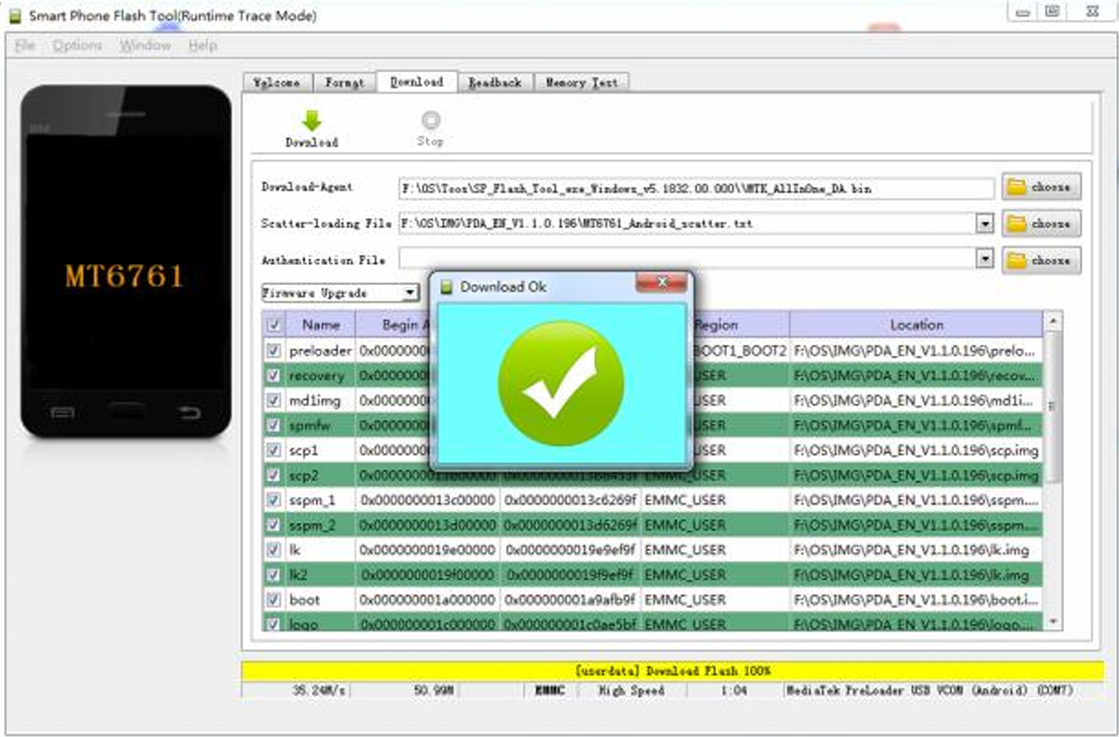
12\. Wait until it is finished downloading.
[](https://hugeerp10.co.za/hsofmanual/uploads/images/gallery/2025-10/dN7image.png)
13.Click the white X in the red box to close Download Ok.
14.Unplug the USB cable.
15\. Power on the scanner to boot.
16\. Set up the scanner from scratch.
**To upgrade another scanner, go to step 5**
# Scansku Hard Reset Devices
##### Hard Reset Scansku C61
Please follow below steps to factory reset your device:
1. turn off your device
2. press power button and Volume- together, then release power button first, the release volume key, you will see a menu.
3\. Using volume keys to select "recovery mode", use the power key to confirm.
4. You will see an Android robot, then holding the power key , then press and release volume+, you will see a menu.
5.find "factory reset" option, then use the power key to confirm.
---
##### Hard Reset Scansku R Series
1. Turn the device off. If it won’t turn off, remove the battery from the back and re-insert it.
2. Hold down the power button (lower button on right side) and volume up button (middle button on left side) at the same time. Keep holding till it enters a black ‘boot’ screen with words such as ‘recovery'. You might have to try a couple of times as you have to get the timing of holding the buttons right. You can remove the battery before each time to turn off and try again.
When you get to that screen.
1. Use the volume up button to cycle through the 3 options to get to ‘recovery mode’. Use the volume down button to select it.
2. An Android image will appear with "No Command". Hold down the power button and volume up button at the same time then let go of both at the same time
3. It should now go to another screen with a list of options. Select ‘wipe data/factory reset’. Do this by using the volume down button to scroll down and power button to select
4. Next screen, cycle down to ‘Yes’ line and follow instructions to reset it.
---
##### Hard Reset Scansku G- Series
1\. Shut down the scanner
2\. Press the power button+left scan button to enter Boot Mode
3\. Press the left scan button to switch the Recovery Mode option, and then press the right scan button to confirm. Enter Android Recovery mode.
4\. Press the left or right scan key to switch to the Wipe data/factory reset menu. Press the power button to confirm.
5\. Continue pressing the left scan button to select "Yes", and press the power button to confirm.
---
##### Hard Reset Scansku C66 Series
---
##### Hard Reset Scansku V Series
1. Shut down the scanner
2. Press the left scan button and power button to enter Boot Mode
3. Press the left scan button and scroll to the Recovery Mode option, and then press the right scan button to confirm.
4. Select Enter Wipe data/factory reset menu. Press the power button to confirm.
---