Getting Started
- Find Your Way Around
- First Time Login
- Grid Columns
- Keyboard shortcut keys
- Froala HTML Editor Info
- Desktop Shortcut Creation
- Form Colours
- Date Buttons
- Email Confirmation and Errors
Find Your Way Around
Main Modules
The main system screen consists of 8 modules. In the security setup you can limit users from gaining access to the each module.
We have also added quick access to your CRM functions such as time logs and support logs ,sales leads and reminders.
.png)
Modules:
1. General Ledger
2. Debtors / Receivables / Customers
3. Creditors / Payables / Suppliers
4. Inventory / Stock / Service
5. Job Costing
6. Webatar
7. Trackit
8. System Configuration
Menu Groups
Once you click onto one of the icons for example General Ledger, the following screen will appear. In this area you will see Menu Groups which are divided into the following
Configuration – This is where you setup and maintain your data relevant to the module you have accessed.
Activity – This is where all the actions happen in the module, for example in the General Ledger this is where the Cashbook and Journals are done.
Analysis – This is where you can view your data on screen as to what has happened when you posted your information.
Reports – This is where you will pull and print the reports relevant to the module.
.png)
Menu Items
When you click on one of the Menu Groups, it will open up more Menu Items which are applicable for the menu Group and Module.
.png)
Menu Items Opened
Once you have clicked on the desired menu Item it will open the relevant activity.
You will notice that the page is divided in three sections.
1.Header Functions
2.Header
3.Detail
Header Functions
Allows user to Post, print and insert documents.
Header
In this area you will be able to stipulate your search criteria to bring back the relevant data in the Detail Section.
Detail
In the area information will appear based on your search
.png)
Information on Module
In the top area of page, this area will give you which module you are accessing and the build number of the package.
In the lower area of the page, this area will give you the following information:
User – Who is logged in
Role – What security access does the user have for this module
Company – What company set of books are you accessing.
Branch – What Branch are you accessing from.
First Time Login
Video training manual 2016 - Click Here
Grid Columns
Resizing or finding hidden columns
1. Reset your grid view
2. Or check for the hidden column
.png)
Go to one of the column headers and where the arrow appears, click on the drop down, then down to columns.
This will show you the active and hidden columns, check that the credit column is ticked
.png)
Reset your grid, go to the top right hand corner of your window.
Click on the two arrows which will reset your grid back to default.
Reopen the module to view the columns
.png)
Keyboard shortcut keys
Video training manual 2019 - Click Here
The system caters for shortcut keys so as to reduce the use of the mouse
See below shortcut keys
Not all windows are configured for keyboard keys
Basic keys
| Move between fields | Tab | Buttons and fields |
| Backwards move | Shift + Tab | Buttons and fields |
| Add | Insert | Add |
| Delete line record | Delete | Delete record |
| Help | Alt + H | Help manual |
|
Select record |
Enter |
Select record in dropdown Select button Run search in search window |
|
Move in dropdown |
Up and down arrow keys |
Move in dropdown |
Function keys
|
Search |
Alt + S |
Search |
|
Find |
Crtl + F |
Find |
|
Add |
Alt + A |
Add |
|
Quick Add |
Alt + Q |
Quick Add |
|
Edit |
Alt + E |
Edit |
|
Delete |
Alt + X |
Delete Button |
|
Save |
Alt + S |
Save |
|
Close |
Alt + C |
Close |
|
Save and Close |
Alt + V Alt + Y |
Yes |
|
Save and New |
Alt + N |
New |
|
|
Alt + P |
|
|
Tabs - Tab 1 Main |
Alt + 1 |
Selects 1st Tab |
|
Tabs - Tab 2 |
Alt + 2 |
Selects 2nd Tab |
|
Tabs - Tab 3 |
Alt + 3 |
Selects 3rd Tab |
|
Tabs - Tab 4 |
Alt + 4 |
4th Tab |
|
Tabs - Tab 5 |
Alt + 5 |
5th Tab |
|
Tabs - Tab 6 |
Alt + 6 |
6th Tab |
|
Tabs - Tab 7 |
Alt + 7 |
7th Tab |
|
Tabs - Tab 8 |
Alt + 8 |
8th Tab |
|
Memo |
Alt + M |
Memo |
|
Attachment |
Alt + T Alt + D |
Document |
|
Reminder |
Alt + R |
Reminder |
|
Alert |
Alt + W |
Alert |
|
Process |
Alt + O Alt + G |
Go |
|
Barcode Print |
Alt + B |
Barcode Print |
|
First button row |
Alt + 0 |
Focus on Attachment or first button on top row |
|
Function button row |
Alt + 9 |
Focus on Add |
|
First grid line focus |
Alt + I |
Highlights First Line on the Grid |
|
Close Button Focus |
Alt + T |
Focus on Close Button |
|
Authorise Sales Order |
Alt + Z |
Authorise document |
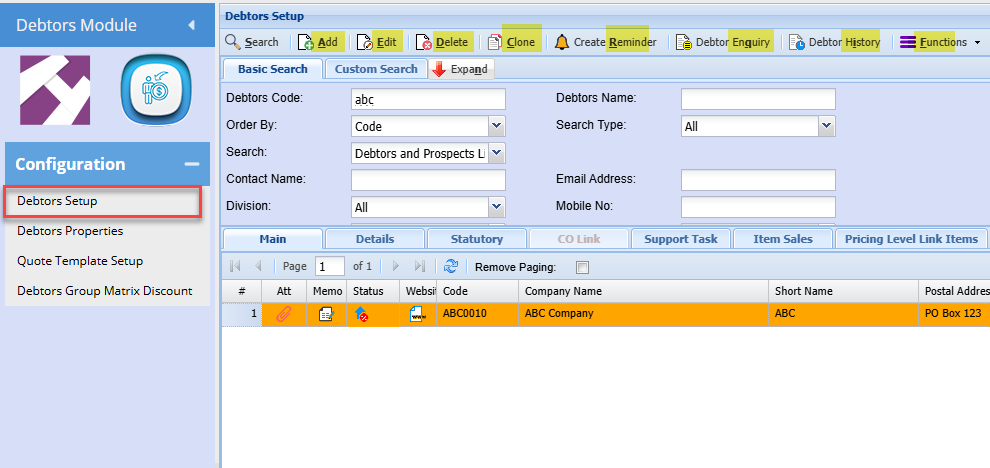
Keyboard keys will be indicated with a bold letter and underscore
An example of this is Debtors setup (View keys)
Print Keys
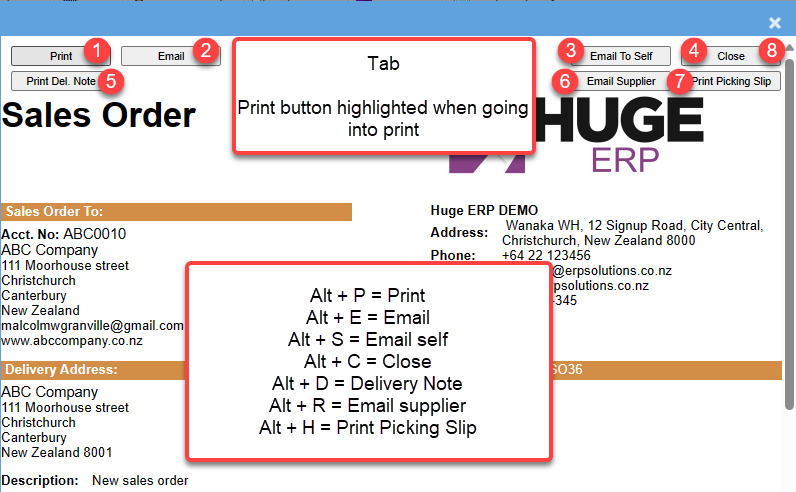
Focus on Print - click enter to print
| Alt + P | ||
| Alt + E | ||
| Email Self | Alt + S | Email Self |
| Close | Alt + C | Close window |
| Delivery Note | Alt + D | Print delivery note |
| Email Supplier | Alt + R | Email supplier |
| Picking Slip | Alt + H | Print Picking Slip |
Froala HTML Editor Info
This function allows users to enter information into a word type environment.
Text can be changed, images inserted and many other functions.
These are available in the following sections
- Support log ticket
- Quote
- Manage Job
- Policy doc
- Time Log
- Sales lead
- Pre-inspection checklist
- Book-In
.png)
Desktop Shortcut Creation
Video training manual - Click Here
Shows how to create a shortcut on the desktop
Replace the http://localhost with the online company access. This will look something like this https://webaccounting1.co.za
The fulll path can be https://webaccounting1.co.za/csp/ca1000506/wab/acck/startup.csp
Form Colours
Each window will have a certain colour scheme .
For customer documents we will have three colours,
1.Light Yellow ( #ffe6b3 ) for quantity (Bold and centre)
2.Light green ( #90EE90 ) for selling price
3.Rosy Brown ( #FFC1C1 ) for cost price
In most cases numbers are always right aligned, however in some of the forms the amounts will be centre aligned for easy reading and editing
.png)
Date Buttons
Date Search Quick Buttons
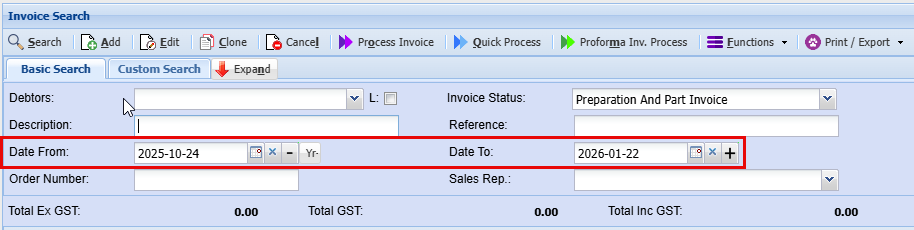
In most of the Date from searches, there will be three buttons next to the date
|
|
The X button will clear the date which will search ALL records in the past. Should you continue to click on the - button, it will keep going back a month at a time. |
|
|
The - button will first take the date on the date display to the first of the following month. |
|
|
The Yr- button will take the date back 12 months |
|
|
The + Button will just forward a month |


Email Confirmation and Errors
The system sends out emails to an email server which can either be a SMTP server, Exchange Server or Gmail email server.
When you send the email it routes it to one of these Mail servers and once the Mail server accepts it we log an entry that it was successfully sent and received by the Mail server .
From there the Mail server sends it out to the particular person, however we do not know whether or not it was successfully received to that particular person .
The best way to check whether an email has gone out to that person is to copy yourself in on the Mail that has been sent. You set this up once and it will remember that setting for you .
When emailing your document, click on Users and move your name over to the right box.
.png)
To check the status of the emails sent, click on your username on the top right hand corner of the module and select printing status.
.png)
When you are in this menu, the search will be specific to you, click on search button to see all the emails sent out .
Should there be an error on the sending out of the email, highlight that error and click on view to see the details .
Then we can troubleshoot where the problem could be as to why the email did not get sent out.
.png)
Error message
.png)