Debtors Report List Menu
- Top Sales By Division and Region
- Age Analysis
- Alternate FNB Debit Order File Generator
- Bank File Exports
- Commission By Inventory Item/Sales Rep/Region
- CPA Export File
- Customer Listing
- Customer Price List
- Debtor Sales Distribution By Groups
- Debtor Statistics per Category by Date Range
- Debtors Allocation Report
- Debtors Contacts Report
- Debtors Decimal Report
- Debtors Graph
- Debtors Group Summary Report
- Debtors Inventory Filter
- Debtors Journal Report
- Debtors Receipt Report
- Debtors Summary Report
- Debtors with no Transactions for a Date Range
- Detailed Age Analysis
- Direct Debit Report
- Document History
- Generate Debit Order File (FNB)
- Generate Debit Order File (Standard Bank)
- Group Code YTD Turnover Report
- Inter Branch Transactions
- Invoices By Date
- Logistics Report
- MNO (Mobile Network Operator) Report
- Monthly YTD Turnover Statistics Report
- New Client Listing
- POS Cash up Report
- Quarterly Turnover Statistics Report
- Quote Report
- Recurring Head Office Transactions
- Recurring Sales Report
- Recurring Transaction Line Detail Report
- Recurring Transaction Report
- Recurring Transactions - End of Contacts Report
- Sales Analysis Report
- Sales Overview Report 2
- Sales Forecast Report
- Sales Leads Statistics Report
- Sales Monthly Group Report
- Sales Order Accounting Report
- Sales Order Back Dated
- Sales Order Delivery Schedule
- Sales Order Incomplete Orders
- Sales Order Shipping Performance
- Sales Order Tracking Report
- Sales Orders
- Sales Overview Report
- Sales Performance
- Status Age Analysis
- Top Sales
- Top Sales by Rep
- Transactions Report
- Turnover by Division / Region
- Turnover Statistics Report by Stock Category
- Weekly Debt Movement Summary
Top Sales By Division and Region
Debtors> Reports> Report List
Top sales report by division or region which can be sorted by highest to lowest. Can be viewed by dynamic or static sales.
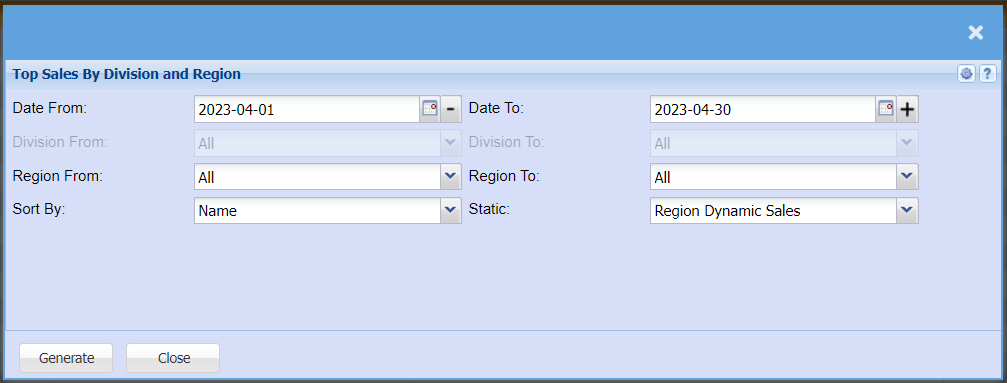
| Date From / Date To | Select a Customer/Debtor you wish to view the report from. Select the Customer/Debtor you wish to see up to in the report. |
| Division From / Division To | If you have set up divisions for your debtors, you can pull the report for all your debtors or you can select a specific Division from the drop-down menu. |
| Region From / Region To | You can pull the report for all your debtors, or you can select a specific Region from the drop-down menu if you have set up Regions for your debtors. |
| Sort By | Select a sort criteria on the drop-down menu selection |
| Static |
Age Analysis
Debtors> Reports> Report List
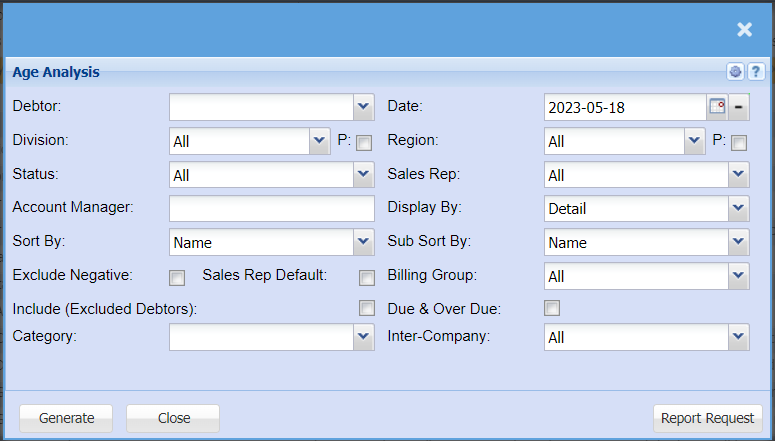
| Debtor |
If left blank this means all Debtors Select a debtor for single selection |
| Division | If you have multiple Divisions, by selecting this will add this column to your report. |
| Status | If you select all the report will pull all statuses. If you want to view report by status, select the status on the drop-down menu |
| Account Manager | You can pull the report for all your debtors, or you can select a specific Account manager from the drop-down menu if you have set up Account Managers for your debtors. |
| Sort By | Choose from the drop-down menu how you would like your report sorted, your options are by name or code. |
| Exclude Negative Tick | By ticking this box your report will exclude all negative transactions. |
| Sales Rep Default Tick | |
| Include (Excluded Debtors) Tick | |
| Category | To generate the report, the user has to select the category from the drop-down menu |
| Show Inactive Tick | By ticking the Inactive box this will include inactive Debtors/Customers in your report |
| Date |
This is the date ending of the report Click the minus button to go back to the first of each month |
| Region | If you have Regions, this will add Regions to the report. |
| Sales Rep | If you want to run a report by a specific sales rep, then you will need to select the sales rep on the drop-down menu. If you leave the sales rep on all the report will run by all sales rep. |
| Display By | Choose how you would like to have your report displayed, you can have it detailed or just a summary. You also have a choice to have it displayed by group, e.g. group by Sales Rep, or Group by Division or Region, Group by Status etc. |
| Sub Sort By | Sub Sort the report by selecting one option from the drop-down menu allows the user to pull a report with a secondary criteria that will be sorted by either, Code, Description, Warehouse or Bin location. |
| Billing Group | If you set up bulling groups you can select to run the report for a specific billing group. |
| Due & Over Due | |
| Inter-Company |
Alternate FNB Debit Order File Generator
Debtors> Reports> Report List
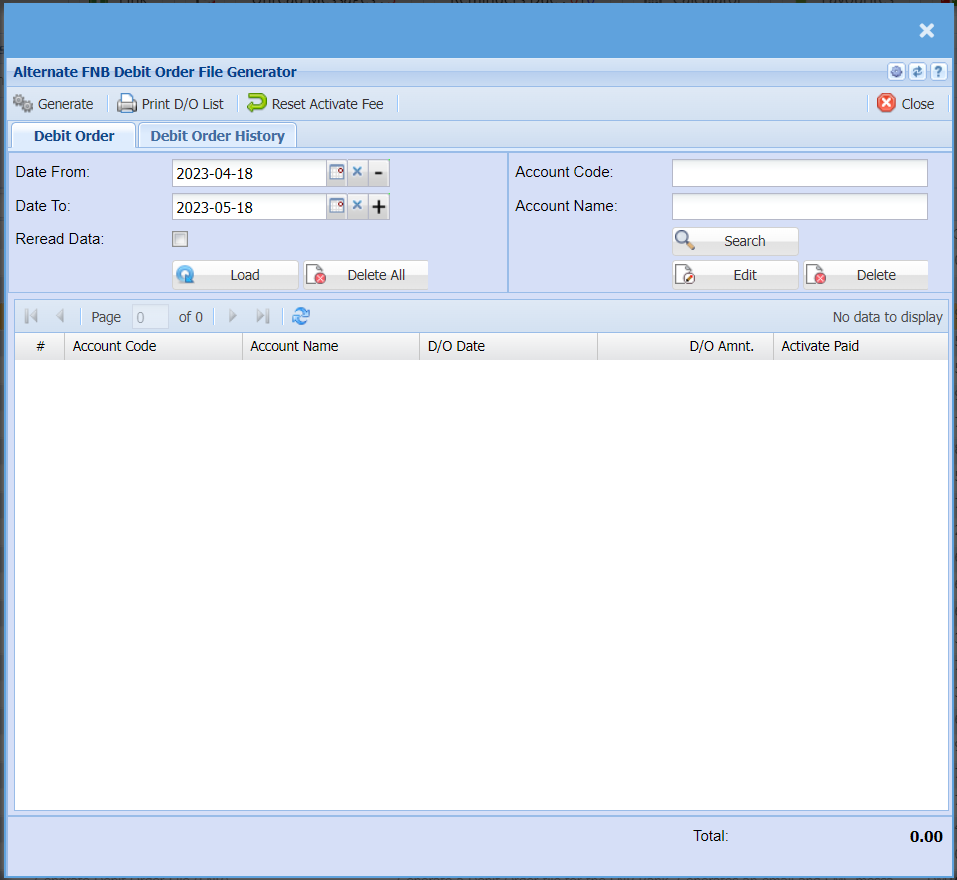
| Generate | Click the "Generate" button to open the report. You will have options to copy, email, or print the report. To view the report in an Excel document, copy the report and paste it into an Excel file. |
| Print D/O List | Click the "Print D/O List" if you would like to print the report for your pending debit orders. |
| Reset Activate Fee | |
| Date From / Date To | Choose the date range for which you want to view the report from Select a date range of when you want to see the report to |
| Reread Data Tick | |
| Account Code | |
| Account Name | |
| Load | |
| Delete All | |
| Account Code | |
| Account Name | |
| Search | Allows you to search for an existing item, Creditor or Debtor based on system fields and which module you are in. |
| Edit | Allows you to edit an existing Inventory Item, Creditor or Debtor depending on the module you are in |
| Delete | Allows you to Delete an existing Inventory Item, Creditor or Debtor depending on the module you are in, you will not be able to delete an Inventory Item, Creditor or Debtor if they have transactions against the. |
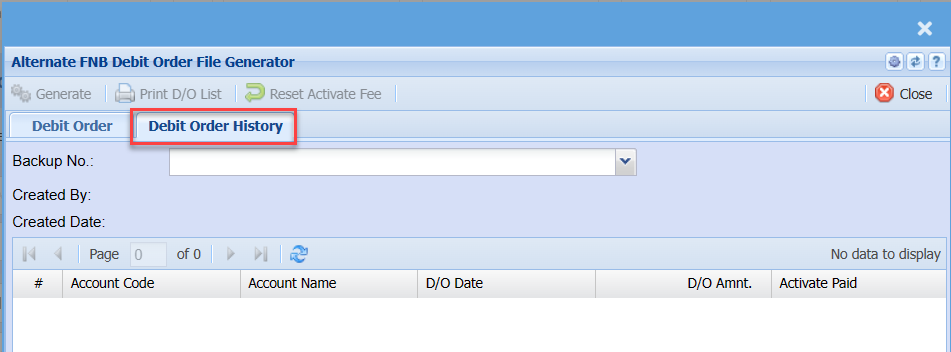
| Backup No. | |
| Created By | |
| Created Date |
Bank File Exports
Debtors> Reports> Report List
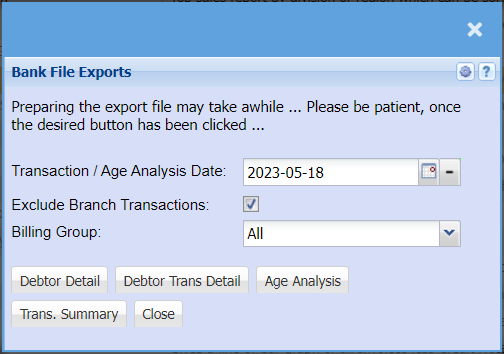
| Transaction / Age Analysis Date | |
| Exclude Branch Transactions Tick | |
| Billing Group | If you have set up billing groups you will be able to select a specific group from the drop-down menu for your report |
| Debtor Detail Button | |
| Debtor Trans Detail Button | |
| Age Analysis Button | This will give you an aged analysis report for the period you have selected. |
| Trans. Summary | Click the Trans. Summary to get an accumulative amount of all you Invoice, Credit note Totals, Payment Total etc. |
Commission By Inventory Item/Sales Rep/Region
Debtors> Reports> Report List

| Debtor Category | If you have set up Debtor Categories you will be able to pull a report for a specific debtor when selected form the drop-down menu. |
| Date From / Date To | Select the date range for which you want to view the report from Select a date range of when you want to see the report to |
| Region | If you have Regions, this will add Regions to the report. |
| Activate Commission Override Tick | |
| Sales Rep | If you want to run a report by a specific sales rep, then you will need to select the sales rep on the drop-down menu. If you leave the sales rep on all the report will run by all sales rep. |
| Commission % |
CPA Export File
Debtors> Reports> Report List
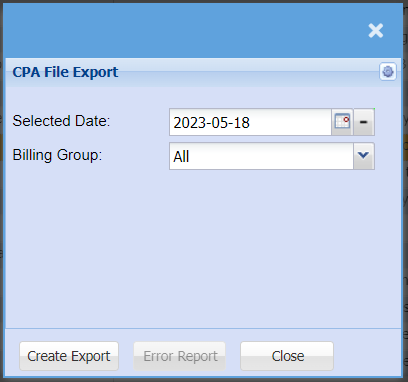
| Selected Date | Select the date that you would like to pull this report for |
| Billing Group | If you have billing groups like, Subscriptions, you can pull a report for these specific groups, or you can pull a report that will include all transactions. |
| Create Export | Click the "Create Export" button to open the report in a text file. To view the report in an Excel document, copy the report and paste it into an Excel file. |
| Error Report | An error report can be run for your creditors, this will highlight incorrect or missing information |
Customer Listing
Debtors> Reports> Report List
Report on all debtors that have been added to the debtors setup
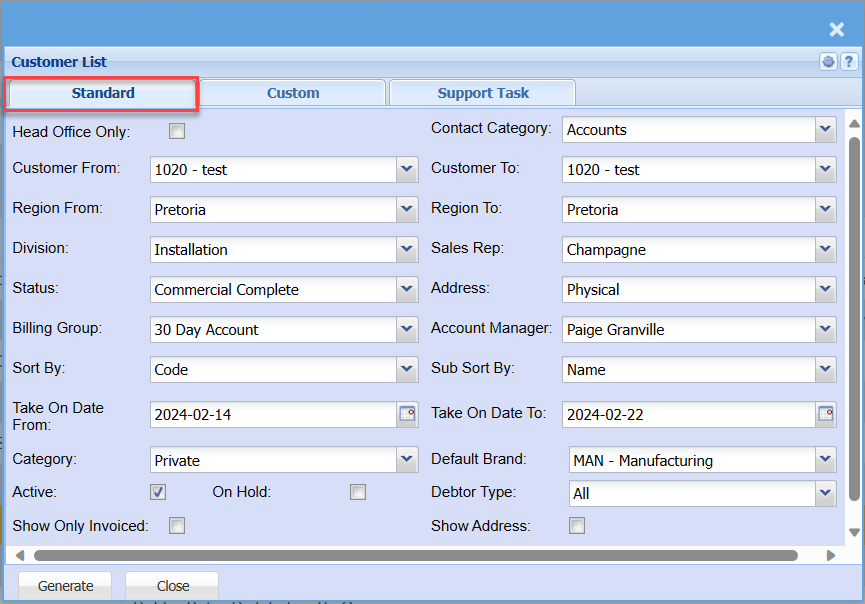
| Head Office Only Tick | If you have multiple offices with a Head office, by putting this tick on will pull he head offices only. |
| Customer From / Customer To | You can select which customer you want to pull the report from and to. |
| Region From / Region To | If you have Regions, this will add Regions to the report. |
| Division | If you have multiple Divisions, by selecting this will add this column to your report. |
| Status | If you select all the report will pull all statuses. If you want to view report by status, select the status on the drop-down menu |
| Billing Group | If you have billing groups like, Subscriptions, you can pull a report for these specific groups, or you can pull a report that will include all transactions. |
| Sort By | Select a sort criteria on the drop-down menu |
| Take On Date From / Take on Date To | Select the date From and To that you want to pull a report for that customers were added to the system |
| Category | To generate the report, the user has to select the category from the drop-down menu |
| Active Tick | By having the active tick on will eliminate the inactive customers form your report |
| Show Only Invoiced Tick | By having the Show Invoiced Only tick on .... |
| On Hold Tick | By having the On Hold tick on will only pull the report for customers that have their account on hold. |
| Contact Category | Select the category you would like to pull customer listings for, e.g. accounts, Administration, Finance, Marketing, Production, Purchasing, Sales etc. |
| Sales Rep | If you want to run a report by a specific sales rep, then you will need to select the sales rep on the drop-down menu. If you leave the sales rep on all the report will run by all sales rep. |
| Address | You can choose to have the customers Physical address, Postal address or Delivery address added to your report. |
| Account Manager | You can pull a report that is specifically for one Account Manager or all account managers. |
| Sub Sort By | Sub Sort the report by selecting one option from the drop-down menu allows the user to pull a report with a secondary criteria that will be sorted by either, Code, Description, Warehouse or Bin location. |
| Default Brand | Select a default brand of your inventory from the drop-down menu that you would like to pull a report for. |
| Debtor Type | |
| Show Address Tick |
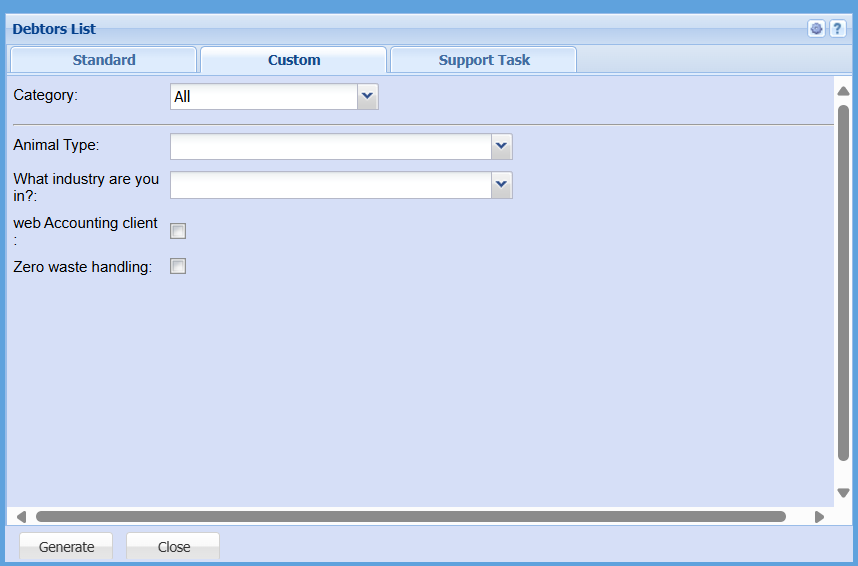
| Category | To generate the report, the user has to select the category from the drop-down menu |
| Colour | |
| Drawn By |
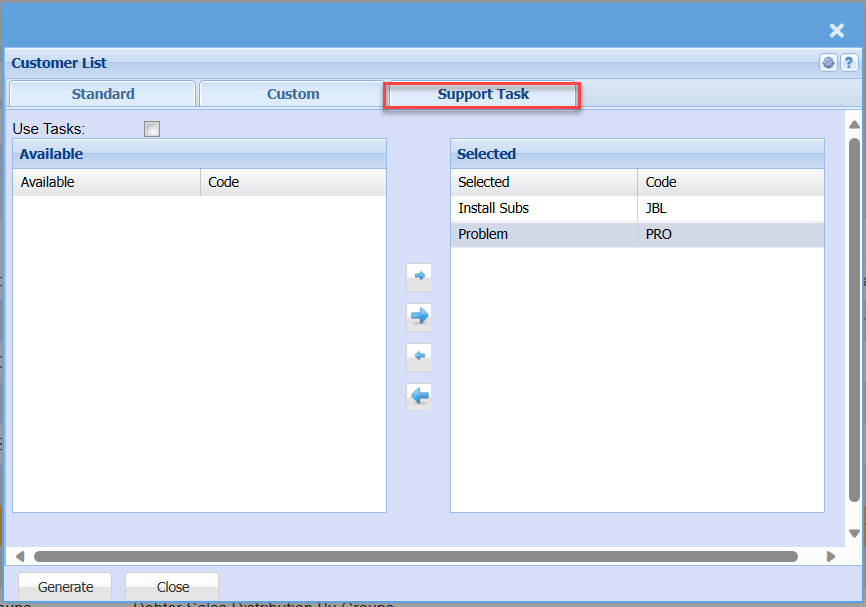
| Use Tasks Tick | |
| Available and Selected |
Customer Price List
Debtors> Reports> Report List
Gives a report on price levels in the system which can be sent to a customer
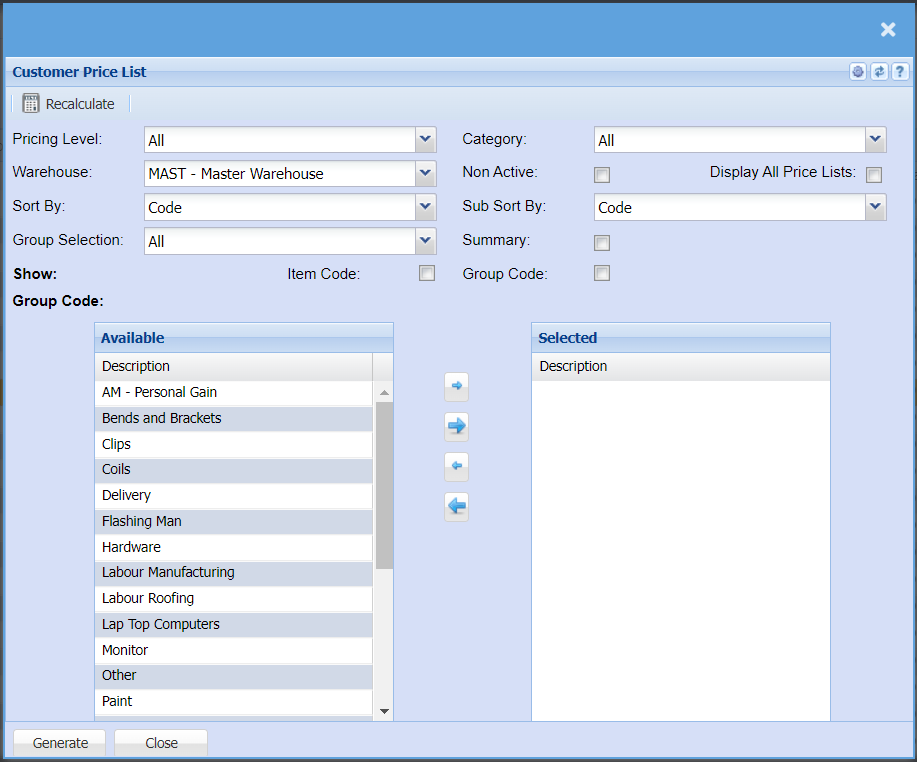
| Recalculate | You can update cost prices of your inventory items by clicking the Recalculate button |
| Pricing Level | If you have different pricing levels that apply during different in and out of seasons or if you have special pricing structures, you can select this from the drop-down menu to refine your report |
| Warehouse | Here you can select a specific warehouse you would like to pull the report for should have multiple warehouses |
| Sort By | Select a sort criteria on the drop-down menu |
| Group Selection | |
| Category | |
| Non-Active Tick | This option will allow you to include inactive items on the report when selected |
| Display All Price Lists Tick | |
| Sub Sort By | Sub Sort the report by selecting one option from the drop-down menu allows the user to pull a report with a secondary criteria that will be sorted by either, Code, Description, Warehouse or Bin location. |
| Summary | If you put the tick on the report will only pull limited information |
| Item Code Tick | You can apply the tick if you are wanting to report to be pulled using your item codes |
| Group Code Tick | You can apply the tick if you are wanting to report to be pulled using your item group codes |
Debtor Sales Distribution By Groups
Debtors> Reports> Report list
Debtor Sales Distribution by Groups.
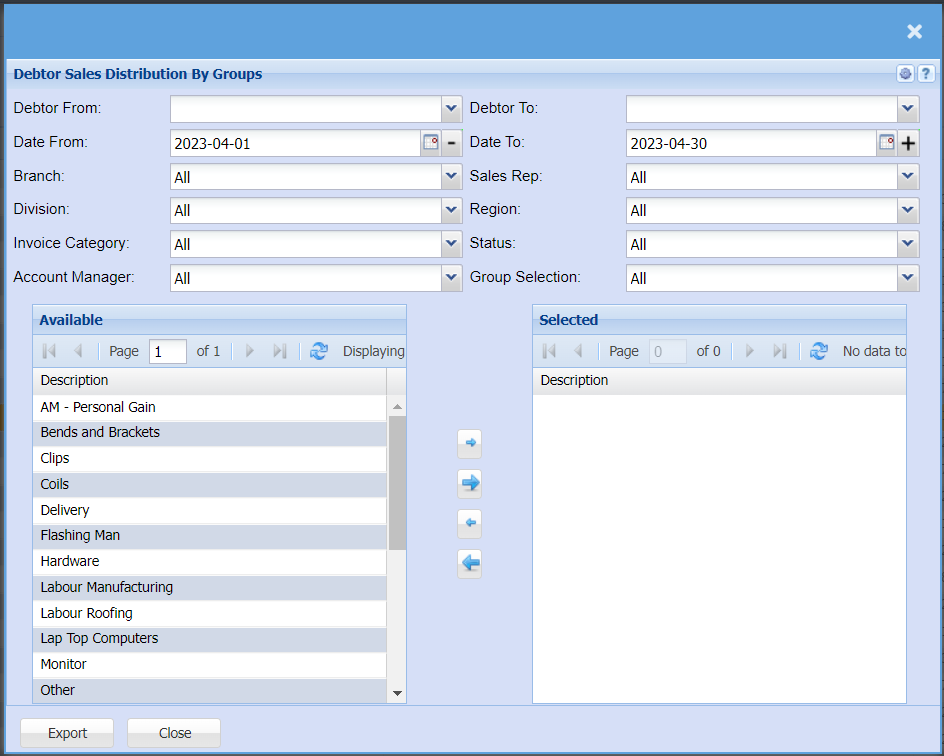
This is debtor’s sales distribution from different groups
| From Debtor / To Debtor | Select a Customer/Debtor you wish to view the report from. Select the Customer/Debtor you wish to see up to in the report. |
| Date From / Date To | Choose the date range for which you want to view the report from Select a date range of when you want to see the report to |
| Branches | When working with multiple branches this drop-down allows the user to select a specific branch to pull a report for. |
| Sales Rep | If you want to run a report by a specific sales rep, then you will need to select the sales rep on the drop-down menu. If you leave the sales rep on all the report will run by all sales rep. |
| Division | If you have multiple Divisions, by selecting this will add this column to your report. |
| Region | If you have Regions, this will add Regions to the report. |
| Invoice Category | to select the category from the drop-down arrow |
| Debtor Status | to select the status from the drop-down arrow |
| Account Manager | If you have Account Managers and want to pull a report for a specific Account Manager, you can select one from the drop-down menu. |
| Group Selection | |
| Generate button | Click the "Generate" button to open the report. You will have options to copy, email, or print the report. To view the report in an Excel document, copy the report and paste it into an Excel file. |
Debtor Statistics per Category by Date Range
Debtors> Reports> Report List
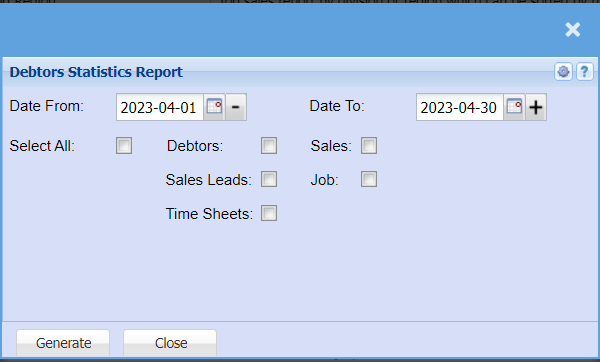
| Date From / Date To | Choose the date range for which you want to view the report from / Select a date range of when you want to see up to on the report. |
| Select All Tick | Tick the Select all box if you want to include Debtors, Sales, sales Leads, jobs and time sheets to your report |
| Debtors Tick | Tick the Debtors box if you want to include Debtors to your report |
| Sales Leads Tick | Tick the Sales Lead box if you want to include Sales Leads to your report |
| Time Sheets Tick | Tick the Time Sheet box if you want to include Timesheets to your report |
| Sales Tick | Tick the Sales box if you want to include Sales to your report |
| Job Tick | Tick the Job box if you want to include jobs to your report |
Debtors Allocation Report
Debtors> Reports> Report List
Shows all detailed allocations of payments of invoices per Debtor.
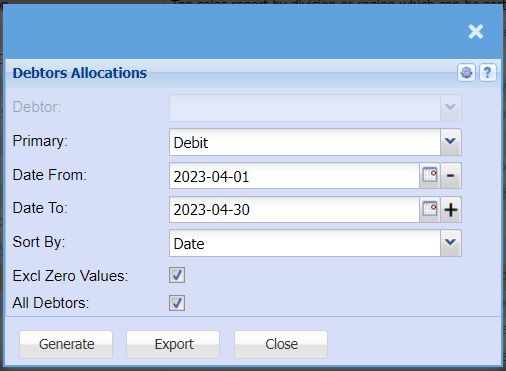
Allows a user to generate debtor’s allocation report
| Debtor | Select a Customer/Debtor you wish to view the report for |
| Primary | Select the primary source from the drop-down Menu that you would like to pull the report for. |
| Date From and To | Select the date range for which you want to view the report from / Select a date range of when you want to see up to on the report. |
| Sort By | Select a sort criteria on the drop-down menu |
| Excl Zero Values | Tick this box to exclude zero values to your report. If not ticked, it will include zero values |
| All Debtors | Tick all Debtors to include all debtors to your report in a separate column |
| Generate button | Click the "Generate" button to open the report. You will have options to copy, email, or print the report. To view the report in an Excel document, copy the report and paste it into an Excel file. |
Debtors Contacts Report
Debtors> Reports> Report list
List of either Debtor, Prospects or Opportunities plus their respective contracts listed per Debtor, Prospects or Opportunities. This report can also be selected for All debtor types.
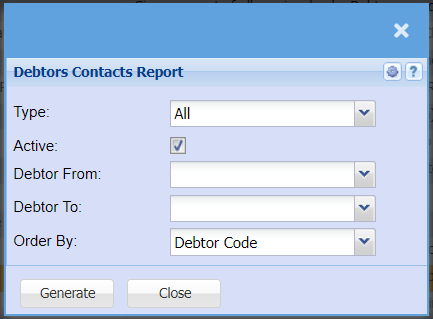
Report on list of Debtors, Prospects or opportunity
| Type | Select the type of contacts you would like to pull a report for from the drop-down menu, you can choose form Prospects, Debtors or Opportunities. |
| Active | By Ticking the Active box, the report will only generate active debtors contacts only |
| Debtor From / Debtor To | Select a Customer/Debtor you wish to view the report from. Select the Customer/Debtor you wish to see up to in the report. |
| Order By | Select how you would like your report to be order by from the drop-down menu, you can choose from Debtors code or Debtors name. |
| Generate button | Click the "Generate" button to open the report. You will have options to copy, email, or print the report. To view the report in an Excel document, copy the report and paste it into an Excel file. |
Debtors Decimal Report
Debtors >Reports >Report list
This report works out any debtors that have decimal values outstanding on debit and credit values.
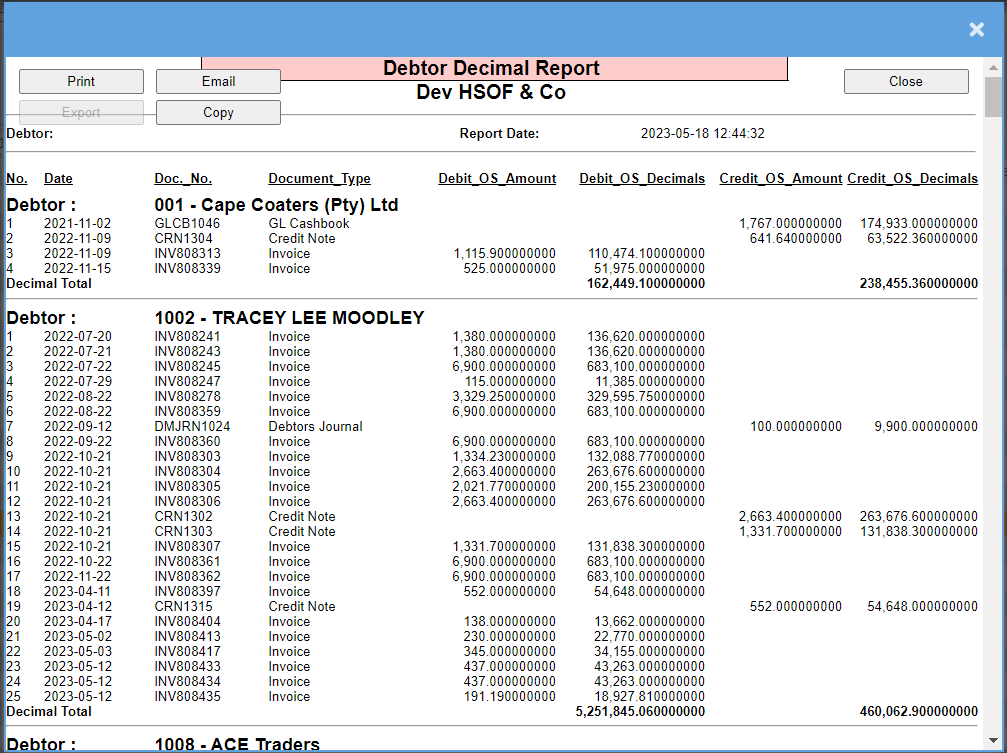
Debtors Graph
Debtors >Reports >Report list
Gives a line or bar graph of all invoices less credit notes for a specific debtor. Daily intervals can be specified.
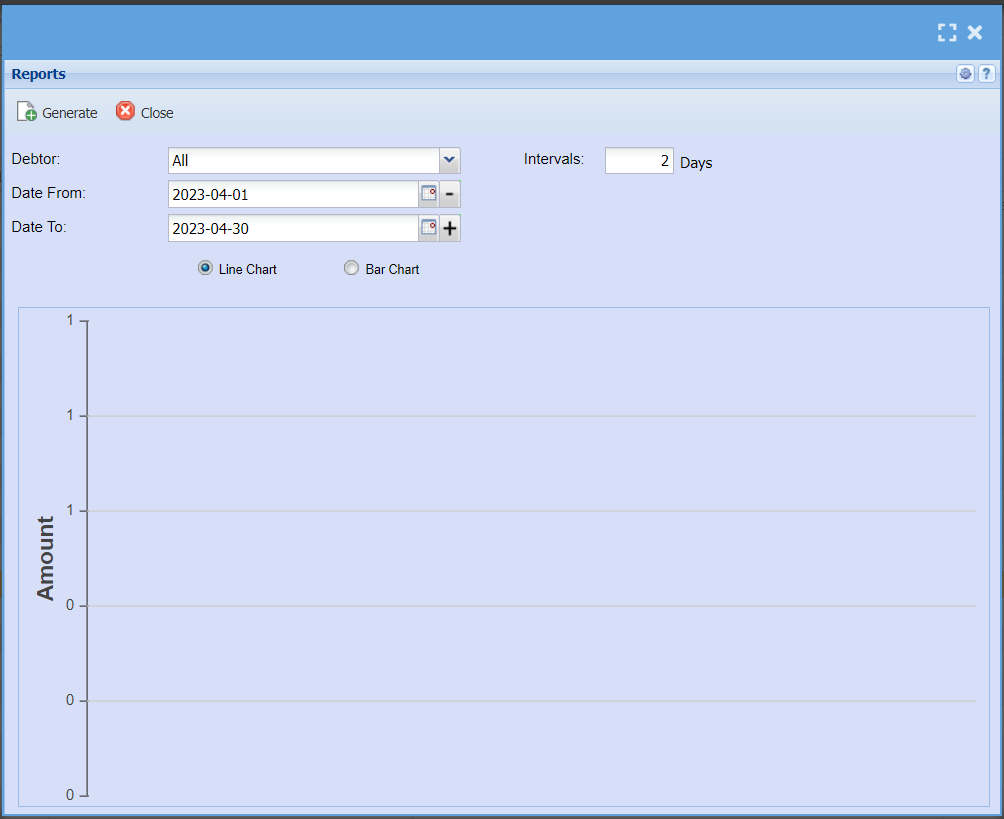
This report shows a line or bar graph of all invoices less credit notes for a selected debtor
| Debtor | Select a debtor you would like to pull the report for |
| Intervals | Enter the number of intervals you would like yo pull a report for |
| Date From / Date To | Choose the date range for which you want to view the report from / Select a date range of when you want to see up to on the report. |
| Chart Type | Select if you want to pull the chart in a line chart or a bar chart |
| Generate button | Click the "Generate" button to open the report. You will have options to copy, email, or print the report. To view the report in an Excel document, copy the report and paste it into an Excel file. |
Debtors Group Summary Report
Debtors >Reports >Report list
This report gives invoices, less credit notes per debtor, spread over the number of financial months indicated on the criteria given in the table form.
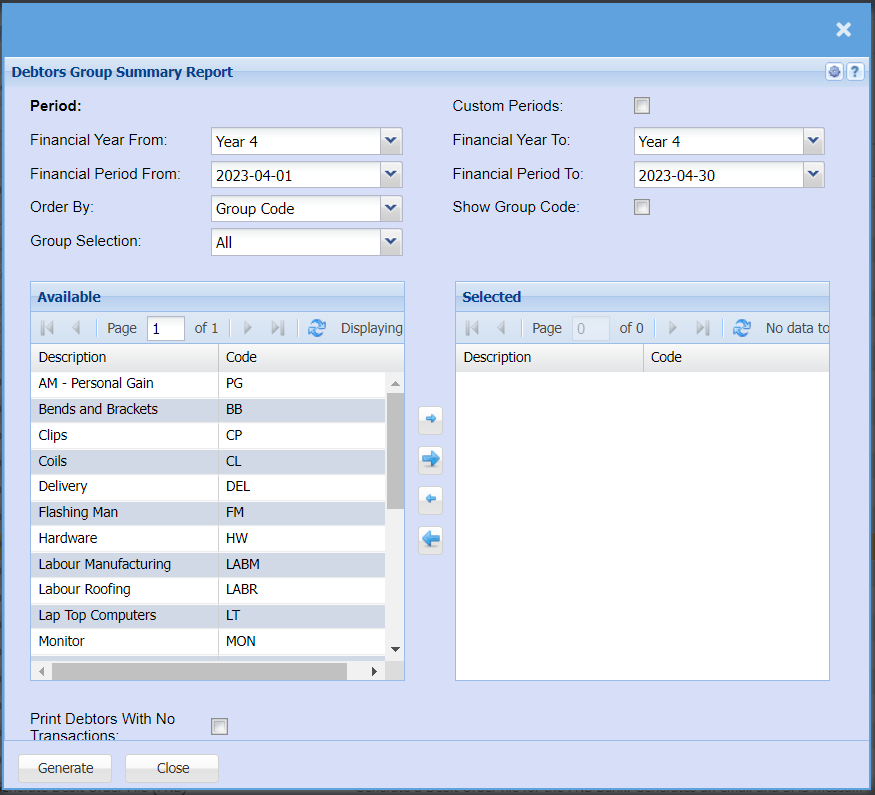
The report that runs according to invoices less credit notes per group code
| Financial Year From / Financial Year To | Select the year From and To from the drop-down menu that you would like to pull the report for |
| Financial Period From / Financial Period To | Select the period From and To from the drop-down menu that you would like to pull the report for |
| Order By | Select how you would like your report to be order by from the drop-down menu, you can choose from Debtors code or Debtors name. |
| Group Selection | If you have set up groups for your Inventory you can choose to refine your report by selecting a group on the drop-down menu |
| Custom Periods Tick | If you tick custom period, you will be able to use any date to pull a report for. |
| Show Group Code Tick | If you tick Show Group Codes, this will add a column to your report with showing the group codes. |
| Print Debtors With No Transactions Tick | By ticking this box all your debtors who do not have any transactions for the time period you are pulling the report for will still be pulled for the report |
Debtors Inventory Filter
Debtors >Reports >Report list
This report shows all transactions by debtor, invoice and displaying all lines completed on the invoice.
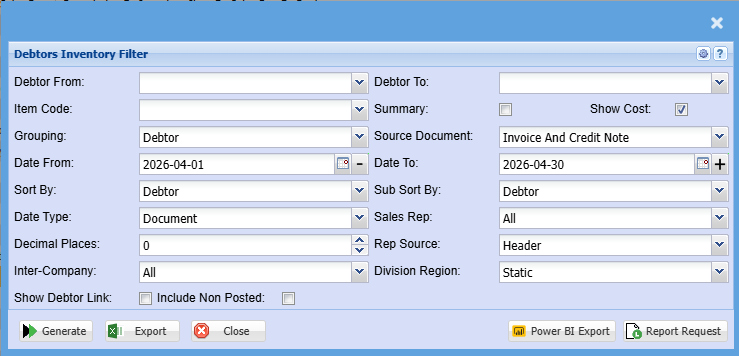
| Debtor From / Debtor To | Select a Customer/Debtor you wish to view the report from. Select the Customer/Debtor you wish to see up to in the report. |
| Item Code | Select an item code from the drop-down menu |
| Grouping | Select grouping of the report from the drop-down menu. If you don't wish to group your report leave the selection on none |
| Date From / Date To | Choose the date range for which you want to view the report from Select a date range of when you want to see the report to |
| Sort By | Select a sort criteria on the drop-down menu |
| Date Type | Select a date type on the drop-down menu selection |
| Decimal Places | It is advisable to set decimals to two places, you can view the report with up to 9 decimal places. |
| Summary Tick | Tick the box in order to include summary on the report |
| Show Cost Tick | Tick the box in order to include cost on the report |
| Source Document |
Select source document from the drop-down menu All: Includes invoices, credit notes, quotes and sales orders Invoice: Only invoices will be in this report Credit Note: Only credit notes will be in this report Invoice and Credit Note: Invoices less credit notes which is the most common selection for true sales Quotes: Only quotes will be in this report Sales Orders: Only sales orders will be in this report |
| Sub Sort By | Sub Sort the report by selecting one option from the drop-down menu allows the user to pull a report with a secondary criteria that will be sorted by either, Code, Description, Warehouse or Bin location. |
| Sales Rep | If you want to run a report by a specific sales rep, then you will need to select the sales rep on the drop-down menu. If you leave the sales rep on all the report will run by all sales rep. |
| Rep Source |
Select the source of where the data must correlate for the sales Rep. There are three options: Header: The sales Rep that is selected on the header of the sales document Lines: The sales Rep that is selected per item line on a document, This could mean that there can be multiple sales reps per document Customer: Override the document and sales line sales reps allocated, just take the default sales Rep at customer to run report. |
| Inter-Company |
Select the option to include or exclude invoices and credit notes that are intercompany for reporting These are customers that are flag as Inter-Company |
| Division Region |
Select the source of how you want to select division and regions, there are two options: Static: This is taking the division and region that is specified at the customer setup level Dynamic: This takes the division and region specified on the document, this can be different to the division and region set up at the customer |
| Include Non-Posted Tick | Tick the box if you want to include non-posted transactions in your report |
| Generate | Click the "Generate" button to open the report. You will have options to copy, email, or print the report. To view the report in an Excel document, copy the report and paste it into an Excel file. |
| Export | This allows you to export the report to an Excel file |
| Power BI Export | This exports the data ready for a power BI import |
| Report Request | Set up a report request to run the report for a later in the day if the report takes long and include multiple people to have access to this report |
Overall discount and line discount
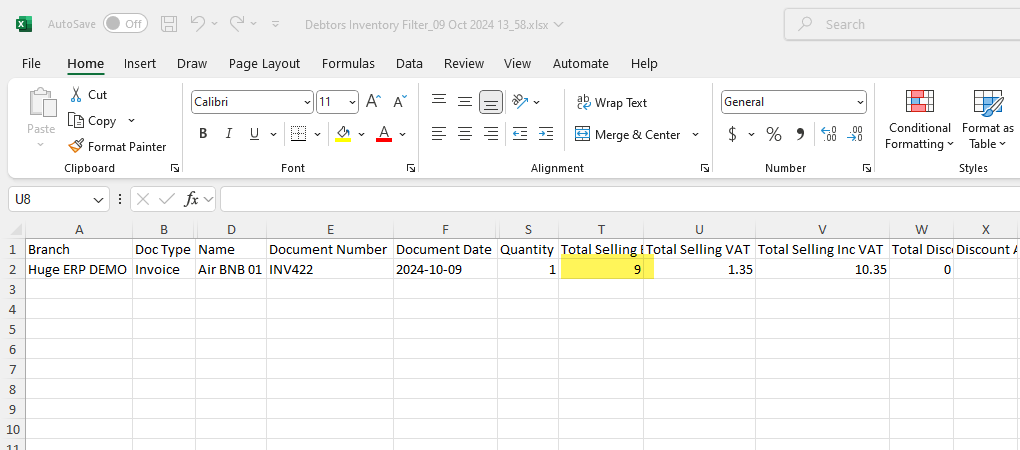
This report will display line discount versus overall discount which is the net effect of the discount.
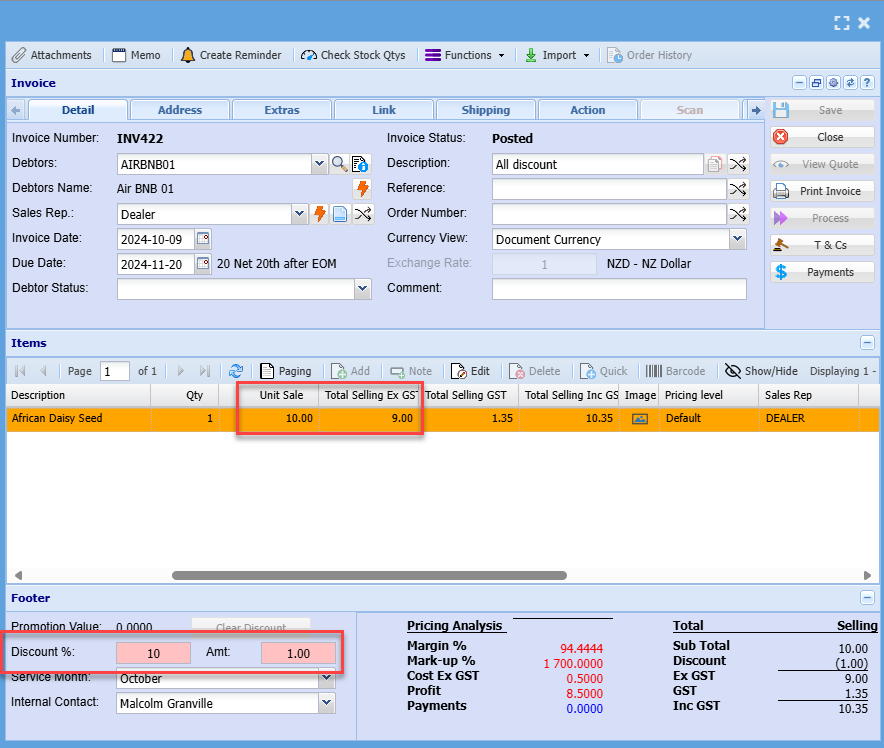
See example below of overall discount given to an invoice and the report result
If we take a line item that costs 10.00 and give and overall discount of 10%, the net effect of the line is 9.00 .
Therefore the report will show 9.00 as the value
Invoice example
Using overall discount can be problem as it will give discount on a line that may also contain a line discount. Thereby resulting in a double discount given.
Debtors Journal Report
Debtors >Reports >Report list
Shows Posted debtor journals, who created then and who posted them.
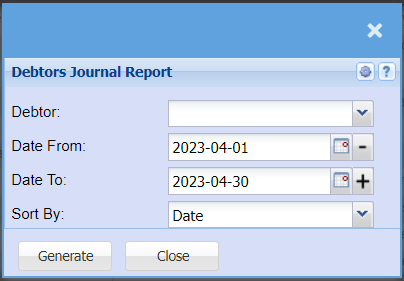
This is a report on debtors posted journal
| Debtor | Select a debtor from the drop-down menu that you wish to run the report for. |
| Date From / Date To | Choose the date range for which you want to view the report from Select a date range of when you want to see the report to |
| Sort By | Choose from the drop-down menu how you would like your report sorted, your options are by date, Document No, Reference, Action or debtor. |
Debtors Receipt Report
Debtors>Reports>Report List
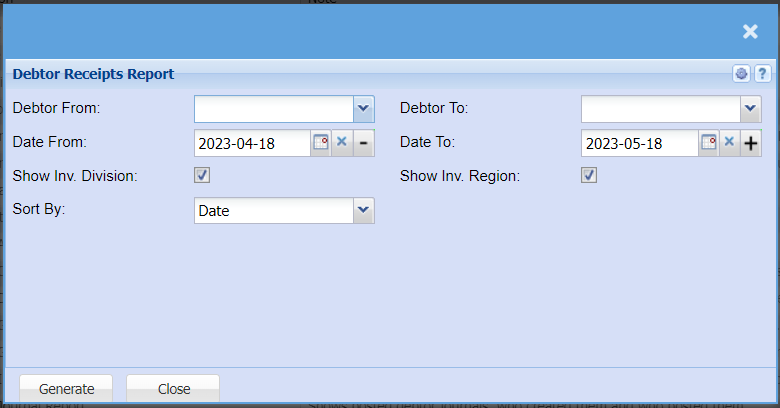
| Debtor From / Debtor To | Select a Customer/Debtor you wish to view the report from. Select the Customer/Debtor you wish to see up to in the report. |
| Date From / Date To | Choose the date range for which you want to view the report from / Select a date range of when you want to see up to on the report. |
| Show Inv. Division Tick | |
| Sort By | Choose from the drop-down menu how you would like your report sorted, your options are by date, Document No, Reference, Action or debtor. |
| Show Inv. Region Tick |
Debtors Summary Report
Debtors>Reports>Report List
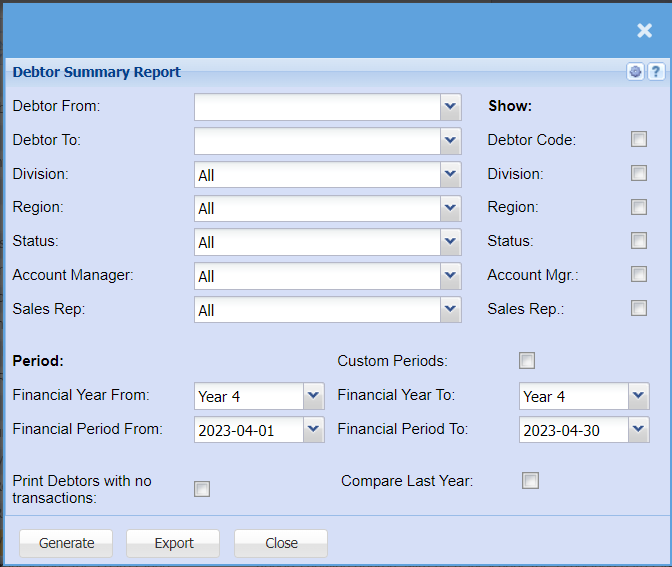
This is a debtor’s summary report
| Debtor From / Debtor To | Select a Customer/Debtor you wish to view the report from. Select the Customer/Debtor you wish to see up to in the report. |
| Division | If you have multiple Divisions, you can either select a specific division to pull a report for or if you select all, it will include all divisions. |
| Region | If you have Regions, you can either select a specific region to pull a report for or if you select all it will include all divisions. |
| Status | You can choose a specific group that you want to pull a report for, you can select from a different module or specific product group. You can also select all to add all statuses to the report. |
| Account Manager | If you have Account managers set up, you can either select a specific manager to pull a report for or if you select all it will include all Account Managers in the report. |
| Sales Rep | If you have Sales Reps set up, you can either select a specific Sales Rep to pull a report for or if you select all it will include all Sales reps in the report. |
| Debtor Code | By ticking the Debtor Code box a column will be added to the report containing the Debtors code used at setup. |
| Division | If you have chosen All from the drop-down menu and If you have multiple Divisions, ticking the box will add this column to your report so you can filter per Division once report has been generated. |
| Region | If you have chosen All from the drop-down menu and If you have multiple Regions, ticking the box will add this column to your report so you can filter per Region once report has been generated. |
| Status | If you have chosen All from the drop-down menu and If you have chosen All Statuses, ticking the box will add this column to your report so you can filter per Status once report has been generated. |
| Account Mgr | If you have chosen All from the drop-down menu and If you have Account managers setup, ticking the box will add this column to your report so you can filter per Account manager once report has been generated. |
| Sales Rep | If you have chosen All from the drop-down menu and If you have Sales Reps setup, ticking the box will add this column to your report so you can filter per Sales Rep once report has been generated. |
| Financial Year From / Financial Year To | Select the Financial Year From and To range that you want to pull a report for. |
| Financial Period From / Financial Period To | Select the Financial Period From and To date range that you want to pull a report for. |
| Print Debtors with no transactions | By ticking the box the report will include customers without transactions on the report |
| Custom Periods | By ticking the box the report will include a Custom Period field in the report |
| Compare Last Year | By Ticking Compare Last year will add a column month by month so you can compare one period to another side by side. |
Debtors with no Transactions for a Date Range
Debtors >Reports >Report list
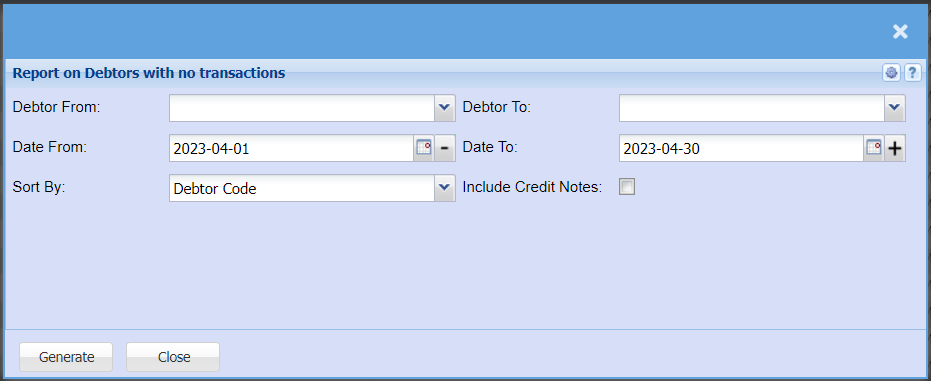
| Debtor From / Debtor To | Select a Customer/Debtor you wish to view the report from. Select the Customer/Debtor you wish to see up to in the report. |
| Date From / Date To | Choose the date range for which you want to view the report from / Select a date range of when you want to see up to on the report. |
| Sort by | Choose from the drop-down menu how you would like your report sorted, your options are by date, Document No, Reference, Action or debtor. |
| Include Credit Notes Tick | By ticking this box, should there be any credit notes allocated to a specific debtor, this will show in the report when generated. |
Detailed Age Analysis
Debtors>Reports>Report List
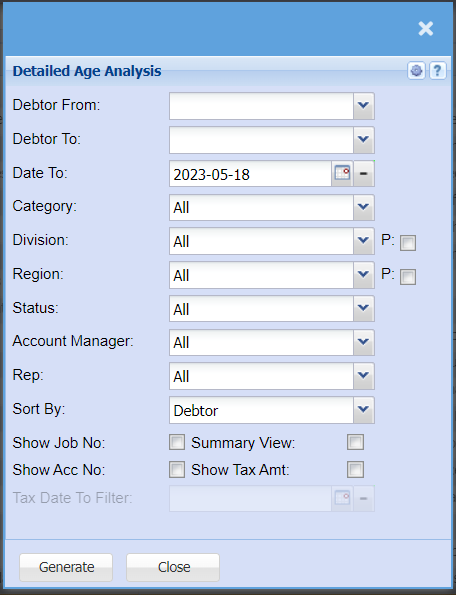
Report that shows detailed customers unallocated transactions
| Debtor From / Debtor To | Select a Customer/Debtor you wish to view the report from. Select the Customer/Debtor you wish to see up to in the report. |
| Date To | Select the date that you want the report to pull up to. |
| Category | You can pull the report for all your debtors Categories, or you can select a specific Division from the drop-down menu if you have set up divisions for your debtors. |
| Division | You can pull the report for all your debtors Divisions, or you can select a specific Division from the drop-down menu if you have set up divisions for your debtors. |
| Region | You can pull the report for all your debtors Regions, or you can select a specific Region from the drop-down menu if you have set up Regions for your debtors. |
| Status | If you select all the report will pull all statuses. If you want to view report by status, select the status on the drop-down menu |
| Account Manager | You can pull the report for all your debtors, or you can select a specific Account manager from the drop-down menu if you have set up Account Managers for your debtors. |
| Rep | You can pull the report for all your debtors Reps, or you can select a specific Rep from the drop-down menu if you have set up Reps for your debtors. |
| Sort By | You can choose to have the report sorted by the debtor's name or the category should you have categories set up. |
| Show Job No. | By Ticking the Show Job No. box, this will add a column with the Job Number to the report. |
| Summary View | By ticking the Summery View Box will limit the information in the report when generated. |
| Show Acc No. | By Ticking the Show Acc No. box, this will add a column with the Account Numbers to the report. |
| Show Tax Amt | By Ticking the Show Tax Amt box, this will add a column with the Tax amount to the report. |
| Tax Date To Filter |
Direct Debit Report
Debtors >Reports >Report list
Setup the customer with a Direct Debit and report on them and export for bank
Print or export a report on Direct Debit

| Amount for Report | You can choose to pull a report using the installment due or you can choose an ages analysis amount. |
| Aging | When you select Aging Due, here you can select 30 Days, 60 Days 90 Days etc. |
| Date | Select the date you are wanting the debit report for |
| Reference | Here you can add the Reference you would have added to the Debit order eg: January, February etc. |
| Description | Here you can add the Description of what you would have added to your direct Debit eg: Rent or Car etc. |
Document History
Debtors >Reports >Report list
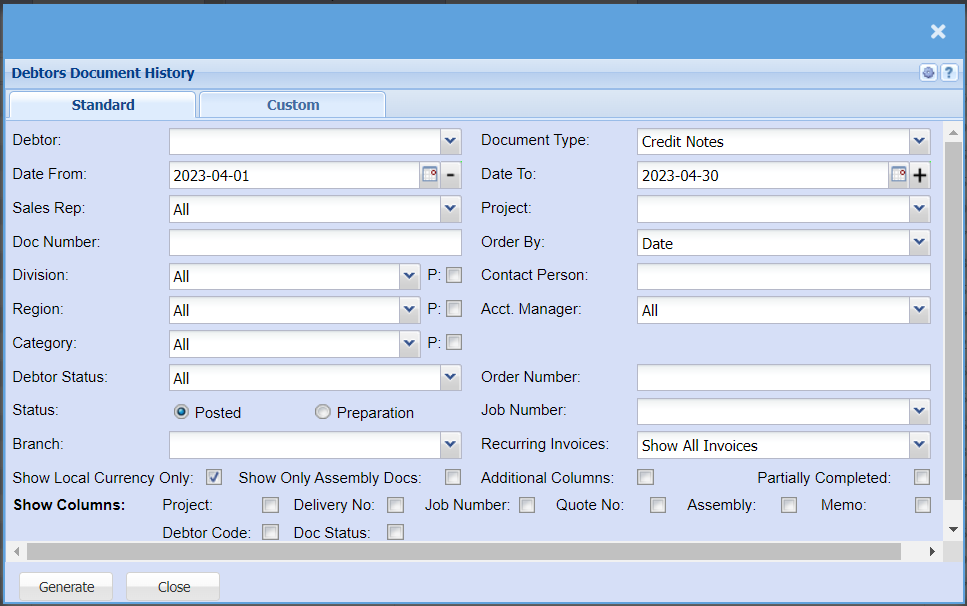
This is a full report of posted documents of a selected debtor
| Debtor | Select the debtor you wish to pull document history for. |
| Date From / Date To | Choose the date range for which you want to view the report from / Select a date range of when you want to see up to on the report. |
| Sales Rep | If you want to run a report by a specific sales rep, then you will need to select the sales rep on the drop-down menu. If you leave the sales rep on all the report will run by all sales rep. |
| Doc Number | If you are looking for a specific document and know the document number, you can add it here. |
| Division | If you have set up divisions for your debtors, you can pull the report for all your debtors or you can select a specific Division from the drop-down menu. |
| Region | If you have set up Regions for your debtors, you can pull the report for all your debtors, or you can select a specific Region from the drop-down menu. |
| Category | To generate the report, the user has to select the category from the drop-down menu |
| Debtor Status | to select the status from the drop-down menu |
| Status - Posted or Preparation | Select the document status you want to pull a report for, you have a choice form Posted Invoices or Invoices still in Preparation stage. |
| Branch | When working with multiple branches this drop-down allows the user to select a specific branch to pull a report for. |
| Show Local Currency Only | By ticking this box, the report will exclude any foreign currency transactions |
| Document Type | Here you can select the type of documents you are after, invoice, Credit note, Sales order, Delivery Note Etc. |
| Project | |
| Order By | Here you can choose what you would like the report to be arranged by, by selecting from the drop-down menu. |
| Acct. Manager | You can pull the report for all your debtors, or you can select a specific Account manager from the drop-down menu if you have set up Account Managers for your debtors. |
| Order Number | If you are looking for a specific document for a specific order number, you can add the order number here to refine the search |
| Job Number | If you are looking for a specific document for a specific job number, you can select the job number from the drop-down menu. |
| Recurring Invoices | Here you can choose whether you want to pull a report or all invoices, Recurring invoices or to exclude recurring invoices. |
| Show Columns | You can tick the boxes you wish to have shown on your report. |
Generate Debit Order File (FNB)
Debtors >Reports >Report list
Generate a debit order file to the FNB Bank.
Generates an e-mail and SMS message to notify the debtor of the pending Debit Order
The report that generates a debit order for the bank
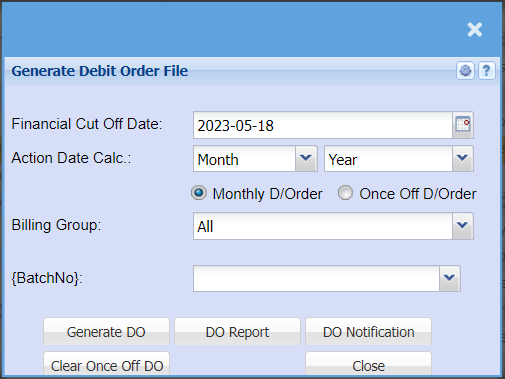
| Financial Cut Off Date | Select a date that you would like to be your financial cutoff date. |
| Action Date Calc | Select the month and year from the drop-down menus for your action date. |
| Monthly/Once off D/Order | Here you can choose if you are generating a report your monthly customers or for a once off debit order. |
| BatchNo | Here you can select the batch order you are pulling a report for. |
| Generate Do | This button will generate a file that can be uploaded into FNB to process debit orders. |
| Do Report | This button will run the report |
| Do Notification | This button will send out notifications to your customers informing them of the Debit order |
| Clear Once Off Do | This button will clear the once off debit order from the debtors |
Generate Debit Order File (Standard Bank)
Debtors >Reports >Report list
Generate Debit Order File for Standard Bank
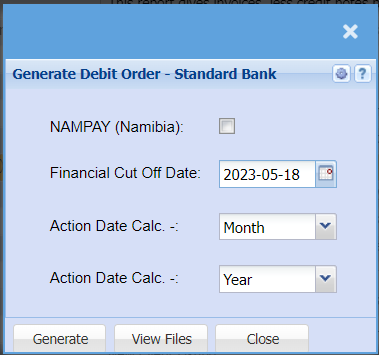
| NAMPAY (Namibia) | This tick box is if you are in Namibia |
| Financial Cut Off Date | Select the date you want to use as your debit order cutoff date |
| Action Date Calc. | Select the month you are working with |
| Action Date Calc. | Select the year you are working with |
| Generate | Click the "Generate" button to open the report. You will have options to copy, email, or print the report. To view the report in an Excel document, copy the report and paste it into an Excel file. |
| View Files | The View File button will create the file in another screen so you can view what your report will look like |
Group Code YTD Turnover Report
Debtors >Reports >Report list
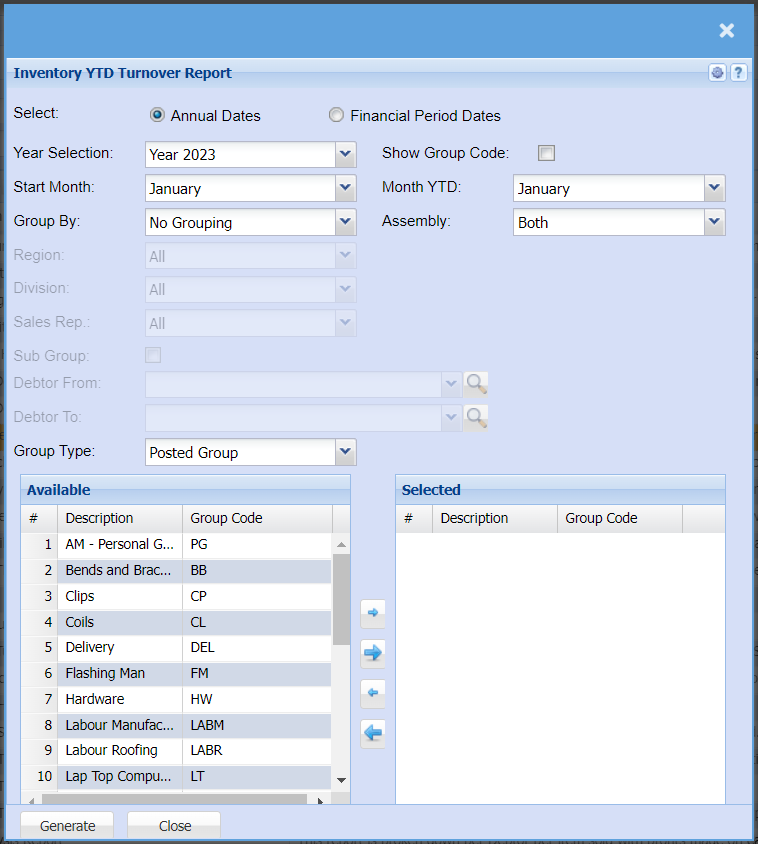
| Select | Select if you want to pull your YTD Turnover Report using Annual dates or Financial Period Dates |
| Year Selection | Select the financial year you are pulling the report for |
| Start Month | Select the month you are pulling this report for |
| Group By | Select from the drop-down menu if you want to pull your report by a specific group, you can choose from No Grouping, Region, Division or Sales Rep. |
| Region | You can pull the report for all your debtors, or you can select a specific Region from the drop-down menu if you have set up Regions for your debtors. |
| Division | If you have set up divisions for your debtors, you can pull the report for all your debtors or you can select a specific Division from the drop-down menu. |
| Sales Rep | If you want to run a report by a specific sales rep, then you will need to select the sales rep on the drop-down menu. If you leave the sales rep on all the report will run by all sales rep. |
| Sub Group | When ticking Sub Group you will be able to select your range of debtors you want to pull a report for. |
| Debtor From / Debtor To | Select a Customer/Debtor you wish to view the report from. Select the Customer/Debtor you wish to see up to in the report. |
| Group Type | You can select from Current Group or Posted Group types |
| Show Group Code | If you tick this box a column will be added that shows the group code |
| Month YTD | Select the month you want to pull the report up to. It cannot be older than the Start month. |
| Assembly |
Inter Branch Transactions
Debtors >Reports >Report list
Inter Branch Transactions shows inter branch credit notes and invoices filtered by user region, transaction source and branch transactions.
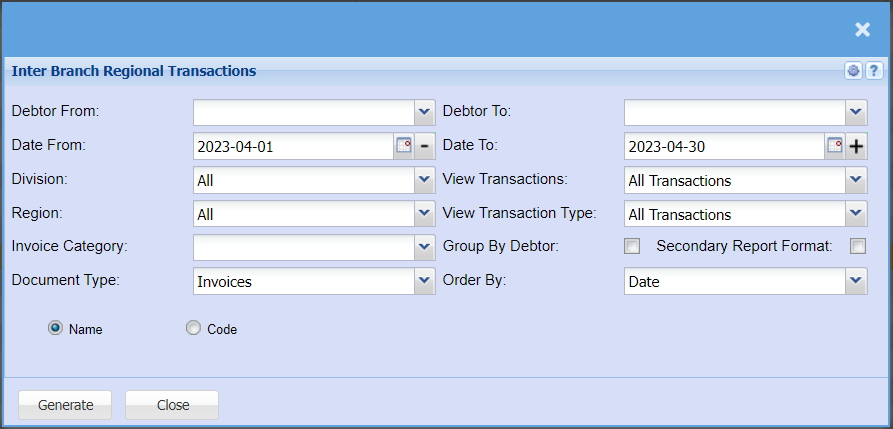
| Debtor From / Debtor To | Select a Customer/Debtor you wish to view the report from. Select the Customer/Debtor you wish to see up to in the report. |
| Date From / Date To | Choose the date range for which you want to view the report from / Select a date range of when you want to see up to on the report. |
| Division | If you have set up divisions for your debtors, you can pull the report for all your debtors or you can select a specific Division from the drop-down menu. |
| Region | You can pull the report for all your debtors, or you can select a specific Region from the drop-down menu if you have set up Regions for your debtors. |
| Invoice Category | |
| Document Type | You can select to pull a report for Invoices, Credit Notes or both |
| View Transactions | Here you can select to pull all transactions, or you can choose to pull only system transactions or imported transactions. |
| View Transaction Type | |
| Group By Debtor | |
| Secondary Report Format | |
| Order By | Select the order you want your report to be generated in by selecting either Date, Description or Reference. |
Invoices By Date
Debtors >Reports >Report list
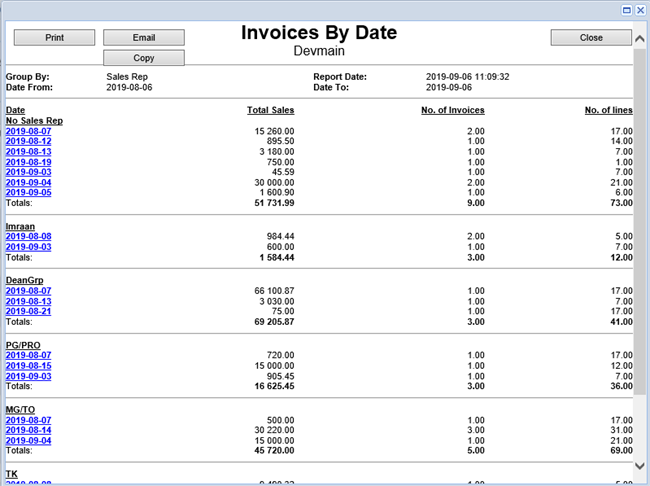
Shows summary of invoices and credit notes by rep or date, also is an inter-branch report for invoices.
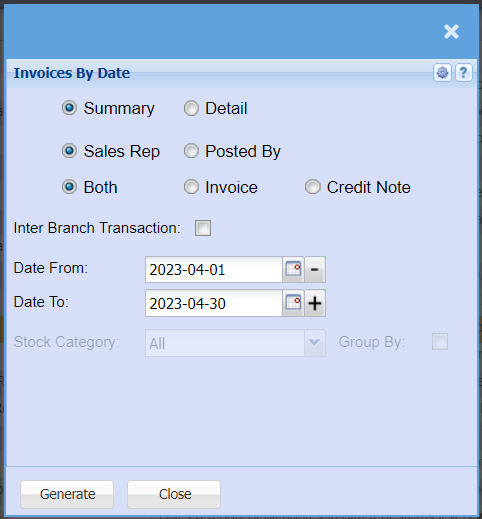
| Summary | Click on Summary if you want a report with limited information |
| Detail | Click on Detail if you want a report with more information |
| Sales Rep | Click on Sales Rep if you want this added as a column to your report |
| Posted By | Click on Posted by if you want this added as a column to your report |
| Both | Click on Both if you want invoices and Credit notes added as a column to your report |
| Invoice | Click on Invoice if you want Only invoices added as a column to your report |
| Credit Note | Click on Credit Note if you want Only Credit Notes added as a column to your report |
| Inter Branch Transaction | Tick this box if you would like inter branch transactions added to your report |
| Date From / Date To | Choose the date range for which you want to view the report from / Select a date range of when you want to see up to on the report. |
| Stock Category | Select a Stock Category from the drop-down menu that you want to pull the report for |
| Group By | Tick this box if you want the report grouped by Caragory. |
Logistics Report
Debtors >Reports >Report list
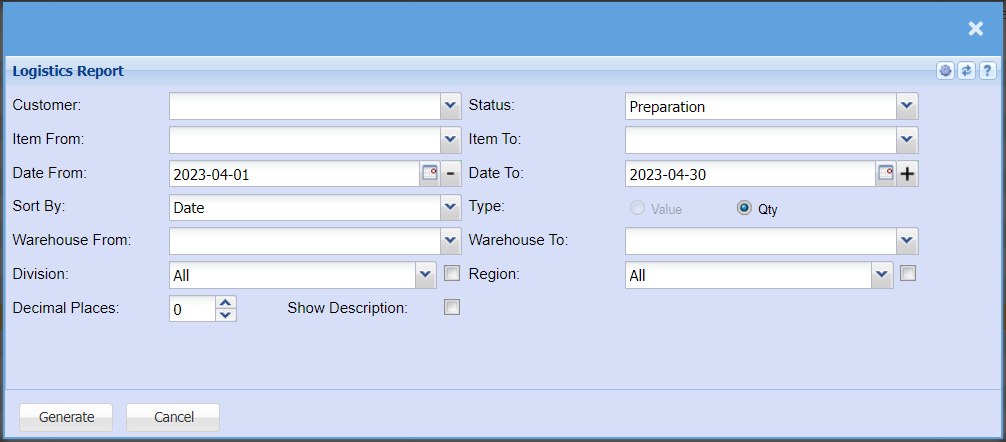
| Customer | Select a custom from the drop-down menu that you want to pull a report for. |
| Item From / Item To | Select the items from the drop-down menu that you want to pull the report from and to. |
| Date From / Date To | Choose the date range for which you want to view the report from / Select a date range of when you want to see up to on the report. |
| Sort By | Select a sort criteria on the drop-down menu |
| Warehouse From / Warehouse To | Select the warehouse the report will fetch data from and to. |
| Division | If you have set up divisions for your debtors, you can pull the report for all your debtors or you can select a specific Division from the drop-down menu. |
| Decimal Places | It is advisable to set decimals to two places. You can View the report with any number of decimal places. |
| Show Description | By ticking the box, this will add a column to the report containing the description of the item |
| Status | |
| Type | Here you can select if you want to pull a report for the Value or Quantity of the item |
| Region | It is advisable to set decimals to two places. You can View the report with any number of decimal places. |
MNO (Mobile Network Operator) Report
Debtors >Reports >Report list
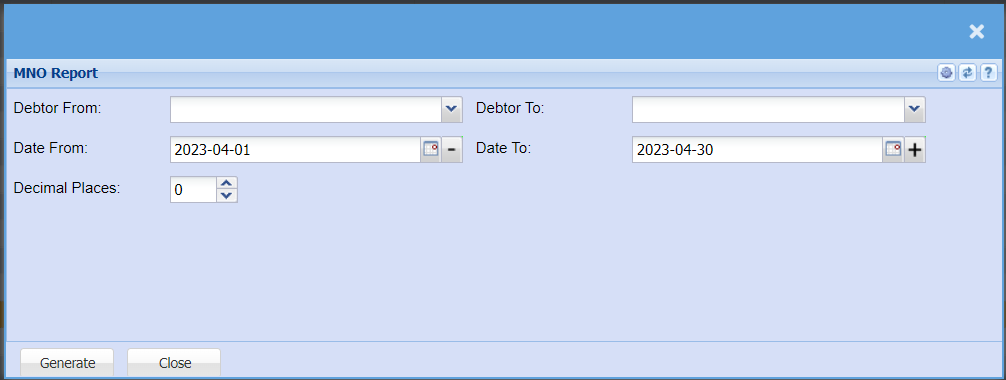
| Debtor From / Debtor To | Select a Customer/Debtor you wish to view the report from. Select the Customer/Debtor you wish to see up to in the report. |
| Date From / Date To | Choose the date range for which you want to view the report from / Select a date range of when you want to see up to on the report. |
| Decimal Places | It is advisable to set decimals to two places. You can View the report with any number of decimal places. |
Monthly YTD Turnover Statistics Report
Debtors >Reports >Report list
Monthly YTD Turnover Statistics Report. Grouped By Region, Division or Sales Rep.
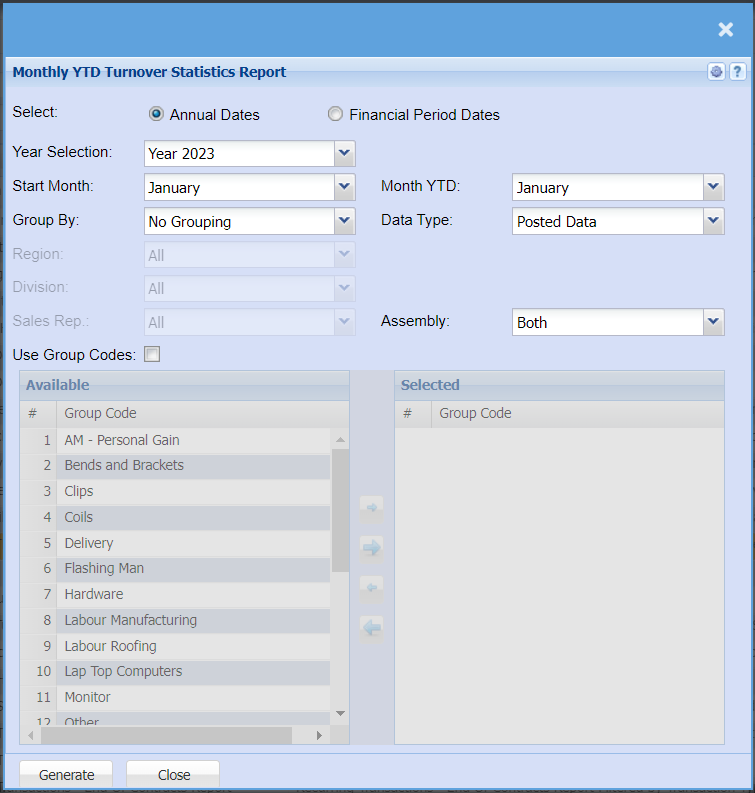
| Select | Select if you want your report to be pulled using annual dates (January - December) or Financial Year Dates (April - March) |
| Year Selection | Select the financial year you are wanting to pull a report for. |
| Start Month | Choose the month you want to run your report from |
| Month YTD | Choose the month you want to run your report up to. |
| Group By | Select from the drop-down menu if you want to pull your report by a specific group, you can choose from No Grouping, Region, Division or Sales Rep. |
| Region | You can pull the report for all your debtors, or you can select a specific Region from the drop-down menu if you have set up Regions for your debtors. |
| Division | If you have set up divisions for your debtors, you can pull the report for all your debtors or you can select a specific Division from the drop-down menu. |
| Sales Rep | If you want to run a report by a specific sales rep, then you will need to select the sales rep on the drop-down menu. If you leave the sales rep on all the report will run by all sales rep. |
| Use Group Codes | If you have group codes, you can tick the Use Group Codes box if you want to pull a report for specific inventory group or multiple thereof, if you want to pull a report for all items you can leave this box unticked. |
| Data Type | Select if you want Posted Data or Static Data |
| Assembly | If you run jobs through an assembly line, you can choose to filter for only those jobs or you can choose to exclude those jobs or pull a report that will have all jobs. |
New Client Listing
Debtors >Reports >Report list
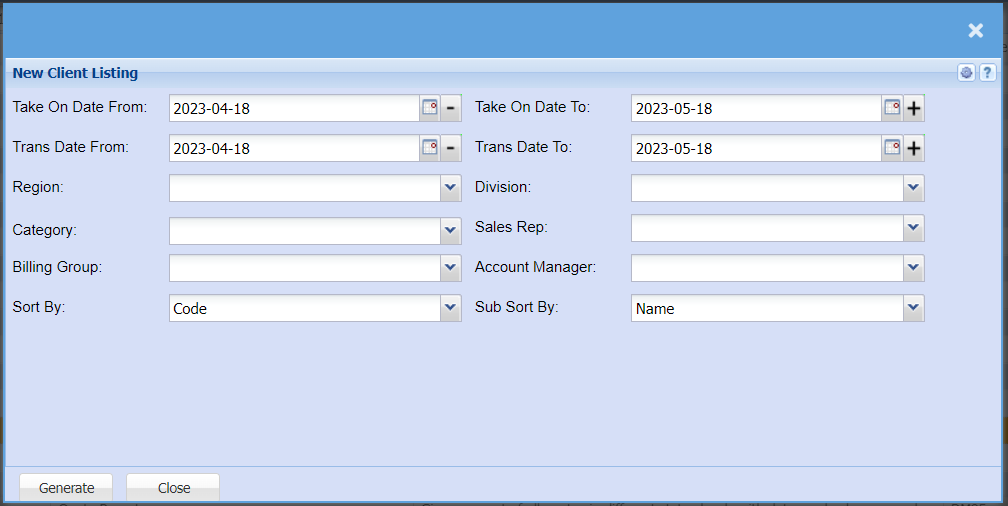
| Take On Date From / Take On Date To | Select a date from and to that you want to pull a report for new clients |
| Trans Date From / Trans Date To | Select the date from and to that you want to pull a transaction report for, for new clients. |
| Region | You can pull the report for all your debtors, or you can select a specific Region from the drop-down menu if you have set up Regions for your debtors. |
| Category | To generate the report, the user has to select the category from the drop-down menu |
| Billing Group | If you have billing groups like, Subscriptions, you can pull a report for these specific groups, or you can pull a report that will include all transactions. |
| Sort By | Choose from the drop-down menu how you would like your report sorted, your options are by date, Document No, Reference, Action or debtor. |
| Division | If you have set up divisions for your debtors, you can pull the report for all your debtors or you can select a specific Division from the drop-down menu. |
| Sales Rep | If you want to run a report by a specific sales rep, then you will need to select the sales rep on the drop-down menu. If you leave the sales rep on all the report will run by all sales rep. |
| Account Manager | You can pull the report for all your debtors, or you can select a specific Account manager from the drop-down menu if you have set up Account Managers for your debtors. |
| Sub Sort By | Sub Sort the report by selecting one option from the drop-down menu allows the user to pull a report with a secondary criteria that will be sorted by either, Code, Description, Warehouse or Bin location. |
POS Cash up Report
Debtors >Reports >Report list
Shows the cash and Sales received by the till for point of sale.

Report on cash and sales received from the till point of sale
| Date From / Date To | Choose the date range for which you want to view the report from / Select a date range of when you want to see up to on the report. |
| Till | to select the till from the drop-down arrow |
| Summary | Tick if you require a summary sum total of the respective payment methods by till |
| Generate | Click the "Generate" button to open the report. You will have options to copy, email, or print the report. To view the report in an Excel document, copy the report and paste it into an Excel file. |
Quarterly Turnover Statistics Report
Debtors >Reports >Report list
Quarterly turnover statistics report grouped by either Region, Division or Sales Rep
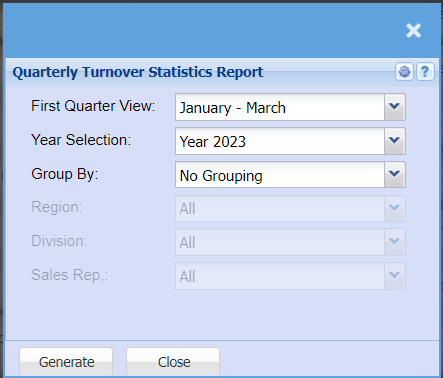
Due to the width of the data being reported this report is best viewed on screen by dragging the size of the report screen
outwards to enlarge the report or to use the Copy to Clipboard function and view the data in a spread sheet.
| First Quarter View | Allows the user to select where the first quarter of the report should start. The dropdown allows the user to select the starting quarter to start at any month of the year with the subsequent quarters being calculate in the background. e.g., Quarter 1: March – May, subsequent quarters, Quarter 2: June - August, Quarter 3: September - November, Quarter 4: December – February (Next Year) |
| Year Selection | Allows the user to select what would be the primary year and the report calculates one year back for the comparative year. |
| Group By | Allows the user to view the report in different formats. No Grouping: Displays the report in debtor alphabetical order. |
| Region | Displays the all the data grouped by regions in debtor alphabetical order. Region dropdown Specific Region: Displays only that Region’s data in debtor alphabetical order. |
| Division | Displays the all the data grouped by Divisions in debtor alphabetical order. Division dropdown Specific Division: Displays only that Division’s data in debtor alphabetical order. Please Note: Due to the data being dependent on Invoices and Credit Notes being linked to Sales Reps. The resulting report may not be accurate if not all Invoices and Credit Notes are not linked to Sales Reps. |
| Sales Rep | Displays the all the data grouped by Sales Reps in debtor alphabetical order. Sales Rep dropdown Specific Sales Rep: Displays only that Sales Rep’s data in debtor alphabetical order. |
Quote Report
Debtors >Reports >Report list
Gives a report of all quotes in different status levels with dates and values on each quote.
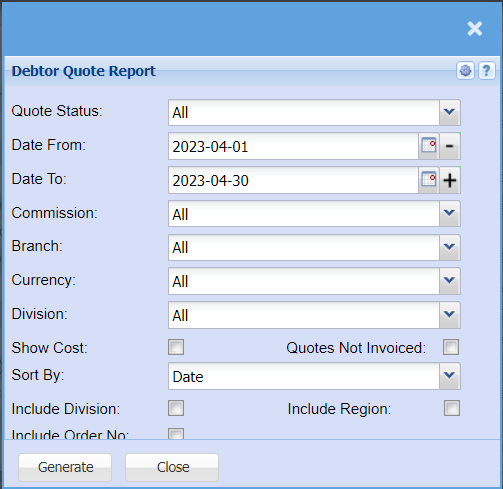
This is how a debtor is selected by using the long search
| Quote Status | Select from the drop-down menu which statuses of Quotes you want to pull a report for, this could be Approved quotes, Cancelled Quotes, quotes that are still in Preparation stage or rejected quotes etc. |
| Date From / Date To | Choose the date range for which you want to view the report from / Select a date range of when you want to see up to on the report. |
| Commission | Select from the drop-down menu if you want to pull the Quote report for a specific Sales Rep. |
| Branch | If you have more than one branch, you can pull a report per branch by selecting the branch from the drop-down menu. |
| Currency | If you operation with multi-currency you can pull a report for all currencies or you can select a specific currency. |
| Division | If you have set up divisions for your debtors, you can pull the report for all your debtors or you can select a specific Division from the drop-down menu. |
| Show Cost | Tick the box if you want to have the costs shown on the quote report. |
| Quotes Not Invoiced | |
| Sort By | Choose from the drop-down menu how you would like your report sorted, your options are by date or quote number |
| Include Division | If you have Divisions set up, you can pull a report for all divisions combined or for a specific division. |
| Include Region | If you have Regions set up, you can pull a report for all regions combined or for a specific division. |
| Include Order No | Tick the box if you would like to include customer purchase orders on the report. |
Recurring Head Office Transactions
Debtors >Reports >Report list
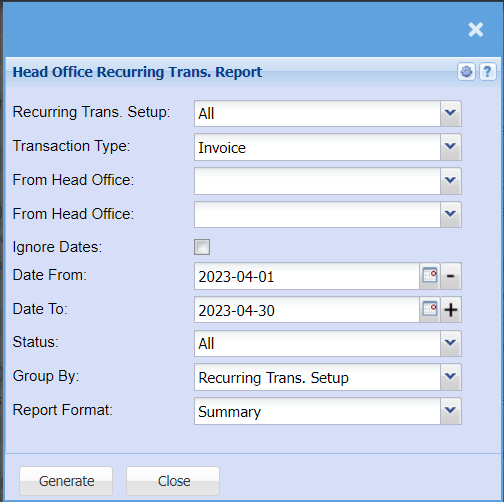
| Recurring Trans. Setup | Select all or specific recurring transactions from the dropdown menu. |
| Transaction Type | |
| From Head Office | Select a Creditor from the drop-down menu to start the report from, or leave blank if you want a report for all creditors. |
| From Head Office | Select a Creditor from the drop-down menu to end the report at or leave blank if you want a report for all creditors. |
| Ignore Dates | Tick this box to pull all creditors with recurring transactions no matter the date. |
| Date From / Date To | Choose the date range for which you want to view the report from / Select a date range of when you want to see up to on the report. |
| Status | Select if you want posted transactions, transactions not yet posted or both. |
| Group By | |
| Report Format | Select from the drop-down menu if you want a detailed or summary report. |
Recurring Sales Report
Debtors >Reports >Report list
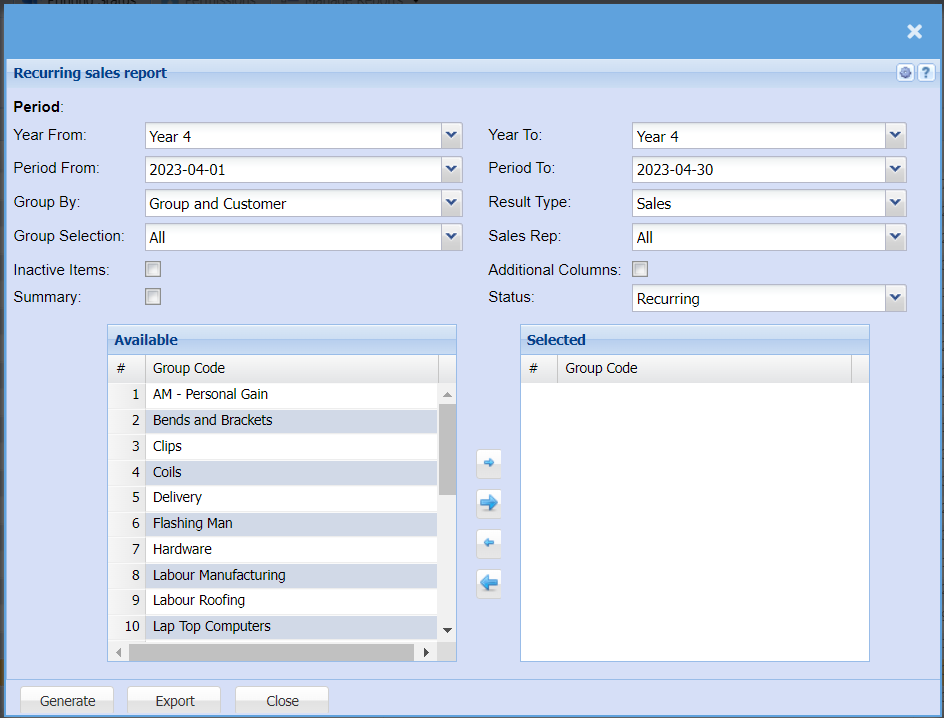
| Year From / Year To | Select the year From and Year To Dates from the drop-down menus will show results specific to the period you have selected. |
| Period From / Period To | Select the from and to period for your report. The From Period will always be the first of the month you select and the To Period will always be the last day of that month. |
| Group By | Select from the drop-down menu if you want to pull your report by a specific group, you can choose from No Grouping, Region, Division or Sales Rep. |
| Group Selection | |
| Inactive Items | Tick the box if you would like to include Inactive Items in your report |
| Summary | If you put the tick on the report will only pull limited information |
| Result Type | Select a result type from the drop-down menu, select from Sales, Cost, Profit, Qty or Sales and Quantity. |
| Sales Rep | If you want to run a report by a specific sales rep, then you will need to select the sales rep on the drop-down menu. If you leave the sales rep on all the report will run by all sales rep. |
| Additional Columns | |
| Status | If you select all the report will pull all statuses. If you want to view report by status, select the status on the drop-down menu |
Recurring Transaction Line Detail Report
Debtors >Reports >Report list

| Recurring Transaction | Select from the drop-down menu to pull a report for a specific transaction type or you can select all to include all recurring transactions. |
| Transaction Type | If you want a report for a specific transaction type e.g. Invoices or Goods Received; you can select this from the drop-down menu. Leave the report on all if you want a full report on all transaction types. |
| Debtor From / Debtor To | Select a Customer/Debtor you wish to view the report from. Select the Customer/Debtor you wish to see up to in the report. |
| Supplier From / Supplier To | Select a Customer/Debtor you wish to view the report from and up to from the drop-down menus if you wish to pull a report for a specific Customer/Debtor. If Transaction Type is left on all you will not need to do this. |
| Date From / Date To | Choose the date range for which you want to view the report from / Select a date range of when you want to see up to on the report. |
| Inventory From / Inventory To | If you leave the stock item fields blank, all stock items will be displayed on the report. If you choose specific stock items, the report will sort information by stock item code from and to the selected codes rather than description. |
| Stock Category | If you have set up stock Categories for your inventory, you can choose to pull a report on all Stock Categories or you can choose a specific category from the drop-down menu. |
| Status | If you select all the report will pull all statuses. If you want to view report by status, select the status on the drop-down menu |
| Report Format | Select from the drop-down menu if you want a detailed report or a summary. |
| Sort Order | Fron the drop-down menu you can choose to sort the report by Date, Client Name, Client Code or category. |
| Show Division / Region | By ticking this box there will be added columns to the report that will show Division and Region for each Customer/Debtor |
Recurring Transaction Report
Debtors> Reports> Report List
List of recurring transactions
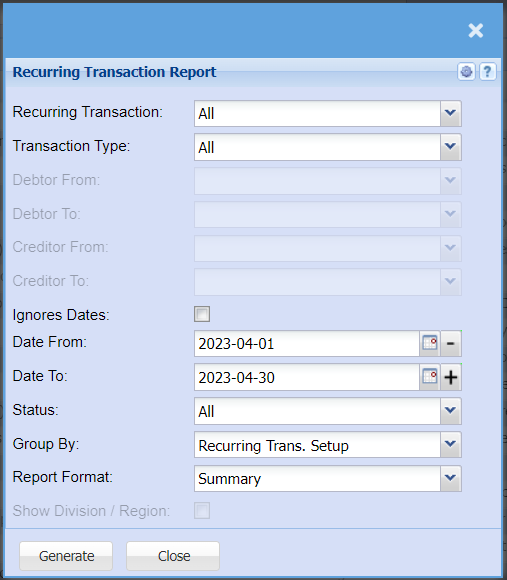
| Recurring Transaction | Select from the drop-down menu to pull a report for a specific transaction type, or you can select all to include all recurring transactions. |
| Transaction Type | If you want a report for a specific transaction type e.g. Invoices or Goods Received; you can select this from the drop-down menu. Leave the report on all if you want a full report on all transaction types. |
| Debtor From / Debtor To | Select a Customer/Debtor you wish to view the report from. Select the Customer/Debtor you wish to see up to in the report. |
| Creditor From / Creditor To | Select a Supplier/Creditor you wish to view the report from. Select the Supplier/Creditor you wish to see up to in the report. |
| Ignores Dates | Tick this box to pull all creditors with recurring transactions no matter the date. |
| Date From / Date To | Choose the date range for which you want to view the report from / Select a date range of when you want to see up to on the report. |
| Status | If you select all the report will pull all statuses. If you want to view report by status, select the status on the drop-down menu |
| Group By | Select from the drop-down menu if you want to pull your report by a specific group, you can choose from No Grouping, Region, Division or Sales Rep. |
| Report Format | Select from the drop-down menu if you want a detailed report or a summary. |
| Show Division / Region | By ticking this box there will be added columns to the report that will show Division and Region for each Customer/Debtor |
Recurring Transactions - End of Contacts Report
Debtors >Reports >Report list
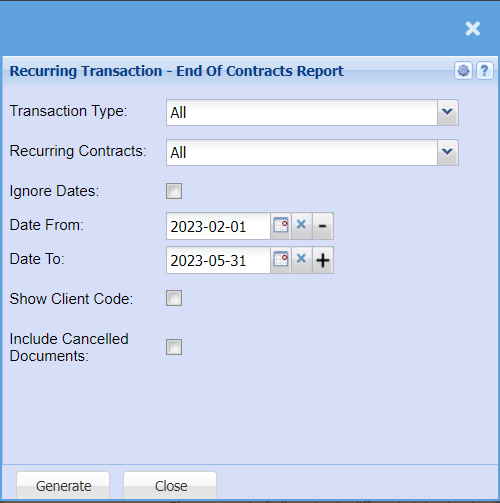
| Transaction Type | Select from the drop-down menu to pull a report for a specific transaction type, or you can select all to include all recurring transactions. |
| Recurring Contacts | If you have Recurring Contracts like, Subscriptions, you can pull a report for these specific contracts, or you can pull a report that will include all transactions. |
| Ignore Dates | Tick this box to pull all creditors with recurring transactions no matter the date. |
| Date From / Date To | Choose the date range for which you want to view the report from / Select a date range of when you want to see up to on the report. |
| Show Client Code | Tick the Show Client Code if you would like a column added to your report that include the Clients code. |
| Include Cancelled Documents | Tick the box if you want the report to include cancelled documents. |
Sales Analysis Report
Debtors >Reports >Report list
This report is broken down per Debtor per item sold with profits made on each item and percentage.
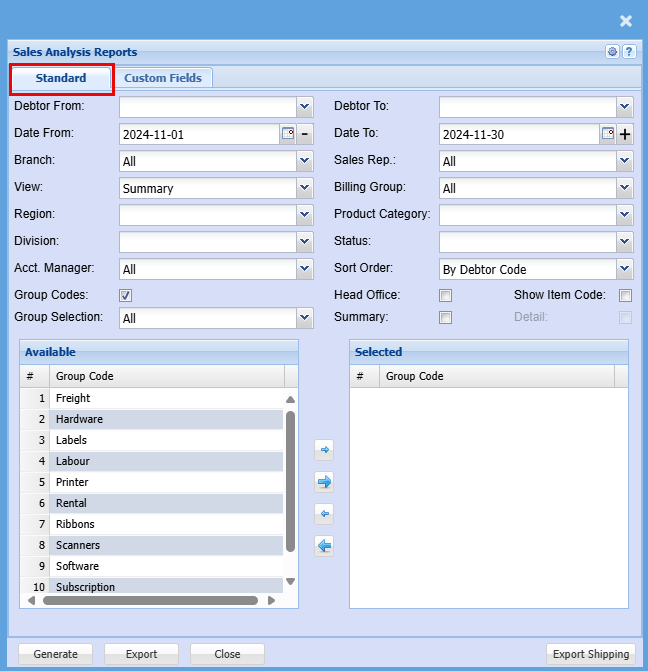
Standard Tab
| Debtor From / Debtor To | Select a Customer/Debtor you wish to view the report from. Select the Customer/Debtor you wish to see up to in the report. |
| Date From / Date To | Choose the date range for which you want to view the report from / Select a date range of when you want to see up to on the report. |
| Branch | When working with multiple branches this drop-down allows the user to select a specific branch to pull a report for. |
| View | Select how you want to view the report, either in a summary view or a Cutt off version. |
| Region | You can pull the report for all your debtors, or you can select a specific Region from the drop-down menu if you have set up Regions for your debtors. |
| Division | If you have set up divisions for your debtors, you can pull the report for all your debtors or you can select a specific Division from the drop-down menu. |
| Acct. Manager | You can pull the report for all your debtors, or you can select a specific Account manager from the drop-down menu if you have set up Account Managers for your debtors. |
| Group Codes | If you have set up Group Codes for your inventory you can select a group code from the drop-down menu to define your search to a specific group. Leave unticked if you want a report for all Groups. |
| Group Selection | When Group Codes is ticked you will be able to Select specific inventory Groups to pull a report for. |
| Sales Rep | If you want to run a report by a specific sales rep, then you will need to select the sales rep on the drop-down menu. If you leave the sales rep on all the report will run by all sales rep. |
| Billing Group | If you have billing groups like, Subscriptions, you can pull a report for these specific groups, or you can pull a report that will include all transactions. |
| Status | If you select all the report will pull all statuses. If you want to view report by status, select the status on the drop-down menu |
| Sort Order | Choose from the drop-down menu how you would like your report sorted, your options are by Debtor Code, Debtor Name or Item Code |
| Head Office | by ticking the Head Office box, the report will include a column for head office sales analysis |
| Summary | If you put the tick on the report will only pull limited information |
| Detail | Selecting Detail will include all the columns available for this report |
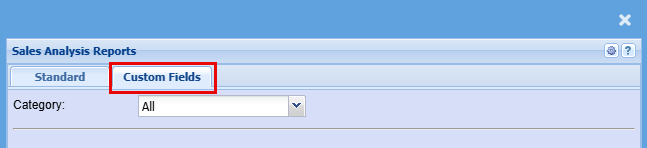
Custom Fields
| Category | Select a Category from the drop-down menu |
Sales Overview Report 2
Debtors >Reports >Report list
Sales figures based on Quotes and Sales Order
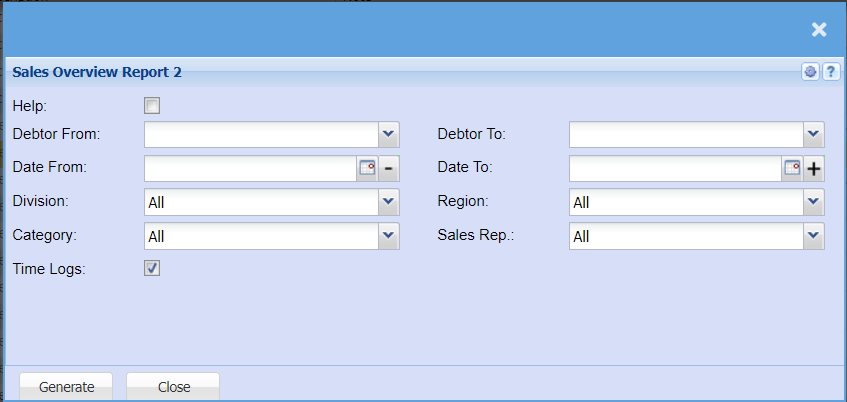
| Help | |
| Debtor From / Debtor To | Select a Customer/Debtor you wish to view the report from. Select the Customer/Debtor you wish to see up to in the report. |
| Date From / Date To | Choose the date range for which you want to view the report from / Select a date range of when you want to see up to on the report. |
| Division | If you have set up divisions for your debtors, you can pull the report for all your debtors or you can select a specific Division from the drop-down menu. |
| Category | To generate the report, the user has to select the category from the drop-down menu |
| Time Logs | If you would like a time log of the sales transactions, tick the box |
| Region | You can pull the report for all your debtors, or you can select a specific Region from the drop-down menu if you have set up Regions for your debtors. |
| Sales Rep | If you want to run a report by a specific sales rep, then you will need to select the sales rep on the drop down menu. If you leave the sales rep on all the report will run by all sales rep. |
Sales Forecast Report
Debtors >Reports >Report list
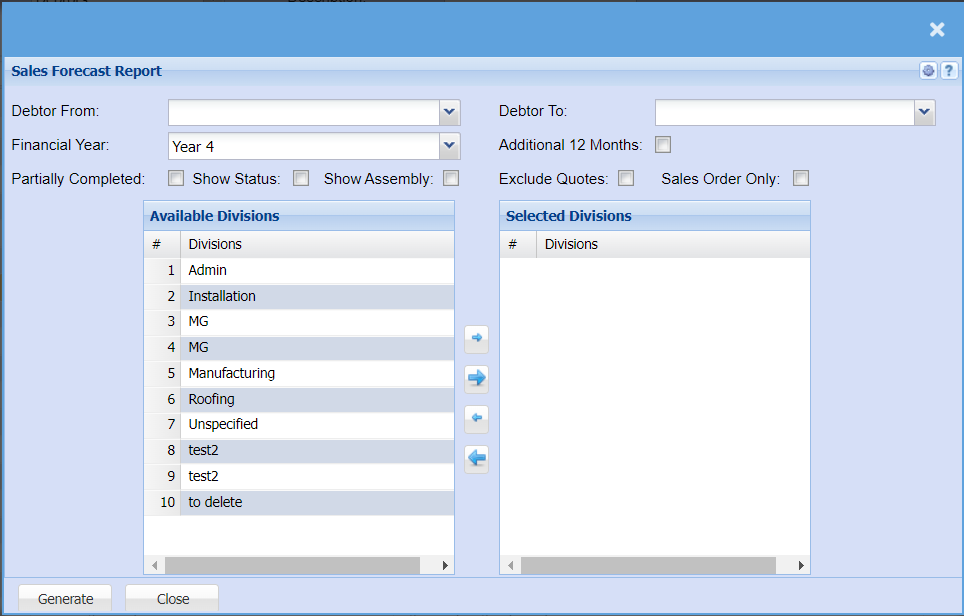
| Debtor From / Debtor To | Select a Customer/Debtor you wish to view the report from. Select the Customer/Debtor you wish to see up to in the report. |
| Financial Year | Select the financial year you would like to pull the report for. |
| Additional 12 Months | This allows you to forecast for an additional 12 months from now and not when back dating. |
| Partially Completed | Tick this box to include all sales orders that are not yet complete. |
| Show Status | Tick this box to include a column that will show the current status, e.g. Sales order could be in preparation stage. |
| Show Assembly | Tick this box if you would like your report to include Assembly which is associated with work in an assembly line. |
| Exclude Quotes | Tick this box to exclude quote from your sales forecast report. |
| Sales Order Only | Tick this box if you would like a report with sales orders only. |
Sales Leads Statistics Report
Debtors >Reports >Report list
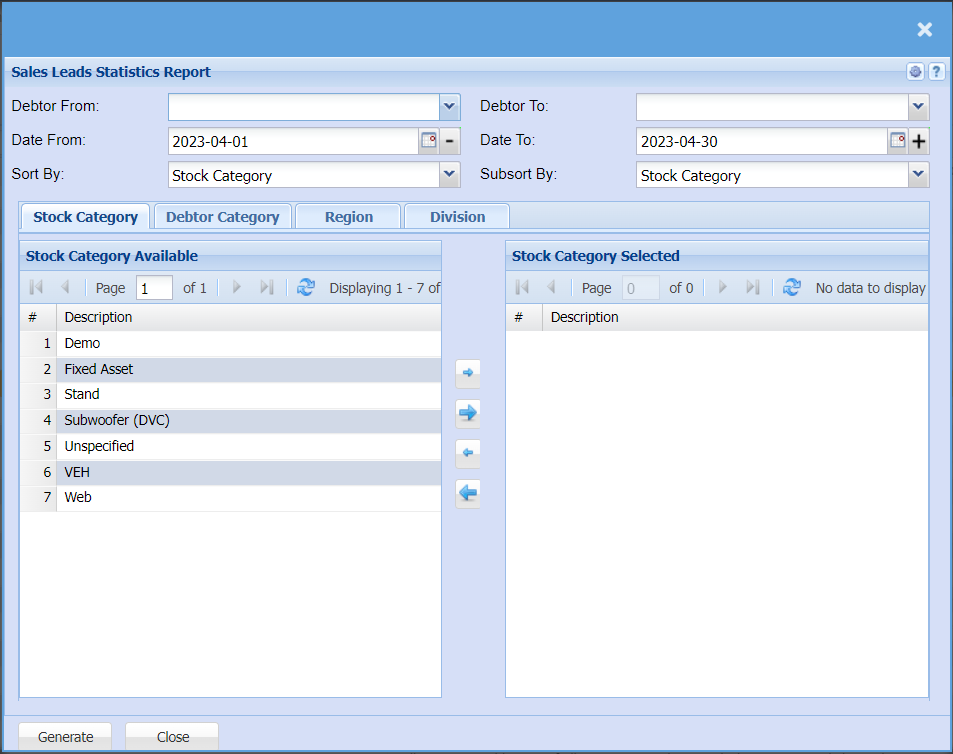
| Debtor From / Debtor To | Select a Customer/Debtor you wish to view the report from. Select the Customer/Debtor you wish to see up to in the report. |
| Date From / Date To | Choose the date range for which you want to view the report from / Select a date range of when you want to see up to on the report. |
| Sort By | Choose from the drop-down menu how you would like your report sorted, your options are by Stock Category, Debtor or Debtor Category. |
| Sub sort By | You can choose a Sub Sort column by selecting one option from the drop-down menu allows the user to pull a report with a secondary criteria that will be sorted by either, Stock Category, Debtor or Debtor Category. |
| Stock Category | In the Stock Category Tab, you will see a list of Stock Categories that you can pull the report for, by double click on the stock category or categories you would like to pull the report for will put them over to the selected column. |
| Debtor Category Tab | If you have set up Debtor Categories you can refine your report by selecting specific debtor groups by double clicking on them, they will then move over to the Selected column. |
| Region Tab | If you have set up Regions, you can select specific Region by double clicking on them, they will them move over to the selected column. |
| Division Tab | If you have set up Divisions, you can select specific Divisions by double clicking on them, they will them move over to the selected column. |
Sales Monthly Group Report
Debtors >Reports >Report list
Report shows sales monthly grouped by Groups and then by Customers

| From Year / Year To | Select the year From and Year To Dates from the drop-down menus will show results specific to the period you have selected. |
| From Period / Period To | Select the period From and the Period To from the drop-down menus |
| Group By | Select what you would like your report to be grouped by from the drop-down menu. If you don't wish to group your report leave the selection on none |
| Group Selection | Allows an option to select a group |
| Inactive Items | By ticking the box for Inactive items, this will include these items in your report. |
| Summary | If you put the tick on the report will only pull limited information |
| Show Stock Code | If you have selected any of the options in the Group by drop-down menu that contains Inventory, you will be able to tick the box for Show Stock Code which will add this column to your report. |
| Additional Columns | When this is selected it gives more information |
| Result Type | Select a result type from the drop-down menu, select from Sales, Cost, Profit, Qty or Sales and Quantity. |
| Sales Rep | If you want to run a report by a specific sales rep, then you will need to select the sales rep on the drop-down menu. If you leave the sales rep on all the report will run by all sales rep. |
| Warehouse | If you select all warehouses the report will fetch data from all warehouses. If you want to search by a specific warehouse, select the warehouse from the menu. |
| Decimal Places | It is advisable to set decimals to two places. You can View the report with any number of decimal places. |
Sales Order Accounting Report
Debtors >Reports >Report list
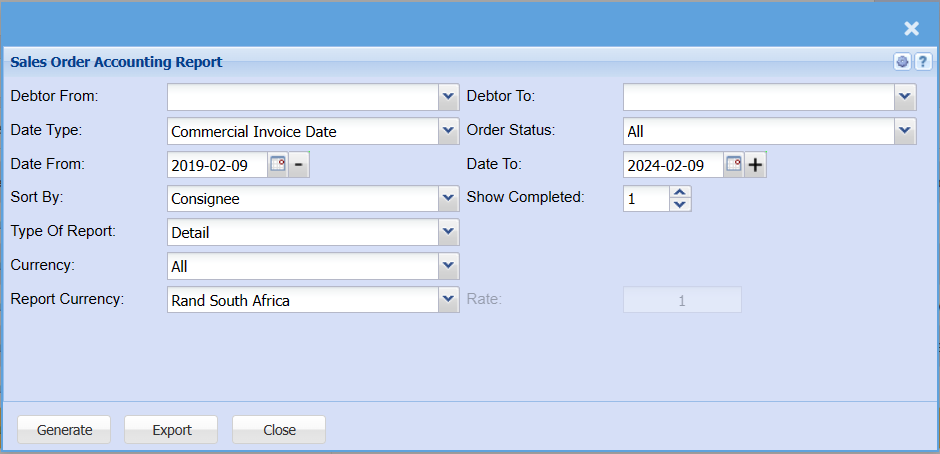
| Debtor From - Debtor To | Select a Customer/Debtor you wish to view the report from. Select the Customer/Debtor you wish to see up to in the report. |
| Date Type | Select a date type on the drop-down menu selection |
| Date From /Date To | Choose the date range for which you want to view the report from / Select a date range of when you want to see up to on the report. |
| Sort By | Select a sort criteria on the drop-down menu |
| Type Of Report | Select whether you would like a detailed report or a summary report. |
| Currency | Select the currency you would like your report to be exported in. |
| Report Currency | Select the currency you would like your report to be exported in. |
| Order Status | Select from the drop-down menu if you want to include all orders, processed orders only or outstanding orders. |
| Show Completed | |
| Rate |
Sales Order Back Dated
Debtors >Reports >Report list
The report gives the value or quantity outstanding on sales orders in different status levels.
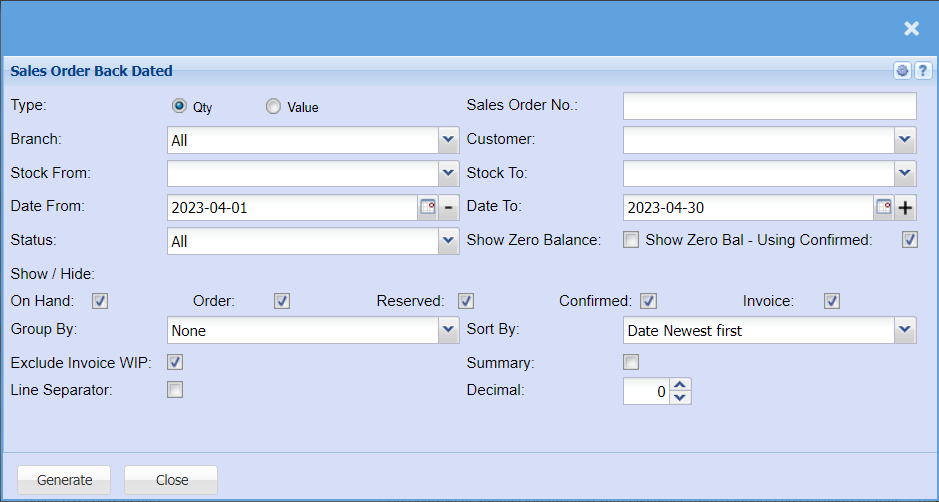
| Type | Type allows you to refine your report to only show Item Quantity of sales, Sales Value, Cost of Sales or Quantity and Sales together. |
| Branch | When working with multiple branches this drop-down allows the user to select a specific branch to pull a report for. |
| Stock From / Stock To | Select Stock from and Stock to fields from the drop-down menus to limit what will be displayed on the report. |
| Date From / Date To | Select the date range for which you want to view the report from / Select a date range of when you want to see up to on the report. |
| Status | If you select all the report will pull all statuses. If you want to view report by status, select the status on the drop-down menu |
| Show / Hide | Tick the boxes of the back orders you would like to include in your report, if they are not ticked, they will be excluded from the report. |
| Group By | Select group by from the drop-down menu |
| Exclude Invoice WIP | Tick the box to exclude invoice in WIP status |
| Line Separator | Ticking this box will include a darker line between each sales order. |
| Sales Order No | IF you know the sales order number, you can add it here. |
| Customer | You can select to pull the back-order report for a specific customer by choosing them from the drop-down menu, or you can leave it blank, and it will pull sales orders for all customers. |
| Show Zero Balance | By ticking the box, the sales order back dated report will include zero balance |
| Show Zero Bal - Using Confirmed | By ticking the box, the sales order back dated report will include zero balance confirmed on invoices. |
| Sort By | Sort the report by selecting either Date Newest First, Date Oldest First, Customer or Stock Code from the drop-down menu |
| Summary | Select from the drop-down menu if you want to have a full detailed report or just summery report. |
| Decimal | It is advisable to set decimals to two places. You can View the report with any number of decimal places. |
Sales Order Delivery Schedule
Debtors >Reports >Report list
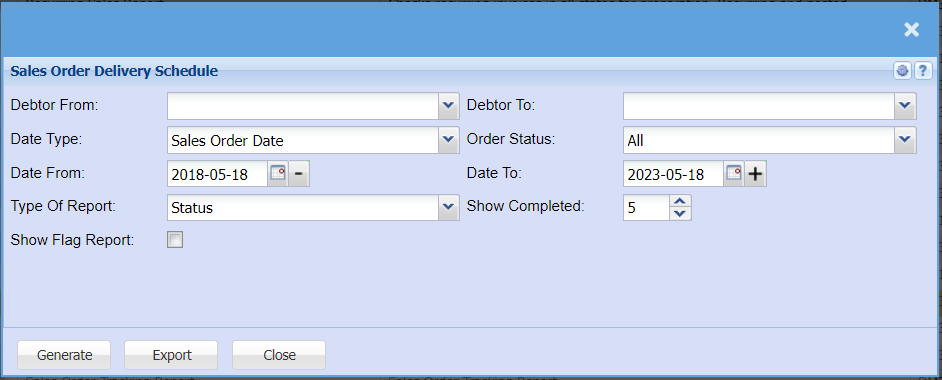
| Debtor From / Debtor To | Select a Customer/Debtor you wish to view the report from. Select the Customer/Debtor you wish to see up to in the report. |
| Date Type | Select from the drop-down menu what date you would like the report to have, you can choose from either, Sales order date, Shipment Required at Customer, ETD of ship/Aircraft, Shipment on board, ETA of ship/Aircraft, Elec Docs sent to Customer. |
| Date From / Date To | Choose the date range for which you want to view the report from / Select a date range of when you want to see up to on the report. |
| Type Of Report | Select from the drop-down menu if you would like a detail report about the sales order Delivery schedule or you can select to have Just a status report. |
| Show Flag Report | If an inventory item has been marked for flag report, then you can add this to your report. |
|
Order Status |
You can pull a report that will show all Status of all Sales orders, or you can select a specific status to pull a report for e.g. Preparation, Confirmed, partially completed, Completed etc. |
|
Show Completed |
Sales Order Incomplete Orders
Debtors >Reports >Report list

| Debtor From / Debtor To | Select a Customer/Debtor you wish to view the report from. Select the Customer/Debtor you wish to see up to in the report. |
| Date Type | Select from the drop-down menu what date you would like the report to have, you can choose from either, Sales order date, Shipment Required at Customer, ETD of ship/Aircraft, Shipment on board, ETA of ship/Aircraft, Elec Docs sent to Customer. |
| Date From / Date To | Choose the date range for which you want to view the report from / Select a date range of when you want to see up to on the report. |
| Sort By | Select from the drop-down menu if you would like your report to be sorted by, Per consignee, Shipment Required at Customer or Sales order No. |
| Order Status | You can pull a report that will show all Status of all Sales orders, or you can select a specific status to pull a report for e.g. Preparation, Confirmed, partially completed, Completed etc. |
| Show Flag Report | If an inventory item has been marked for flag report, then you can add this to your report. |
Sales Order Shipping Performance
Debtors >Reports >Report list
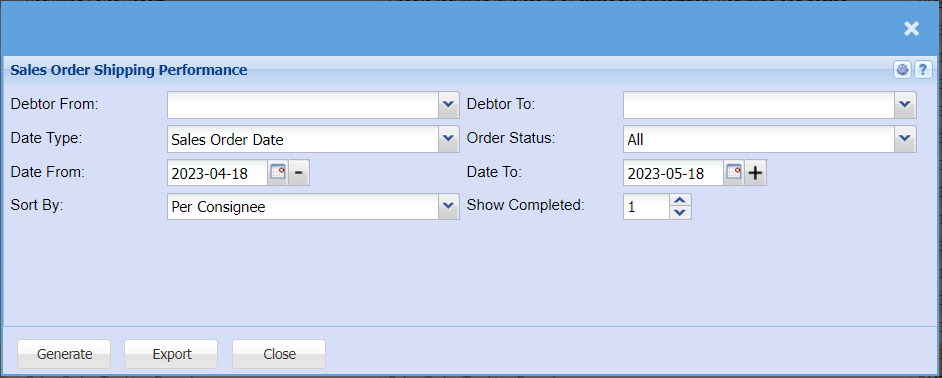
| Debtor From / Debtor To | Select a Customer/Debtor you wish to view the report from. Select the Customer/Debtor you wish to see up to in the report. |
| Date Type | Select from the drop-down menu what date you would like the report to have, you can choose from either, Sales order date, Shipment Required at Customer, ETD of ship/Aircraft, Shipment on board, ETA of ship/Aircraft, Elec Docs sent to Customer. |
| Date From / Date To | Choose the date range for which you want to view the report from / Select a date range of when you want to see up to on the report. |
| Sort By | Select from the drop-down menu if you would like your report to be sorted by, Per consignee, Shipment Required at Customer or Sales order No. |
| Order Status | You can pull a report that will show all Status of all Sales orders, or you can select a specific status to pull a report for e.g. Preparation, Confirmed, partially completed, Completed etc. |
| Show Completed |
Sales Order Tracking Report
Debtors >Reports >Report list
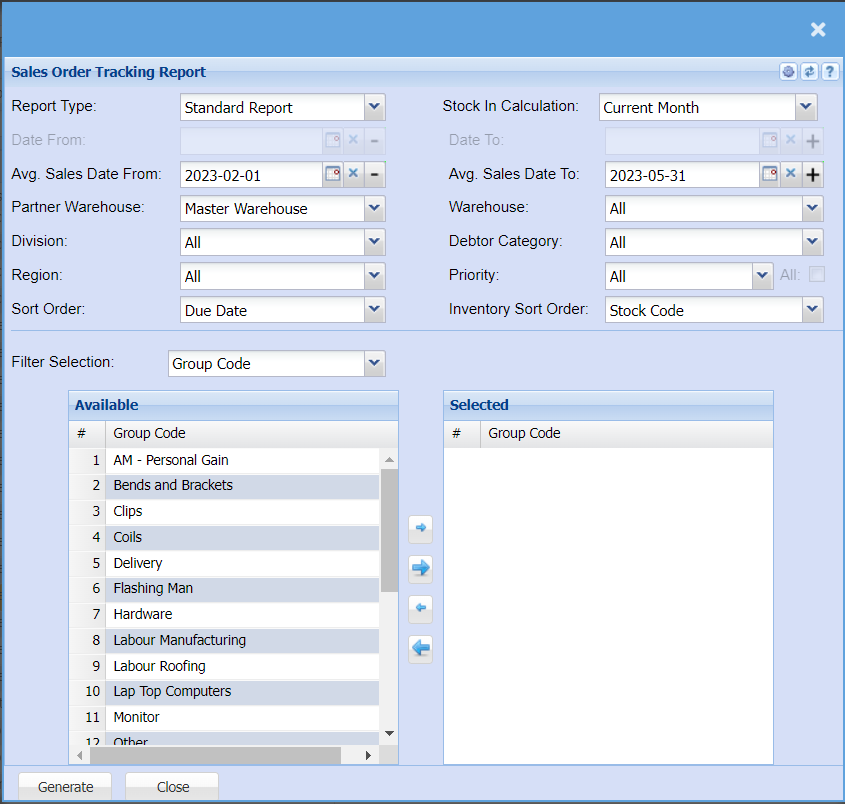
| Report Type | Select from the drop-down menu if you would like a standard report or a Forecast report |
| Date From / Date To | Choose the date range for which you want to view the report from / Select a date range of when you want to see up to on the report. |
| Avg. Sales Date From - Avg. Sales date To | Choose the Average Sales Date range for which you want to view the report from / Select a date range of when you want to see up to on the report. |
| Partner Warehouse | |
| Division | If you have set up divisions for your debtors, you can pull the report for all your debtors or you can select a specific Division from the drop-down menu. |
| Region | You can pull the report for all your debtors, or you can select a specific Region from the drop-down menu if you have set up Regions for your debtors. |
| Sort Order | Select from the drop-down menu if you would like your report to be sorted by, Shipping date, Debtor Code, Debtor Name, Sales order date or Sales order number. |
| Stock In Calculation | Select if you would like the report to be pulled from the current month or from a specific date range. |
| Warehouse | If you select all warehouses the report will fetch data from all warehouses. If you want to search by a specific warehouse, select the warehouse from the menu. |
| Debtor Category | Select from the drop-sown menu if you want all Debtor categories included or only those on hold |
| Priority | If you have set up Priorities for your stock items and you would like to pull a report for a specific priority, you can select this from the drop-down menu, or you can select all to pull a full report. |
| Inventory Sort Order | Select from the drop-down menu if you want your inventory sorted by stock code or Stock description in your report. |
| Filter Selection | Here you can choose from the drop-down menu if you want to pull a report using your inventory group codes or your item categories if you have set them up. |
Sales Orders
Debtors >Reports >Report list
The report displays the different status of sales orders which includes what has been ordered, received, processed and the balance
Criteria can be run by debtors or date or stock.
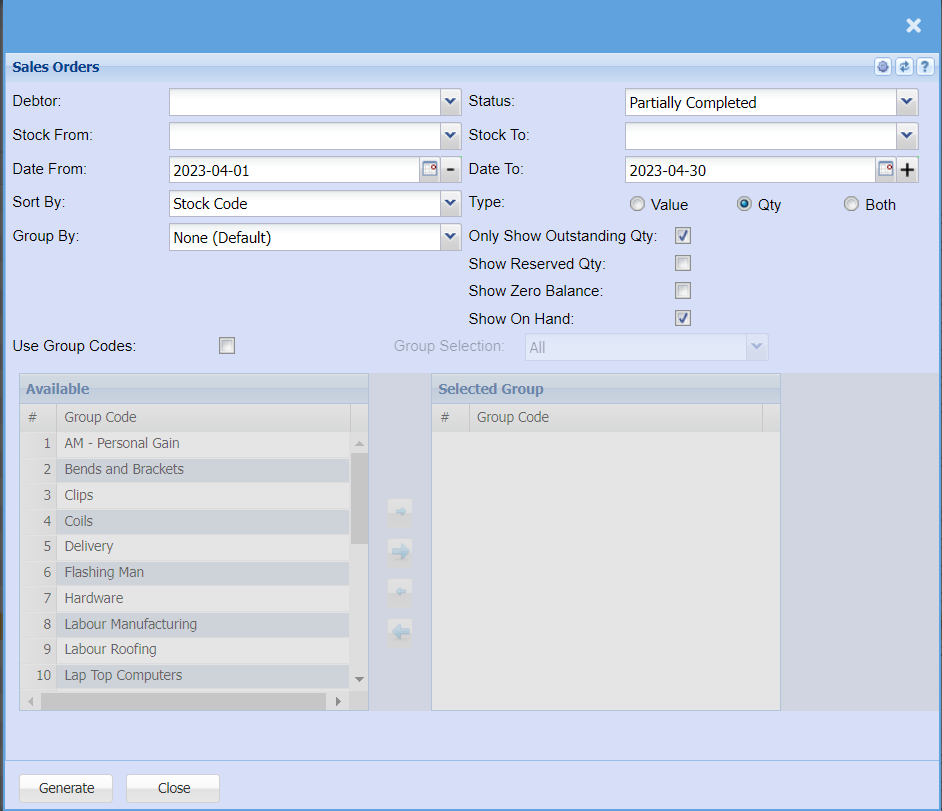
| Debtor | Select debtor if you wish to run the report by debtor/customer |
| Stock From / Stock To | Select Stock from and Stock to fields from the drop-down menus to limit what will be displayed on the report. |
| Date From / Date To | Choose the date range for which you want to view the report from / Select a date range of when you want to see up to on the report. |
| Sort By | Select from the drop-down menu what you would like your report to be sorted by, select form Date, Sales Order Number, Customer Order Number, Customer or Stock Code |
| Group By | Select what you would like your report to be grouped by from the drop-down menu. If you don't wish to group your report leave the selection on none |
| Status | If you select all the report will pull all statuses. If you want to view report by status, select the status on the drop-down menu |
| Type | Type allows you to refine your report to show by Value, Quantity or both. |
| Only Show Outstanding Qty | Tick this box if you would like to only show the outstanding quantities on your sales orders. |
| Show Reserved Qty | Tick this box if you would like the report to show Item quantities that are on reserve. |
| Show Zero Balance | Tick this box to include items that have zero balance. |
| Show On Hand | Tick this box if you would like the report to show Item quantities that are currently in stock. |
| Use Group Codes | If you would like to refine your report to be on specific group codes only you can tick this box and then double click on the group codes, you would like to pull a report on. |
| Selected Group | When you double click on the group code in the available group code column it will move over to the selected group column, and these are the items the report will be pulled on. |
Sales Overview Report
Debtors>Reports>Report List
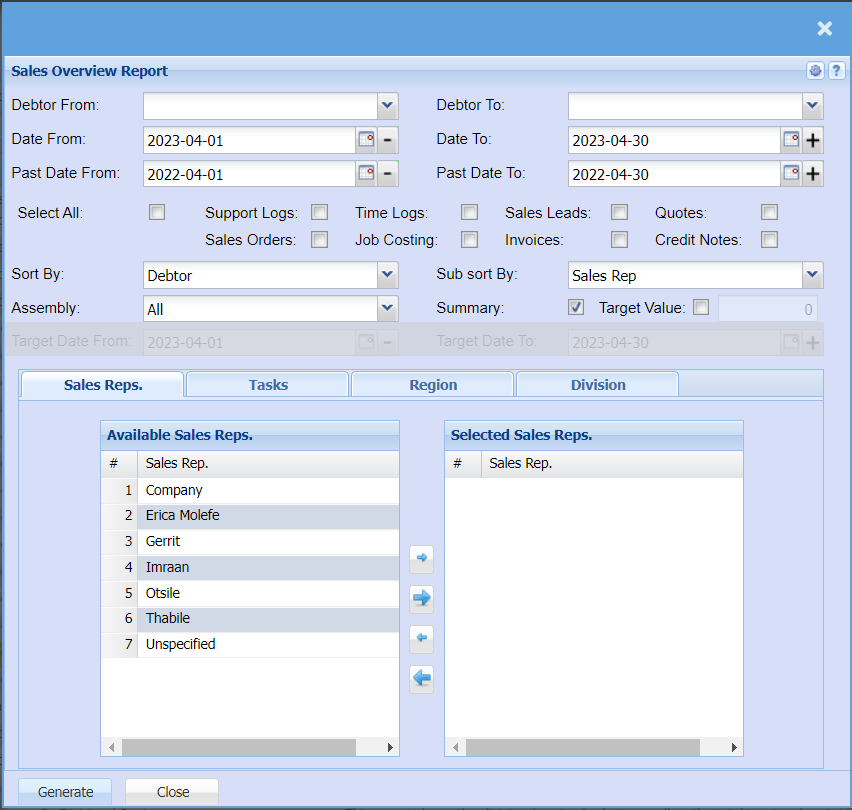
An Analysis of various interactions with customer from Support Logs through to Invoices and Credit Notes.
NOTES
New Debtor: It looks at the captured date on the Debtor, then it checks if this date is within the date range for the report, if it is then it looks if there is an invoice against the debtor. Only then is it flagged as a new debtor. This was the requirement to classify a new debtor flag.
| Debtor from / Debtor To | Select a Customer/Debtor you wish to view the report from. Select the Customer/Debtor you wish to see up to in the report. |
| Date from / Date to | Choose the date range for which you want to view the report from / Select a date range of when you want to see up to on the report. |
| Past Date from / Past Date to | Choose the past date range for which you want to view the report from / Select a past date range of when you want to see up to on the report. |
| Select All / Individual Ticks | Select all will select all the other options you can add or remove from your report, by unticking these boxes they will be removed from your report. |
| Sort By | Choose from the drop-down menu how you would like your report sorted, your options are by Debtor, Sales Rep, Region or Division. |
| Assembly | If you run jobs through an assembly line, you can choose to filter for only those jobs or you can choose to exclude those jobs or pull a report that will have all jobs. |
| Sub Sort By | Sub Sort the report by selecting one option from the drop-down menu allows the user to pull a report with a secondary criteria that will be sorted by either, Code, Description, Warehouse or Bin location. |
| Summary | If you put the tick on the report will only pull limited information |
| Target Value | This is if you are looking for a specific Value in a specific time frame. Select your dates to narrow down your report. |
| Division / Region | This looks at the invoice and not the debtor's setup. |
| Invoices Value Current | No longer displays cancelled invoices. |
Check lists:
Select all generates a report of everything within the checklist options
Support logs generate a log report of all support logs limited to what you have clicked
Sales leads generates a sales report limited to what you have selected
Quotes generates a quote report which includes totals, amounts, approved not approved etc.
Sort by within the sort by dropdown they are options in which you can select to make report more readable
Sales reps contains all the reps, Task contains all the tasks, region contains all regions and division contains all division
Sales Performance
Debtors >Reports >Report list
Shows actions on sales orders, who did them and how long they took.
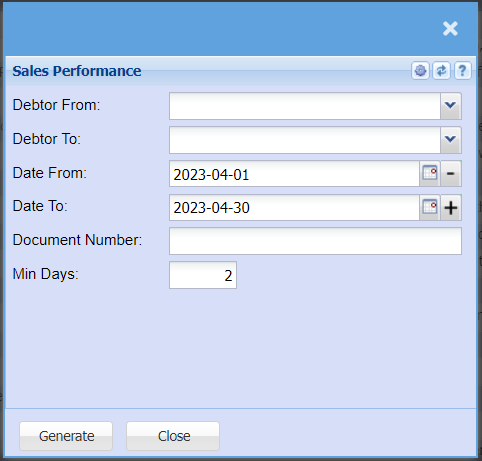
The report shows the sales performance
| Debtor From / Debtor To | Select a Customer/Debtor you wish to view the report from. Select the Customer/Debtor you wish to see up to in the report. |
| Date From / Date To | Choose the date range for which you want to view the report from / Select a date range of when you want to see up to on the report. |
| Document Number | Enter the sales performance document number |
| Min Days | Enter minimum days performance |
Status Age Analysis
Debtors>Reports>Report List
Age analysis grouped by status
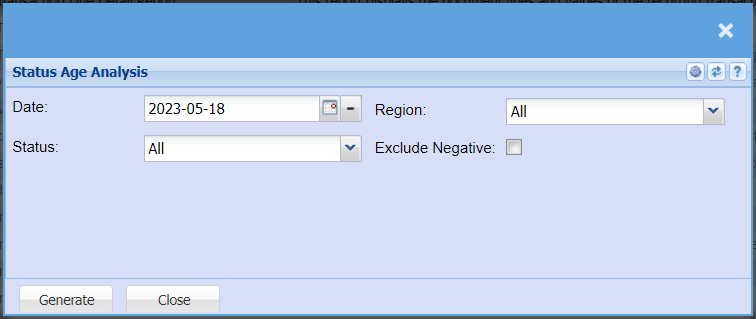
The report on status age analysis
| Date | Select the date for running the report |
| Region | You can pull the report for all your debtors, or you can select a specific Region from the drop-down menu if you have set up Regions for your debtors. |
| Status | If you select all the report will pull all statuses. If you want to view report by status, select the status on the drop-down menu |
| Exclude Negative | By ticking the box means that the report will exclude negative amounts |
Top Sales
Debtors >Reports > Report list
Shows a summary per debtor of invoices less credit notes of sales made.
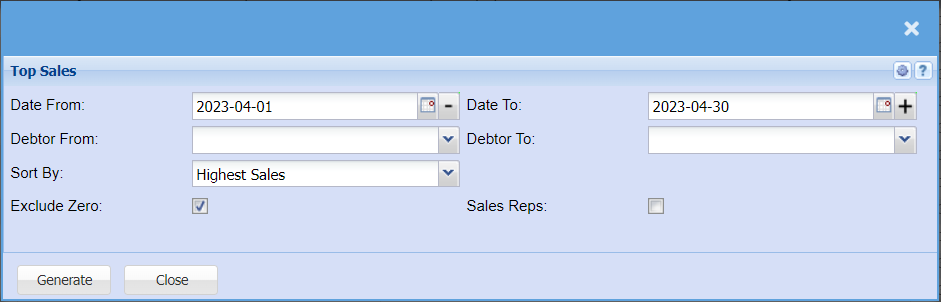
The report shows debtors top sales
| Date From / Date To | Choose the date range for which you want to view the report from / Select a date range of when you want to see up to on the report. |
| Debtor From / Debtor To | Select a Customer/Debtor you wish to view the report from. Select the Customer/Debtor you wish to see up to in the report. |
| Sort By | Choose from the drop-down menu how you would like your report sorted, your options are code, Customer name, Highest Sales, Lowest Sales and Sales Rep |
| Exclude Zero | By ticking the box, the report will exclude zero balances |
| Sales Reps | By ticking the box, the report will include sales reps in a separate column in your report |
Top Sales by Rep
Debtors >Reports > Report list
Shows a summary per sales rep of the list of debtors of sales done where values are working out on rep commission taking into account invoices less credit notes.
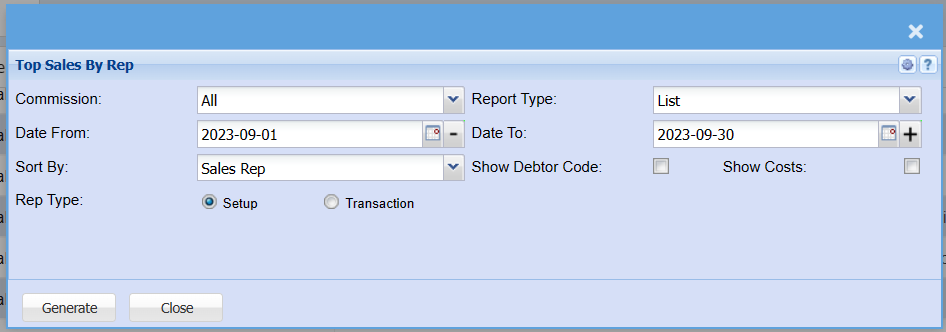
This is a summary of a sales rep report list
| Commission | Select the sales rep you would like to pull a commission report from the drop-down menu |
| Date From - Date To | Choose the date range for which you want to view the report from / Select a date range of when you want to see up to on the report. |
| Sort By | Choose from the drop-down menu how you would like your report sorted, your options are to sort by Debtors Code, Debtors Description, Sales Rep, Hight to Low and Low to High |
| Rep Type | Select if you would like the report to show the Rep listed when the customer was sent up or the rep who processed the transaction. |
| Report Type | to select the type of the report from the drop-down Menu |
| Show Debtor Code | By ticking this box you will be adding another column to your report that will show the debtor's code. |
| Show Costs | By ticking this box you will be adding a column that adds the costs of the transaction to the report. |
Transactions Report
Debtors >Reports > Report list
Full transactional history of all postings in debtors with opening and closing balance per debtor and movement between dates specified.
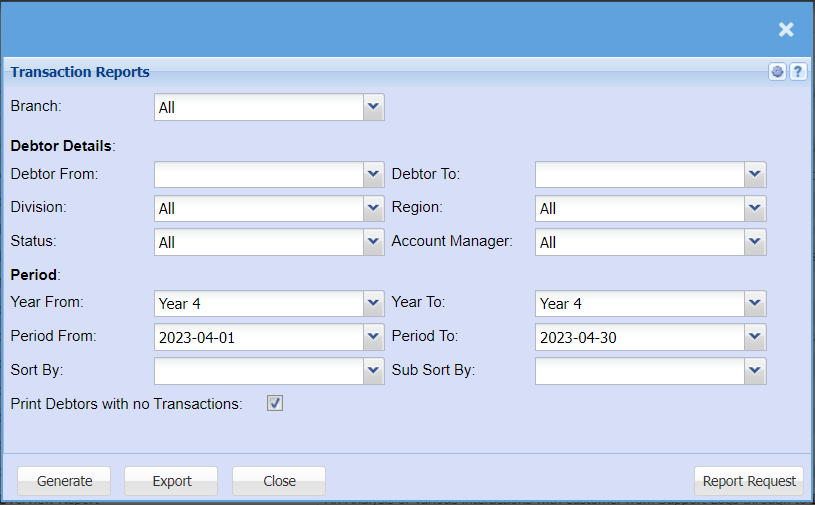
This is a debtor’s full transactional history of posted documents
| Branch | When working with multiple branches this drop-down allows the user to select a specific branch to pull a report for. |
| Debtor From / Debtor To | Select a Customer/Debtor you wish to view the report from. Select the Customer/Debtor you wish to see up to in the report. |
| Division | If you have set up divisions for your debtors, you can pull the report for all your debtors or you can select a specific Division from the drop-down menu. |
| Status | If you select all the report will pull all statuses. If you want to view report by status, select the status on the drop-down menu |
| Region | You can pull the report for all your debtors, or you can select a specific Region from the drop-down menu if you have set up Regions for your debtors. |
| Account Manager | You can pull the report for all your debtors, or you can select a specific Account manager from the drop-down menu if you have set up Account Managers for your debtors. |
| Year From / Year To | Select the year From and Year To Dates from the drop-down menus will show results specific to the period you have selected. |
| Period From / Period To | Select the period From and the Period To from the drop-down menus |
| Sort By | Select how you would like your report to be sorted by selecting one option from the drop-down menu allows the user to pull a report with a secondary criteria that will be sorted by either, date Reference, Description, Debit or Credit. |
| Print Debtors with no Transactions | to tick the box in order to include debtors with no transactions |
| Sub Sort By | Sub Sort the report by selecting one option from the drop-down menu allows the user to pull a report with a secondary criteria that will be sorted by either, date Reference, Description, Debit or Credit. |
Turnover by Division / Region
Debtors > Reports > Report List
This report shows the division budget as well as the total invoices less total credit notes as total sales .
Also shows the previous years sales.
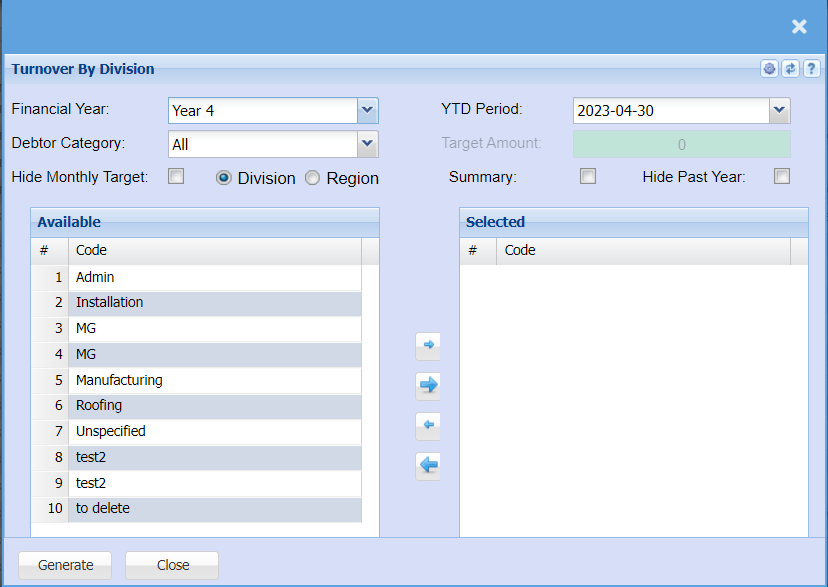
| Financial Year | Select the financial year you are running the report for |
| Debtor Category | To generate the report, the user has to select the category from the drop-down menu |
| Hide Monthly Target | Tick this box if you want to exclude the monthly targets from your report |
| YTD Period | Select the Year-to-date period you would like to pull the report for |
| Target Amount | You can add a target amount if there is a specific amount you are looking for |
| Summary | If you put the tick on the report will only pull limited information |
| Hide Past Year | Tick this box if you want to exclude the past years sales from your report |
Turnover Statistics Report by Stock Category
Debtors >Reports >Report list

| Select | Select if you want your report to be pulled using annual dates (January - December) or Financial Year Dates (April - March) |
| Year | Select the financial year you are wanting to pull a report for. |
| Start Month | Choose the month you want to run your report from |
| Group By | Select from the drop-down menu if you want to pull your report by a specific group, you can choose from No Grouping, Region, Division or Sales Rep. |
| Category | To generate the report, the user has to select the category from the drop-down menu |
| Division | If you have set up divisions for your debtors, you can pull the report for all your debtors or you can select a specific Division from the drop-down menu. |
| Sales Rep | If you want to run a report by a specific sales rep, then you will need to select the sales rep on the drop-down menu. If you leave the sales rep on all the report will run by all sales rep. |
| Include Cost | When you select Include costs, you can double click on specific Stock items which will then move over the select column which will be the items you pull the report for. |
| Month YTD | Choose the month you want to run your report up to. |
| Data Type | Select if you want Posted Data or Static Data |
| Summary | If you put the tick on the report will only pull limited information |
| Region | You can pull the report for all your debtors, or you can select a specific Region from the drop-down menu if you have set up Regions for your debtors. |
| Assembly | If you run jobs through an assembly line, you can choose to filter for only those jobs or you can choose to exclude those jobs or pull a report that will have all jobs. |
| Prev. Year | Tick the Previous year to add a column to your report will show your stats for the same time frame of the previous year. |
Weekly Debt Movement Summary
Debtors>Reports>Report List
Shows a summary and detail movement of transactions between a specific date range.
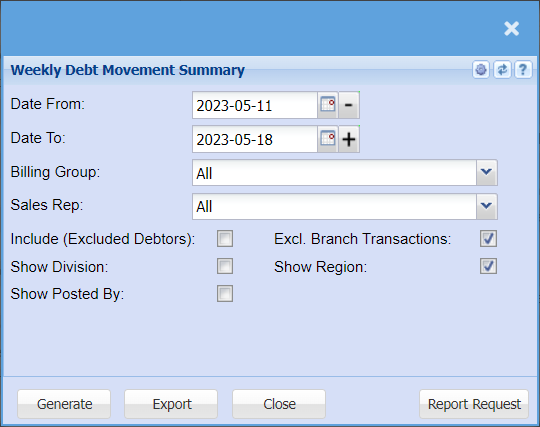
This is a report that shows a debtor’ summary of transactions movement
| Date From / Date To | Choose the date range for which you want to view the report from / Select a date range of when you want to see up to on the report. |
| Billing Group | If you have set up billing groups you will be able to pull the report for a specific billing group |
| Sales Rep | If you want to run a report by a specific sales rep, then you will need to select the sales rep on the drop-down menu. If you leave the sales rep on all the report will run by all sales rep. |
| Include (Excluded Debtors) | It gives the user an option to include or exclude debtors on the report by ticking or not ticking the box |
| Show Division | Tick this box if you want to add a column to your report that shows the Divisions |
| Show Posted By | Tick this box if you want to add a column to your report that shows who processed the transaction |
| Excl. Branch Transactions | it gives the user an option to include or exclude branch transactions on the report by ticking the box |
| Show Region | Tick this box if you want to add a column to your report that shows the regions |