BSCM - General
General
- User Setup
- User Management – User Search
- User Setup Process
- Module Access Tab
- Form Security
- GL Control Accounts Access
- User Inactive or Delete
- Messages
- Leave
- User Log Out
- User Password – Set Password Help
- Debtor Access
- Incident Log
- Basic User Setup
- Add User
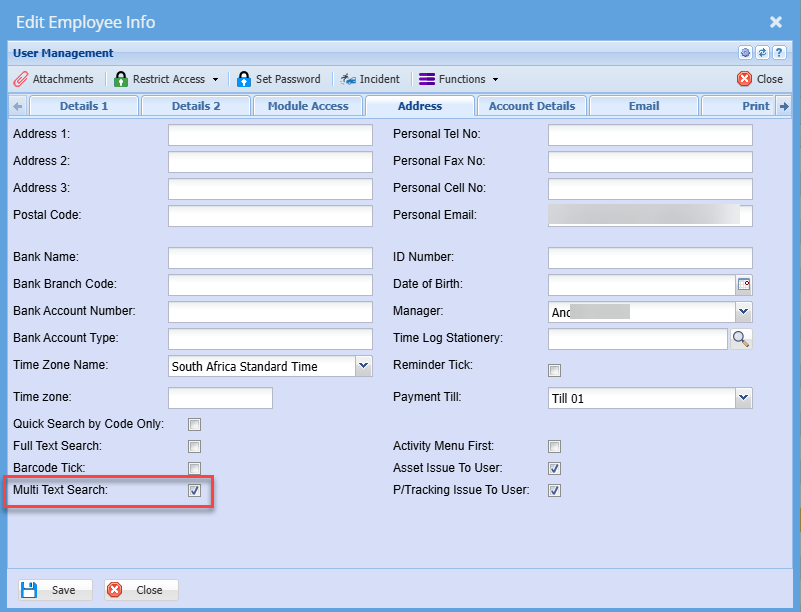
- Multi-text Search
- Two Factor Authentication
- Daily sales rep email report
- Colour Hex Code - Memo Notes
- Special Deals
- Special Deals
- Set Password
- Sales rep Commission (BDM)
- Leave Allocation
- Leave Calendar
- VAT / GST table
- Tax - VAT / GST Table
- VAT / GST Type Tables Manuals
- VAT / GST Summary Report
- VAT Rate Change Procedure
- Projects
- Pricing Levels
- Terms and Conditions
- Recurring Transactions
- Recurring Transactions Search
- Recurring invoices Setup
- Recurring Invoices Security
- Debtors Recurring invoices on hold status to change to cancelled
- Recurring Invoice update future invoices
- Invoice Status
- Weather Forecast
- User Themes
User Setup
User Setup
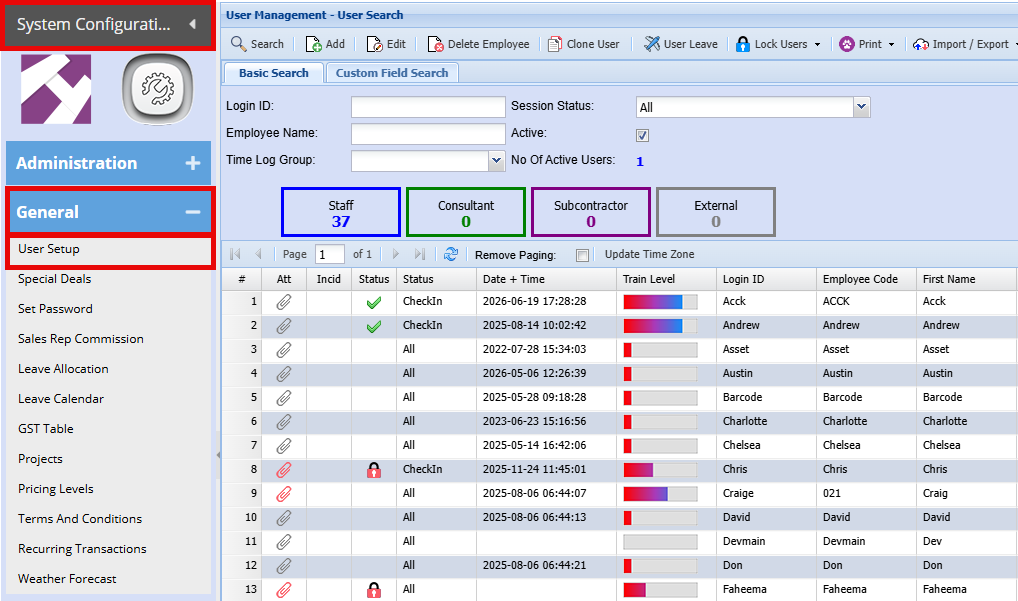
User Management – User Search
Video Training Manual 2016 - Click Here
Systems Configuration Module> General> User Setup
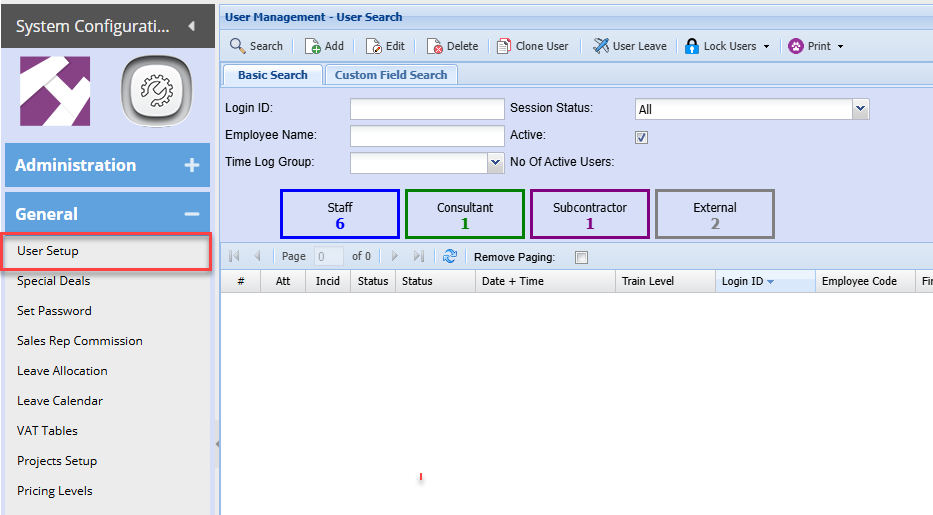
You can search for a user using the following criteria:
- Login Id
- Employee Name
- Time Log Group
- Session Status
- Or by active or inactive
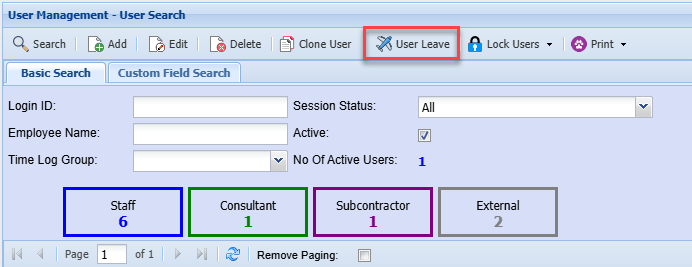
User management - User search buttons explained
| User Leave | Shows the leave allocated to that specific User. |
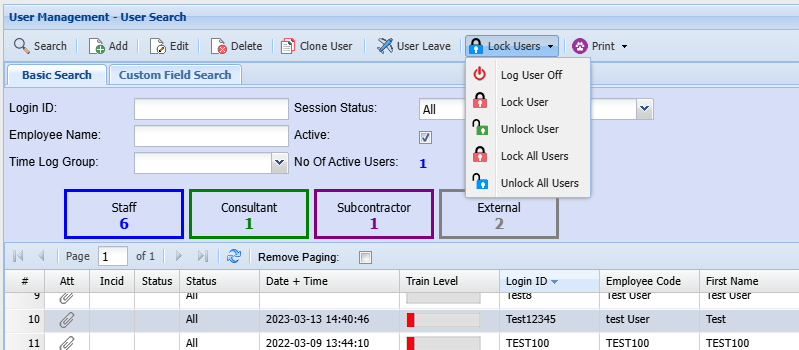
| Log User Off | Logs the currently selected Employee out. |
| Lock User | Locks the currently selected Employee. |
| Unlock User | Unlocks the currently selected Employee. |
| Lock All Users | Locks all Employees. |
| Unlock All Users | Unlocks all Employees. |
Leave User
Huge ERP has a basic leave approval and tracking system
Staff can request leave and then email managers
Managers can then approve or deny the request
Leave is then tracked and can also be printed out if needed
Lock Users
Lock users allows you to lock and unlock a user from the system
| Log User Off |
This allows the admin user to log out users who logged off abnormally or who forgot to log off |
| Lock User | This allows the admin user to lock out a user from entering the system |
| Unlock User |
This allows the admin user to unlock users locked out of the system or lock themselves from the system Sometimes users try to log onto the system multiple times and receive error code 7 Once a user has error code 7 this is where the admin user can unlock the user |
| Lock All Users | In case it is month end and staff is busy with stock counts or there is a major system update the users are not allowed to sign or log into the system we can lock all users here |
|
Unlock All Users |
Once done with the maintenance or stock takes you can unlock all users by clicking inlock all users |
User Setup Process
To setup new users to access the system, go to:
System Configuration Module >General >User Setup
The following screen will appear
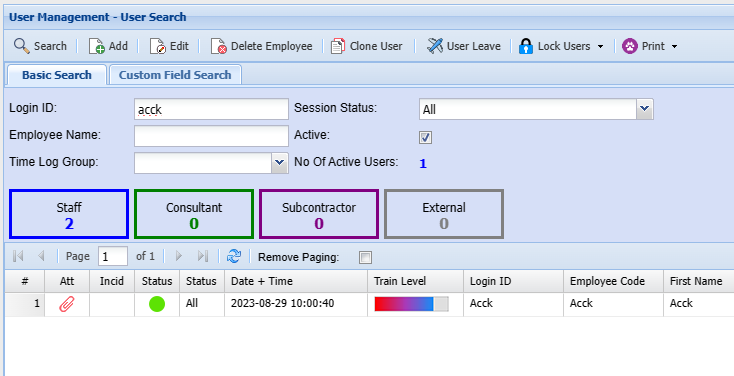
To add a new user, click on the Add button and the screen below will appear
This is where you add all necessary details about a user and setup their security
Functions Buttons
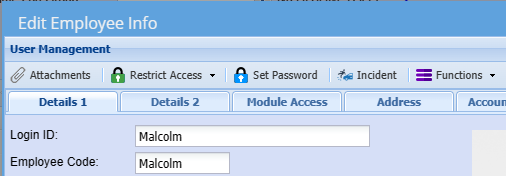
| Attachments | Here you can add any documentation or photos related to this user |
| Restrict Access | Manage the users access to certain modules |
| Debtor Access |
Restrict access to debtors |
| Asset Category Access | |
| CRM Customer Access | |
| Set Password | Set a login username and password for each user / Reset a password |
| Incident | |
| Functions Menu | |
| Branch | |
| Division | |
| Region | |
| Department | |
| Function | |
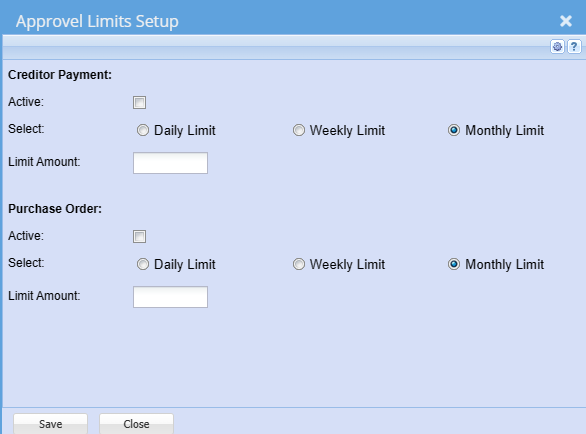
| Approval limits setup | Set approval limits per time period for user |
Approval limits
Setup approval limits by Day, Week or Month
Allowance for Creditor payment and Purchase Order
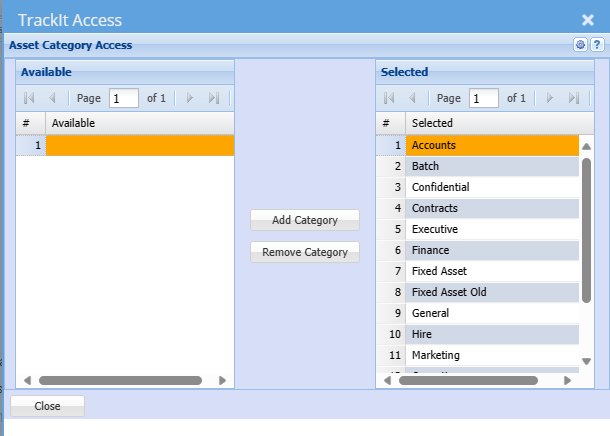
TrackIT Access
Select which categories the user will access to
Minimum should be General and Fixed Asset
CRM Customer Access
Restrict access to customers in the CRM module

Details 1 Tab
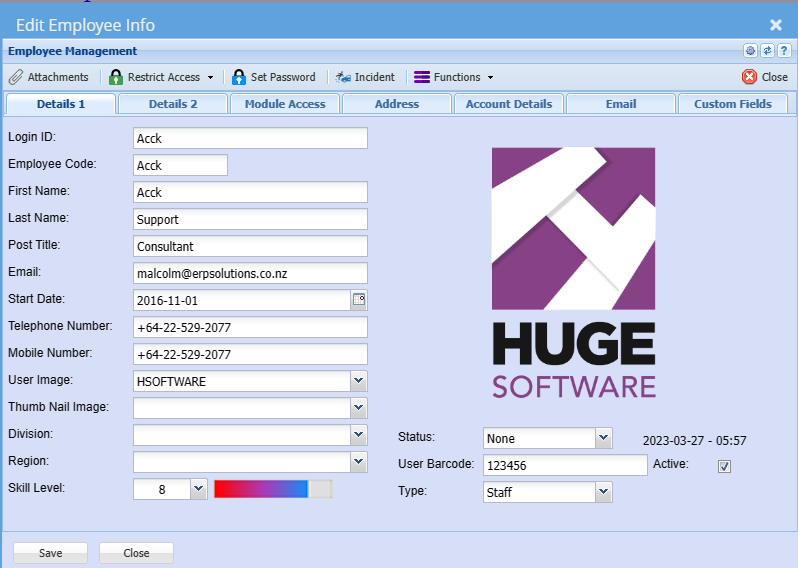
| Login ID: | This is case sensitive when the user logs in. This will be the name which is used when the user logs in. |
| Employee Code: | The users code of the company, usually the payroll code |
| First Name: | First name of the User |
| Last Name: | The Surname of the User |
| Post Title: | Enter the post title of the user |
| Email: |
Enter the work email address of the user This is used to send out emails from the user |
| Start Date: | |
| Telephone Number: | |
| Mobile Number: | |
| User Image: | This is a drop down and only shows Images which have being uploaded as attachments. You can select a default image against the user to show on the right-hand side |
| Thumb Nail Image: | |
| Division: | |
| Region: | |
| Skill Level: | |
| Status: | |
| User Barcode: | |
| Type: | |
| Active: | User is active when ticked, should you take the tick off then the user will no longer have access to the system |
Details 2 Tab
| Primary Branch: | This is the Users primary branch and branch settings will take affect based on the branch selected (see company profiles). Posting of documents will take the general ledger links of this branch. |
| Language: | The language selected here will determine what language profile the user will log onto. (default can be set at company profile level). |
| Timeout Mins: | Time out in Minutes – The default setting is 180 Minutes ( 3 hours). The timeout will log the user out after the period of 180 Minutes if he/she has not worked in the system. |
| Reminder User Prefix: | |
| Reminder Counter: | |
| Contract Default: | |
| Time Log Group: | |
| Activate Messages: | |
| GPS Device No: | |
| Creditors Process: |
| Sales Rep Link: | |
| Sales Rep Link Tick Box: | If ticked will indicate whether the user is a Sales Representative or not. |
| Hide Costs: | |
| Disable Debtors search after first save: | |
| Disable pricing Structure: | |
| Disable Sales rep pricing: | If this field is ticked then the user cannot change the selling prices when invoicing. |
| Line Discount Disabled: | |
| Disable Sales Rep Mark-Up: | If this field is ticked then the user cannot change the markup values when invoicing. |
| Line Discount Range: | |
| Over All Discount Disabled: | |
| Over All Discount Range: | |
| Enable Two Factor auth: | |
| Two Factor Renew Period: |
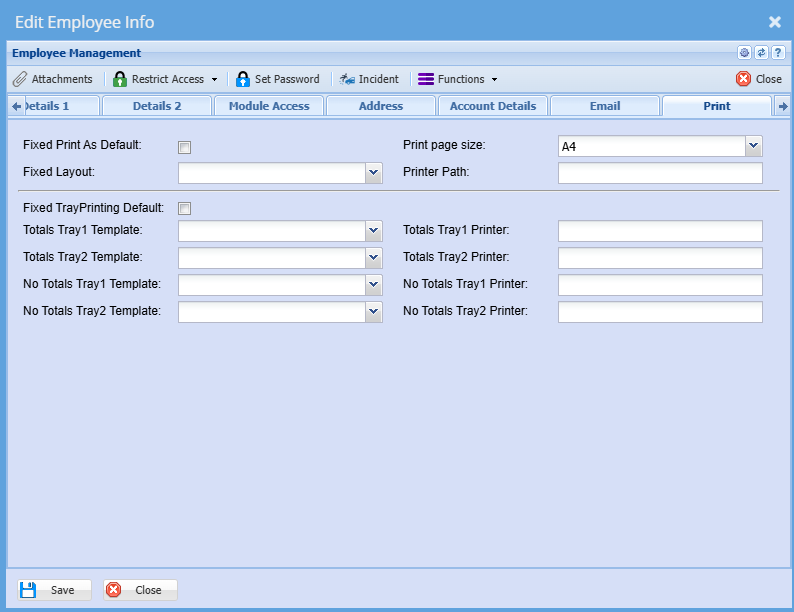
| Email Type: | |
| Print Page size: | |
| Fixed Layout: | |
| Fixed Print as Default: | |
| Interface User: | |
| Printer Path: |
Module Access Tab

| Allow Multiple Module Windows | When ticked this will allow the user to open multiple Module windows simultaneously for example 3 Debtors Module windows where the user is doing invoicing, adding a new debtor and doing a quote. The default is set to allow the user to open multiple module windows. |
| View Security Button | This button allows the user to set security on each form window in the system. This means you can lock down buttons and tabs per window. The default is set to not active as you do not want staff to change their security access. Only the Administrator should have this ticked. |
| Mobile Access | Tick to allow user to access Webatar mobile business app |
| Mobile Role |
Setup a mobile role for the user |
New Access
Preferred Users button
Select a preferred user, this is used in Webatar when confirming the order

Warehouse access
Setup which warehouses the user will have access to
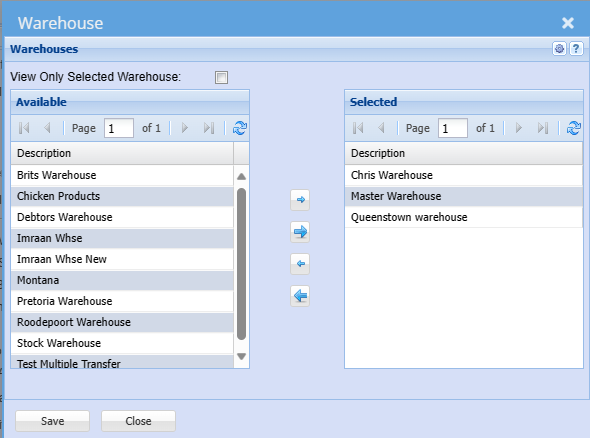
| View Only Selected Warehouse | When tick is on, warehouse searches and drop downs will be limited to selected warehouses |
| Available and Selected | View all available warehouses |
Address Tab
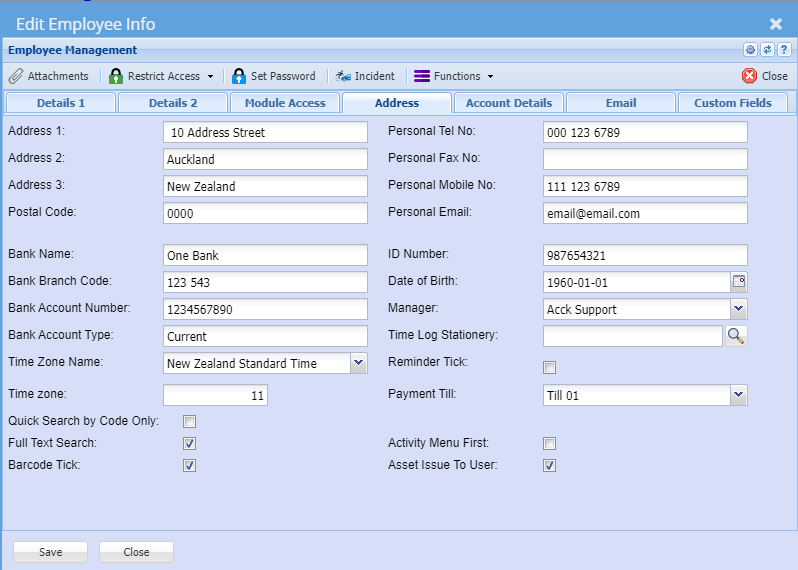
| ID Number | Identity Number of the User |
| Date of Birth | Date of Birthday of the User |
| Telephone Number | Contact Telephone number |
| Cellular Number | Contact Cellular number |
| Email Address | Email Address of the User, this email address is also used as a reply email to emails sent out of the system. |
| Primary Branch | This is the Users primary branch and branch settings will take affect based on the branch selected (see company profiles). Posting of documents will take the general ledger links of this branch. |
| Language | The language selected here will determine what language profile the user will log onto. (default can be set at company profile level). |
| Manager | Select the User’s Manager |
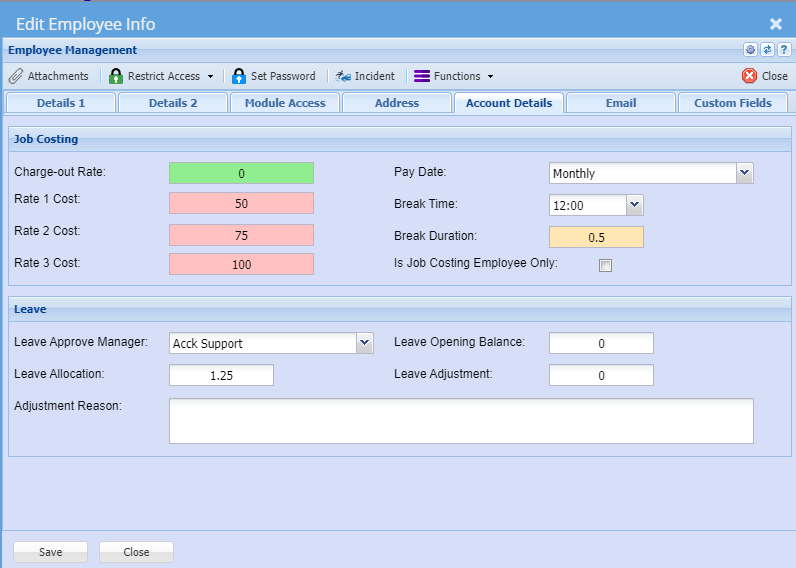
Account Details Tab
Email Tab
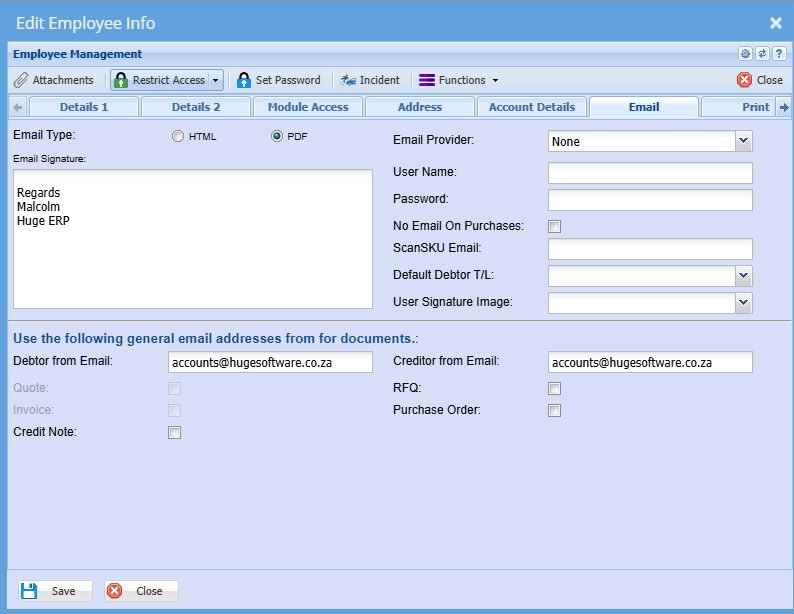
General email from address
Allow emails sent out for Credit Note, RFQ and Purchase order to be sent by a generic emails address
Print Tab
Custom Fields Tab
Module Access Tab
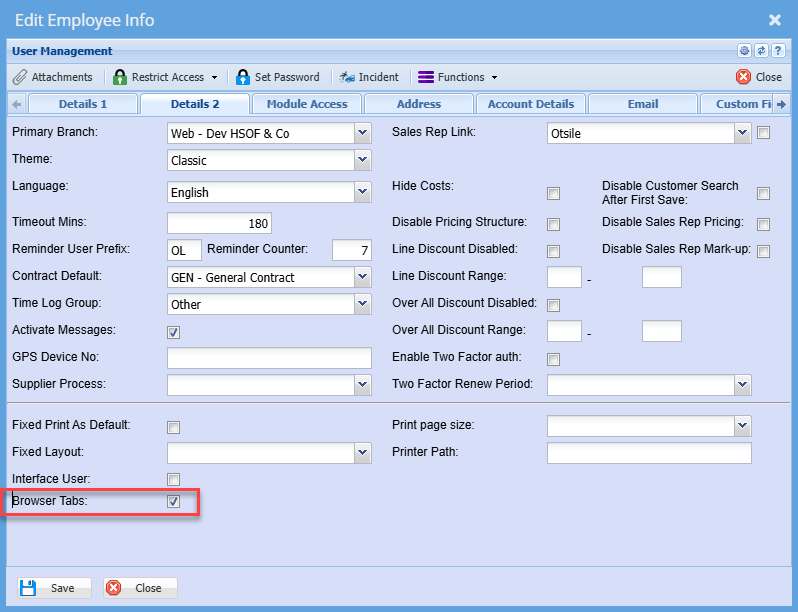
Details 2
Browser Tabs allows you to open modules and windows in tabs instead of a new window
Activity Menu first
To set the Activity menu first in some modules, put the tick on next to the Module security
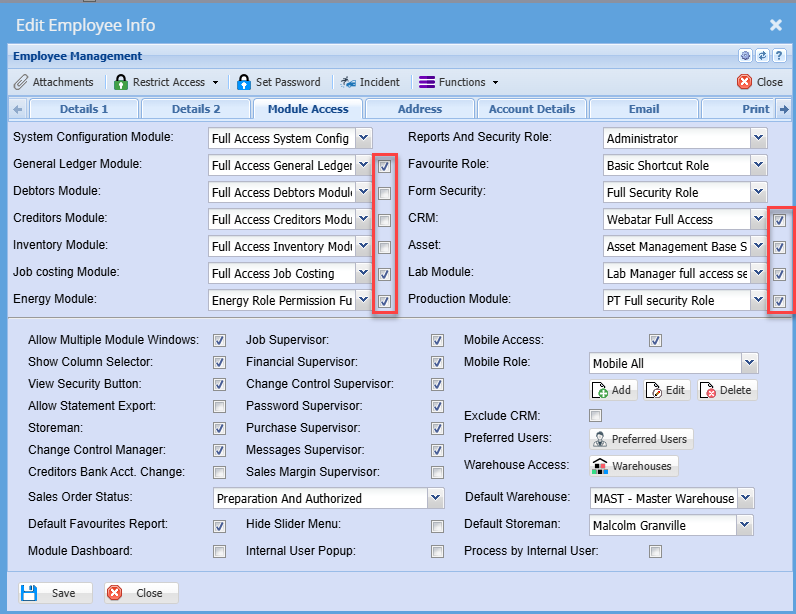
This will put the Activity menu first when going into the module
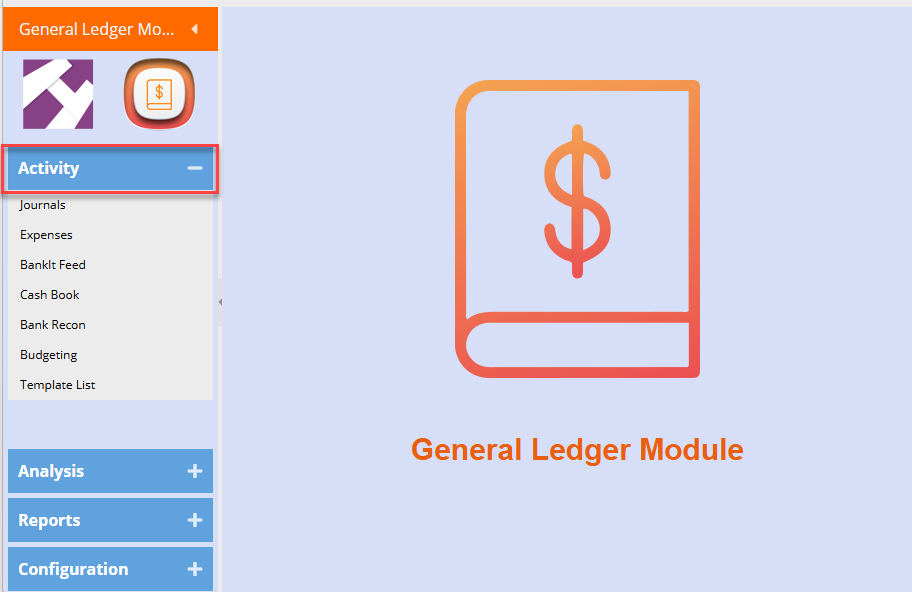
Module Access
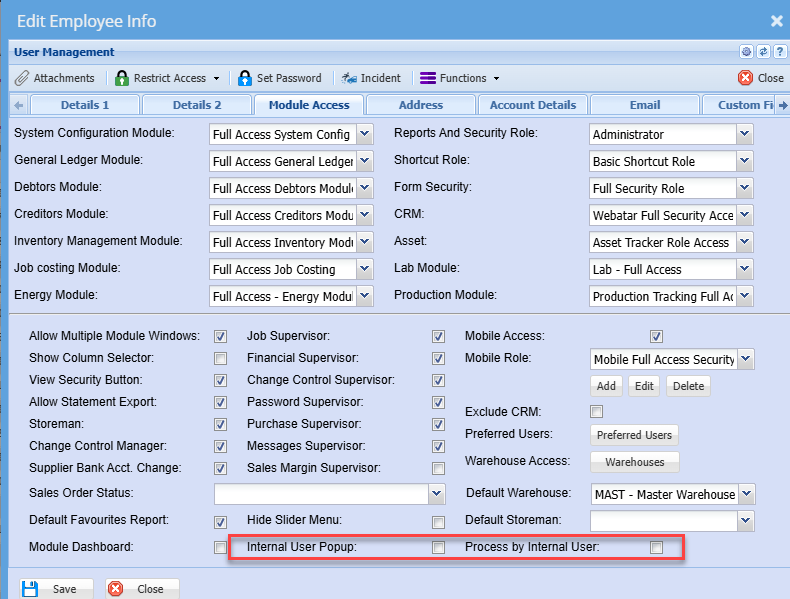
Form Security
Video training manual 2016 - Click Here
GL Control Accounts Access
The default security is off for users to view the General ledger control accounts.
These accounts are:
| 1 | Inventory / Stock Control Account |
| 2 | Customer / Debtors Control Account |
| 3 | Suppliers / Creditors Control Account |
| 4 | VAT / GST / Tax Control Account |
This affects the searches or posting to these control accounts.
Should you want the person to view or process to these accounts, enable the security tick box for financial supervisor.
.png)
User Inactive or Delete
When we make a user inactive or delete a user.
The following will occur:
| 1 | Webatar tick is off |
| 2 | Job costing module access is removed |
When the license is checked it ignores users that are deleted from the count.
.png)
Messages
Systems Configuration > General > User Setup> Tick to activate messages on a user.
| • Keep track of all tasks, reminders and items linked to jobs |
| • Provides notification updates in one place. |
| • Notifications can be used to create new reminders. |
| • Shows mail as "read by "specific users |
.png)
.png)
The number of messages for a user will be shown on the landing page. To access the messages, open any module in the system, right above, the messages notification will be displayed.
Double click on the message and view available messages.
.png)
.png)
| 1 | Search: Search for messages |
| 2 | Date from and date to: use the date criteria to filter messages |
| 3 | Read Type: unread or read messages will be displayed according to the type selected |
| 4 | Company name: Filter by company |
| 5 | Document name: Filter by document name |
.png)
Double click on the message, once viewed the message turns black or alternatively you can add a tick on the message tick box and mark it as read in the change status button and confirm by clicking yes to continue.
Leave
Huge ERP (Webaccounting) has a basic leave approval and tracking system.
Staff can request leave and then email managers.
Managers can then approve or deny the request.
Leave is then tracked and can also be printed out if needed.
.png)
User Log Out
This feature assists in logging a user off the system when a user has been abnormally logged off.
When a user logs into the system and a message comes up informing the user that the said user is already logged in. An administrator could be requested to log you off, or you can now log yourself off.
Select the Log off Users button.
.png)
Select the Search button which will display all users logged onto the Huge ERP system
.png)
Select the user you want to log off the Huge ERP
Press the Log off User button
.png)
User Password – Set Password Help
Video training manual 2016 - Click Here
System Configuration> General> Set Password
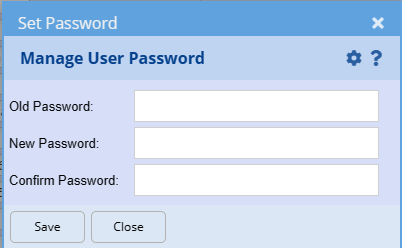
Passwords are a minimum of 8 characters with at least one capital letter and one number.
A user with Supervisor password tick on, can change a password without knowing what the existing password is.
Changing a password: Enter the new password in the “New password” and “Confirm Password” fields.
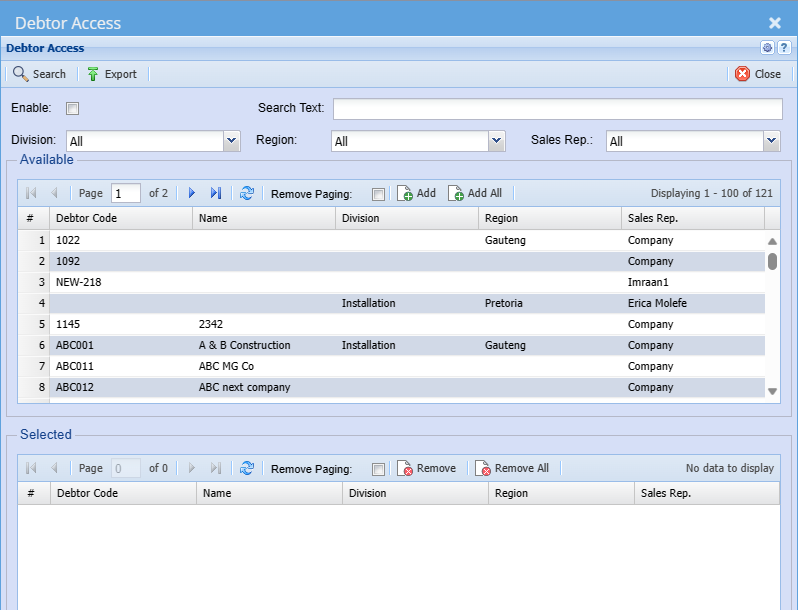
Debtor Access
Enable this function for additional security to limit access to customers
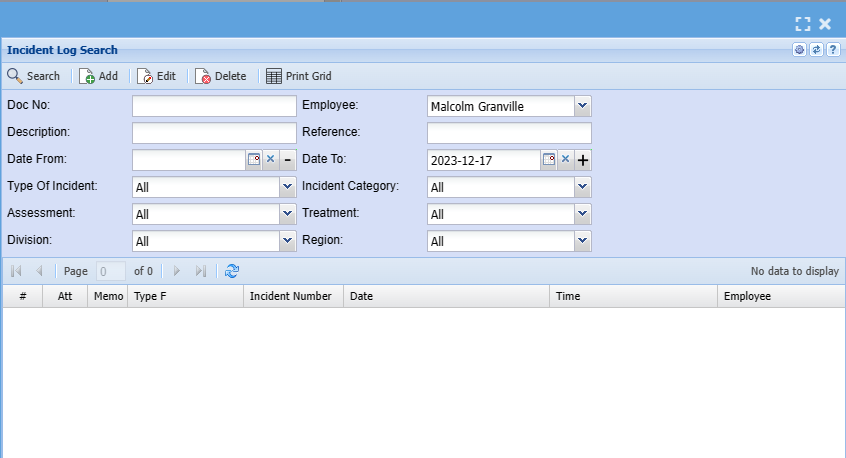
Incident Log
Log incidents with users
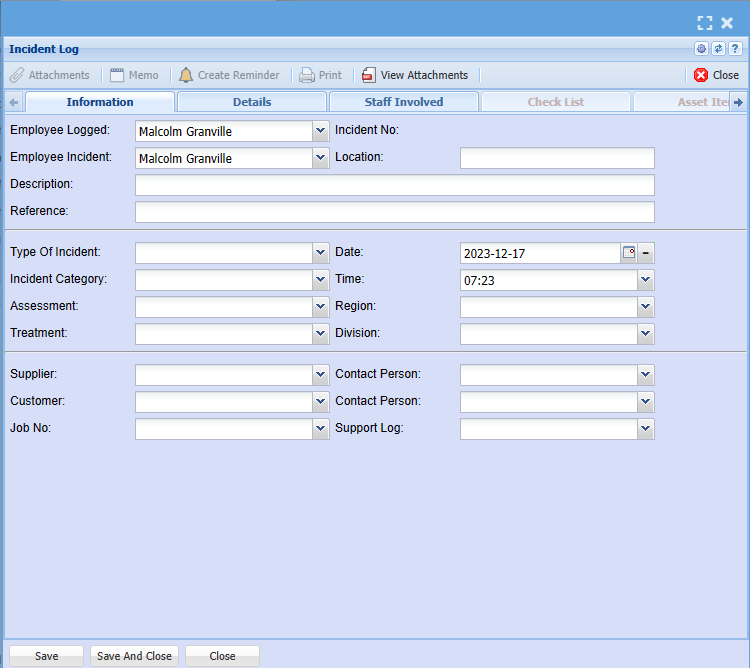
Add / Edit an incident
Basic User Setup
ideo Training Manual 2016 - Click Here
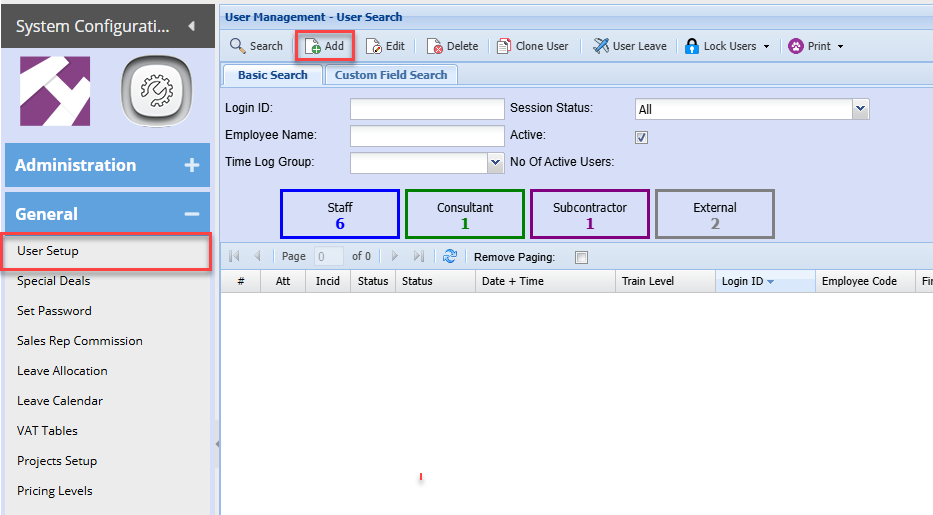
To add a new user go to
Systems Configuration Module> General> User Setup
To add a new user click Add
Once complete click save and then click on Details 2
Details 2
| User Leave | Shows the leave allocated to that specific User. |
| Log User Off | Logs the currently selected Employee out. |
| Lock User | Locks the currently selected Employee. |
| Unlock User | Unlocks the currently selected Employee. |
| Lock All Users | Locks all Employees. |
| Unlock All Users | Unlocks all Employees. |
Add User
Multi-text Search
Multi text search allows one to search on individual names within the table
These are active on the following drop downs:
- Inventory item search on code and name
- Debtors search on code and name
- Creditors search on code and name
- Task builds on code and name
These are active on the following search windows
-
Inventory setup - description search
-
Debtors setup - description search
-
Creditors setup - description search
-
Job costing - Build task setup - Description search
-
Asset Tracker - Asset name search
-
Inventory Enquiry (Analysis) - Item Description search
-
Debtors Document History - Debtor Name and Short Description
-
Creditors Document History - Creditor Name and Short Description
-
GL Account Analysis - Description, Source Reference and Line Reference
-
Time Log Search - Reference
Two Factor Authentication
How Two-Factor Authentication Works
Two-factor authentication adds an extra layer of security by requiring not just your password, but also a unique code generated by an authentication app.
Time-Based One-Time Passwords
- The code you see in your authenticator app is time-based.
- It refreshes automatically every 30 seconds.
- You don’t need to request a new code manually, your app generates it continuously.
- Each code is valid for a short window and can only be used once.
Frequency of Use
Depending on how your Huge ERP account is configured, you may be prompted to enter a new code:
- Once per day/week/month
- Only when logging in from a new device or location
What You Need to Know
- Keep your authenticator app installed and accessible on your device.
- If you lose access to your app or device, you’ll need to contact support to reset your Two-Factor Authentication setup.
- The code is tied to your device and account, no one else can use it.
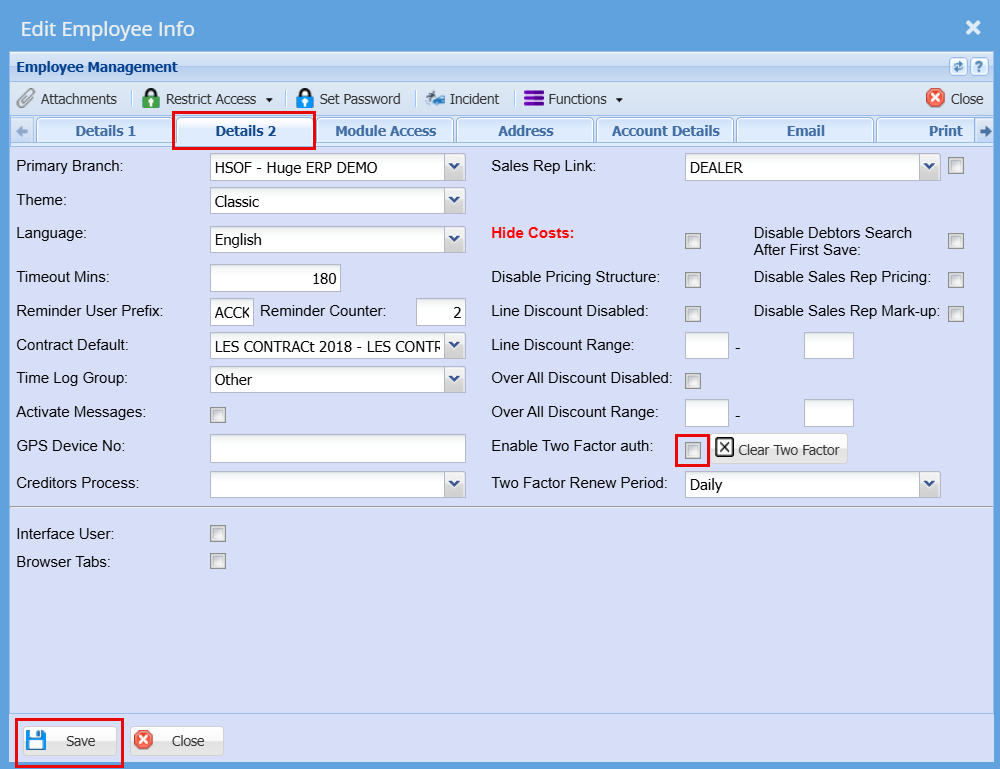
To activate the Two Factor Authentication on a user's login:
Systm configuration > General > User Setup
- Double-click on the user profile you wish to update.
- Navigate to the “Details 2” tab within the user profile.
- Select the checkbox labeled “Enable Two Factor Auth.”
- Click “Save” to apply the updated security settings.
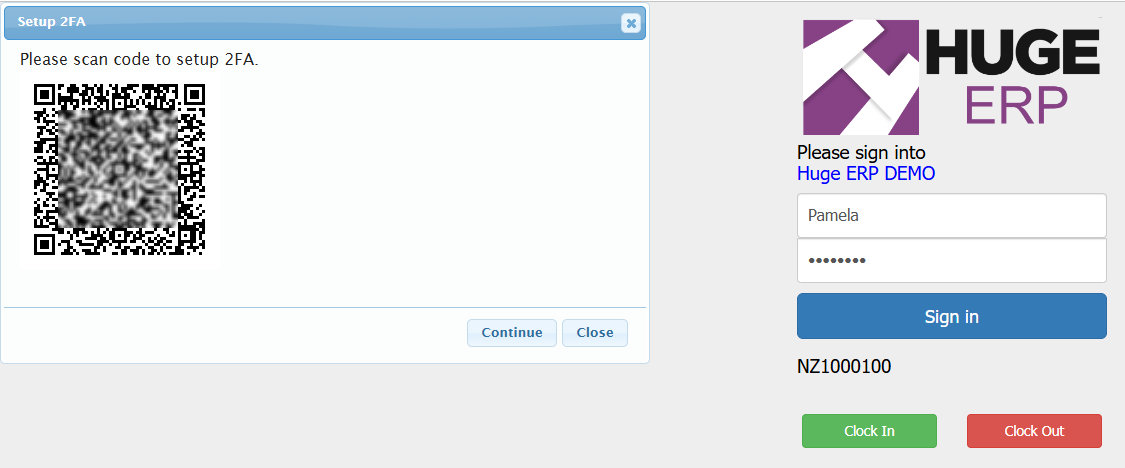
The user must close any active Huge ERP sessions and log in again. The following screen will be displayed.
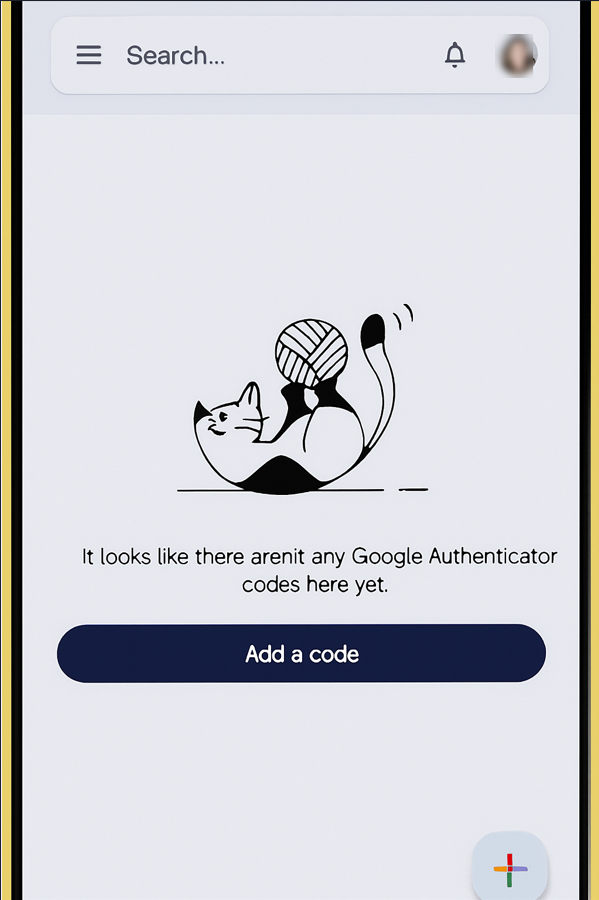
On your phone, open the Authenticator app.
Tap 'Add a code' or the '+' icon in the bottom-right corner, then scan the QR code displayed on your screen.
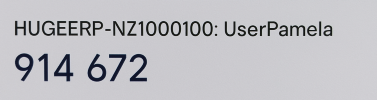
Once set up, you’ll receive a code similar to the one shown below which you will then add to the OTP block when you log in again.
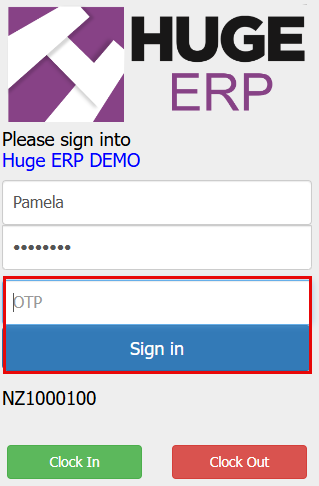
Apon logging in you will need to insert your Password as well as the OTP number from the Authentication App.
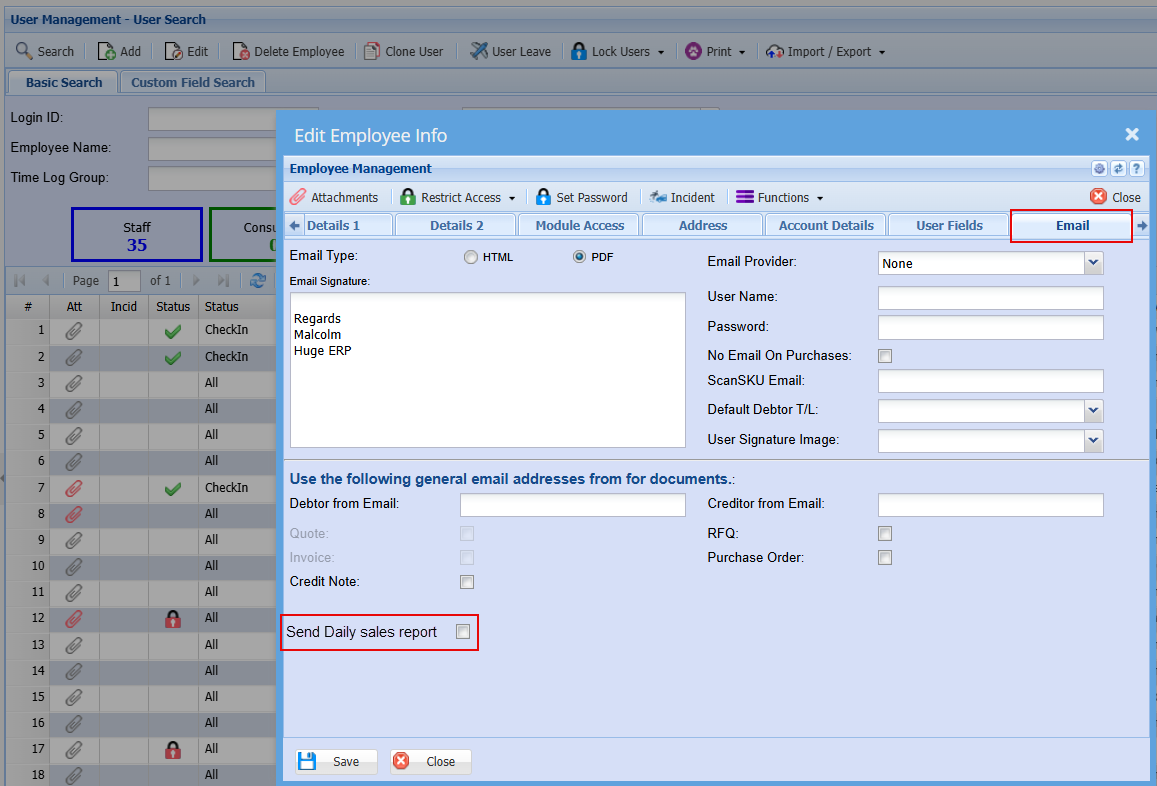
Daily sales rep email report
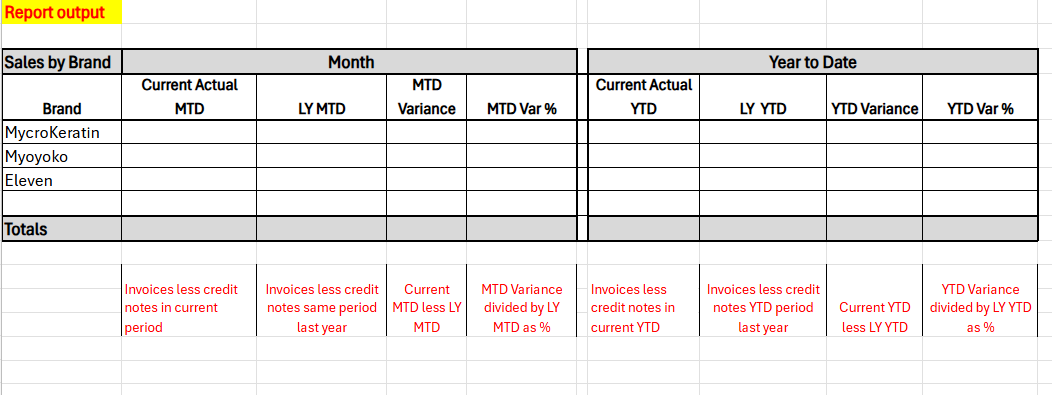
This function will allow a daily email to the user based on the default sales rep.
Daily email summary
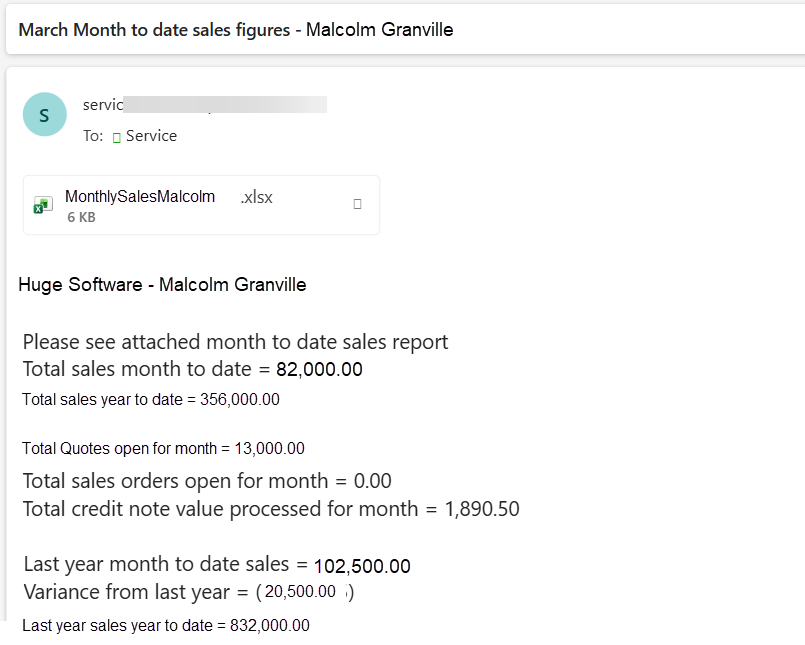
Report attached by Brand for Sales rep
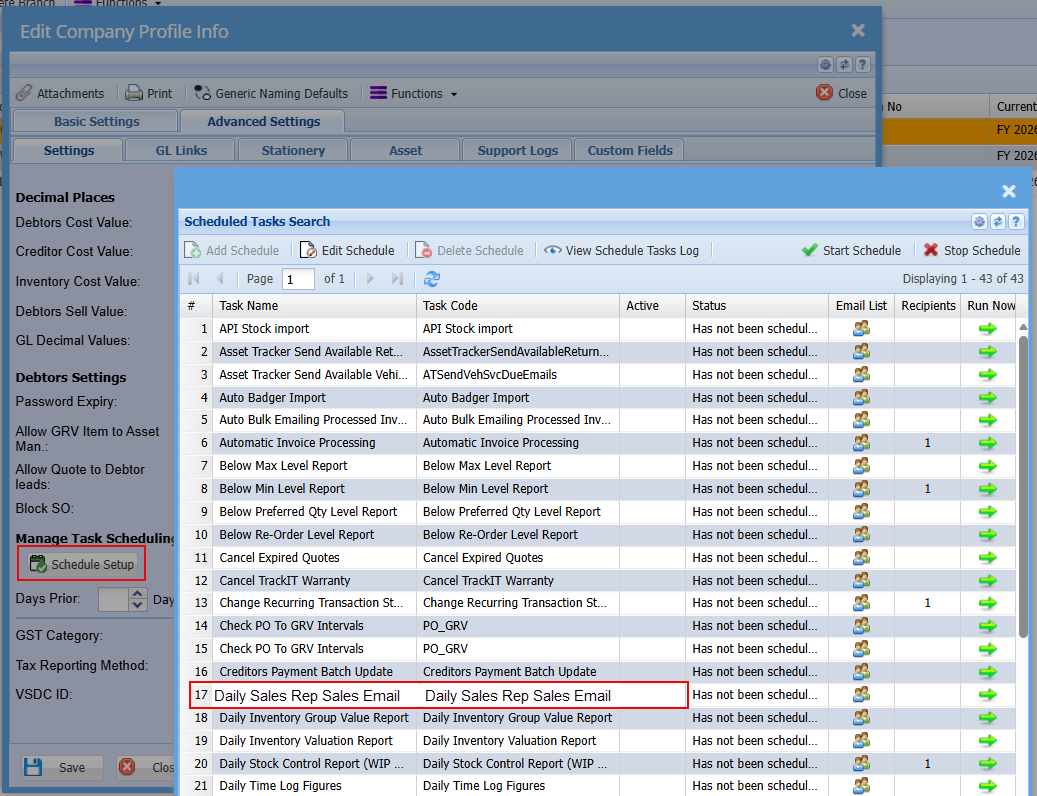
Enable the email schedule to check each user that has the tick activated
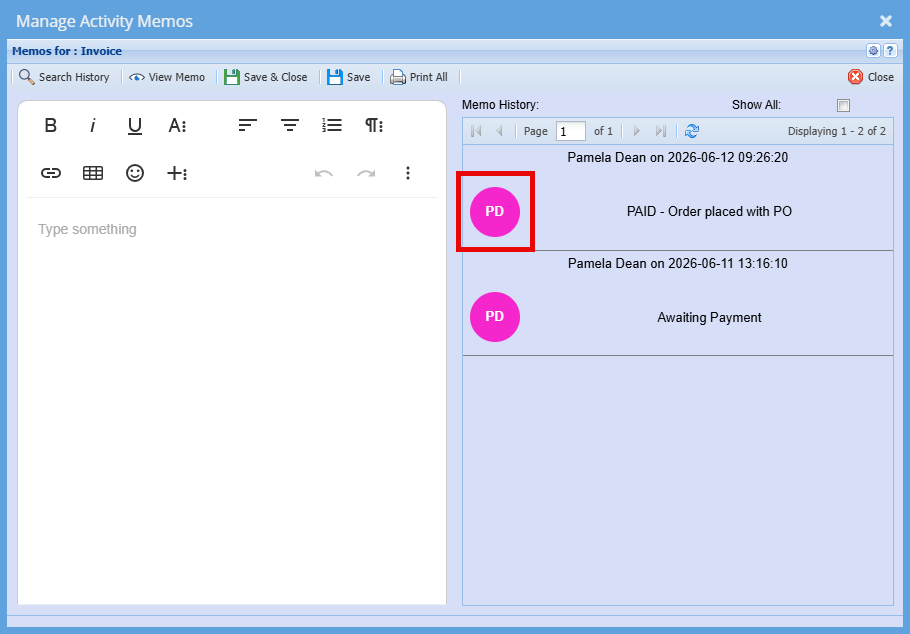
Colour Hex Code - Memo Notes
Setup:
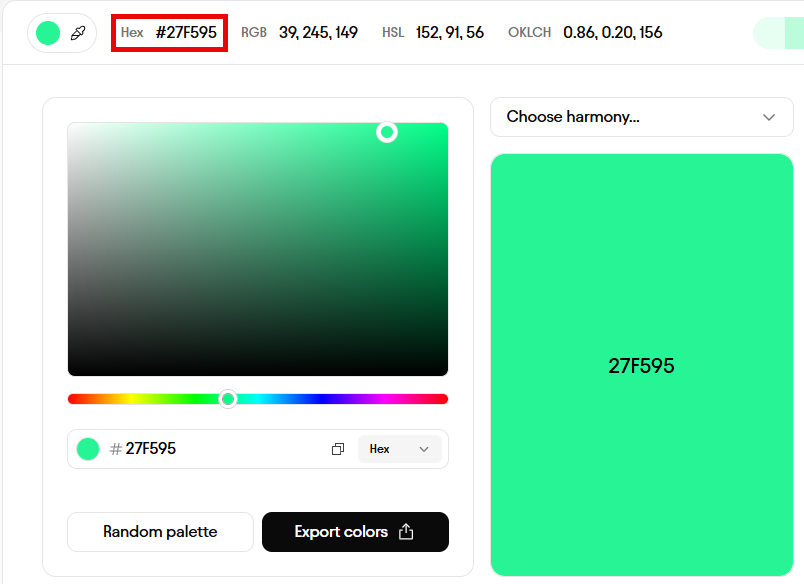
Click on the below link to find the colour of your choice
Copy the Hex Number
In Huge ERP:
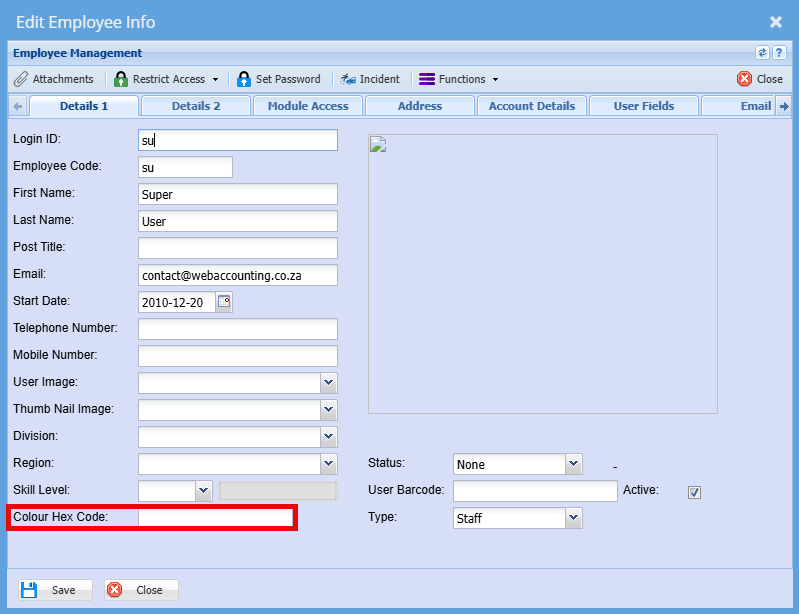
System Configuration > General > User Setup
- Double click on the username of the person you want to set a colour for
- Paste the colour code into the "Colour Hex Code" field
- Click "Save"
Special Deals
Special Deals
Special Deals
System Configuration> General> Special Deals
Deals help setup groups of items to sell
Setup the period the deals will run for
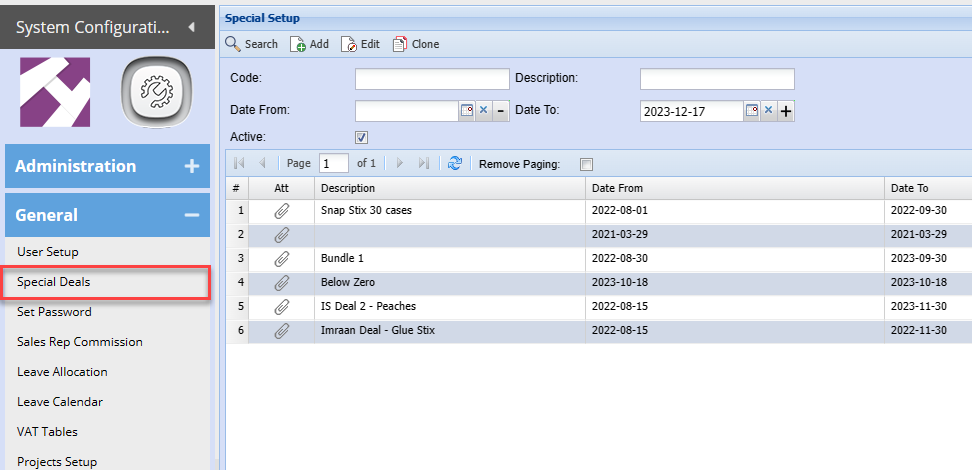
| Add/ Edit | Add or edit a special deal |
| Clone | Clone a deal and change |
Range Tab
Setup the Range based on Quantity or Value
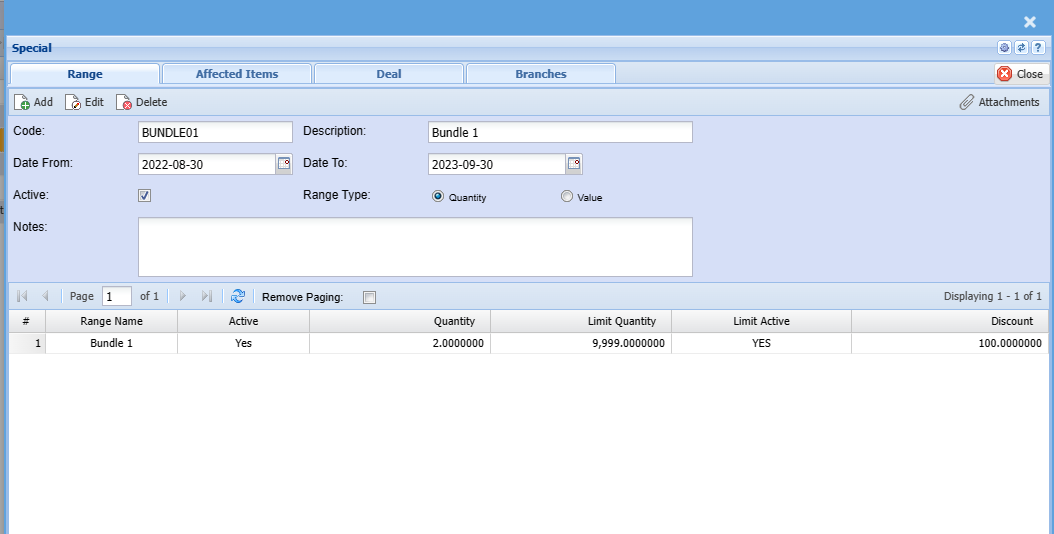
Range edit
Enter the range
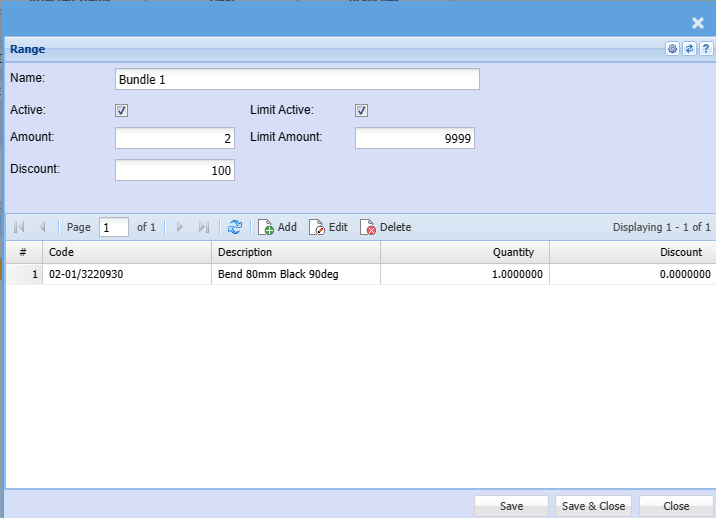
Linked Items
Search and filter items to be part of the item deal
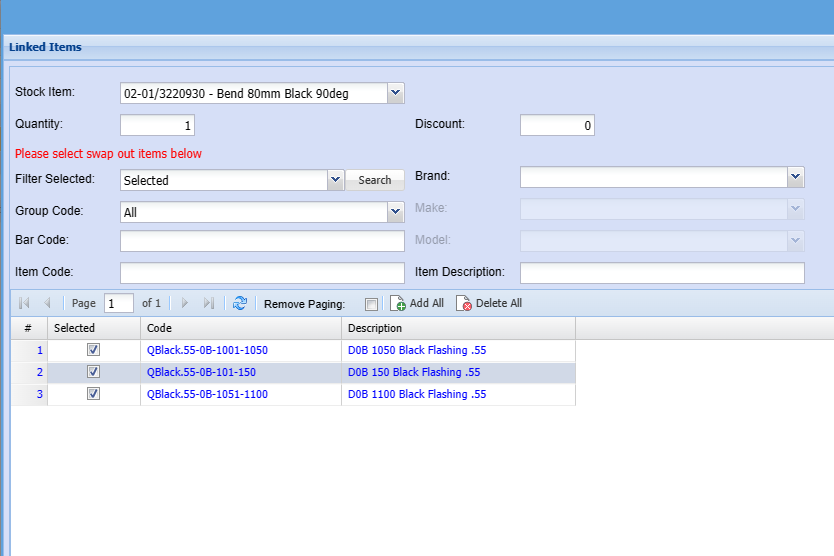
Affected Items Tab
Select a list of Affected Items

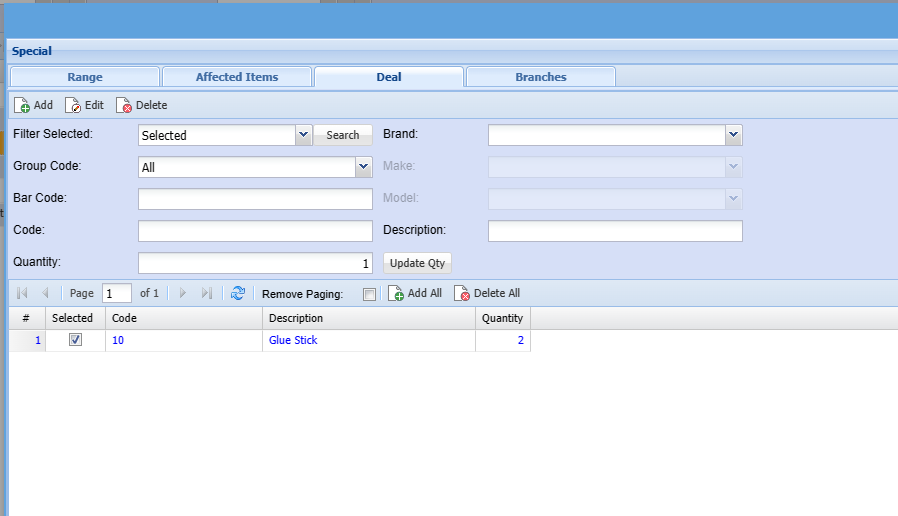
Deal Tab
Put in the items that are part of the deal
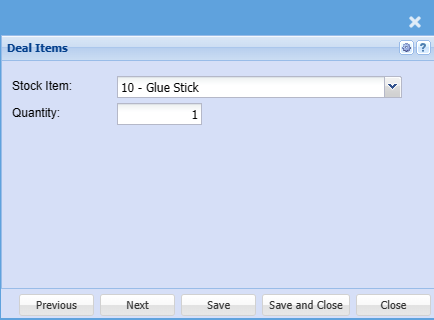
Deal Item
Set the quantity for the deal
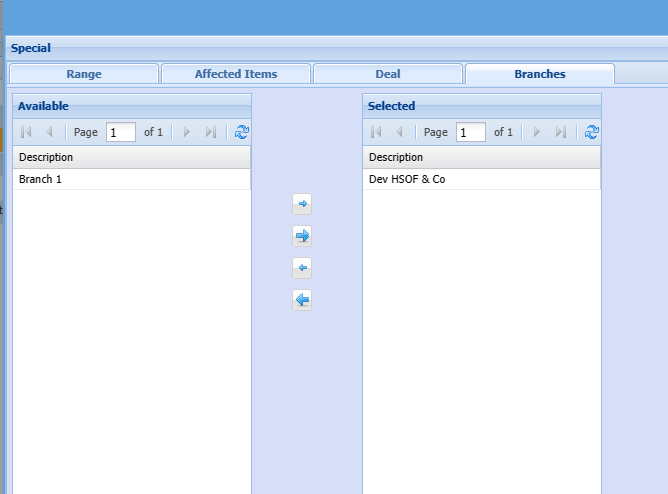
Branches Tab
Assign which branches can see this deal
Set Password
Set Password
Sales rep Commission (BDM)
Sales representative commission
Business development Manager (BDM)
Sales Rep Commission
System Configuration> General> Sales Rep Commission
Sales Rep Commissions are financial incentives that companies offer to their sales representatives based on the sales performance of the individual. Commissions are a common and effective way to motivate sales reps to achieve specific targets and contribute to the company's revenue goals.
The structure of sales commissions can vary widely and this is why it is important for both the company and the sales reps to have a clear understanding of how the commission plan works. This is why it is crucial to set sales rep commission.
Only Commission Groups are displayed for selection in the various drop downs throughout the program .e.g. Debtor Setup - Commission, Quotes, Sales Orders etc
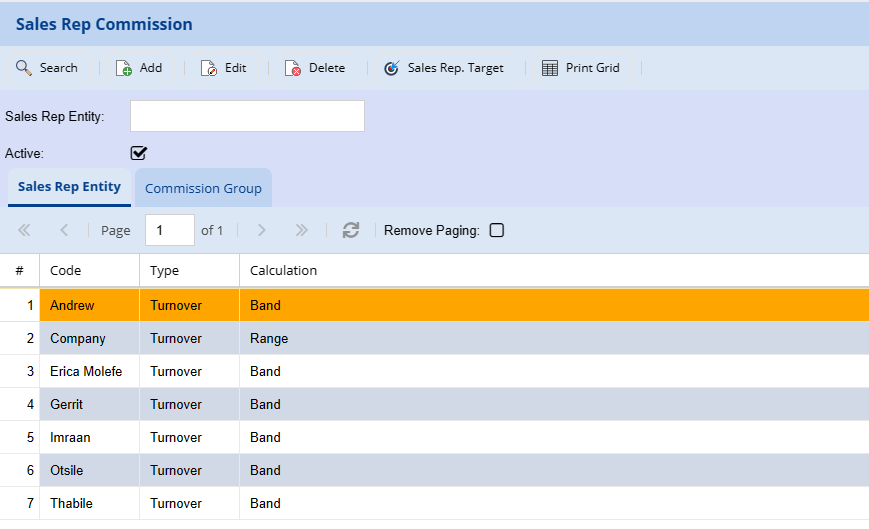
| Sales Rep Target | Sales Rep Targets are set up for key performance indicators |
| Sales Rep Entity | Shows the rep entities |
| Commission Group | Shows commission groups |
Sales Rep Target set-up video 2016 - Click here
Sales Rep Target
Sales rep targets, also known as sales targets or quotas, are specific, measurable goals set for sales representatives to achieve within a defined period.
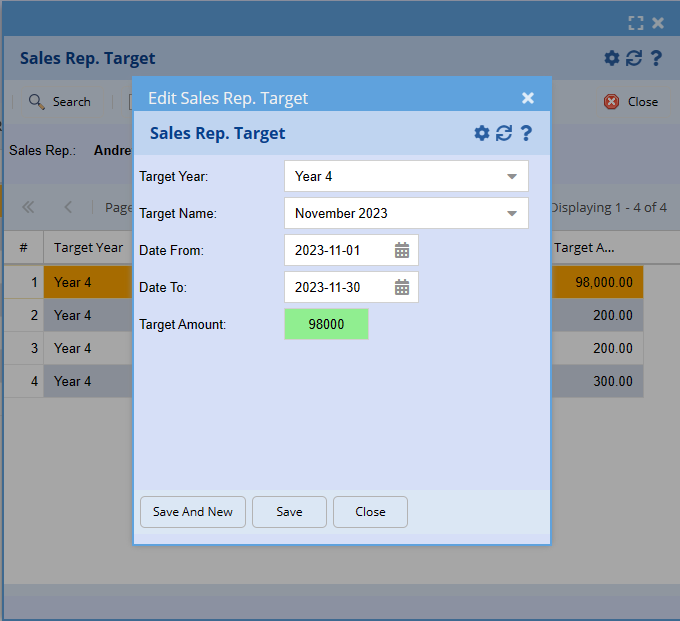
| Target Year | Add Target year |
| Target Name | Add target name |
| Date From | Enter start date |
| Date To | Enter end date |
| Target Amount | Enter target amount |
Sales Rep. Entity Tab
Each Sales Rep employed by the company or any entity that could earn commission as a result of sales must be created under sales Rep Entity
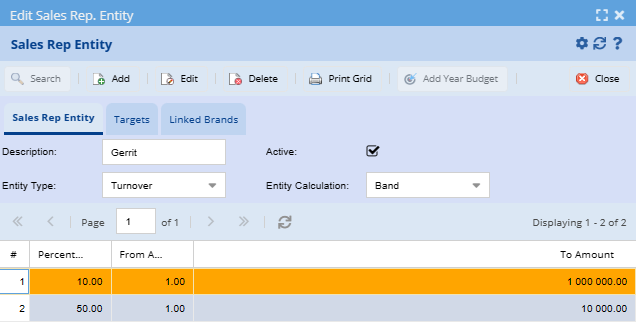
| Description | The sales rep’s name or the entity that would be executing the sales |
| Active | When the tick box has been ticked, the Sales Rep Code will appear on all Sales Rep drop down selections. If not ticked the Sale Rep Code will not be displayed |
| Entity Type | Select entity type on the drop down |
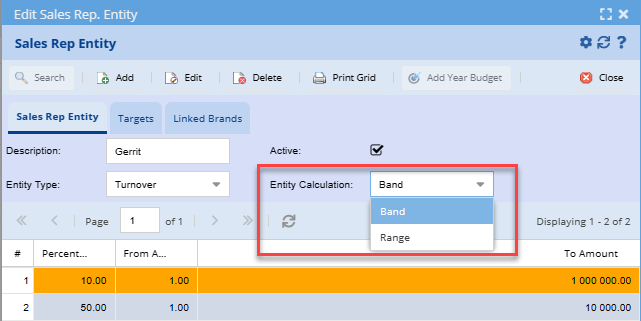
| Entity Calculation | Will the entity receive commission on a Sales Range or Sales Band, e.g. Range / Band |
Sales Rep Entity Values
This is where you set up commission values and percentage
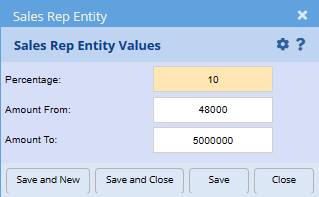
| Percentage | Add a percentage that a sales rep will receive if they reach their target amount |
| Amount From | Add the start amount that a sales rep should reach before earning a commission |
| Amount To | Add a to amount for sales rep commission |
Commission Group Tab
The Commission Group set consists of setting up either a Sales Rep as a group or creating a group that will receive a commission for sales.
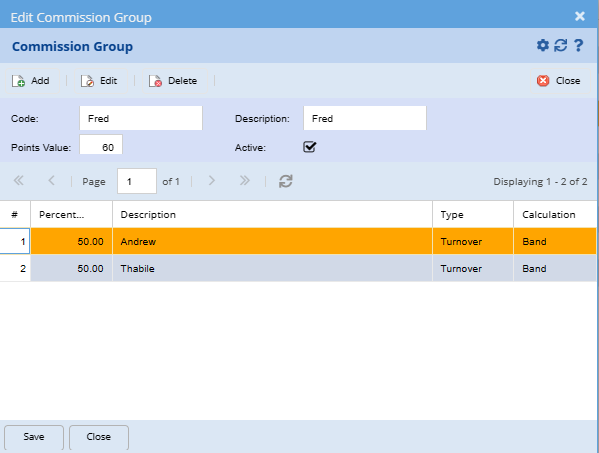
| Code | The code can be either a sales rep name or a name, code or word to identify a group that will be receiving commission |
| Description | Description of the name, code or word used in the Code. |
| Point Value | |
| Active | When the tick box has been ticked, the Sales Rep Code will appear on all Sales Rep drop down selections. If not ticked the Sale Rep Code will not be displayed |
| Grid | This indicates the target allocated to a sales rep |
Entity Calculations Explained
Select the Sales Rep. Entity from the dropdown options. The Sales Rep. Type and Calculation are available in the dropdown from the previous setup under Sales Rep. Entity.
Commission group
| Percentage | Code | Type | Calculation |
| 50 | James | Turnover | Range |
| 50 | Philip | Turnover | Range |
Turnover and Range
First Calculation: (Sales Rep entity)
Sales Rep, “James”, Sales Turnover 80,000.00 at 15% result Total Commission 12,000.00.
Second Calculation (Commission Group)
“James” receives 100% of the commission calculated in First Calculation, based on the “James” Commission Group result 12,000.00
“James” receives 50% of commission calculated in First Calculation, based on “James and Philip” Commission Group result 6,000.00
Turnover and Bands
First Calculation: (Sales Rep entity)
Sales Rep, “James”, Sales Turnover 80,000.00.
e.g. Bands
5% up to 25,000.00 = 1,250.00
10% up to 50,000.00 = 5,000.00
15% up to 75,000.00 = 9,000.00
15% up to 80,000.00 = 750.00
Total Commission 16,000.00
Second Calculation (Commission Group)
“James” receives 100% of the commission calculated in First Calculation, based on the “James” Commission Group result 16,000.00
“James” receives 50% of commission calculated in First Calculation, based on “James and Philip” Commission Group result 8,000.00
Profit and Range
This calculation is based on deducting Cost of Sales from the Turnover (Total Invoiced amount) e.g.
Sales Rep, “James”, Sales Turnover R80,000.00.
| Turnover | 80,000.00 |
| Cost of Sales | 65,000.00 |
| Profit | 15,000.00 |
First Calculation: (Sales Rep entity)
Sales Rep, “James”, Sales Turnover 15,000.00 at 15% result 2,250.00.
Second Calculation (Commission Group)
“James” receives 100% of the commission calculated in First Calculation., based on the “James” Commission Group result 2,250.00
“James” receives 50% of commission calculated in First Calculation. Based on “James and Philip” Commission Group result 1,125.00
Profit and Bands
Sales Rep, “James”, Sales Turnover 80,000.00.
| Turnover | 80,000.00 |
| Cost of Sales | 65,000.00 |
| Profit | 15,000.00 |
5% up to 15,000.00 = 750.00
Total Commission 750.00
Second Calculation (Commission Group)
“James” receives 100% of the commission calculated in First Calculation., based on the “James” Commission Group result 750.00
“James” receives 50% of commission calculated in First Calculation. Based on “James and Philip” Commission Group result 375.00
Leave Allocation
Leave allocation
Leave Allocation
Video training manual 2016 - Click Here
System Configuration>General>Leave Allocation
.png)
.png)
Once Leave is created, Send Request Leave for Approval
.png)
Leave Calendar
Leave calendar
Leave Calendar
System Configuration> General> Leave Calendar
View calendar entries by Employee
Click on entry to edit
.png)
.png)
VAT / GST table
VAT / GST table
Tax - VAT / GST Table
Video training manual 2016 - Click Here
System Configuration> General> VAT / GST Tables
.png)
The reason for VAT tables is to make it easy when analyzing the VAT report.
Descriptions of the various VAT types can be edited to suit your wording preference and to make it
Easier for staff to identify which tables apply to respective documents.
| Search button | allows the user to search by Vat Code for a quick search, or just searching for everything with the fields empty by clicking on search button |
| Add button | allows you to create a new VAT Table. |
| Edit button | allows you to View or Edit the currently selected VAT Table. |
| Print Grid button | allows you the print the display grid |
VAT / GST Type Tables Manuals
The reason for VAT tables is to make it easy when analyzing the VAT report.
Descriptions of the various VAT types can be edited to suit your wording preference and to make it
easier for staff to identify which table apply to respective documents.
Go to System Configuration>General> VAT Tables
Click on VAT Tables and search
.png)
A list of added Vat Types will be displayed
.png)
Double click on the specific table you wish to amend
.png)
VAT Code: This is the code of the VAT type.
This can be edited.
VAT Description: You can click on this field to amend the description to suit your
personal preference.
Percentage: This is the VAT percentage applicable in South Africa. If you are in another
country, you need to change this percentage to that which applies in that country.
Tick the respective boxes that you wish this VAT type to appear on.
In the case above General Journal
Debtors Journal Transaction and Invoice.
VAT Types - Upon the processing of documents, where vat is required, the drop-down menu will show the relevant VAT Type options.
When a block is ticked, the associated VAT table option will be displayed on the drop-down menu of the Vat Type field when processing the respective documents.
If you do not want this VAT table to be an option on the drop-down, un-tick the block and the VAT option will not be displayed when processing the document.
In this way the ticks can be effectively used to avoid staff from unknowingly choosing the incorrect VAT type when processing a specific document or transaction, thereby eliminating confusion on the VAT report.
| INV VAT | Used for debtors (Customer) invoices |
| DISC VAT | Debtors: Used on discounts to Debtors |
| CRD VAT | Used for credit notes to your customers |
| GRV VAT | Used for purchase orders from your suppliers |
| CASHBOOK VAT | Used when processing cashbook transactions, e.g. Rent |
| RTS VAT | Used for returns to supplier |
| Capital VAT | Used for Capital expenditure |
| No VAT | Used when processing a no VAT Transaction |
| EXP VAT | Used when processing VAT Exempt transaction |
| DIS VAT | Creditors: Used on discounts to creditors |
| IMPORT | Used when importing Goods |
| Add | Allows you to create a new VAT Table. |
| Amend | Allows you to View or Edit the currently selected VAT Table. |
VAT / GST Summary Report
There is a new category on the VAT / GST Tables to assign various categories to the VAT / GST types.
This is to eliminate manual excel spreadsheets where we need to sum up the sales and purchases.
So when we submit to Tax Office, they want sales and purchase totals
When adding the text to the grid
Don’t show if it is set to none
| 1 | Sales in Blue |
| 2 | Purchases in Red |
System Configuration> General> VAT/GST > Edit
.png)
Reports
.png)
Tick box to select Show summary calculations
.png)
Report output
.png)
VAT Rate Change Procedure
NOTE: This option is ONLY for South African companies and can only be run from the 01 May 2025
In the event that the VAT rate changes, one will need to update the system to the new VAT rate.
The VAT rate changes will affect the following entries:
- Any open debtor transactions (Invoices, Credit Notes, Sales Orders, Quotes, Journals)
- Any open creditors transactions (Purchase Orders, Goods Received Notes-GRVs, Stock return notes, Journals)
- Open Cashbooks
- Open Expenses
- Open General ledger journals
- Recurring transactions
Posted transactions will not be affected by these utilities.
The process to change the VAT rate is as follows:
- Ascertain the effective date of the rate change
- Take a system Backup
- On the effective date of the VAT rate change, run the VAT Utilities
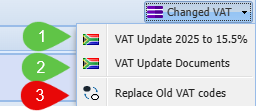
The following utilities need to be run:
Option 1 and Option 2 are mandatory
Option 3 is optional
1. Effective date of the new VAT rate:
This will typically be published in the media. let's use the date is 1 May 2025 as an example.
Preferably any transactions as of this date need to be finalised and process. Alternatively, transactions that are not processed, but should still have the old rate applicable, will then have to be changed back to the current (initial) VAT rate using the utility.
2. System Back Up
Go To: System configuration>Administration>Backups
Click Create
Edit the file name if necessary. Do not change the file path.
Click Save
Allow a few minutes for the backup to complete
3. Run VAT Utilities
3.1 First Utility - VAT Update 2025 to 15.5%
Important: This step can only be done on the effective date of the new rate. Running this utility before the effective date will update all open transactions to the new rate.
Go to: System configuration>General>VAT Tables
Click the Changed VAT drop down arrow
Select the first Utility: VAT Update 2025 to 15.5%
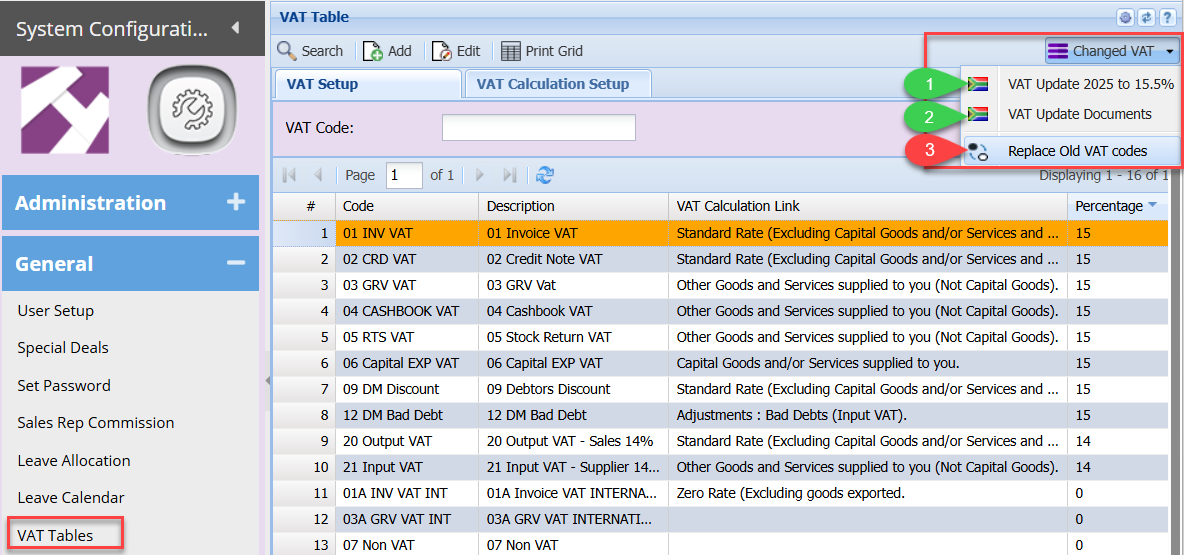
Click OK
Search
Note:
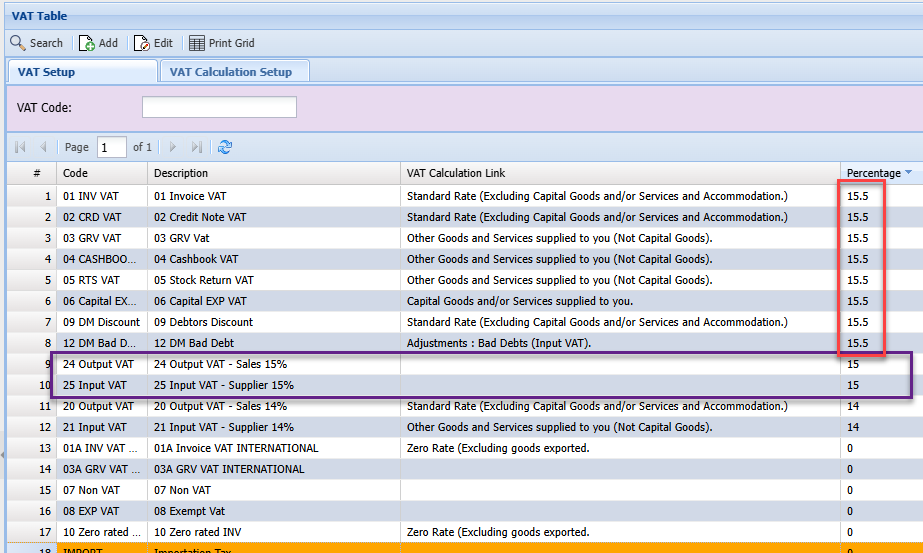
- All the VAT rates on the existing VAT Types have been updated to 15.5%
- Existing VAT types with 0% VAT rate will not be affected
- Two new VAT types have been created with the 15% rate:
| Output VAT - Sales 15% | This VAT Type will be used for any Debtor / Sales transactions that the 15% VAT rate should apply to. |
| Input VAT - Supplier 15% | This VAT Type will be used for any Creditors transactions, GRVs, RTS & expenses that the 15% VAT rate should be applied to |
Essentially, these 2 new VAT types will be used of any open transactions that are dated prior to 01 May 2025.
3.2. Second Utility - VAT Update Documents
Select VAT Update Documents from the above drop down
Then click Run
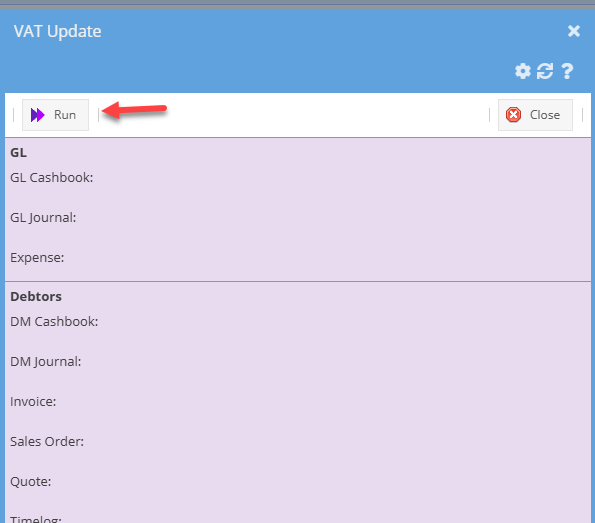
This utility will look for all open documents and update the VAT value displayed on the document and search grids.
This means that the user does not need to open and re-save each transaction manually to update the VAT values.
A 'Done" result will be returned as the respective document types are updated
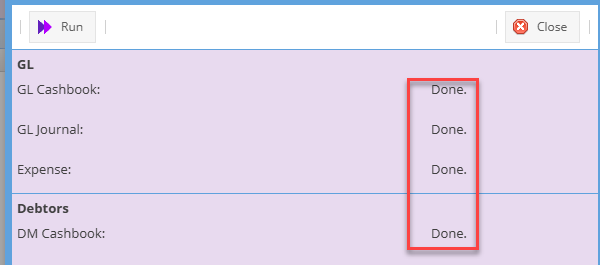
When you then search any document in preparation, you will notice the VAT value is updated to the new VAT rate.
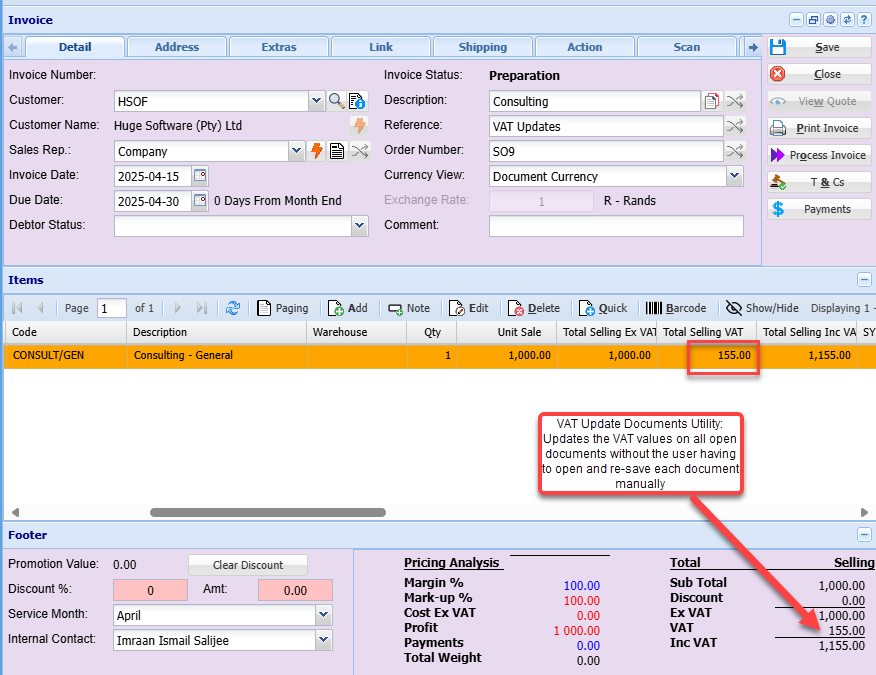
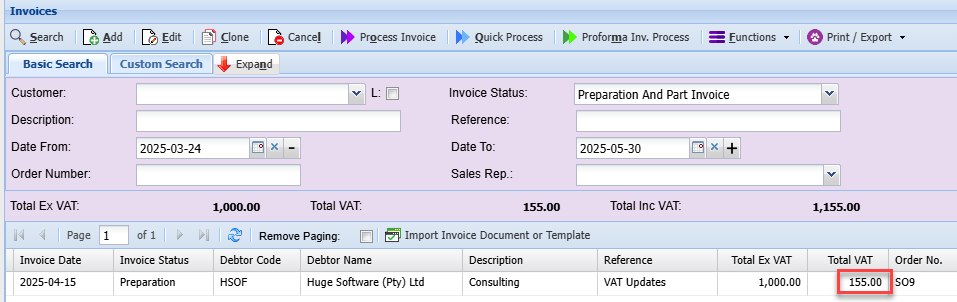
This Utility will also update the VAT value on any created recurring transactions that have been setup for future months.
3.3. Third Utility - Replace Old VAT codes
Warning: Only run this utility if you want to change the Tax Type to old VAT rate on open documents
This utility is used to update any open transactions that may still be dated prior to 01 May 2025, and the old VAT rate (15%) should be applied.
Select Replace Old VAT codes from the change VAT drop down
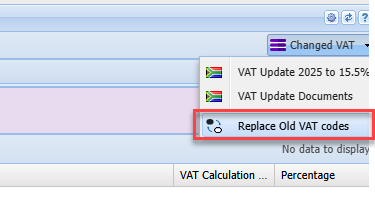
This utility needs to be run per transaction type
Example: If you wish to update all open Cashbooks dated before 01 May 2025 to the 15% rate:
Select Document type: GL Cashbook
Enter Old VAT Rate: 04 Cashbook VAT - (remember this was updated with the second utility above to the new 15.5% VAT rate)
Enter New Tax Type: Input VAT - Supplier 15%
Enter the end date: 2025-04-30 - this is the last day the initial 15% VAT rate is to be applied.
The utility will search for any open cashbooks entries that are dated on or before 30 April 2025 and update the VAT type to Input VAT - Suppliers 15%
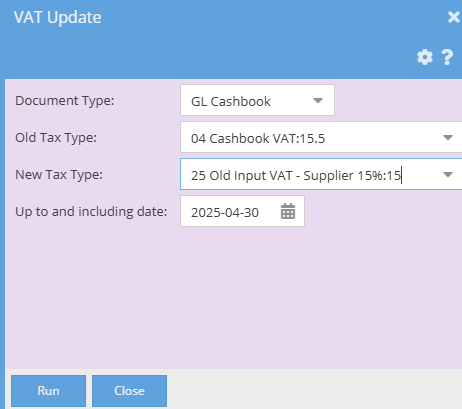
| Document Type | Select the required document type from the drop down |
| Old Tax Type | This is the Updated VAT type with the15.5% rate |
| New Tax Type |
Select the VAT Type to be applied. There would have been 2 new VAT types created with the first VAT Utility. 1. Output VAT - Sales 15%: use for Debtors/ Sales documents 2. Input VAT - Supplier 15%: use for Creditors / Purchase Documents & Cashbook entries |
| Up to and Including date | This is the last date that the current or old VAT rate will apply; in this case 30 April 2025 |
Click Run
This will then find any open documents for the respective document type selected, dated on or before the 30 April 2025, example Cashbook and change the VAT Type and the VAT rate to the15% rate.
Repeat this step for all the other document types that you may have open documents for that the 'old" 15% rate should be applied to
Projects
Projects
Project Setup
Video training manual 2016 - Click Here
System Configuration> General> Projects Setup
.png)
Projects are different from job costing.
Where job costing relates to costs per job, a project can have multiple job costings allocated to it.
Projects are situated throughout the system and produce a Project Profit and Loss similar to an income statement.
In this section, you will first setup the Project Lines.
A Project Line is defined as the actual project name. Then you will setup a Project Group.
For each Project Line that is setup, you should setup a Project Group.
.png)
NOTE: Only Project Groups are shown in all the document assignments and not the Project Lines.
Project Lines Tab
| Code | Allows the user to search by the project’s code. |
| Description | Allows the user to search by the project’s description. |
| Active | Search for Active or Inactive Projects |
| Search | Searches for Project Lines that matches the criteria entered in the Code, Description and Active fields. |
| Edit | Opens the edit screen where the user will be allowed to edit the selected project line. |
| Print Grid | Print the Current Grid |
| View Details | Not Available for Project Lines |
Project Groups Tab
Note: If a project line is being used in a Project Group, it will be marked as inactive and not be deleted.
| Code | Allows the user to search by the project’s code. |
| Description | Allows the user to search by the project’s description. |
| Active | Search for Active or Inactive Projects |
| Search | Searches for Project Groups that matches the criteria entered in the Code, Description and Active or inactive fields. |
| Edit | Opens the edit screen where the user will be allowed to edit the selected project Group. |
| Print Grid | Print the Current Grid as well as the project lines associated with the groups |
| View Details | View the project’s related documents such a Quote, Invoice, etc. |
Project reports
There are multiple ways to get information on the detail of projects
There are two ways to get your information
|
Report on project profit and loss |
Transactions report |
|
1. Detailed |
|
|
2. Summary |
Run the Report for Project profit and loss
Leave the tick off for summary, tick on for detail

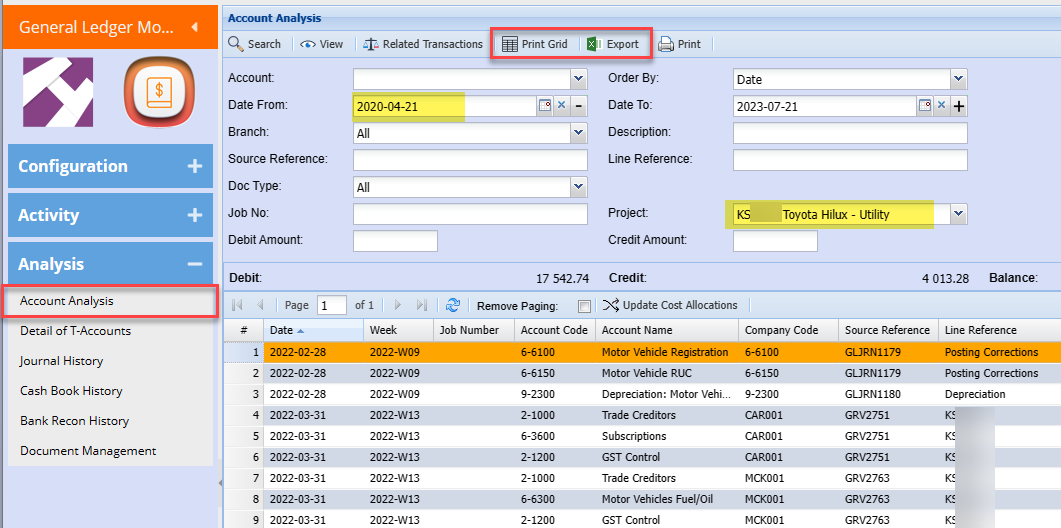
Project details in GL account analysis
Go to GL account analysis, take your date back
Select the project you want to run
Pricing Levels
Pricing Levels
Pricing Levels
Video training manual 2016 - Click Here
System Configuration> General> Pricing Levels
This is where multiple types of pricing levels for customers are created.
.png)
All that is required is to set up the code and description of the new pricing structure.
.png)
This form is used to create pricing levels.
| Code | Enter a code for the pricing structure |
| Description | Enter a pricing structure description |
Standard Tab
| Branch button | shows the branch for the currently selected Pricing Level. |
.png)
Under inventory setup, the pricing structures are then setup per item giving unlimited pricing matrix
.png)
| Search button | Search for loaded Pricing Levels; if the Code field is blank the search will return all Pricing Levels |
| Add button | Add a new Pricing Level. |
| Edit button | View/edit the currently selected Pricing Level. |
| Print Grid button | User able to print all Pricing Levels on the display grid |
Pricing level update for currency bulk
Added in the new pricing level for a currency.
Currently it is on a one at a time basis.
This is a problem, need to do it in bulk
The pricing level update will be based on the search criteria.
.png)
.png)
.png)
This is the window that comes up
Rules:
| 1. First rule here is to add in a pricing level against the item | 2. Selling price work out | 3. Force override means that if the item already has a multicurrency pricing level |
| a. If the pricing level for that price structure does not exist, add it | a. Because this is a multicurrency, we need to first work out the cost price of the item and convert it to currency | a. With tick override sell price |
| b. Then add in the pricing level currency | b. Then divide by the exchange rate and then multiple up by the percentage to get the sell value | b. Without tick do nothing with item |
.png)
.png)
Terms and Conditions
Terms and Conditions
Terms And Conditions Setup
Video Training Manual 2016 - Click Here
System Configuration> General> Terms and Conditions
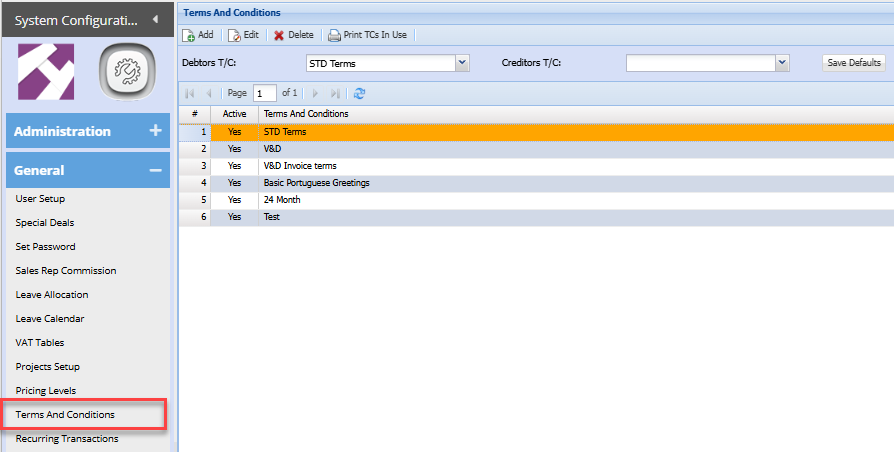
General arrangements that form part of an agreement or contract
| Add button | Add new Terms and Conditions |
| Edit button | View or edit an already added Terms and Conditions |
| Delete button | Delete the currently selected Terms and Conditions |
| Print TC's in Use |
This will give you a history of Terms and conditions that have been used in the past It will give you a list indicating document number, date and debtors code and name |
Add Terms and Conditions
To add new terms and conditions click add
The screen below will display
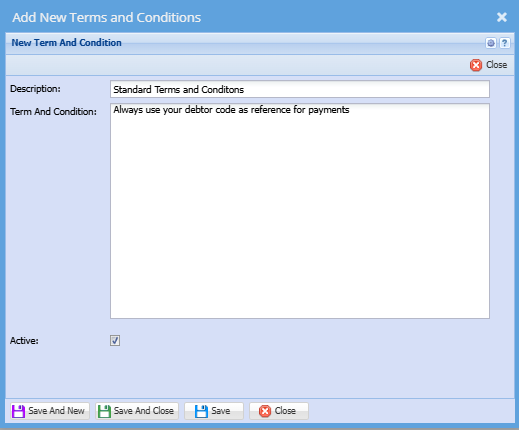
| Description | Enter a description for your terms and conditions |
| Term And Condition |
Enter the actual terms and conditions You can add as many as you wish based on your company's terms and conditions |
| Active |
Put a tick on if the terms and conditions should be in use Put the tick off if the terms and conditions must not be in use |
Once you are done click Save and New if creating multiple terms and conditions or click save and close if just creating one terms and conditions.
Once completed the terms and conditions will display as shown below:
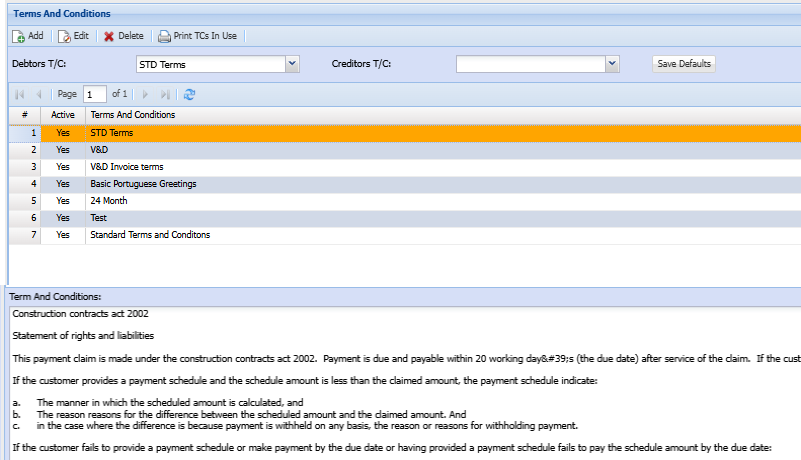
You can also select terms to be used as a default on debtors/customers' documents and creditors/suppliers' documents documents
Select the Debtor/ Customer and Creditor/ Supplier T/C drop down
Then click save as default

Recurring Transactions
Recurring Transactions
Recurring Transactions Search
Video training manual 2016 - Click Here
Go to system configuration > general menu group > recurring transactions.
.png)
Enter a Recurring Transaction Coder, Description, Status, In Use Criteria or Active status to initiate the search.
As in the case with all WebAccounting searches the code and description can left empty.
| In Use Status | When a Recurring Transaction Setup is used to generate a range of invoices then the In Use indicator flag is set to true. Therefor by selecting In Use for the search will result in all Recurring Transaction Setups that are in use being returned. |
| Active | Searching for Active or Inactive Recurring Transaction Setups |
| Add | Insert a new Recurring Transaction Setup |
| Edit | View/Edit the currently selected Recurring Transaction Setup |
| Delete | Only Recurring Transaction Setups that are not In Use can be deleted. Deletes the currently selected Recurring Transaction Setup |
| Cancel | In the event of cancelling a Recurring Transaction Setup firstly a Reason has to be entered to continue and secondly All Transactions that have been generated that have not been processed/posted will be deleted. Cancel the currently selected Recurring Transaction Setup. |
| Print Grid | A report of all records resulting from a search will be printed in a grid format. i.e. the same search criteria applies to the Print Grid. |
| Change Status | Clicking on this button open a window that will allow you to change the Invoice status from Recurring Transaction to Preparation for a specifically selected date. |
Only invoices with the status Preparation can be processed.
Recurring invoices Setup
Go to system configuration > general menu group > recurring transactions
In this area you are going to be setting up the contract terms, which means you'll define which period the recurring is going to be running, example for a 12-month cycle and at which day you're going to be running the recurring
Enter code and put a description and a define when you want the recurring to run.
I suggest setting up a yearly recurring contracts for 12 months. so that would be one for 2019 and another one for 2020. The reason behind this is that you cannot use the same contract for the same customer.
.png)
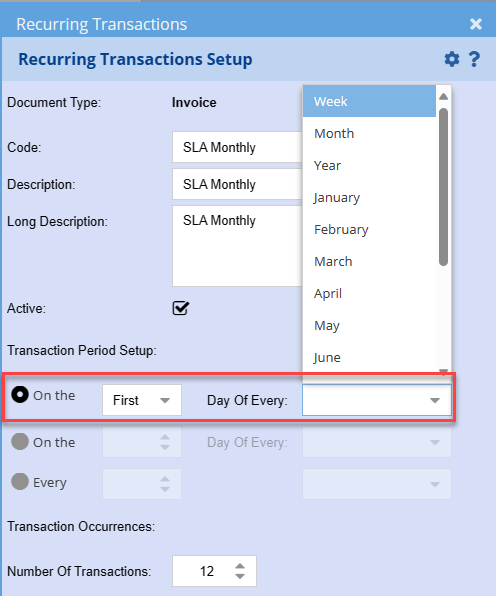
Transaction Period setup
On the First or Last Day of each period entity e.g. Week, Month, Year etc.
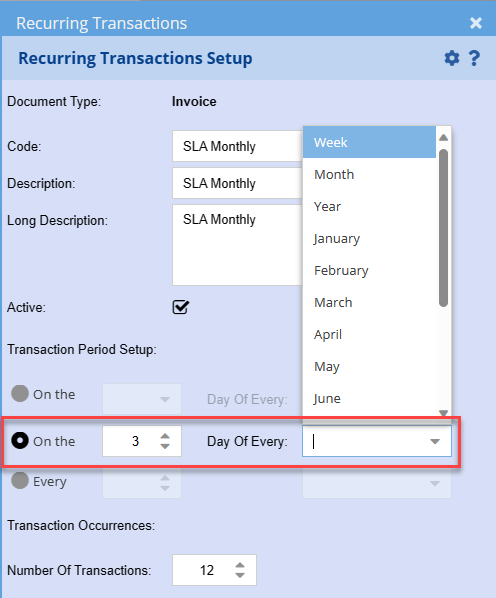
On the 3rd Day of every period entity e.g. Week, Month, Year etc.
Monday is day 1.
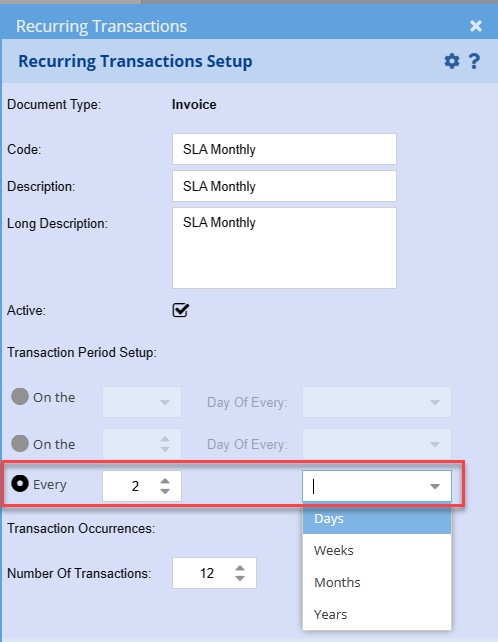
Every 2nd Day, Every 2nd Week (Monday), Every 2nd Month – 1st day of the Month
and Every 2nd Year – 1st day of the Year
Memo Button

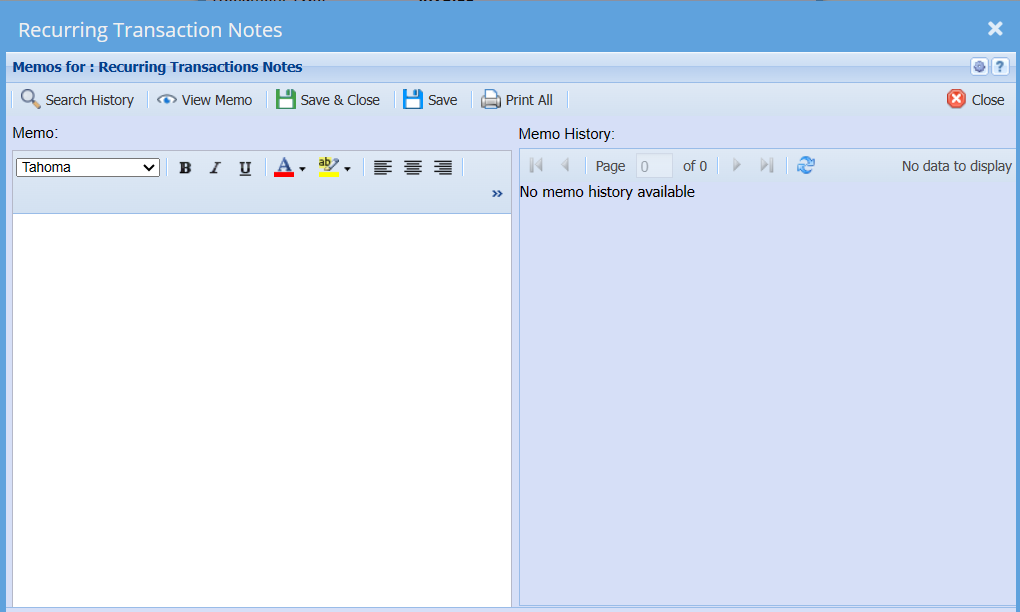
| Search History | |
| View Memo | |
| Print All |
Recurring Invoices Security
Video training manual 2016 - Click Here
Debtors Recurring invoices on hold status to change to cancelled
Rules in on Recurring invoices regarding on hold status.
If a client is on hold when the recurring is changing the status of the debtors invoice from recurring to preparation.
The recurring invoice needs to be changed to cancelled and an email is sent to the user that these accounts were changed to cancelled because they were put on hold.
If the user needs to reinstate that recurring, there is new functionality to reinstate the invoice.
Email to User
Customer Code - Customer Name - Date - Invoice Description - Amount - On Hold and status changed to cancelled
.png)
Recurring Invoice update future invoices
Customer / Debtors Module> Activity> Invoices
There are a number of places to update the changes, here is one place to change
One will still have to change each recurring invoice, however you can then update all future invoices with ease
Go to Customers invoice
Select the Invoice status to be recurring transactions
Change your date to the end of the month
To make your search have better results, you can put in a key word in the description or reference
Click on search to find all recurring invoices that will be processed on the 25th April
.png)
Open up the invoice
| 1 | Make the relevant changes to the line descriptions |
| 2 | Click on Update Recurring |
| 3 | Click on Lines – this will update all future recurring invoices |
| 4 | Close invoice and then open next one |
If you have changed any description on the header, you can use Header button or Both to change Header and Lines of the future invoices.
This change looks at the current recurring invoice and then allows you to change future ones
Item codes can be changed at inventory setup and will update all documents active.
However descriptions will not, as each one is saved on the document and can be different
.png)
Invoice Status
Recurring Documents
Customer invoices creating contracts against customers and then automatically generate future invoices.
These invoices can either be automatically invoiced, processed and then emailed off to the customer, a report will then be sent to you showing you what was sent off.
This will also show you where contracts are coming to an end.
.png)
Weather Forecast
Weather Forecast
Weather Forecast setup Region
Setting up your Region
Add in a region
Ensure one of the regions is a default
When entering the Weather Code link, ensure that you enter the region and Country
| Region | You can spell out the word Christchurch or CHC |
Separate with a comma
| Country | Enter the short name or long name e.g. NZ or New Zealand |
.png)
Manually Call the API to update weather for two week ahead
.png)
Forecast Log
The forecast log will update and keep the information on weather.
Future dates will be overriden by the forecast api
.png)
Region weather link
Link the weather to the region in customer / debtors setup
This helps identify the weather that a user is setup in.
Helps identify a customer in that region weather.
.png)
Job Scheduling
Job Scheduling Weather link
The job scheduling will show the weather icon or weather colour
.png)
User Themes
The system caters for two types of themes per user.
System is upgrading to latest forms.
- Classic View
- Triton

Classic View
Classic View is a smaller font and condensed view
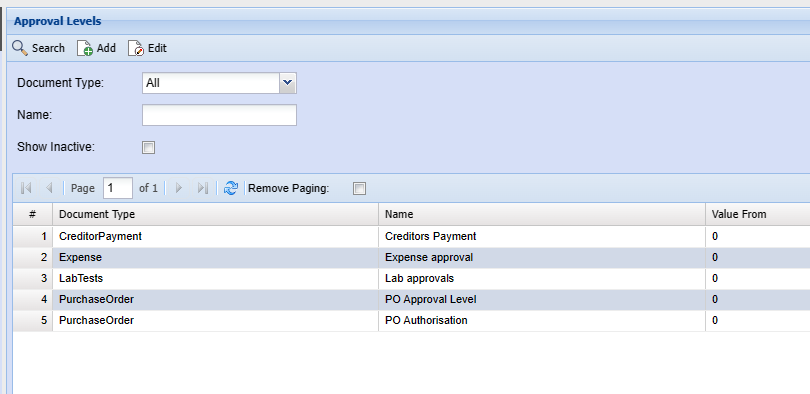
Below is an example of classic view
Triton View
This view is larger and more modern view of windows
Grids are bigger, general overview is bigger