BJC Activity
- Job Costing Overview
- Job Costing Quotes
- Creating a New Quote
- Promoting Quote to a Job
- Manage Quantity on Job
- Quote Tabs Explained
- Quote Statuses
- Quote - Exclude from Reports
- Job Costing Quote Detail Report
- Manage Job
- Managing a Job
- Job Search Screen Explained
- Manage Job Line Edit and reassign
- Unmanage All Job Lines
- Manage Job Functions Tab Explained - Detailed
- Job Costing Screens Defined
- Job Bill of Materials Process (BOM)
- File Upload & Import Process
- Job Management Letter/Note Template
- Closing or Cancel Job
- Reopening a Job
- Manage Job Statuses
- Print Job Card
- Changing the Warehouse on Job Lines
- Change customer on Job
- Reassign Job and Editing of the Cost Price
- Create Reminder
- Sub Job Link
- Job Expense Cashbook
- Job Costing Sell Value
- Job Expense Supplier Journal
- Stock Recovered Costs
- Job Costing stock write off and Gain and Loss balance
- Take On Values for Job
- Creating a New Job
- Planned Time Log Schedule
- Job Schedule Activity
- GRV To Job
- Time Tracker Export
- Job Total Analysis
- Time Logs to Jobs
- Bookins
- Picking Slip
- Job Delivery Note
- Job Invoice
- Job Costing Invoicing
- Invoice Value Summary
- Job Costing Percentage Invoice
- Job Lines clear "To be invoiced" flag
- Job Collect / Delivery
- Job Costing Case Studies
Job Costing Overview
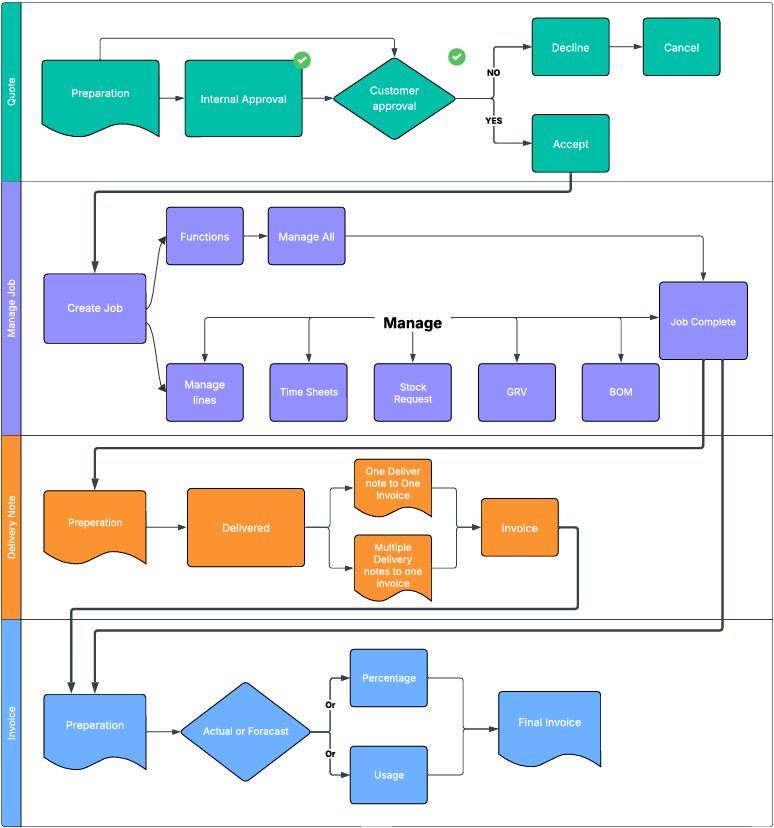
Job Costing Flow Diagram
Job Costing Overview
Quote
Every job begins with a Quote, which provides the estimated cost of the work and serves as the basis for customer approval. Once approved, the quote can be promoted to a Managed Job—the central stage where production activities are tracked, coordinated, and monitored.
From there, you have two workflow options:
- Option 1: Proceed to a Delivery Note if items need to be dispatched, followed by an Invoice.
- Option 2: Go directly from Managed Job to Invoice if no delivery documentation is required.
Alternatively, you can initiate a job directly from the Managed Job stage. In this case, the system will automatically generate a corresponding quote, ensuring every job remains linked to a quote—regardless of where it begins.
Invoicing can be structured in two primary formats: percentage-based or usage-based. Each format can be further refined into actual or forecasted (predicted) invoicing. Multiple invoices can be issued under either approach, depending on project needs or billing cycles.
Manage Job
The Managed Job stage is the operational heart of your workflow—where production activities are created, tracked, and coordinated. You can initiate a job directly from this stage, and the system will automatically generate a corresponding Quote, ensuring every job remains linked to a quote regardless of where it begins. This maintains traceability and financial alignment across all job types.
Once a job is created, you have two management options:
- Manage All Lines as a Single Function:
This approach is ideal for smaller jobs with limited complexity. It allows you to control all job components in one place, streamlining updates and reducing overhead. However, caution is advised for larger jobs, as this method can obscure individual line-level visibility and make it harder to track progress or isolate issues. - Manage Job Line by Line:
Recommended for larger or multi-phase jobs, this method gives you more control over each line item. You can monitor progress, allocate resources, and adjust timelines independently, ensuring better oversight and flexibility throughout the job lifecycle.
Within the Managed Job stage, you can also access and update key operational modules:
- Time Sheets: Record labour hours and assign them to specific job lines or phases. This supports accurate cost tracking and resource planning.
- Stock Requests: Generate requests for items not currently in stock. These requests trigger procurement workflows to ensure materials are available when needed.
- GRV (Goods Received Voucher): Use GRVs to document partial dispatches, especially useful when some items are ready for delivery while others remain in production.
- BOM (Bill of Materials): Manage and update BOMs to reflect the materials required for each job line. This ensures production teams have clear visibility into what’s needed and when.
Together, these tools provide a robust framework for managing jobs of any size, supporting both operational efficiency and financial accuracy
Delivery Note
Once a job, or part of a job is complete and ready for dispatch, a Delivery Note can be prepared to document the items being sent. This note serves as the formal record of what’s leaving your premises and when.
You can choose between two dispatch-to-invoice workflows:
- One Delivery Note to One Invoice: Ideal for single shipments or straightforward billing.
- Multiple Delivery Notes to One Invoice: Useful for staged deliveries that are consolidated into a single invoice for streamlined billing.
This flexibility ensures your dispatch and invoicing processes stay aligned with the pace and structure of the job.
Invoice
Invoicing can be structured in two primary formats: percentage-based or usage-based. Each format can be further refined into actual or forecasted (predicted) invoicing. Multiple invoices can be issued under either approach, depending on project needs or billing cycles.
Invoicing can be structured around two distinct approaches. Forecasted and Actual, each with its own implications for cost control and client expectations.
- Forecasted Invoicing - Forecasted invoicing is based on the original quote accepted by the client. This quote sets a fixed financial boundary for the job. Any costs incurred beyond the quoted amount are absorbed by the company, as the client has agreed to the scope and price upfront. This model is ideal for projects with clearly defined deliverables and minimal expected variation.
- Usage/Actual Invoicing - Actual invoicing reflects the real costs incurred during the job. It’s typically used for charge-up jobs, where billing is based on time, materials, or usage. If costs exceed the original quote, this is treated as scope creep, usually due to client-driven changes or additions. These adjustments are communicated and invoiced accordingly.
- Invoices reflect real item costs, similar to a traditional invoice format.
- You can compare quoted item costs and selling prices against actuals and invoiced amounts.
- This model is ideal for jobs with variable scope or evolving material requirements.
- Percentage-Based Invoicing - Percentage invoicing allows you to bill progressively over the life of a job. It’s especially useful for long-term or multi-phase projects.
- You can issue an invoice before the job starts, based on an agreed percentage.
- Costs are tracked against the quote, allowing you to compare estimated vs actuals.
- This approach helps maintain monthly profit and loss consistency, supporting smoother financial reporting.
Job Costing Quotes
Creating a New Quote
Video training manual 2020 - Click Here
Video training manual 2016 - Click Here
Job Costing Module > Activity > New Quote
A job can be created from a Quote
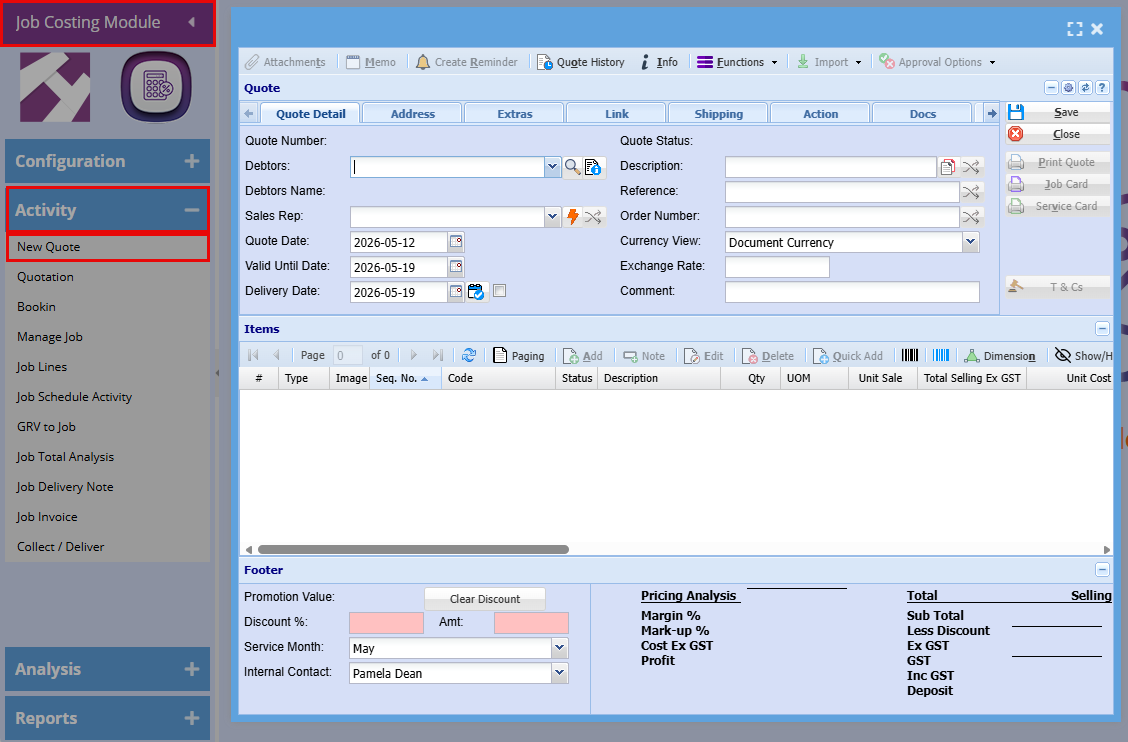
Quote Details Tab
| Quote Number | Quote number will populate when the Quote is saved |
|
Debtors |
Search and select the appropriate Account (company) or Contact (individual) from the list.
|
| Debtors Name | Debtors Name will populate when the Quote is saved |
| Sales Rep | Select a Sales if required |
| Quote Date | Select Date |
| Valid Until Date |
Select the date until which the quote is valid. |
| Delivery Date |
Select he date when the goods or services are expected to be delivered to the customer.
|
| Quote Status |
Automatically updates as the quote progresses through the approval process.
|
| Description |
A free-text field used to clearly identify the quote.
|
| Reference |
A customer-provided identifier used to track or link the quote
|
| Order Number |
A customer-provided number used to identify and track the order
|
| Currency View |
Displays the system’s default currency, with the option to switch between currencies if multi-currency is enabled.
|
| Exchange Rate |
The rate used to convert amounts from one currency to another
|
| Comments |
A free-text field used to add notes or additional information about the quote
|
Address tab
| Address Type |
The default address is automatically selected, but you can change it for the current quote if needed.
|
| Contact Person |
The default contact is automatically selected, but you can change it for this quote. To edit the contact’s details, click the view button.
|
|
Project |
Select the relevant project associated with the quote, if applicable.
|
| Division |
The default division is automatically selected, but you can change the customer’s division within the company if needed.
|
| Region |
The default region is automatically selected, but you can change the customer’s region if needed.
|
| Invoice Group |
Select the customer’s invoice group.
|
Extras tab
| Completion Date |
The date when the job is expected to be completed.
|
| Job No. |
Assign a job number to the quote in advance.
|
| Attach Spec To Email |
Allows you to include the specification document when sending the quote via email.
|
| Print Custom Fields |
Includes custom fields in the printed quote (see Custom Fields tab).
|
| Please select the stock type |
Select the type of stock for the item.
|
| Markup % |
The percentage added to the cost price to determine the selling price.
|
| Text field |
A free-text field used to enter additional details or information.
|
| Set Markup % Button | Allows the user to change the mark-up on selected stock type lines. |
| Remove lines button |
Allows you to remove quote lines based on the selected stock type
|
| Zero Sell, Price |
Allows you to set the selling price of the selected stock type lines to zero.
|
| Long Description |
A detailed overview providing additional information about the quote.
|
| Custom Fields |
Allows you to add and manage additional fields on the quote as needed.
|
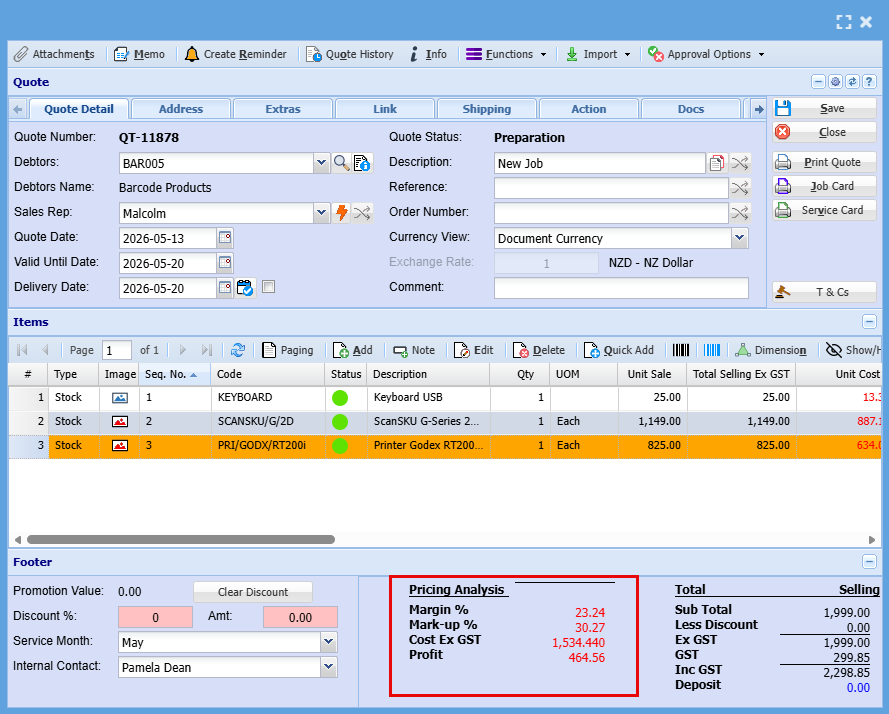
Overall Quote View
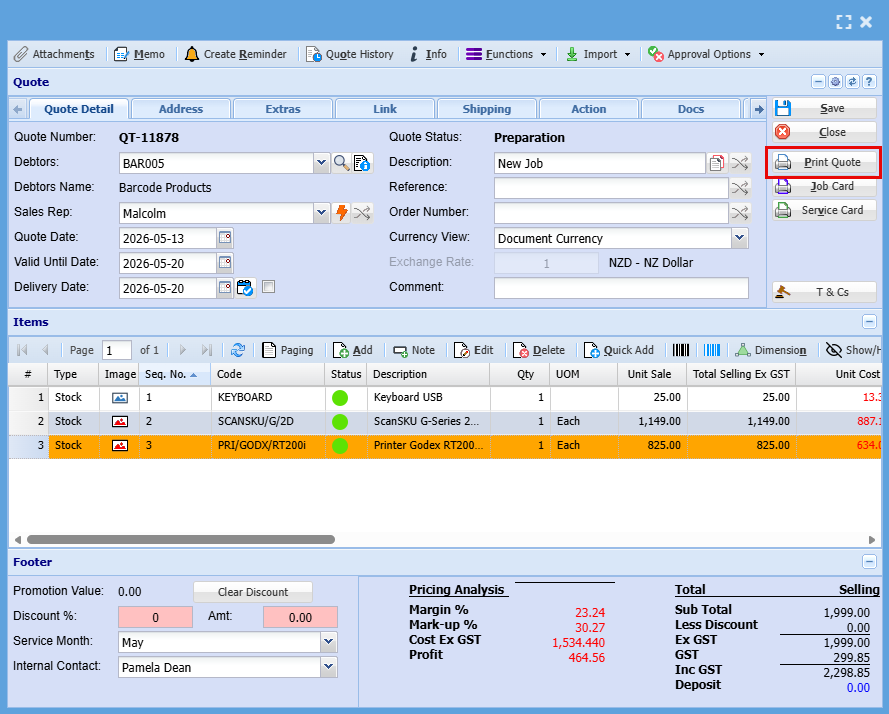
You will notice the bottom of the window the selling price, costs and profit that will be made on the job.
Printing and Emailing of Quote
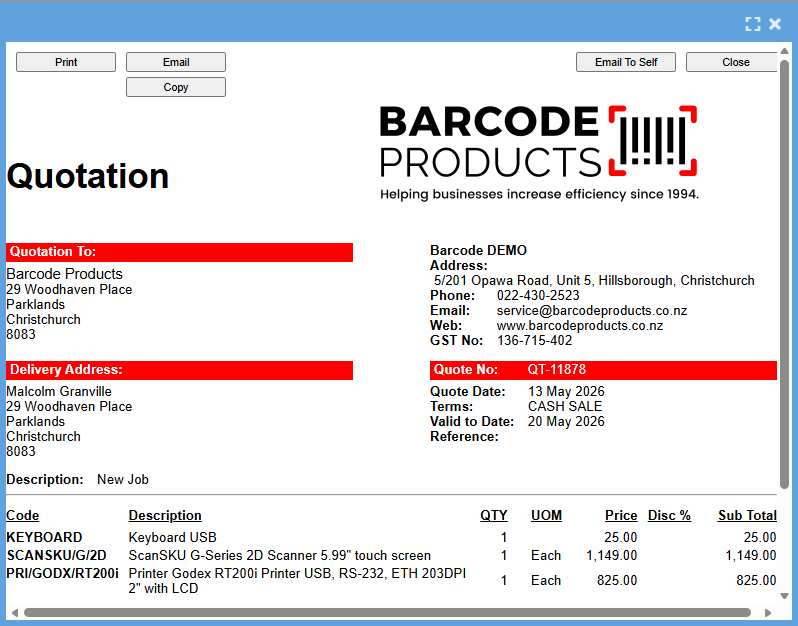
You can email the quote off to the client or print out.
- Click Print Quote
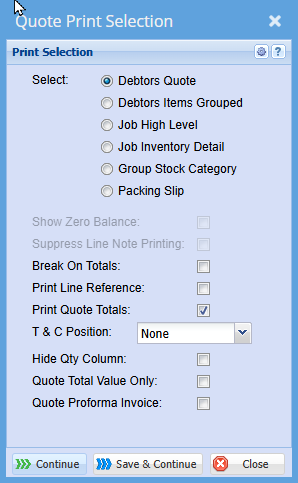
The below window will provide you with options on what you want your quote to look like.
Click "Continue"
Promoting Quote to a Job
Promoting Quote to a Job
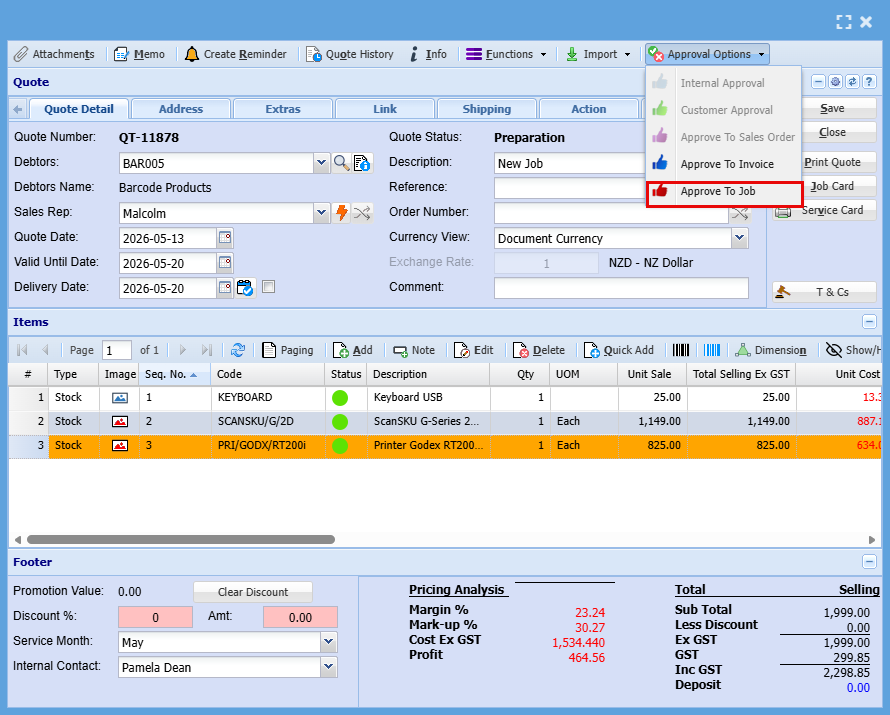
- Once a quote is accepted, it can be approved and converted into a job by clicking "Approval Options" and selecting "Approve to Job"
- Select the settings in the below screen for your Job
- Click "Continue"
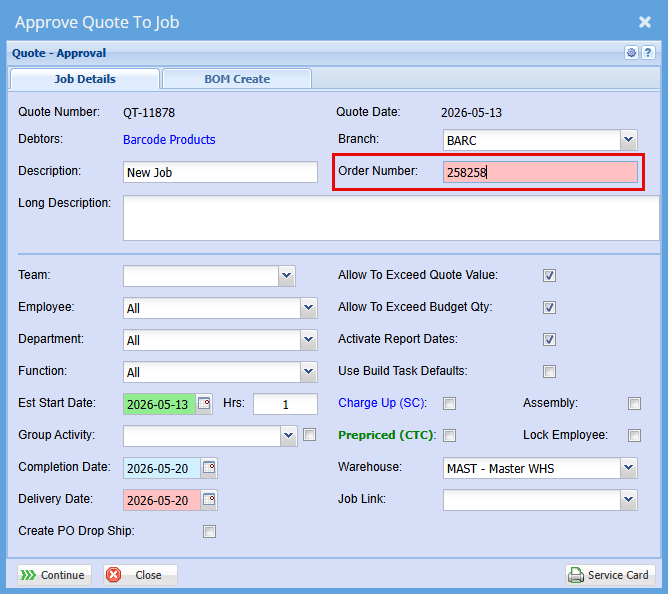
| Job Description |
A brief description to help identify the job.
|
| Order Number |
A unique reference number assigned to an order to help identify and track it. |
| Long Description |
A detailed explanation of an item, job, or order, providing more information beyond the short description. |
| Team |
Used to assign a specific team to a job when teams are set up.
|
| Employee |
Used to assign a specific employee to a job. |
| Department |
Used to assign or identify the department responsible for a job. |
| Function | |
| Est Start Date |
The planned or expected date a job is scheduled to begin. |
| Group Activity | |
| Completion Date |
The date a job is completed or expected to be finished. |
| Delivery Date |
The date when goods or work are scheduled to be delivered or completed. |
| Create PO Drop Ship |
Generates a purchase order for items to be shipped directly from the supplier to the customer. |
| Allow To Exceed Quote Value |
Permits the final job or order cost to go over the originally quoted amount. |
| Allow To Exceed budget Qty |
Permits the quantity used or ordered for a job to exceed the originally budgeted amount. |
| Active Report Dates |
The date range selected to define which records or data are included in a report. |
| Use build Task Defaults | |
| Charge Up (SC) |
Applies an additional charge to a job or item over and above the accepted quote amount. |
| Pre-priced (CTC) |
Indicates that the cost is fixed in advance, already included in the pricing, and cannot be exceeded without further approval.
|
| Assembly | |
| Lock Employee |
Prevents changes to the employee assigned to a job without the necessary permission or approval. |
| Warehouse |
Selects the warehouse location from which stock will be sourced for a job or order. |
| Job Link |
Used to link or associate one job with another related job. |
| Service Card |
Used to print a job card with the details required to complete a job. |
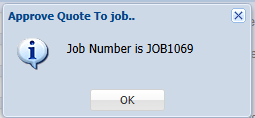
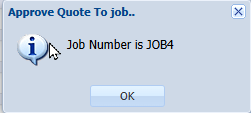
A unique number automatically assigned to identify and track a job.
- Click "OK"
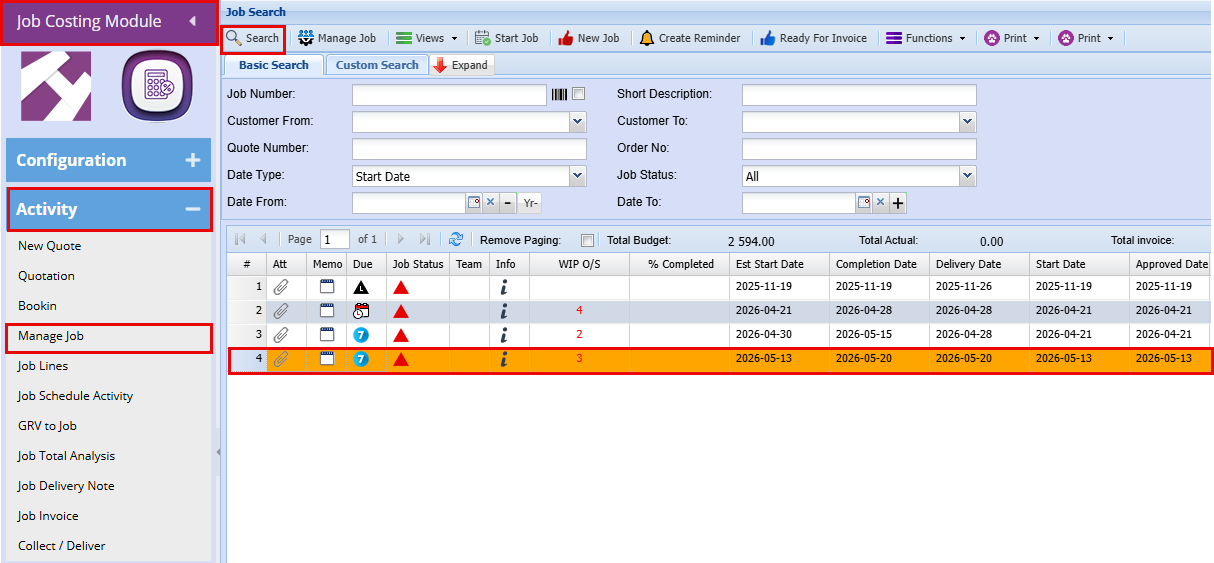
- To view your job click on "Manage Job"
Manage Quantity on Job
Manage Quantity on Job
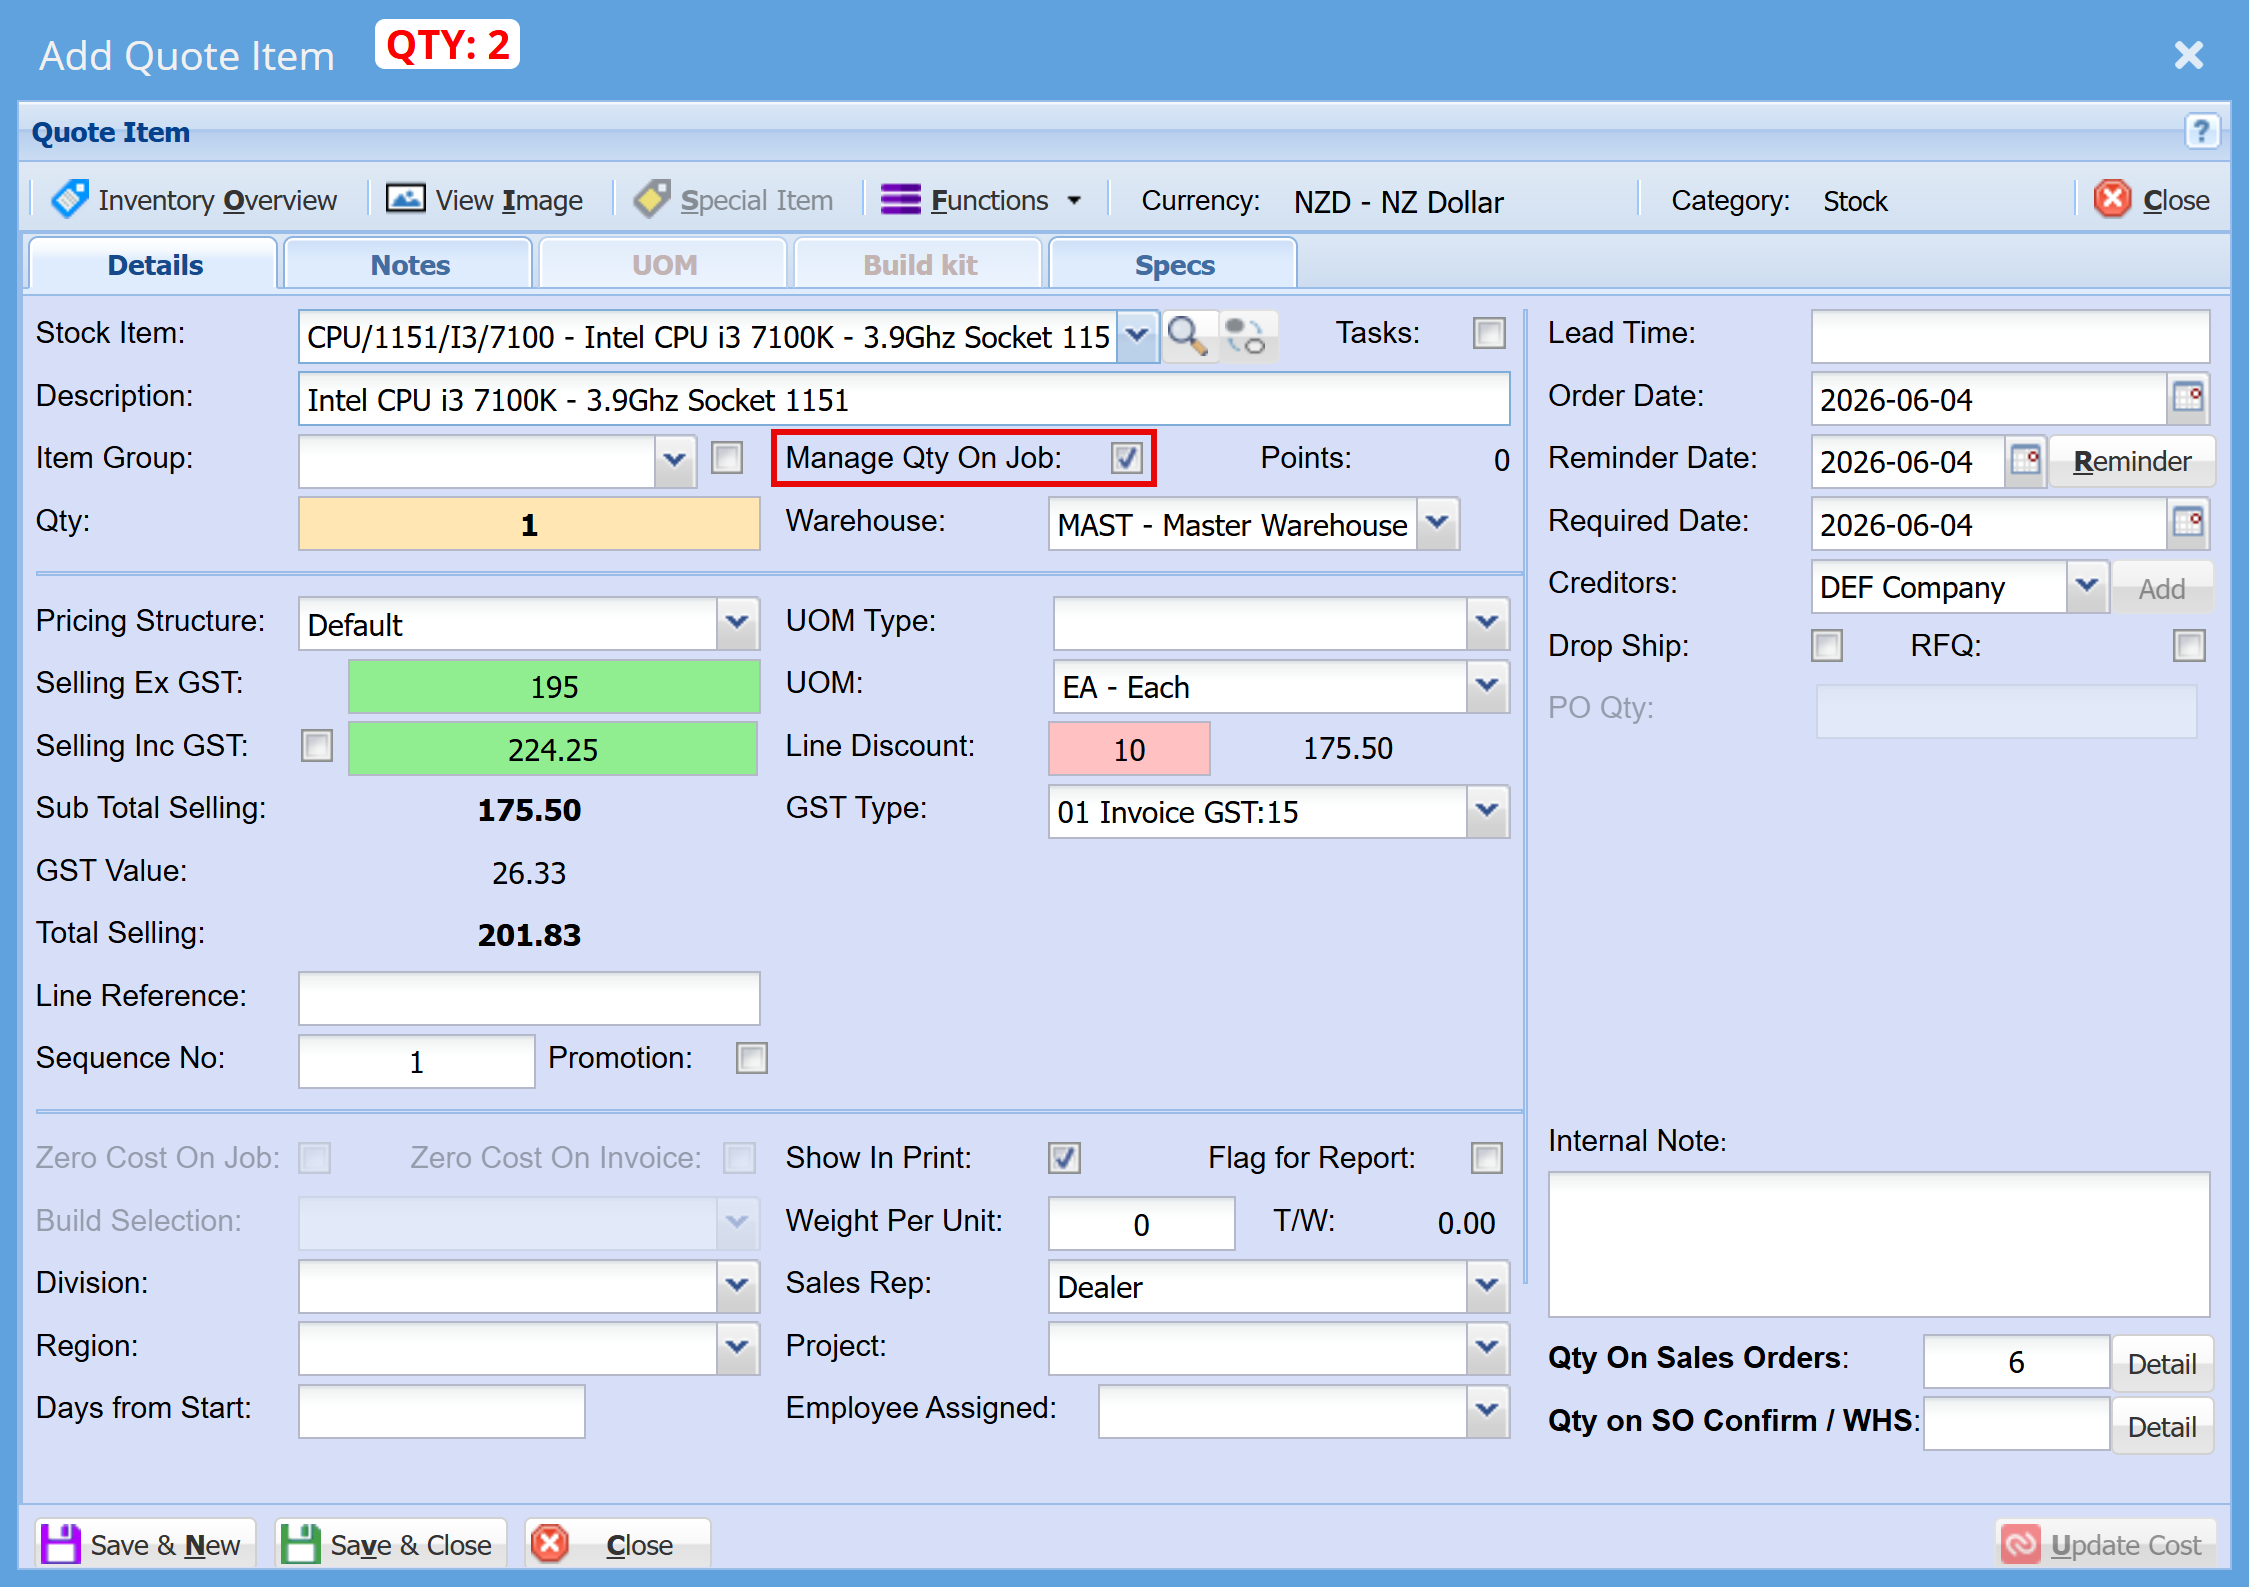
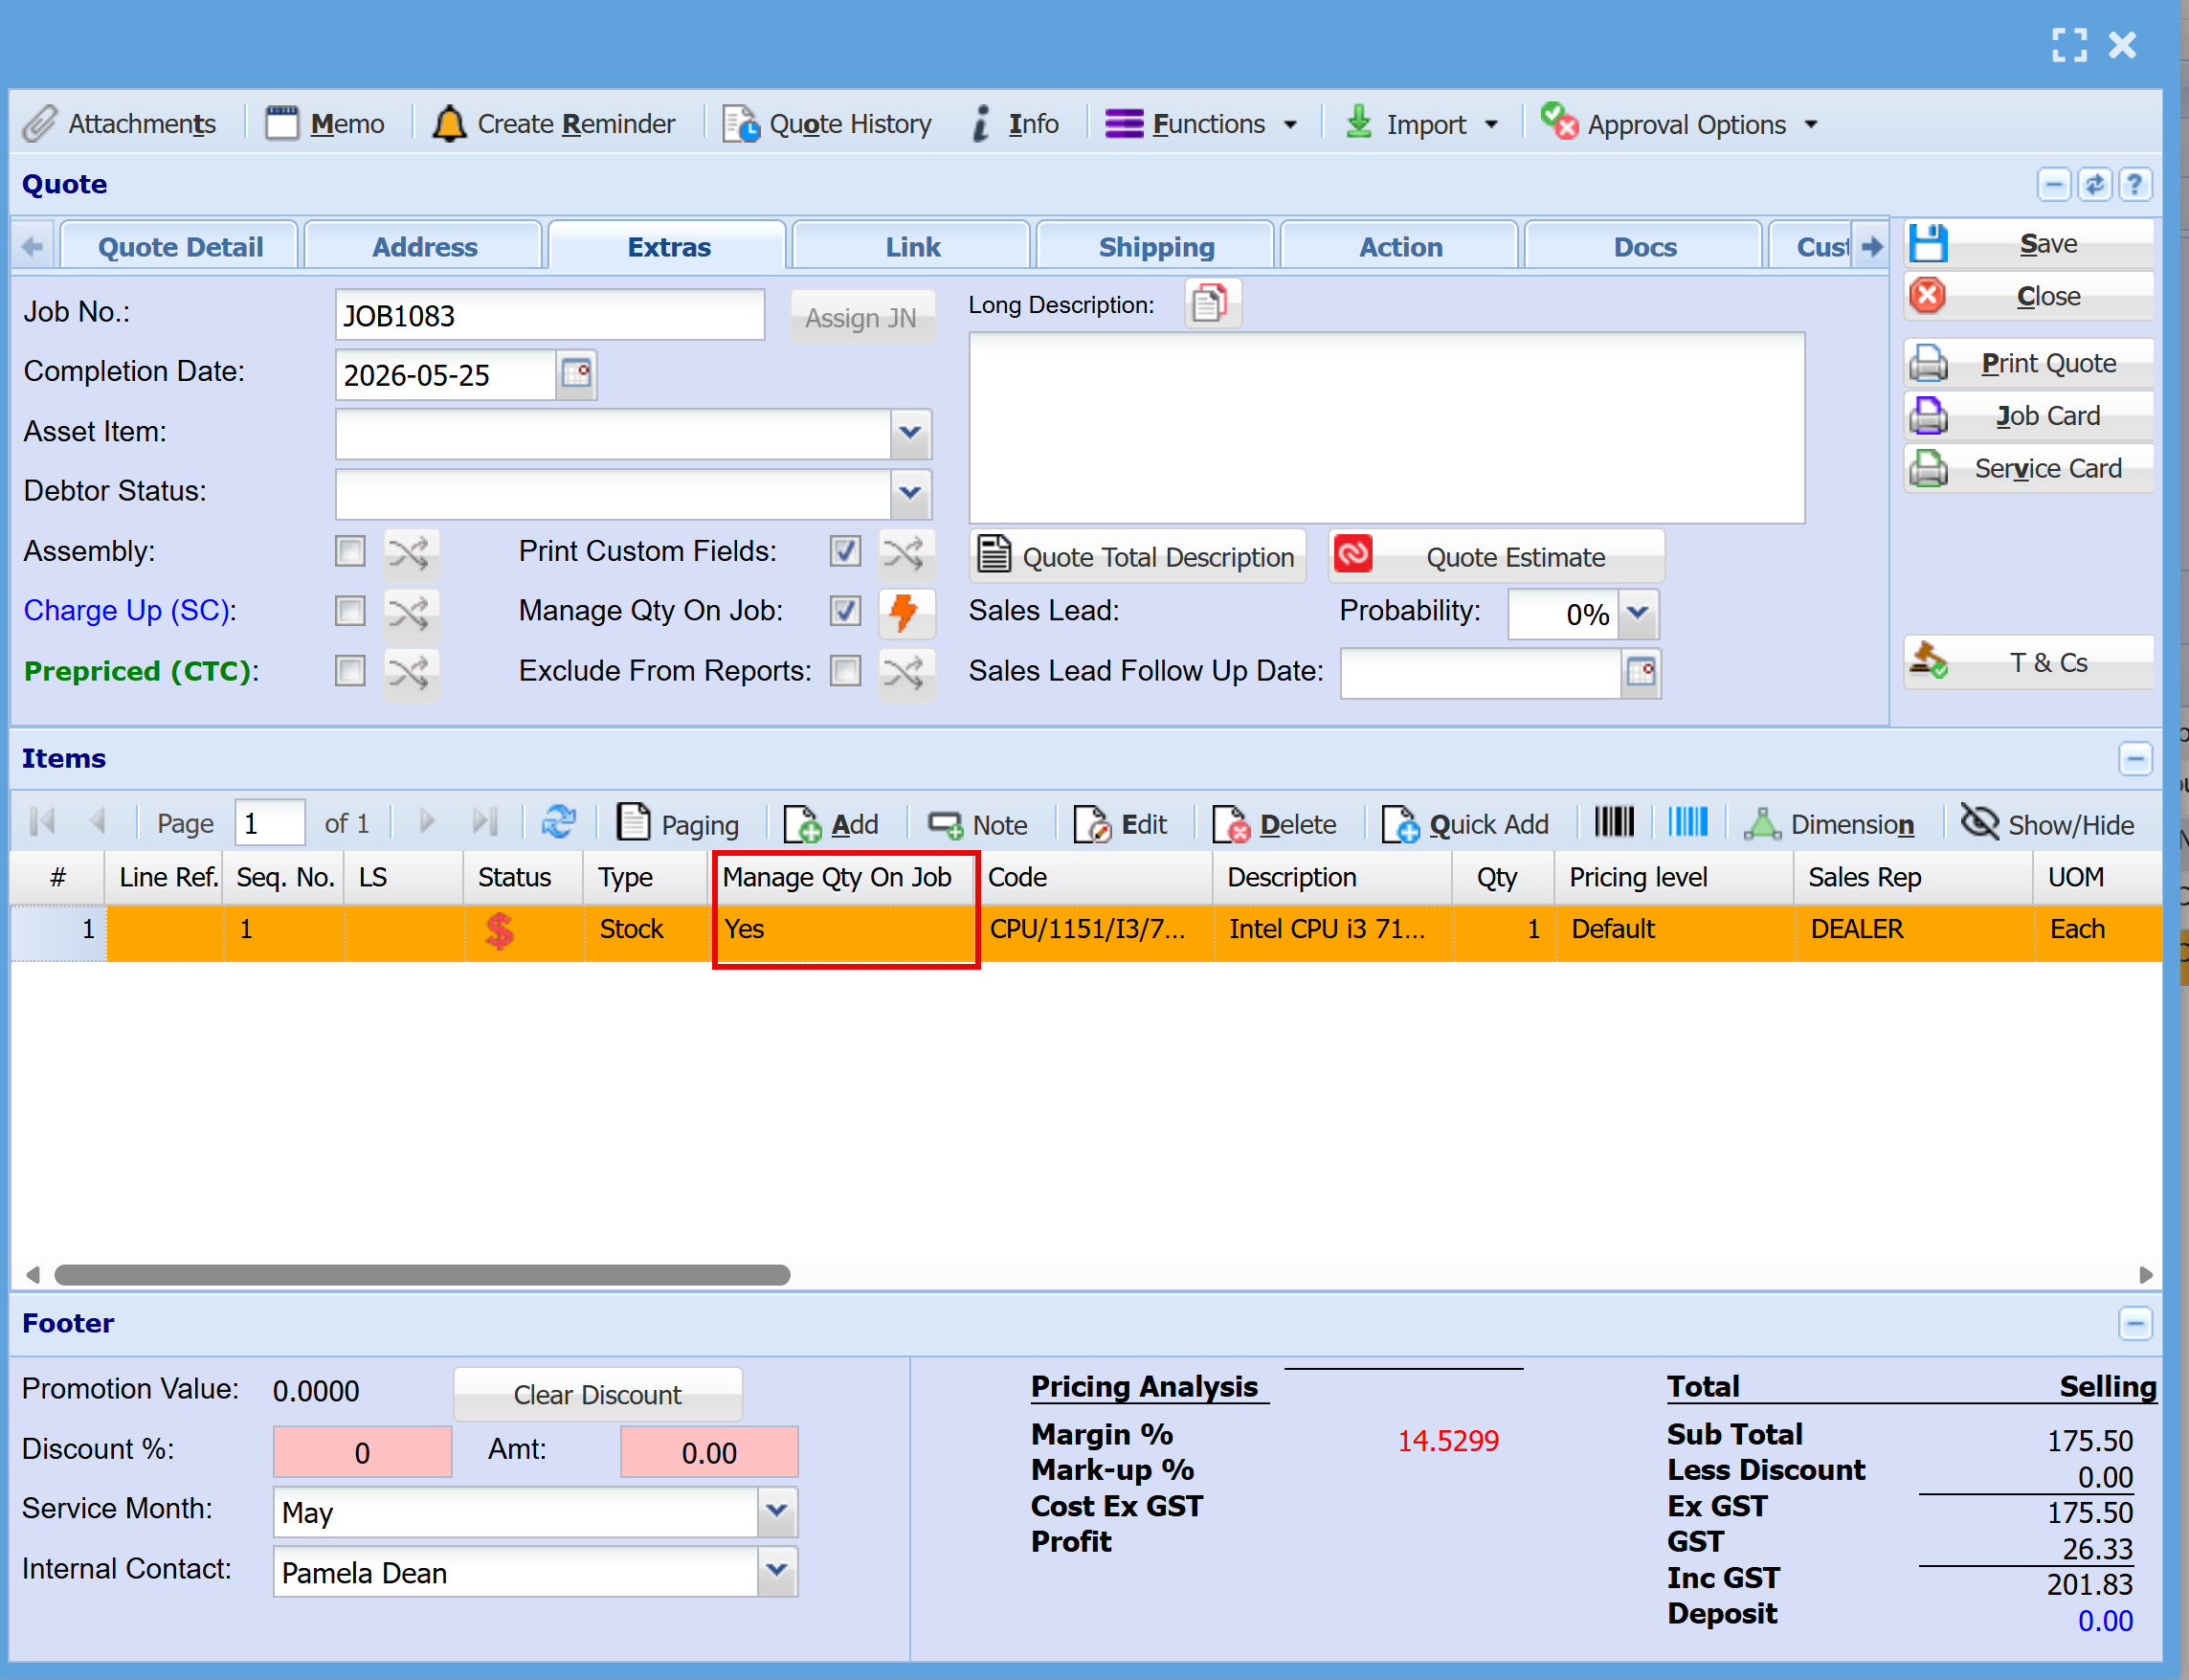
You can automatically manage quote lines by enabling the Manage Qty on Job option.
- On the quote header, go to the Extras tab
- Tick Manage Qty on Job
This ensures that all lines added to the quote are automatically marked for managed quantity on the job.
Updating Existing Quotes
The lightning bolt button can be used to update older quotes, or quotes where the option was not selected when first created.
Default Behaviour
- By default, this option is unticked
- This is because quotes are not always managed directly to a job, as their primary purpose is to prepare and budget work before job execution
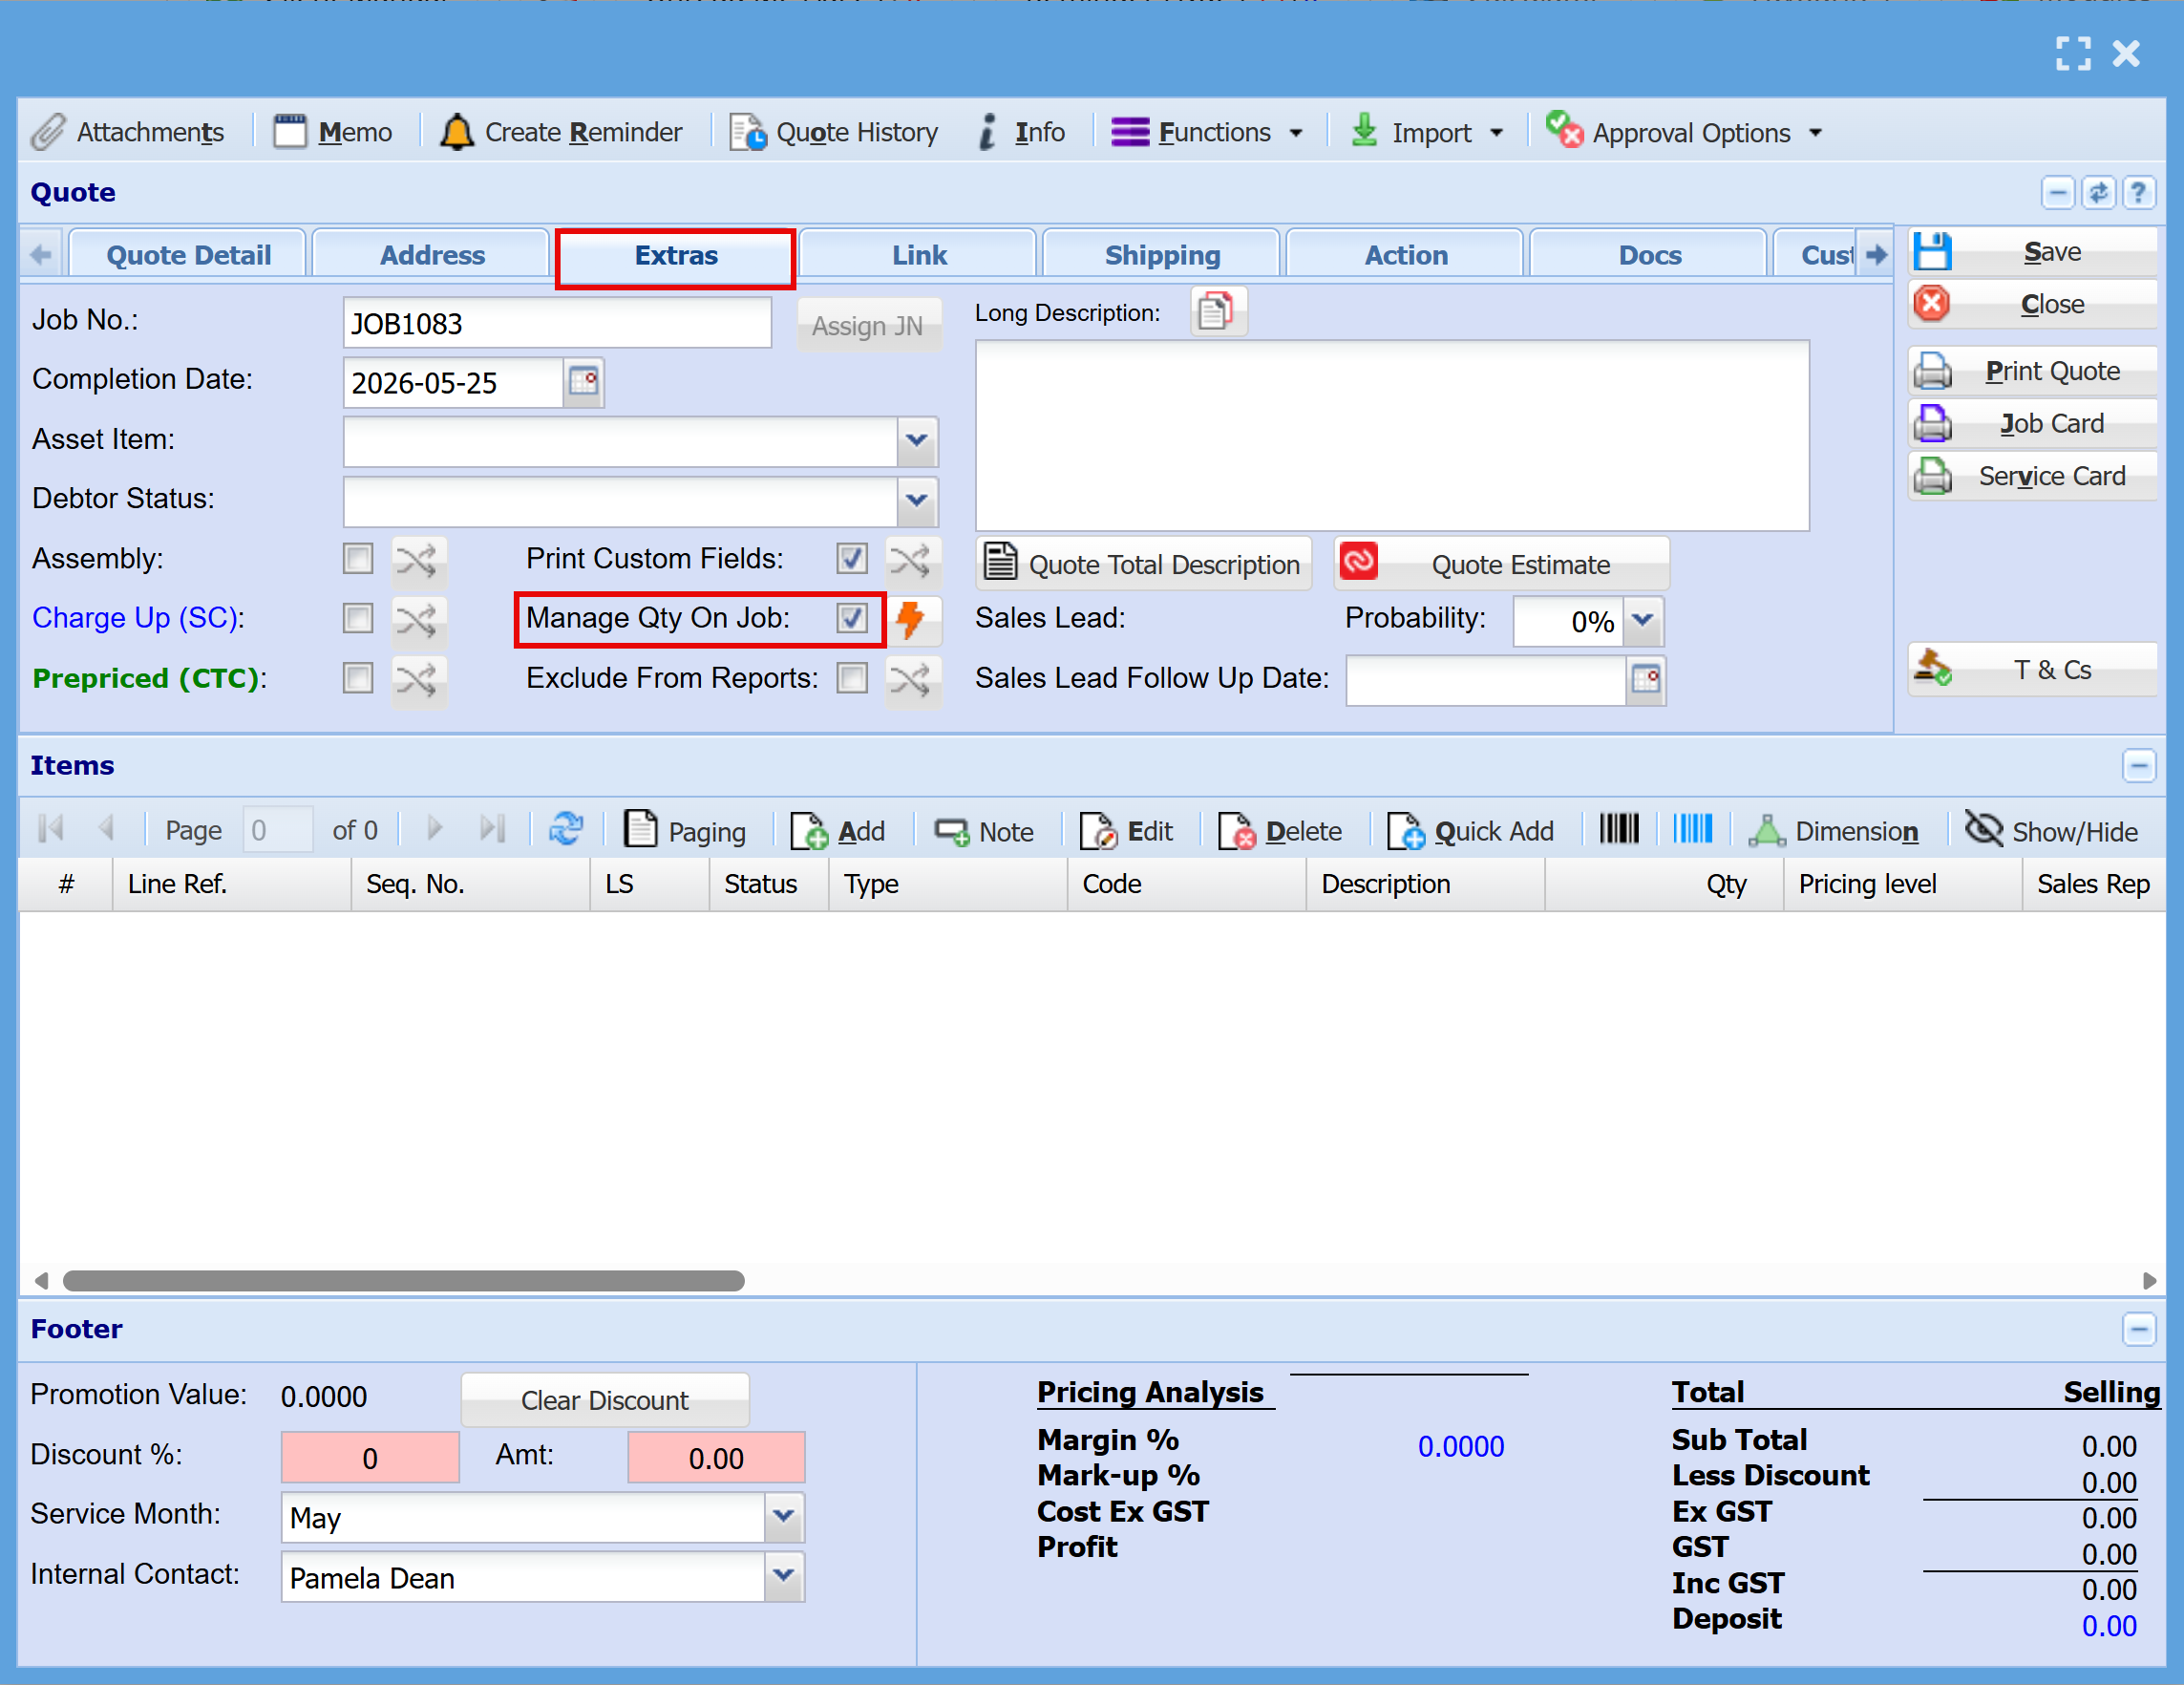
Once lines are entered, the Manage Quantity on Job option will be automatically selected for each line.
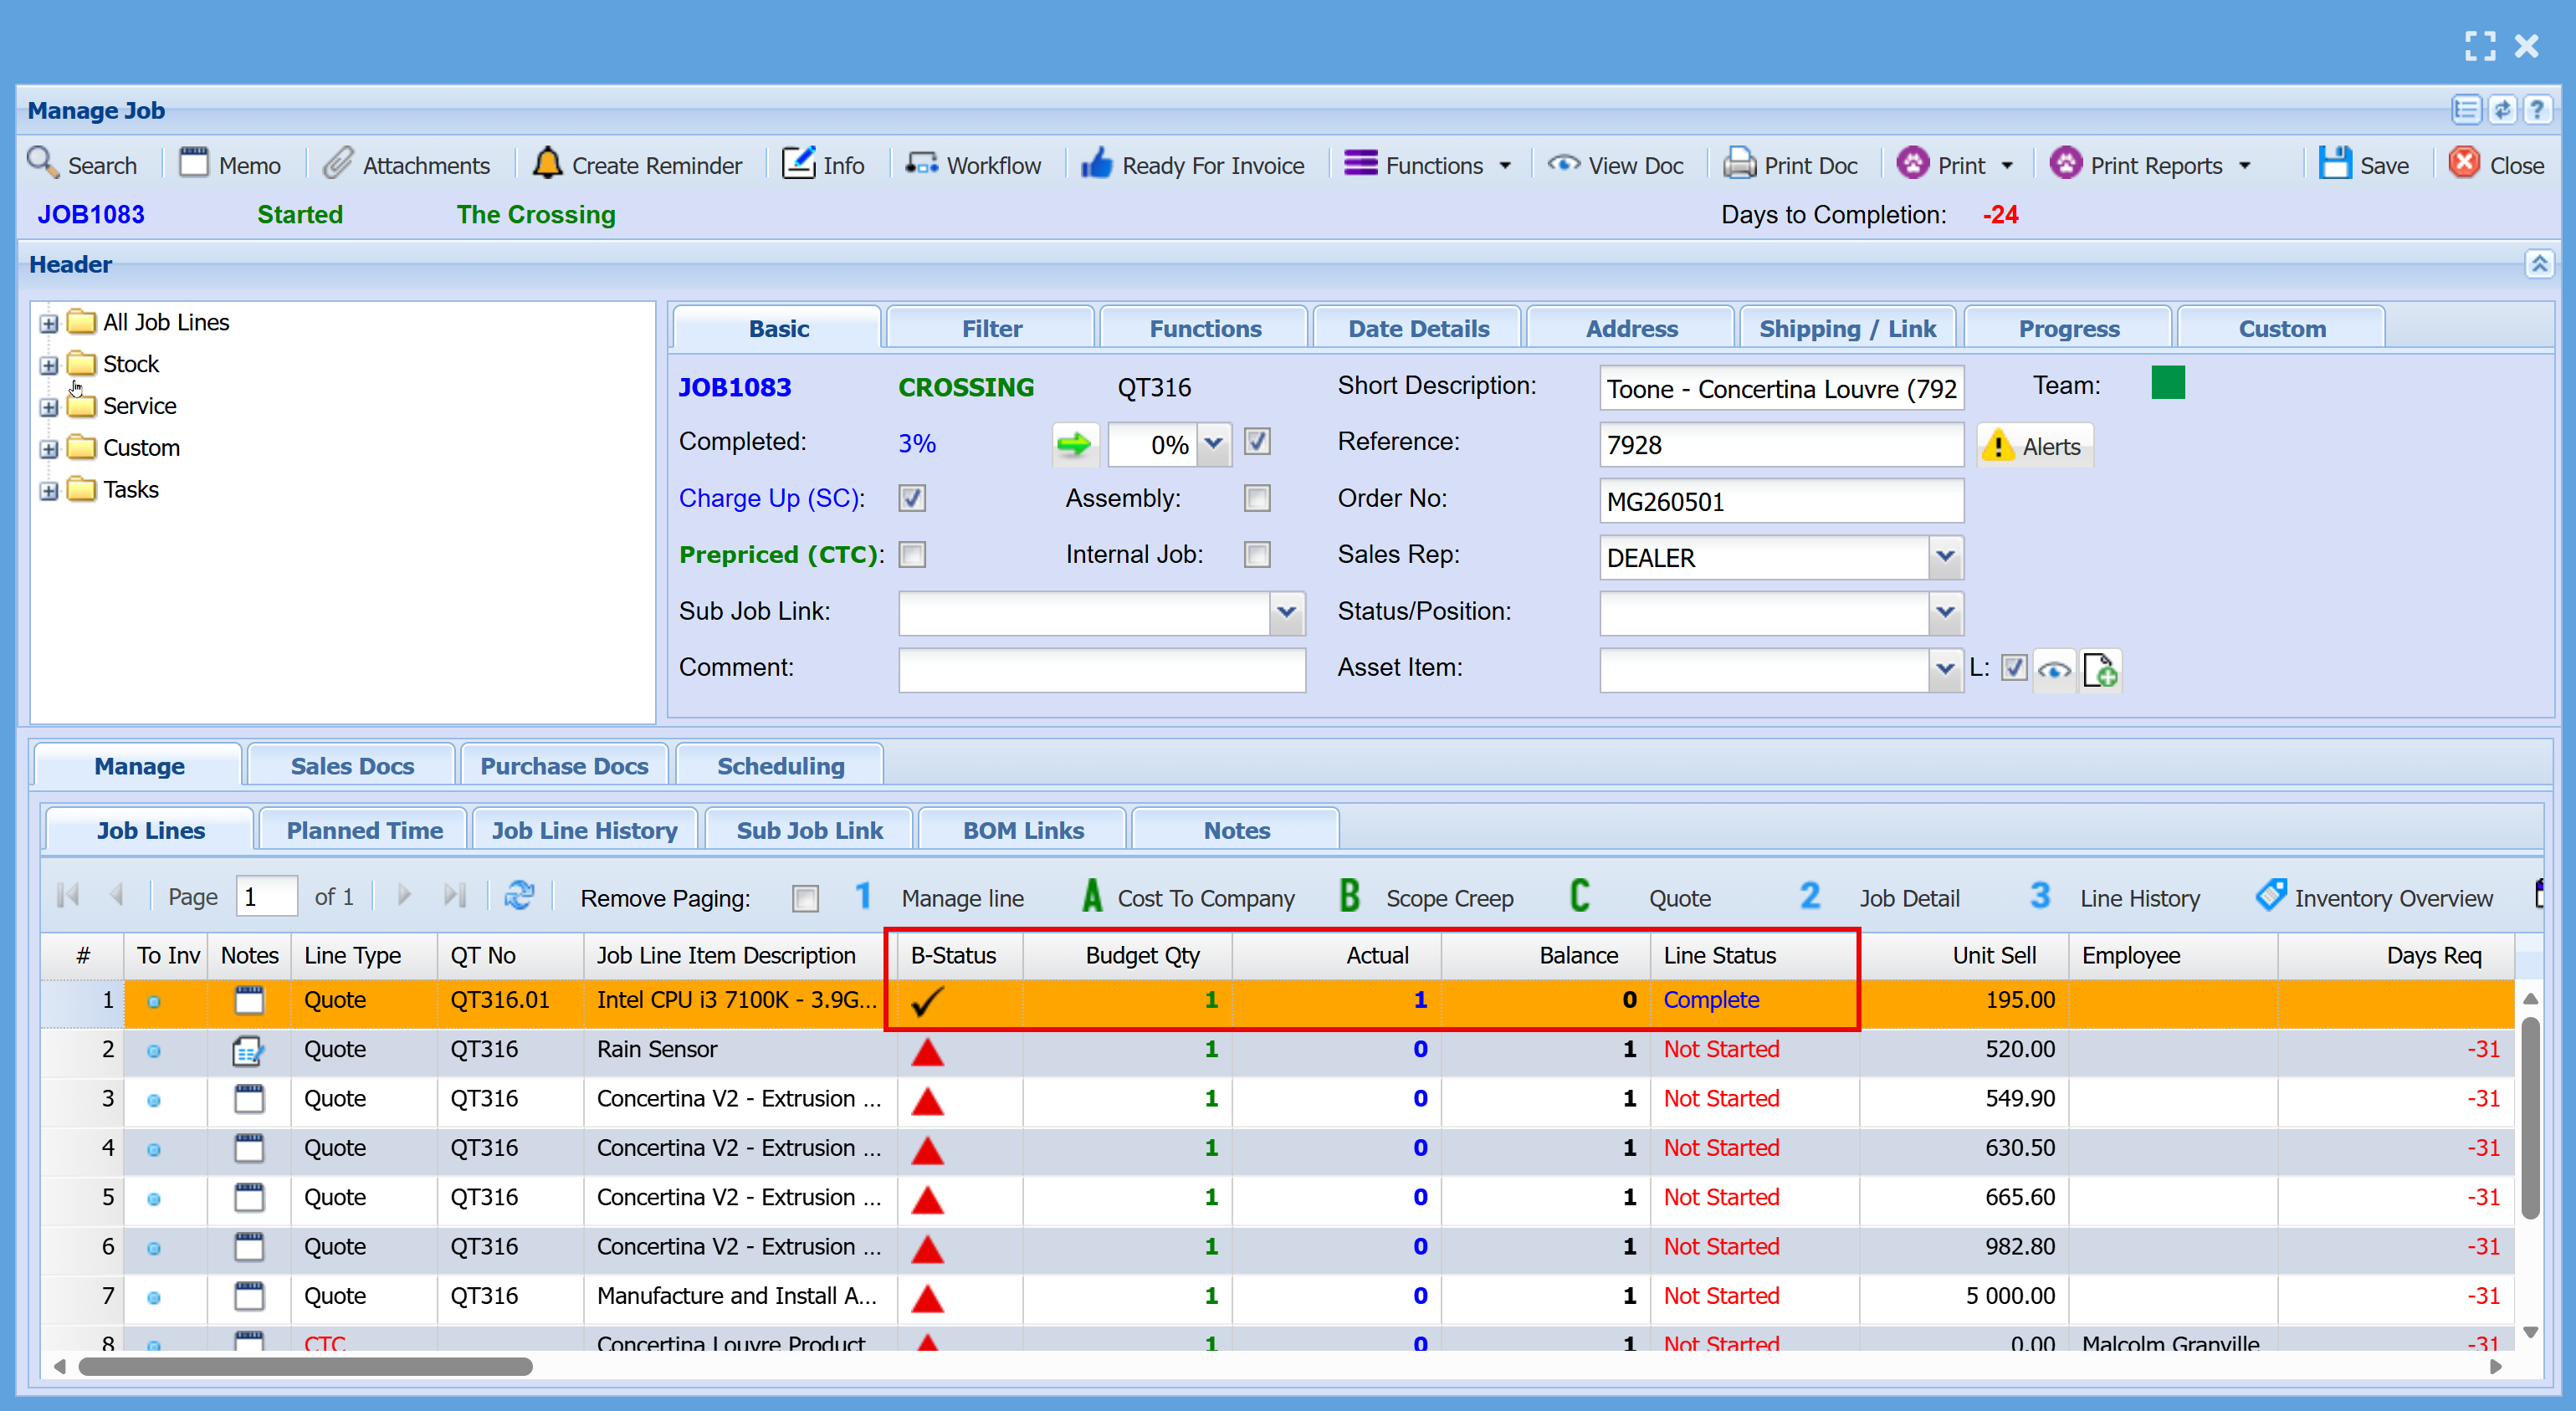
Job lines are processed once they have been managed, marked as Is Complete, and their status updated to Complete
Rule
- If there is insufficient stock available, the line cannot be managed
- This includes situations where stock exists but is not enough to fully cover the required quantity
In these cases, the line will remain unmanaged on the job until sufficient stock is available
Quote Tabs Explained
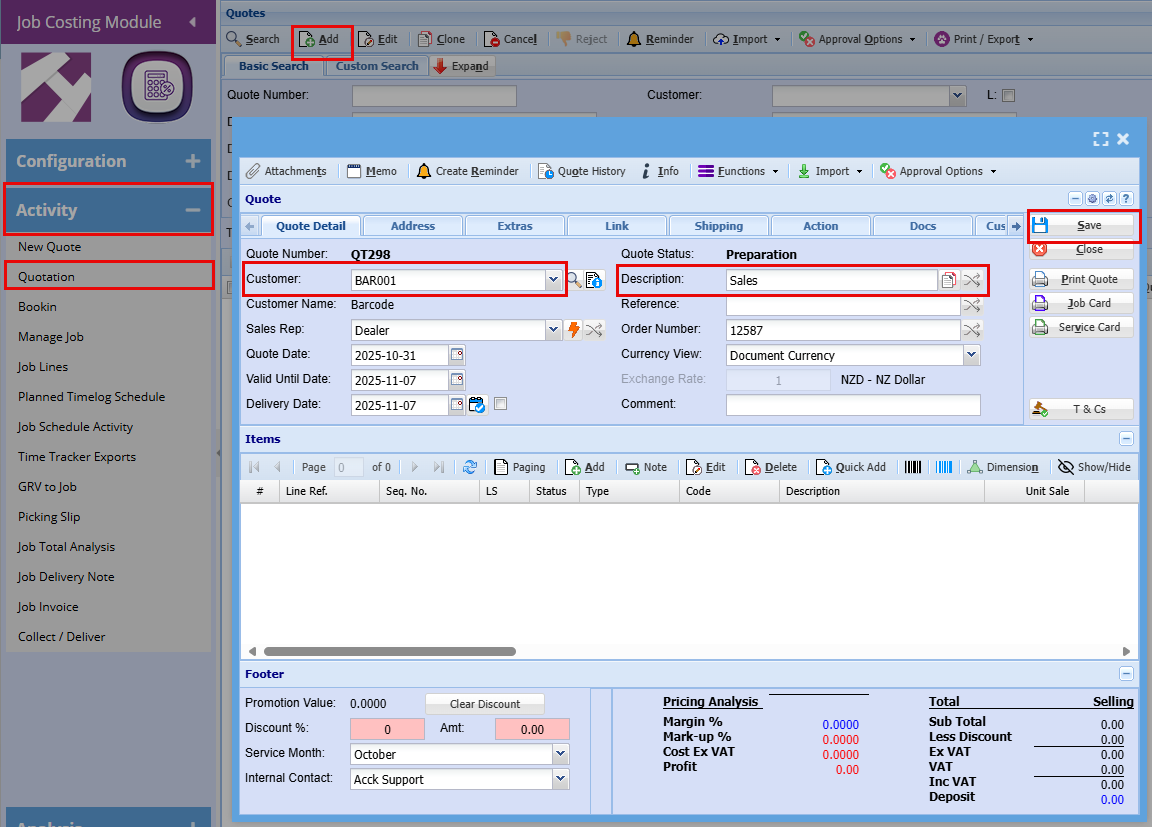
Job Costing Module >Activity > Quotation
-
Open or Create a Quote
- Navigate to the Quotes section.
- Click "Add" or open an existing one.
-
Locate the Customer Field
- Look for a field labeled Customer, Account, or Contact.
-
Save the Quote
- Click Save to lock in the selected customer.
Tips
- If the customer isn’t listed, you may need to create a new customer record first.
- Ensure you select the correct type (Account vs Contact) depending on your system’s setup.
Quote Tabs Explained Detailed

Quote Detail Tab
This screen is used to create and manage customer quotes, capturing key details such as the customer, dates, pricing, and references, while allowing you to add and manage items included in the quote.
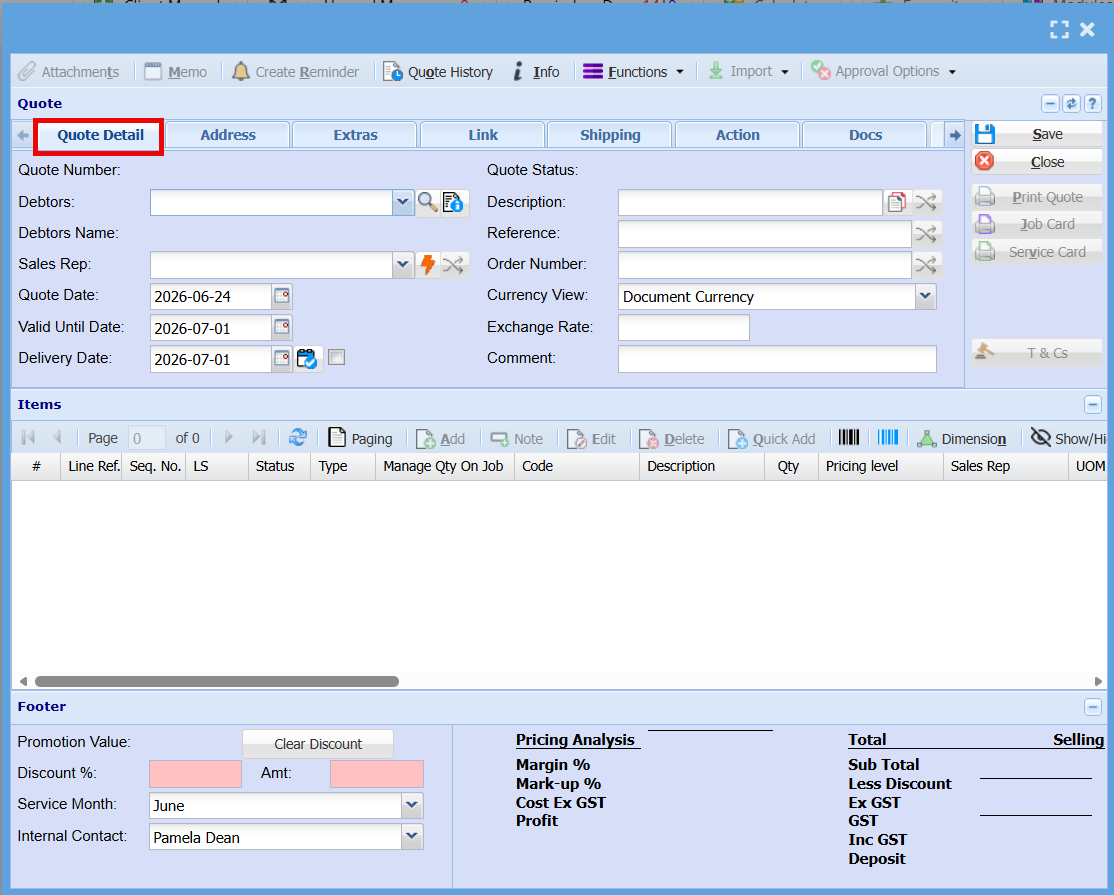
| Quote | Automatically generated |
| Customer |
Choose the appropriate Account (company) or Contact (individual) from the list
|
| Customer Name | Auto populates as customer is selected |
| Sales Rep | Select a sales rep for this customer |
| Quote Date | Usually todays date |
| Valid Until Date |
Select the date until which the quote is valid. |
| Delivery Date |
The date when the goods or services are expected to be delivered to the customer
|
| Quote Status |
Automatically updates as the quote progresses through the approval process.
|
| Description |
A free-text field used to clearly identify the quote.
|
| Reference |
A customer-provided identifier used to track or link the quote.
|
| Order Number |
A customer-provided number used to identify and track the order
|
| Currency View |
Displays the system’s default currency, with the option to switch between currencies if multi-currency is enabled
|
|
Exchange Rate
|
The rate used to convert amounts from one currency to another.
|
|
Comments
|
A free-text field used to add notes or additional information about the quote.
|
Address Tab
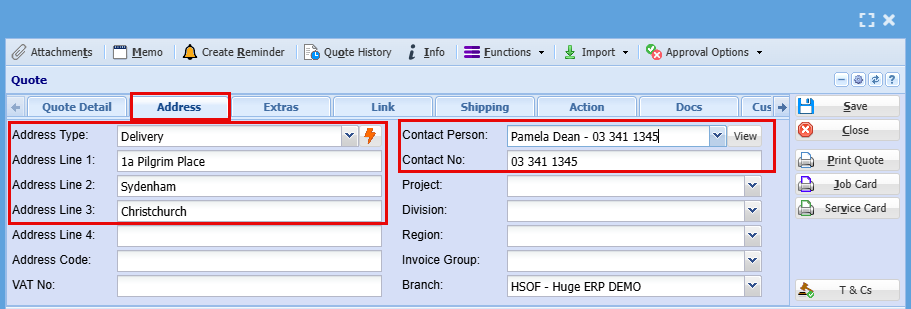
| Address Type |
The default address is automatically selected, but you can change it for the current quote if needed.
|
| Address Lines 1-4 | Address |
| Address Code | Postal Code |
| VAT No. | Customer Tax Number |
| Contact Person |
The default contact is automatically selected, but you can change it for this quote. To edit the contact’s details, click the view button.
|
| Contact Number | Customer Contact Persons Number |
| Project |
Select the relevant project associated with the quote, if applicable.
|
| Division |
The default division is automatically selected, but you can change the customer’s division within the company if needed.
|
| Region |
The default region is automatically selected, but you can change the customer’s region if needed.
|
| Invoice Group |
Select the customer’s invoice group.
|
| Branch | Company Branch |
Extras Tab
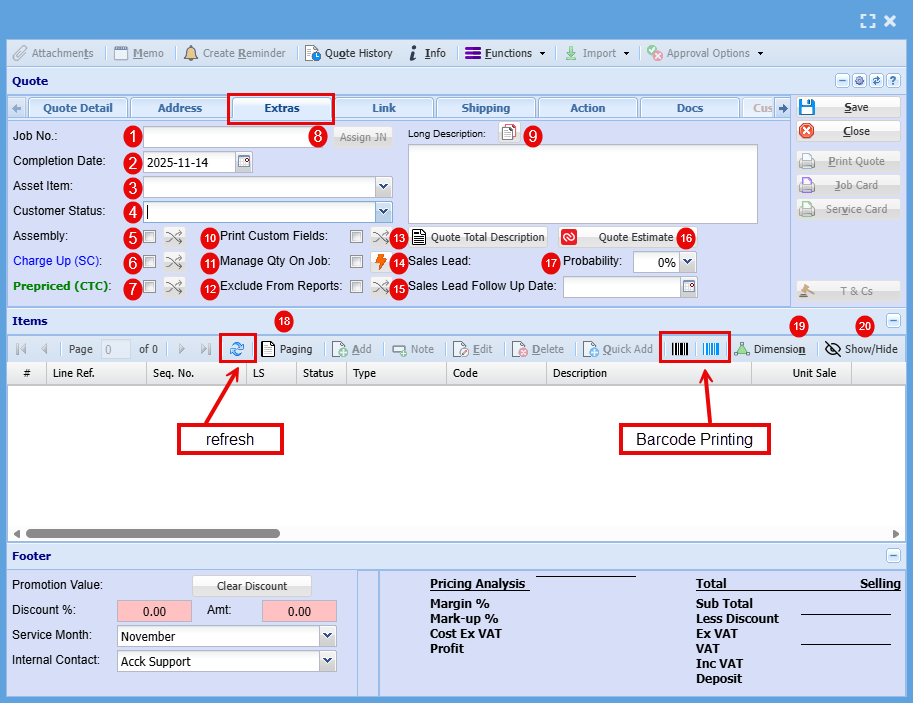
| 1 | Job Number | Clicking 'Assign JN' at this stage will generate a Job Number for the quote, which will automatically carry over once the quote is approved and converted into a actual job. |
| 2 | Completion Date | This is the date that you are expected to be able to complete this Job |
| 3 | Asset Item | The Asset Item field links a company-owned asset (e.g., printer, scanner, laptop) to a specific job or quote. This ensures equipment used is tracked, recorded, and associated with the job for better visibility and management. |
| 4 | Customer Status | Options "On Hold" |
| 5 | Assembly | “Assembly” refers to an internal process where components or materials are prepared, combined, or staged before installation or delivery. It’s not billed separately to the customer but contributes to your overall job cost. |
| 6 | Charge Up (SC) | Charge Up (SC)” means the customer is billed for actual time and materials used, including any extras beyond the initial scope. Charge Up allows you to invoice for additional costs incurred during the job. |
| 7 | Prepaid (Cost to Company) | "Prepaid” refers to the quoted amount for the job, the fixed charge agreed to by the customer. You can’t invoice beyond this amount, so any extra time, materials, or costs that exceed the quote become your internal expense, or ‘Cost to Company (CTC) |
| 8 | Assign JN | Clicking 'Assign JN' at this stage will generate a Job Number for the quote, which will automatically carry over once the quote is approved and converted into a actual job. |
| 9 | Long Description | Here you can write a description of the job being done. |
| 10 | Print Custom Fields | Includes custom fields in the printed quote (see Custom Fields tab). |
| 11 | Manage Qty on Job | The “Manage Qty on Job” tick box automatically transfers and manages item quantities when a quote is converted into a job, ensuring quantities remain accurate without manual adjustment. |
| 12 | Exclude from Reports | This flag will assist when running reports on quote values, allowing us to exclude certain quotes (effectively treating them as zero). |
| 13 | Quote Total Description | |
| 14 | Sales Lead | If this quote originated from a tracked Sales Lead, the associated Sales Lead number will be displayed here. Updating the Probability percentage will automatically sync the change with the corresponding Sales Lead. |
| 15 | Sales Lead Follow up Date | Updating the Follow up the system will automatically sync the change with the corresponding Sales Lead follow up date. |
| 16 | Quote Estimate | |
| 17 | Probability | If this quote originated from a tracked Sales Lead, the associated Sales Lead number will be displayed here. Updating the Probability percentage will automatically sync the change with the corresponding Sales Lead. |
| 18 | Paging | If your line items span multiple pages and require navigation using the page up/down arrows, clicking the Paging Box will disable paging, allowing you to scroll through all items in a continuous view. |
| 19 | Dimension | |
| 20 | Show/Hide |
Allows you to control which sections or fields are visible on the screen. This can help simplify the interface by hiding fields that are not relevant to your workflow. |
Link Tab
Below is an overview of the fields available under the Link Tab on the quote screen:
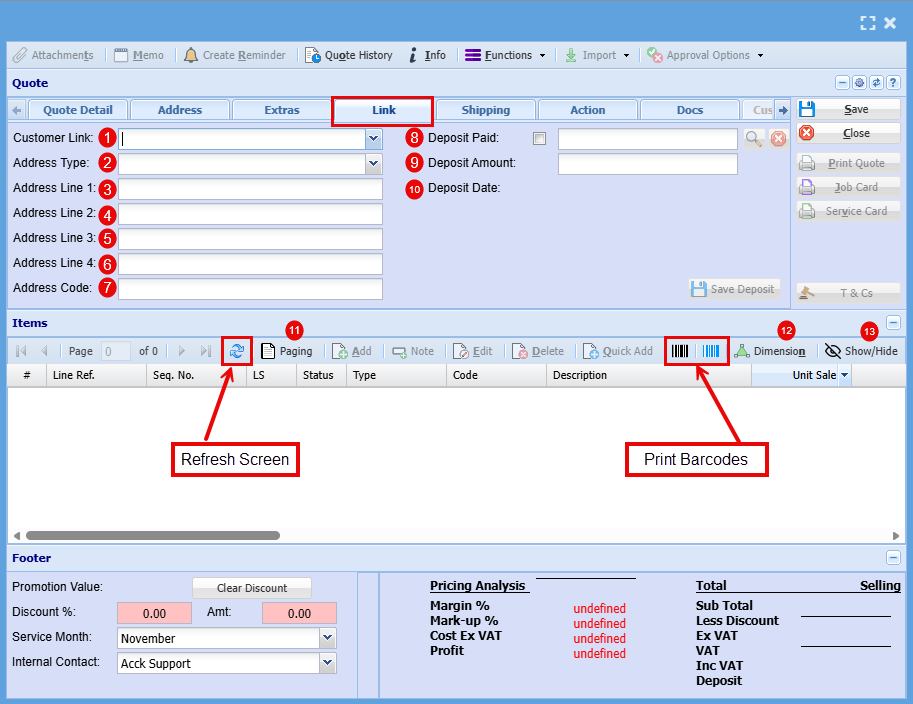
| 1 | Customer Link |
|
| 2 | Address Type |
This defines the type of address being used (for example, billing, delivery, or site address). Selecting the correct type ensures the quote is applied to the right location.
|
| 3-6 | Address line 1-4 |
These fields capture the full address details associated with the quote. You can enter street, suburb, city, and any additional location information required.
|
| 7 | Address code |
A reference code used to identify saved or standard addresses.
|
| 8 | Deposit Paid |
Enter the value of the deposit paid. This amount will be automatically deducted from the total quote value, giving a more accurate balance owing. |
| 9 | Deposit Amount |
Tick this box if the customer has already made a deposit payment. This flags the quote so the system knows part payment has been received. |
| 10 | Deposit Date |
Record the exact date the deposit was received. This is useful for tracking payments and keeping financial records accurate. |
| 11 | Paging |
When a quote contains a large number of line items, they may be split across multiple pages.
|
| 12 | Dimension | |
| 13 | Show/Hide |
Allows you to control which sections or fields are visible on the screen. This can help simplify the interface by hiding fields that are not relevant to your workflow. |
Shipping Tab
Below is a detailed overview of the fields available under the Shipping tab on the quote screen:

| 1 | Shipping Method |
Select the method of delivery for the order (e.g. courier, pickup, freight). This helps define how the goods will be sent to the customer. |
| 2 | Shipping Date |
Enter the date (and time) the order is scheduled to be shipped. This is useful for planning dispatch and providing accurate delivery expectations. |
| 3 | Send Email |
Tick this option if you want the system to send a notification email related to the shipment (e.g. confirmation or dispatch details). |
| 4 | Shipping Location |
Specifies the destination location the goods are being shipped to. This may differ from the billing address if the customer has multiple delivery sites. |
| 5 | Internal Delivery |
Used when the delivery is being handled internally by your own team or vehicles, rather than an external courier. |
| 6 | Delivery Company |
Select or enter the external courier or freight company responsible for delivering the shipment (e.g. NZ Post, Mainfreight). |
| 7 | Tracking Number |
Enter the tracking number provided by the courier. This allows both your team and the customer to track the shipment progress. |
| 8 | Frozen |
Enter the tracking number provided by the courier. This allows both your team and the customer to track the shipment progress. |
| 9 | Paging |
When there are many line items:
|
| 10 | Dimension | |
| 11 | Show/Hide |
Allows you to customise the screen view by showing or hiding certain fields or sections, helping keep the interface clean and relevant. |
Action Tab
Below is a detailed overview of the fields and functions available under the Action tab on the quote screen:
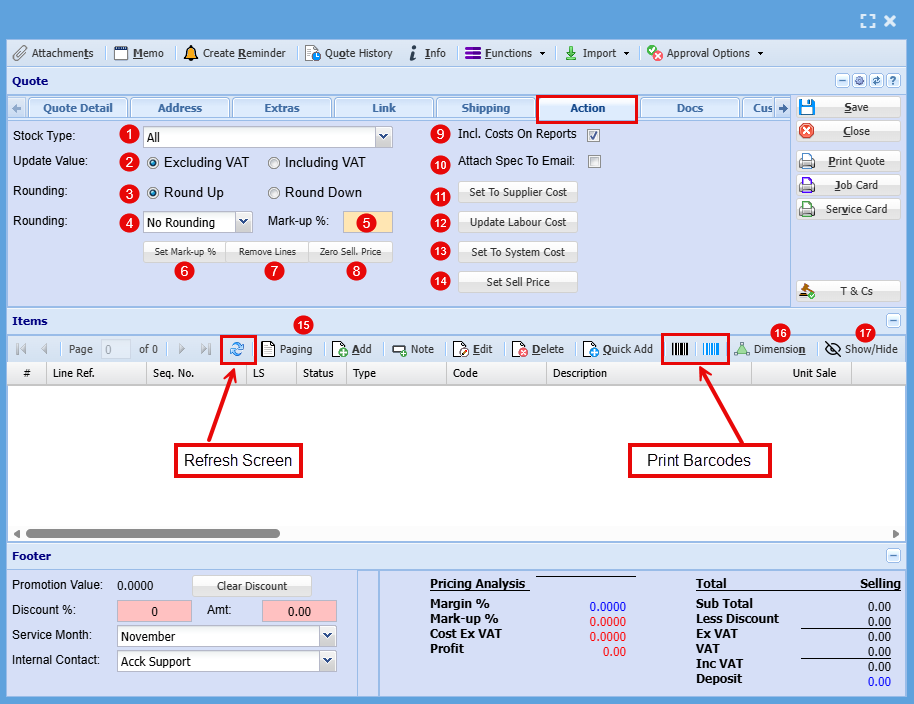
| 1 | Stock Type |
Allows you to filter or apply actions to a specific type of stock (e.g. all items, stock items only, or non-stock items). This ensures changes are applied only where needed. |
| 2 | Update Value |
Determines whether pricing updates are applied including or excluding VAT. This is important for maintaining accurate pricing calculations depending on how your system is set up. |
| 3 | Rounding Up |
Controls how pricing values are rounded:
|
| 4 | Rounding Down |
Controls how pricing values are rounded:
|
| 5 | Mark-Up % |
Enter the desired markup percentage to apply to selected line items. This is used to calculate selling prices based on cost. |
| 6 | Set Mark-Up % |
Applies the entered markup percentage across selected items. This is a quick way to update pricing in bulk. |
| 7 | Remove Lines |
Removes selected line items from the quote. Useful for cleaning up or adjusting the quote quickly. |
| 8 | Zero Sell, Price |
Sets the selling price to zero for selected items. This may be used for complimentary items, warranty replacements, or no-charge components. |
| 9 | Incl. Cost on Reports |
When enabled, this includes cost values in reports, allowing for visibility of margins and profitability. |
| 10 | Attach Specs to Email |
Tick this option to include product specifications when emailing the quote to the customer. |
| 11 | Set to Supplier Costs |
Updates selected items so their pricing reflects the supplier cost directly. Useful when recalculating pricing based on updated supplier pricing. |
| 12 | Update Labour Cost |
Refreshes or updates the labour cost values associated with the quote. |
| 13 | Set to System cost |
Resets pricing to the system’s default cost values, ensuring consistency with your pricing database. |
| 14 | Set Sell Price |
Allows you to manually set or update the selling price for selected items. |
| 15 | Paging |
When dealing with many line items:
|
| 16 | Dimension | |
| 17 | Show/Hide |
Allows you to customise the screen view by showing or hiding certain fields or sections, helping keep the interface clean and relevant. |
Docs Tab
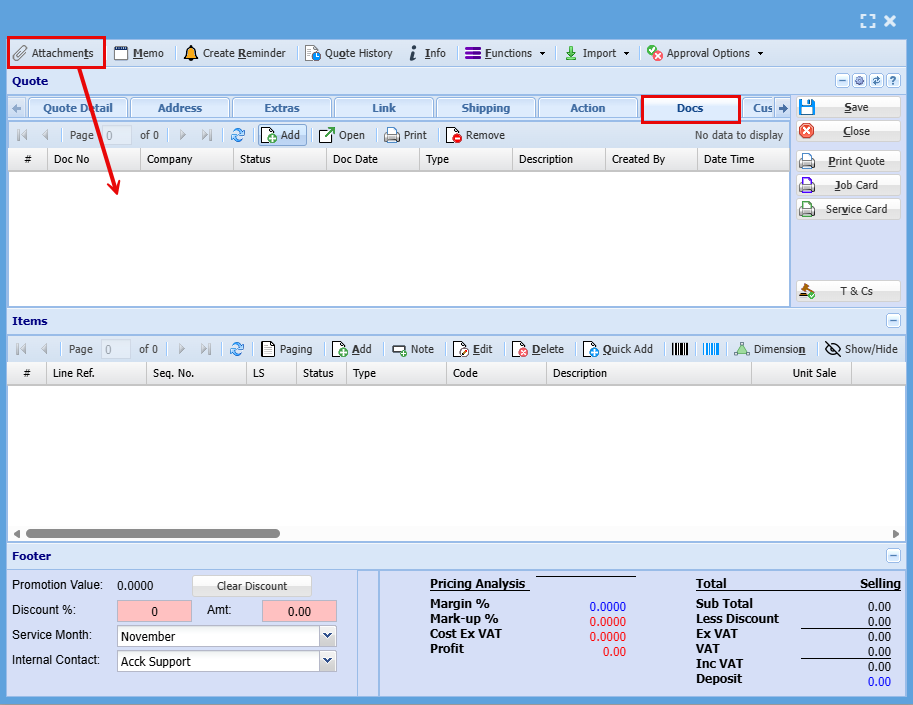
This tab displays a list of all documents that have been attached to the quote. These could include files such as specifications, images, PDFs, or any supporting documentation relevant to the job.
This tab provides instant access to upload documents in any format (PDF, Word, Excel, etc.) or retrieve relevant files previously attached to this quote.
Each document listed will typically show details such as:
- Document name or number
- Type of document
- Description
- Date created
- User who uploaded it
Key Functions
-
Attachments (top left button)
Allows you to add new documents to the quote. This is where you upload files that need to be linked or sent with the job or quote. -
Add / Open / Print / Remove
These options allow you to:- Add new documents
- Open existing attachments
- Print attached files
- Remove documents if they are no longer required
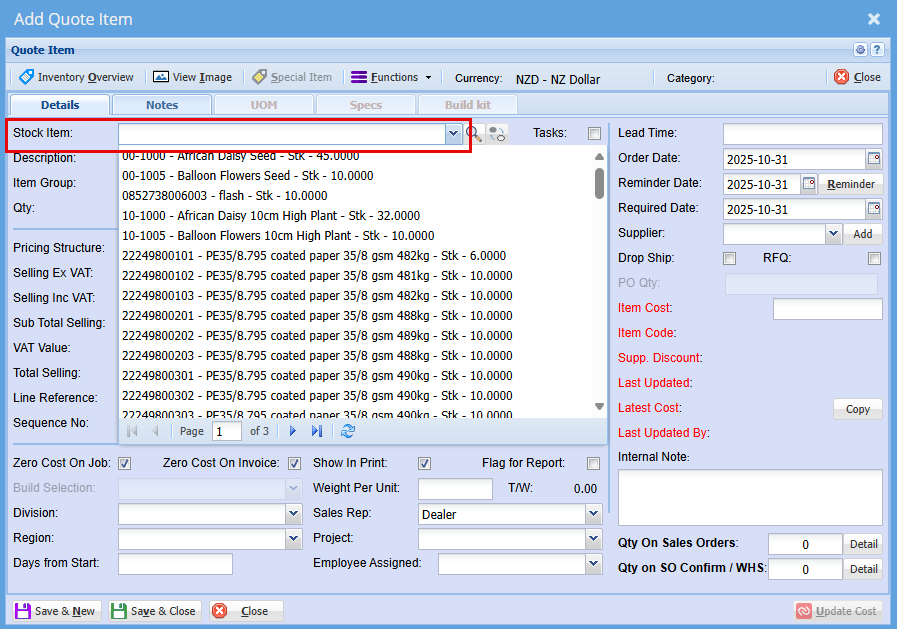
Adding Stock Items to Quote
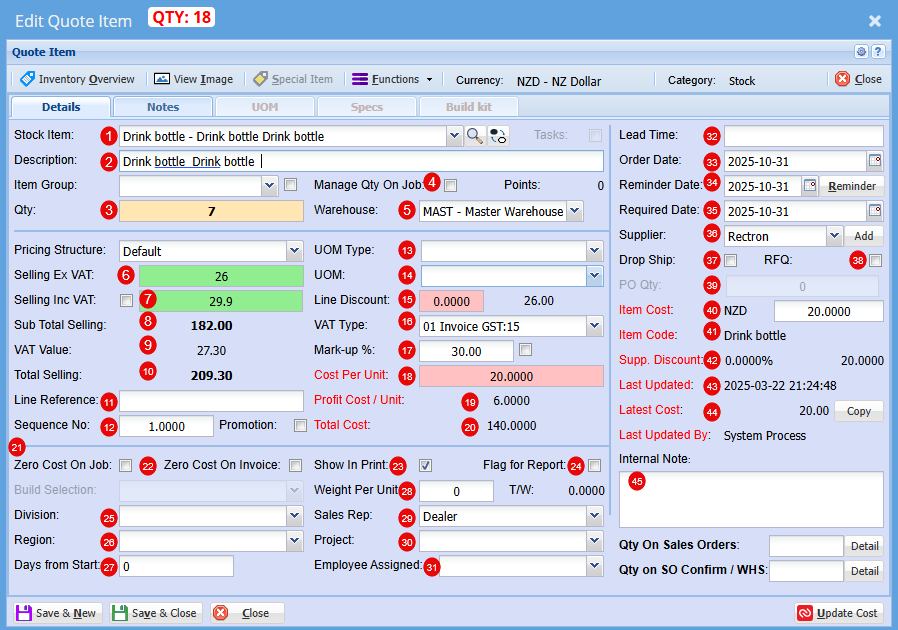
This screen is used to add a stock item to a quote, define pricing, quantities, and control how the item is handled for the job, invoicing, and reporting.
Item & Quantity Details
| Stock Item |
Select your stock item from the drop-down menu |
| Description |
At this stage you can change the Description if needed |
| Qty |
Add the Quantity you require of this item |
| Manage Qty on Job |
Controls whether the quantity is actively tracked and managed when the quote is converted to a job.
|
| Warehouse |
Select the Warehouse you wish to sell this item form |
| Selling Ex GST |
Price per item does not include the 15% Goods and Services Tax. You add GST on top of the listed amount. |
| Selling Inc GST |
Price per item includes the 15% Goods and Services Tax. The GST is already built into the total amount shown. |
| Sub Total Selling |
Total price of total quantity of item that does not include the 15% Goods and Services Tax. You add GST on top of the listed amount. |
| VAT (GST) Value |
Total GST only on total quantity of items |
| Selling Total |
Total price of total quantity of item includes the 15% Goods and Services Tax. The GST is already built into the total amount shown. |
Line Details
| Line Reference |
|
| Sequence No. |
You can change the Sequence in the quote for this item |
Units & Discounts
| UOM Type |
These are custom configuration settings applied during setup, tailored specifically to your product formats (e.g., Per Roll, Per Unit, Pack). |
| UOM |
These are custom configuration settings applied during setup, tailored specifically to your product formats (e.g., 1000 per roll, 6 per pack). |
| Line Discount |
You can apply a discount to this item |
| VAT (GST)Type |
If this item is GST exempt or a Non-GST item it can be changed here |
Margin & Costing
| Mark up % |
At this stage you can increase your profit % |
| Cost Per Unit |
This is the total cost to produce or buy one item. It helps you set prices and track profitability. |
| Profit Cost/Unit | This is how much profit you make on each item sold after subtracting its cost. |
| Total Cost | This s the full amount spent to produce or purchase a set of items or complete a job. |
Cost Behaviour
| Zero Cost on Job |
These ticks will be automatically on or off based on the setup if the item. When the item is promoted to a Job, its initial cost is cleared and recalculated progressively as the job is built—ensuring you have an accurate final cost at completion. |
| Zero Cost on Invoice |
As with the Cost on job, these ticks will be automatically on or off based on the setup if the item. When the item is promoted to a Job, its initial cost is cleared and recalculated progressively as the job is built—ensuring you have an accurate final cost at completion. |
Visibility & Reporting
| Show on Print |
|
| Flag for Report |
|
Organisation & Scheduling
| Division |
Select a division within of a company that focuses on one area of work. |
| Region |
Select a region the job will fall under, it can include multiple cities or towns and often has its own local government or identity. |
| Days from Start | Use this field to schedule when this item should begin—set as a number of days from the job’s start date. |
| Weight Per Unit | This is determined at setup |
People & Projects
| Sales Rep | You are able to allocate someone who promotes and sells a company’s products or services to customers. They often handle quotes, follow-ups, and customer relationships, helping drive revenue and build trust. |
| Project | You can Link a quote to a specific project |
| Employee Assigned | Refers to the specific person responsible for completing a task or project. It helps track accountability, scheduling, and communication. |
Dates & Supplier Info
| Lead Time | This is the amount of time between starting a process and completing it. It usually refers to how long it takes from placing an order to receiving the goods or service. |
| Order Date | This is the day a customer places an order for goods or services. |
| Reminder Date | This is the day you plan to check in after sending the quote. |
| Required Date | This is the day the customer wants the goods or service delivered |
| Supplier | This is the company that provides goods or services to another business |
Purchasing Options
| Drop Ship |
Ticking this box enables you to generate a Purchase Order on the fly—complete with all relevant details, so you don’t need to build one from scratch when drop-shipping an item. |
| RFQ (Request for Quote) |
Ticking this box allows you to generate a Request for Quote on the fly—pre-filled with all relevant details, so you don’t need to start from scratch when requesting updated pricing for an item. |
| PO Qty |
Enter the quantity here for which you want to generate a Purchase Order or Request for Quote. |
Supplier Costing
| Item Cost |
This shows the actual cost of the item |
| Item Code |
This is the suppliers item code |
| Supplier Discount |
Shows if you received a discount on this item when purchased form supplier |
| Last Updated |
This is the date the cost was last updated for this item |
| Latest Cost |
Similar to Item cost, this shows the actual cost of the item at that date |
Internal Notes
| Internal Note |
Use this field to add private comments or internal details related to the job, quote, or project.
These notes are for internal use only and are not visible to the customer, making it ideal for internal communication and instructions. |
Approve Quote to Job
Quotes must go through approval stages to ensure they are reviewed internally and accepted by the customer before being converted into a job.
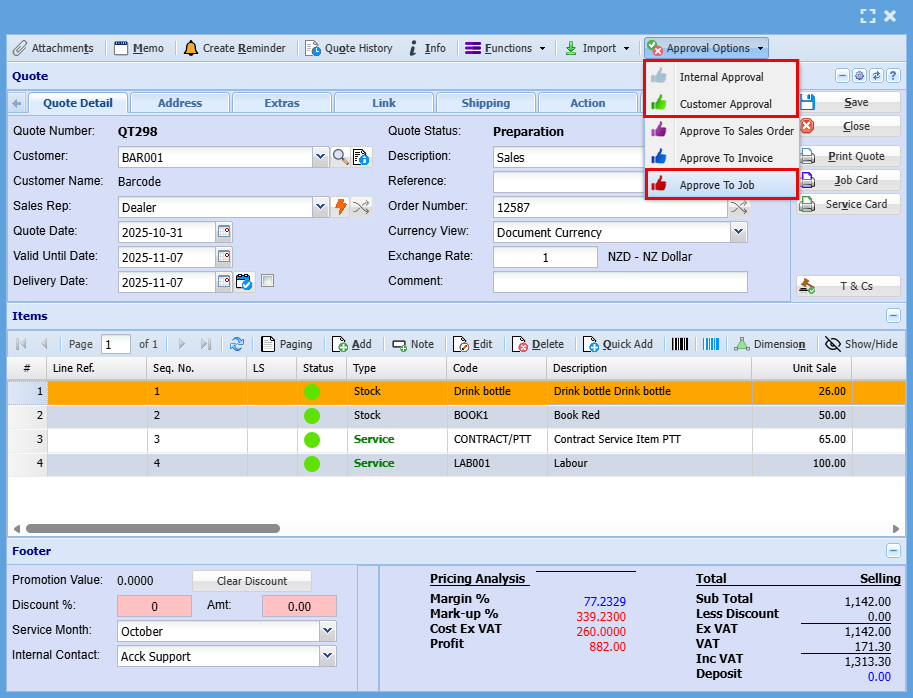
Internal Approval
This stage is for internal review and sign-off.
It ensures pricing, margins, and job details are checked and approved within the business before sending to the customer.
Once internally approved, the quote is provided to the customer for acceptance.
This confirms the customer agrees to the scope, pricing, and terms.
After customer approval, selecting “Approve to Job” converts the quote into an active job.
The job is then available in Manage Job and becomes part of the live workload.
Approved to job
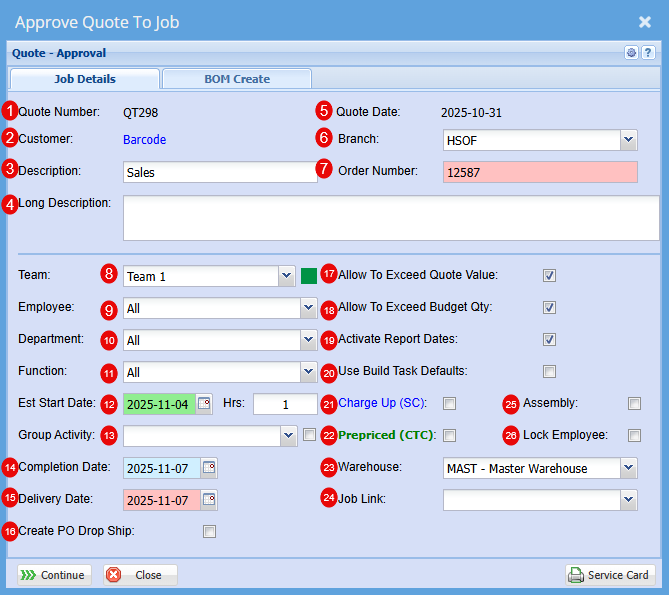
| 1 | Quote Number | This is the Quote number linked |
| 2 | Customer | Customers Name |
| 3 | Description | This will be specific to the Job as an easy identifier in a list |
| 4 | Long Description | Here you can be more specific to the job |
| 5 | Quote Date | This is the date of the Quote |
| 6 | Branch | You can select a specific branch that this is linked to if you had these set up at the start |
| 7 | Order Number | Customer Order Number |
| 8 | Team | You can select a team if these have been setup |
| 9 | Employee | Refers to the specific person responsible for completing a task or project. It helps track accountability, scheduling, and communication. |
| 10 | Department | Add a department if this has been setup for your company |
| 11 | Function | |
| 12 | Est Start Date | Date estimated for Job to start |
| 13 | Group Activity | |
| 14 | Completion Date | Date Estimated for Job to be completed |
| 15 | Delivery Date |
Date that the item is expected to be delivered to your customer |
| 16 | Create PO Drop Ship | This is to allow you to create a PO from the Job once its started. |
| 17 | Allow to Exceed Quote Value | Ticking this box allows actual job costs to exceed the quoted value. This is helpful when unexpected expenses arise during production or service delivery, and you want the system to continue tracking costs without treating the quote as a strict limit. If left unticked, a new quote must be created to include any additional costs. |
| 18 | Allow to Exceed Budget Qty | Ticking this box allows the actual quantity used in the job to exceed the budgeted amount. This is useful when additional units are required during production or service delivery. If left unticked, you’ll need to produce a new quote to add more units. |
| 19 | Activate Report Dates | This will allow you to be able to report on this job |
| 20 | Use Build Task Defaults |
When you create a build task default, you can specify alternative warehouses or item sources. Once a quote is converted into a job, the system will apply the defaults set in your build template. This ensures that materials are drawn from the designated warehouse rather than the main warehouse, allowing for more precise inventory control—especially when working with a master warehouse setup. |
| 21 | Charge Up (SC) | Charge Up (SC) means the customer is billed for actual time and materials used, including any extras beyond the initial scope. Charge Up allows you to invoice for additional costs incurred during the job. |
| 22 | Prepaid (CTC) |
Prepaid refers to the quoted amount for the job, the fixed charge agreed to by the customer. You can’t invoice beyond this amount, so any extra time, materials, or costs that exceed the quote become your internal expense, or ‘Cost to Company (CTC) |
| 23 | Warehouse | All stock will come from the Warehouse selected here |
| 24 | Job Link | You may find that you already have a job for this customer, and this is a sub job, to can select this job form the drop-down menu link to two or more jobs. |
| 25 | Assembly | “Assembly” refers to an internal process where components or materials are prepared, combined, or staged before installation or delivery. It’s not billed separately to the customer but contributes to your overall job cost. |
| 26 | Lock Employee | You can lock the employee assigned to this job so it cannot be changed without your knowledge. |
Quote Statuses
Job Costing > Activity > Job New Quote Search
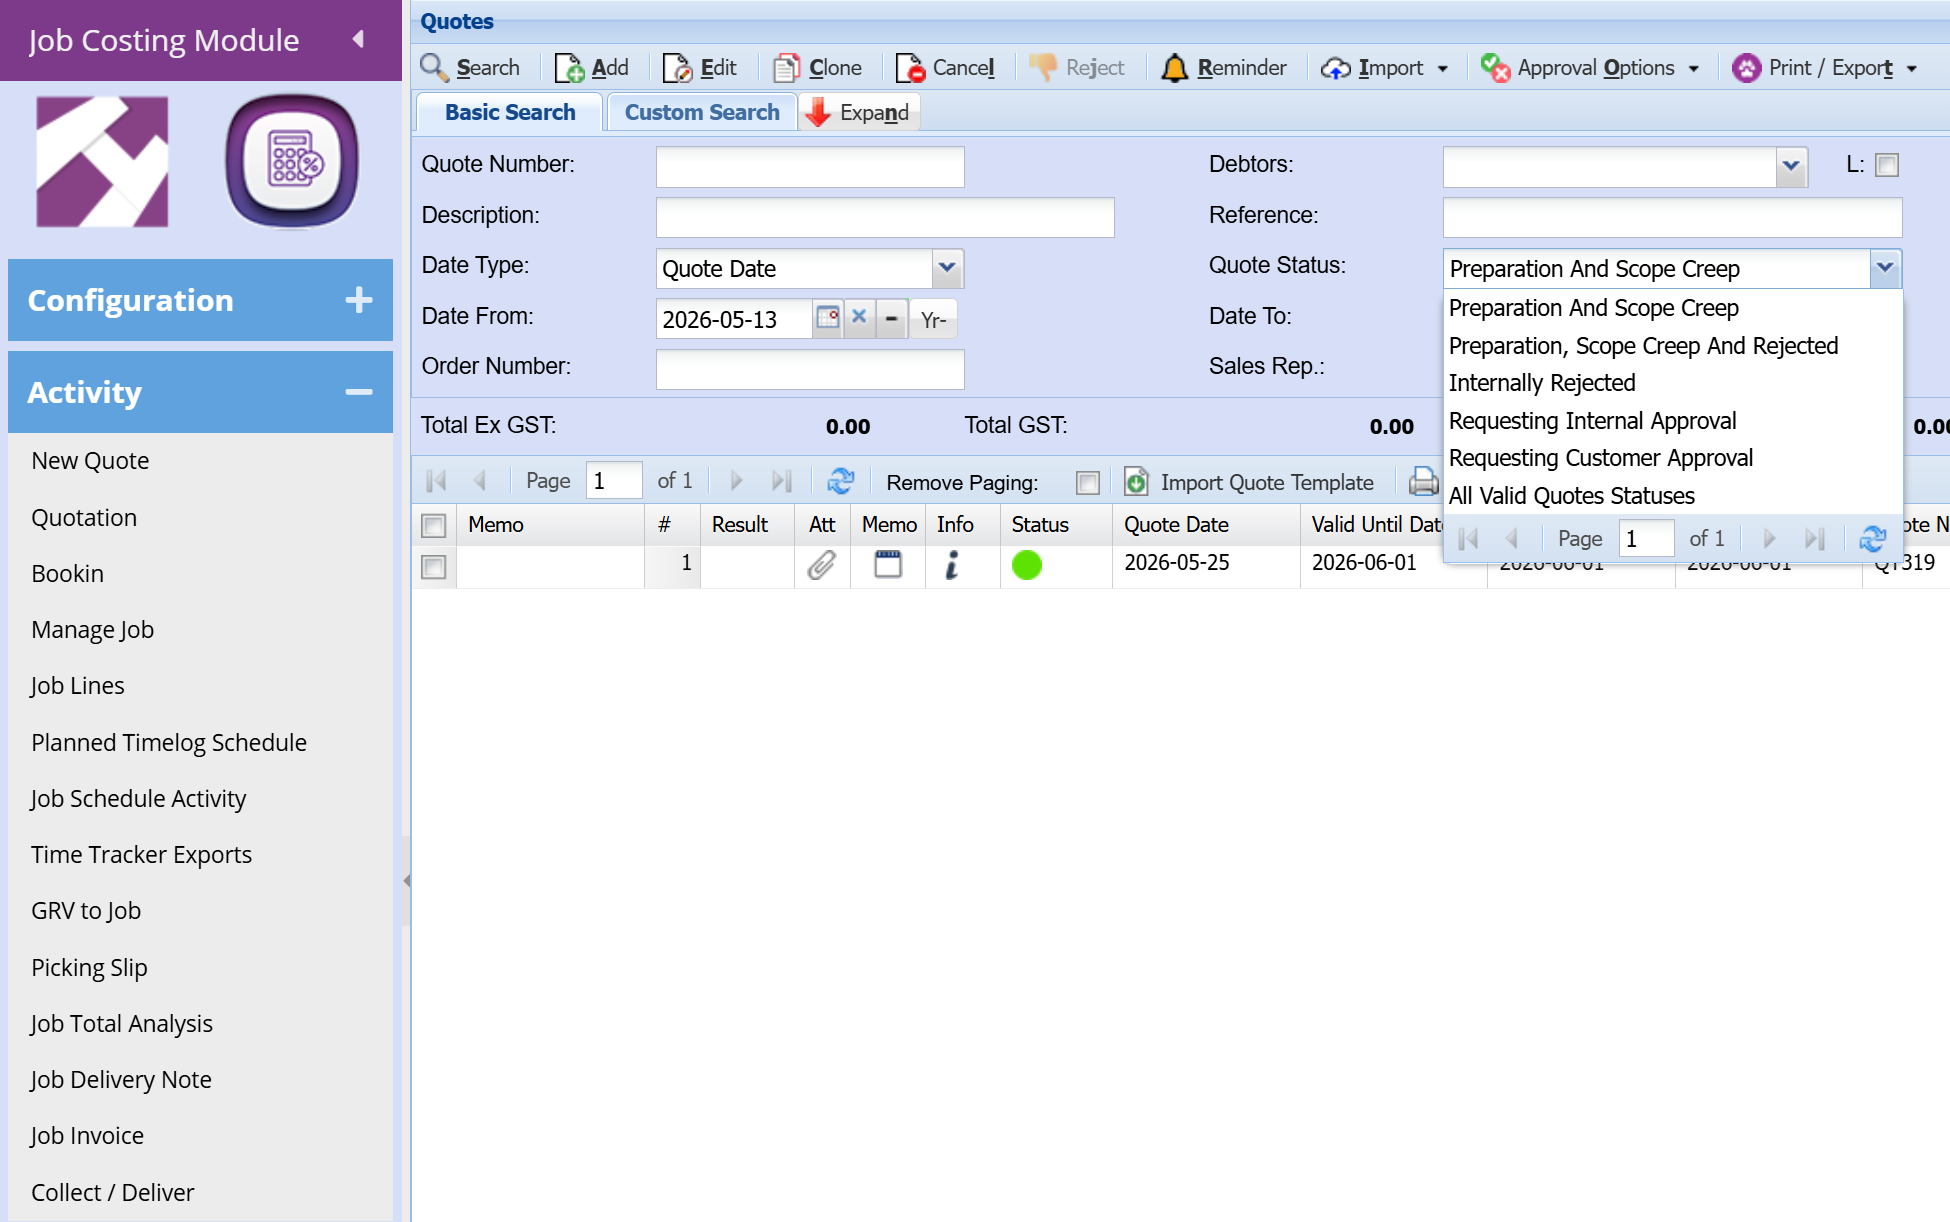
Preparation
This is the stage where a quote has been created.
Path:
All
Displays quotes across all status stages. It is not recommended to search using this status.
Scope Creep Quote
This applies when a quote is created from a job using the Scope Creep Quote function. The quote is considered to be in the preparation stage and must progress through all approval stages.
Requesting Internal Approval
This status indicates the quote has moved from Preparation to Internal Approval.
Path: Job Costing > Activity > Job Internal Quote Approval
Internal Approval
This is the stage where the quote is undergoing internal review and approval.
Job Customer Quote Approval
This status means the quote has progressed from Preparation or Internal Approval to Customer Approval.
Path: Job Costing > Activity > Job Customer Quote Approval
Customer Approved
This status indicates the quote has been approved (from Preparation, Internal Approval, or Customer Approval) and converted into an active job. The job is now available under Manage Job, essentially forming part of the order book.
Path: Job Costing > Activity > Manage Job
Internal Rejection
This occurs when a quote is rejected during the Internal Approval stage.
Customer Rejection
This occurs when a quote is rejected during the Customer Approval stage.
This status applies when a quote is cancelled at any stage of the quote process.
Quote - Exclude from Reports
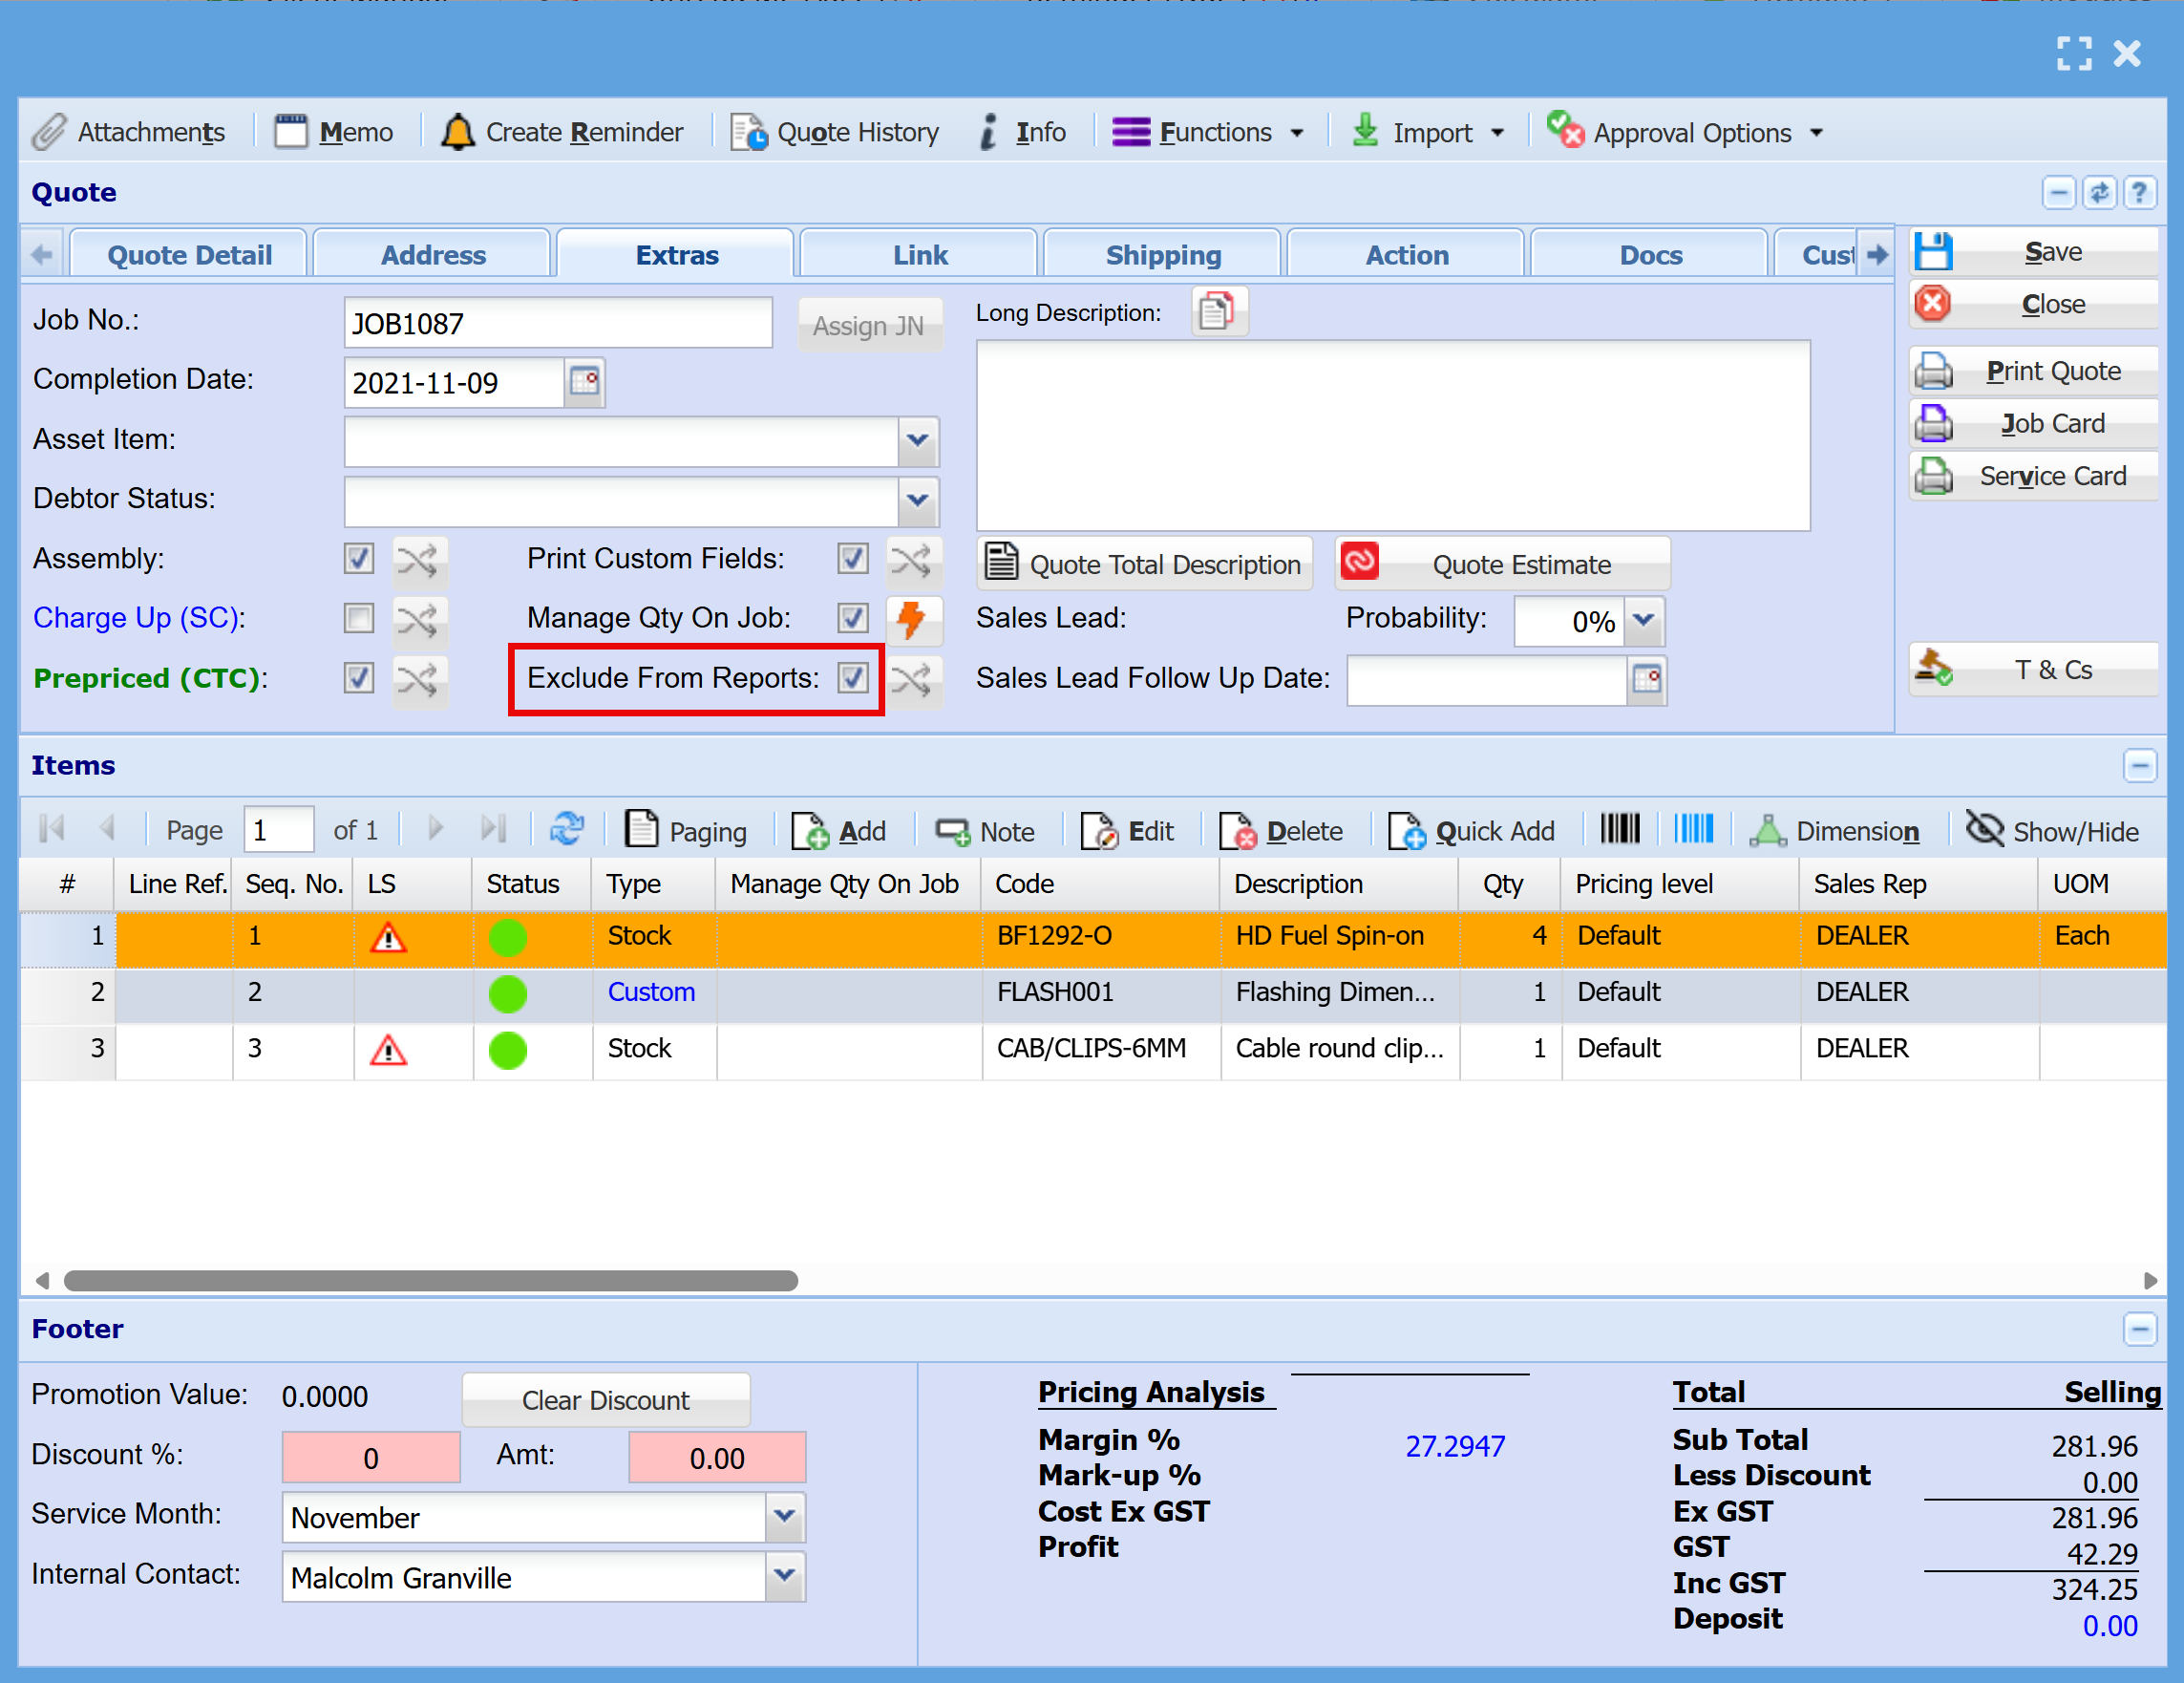
This flag will assist when running reports on quote values, allowing us to exclude certain quotes (effectively treating them as zero).
This will work in conjunction with the Prepriced tick box.
Rules:
-
Quote created from a job (Prepriced already ticked):
- If a quote is created from a job where the Prepriced tick is already selected, then the “Exclude from Reports” tick should automatically be applied.
-
Quote (.1) created from a job (Prepriced added later):
- If a quote is created from a job and the user selects the Prepriced tick (when it was not previously selected), then the “Exclude from Reports” tick should also be applied.
-
New standalone quote:
- If a new quote is created (not from a job) and the user selects Prepriced, no action is required — do not apply the “Exclude from Reports” tick.
Job Costing Quote Detail Report
Job Costing > Reports> Job Quote Detail Report
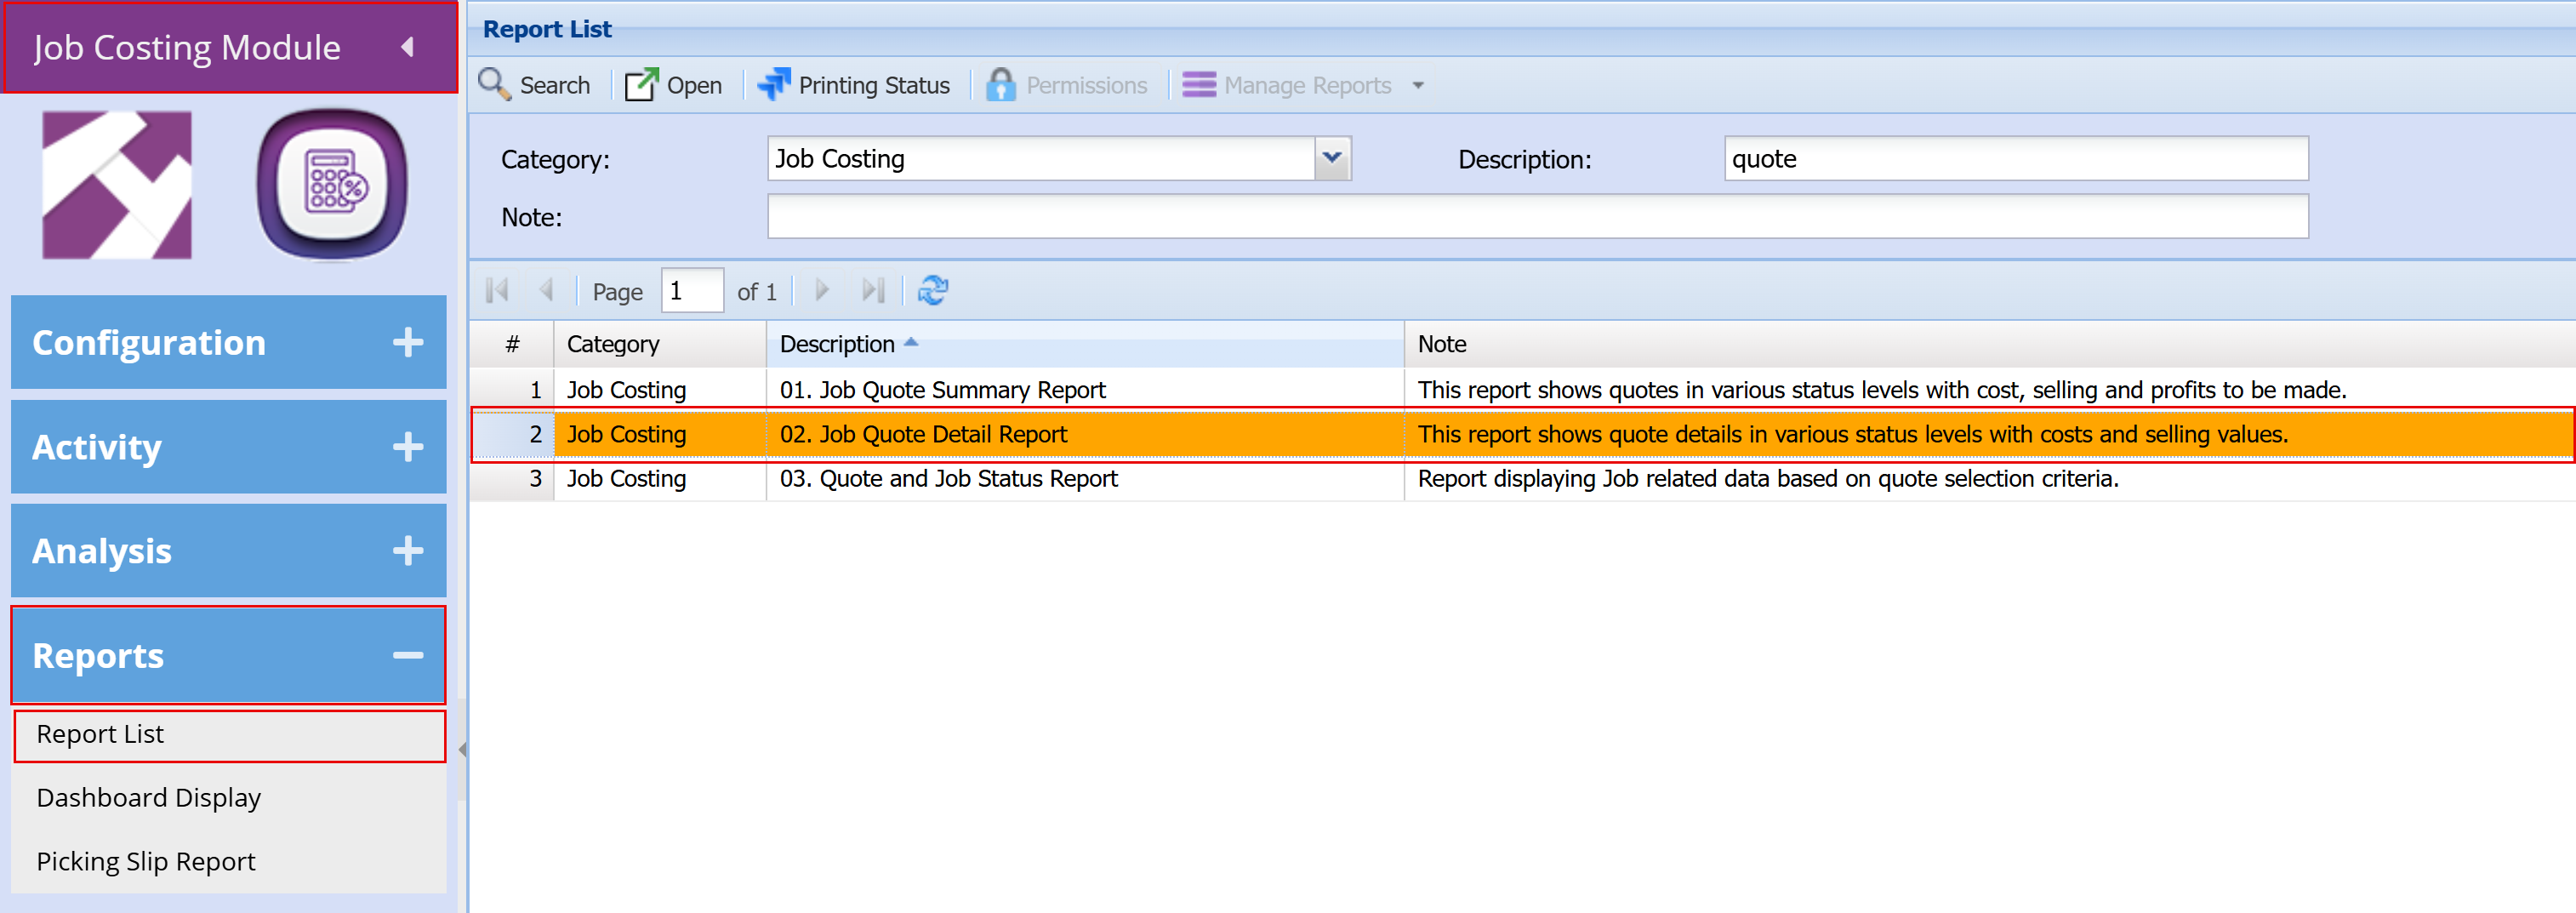
- Double click to open report
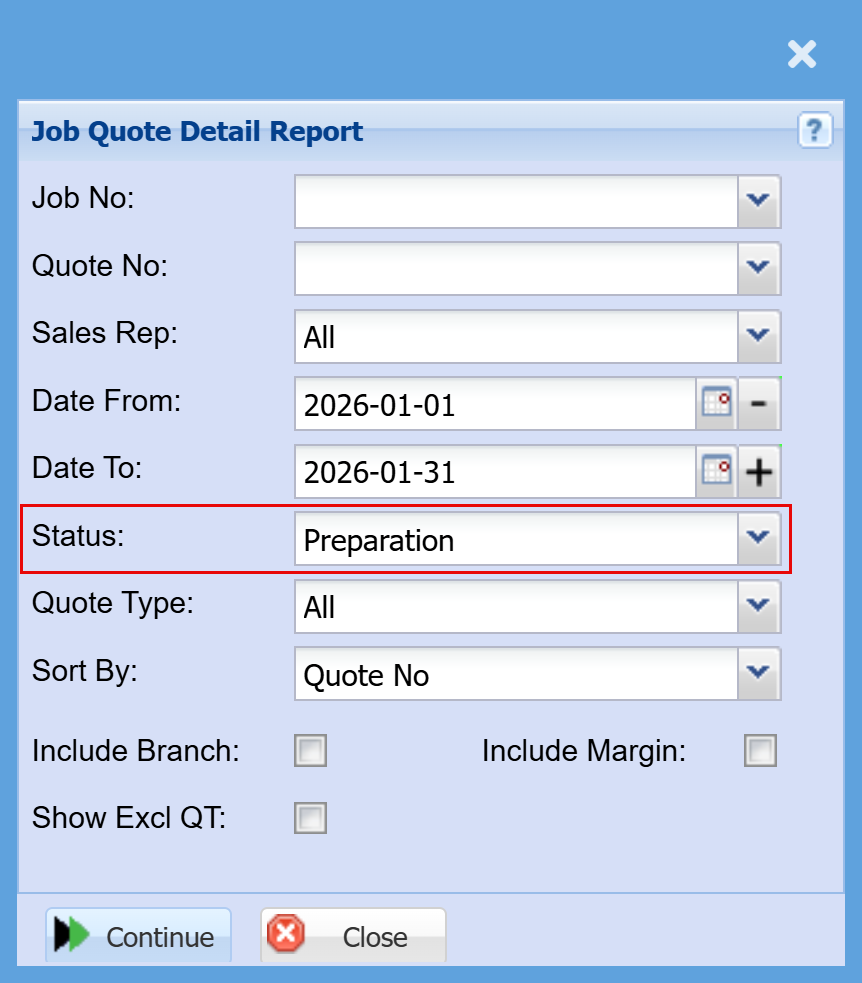
Statuses
|
Preparation |
This is the stage where a quote has been created. |
|
Scope Creep Quote |
This applies when a quote is created from a job using the Scope Creep Quote function. The quote is considered to be in the preparation stage and must progress through all approval stages. |
|
All |
Displays quotes across all status stages. It is not recommended to search using this status |
|
Requesting Internal Approval |
This status indicates the quote has moved from Preparation to Internal Approval. Path: Job Costing > Activity > Job Internal Quote Approval |
|
Internal Approval |
This is the stage where the quote is undergoing internal review and approval. |
|
Job Customer Quote Approval |
This status means the quote has progressed from Preparation or Internal Approval to Customer Approval. Path: Job Costing > Activity > Job Customer Quote Approval |
|
Customer Approved |
This status indicates the quote has been approved (from Preparation, Internal Approval, or Customer Approval) and converted into an active job. The job is now available under Manage Job, essentially forming part of the order book. Path: Job Costing > Activity > Manage Job |
|
Internal Rejection |
This occurs when a quote is rejected during the Internal Approval stage. |
|
Customer Rejection |
This occurs when a quote is rejected during the Customer Approval stage. |
|
Cancelled |
This status applies when a quote is cancelled at any stage of the quote process. |
Manage Job
Managing a Job
Job Management
Job Costing > Activity > Manage Job
- Type in your Job number
Click Search
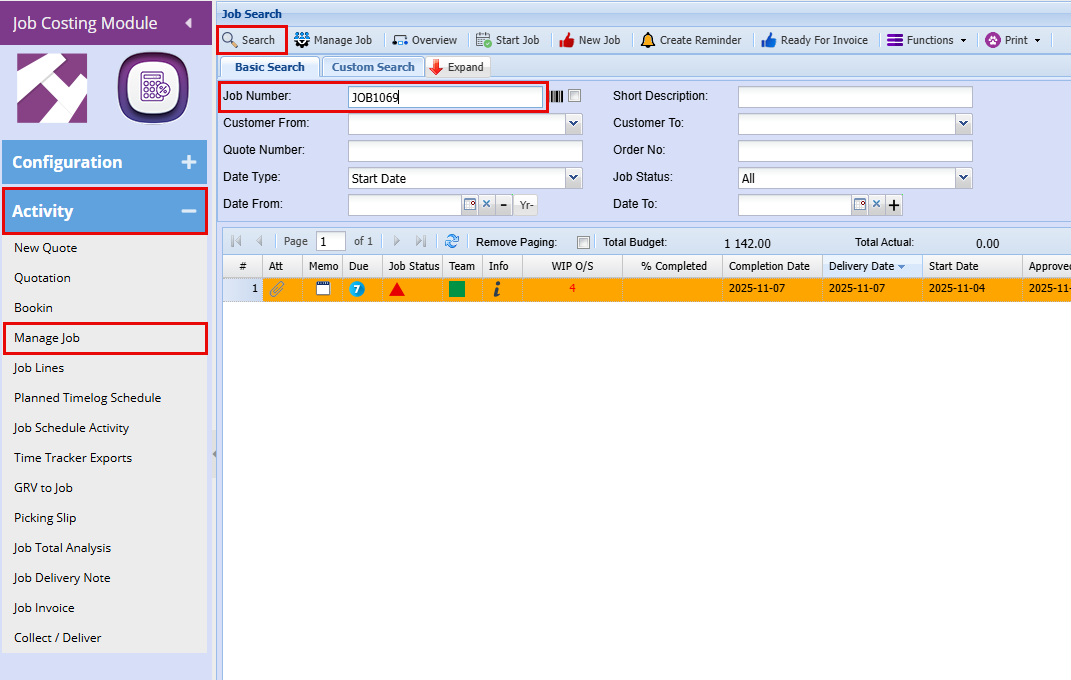
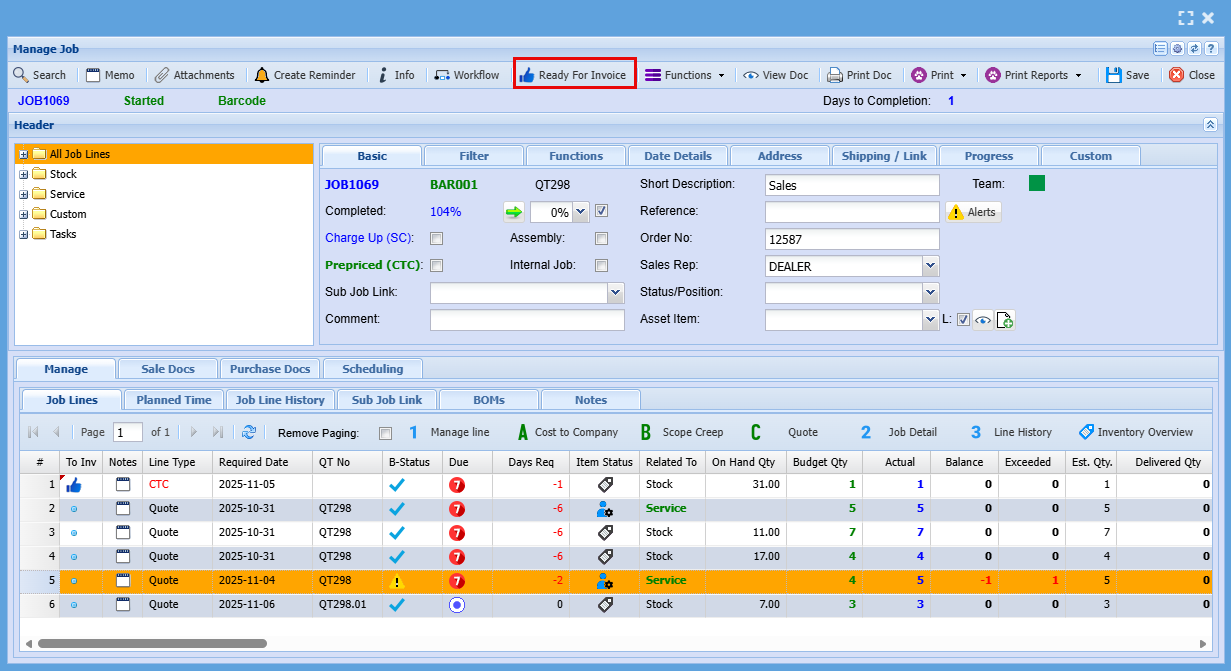
Each job line consists of multiple columns, with each column providing specific details about the job.
You can rearrange the columns in the order that the information is most relevant to you by simply dragging and dropping them into your preferred order as shown below.
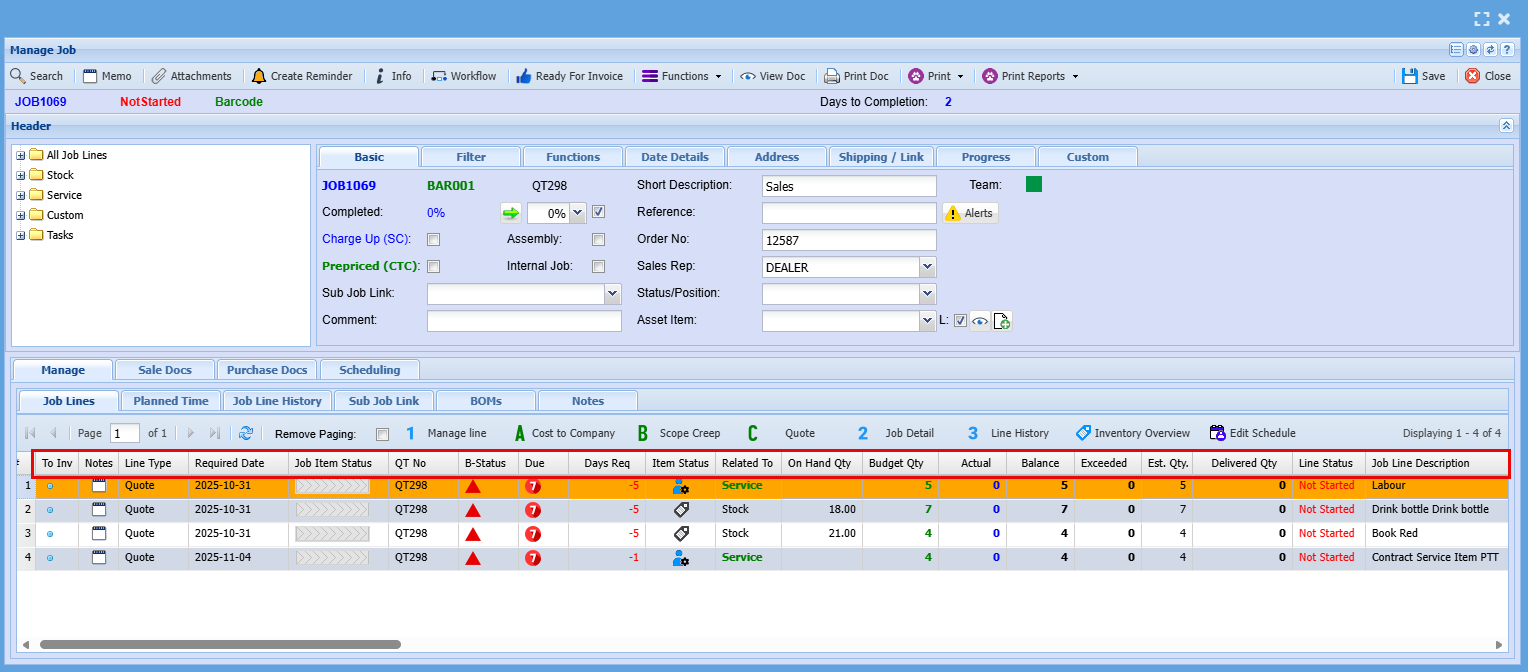
| To Invoice | You can click on the dot to change the icon to a thumbs up to send this line for invoicing |
| Notes | You can add notes for internal records. |
| Line Type | This refers to where the line came from, the example above is from a Quote but can come from a CTC (Cost to Company) or a SC (Scope Creep) |
| Required Date | This is the date the Job is to be completed by |
| Job Item Progress | This is used for Production Tracking |
| QT No. | This is the Quote number the line was added from |
| B-Status | This will show a different icon to show whether the Job has been started, in progress or completed |
| Due | Will show you how many days are given to complete Job |
| Days Required | This will show you have may days is needed to complete this Job Line Item |
| Item Status | This will show if the line is a Stock, Service or Custom Item using Icons |
| Related To | This will show if the line is a Stock, Service or Custom Item |
| On Hand Qty | This will show you how many of the specific item you have on hand to do the job, it will highlight if you do not have enough stock to complete the job |
| Budget Qty | This shows you what you had initially quoted |
| Actual | This Quantity indicates the quantity used for the job |
| Balance | This is the Quantity that is left over from the Budget Quantity |
| Exceeded | This will show you the quantity you have exceeded over the Budget Quantity |
| Est Qty | This is usually the same as tour Budget Qty |
| Delivered Qty | This is how many of this line item has been completed and actually dispatched to the customer |
| Line Status | This speaks to the Job Item Status and B-Status which shows job progress |
| Job Line Description | This is the description form the quote detailing what the line item is |
Manage Job by Line
Managing one line at a time within a workflow keeps you in control by ensuring each task is handled deliberately and accurately. This method reduces errors, simplifies troubleshooting, and creates a clear audit trail. It’s the recommended approach for maintaining consistency, accountability, and professional standards across every job.
- Double click on a job line
- Update your usage amount for this item
As shown below the main things you will be looking at is the following
| Available Stock Qty | Shows you all available stock |
| Budget Qty | This is what was Quoted |
| Actual Qty | This is how many have been used |
| Balance Qty | This is how many you have left to use from your Quote amount |
| Usage | This is an open field where you will put in the quantity being used |
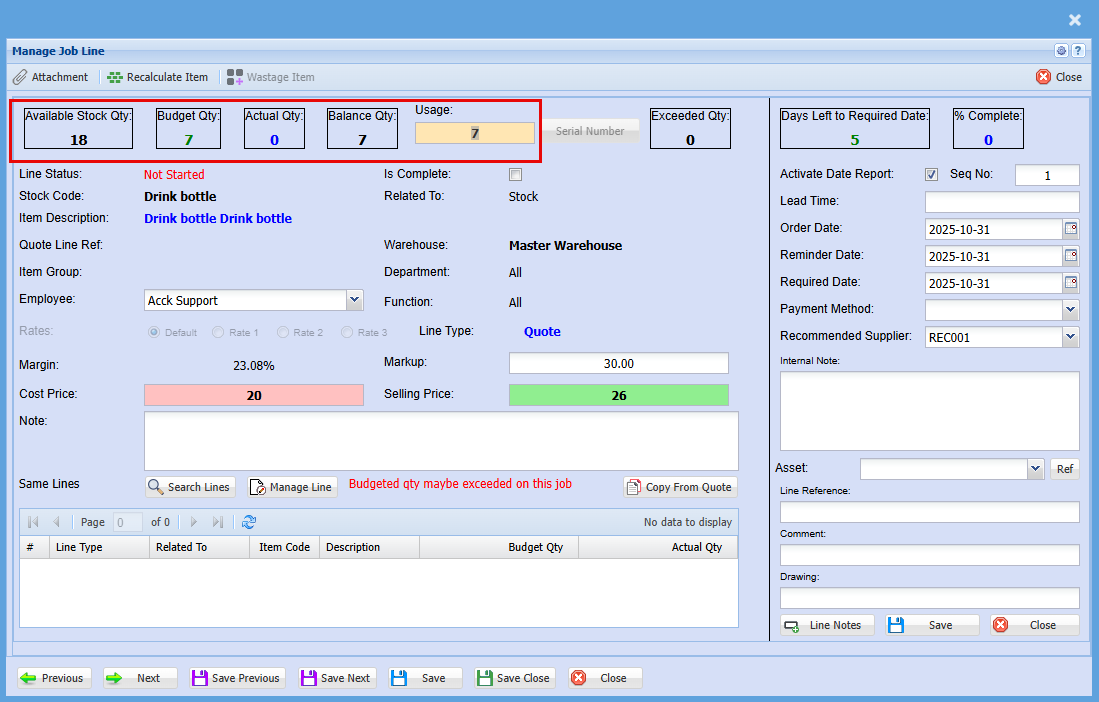
- Click Save and Close
You can now see that the line is active, and you’ll notice updated quantities and statuses reflecting the latest changes.
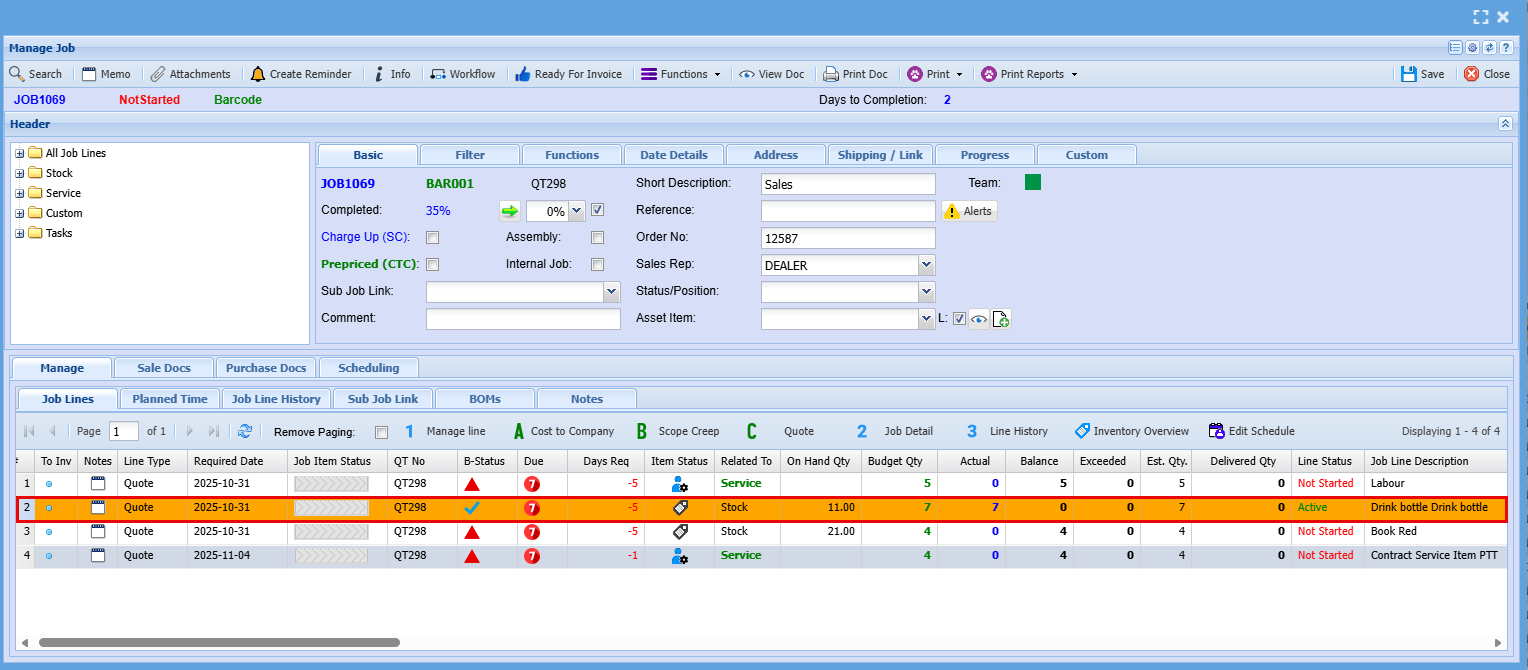
If you've made an error and need to adjust the quantity, simply double-click the Job Line again. To decrease the quantity, enter a minus sign (–) in front of the amount you're reducing, as shown below.

UnManage Line/All
| A | Unmanage All items on a job |
| B |
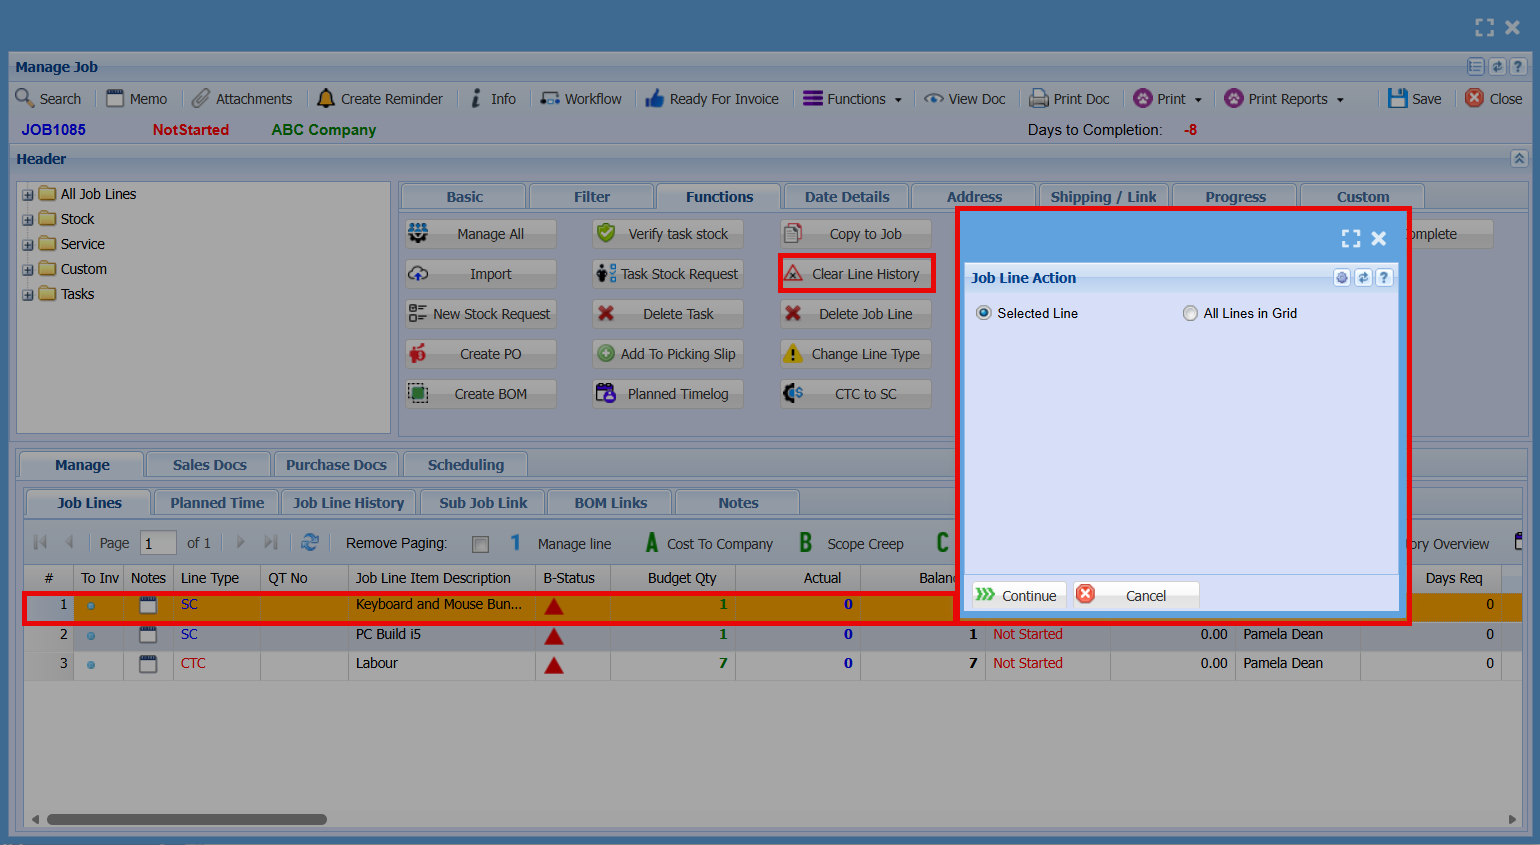
Clear Line History Only works if the Managed Actual quantity equals zero |
| C |
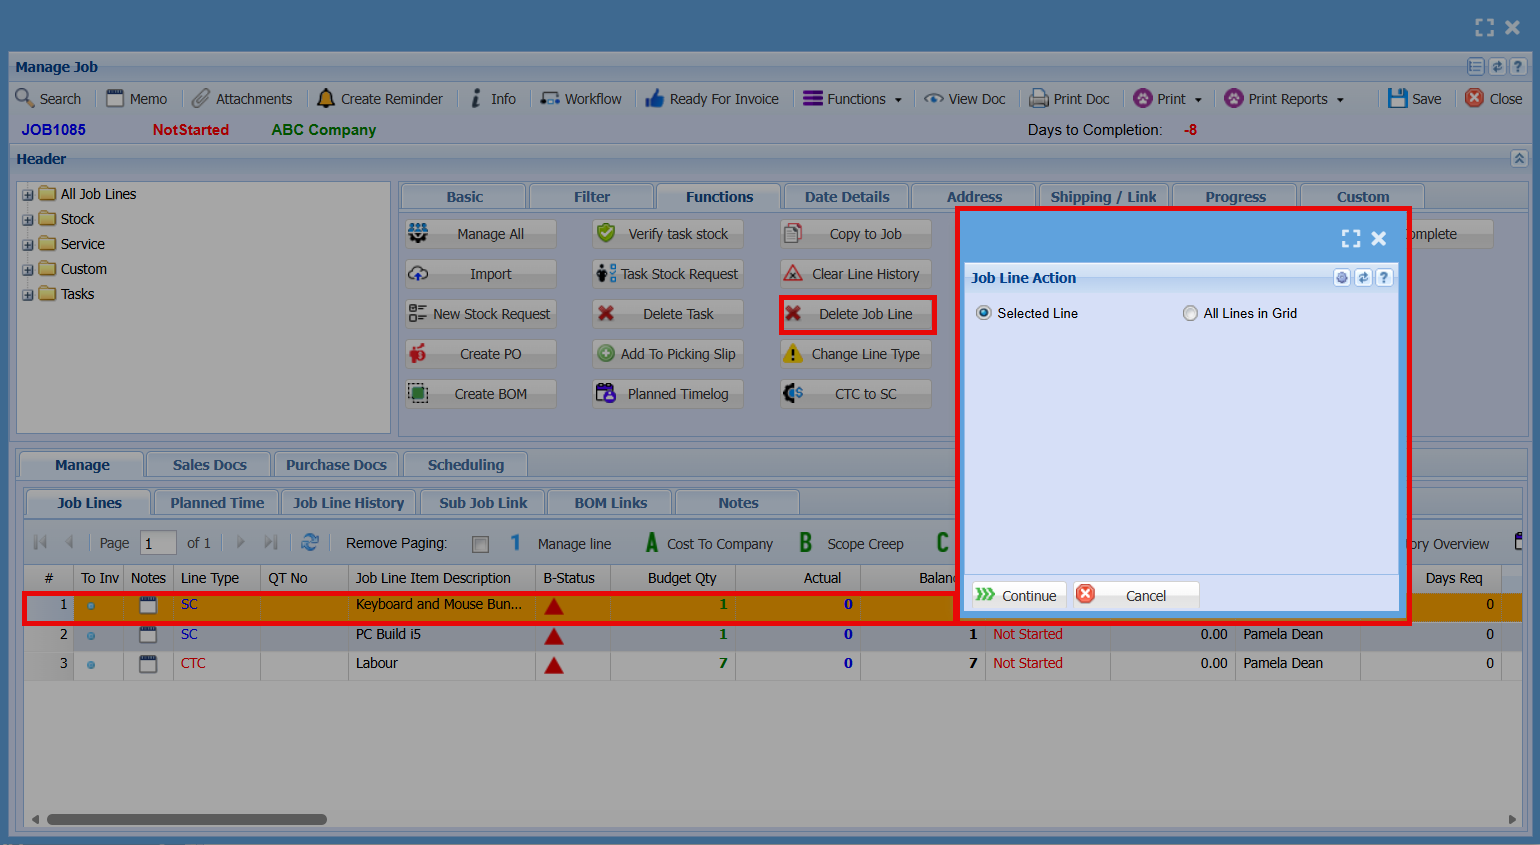
Delete Job Line Only works if there are no Line History entries |
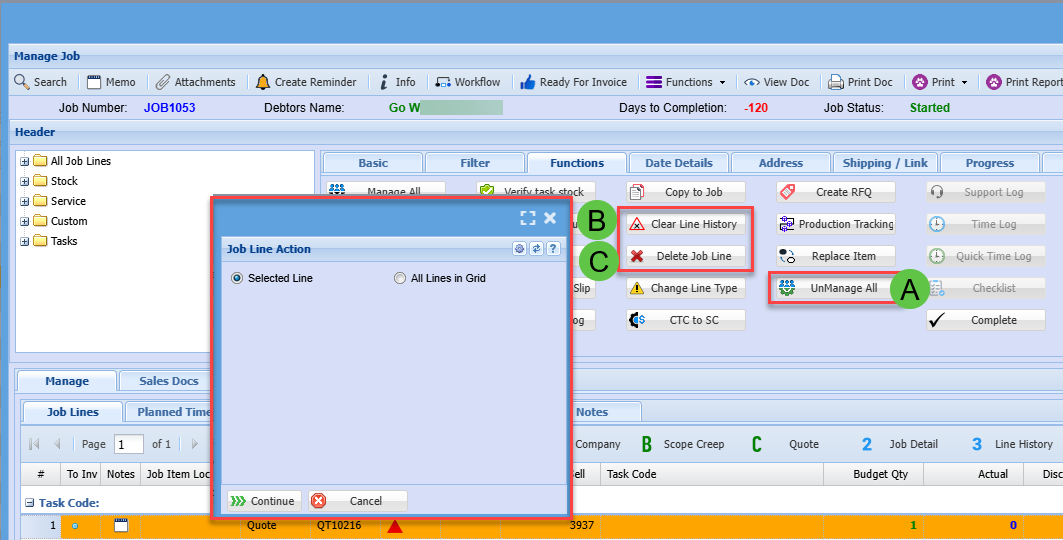
- Actions can be applied to either a selected line or all lines in the grid.
- “All lines in grid” will operate based on the currently filtered data.
- If a line cannot be processed, it will be skipped and the system will continue with the next line.
Adding a New Line to a Job
To add a new item to a job, you have three options:
- Scope Creep – This can be added manually and will be charged to the customer. It’s recorded as a cost to company and included in the overall job cost.
- Cost to Company – Also added manually, this option absorbs the cost internally without charging the customer. It’s useful for goodwill gestures or internal adjustments.
- Quote – If the customer has accepted a quote for the additional work, it follows the same process as the initial quote but is linked to the existing job rather than creating a new one.
See below where you will find these options.
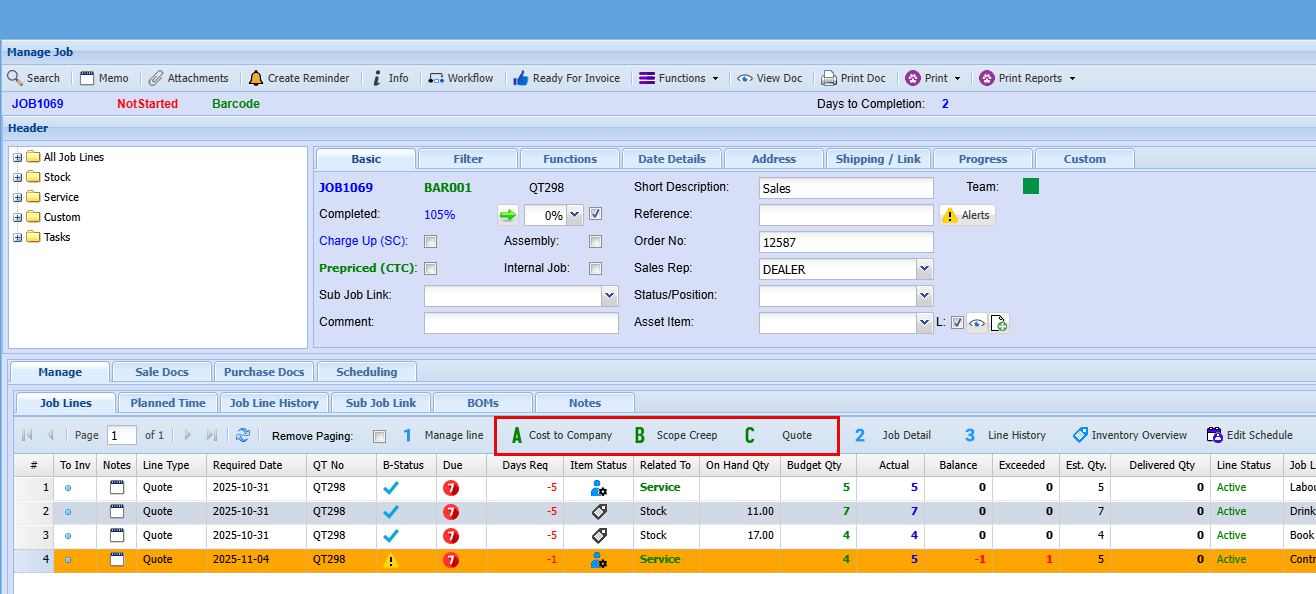
The screen to add Scope Creep or Cost to Company looks the same and essentially works the same.
- Click on Scope Creep or Cost to Company

- Select your Item from the dropdown menu
- Add your Quantity
- Click Save & Close

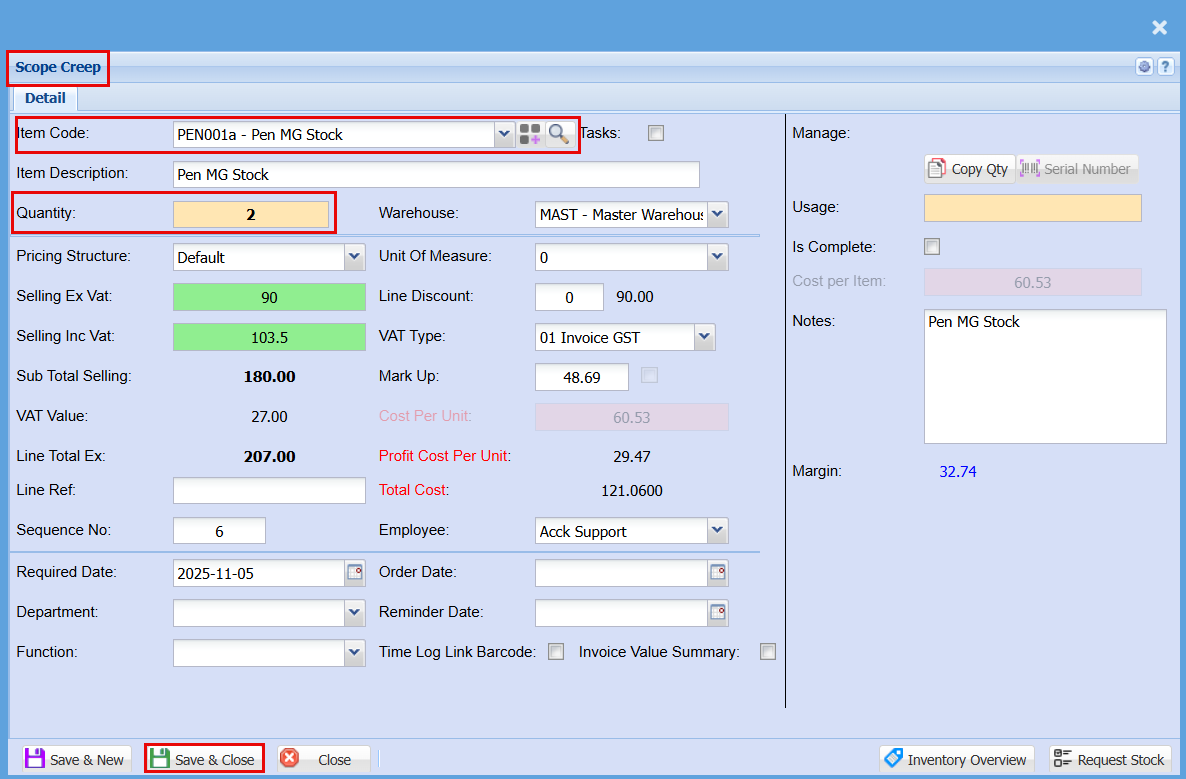
To add a new line to the job from Quote:
- Click on Quote

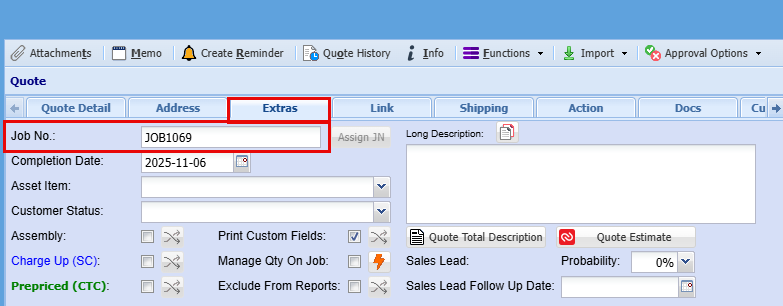
Creating a quote from within a Job similarly to starting one via Job Costing > Activity > Quote in the main menu. However, because it originates from a job, it will automatically be linked to that job. This connection is visible in the Extras tab.
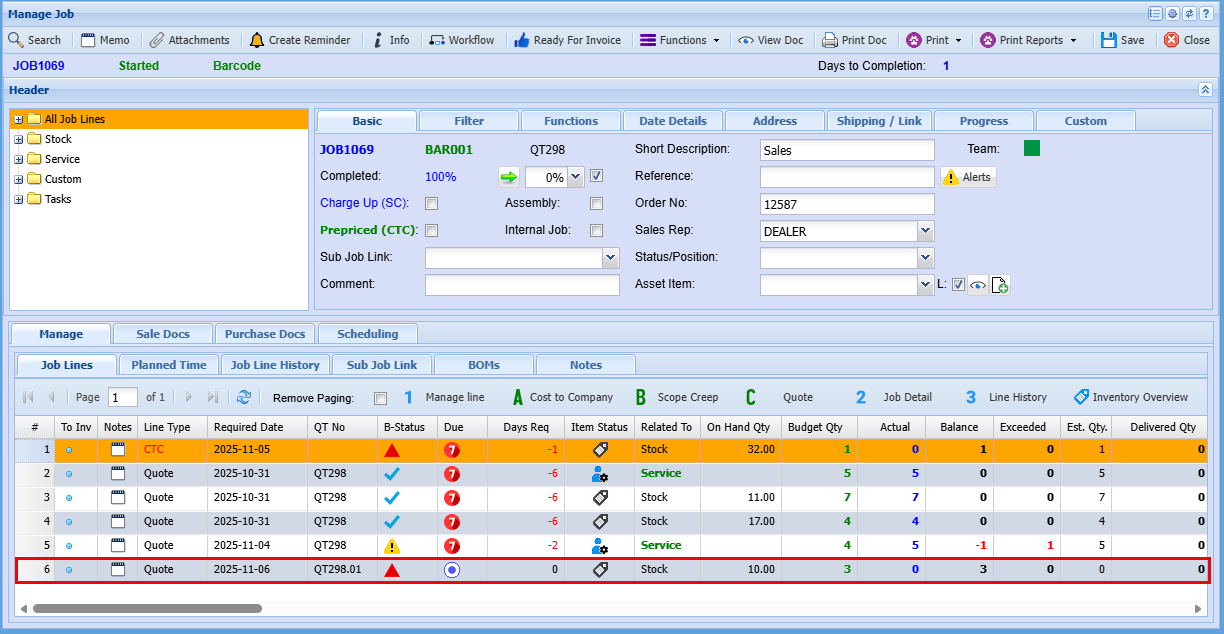
Quotes created this way will also include a “.1” suffix after the original quote number, this indicates that the quote is an extension or variation of the original, tied directly to the job.
If you create a quote from the main menu instead, it will generate a new quote number. You can still manually link it to a job by entering the job number, but creating it from within the job acts as a convenient shortcut.
Once customer approval is received and the quote is approved to the job, the corresponding line will be added to the job record. The quote number will appear with a “.1” suffix appended to the original quote number, this provides a quick visual cue that the item represents additional work beyond the original quote.
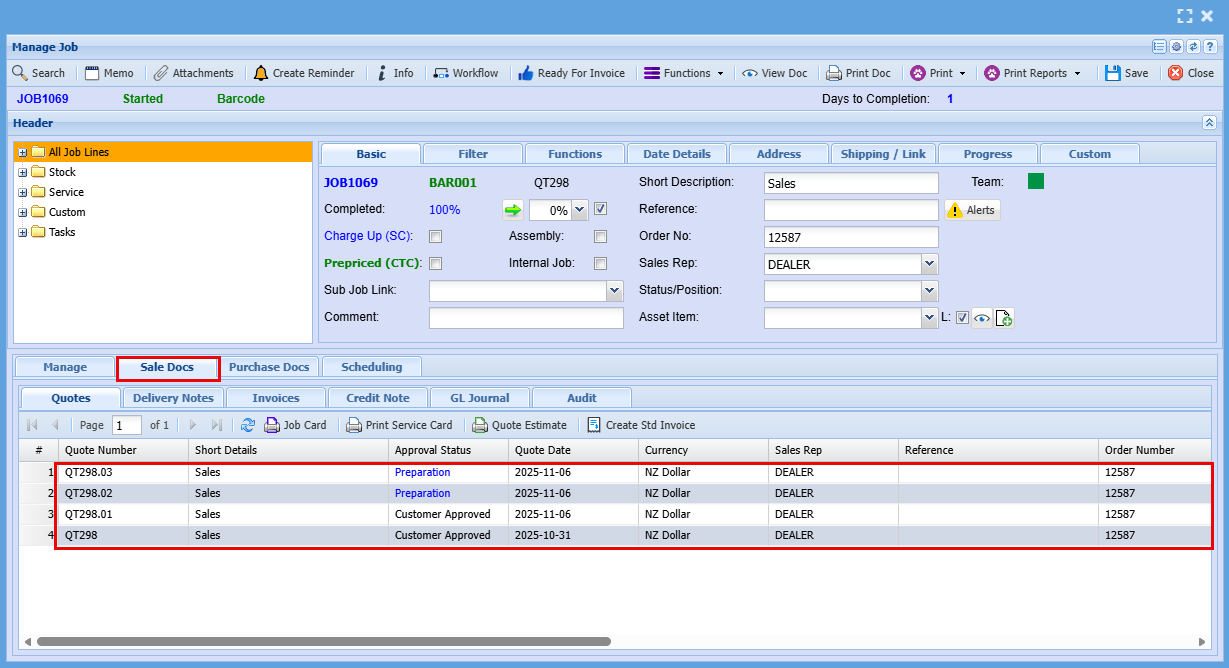
Viewing the Quotes on a Job
To view all quotes on a job clock on the "Sales Docs" tab. Here you will see any outstanding quote as well as quotes that have been approved.
Move Job to Invoice
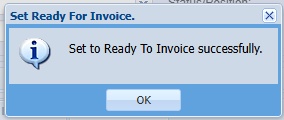
Once the job is fully completed and all line items have been managed, you can click the “Thumbs Up” icon at the top tabs, labeled “Ready to Invoice.”
Job Search Screen Explained
Job Search Screen
Searching for Jobs - Job Costing > Activity > Manage Job
This area only searches for Jobs with a Job status of
- Not Started
- Started
- In Progressing
Search Button

After selecting or entering the relevant filters (such as job number, customer, date range, or status), clicking Search will display all jobs that match those criteria in the results grid below.
Basic Search Tab

| Job Number |
If you know the exact job reference
|
|
Customer From / To
|
Filter jobs for a specific customer or range of customers
|
| Quote Number |
Locate jobs linked to a specific quote
|
|
Order Number
|
Search using the related order reference
|
|
Short Description
|
Search by keywords describing the job
|
|
Date Type
|
Choose which date you want to filter by (e.g., Start Date)
|
|
Date From / Date To
|
Define a date range to refine results
|
|
Job Status
|
Filter by status (e.g., All, Active, Completed)
|
Job Search Grid Columns Explained
Job Costing > Activity > Manage Job
- Click Search
The Job Search screen displays results in a grid format. Each row represents a job record, and the columns provide key information about that job.
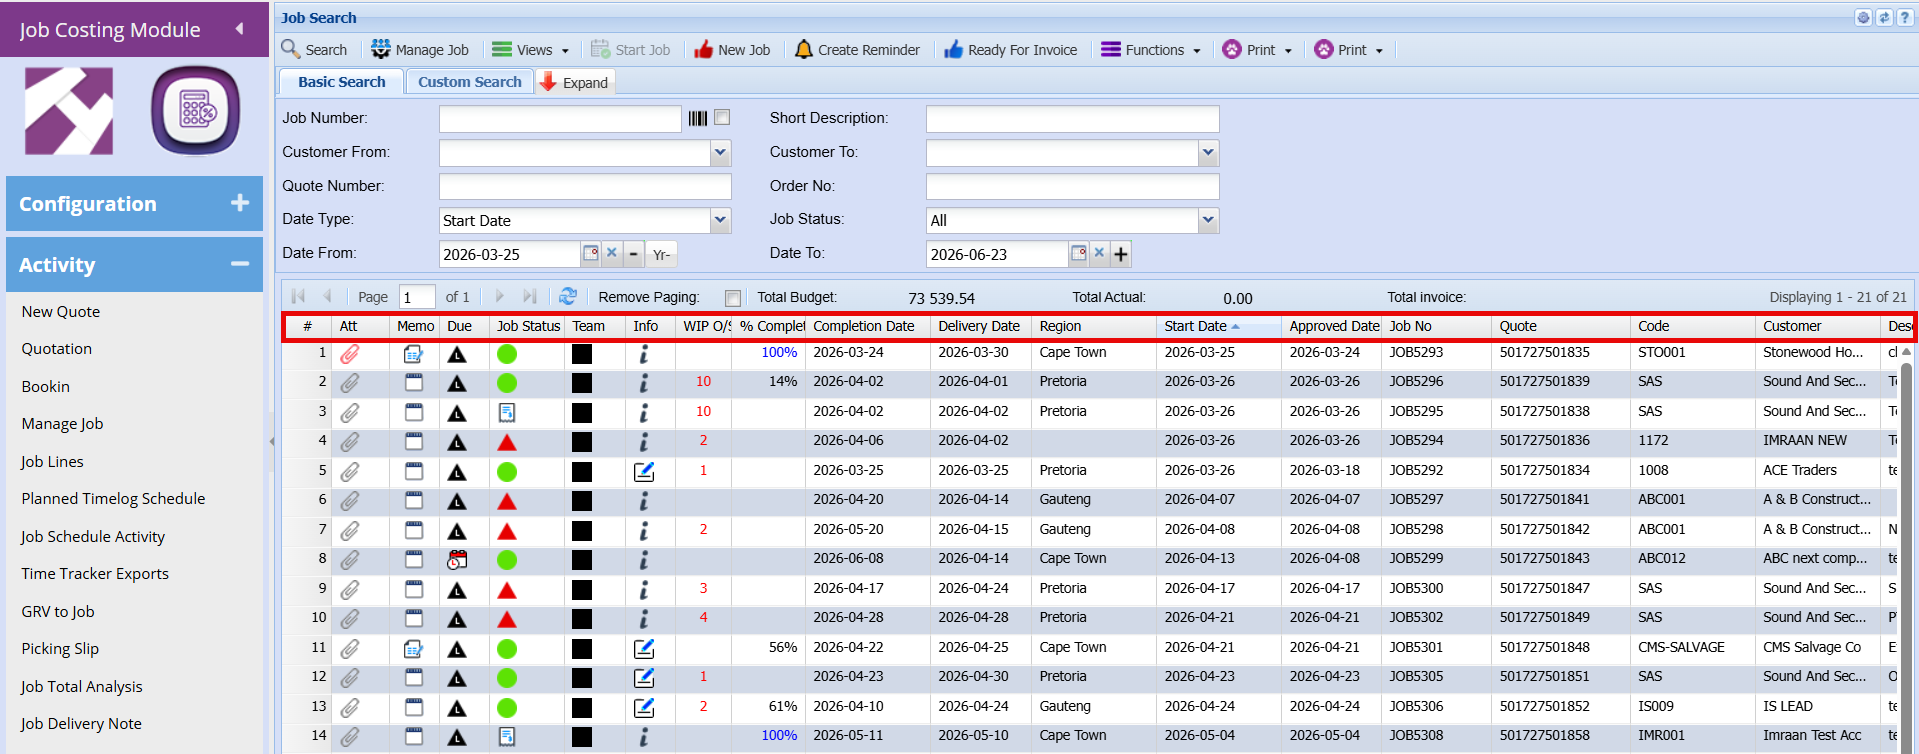
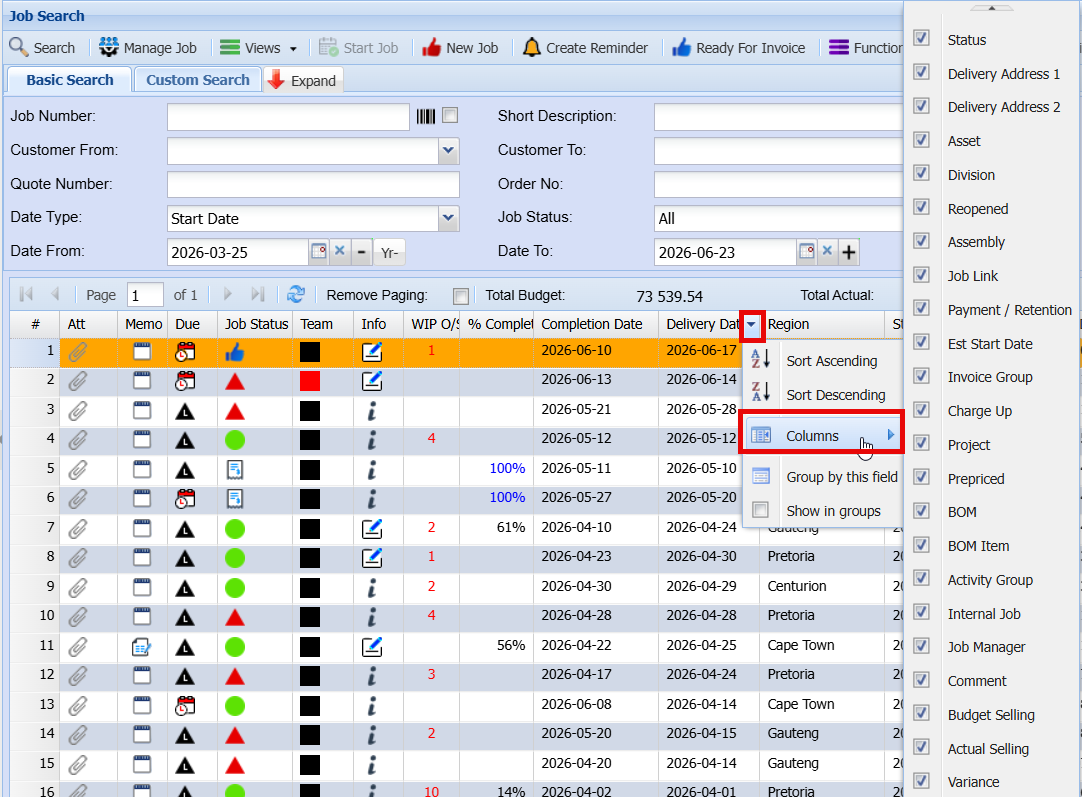
The grid is customisable, allowing users to choose which columns are visible based on their needs.
Customise columns in the grid:
- Hover your mouse over any column header in the grid
- A downward arrow will appear on the right-hand side of the header
- Click on this arrow to open a menu
- Select “Columns” from the list
- A full list of available column options will then be displayed
- Tick will show a column or untick to hide it
Reordering Columns
- Columns can also be rearranged to suit your preferred layout
- Simply click and hold a column header, then drag and drop it into the desired position
- This allows you to organise the grid in a way that best fits your workflow
|
Status
|
Displays the current status of the job
|
|
Delivery Address 1 / 2
|
Shows the delivery location details
|
|
Asset
|
Links the job to a specific asset, if applicable
|
|
Division
|
Indicates the business division associated with the job
|
|
Reopened
|
Identifies jobs that have been reopened after completion
|
|
Assembly
|
Indicates if the job involves assembly components
|
|
Job Link
|
Provides a reference or link to related jobs
|
|
Payment / Retention
|
Displays payment or retention-related information
|
|
Estimated Start Date
|
Planned start date for the job
|
|
Invoice Group
|
Groups jobs for invoicing purposes
|
|
Charge Up
|
Indicates whether the job is chargeable
|
|
Project
|
Links the job to a broader project
|
|
Prepriced
|
Shows if pricing has been predefined
|
|
BOM / BOM Item
|
Displays Bill of Materials and related items
|
|
Activity Group
|
Categorises the job under a specific activity
|
|
Internal Job
|
Flags jobs that are internal (non-customer facing)
|
|
Job Manager
|
Shows the person responsible for the job
|
|
Comment
|
Allows for additional notes or remarks
|
|
Budget Selling
|
Budgeted revenue for the job
|
|
Actual Selling
|
Actual revenue recorded
|
|
Variance
|
Difference between budget and actual values
|
|
Invoiced Selling
|
Amount that has been invoiced
|
|
Memo
|
Additional internal notes or messages
|
|
Att (Attachments)
|
Indicates if documents or files are attached to the job
|
|
Due
|
Displays due dates or overdue indicators
|
|
Job Status
|
Current status of the job (e.g. in progress, completed)
|
|
Team
|
The team assigned to the job
|
|
Info
|
Additional job-related information or quick access details
|
|
WIP O/S (Work in Progress Outstanding)
|
Value of work still in progress |
| % Completed |
Progress percentage of the job
|
|
Completion Date
|
Date the job was completed
|
|
Delivery Date
|
Scheduled or actual delivery date
|
|
Region
|
Geographic area linked to the job
|
|
Start Date
|
When the job began
|
|
Approved Date
|
Date the job was approved
|
Expanded Search Fields


|
Status / Position
|
Filter jobs based on their current status or stage within the workflow
|
|
Division
|
Search for jobs linked to a specific business division
|
|
Region
|
Narrow results by geographic location or branch
|
|
Project
|
Locate jobs associated with a particular project |
|
Payment / Retention
|
Filter based on payment terms or retention details
|
|
Reference
|
Search using any external or internal reference number
|
|
Asset Item
|
Find jobs linked to a specific asset or item
|
|
Order By
|
Sort the results based on selected criteria (e.g., date, job number)
|
|
Assembly
|
Filter jobs related to specific assemblies or grouped components
|
|
Charge Up
|
Identify jobs based on charge-up rules or settings
|
|
Prepriced
|
Filter jobs that have predefined pricing applied
|
|
Job Manager
|
Search for jobs assigned to a specific manager
|
|
Invoice Group (Inv Group)
|
Locate jobs grouped for invoicing purposes
|
These additional filters are especially useful when:
- Working with large volumes of jobs
- Needing to pinpoint very specific records
- Performing reporting or detailed analysis
They allow users to move beyond basic searches and fine-tune results with greater accuracy and control.
Manage Job Button

The Manage Job button (highlighted in the toolbar at the top) is used to open a selected job into the full job management screen.
Views Button

- Overview Option
This screen allows you to control how the Job Workflow overview is displayed, helping you plan and track jobs over a selected time period.

This screen allows you to control how the Job Workflow overview is displayed, helping you plan and track jobs over a selected time period.
|
View |
The first View dropdown lets you choose which date the workflow is based on: - Estimated Start Date This determines how jobs are positioned and displayed in the workflow timeline. |
|
Column Width |
- This setting controls the width of the columns in the workflow display. Useful for adjusting the layout to fit your screen or improve readability. |
|
Date Range (Date From / Date To) |
- Defines the overall date range of jobs to include in the workflow. - Only jobs within this selected period will be displayed. |
|
Debtor Filter |
- Used to filter jobs for a specific customer (debtor). |
|
View (Duration) |
The second View option controls how far ahead you can plan: - You can display the workflow for up to 12 weeks in advance This helps with forward planning and scheduling. |
|
Start Date |
- Defines the starting point of the workflow view - This is typically set to today’s date, but can be adjusted if needed |
|
Action Buttons |
- Search – Applies the selected filters and displays the workflow - Close – Exits the screen - Clear – Resets all fields |
Once you have applied your desired filters and clicked Search, the results screen will appear as shown below.
This screen displays the results of your search in a workflow (timeline) view, organised by date.
Each column represents a specific date, and the jobs returned from your search criteria are displayed under their scheduled or estimated start dates.

Key Features:
Job Display – Each job appears as a card showing key details such as:
- Job name or description
- Job number
- Status indicators (icons and colours)
- Start and completion dates
- Assigned team
Date-Based Layout – Jobs are arranged in columns by date, making it easy to see what work is scheduled on each day.
Drag-and-Drop Functionality – Users can click and drag jobs from one date column to another to reschedule or reorganise the workflow.
Visual Status Indicators – Colours and icons provide a quick view of job progress, delays, or completion status.
- Calendar Option
The Calendar View displays jobs in a familiar calendar layout, making it easy to see when work is scheduled across specific days.
- Day – View jobs scheduled for a single day
- Week – See jobs across a full week
- Month – Get an overview of jobs across the entire month

- Gantt Chart View
The Gantt Chart View provides a detailed timeline of all jobs, allowing users to visually track progress, duration, and scheduling across a timeline.

- Timeline Display – Each job is represented as a horizontal bar stretched across the dates it is scheduled for, making it easy to see how long a job will take and when it is due.
- Job Details Panel – On the left-hand side, key information is displayed in columns, including:
Job Name
Job Number
Estimated Start Date
Customer Name
Description
- Date Grid (Right Side) – The timeline on the right shows days and weeks, with job bars positioned according to their scheduled start and end dates.
- Visual Progress Tracking – The length and position of each bar clearly indicate:
Job duration
Overlaps with other jobs
Gaps in scheduling
- Drag-and-Drop Functionality – Jobs can be moved along the timeline to adjust scheduling, allowing users to easily reschedule or reorganise workloads.
- Zoom Option – The zoom control allows users to adjust how much detail is displayed in the timeline (e.g., viewing a shorter or longer time period).
Start Job Button

- In most cases, a job will start automatically as soon as a job line is managed or worked on.
- However, there may be situations where you want to start the job before managing any lines.
In this case, you can simply:
- Select the job from the list
- Click the Start Job button
This will activate the job without needing to work on any job lines first.
New Job Button

When this option is selected, a new job is started “on the fly,” allowing users to quickly set up and begin working on a job straight away.
- Direct Job Creation – Create a job immediately without needing an existing quote
- Automatic Background Process – The system will automatically create a blank quote in the background
- Linked Records – This quote is linked to the job and can be accessed later under the Quotes section
- Flexible Workflow – Ideal for situations where work needs to begin quickly without following the full quote-to-job process
Create Reminder Button
The Create Reminder button allows you to set a reminder for a selected job.

To use this feature:
-
- Select a job from the list
- Click Create Reminder
- Enter the reminder details (e.g., date, time, and notes)
This is useful for setting follow-ups, deadlines, or any important actions related to a job.
Ready for Invoice
The Ready for Invoice button is used to mark a job as ready to be invoiced.
When selected, it simply adds a thumbs-up icon to the job in the results grid, providing a clear visual indicator that the job is complete and ready for billing.

- Visual Indicator – Adds a thumbs-up icon to the job line
- Quick Status Update – Clearly shows that the job is ready to be invoiced
- No Complex Process – This is a simple flag and does not generate an invoice automatically
- Easy Tracking – Helps users quickly identify which jobs are ready for the invoicing stage
Functions Button
The Functions tab provides access to a range of additional actions that can be performed on a selected job. These are typically used for maintenance, updates, or managing specific job settings.

| Close or Cancel Job |
Allows you to close a completed job or cancel a job that is no longer required
|
| Job BOM |
Opens or manages the materials associated with the job
|
| Import Delivery / Completion Dates |
Used to update job delivery or completion dates in bulk
|
|
Recalculate Job |
Refreshes and recalculates job costs and related figures to ensure accuracy
|
|
Update Percentage Complete |
Updates the job’s progress bar percentage based on current activity
|
| Payment / Retention |
Manages payment details, including any retention amounts held or released
|
| Change Customer on Job |
Allows you to update or correct the customer linked to the job
|
Manage Job Line Edit and reassign
Double-click a Job to open it. Within the job, double-click a job line to edit or reassign it.
This is the main screen where a Job line is managed
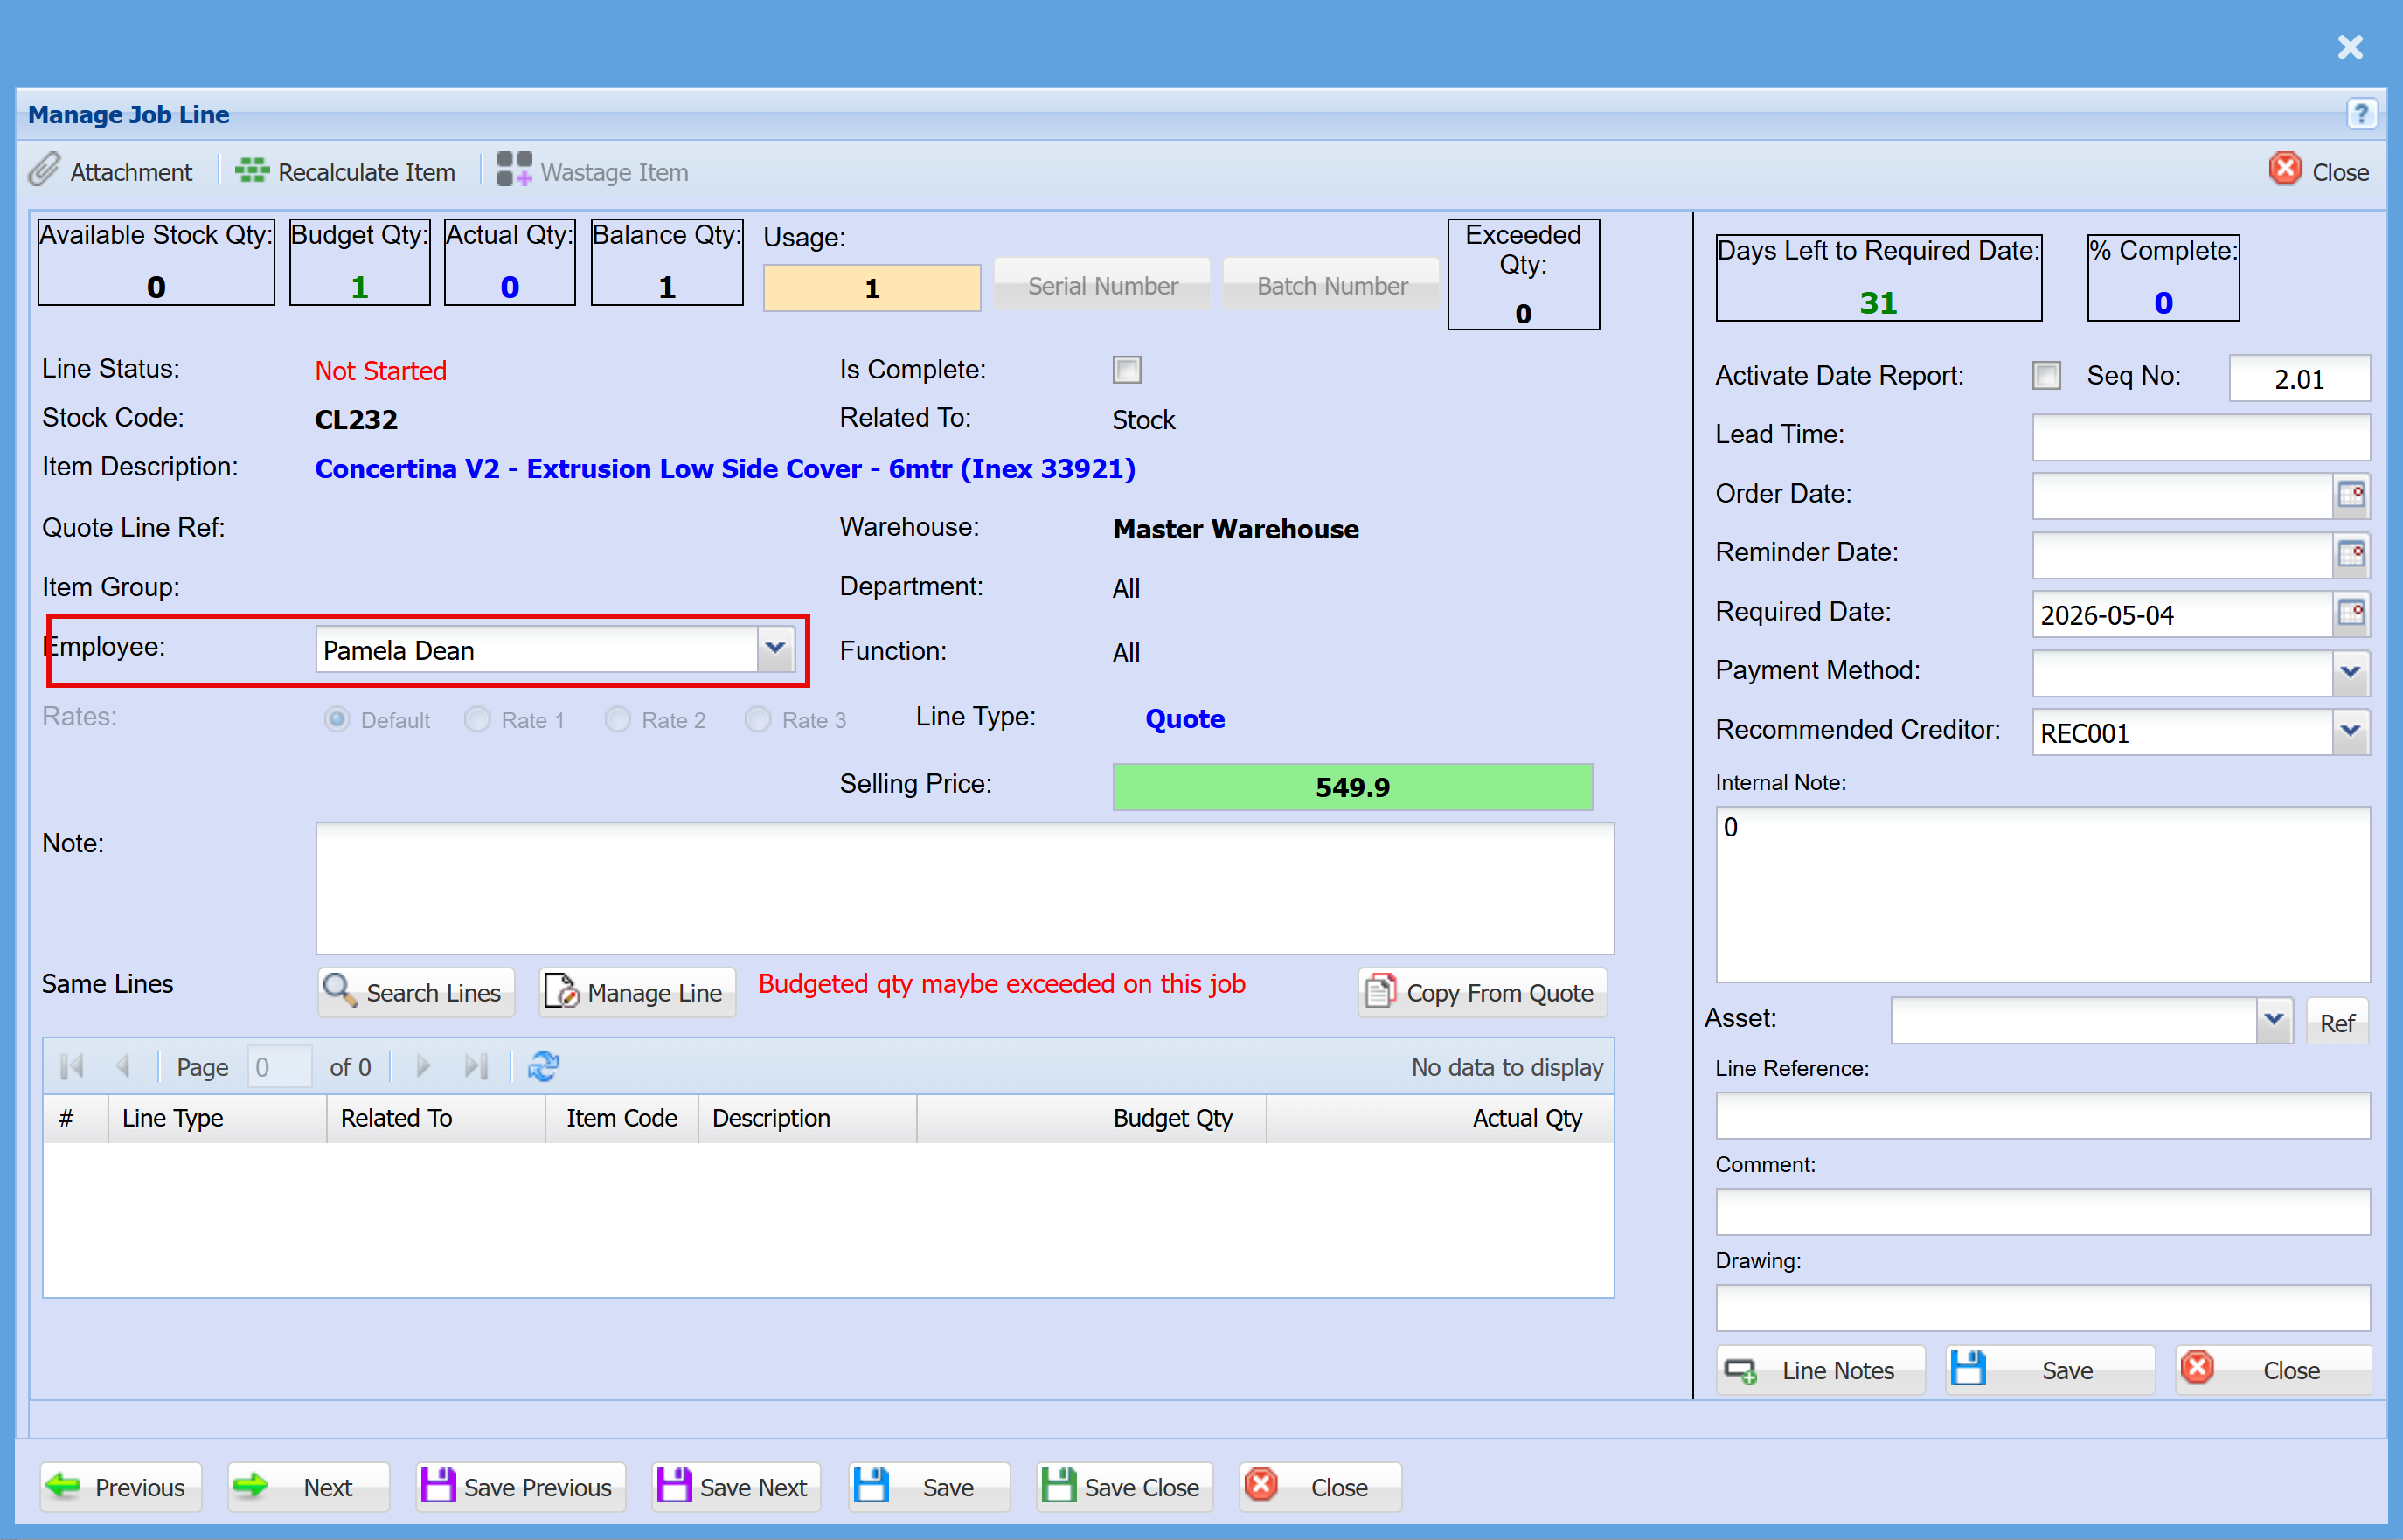
Restrictions
You cannot edit the line if:
- The line is locked
- The item has been marked for invoice or delivery note
You cannot change cost or quantity if the item is a:
- Stock item
- Fixed asset
Reassignment Rules (Sell Price)
When reassigning to a new parent:
-
The line will adopt the sell price of the new parent
-
If the item is a stock category (SC) or quote line, it will use its own sell price
-
If the new parent is a Cost to Company (CTC) item, the sell price will be removed from the line
Unmanage All Job Lines
The “Unmanage All” function will reverse any managed quantities on job lines, reducing them back to an unmanaged state based on what has not yet been invoiced.
- Any quantities already invoiced cannot be unmanaged, as they are finalised in the system
- Only non-invoiced quantities will be adjusted
To fully remove or reset job lines, use the available actions provided below in combination.
| A | UnManage All items on a job |
| B |
Clear Line History Only works if the Managed Actual quantity equals zero |
| C |
Delete Job Line Only works if there are no Line History entries |
Actions can be applied to either selected lines or all lines within the grid.
- All Lines in Grid – This option will apply the action only to the lines currently visible, based on the applied filters
- If a line cannot be processed (e.g. due to system restrictions), it will be skipped automatically, and the action will continue on the remaining lines
This ensures efficient processing without interruption when working with multiple job lines.
Manage Job Functions Tab Explained - Detailed
Functions Tab

| Manage All |
The Manage All button is used to manage all lines on the job at once. |
| Import |
The Import button is used to upload job lines from a file into the job. |
| New Stock Request |
The New Stock Request button is used to create a request for stock items required for a job. |
| Create PO | The Create PO screen is used to generate purchase orders for items required on a job. |
| Create BOM |
The Create BOM screen is used to add a Bill of Materials to a job, bringing in a predefined set of items. |
| Verify task stock | |
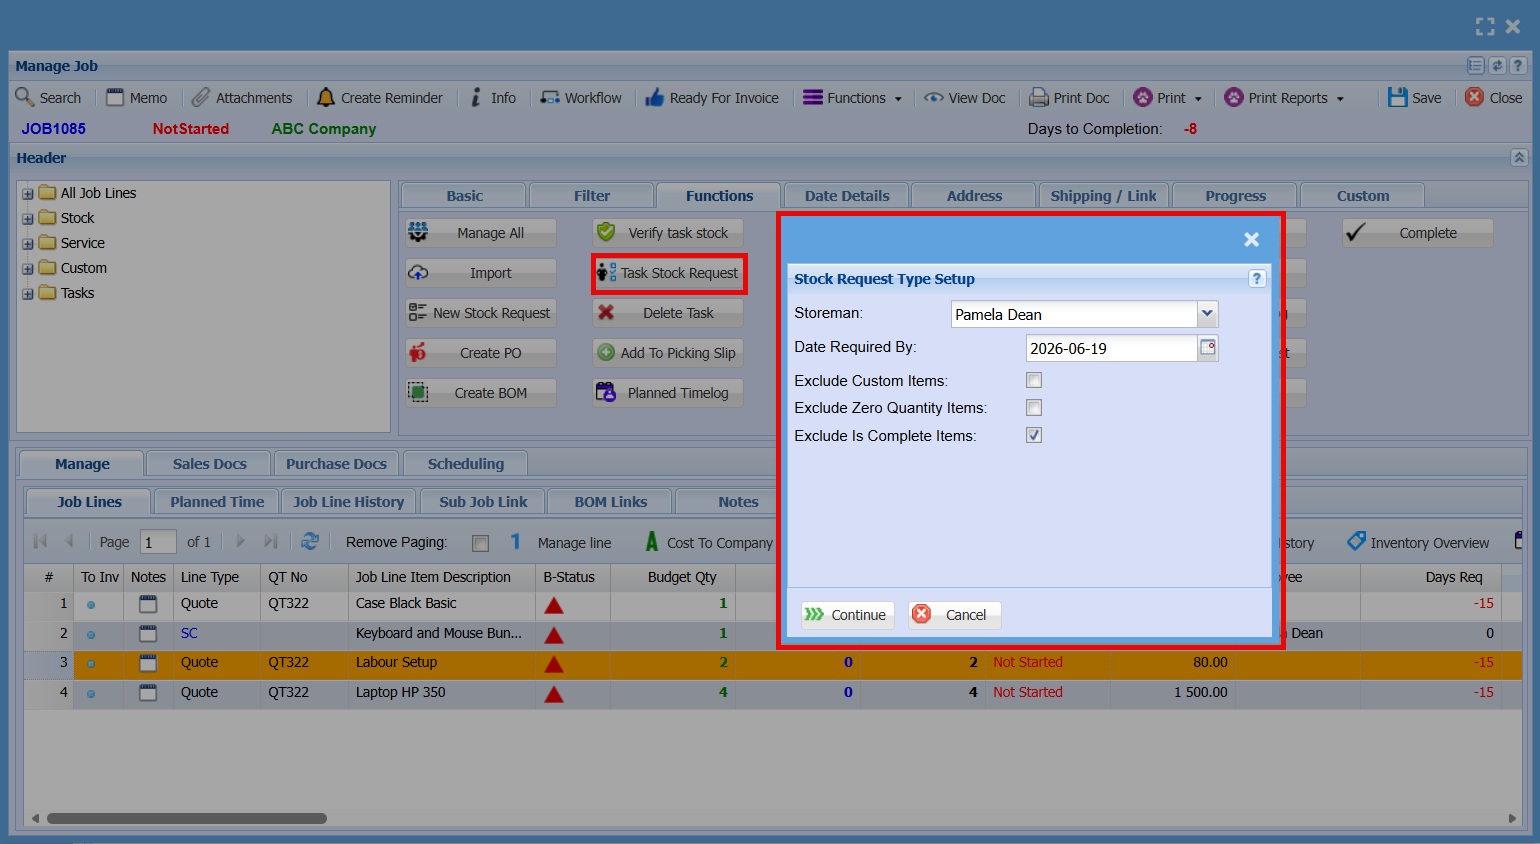
| Task Stock Request | |
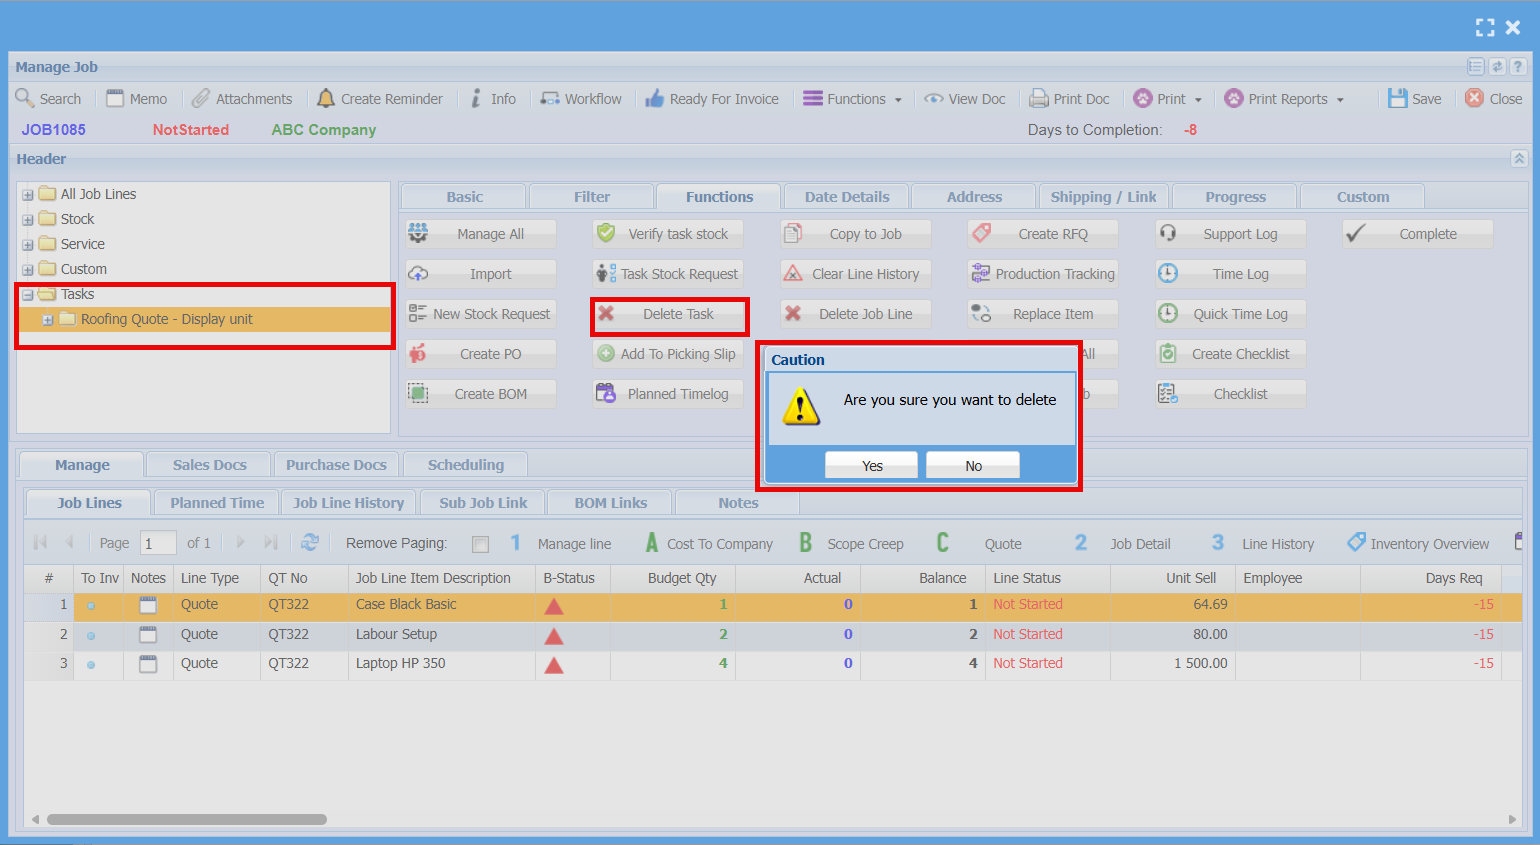
| Delete Task |
The Delete Task button is used to remove a task from the job. |
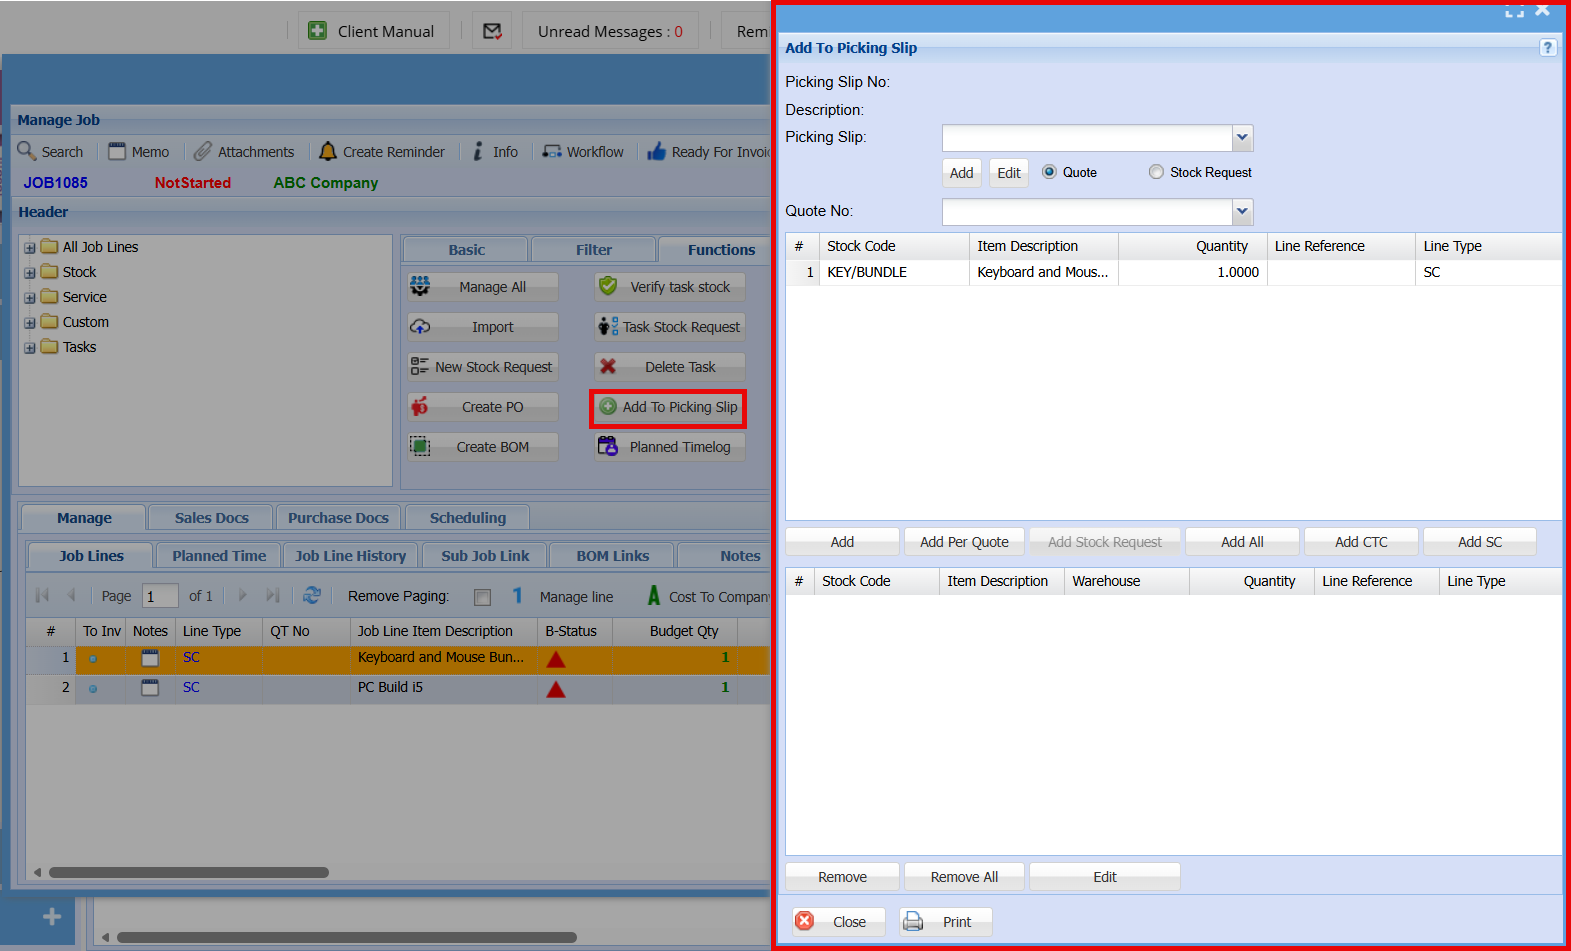
| Add to Picking Slip |
The Add to Picking Slip button is used to assign selected job lines to a picking slip for warehouse processing. |
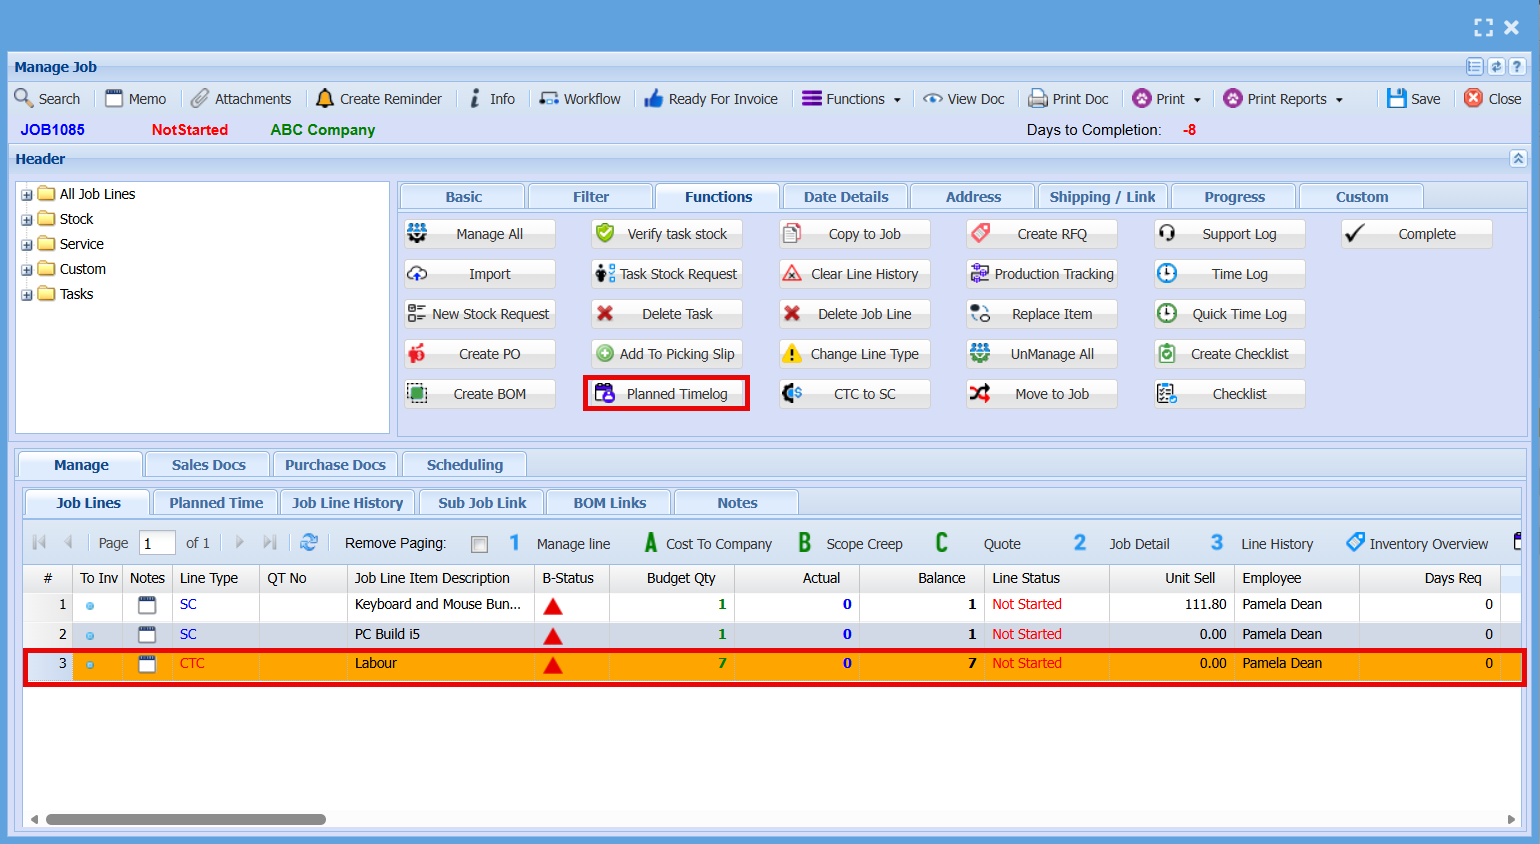
| Planned Timelog |
Allows you to Generate a planned time logs for each employee based on the entries in the Job Line tab, allowing future work to be scheduled and tracked effectively.
|
| Copy to Job |
The Copy to Job button allows you to copy selected job line(s) to another job. |
| Clear Line History | |
| Delete Job Line | |
| Change Line Type | |
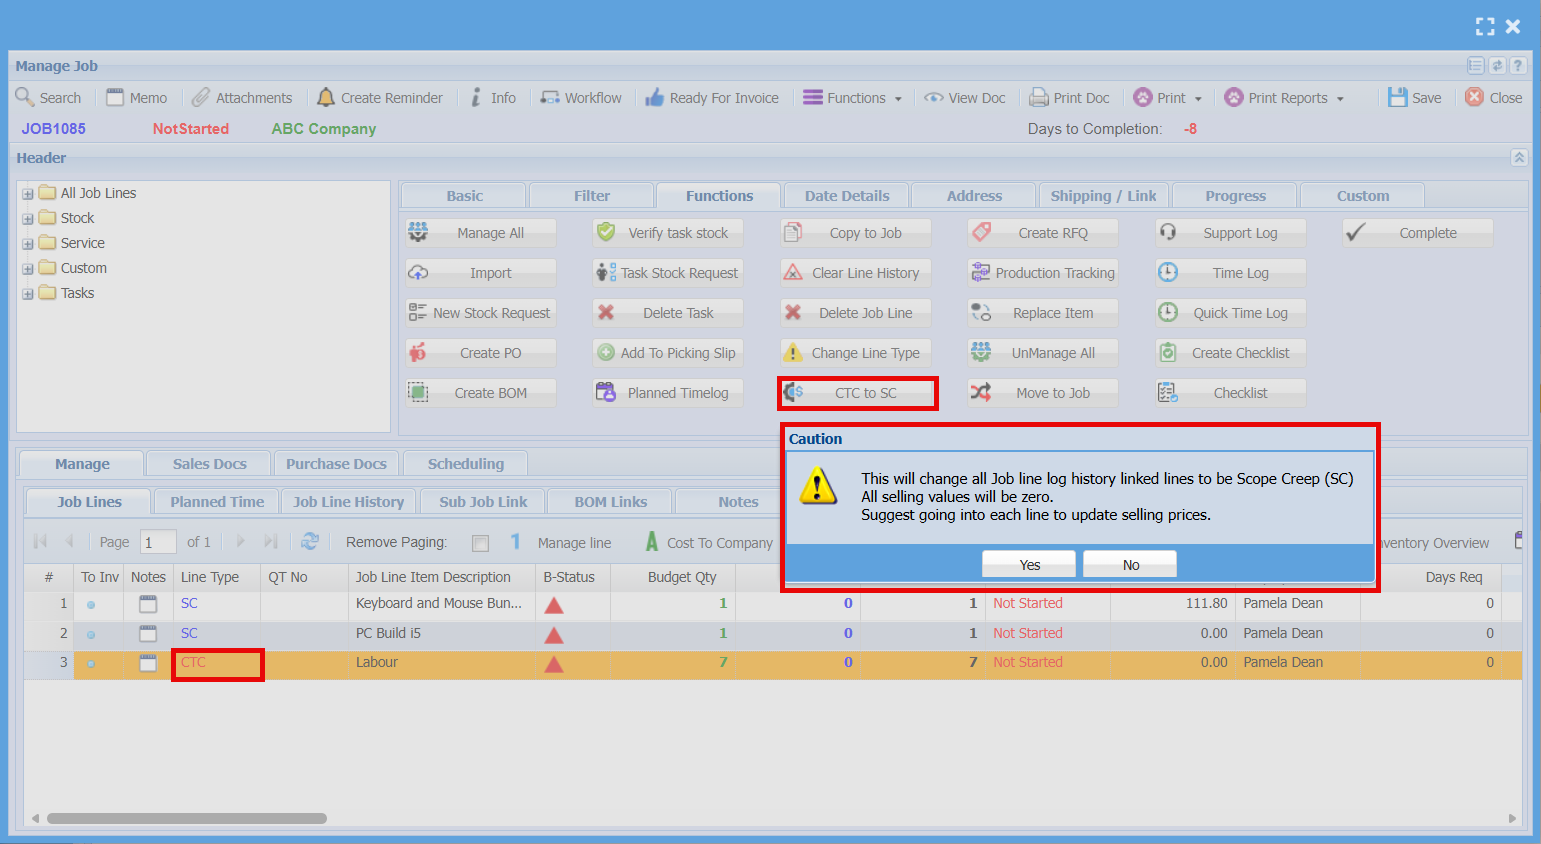
| CTC to SC | |
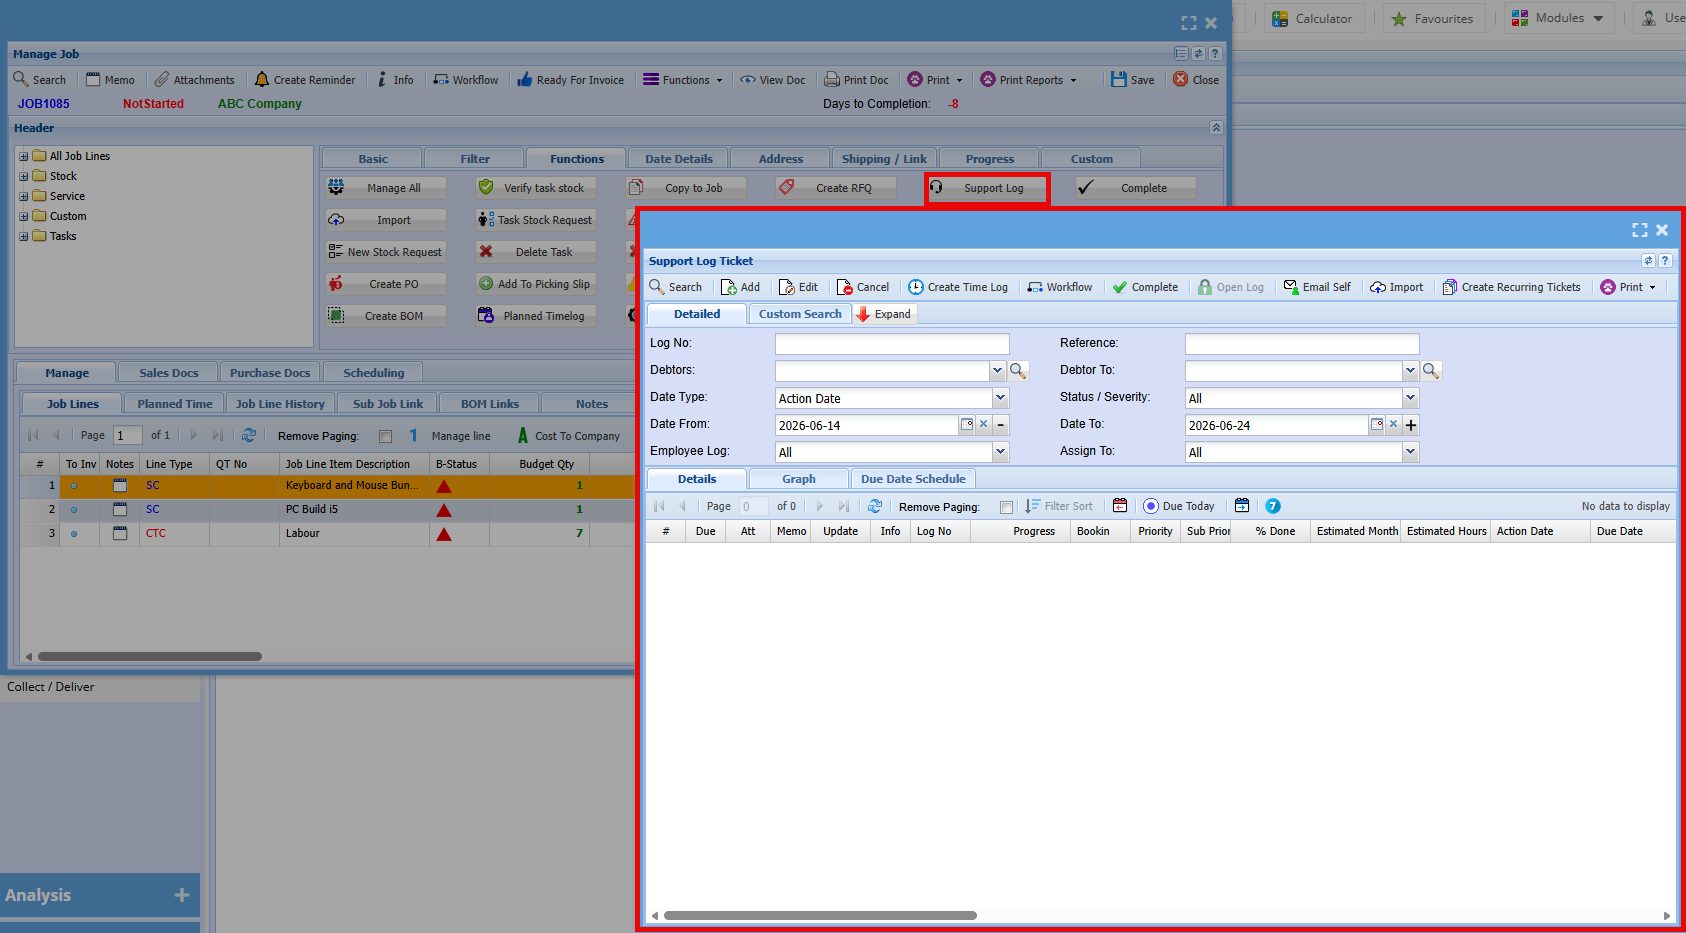
| Support Log | |
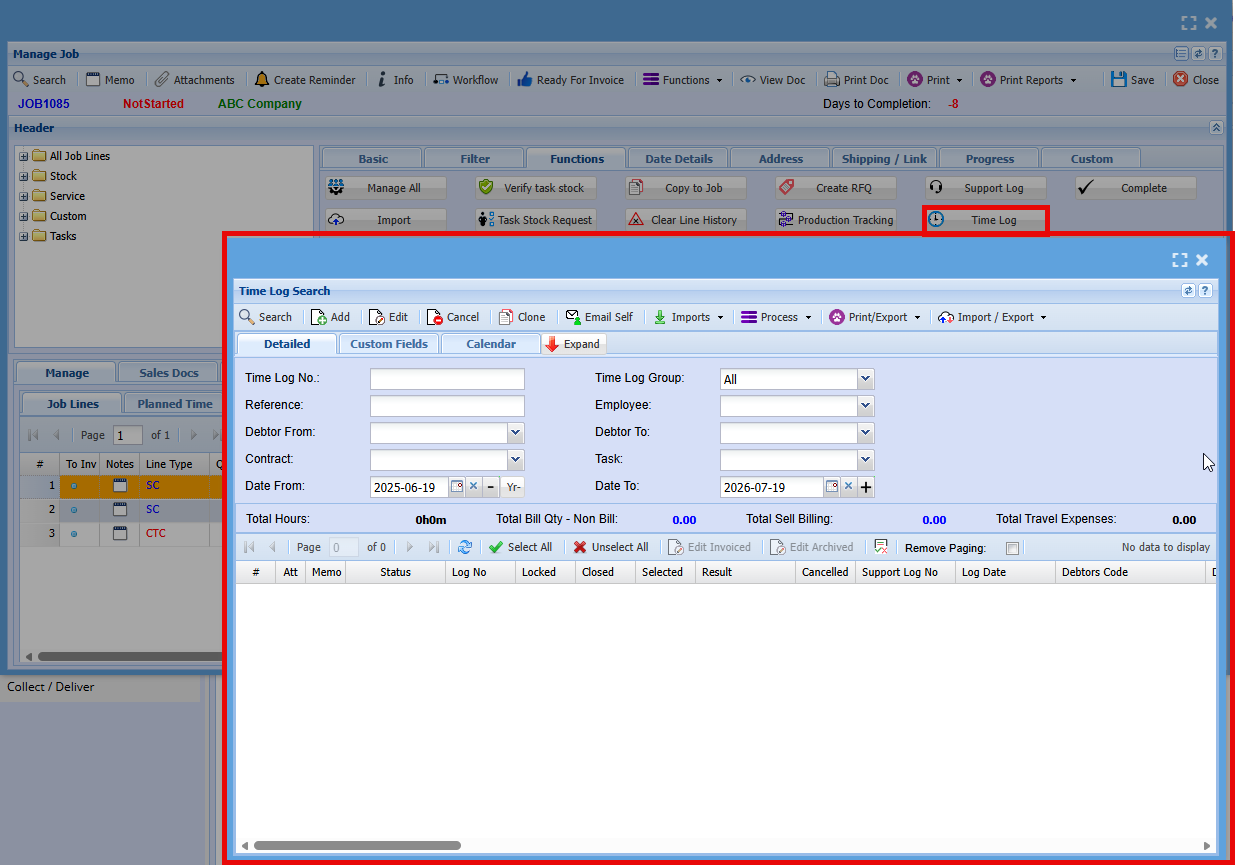
| Time Log | |
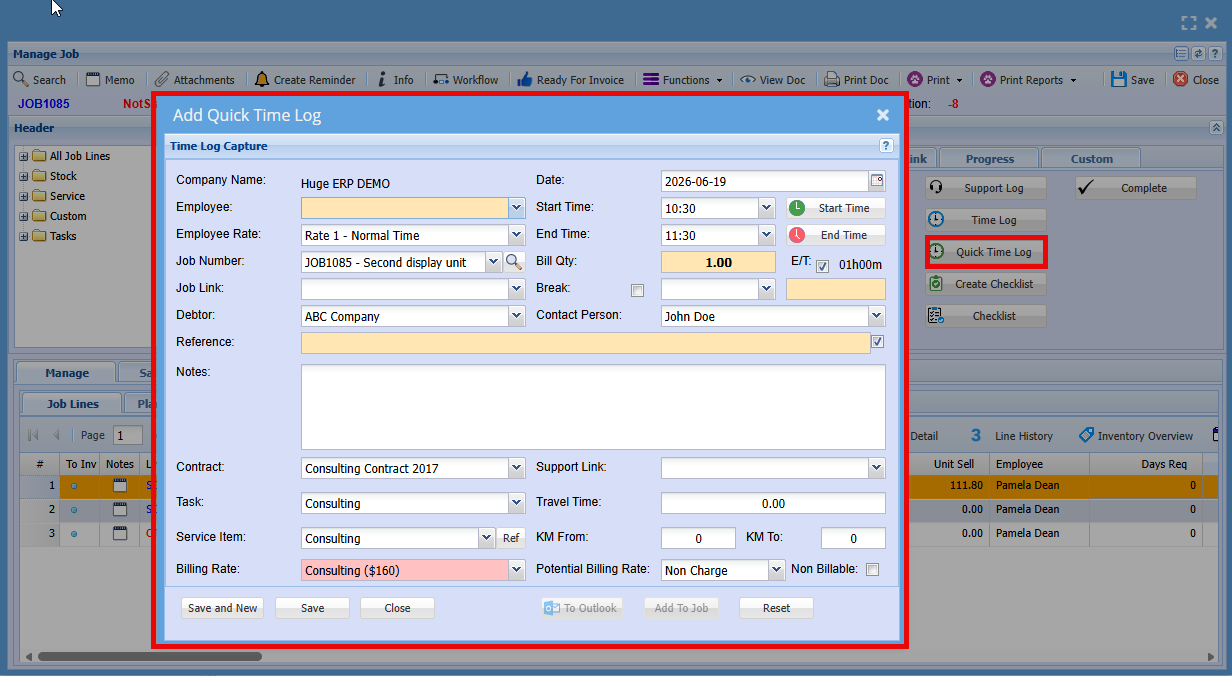
| Quick Time Log | |
| Checklist | |
| Complete |
Manage All
The Manage All button is used to manage all lines on the job at once.
When selected, a confirmation window will appear asking if you want to proceed. You can also choose to include wastage items.
Click Yes to continue and apply actions to all job lines, or No to cancel.
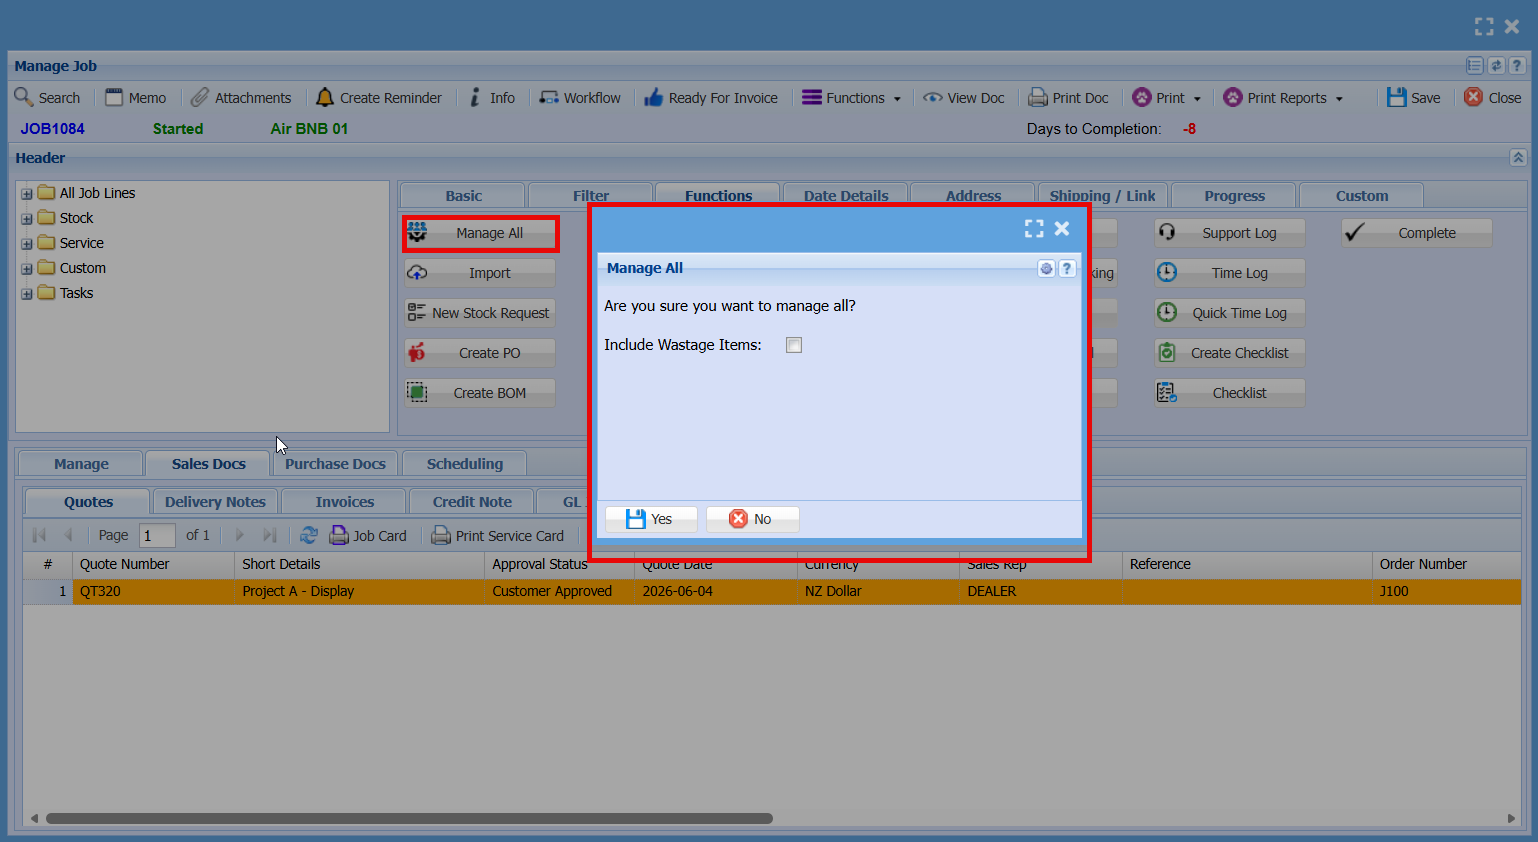
Import Button - Line Import
This feature is ideal when importing a recipe or BOM set up for a single unit. The multiplier allows you to scale the quantities automatically during import, saving time and ensuring accuracy.
When selected, the Job Import screen will open where you can:
- Choose a file to import
- Set a quantity multiplier (if required)
- Click Upload to import the lines
Only valid items will be imported, and any errors can be reviewed using Show Errors.
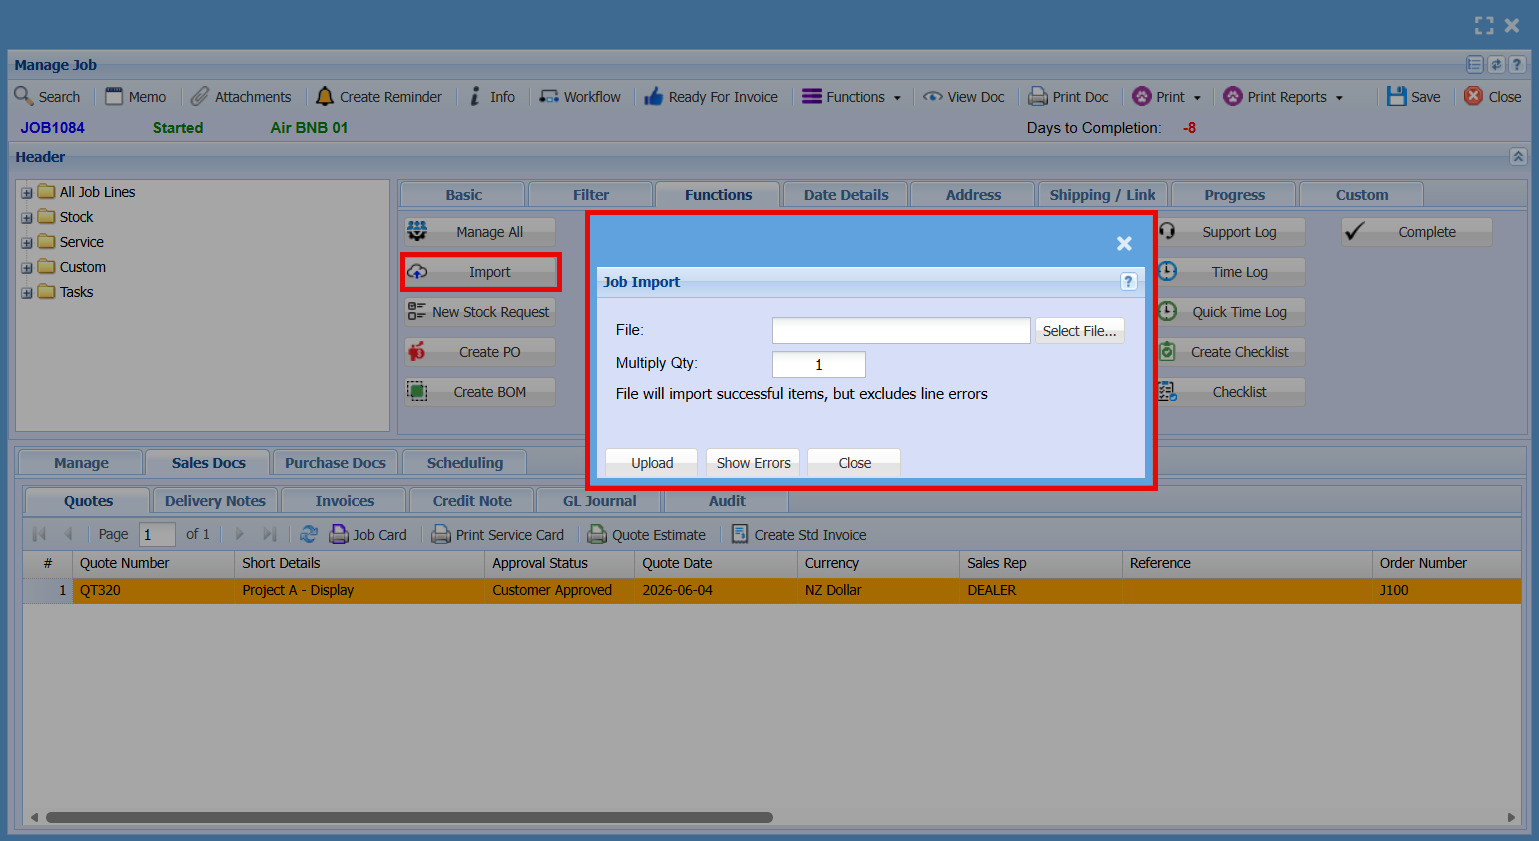
File Upload & Import Process
-
Click the Select File button to open the file browser and locate the file you want to import.
-
Click Upload to send the file to the server and start the import process.
Quantity Multiplier Option
-
You have the option to multiply quantities during import. This will adjust both the budget quantity and the managed quantity.
-
The default value is 1, but this can be changed before uploading the file.
Please Note
- The file must be in .CSV format using semi-colon (;) separation
- The file must include headers, however these will be ignored during import
- If any errors occur, they will be recorded in the log
- Please correct the errors and restart the import process
Import Rules
- The CSV file must use semi-colon (;) separation
- Stock items take cost from the item setup, regardless of any cost entered in the file
- Stock items take the selling price from the Excel file
- If the stock item selling price is blank, it defaults to the item setup value
- Custom and Service items take both cost and selling price from Excel
- If cost and selling are blank for Custom or Service items, values default to item setup
- If a Service item uses time allocation and an employee rate is set, cost is taken from user setup rates (1, 2, or 3)
- If cost is set to zero (0), it will be imported as zero
- If Managed Qty is blank, the line is added as Not Started
- If Managed Qty has a value, the line is added as Active
- If there is no stock on hand, the line will be added but not managed
- If the Required Date is blank, the system uses the current date
- Dates must be in the format: YYYY-MM-DD (e.g. 2020-04-05)
- If the Employee field is blank, it will remain blank
- The Employee field uses the login ID
- If the Rate field is blank (with an employee), it remains blank
- Set Rate to 1, 2, or 3 to use the corresponding user setup rate
- If both Employee and Rate are set for a Service item, cost is taken from the user setup rate
- Description is imported from Excel
- If Description is blank, it defaults from item setup
- Set Is Complete = 1 to mark the line as complete
- For stock items, the correct Warehouse Code must be provided
- Drawing is a free text field
- Comment is a free text field
CSV File Template
|
Field Header |
Example |
Required or Not |
|
Type |
CTC or SC |
Required |
|
ItemCode |
MGPEN001 |
Required |
|
Description |
Pen with Red and Yellow dots |
|
|
Budgetqty |
5 |
Required |
|
Cost |
10 |
|
|
Selling |
20 |
|
|
WarehouseCode |
MAST |
Required if a stock item |
|
LineRef |
Line Reference |
|
|
Required Date |
2020-04-06 |
|
|
Employee Login |
Malcolm |
|
|
Rate |
1 or 2 or 3 |
|
|
Is Complete |
1 |
|
|
Drawing |
1170-780-112-456 |
|
|
Comment |
Check the pen colours |
|
New Stock Request
The New Stock Request button is used to create a request for stock items required for a job.
This screen allows you to:
- Enter a reference and description for the request
- Select the requested by user and required date
- Add the stock items and quantities needed
- Link the request to the job number
Once completed, the request can be saved and sent for processing, allowing the store team to supply the required items for the job.
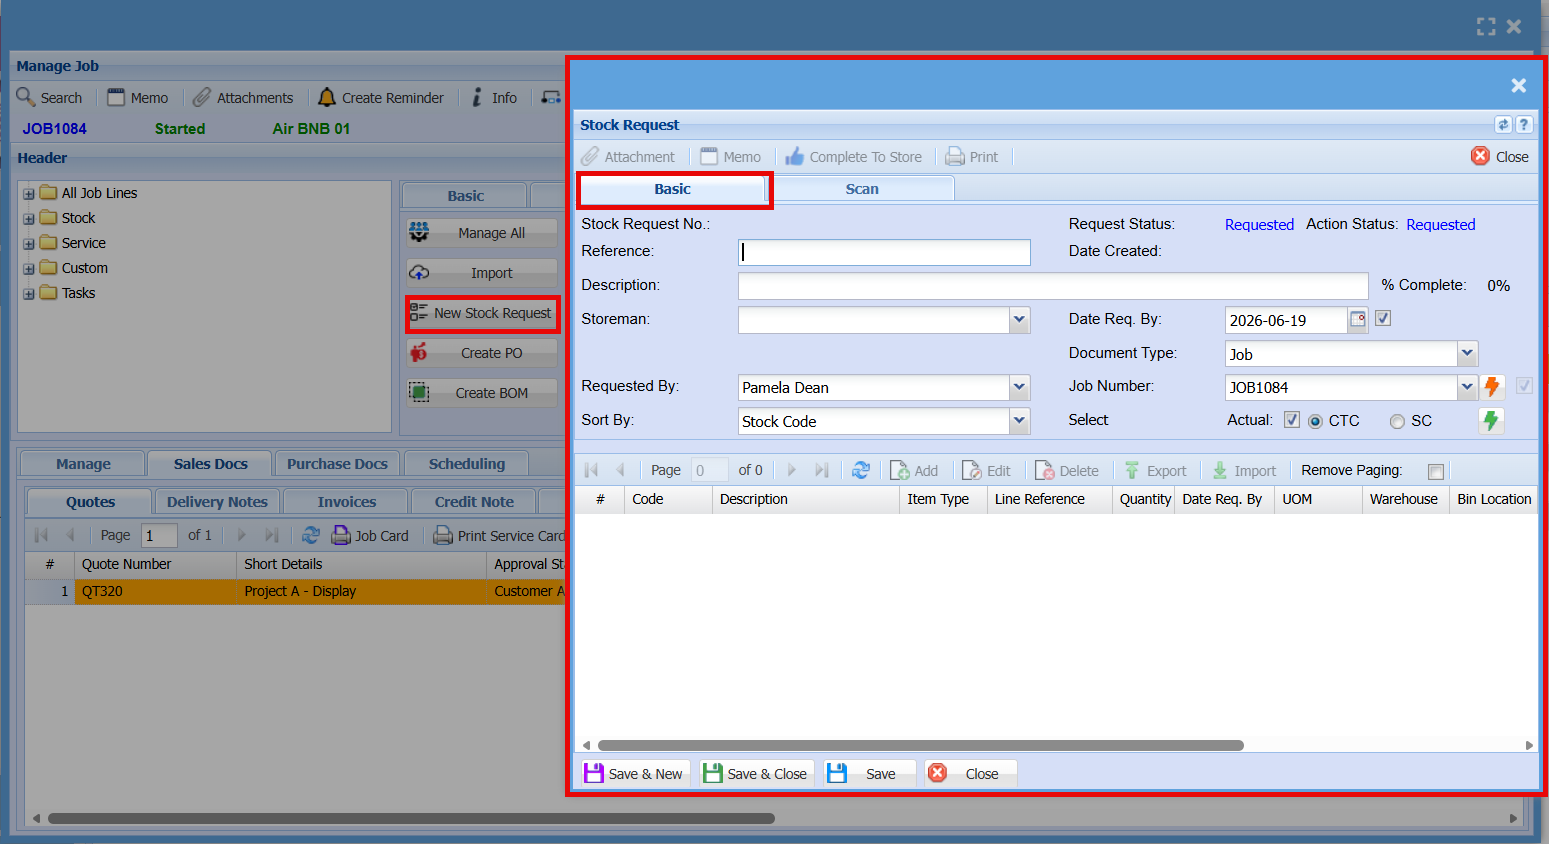
- Basic Tab
| Stock Request No |
System-generated number for the request
|
| Reference |
Optional reference for internal tracking
|
| Description |
Brief details about the stock request
|
| Storeman |
Select the staff member responsible for the request
|
| Requested By |
Shows the current status of the request (e.g. Requested)
|
| Sort By |
How items are arranged (e.g. Stock Code)
|
|
Date Created
|
When the request was created
|
|
% Complete
|
Progress of the request
|
| Date Req. By |
Required date for the items
|
| Document Type |
Type of record (e.g. Job)
|
| Job Number |
Links the request to a specific job
|
| Select |
(Actual / CTC / SC): Determines costing/selection method
|
- Item Grid (Botton Section)
This screen ensures all required stock for a job is formally requested, tracked, and supplied by the store team.
|
Code
|
Item Code |
| Description |
Item details
|
|
Item Type
|
Type of item (e.g. stock, service)
|
|
Line Reference
|
Reference per line
|
|
Quantity
|
Number of items requested
|
|
Date Req. By
|
Required date per item
|
|
UOM
|
Unit of measure |
|
Warehouse / Bin Location
|
Where the item is stored
|
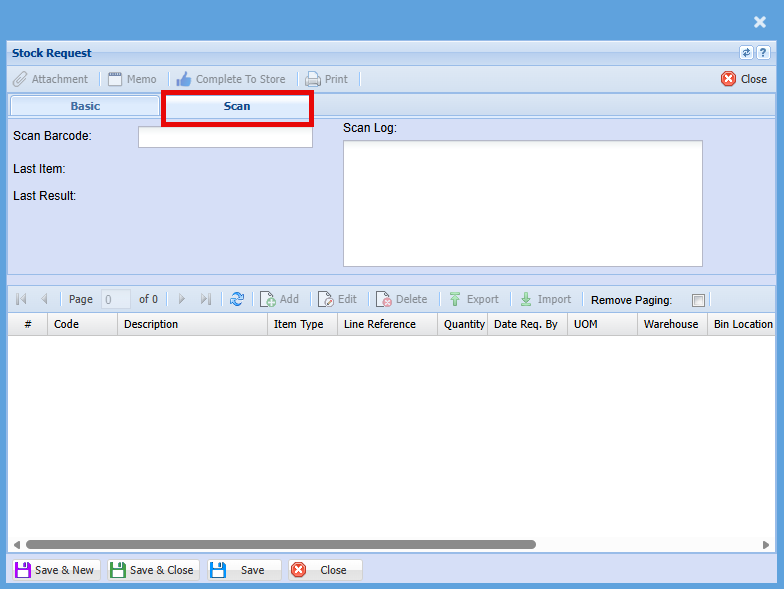
- Scan Tab
The Scan tab works the same as the Basic tab but is designed for barcode scanning.
- Scan Barcode: Scan or enter the item barcode to quickly add it to the request
- Last Item / Last Result: Displays the most recently scanned item and result
- Scan Log: Shows a history of scanned items
Items scanned are automatically added to the item grid below, removing the need to manually search and enter stock codes.
Purpose: Speeds up stock requests by allowing items to be added using a barcode scanner.
Create PO
The Create PO screen is used to generate purchase orders for items required on a job.
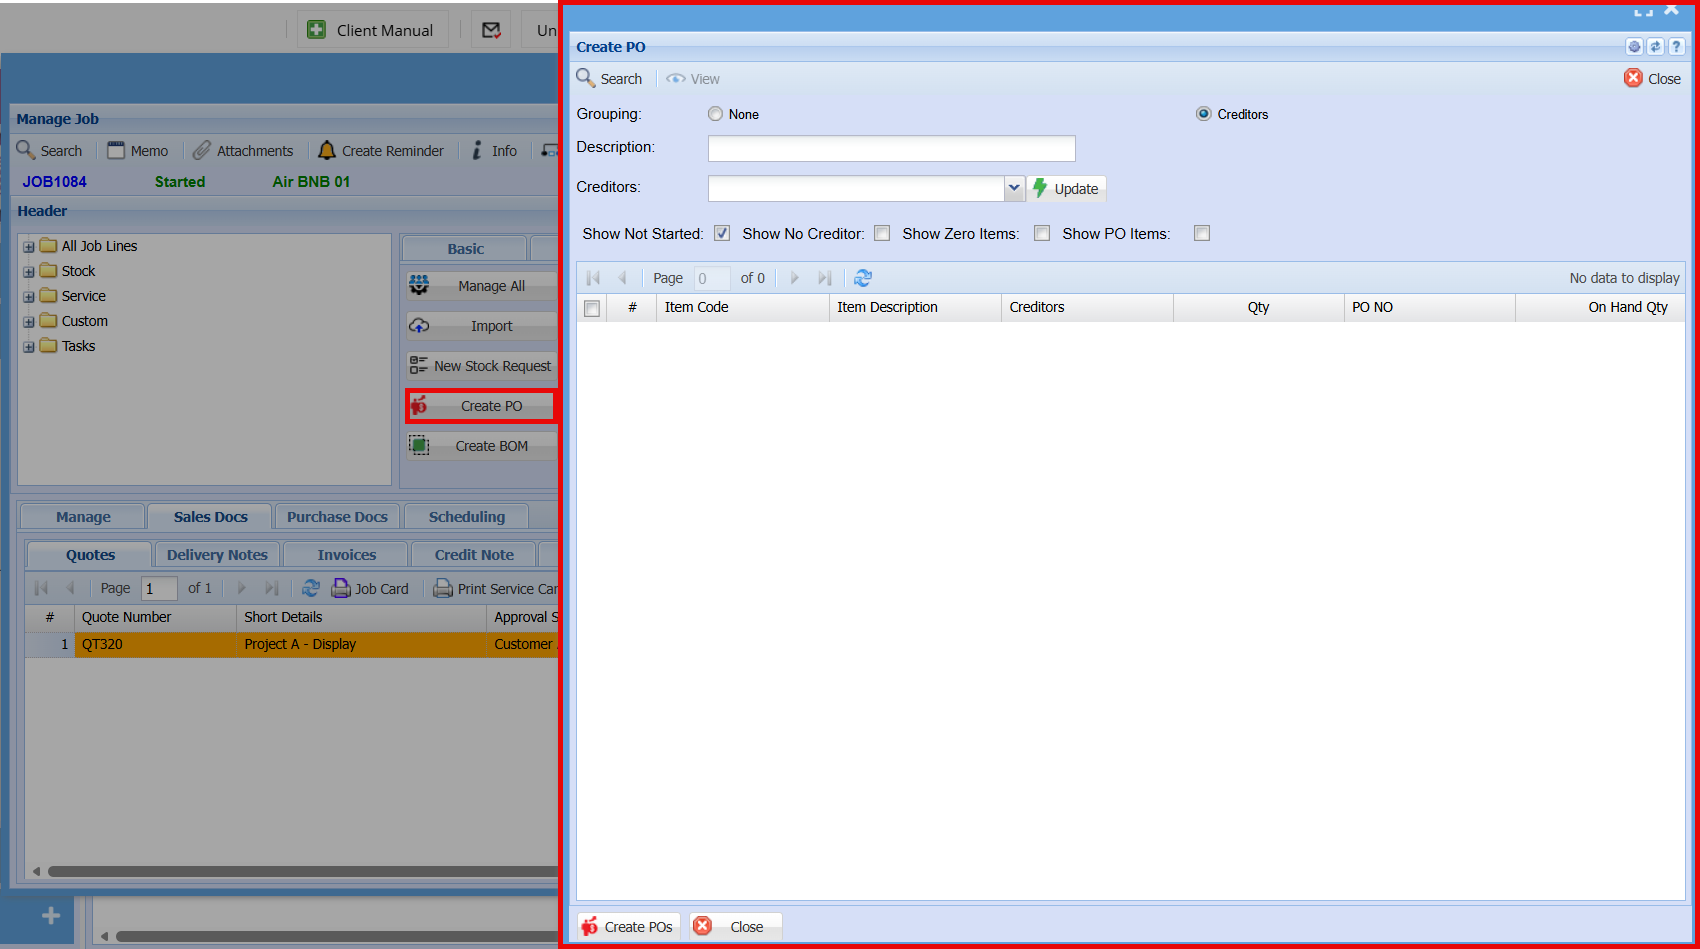
| Grouping |
Choose how items are grouped when creating POs:
|
| Description |
Enter a description for the purchase order(s)
|
| Creditor |
Select or update the supplier for the items |
| Show Not Started |
Displays items not yet processed
|
| Show No Creditor | Shows items without a supplier assigned |
| Show Zero Items | Includes items with zero quantity |
| Show PO Items | Shows items already linked to a PO |
|
Create POs/ Close |
Select the required items from the grid
Click Create POs to generate purchase order(s)
Close to exit the screen
|
Create BOM
This screen allows you to quickly add multiple predefined items to a job using a selected BOM, saving time and ensuring consistency.
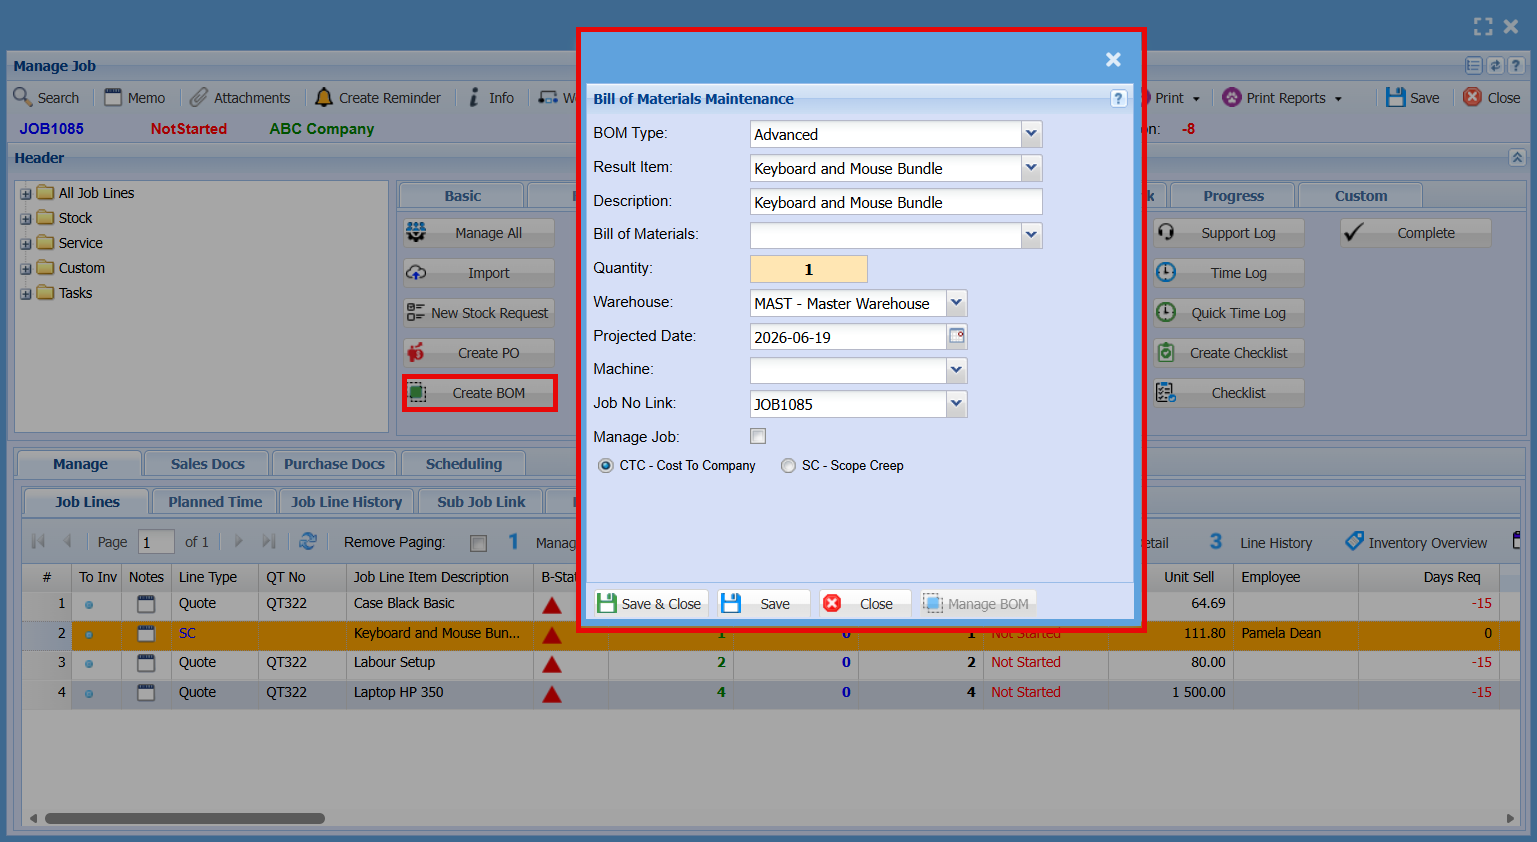
|
BOM Type
|
Choose Basic or Advanced, which determines which BOM list is available
|
|
Result Item
|
Select the BOM item you want to apply (based on the chosen BOM type)
|
|
Description
|
Displays or allows entry of the BOM description
|
|
Bill of Materials
|
Select the specific BOM record if multiple exist |
|
Quantity
|
Number of times the BOM will be applied
|
|
Warehouse
|
Select the warehouse the items will be drawn from
|
|
Projected Date
|
Expected date for the BOM items
|
|
Machine
|
Optional field for linking to a machine
|
|
Job No Link
|
Confirms the job the BOM will be added to |
|
Manage Job
|
Apply the BOM and manage the lines immediately
|
|
CTC / SC
|
Choose how the BOM is costed (Cost to Company or Scope Creep) |
|
Actions
|
Save & Close: Apply the BOM and exit
Save: Save without closing
Close: Exit without saving
Manage BOM: Open BOM management (if available)
|
Verify Task Stock
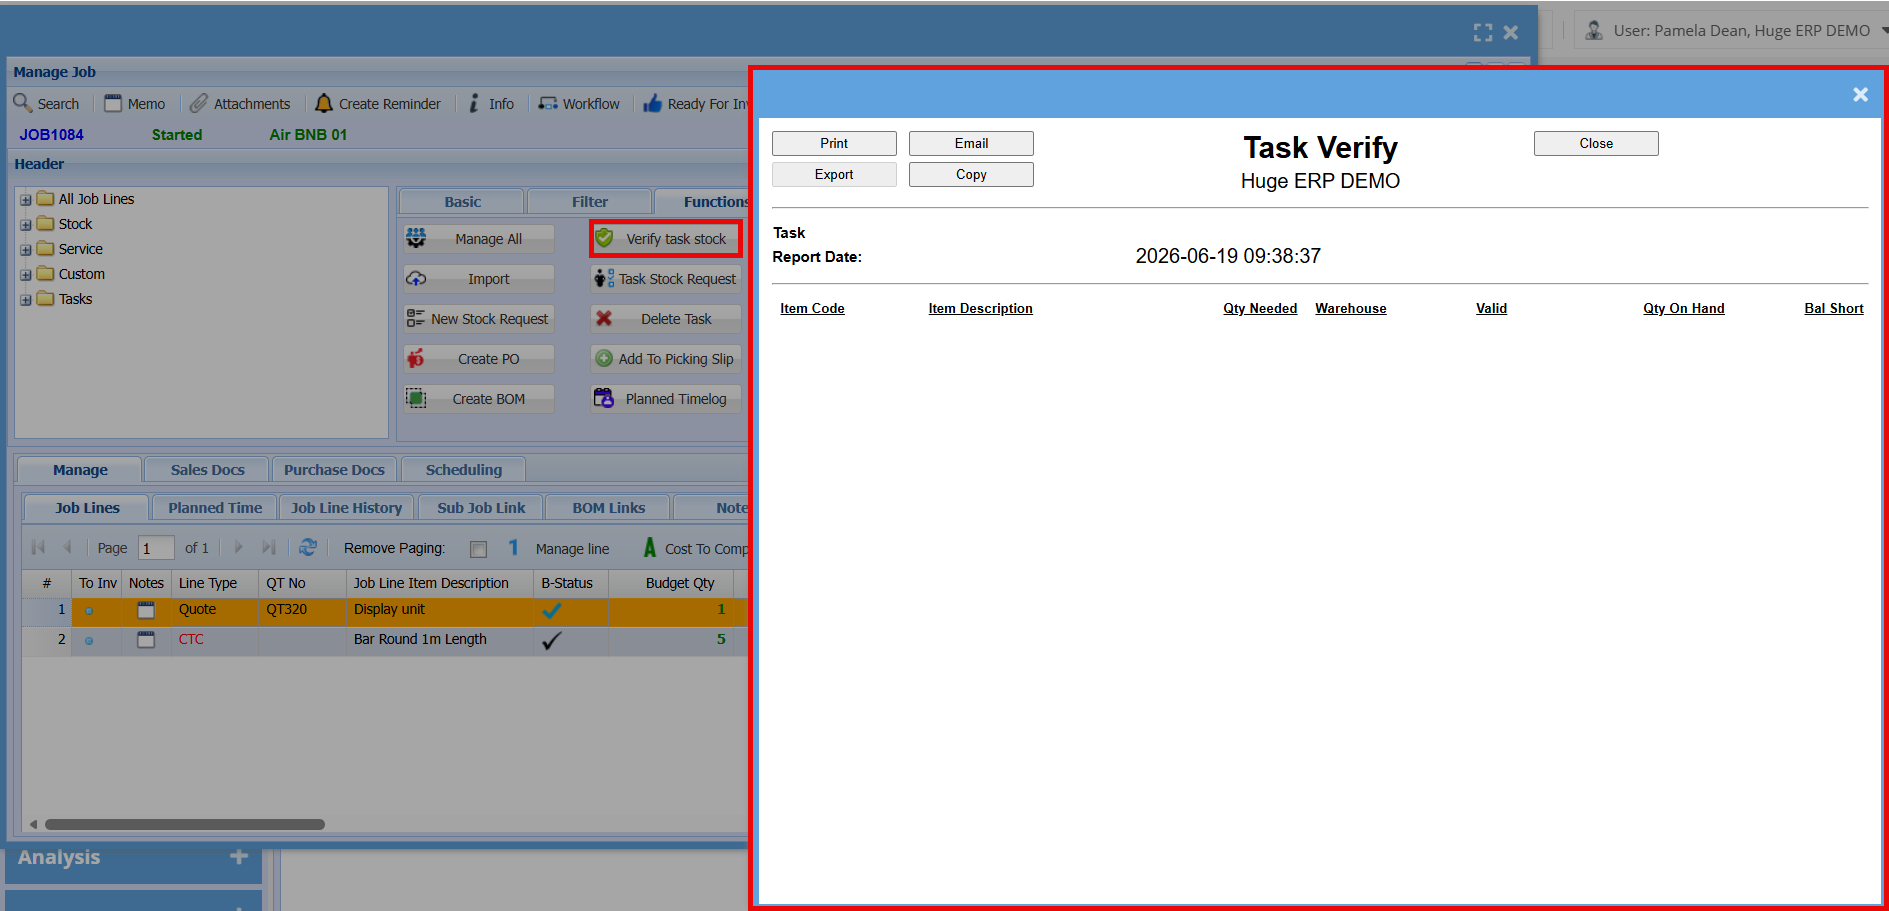
Task Stock Request
Delete Task
The Delete Task button is used to remove a task from the job.
- You must first select a task from the Tasks section (left panel)
- The button will only work when a task is highlighted/selected
When clicked, a confirmation message will appear:
- Click Yes to delete the task
- Click No to cancel
Note: Only tasks (not standard job lines) can be deleted using this button.
Add a Picking Slip
This function allows you to send selected job items to the warehouse so they can be picked and prepared for the job.
- You must first highlight the job line(s) you want to add
- Clicking the button opens the Add To Picking Slip screen
On this screen you can:
- Select an existing Picking Slip or create a new one
- Choose whether to add items from a Quote or Stock Request
- View the selected items in the top grid
- Add items to the picking slip using Add / Add All / Add Per Quote
The bottom grid shows the items that have been added to the picking slip.
Actions:
- Remove / Remove All: Remove items from the picking slip
- Edit: Modify selected lines
- Print: Print the picking slip
- Close: Exit the screen
Planned Time Log
Copy to Job
This function lets you reuse job lines across different jobs, saving time and ensuring consistency.
- You must first highlight the line item(s) you want to copy
- Clicking the button opens the Copy Job lines to other job screen
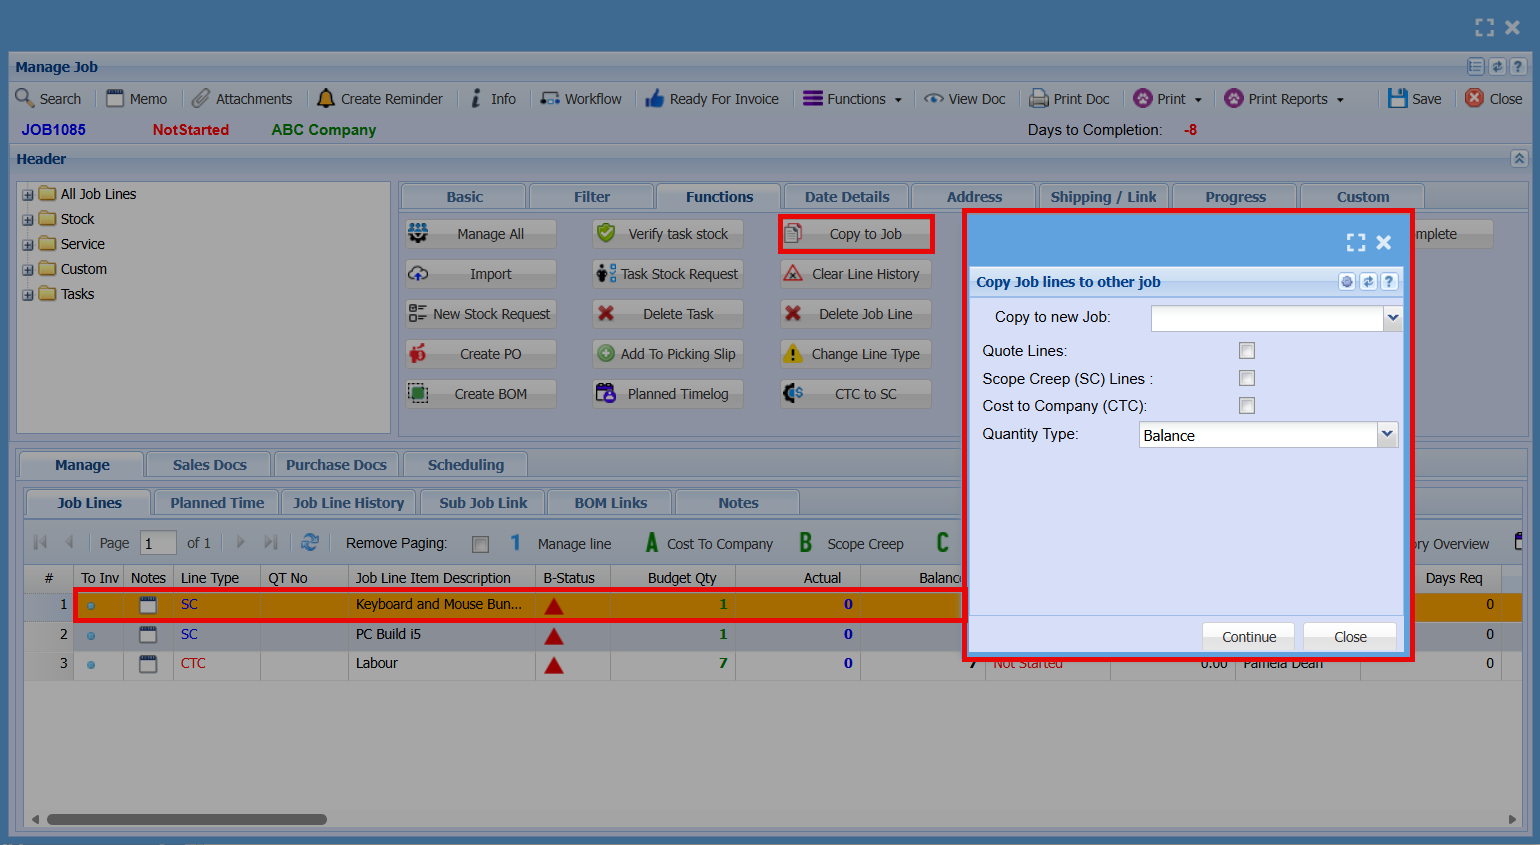
| Copy to new Job: | Select the job you want to copy the line(s) to |
| Quote Lines: | Tick to copy as quote lines |
| Scope Creep (SC) Lines: | Tick to copy as scope creep lines |
| Cost to Company (CTC): | Tick to copy as cost to company lines |
| Quantity Type: |
Choose how the quantity is copied: - For example, Balance will copy only the remaining quantity |
| Actions |
|
Clear Line History
Delete Job Line
Change Line Type
?????
CTC to SC
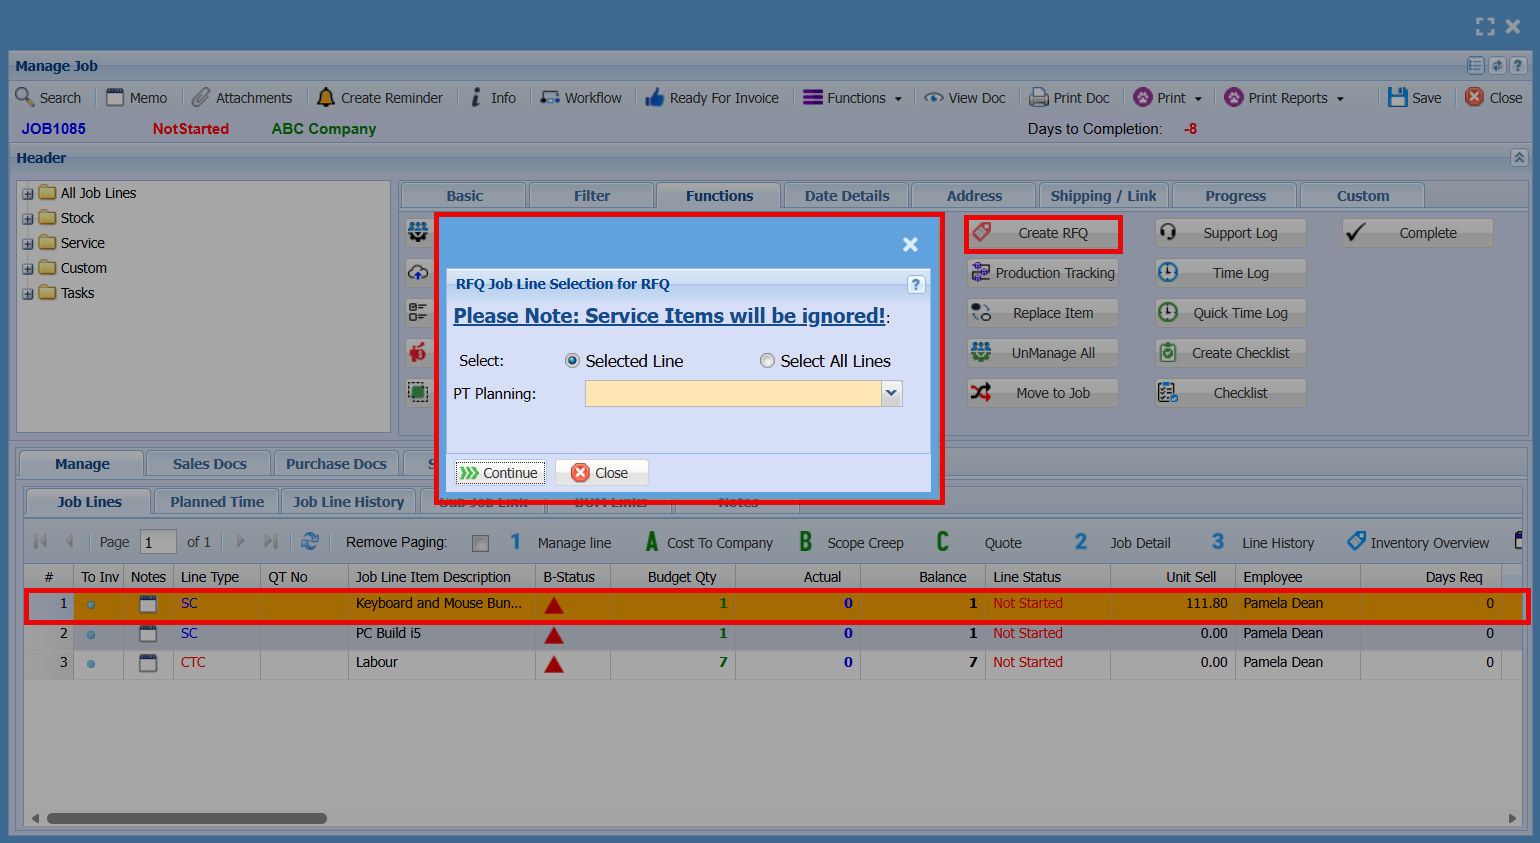
Create RFQ
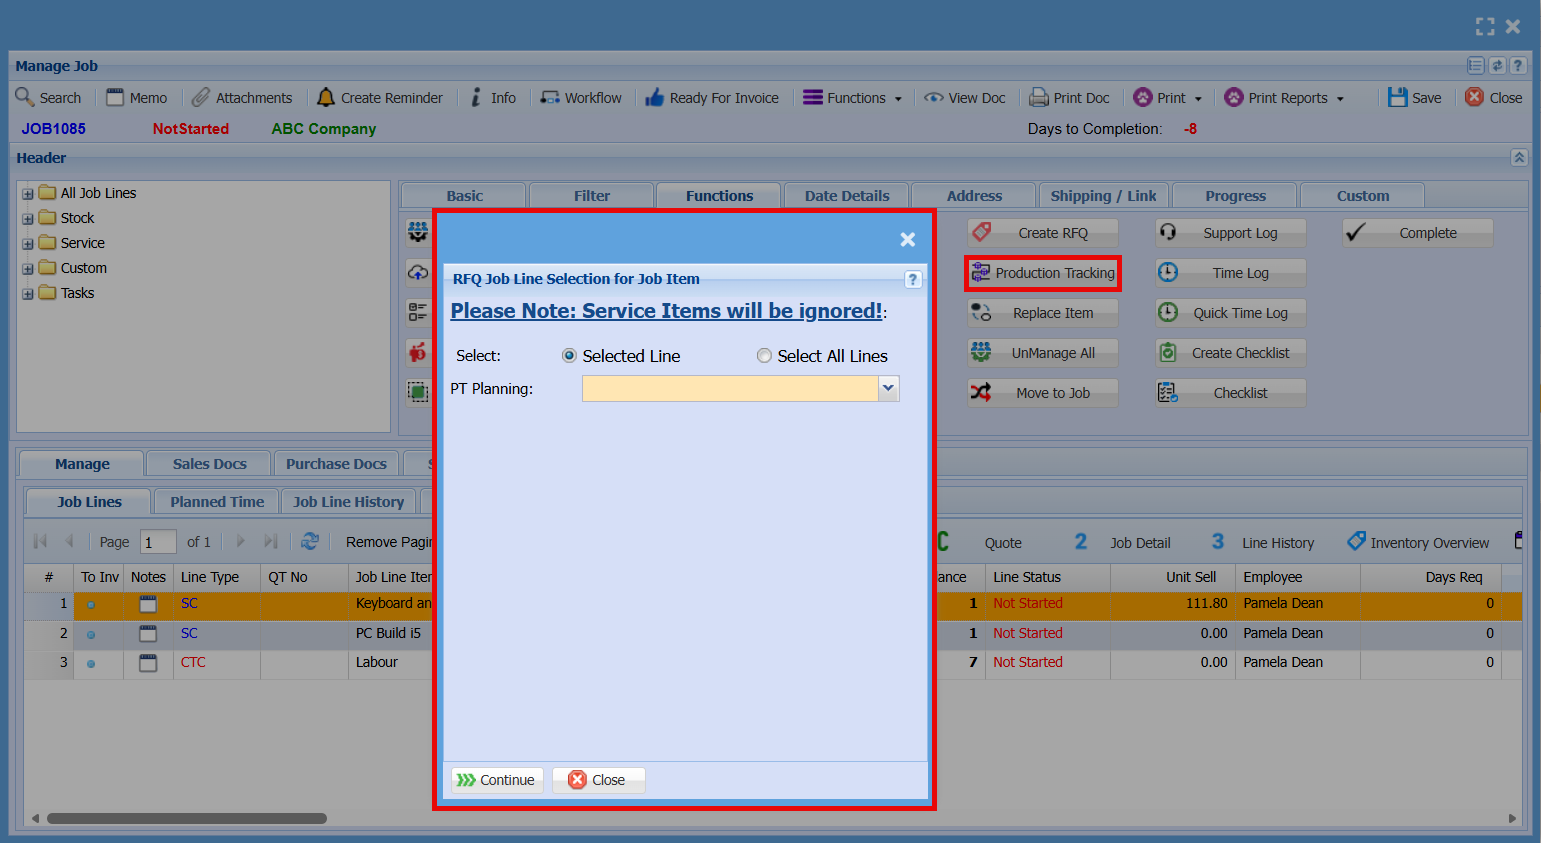
Production Tracking
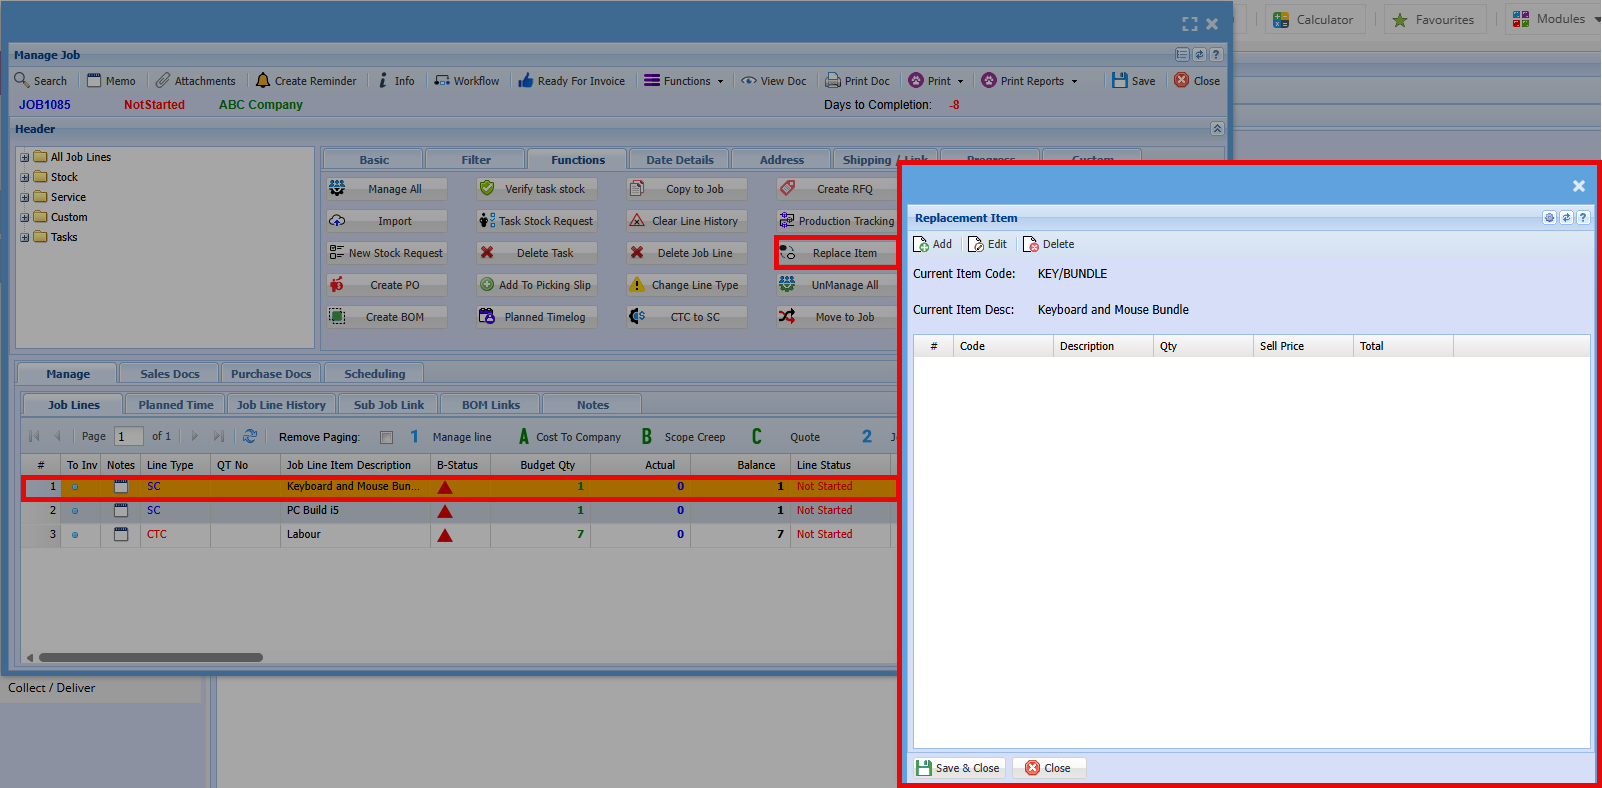
Replace Item
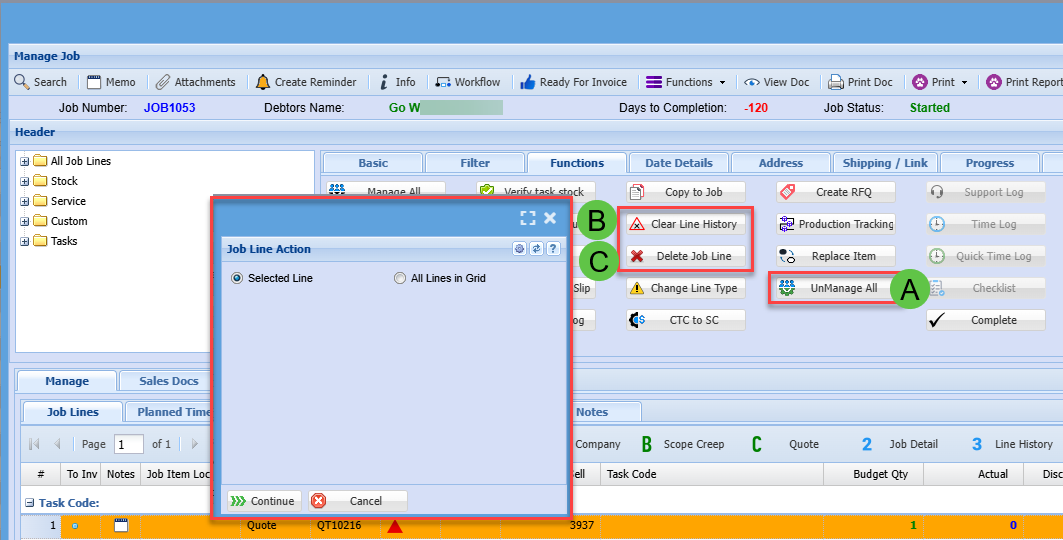
Manage All
The “Unmanage All” function will reverse any managed quantities on job lines, reducing them back to an unmanaged state based on what has not yet been invoiced.
| A | UnManage All items on a job |
| B |
Clear Line History Only works if the Managed Actual quantity equals zero |
| C |
Delete Job Line Only works if there are no Line History entries |
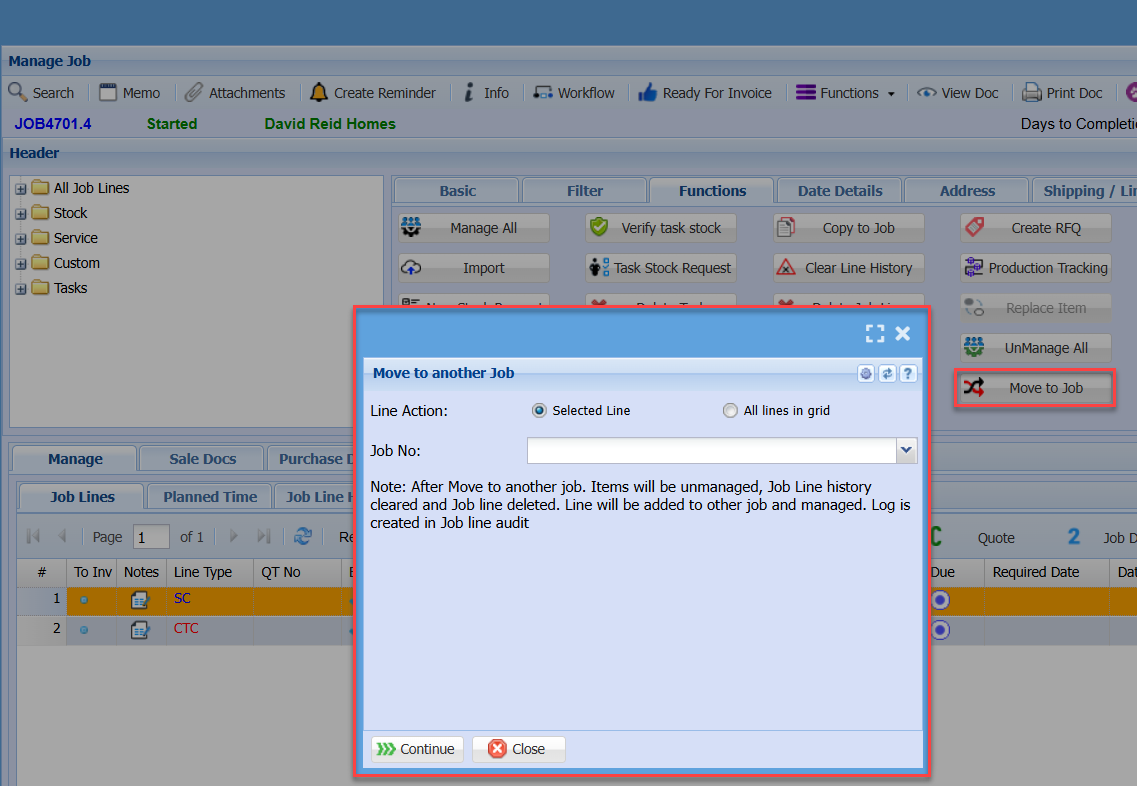
Move to Job
Support Log
Time Log
Quick Time Log
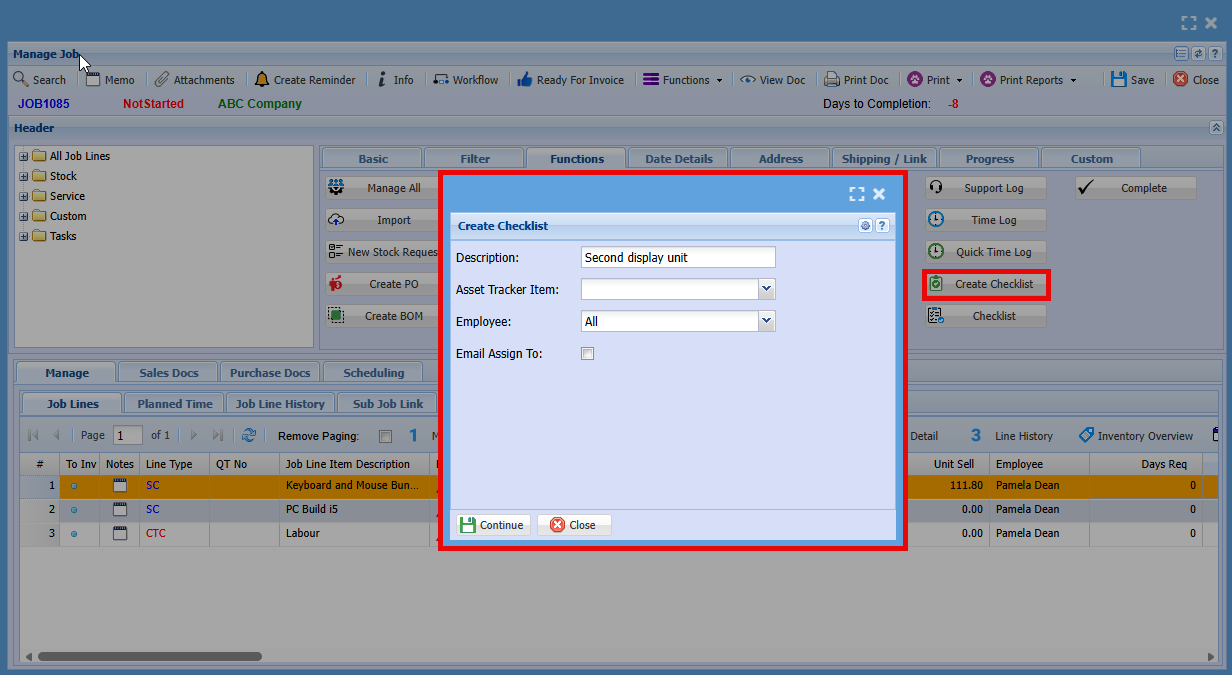
Create Checklist
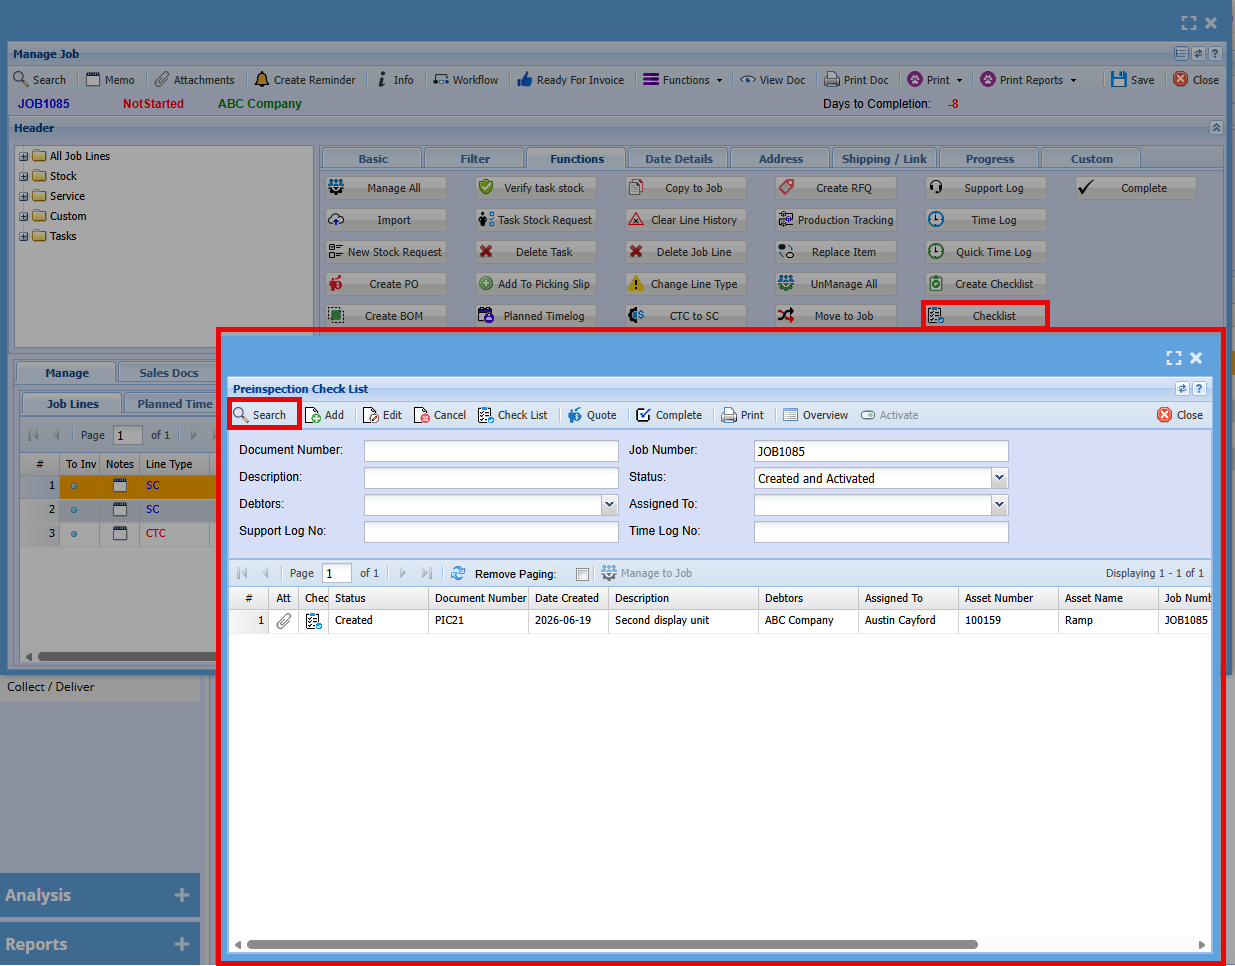
Checklist
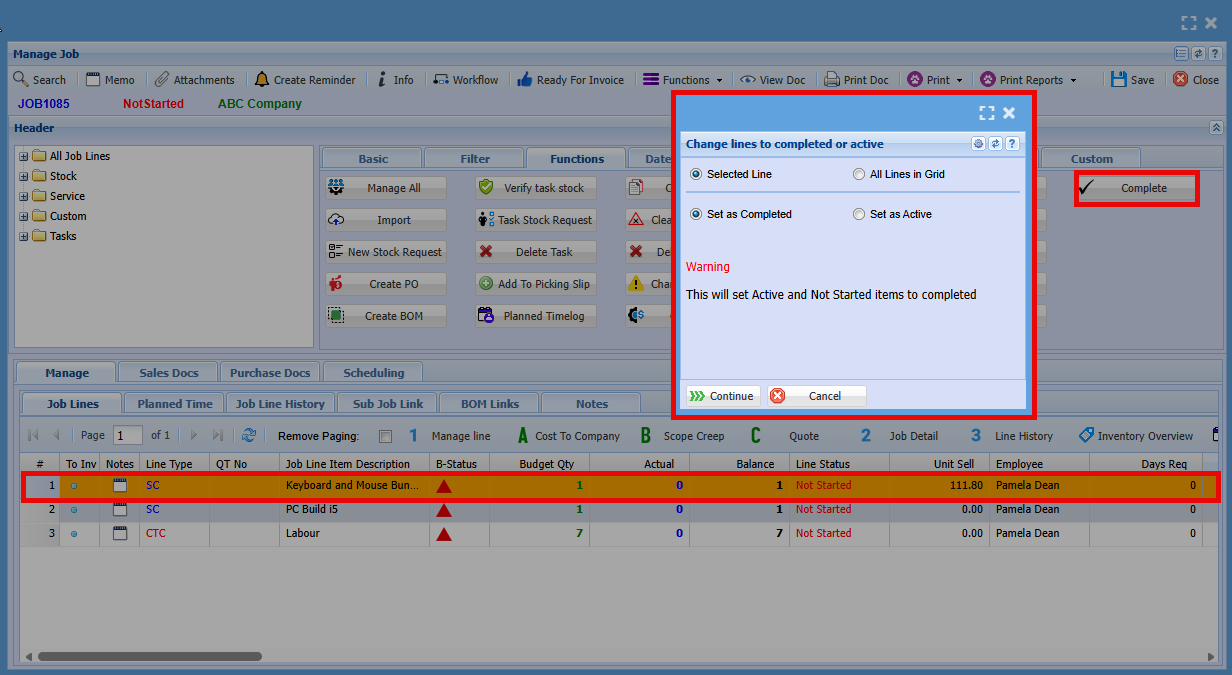
Complete
Job Costing Screens Defined
Manage Job - Buttons Explained
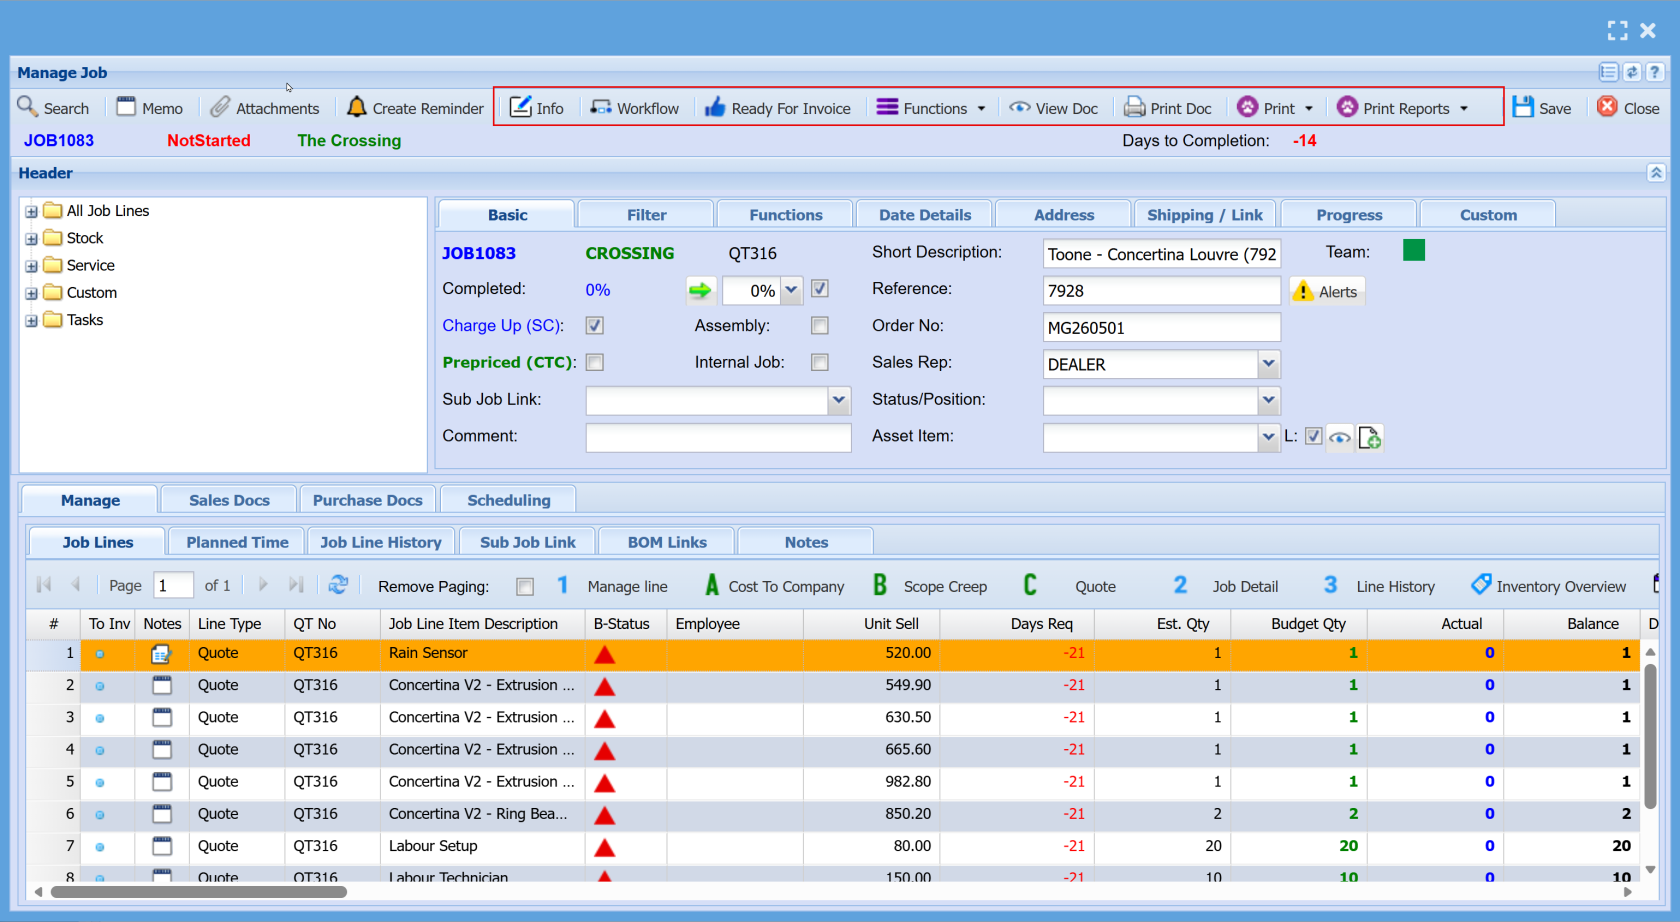
| Info |
This screen is used to add and manage internal notes for a job.
|
| Workflow |
This screen allows you to control how the Job Workflow overview is displayed, helping you plan and track jobs over a selected time period. |
| Ready for Invoice |
When selected, it simply adds a thumbs-up icon to the job in the results grid, providing a clear visual indicator that the job is complete and ready for billing. |
| Functions |
The Functions tab provides access to a range of additional actions that can be performed on a selected job. These are typically used for maintenance, updates, or managing specific job settings. |
| View Doc |
When you select a document in the Sales Doc or Purchase Doc tab and click View Doc, the document will open in a new screen. |
| Print Doc |
When you select a document in the Sales Doc or Purchase Doc tab and click Print Doc, it will open a print selection screen. From there, click Continue to either print or email the document. |
| Print Reports |
The Print Reports button provides a dropdown list of available job reports. Select the required report (e.g. Job Card, Job Analysis, Cost Report), and it will open ready for printing or review. This allows quick access to different reports related to the selected job. |
Manage Job - Tab Explained
Basic Tab Overview
The Basic tab provides a high-level overview of the job and contains the key fields required to manage and update core job information.
The Basic tab is used to:
- View and update key job details
- Track job progress and status
- Assign responsibility and references
- Capture essential operational and administrative information
It acts as the central point for managing the most important aspects of a job before moving into more detailed tabs (such as Dates, Address, or Progress).
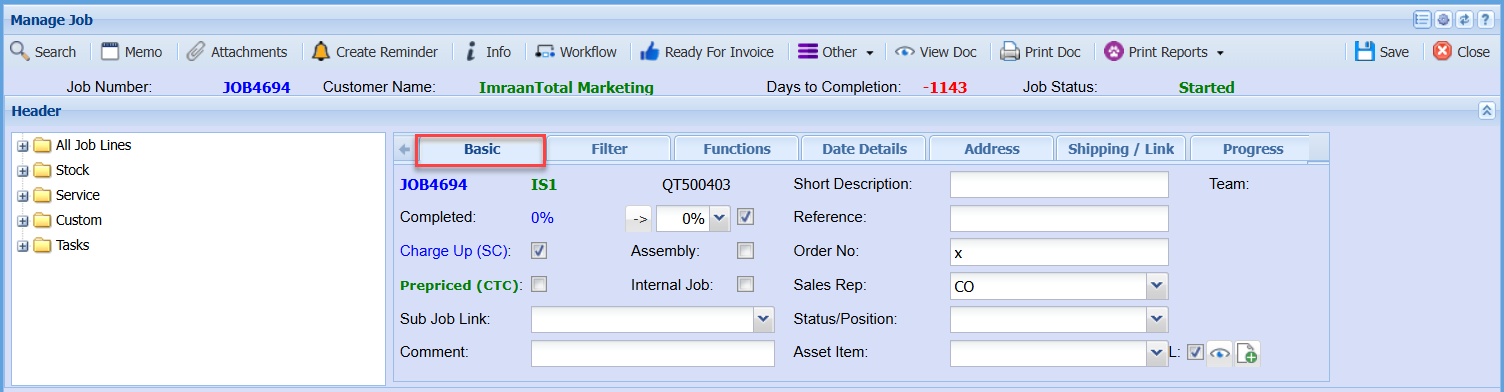
| Completed |
This controls the overall progress of the job
|
| Charge Up (SC) Tick |
When ticked, this indicates the job is chargeable to the customer
|
| Assembly Tick |
Used when the job involves building or assembling components
|
| Prepriced (CTC) Tick |
Indicates the job has fixed or predefined pricing, meaning costs are not calculated dynamically
|
| Internal Job Tick |
Marks the job as internal use only, meaning it is not billed to a customer
|
| Sub Job Link |
Allows you to connect this job to another related job, useful for larger projects split into parts
|
| Comment |
Used to add important notes, instructions, or context
|
| Short Description |
A brief summary of the job for quick identification
|
| Reference |
Any additional identifier or note provided by the customer or internally
|
| Order No |
Links the job to a customer order or purchase order
|
| Sales Rep |
The person responsible for the sale or account
|
| Status/Position |
Shows where the job sits within the workflow or process stage
|
|
Team
|
The group or department responsible for completing the job
|
| Asset Item |
Links the job to a specific asset or item, if required
|
Job Percentage Complete
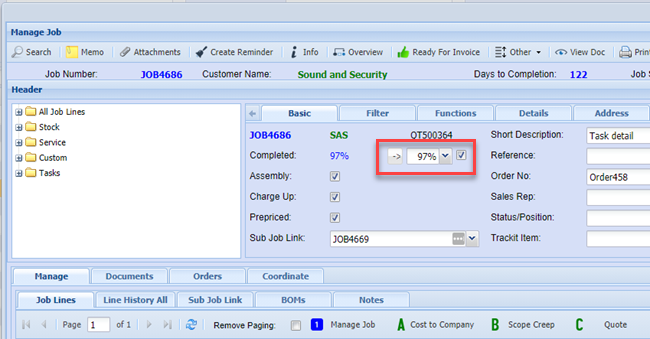
The job completion percentage is calculated by comparing the total budgeted quantity to the total actual quantity completed.
This value is displayed in blue; however, it may not always accurately reflect the true completion status. In such cases, the user may need to adjust it manually.
The percentage can be updated by clicking the arrow button or selecting a value from the dropdown menu.
If the tick box is enabled, the percentage will automatically update each time the job is saved. If the tick box is disabled, the percentage will remain unchanged and must be updated manually by the user.
.png)
This function will only apply to jobs where the tick box is enabled. Jobs with the tick box disabled will not be updated automatically and must be adjusted manually by the user.
Filter Tab Overview
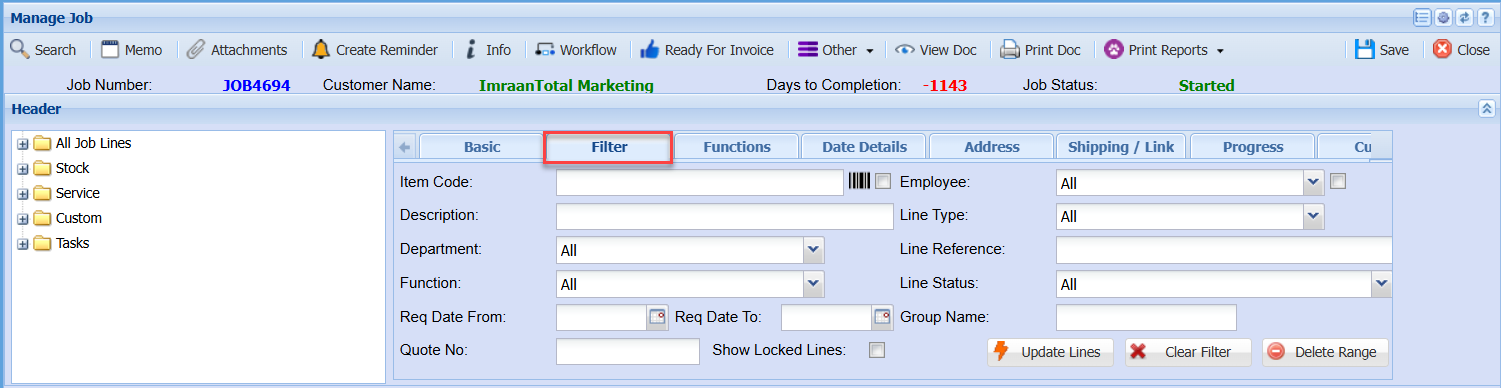
| Item Code | |
| Description | |
| Department | |
| Function | |
| Req Date From and To | |
| Quote No | |
| Show Locked Lines Tick | |
| Employee | |
| Line Type | |
| Line Reference | |
| Line Status | |
| Group Name | |
| Update Lines | |
| Clear Filter | |
| Delete Range |
Progress Tab Overview
The Progress tab provides a summary of job performance, with totals calculated based on values entered in the Scheduling tab (task activity groups).
.png)
|
Total Sell Budget |
|
|
Total Cost Budget |
|
|
Activity Job Progress % |
|
|
Activity Sell Budget Sum |
|
|
Invoiced to Date |
|
|
Potential to Invoice |
|
|
Invoiced % to Date Sum |
|
|
Value to Invoice |
|
|
Total Hours |
|
Manage Job - Notes Tab
The Notes for Manage Job has been upgraded to the new text format
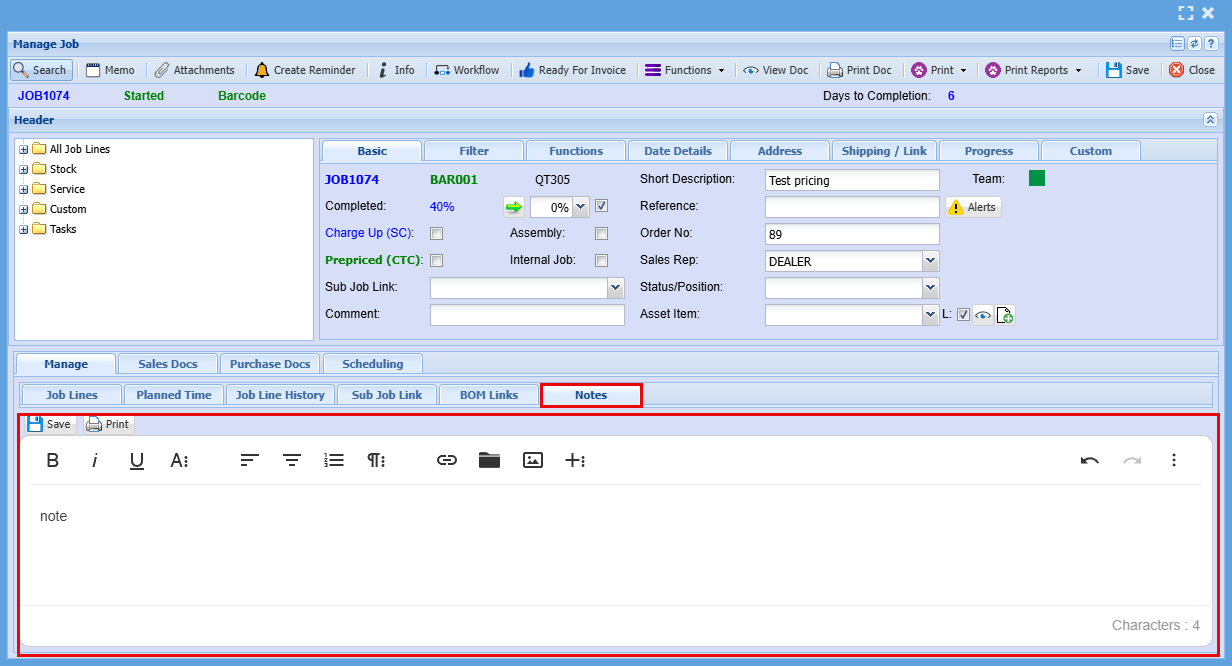
Job Bill of Materials Process (BOM)
The Job Bill of Material (BOM)
Process Steps:
Create and prepare the initial job quote.
Convert the approved quote into an active job and manage it accordingly.
Include any relevant labour or additional service costs to ensure the total job cost is accurate.
Process the Job BOM to generate the resultant item, then close the job.
Job Bill Of Material (BOM) Process

Resultant Item Setup
Go to Inventory > Configuration > Inventory Setup
- Click Add
- Enter an Item Code (ensure it aligns with your existing inventory coding convention)
- Enter the required Item Description
- Select the correct Group Code
- Click Save
- Navigate to the Bill of Material tab
.png)
- Select the BOM Item checkbox
- Click Save and Close
.png)
Setup the BOM item
Go to setup the Bill of Materials item
.png)
Capture Quote - Job Costing
Job Costing > Activity >Quotation
- Enter the GST Production Account Code
- Enter the Description and Reference
- Enter the Order Number
- Click the Address tab
.png)
- Enter the required Division
- Enter the required Region
- Enter the Invoice Group (if applicable)
.png)
- Click Save
- Select the Add tab
- Choose the Stock Code or enter the description for the resultant item to be produced
- Enter the required Quantity
- Enter the estimated Cost Price - Do not enter a selling price
.png)
- Click Save and Close
- Click the Approval Options dropdown
- Select Customer Approval – this must be selected to ensure correct reporting
- Select Approve to Job
.png)
.png)
(This allows quantities and values to exceed the original job budget where required)
- Click Continue
- Click OK
.png)
Manage Job
Job Costing > Activity > Manage Job
- Enter the Job Number
- Select the required Production Job
- Click Manage Job
- Click the Cost to Company button
.png)
- Enter the Item Code of the stock item being used to produce this BOM item
- Enter the required Quantity
- Click Save and New to add another item
.png)
.png)
Inventory > Analysis > Stock Enquiry
.png)
- Manage the stock items added to the job
- Double-click the relevant line and enter the quantity used
.png)
Once all stock items have been processed, review the job lines to ensure they are accurate and have been correctly managed
.png)
Ensure all timesheets from relevant staff have been submitted and are ready for capture, or have already been entered into the system
.png)
- Check the costing analysis of the job
- Open the job
- Select the Print tab
- Click the Job Total Analysis button
.png)
Click the Managed Totals tab
.png)
- Click the View Details Button
.png)
- Close all open windows
- Return to the Job Search screen
- Search for the job, then click the Extras dropdown
- Select the Job BOM button
.png)
- Enter the Resultant Item Code
- Enter the Quantity to be produced
- Click Save
- Click Process
.png)
.png)
- Verify the BOM Item Stock
.png)
You will notice that the resultant item stock on hand has now been updated and increased accordingly
File Upload & Import Process
Quantity Multiplier Option
-
You have the option to multiply quantities during import. This will adjust both the budget quantity and the managed quantity.
-
The default value is 1, but this can be changed before uploading the file.
This feature is ideal when importing a recipe or BOM set up for a single unit. The multiplier allows you to scale the quantities automatically during import, saving time and ensuring accuracy.
Please Note
- The file must be in .CSV format using semi-colon (;) separation
- The file must include headers, however these will be ignored during import
- If any errors occur, they will be recorded in the log
- Please correct the errors and restart the import process
- Please correct the errors and restart the import process
Import Rules
- The CSV file must use semi-colon (;) separation
- Stock items take cost from the item setup, regardless of any cost entered in the file
- Stock items take the selling price from the Excel file
- If the stock item selling price is blank, it defaults to the item setup value
- Custom and Service items take both cost and selling price from Excel
- If cost and selling are blank for Custom or Service items, values default to item setup
- If a Service item uses time allocation and an employee rate is set, cost is taken from user setup rates (1, 2, or 3)
- If cost is set to zero (0), it will be imported as zero
- If Managed Qty is blank, the line is added as Not Started
- If Managed Qty has a value, the line is added as Active
- If there is no stock on hand, the line will be added but not managed
- If the Required Date is blank, the system uses the current date
- Dates must be in the format: YYYY-MM-DD (e.g. 2020-04-05)
- If the Employee field is blank, it will remain blank
- The Employee field uses the login ID
- If the Rate field is blank (with an employee), it remains blank
- Set Rate to 1, 2, or 3 to use the corresponding user setup rate
- If both Employee and Rate are set for a Service item, cost is taken from the user setup rate
- Description is imported from Excel
- If Description is blank, it defaults from item setup
- Set Is Complete = 1 to mark the line as complete
- For stock items, the correct Warehouse Code must be provided
- Drawing is a free text field
- Comment is a free text field
CSV File Template
Below is the required structure for the CSV import file. Ensure the file is saved with semi-colon (;) separators.
ItemCode;Description;Quantity;Cost;Selling;ManagedQty;RequiredDate;Employee;Rate;IsComplete;WarehouseCode;Drawing;Comment
ITEM001;Sample Stock Item;10;;25.00;10;2026-06-01;jbloggs;1;0;MAIN;DRW001;Standard item
SERV001;Labour Task;5;50.00;75.00;5;2026-06-02;asmith;2;0;;;Installation work
CUST001;Custom Item;2;20.00;40.00;;2026-06-03;;;0;;Custom ref;Special notesField Overview
- ItemCode – Stock, Service, or Custom item code
- Description – Item description (optional if using item setup)
- Quantity – Budget quantity
- Cost – Cost value (rules apply depending on item type)
- Selling – Selling price
- ManagedQty – Quantity to manage on the job
- RequiredDate – Format: YYYY-MM-DD
- Employee – User login ID
- Rate – 1, 2, or 3 (user setup rate)
- IsComplete – 1 = Complete, 0 = Not complete
- WarehouseCode – Required for stock items
- Drawing – Free text field
- Comment – Free text field
- Leave fields blank where not applicable
- Ensure formatting matches the rules provided
- Validate data before importing to reduce errors
Job Management Letter/Note Template
Where to find Job Management Letter Templates
There are two places within the Job management where you can pull in templates to record job information and Notes. These templates are set up in CRM Module.
CRM > Configuration > Email Template
- Use the email drop-down below to filter the Job Management templates.
- Click "Add" to add a new template
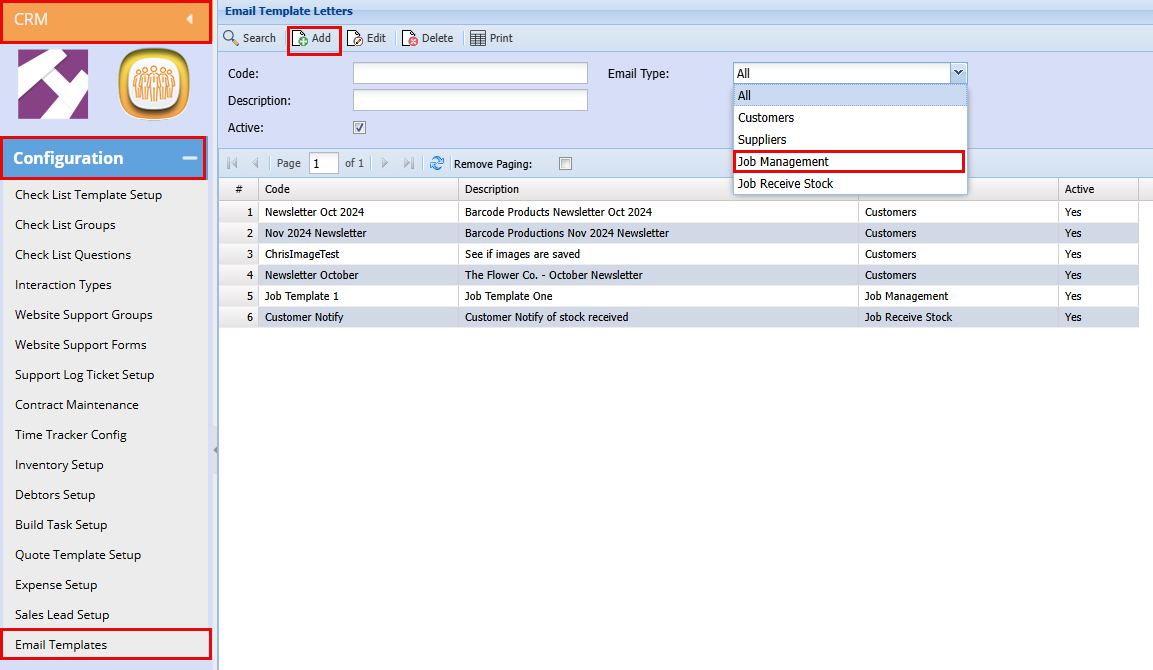
Creating a new Template for Job Managing
Add the below for your template as shown below:
- Code
- Description
- Choose the type "Manage Job"
- Add your template, here you will be able to design your template by adding text, images, grids, links etc.
- Click "Save & Close"
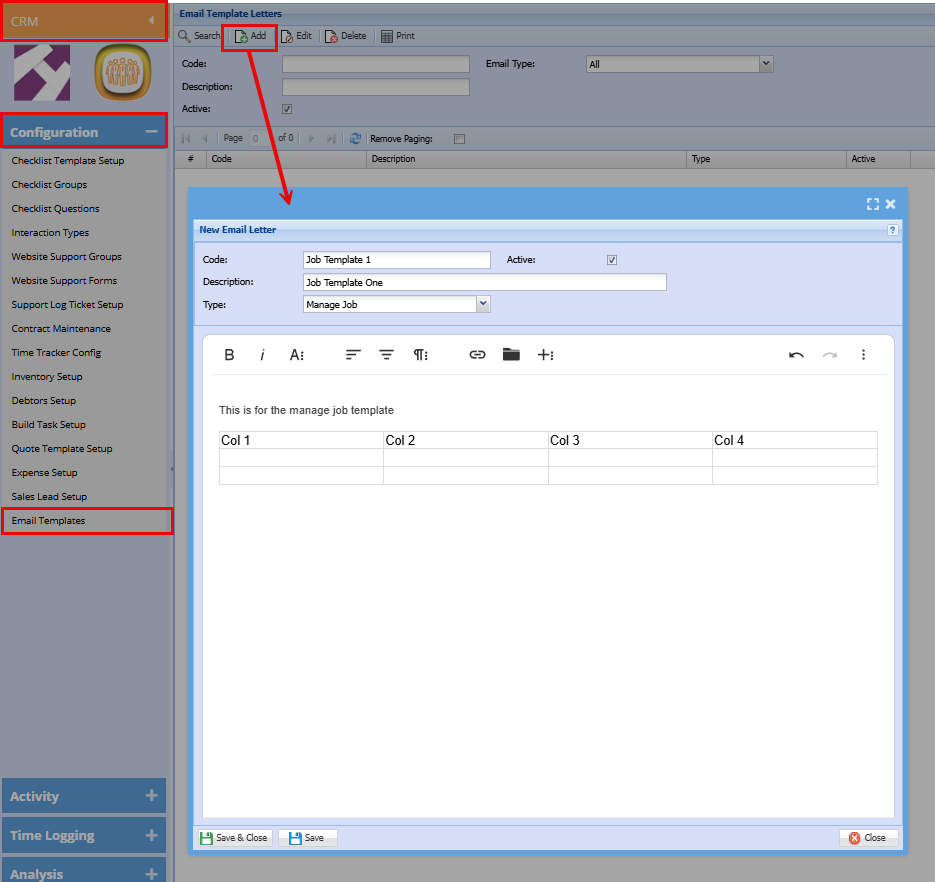
Where to Add a Job Management Letter Templates
Job costing has two locations where the templates can be pulled in.
Job Costing Module > Activity > Manage Job
- Search for the job you are wanting to add a template to.
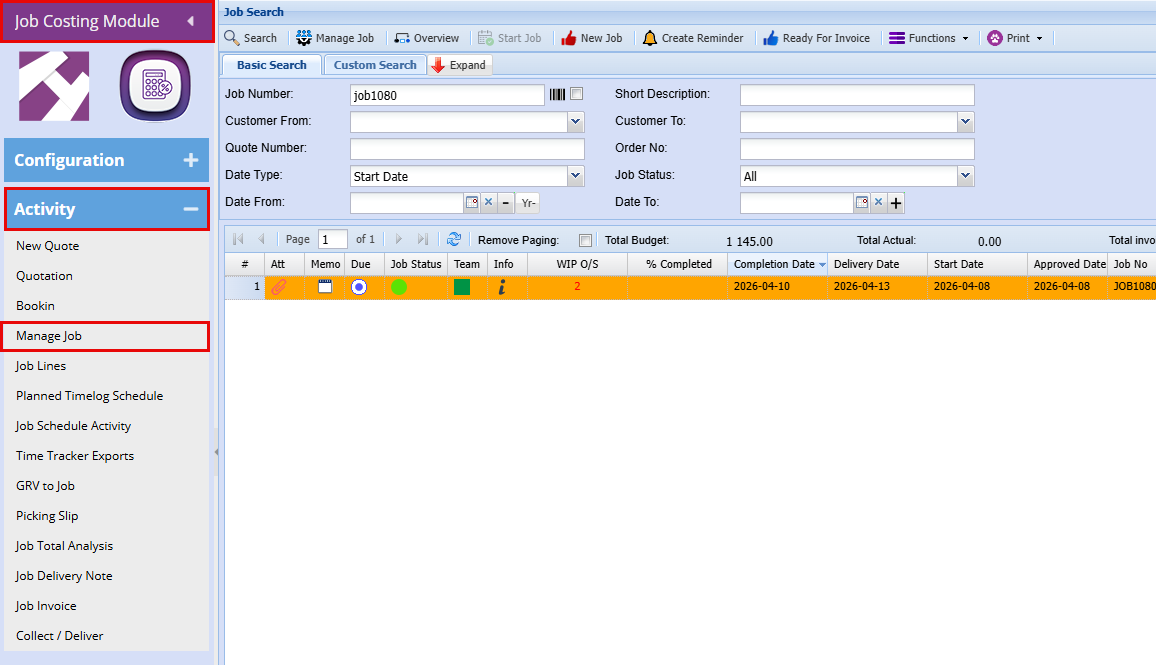
Notes (Add template here)
- Double Click on the job line to open the job
- Click on "Notes"
- Click on "From Template" a widow will open with a dropdown
- Select your template from the dropdown to populate the text box.
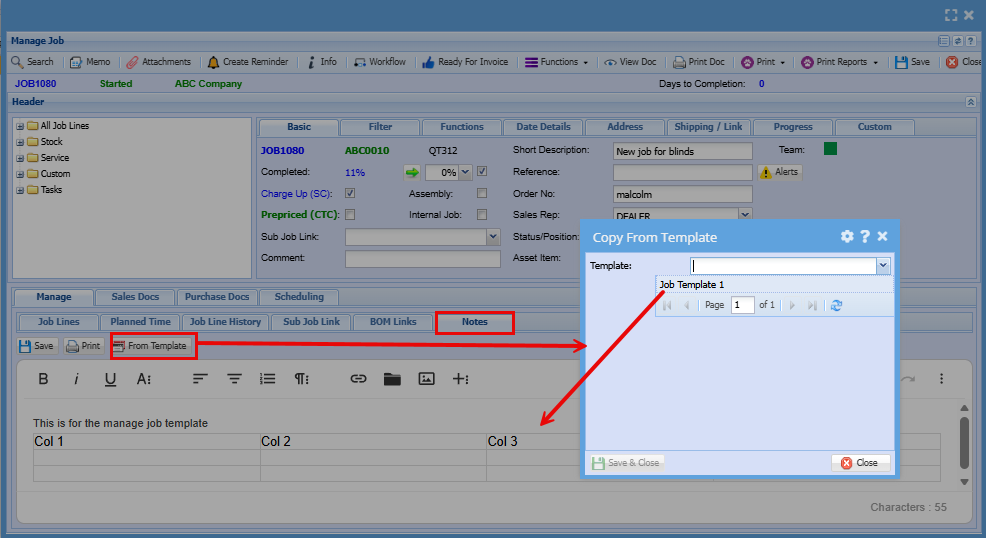
Info (Add template here)
- Click on "Info"
- Click on "From Template" a widow will open with a dropdown
- Select your template from the dropdown to populate the text box.
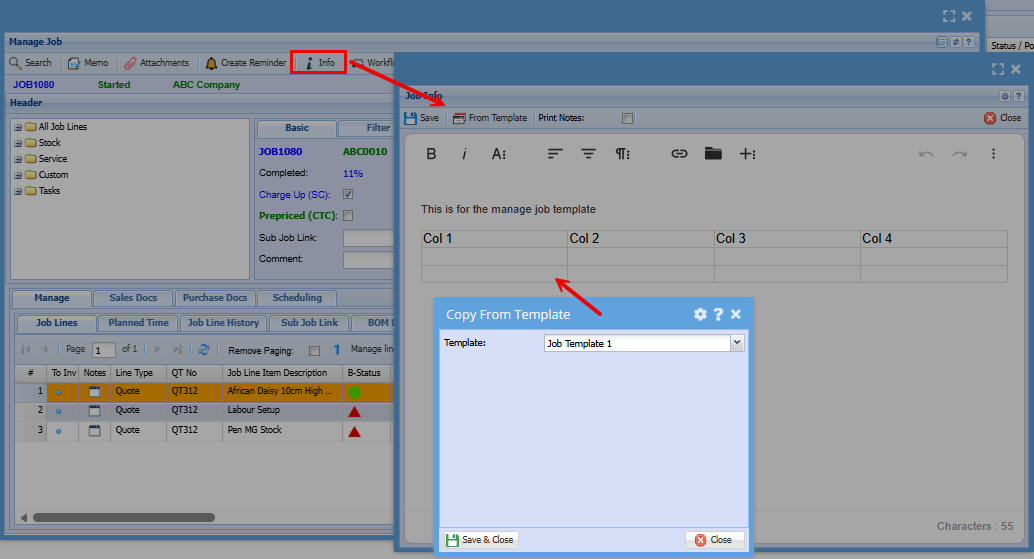
Closing or Cancel Job
Closing a Job
Job Costing > Activity > Manage Job
A job is automatically closed upon issuing a final invoice. However, if invoicing is complete and the job remains open due to outstanding purchase orders or quotes, it can be manually closed as needed.
- Close all the open documents (Quotes, PO, Delivery Notes)
- Highlight the job line you want to close
- Click "Functions" dropdown at the top left of the screen
- Click "Close or Cancel Job"
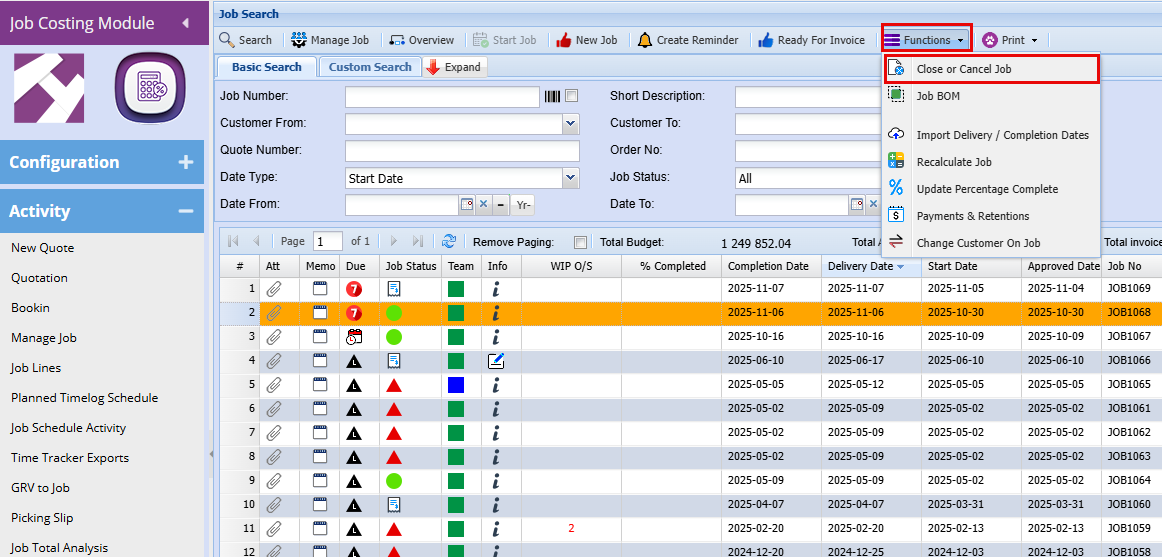
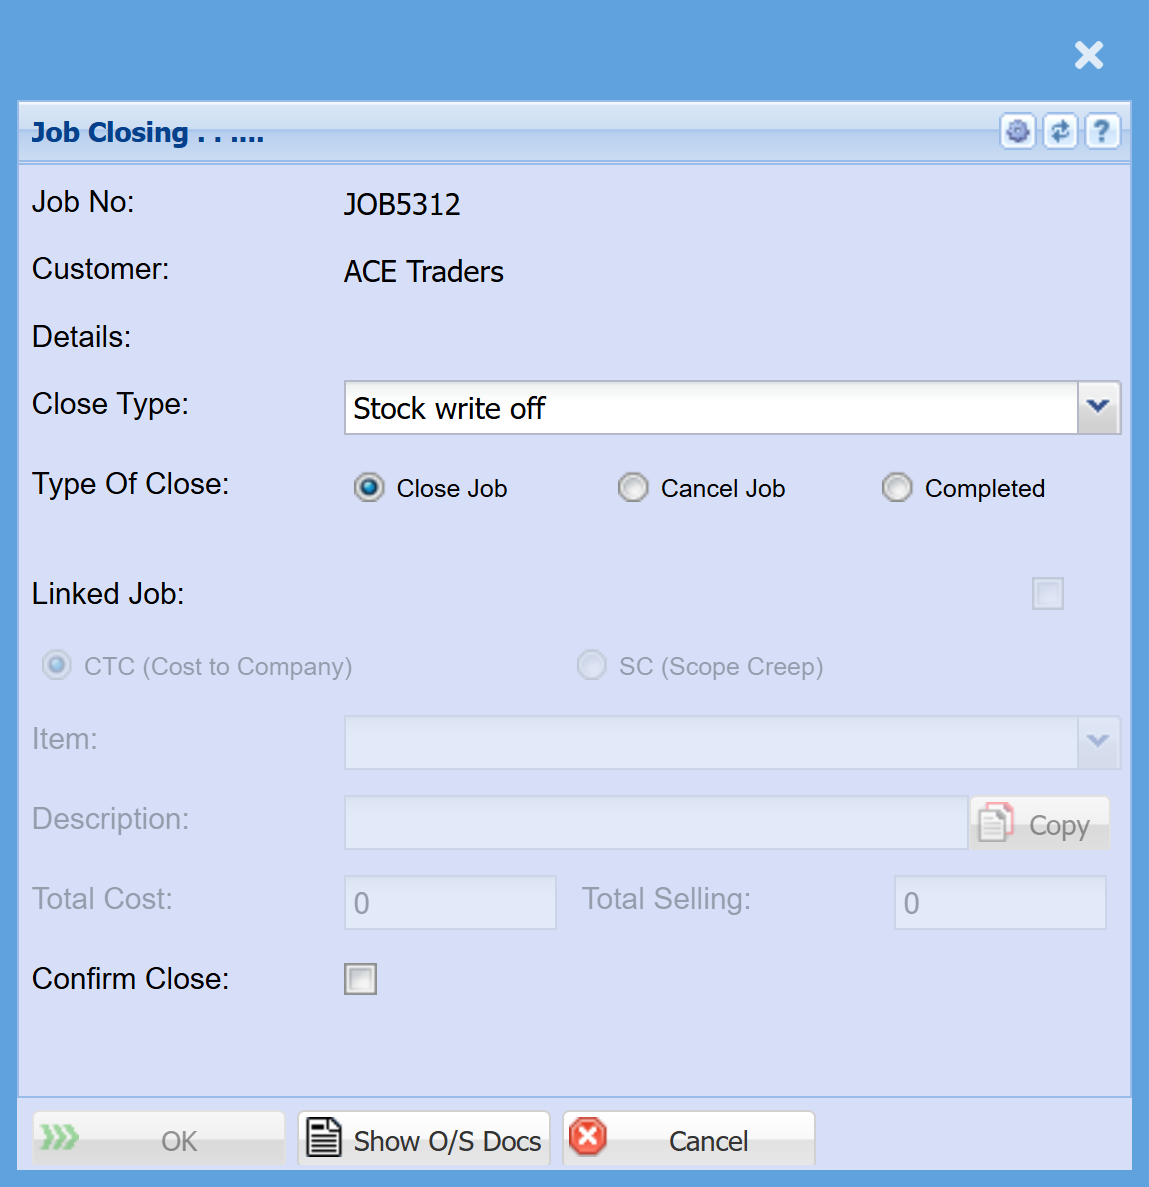
Auto-populated information
These details are pulled through from the job:
- Job No – Displays the job being closed (e.g. JOB5312)
- Customer – Shows the customer linked to the job
- Details – Additional job information (if applicable)
Close Type
- Used to select how the job is being closed financially or operationally
- Example shown: Stock write off
Choose one of the following options:
- Close Job → Standard closing of the job
- Cancel Job → Use if the job is no longer going ahead
- Completed → Confirms the job has been fully finished
- Allows you to link this job to another if required
- Options like:
- CTC (Cost to Company)
- SC (Scope Creep)
- Additional fields (Item, Description, Cost, Selling) will activate if used
- Confirm Close (checkbox)
👉 Must be ticked to finalise the job closure
- OK → Completes the job closing process
- Show O/S Docs → Displays any outstanding documents (must usually be resolved before closing)
- Cancel → Exits without closing the job
Reopening a Job
This manual outlines recent system changes designed to identify when a job has been reopened.
When searching for jobs, reopened jobs will be clearly indicated in the grid:
- The row will be highlighted in green
- A Reopened column will display the date and time the job was reopened
.png)
Lock Lines
When a job is closed, all associated lines—whether managed or not—are locked.
If the job is later reopened, these existing lines will remain locked and cannot be edited.
Only new lines can be added to the job.
Job Reopened Indicators
When opening a reopened job, the system clearly highlights this status for visibility.
- A Reopened indicator is displayed in the top left corner of the job screen
- Any lines that were locked upon reopening are clearly identified
This ensures users can easily recognise that the job has been reopened and understand which lines can no longer be edited
.png)
Refresh Grids
You can now refresh job tabs without needing to close and reopen the job.
Simply click on the All Job Lines Level tree view, and the system will automatically refresh all job tabs, including the line items.
.png)
Manage Job Statuses
Job Statuses
Job statuses indicate the current stage of a job, helping users track progress, manage workflows, and ensure accurate reporting.
| Status | Details |
| NotStarted |
The job has been created but not yet begun. It is unmanaged and has no active work or progress.
|
| Started |
The job is in progress. This typically means managed lines have been added or work has commenced.
|
| Completed |
The job has been finished and closed.
A final invoice will usually trigger the job to move to this status.
|
| Closed |
|
| Cancelled |
|
| JobBOM |
The job is being used to produce a Bill of Materials.
In this case, the job acts like a “recipe” to build or assemble a final product from components.
|
| InProcessing |
An error has occurred while completing the job, usually during invoicing.
These jobs should be reviewed and corrected. To resolve, manually close the job and update the status to Completed, Closed, or Cancelled as appropriate.
|
When running reports, you can filter jobs based on their status, such as Started or Completed.
- Started Jobs – These are active jobs that are currently in progress
- Completed Jobs – These are jobs that have been finished and closed
This allows for accurate tracking of work in progress versus completed work.
.png)
Correcting an Incorrect Job Status
If a job has been closed or marked with the wrong status, it can be corrected by updating the job status.
- You can toggle between Closed and Completed as required
- To make this change, navigate to Job History and update the status accordingly
This ensures the job reflects the correct stage for accurate tracking and reporting.
.png)
In Processing Status Change
This status occurs when an issue arises during invoicing, preventing the job from being completed.
Typically, the invoice has processed correctly, but the job has failed to update to a completed status.
To correct this:
- Manually close the job
- Update the status to Completed
This ensures the job is properly finalised for accurate reporting and tracking.
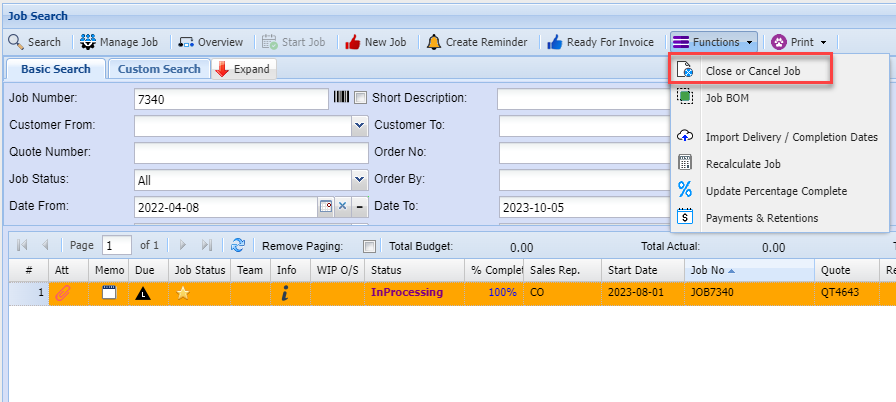
Job Manage status search
Job Costing > Activity > Manage Job
Due date colours is based on Completion date to current date
.png)
Job Status Line Due Date
Job Costing > Activity > Manage Job
Due date colours are based on the Completion Date compared to the current date.
These visual indicators help quickly identify whether a job is on track, approaching its deadline, or overdue.
|
Icon |
Details |
|
|
Past 30 days from Due date based on current date |
|
|
Before 30 days from due date based on current date |
|
|
Past 7 days from the Due date based on current date |
|
|
Due date is on today’s date |
|
|
Future 7 days from current date to due date |
|
|
Anything after 7 days up to 30 days in the future |
|
|
After 30 days in the future |
.png)
.png)
.png)
.png)
.png)
.png)
.png)
.png)
Job Status Lines Indicators
Job Costing > Activity > Manage Job
Line statuses provide a clear visual way to track progress by comparing planned (budgeted) quantities against actual usage, while also indicating whether a line has been completed. These colour-coded indicators make it easy to quickly see if a line is on track, completed, or exceeding plan.
|
Icon |
|
Details |
|
|
Not Started |
No activity has been recorded on the line.
|
|
|
In Progress |
In Progress (Green)
|
|
|
Qty Reached |
Qty Reached (Blue with Tick)
|
|
|
Qty Exceeded |
The line has gone beyond the original plan.
|
|
|
Is Complete |
The line has been manually marked as finished.
|
.png)
.png)
.png)
.png)
.png)
Manage Line Status Indicators
Job Line Status Word
Job Costing > Activity > Manage Job
Line status comes in three types
Line Status Types
-
Not Started (Red)
The line has not yet been actioned. No work or quantities have been recorded. -
Started (Green)
The line is actively in progress. Work has begun and is being managed. -
Completed (Blue)
The line has been finished. All required work has been completed and marked accordingly.
.png)
Print Job Card
Job Costing> Activity> Quotation> Print /Export
Select A quote that has a job number and select print job Card form the drop-down arrow.
.png)
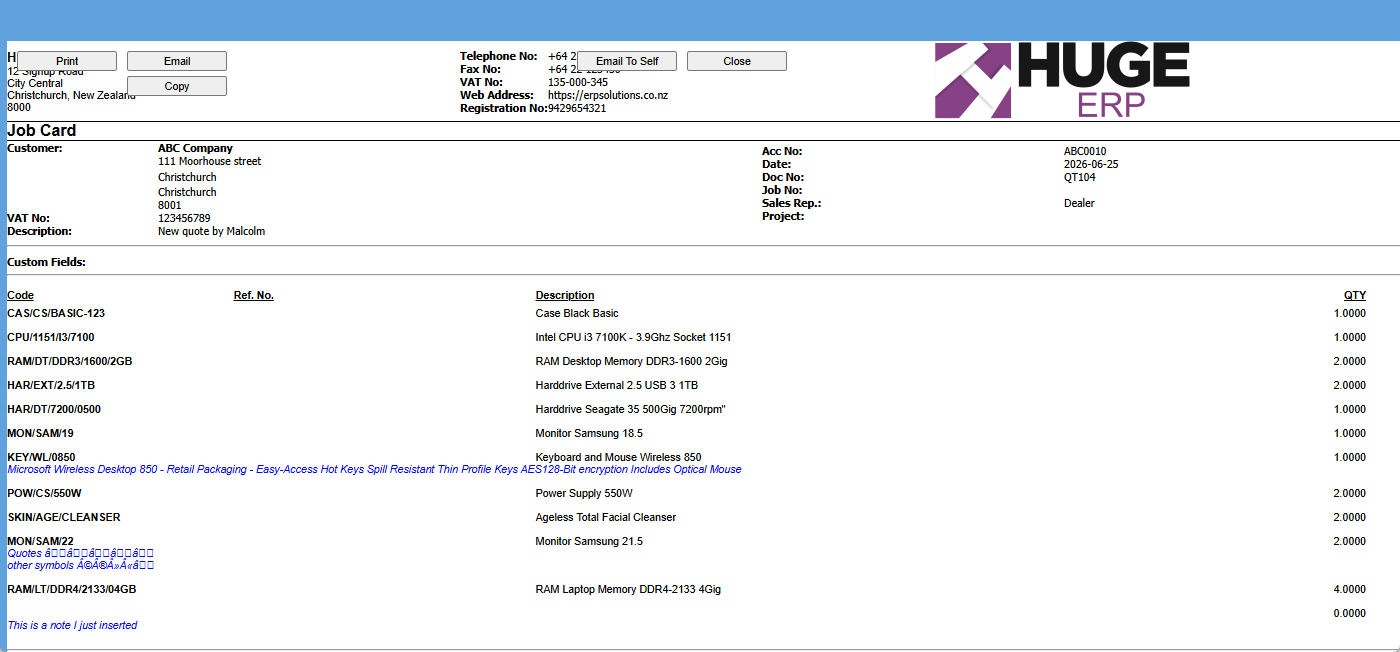
Print Service Card
Job Costing > Activity> Quotation> Print /Export
| Print a service card | Select a quote with a job number and print a service card from the drop-down menu |
.png)
Print Job Header
Select Job Header Print Help
Job Costing > Activity> Quotation> Print /Export
| Generate | Generates a print layout according to the information contained in that specific Job History Item |
.png)
.png)
Changing the Warehouse on Job Lines
There may be instances where an incorrect warehouse has been selected on a job line and needs to be updated.
To change the warehouse, access the line through the Job Detail Line button and make the required update.
.png)
Return to the Job Lines screen.
- Locate the job line with the incorrect warehouse.
- Select (highlight) the relevant line.
- Click the Job Detail button.
.png)
- Highlight the job line you want to change.
- Click the Edit Split button.
.png)
- Update the Warehouse field as required.
.png)
Change customer on Job
System Configuration > Security > System Utilities
The system provides a utility that allows you to change the customer on an existing job, provided certain conditions are met.
-
The customer can only be changed if NO invoices have been created or processed against the job.
- If invoices exist, this utility will not be applicable.
How to:
- Double click on the "Change Customer on Job" utility
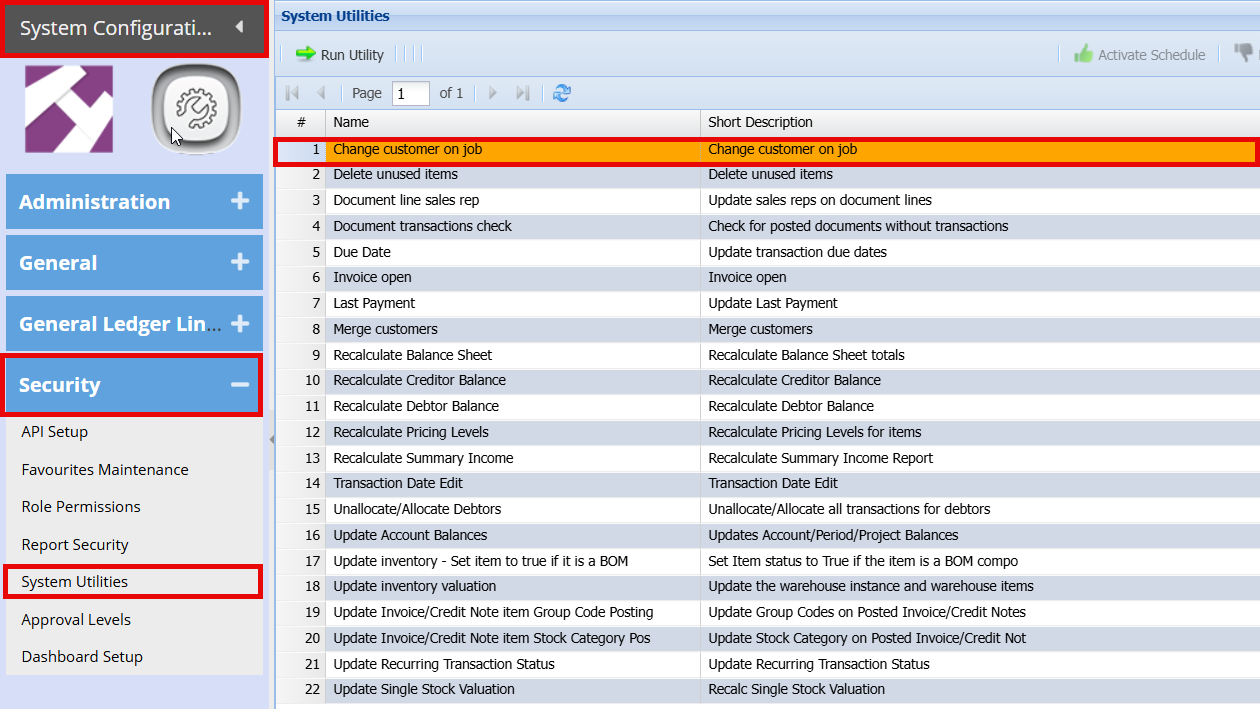
You will get a prompt that to confirm you want to change the customer.
- Click "Yes"
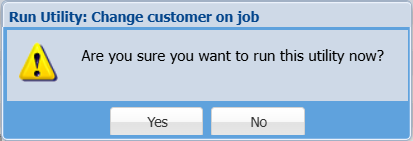
- Select the job number you want to change
- Select the New Customer
- Click "Change"
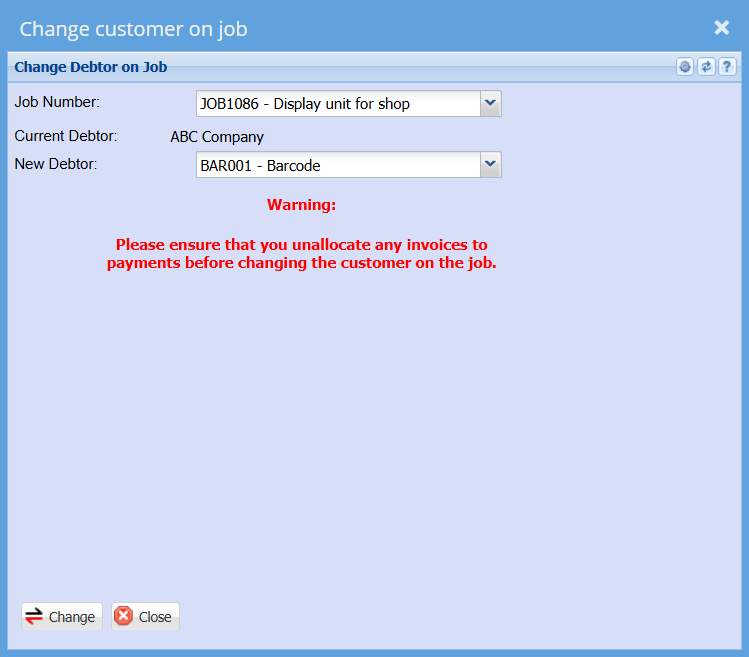
you will then get a pop up to say that the customer has been updated
Reassign Job and Editing of the Cost Price
Double-click a Job to open it. Within the job, double-click a job line to edit or reassign it.
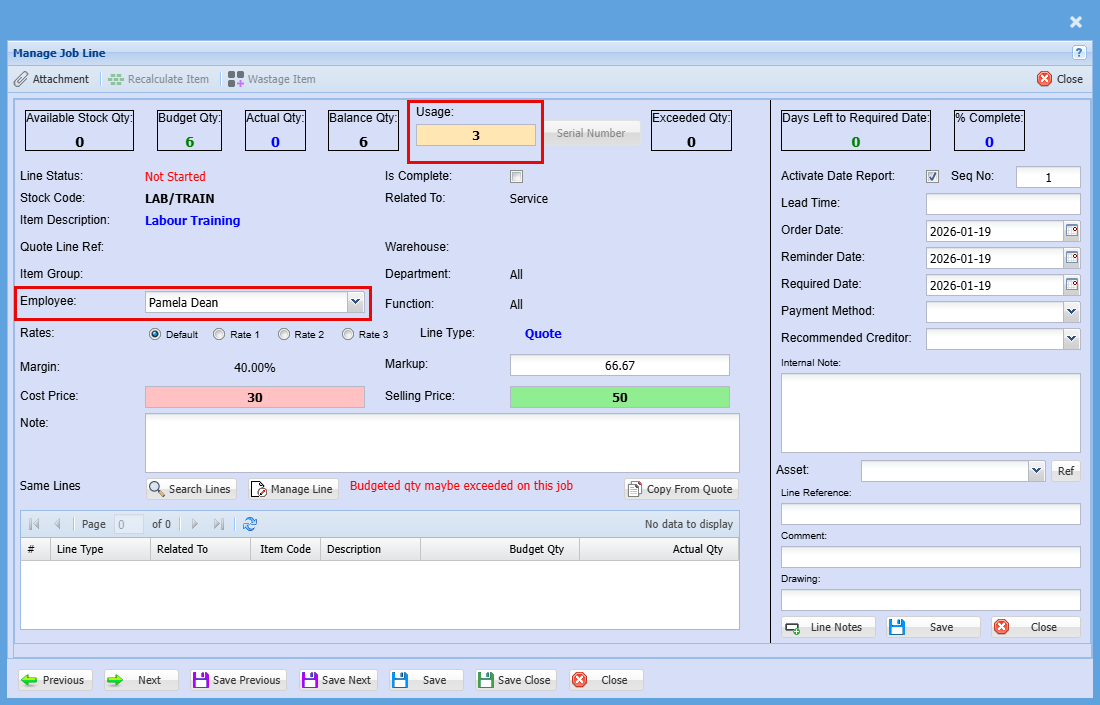
- Allows you to edit the cost price of a managed line
- Allows you to reassign the job line to another parent line
- Allows you to change the employee assigned to the managed line
Restrictions
You cannot edit the line if:
- The line is locked
- The item has been marked for invoice or delivery note
You cannot change cost or quantity if the item is a:
- Stock item
- Fixed asset
Reassignment Rules (Sell Price)
When reassigning to a new parent:
-
The line will adopt the sell price of the new parent
-
If the item is a stock category (SC) or quote line, it will use its own sell price
-
If the new parent is a Cost to Company (CTC) item, the sell price will be removed from the line
Create Reminder

The “Create Reminder” button (highlighted with the bell icon in the top toolbar) is used to set up reminders for a job.
When you click this button, it allows you to:
- Schedule a follow-up action
- Set a date and time for the reminder
- Add notes about what needs to be done
- Ensure important tasks or jobs are not missed
This is especially useful for:
- Following up with customers
- Checking on job progress
- Reminding yourself to complete outstanding tasks
This screen is where you set up and manage a reminder for a job.
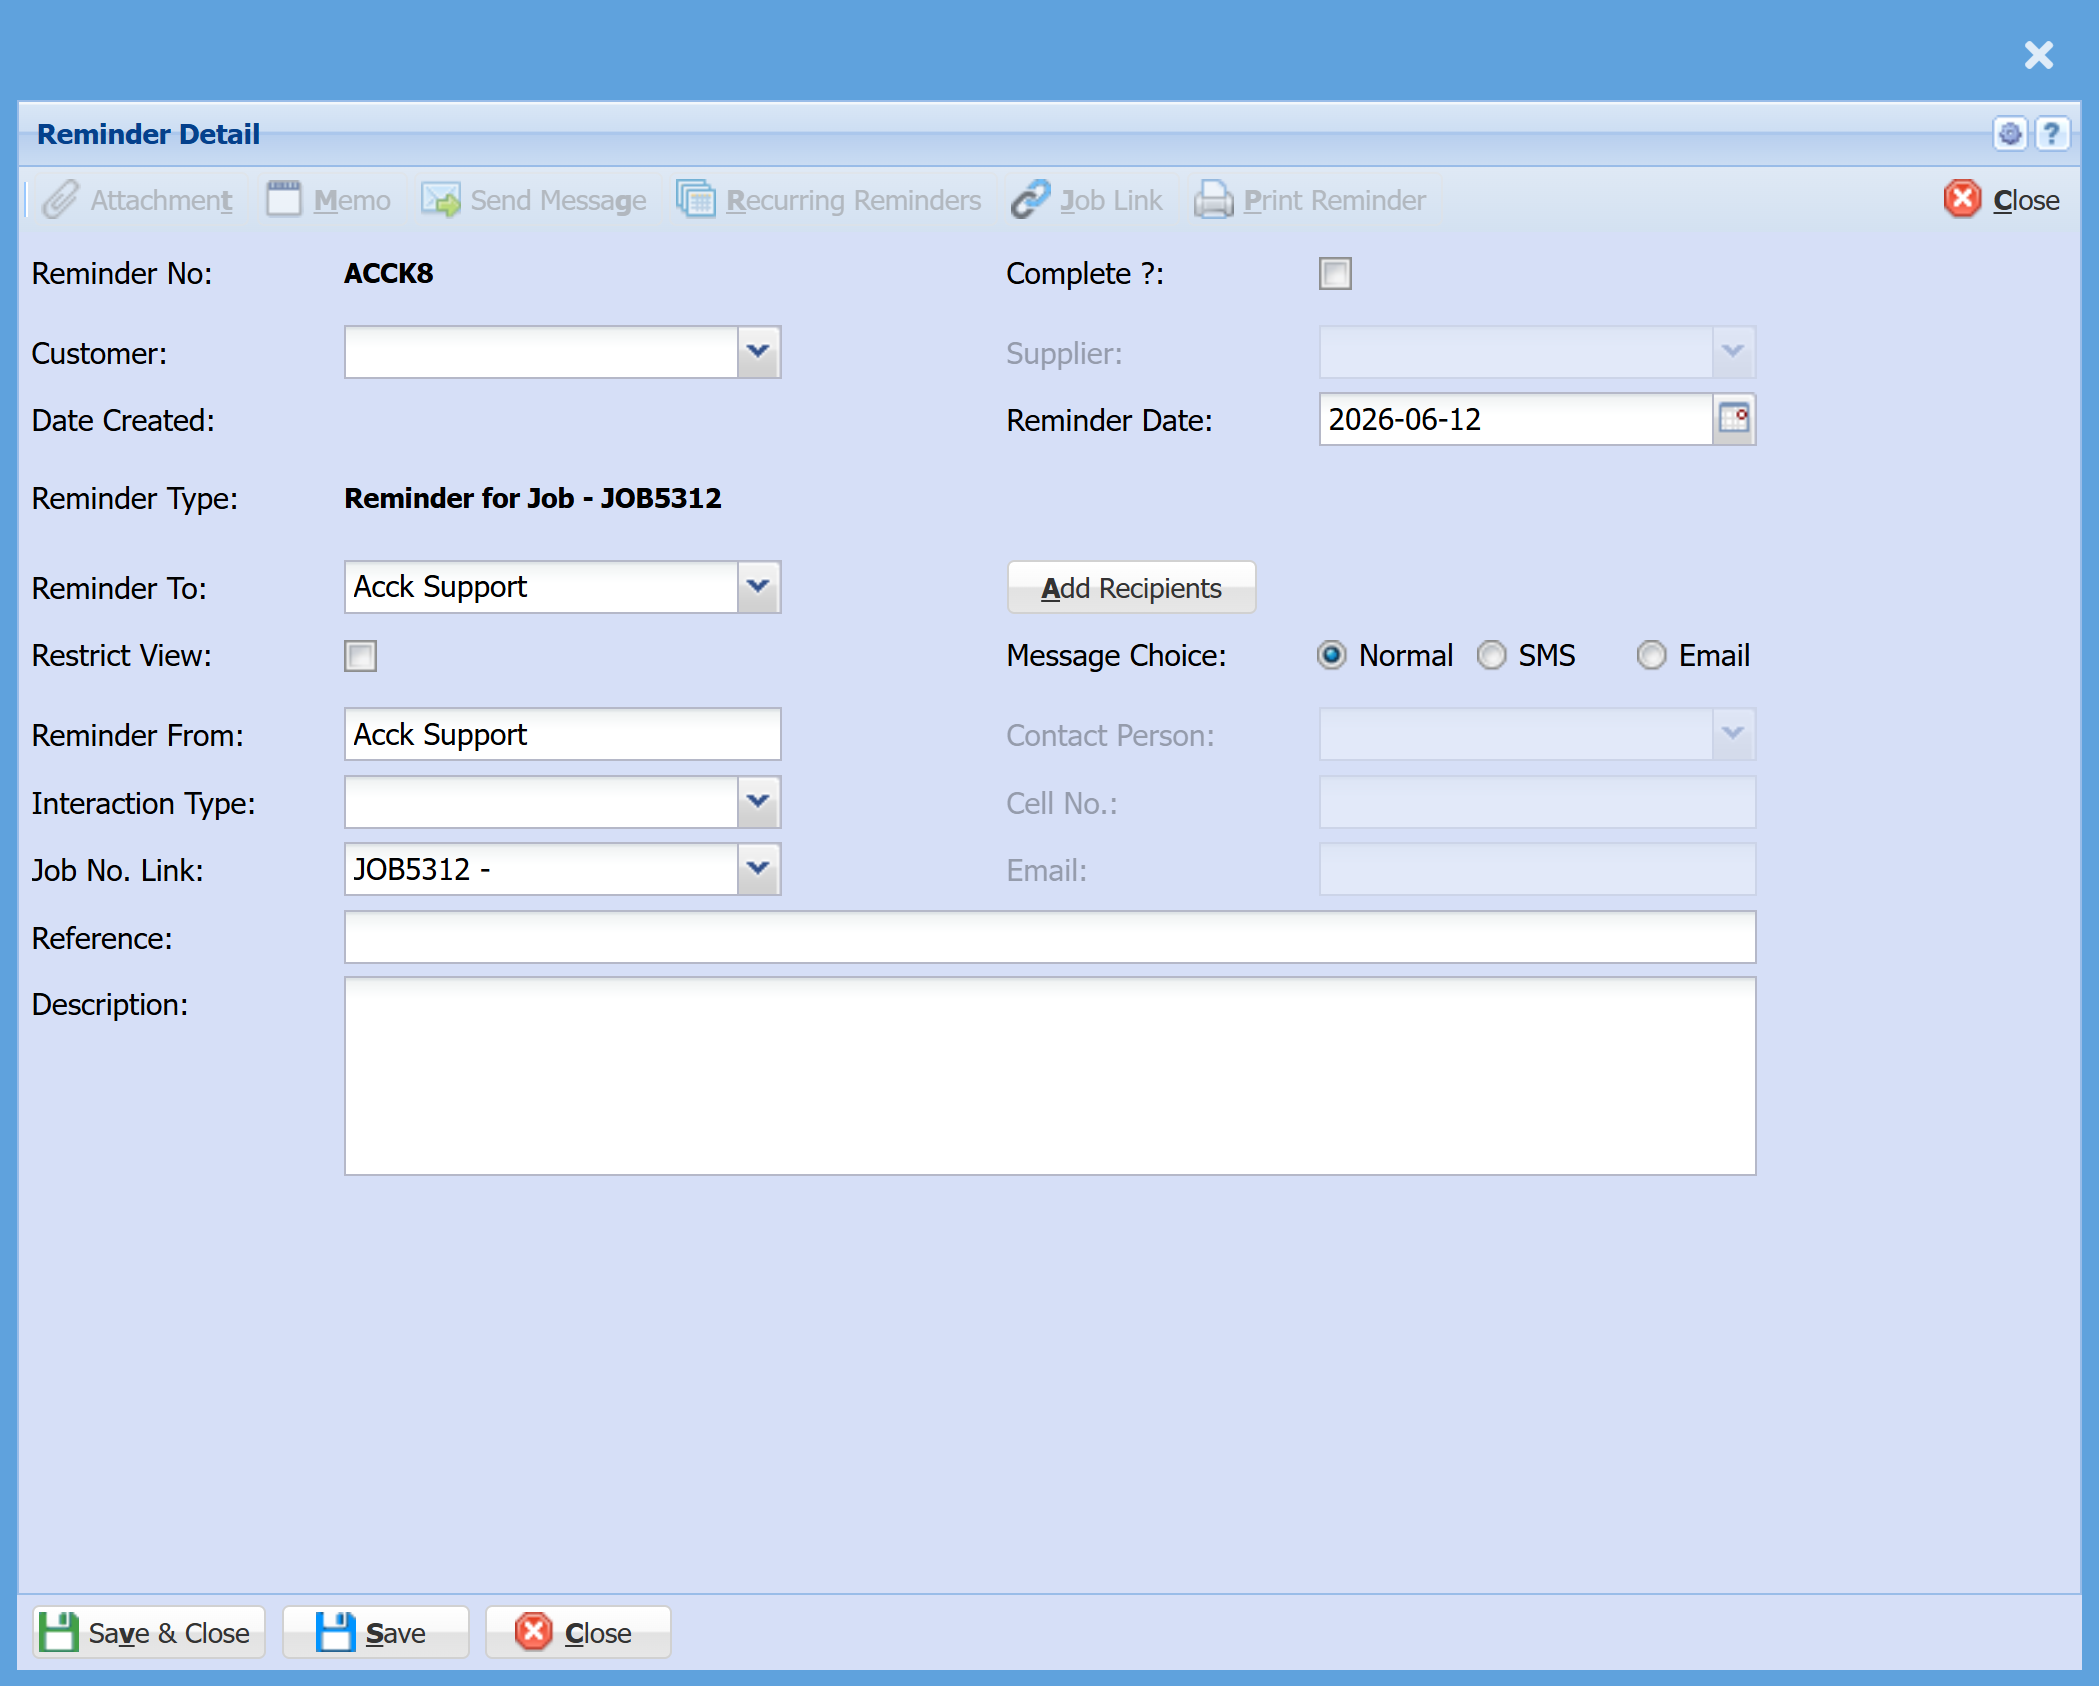
|
Reminder No
|
A unique reference number generated by the system.
|
|
Complete?
|
Tick once the reminder has been actioned. |
| Reminder Date | Select the date you would like the reminder to trigger. |
|
Customer / Supplier
|
Link the reminder if required.
|
|
Created Date
|
This will be the date the reminder is created
|
|
Reminder Date
|
Select the date you would like the reminder to trigger.
|
|
Reminder Type
|
Automatically links the reminder to the job (e.g. Reminder for Job – JOB5312).
|
| Reminder To | Choose who the reminder will be assigned to (e.g. a user, team, or department). |
| Add Recipients |
Optional – add additional people who should also receive the reminder.
Once you click “Add Recipients” and select a recipient:
|
| Message Choice |
|
| Restrict View | |
|
Reminder From
|
The user or team creating the reminder.
|
| Interactive Type |
This field is used to categorise the type of reminder or follow-up so it can be tracked and filtered more easily. You can select from the following options:
|
| Job No. Link | This automatically links the reminder to the job you created it from. |
| Reference | Enter a short title or subject for the reminder. |
| Description | Add detailed notes about what needs to be done or followed up. |
Sub Job Link
This section allows you to create a sub-job linked to a main job.
The sub-job retains the original job number, with an extension added (e.g. .1) to indicate that it forms part of the main job. This helps group related work under a single job structure while still tracking each component separately.
.png)
Follow the steps to create a Sub Job linked to the main job.
When created, the system will automatically assign a sub-job number based on the main job—for example:
- Main Job: Job15
- Sub Job: Job15.1
This numbering structure clearly indicates that the sub-job forms part of the main job while allowing it to be managed and tracked independently.
.png)
Job Expense Cashbook
Job expenses are linked directly to the General Ledger cashbooks, ensuring that all job-related costs are accurately recorded.
These expenses are captured through entries in the General Ledger cashbook lines, allowing costs such as purchases, travel, or miscellaneous expenses to be allocated to a specific job for proper tracking and reporting.
.png)
After clicking Next, you can assign the cashbook line to a specific job.
- Select the relevant Job to ensure the expense is correctly allocated
- Ensure a Job Service Item is entered, as this determines how the cost is recorded against the job line
This step ensures that all expenses are properly linked to the job and accurately reflected in job costing and reporting.
.png)
Once processed, the expense will be added to the job under the Expense category.
.png)
When reviewing the job detail line, the expense will display key information linked to the job:
- A note describing the expense
- A usage quantity of 1, indicating a single expense entry
- The cost price, showing the value allocated to the job
This provides clear visibility of how the expense has been recorded and applied within the job.
.png)
Job Costing Sell Value
Job Search
Job Costing Module > Activity > Manage Job
In the past, we never used to show values on the manage job screen.
We now show values on the top bar and on the grid.
The top bar shows the total budget, Total Actual and Total Invoice
This allows you to easily manage job costing values on the job search screen.

Job values are also showing on the manage job grid as shown below:
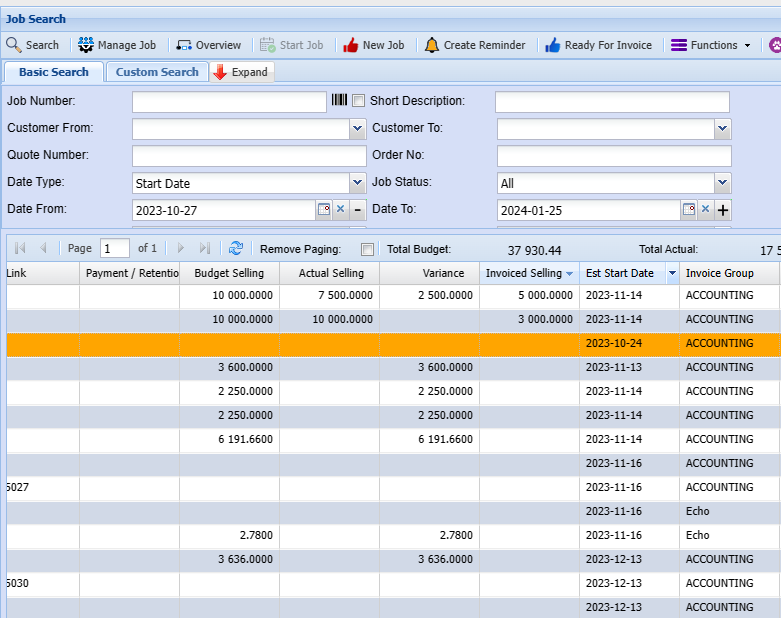
The job values also show on the job lines and job history making it easy to manage jobs and all the selling prices.
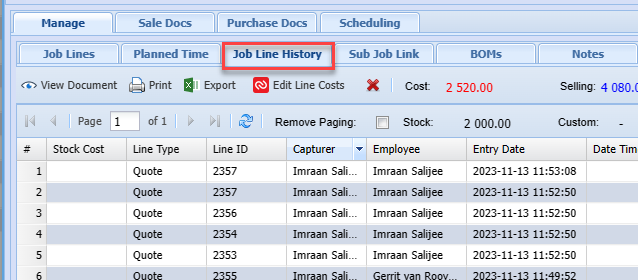
Job Expense Supplier Journal
Job expenses are directly linked to the Supplier Journal (Creditors Journal), allowing costs entered through supplier invoices or journals to be allocated to specific jobs.
For this functionality to work correctly, the appropriate setup must be completed in Links Maintenance.
System Configuration > General Ledger Links > Links Maintenance > Groups tab
Within the Edit GL Group Link window, the following options must be configured:
Allow Journal To Job
- This must be ticked to enable supplier journals to be allocated to jobs.
- If not enabled, job costing from supplier journals will not be available.
- This should be ticked to indicate that the group is used for purchase-related transactions.
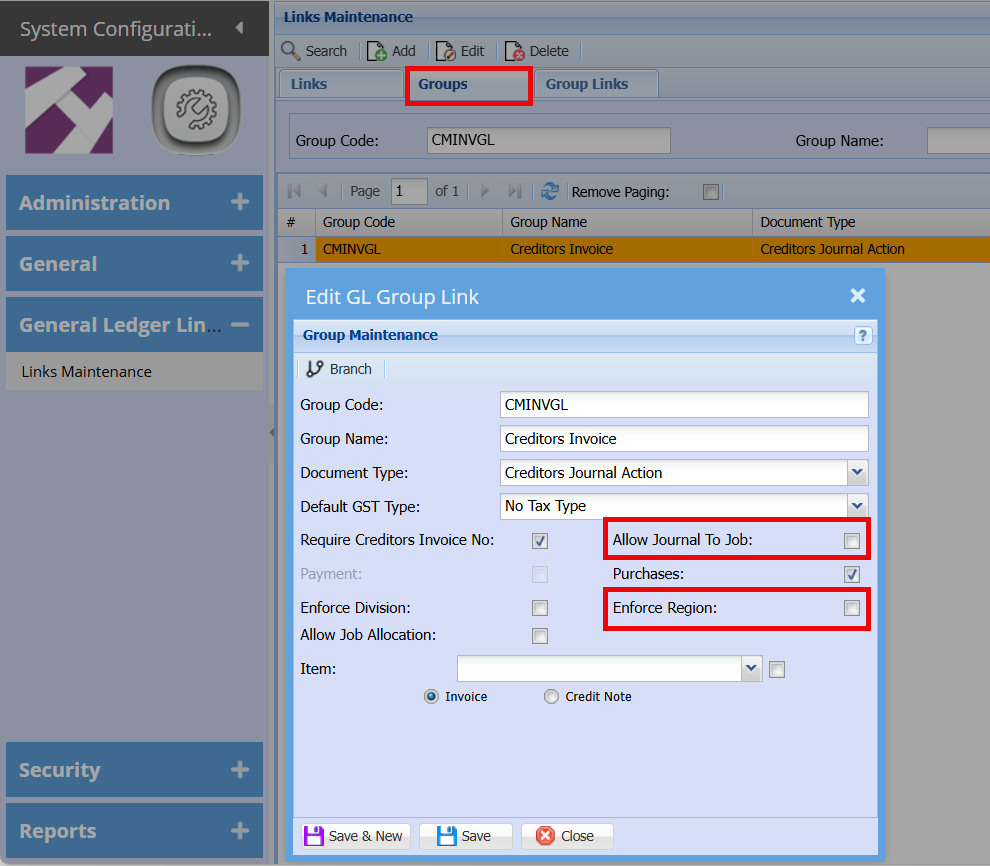
Stock Recovered Costs
Stock recovered costs are created from stock items that cannot be un managed from the job.
The stock item will be returned back on job via a stock level adjustment.
The value of the stock item will be added to the job as a custom item called stock recovered costs.
The quantity will be the same as the quantity of stock returned as a postive figure.
The value of the stock item will be the recovered cost on the job as a negative value.
See stock request return to job processes under inventory module
Job Costing stock write off and Gain and Loss balance
Stock Write-Off & GL Allocation
When closing a job and writing off stock, the associated cost must be correctly allocated in the General Ledger (GL).
To ensure accurate financial reporting, the write-off should be posted to the Cost of Sales account using the GL code:
“Job Costing Stock Write Off.”
This ensures that any unrecovered stock used on the job is properly accounted for as a cost to the business.
.png)
Setup a new GL link and GL Link setup
To correctly account for stock written off during job closure, a dedicated GL link must be configured.
- GL Link Code:
JOBSTKWRITEOFF - Description: Job Costing Stock Write-Off
This link should be assigned to the appropriate Cost of Sales account in the General Ledger.
Setting this up ensures that any stock written off is accurately recorded as a cost to the business, maintaining correct financial reporting and audit tracking.
.png)
Group Link
A Group Link must be created to support stock write-offs during job closure.
- Document Type: Job Close Stock Write Off
- Code:
JOBWRITEOFF - Description: Job Costing Stock Write Off
This setup ensures that when stock is written off during job closure, the transaction is correctly recorded and linked to the appropriate GL account for accurate costing and reporting.
.png)
Link GL Links
.png)
Create Link under SCM
.png)
Job Close & Stock Write-Off Process
When closing a job and processing the final invoice, any stock write-offs must be recorded using the newly created GL link.
- Continue to use the Stock Journal Adjustment process
- However, ensure the GL link JOBSTKWRITEOFF (Job Costing Stock Write Off) is selected
This ensures that any unrecovered stock from the job is correctly posted to the Cost of Sales, maintaining accurate financial reporting and job costing.
.png)
Percentage Invoice – WIP Correction
This process applies specifically to final percentage-based job invoices.
It is used to correct any variance between the Work in Progress (WIP) Ledger account and the stock write-off value when completing a job. These differences can occur due to timing, usage, or costing variations throughout the job lifecycle.
To support this correction, a new GL account must be set up and used during the final invoicing stage. This ensures that:
- WIP balances are cleared correctly
- Stock write-offs are accurately reflected
- Financial reporting remains balanced and accurate
.png)
GL Link Setup – Job Gain / Loss
To manage any differences identified during final job invoicing, a new GL link must be created.
- GL Link Code:
JOBGAINLOSS - Description: Job Costing Gain or Loss
This link is used to account for any variance between expected and actual job costs (gain or loss), ensuring these differences are accurately recorded in the General Ledger.
This helps maintain clean financial reporting and proper reconciliation when closing jobs.
.png)
GL Link Group – Job WIP Correction
A new Document Type must be created to support WIP corrections during job finalisation.
- Document Type: Job WIP Correction
This document type is used to group and process adjustments required to correct differences between Work in Progress (WIP) and actual job costs when completing percentage-based jobs.
It ensures all WIP correction entries are clearly recorded, tracked, and linked to the appropriate GL accounts for accurate financial reporting.
.png)
GL Link
.png)
GL Link SCM Setup – Job WIP Correction
A new GL link must be created within the SCM (Supply Chain Management) setup to support WIP corrections during job finalisation.
- GL Link: Job WIP Correction
This link is used when processing adjustments between Work in Progress (WIP) and actual job costs, particularly for percentage-based invoicing.
It ensures that any corrections are accurately recorded and aligned with the correct GL accounts, supporting proper reconciliation and financial reporting.
Example
- Quote Created
.png)
- Do first invoice – half
.png)
- Invoice posting
.png)
- T-Accounts
.png)
- Lines are managed, but more costs are added
.png)
This means that the job has exceeded by R160-03
.png)
Second Invoice
A second invoice was processed without managing the remaining lines, resulting in increased profit.
- The WIP Account now reflects R800.00
- The Stock Write-Off totals R560.04
- This creates a difference of R239.96, representing the variance remaining in the WIP account
.png)
.png)
- WIP Balance Correction
The balance in the WIP account must be adjusted when there is a difference between WIP and actual job costs. This typically occurs when the WIP value is higher than the actual costs recorded.
- Debit: WIP – R239.96
- Credit: Cost of Sales – Job Gain/Loss – R239.96
- Debit: Cost of Sales – Job Gain/Loss – R239.96
- Credit: WIP – R239.96
To determine the correct adjustment:
- Calculate all estimated values posted to the WIP account for the job
- Compare these to the actual costs posted to Cost of Sales (COS)
- Identify the difference and process the adjustment accordingly
This ensures the WIP account is accurately balanced and reflects the true cost of the job compared to the original estimates.
Take On Values for Job
Taking on Values for a Job
-
Create a Sub Quote
- Generate a sub-quote from the existing job, using the closing balances for both cost and selling values completed to date.
- Generate a sub-quote from the existing job, using the closing balances for both cost and selling values completed to date.
-
Set Up an Inventory Item
- Create a new custom inventory item called:
XJOB/OB – X Job Cost Opening Balance - Use this item code on the quote lines.
- Create a new custom inventory item called:
-
Structure the Quote Lines
- Divide the quote into two lines (using the same inventory code):
- Costs and sales related to all previously invoiced documents to date.
- Costs and sales representing the remaining balance compared to the total job budget.
- Divide the quote into two lines (using the same inventory code):
-
Validate Totals
- For existing jobs, ensure that:
- The two calculated values above, plus any new values,
equal the total estimated cost and selling value of the job.
- The two calculated values above, plus any new values,
- For existing jobs, ensure that:
-
Push Quote to Job
- Once the quote is created and applied to the job:
- Manage the quote lines so that costs and sales are correctly reflected in the Job WIP (Work in Progress) reports.
- Manage the quote lines so that costs and sales are correctly reflected in the Job WIP (Work in Progress) reports.
- Once the quote is created and applied to the job:
-
Raise Customer Invoice
- Create a customer invoice for the opening balance lines.
- Process the invoice to reflect completion, ensuring:
- No VAT/GST is applied.
- No VAT/GST is applied.
-
Post to Suspense Account
- Allow the invoice to prompt for posting.
- Adjust the ledger so that it posts to the Take-On Suspense Account.
-
Balance the Customer Account
- Create a customer journal transaction to balance the account.
- Offset the entry against the Take-On Suspense Account.
- Allocate the journal and invoice together.
-
Invoice Numbering
- Change the invoice reference format to: JOBOB + sequential number (starting from 100)
- Change the invoice reference format to: JOBOB + sequential number (starting from 100)
-
Processing Timing
- Perform this process outside of normal production hours to prevent interference with regular invoice processing using the temporary numbering.
- Perform this process outside of normal production hours to prevent interference with regular invoice processing using the temporary numbering.
-
Restore Invoice Sequence
- After completion, revert the invoice numbering sequence back to the standard range.
Creating a New Job
New Job Button
New Job Button

When this option is selected, a new job is started “on the fly,” allowing users to quickly set up and begin working on a job straight away.
- Direct Job Creation – Create a job immediately without needing an existing quote
- Automatic Background Process – The system will automatically create a blank quote in the background
- Linked Records – This quote is linked to the job and can be accessed later under the Quotes section
- Flexible Workflow – Ideal for situations where work needs to begin quickly without following the full quote-to-job process
Creating a New Job Process:
- Click New Job
- Complete relevant forms
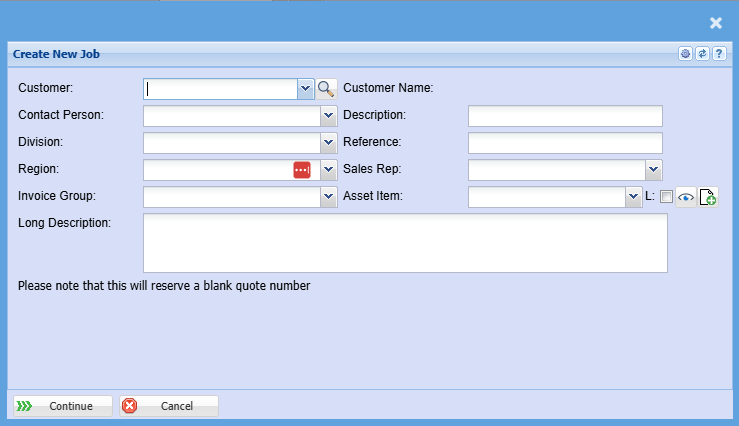
|
Customer
|
Select the customer the job is for
|
|
Customer Name
|
Displays the name of the selected custome
|
|
Contact Person
|
Choose the relevant contact for the job
|
|
Description
|
Enter a short description or title for the job
|
|
Division
|
Assign the job to a specific business division
|
|
Reference
|
Add a reference number if applicable (e.g., customer reference)
|
|
Region
|
Select the region or branch responsible for the job
|
|
Sales Rep
|
Assign the job to a sales representative
|
| Invoice Group |
Specify how the job will be grouped for invoicing
|
|
Asset Item
|
Link the job to a specific asset if required
|
|
Long Description
|
Enter a more detailed description of the job
|
- Continue – Proceeds to the next step and creates the job
- Cancel – Exits without saving
This screen appears after clicking Continue when creating a new job. It is used to finalise and approve the job setup, converting the automatically created quote into an active job.
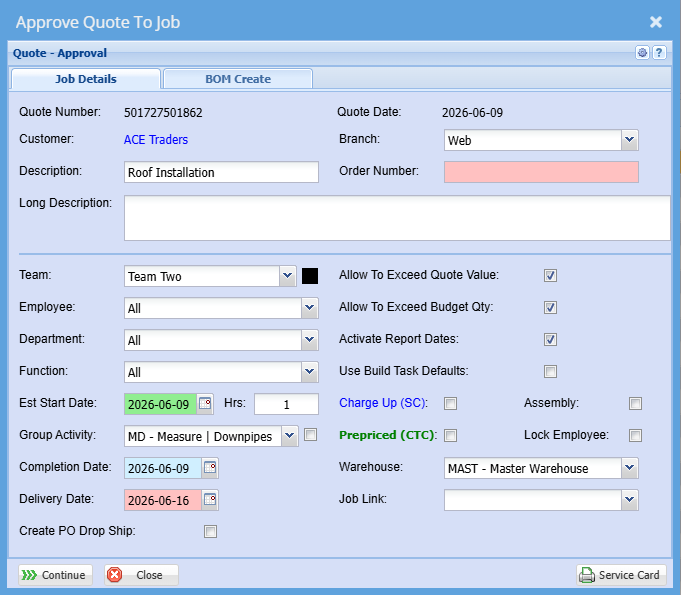
This screen displays and confirms the key information for the job:
- Quote Number / Quote Date – Auto-generated by the system when the job was created
- Customer – The customer linked to the job which is Auto populated
- Branch – The branch the job is assigned to
- Description / Long Description – The job description entered earlier
-
Order Number (Compulsory Field) – The Order Number must be entered before proceeding. The system will not allow you to continue or complete the job setup until this field has been filled in.
These fields allow you to define how the job will be managed:
- Team – Assigns the job to a specific team
- Employee / Department / Function – Further allocation of responsibility
- Estimated Start Date & Hours – Defines when the job will begin and initial time allocation
- Group Activity – Assigns the job to a specific workflow or activity group
- Completion Date – Expected job completion
- Delivery Date – When the job is due for delivery
These options control how the job behaves:
- Allow to Exceed Quote Value – Permits costs to go over the quoted amount
- Allow to Exceed Budget Qty – Allows quantities to exceed planned amounts
- Activate Report Dates – Enables tracking of reporting dates
- Use Build Task Defaults – Applies predefined task templates
- Charge Up (SC) – Enables charge-up costing
- Prepriced (CTC) – Indicates the job uses predefined pricing
- Assembly / Lock Employee – Controls job structure and assignment restrictions
Other Fields
- Warehouse – Select the warehouse linked to the job
- Job Link – Links this job to another job if required
- Create PO Drop Ship – Option to create purchase orders for direct delivery
- Continue – Confirms and completes the job creation
- Close – Exits without proceeding
Planned Time Log Schedule
Job Schedule Activity
Job Schedule Activity
Job Schedule Activity Screen Overview
Video training manual 2021 - Click Here
The Job Schedule Activity screen provides a comprehensive, multi-view overview of all jobs, allowing you to monitor progress, manage schedules, and optimise resources from a single location.
Using the tabs available, you can view and manage jobs from different perspectives:
-
Job Activities – Displays detailed task breakdowns per job, giving full visibility of the work required.
-
Job Schedule – Provides a high-level timeline view of all jobs, helping you see when work is planned, identify overlaps or gaps, and adjust schedules to keep jobs on track for completion.
-
Employee Schedule – Shows how work is allocated across individual employees, allowing you to identify who is busy, who may be overloaded, and who has capacity to assist.
-
Team Schedule – Displays how teams are assigned to jobs and tasks, supporting team-based planning and workload balancing.
-
Employee Tasks – Provides a task-level view for each employee, giving a more detailed breakdown of individual responsibilities
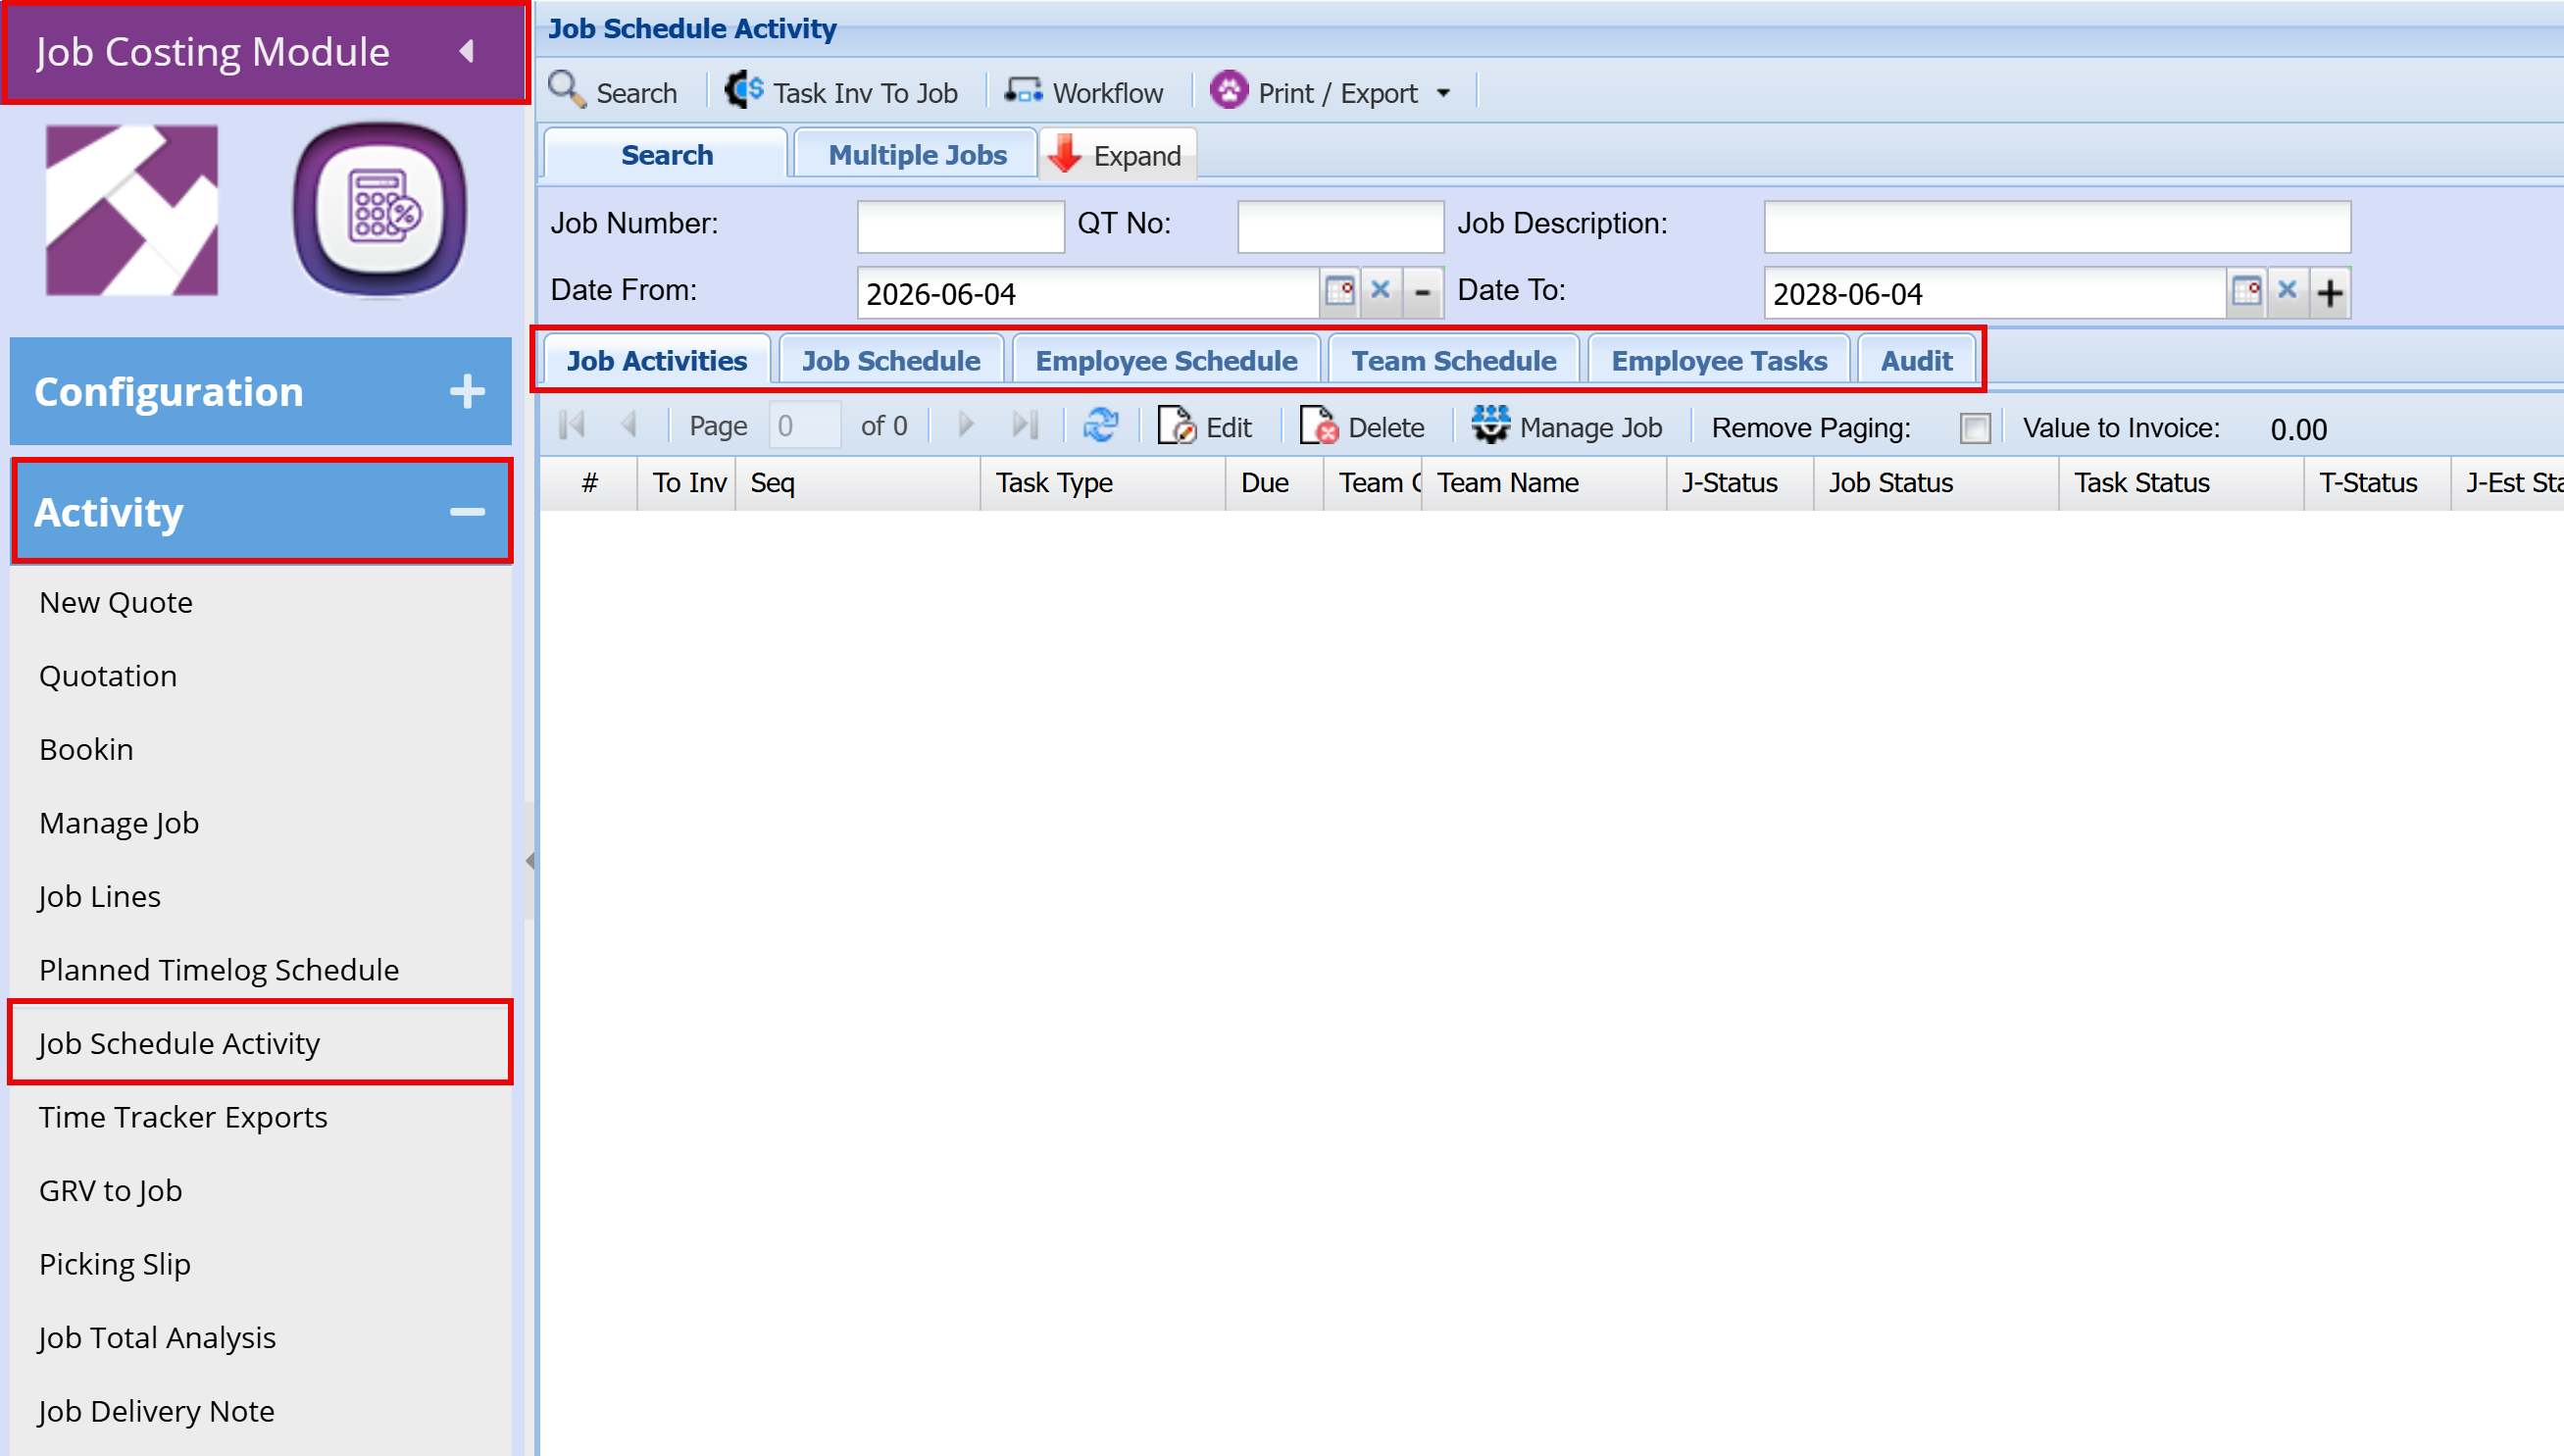
Job Schedule Activity – Overview Screen
This screen provides a comprehensive overview of all current and future jobs, allowing you to monitor progress, track statuses, and manage workload across teams.
Summary
- Provides an overview of all job activities and task statuses
- Shows job progress, timing, and team allocation
- Highlights tasks that require attention
- Supports monitoring of current and upcoming work
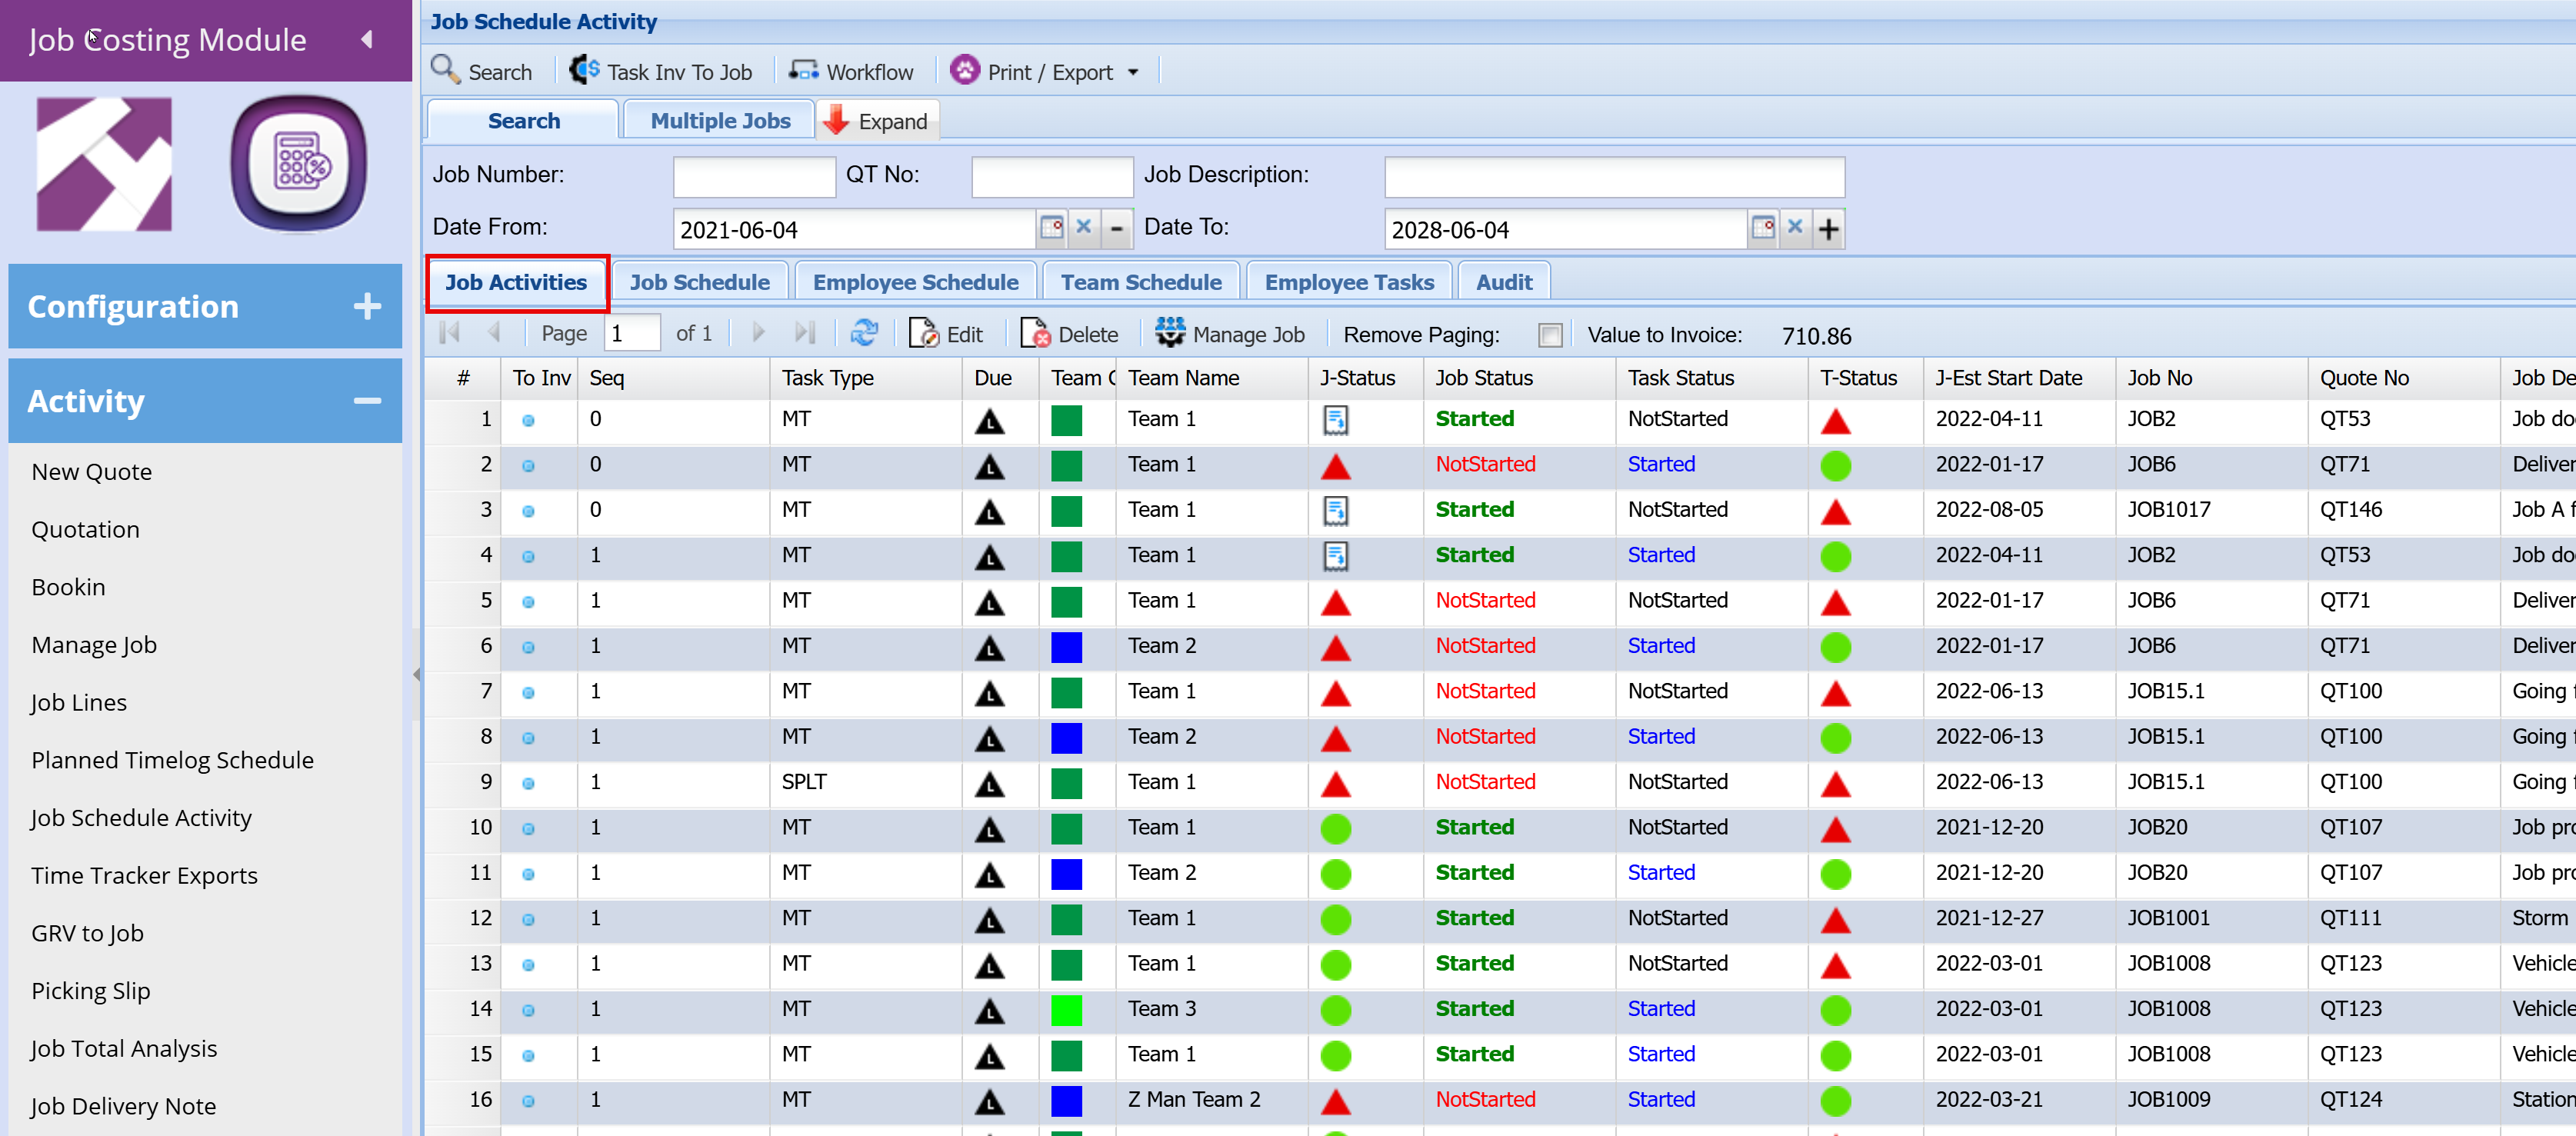
- Job List Overview
- Each row represents a job task or activity linked to a job.
- It includes key details such as:
- Job Number
- Quote Number
- Team assigned
- Estimated start date
- Job description
The screen gives a clear snapshot of where each job sits using multiple status columns:
-
Job Status
- Started (green)
- Not Started (red)
-
Task Status
- Indicates whether the specific task has begun
-
T-Status (Traffic Light Indicator)
- 🟢 Green = On track
- 🔴 Red = Requires attention / delay
- Provides a quick visual health check of the job
- The Team Code and Team Name fields show which team is assigned to each job.
- This helps identify:
- Who is responsible
- Workload per team
- The Estimated Start Date shows when jobs are planned to begin.
- This allows you to:
- View upcoming work
- Identify current active jobs
- Spot overlaps or scheduling conflicts
At the top of the screen, you can filter by:
- Job Number
- Quote Number
- Job Description
- Date range
This helps you focus on specific jobs, time periods, or teams.
This screen is typically used to:
- Monitor all jobs in one place (current and future)
- Track progress and status at a glance
- Identify delays or issues quickly
- Review team allocations and workload
- Support planning decisions before using detailed scheduling screens
Job Schedule Screen Overview
This screen provides a timeline view of current and future jobs, helping you track when jobs are planned to start and how they are spread over time.
Summary
- Provides a high-level timeline view of all jobs
- Highlights workload distribution, gaps, and overlaps
- Helps identify overbooking and capacity issues
- Supports planning and rescheduling to keep jobs on track
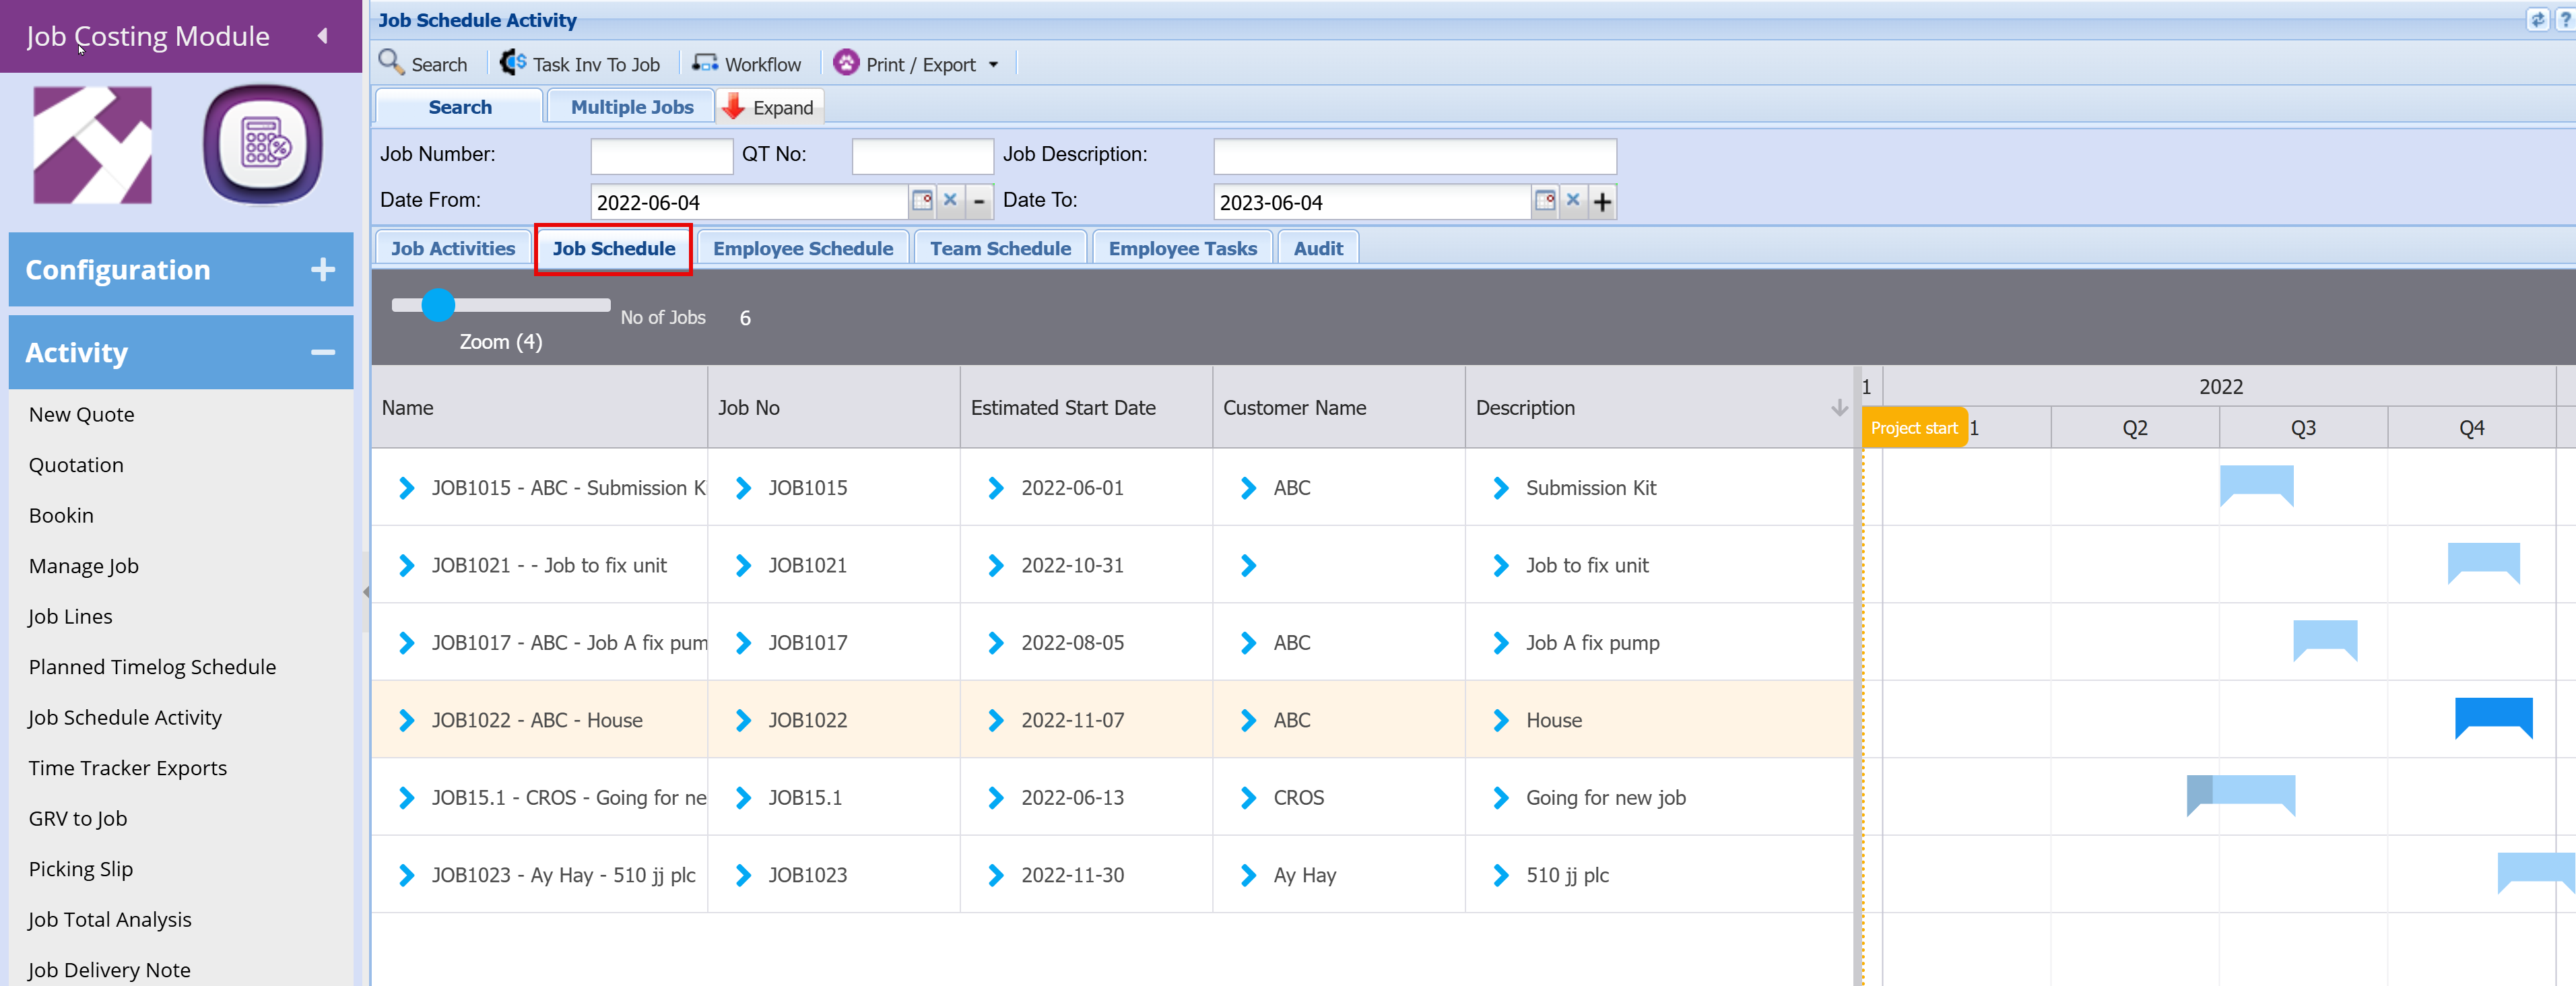
What the Screen Shows
- Left Panel – Job Details
Each row represents a job, with key information including:
- Name – Job number and short description
- Job No – Unique job reference
- Estimated Start Date – When the job is scheduled to begin
- Customer Name – Who the job is for
- Description – Summary of the work
-
Displays jobs visually across a calendar timeline (by month/quarter)
-
Each job is shown as a blue bar
-
The position of the bar shows:
- When the job is scheduled
- How long the job is expected to run
-
The “Project Start” marker highlights the beginning of the selected timeline period
Visual Planning
- Quickly see current jobs vs upcoming jobs
- Identify gaps, overlaps, or busy periods
Timeline Scaling
- The Zoom slider allows you to adjust how much detail is shown (more detail or broader view)
- Job Tracking
- Easily monitor:
- Jobs starting soon
- Jobs scheduled later in the year
- Workload distribution over time
- Clicking a job (via the arrow icon) allows you to drill into job details
This screen is ideal for:
- High-level planning
- Reviewing future workload
- Checking job timing and sequencing
- Supporting scheduling decisions before assigning teams/resources
Employee Schedule Screen Overview
This screen provides a resource-focused view of all employees and their allocated work, helping you understand who is working on what, when, and how busy each person is.
Summary
- Displays employee work allocation across a timeline
- Helps identify who is busy and who has capacity
- Supports workload balancing and resource planning
- Hover over tasks to view job details
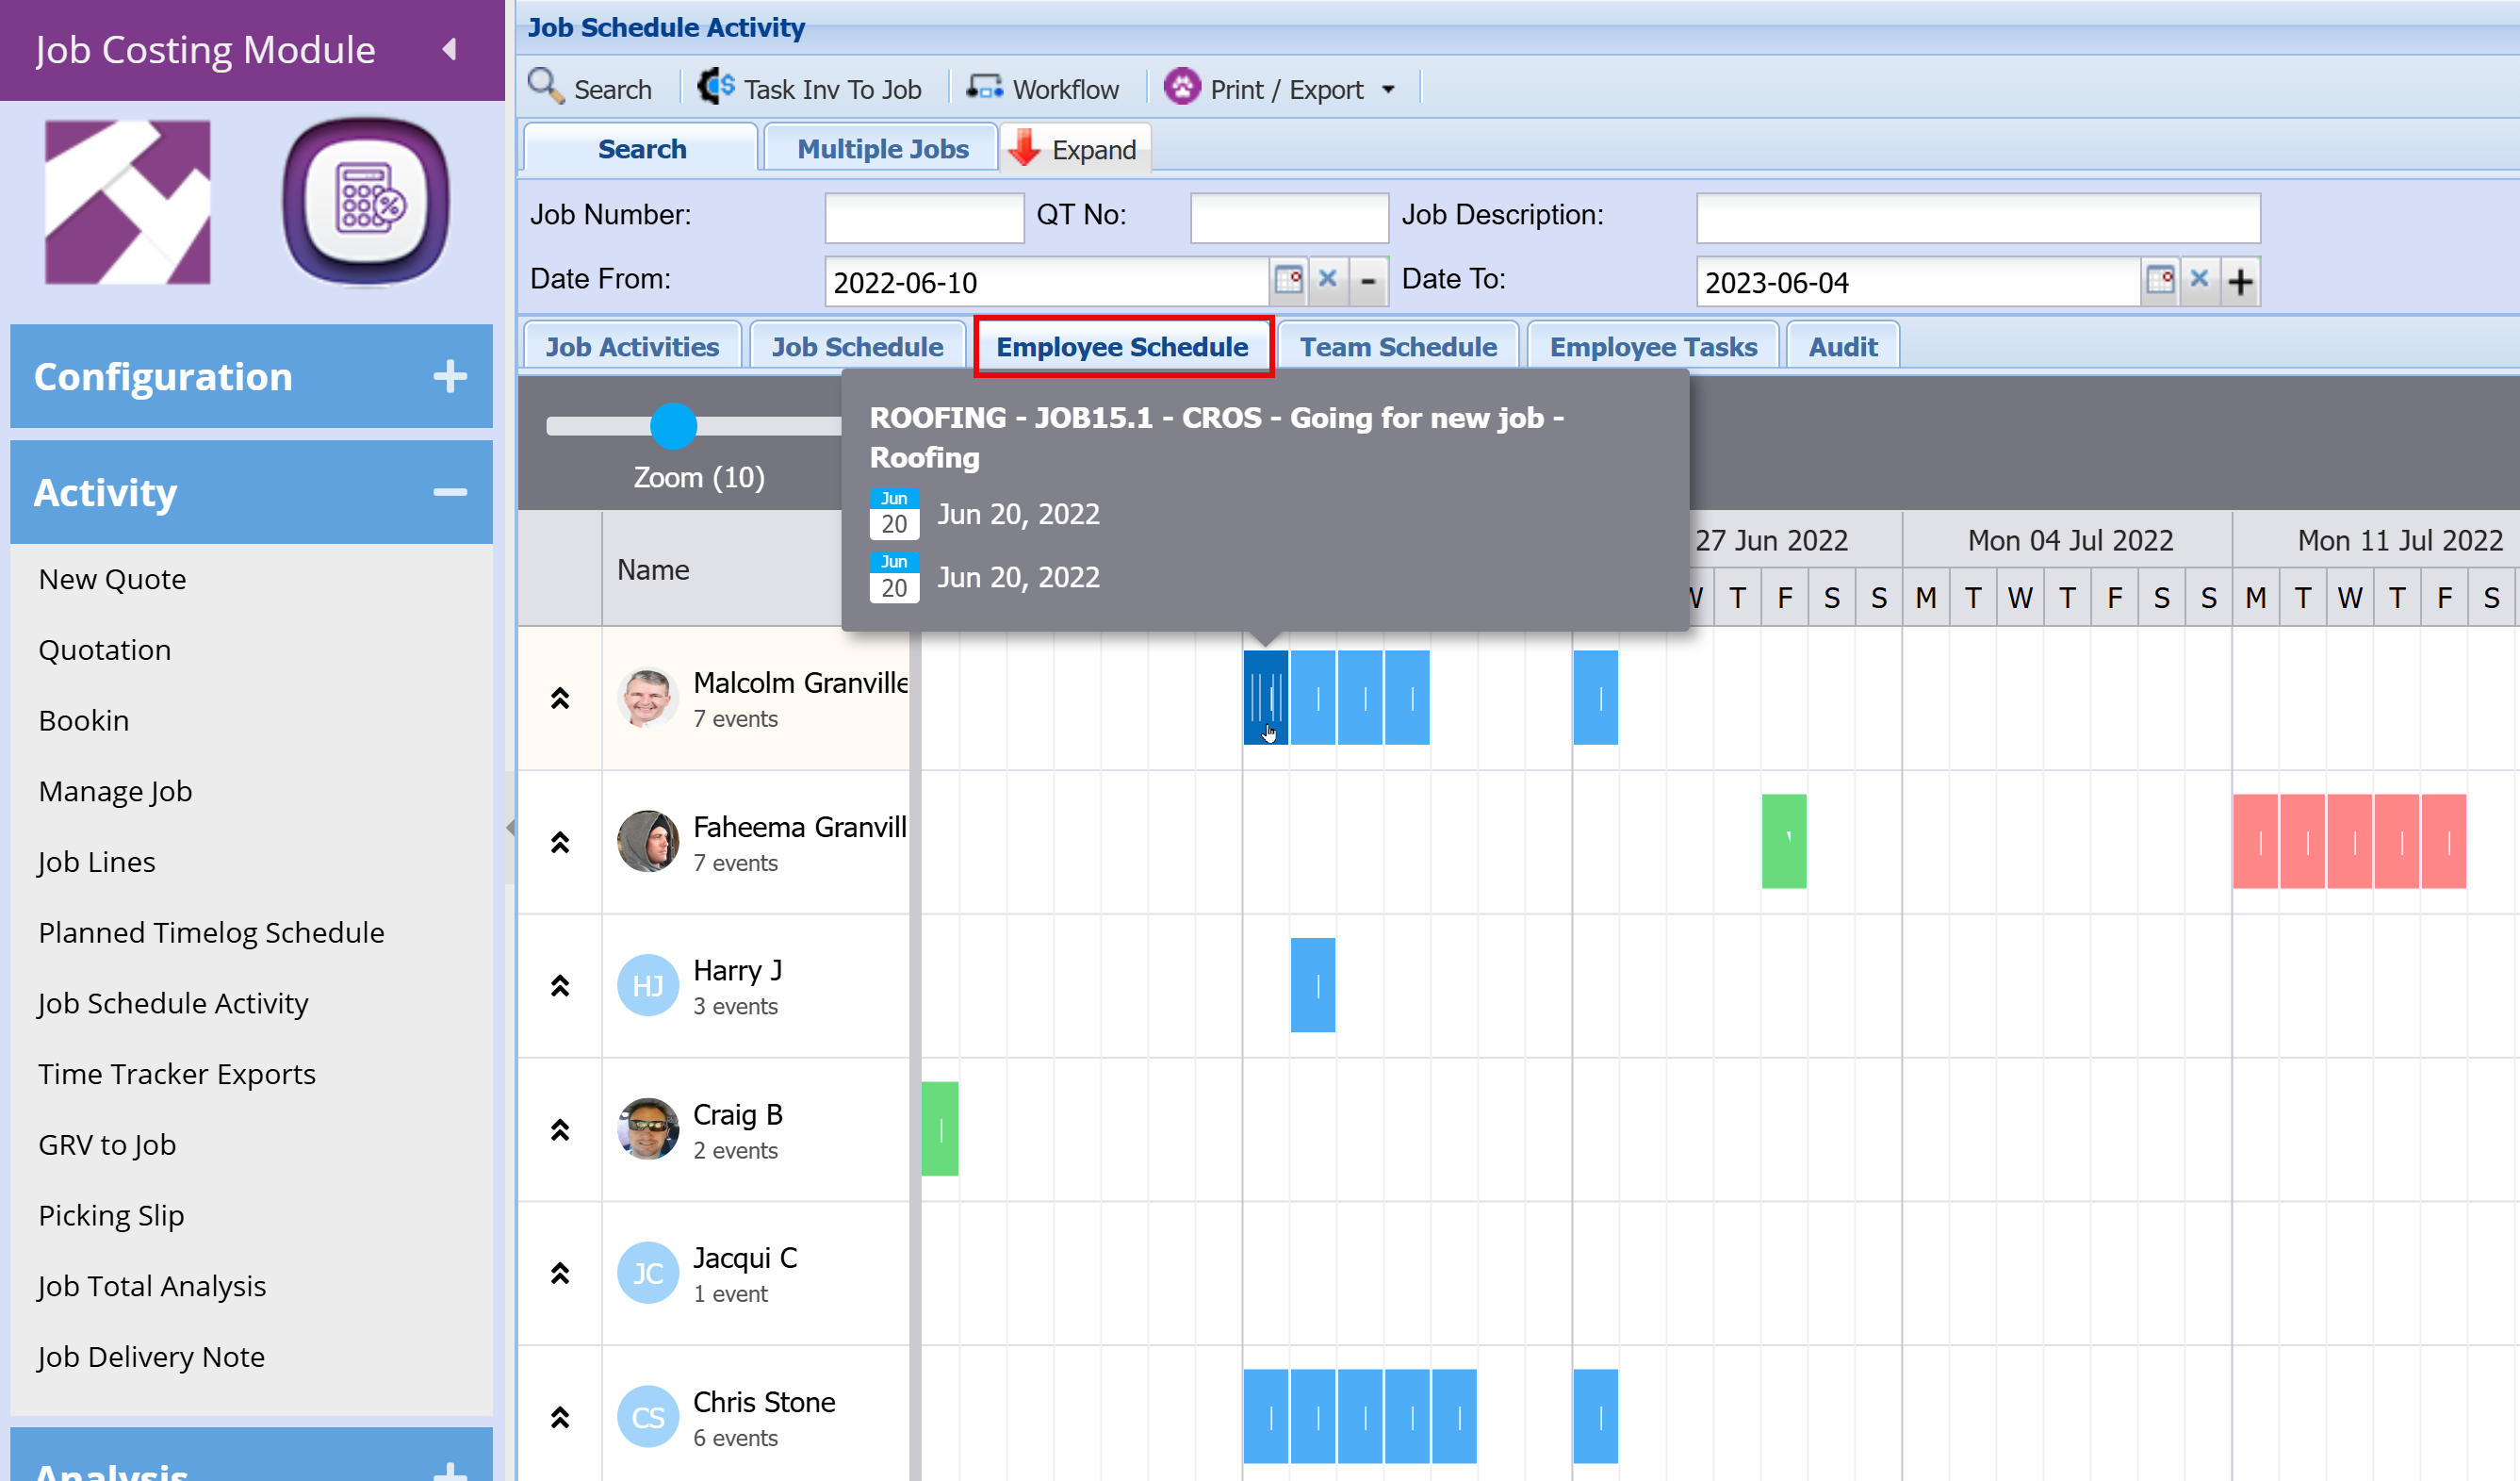
What the Screen Shows
- Left Panel – Employees
- Each row represents an individual employee/resource
- Displays:
- Employee name
- Profile icon
- Number of scheduled events/tasks
This allows you to quickly see who is active and how much work is assigned.
-
Jobs are displayed as coloured blocks across a calendar (by day/week)
-
Each block represents a task assigned to that employee
-
The position and length of the block shows:
- When the work is scheduled
- How long the task will take
-
Hovering over a block shows job details (e.g. job number, description, dates)
Resource Visibility
- See exactly where each employee is allocated
- Understand what jobs each person is working on across the timeline
- Identify employees who:
- Have too many tasks scheduled (overloaded)
- Have gaps or light workloads (underutilised)
This makes it easy to balance work across the team.
- Quickly determine:
- Who may need assistance
- Who is available to help on other jobs
This improves team efficiency and reduces delays.
- Multiple coloured blocks indicate multiple tasks or longer workloads
- Large clusters of blocks = busy periods
- Minimal or no blocks = availability
- Adjust the Zoom slider to view:
- Detailed daily schedules
- Or a broader weekly overview
This screen is ideal for:
- Daily and weekly planning
- Monitoring individual workloads
- Balancing work across staff
- Ensuring no one is overbooked or underutilised
- Improving overall resource efficiency
Team Schedule Screen Overview
This screen is used to plan and manage team workloads across jobs and dates. It provides a visual schedule that helps you track where each job sits and how teams are allocated over time.
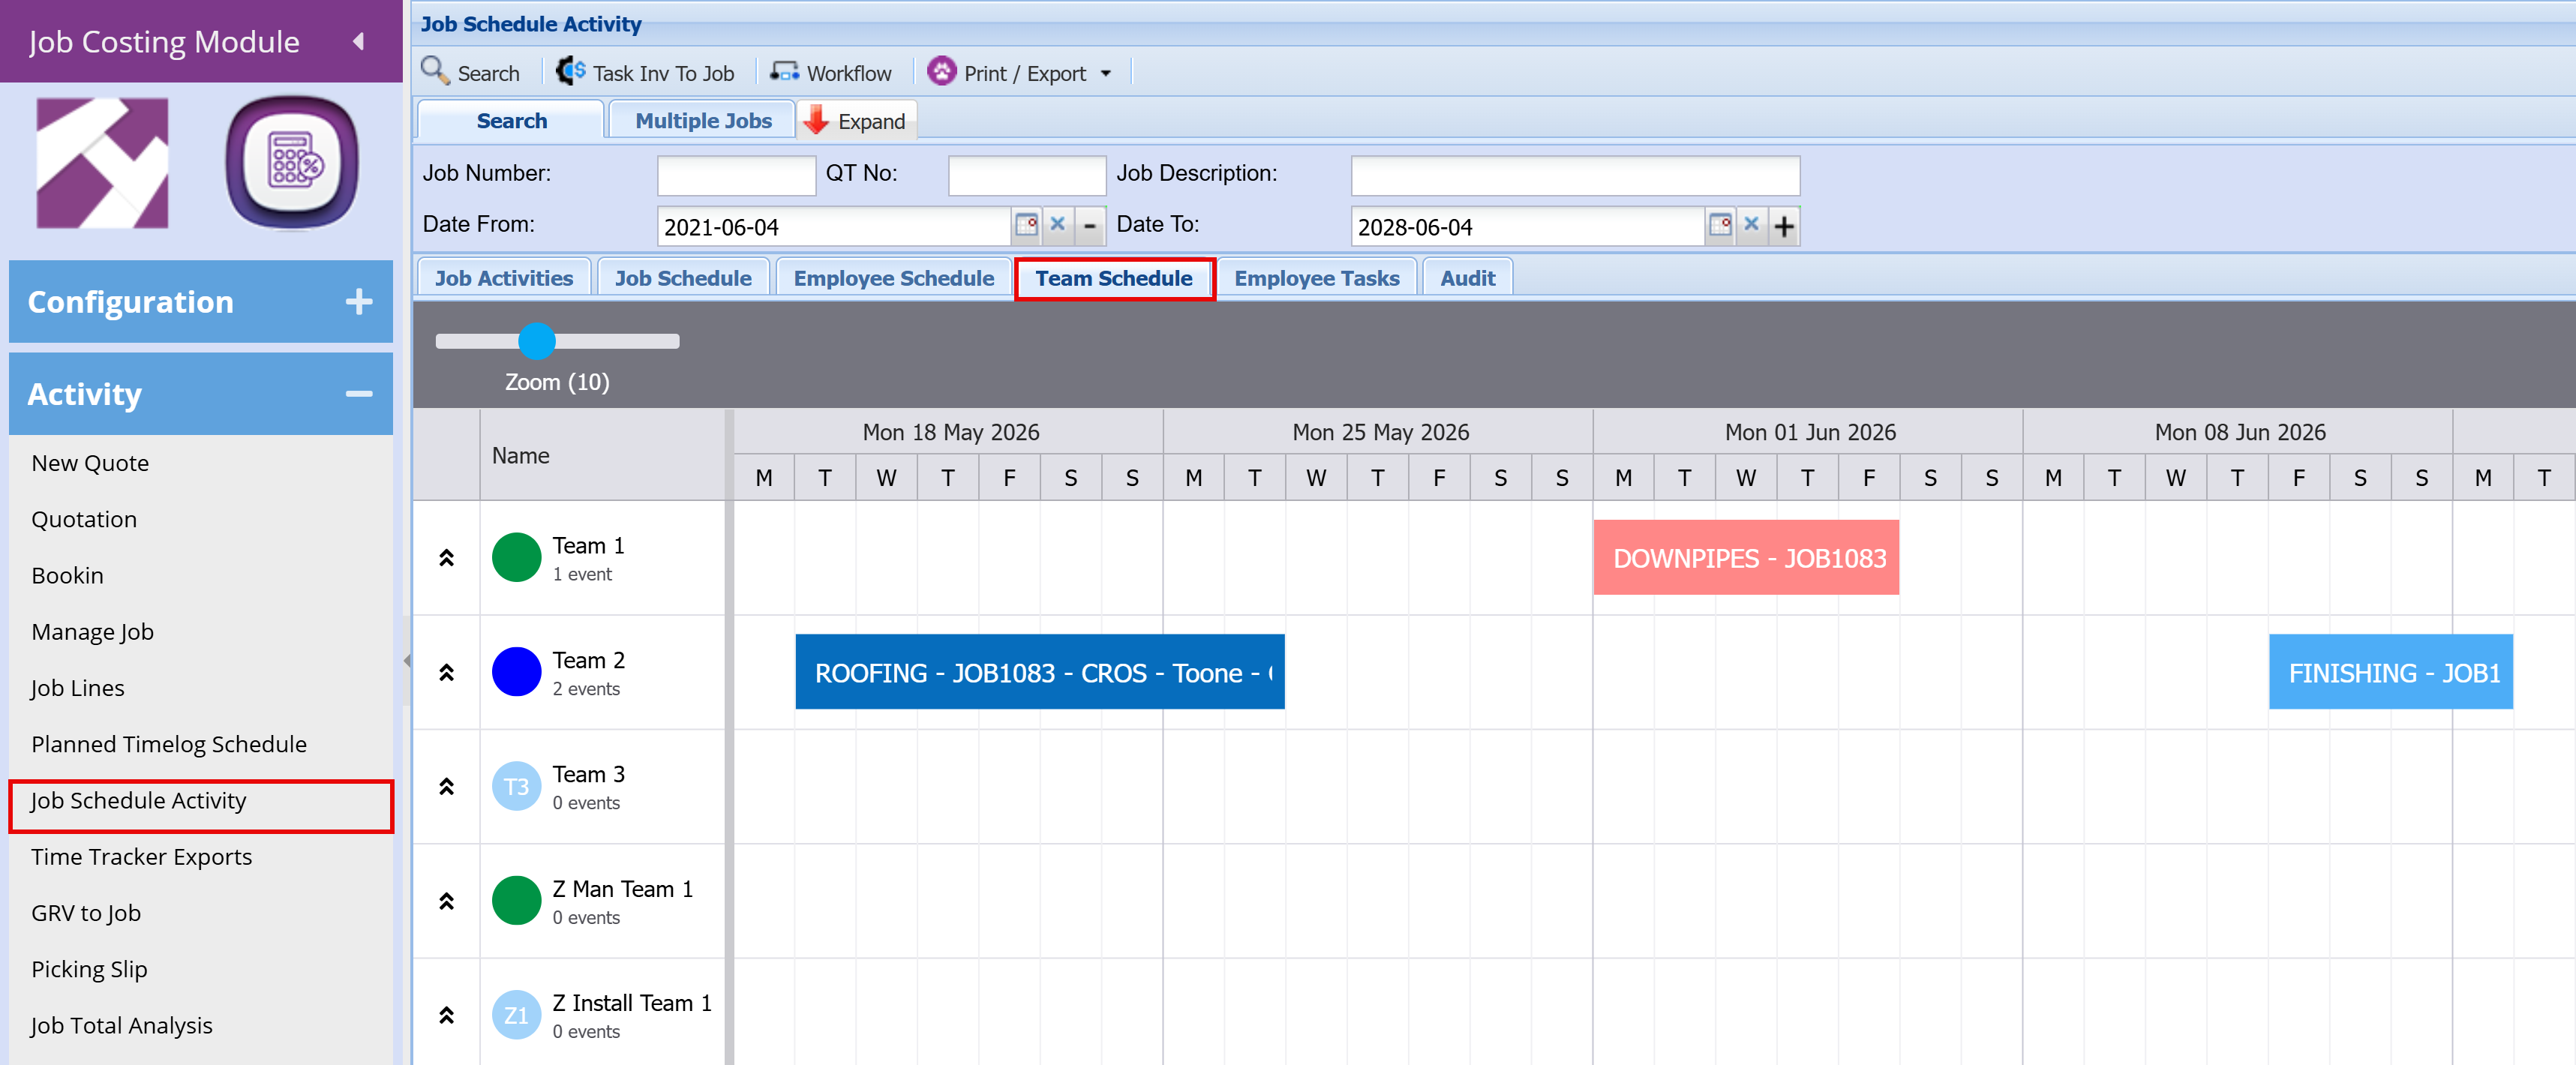
Key Features
- Team-Based Scheduling
- Each row represents a team (e.g. Team 1, Team 2, etc.).
- Jobs are assigned to teams and displayed as coloured bars across the calendar.
- Timeline View
- The grid is organised by days and weeks, allowing you to see:
- When jobs are scheduled
- How long each job will take
- Any overlaps or gaps in scheduling
- Drag-and-Drop Functionality
- Jobs can be easily moved between teams or dates by dragging and dropping.
- This allows you to:
- Adjust schedules if a job is running behind or ahead
- Reallocate work between teams to balance capacity
- Quickly respond to changes in production or priorities
- Visual Job Tracking
- Each job is shown as a labelled block (e.g. ROOFING – JOB1083).
- The length of the block represents the duration of the task.
- Colours help visually distinguish between jobs or job types.
This screen is typically used by planners or managers to:
- Allocate jobs to specific teams
- Monitor daily and weekly workloads
- Adjust schedules in real time
- Keep production aligned with deadlines
Employee Tasks Screen Overview
The Employee Tasks screen provides a detailed, task-level view of work assigned to each employee, allowing you to track individual responsibilities, progress, and timing in a structured list format.
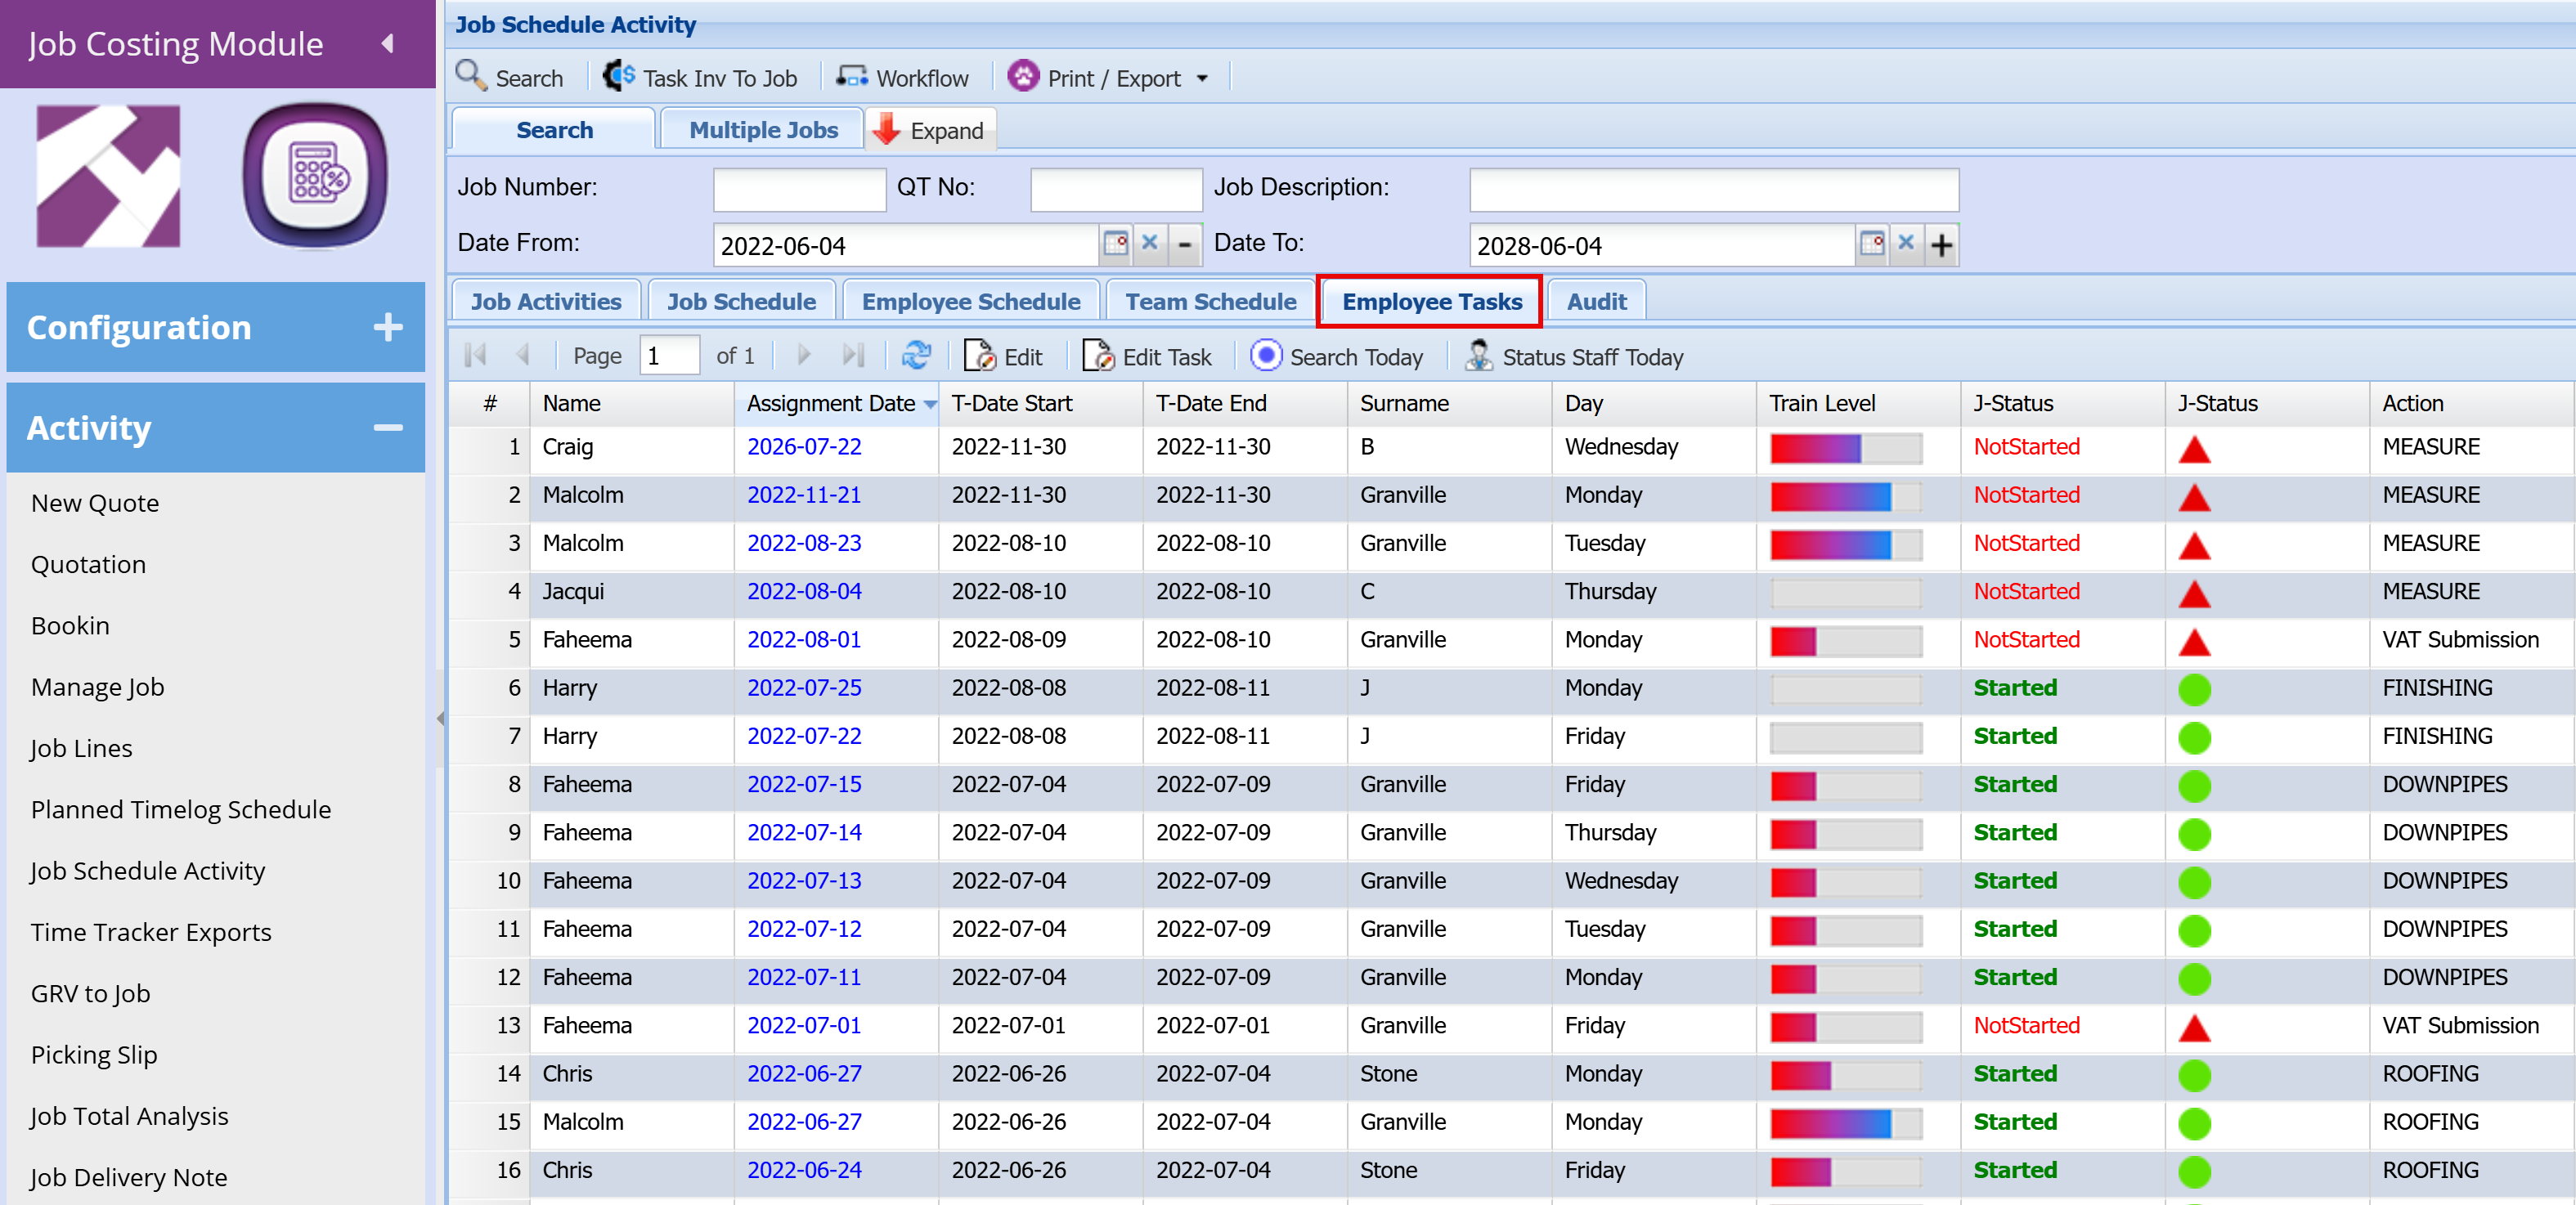
What the Screen Shows
Each row represents a task assigned to an employee, with key information including:
-
Name – The employee assigned to the task
-
Assignment Date – When the task is scheduled
-
Task Start & End Dates – Planned duration of the task
-
Day – The day of the week the task falls on
-
Train Level – Indicates skill level or proficiency of the employee
-
Job Status (J-Status) – Shows whether the job is:
- Started (green)
- Not Started (red)
-
T-Status (Traffic Indicator)
- 🟢 Green = On track
- 🔴 Red = Requires attention
-
Action – The specific activity being performed (e.g. Roofing, Downpipes, Finishing)
Detailed Task Visibility
- Provides a clear breakdown of tasks per employee
- Allows you to see exactly what each person is doing on specific days
- Monitor whether tasks have been started or not started
- Use visual indicators to quickly identify issues or delays
- Helps you understand:
- Who is working on which tasks
- How work is distributed across employees
- Whether tasks align with employee skill levels
- The structured format makes it ideal for:
- Reviewing daily workloads
- Confirming task assignments
- Ensuring all required work has been allocated
This screen is typically used for:
- Supervisors or managers to review and assign tasks
- Tracking day-to-day execution of jobs
- Ensuring all employees are correctly allocated to tasks
- Monitoring task progress and completion readiness
Task activity import
Allow for all tasks to be updated via an import
Template can be found in SCM> Imports > Templates
.png)
Task Activity Managing
Managing a task activity allows one to do the following
1.Change the activity description
2.Assign a team to this activity
3.They are three status's: not started ,started and completed
4.They are multiple task types namely: main task, split task, sub task and milestone
5.A task it's specified with a start date and an end date
6.You can exclude Saturdays and Sundays when creating a resource linked to this task
7.The task duration days workout they end date from the start date
8.Lag days workout the number of days between the tasks
9.Notes can be added to a task
10.Comments can be added to the task
11.A task can have a sell budget which is linked to the two percentages
12.Job progress percentage is defined as the percentage of the task activity completed
13.Invoiced percentage to date is defined as the percentage invoiced to date
14.The value to invoiced is worked out between the difference of the percentage production and percentage invoice to the total sell budget
15.Linked split tasks show all tasks that are linked to a main task
.png)
Enforce start date on task activity
Update Task activities in Manage job includes enforce start date
1. Recalculate dates will start with estimated job start date and work out task activities from sequence one
2. As soon as a task has the enforce tick on, this will not change this date and leave date as is
3. Following tasks after a task activity with an enforce tick on, will recalculate lag days etc from new enforced date
4. With each new enforce date, the system will recalculate subsequent tasks
.png)
Deleting a Task
To delete a task one would need to go into the manage job window in the scheduling tab.
You can only delete a task if both percentages equal zero %
A split task can be deleted from the main tab of job scheduling , if both percentage is equal to zero .
A main task can only be deleted from the manage job screen.
.png)
Deleting a task from Manage Job
.png)
Create default settings for splitting a task
Go to System Configuration > General > Defaults > Job Costing Tab
.png)
Team Schedule
Team scheduling allows for planning task activities on teams
Colours can be assigned to task activites as well as Teams
Team Colours can be assigned
Recommend changing Team names from Team Kevin to T- Kevin
Task colours updated based on default task activity group
Recommend changing Task activity codes from ME-01 to as short name up to 5 to 6 characters MEAS for Measure
This because the schedule is reflects the code instead of the name, there is limited space to display information
Information is display – Task code – Job number – Customer short name – Job description
Teams sequence number updated to force preview of teams in a specific order
Team schedule allows for zooming in to any period you want
Zoom 10 is good to view for 2 to 3 week period
Zoom 9 is good for 2 month view showing per day
Tasks can be moved to another team
Click and drag to another team
Tasks can be dragged to extend time of task
Move to another day
Click end of block to extend or reduce period
Tasks can now be split
Edit the Task to split with new dates
There will always be a Main task and then split tasks linked to the main task
Week start dates when looking at the calendar is Monday to Sunday
.png)
Update customers with Short Name recommended
This short name is used in the Gantt chart and scheduling
.png)
GRV To Job
Time Tracker Export
Job Total Analysis
Time Logs to Jobs
Time Logs incorrect on Job
Any time log can be changed if it is open including the customer and job number, if it has not gone to job.
This means that if you selected the wrong customer, employee or job, you are able to change this.
Time logs that were processed to a job but were incorrect.
The time log is locked down as an audit entry was processed to a job.
Process on how to reverse this.
1.Go to the job that the time log was wrongly assigned.
2.Double click on the time log and enter the negative quantity amount to reverse via Manage Line
3.This removes the cost allocated to the job
4.However the historical audit of adding and removing on the job will remain
5.The costing on the job will then be correct
6.Go to the CRM > Activity > Time logging
7.Select the expand tab
8.Select to view Show All time logs status
9.Select via the tick boxes the time logs you want to reopen
10.Go to the drop of the process button and click Open time logs
11.This will open the lock on the time logs and you can make changes
12.Once you have made your changes to Customer, Job Number, Time etc
13.Select and process time logs to jobs like you have done before
Open up locked time logs
.png)
Bookins
Book In integration with Asset Tracker
Bookin Integration with asset tracker allows you to book assets within job costing.
Job Costing module > Activity > Bookin
- Open the Job Costing module to find the integrated booking feature.
- Within Job Costing, locate the option to book assets.
- Choose the specific asset you want to book for a job.
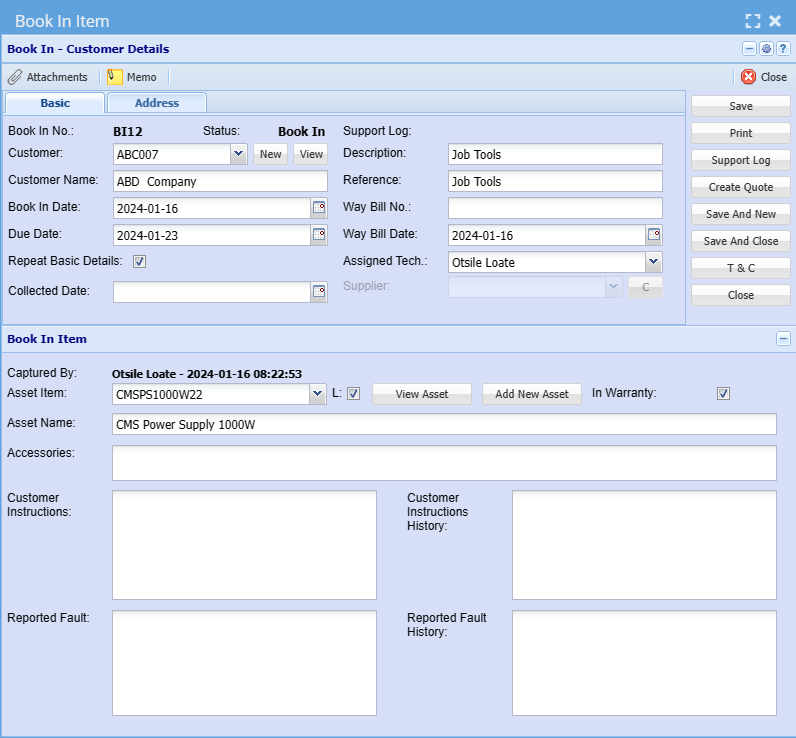
Picking Slip
Picking Slip
.png)
Add to Picking Slip
This Picking slip form allows the user to add items onto Job
.png)
Select All – Selects all picking slips available.
Print Pick Report – Prints a Picking Slip Report according to the information you or someone
prior to you has entered.
Save – Saves the current form.
Picking Slip Process
Video training manual 2016 - Click Here
Go to Job Costing Module > Activity > Manage Job
Once you have search for the job to manage, highlight job and click on Manage Job.
.png)
When the window has loaded click on All Job Lines to display job lines.
There will be a tab called Picking Slip, click on the tab in the middle of the window.
The bottom tab called Picking slip will also be displayed
.png) .
.
Add to Picking Slip – Adds a new picking slip
Print – Print the picking slip
Edit – You can edit a picking slip
Picked – Allows one to allocate quantities to the picking slip, quantities that are picked.
Manage Items – Allows one to manage the picking slip on the quantities picked, this moves the stock from on shelf to Job WIP.
Close – Closes the picking slip.
To add a new picking slip, click on the button called Add to Picking Slip.
Click on the Add button at the top of the window, this will allow you to create a new picking slip and allocate a picking slip number,
A new window will come up so that you can name the picking slip. Click on Save and Close.
.png)
Once the Picking slip number and name has being allocated, highlight the stock item which you want to add to the picking slip and click on the Add button.
Note:
Only items which have being added to the job will appear in this section.
When you have clicked on Add button, a new window will come up with the quantity that is add on the job line. Should this be different make your change to what needs to be picked.
The stock line will move from the top column window to the bottom window
Should you wish to remove the stock item from the list highlight the item and click on the remove button.
OR maybe you need to change the quantity, highlight the item and click on the Edit button. Change the quantity and click OK.
.png)
Click on the Print button to print the picking slip.
Click on the Close button to close the current window.
.png)
Note:
Once the user clicks on the print button to print the document it will register the date and time of print.
.png)
The user can Edit the picking slip again and make changes before the picking slip can be picked and managed.
Click on the Picked button to have the stock picked, this will bring up a new window. You can click on the Select All button to select all quantities that have being picked. OR change the quantities to what has being picked.
Once the items have being picked the system will mark a date a time which has being picked.
.png)
The stock has now being picked and can be managed. Click on the Managed button to manage the items that have being picked.
Note:
Only at this stage will the stock be moved from On shelf to Job WIP.
After clicking on Manage button a window will come up to show whether there is a problem with managing items or not, then you can go back to change the picking slip quantity.
You can close a picking slip at any time except when it has being managed. When the picking slip has being managed it means the stock has already moved from on shelf to Job WIP.
Current and History search of Picking slips
Go to Job Costing Module > Activity > Picking Slip
Click on the search button to search for Picking slips that have being Created, Picked, Managed or Closed.
Picking Slip Additional Procedure
This is where one can add stock onto a picking slip on a job from items already added on from a quote.
OR
Add new stock onto the job and picking slip.
Go to Manage Job > Amend Job > Picking Slip Tab
.png)
To create a new Picking slip click on the Add to Picking Slip Button
Create a new picking slip to add items to
Click on the Add button to create a new picking slip
.png)
Put a new name for the picking slip
.png)
Select the new picking slip name
.png)
To add stock from the list, highlight the item and then click on the add button.
IF you want to add all the items, click on Add All button
.png)
After clicking on Add, a window will appear for you to put a quantity onto the picking slip.
.png)
The items on the lower window will be assigned to the picking slip
.png)
Now if you want to add new items onto the JOB and PICKING SLIP you can use the Add CTC button or Add SC button
CTC = Cost To Company
SC = Scope Creep
CTC is where you are adding the item without a selling price only cost price.
SC is where you will put in the selling price to charge the customer.
Clicking on CTC button add
This will add the item to the job and add to the picking slip
.png)
CTC item added to the picking slip and job, you can now add to the picking slip
.png)
Clicking on SC button add
This will add the item to the job and add to the picking slip
.png)
As you can see the stock is added to the picking slip
.png)
You can now print out the printing slip to be issued to staff to pick
.png)
You can see the Picking slip number
.png)
When the stock is then picked from the stores, the store man will highlight the picking slip and click on Picked.
.png)
Then the store man after giving the stock to the person will click on Manage Items to move the stock from on shelf to Work in Progress.
Picking Slip not processing
Processing the posted GRVs stock items to Jobs.
Go to Job Costing Module > Activity > GRV to Job
.png)
Remove the date from and click on the search button, to list all GRVs with Job allocations to them.
.png)
Highlight the GRV to Process, click on the Process button.
Note: This does not do any General Ledger accounting transactions, these have already taken place when the GRV was posted.
This Process just moves the stock from On shelf to Job WIP section.
.png)
If there is a problem with Posting of the GRV, it will come up in red. Click on the X in the top right hand corner to close the window.
.png)
The GRV to Job Picking Slip will come up. Print out document so that you can research why the stock will not move from On Shelf to Job. Some reasons are as follows:
1. Job is closed and stock item cannot move onto a closed job.
2. There is insufficient stock on Hand to move to a Job. (stock could have being used on another job or has already being allocated some other way in the system).
3. Only one of the items on the Picking slip has one of the above problems and thus the whole process is stopped
.png)
Click on the print button on the report to print out the document to analysis the data.
.png)
Go to Job Costing Module > Analysis > Manage Job History.
This is to check on jobs which have being closed or cancelled or completed.
.png)
Once in the search header do the following:
1. Put the job number that you want to close in the Job Number field
2. Remove your Date From – this allows one to search all jobs from beginning of time
3. Click on Search button
.png)
Double click on the highlighted line or click on the View button at the bottom of the screen.
.png)
When in the Manage Job
1. Enter the item code in the filter for quick search
2. Click on All Job Lines to show information up on the grid.
3. As one can see nothing comes up which means that nothing was entered against the job for that item.
.png)
When in the Manage Job, do the same for the other item
1. Enter the item code in the filter for quick search
2. Click on All Job Lines to show information up on the grid.
As one can see nothing comes up which means that nothing was entered against the job for that item.
.png)
When in the Manage Job, checking for all items entered on the job.
1. Leave the item code blank in the filter to search on all items
2. Click on All Job Lines to show information up on the grid.
You will notice that items come onto the grid, if you notice that items have values entered against the Actual column, it means it has being managed and stock has moved from On Shelf to Job WIP.
.png)
Highlight the line so as to see what was managed and by who, date and when. Click on the History Button.
.png)
Notice that the line was managed on a particular date and by how many.
.png)
Summary:
This means that Based on the example we just did, the job was closed and the items were not allocated to the jobs.
What does this mean:
It means that the stock in the computer accounting system still reflects the stock is in the store room and has not being allocated to the Job.
What one has to do is to check the store room to match what stock is actually there vs what the computer accounting system says is on Hand.
Should the stock be out with those items then one would have to do a stock level adjustment Journal to reduce the stock levels on hand to match the store. This is only done if the items were not managed on the closed job and that it was not invoiced to that customer. Otherwise the stock has already left the on shelf on the accounting system.
Checking quantity on hand on system
Go to Inventory Module > Configuration > Inventory Setup.
Put your item in the Item Code and click on search to pick up the item you are looking for. Highlight the item which is relevant.
.png)
Click on the tab called Stock Available, this will tell you how much stock is On Hand vs Stock in WIP.
.png)
Check the other item as well. By checking the items
.png)
Next example of problems
Manually allocating of GRV to Job
In this example:
The first and third items, the jobs are opened but the second line the job has being closed. This means that you cannot process this document, so we will take you through the steps to allocated the stock to Job WIP
.png)
Go to Job Costing Module > Activity > Manage Job
This is to check on jobs which are non started or started.
.png)
Once in the search header do the following:
1. Put the job number that you want to close in the Job Number field
2. Remove your Date From – this allows one to search all jobs from beginning of time
3. Click on Search button
.png)
Double click on the highlighted line or click on the Manage Job button at the bottom of the screen.
.png)
When in the Manage Job checking on open jobs
1. Enter the item code in the filter for quick search
2. Click on All Job Lines to show information up on the grid.
3. As one can see nothing comes up which means that nothing was entered against the job for that item.
.png)
We are now going to manually allocate the stock items to the job.
Click on Cost to Company to add the item.
.png)
When the window comes up enter the item that is required.
Click on the quantity needed.
.png)
To Manage the line at the same time as entering it, click on the Manage Tab and enter the usage quantity. Also enter a note so you will know why you entered this. The GRV number will help. Then click on Save and Close button.
.png)
You will notice that the item has being entered onto the Job and that both the budget and Actual quantities have being update. This means that the stock has moved from On Shelf to Job WIP sections.
.png)
You will notice that the item has being entered onto the Job and that both the budget and Actual quantities have being update. This means that the stock has moved from On Shelf to Job WIP sections.
To look at the History of the line,
Highlight the line and click on the History button.
.png)
Next Item
Do the same for the next item.
However you will notice that on this example the line already exists. It has already 2 items allocated to it.
.png)
We will now highlight the line and click on Manage Job.
.png)
You are now going to manage an additional quantity onto the job.
Fill in the quantity in the Usage area, enter your note and click on Save and Close button.
.png)
Notice that the line has increased to usage of 5.
.png)
When highlighting the line and clicking on the History button, one can see the movement history on this item.
.png)
After Analysis and adding items
This procedure is shown on how to write off stock on jobs that have being closed and stock needs to be written off (note: the item used here was already allocated to a closed job and does not need to be written off, this is JUST an example of how to do this)
Write off stock to the closed Job 2975 of 1 item after checking physical stock.
One must check the physical stock in the store room to the stock on hand on the system.
Go to Inventory Module > Activity > Stock Level Adjustment
.png)
Click on the insert button at the bottom of the screen.
Fill in the information needed on what is being written off. Make clear notes so when auditors need to check why one is writing off the stock you have valid reasons.
.png)
Inserting of the line to be written off.
1. Select and search for the item.
2. Select the warehouse that you are reducing the item by.
3. Select the Decrease circle button.
4. Enter the amount you are decreasing the item by.
5. Enter a reason.
.png)
This is what the batch will look like. Click on Close to go back to the Stock Level adjustment batch processing.
.png)
At the bottom of the window, click on the Process tab, click on the Verify button to ensure that the stock level will process.
Click on the process button to complete the transaction.
This will now update the General Accounts by reducing the stock ledger account and stock adjustment account.
It will also do the stock movement from On Shelf out of the system.
.png)
Closing of GRV to Job Picking Slip
Now one can remove the GRV to Job item from the list with valid reasons.
Go to Job Costing Module > Activity > GRV to Job
Highlight the line GRV to be removed.
Click on the REMOVE button.
Note: there is no General ledger transactions that take place, it merely removes the GRV from this list.
.png)
Confirm you want to remove this item. Click on Yes to do this.
.png)
.png)
Message comes up to alert the user that it was successfully removed.
.png)
Enter a reason in the note space as to why you are removing and click on the OK button.
Job Delivery Note
Job Delivery Note Search
Job Costing Module > Activity > Job Delivery Note
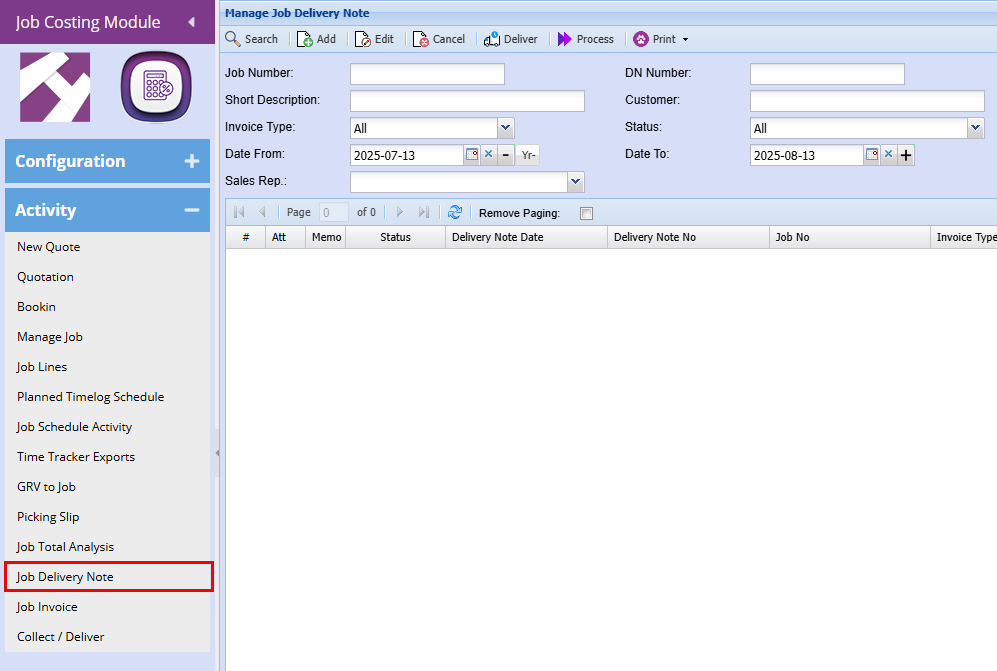
| Search | Clicking Search will bring up all the Job Delivery Notes unless a Filter is added eg: job number, DN number or customer name |
| Add | Add a new Job Delivery Note |
| Edit | Edit the currently selected Delivery Note Item. |
| Cancel | Cancels the currently selected Delivery Note Item. |
| Deliver | |
| Process | Processes the currently selected Delivery Note Item to Delivered. |
| You can print the Delivery note or the Cut sheet |
Manage Job Delivery Note
Job Invoice
Job Costing Invoicing
Invoicing
- As a fully Completed Job
- Line by Line
Invoicing a fully completed job
Once the job is fully completed and all line items have been managed, you can click the “Thumbs Up” icon at the top tabs, labeled “Ready to Invoice.”
Invoicing a Job by Line/s
For line-by-line invoicing, each line item includes a dot under the “To Inv” column. Clicking this dot will change it to a “Thumbs Up” icon, indicating that the item is ready to be invoiced. Once selected, the line will be moved over to the invoice.
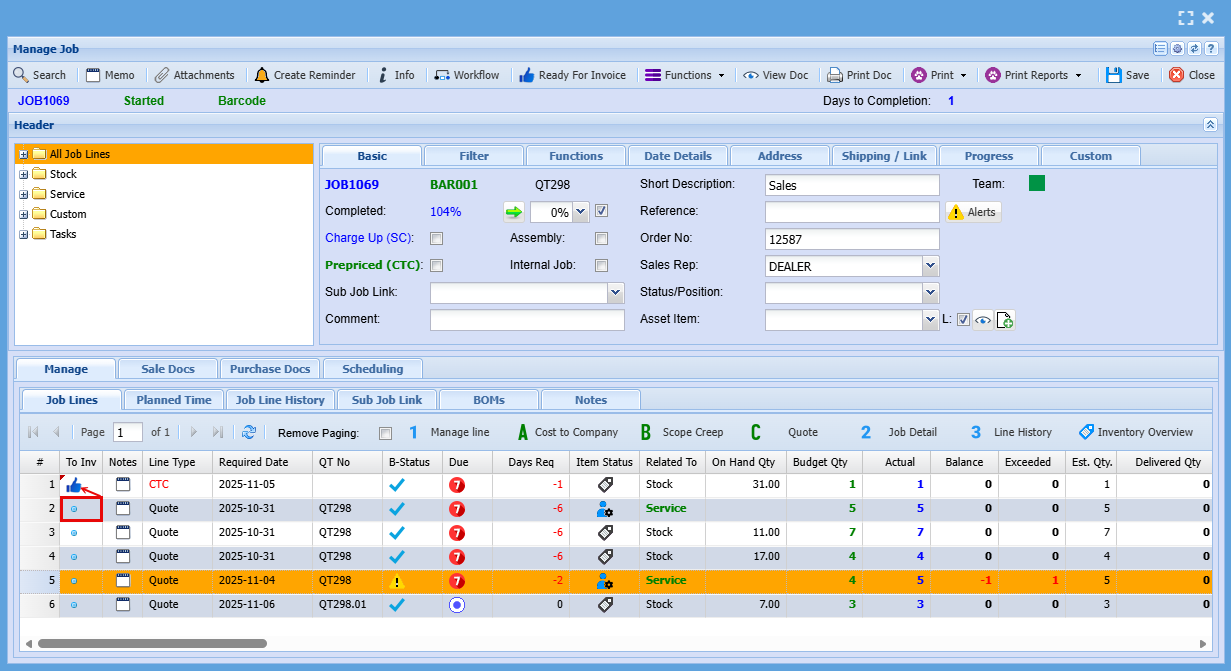
To invoice a Job go to Job Invoice
Job Costing > Activity > Job Invoice
You will see that your invoice is sitting in the "Ready For Invoice" tab
- Double click on the invoice line to open the invoice
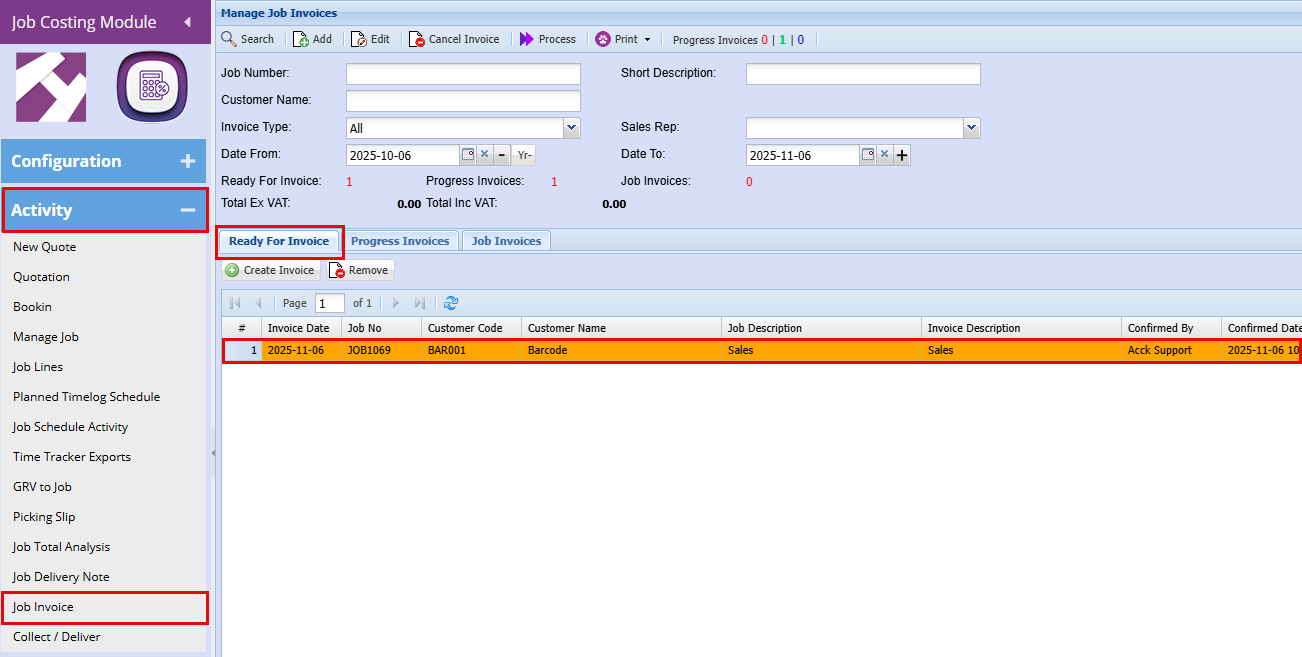
You will then need to choose what type of Invoice you are creating
- Percentage-Based Invoicing - Percentage invoicing enables you to specify a billing amount and include a summary description, while concealing detailed line items. This approach facilitates progressive billing over the duration of a project: for example, when a client pays 25% upfront to initiate work, followed by three equal monthly payments covering the remaining 75%. This does not look at what has or has not been managed on a job.
- Usage/Actual Invoicing - Usage or Actual Invoicing allows you to bill based on real-time job progress, capturing actual hours worked, materials used, or completed tasks. It displays detailed line items and supports flexible billing as the job evolves—ideal for time-and-materials work or projects with variable scope and deliverables.
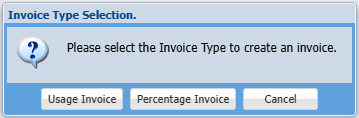
Once an invoice type, either Usage or Percentage, is selected for a job, it becomes fixed and cannot be changed. This selection determines how the job will be invoiced through to completion. After choosing the invoice type, the next screen will display the job number and confirm the selected invoicing method
Next, indicate whether this is the final invoice by ticking the Final Invoice box.
- If you do not tick "Final Invoice," the job will remain open. You will also be able to do multiple invoices on this job.
- If you do tick "Final Invoice" and all work is complete, the system will automatically check for any open documents related to the job and alert you. These documents must be closed or cancelled before the invoice can be processed.
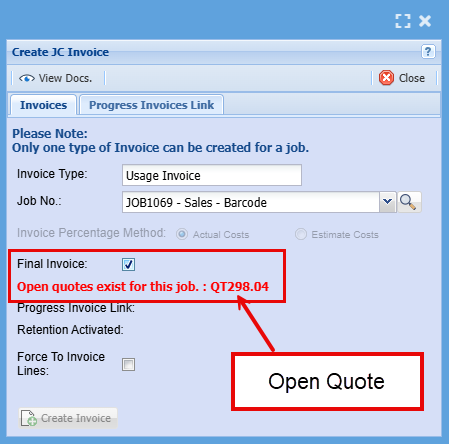

- Click Create Invoice
- Click Continue
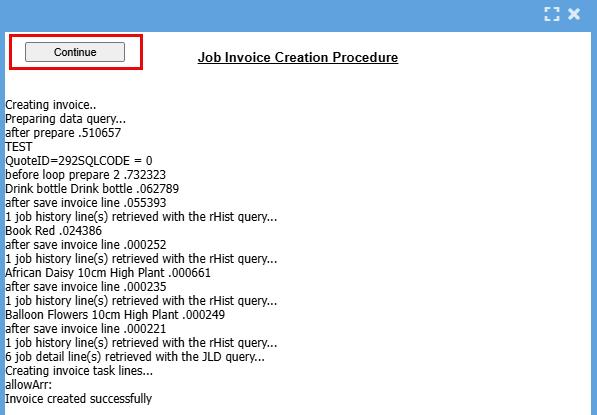
Once you create a final invoice you will not be able to open the Job in Manage Job
The invoice will now appear under the "Job Invoices" tab, having moved from the "Ready For Invoice" tab. In the "Final Inv." column, you'll see either "Yes" or "No" based on your earlier selection. This view also confirms the invoicing method chosen, either Usage or Percentage.
- Double Click on the Invoice line to open the invoice
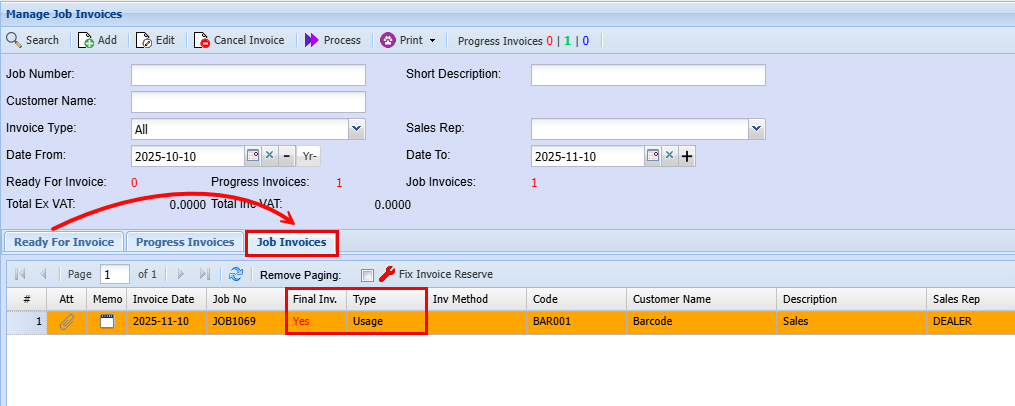
At this stage, all values are set to zero, prompting you to specify what you’d like to invoice. For a straightforward job, simply click the green "Invoice All Qtys" button to proceed as shown in the below screenshot.
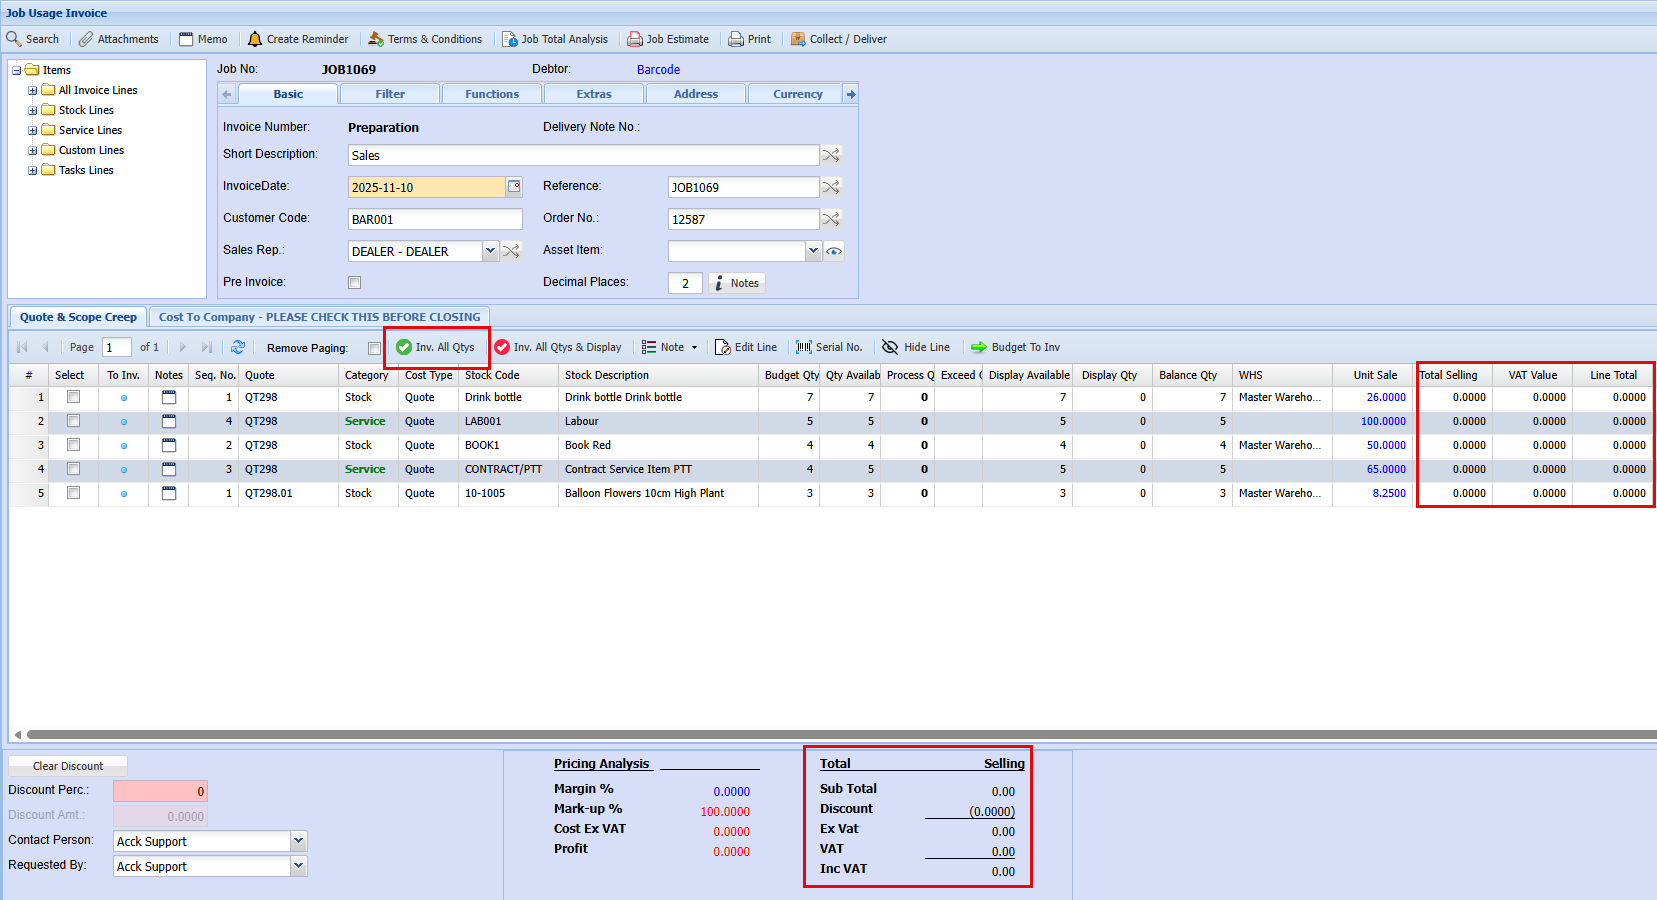
|
|
By clicking "Inv. All Qtys" to add total to your invoice it will add all lines including all Cost to Company (CTC) Lines. These can be deleted in added accidently |
|
|
By selecting "Inv. All Qtys & Display," you’ll be able to choose which items appear on the invoice with or without a dollar value. To configure these display settings, click on the second tab labeled "Cost To Company." |
The below Manage Invoice All Qtys window will pop up:
- You will then select "Invoice - All Lines"
- Click Continue
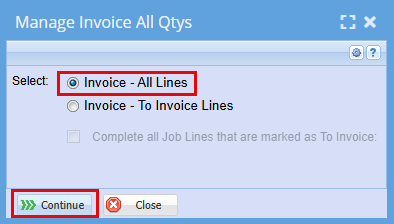
|
Invoice - All Lines
|
You would select All Lines to be invoiced if you selected the be button to invoice your job |
|
Invoice - To Invoice Lines
|
If you’ve marked specific lines for invoicing using the thumbs-up icon in the "To Inv" column, proceed by selecting the "To Invoice Lines" option to generate an invoice for only those approved items. |

Once you have clicked "Continue" you will see that the values have pulled through from the Job.
At this point you can make any necessary changes to this invoice before finalizing it.
Reminder: If you've selected "Final Invoice," no further invoices can be generated for this job. Any managed lines that are not invoiced at this stage will be written off automatically by the system (CTC). However, if you've chosen to invoice only selected lines, you can adjust the quantities here, and any remaining balance will be available for invoicing at a later stage.
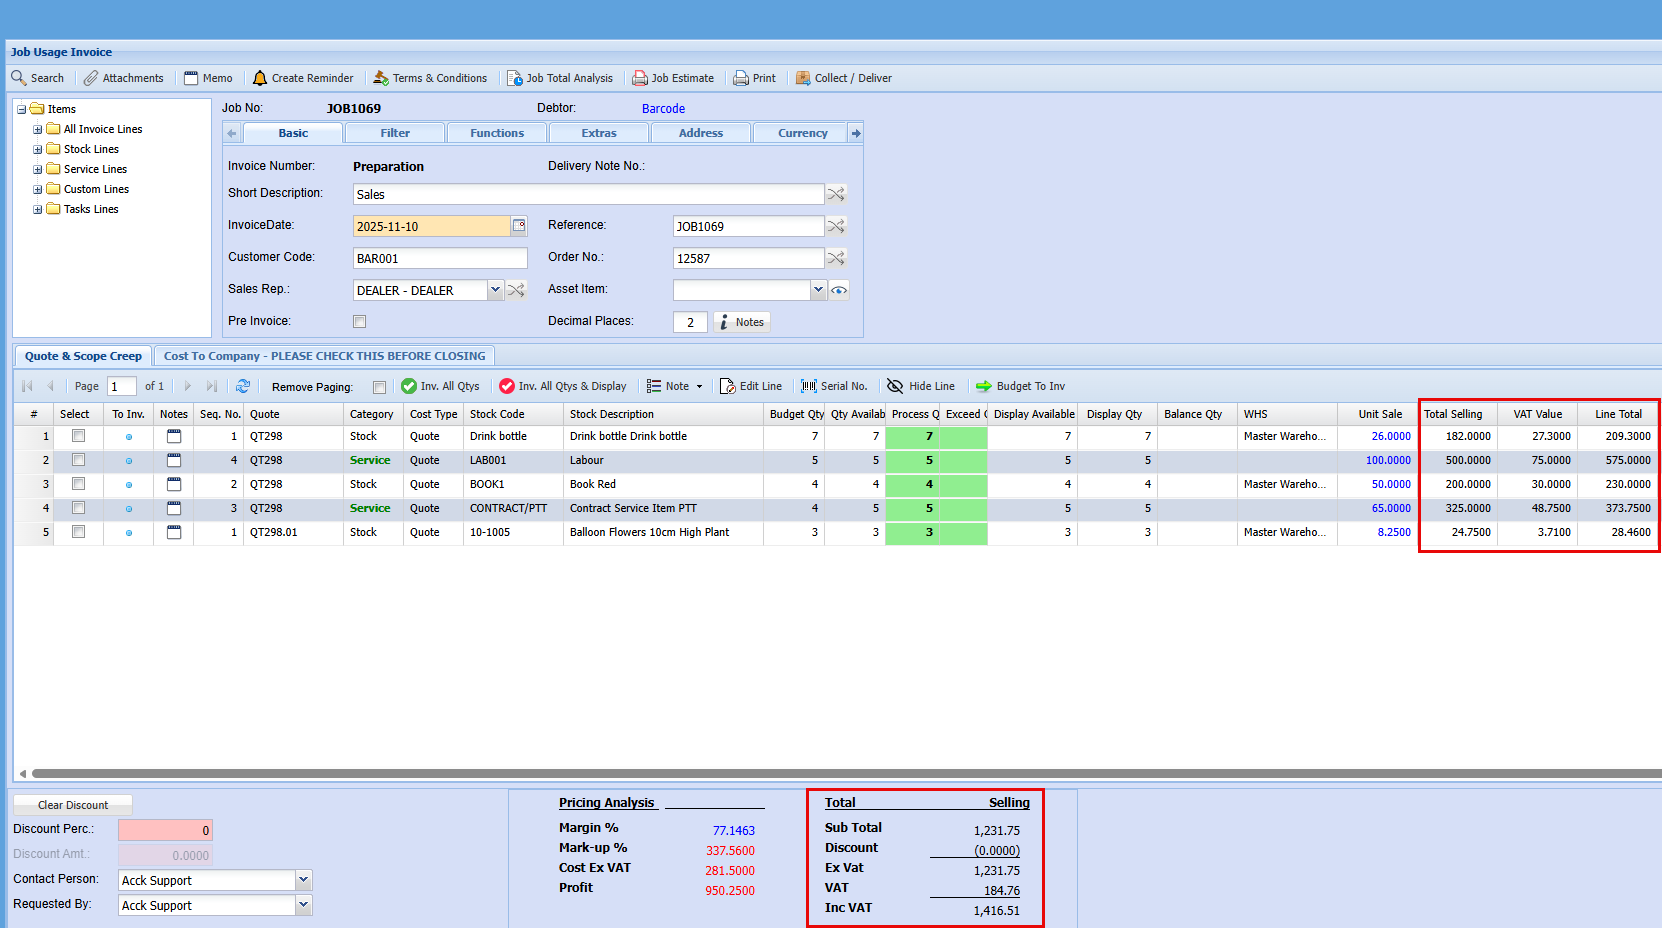
Before proceeding with this invoice, please review the Cost to Company (CTC) tab. To display specific lines on the invoice, enter a value in the corresponding "Display Qty" field. Note: this will show the line items without revealing any cost or sell price.
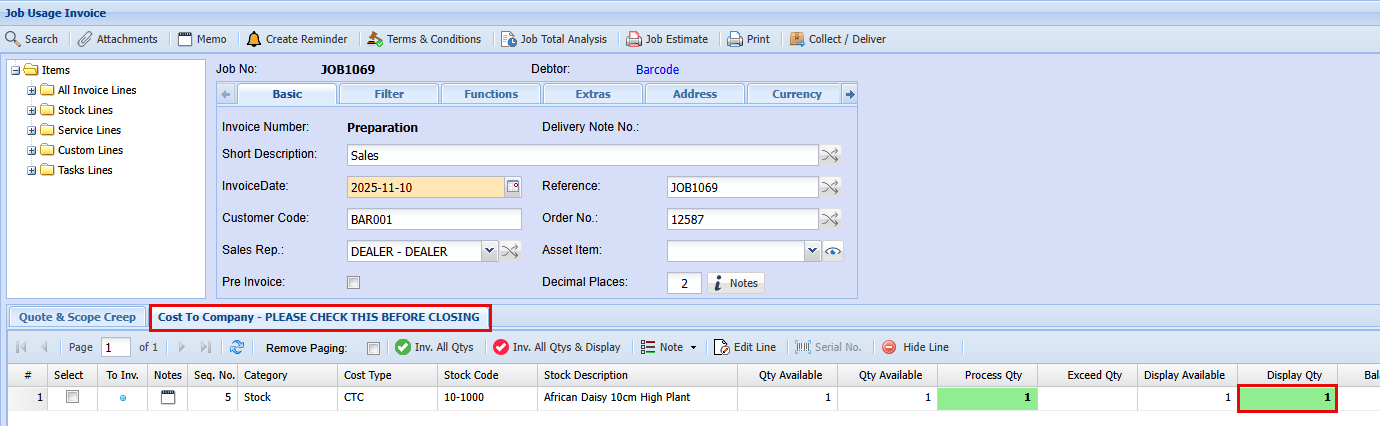
To view the invoice to check how it will be displaced
- Click the "Print" button at the top and
- Click "Continue" on the "Job Usage Invoice Print" Screen
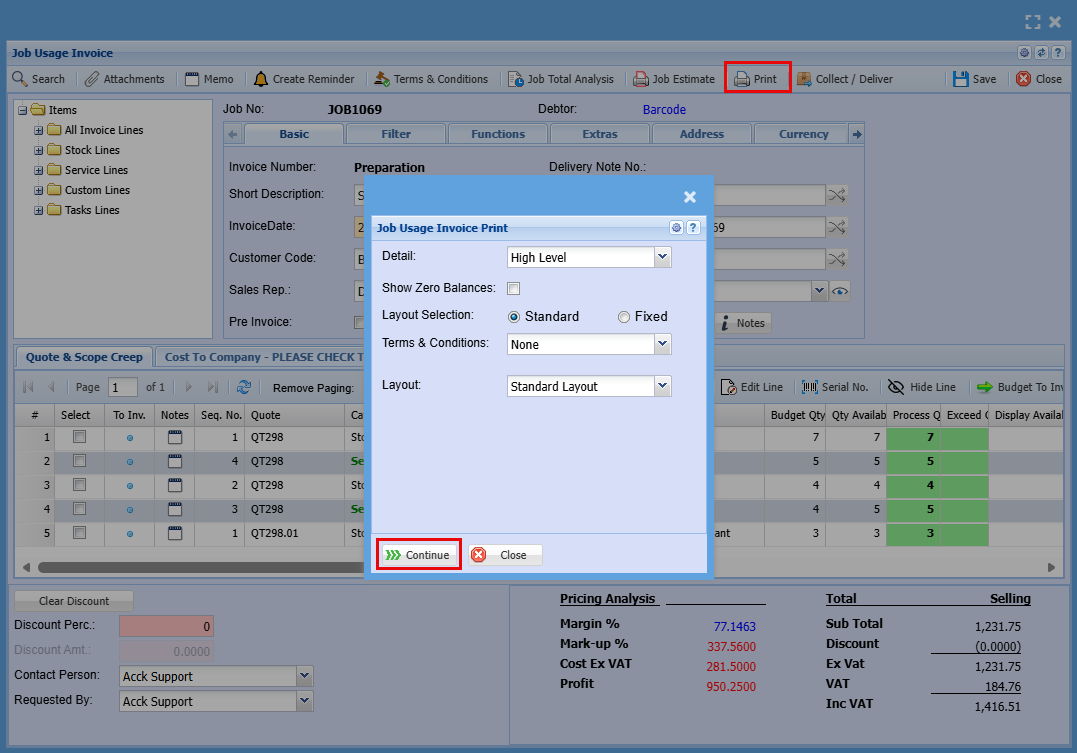
You will now be able to see as shown below what the invoice will look like when sent out.
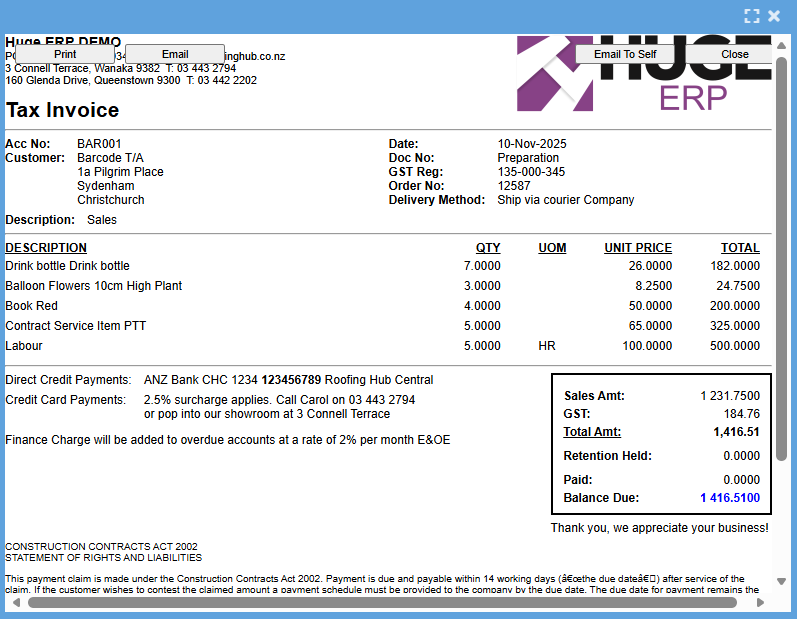
Once you are happy with it all
- Click "Save"
- Click "Close"
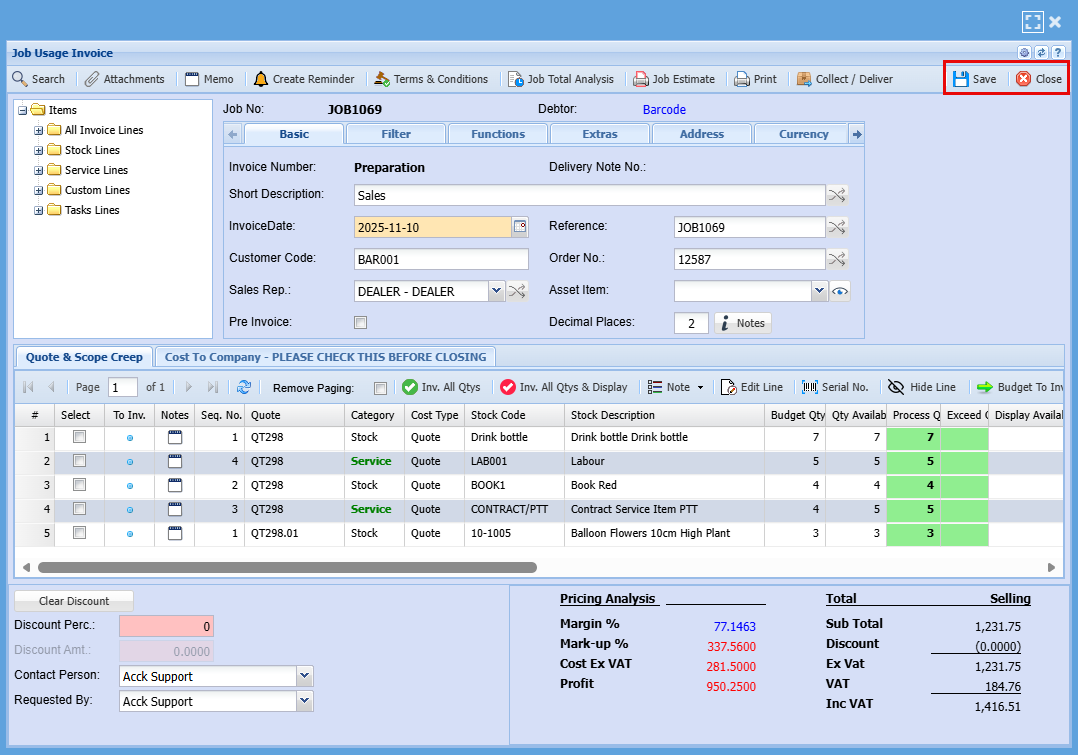
- Highlight the line of the invoice you want to process and send out.
- Click "Process" at the top of the screen
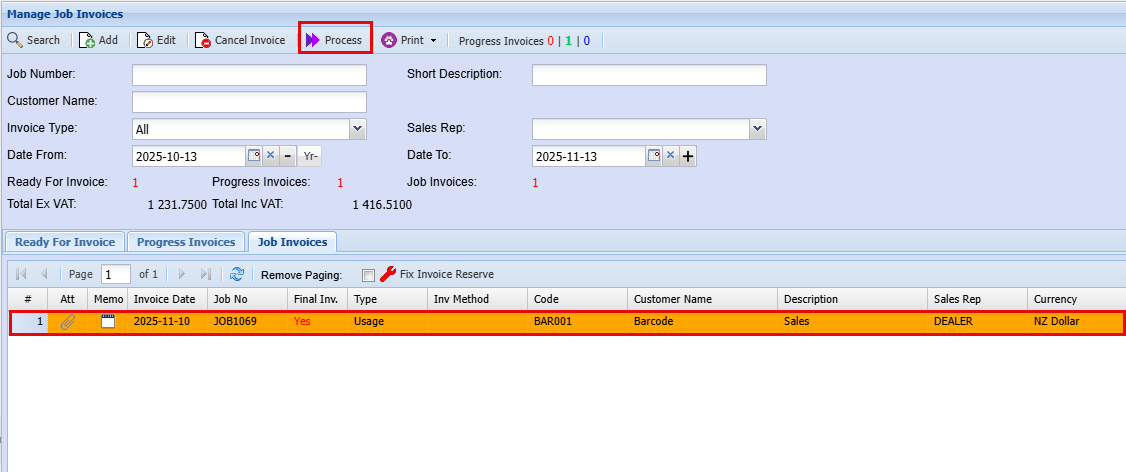
If an item on the invoice is marked as "Cost to Company"—meaning it's not charged to the customer—you’ll see the following prompt to confirm.
- Click "Yes"
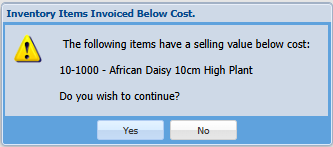
And then you will get the next screen
- Click "Continue"
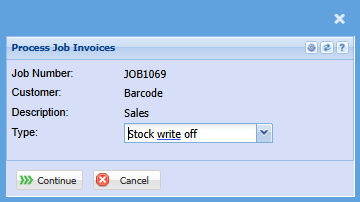
You'll see the screen below indicating that the system is compiling and processing all transactions related to this invoice.
- Click "Continue"
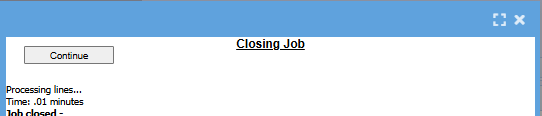
This is the final screen where you can make any last adjustments to your invoice.
- Click "Continue"
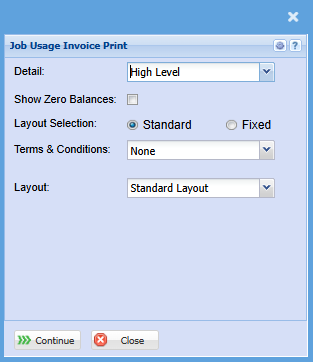
| Details | This changes the view of your invoice when clicking print |
| Show Zero Balances | |
| Layout Selection | |
| Terms & Conditions | |
| Layout |
The invoice is now finalized and ready to be sent to your customer for payment. Once issued, it will automatically close the associated job.
Click "Print" or "Email" to send this final invoice out to the customer
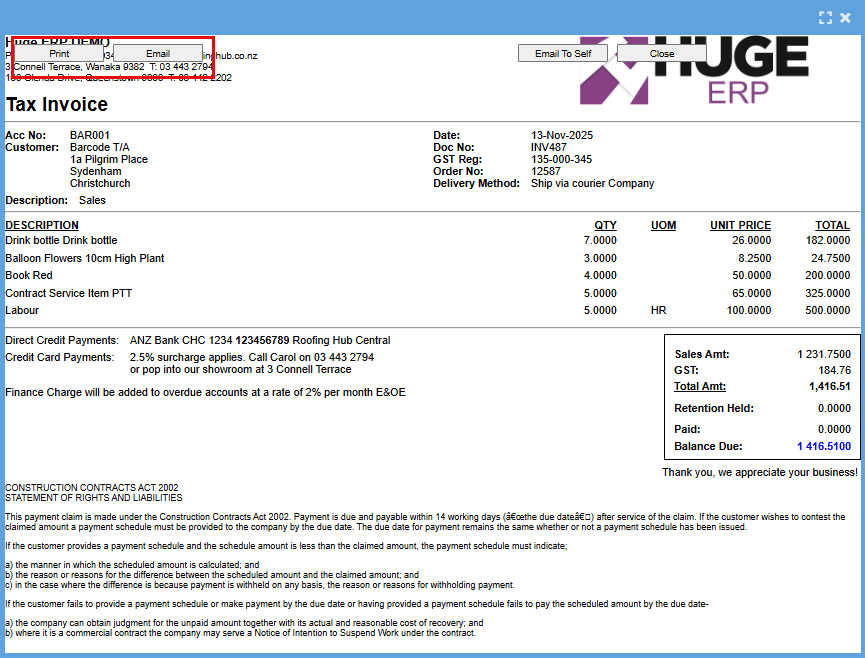
Job Invoice - Split by Employee
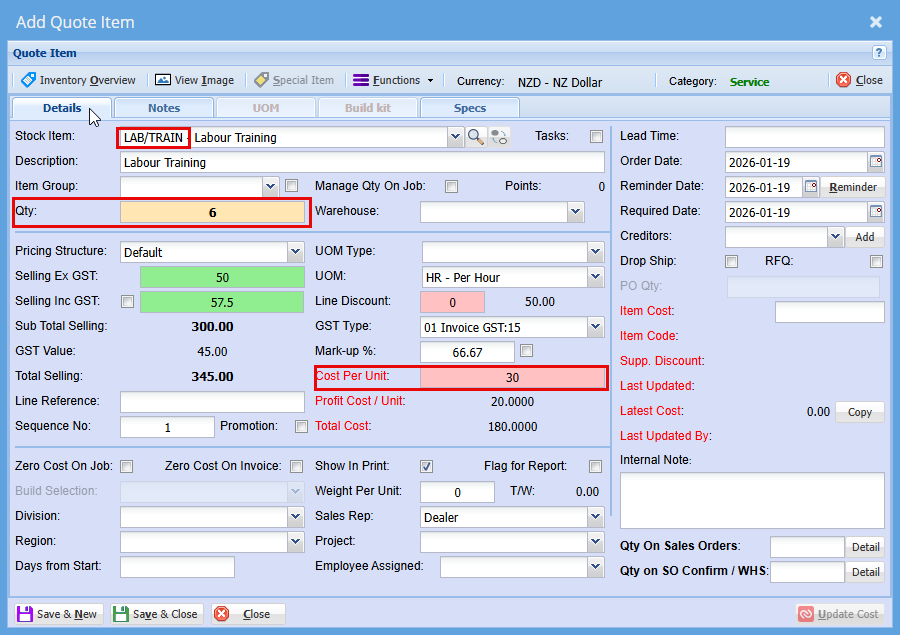

When invoicing you will get the below screen. Here you will need to tick the "Split by Employee" box which will then separate the employees on the invoice.
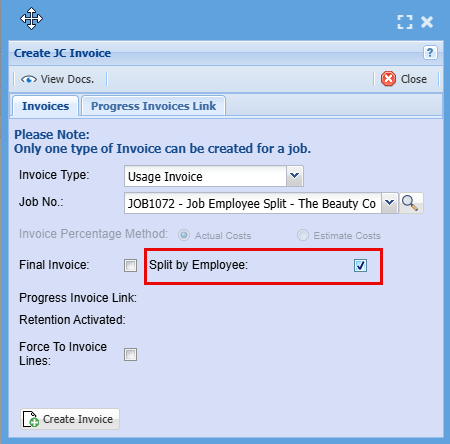
The invoice will have a column now that will show the name of the employees and how many hours they did on the job.
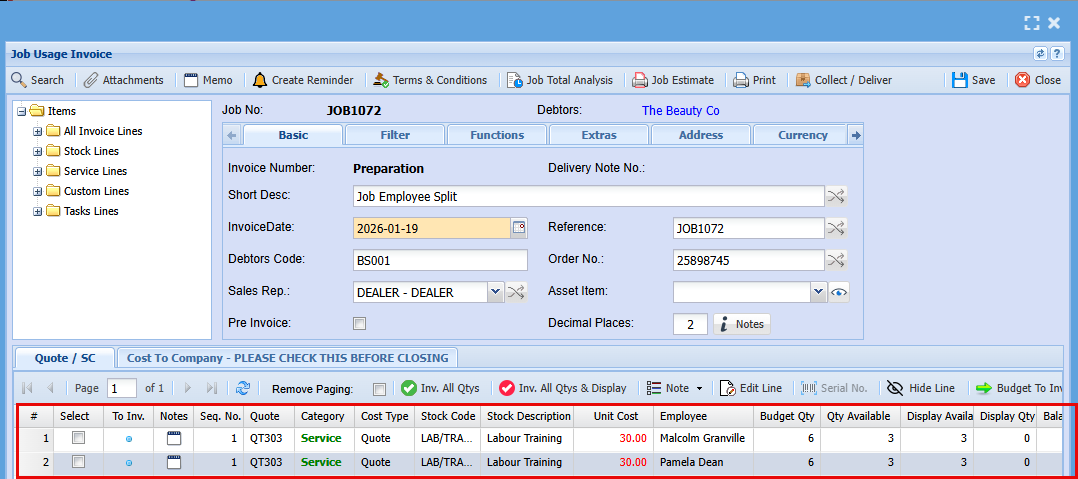
In order to discount the hours or change the hours for this invoice you will need to click Invoice All Quantities (Inv. All Qtys)
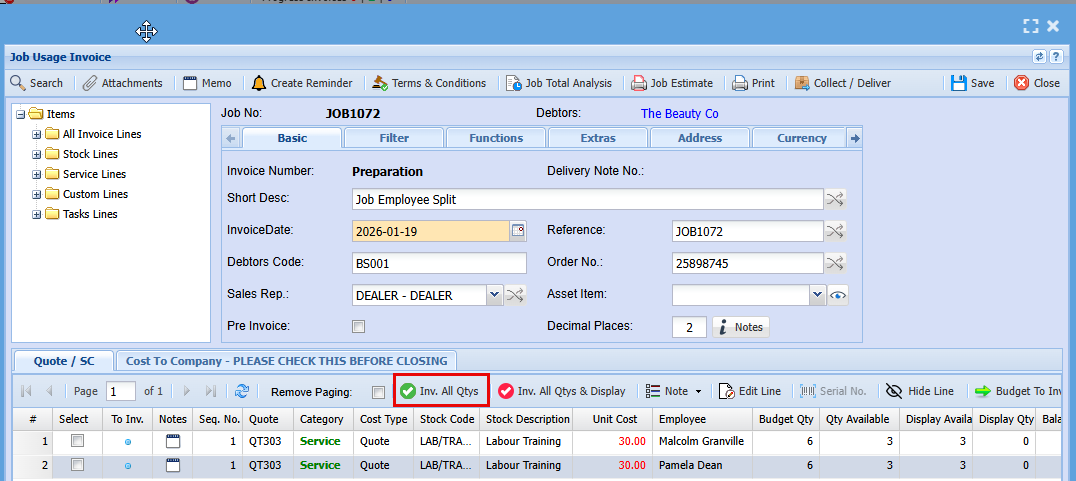
- Click Continue
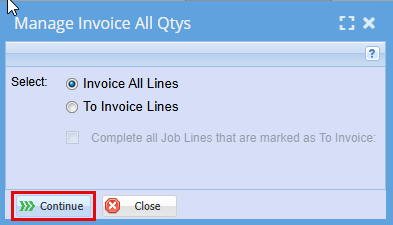
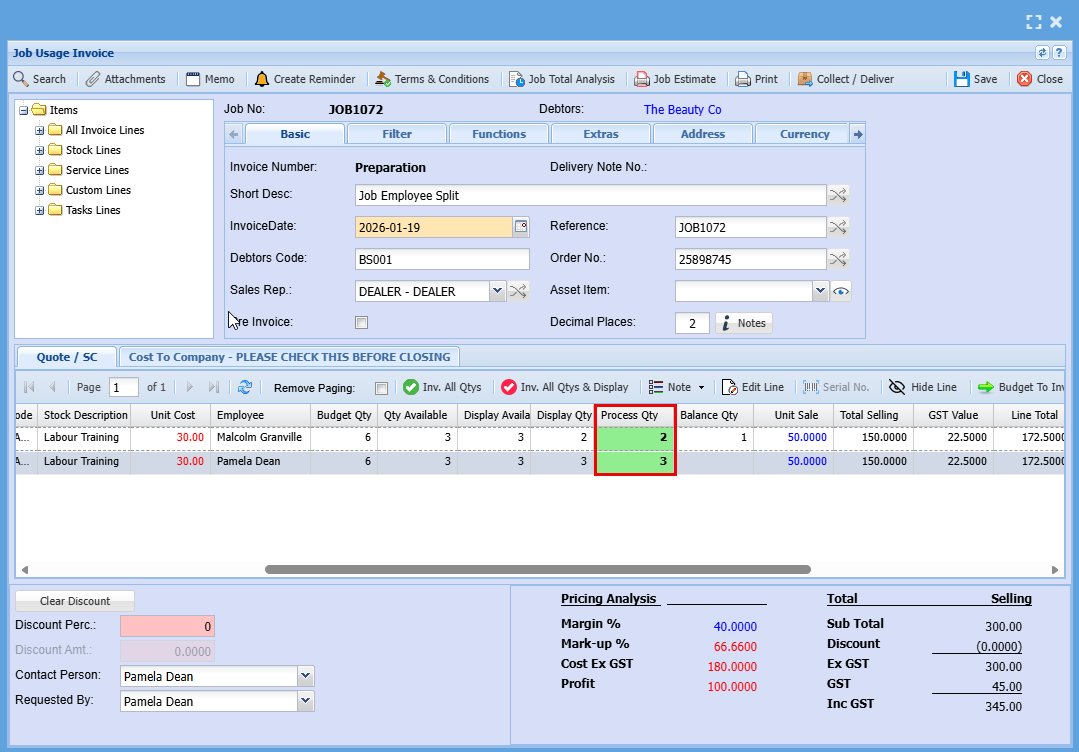
Invoice Value Summary
Summary invoice values allow items to be grouped and displayed as totals, rather than showing each individual line on the invoice.
- These values appear at the bottom of the invoice
- Individual line items are hidden, while totals are grouped by item type
Item Types
- Service = Labour
- Custom = Consumables
- Stock = Materials
Setup
To include items in the invoice summary:
- Tick the relevant items
- These will be hidden from the main invoice lines
- Their values will be grouped and displayed as totals in the summary section
Value Summary Setup - Inventory Item
This screen shows how the Invoice Value Summary is configured at an item level within Inventory Setup.
By ticking the “Invoice Value Summary” checkbox (highlighted on the screen), the selected inventory item will not display as a separate line on the invoice. Instead, its value will be:
This setting is applied per item, allowing you to control which items are summarised versus shown individually.
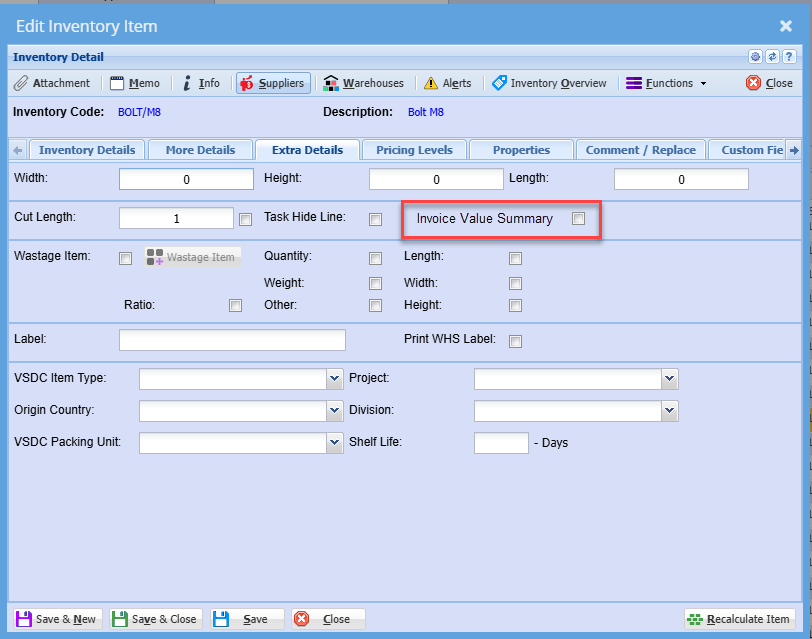
Value Summary Setup - Update a Job Line
This screen shows how to control whether a job line is displayed individually on the invoice or included in the Invoice Value Summary.
To update a job line:
- Open the job and select the relevant line
- Go to the Job Detail tab (highlighted in the screen)
- Tick the “Invoice Value Summary” checkbox
When the Invoice Value Summary option is selected on the job line:
- The line will be hidden from the detailed invoice view
- The value will instead be grouped into the summary totals at the bottom of the invoice (e.g. Labour, Consumables, Materials)
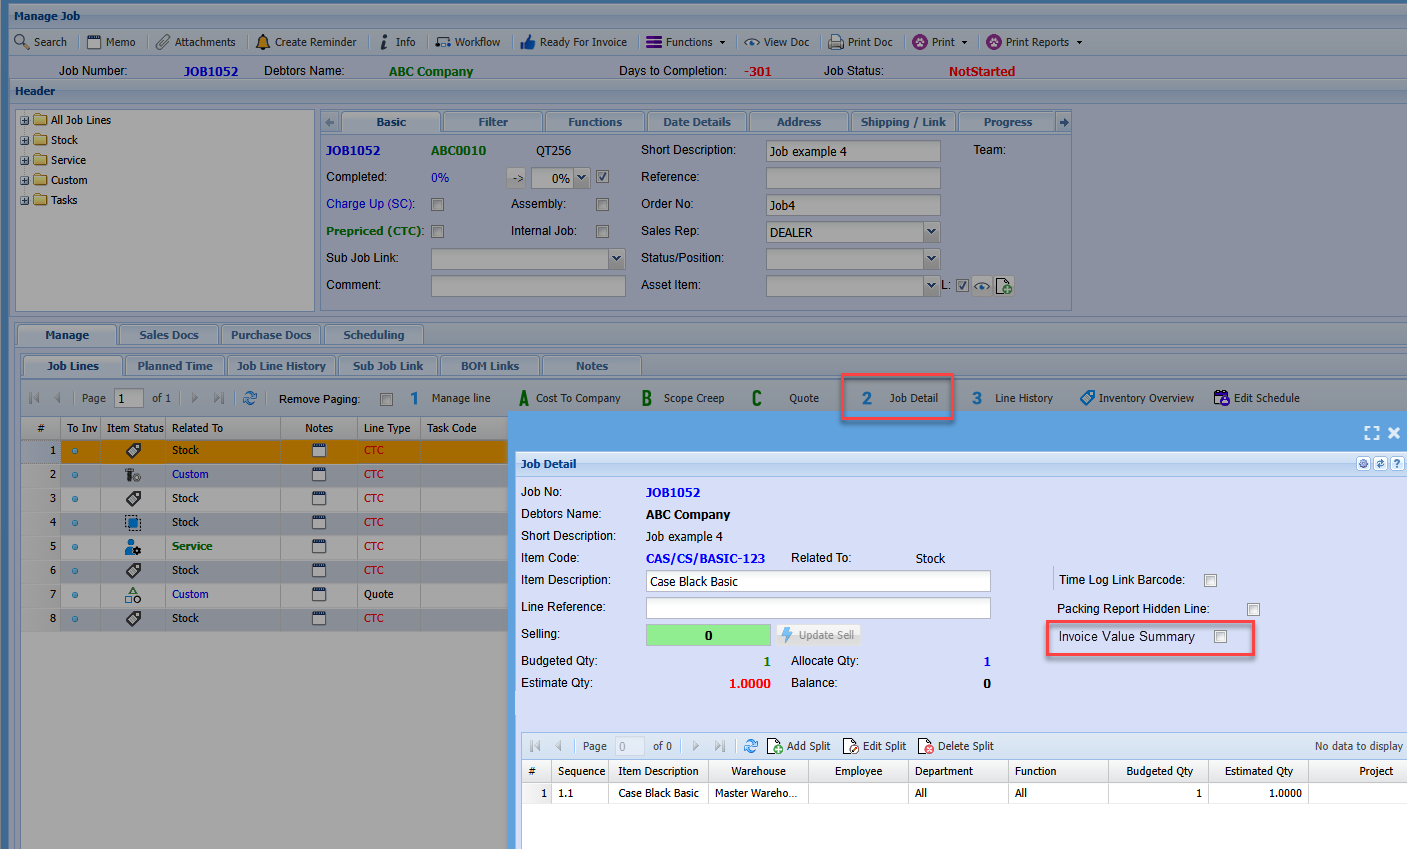
Value Summary Setup - Job Invoice Line
This screen shows how to control whether an item is displayed individually on the invoice or included in the Invoice Value Summary.
To update this on a job invoice line:
- Open the Invoice Line
- Tick the “Invoice Value Summary” checkbox (highlighted on the screen)
When Invoice Value Summary is selected:
- The line will be hidden from the detailed invoice view
- The sell value is still included, but grouped into the summary totals (e.g. Labour, Consumables, Materials) at the bottom of the invoice
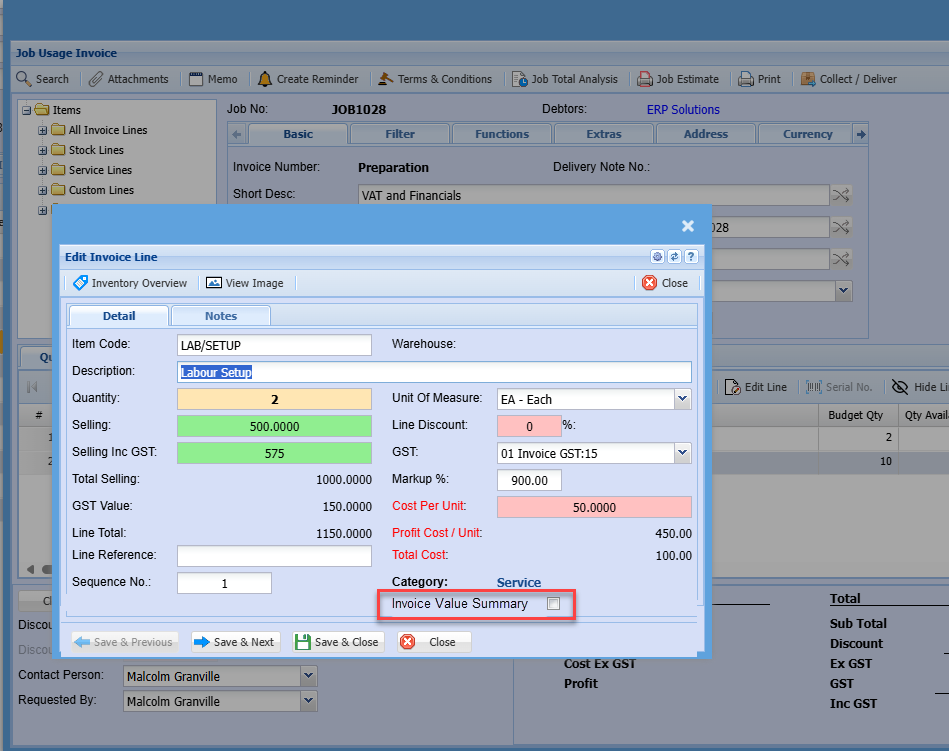
Job Costing Percentage Invoice
Go to Job Costing Module > Activity> Quotation
Click Add to create a new Quote
Select the customer
Enter a Reference
Enter the Order Number
Click Save
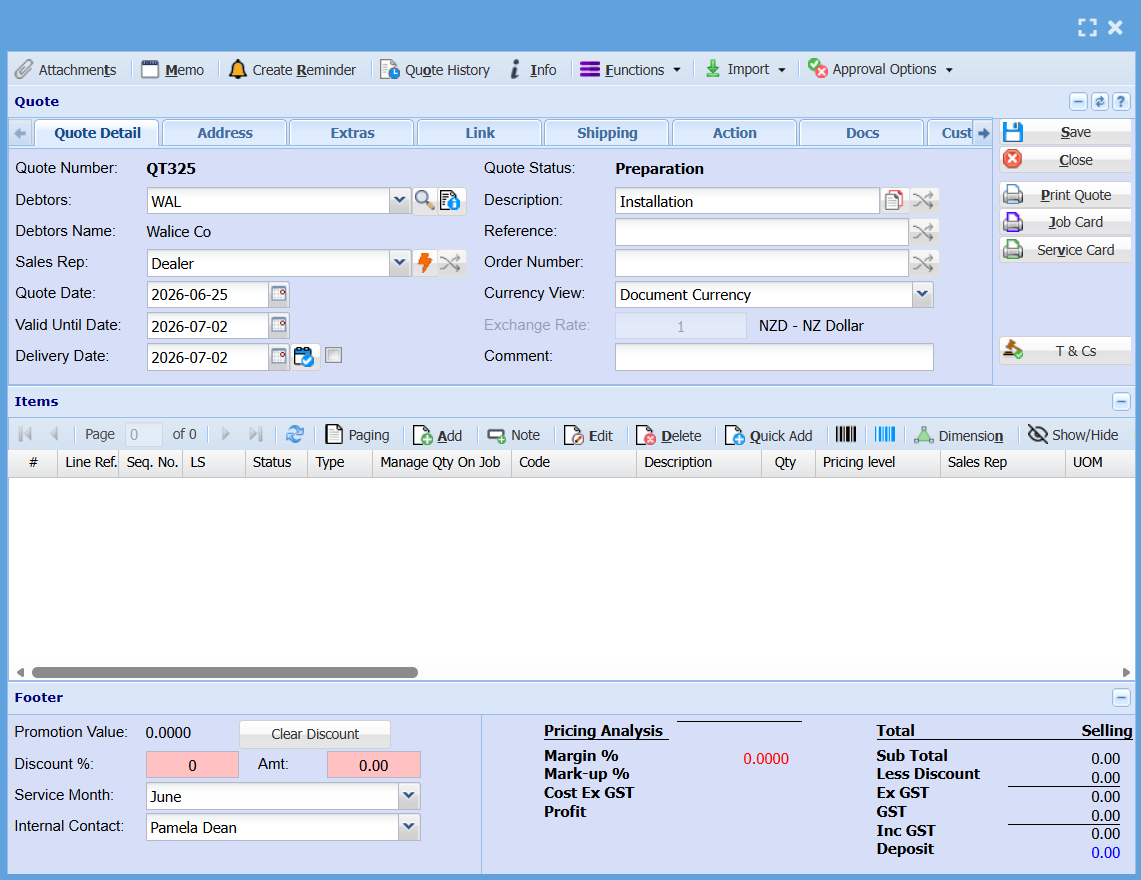
Click Add
Enter the required Item code
Enter the quantity
Check the selling price and amend if required
Click Save and close
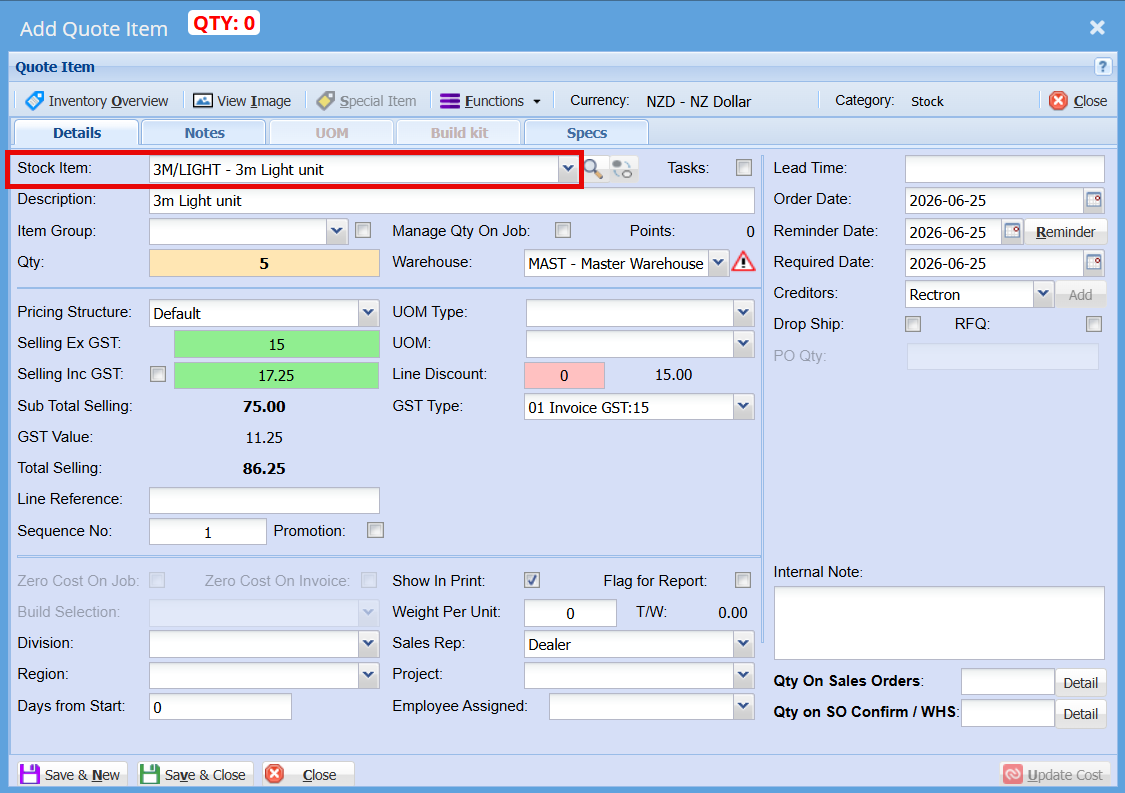
Click Approval Options tab
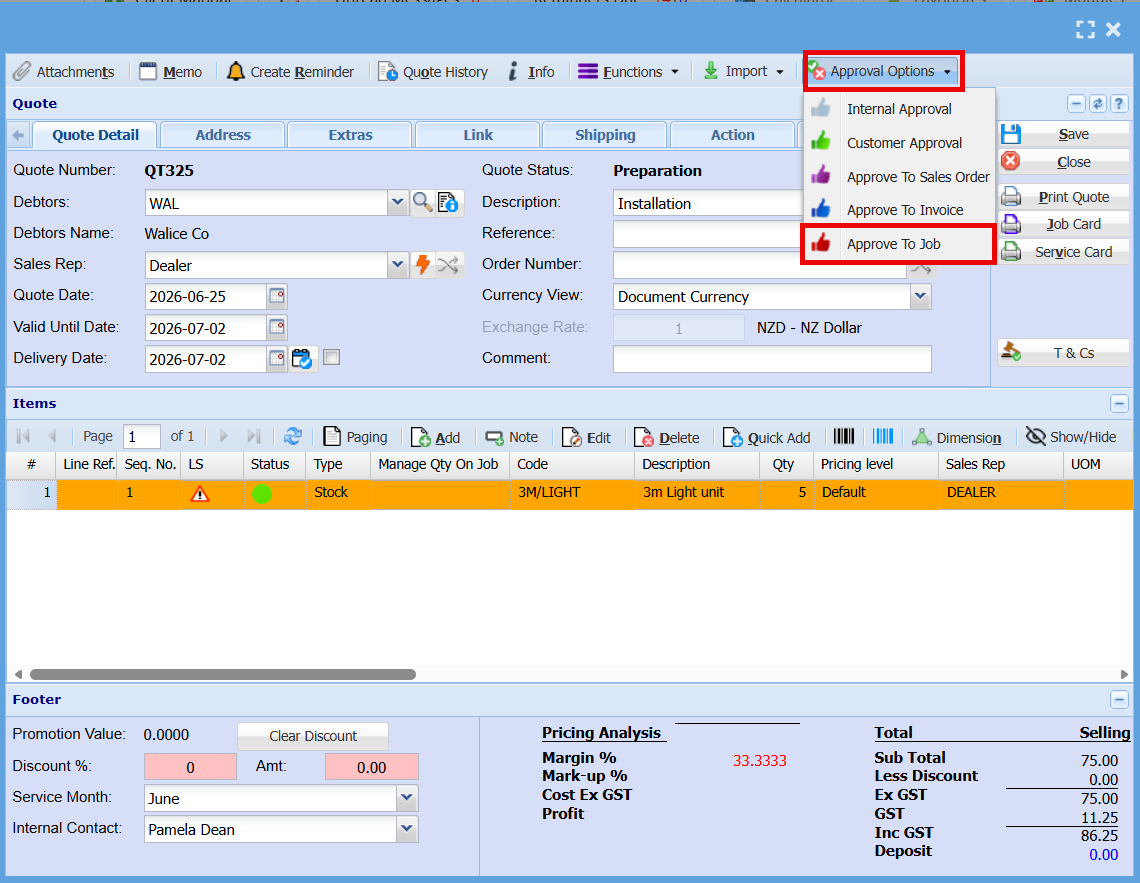
Select Approve to Job
Enter a Description
Check the Order number
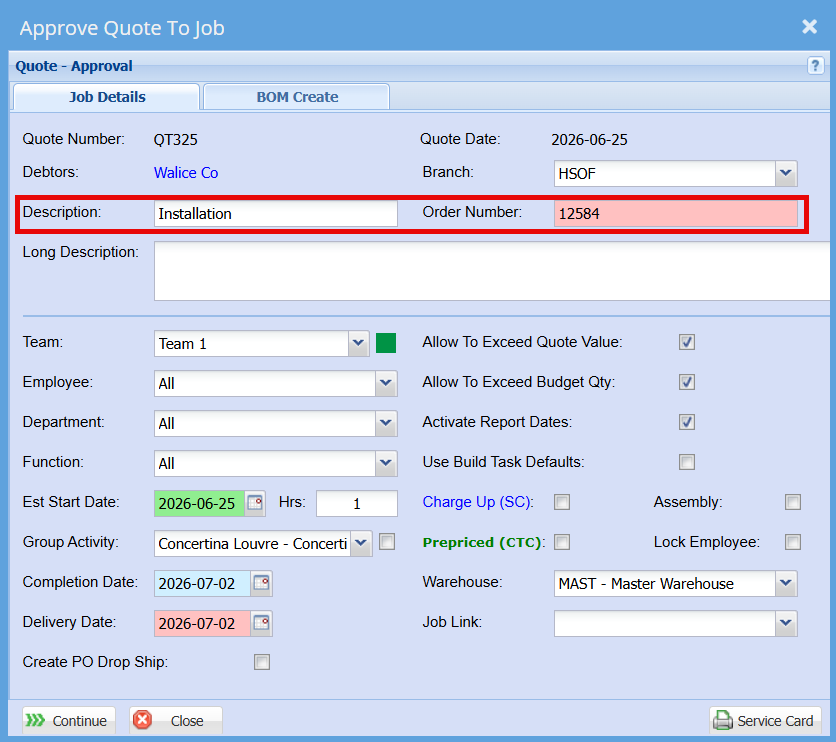
Click Continue
Make a note of the Job number (if necessary)
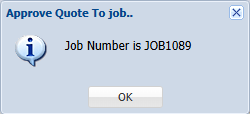
Click OK
The Job has now been opened and can be found under the Managed Job Menu
Go to activity> Manage Job> Enter the job Number> Click Search
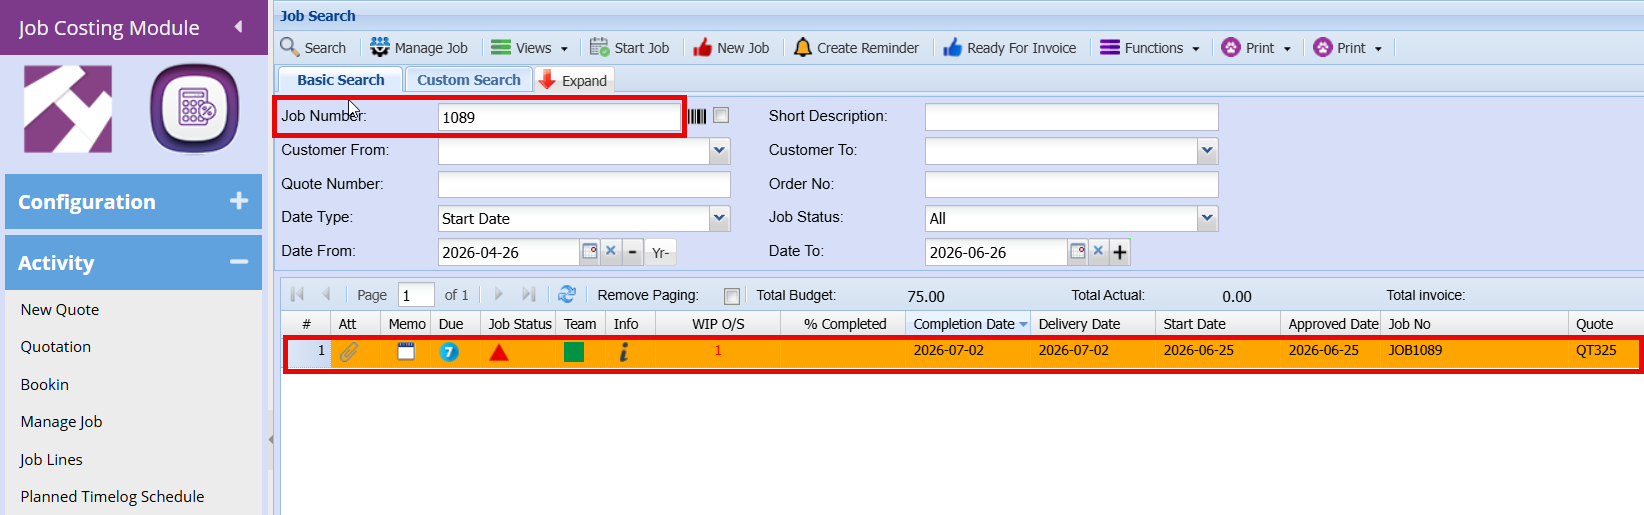
The client/ Job Manager/ Installer can then sign the picking slip as acknowledgment of receipt of the item(s)
Prior to installation, you may need the client to pay a deposit of the total order value.
This is done by way of a Percentage Invoice:
Go to Activity> Job Invoice>
Click Insert
Enter the Job Number and Press Enter
.png)
Select Percentage Invoice from the “Type of Invoice” Drop down
NOTE: DO NOT CLICK FINAL INVOICE BOX AT THIS STAGE
Click Create
.png)
Enter the Deposit amount to be invoiced
Enter the estimated Cost of this invoice.
Note: assuming you require a 50% deposit to be paid upfront, then the cost amount to be entered here will also be 50% of the total order cost
In our example: Selling price per unit equals R 150
Cost Price per unit equals R 100
Total Selling Price = R 7500 (50x R150)
Total Cost Price = R 5000 (50x R100)
This 50% Deposit equals R 3750
And 50% Cost equals R 2500
Enter a description to be printed as a invoice line on the invoice.
Click Save and Close
Click Close
.png)
Check that the correct invoice is highlighted
Click the Process Tab
The invoice will print to screen. You can now print a hard copy and/or email the invoice as required.
.png)
The ledger account entries for this invoice will be as follows:
.png)
Upon completion of the job, you will then need to create an invoice for the balance of the amount due.
Go to Activity> Job Invoice> Click Insert
Enter the Job Number and press Enter
Click Final Invoice Box
Click Create
Enter the remaining balance to be invoiced
Enter the remaining estimated Cost
Enter the Description to be printed on the invoice Line
Click Save and Close
Click Close
Click The Process Tab and then click the Process Button
.png)
Ensure that the drop down is selected as “Stock Write Off”
(This is to remove the stock from the system)
Click Continue
The final Invoice will then print to screen and you can print a hard copy or email as required
.png)
Click Close to close the Job
.png)
The Ledger entries for this invoice will be as follows
.png)
Accumulatively the ledger accounts will look as follows:
.png)
NOTE:
Since the cost of the items are estimated initially, upon closure of the job, the Actual system average cost will be posted to the Work in Progress Account.
This will result in the Work in progress account not being cleared out.
You will then need to process a journal in order to clear the Work in progress account. The contra account being most likely the Cost of Sales Account. (in order to realise the actual cost on your financials)
Job Lines clear "To be invoiced" flag
A highlighted thumbs-up icon indicates that the line is selected and will be included in the next invoice.
To clear all To Be Invoiced flags, use the Clear All Lines To Invoice button after completing the invoice for the job.
This will remove the thumbs-up icon from all job lines and reset them for future invoicing.
.png)
Job Collect / Delivery
Job Costing Case Studies
Quote Creation
Quote Creation
Job Costing > Activity > Quote
Before adding your line items to your quote, take a moment to review the key tabs across the top of your page, some of these tabs may contain important options you may want to configure or define first for a basic Quote.

Quote Detail Tab:
- Click "Add"
- Enter the Customer name and Description.
- Click "Save"(By clicking save you activate the button allowing you to "Add" a line item.)
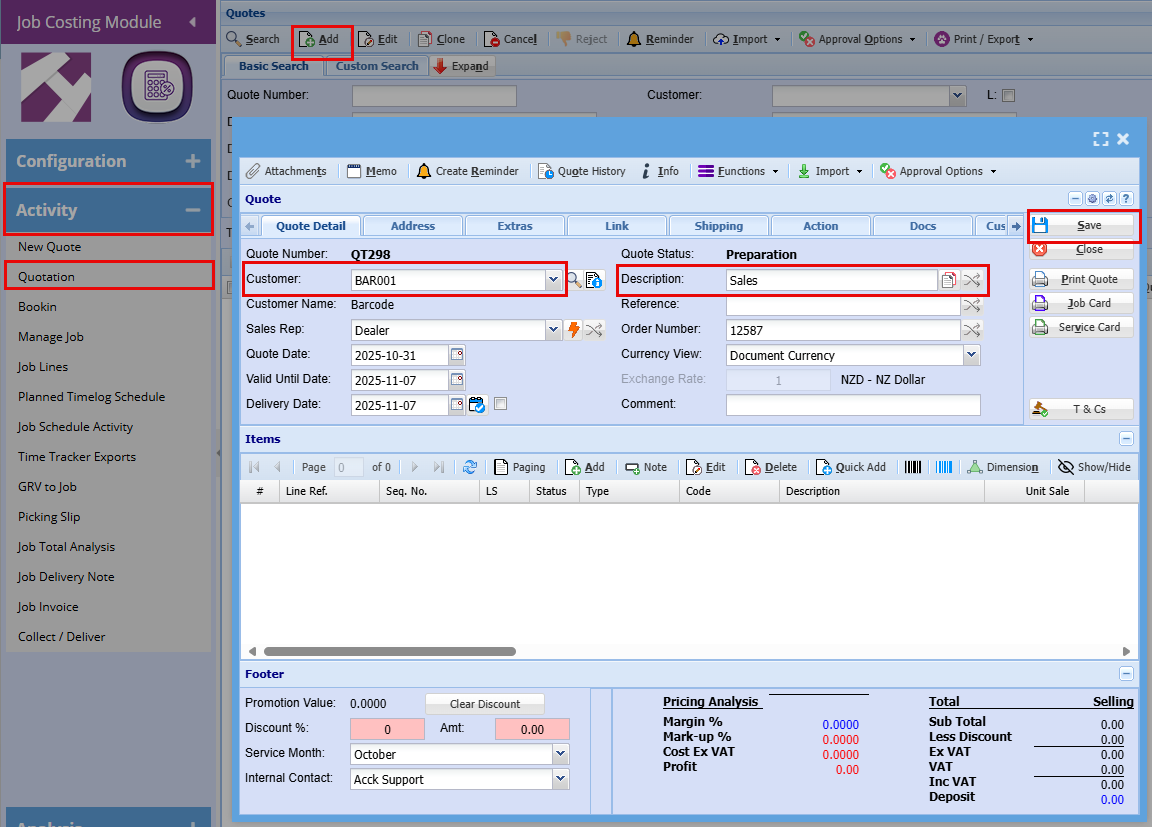
Address Tab:
- Use this tab to update the job address if required.
- Select the contact person for the quote from the dropdown list.
- If the contact does not exist yet, click the View button to add a new contact on the fly
Note: if details are edited on the quote, this will only apply to the specific quote and not update the debtor setup unless the debtor setup is access and updated as well.
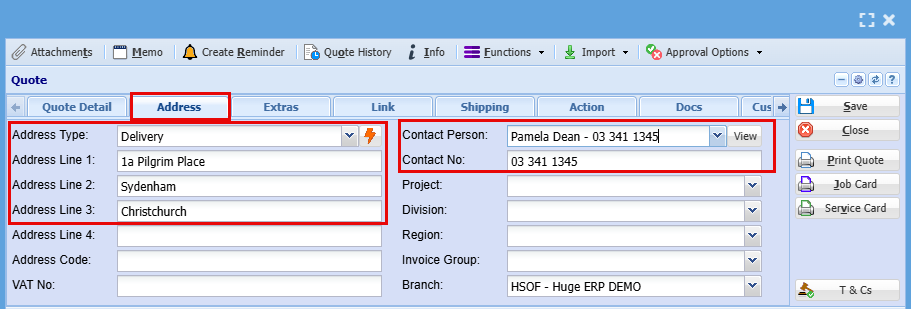
Extras Tab:
Select the billing method that applies to this job
Among the top tabs, click on the "Extras" tab.
- Tick the box that applied to your customer.
- Click "Save"
| Assembly | “Assembly” refers to an internal process where components or materials are prepared, combined, or staged before installation or delivery. It’s not billed separately to the customer but contributes to your overall job cost. |
| Charge Up (SC) | Charge Up (SC)” means the customer is billed for actual time and materials used, including any extras beyond the initial scope. Charge Up allows you to invoice for additional costs incurred during the job. |
| Prepaid (CTC) |
"Prepaid” refers to the quoted amount for the job, the fixed charge agreed to by the customer. You can’t invoice beyond this amount, so any extra time, materials, or costs that exceed the quote become your internal expense, or ‘Cost to Company (CTC) |
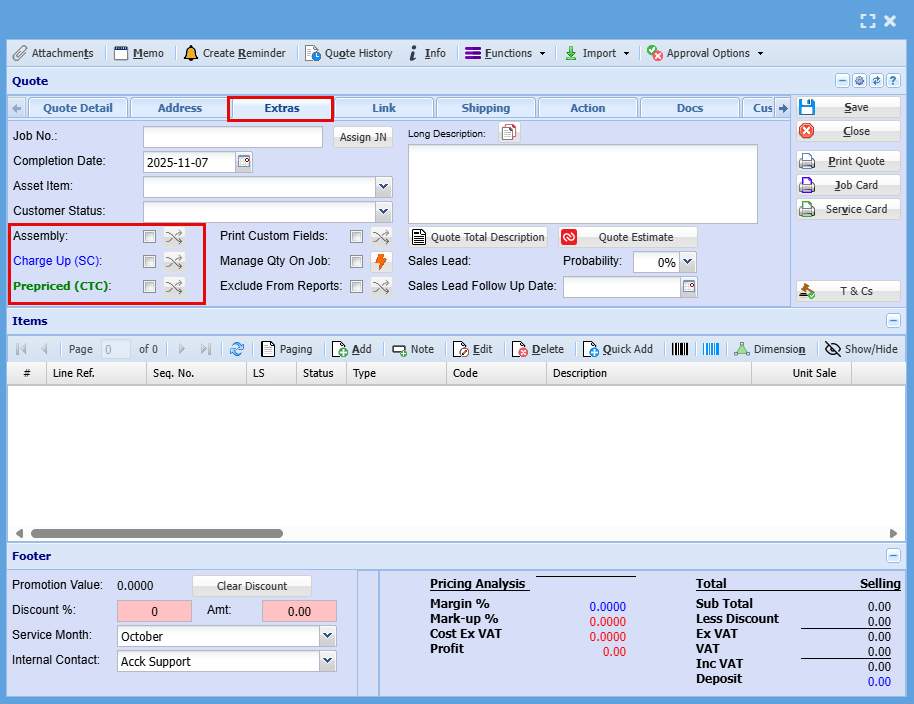
Adding Line Items to a Quote.
- Click the "Add" button located halfway down the page

- From the dropdown menu, choose the relevant item (Stock, Service, or Custom Items.)

- Once selected, check the basic fields:
1 Select Item
2 Check description as this can be changed at this point
3 Add Quantity
4 Check Cost of Item
5 Check your markup
6 Check Sell Price - click Save & Close to confirm your choice
- Add as many as items as needed
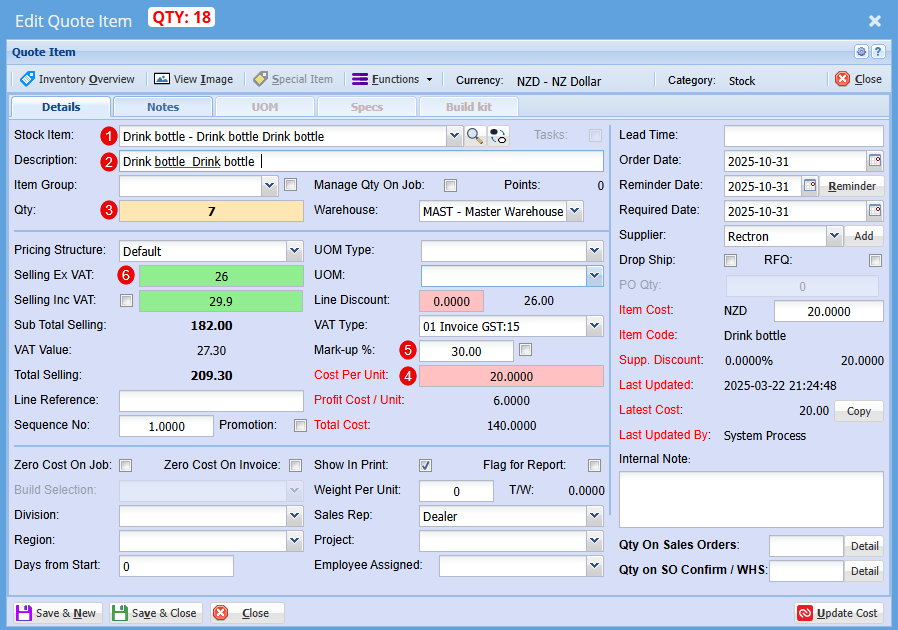
| Stock Item |
Select your stock item from the drop-down menu |
| Description |
At this stage you can change the Description if needed |
| Qty |
Add the Quantity you require of this item |
| Cost Per Unit |
Check the cost of this item |
| Mark up % |
At this stage you can increase your profit % |
| Selling Ex GST |
Price does not include the 15% Goods and Services Tax. You add GST on top of the listed amount. |
You can now submit this quote for customer approval.
At the top of the quote, you'll find Approval Options. From here, you can either send the quote for internal approval before forwarding it to the customer, or send it directly to the customer. Once customer approval is received, use the same dropdown menu to promote the quote to a Job.
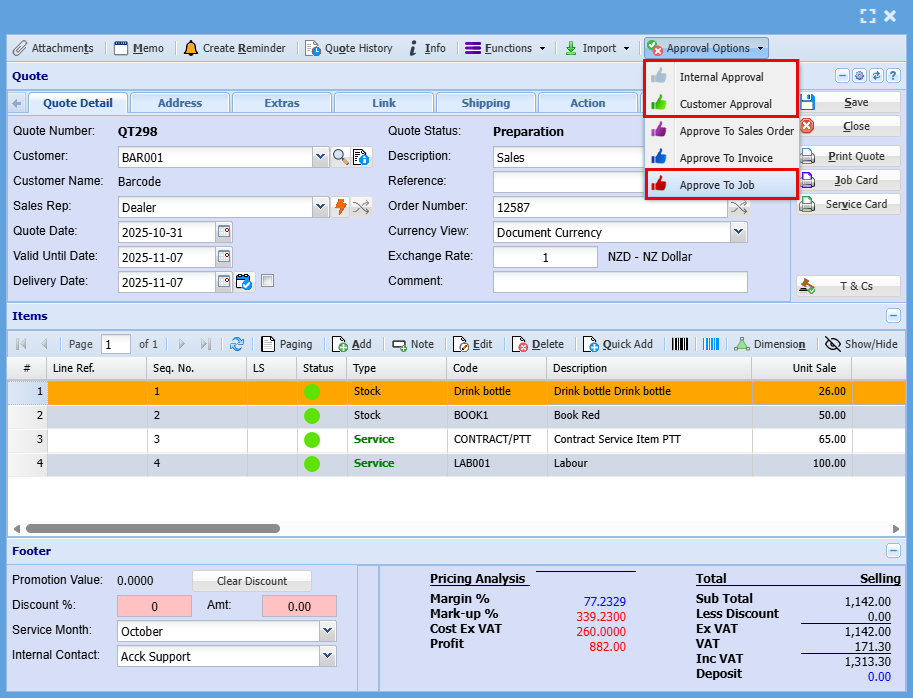
Once you click Approve to Job you will have the below Approve Quote to Job screen pop us.
You will always need an Order number, here you will also make sure you have selected weather this is a Charge Up (Scope Creep) or a prepriced (Cost to company) job.
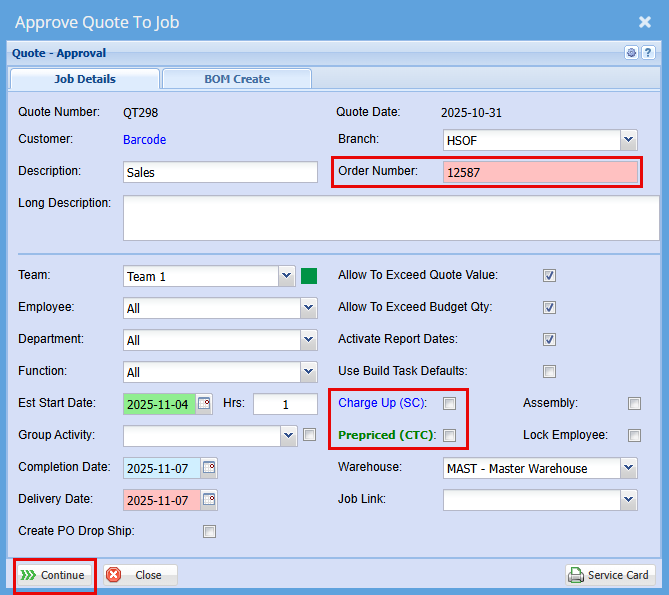
- Click Continue to create the job