# Manage Job
# Managing a Job
#### **Job Management**
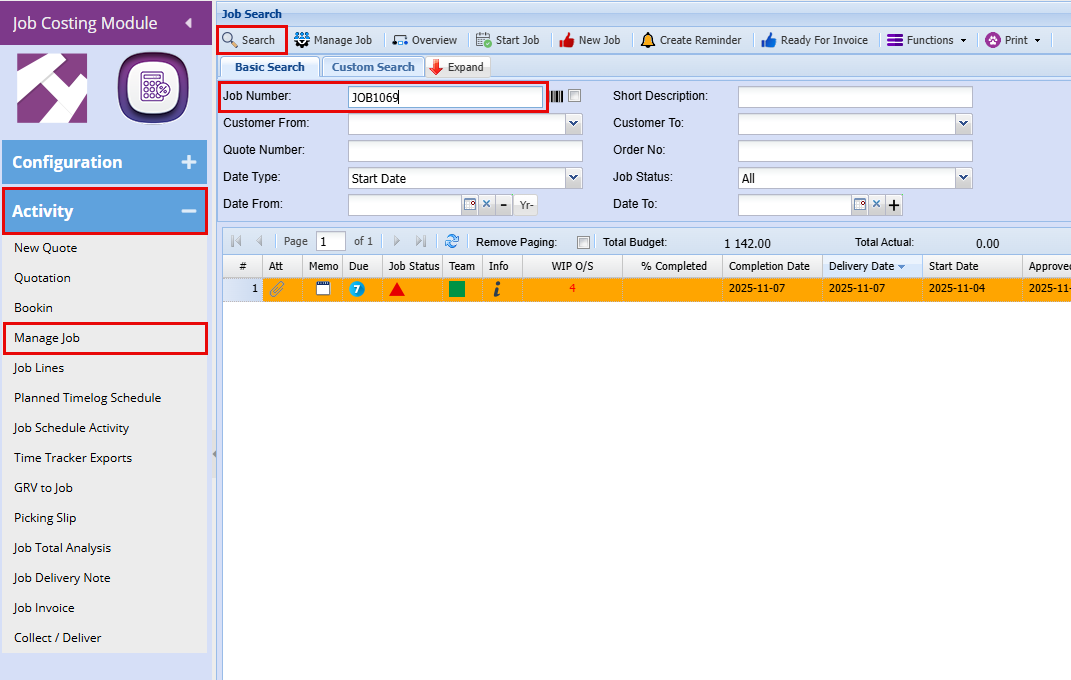
**Job Costing > Activity > Manage Job**
- Type in your Job number
Click **Search**
[](https://hugeerp10.co.za/hsofmanual/uploads/images/gallery/2025-11/l3Bimage.png)
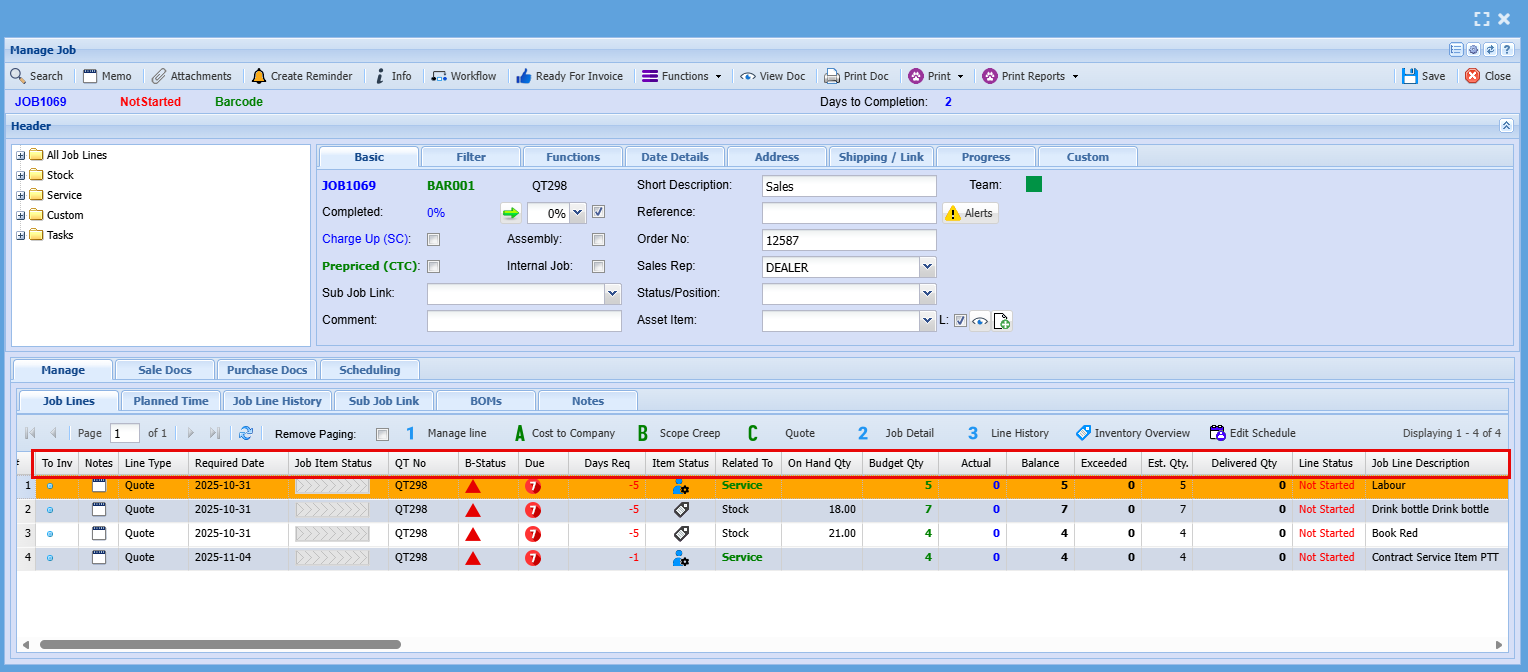
Each job line consists of multiple columns, with each column providing specific details about the job.
You can rearrange the columns in the order that the information is most relevant to you by simply dragging and dropping them into your preferred order as shown below.
[](https://hugeerp10.co.za/hsofmanual/uploads/images/gallery/2025-11/Yqcimage.png)
| **To Invoice** | You can click on the dot to change the icon to a thumbs up to send this line for invoicing |
| **Notes** | You can add notes for internal records. |
| **Line Type** | This refers to where the line came from, the example above is from a Quote but can come from a CTC (Cost to Company) or a SC (Scope Creep) |
| **Required Date** | This is the date the Job is to be completed by |
| **Job Item Progress** | This is used for Production Tracking |
| **QT No.** | This is the Quote number the line was added from |
| **B-Status** | This will show a different icon to show whether the Job has been started, in progress or completed |
| **Due** | Will show you how many days are given to complete Job |
| **Days Required** | This will show you have may days is needed to complete this Job Line Item |
| **Item Status** | This will show if the line is a Stock, Service or Custom Item using Icons |
| **Related To** | This will show if the line is a Stock, Service or Custom Item |
| **On Hand Qty** | This will show you how many of the specific item you have on hand to do the job, it will highlight if you do not have enough stock to complete the job |
| **Budget Qty** | This shows you what you had initially quoted |
| **Actual** | This Quantity indicates the quantity used for the job |
| **Balance** | This is the Quantity that is left over from the Budget Quantity |
| **Exceeded** | This will show you the quantity you have exceeded over the Budget Quantity |
| **Est Qty** | This is usually the same as tour Budget Qty |
| **Delivered Qty** | This is how many of this line item has been completed and actually dispatched to the customer |
| **Line Status** | This speaks to the Job Item Status and B-Status which shows job progress |
| **Job Line Description** | This is the description form the quote detailing what the line item is |
##### **Manage Job by Line**
Managing one line at a time within a workflow keeps you in control by ensuring each task is handled deliberately and accurately. This method reduces errors, simplifies troubleshooting, and creates a clear audit trail. It’s the recommended approach for maintaining consistency, accountability, and professional standards across every job.
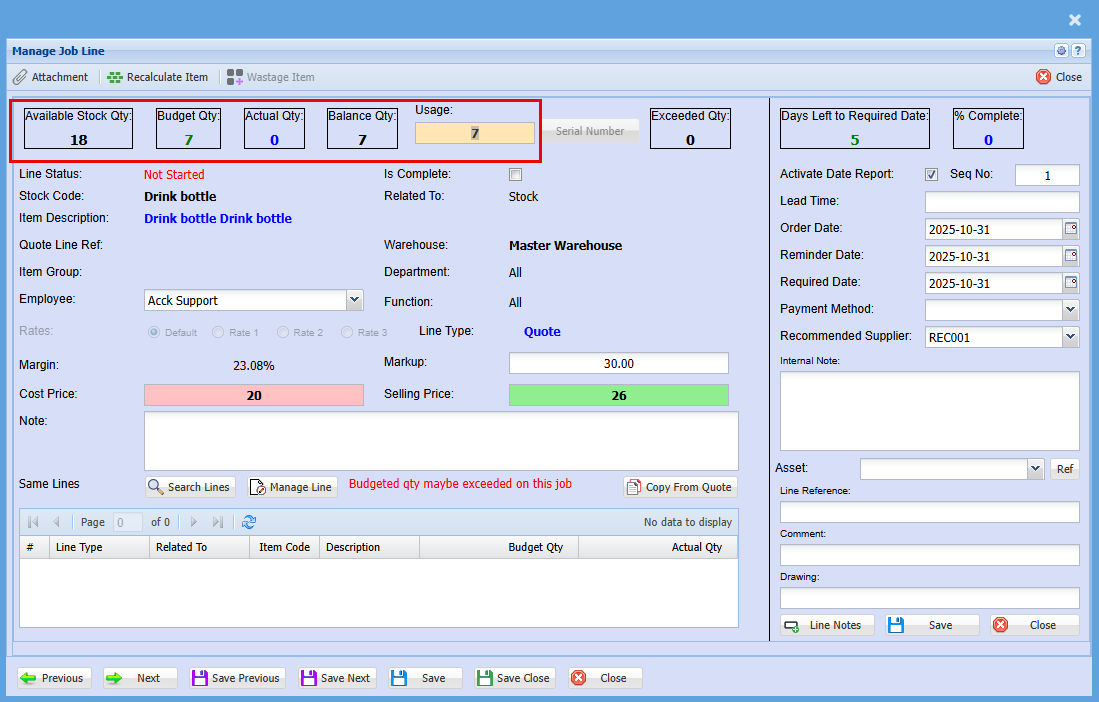
- **Double click** on a job line
- Update your usage amount for this item
As shown below the main things you will be looking at is the following
| Available Stock Qty | Shows you all available stock |
| Budget Qty | This is what was Quoted |
| Actual Qty | This is how many have been used |
| Balance Qty | This is how many you have left to use from your Quote amount |
| Usage | This is an open field where you will put in the quantity being used |
[](https://hugeerp10.co.za/hsofmanual/uploads/images/gallery/2025-11/S8iimage.png)
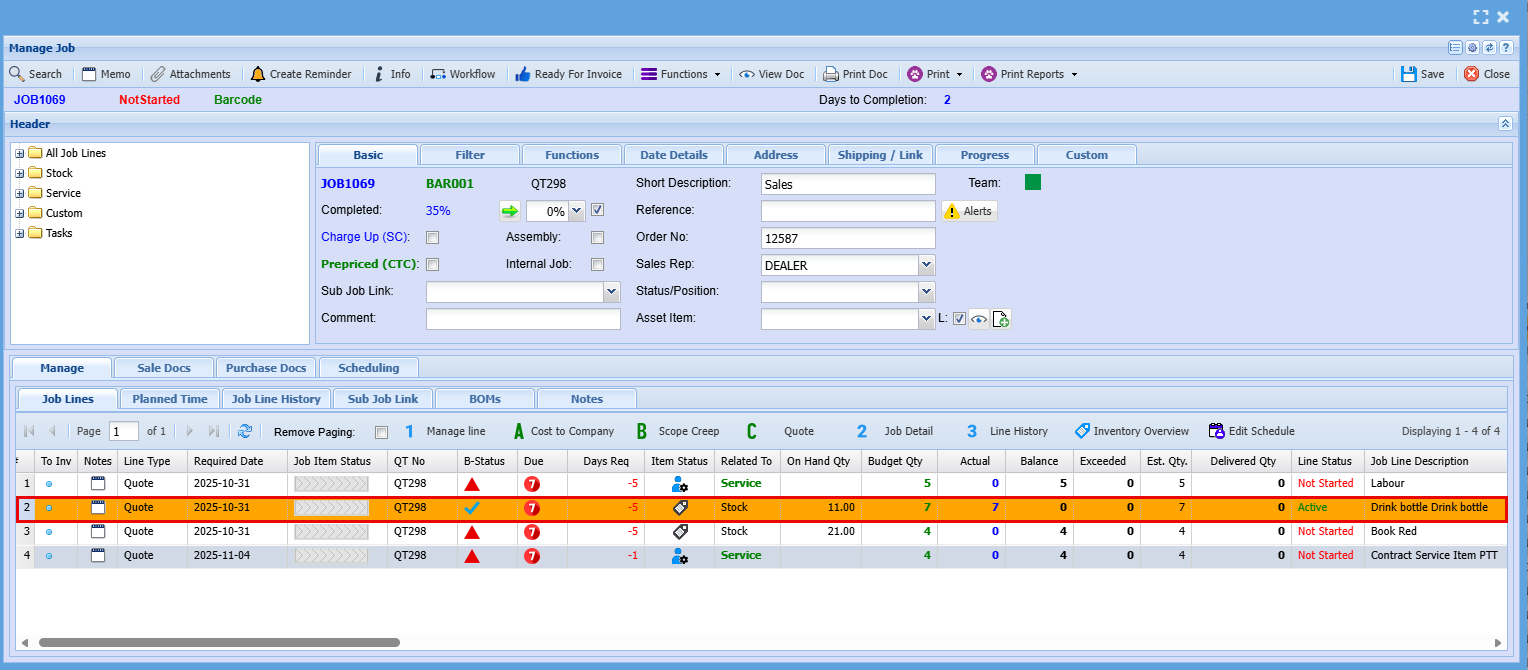
- Click **Save and Close**
You can now see that the line is active, and you’ll notice updated **quantities** and **statuses** reflecting the latest changes.
[](https://hugeerp10.co.za/hsofmanual/uploads/images/gallery/2025-11/DPBimage.png)
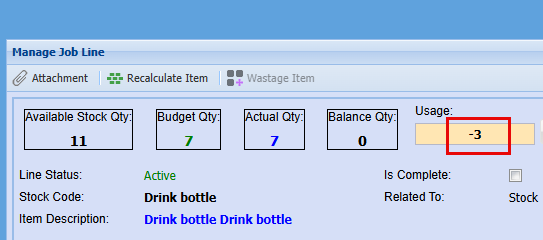
If you've made an error and need to adjust the quantity, simply double-click the Job Line again. To decrease the quantity, enter a minus sign (–) in front of the amount you're reducing, as shown below.
[](https://hugeerp10.co.za/hsofmanual/uploads/images/gallery/2025-11/pAuimage.png)
---
##### **UnManage Line/All**
**Unmanage All** will reverse managed quantities, less any quantities that have already been invoiced.
If a line has been invoiced, it cannot be unmanaged, as it has already been processed out of the system.
To remove job lines from a job, use all three of the actions listed below.
| A | Unmanage All items on a job |
| B | Clear Line History
Only works if the Managed Actual quantity equals zero
|
| C | Delete Job Line
Only works if there are no Line History entries
|
This screen is used to find and review jobs within the Job Costing Module. It includes a variety of filters at the top that allow users to quickly search for jobs using whatever information they have available. These filters provide flexibility, enabling users to perform broad searches with minimal details (such as a name or date) or narrow searches using specific criteria.
This area only searches for Jobs with a Job status of
- Not Started
- Started
- In Progressing
##### **Search Button**

The **Search** button is used to run the search once you have entered your desired criteria.
After selecting or entering the relevant filters (such as job number, customer, date range, or status), clicking **Search** will display all jobs that match those criteria in the results grid below.
**Basic Search Tab**
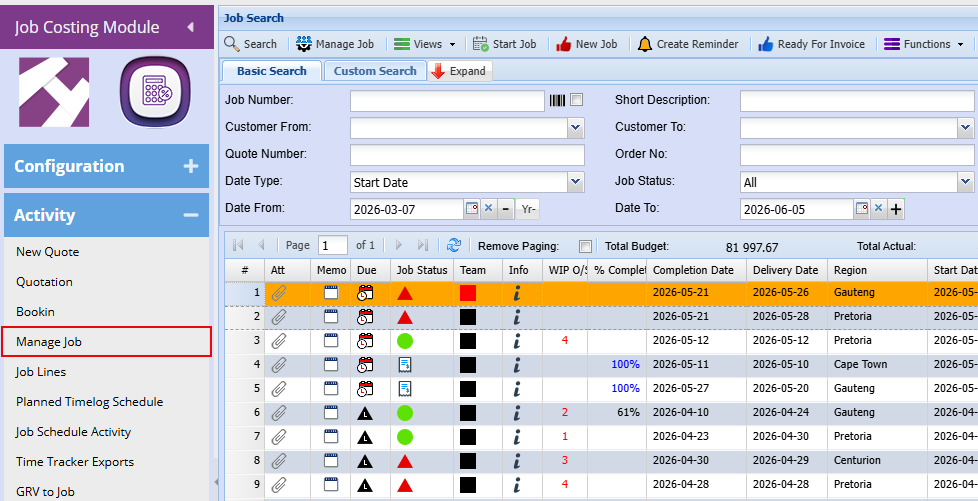
| **Job Number** | If you know the exact job reference |
**Customer From / To** | Filter jobs for a specific customer or range of customers |
| **Quote Number** | Locate jobs linked to a specific quote |
**Order Number** | Search using the related order reference |
**Short Description** | Search by keywords describing the job |
**Date Type** | Choose which date you want to filter by (e.g., Start Date) |
**Date From / Date To** | Define a date range to refine results |
**Job Status** | Filter by status (e.g., All, Active, Completed) |
#####
##### **Job Search Grid Columns Explained**
**Job Costing > Activity > Manage Job**
- Click **Search**
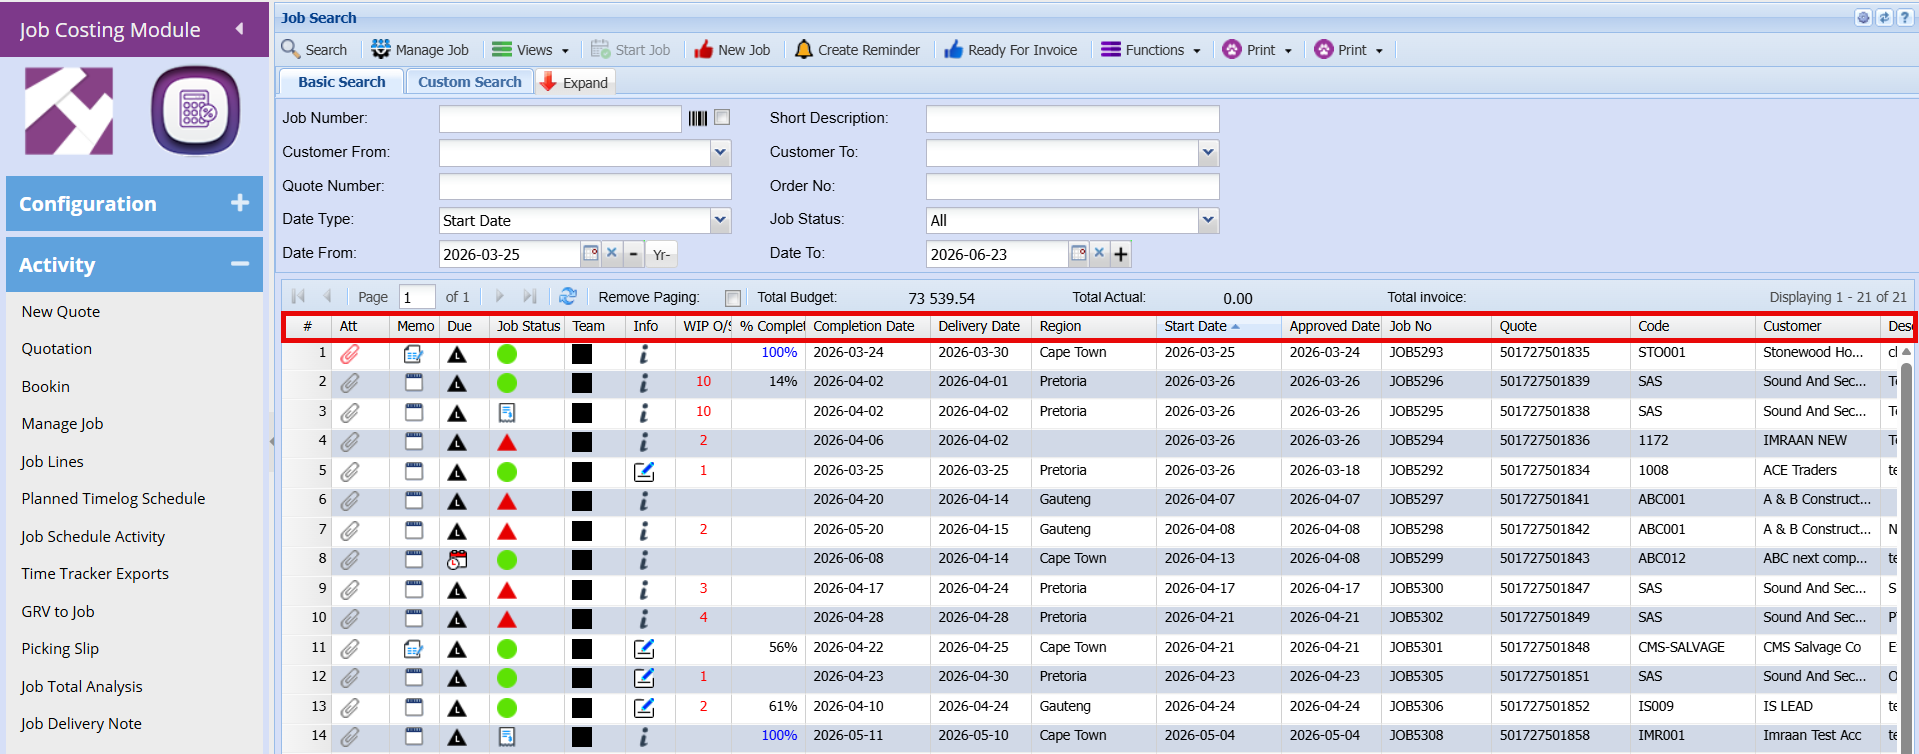
The Job Search screen displays results in a grid format. Each row represents a job record, and the columns provide key information about that job.
[](https://hugeerp10.co.za/hsofmanual/uploads/images/gallery/2026-06/saRimage.png)
The grid is **customisable**, allowing users to choose which columns are visible based on their needs.
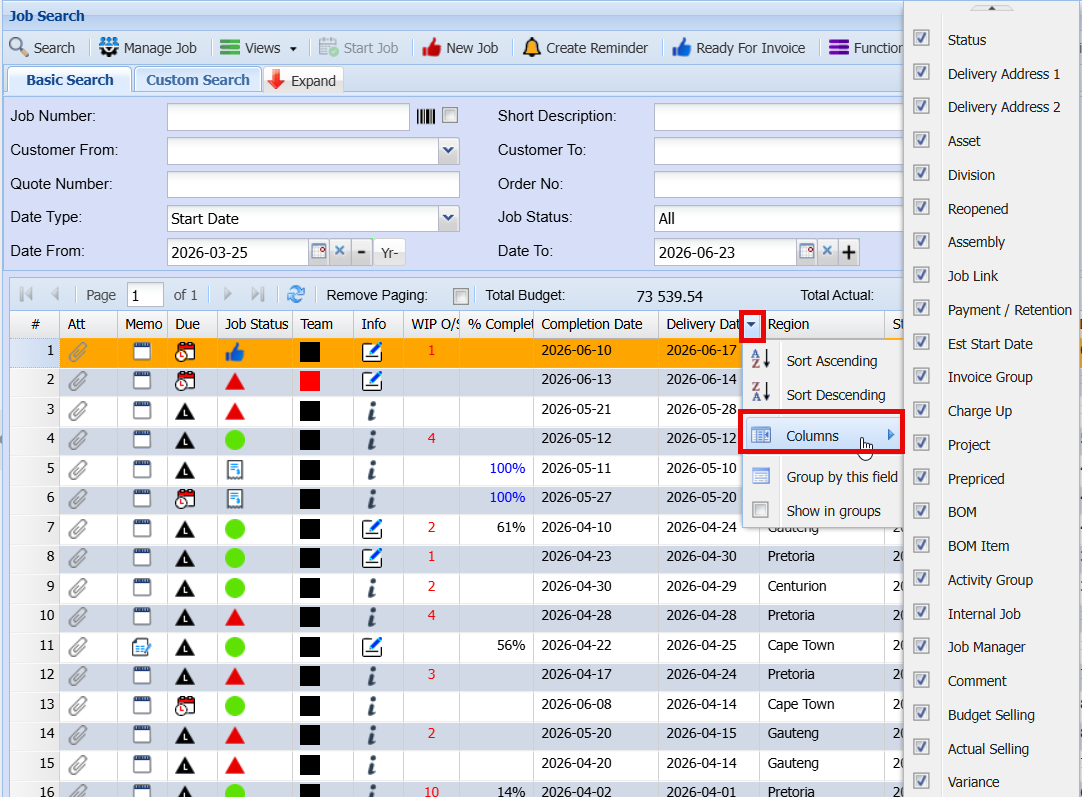
Customise columns in the grid:
- Hover your mouse over any **column header** in the grid
- A **downward arrow** will appear on the right-hand side of the header
- Click on this arrow to open a menu
- Select **“Columns”** from the list
- A full list of available column options will then be displayed
- Tick will show a column or untick to hide it
[](https://hugeerp10.co.za/hsofmanual/uploads/images/gallery/2026-06/wspimage.png)
**Reordering Columns**
- Columns can also be rearranged to suit your preferred layout
- Simply **click and hold a column header**, then **drag and drop it** into the desired position
- This allows you to organise the grid in a way that best fits your workflow
**Status** | Displays the current status of the job |
**Delivery Address 1 / 2** | Shows the delivery location details |
**Asset** | Links the job to a specific asset, if applicable |
**Division** | Indicates the business division associated with the job |
**Reopened** | Identifies jobs that have been reopened after completion |
**Assembly** | Indicates if the job involves assembly components |
**Job Link** | Provides a reference or link to related jobs |
**Payment / Retention** | Displays payment or retention-related information |
**Estimated Start Date** | Planned start date for the job |
**Invoice Group** | Groups jobs for invoicing purposes |
**Charge Up** | Indicates whether the job is chargeable |
**Project** | Links the job to a broader project |
**Prepriced** | Shows if pricing has been predefined |
**BOM / BOM Item** | Displays Bill of Materials and related items |
**Activity Group** | Categorises the job under a specific activity |
**Internal Job** | Flags jobs that are internal (non-customer facing) |
**Job Manager** | Shows the person responsible for the job |
**Comment** | Allows for additional notes or remarks |
**Budget Selling** | Budgeted revenue for the job |
**Actual Selling** | Actual revenue recorded |
**Variance** | Difference between budget and actual values |
**Invoiced Selling** | Amount that has been invoiced |
**Memo** | Additional internal notes or messages |
**Att (Attachments)** | Indicates if documents or files are attached to the job |
**Due** | Displays due dates or overdue indicators |
**Job Status** | Current status of the job (e.g. in progress, completed) |
**Team** | The team assigned to the job |
**Info** | Additional job-related information or quick access details |
**WIP O/S (Work in Progress Outstanding)** | Value of work still in progress |
| **% Completed** | Progress percentage of the job |
**Completion Date** | Date the job was completed |
**Delivery Date** | Scheduled or actual delivery date |
**Region** | Geographic area linked to the job |
**Start Date** | When the job began |
**Approved Date** | Date the job was approved |
#####
##### **Expanded Search Fields**
When the **Expand (Contract)** option is selected, additional search filters become available. These provide more advanced ways to refine your search results.
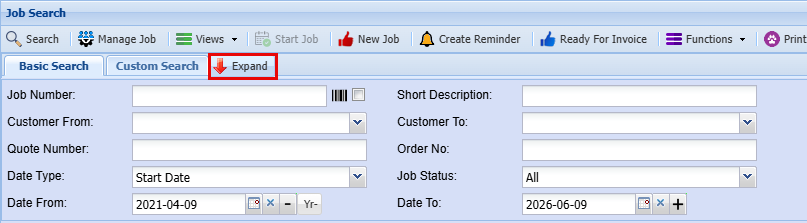
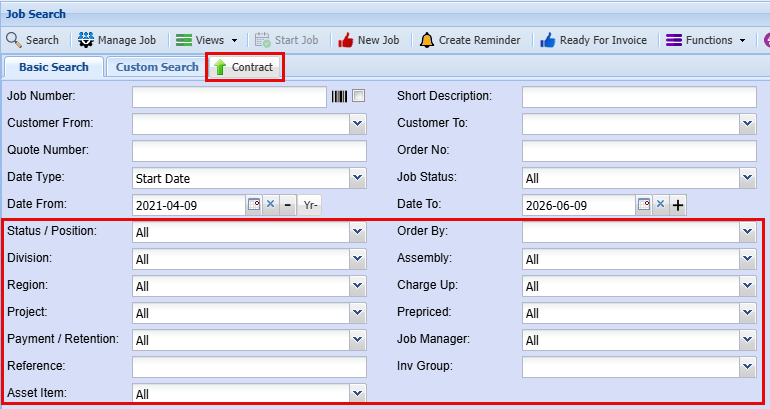
**Status / Position** | Filter jobs based on their current status or stage within the workflow |
**Division** | Search for jobs linked to a specific business division |
**Region** | Narrow results by geographic location or branch |
**Project** | Locate jobs associated with a particular project |
**Payment / Retention** | Filter based on payment terms or retention details |
**Reference** | Search using any external or internal reference number |
**Asset Item** | Find jobs linked to a specific asset or item |
**Order By** | Sort the results based on selected criteria (e.g., date, job number) |
**Assembly** | Filter jobs related to specific assemblies or grouped components |
**Charge Up** | Identify jobs based on charge-up rules or settings |
| Filter jobs that have predefined pricing applied |
| Search for jobs assigned to a specific manager |
**Invoice Group (Inv Group)** | Locate jobs grouped for invoicing purposes |
These additional filters are especially useful when:
- Working with **large volumes of jobs**
- Needing to **pinpoint very specific records**
- Performing **reporting or detailed analysis**
They allow users to move beyond basic searches and **fine-tune results with greater accuracy and control**.
---
##### **Manage Job Button**

The **Manage Job** button (highlighted in the toolbar at the top) is used to **open a selected job into the full job management screen**.
- To use this button:
1. Highlight a job line from the results grid below
2. Click **Manage Job**
- This will open the **Manage Job screen**, where you can:
- View full job details
- Update job information
- Manage tasks, timelines, and progress
- Access related documents and financials
---
#####
##### **Views Button**
The **Views** button allows users to change how the job information is displayed after running a search. Instead of only viewing jobs in a standard list, users can choose different layouts depending on their needs.

- **Overview Option**
This screen allows you to control how the Job Workflow overview is displayed, helping you plan and track jobs over a selected time period.
Click the **Search button (magnifying glass icon)** at the top of the screen to open the search fields.
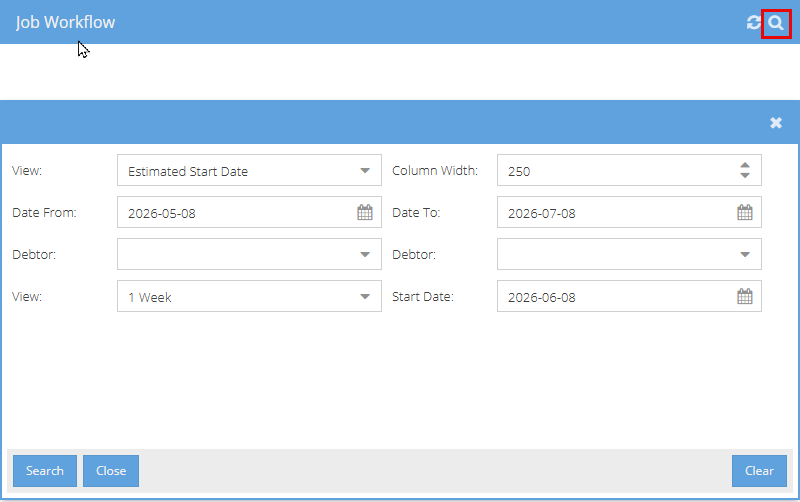
This screen allows you to control how the **Job Workflow overview** is displayed, helping you plan and track jobs over a selected time period.
| **View**
| The first **View** dropdown lets you choose which date the workflow is based on:
**- Estimated Start Date - Completion Date - Delivery Date**
This determines how jobs are positioned and displayed in the workflow timeline.
|
| **Column Width**
| \- This setting controls the **width of the columns** in the workflow display.
\- Increasing the value makes columns wider, while decreasing it makes them narrower.
Useful for adjusting the layout to fit your screen or improve readability.
|
| **Date Range (Date From / Date To)**
| - Defines the **overall date range** of jobs to include in the workflow.
- Only jobs within this selected period will be displayed. |
| **Debtor Filter**
| \- Used to filter jobs for a **specific customer (debtor)**.
\- If left **blank**, the system will display **all jobs**.
\- If a customer has multiple jobs, you can select them here to narrow down the results.
|
| **View (Duration)**
| The second **View** option controls how far ahead you can plan:
\- You can display the workflow for up to **12 weeks in advance**
This helps with forward planning and scheduling.
|
| **Start Date**
| \- Defines the **starting point of the workflow view**
\- This is typically set to **today’s date**, but can be adjusted if needed
|
| **Action Buttons**
| **- Search** – Applies the selected filters and displays the workflow
**- Close** – Exits the screen
**- Clear** – Resets all fields
|
Once you have applied your desired filters and clicked **Search**, the results screen will appear as shown below.
This screen displays the results of your search in a **workflow (timeline) view**, organised by date.
Each column represents a specific date, and the jobs returned from your search criteria are displayed under their scheduled or estimated start dates.
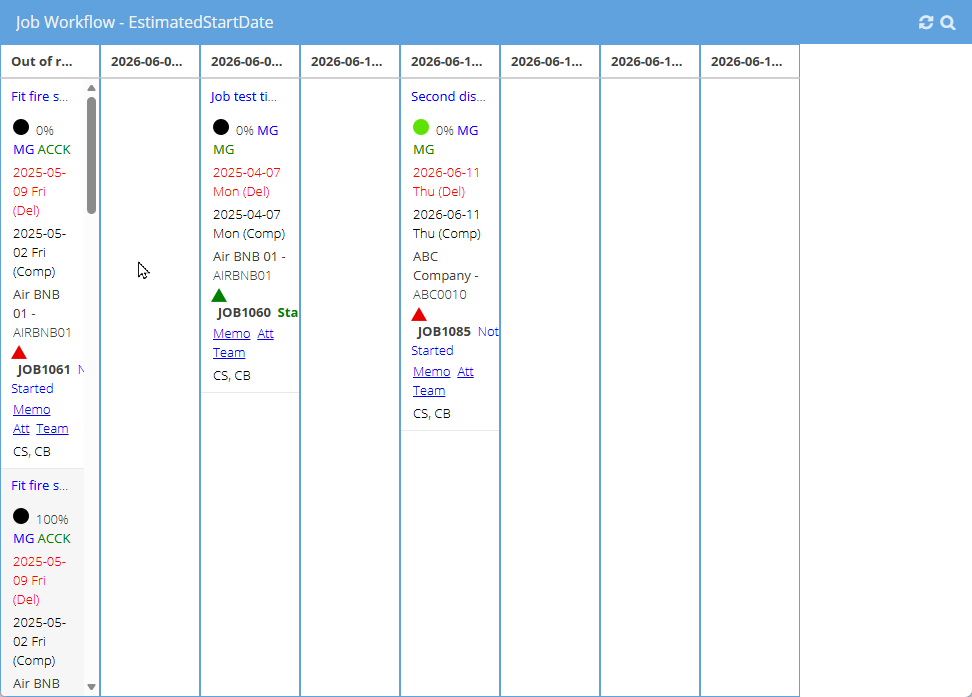
**Key Features:**
**Job Display** – Each job appears as a card showing key details such as:
\- Job name or description
\- Job number
\- Status indicators (icons and colours)
\- Start and completion dates
\- Assigned team
**Date-Based Layout** – Jobs are arranged in columns by date, making it easy to see what work is scheduled on each day.
**Drag-and-Drop Functionality** – Users can click and drag jobs from one date column to another to reschedule or reorganise the workflow.
**Visual Status Indicators** – Colours and icons provide a quick view of job progress, delays, or completion status.
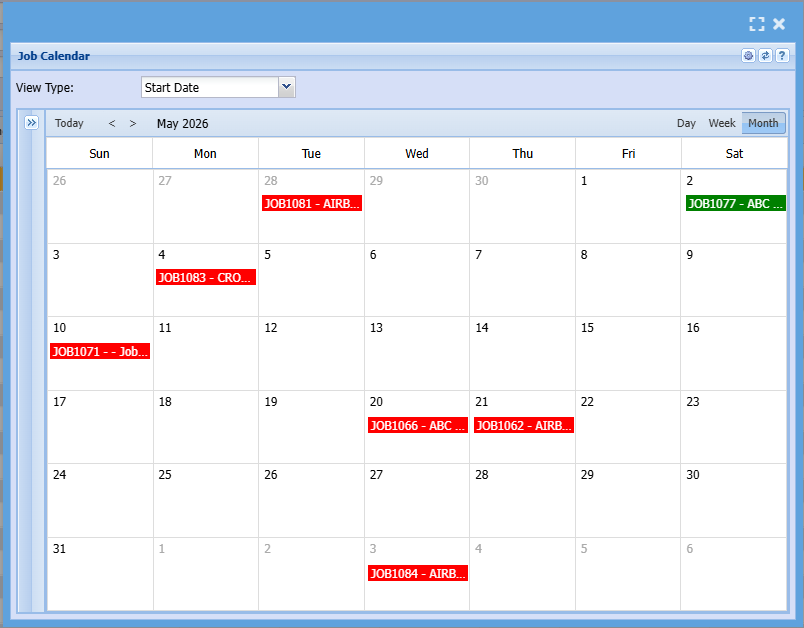
- **Calendar Option**
The **Calendar View** displays jobs in a familiar calendar layout, making it easy to see when work is scheduled across specific days.
**Key Features:**
Jobs are displayed on the calendar by their selected date (e.g., Start Date), so you can quickly see what is planned and when.
**View Options** – You can switch between:
**- Day** – View jobs scheduled for a single day
**- Week** – See jobs across a full week
**- Month** – Get an overview of jobs across the entire month
**Navigation** – Use the arrows or date selector to move between different days, weeks, or months.
**Drag-and-Drop Functionality** – Jobs can be easily dragged from one date to another to reschedule them.
**Visual Indicators** – Jobs are shown as coloured blocks, helping you quickly identify and differentiate between them.
- **Gantt Chart View**
The **Gantt Chart View** provides a detailed timeline of all jobs, allowing users to visually track progress, duration, and scheduling across a timeline.
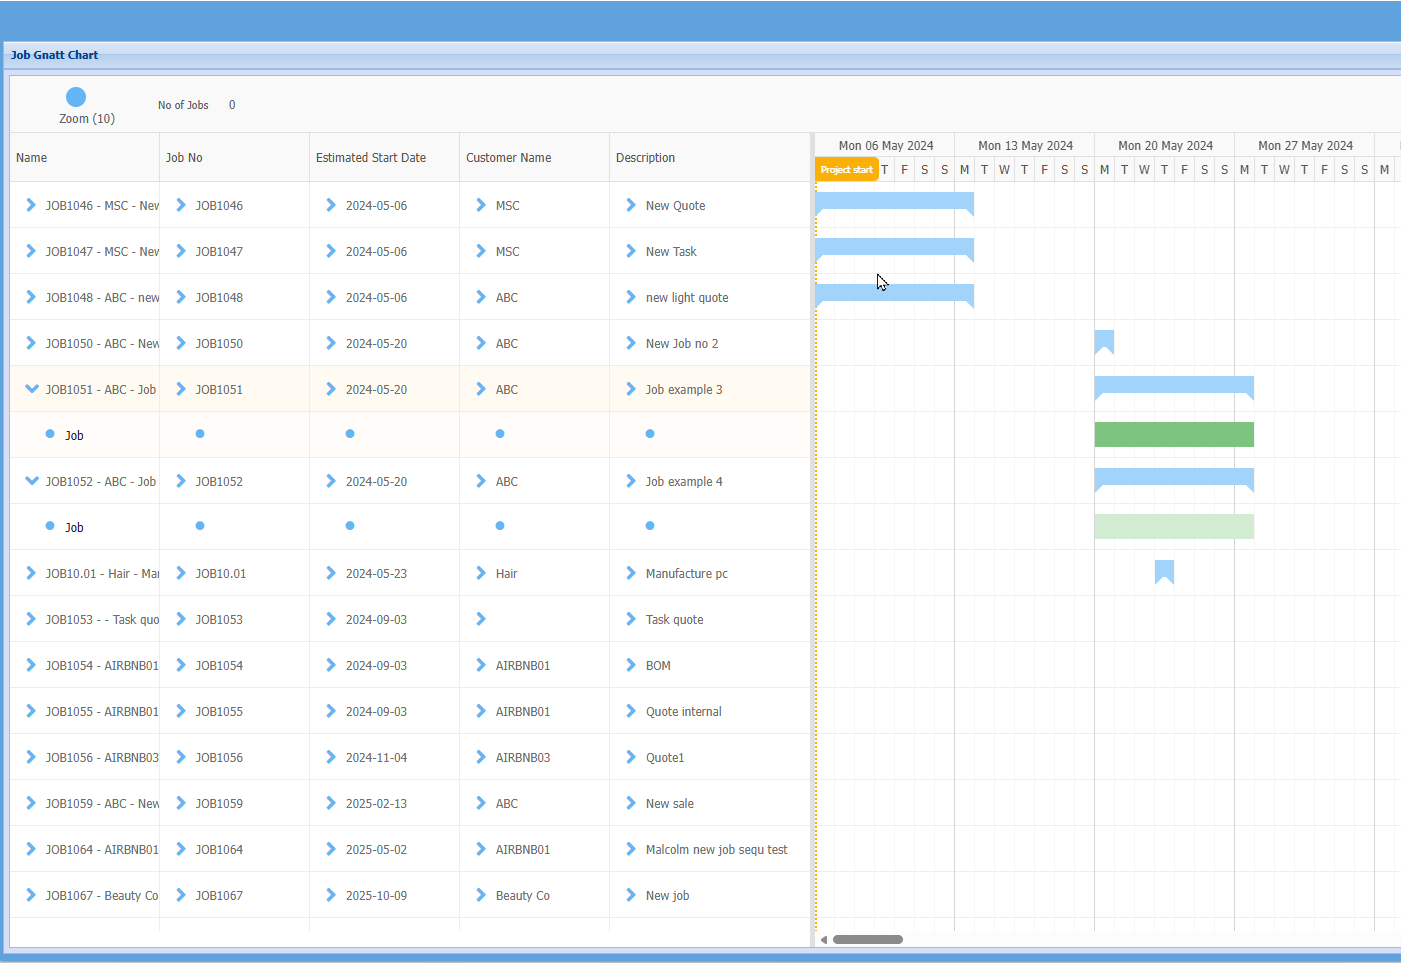
**- Timeline Display** – Each job is represented as a horizontal bar stretched across the dates it is scheduled for, making it easy to see how long a job will take and when it is due.
**- Job Details Panel** – On the left-hand side, key information is displayed in columns, including:
Job Name
Job Number
Estimated Start Date
Customer Name
Description
**- Date Grid (Right Side)** – The timeline on the right shows days and weeks, with job bars positioned according to their scheduled start and end dates.
**- Visual Progress Tracking** – The length and position of each bar clearly indicate:
Job duration
Overlaps with other jobs
Gaps in scheduling
**- Drag-and-Drop Functionality** – Jobs can be moved along the timeline to adjust scheduling, allowing users to easily reschedule or reorganise workloads.
**- Zoom Option** – The zoom control allows users to adjust how much detail is displayed in the timeline (e.g., viewing a shorter or longer time period).
---
#####
##### **Start Job Button**
The **Start Job** button allows you to manually start a job.

- In most cases, a job will **start automatically** as soon as a job line is managed or worked on.
- However, there may be situations where you want to **start the job before managing any lines**.
In this case, you can simply:
1. Select the job from the list
2. Click the **Start Job** button
This will activate the job without needing to work on any job lines first.
---
#####
##### **New Job Button**
The **New Job** button is used to create a job directly, without first creating or promoting a quote.

When this option is selected, a new job is started “on the fly,” allowing users to quickly set up and begin working on a job straight away.
- **Direct Job Creation** – Create a job immediately without needing an existing quote
- **Automatic Background Process** – The system will automatically create a blank quote in the background
- **Linked Records** – This quote is linked to the job and can be accessed later under the **Quotes** section
- **Flexible Workflow** – Ideal for situations where work needs to begin quickly without following the full quote-to-job process
---
#####
##### **Create Reminder Button**
The **Create Reminder** button allows you to set a reminder for a selected job.

To use this feature:
1. 1. Select a job from the list
2. Click **Create Reminder**
3. Enter the reminder details (e.g., date, time, and notes)
This is useful for setting follow-ups, deadlines, or any important actions related to a job.
---
#####
##### **Ready for Invoice**
The **Ready for Invoice** button is used to mark a job as ready to be invoiced.
When selected, it simply adds a **thumbs-up icon** to the job in the results grid, providing a clear visual indicator that the job is complete and ready for billing.
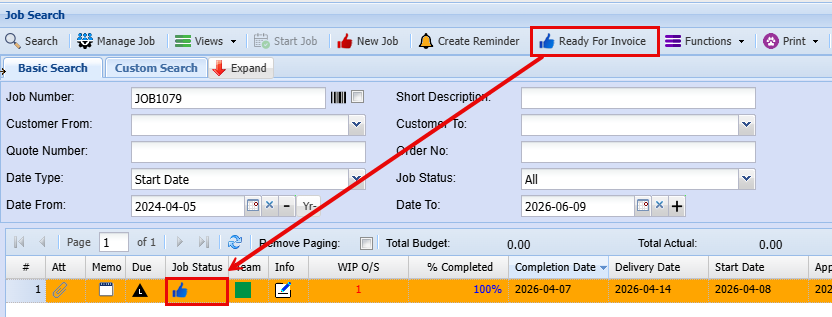
- **Visual Indicator** – Adds a thumbs-up icon to the job line
- **Quick Status Update** – Clearly shows that the job is ready to be invoiced
- **No Complex Process** – This is a simple flag and does not generate an invoice automatically
- **Easy Tracking** – Helps users quickly identify which jobs are ready for the invoicing stage
---
#####
##### **Functions Button**
The **Functions** tab provides access to a range of additional actions that can be performed on a selected job. These are typically used for maintenance, updates, or managing specific job settings.
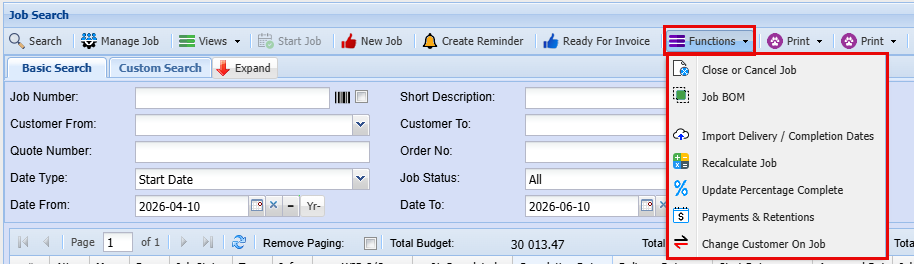
| **Close or Cancel Job** | Allows you to close a completed job or cancel a job that is no longer required |
| **Job BOM** | Opens or manages the materials associated with the job |
| **Import Delivery / Completion Dates** | Used to update job delivery or completion dates in bulk |
| **Recalculate Job**
| Refreshes and recalculates job costs and related figures to ensure accuracy |
| **Update Percentage Complete**
| Updates the job’s progress bar percentage based on current activity |
| **Payment / Retention** | Manages payment details, including any retention amounts held or released |
| **Change Customer on Job** | Allows you to update or correct the customer linked to the job |
# Manage Job Line Edit and reassign
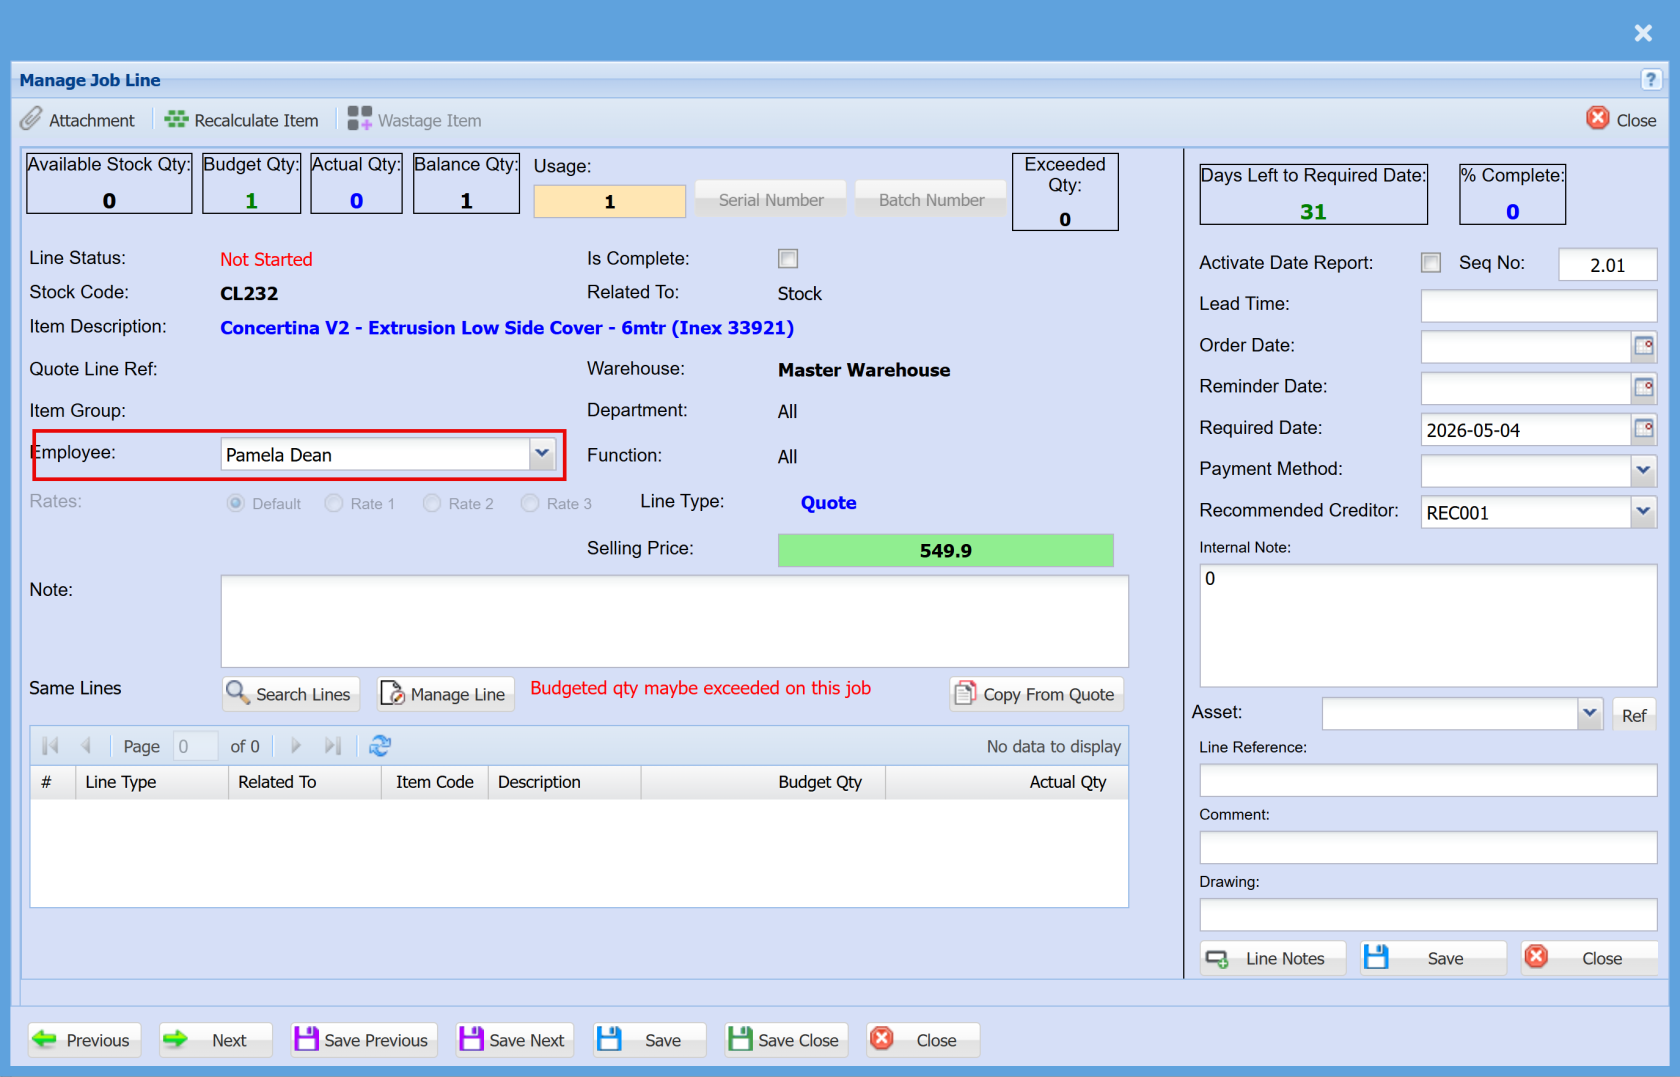
Double-click a **Job** to open it. Within the job, double-click a **job line** to edit or reassign it.
This is the main screen where a Job line is managed
[](https://hugeerp10.co.za/hsofmanual/uploads/images/gallery/2026-06/osOimage.png)
**Restrictions**
You cannot edit the line if:
1. The line is **locked**
2. The item has been marked for **invoice or delivery note**
You cannot change **cost or quantity** if the item is a:
- **Stock item**
- **Fixed asset**
**Reassignment Rules (Sell Price)**
When reassigning to a new parent:
- The line will adopt the **sell price of the new parent**
- If the item is a **stock category (SC) or quote line**, it will use its own **sell price**
- If the new parent is a **Cost to Company (CTC)** item, the **sell price will be removed** from the line
# Unmanage All Job Lines
The **“Unmanage All”** function will reverse any managed quantities on job lines, reducing them back to an unmanaged state based on what has not yet been invoiced.
- Any quantities already **invoiced cannot be unmanaged**, as they are finalised in the system
- Only **non-invoiced quantities** will be adjusted
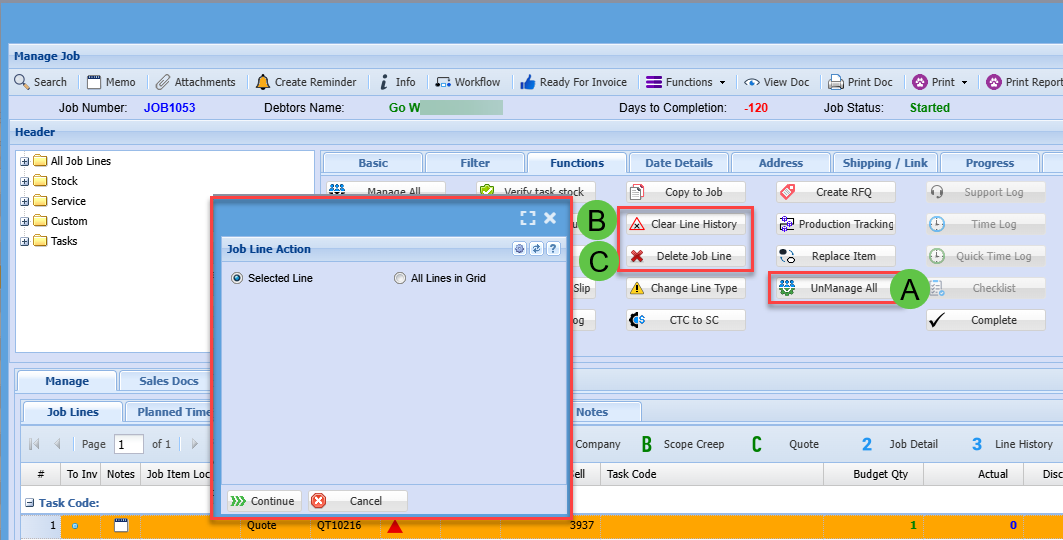
To fully remove or reset job lines, use the available actions provided below in combination.
| **A** | UnManage All items on a job |
| **B** | Clear Line History
Only works if the Managed Actual quantity equals zero
|
| **C** | Delete Job Line
Only works if there are no Line History entries
|
[](https://hugeerp10.co.za/hsofmanual/uploads/images/gallery/2025-04/j75image.png)
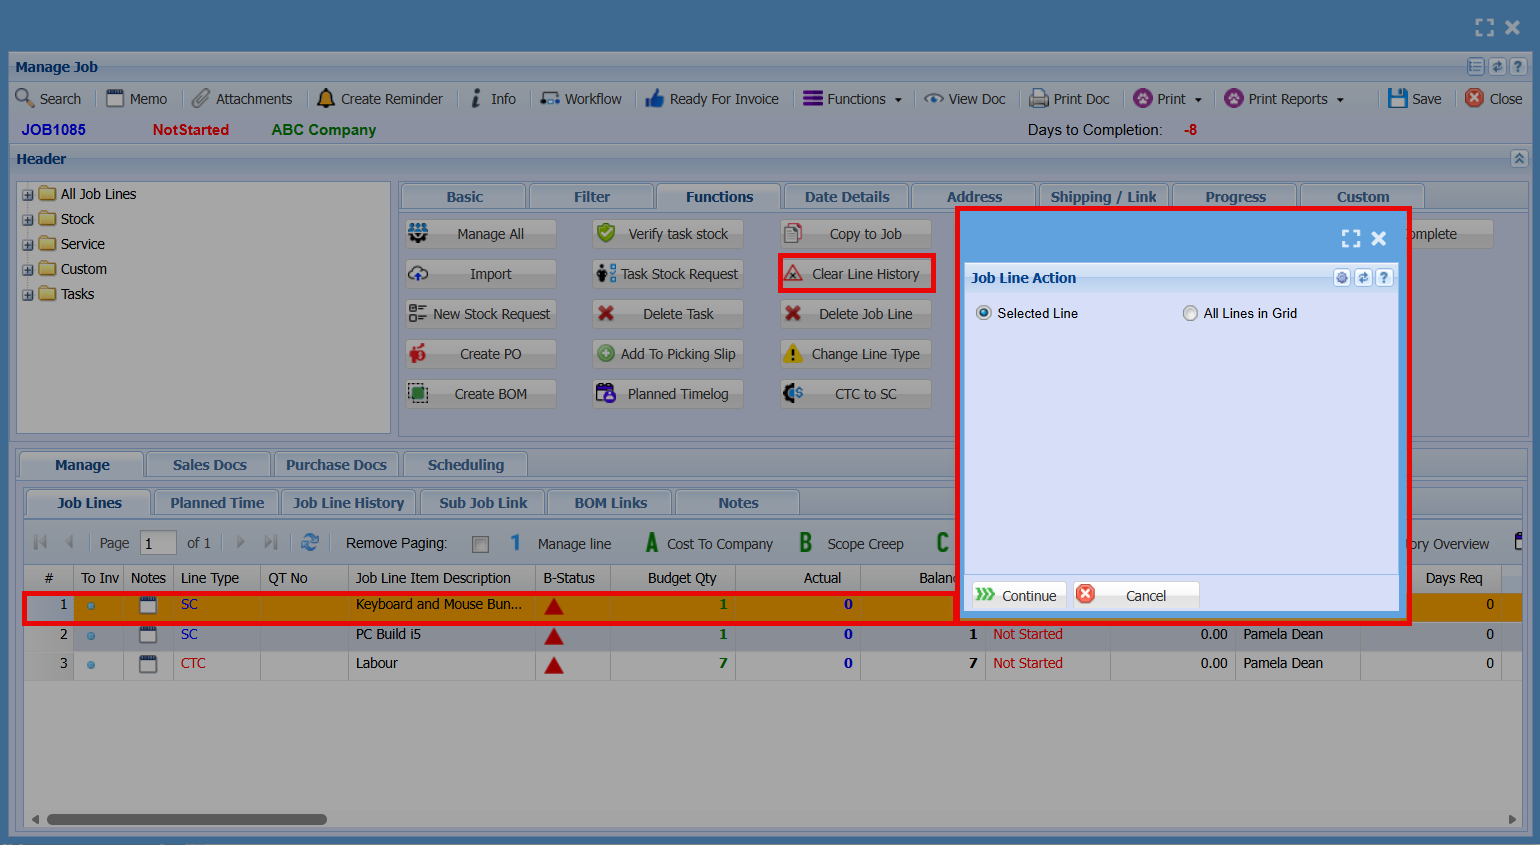
Actions can be applied to either **selected lines** or **all lines within the grid**.
- **All Lines in Grid** – This option will apply the action only to the lines currently visible, based on the applied filters
- If a line cannot be processed (e.g. due to system restrictions), it will be **skipped automatically**, and the action will continue on the remaining lines
This ensures efficient processing without interruption when working with multiple job lines.
# Manage Job Functions Tab Explained - Detailed
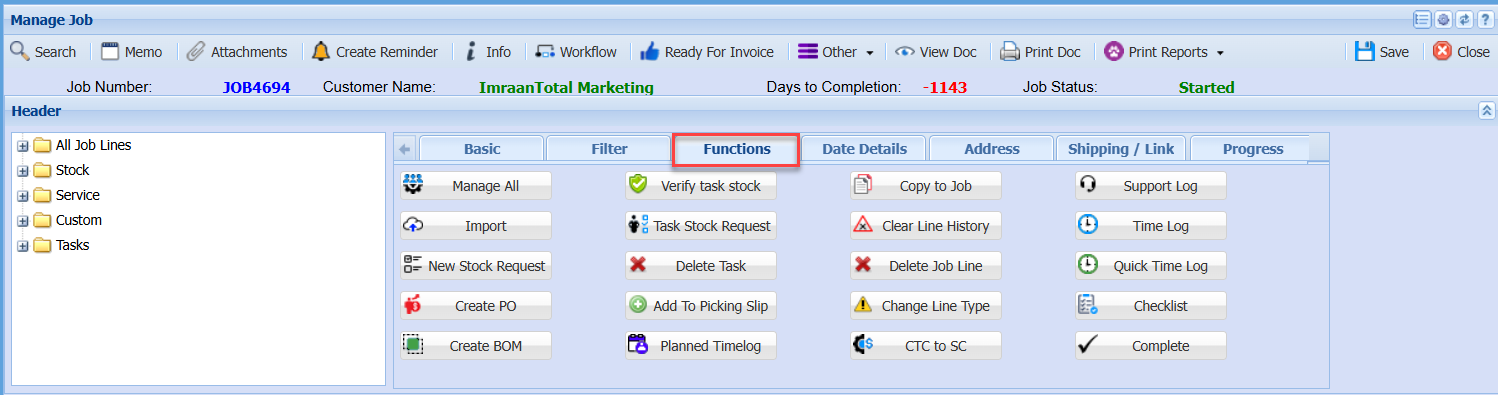
#### Functions Tab
[](https://hugeerp10.co.za/hsofmanual/uploads/images/gallery/2024-07/bTrimage.png)
| **Manage All** | The **Manage All** button is used to manage **all lines on the job at once**.
|
| **Import** | The **Import** button is used to **upload job lines from a file into the job**.
|
| **New Stock Request** | The **New Stock Request** button is used to create a **request for stock items required for a job**.
|
| **Create PO** | The **Create PO** screen is used to generate **purchase orders for items required on a job**. |
| **Create BOM** | The **Create BOM** screen is used to add a **Bill of Materials to a job**, bringing in a predefined set of items.
|
| **Verify task stock** |
|
| **Task Stock Request** |
|
| **Delete Task** | The **Delete Task** button is used to remove a **task from the job**.
|
| **Add to Picking Slip** | The **Add to Picking Slip** button is used to assign **selected job lines to a picking slip** for warehouse processing.
|
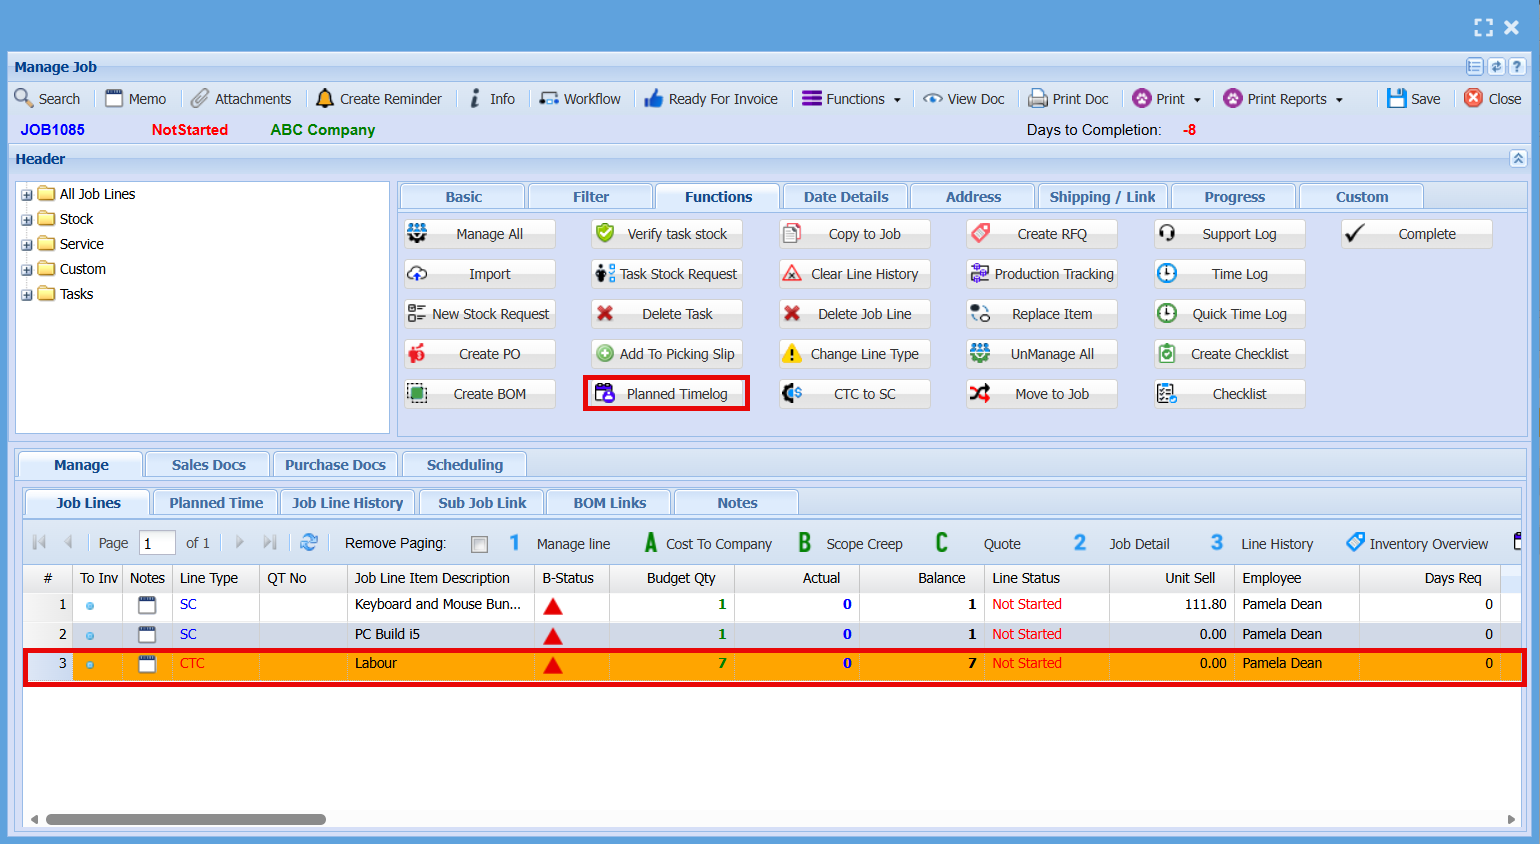
| **Planned Timelog** | Allows you to Generate a planned time logs for each **employee based** on the entries in the **Job Line tab**, allowing future work to be scheduled and tracked effectively. |
| **Copy to Job** | The **Copy to Job** button allows you to **copy selected job line(s) to another job**.
|
| **Clear Line History** |
|
| **Delete Job Line** |
|
| **Change Line Type** |
|
| **CTC to SC** |
|
| **Support Log** |
|
| **Time Log** |
|
| **Quick Time Log** |
|
| **Checklist** |
|
| **Complete** |
|
---
##### Manage All
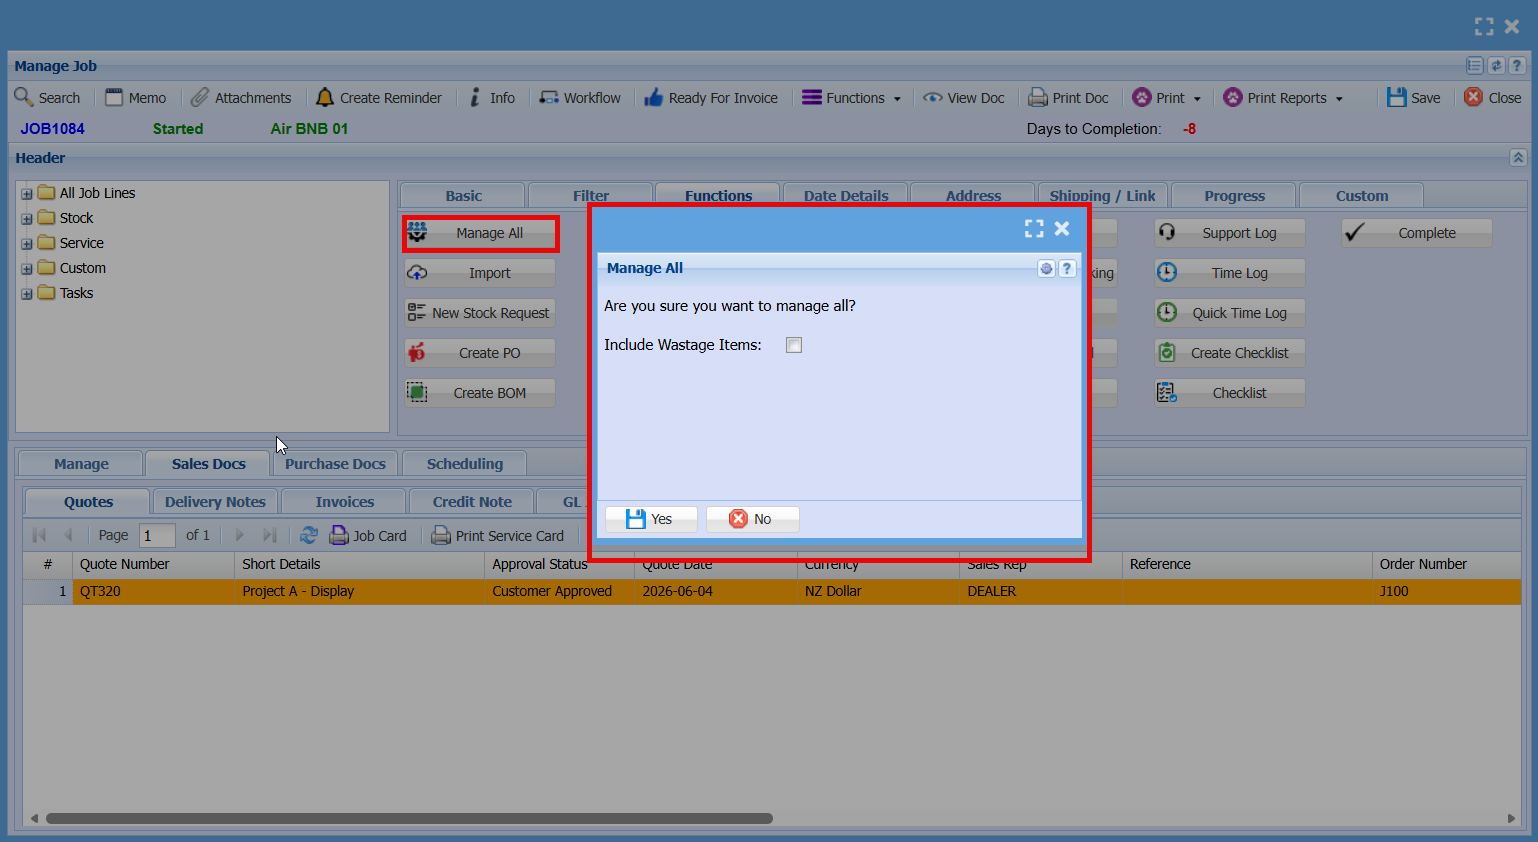
The **Manage All** button is used to manage **all lines on the job at once**.
When selected, a confirmation window will appear asking if you want to proceed. You can also choose to **include wastage items**.
Click **Yes** to continue and apply actions to all job lines, or **No** to cancel.
[](https://hugeerp10.co.za/hsofmanual/uploads/images/gallery/2026-06/gsrimage.png)
---
##### Import Button - Line Import
The **Import** button is used to **upload job lines from a file into the job**.
This feature is ideal when importing a **recipe or BOM set up for a single unit**. The multiplier allows you to scale the quantities automatically during import, saving time and ensuring accuracy.
When selected, the Job Import screen will open where you can:
- Choose a file to import
- Set a **quantity multiplier** (if required)
- Click **Upload** to import the lines
Only valid items will be imported, and any errors can be reviewed using **Show Errors**.
[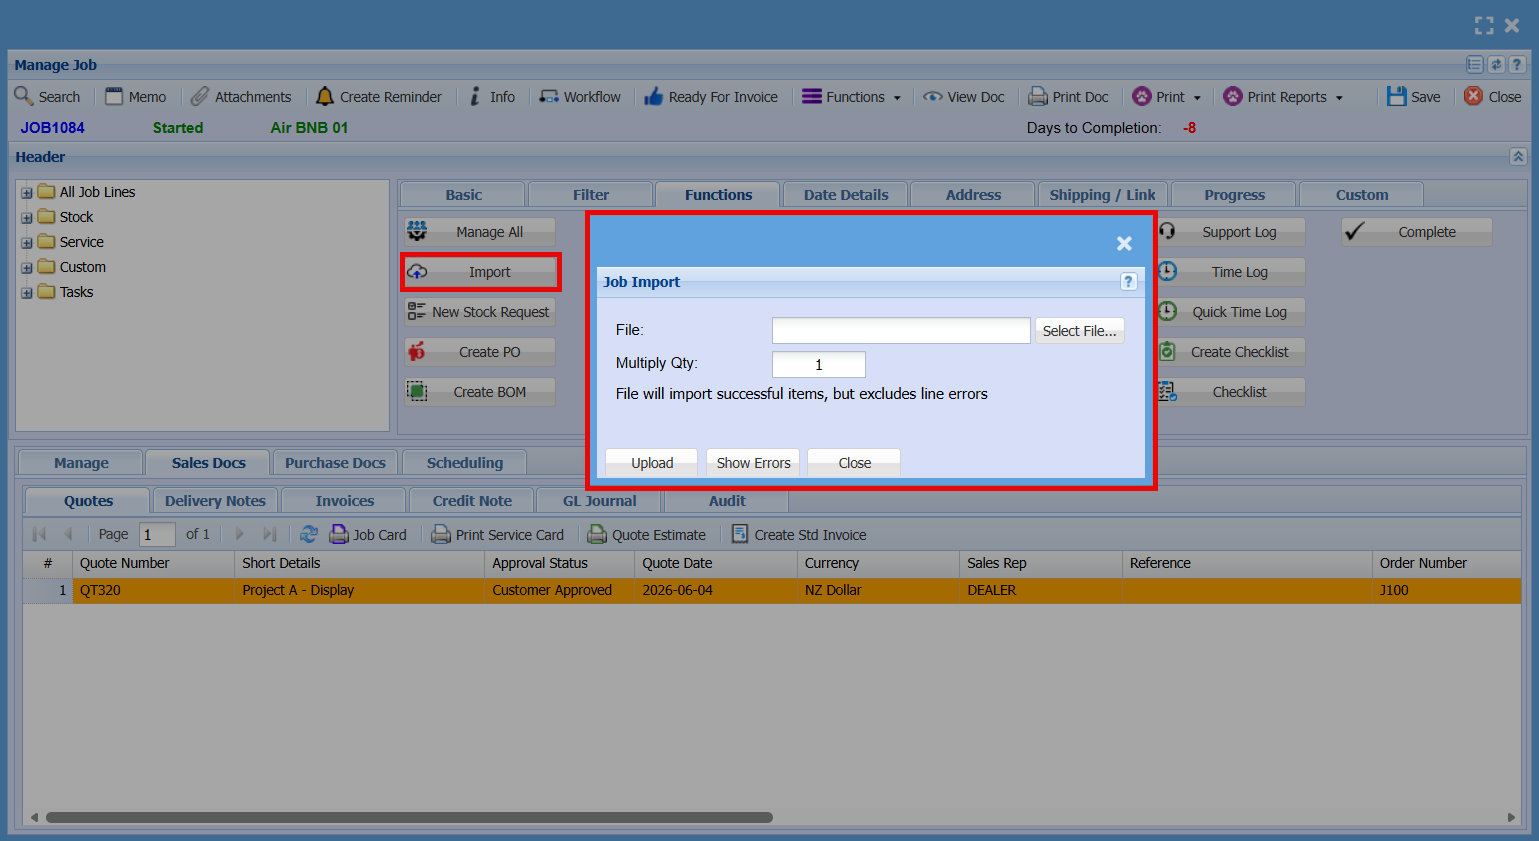](https://hugeerp10.co.za/hsofmanual/uploads/images/gallery/2026-06/sCCimage.png)
**File Upload & Import Process**
- Click the **Select File** button to open the file browser and locate the file you want to import.
- Click **Upload** to send the file to the server and start the import process.
**Quantity Multiplier Option**
- You have the option to **multiply quantities during import**. This will adjust both the **budget quantity** and the **managed quantity**.
- The default value is **1**, but this can be changed **before uploading the file**.
**Please Note**
- The file must be in **.CSV format** using **semi-colon (;) separation**
- The file must include **headers**, however these will be ignored during import
- If any errors occur, they will be recorded in the **log**
- Please correct the errors and restart the import process
**Import Rules**
1. The **CSV file must use semi-colon (;) separation**
2. **Stock items** take cost from the item setup, regardless of any cost entered in the file
3. **Stock items** take the selling price from the Excel file
4. If the stock item selling price is blank, it defaults to the **item setup value**
5. **Custom and Service items** take both cost and selling price from Excel
6. If cost and selling are blank for Custom or Service items, values default to **item setup**
7. If a **Service item** uses time allocation and an employee rate is set, cost is taken from **user setup rates (1, 2, or 3)**
8. If cost is set to **zero (0)**, it will be imported as zero
9. If **Managed Qty** is blank, the line is added as **Not Started**
10. If **Managed Qty** has a value, the line is added as **Active**
11. If there is **no stock on hand**, the line will be added but **not managed**
12. If the **Required Date** is blank, the system uses the **current date**
13. Dates must be in the format: **YYYY-MM-DD** (e.g. 2020-04-05)
14. If the **Employee field** is blank, it will remain blank
15. The **Employee field** uses the **login ID**
16. If the **Rate field** is blank (with an employee), it remains blank
17. Set **Rate to 1, 2, or 3** to use the corresponding user setup rate
18. If both **Employee and Rate** are set for a Service item, cost is taken from the **user setup rate**
19. **Description** is imported from Excel
20. If Description is blank, it defaults from **item setup**
21. Set **Is Complete = 1** to mark the line as complete
22. For stock items, the correct **Warehouse Code** must be provided
23. **Drawing** is a free text field
24. **Comment** is a free text field
**CSV File Template**
---
##### New Stock Request
The **New Stock Request** button is used to create a **request for stock items required for a job**.
This screen allows you to:
- Enter a **reference and description** for the request
- Select the **requested by** user and required date
- Add the **stock items and quantities needed**
- Link the request to the **job number**
Once completed, the request can be saved and sent for processing, allowing the store team to supply the required items for the job.
[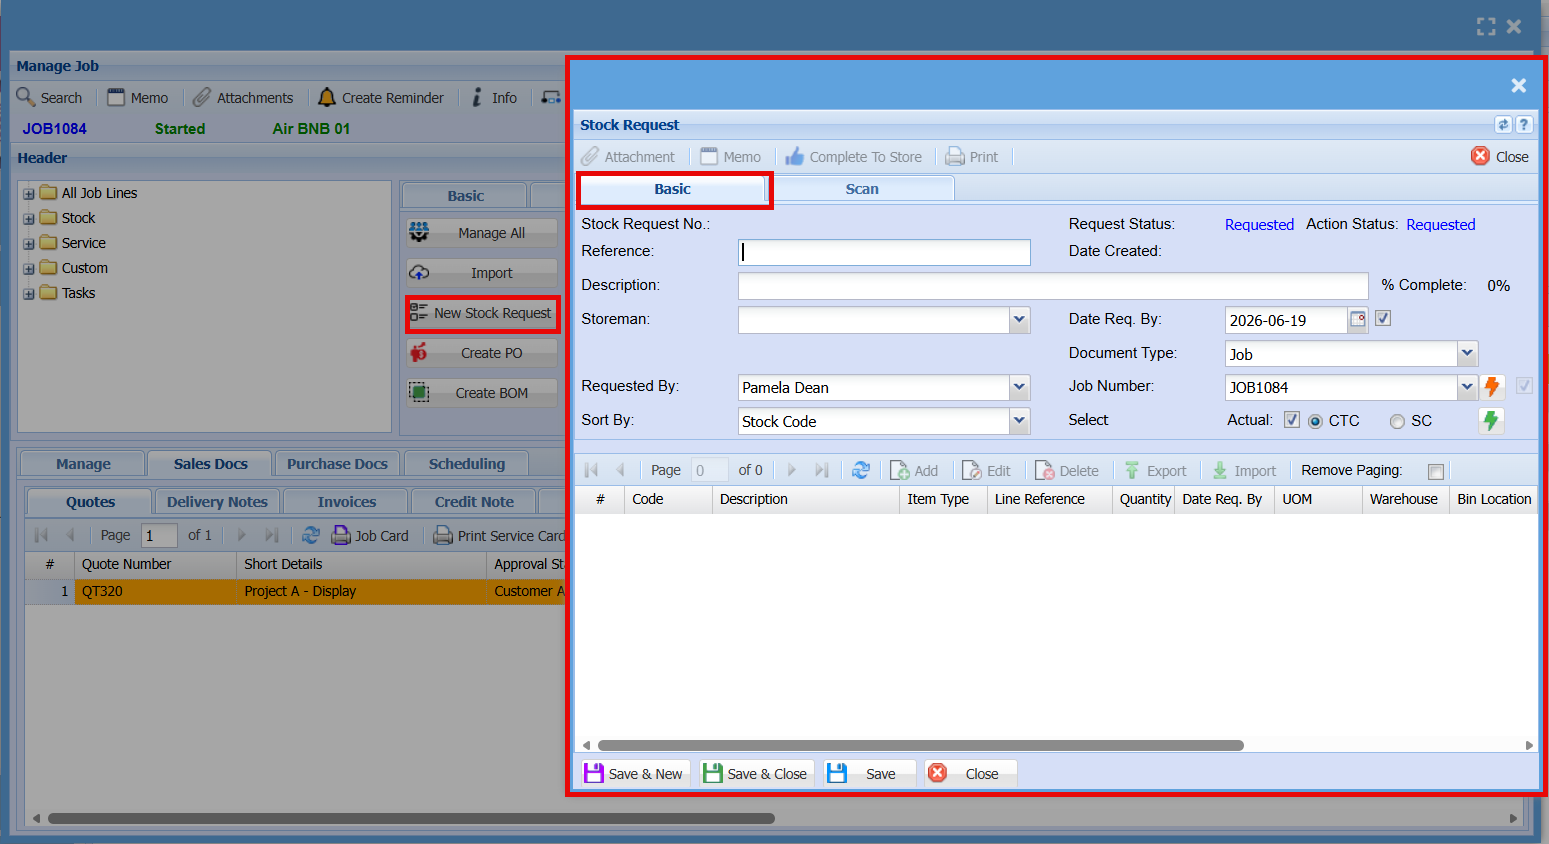](https://hugeerp10.co.za/hsofmanual/uploads/images/gallery/2026-06/1XTimage.png)
- Basic Tab
| **Stock Request No** | System-generated number for the request |
| **Reference** | Optional reference for internal tracking |
| **Description** | Brief details about the stock request |
| **Storeman** | Select the staff member responsible for the request |
| **Requested By** | Shows the current status of the request (e.g. Requested) |
| **Sort By** | How items are arranged (e.g. Stock Code) |
**Date Created** | When the request was created |
| |
| **Date Req. By** | Required date for the items |
| **Document Type** | Type of record (e.g. Job) |
| **Job Number** | Links the request to a specific job |
| **Select** | **(Actual / CTC / SC):** Determines costing/selection method |
- Item Grid (Botton Section)
This screen ensures all required stock for a job is formally requested, tracked, and supplied by the store team.
**Code** | Item Code |
| **Description** | Item details |
**Item Type** | Type of item (e.g. stock, service) |
**Line Reference** | Reference per line |
**Quantity** | Number of items requested |
**Date Req. By** | Required date per item |
**UOM** | Unit of measure |
**Warehouse / Bin Location** | Where the item is stored |
- Scan Tab
The **Scan** tab works the same as the Basic tab but is designed for **barcode scanning**.
- **Scan Barcode:** Scan or enter the item barcode to quickly add it to the request
- **Last Item / Last Result:** Displays the most recently scanned item and result
- **Scan Log:** Shows a history of scanned items
Items scanned are automatically added to the **item grid below**, removing the need to manually search and enter stock codes.
**Purpose:** Speeds up stock requests by allowing items to be added using a barcode scanner.
[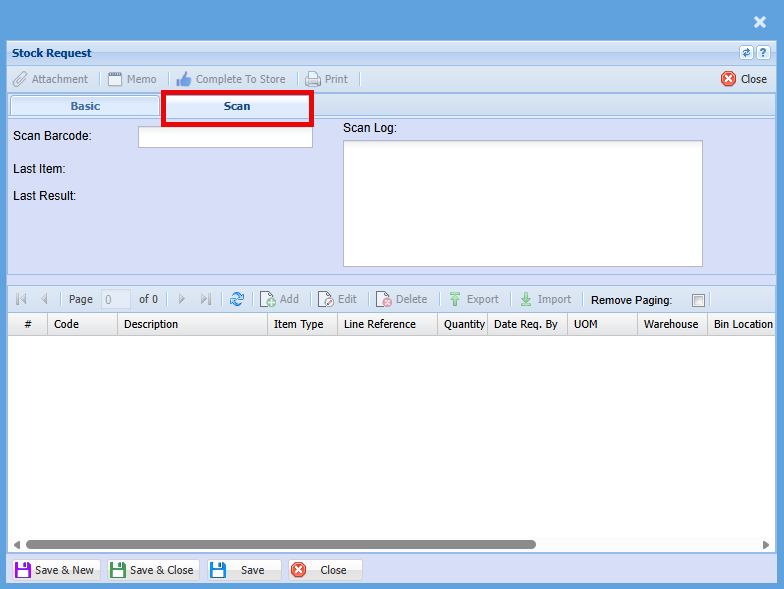](https://hugeerp10.co.za/hsofmanual/uploads/images/gallery/2026-06/1ALimage.png)
---
##### Create PO
The **Create PO** screen is used to generate **purchase orders for items required on a job**.
[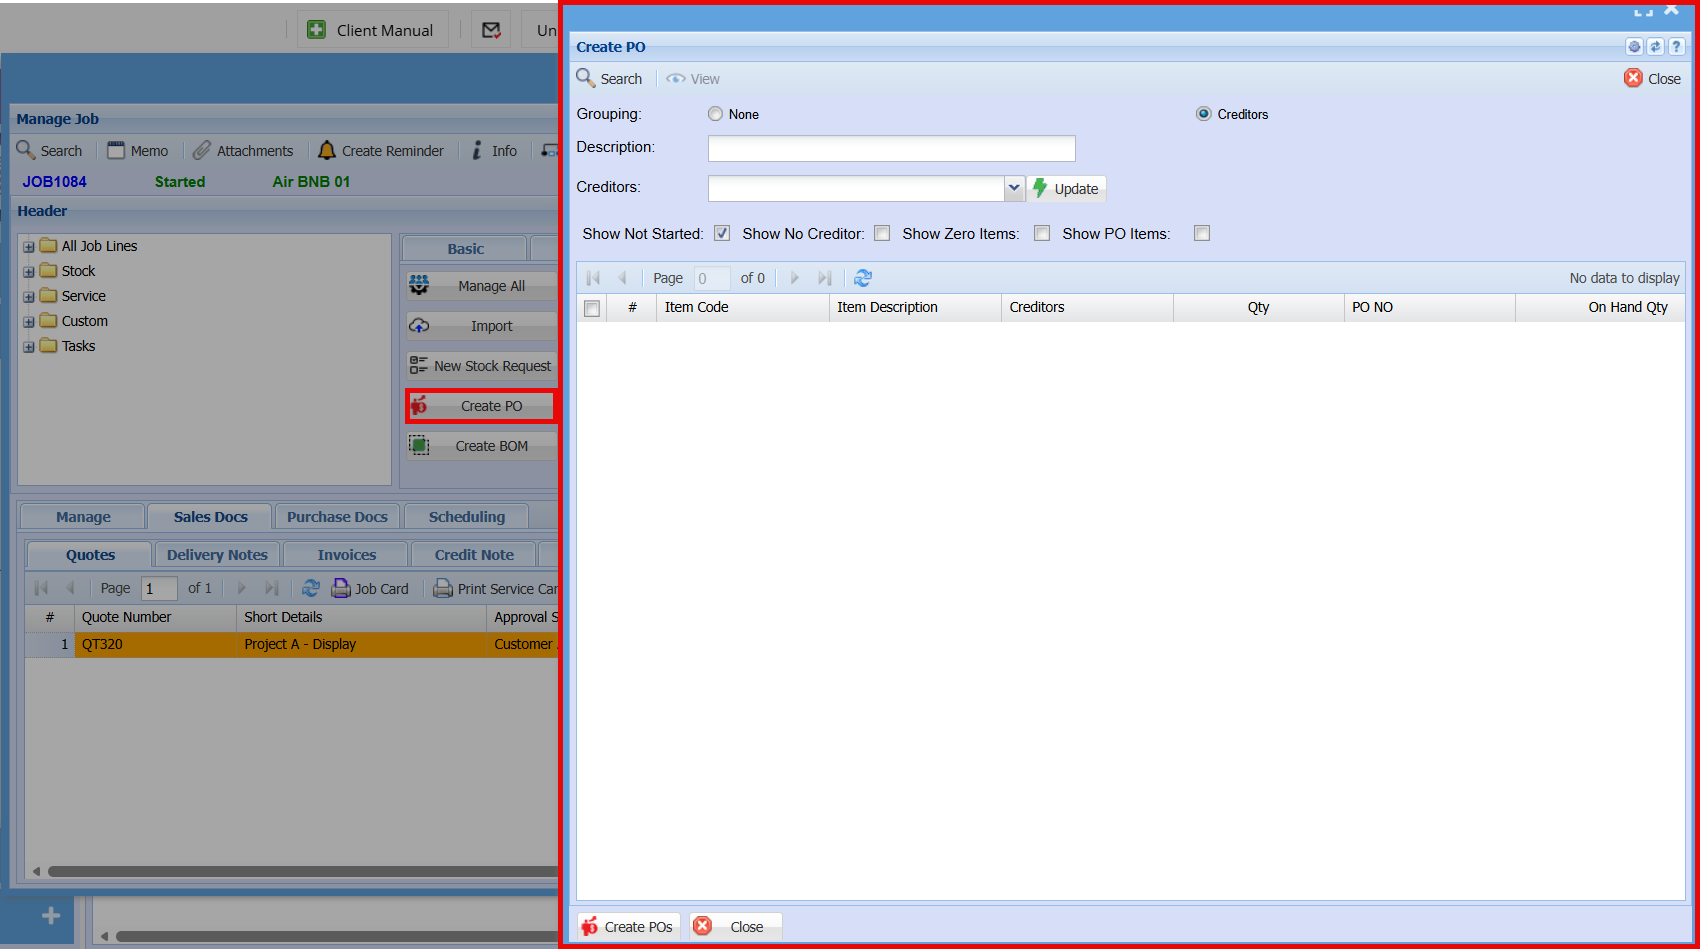](https://hugeerp10.co.za/hsofmanual/uploads/images/gallery/2026-06/Pmyimage.png)
| **Grouping** | Choose how items are grouped when creating POs:
- **None** (no grouping)
- **Creditors** (group by supplier)
|
| **Description** | Enter a description for the purchase order(s) |
| **Creditor** | Select or update the **supplier** for the items
|
| **Show Not Started** | Displays items not yet processed |
| **Show No Creditor** | Shows items without a supplier assigned |
| **Show Zero Items** | Includes items with zero quantity |
| **Show PO Items** | Shows items already linked to a PO |
| **Create POs/**
**Close**
| Select the required items from the grid Click **Create POs** to generate purchase order(s) **Close** to exit the screen |
---
##### Create BOM
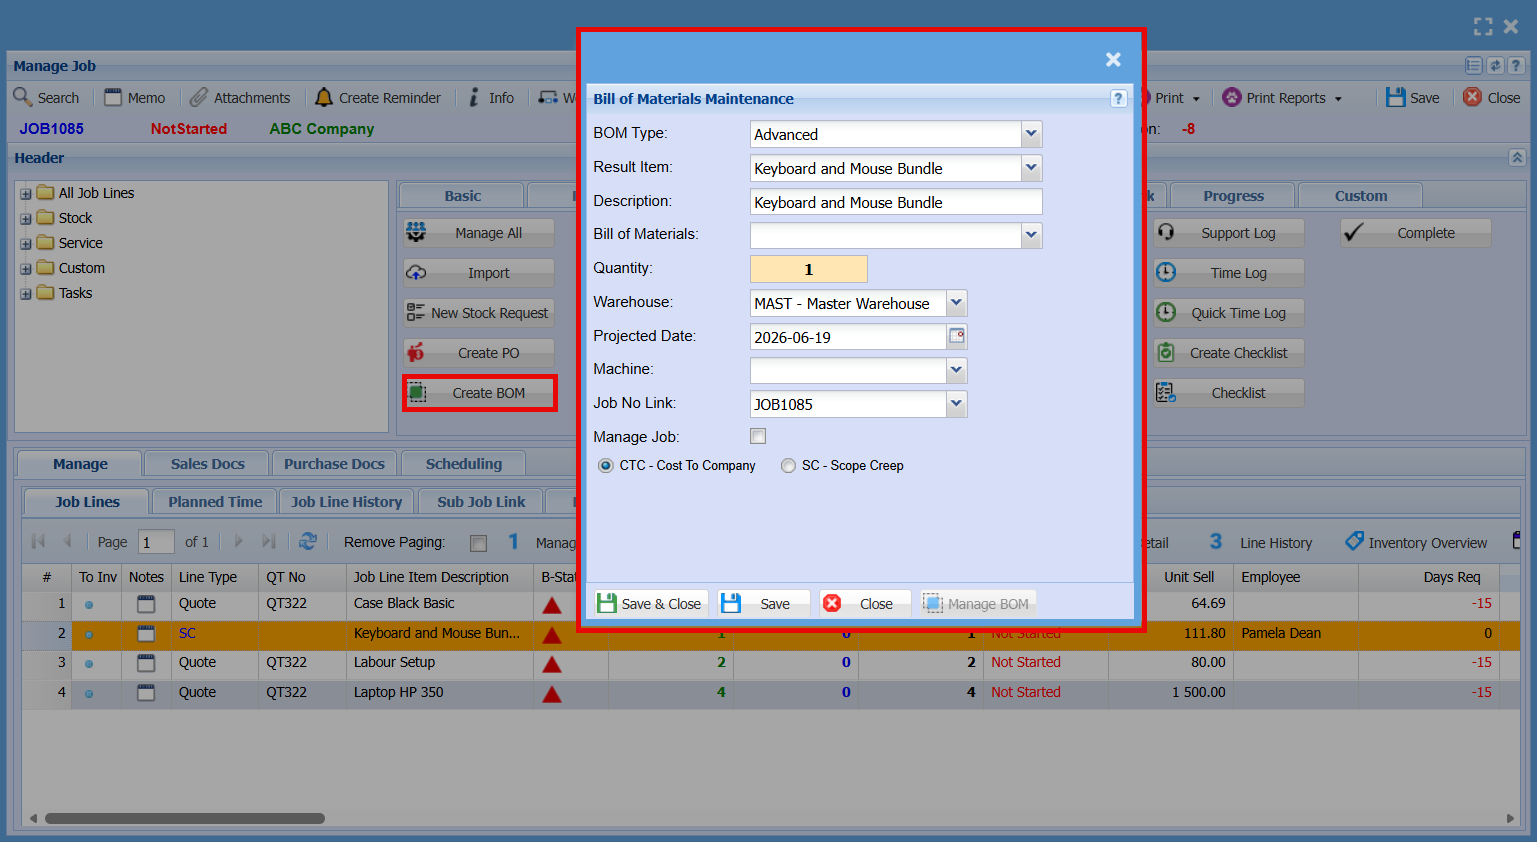
This screen allows you to quickly **add multiple predefined items to a job** using a selected BOM, saving time and ensuring consistency.
[](https://hugeerp10.co.za/hsofmanual/uploads/images/gallery/2026-06/YKOimage.png)
**BOM Type**
| Choose **Basic** or **Advanced**, which determines which BOM list is available |
**Result Item**
| Select the BOM item you want to apply (based on the chosen BOM type) |
**Description** | Displays or allows entry of the BOM description |
**Bill of Materials**
| Select the specific BOM record if multiple exist
|
**Quantity** | Number of times the BOM will be applied |
**Warehouse** | Select the warehouse the items will be drawn from |
**Projected Date**
| Expected date for the BOM items |
**Machine** | Optional field for linking to a machine |
**Job No Link**
| Confirms the job the BOM will be added to
|
**Manage Job**
| Apply the BOM and manage the lines immediately |
| Choose how the BOM is costed (Cost to Company or Scope Creep)
|
| **Save & Close:** Apply the BOM and exit **Save:** Save without closing **Close:** Exit without saving **Manage BOM:** Open BOM management (if available) |
---
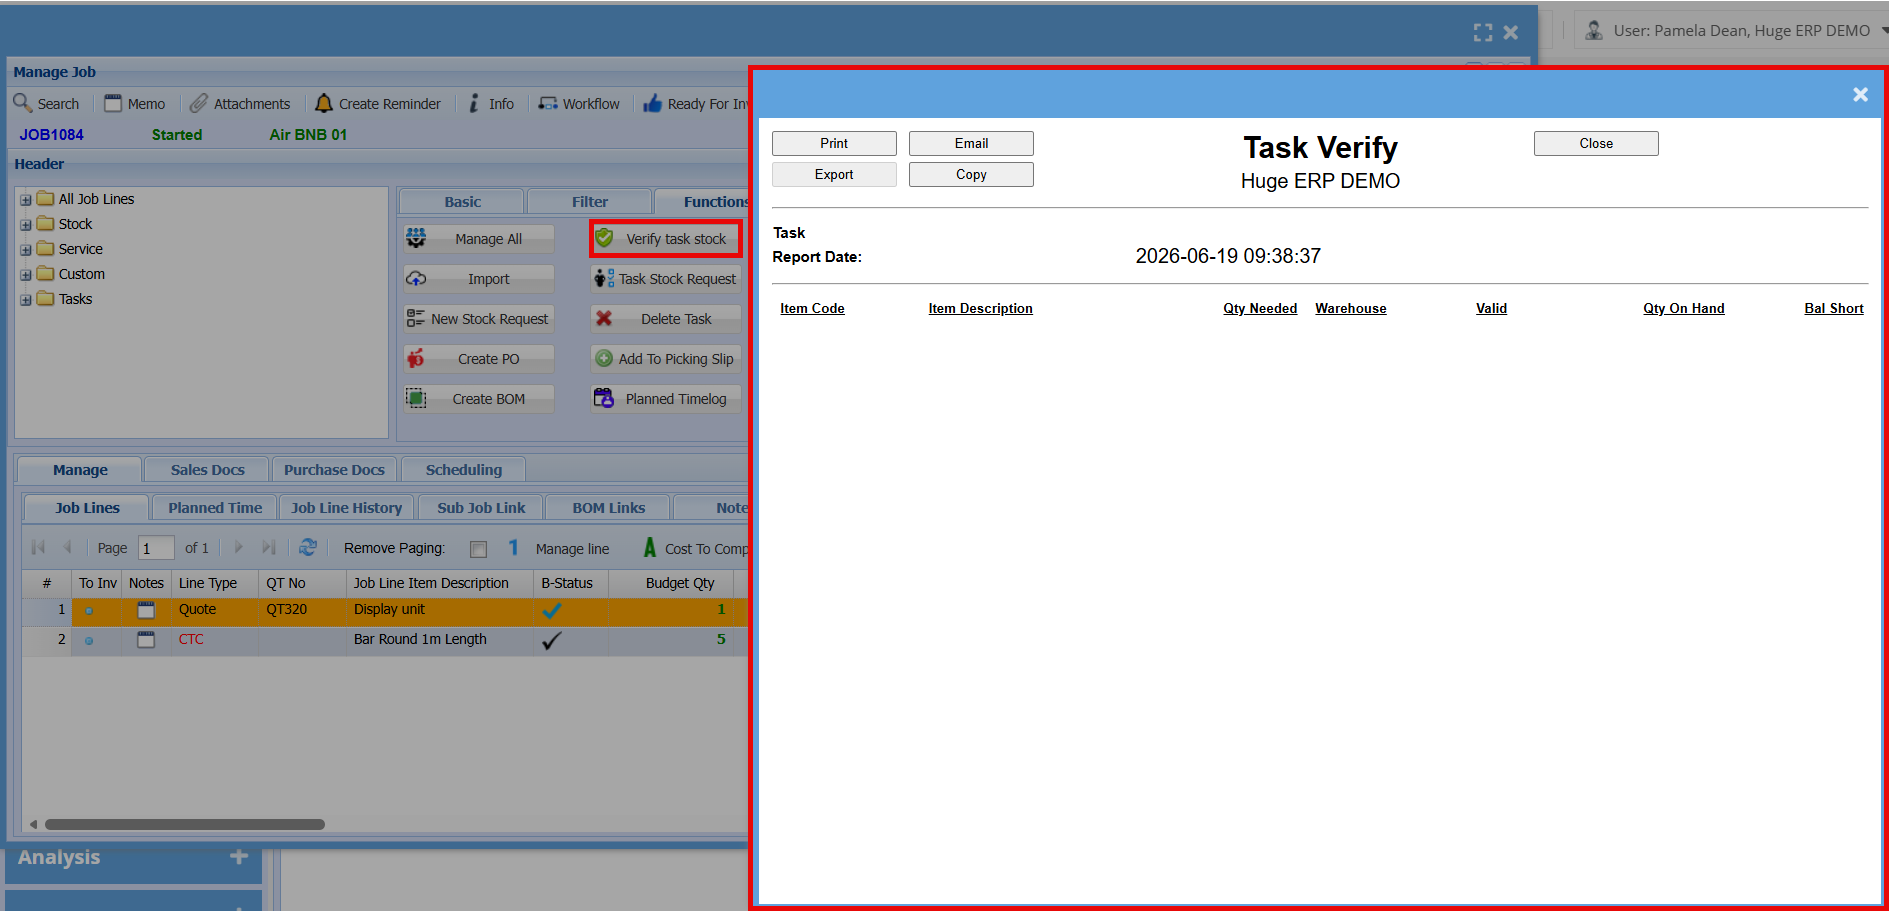
##### Verify Task Stock
[](https://hugeerp10.co.za/hsofmanual/uploads/images/gallery/2026-06/LhNimage.png)
---
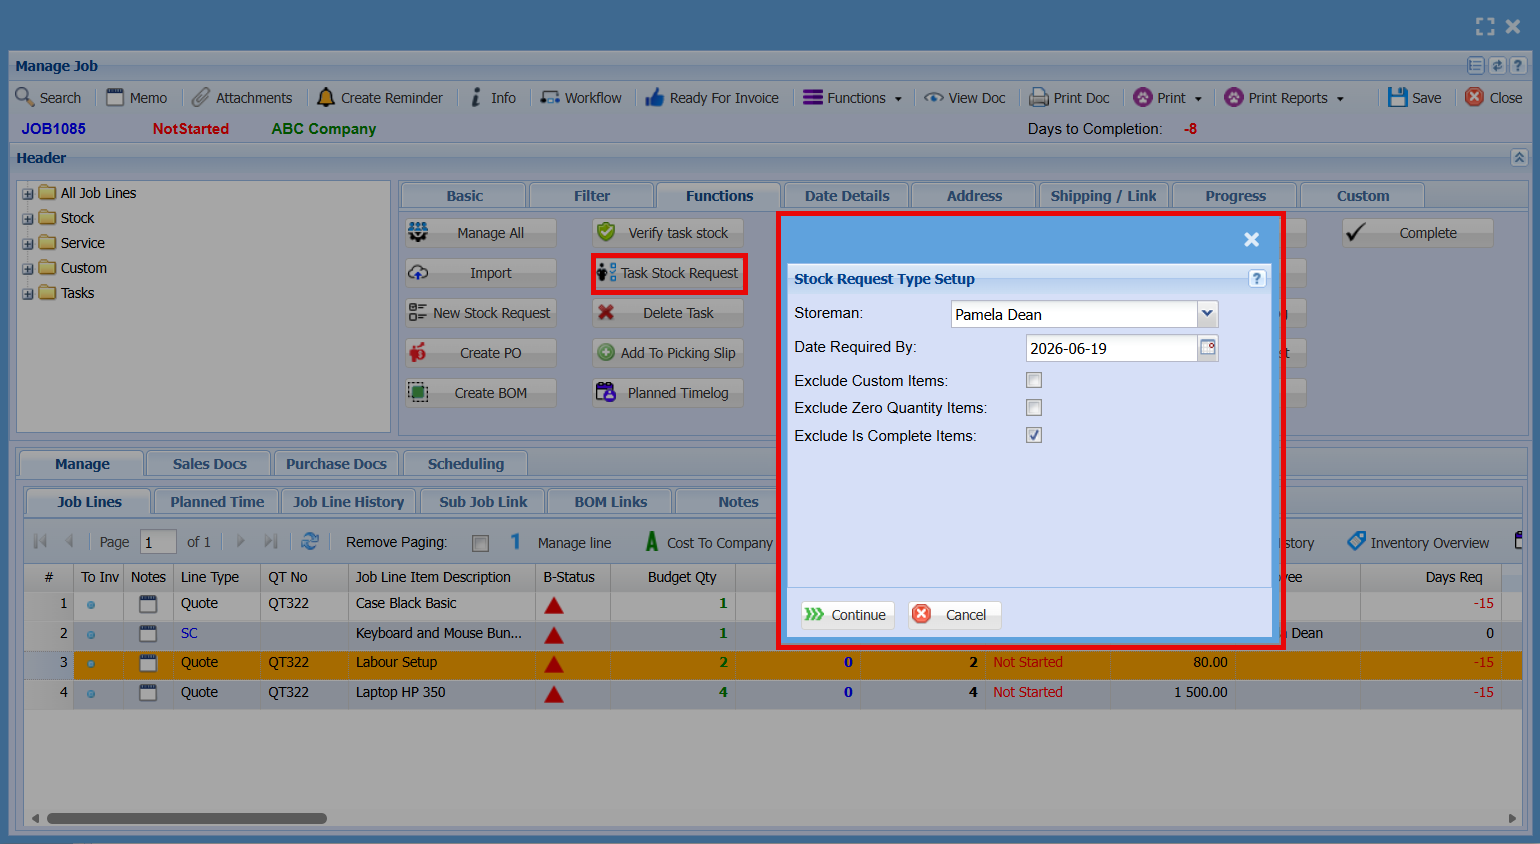
##### Task Stock Request
[](https://hugeerp10.co.za/hsofmanual/uploads/images/gallery/2026-06/GXKimage.png)
---
##### Delete Task
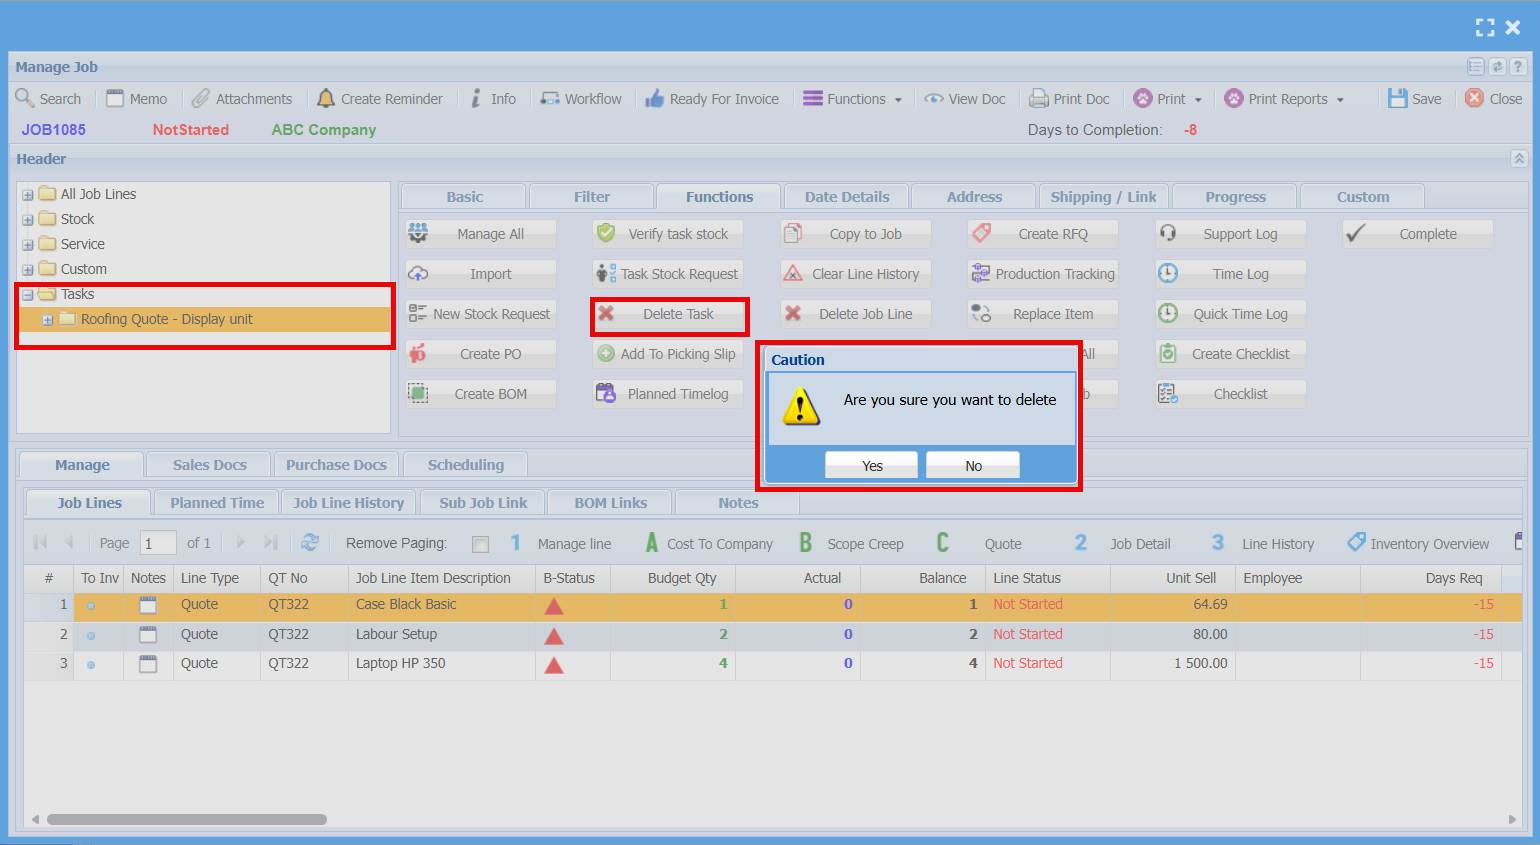
The **Delete Task** button is used to remove a **task from the job**.
- You must first select a **task from the Tasks section** (left panel)
- The button will only work when a **task is highlighted/selected**
When clicked, a confirmation message will appear:
- Click **Yes** to delete the task
- Click **No** to cancel
**Note:** Only tasks (not standard job lines) can be deleted using this button.
[](https://hugeerp10.co.za/hsofmanual/uploads/images/gallery/2026-06/LWlimage.png)
---
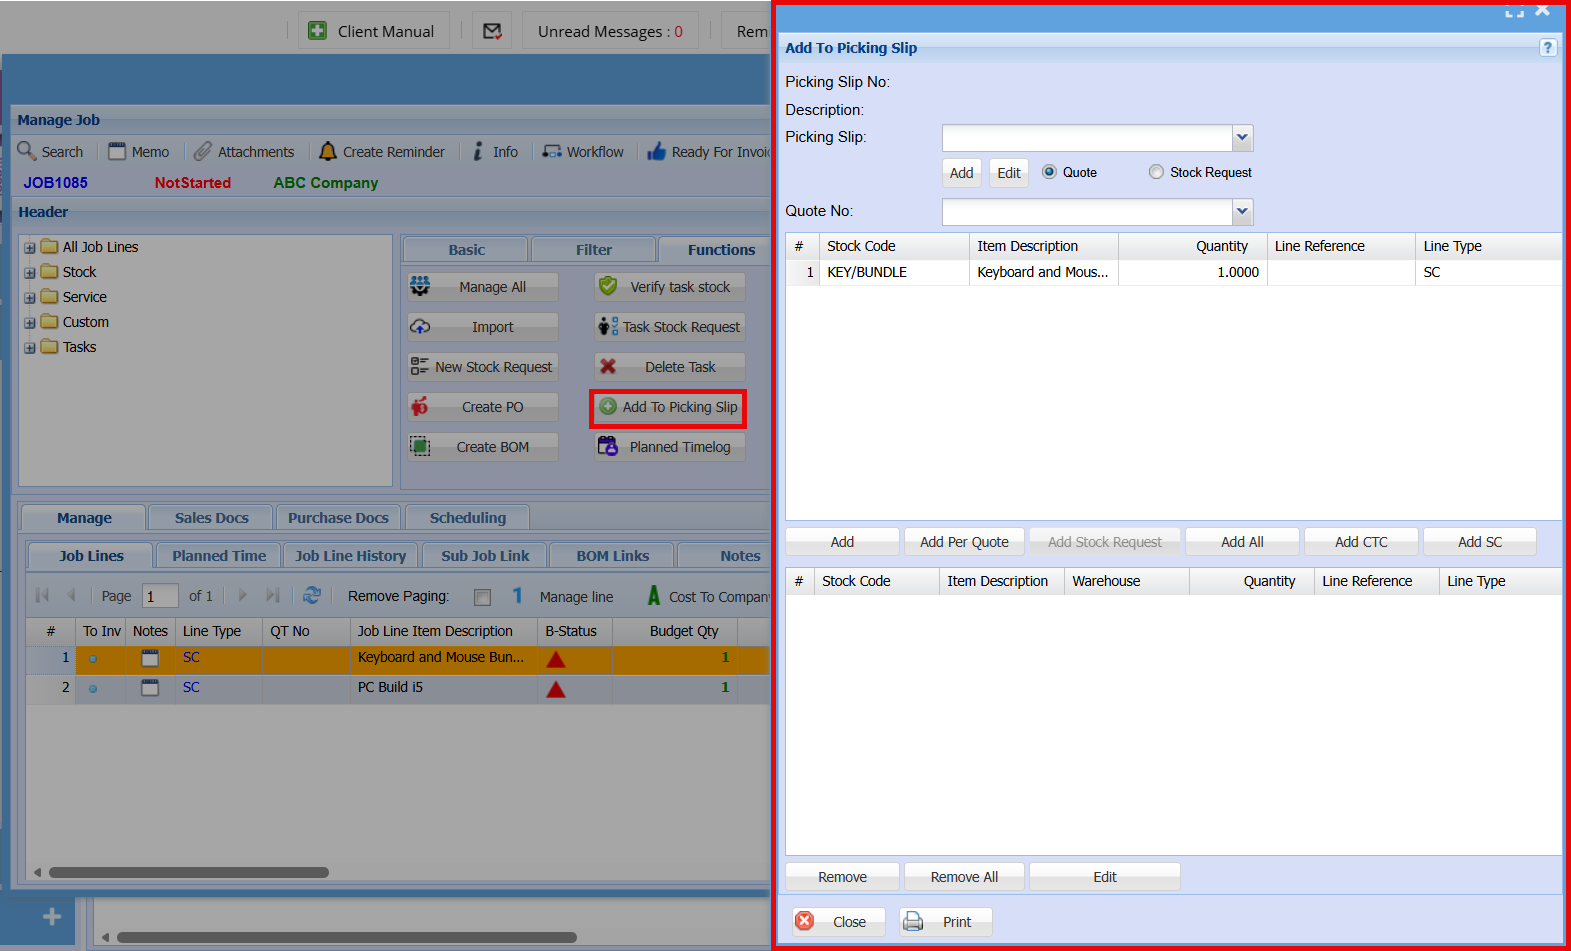
##### Add a Picking Slip
This function allows you to **send selected job items to the warehouse** so they can be picked and prepared for the job.
- You must first **highlight the job line(s)** you want to add
- Clicking the button opens the **Add To Picking Slip** screen
**On this screen you can:**
- Select an existing **Picking Slip** or create a new one
- Choose whether to add items from a **Quote** or **Stock Request**
- View the selected items in the top grid
- Add items to the picking slip using **Add / Add All / Add Per Quote**
The bottom grid shows the items that have been added to the picking slip.
**Actions:**
- **Remove / Remove All:** Remove items from the picking slip
- **Edit:** Modify selected lines
- **Print:** Print the picking slip
- **Close:** Exit the screen
[](https://hugeerp10.co.za/hsofmanual/uploads/images/gallery/2026-06/ZMjimage.png)
---
##### Planned Time Log
[](https://hugeerp10.co.za/hsofmanual/uploads/images/gallery/2026-06/OhKimage.png)
---
##### Copy to Job
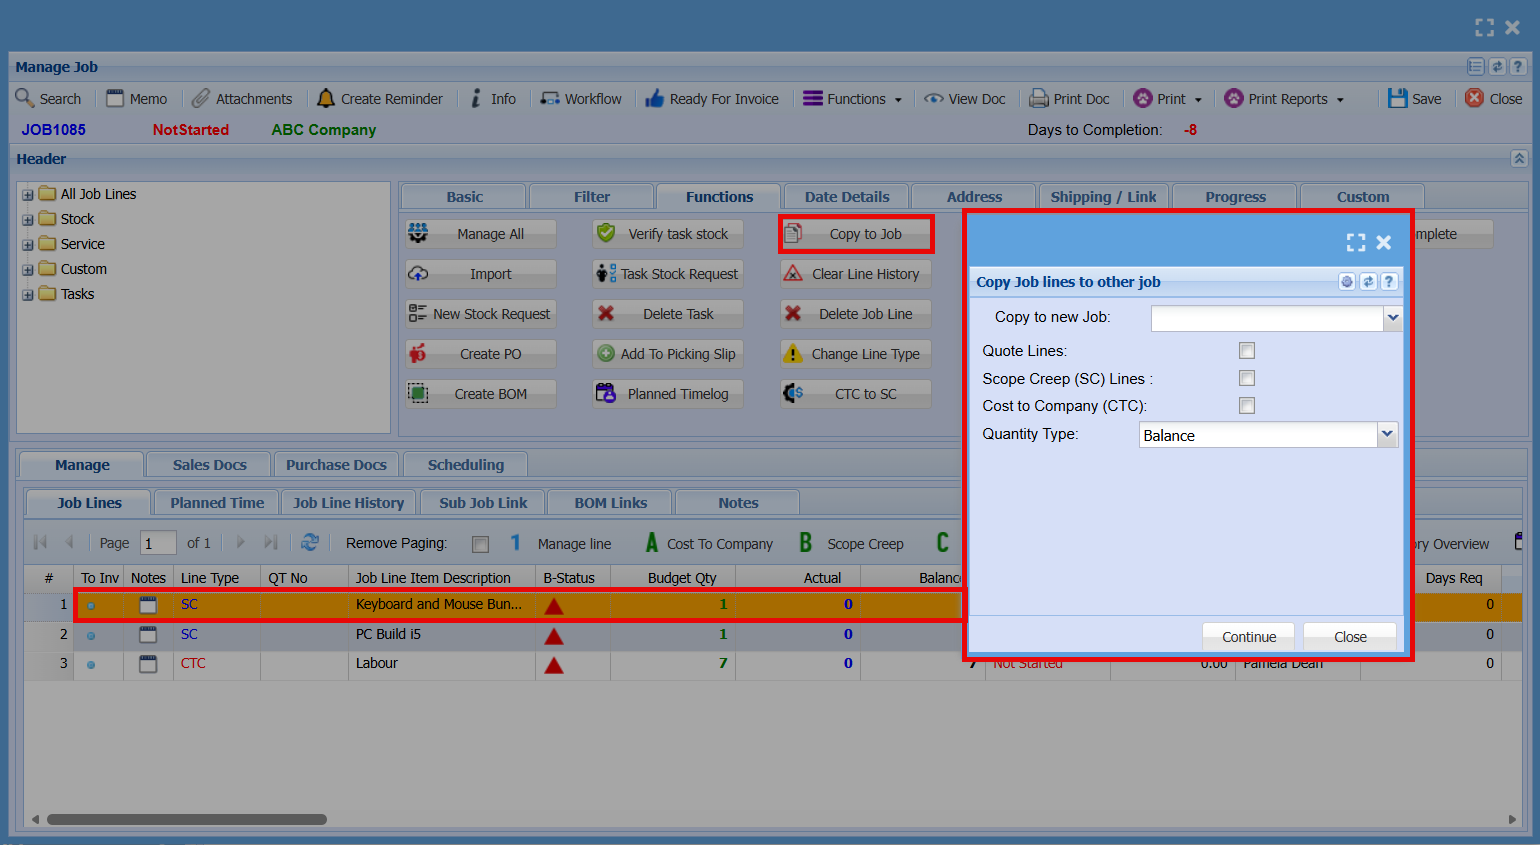
This function lets you **reuse job lines across different jobs**, saving time and ensuring consistency.
- You must first **highlight the line item(s)** you want to copy
- Clicking the button opens the **Copy Job lines to other job** screen
[](https://hugeerp10.co.za/hsofmanual/uploads/images/gallery/2026-06/5VDimage.png)
| **Copy to new Job:** | Select the job you want to copy the line(s) to |
| **Quote Lines:** | Tick to copy as **quote lines** |
| **Scope Creep (SC) Lines:** | Tick to copy as **scope creep lines** |
| **Cost to Company (CTC):** | Tick to copy as **cost to company lines** |
| **Quantity Type:** | Choose how the quantity is copied:
\- For example, **Balance** will copy only the remaining quantity
|
| **Actions** | - **Continue:** Copies the selected line(s) to the chosen job
- **Close:** Exits without copying
|
---
##### Clear Line History
[](https://hugeerp10.co.za/hsofmanual/uploads/images/gallery/2026-06/eBdimage.png)
---
##### Delete Job Line
[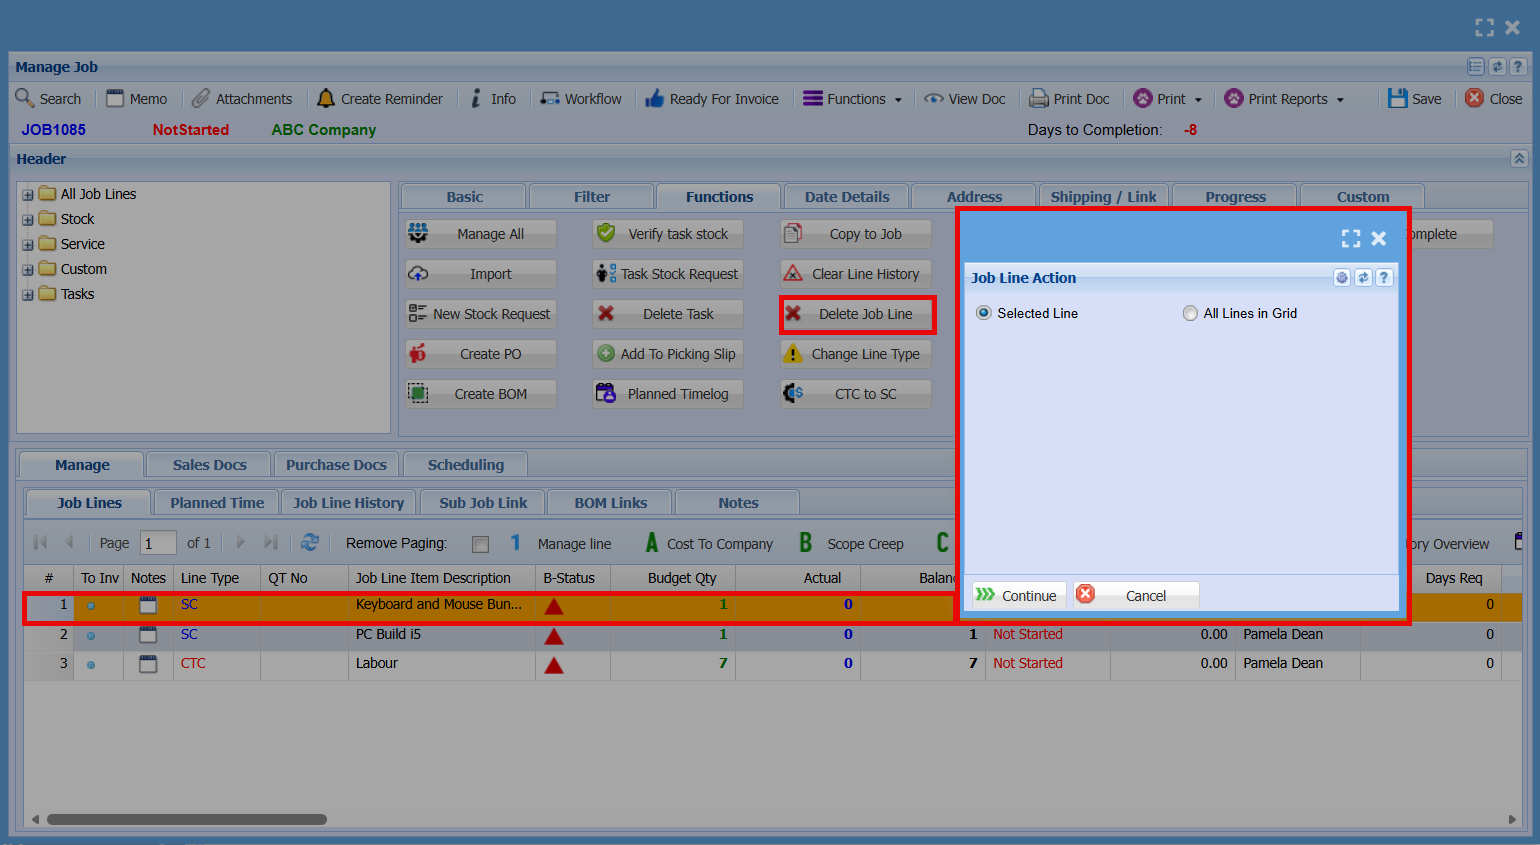](https://hugeerp10.co.za/hsofmanual/uploads/images/gallery/2026-06/nMBimage.png)
---
##### Change Line Type
?????
---
##### CTC to SC
[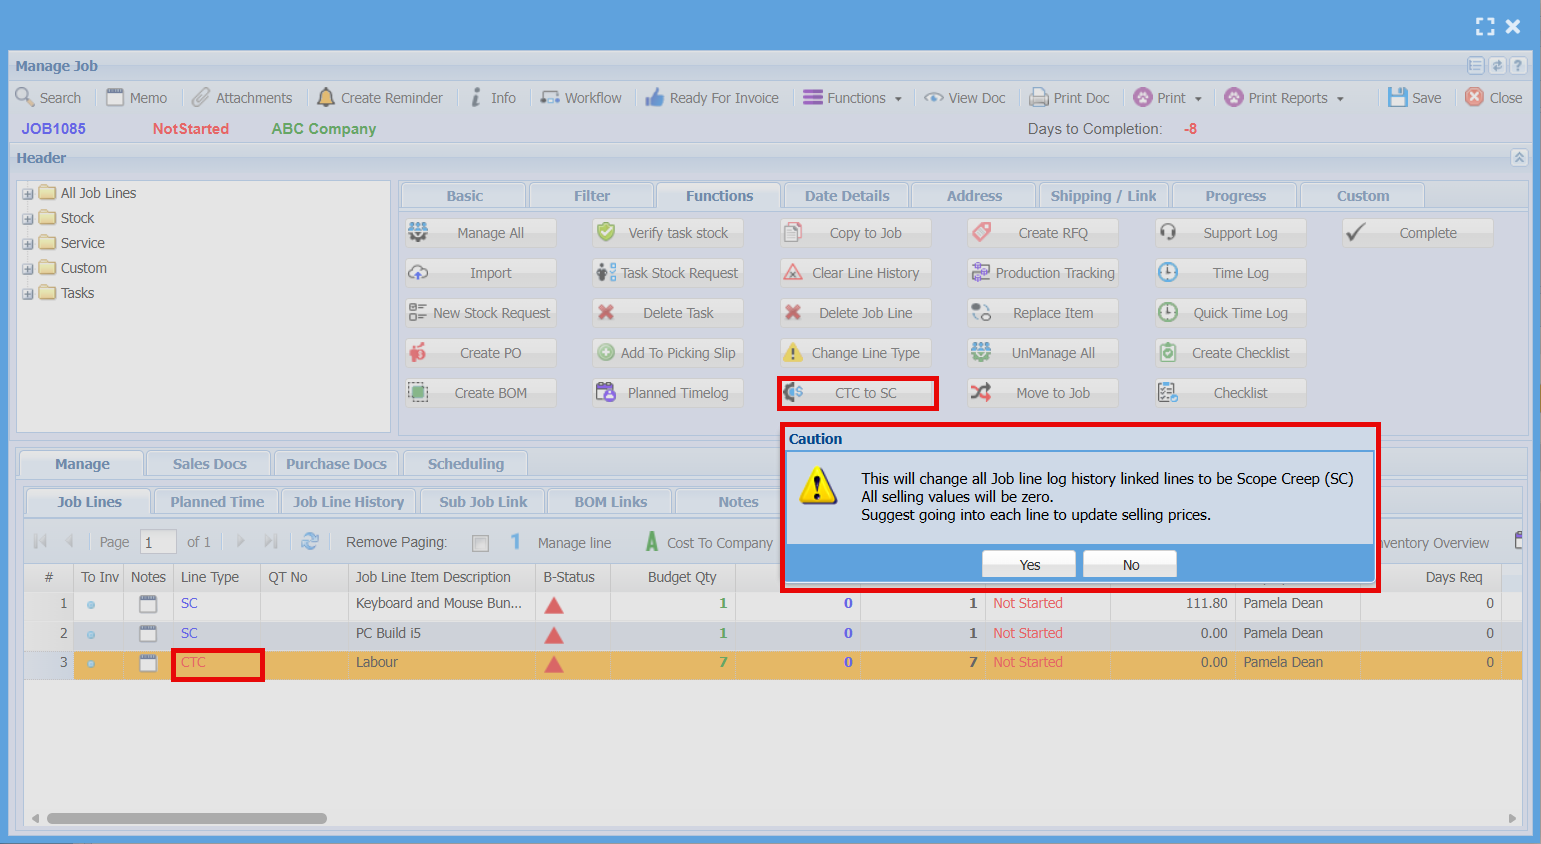](https://hugeerp10.co.za/hsofmanual/uploads/images/gallery/2026-06/nuOimage.png)
---
##### Create RFQ
[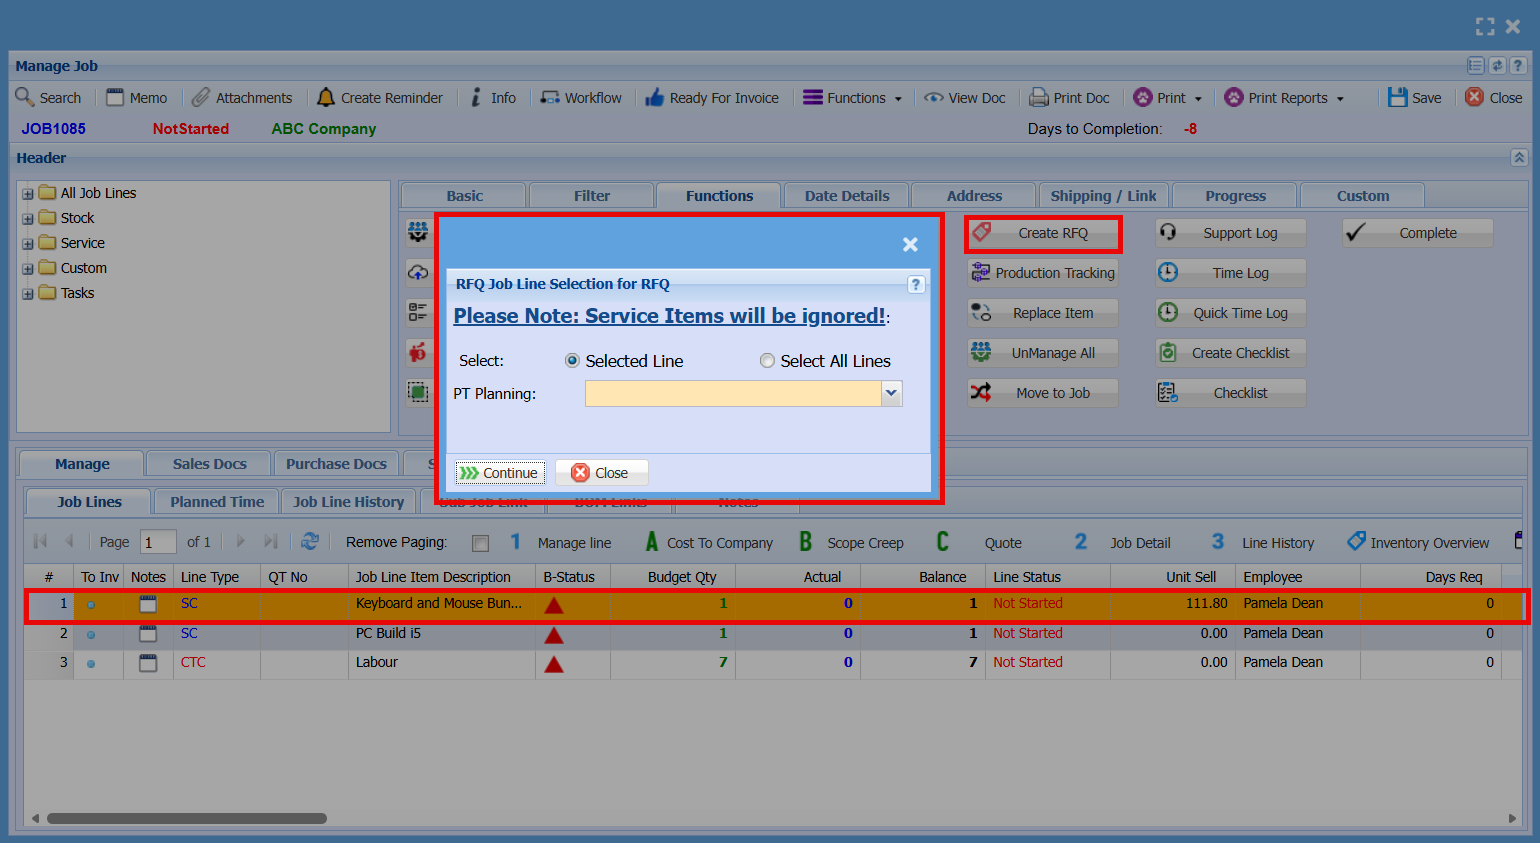](https://hugeerp10.co.za/hsofmanual/uploads/images/gallery/2026-06/Ml8image.png)
---
##### Production Tracking
[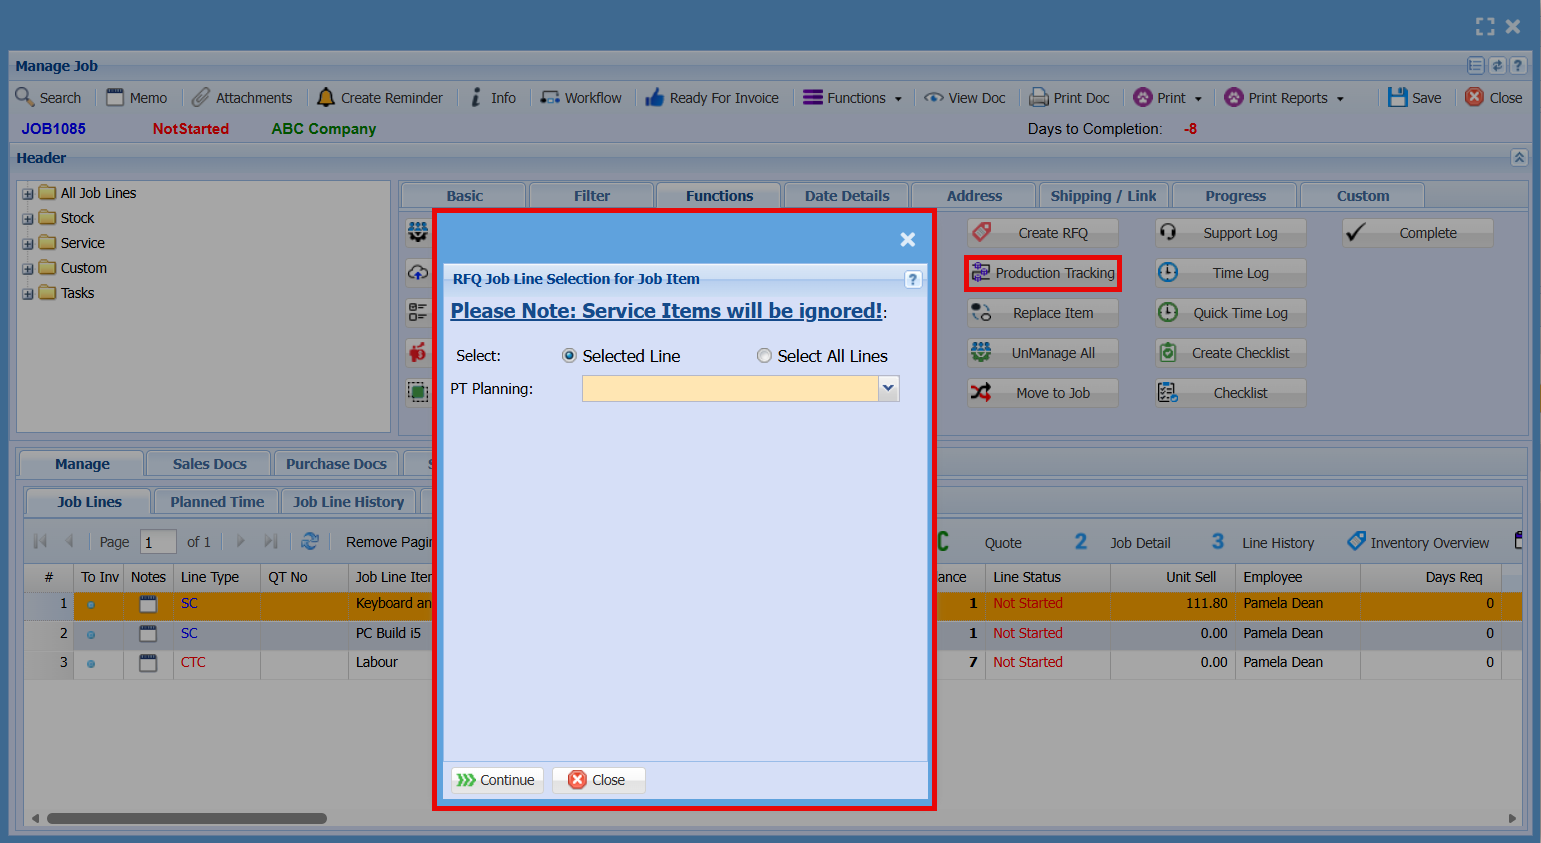](https://hugeerp10.co.za/hsofmanual/uploads/images/gallery/2026-06/bAtimage.png)
---
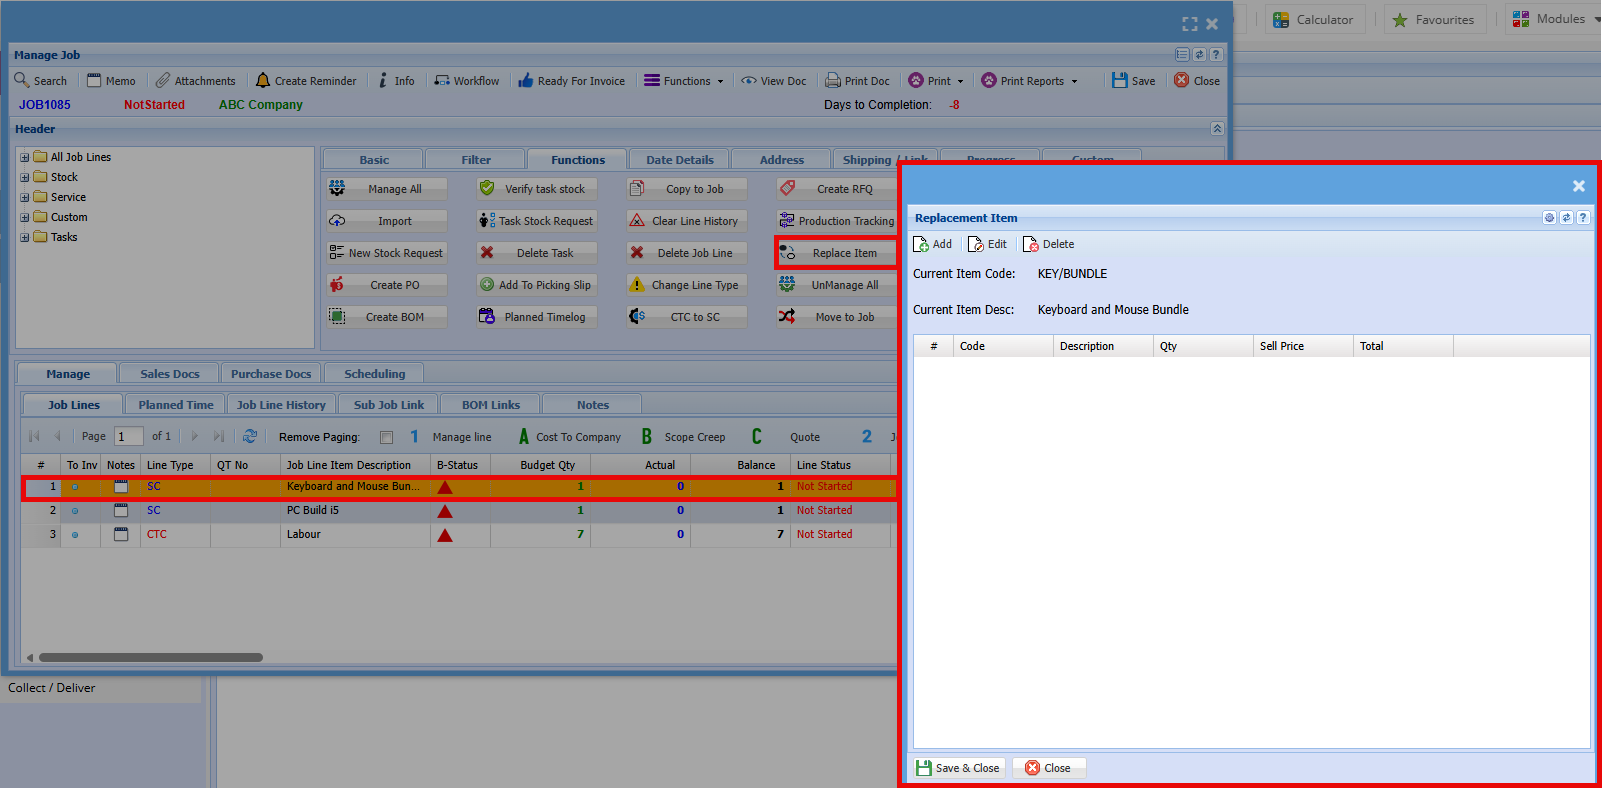
##### Replace Item
[](https://hugeerp10.co.za/hsofmanual/uploads/images/gallery/2026-06/XJMimage.png)
---
##### Manage All
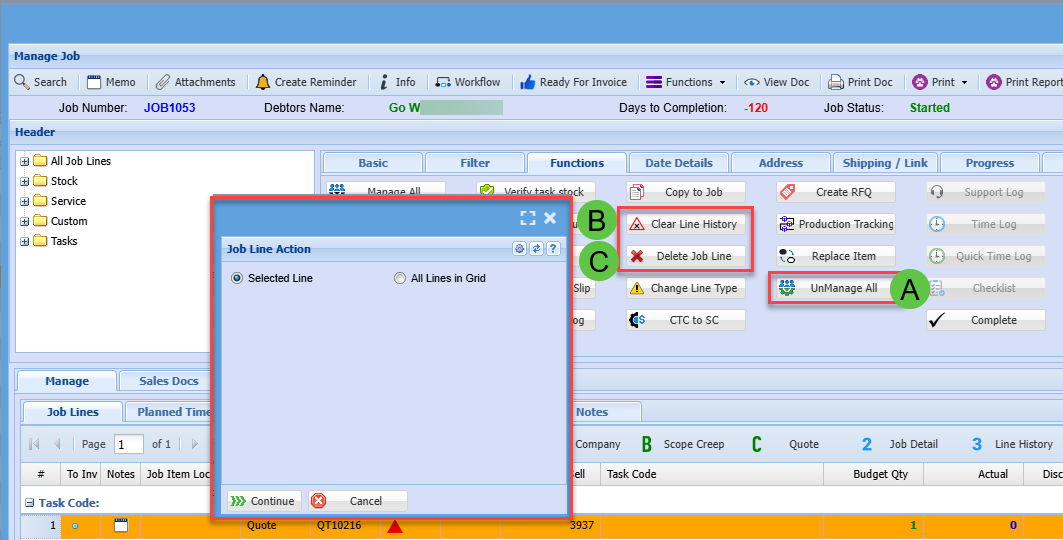
The **“Unmanage All”** function will reverse any managed quantities on job lines, reducing them back to an unmanaged state based on what has not yet been invoiced.
| **A** | UnManage All items on a job |
| **B** | Clear Line History
Only works if the Managed Actual quantity equals zero
|
| **C** | Delete Job Line
Only works if there are no Line History entries
|
[](https://hugeerp10.co.za/hsofmanual/uploads/images/gallery/2026-06/tf8image.png)
---
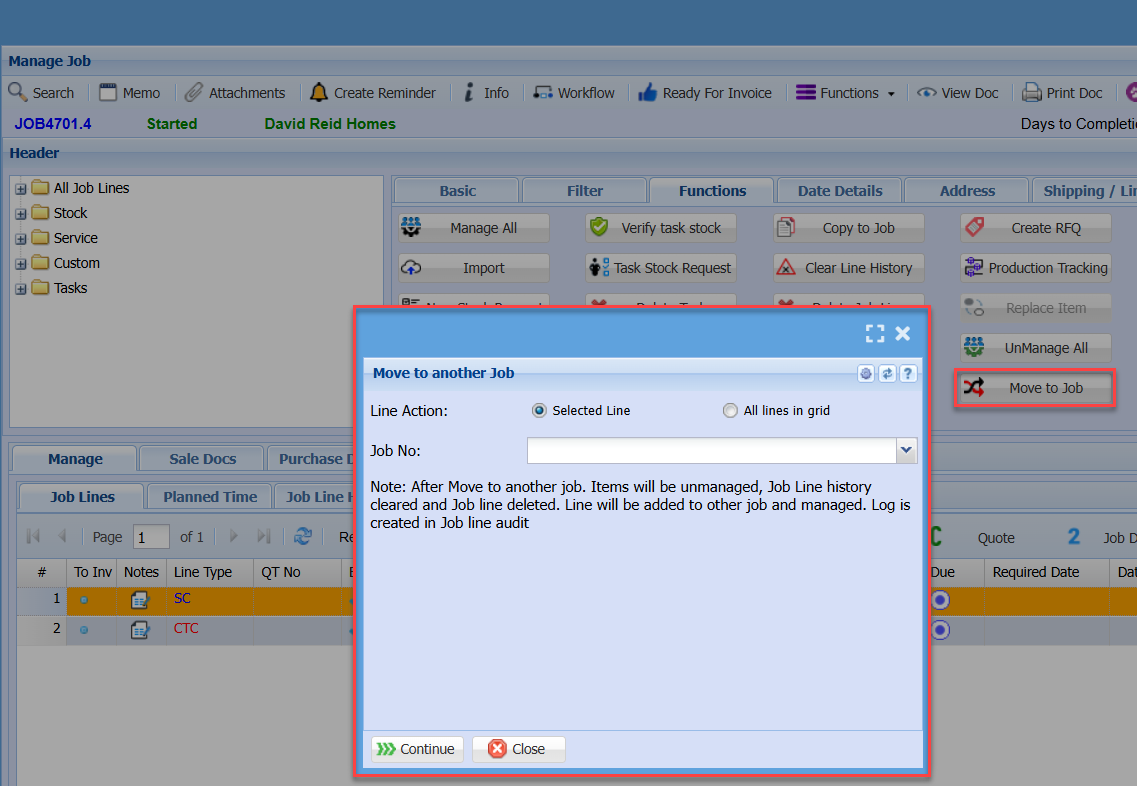
##### Move to Job
[](https://hugeerp10.co.za/hsofmanual/uploads/images/gallery/2026-06/Aoeimage.png)
---
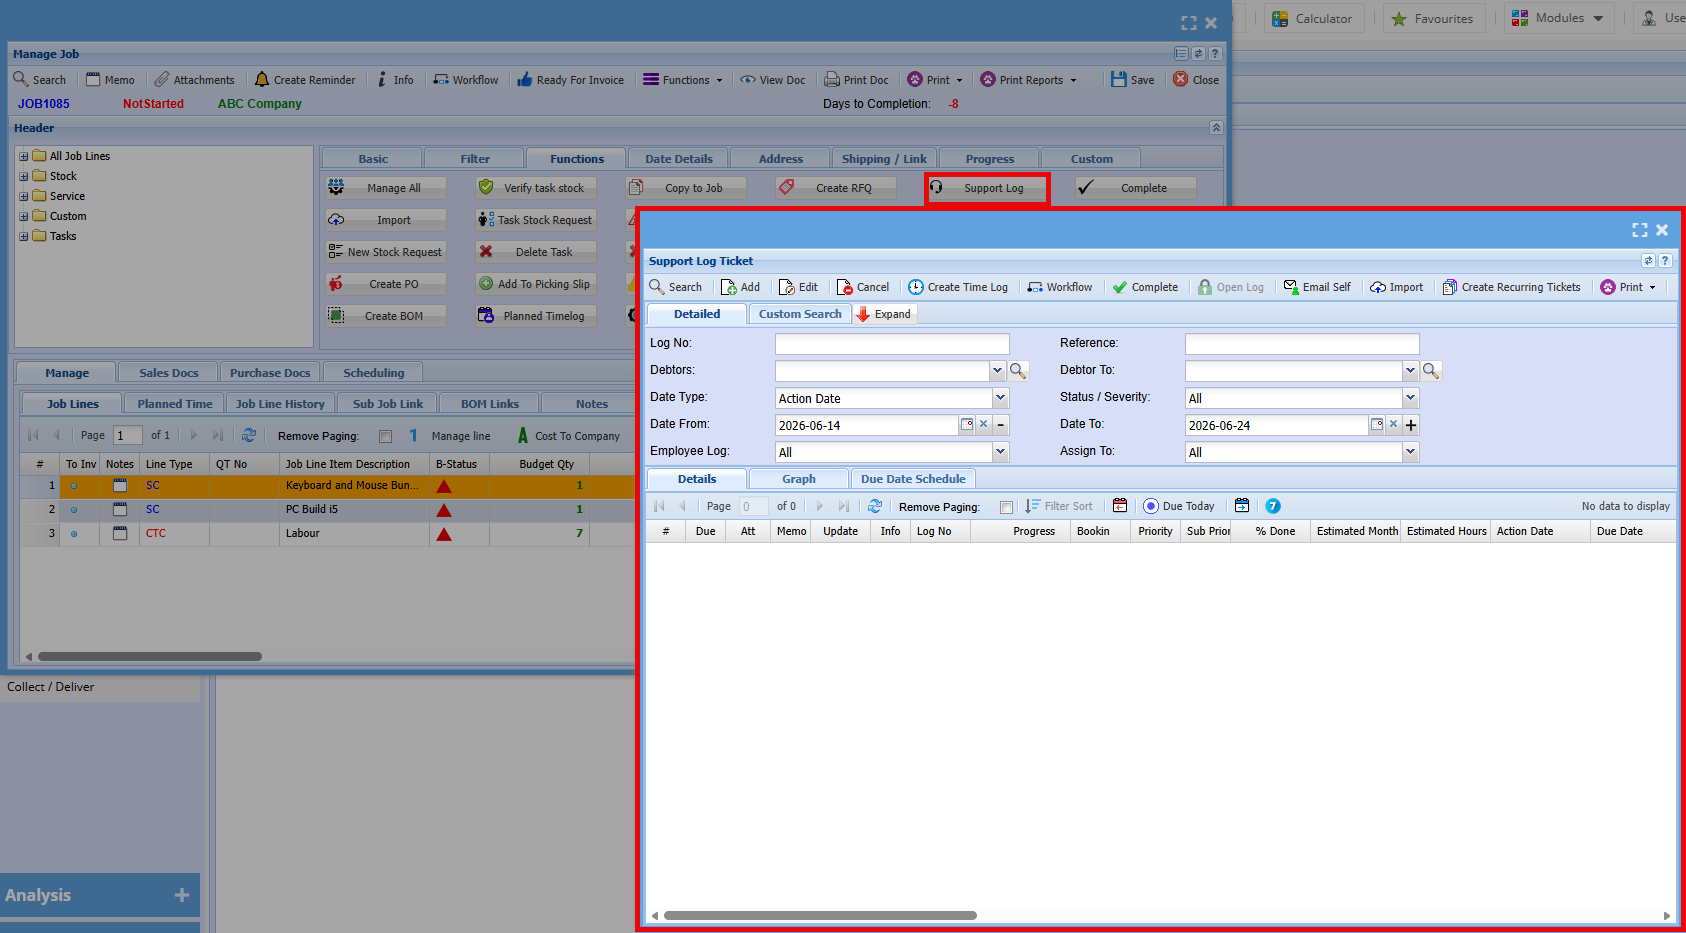
##### Support Log
[](https://hugeerp10.co.za/hsofmanual/uploads/images/gallery/2026-06/lGCimage.png)
---
##### Time Log
[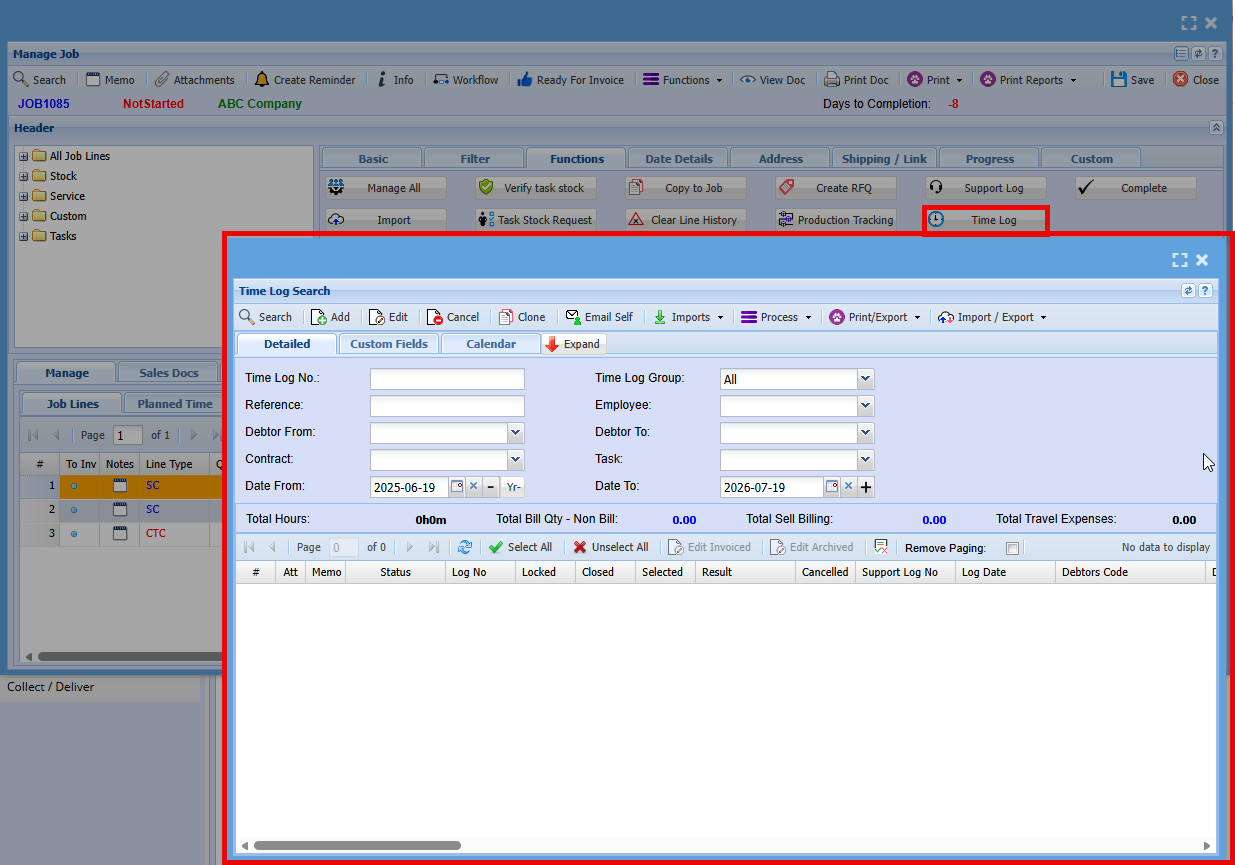](https://hugeerp10.co.za/hsofmanual/uploads/images/gallery/2026-06/s1uimage.png)
---
##### Quick Time Log
[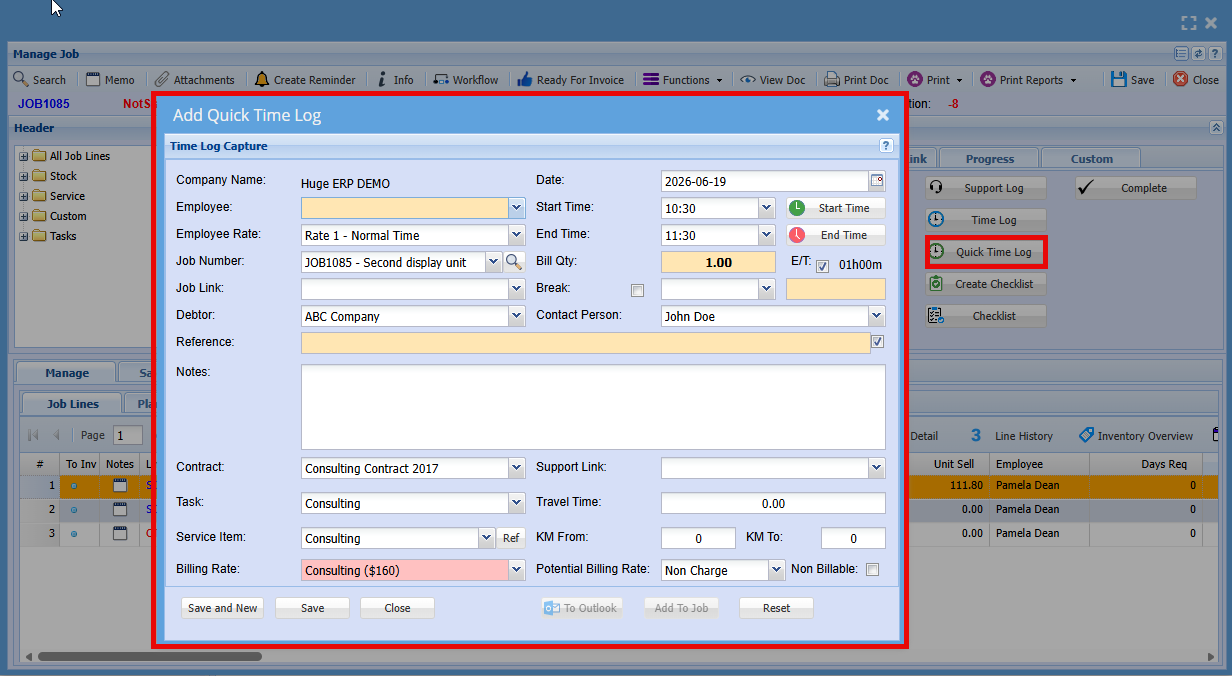](https://hugeerp10.co.za/hsofmanual/uploads/images/gallery/2026-06/7fuimage.png)
---
##### Create Checklist
[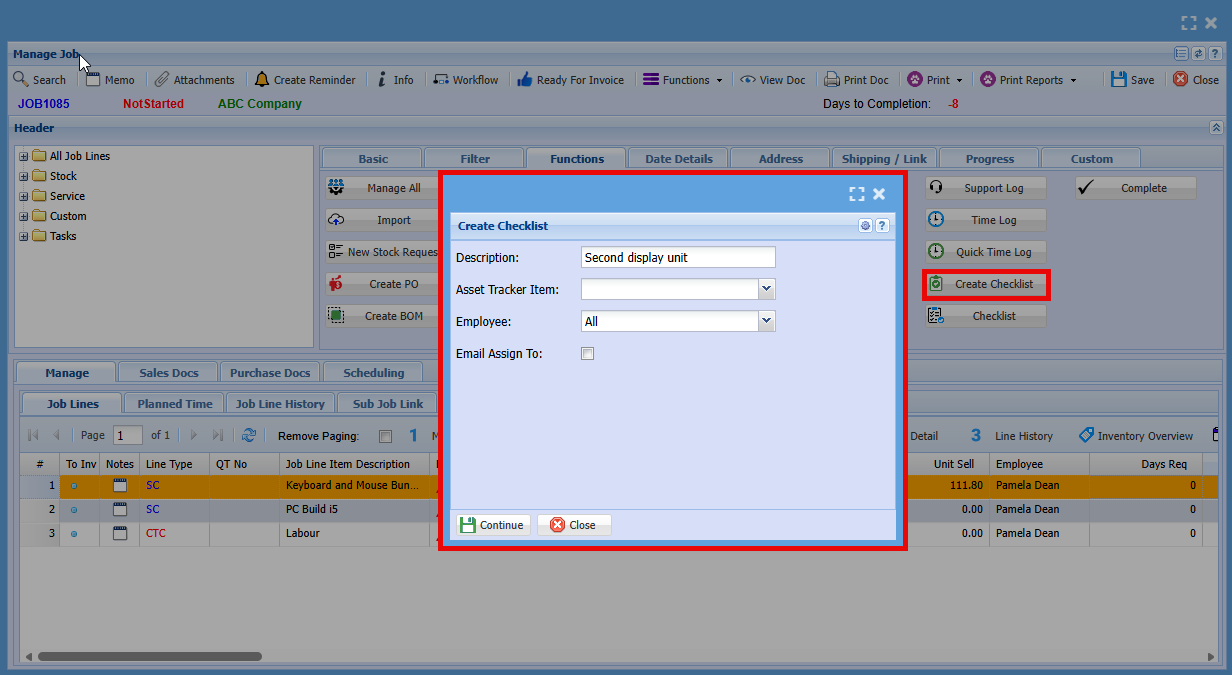](https://hugeerp10.co.za/hsofmanual/uploads/images/gallery/2026-06/Y3Dimage.png)
---
##### Checklist
[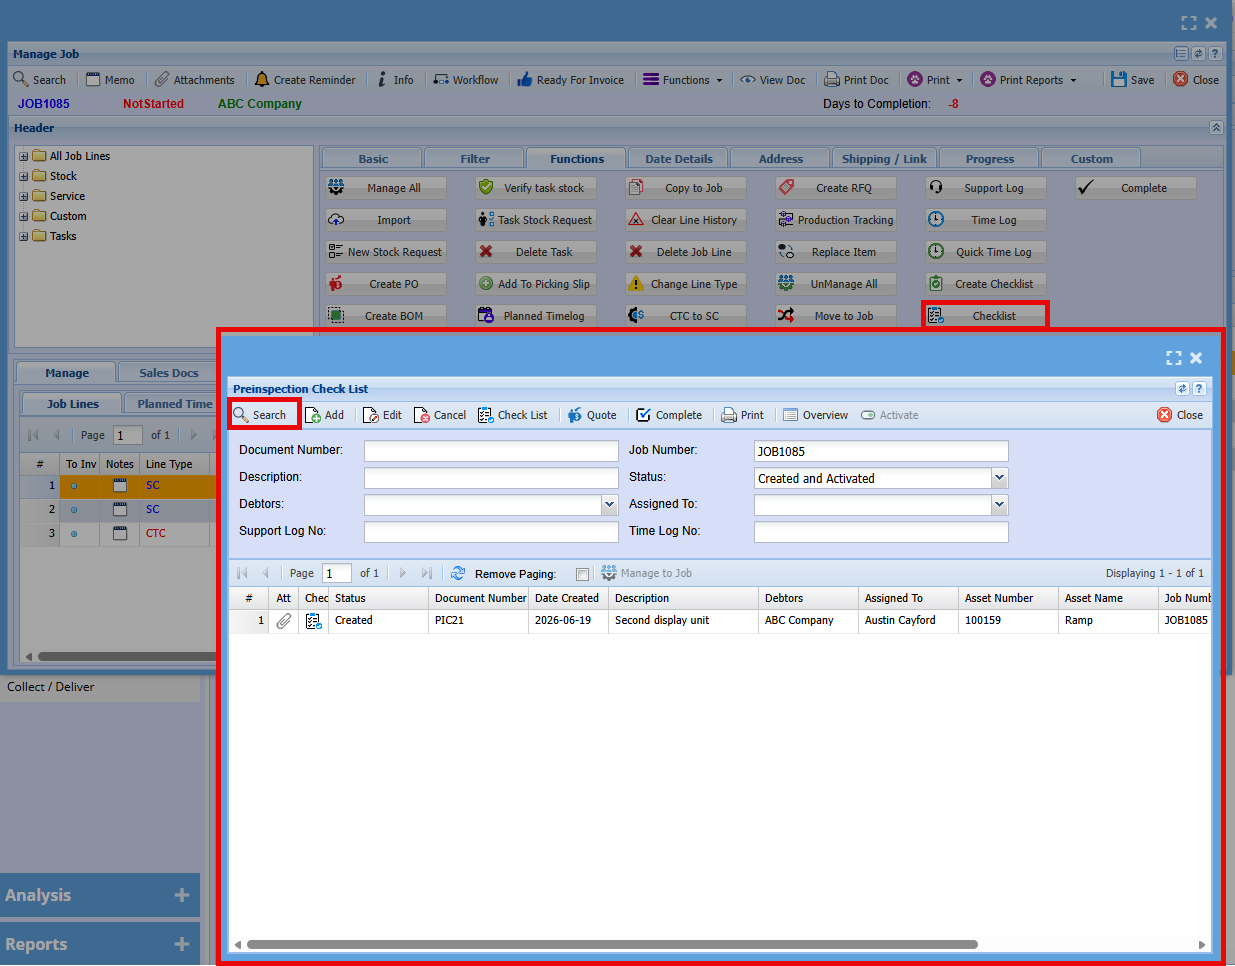](https://hugeerp10.co.za/hsofmanual/uploads/images/gallery/2026-06/QiBimage.png)
---
##### Complete
[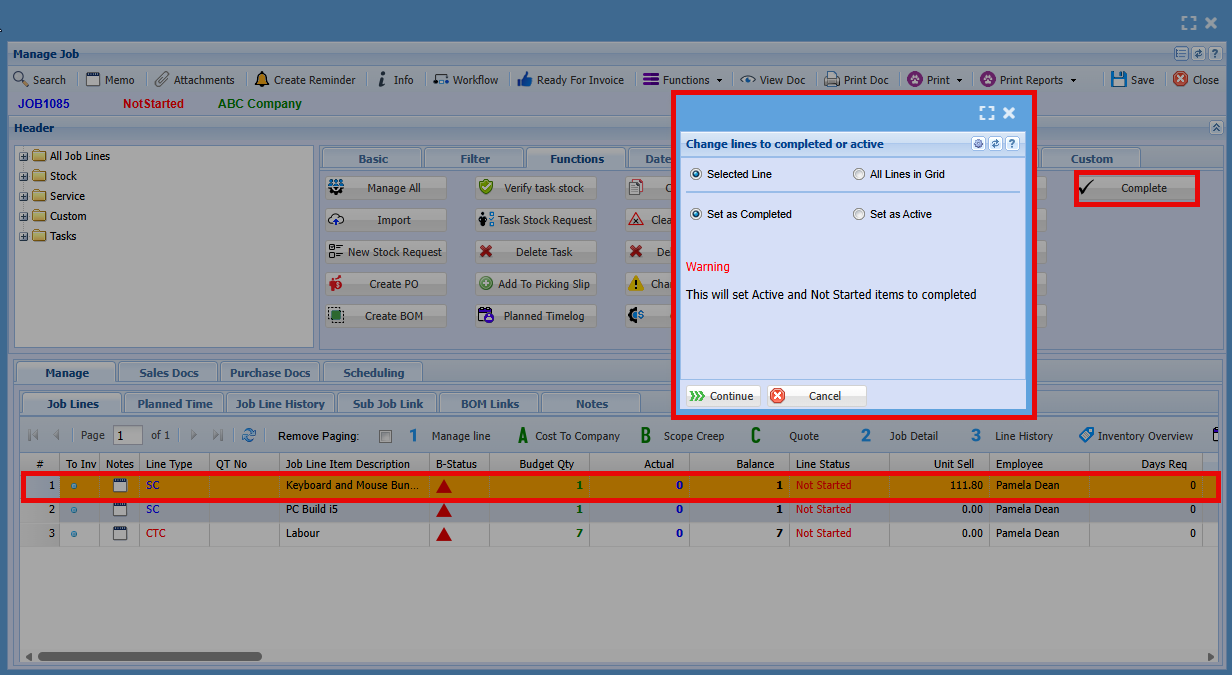](https://hugeerp10.co.za/hsofmanual/uploads/images/gallery/2026-06/AMCimage.png)
# Job Costing Screens Defined
### Manage Job - Buttons Explained
[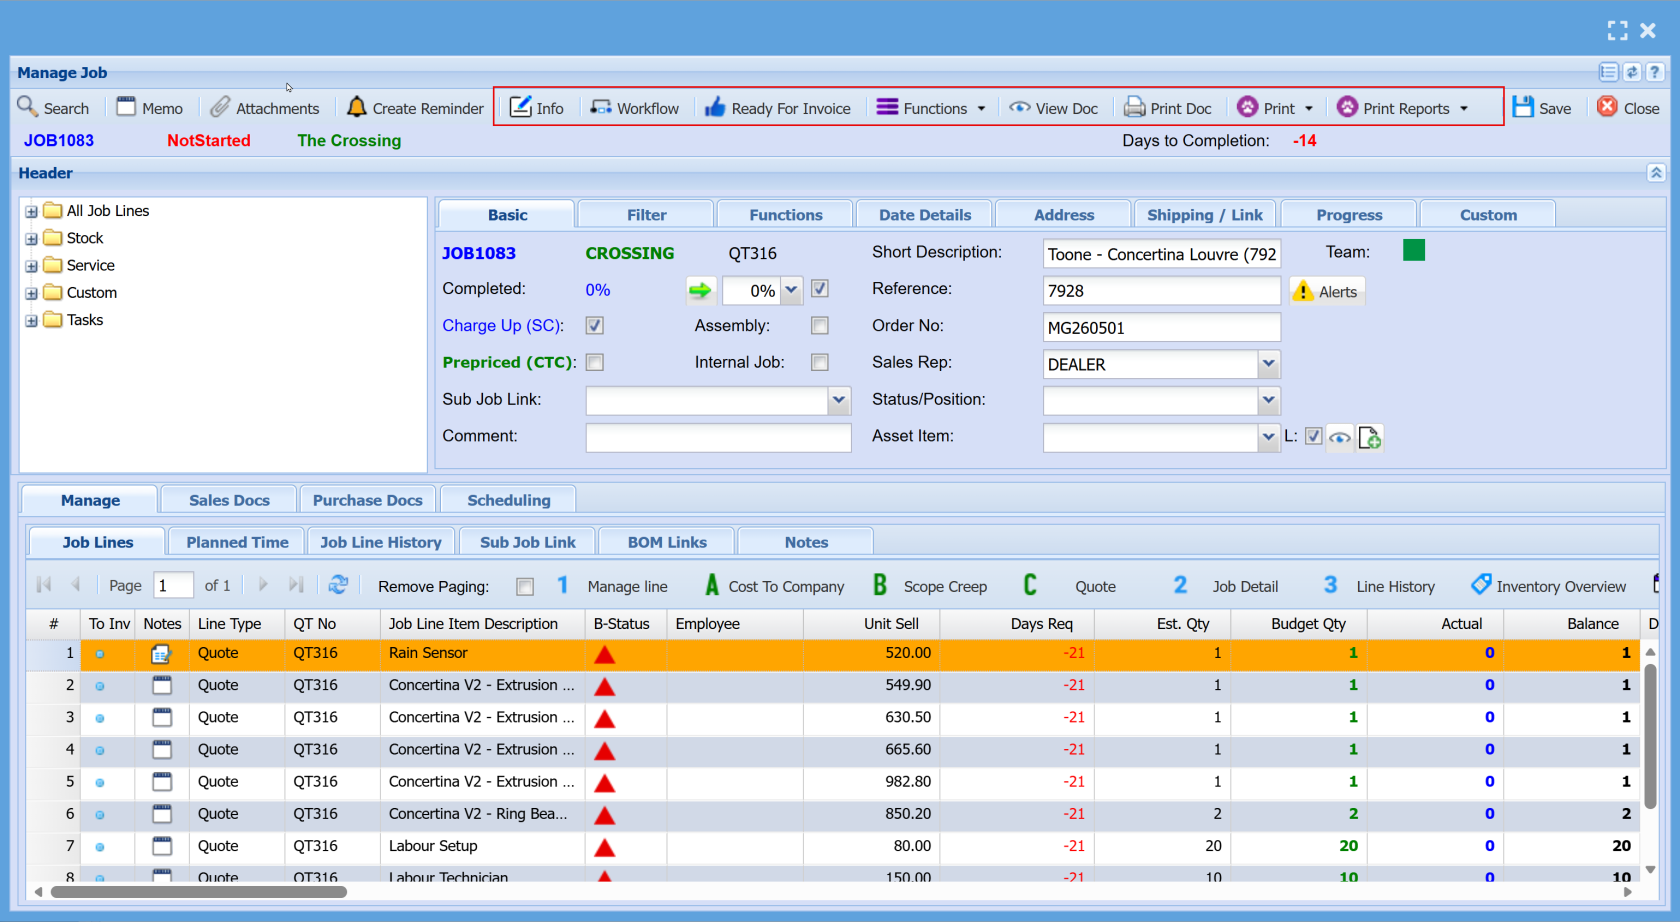](https://hugeerp10.co.za/hsofmanual/uploads/images/gallery/2026-06/NrEimage.png)
| **Info** | This screen is used to add and manage **internal notes for a job**.
- Enter notes in the main text area (with formatting options available)
- **Save** to store notes against the job
- **From Template** to insert **pre-set templates**
- **Print Notes** to include notes in printed documents
- **Close** to exit
|
| **Workflow** | This screen allows you to control how the Job Workflow overview is displayed, helping you plan and track jobs over a selected time period.
|
| **Ready for Invoice** | When selected, it simply adds a **thumbs-up icon** to the job in the results grid, providing a clear visual indicator that the job is complete and ready for billing.
|
| **Functions** | The **Functions** tab provides access to a range of additional actions that can be performed on a selected job. These are typically used for maintenance, updates, or managing specific job settings.
|
| **View Doc** | When you select a document in the Sales Doc or Purchase Doc tab and click **View Doc**, the document will open in a new screen.
|
| **Print Doc** | When you select a document in the Sales Doc or Purchase Doc tab and click **Print Doc**, it will open a print selection screen.
From there, click **Continue** to either **print or email the document**.
|
| **Print Reports** | The **Print Reports** button provides a dropdown list of available job reports.
Select the required report (e.g. Job Card, Job Analysis, Cost Report), and it will open ready for printing or review.
This allows quick access to different reports related to the selected job.
|
### Manage Job - Tab Explained
#### **Basic Tab Overview**
The **Basic** tab provides a high-level overview of the job and contains the key fields required to manage and update core job information.
The **Basic tab** is used to:
- View and update key job details
- Track job progress and status
- Assign responsibility and references
- Capture essential operational and administrative information
It acts as the central point for managing the most important aspects of a job before moving into more detailed tabs (such as Dates, Address, or Progress).
[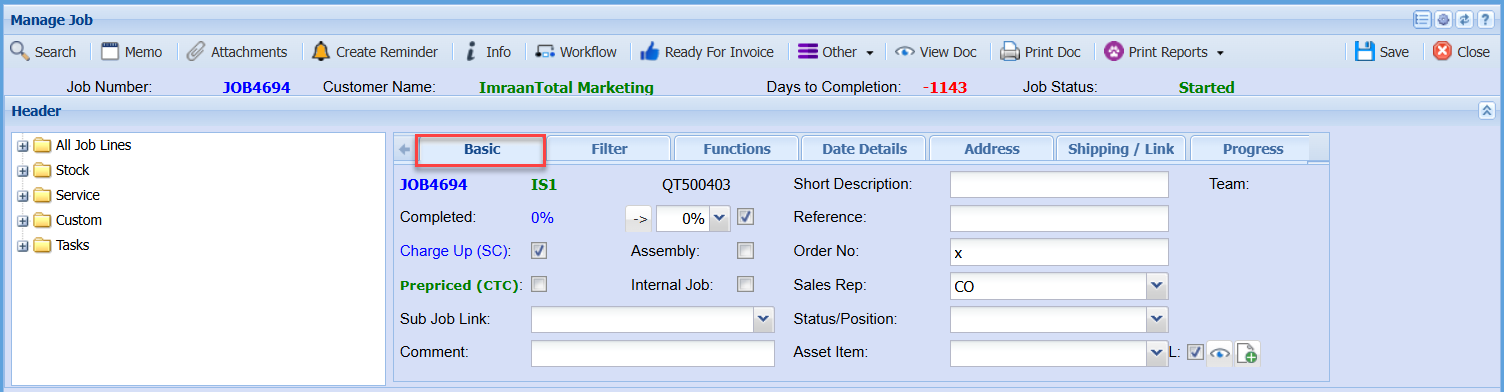](https://hugeerp10.co.za/hsofmanual/uploads/images/gallery/2024-07/2Rzimage.png)
| **Completed** | This controls the **overall progress of the job**- Can be updated manually to reflect how far along the job is
- Helps with tracking timelines and reporting
The small controls beside it allow for **quick adjustments** without typing |
| **Charge Up (SC) Tick** | When ticked, this indicates the job is **chargeable to the customer** |
| **Assembly Tick** | Used when the job involves **building or assembling components** |
| **Prepriced (CTC) Tick** | Indicates the job has **fixed or predefined pricing**, meaning costs are not calculated dynamically |
| **Internal Job Tick** | Marks the job as **internal use only**, meaning it is not billed to a customer |
| **Sub Job Link** | Allows you to **connect this job to another related job**, useful for larger projects split into parts |
| **Comment** | Used to add **important notes, instructions, or context**- This is useful for keeping **communication clear between users or teams**
|
| **Short Description** | A **brief summary** of the job for quick identification |
| **Reference** | Any **additional identifier or note** provided by the customer or internally |
| **Order No** | Links the job to a **customer order or purchase order** |
| **Sales Rep** | The **person responsible for the sale or account** |
| **Status/Position** | Shows where the job sits within the **workflow or process stage** |
**Team** | The **group or department** responsible for completing the job |
| **Asset Item** | Links the job to a **specific asset or item**, if required - Includes lookup options to quickly **search and attach records**
|
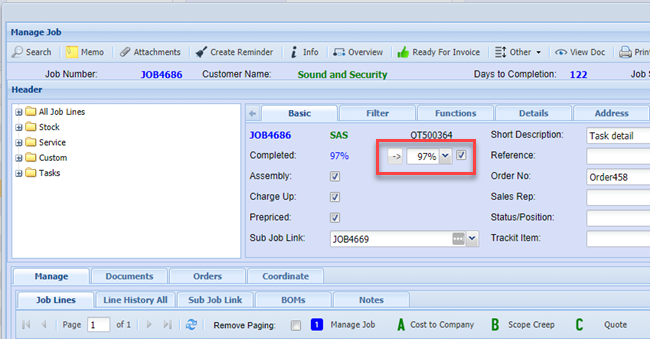
##### Job Percentage Complete
[](https://hugeerp10.co.za/hsofmanual/uploads/images/gallery/2026-06/8cLimage.png)
The job completion percentage is calculated by comparing the **total budgeted quantity** to the **total actual quantity completed**.
This value is displayed in blue; however, it may not always accurately reflect the true completion status. In such cases, the user may need to adjust it manually.
The percentage can be updated by clicking the **arrow button** or selecting a value from the **dropdown menu**.
If the **tick box is enabled**, the percentage will automatically update each time the job is saved. If the tick box is disabled, the percentage will remain unchanged and must be updated manually by the user.
.png)
A single button is available to **update the completion percentage across all jobs simultaneously**.
This function will only apply to jobs where the **tick box is enabled**. Jobs with the tick box disabled will **not be updated automatically** and must be adjusted manually by the user.
#### **Filter Tab Overview**
[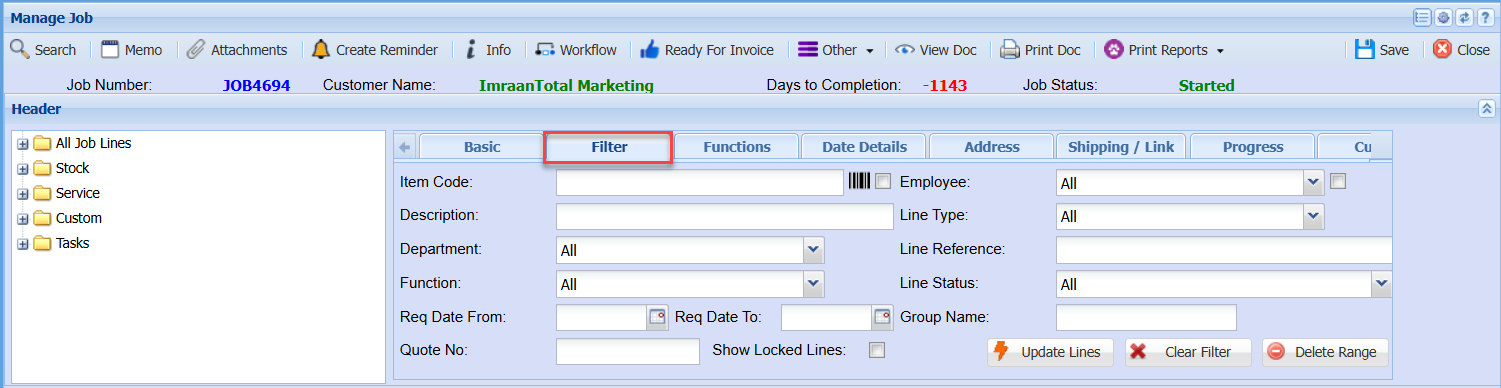](https://hugeerp10.co.za/hsofmanual/uploads/images/gallery/2024-07/r2Fimage.png)
| **Item Code** | |
| **Description** |
|
| **Department** |
|
| **Function** |
|
| **Req Date From and To** |
|
| **Quote No** |
|
| **Show Locked Lines Tick** |
|
| **Employee** |
|
| **Line Type** |
|
| **Line Reference** |
|
| **Line Status** |
|
| **Group Name** |
|
| **Update Lines** |
|
| **Clear Filter** |
|
| **Delete Range** |
|
#### **Progress Tab Overview**
The **Progress tab** provides a summary of job performance, with totals calculated based on values entered in the **Scheduling tab** (task activity groups).
**.png)**
| **Total Sell Budget**
| - This value is initially populated when a quote is promoted to a job.
- It represents the **total sell value (excluding)** from the quote.
- This figure **can be manually updated** if required.
|
| **Total Cost Budget**
| - Also populated when the quote is promoted to a job.
- Represents the **total cost value (excluding)** from the quote.
- This figure **can be manually updated**.
|
| **Activity Job Progress %**
| - Calculated as the **sum of percentage completion** entered in the Scheduling tab for task activity groups.
- Reflects overall job progress.
|
| **Activity Sell Budget Sum**
| - The **total of all sell values** assigned to task activity groups in the Scheduling tab.
|
| **Invoiced to Date**
| - The **total value of all processed invoices**.
- Displayed as the **sell value excluding GST**.
|
| **Potential to Invoice**
| - Calculated as:
**Activity Sell Budget – Invoiced to Date**
- Indicates remaining value available to invoice.
|
| **Invoiced % to Date Sum**
| - The **total percentage already invoiced**, based on percentages entered on task activity lines.
|
| **Value to Invoice**
| - The **calculated value ready to be invoiced**, based on the invoicing percentages selected on task activity lines.
|
| **Total Hours**
| - A **manual entry field** used to record the total hours required for the job.
|
#### **Manage Job - Notes Tab**
The Notes for Manage Job has been upgraded to the new text format
[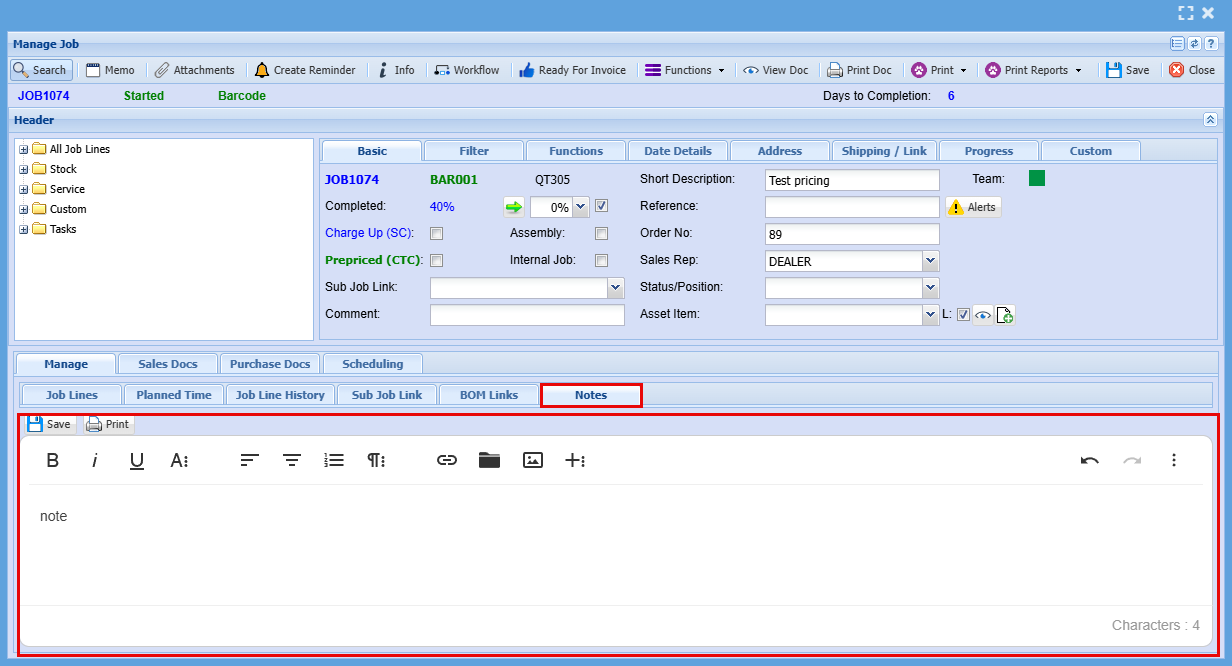](https://hugeerp10.co.za/hsofmanual/uploads/images/gallery/2026-01/CFqimage.png)
# Job Bill of Materials Process (BOM)
#### **The Job Bill of Material (BOM)**
This process enables you to produce a BOM resultant item using a job, ensuring accurate control of the final item cost, including all applicable labour and service costs.
Process Steps:
**Quote**
Create and prepare the initial job quote.
**Manage Job**
Convert the approved quote into an active job and manage it accordingly.
**Add Labour and Service Costs**
Include any relevant labour or additional service costs to ensure the total job cost is accurate.
**Process Job BOM and Close**
Process the Job BOM to generate the resultant item, then close the job.
#### **Job Bill Of Material (BOM) Process**
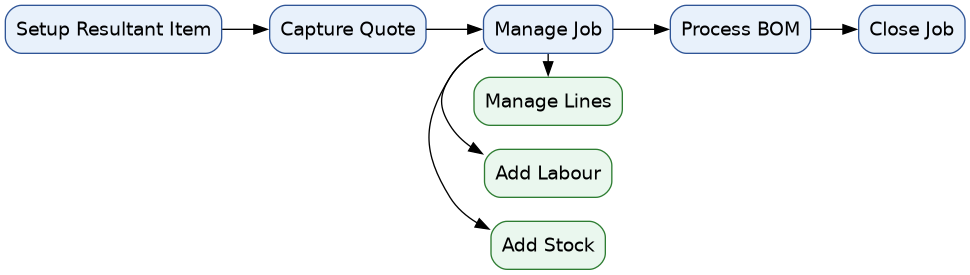
#### Resultant Item Setup
Go to **Inventory > Configuration > Inventory Setup**
- Click **Add**
- Enter an **Item Code** (ensure it aligns with your existing inventory coding convention)
- Enter the required **Item Description**
- Select the correct **Group Code**
- Click **Save**
- Navigate to the **Bill of Material** tab
.png)
- Select the **BOM Item** checkbox
- Click **Save and Close**
.png)
#### Setup the BOM item
Go to setup the Bill of Materials item
.png)
#### Capture Quote - Job Costing
J**ob Costing > Activity >Quotation**
- Enter the **GST Production Account Code**
- Enter the **Description** and **Reference**
- Enter the **Order Number**
- Click the **Address** tab
.png)
- Enter the required **Division**
- Enter the required **Region**
- Enter the **Invoice Group** (if applicable)
.png)
- Click **Save**
- Select the **Add** tab
- Choose the **Stock Code** or enter the description for the resultant item to be produced
- Enter the required **Quantity**
- Enter the estimated **Cost Price -** Do **not** enter a selling price
.png)
- Click **Save and Close**
- Click the **Approval Options** dropdown
- Select **Customer Approval** – this must be selected to ensure correct reporting
- Select **Approve to Job**
.png)
Once **Approve to Job** has been selected, this screen will appear
Ensure the appropriate options are selected based on how you want to control and manage the job
.png)
Ensure the **Exceed Quantities** and **Value** options are selected.
*(This allows quantities and values to exceed the original job budget where required)*
- Click **Continue**
- Click **OK**
.png)
#### Manage Job
**Job Costing > Activity > Manage Job**
- Enter the **Job Number**
- Select the required **Production Job**
- Click **Manage Job**
- Click the **Cost to Company** button
.png)
- Enter the **Item Code** of the stock item being used to produce this BOM item
- Enter the required **Quantity**
- Click **Save and New** to add another item
.png)
- Continue adding all items required to produce the resultant item
You can check stock on hand for both the component items and the resultant item by navigating to:
**Inventory > Analysis > Stock Enquiry**
.png)
- Manage the stock items added to the job
- Double-click the relevant line and enter the **quantity used**
.png)
Once all stock items have been processed, review the job lines to ensure they are accurate and have been correctly managed
.png)
Ensure all timesheets from relevant staff have been submitted and are ready for capture, or have already been entered into the system
.png)
- Check the costing analysis of the job
- Open the job
- Select the **Print** tab
- Click the **Job Total Analysis** button
.png)
Click the **Managed Totals** tab
.png)
- Click the **View Details** Button
.png)
Review the details to ensure everything is accurate.
Once all lines have been verified and the job is ready to be completed: - Close all open windows
- Return to the **Job Search** screen
- Search for the job, then click the **Extras** dropdown
- Select the **Job BOM** button
.png)
- Enter the **Resultant Item Code**
- Enter the **Quantity** to be produced
- Click **Save**
- Click **Process**
.png)
.png)
- Verify the BOM Item Stock
.png)
You will notice that the **resultant item stock on hand** has now been updated and increased accordingly
.png)
# File Upload & Import Process
Click the **Select File** button to open the file browser and locate the file you want to import.
Click **Upload** to send the file to the server and start the import process.
**Quantity Multiplier Option**
- You have the option to **multiply quantities during import**. This will adjust both the **budget quantity** and the **managed quantity**.
- The default value is **1**, but this can be changed **before uploading the file**.
**When to Use**
**Please Note**
- The file must be in **.CSV format** using **semi-colon (;) separation**
- The file must include **headers**, however these will be ignored during import
- If any errors occur, they will be recorded in the **log**
- Please correct the errors and restart the import process
##### **Import Rules**
1. The **CSV file must use semi-colon (;) separation**
2. **Stock items** take cost from the item setup, regardless of any cost entered in the file
3. **Stock items** take the selling price from the Excel file
4. If the stock item selling price is blank, it defaults to the **item setup value**
5. **Custom and Service items** take both cost and selling price from Excel
6. If cost and selling are blank for Custom or Service items, values default to **item setup**
7. If a **Service item** uses time allocation and an employee rate is set, cost is taken from **user setup rates (1, 2, or 3)**
8. If cost is set to **zero (0)**, it will be imported as zero
9. If **Managed Qty** is blank, the line is added as **Not Started**
10. If **Managed Qty** has a value, the line is added as **Active**
11. If there is **no stock on hand**, the line will be added but **not managed**
12. If the **Required Date** is blank, the system uses the **current date**
13. Dates must be in the format: **YYYY-MM-DD** (e.g. 2020-04-05)
14. If the **Employee field** is blank, it will remain blank
15. The **Employee field** uses the **login ID**
16. If the **Rate field** is blank (with an employee), it remains blank
17. Set **Rate to 1, 2, or 3** to use the corresponding user setup rate
18. If both **Employee and Rate** are set for a Service item, cost is taken from the **user setup rate**
19. **Description** is imported from Excel
20. If Description is blank, it defaults from **item setup**
21. Set **Is Complete = 1** to mark the line as complete
22. For stock items, the correct **Warehouse Code** must be provided
23. **Drawing** is a free text field
24. **Comment** is a free text field
**CSV File Template**
Below is the required structure for the CSV import file. Ensure the file is saved with **semi-colon (;) separators**.
```
ItemCode;Description;Quantity;Cost;Selling;ManagedQty;RequiredDate;Employee;Rate;IsComplete;WarehouseCode;Drawing;Comment
ITEM001;Sample Stock Item;10;;25.00;10;2026-06-01;jbloggs;1;0;MAIN;DRW001;Standard item
SERV001;Labour Task;5;50.00;75.00;5;2026-06-02;asmith;2;0;;;Installation work
CUST001;Custom Item;2;20.00;40.00;;2026-06-03;;;0;;Custom ref;Special notes
```
**Field Overview**
- **ItemCode** – Stock, Service, or Custom item code
- **Description** – Item description (optional if using item setup)
- **Quantity** – Budget quantity
- **Cost** – Cost value (rules apply depending on item type)
- **Selling** – Selling price
- **ManagedQty** – Quantity to manage on the job
- **RequiredDate** – Format: YYYY-MM-DD
- **Employee** – User login ID
- **Rate** – 1, 2, or 3 (user setup rate)
- **IsComplete** – 1 = Complete, 0 = Not complete
- **WarehouseCode** – Required for stock items
- **Drawing** – Free text field
- **Comment** – Free text field
**Key Notes**
- Leave fields blank where not applicable
- Ensure formatting matches the rules provided
- Validate data before importing to reduce errors
# Job Management Letter/Note Template
##### Where to find Job Management Letter Templates
There are two places within the Job management where you can pull in templates to record job information and Notes. These templates are set up in CRM Module.
**CRM > Configuration > Email Template**
- Use the email drop-down below to filter the Job Management templates.
- Click "Add" to add a new template
[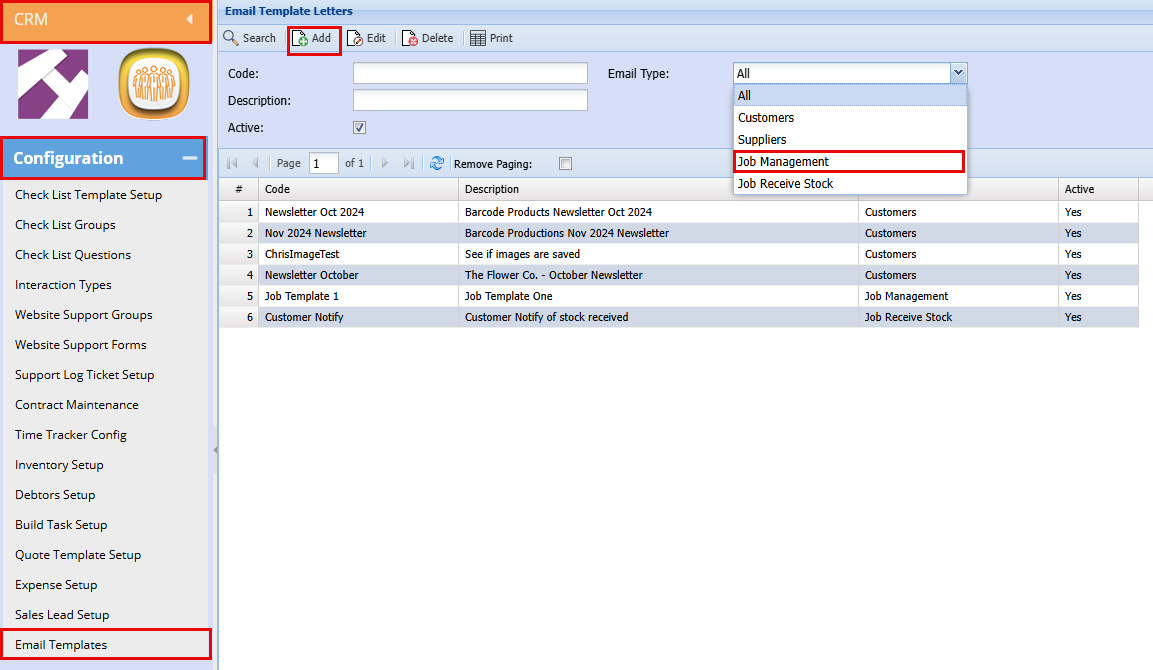](https://hugeerp10.co.za/hsofmanual/uploads/images/gallery/2026-04/Sybimage.png)
##### Creating a new Template for Job Managing
Add the below for your template as shown below:
- **Code**
- **Description**
- Choose the type "**Manage Job**"
- Add your template, here you will be able to design your template by adding text, images, grids, links etc.
- Click "**Save & Close**"
[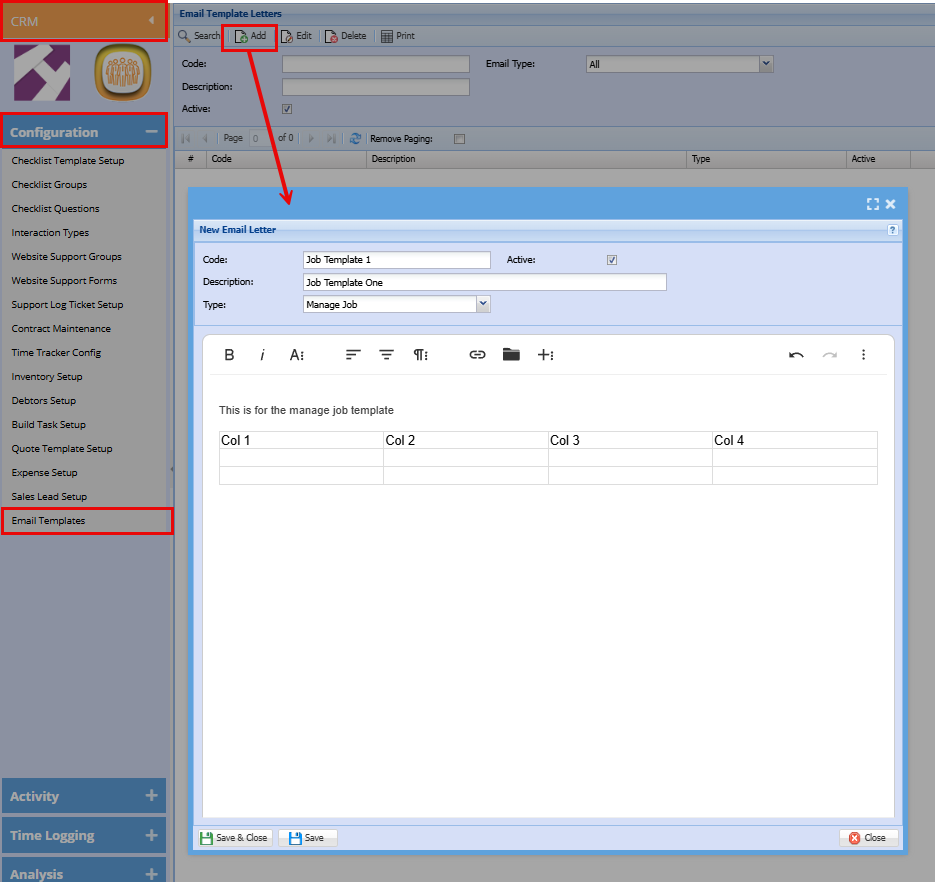](https://hugeerp10.co.za/hsofmanual/uploads/images/gallery/2026-04/wlsimage.png)
##### Where to Add a Job Management Letter Templates
Job costing has two locations where the templates can be pulled in.
**Job Costing Module > Activity > Manage Job**
- Search for the job you are wanting to add a template to.
**[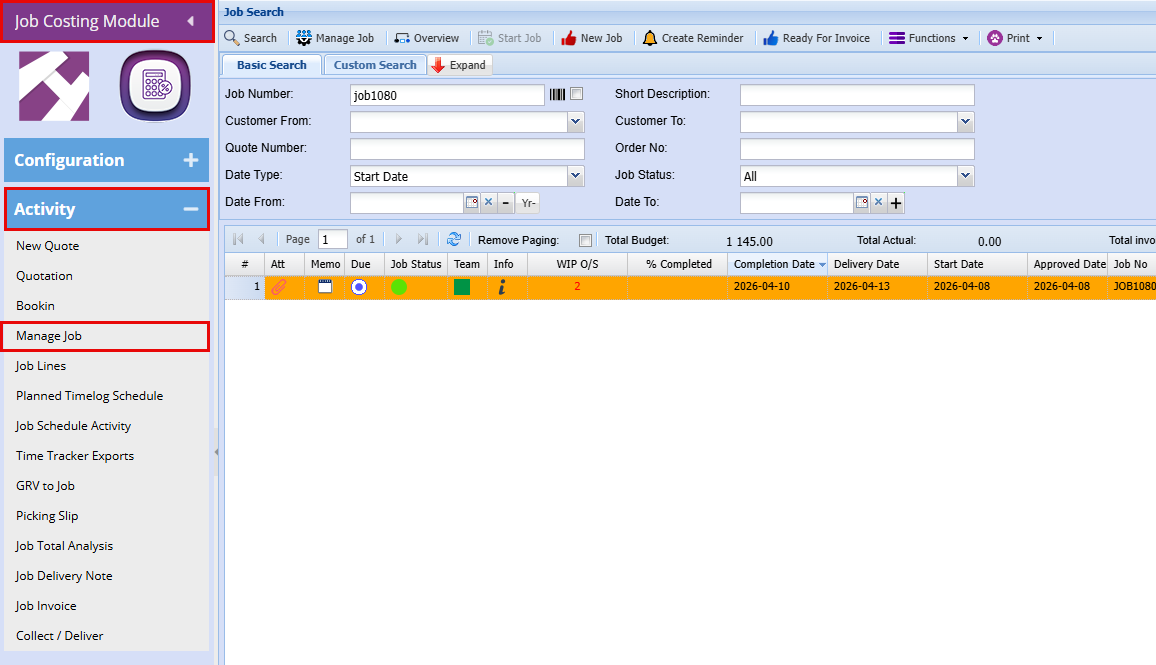](https://hugeerp10.co.za/hsofmanual/uploads/images/gallery/2026-04/uVOimage.png)**
**Notes (Add template here)**
- **Double Click** on the job line to open the job
- Click on "**Notes**"
- Click on "**From Template**" a widow will open with a dropdown
- Select your template from the dropdown to populate the text box.
[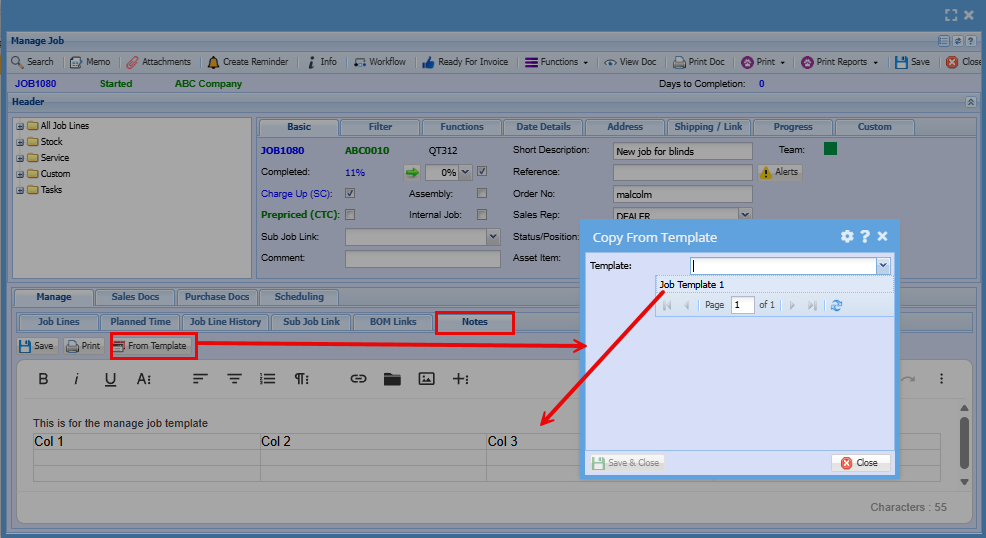](https://hugeerp10.co.za/hsofmanual/uploads/images/gallery/2026-04/PAaimage.png)
**Info (Add template here)**
- Click on "**Info**"
- Click on "**From Template**" a widow will open with a dropdown
- Select your template from the dropdown to populate the text box.
[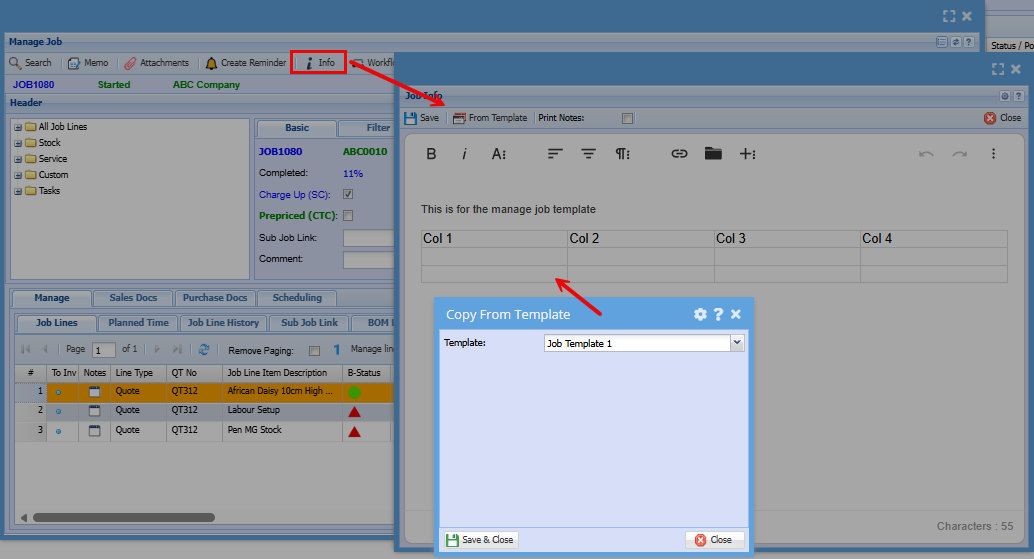](https://hugeerp10.co.za/hsofmanual/uploads/images/gallery/2026-04/V83image.png)
# Closing or Cancel Job
##### Closing a Job
**Job Costing > Activity > Manage Job**
A job is automatically closed upon issuing a final invoice. However, if invoicing is complete and the job remains open due to outstanding purchase orders or quotes, it can be manually closed as needed.
- **Close** all the open documents (Quotes, PO, Delivery Notes)
- **Highlight** the job line you want to close
- Click "**Functions**" dropdown at the top left of the screen
- Click "**Close or Cancel Job**"
[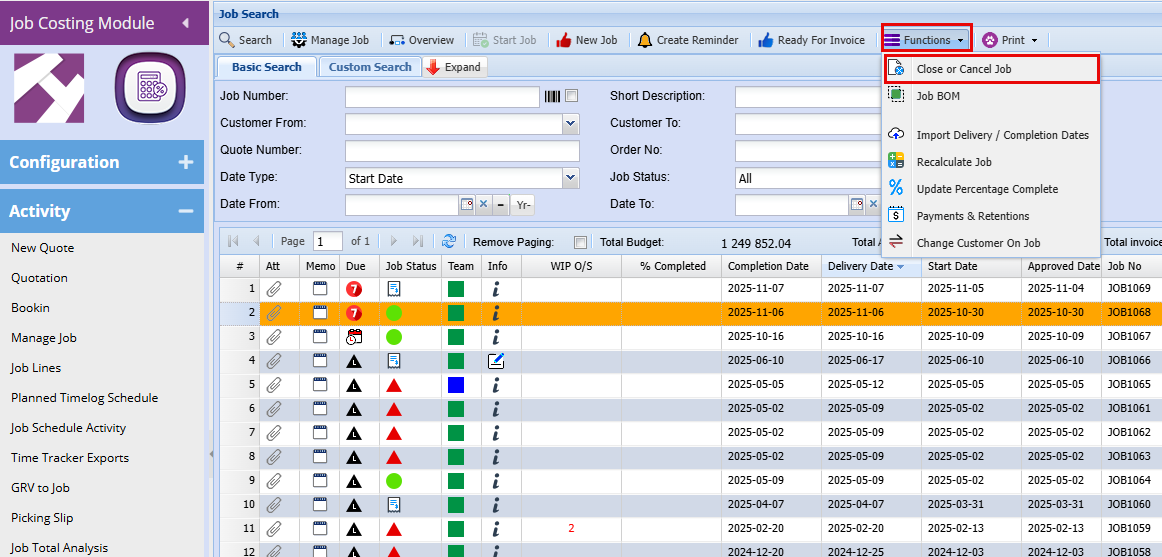](https://hugeerp10.co.za/hsofmanual/uploads/images/gallery/2026-06/EYHimage.png)
This screen is used to close a job. You select how it’s being closed, confirm it, and then click OK. The job and customer details are already filled in automatically.
[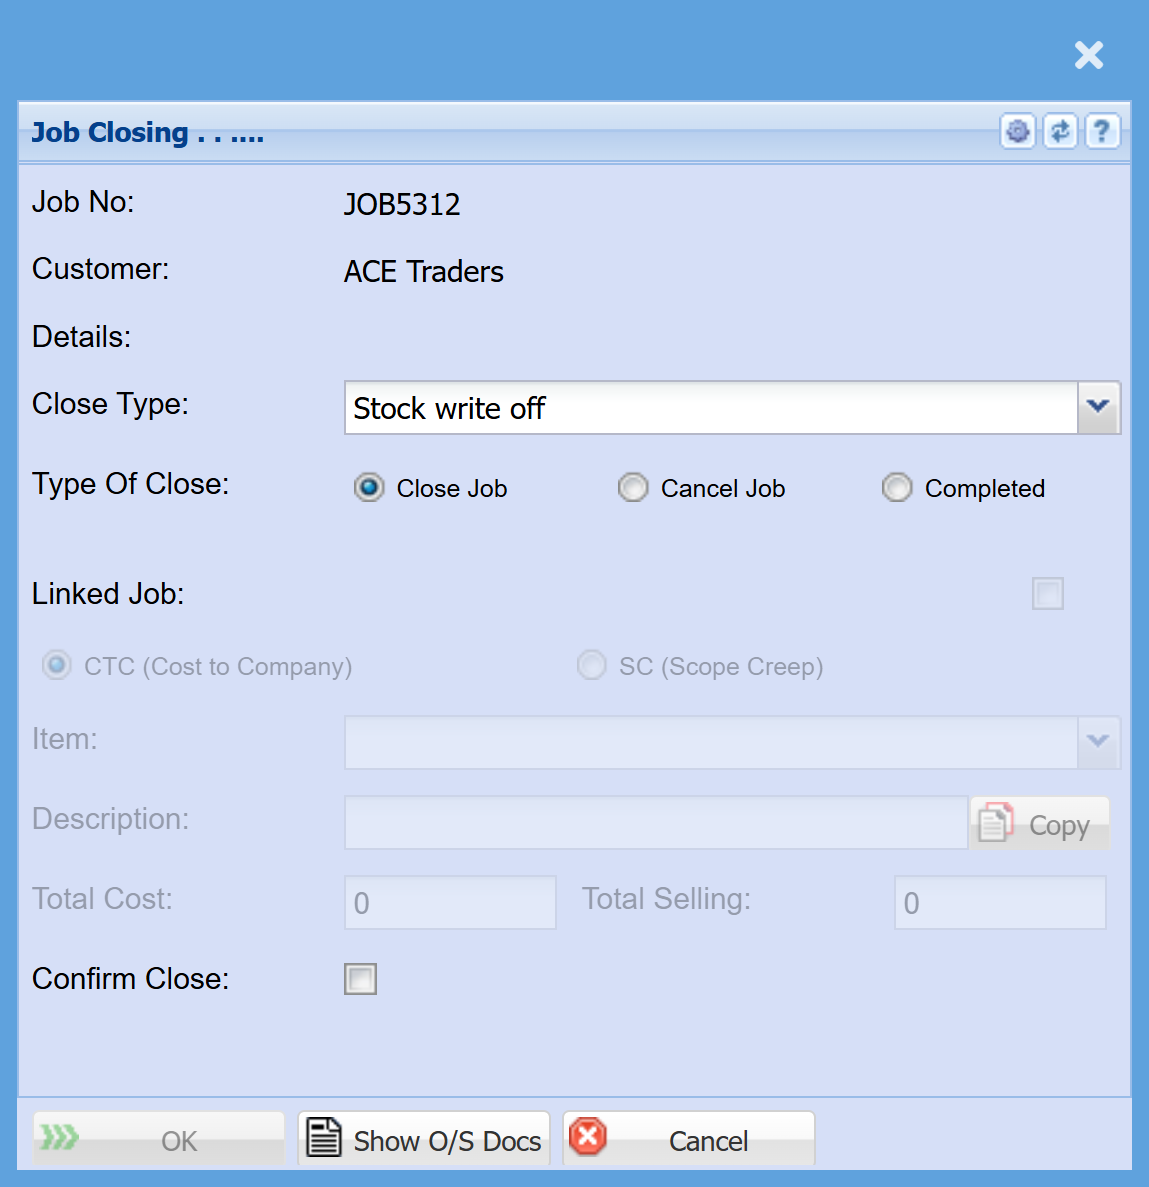](https://hugeerp10.co.za/hsofmanual/uploads/images/gallery/2026-06/W95image.png)
**Auto-populated information**
These details are pulled through from the job:
- **Job No** – Displays the job being closed (e.g. JOB5312)
- **Customer** – Shows the customer linked to the job
- **Details** – Additional job information (if applicable)
**Closing setup**
**Close Type**
- Used to select how the job is being closed financially or operationally
- Example shown: **Stock write off**
**Type of Close**
Choose one of the following options:
- **Close Job** → Standard closing of the job
- **Cancel Job** → Use if the job is no longer going ahead
- **Completed** → Confirms the job has been fully finished
**Linked Job (optional)**
- Allows you to link this job to another if required
- Options like:
- **CTC (Cost to Company)**
- **SC (Scope Creep)**
- Additional fields (Item, Description, Cost, Selling) will activate if used
**Confirm Close**
- **Confirm Close (checkbox)**
👉 Must be ticked to finalise the job closure
**Actions**
- **OK** → Completes the job closing process
- **Show O/S Docs** → Displays any outstanding documents (must usually be resolved before closing)
- **Cancel** → Exits without closing the job
# Reopening a Job
This manual outlines recent system changes designed to identify when a job has been reopened.
When searching for jobs, reopened jobs will be clearly indicated in the grid:
- The row will be highlighted in green
- A **Reopened** column will display the date and time the job was reopened
.png)
**Lock Lines**
When a job is closed, all associated lines—whether managed or not—are locked.
If the job is later reopened, these existing lines will remain locked and cannot be edited.
Only new lines can be added to the job.
**Job Reopened Indicators**
When opening a reopened job, the system clearly highlights this status for visibility.
- A **Reopened indicator** is displayed in the top left corner of the job screen
- Any lines that were locked upon reopening are clearly identified
This ensures users can easily recognise that the job has been reopened and understand which lines can no longer be edited
.png)
**Refresh Grids**
You can now refresh job tabs without needing to close and reopen the job.
Simply click on the **All Job Lines Level tree view**, and the system will automatically refresh all job tabs, including the line items.
.png)
# Manage Job Statuses
##### **Job Statuses**
Job statuses indicate the current stage of a job, helping users track progress, manage workflows, and ensure accurate reporting.
| **Status** | **Details** |
| **NotStarted** | The job has been created but not yet begun. It is unmanaged and has no active work or progress. |
| **Started** | The job is in progress. This typically means managed lines have been added or work has commenced. |
| **Completed** | The job has been finished and closed.
A final invoice will usually trigger the job to move to this status. |
| **Closed** | - The job has been manually closed.
- This may occur if the job is no longer required, the customer is no longer active, or costs (such as stock or labour) cannot be recovered.
- Jobs are closed using the **Job Close** function.
|
| **Cancelled** | - Job is cancelled
- Job created was a mistake
- Job was NotStarted and needs to be taken off the list
|
| **JobBOM** | The job is being used to produce a **Bill of Materials**.
In this case, the job acts like a “recipe” to build or assemble a final product from components. |
| **InProcessing** | An error has occurred while completing the job, usually during invoicing.
These jobs should be reviewed and corrected.
To resolve, manually close the job and update the status to **Completed**, **Closed**, or **Cancelled** as appropriate. |
When running reports, you can filter jobs based on their status, such as **Started** or **Completed**.
- **Started Jobs** – These are active jobs that are currently in progress
- **Completed Jobs** – These are jobs that have been finished and closed
This allows for accurate tracking of work in progress versus completed work.
.png)
---
##### **Correcting an Incorrect Job Status**
If a job has been closed or marked with the wrong status, it can be corrected by updating the job status.
- You can **toggle between Closed and Completed** as required
- To make this change, navigate to **Job History** and update the status accordingly
This ensures the job reflects the correct stage for accurate tracking and reporting.
.png)
---
#####
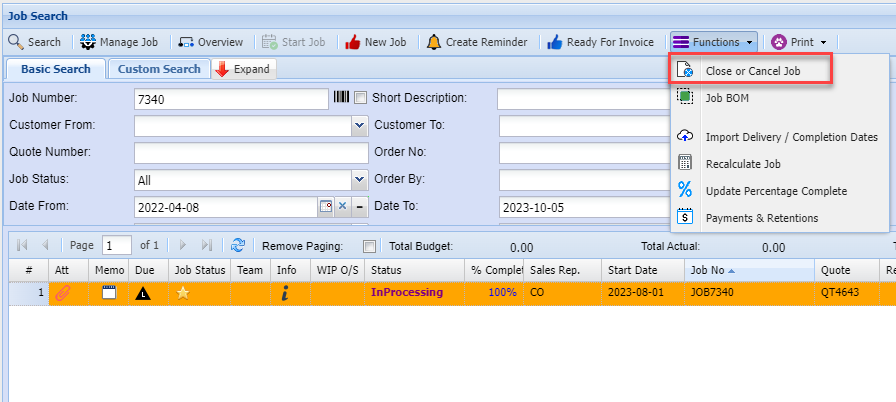
##### **In Processing Status Change**
This status occurs when an issue arises during invoicing, preventing the job from being completed.
Typically, the invoice has processed correctly, but the job has failed to update to a completed status.
To correct this:
- Manually **close the job**
- Update the status to **Completed**
This ensures the job is properly finalised for accurate reporting and tracking.
[](https://hugeerp10.co.za/hsofmanual/uploads/images/gallery/2023-10/6Ryimage.png)
---
#####
##### **Job Manage status search**
**Job Costing > Activity > Manage Job**
Due date colours is based on Completion date to current date
.png)
---
##### **Job Status Line Due Date**
**Job Costing > Activity > Manage Job**
Due date colours are based on the **Completion Date compared to the current date**.
These visual indicators help quickly identify whether a job is on track, approaching its deadline, or overdue.
| Icon
| Details
|
| .png)
| Past 30 days from Due date based on current date
|
| .png)
| Before 30 days from due date based on current date
|
| .png)
| Past 7 days from the Due date based on current date
|
| .png)
| Due date is on today’s date
|
| .png)
| Future 7 days from current date to due date
|
| .png)
| Anything after 7 days up to 30 days in the future
|
| .png)
| After 30 days in the future
|
| Icon
| | Details
|
| .png)
| Not Started
| No activity has been recorded on the line.
- No quantities have been allocated or processed
- The line has not been worked on yet
- Serves as a clear indicator that action is still required
|
| .png)
| In Progress
| **In Progress (Green)**
Work has begun and the line is actively being managed.
- Quantities are being used or updated
- Actual usage is still below the budgeted amount
- Indicates the job is progressing as planned
|
| .png)
| Qty Reached
| **Qty Reached (Blue with Tick)**
The planned work has been completed exactly as expected.
- Actual quantity equals the budgeted quantity
- No overuse or shortfall
- The tick confirms the target has been met
|
| .png)
| Qty Exceeded
| The line has gone beyond the original plan.
- Actual quantity is greater than the budgeted amount
- May indicate additional usage, cost overruns, or scope changes
- Should be reviewed for accuracy or approval
|
| .png)
| Is Complete
| The line has been manually marked as finished.
- No further updates are expected
- Confirms the line is finalised, regardless of quantities
|
- **Not Started (Red)**
The line has not yet been actioned. No work or quantities have been recorded.
- **Started (Green)**
The line is actively in progress. Work has begun and is being managed.
- **Completed (Blue)**
The line has been finished. All required work has been completed and marked accordingly.
.png)
# Print Job Card
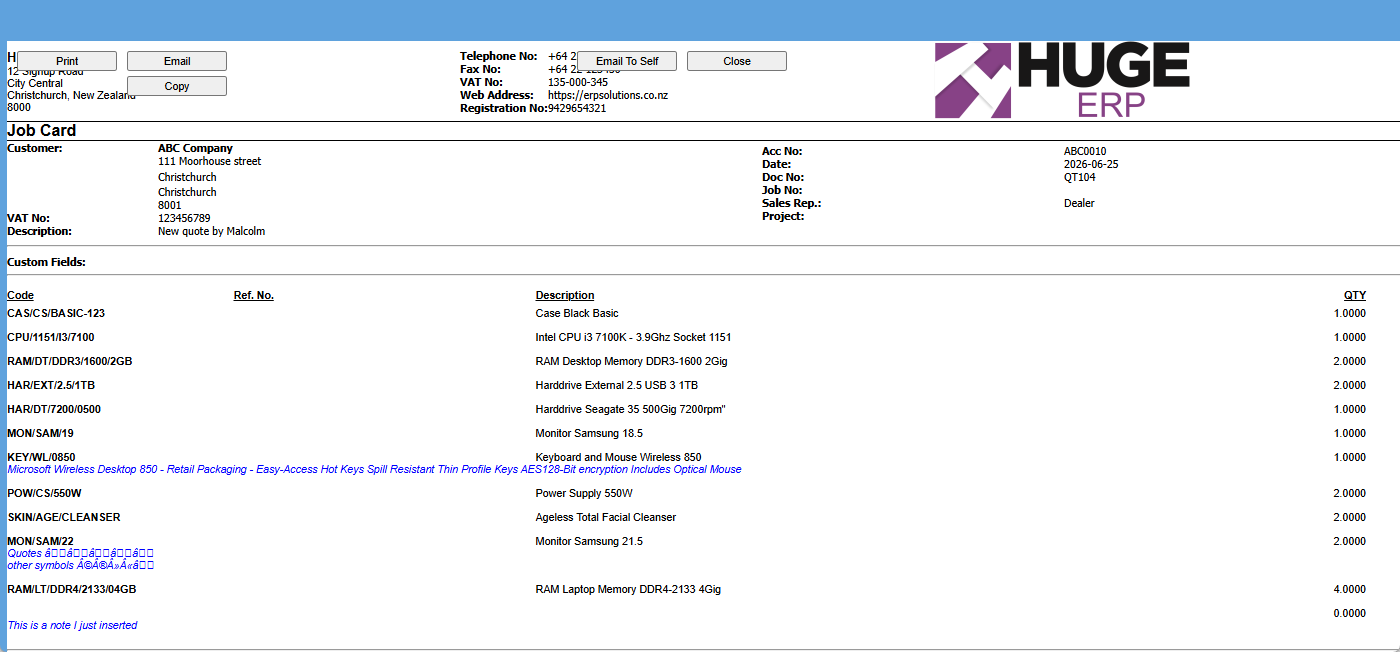
**Job Costing> Activity> Quotation> Print /Export**
Select A quote that has a job number and select print job Card form the drop-down arrow.
.png)
[](https://hugeerp10.co.za/hsofmanual/uploads/images/gallery/2026-06/JTvimage.png)
---
#### Print Service Card
**Job Costing > Activity> Quotation> Print /Export**
| Print a service card | Select a quote with a job number and print a service card from the drop-down menu |
.png)
---
#### Print Job Header
Select Job Header Print Help
**Job Costing > Activity> Quotation> Print /Export**
| Generate | Generates a print layout according to the information contained in that specific Job History Item |
.png)
.png)
# Changing the Warehouse on Job Lines
There may be instances where an incorrect warehouse has been selected on a job line and needs to be updated.
To change the warehouse, access the line through the **Job Detail Line** button and make the required update.
.png)
Return to the **Job Lines** screen.
- Locate the job line with the incorrect warehouse.
- Select (highlight) the relevant line.
- Click the **Job Detail** button.
.png)
- Highlight the job line you want to change.
- Click the **Edit Split** button.
.png)
- Update the **Warehouse** field as required.
.png)
# Change customer on Job
**System Configuration > Security > System Utilities**
The system provides a utility that allows you to **change the customer on an existing job**, provided certain conditions are met.
-
The customer can **only be changed if NO invoices have been created or processed** against the job.
-
If invoices exist, this utility will not be applicable.
- Double click on the "**Change Customer on Job**" utility
[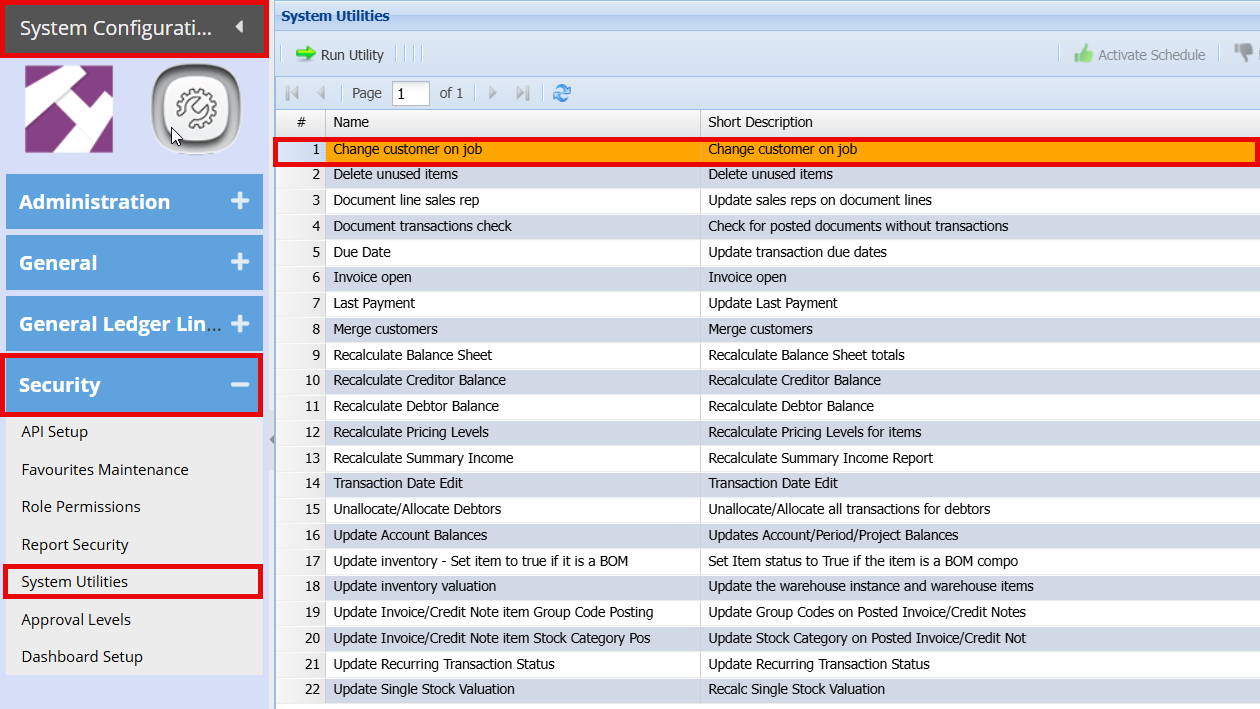](https://hugeerp10.co.za/hsofmanual/uploads/images/gallery/2026-06/NMmimage.png)
You will get a prompt that to confirm you want to change the customer.
- Click "**Yes**"
[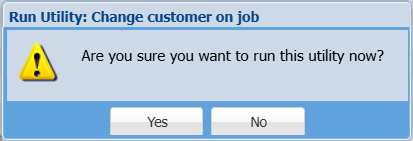](https://hugeerp10.co.za/hsofmanual/uploads/images/gallery/2026-06/XDtimage.png)
- Select the **job number** you want to change
- Select the **New Customer**
- Click "**Change"**
["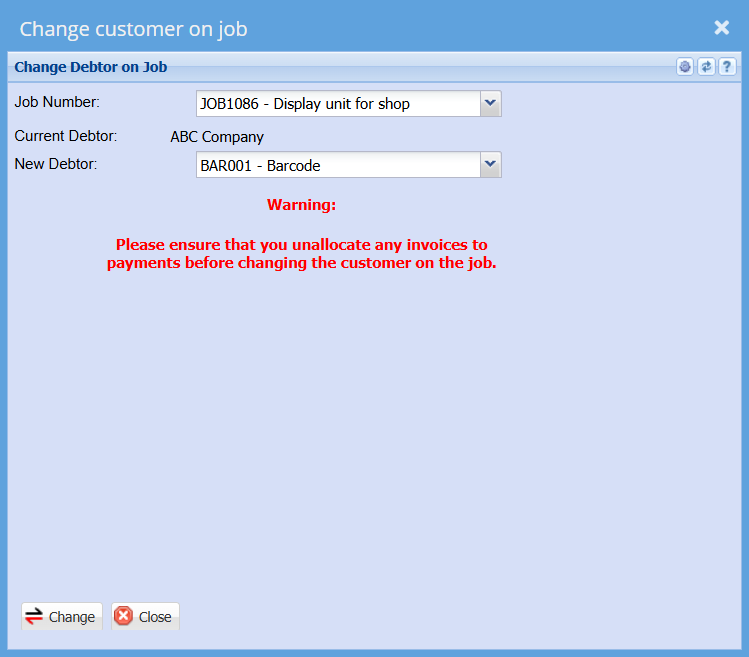](https://hugeerp10.co.za/hsofmanual/uploads/images/gallery/2026-06/mTDimage.png)
you will then get a pop up to say that the customer has been updated
[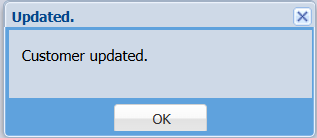](https://hugeerp10.co.za/hsofmanual/uploads/images/gallery/2026-06/8rGimage.png)
# Reassign Job and Editing of the Cost Price
Double-click a **Job** to open it. Within the job, double-click a **job line** to edit or reassign it.
[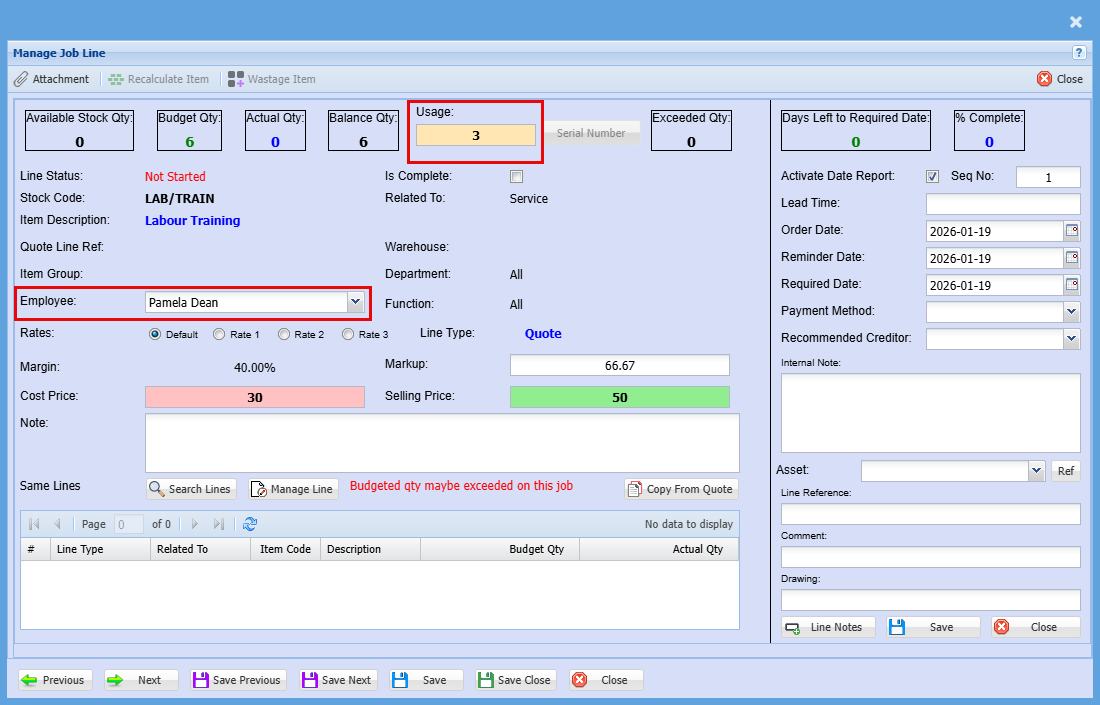](https://hugeerp10.co.za/hsofmanual/uploads/images/gallery/2026-06/S8Kimage.png)
- Allows you to edit the **cost price** of a managed line
- Allows you to **reassign the job line** to another parent line
- Allows you to change the **employee assigned** to the managed line
##### **Restrictions**
You cannot edit the line if:
1. The line is **locked**
2. The item has been marked for **invoice or delivery note**
You cannot change **cost or quantity** if the item is a:
- **Stock item**
- **Fixed asset**
##### **Reassignment Rules (Sell Price)**
When reassigning to a new parent:
- The line will adopt the **sell price of the new parent**
- If the item is a **stock category (SC) or quote line**, it will use its own **sell price**
- If the new parent is a **Cost to Company (CTC)** item, the **sell price will be removed** from the line
# Create Reminder
[](https://hugeerp10.co.za/hsofmanual/uploads/images/gallery/2026-06/iOSimage.png)
The **“Create Reminder”** button (highlighted with the bell icon in the top toolbar) is used to set up reminders for a job.
When you click this button, it allows you to:
- Schedule a **follow-up action**
- Set a **date and time** for the reminder
- Add notes about what needs to be done
- Ensure important tasks or jobs are not missed
This is especially useful for:
- Following up with customers
- Checking on job progress
- Reminding yourself to complete outstanding tasks
This screen is where you **set up and manage a reminder for a job**.
[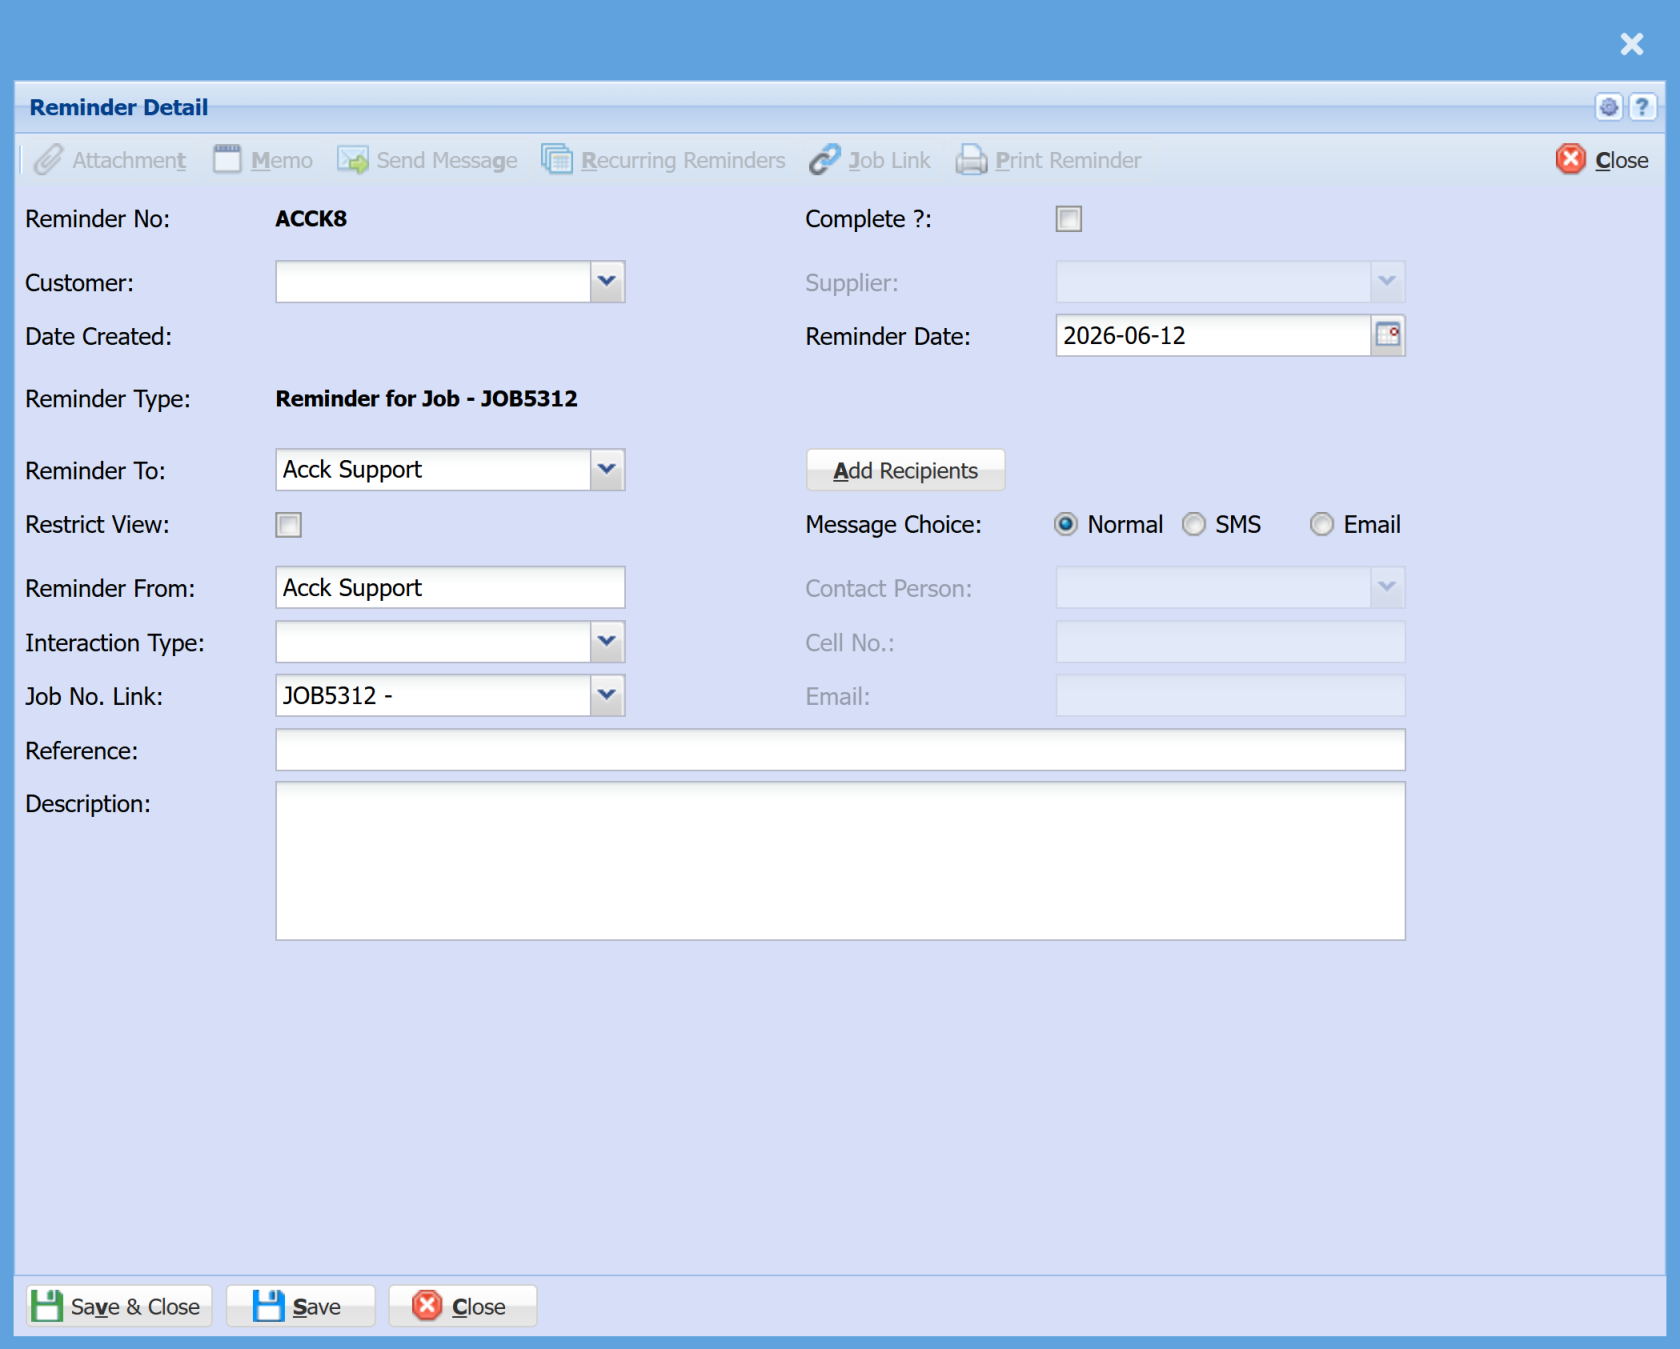](https://hugeerp10.co.za/hsofmanual/uploads/images/gallery/2026-06/IzLimage.png)
Reminder No | A unique reference number generated by the system. |
| Tick once the reminder has been actioned.
|
| **Reminder Date** | Select the date you would like the reminder to trigger. |
**Customer / Supplier**
| Link the reminder if required. |
**Created Date** | This will be the date the reminder is created |
| Select the date you would like the reminder to trigger. |
| Automatically links the reminder to the job (e.g. *Reminder for Job – JOB5312*). |
| **Reminder To** | Choose who the reminder will be assigned to (e.g. a user, team, or department). |
| **Add Recipients** | Optional – add additional people who should also receive the reminder.
Once you click **“Add Recipients”** and select a recipient:
- These fields will **automatically become active**
- The system will then:
- Populate the **Contact Person**
- Display or allow entry of the **Cell Number**
- Display or allow entry of the **Email address**
|
| **Message Choice** | - Select how the reminder will be delivered:
- **Normal** (system alert)
- **SMS**
- **Email**
|
| **Restrict View** |
|
Reminder From | The user or team creating the reminder. |
| **Interactive Type** | This field is used to **categorise the type of reminder or follow-up** so it can be tracked and filtered more easily.
You can select from the following options:
- **Clients** – General client-related follow-ups
- **Email** – When the reminder relates to sending or responding to an email
- **General** – For standard or uncategorised tasks
- **Leads** – Follow-ups related to new business or opportunities
- **Meeting** – Reminders for scheduled meetings
- **Sales** – Sales-related tasks or follow-ups
- **Telephone Calls** – When a call needs to be made
- **URGENT** – High-priority items that require immediate attention
|
| **Job No. Link** | This automatically links the reminder to the job you created it from. |
| **Reference** | Enter a short title or subject for the reminder. |
| **Description** | Add detailed notes about what needs to be done or followed up. |
# Sub Job Link
This section allows you to create a **sub-job** linked to a main job.
The sub-job retains the original job number, with an extension added (e.g. *.1*) to indicate that it forms part of the main job. This helps group related work under a single job structure while still tracking each component separately.
.png)
Follow the steps to create a **Sub Job** linked to the main job.
When created, the system will automatically assign a sub-job number based on the main job—for example:
- **Main Job:** Job15
- **Sub Job:** Job15.1
This numbering structure clearly indicates that the sub-job forms part of the main job while allowing it to be managed and tracked independently.
.png)
# Job Expense Cashbook
Job expenses are linked directly to the **General Ledger cashbooks**, ensuring that all job-related costs are accurately recorded.
These expenses are captured through entries in the **General Ledger cashbook lines**, allowing costs such as purchases, travel, or miscellaneous expenses to be allocated to a specific job for proper tracking and reporting.
.png)
After clicking **Next**, you can assign the cashbook line to a specific job.
- Select the relevant **Job** to ensure the expense is correctly allocated
- Ensure a **Job Service Item** is entered, as this determines how the cost is recorded against the job line
This step ensures that all expenses are properly linked to the job and accurately reflected in job costing and reporting.
.png)
Once processed, the expense will be added to the job under the **Expense category**.
.png)
When reviewing the job detail line, the expense will display key information linked to the job:
- A **note** describing the expense
- A **usage quantity of 1**, indicating a single expense entry
- The **cost price**, showing the value allocated to the job
This provides clear visibility of how the expense has been recorded and applied within the job.
.png)
# Job Costing Sell Value
#### Job Search
**Job Costing Module > Activity > Manage Job **
In the past, we never used to show values on the manage job screen.
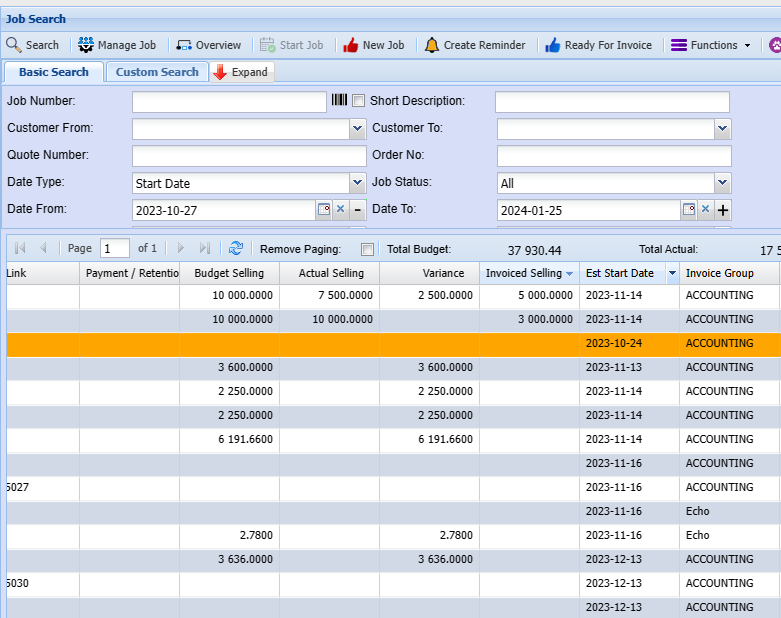
We now show values on the top bar and on the grid.
The top bar shows the total budget, Total Actual and Total Invoice
This allows you to easily manage job costing values on the job search screen.
[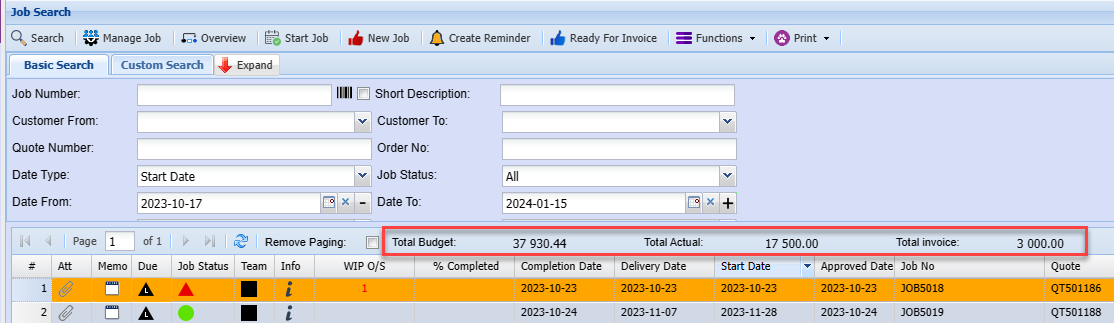](https://hugeerp10.co.za/hsofmanual/uploads/images/gallery/2024-01/HKTimage.png)
Job values are also showing on the manage job grid as shown below:
[](https://hugeerp10.co.za/hsofmanual/uploads/images/gallery/2024-01/UVGimage.png)
The job values also show on the job lines and job history making it easy to manage jobs and all the selling prices.
[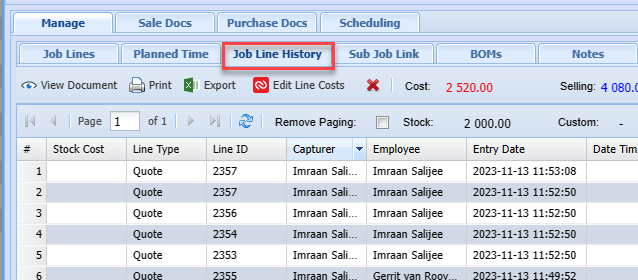](https://hugeerp10.co.za/hsofmanual/uploads/images/gallery/2024-01/eeYimage.png)
# Job Expense Supplier Journal
Job expenses are directly linked to the **Supplier Journal (Creditors Journal)**, allowing costs entered through supplier invoices or journals to be allocated to specific jobs.
For this functionality to work correctly, the appropriate setup must be completed in **Links Maintenance**.
**System Configuration > General Ledger Links > Links Maintenance > Groups tab**
Within the **Edit GL Group Link** window, the following options must be configured:
**Allow Journal To Job**
- This must be **ticked** to enable supplier journals to be allocated to jobs.
- If not enabled, job costing from supplier journals will not be available.
**Purchases**
- This should be **ticked** to indicate that the group is used for purchase-related transactions.
[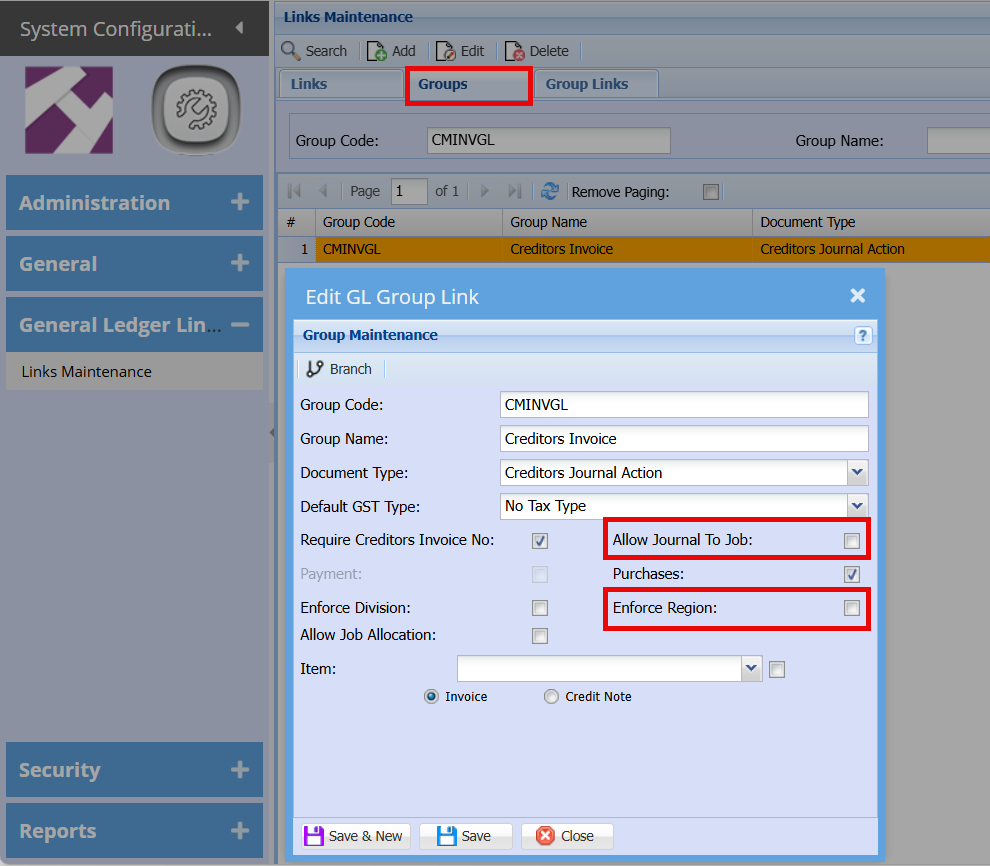](https://hugeerp10.co.za/hsofmanual/uploads/images/gallery/2026-06/MITimage.png)
# Stock Recovered Costs
Stock recovered costs are created from stock items that cannot be un managed from the job.
The stock item will be returned back on job via a stock level adjustment.
The value of the stock item will be added to the job as a custom item called stock recovered costs.
The quantity will be the same as the quantity of stock returned as a postive figure.
The value of the stock item will be the recovered cost on the job as a negative value.
See [stock request return to job](https://hugeerp0.co.za/csp/webhelp/topics/idh-topic11180.htm) processes under inventory module
# Job Costing stock write off and Gain and Loss balance
##### **Stock Write-Off & GL Allocation**
When closing a job and writing off stock, the associated cost must be correctly allocated in the General Ledger (GL).
To ensure accurate financial reporting, the write-off should be posted to the **Cost of Sales** account using the GL code:
**“Job Costing Stock Write Off.”**
This ensures that any unrecovered stock used on the job is properly accounted for as a cost to the business.
.png)
##### **Setup a new GL link and GL Link setup**
To correctly account for stock written off during job closure, a dedicated GL link must be configured.
- **GL Link Code:** `JOBSTKWRITEOFF`
- **Description:** *Job Costing Stock Write-Off*
This link should be assigned to the appropriate **Cost of Sales** account in the General Ledger.
Setting this up ensures that any stock written off is accurately recorded as a cost to the business, maintaining correct financial reporting and audit tracking.
.png)
##### **Group Link**
A Group Link must be created to support stock write-offs during job closure.
- **Document Type:** *Job Close Stock Write Off*
- **Code:** `JOBWRITEOFF`
- **Description:** *Job Costing Stock Write Off*
This setup ensures that when stock is written off during job closure, the transaction is correctly recorded and linked to the appropriate GL account for accurate costing and reporting.
.png)
##### **Link GL Links**
.png)
##### **Create Link under SCM**
.png)
##### **Job Close & Stock Write-Off Process**
When closing a job and processing the final invoice, any stock write-offs must be recorded using the newly created GL link.
- Continue to use the **Stock Journal Adjustment** process
- However, ensure the GL link **JOBSTKWRITEOFF (Job Costing Stock Write Off)** is selected
This ensures that any unrecovered stock from the job is correctly posted to the **Cost of Sales**, maintaining accurate financial reporting and job costing.
.png)
##### **Percentage Invoice – WIP Correction**
This process applies specifically to **final percentage-based job invoices**.
It is used to correct any variance between the **Work in Progress (WIP) Ledger account** and the **stock write-off value** when completing a job. These differences can occur due to timing, usage, or costing variations throughout the job lifecycle.
To support this correction, a **new GL account** must be set up and used during the final invoicing stage. This ensures that:
- WIP balances are cleared correctly
- Stock write-offs are accurately reflected
- Financial reporting remains balanced and accurate
.png)
##### **GL Link Setup – Job Gain / Loss**
To manage any differences identified during final job invoicing, a new GL link must be created.
- **GL Link Code:** `JOBGAINLOSS`
- **Description:** *Job Costing Gain or Loss*
This link is used to account for any variance between expected and actual job costs (gain or loss), ensuring these differences are accurately recorded in the General Ledger.
This helps maintain clean financial reporting and proper reconciliation when closing jobs.
.png)
##### **GL Link Group – Job WIP Correction**
A new **Document Type** must be created to support WIP corrections during job finalisation.
- **Document Type:** *Job WIP Correction*
This document type is used to group and process adjustments required to correct differences between **Work in Progress (WIP)** and actual job costs when completing percentage-based jobs.
It ensures all WIP correction entries are clearly recorded, tracked, and linked to the appropriate GL accounts for accurate financial reporting.
.png)
##### **GL Link**
.png)
##### **GL Link SCM Setup – Job WIP Correction**
A new GL link must be created within the **SCM (Supply Chain Management) setup** to support WIP corrections during job finalisation.
- **GL Link:** *Job WIP Correction*
This link is used when processing adjustments between **Work in Progress (WIP)** and actual job costs, particularly for percentage-based invoicing.
It ensures that any corrections are accurately recorded and aligned with the correct GL accounts, supporting proper reconciliation and financial reporting.
.png)
##### ** Example**
- Quote Created
.png)
- Do first invoice – half
.png)
- Invoice posting
.png)
- T-Accounts
.png)
- Lines are managed, but more costs are added
.png)
This means that the job has exceeded by R160-03
.png)
**Second Invoice**
A second invoice was processed without managing the remaining lines, resulting in increased profit.
- The **WIP Account** now reflects **R800.00**
- The **Stock Write-Off** totals **R560.04**
- This creates a **difference of R239.96**, representing the variance remaining in the WIP account
.png)
.png)
- **WIP Balance Correction**
The balance in the **WIP account must be adjusted** when there is a difference between WIP and actual job costs. This typically occurs when the **WIP value is higher than the actual costs recorded**.
**If WIP is Higher (Adjust Down):**
- **Debit:** WIP – R239.96
- **Credit:** Cost of Sales – Job Gain/Loss – R239.96
**If Actual Costs are Higher (Adjust Up – Default GL Behaviour):**
- **Debit:** Cost of Sales – Job Gain/Loss – R239.96
- **Credit:** WIP – R239.96
**Explanation**
To determine the correct adjustment:
- Calculate all estimated values posted to the **WIP account** for the job
- Compare these to the actual costs posted to **Cost of Sales (COS)**
- Identify the difference and process the adjustment accordingly
This ensures the WIP account is accurately balanced and reflects the true cost of the job compared to the original estimates.
# Take On Values for Job
### Taking on Values for a Job
1. **Create a Sub Quote**
- Generate a sub-quote from the existing job, using the closing balances for both cost and selling values completed to date.
2. **Set Up an Inventory Item**
- Create a new custom inventory item called:
**XJOB/OB – X Job Cost Opening Balance**
- Use this item code on the quote lines.
3. **Structure the Quote Lines**
- Divide the quote into two lines (using the same inventory code):
1. Costs and sales related to all previously invoiced documents to date.
2. Costs and sales representing the remaining balance compared to the total job budget.
4. **Validate Totals**
- For existing jobs, ensure that:
- The two calculated values above, plus any new values,
**equal the total estimated cost and selling value of the job.**
5. **Push Quote to Job**
- Once the quote is created and applied to the job:
- Manage the quote lines so that costs and sales are correctly reflected in the Job WIP (Work in Progress) reports.
6. **Raise Customer Invoice**
- Create a customer invoice for the opening balance lines.
- Process the invoice to reflect completion, ensuring:
- No VAT/GST is applied.
7. **Post to Suspense Account**
- Allow the invoice to prompt for posting.
- Adjust the ledger so that it posts to the **Take-On Suspense Account**.
8. **Balance the Customer Account**
- Create a customer journal transaction to balance the account.
- Offset the entry against the Take-On Suspense Account.
- Allocate the journal and invoice together.
9. **Invoice Numbering**
- Change the invoice reference format to: **JOBOB + sequential number (starting from 100)**
10. **Processing Timing**
- Perform this process **outside of normal production hours** to prevent interference with regular invoice processing using the temporary numbering.
11. **Restore Invoice Sequence**
- After completion, revert the invoice numbering sequence back to the standard range.