# BIM - Activity

Activity

# Stock Forecast

# Stock Forecast Process

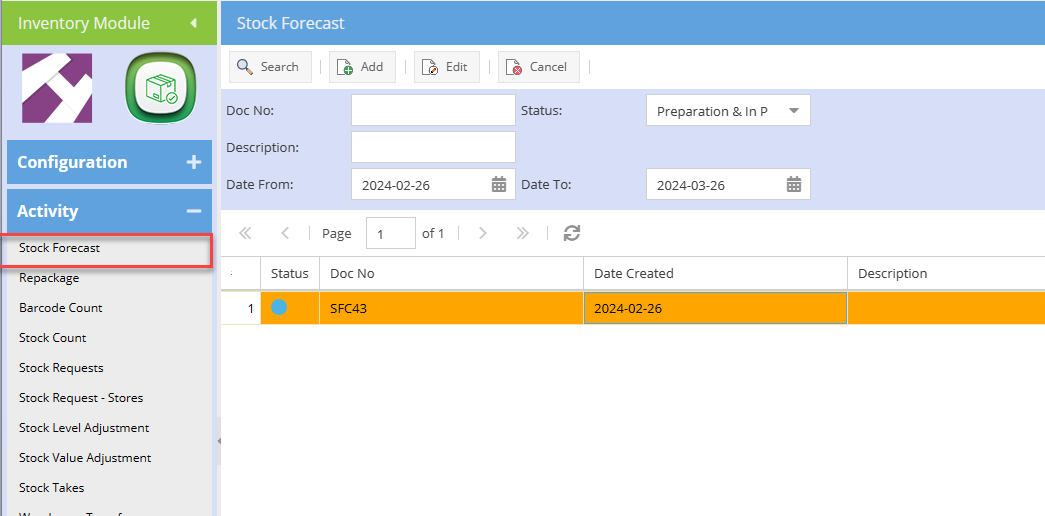
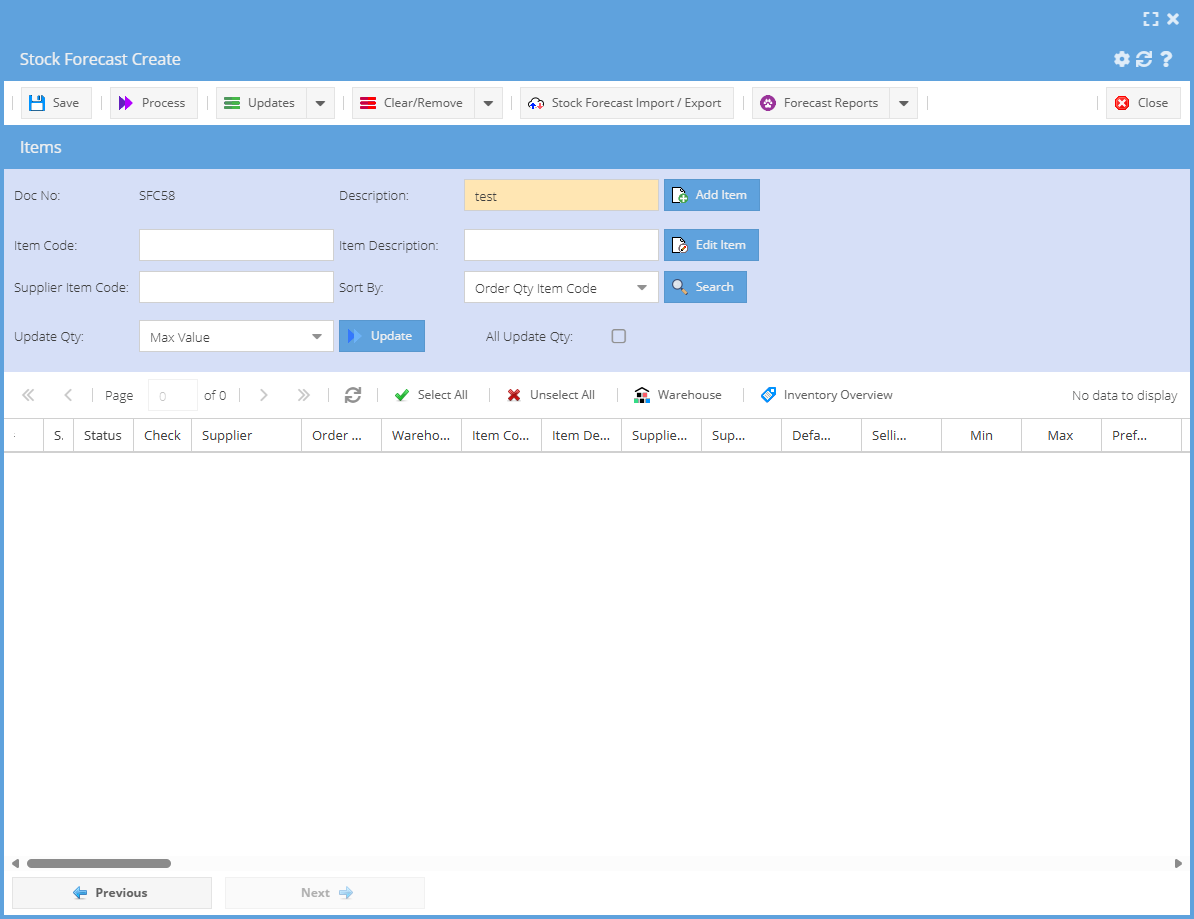
The stock forecast is used to predict or calculate how much stock to purchase in advance

<span style="color: rgb(45, 194, 107);">**Inventory Module&gt; Activity&gt; Stock Forecast**</span>

[![image.png](https://hugeerp10.co.za/hsofmanual/uploads/images/gallery/2024-03/scaled-1680-/iDWimage.png)](https://hugeerp10.co.za/hsofmanual/uploads/images/gallery/2024-03/iDWimage.png)

Clicking Add

[![image.png](https://hugeerp10.co.za/hsofmanual/uploads/images/gallery/2024-10/scaled-1680-/cCLimage.png)](https://hugeerp10.co.za/hsofmanual/uploads/images/gallery/2024-10/cCLimage.png)
# Repackage Menu

Repackaging of stock

# Repackage

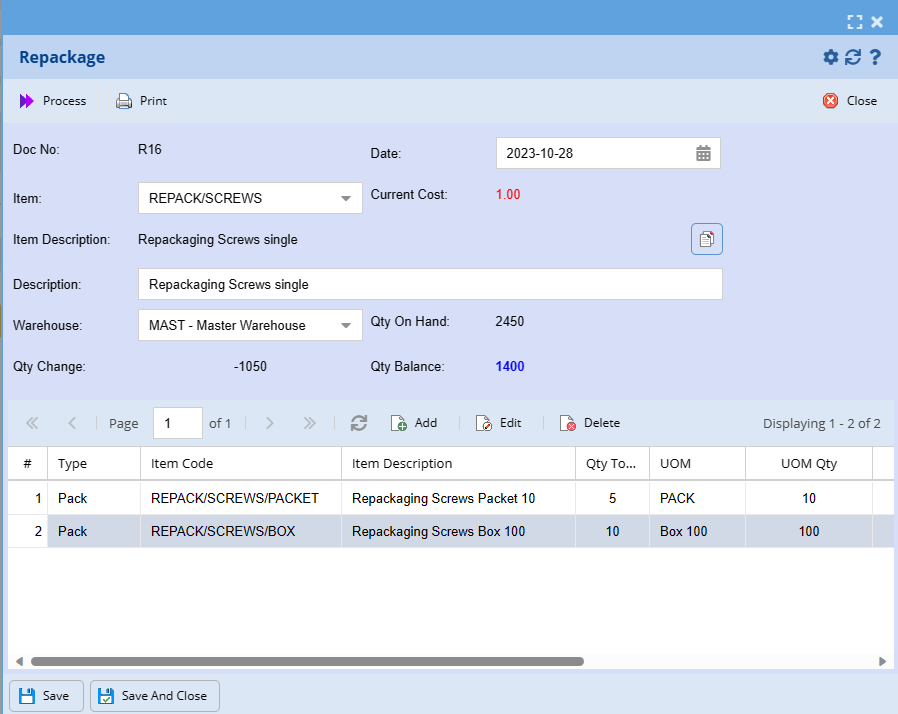
<span style="color: rgb(0, 0, 0);">Repackage is a combination of stock level adjustment and stock value adjustment.</span>

<span style="color: rgb(0, 0, 0);">Repackage helps to distribute product quantities into other product packaging.</span>

<span style="color: rgb(0, 0, 0);">If you have a box of screws and want to turn it into smaller packages it allows you to do that and to change the pricing to suit the pricing of the smaller packages.</span>

See detailed video on how repackage works - [Repackage.mp4](https://hugeerp10.co.za/hsofmanual/attachments/5)

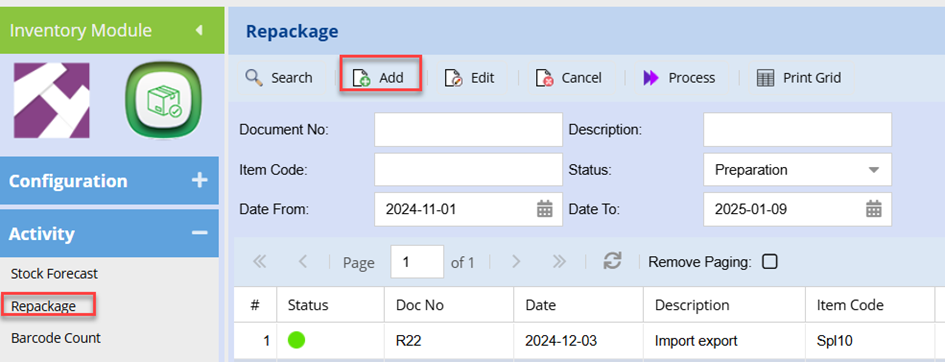
<span style="color: rgb(45, 194, 107);">**Inventory Module&gt; Activity&gt; Repackage**</span>

[![image.png](https://hugeerp10.co.za/hsofmanual/uploads/images/gallery/2023-10/scaled-1680-/YHW6RYimage.png)](https://hugeerp10.co.za/hsofmanual/uploads/images/gallery/2023-10/YHW6RYimage.png)

# Creating a new repackage

Adding in a new repackage item

[![image.png](https://hugeerp10.co.za/hsofmanual/uploads/images/gallery/2023-10/scaled-1680-/EhFimage.png)](https://hugeerp10.co.za/hsofmanual/uploads/images/gallery/2023-10/EhFimage.png)
# Repackage Basic Import

<span lang="EN-GB">In place of adding items individually on the repackage function, one can import the item.</span>

<span lang="EN-GB"> </span><span lang="EN-GB">To import items:</span>

<span lang="EN-GB"> </span><span lang="EN-GB">You will need to create the import file</span>

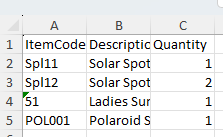
<span lang="EN-GB">The file template is a s below and is a standard excel format file</span>

[![image.png](https://hugeerp10.co.za/hsofmanual/uploads/images/gallery/2025-01/scaled-1680-/DNCimage.png)](https://hugeerp10.co.za/hsofmanual/uploads/images/gallery/2025-01/DNCimage.png)

<span lang="EN-GB">Once the file has been created. Save the file in a dedicated folder</span>

<span lang="EN-GB"> </span><span lang="EN-GB">Go to Repackage</span>

<span lang="EN-GB">Create a new repackage setup</span>

<span lang="EN-GB"> </span>[![image.png](https://hugeerp10.co.za/hsofmanual/uploads/images/gallery/2025-01/scaled-1680-/ktqimage.png)](https://hugeerp10.co.za/hsofmanual/uploads/images/gallery/2025-01/ktqimage.png)

<span lang="EN-GB">Select the relevant code and Enter the description as you would normally</span>

<span lang="EN-GB"> </span><span lang="EN-GB">Click Save at the bottom of the page</span>

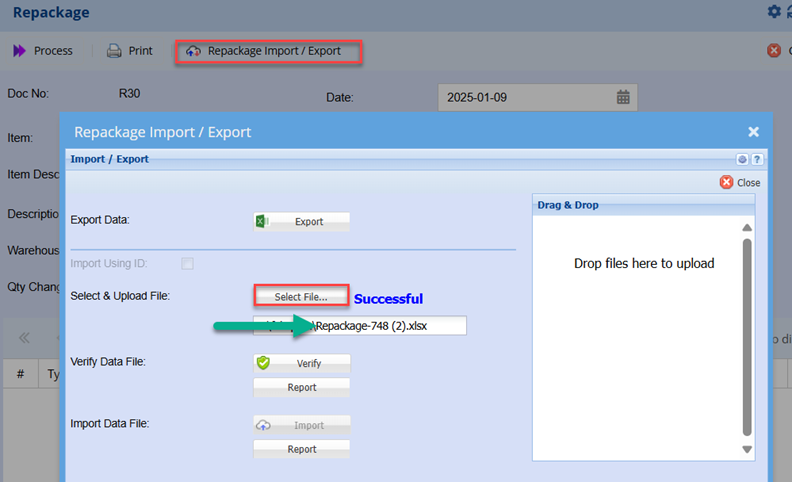
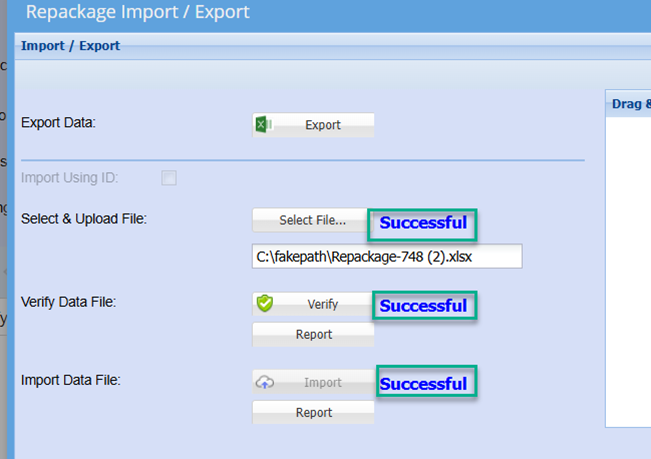
<span lang="EN-GB"> </span><span lang="EN-GB">Click the Repackage Import / Export Button</span>

<span lang="EN-GB"> </span><span lang="EN-GB">Search for the file and select</span>

<span lang="EN-GB"> </span><span lang="EN-GB">This will upload and you should see “successful” indicted<span style="mso-spacerun: yes;"> </span>(once the file has bene uploaded ) </span>

<span lang="EN-GB"> </span>[![image.png](https://hugeerp10.co.za/hsofmanual/uploads/images/gallery/2025-01/scaled-1680-/Ffnimage.png)](https://hugeerp10.co.za/hsofmanual/uploads/images/gallery/2025-01/Ffnimage.png)

<span lang="EN-GB">Click Verify</span>

<span lang="EN-GB">Successful should be returned</span>

<span lang="EN-GB">If unsuccessful or failed, click the Report button to establish the cause of the file failing to verify.</span>

<span lang="EN-GB"> </span><span lang="EN-GB">Once successfully verified, click the import button</span>

<span lang="EN-GB"> </span><span lang="EN-GB">Again, successful should be displayed</span>

<span lang="EN-GB"> </span>[![image.png](https://hugeerp10.co.za/hsofmanual/uploads/images/gallery/2025-01/scaled-1680-/KQHimage.png)](https://hugeerp10.co.za/hsofmanual/uploads/images/gallery/2025-01/KQHimage.png)

<span lang="EN-GB" style="mso-no-proof: yes;"></span>

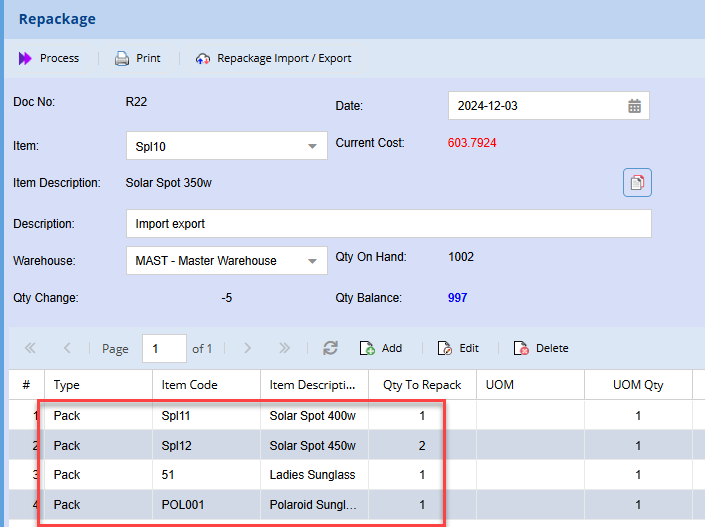
<span lang="EN-GB"> </span><span lang="EN-GB">Click close.</span>

<span lang="EN-GB">This will return to the Repackage grid where you should notice all item have been import and are displayed on the grid</span>

<span lang="EN-GB"> </span>

[![image.png](https://hugeerp10.co.za/hsofmanual/uploads/images/gallery/2025-01/scaled-1680-/uPBimage.png)](https://hugeerp10.co.za/hsofmanual/uploads/images/gallery/2025-01/uPBimage.png)

<span lang="EN-GB"> </span>

<span lang="EN-GB"> </span>

<span lang="EN-GB"></span>

# Barcode Count

# Barcode Count Search

[![image.png](https://hugeerp10.co.za/hsofmanual/uploads/images/gallery/2024-10/scaled-1680-/oWLimage.png)](https://hugeerp10.co.za/hsofmanual/uploads/images/gallery/2024-10/oWLimage.png)
# Stock Count Menu

# Stock Count

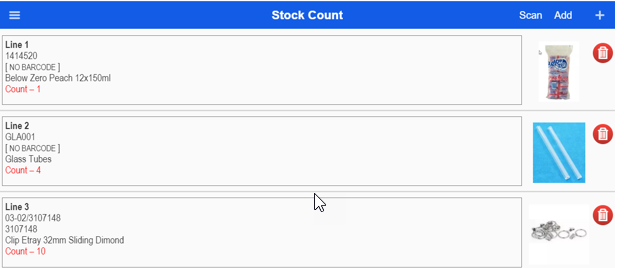
<span class="ts10">It is a function available on our webatar app that allows the user to count inventory using their mobile devices</span>

<span class="ts10">this data is then synced to the main system.</span>

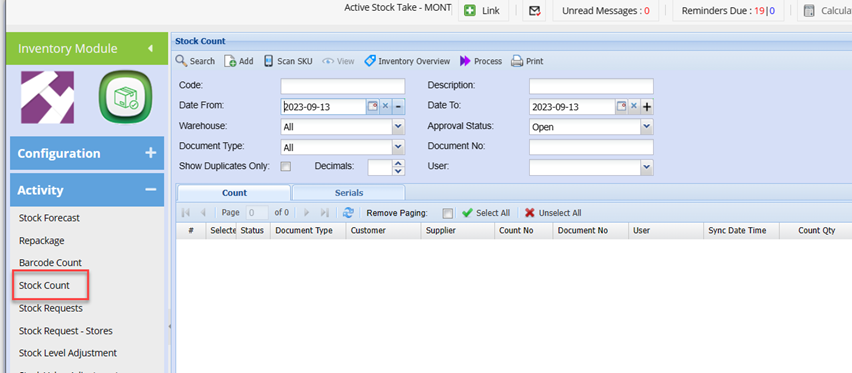
<span class="ts10">Upon syncing the user will go to the main system</span>

<span class="ts15">Inventory&gt; Activity&gt; Stock Count</span>

<span class="ts0"> </span><span class="ts0"> </span>![](https://hugeerp0.co.za/csp/webhelp/topics/images/image(3267).png)

<span class="ts0">Stock count process to stock take</span>

![](https://hugeerp0.co.za/csp/webhelp/topics/images/image(3082).png)

# Stock Count Process

**<span lang="EN-GB" style="mso-no-proof: yes;"> </span>**

<span lang="EN-GB" style="mso-no-proof: yes;">The stock count function is a feature on the Webatar App that allows one to do stock takes or cycle counts. These counts can then be processed to various documents including stock takes.</span>

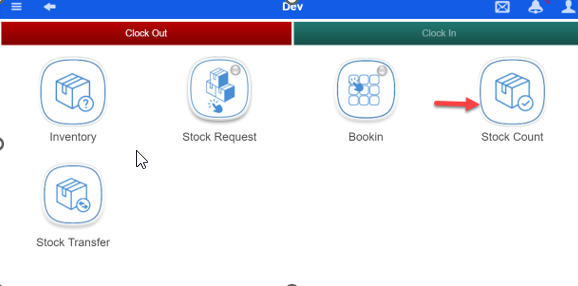
<span lang="EN-GB" style="mso-no-proof: yes;">On the Webatar App, go to Inventory, Stock Counts</span>

<span style="font-size: 12.0pt; line-height: 107%; mso-bidi-font-family: Calibri; mso-no-proof: yes;"><span style="mso-list: Ignore;"><span style="font: 7.0pt 'Times New Roman';"> </span></span></span>

[![image.png](https://hugeerp10.co.za/hsofmanual/uploads/images/gallery/2024-01/scaled-1680-/qRrimage.png)](https://hugeerp10.co.za/hsofmanual/uploads/images/gallery/2024-01/qRrimage.png)

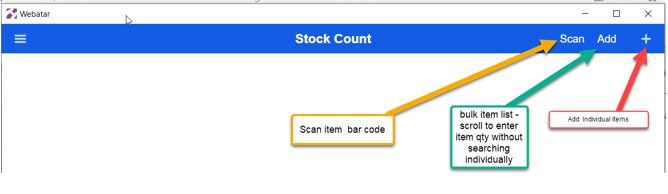
<span lang="EN-GB">There are Multiple ways to add items to the count</span>

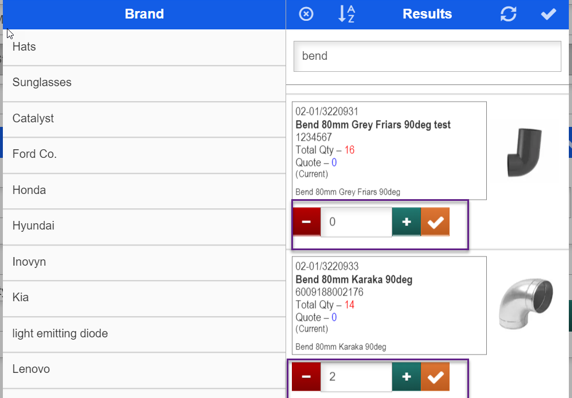
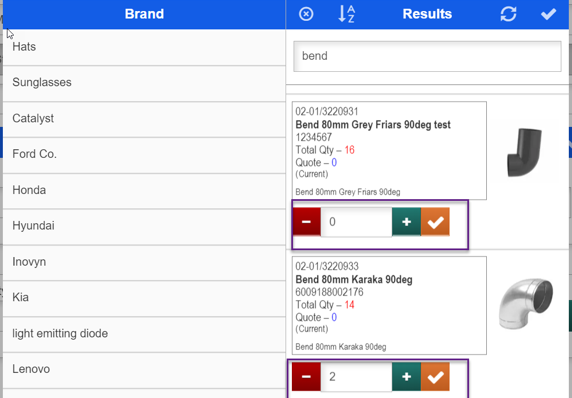
<span style="mso-bidi-font-family: Calibri;"><span style="mso-list: Ignore;">1.<span style="font: 7.0pt 'Times New Roman';"> </span></span></span>Add items to the count individually by filtering on Brand categorisation.

<span style="mso-bidi-font-family: Calibri;"><span style="mso-list: Ignore;">2.<span style="font: 7.0pt 'Times New Roman';"> </span></span></span>Quick Add: Call up multiple items and enter counts simply by scrolling to the required item

<span style="mso-bidi-font-family: Calibri;"><span style="mso-list: Ignore;">3.<span style="font: 7.0pt 'Times New Roman';"> </span></span></span>Search count item by bar code

<span style="mso-bidi-font-family: Calibri;"><span style="mso-list: Ignore;">4.<span style="font: 7.0pt 'Times New Roman';"> </span></span></span>Search items product code or description

<span style="mso-bidi-font-family: Calibri;"><span style="mso-list: Ignore;">5.<span style="font: 7.0pt 'Times New Roman';"> </span></span></span>Scan item bar code

[![image.png](https://hugeerp10.co.za/hsofmanual/uploads/images/gallery/2024-01/scaled-1680-/hHiimage.png)](https://hugeerp10.co.za/hsofmanual/uploads/images/gallery/2024-01/hHiimage.png)

<span lang="EN-GB">Once the item is searched and returned on screen</span>

<span lang="EN-GB">Simply enter the actual count quantity</span>

<span lang="EN-GB">Warehouse is set to default to the user, thus saves time on having to select the warehouse on each count.</span>

<span lang="EN-GB">Click save</span>

<span lang="EN-GB">Search the next item and enter the count quantity.</span>

<span lang="EN-GB"> </span><span lang="EN-GB">Count and save multiple items and then sync.</span>

<span lang="EN-GB">Sync to sever either individually after each count, or bulk sync – after counted few / all items.</span>

<span lang="EN-GB"> </span>[![image.png](https://hugeerp10.co.za/hsofmanual/uploads/images/gallery/2024-01/scaled-1680-/mmoimage.png)](https://hugeerp10.co.za/hsofmanual/uploads/images/gallery/2024-01/mmoimage.png)

<span lang="EN-GB"> </span><span lang="EN-GB">Enter any relevant notes related to queries/ discrepancies.</span>

[![image.png](https://hugeerp10.co.za/hsofmanual/uploads/images/gallery/2024-01/scaled-1680-/G4ximage.png)](https://hugeerp10.co.za/hsofmanual/uploads/images/gallery/2024-01/G4ximage.png)

<span lang="EN-GB">Counts not sync’d to server can be deleted or edited in the event of errors</span>

[![image.png](https://hugeerp10.co.za/hsofmanual/uploads/images/gallery/2024-01/scaled-1680-/qN5image.png)](https://hugeerp10.co.za/hsofmanual/uploads/images/gallery/2024-01/qN5image.png)

<span lang="EN-GB">once items are counted and ready to sync, click the sync bar to push counts to the server</span>

[![image.png](https://hugeerp10.co.za/hsofmanual/uploads/images/gallery/2024-01/scaled-1680-/K0Vimage.png)](https://hugeerp10.co.za/hsofmanual/uploads/images/gallery/2024-01/K0Vimage.png)

<span lang="EN-GB">Items successfully sync’d from Webatar will be displayed on the main system as follows</span>

<span lang="EN-GB">Go to Inventory Module &gt; Activity &gt; Stock Count</span>

<span lang="EN-GB">Enter the required date range and warehouse.</span>

<span lang="EN-GB">Click Search</span>

<span lang="EN-GB" style="mso-no-proof: yes;">![](https://hugeerp10.co.za/hsofmanual/uploads/images/gallery/2024-01/embedded-image-2owxzszf.png)  
</span>

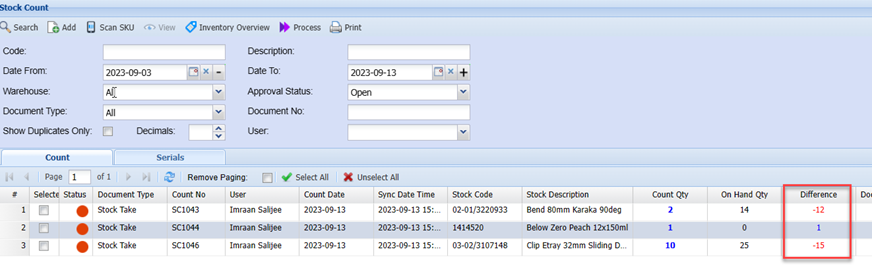
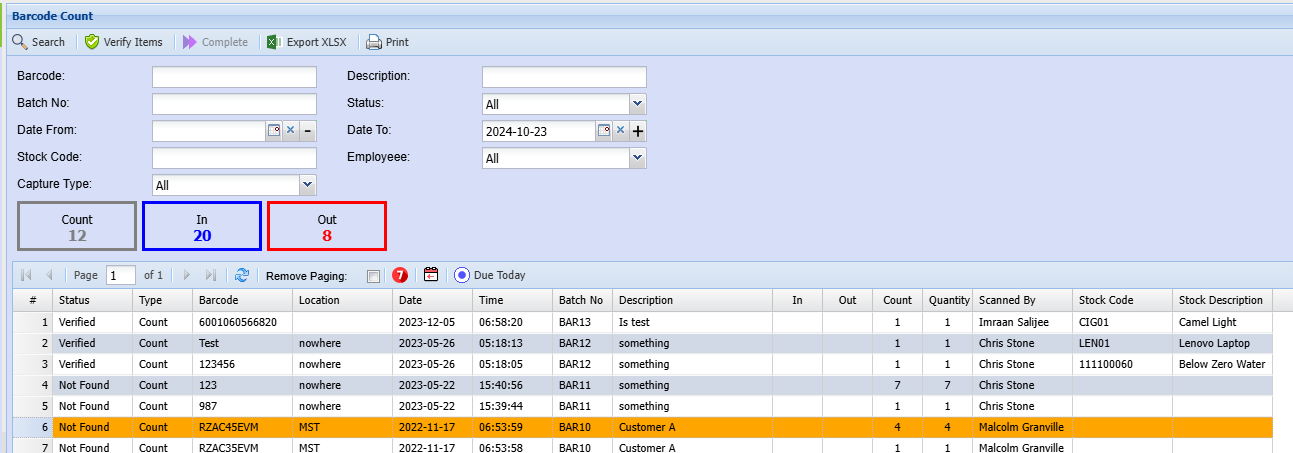
<span lang="EN-GB">See variance as soon as counts are sync’d, resulting in fewer delays in resolving discrepancies.</span>

<span lang="EN-GB"> </span><span lang="EN-GB" style="mso-no-proof: yes;"></span>![](https://hugeerp10.co.za/hsofmanual/uploads/images/gallery/2024-01/embedded-image-eaqbcvji.png)

<span lang="EN-GB"> </span><span lang="EN-GB">You will notice the synced items are listed in the grid with the system quantity, counted quantity and variance or difference.</span>

<span lang="EN-GB">The supervisor can then opt to do second counts on items where necessary.</span>

<span lang="EN-GB">Any duplicated counts can be deleted / marked compete from the grid.</span>

<span lang="EN-GB"> </span><span lang="EN-GB">Once the counts have been completed, these can be processed to the stock take</span>

<span lang="EN-GB" style="mso-no-proof: yes;">  
</span>

<span class="ts0">The process to stock take</span>

<span class="ts0">When clicking on the process, bring up a window</span>

<span class="ts0">This window will have the option for document type.</span>

<span class="ts0">Currently only Stock Take</span>

<span class="ts0">Select stock take and then there is another option which looks at open stock takes.</span>

<span class="ts0">Select on the stock take.</span>

<span class="ts0">This stock take defines the warehouse and items</span>

<span class="ts0">When clicking on next the following will happen</span>

<span class="ts0">Filter all stock counts by the warehouse, meaning that if the count is of another warehouse, ignore it</span>

<span class="ts0">If an item was counted multiple times, take the last count for the stock take</span>

<span class="ts0">On the status, only look at Open status, ignore other statuses</span>

<span class="ts0">If Document Type was not specified as StockTake but user selected it, use it for the stock take.</span>

<span class="ts0">If a stock item was counted but the stock take does not have this item, ignore it.</span>

<span class="ts0">When clicking on continue, produce an exception report with various headers</span>

<table border="1" id="bkmrk-successful-showing-i" style="border-collapse: collapse; width: 76.6667%;"><colgroup><col style="width: 29.9075%;"></col><col style="width: 70.0595%;"></col></colgroup><tbody><tr><td><span class="ts0">Successful</span></td><td><span class="ts0">Showing Items successfully updated to the stock take file</span></td></tr><tr><td><span class="ts0">Duplicate items</span></td><td><span class="ts0">Show items that were duplicated but was not taken to stock take</span></td></tr><tr><td><span class="ts0">Items not in stock take</span></td><td><span class="ts0">Show items that were in stock count but not in stock take</span></td></tr></tbody></table>

<span class="ts0">After you have successfully updated the stock take file, do the following to the stock count items</span>

<table border="1" id="bkmrk-1-change-the-status-" style="border-collapse: collapse; width: 91.9753%;"><colgroup><col style="width: 5.10731%;"></col><col style="width: 94.8658%;"></col></colgroup><tbody><tr><td>1</td><td><span class="ts0">Change the status to completed</span></td></tr><tr><td>2</td><td><span class="ts0">Insert the stock take document number into the Document no column.</span></td></tr><tr><td>3</td><td><span class="ts0">For those items that did not have a Document type StockTake marked which was blank, mark it as StockTake</span></td></tr></tbody></table>

<span class="ts0"> </span>![](https://hugeerp0.co.za/csp/webhelp/topics/images/image(3268).png)

# ScanSKU Count

<span class="ts10">Video training manual 2021 - </span>[Click Here](https://vimeo.com/655201173)

<span class="ts0">This section of the system uses the ScanSKU device to scan for stock take and stock count and import into the stock count.</span>

<span class="ts0">Open up the Scan SKU window from Scan SKU button.</span>

<span class="ts0">Once window is open, drag your scanned CSV file from your email onto the window.</span>

<span class="ts0">The system will automatically upload the file and import the data.</span>

<span class="ts0">If there are any errors, a button will appear which you can print, that shows you all the errors.</span>

<span class="ts0"> </span>![](https://hugeerp0.co.za/csp/webhelp/topics/images/image(3387).png)

# Count to Stock Take

<span class="ts10">Video training manual 2021 - </span>[Click Here](https://vimeo.com/505507926)

<span class="ts0">Processing of stock counts to a stock take</span>

[![image.png](https://hugeerp10.co.za/hsofmanual/uploads/images/gallery/2024-10/scaled-1680-/Yv8image.png)](https://hugeerp10.co.za/hsofmanual/uploads/images/gallery/2024-10/Yv8image.png)

#### Print

[![image.png](https://hugeerp10.co.za/hsofmanual/uploads/images/gallery/2024-10/scaled-1680-/hb8image.png)](https://hugeerp10.co.za/hsofmanual/uploads/images/gallery/2024-10/hb8image.png)

---

#### Functions

[![image.png](https://hugeerp10.co.za/hsofmanual/uploads/images/gallery/2024-10/scaled-1680-/z9ximage.png)](https://hugeerp10.co.za/hsofmanual/uploads/images/gallery/2024-10/z9ximage.png)

---

##### Process Actions

[![image.png](https://hugeerp10.co.za/hsofmanual/uploads/images/gallery/2024-10/scaled-1680-/HRYimage.png)](https://hugeerp10.co.za/hsofmanual/uploads/images/gallery/2024-10/HRYimage.png)

# Barcode scanning using ScanSKU

<span class="ts0">Go to section ScanSKU for how to do</span>

[Click here](https://hugeerp0.co.za/csp/webhelp/topics/idh-topic10700.htm)

<span class="ts0"> </span> ![](https://hugeerp0.co.za/csp/webhelp/topics/images/image(3744).png)

# Add Stock Count

Adding a manual entry into stock count

Click on the Add button to add in an entry manually

[![image.png](https://hugeerp10.co.za/hsofmanual/uploads/images/gallery/2025-01/scaled-1680-/poCimage.png)](https://hugeerp10.co.za/hsofmanual/uploads/images/gallery/2025-01/poCimage.png)
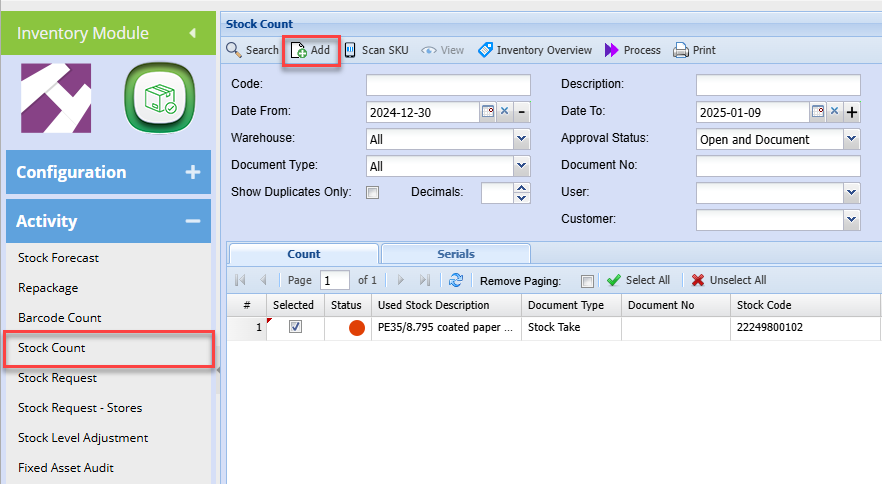
Clicking Add

[![image.png](https://hugeerp10.co.za/hsofmanual/uploads/images/gallery/2025-01/scaled-1680-/Nb1image.png)](https://hugeerp10.co.za/hsofmanual/uploads/images/gallery/2025-01/Nb1image.png)
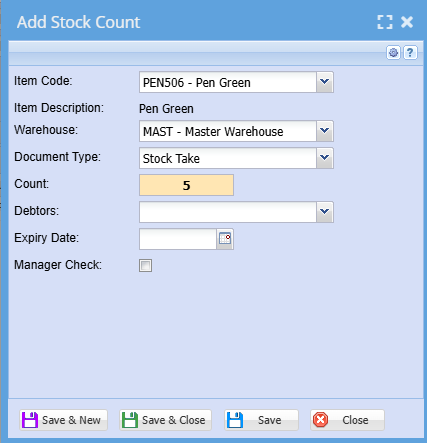
<table border="1" id="bkmrk-item-code-search-for" style="border-collapse: collapse; width: 100%;"><colgroup><col style="width: 34.3453%;"></col><col style="width: 65.7739%;"></col></colgroup><tbody><tr><td>**Item Code**</td><td>Search for the item by code or description</td></tr><tr><td>**Item Description**</td><td>Shows the description of the selected item</td></tr><tr><td>**Warehouse**</td><td>The default warehouse will appear</td></tr><tr><td>**Document Type**</td><td>Specify the type of count

Stock take, Stock Level, invoice, credit note, stock receive, stock return

</td></tr><tr><td>**Count**</td><td>Add in the count</td></tr><tr><td>**Debtors**</td><td>Select the associated customer</td></tr><tr><td>**Expiry Date**</td><td>Enter the expiry date of the product</td></tr><tr><td>**Manager Check**</td><td>Activate tick if the product was checked by a manager</td></tr></tbody></table>

---

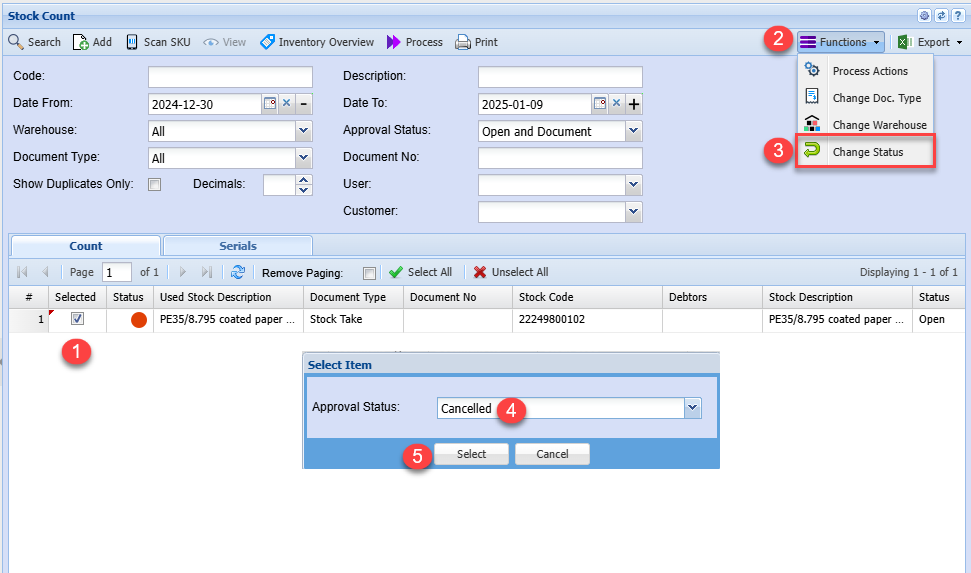
##### Cancel a Count entry

Adding in a count but made a mistake.

<span data-olk-copy-source="MessageBody">One cannot edit or delete the loaded item, but you can cancel the entry.</span>

<span data-olk-copy-source="MessageBody">Follow the steps below</span>

[![image.png](https://hugeerp10.co.za/hsofmanual/uploads/images/gallery/2025-01/scaled-1680-/nMyimage.png)](https://hugeerp10.co.za/hsofmanual/uploads/images/gallery/2025-01/nMyimage.png)

# Stock Requests Menu

# Stock Request

<span class="ts0">Stock request usually imply requesting stock items from your warehouse.</span>

<span class="ts0">Stock Request process</span>

![](https://hugeerp0.co.za/csp/webhelp/topics/images/image(2334).png)

<span class="ts0">Within the Webaccounting system, stock requests can be used for 3 reasons:</span>

<span class="ts0">RFQ – Request for Quote</span>

<span class="ts0">Request stock from warehouse (Picking Slip)</span>

<span class="ts0">Request Purchase order</span>

<span class="ts0">This form allows the user to search for and amend existing stock requests and create</span>

<span class="ts0">n</span><span class="ts0">ew stock requests.</span>

<span class="ts0">To create a new stock request, Click on</span><span class="ts0"> Add</span>

<span class="ts0">Enter a description of your choice. (This could be a client’s name, or purpose for the stock </span><span class="ts0">request for example).</span>

<span class="ts0">The reference could be the same as the description or a unique reference that you wish.</span>

<span class="ts0">Requested by, will default to the name of the user capturing the stock request, however, you can</span>

<span class="ts0">change this by clicking on the drop down box and selecting the person’s name that actually</span>

<span class="ts0">requested the stock.</span>

<span class="ts0">For instance, you may be the warehouse manager and a staff member requests stock items, you</span>

<span class="ts0">could enter his/ her name as a reference for possible future queries.</span>

<span class="ts0">The stock request can be of two types, Either Cost to Company (CTC) or Scope Creep (SC)</span>

<span class="ts0">CTC = A cost to company. SC = An adhoc cost, perhaps an item initially forgotten to add.</span>

<span class="ts0">To Insert item line(s), click </span><span class="ts0">Add</span>

<table border="1" id="bkmrk-basic-search-tab-the" style="border-collapse: collapse; width: 95.8025%;"><colgroup><col style="width: 23.554%;"></col><col style="width: 76.4198%;"></col></colgroup><tbody><tr><td><span class="ts0">Basic Search Tab</span></td><td><span class="ts0">the user can search by entering the information on the following fields</span></td></tr><tr><td><span class="ts0">Stock Request Number</span></td><td><span class="ts0">to search by entering the stock request number</span></td></tr><tr><td><span class="ts0">Description</span></td><td><span class="ts0">to search by entering the description</span></td></tr><tr><td><span class="ts0">Job Number</span></td><td><span class="ts0">search by entering the job number</span></td></tr><tr><td><span class="ts0">Date From</span></td><td><span class="ts0">search by selecting the date from which stock request search runs from and also the date to</span></td></tr><tr><td><span class="ts0">Status</span></td><td><span class="ts0">to search by selecting the status from the drop down arrow</span></td></tr><tr><td><span class="ts0">Requested By</span></td><td><span class="ts0">search by entering the name of the person requesting the stock</span></td></tr><tr><td><span class="ts0">Reference</span></td><td><span class="ts0">search by reference</span></td></tr><tr><td><span class="ts0">Add button</span></td><td><span class="ts0">to insert a new stock request</span></td></tr><tr><td><span class="ts0">Edit button</span></td><td><span class="ts0">to view or edit the selected stock request item</span></td></tr><tr><td><span class="ts0">Delete button</span></td><td><span class="ts0">to remove the currently selected stock request.</span></td></tr></tbody></table>

# Stock request document

<span class="ts2">Stock request document types</span>

![](https://hugeerp0.co.za/csp/webhelp/topics/images/image(3085).png)

# Stock request rules

<span class="ts0">There are certain rules that apply on stock requests relating to Documents.</span>

<span class="ts0">In most cases this is a great way for staff to capture a document telling admin and accounting staff what has happened to stock.</span>

<span class="ts22">Stock request to Invoice</span>

<span class="ts0">This will not update any lines on the job, but create a debtors invoice which is linked to a job.</span>

<span class="ts22">Stock request to credit note</span>

<span class="ts0">This will try and unmanage any items on the job as long as they have not been locked due to invoicing or re opening of job.</span>

<span class="ts0">The stock request will attempt to unmanage any items managed and produce a credit note.</span>

<span class="ts0">If the stock request cannot unmanage any lines, it will still create the credit note for you.</span>

<span class="ts0">This is a great way for staff to log that a customer brought goods back to be credited.</span>

<span class="ts48" style="color: rgb(224, 62, 45);">WARNING</span>

<span class="ts0">If you have not invoiced the customer and the job is still open with no invoices. </span>

<span class="ts0">You will unmanage items on a job prior to invoicing and then produce a credit note of stock that is already off the job.</span>

<span class="ts0">One can land up giving a customer an unnecessary credit.</span>

<span class="ts22">Stock request to stock return note (supplier credit)</span>

<span class="ts0">This will try and unmanage any items on the job as long as they have not been locked due to invoicing or re opening of job.</span>

<span class="ts0">The stock request will attempt to unmanage any items managed and produce a stock return note.</span>

<span class="ts0">If the stock request cannot unmanage any lines, it will still create the stock return note for you.</span>

<span class="ts22">Stock request to Purchase Order</span>

<span class="ts0">This will not update any lines on the job, but create a Purchase order which is linked to a job.</span>

<span class="ts0">The reason no lines will be updated on the job is that when the purchase order receives the stock, it will manage add and manage the stock on the job.</span>

<span class="ts22">Stock request to stock return to stock</span>

<span class="ts0">When this option is selected and we process, the item is found on the job and unmanages the quantity</span>

<span class="ts0">If the item is marked as “Is Complete”, this flag to be removed and then unmanage the item</span>

<span class="ts0">If the item cannot be found on the job, ignore taking it off the job. Give a message to this affect</span>

<span class="ts0"></span>

# Stock Request Manual Process

<span class="ts2">Capturing a Stock Request manually</span>

<span class="ts0">This option will typically be used when you wish to request stock which may not necessarily be for a job, example for holding stock or to initial a Purchase order.</span>

<span class="ts15">Inventory Module&gt; Activity&gt; Stock Requests</span>

![](https://hugeerp0.co.za/csp/webhelp/topics/images/image(3078).png)

<span class="ts0">Click the Add Button</span>

<span class="ts0">Enter the Reference</span>

<span class="ts0">Enter a Description</span>

<span class="ts0">Select the Storeman</span>

<span class="ts0">Select the Job Number (If required)</span>

<span class="ts0">Click Save</span>

![](https://hugeerp0.co.za/csp/webhelp/topics/images/image(3079).png)

<span class="ts0">Click the Add Button</span>

<span class="ts0">Search and select the require stock item</span>

<span class="ts0">Enter the required quantity</span>

<span class="ts0">Ensure the warehouse is correct. This is the warehouse from which you requesting the stock item.</span>

<span class="ts0">You can enter any related notes that may be applicable to this item and you wish the storeman or relevant staff members to be aware of.</span>

![](https://hugeerp0.co.za/csp/webhelp/topics/images/image(3080).png)

<span class="ts0">Click Save &amp; New to add another item or</span>

<span class="ts0">Click Save &amp; Close, if this is the last item that you require</span>

<span class="ts0">Once you have added all the required items, click Complete to Stores Button</span>

![](https://hugeerp0.co.za/csp/webhelp/topics/images/image(3081).png)

<span class="ts0">This will promote your Stock Request to the Stores, where the Storeman will pick up the Stock Request and proceed to draw the stock from the shelf or initiate a Purchase Order.</span>

# Job Return Stock Request

<span class="ts0">Returning stock back onto a job</span>

<span class="ts12">If job line is not locked or invoiced, then we are doing a manage job line with a negative quantity to remove the quantity off the job that was managed.</span>

<span class="ts12">This is the same for a stock item.</span>

<span class="ts12">However if the line is locked because the job was reopened after it was completed or closed. All the lines are locked.</span>

<span class="ts12">We cannot touch those lines.</span>

<span class="ts12">In the case of custom items we do the following</span>

<span class="ts12">Add the custom line to the job with a positive quantity but negative value for cost</span>

<span class="ts12">Currently for stock we do nothing but give an error, however in the new versions the system does the following:</span>

<table border="1" id="bkmrk-1-creates-a-stock-le" style="border-collapse: collapse; width: 83.8272%;"><colgroup><col style="width: 5.74913%;"></col><col style="width: 94.2214%;"></col></colgroup><tbody><tr><td>**1**</td><td><span class="ts12">Creates a stock level adjustment to bring the stock back into on shelf</span></td></tr><tr><td>**2**</td><td><span class="ts12">Links the stock level adjustment to the job</span></td></tr><tr><td>**3**</td><td><span class="ts12">Creates a custom item line in replacement of the stock item, just as we do a custom item return</span></td></tr><tr><td>**a.**</td><td><span class="ts12">Description of stock item replaces the custom item</span></td></tr><tr><td>**b.**</td><td><span class="ts12">The quantity is positive to the stock level item back</span></td></tr><tr><td>**c.**</td><td><span class="ts12">The cost is negative to the value of the item cost</span></td></tr><tr><td>**d.**</td><td><span class="ts12">The custom item is fetched from the defaults section for recovered costs custom item.</span></td></tr><tr><td>**4**</td><td><span class="ts12">Create a new tab on the manage job to show stock level adjustments linked to the job.</span></td></tr></tbody></table>

<span class="ts0">Recovered item setup</span>

![](https://hugeerp0.co.za/csp/webhelp/topics/images/image(3598).png)

<span class="ts0">Setup default recovered custom item</span>

<span class="ts0"> </span>![](https://hugeerp0.co.za/csp/webhelp/topics/images/image(3599).png)

# Stock Requests - Store Menu

# Stock request stores process

<span class="ts0">Once the Stock Request has been promoted to the Stores, the Storman will search the respective stock request:</span>

<span class="ts0">Remember, the Picking slip has already been printe</span><span class="ts0">d</span><span class="ts0"> by the requester.</span>

<span class="ts0">Thus, the Storman would have collected the Picking slip from the designated tray, clipboard.</span>

<span class="ts0">He will then proceed to:</span>

<span class="ts15">Inventory Module&gt;Activity&gt;Stock request – Stores</span>

<span class="ts0">Enter the Request number or Job Number</span>

<span class="ts0">Click Search</span>

<span class="ts0">Double Click the Stock Request line to open the Request</span>

<span class="ts0">Should the Storeman need to edit the stock lines, he can do so by double clicking on the respective line item and making the necessary changes.</span>

<span class="ts0">If the stock item lines are edited, example quantities changed, then a new picking slip will need to be printed.</span>

<span class="ts0">Once the storeman has reviewed all the item lines and now wishes to proceed to draw the stock, he will click the Start Picking Button.</span>

![](https://hugeerp0.co.za/csp/webhelp/topics/images/image(3269).png)

<span class="ts43">The requester can view the progress of his/her request by looking at the Action Status on the Stock Request.</span>

<span class="ts43">You will note as you proceed through the various stages of the Stock Request the Action Status will change accordingly.</span>

<span class="ts43">The “Start Picking” button simply changes the Action Status, indicating that the request is in the process of being picked.</span>

![](https://hugeerp0.co.za/csp/webhelp/topics/images/image(3270).png)

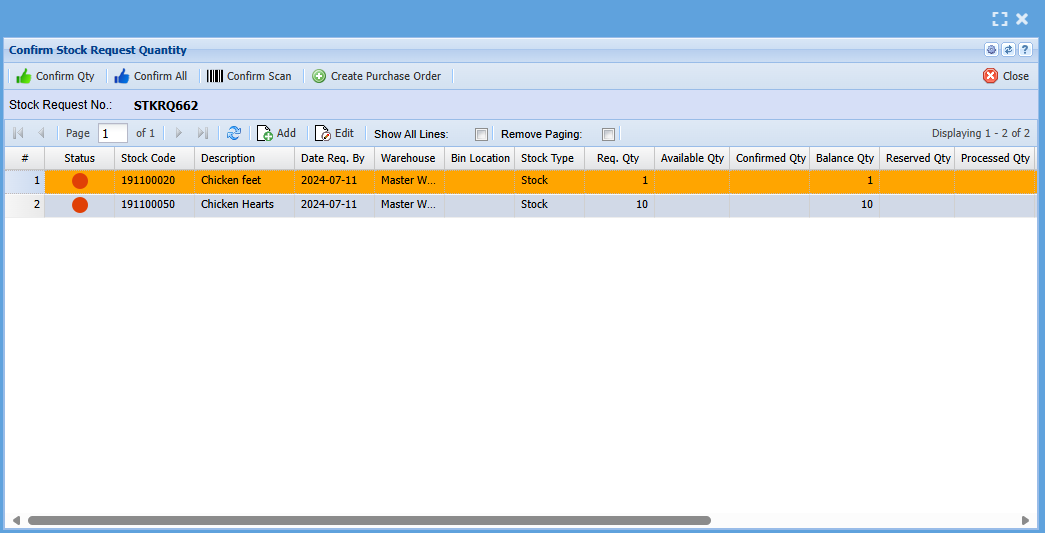
<span class="ts43">The Storeman will now click the Confirm Quantity Button</span><span class="ts46">.</span>

![](https://hugeerp0.co.za/csp/webhelp/topics/images/image(2360).png)

<table border="1" id="bkmrk-1-here-the-storeman-" style="border-collapse: collapse; width: 100%;"><colgroup><col style="width: 4.69807%;"></col><col style="width: 95.2772%;"></col></colgroup><tbody><tr><td>1</td><td><span class="ts43">Here the storeman will click Confirm All button, if he has Physically Picked the respective quantities of all the items.</span></td></tr><tr><td>2</td><td><span class="ts43">Alternatively, he can click the Confirm Quantity Button and then enter the specific quantity he has picked of the highlighted item. Click save and Close</span></td></tr></tbody></table>

<span class="ts46"> </span> ![](https://hugeerp0.co.za/csp/webhelp/topics/images/image(2358).png)

<span class="ts43">You will notice that the different Quantities displayed on the grid will change accordingly as you confirm the quantities picked.</span>

![](https://hugeerp0.co.za/csp/webhelp/topics/images/image(2363).png)

![](https://hugeerp0.co.za/csp/webhelp/topics/images/image(2364).png)

<span class="ts43">The Storeman will then click the Collection Ready Button</span>

<span class="ts43">Take note of the pop up Message</span>

![](https://hugeerp0.co.za/csp/webhelp/topics/images/image(2365).png)

<span class="ts43">You can double click the line items to ensure that all lines have the Job number linked.</span>

<span class="ts43">Once you satisfied that all is correct, Click Yes</span>

<span class="ts43">The below reservation screen will then be displayed</span>

![](https://hugeerp0.co.za/csp/webhelp/topics/images/image(2366).png)

<span class="ts43">Click the Reserve Items Button</span>

<span class="ts43">This will then move the stock on the system from On Shelf to WIP.</span>

<span class="ts43">The item will also be removed from this grid.</span>

<span class="ts43">Should you wish to view the items reserved you can select “Show all Lines” and all item lines will be displayed including those items reserved.</span>

![](https://hugeerp0.co.za/csp/webhelp/topics/images/image(2367).png)

<span class="ts43">If you mistakenly reserved the incorrect item, you can highlight the item by clicking once on the item line and then click the “Unreserve Items” button</span>

<span class="ts43">Click Close</span>

<span class="ts43">Click the “Process To…” button to complete the Stock Request</span>

![](https://hugeerp0.co.za/csp/webhelp/topics/images/image(2368).png)

<span class="ts43">The following Screen will be displayed</span>

![](https://hugeerp0.co.za/csp/webhelp/topics/images/image(2369).png)

<span class="ts43">If you have picked all the stock and no items or quantities are outstanding, then tick the “Close Stock Request” box and click continue.</span>

<span class="ts43">This will automatically close the stock request.</span>

<span class="ts44">If however, you still have items outstanding to be picked, but wish the item picked so far to be collected and taken to the Job, then you will not tick the Close Stock Request Box.</span>

<span class="ts43">Once you click continue, then an email is sent to the Requester to come and collect the stock and the items picked, confirmed, and Reserved will then be Managed on the Job.</span>

![](https://hugeerp0.co.za/csp/webhelp/topics/images/image(2371).png)

<span class="ts12">Click Ok</span>

<span class="ts43">The stock Request will then be closed (if the box was ticked).</span>

<span class="ts43">Click Close</span>

<span class="ts44"><span style="color: rgb(224, 62, 45);">Note:</span> if a stock request or any other document linked to a job has been closed, the the Job will not be able to be closed</span>

<span class="ts44">Therefore, if you have picked ALL the stock on a particular stock request and completed the picking process, it is advisable to tick the “Close Stock Request” box when completing the stock request. Alternatively, this would result in you first having to search for the stock request and closing it in a separate step before the job can be closed upon completion.</span>

---

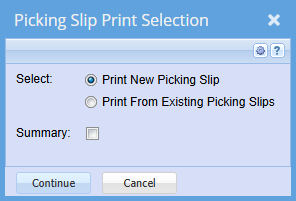
#### <span class="ts44">Print Picking Slip</span>

[![image.png](https://hugeerp10.co.za/hsofmanual/uploads/images/gallery/2024-10/scaled-1680-/JX6image.png)](https://hugeerp10.co.za/hsofmanual/uploads/images/gallery/2024-10/JX6image.png)

---

#### Confirm Quantity

[![image.png](https://hugeerp10.co.za/hsofmanual/uploads/images/gallery/2024-10/scaled-1680-/CQSimage.png)](https://hugeerp10.co.za/hsofmanual/uploads/images/gallery/2024-10/CQSimage.png)
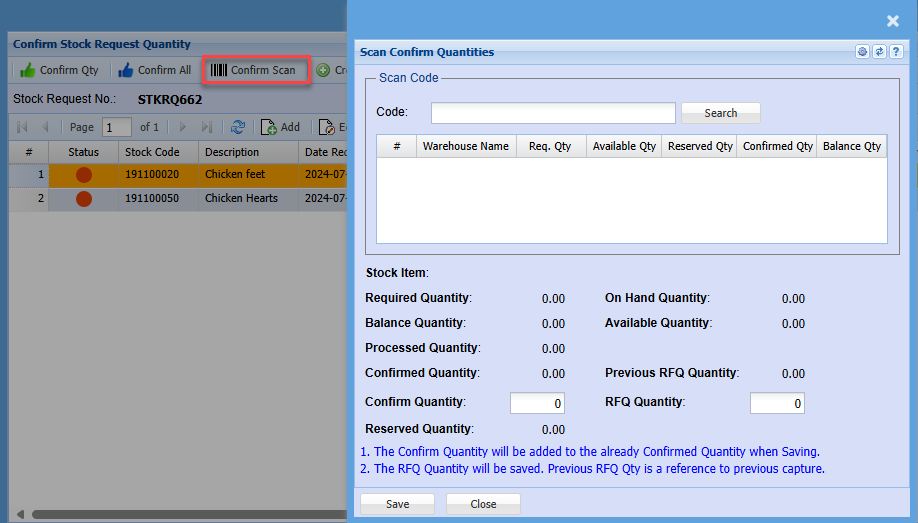
##### Confirm Scan

[![image.png](https://hugeerp10.co.za/hsofmanual/uploads/images/gallery/2024-10/scaled-1680-/qS6image.png)](https://hugeerp10.co.za/hsofmanual/uploads/images/gallery/2024-10/qS6image.png)
# Stock Request Help

<span class="ts64">Job Costing Assign Job Line manage Rule</span>

<span class="ts0">Below are some examples of how the stock should be handle when trying to manage (WIP Allocation) them </span><span class="ts0">onto the job</span>

<span class="ts0">There are two conditions before promoting a quote to a job</span>

<table border="1" id="bkmrk-1-allow-to-exceed-va" style="border-collapse: collapse; width: 32.716%;"><colgroup><col style="width: 10.9605%;"></col><col style="width: 88.9638%;"></col></colgroup><tbody><tr><td>1</td><td><span class="ts0">Allow to Exceed Value</span></td></tr><tr><td>2</td><td><span class="ts0">Allow to Exceed Quantity</span></td></tr></tbody></table>

<span class="ts64">Allow to Exceed Value</span>

<span class="ts7">There is no current rule to handle this when adding stock to a job to be managed</span>

<span class="ts64">Allow to Exceed Quantity</span>

<span class="ts0">This rule applies when managing more stock onto a line that exceeds more on its budget quantity.</span>

<span class="ts0">We will leave this rule in place to handle manual job manage to allow to exceed or not exceed budgeted </span><span class="ts0">quantity.</span>

<span class="ts64">Stock Lines</span>

<span class="ts0">There are three basic rules for assigning stock lines to a job</span>

<table border="1" id="bkmrk-1-quote-2-sc-%E2%80%93-scope" style="border-collapse: collapse; width: 37.5309%;"><colgroup><col style="width: 12.4565%;"></col><col style="width: 87.7752%;"></col></colgroup><tbody><tr><td>1</td><td><span class="ts0">Quote</span></td></tr><tr><td>2</td><td><span class="ts0">SC – Scope Creep</span></td></tr><tr><td>3</td><td><span class="ts0">CTC – Cost to Company</span></td></tr></tbody></table>

<span class="ts0">Documents that allow lines to be added to a job are as follows:</span>

<table border="1" id="bkmrk-1-manual-job-manage-" style="border-collapse: collapse; width: 25.8025%;"><colgroup><col style="width: 16.8255%;"></col><col style="width: 83.0785%;"></col></colgroup><tbody><tr><td>1</td><td><span class="ts0">Manual Job Manage</span></td></tr><tr><td>2</td><td><span class="ts0">Stock Request</span></td></tr><tr><td>3</td><td><span class="ts0">Purchase Orders</span></td></tr><tr><td>4</td><td><span class="ts0">Time Logs</span></td></tr><tr><td>5</td><td><span class="ts0">Cashbooks</span></td></tr></tbody></table>

<span class="ts0">In each of these cases the users should select what he wants to happen to the stock line to be added to a job.</span>

<table border="1" id="bkmrk-1-add-and-manage-qua" style="border-collapse: collapse; width: 52.4691%;"><colgroup><col style="width: 9.42685%;"></col><col style="width: 90.526%;"></col></colgroup><tbody><tr><td>1</td><td><span class="ts0">Add and manage quantities to an existing line</span></td></tr><tr><td>2</td><td><span class="ts0">Create a new stock line</span></td></tr><tr><td>3</td><td><span class="ts0">Fill up current lines and create new ones</span></td></tr><tr><td>4</td><td><span class="ts0">Force a new stock line to be created based on either</span></td></tr><tr><td>a.</td><td><span class="ts0">CTC</span></td></tr><tr><td>b.</td><td><span class="ts0">SC</span></td></tr></tbody></table>

<span class="ts0">Stock Request Selection Actions</span>

<span class="ts0">The rule for Allow to exceed quantity or NOT does not apply in this section</span>

![](https://hugeerp0.co.za/csp/webhelp/topics/images/image(142).png)

<span class="ts0">There will be two sections in the selection</span>

<span class="ts0">Actual (Quote lines)</span>

<span class="ts0">CTC or SC lines</span>

<span class="ts0">By default, the Actual to be Selected with a tick box and the CTC selection selected</span>

<span class="ts64">Rules as follows:</span>

<table border="1" id="bkmrk-1-actual-tick-on-wit" style="border-collapse: collapse; width: 29.8765%;"><colgroup><col style="width: 12.2032%;"></col><col style="width: 87.7309%;"></col></colgroup><tbody><tr><td>1</td><td><span class="ts0">Actual tick on with CTC</span></td></tr><tr><td>2</td><td><span class="ts0">Actual tick on with SC</span></td></tr><tr><td>3</td><td><span class="ts0">Actual tick off with CTC</span></td></tr><tr><td>4</td><td><span class="ts0">Actual tick off with SC</span></td></tr></tbody></table>

<span class="ts0">We start off with the simple ones first</span>

<span class="ts0">Actual tick off with CTC</span>

<span class="ts0">Force a new line on the job as CTC</span>

<span class="ts0">Put the system cost and make the selling price ZERO</span>

<span class="ts0">Actual tick off with SC</span>

<span class="ts0">Force a new line on the job as SC</span>

<span class="ts0">Put the system cost and default selling price on the job</span>

<span class="ts0">Actual Tick on with CTC</span>

<span class="ts0">Find the stock line on the job</span>

<span class="ts0">Check the budgeted quantity versus the managed quantity and check the difference.</span>

<span class="ts0">Manage as much of the stock on the job line marked as quote (do not exceed the budgeted quantity less the </span><span class="ts0">managed), Fulfil the </span><span class="ts0">line.</span>

<span class="ts0">If there is more quantity move onto the next stock line of the same item marked as quote and add more </span><span class="ts0">quantity.</span>

<span class="ts0">If there is still more to add, BUT there are no more quote lines, check on Scope creep lines that have not been </span><span class="ts0">managed fully.</span>

<span class="ts0">Managed as much as possible, but do not exceed.</span>

<span class="ts0">Once all the above is exhausted but there is still quantity, add a new line as a CTC line and put this in the job</span>

<span class="ts0">Actual Tick on with SC</span>

<span class="ts0">Find the stock line on the job</span>

<span class="ts0">Check the budgeted quantity versus the managed quantity and check the difference.</span>

<span class="ts0">Manage as much of the stock on the job line marked as quote (do not exceed the budgeted quantity less the managed), </span><span class="ts0">Fulfil the line.</span>

<span class="ts0">If there is more quantity move onto the next stock line of the same item marked as quote and add more </span><span class="ts0">quantity.</span>

<span class="ts0">If there is still more to add, BUT there are no more quote lines, check on Scope creep lines that have not been </span><span class="ts0">managed fully.</span>

<span class="ts0">Managed as much as possible, but do not exceed.</span>

<span class="ts0">Once all the above is exhausted but there is still quantity, add a new line as a SC line and put this in the job</span>

<span class="ts50">Actual Tick is on, BUT NO stock lines exist</span>

<span class="ts0">If the Actual tick is on but there are no lines on the job for that stock line, apply the first rules where you force</span>

<span class="ts0">CTC or SC</span>

<span class="ts0">Stock request creation from Template Task of Job</span>

<span class="ts0">Stock request lines created from a template task will remember which lines they were created from. When</span>

<span class="ts0">lines from a stock request are managed onto the job, the corresponding lines created from the template task </span><span class="ts0">will be updated first.</span>

<span class="ts0">If the corresponding lines are fully managed by other means, then the general rule above will take place</span>

<span class="ts64">Job Costing MANUAL manage</span>

<span class="ts7">Rules for Allow to Exceed QUANTITY or NOT will apply here</span>

<span class="ts7">As it currently stands</span>

---

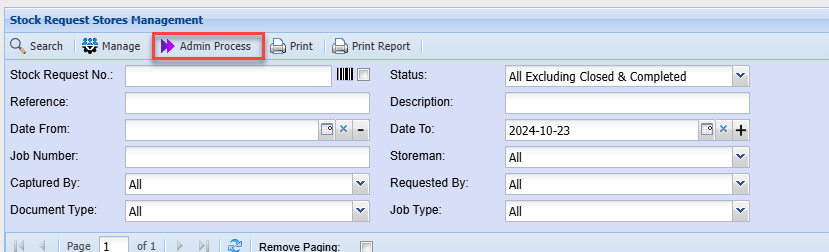
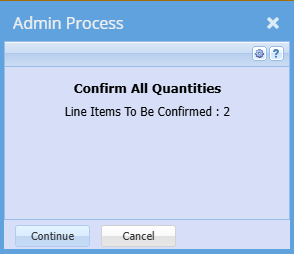
#### <span class="ts7">Admin Process</span>

[![image.png](https://hugeerp10.co.za/hsofmanual/uploads/images/gallery/2024-10/scaled-1680-/ZJiimage.png)](https://hugeerp10.co.za/hsofmanual/uploads/images/gallery/2024-10/ZJiimage.png)

[![image.png](https://hugeerp10.co.za/hsofmanual/uploads/images/gallery/2024-10/scaled-1680-/vUHimage.png)](https://hugeerp10.co.za/hsofmanual/uploads/images/gallery/2024-10/vUHimage.png)
# Stock Return to Job

<span class="ts0">Use this option to return stock back onto the job.</span>

<span class="ts0">This will check the job and where possible it will unmanage the stock or custom items on the job.</span>

<span class="ts0">Custom item</span>

<span class="ts0">If the custom item is unable to be taken off the job, it will create a new line with positive quantity and negative value</span>

<span class="ts0">When stock is unable to be taken off a job, then a Job recovered cost option will be applied.</span>

<span class="ts0">For custom items it works as follows:</span>

<span class="ts0">If job line is not locked or invoiced, then we are doing a manage job line with a negative quantity to remove the quantity off the job that was managed. (Unmanaged item)</span>

<span class="ts0">This is the same for a stock item.</span>

<span class="ts0">However if the line is locked because the job was reopened after it was completed or closed. All the lines are locked.</span>

<span class="ts0">Lines cannot be touched.</span>

<span class="ts0">In the case of custom items we do the following</span>

<span class="ts0">Add the custom line to the job with a positive quantity but negative value for cost</span>

<span class="ts0">Stock will do the following</span>

<table border="1" id="bkmrk-1-create-a-stock-lev" style="border-collapse: collapse; width: 88.0247%;"><colgroup><col style="width: 5.68182%;"></col><col style="width: 94.2911%;"></col></colgroup><tbody><tr><td>**1**</td><td><span class="ts0">Create a stock level adjustment to bring the stock back into on shelf</span></td></tr><tr><td>**2**</td><td><span class="ts0">Link the stock level adjustment to the job</span></td></tr><tr><td>**3**</td><td><span class="ts0">Create a custom item line in replacement of the stock item, just as we do a custom item return</span></td></tr><tr><td>**a.**</td><td><span class="ts0">Description of stock item replaces the custom item</span></td></tr><tr><td>**b.**</td><td><span class="ts0">The quantity is positive to the stock level item back</span></td></tr><tr><td>**c.**</td><td><span class="ts0">The cost is negative to the value of the item cost</span></td></tr><tr><td>**d.**</td><td><span class="ts0">The custom item is fetched from the defaults section for recovered costs custom item.</span></td></tr><tr><td>**4**</td><td><span class="ts0">Stock level adjustments can be seen on the manage job via the stock level adjustment tab.</span></td></tr></tbody></table>

<span class="ts0"> </span><span class="ts0"> </span>![](https://hugeerp0.co.za/csp/webhelp/topics/images/image(3639).png)

# Stock Level Adjustment Menu

# Stock Level Adjustment

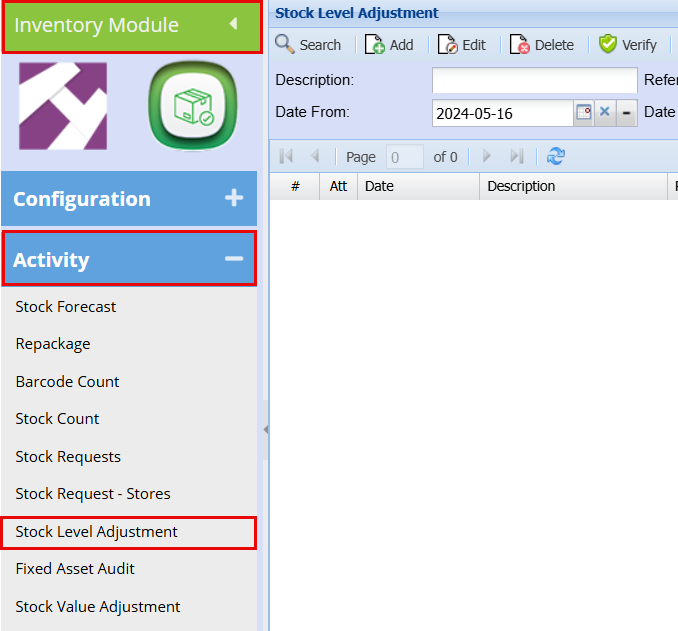
<span class="ts15">I</span><span class="ts15">nventory &gt;Activity&gt;Stock Level Adjustment</span>

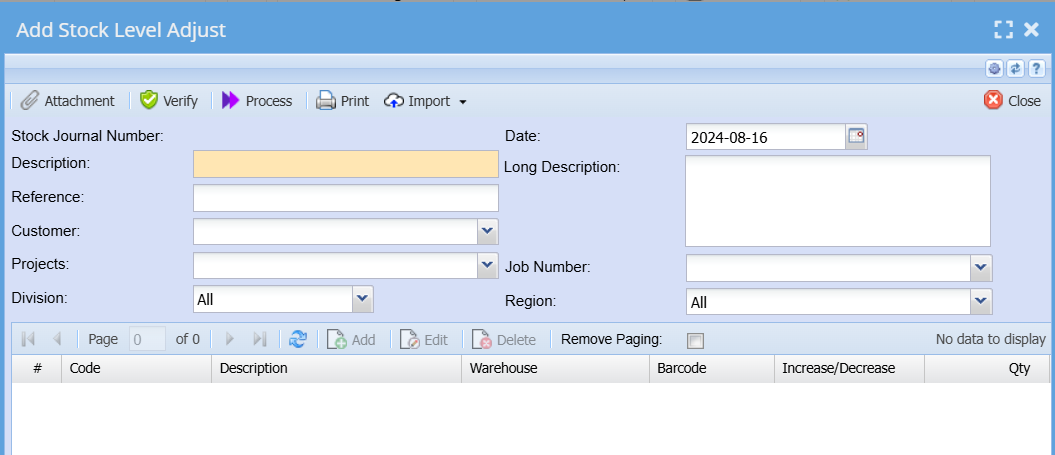
<span class="ts25">To create a stock level item click on the </span><span class="ts25">Add</span><span class="ts25"> button</span>

<span class="ts25">f</span><span class="ts25">ill in the header information of the stock level adjustment and then click on Save.</span>

![](https://hugeerp0.co.za/csp/webhelp/topics/images/image(3276).png)

<span class="ts25">Click on Add to insert lines.</span>

![](https://hugeerp0.co.za/csp/webhelp/topics/images/image(3277).png)

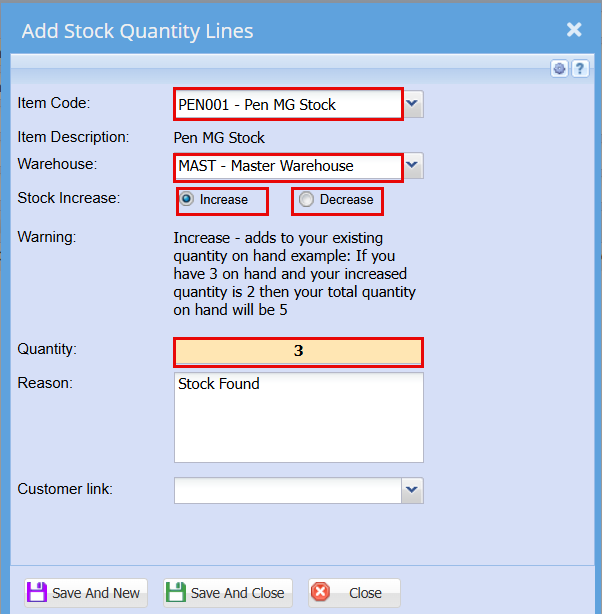
<span class="ts25">In this window search for the stock item and select it, select your warehouse that you want to increase / decrease the stock in. Put in the quantity that you want the increase to go to and put in a reason. Click on Save and close to save changes.</span>

<span class="ts25">Insert all the items that need a stock adjustment. Click on save and then close to take you back to the stock level adjustment screen.</span>

<span class="ts25">Remember that we can also import stock level adjustments from an Excel Sheet.</span>

<span class="ts25">Once you are back to the window you will notice your stock level adjustment journal waiting to be processed.</span>

![](https://hugeerp0.co.za/csp/webhelp/topics/images/image(3278).png)

<div class="block1" id="bkmrk-%C2%A0-note-that-stock-le"><table class="tbl9"><tbody><tr class="row0"><td class="cell0"><span class="ts73"> </span><span class="ts74">Note that Stock Level Adjustments will only process on current dates, they will not be able to be back dated</span><span class="ts74"> or forward dated.</span>

</td></tr></tbody></table>

</div><span class="ts25">We allow only one time where you can back date the stock level adjustment and that is when one is doing the take on balances of stock.</span>

<span class="ts25">The rule is that it has to be the VERY first transaction to be processed.</span>

<span class="ts25">Now go to the tab below where it says process and click on the process button.</span>

<span class="ts25">The stock level adjustment will process the stock and update your stock quantities.</span>

# Stock level Adjustment Import

<span class="ts0">Please keep the following in mind:</span>

<table border="1" id="bkmrk-1-once-you-begin-wit" style="border-collapse: collapse; width: 100.864%;"><colgroup><col style="width: 4.57242%;"></col><col style="width: 95.4029%;"></col></colgroup><tbody><tr><td>1</td><td><span class="ts0">Once you begin with this procedure no source documents can be processed. Only a Stock Take freezes the inventory module.</span></td></tr><tr><td>2</td><td><span class="ts0">Do a backup.</span></td></tr></tbody></table>

![](https://hugeerp0.co.za/csp/webhelp/topics/images/image(1696).png)

<span class="ts25">Print an Inventory Valuation Report before starting a Stock Take</span>

<span class="ts25">IM – Report – Inventory Valuation</span>

![](https://hugeerp0.co.za/csp/webhelp/topics/images/image(1697).png)

<span class="ts25">If you don’t use any of the add on modules or Sales Orders then run a consolidated Valuation report per warehouse. However if you have the Bill of Materials add on module you will need to run a minimum of two reports.</span>

<span class="ts25">Example: A company is using Huge ERP and the Bill of Materials add on module.</span>

<span class="ts24"> </span>![](https://hugeerp0.co.za/csp/webhelp/topics/images/image(1698).png)

<span class="ts25">This will give you a complete overview of all stock on hand and value</span>

<span class="ts24"> </span>![](https://hugeerp0.co.za/csp/webhelp/topics/images/image(1699).png)

<span class="ts25">This report will give you all the stock that will appear in your BOM WIP account. </span><span class="ts76">Remember you can not affect this stock.</span>

<span class="ts77"> </span>![](https://hugeerp0.co.za/csp/webhelp/topics/images/image(1700).png)

<span class="ts25">This is the stock that is to be counted.</span>

<span class="ts24"> </span>![](https://hugeerp0.co.za/csp/webhelp/topics/images/image(1701).png)

<span class="ts25">GL – Reports - Trial Balance</span>

<span class="ts25">Print a Trial Balance</span>

<span class="ts24"> </span>![](https://hugeerp0.co.za/csp/webhelp/topics/images/image(1702).png)

<span class="ts25">Inventory – Reports – Inventory Count</span>

<span class="ts25">Print an Inventory Count Report</span>

<span class="ts24"> </span>![](https://hugeerp0.co.za/csp/webhelp/topics/images/image(1703).png)

<span class="ts25">Print and export to excel</span>

<span class="ts25">Proceed with a manual stock take – See attachment </span><span class="ts78">‘Counted Qty.csv’</span>

![](https://hugeerp0.co.za/csp/webhelp/topics/images/image(1704).png)

<span class="ts25">Sort by Column Variance</span>

<span class="ts24"> </span>![](https://hugeerp0.co.za/csp/webhelp/topics/images/image(1705).png)

<span class="ts25">Now copy and paste the negative values onto a new excel worksheet and do the same for the positive. See attachments ‘</span><span class="ts78">Positive Stock’ </span><span class="ts25">and </span><span class="ts78">‘Negative Stock’.</span>

<span class="ts25">Remember that if the System Qty and Counted Qty are identical there is no reason to do a Stock Journal for these items.</span>

<span class="ts24"> </span>![](https://hugeerp0.co.za/csp/webhelp/topics/images/image(1706).png)

<span class="ts25">On the both import files create a new column called ‘Increase / Decrease’. This will allow the system to know whether the amount being import should increase or decrease the quantity on hand. To ‘Increase’ use a </span><span class="ts79">1 </span><span class="ts25">and to ‘Decrease’ use a </span><span class="ts79">0</span><span class="ts25">.</span>

<span class="ts25">Things to remember:</span>

<table border="1" id="bkmrk-1-you-cannot-import-" style="border-collapse: collapse; width: 75.8025%;"><colgroup><col style="width: 5.68463%;"></col><col style="width: 94.2907%;"></col></colgroup><tbody><tr><td>1</td><td><span class="ts25">You cannot import a negative figure, so re-evaluate the equation that you were using.</span></td></tr><tr><td>2</td><td><span class="ts25">The Variance column cannot have a 1000 comma separator.</span></td></tr></tbody></table>

![](https://hugeerp0.co.za/csp/webhelp/topics/images/image(1707).png)

<span class="ts25">IM - Activity – Stock Level Adjustment</span>

<span class="ts25">Click on the Upload button</span>

<span class="ts24"> </span>![](https://hugeerp0.co.za/csp/webhelp/topics/images/image(1708).png)

<span class="ts25">Browse button</span>

<span class="ts24"> </span>![](https://hugeerp0.co.za/csp/webhelp/topics/images/image(1709).png)

<span class="ts25">Browse for the first import file and click on ‘Open’</span>

<span class="ts24"> </span>![](https://hugeerp0.co.za/csp/webhelp/topics/images/image(1710).png)

<span class="ts25">Upload’</span>

<span class="ts24"> </span>![](https://hugeerp0.co.za/csp/webhelp/topics/images/image(1711).png)

<span class="ts0"> </span>![](https://hugeerp0.co.za/csp/webhelp/topics/images/image(1712).png)

![](https://hugeerp0.co.za/csp/webhelp/topics/images/image(1713).png)

<span class="ts24"> </span>

<span class="ts0"> </span>

<span class="ts0"> </span>

<span class="ts0"> </span>

<span class="ts0"> </span>

<span class="ts24"> </span>

<span class="ts0"> </span>

<span class="ts0"> </span>

<span class="ts30"></span>

# Stock Level Adjustment Journal

<span class="ts0">Please keep the following in mind:</span>

<table border="1" id="bkmrk-1-once-you-begin-wit" style="border-collapse: collapse; width: 100%;"><colgroup><col style="width: 5.45065%;"></col><col style="width: 94.5246%;"></col></colgroup><tbody><tr><td>1</td><td><span class="ts0">Once you begin with this procedure no source documents can be processed. Only a Stock Take freezes the inventory module.</span></td></tr><tr><td>2</td><td><span class="ts0">Do a backup.</span></td></tr></tbody></table>

<span class="ts42"> </span>![](https://hugeerp0.co.za/csp/webhelp/topics/images/image(1696).png)

<span class="ts12">Print an Inventory Valuation Report before starting a Stock Take</span>

<span class="ts12">IM – Report – Inventory Valuation</span>

![](https://hugeerp0.co.za/csp/webhelp/topics/images/image(1697).png)

<span class="ts12">If you don’t use any of the add on modules or Sales Orders then run a consolidated Valuation report per warehouse. However if you have the Bill of Materials add on module you will need to run a minimum of two reports.</span>

<span class="ts12">Example: A company is using Huge ERP and the Bill of Materials add on module.</span>

<span class="ts13"> </span>![](https://hugeerp0.co.za/csp/webhelp/topics/images/image(1698).png)

# Stock level Adjustment In And Out

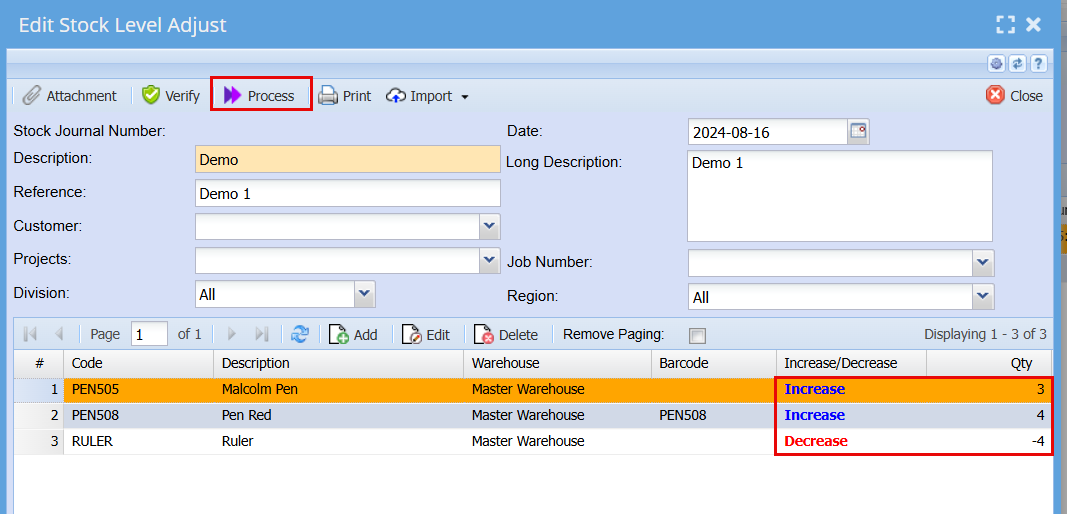
<span class="ts7">After working through this manual you should be able to do a stock level adjustment to convert paper reams into paper sheets.</span>

<span class="ts7">Open the Inventory module.</span>

<span class="ts7">Click on activity and then stock level adjustment.</span>

[![image.png](https://hugeerp10.co.za/hsofmanual/uploads/images/gallery/2024-08/scaled-1680-/f4gimage.png)](https://hugeerp10.co.za/hsofmanual/uploads/images/gallery/2024-08/f4gimage.png)

<span class="ts7">This will open up the stock level adjustment screen. From here you can search for all existing stock level adjustments or create a new one. To create a new stock level adjustment click on Add.</span>

[![image.png](https://hugeerp10.co.za/hsofmanual/uploads/images/gallery/2024-08/scaled-1680-/4Xbimage.png)](https://hugeerp10.co.za/hsofmanual/uploads/images/gallery/2024-08/4Xbimage.png)

<table border="1" id="bkmrk-description-a-descri" style="border-collapse: collapse; width: 100%;"><colgroup><col style="width: 15.696%;"></col><col style="width: 84.2793%;"></col></colgroup><tbody><tr><td><span class="ts50">Description</span></td><td><span class="ts7">A description for the specific stock level adjustment.</span></td></tr><tr><td><span class="ts50">Reference</span></td><td><span class="ts7">A reference for this specific stock level adjustment. An example could be “Convert paper reams to paper sheets”</span></td></tr><tr><td><span class="ts50">Date</span></td><td><span class="ts7">This should be the date on which the stock level adjustment is done.</span></td></tr><tr><td><span class="ts50">Long Description</span></td><td><span class="ts7">This is an optional field and does not have to be completed.</span></td></tr><tr><td><span class="ts50">Job No</span></td><td><span class="ts7">Search for the job number if this stock level adjustment is for a specific job.</span></td></tr></tbody></table>

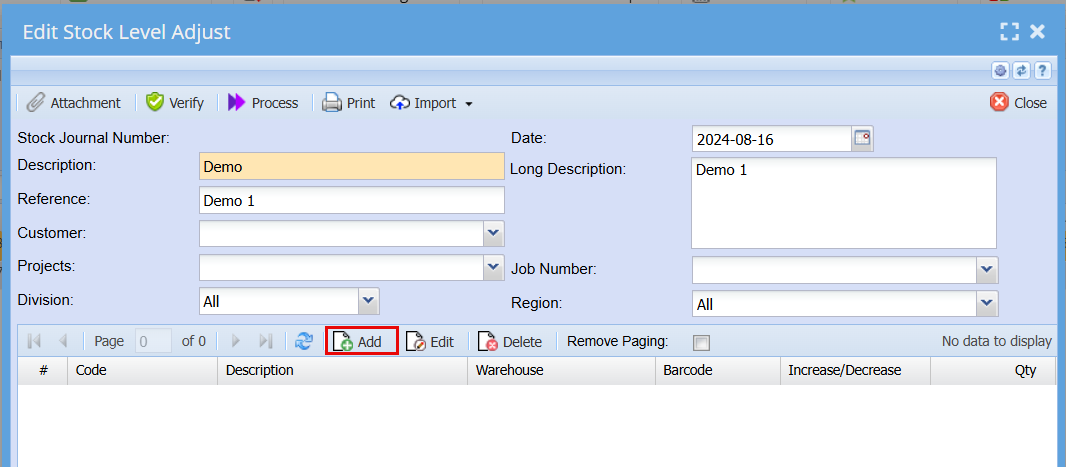
<span class="ts7">Once all the fields have been completed click on save.</span>

<span class="ts7">Notice that the greyed-out buttons (Add, Edit, Delete) in the middle of the screen now opens up. To add an item</span>

[![image.png](https://hugeerp10.co.za/hsofmanual/uploads/images/gallery/2024-08/scaled-1680-/Wn6image.png)](https://hugeerp10.co.za/hsofmanual/uploads/images/gallery/2024-08/Wn6image.png)

<span class="ts7">This will take you to the stock level adjustment click on Add.</span>

<span class="ts7">This will open the stock level adjustment.</span>

[![image.png](https://hugeerp10.co.za/hsofmanual/uploads/images/gallery/2024-08/scaled-1680-/LFgimage.png)](https://hugeerp10.co.za/hsofmanual/uploads/images/gallery/2024-08/LFgimage.png)

<table border="1" id="bkmrk-item-code-search-for" style="border-collapse: collapse; width: 100%;"><colgroup><col style="width: 16.8057%;"></col><col style="width: 83.1695%;"></col></colgroup><tbody><tr><td><span class="ts50">Item Code</span></td><td><span class="ts7">Search for the item by description or code. In this case we want to decrease the paper reams and increase the paper sheets so for the first one selects paper reams.</span></td></tr><tr><td><span class="ts50">Warehouse</span></td><td><span class="ts7">Select Master Warehouse.</span></td></tr><tr><td><span class="ts50">Increase/Decrease</span></td><td><span class="ts7">Select decrease for paper reams.</span></td></tr><tr><td><span class="ts50">Quantity</span></td><td><span class="ts7">Type the number of paper reams to be decreased.</span></td></tr><tr><td><span class="ts50">Reason</span></td><td><span class="ts7">Convert paper reams into paper sheets.</span></td></tr></tbody></table>

<span class="ts7">Here you can adjustment one or more items at the same time.</span>

<span class="ts7">Click save and close or close when you are done.</span>

<span class="ts7">This will take you back to the stock level adjustment screen will be able to see all your adjustments on individual itema.</span>

<span class="ts7">When you are happy with your list, click process at the top of your page.</span>

[![image.png](https://hugeerp10.co.za/hsofmanual/uploads/images/gallery/2024-08/scaled-1680-/3BDimage.png)](https://hugeerp10.co.za/hsofmanual/uploads/images/gallery/2024-08/3BDimage.png)

A processing screen will pop up, click Refresh status and then close.

[![image.png](https://hugeerp10.co.za/hsofmanual/uploads/images/gallery/2024-08/scaled-1680-/6FRClPimage.png)](https://hugeerp10.co.za/hsofmanual/uploads/images/gallery/2024-08/6FRClPimage.png)
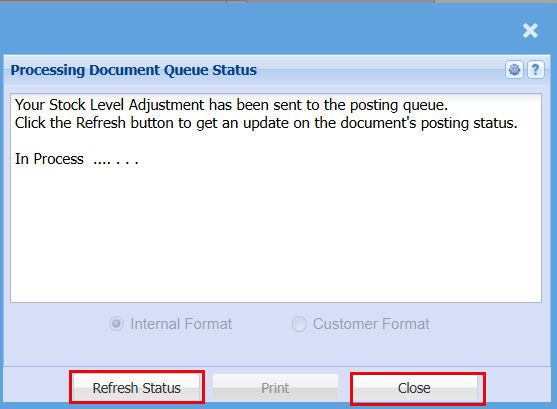
This completes your stock level adjustment

---

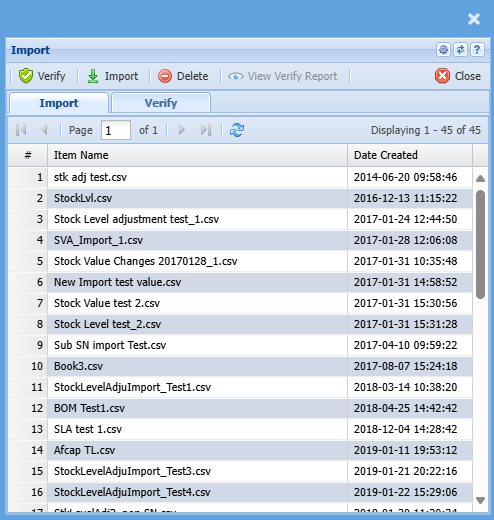
#### Import

[![image.png](https://hugeerp10.co.za/hsofmanual/uploads/images/gallery/2024-10/scaled-1680-/Rk1image.png)](https://hugeerp10.co.za/hsofmanual/uploads/images/gallery/2024-10/Rk1image.png)
---

#### Import S/N

[![image.png](https://hugeerp10.co.za/hsofmanual/uploads/images/gallery/2024-10/scaled-1680-/4HGimage.png)](https://hugeerp10.co.za/hsofmanual/uploads/images/gallery/2024-10/4HGimage.png)
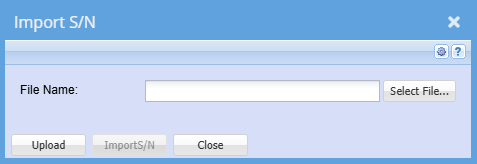
<u>Upload &amp; Import Serial Numbers Help</u>

Click on Browse to navigate to the CSV source document to import the serial numbers.

Click Upload to upload the CSV file into the system.

Once the Upload has been completed successfully click on Import S/N.

A report stating any errors encountered while importing will be automatically generated.

All errors encountered will need to be corrected before the import will be completed successfully.

<u>CSV File format</u>

<u>Stock Level Adjustment Line level (i.e. Stock Item)</u>

![](https://hugeerp0.co.za/csp/hugeerp/wab/Help/Inventory/frmSerialNoUpload_files/image001.jpg)

<span style="text-decoration: underline;">Bulk Serial Numbers</span>

<span style="text-decoration: underline;">Stock Level Adjustment Header Level</span>

![](https://hugeerp0.co.za/csp/hugeerp/wab/Help/Inventory/frmSerialNoUpload_files/image006.jpg)

<p class="callout info"><span class="GramE">NB :</span> Please remember to delete Line 1 from the file.</p>

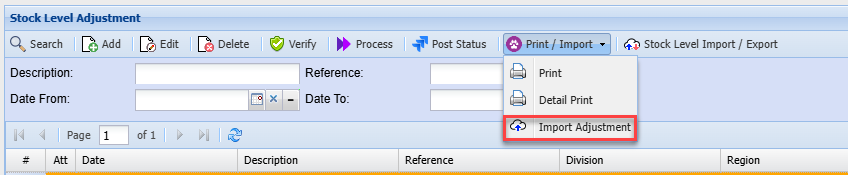
# Import Adjustment

[![image.png](https://hugeerp10.co.za/hsofmanual/uploads/images/gallery/2024-10/scaled-1680-/8ZIimage.png)](https://hugeerp10.co.za/hsofmanual/uploads/images/gallery/2024-10/8ZIimage.png)

[![image.png](https://hugeerp10.co.za/hsofmanual/uploads/images/gallery/2024-10/scaled-1680-/Nz1image.png)](https://hugeerp10.co.za/hsofmanual/uploads/images/gallery/2024-10/Nz1image.png)
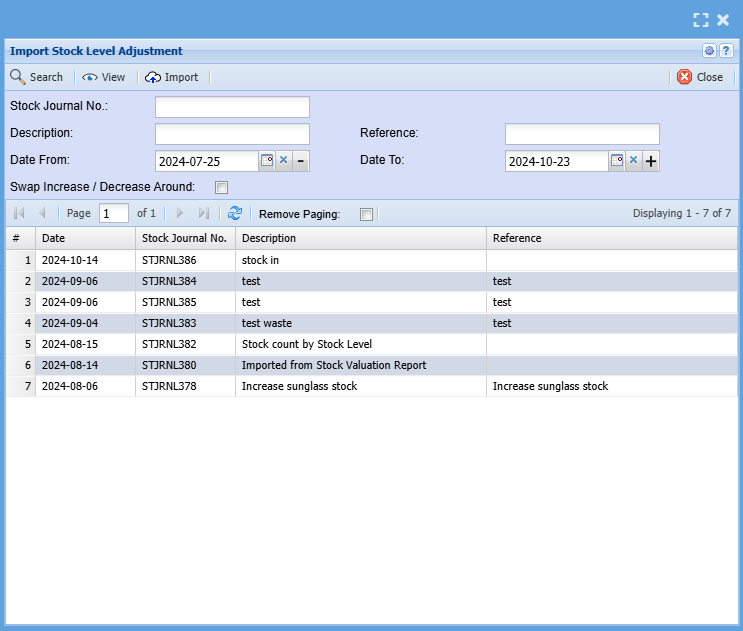
<table border="1" id="bkmrk-search-%C2%A0-view-import" style="border-collapse: collapse; width: 100%;"><colgroup><col style="width: 35.3581%;"></col><col style="width: 64.7408%;"></col></colgroup><tbody><tr><td>**Search**</td><td> </td></tr><tr><td>**View**</td><td>  
</td></tr><tr><td>**Import**</td><td>  
</td></tr><tr><td>**Stock Journal No.**</td><td>  
</td></tr><tr><td>**Description**</td><td>  
</td></tr><tr><td>**Reference**</td><td>  
</td></tr><tr><td>**Date From and To**</td><td>  
</td></tr><tr><td>**Swap Increase / Decrease Around Tick**</td><td>  
</td></tr></tbody></table>

#### View Button

Clicking on the View button will bring up this screen

[![image.png](https://hugeerp10.co.za/hsofmanual/uploads/images/gallery/2024-10/scaled-1680-/1ODimage.png)](https://hugeerp10.co.za/hsofmanual/uploads/images/gallery/2024-10/1ODimage.png)
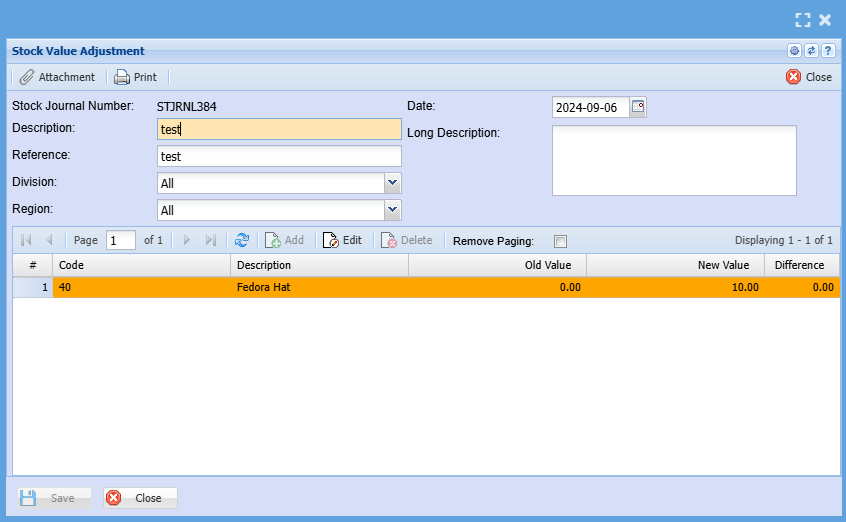
<table border="1" id="bkmrk-stock-journal-number" style="border-collapse: collapse; width: 100%;"><colgroup><col style="width: 50%;"></col><col style="width: 50%;"></col></colgroup><tbody><tr><td>**Stock Journal Number**</td><td> </td></tr><tr><td>**Description**</td><td>  
</td></tr><tr><td>**Reference**</td><td>  
</td></tr><tr><td>**Division**</td><td>  
</td></tr><tr><td>**Region**</td><td>  
</td></tr><tr><td>**Date**</td><td>  
</td></tr><tr><td>**Long Description**</td><td>  
</td></tr></tbody></table>

##### Adding Line

[![image.png](https://hugeerp10.co.za/hsofmanual/uploads/images/gallery/2024-10/scaled-1680-/ooRimage.png)](https://hugeerp10.co.za/hsofmanual/uploads/images/gallery/2024-10/ooRimage.png)

# Stock Value Adjustment Menu

# Stock Value Adjustment

#### Stock Value Adjustment capture

<span class="ts15"><span class="ts0">The stock Value Adjustment function is used to amend the current cost price of an item.</span></span>

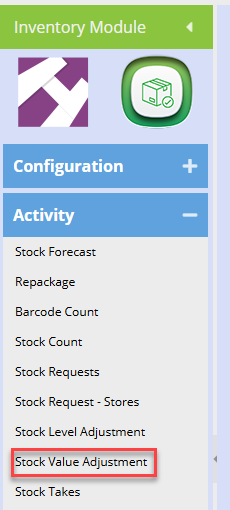
**<span class="ts15" style="color: rgb(45, 194, 107);"><span class="ts0">Inventory Module&gt; Activity&gt; Stock Value Adjustment</span></span>**

[![image.png](https://hugeerp10.co.za/hsofmanual/uploads/images/gallery/2024-06/scaled-1680-/xt1image.png)](https://hugeerp10.co.za/hsofmanual/uploads/images/gallery/2024-06/xt1image.png)

![](https://hugeerp0.co.za/csp/webhelp/topics/images/image(3279).png)

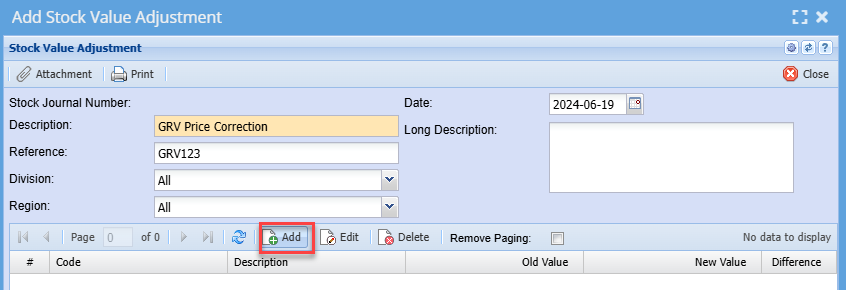
<span class="ts0">Click Add to create a new value adjustment</span>

<span class="ts0">Date – The date will pre-populate to current date. Since stock entries are live, one cannot back date or forward date adjustments</span>

<span class="ts0">Description – to enter brief description for stock value adjustment</span>

<span class="ts0">Reference – to enter the reference for stock value adjustment</span>

<span class="ts0">Division – to select the division from the drop down if applicable</span>

<span class="ts0">Long Description – to enter detailed description for stock value adjustment</span>

<span class="ts0">Religion – to select – to select religion from the drop down arrow if applicable</span>

<span class="ts0">Save button – saves the details added</span>

[![image.png](https://hugeerp10.co.za/hsofmanual/uploads/images/gallery/2024-06/scaled-1680-/lB4image.png)](https://hugeerp10.co.za/hsofmanual/uploads/images/gallery/2024-06/lB4image.png)

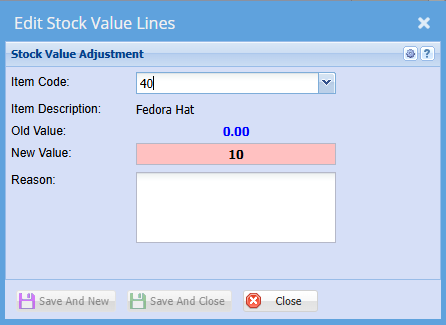
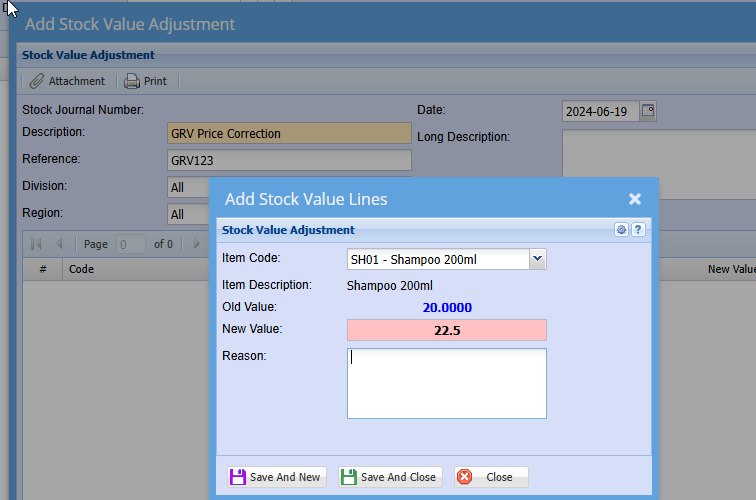
<span class="ts0">Click Add in the centre of the window to begin adding items</span>

<span class="ts0">Item Code – select an item code you wish to adjust the price of.</span>

<span class="ts0">Description - Will auto populate once code is selected</span>

<span class="ts0">New Value – Enter the new or correct unit cost price</span>

<span class="ts0">Reason – Enter reason for changing the price</span>

<span class="ts0">Save And New button – to select another item you wish to change the price off</span>

<span class="ts0">Save And Close button – Saves and closes the form</span>

[![image.png](https://hugeerp10.co.za/hsofmanual/uploads/images/gallery/2024-06/scaled-1680-/FhOimage.png)](https://hugeerp10.co.za/hsofmanual/uploads/images/gallery/2024-06/FhOimage.png)

<span class="ts0">Select the stock Value you created and Click on Process</span>

![](https://hugeerp0.co.za/csp/webhelp/topics/images/image(3281).png)

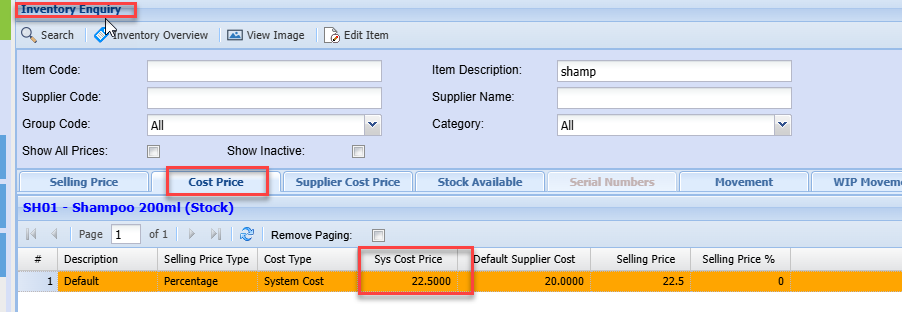
Once the adjustment has been successfully processed, you will note the unit cost price of the item has changed to the new price you entered.

This new cost price will now be used on all new documents created going forward.

[![image.png](https://hugeerp10.co.za/hsofmanual/uploads/images/gallery/2024-06/scaled-1680-/9adimage.png)](https://hugeerp10.co.za/hsofmanual/uploads/images/gallery/2024-06/9adimage.png)
<span class="ts0"> </span>

<span class="ts0"></span>

# Import/Print Button

##### <span class="ts2">Print Stock Value Adjustment</span>

<span class="ts0"> </span>![](https://hugeerp0.co.za/csp/webhelp/topics/images/image(3282).png)

<span class="ts0"> </span><span class="ts0">Allows the user to generate a stock value adjustment report</span>

<span class="ts0"> </span>![](https://hugeerp0.co.za/csp/webhelp/topics/images/image(149).png)

### <span class="ts15">Import</span>

<span class="ts15"> </span><span class="ts0">allows the user to upload and import a stock value adjustment CSV File</span>

<span class="ts0"> </span>![](https://hugeerp0.co.za/csp/webhelp/topics/images/image(150).png)

<span class="ts0"> </span>![](https://hugeerp0.co.za/csp/webhelp/topics/images/image(3283).png)

# Stock Take Menu

# Stock Take Excel Import

#### <span class="ts2">Stock </span><span class="ts2">take count</span><span class="ts2"> </span><span class="ts2">i</span><span class="ts2">mport </span><span class="ts2">file</span>

<span class="ts81"> </span><span class="ts81"> </span><span class="ts0">The file must be a semi-colon ; separated file.</span>

<span class="ts0">The heading can be left in the import file.</span>

<span class="ts0">The fields are as follows,</span>

<div id="bkmrk-stockcode-descriptio"><table class="tbl10"><tbody><tr class="row0"><td class="cell0"><span class="ts0">StockCode</span>

</td><td class="cell1"><span class="ts0">Description</span>

</td><td class="cell2"><span class="ts0">Quantity</span>

</td></tr><tr class="row0"><td class="cell0"><span class="ts0">Code1</span>

</td><td class="cell1"><span class="ts0">Stock Item 1</span>

</td><td class="cell2"><span class="ts0">20</span>

</td></tr><tr class="row0"><td class="cell0"><span class="ts0">Code2</span>

</td><td class="cell1"><span class="ts0">Stock Item 2</span>

</td><td class="cell2"><span class="ts0">3</span>

</td></tr></tbody></table>

</div><span class="ts0"> </span><span class="ts33">Please Note : The import file must be for the applicable wareho</span><span class="ts3">use.</span>

# Barcode Count Import

#### <span class="ts2">Stock </span><span class="ts2">take count</span><span class="ts2"> </span><span class="ts2">i</span><span class="ts2">mport </span><span class="ts2">file</span>

<span class="ts81"> </span><span class="ts81"> </span><span class="ts0">The file must be a semi-colon ; separated file.</span>

<span class="ts0">The heading can be left in the import file.</span>

<span class="ts0">The fields are as follows,</span>

<span class="ts0">Description column must exist but does not need to have a value</span>

<div id="bkmrk-bar-code-description"><table class="tbl9"><tbody><tr class="row1"><td class="cell1"><span class="ts0">Bar Code</span>

</td><td class="cell2"><span class="ts0">Description (Not required)</span>

</td><td class="cell3"><span class="ts0">Quantity</span>

</td></tr><tr class="row1"><td class="cell1"><span class="ts0">6009802069776</span>

</td><td class="cell2"><span class="ts0">Stock Item 1 description</span>

</td><td class="cell3"><span class="ts0">20</span>

</td></tr><tr class="row1"><td class="cell1"><span class="ts0">6009802069813</span>

</td><td class="cell2"><span class="ts0">Stock Item 2 description</span>

</td><td class="cell3"><span class="ts0">3</span>

</td></tr></tbody></table>

</div><span class="ts0"> </span>

<span class="ts0">Please Note : The import file must be for the applicable warehouse.</span>

<span class="ts0"> </span>

<span class="ts0">Once you have scanned your products using a scanner, and have the export file.</span>

<span class="ts0"> </span>

![](https://hugeerp0.co.za/csp/webhelp/topics/images/image(2720).png)

<span class="ts0">You will need to take the file to Excel and configure it in columns</span>

<span class="ts0">Then add in a header and a column between the Barcode and quantity</span>

<span class="ts0">Check that the file in Excel is correct, correct any problems</span>

<span class="ts0">It may be easier to delete the line that is giving a problem as Excel looks at this as a large number</span>

<span class="ts0"> </span>

![](https://hugeerp0.co.za/csp/webhelp/topics/images/image(2721).png)

<span class="ts0"> </span>

<span class="ts0">Format the Excel sheet so that it looks like this</span>

1.<span class="ts0">Using text to columns to separate fields</span>

2.<span class="ts0">Format Barcode field to be a number field without decimals and comma separator</span>

3.<span class="ts0">Insert column for Description</span>

4.<span class="ts0">Insert Header</span>

5.<span class="ts0">Save your file as a Excel sheet</span>

<span class="ts0"> </span>

![](https://hugeerp0.co.za/csp/webhelp/topics/images/image(2722).png)

<span class="ts0"> </span>

<span class="ts0">Now to create the CSV file</span>

1.<span class="ts0">Rename your file with a \_1 to show first attempt</span>

2.<span class="ts0">Click on save as to save as CSV file</span>

3.<span class="ts0">Close the Excel sheet</span>

<span class="ts0"> </span>

![](https://hugeerp0.co.za/csp/webhelp/topics/images/image(2723).png)

<span class="ts0"> </span>

<span class="ts0">There will be three files now</span>

<span class="ts0">Open the csv file in notepad to check that the seperator is semi colon ( ; )</span>

<span class="ts0"> </span>

![](https://hugeerp0.co.za/csp/webhelp/topics/images/image(2724).png)

<span class="ts0"> </span>

<span class="ts0">If the file is separated with a comma then replace all with semi colon</span>

<span class="ts0">Once the file is with semi colon separated then it is ready for import</span>

<span class="ts0">Save and close file</span>

<span class="ts0"> </span>

![](https://hugeerp0.co.za/csp/webhelp/topics/images/image(2725).png)

<span class="ts0"> </span>

<span class="ts0">Go back to your stock take and open up</span>

1.<span class="ts0">Click on Import stock count</span>

2.<span class="ts0">Make sure you tick By Barcode</span>

3.<span class="ts0">Select the csv file</span>

4.<span class="ts0">Click on Upload</span>

5.<span class="ts0">Click on import</span>

<span class="ts0"> </span>

![](https://hugeerp0.co.za/csp/webhelp/topics/images/image(2726).png)

<span class="ts0"> </span>

<span class="ts0">After import the file will show any errors</span>

<span class="ts0"> </span>

![](https://hugeerp0.co.za/csp/webhelp/topics/images/image(2727).png)

<span class="ts0"> </span>

<span class="ts0">You can do some random checks</span>

<span class="ts0">Save your stock take and then continue to complete</span>

<span class="ts0"> </span>

![](https://hugeerp0.co.za/csp/webhelp/topics/images/image(2728).png)

<span class="ts0"></span>

# Stock Take Process

<span class="ts0">When doing stock takes the user must always remember that you cannot process stock in or out of the system while doing a stock take.</span>

<span class="ts0">Some checks to consider when doing a stock take.</span>

<span class="ts0">To do</span>

<span class="ts0">Inform all staff that a stock take will take place on a set date</span>

<span class="ts0">create a backup of your company before starting a stock take9see manual under backups on how this is done)</span>

<span class="ts0">run the inventory valuation recalculation report</span>

<span class="ts0">create a stock take</span>

<span class="ts0">print out a stock count sheet</span>

<span class="ts0">count the stock</span>

<span class="ts0">input the stock count or import the count</span>

<span class="ts0">print variance report and verify variances</span>

<span class="ts0">complete the stock take</span>

 <span class="ts0">Post transactions as of the creation date of stock take</span>

 <span class="ts0">Post transactions as of today's date</span>

<span class="ts0">Print out the stock variance report and export to excel</span>

<span class="ts0">Print out the new Inventory evaluation report</span>

<span class="ts0">Create another backup after stock take is complete</span>

<span class="ts0"> </span>

<div id="bkmrk-things-to-remember-c"><table class="tbl11"><tbody><tr class="row0"><td class="cell0">**<span class="ts0">Things to remember</span>**

</td></tr><tr class="row0"><td class="cell1"><span class="ts0">Create the stock take procedure prior to the month end or year end</span>

</td></tr><tr class="row0"><td class="cell2"><span class="ts0">Ensure no stock is invoiced or GRVed while doing the stock take</span>

</td></tr><tr class="row0"><td class="cell2"><span class="ts0">If the stock takes overlaps the month end or year-end make sure no transactions are posted for the new month until you have completed the stock take prior month end or financial year end.</span>

</td></tr><tr class="row0"><td class="cell2"><span class="ts0">Make sure you Activate the stock take prior to the month end to freeze stock</span>

</td></tr><tr class="row0"><td class="cell2"><span class="ts0">The Inventory count sheet which is printed out is given to staff to manually write on while stock counting</span>

</td></tr><tr class="row0"><td class="cell2"><span class="ts0">It is easier to export a file to Excel from the activated stock take and capture the stock values in this file and then import back into the stock take batch then capturing manually on the stock take batch</span>

</td></tr><tr class="row0"><td class="cell2"><span class="ts0">Remember that the exported file is NOT sorting by stock code or description, it is easier to sort by stock code and then once capturing has completed to sort BACK by ID code, as this is what the import file will look at</span>

</td></tr></tbody></table>

</div>---

<span class="ts0"> </span>

<span class="ts0"></span>

# Create Stock Take Batch

#### <span class="ts2">Create the stock take</span>

<span style="color: rgb(45, 194, 107);">**<span class="ts45">Inventory Module &gt; Activity &gt; Stock Take</span>**</span>

<span class="ts6">Click on the Insert button and then fill in the information needed. In this case we are doing all items in warehouse. Then click on the save button.</span>

<span class="ts9"> </span>![](https://hugeerp0.co.za/csp/webhelp/topics/images/image(3285).png)

<p class="callout info"><span class="ts6">Note: </span><span class="ts6">Stock Takes are done per Warehouse, you will have create stock take batches per warehouse. </span><span class="ts6">Make sure that the stock take is activated before month end.</span></p>

# Activate Stock Take

**<span class="ts9"> </span><span class="ts45">Inventory Module &gt; Activity &gt; Stock Take</span>**

<span class="ts9"> </span><span class="ts6">High light the stock take line and then click on the Functions tab and click on Activate. This ensures that the system now locks down the quantities of the stock take.</span>

<span class="ts6">Note:</span>

<span class="ts6">Stock Takes are done per warehouse, you will have create stock take batches per warehouse.</span>

<span class="ts6">Make sure that the stock take is activated before month end.</span>

![](https://hugeerp0.co.za/csp/webhelp/topics/images/image(3286).png)

# Print out stock count sheet

<span style="color: rgb(45, 194, 107);">**<span class="ts6">Go to </span><span class="ts45">Inventory Module &gt; Reports &gt; Report List &gt; Inventory Count.</span>**</span>

<span class="ts6">Print out the report for Stock Take quantities.</span>

<span class="ts6">The Inventory count sheet that is printed out is given to staff to manually write on while stock counting.</span>

![](https://hugeerp0.co.za/csp/webhelp/topics/images/image(3287).png)

<span class="ts9"> </span>

# Count the Stock

#### <span class="ts2">Count the Stock (Manual Stock Count )</span>

![](https://hugeerp0.co.za/csp/webhelp/topics/images/image(238).png)

# Capturing the quantities of the stock take

<span class="ts6">High light the stock take line and click on the Variance button.</span>

#### <span class="ts6">Details Tab</span>

<span class="ts6">There are various ways of inputting the stock variance</span>

1. <span class="ts6">Find the item and click on the variance button and enter the amount.</span>
    1. <span class="ts6">Multiple people can capture in one stock take batch</span>

<p class="callout warning"><span class="ts6">If the person overrides the same stock code with a new value, this means the quantity entered by the last person who made the change on that stock code will be kept.</span></p>

1. <span class="ts6">Go to the Quick Capture tab, enter the matching stock code (must be the exact number not part) and enter the amount.</span>
2. <span class="ts6">Export the stock take batch to Excel using the export button, capture in Excel and Import the variance changes. (important note to take into account is that the export file is only relevant to the stock take batch you exported from) Should you cancel the stock take and create a new one you will have to export a new Excel file.</span>

[![image.png](https://hugeerp10.co.za/hsofmanual/uploads/images/gallery/2024-10/scaled-1680-/tZGimage.png)](https://hugeerp10.co.za/hsofmanual/uploads/images/gallery/2024-10/tZGimage.png)

---

#### <span class="ts6">Quick Capture Tab</span>

<span class="ts6">Enter the stock code and click on Search and Edit button to find the item and edit.</span>

<span class="ts6">Otherwise click on the search button to find the item and double click to open the item to edit the stock line.</span>

[![image.png](https://hugeerp10.co.za/hsofmanual/uploads/images/gallery/2024-10/scaled-1680-/kW4image.png)](https://hugeerp10.co.za/hsofmanual/uploads/images/gallery/2024-10/kW4image.png)

---

#### <span style="color: rgb(0, 0, 0);">Scan Tab</span>

<span style="color: rgb(0, 0, 0);">Scanning the barcode of the item will find the item and count.</span>

<span style="color: rgb(0, 0, 0);">The more you scan the item, the quantity will increase</span>

[![image.png](https://hugeerp10.co.za/hsofmanual/uploads/images/gallery/2024-10/scaled-1680-/56Rimage.png)](https://hugeerp10.co.za/hsofmanual/uploads/images/gallery/2024-10/56Rimage.png)

---

#### <span class="ts6">Variance Button</span>

<span class="ts6">Highlighting the line and then clicking on variance will do the same as double clicking on the item.</span>

<span class="ts6">This is where one changes the count.</span>

[![image.png](https://hugeerp10.co.za/hsofmanual/uploads/images/gallery/2024-10/scaled-1680-/BA3image.png)](https://hugeerp10.co.za/hsofmanual/uploads/images/gallery/2024-10/BA3image.png)

Once the item is found, change the quantity in the actual field

Click save and close to update

[![image.png](https://hugeerp10.co.za/hsofmanual/uploads/images/gallery/2024-10/scaled-1680-/Xhzimage.png)](https://hugeerp10.co.za/hsofmanual/uploads/images/gallery/2024-10/Xhzimage.png)
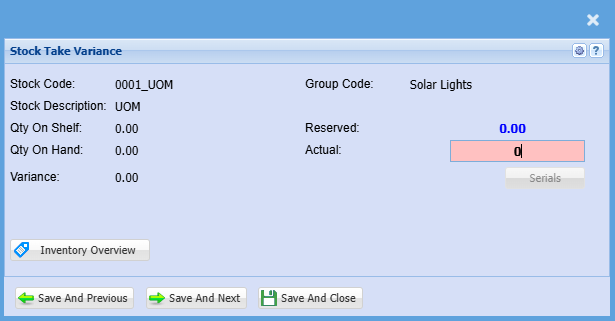
---

#### Print Button

Printing the variance report to check count

[![image.png](https://hugeerp10.co.za/hsofmanual/uploads/images/gallery/2024-10/scaled-1680-/Mn9image.png)](https://hugeerp10.co.za/hsofmanual/uploads/images/gallery/2024-10/Mn9image.png)

Select options before printing

[![image.png](https://hugeerp10.co.za/hsofmanual/uploads/images/gallery/2024-10/scaled-1680-/3cgimage.png)](https://hugeerp10.co.za/hsofmanual/uploads/images/gallery/2024-10/3cgimage.png)

---

#### Import Stock Count

Importing a stock count from Webatar stock count

[![image.png](https://hugeerp10.co.za/hsofmanual/uploads/images/gallery/2024-10/scaled-1680-/eAhimage.png)](https://hugeerp10.co.za/hsofmanual/uploads/images/gallery/2024-10/eAhimage.png)

When the format is correct, import the count

[![image.png](https://hugeerp10.co.za/hsofmanual/uploads/images/gallery/2024-10/scaled-1680-/OEyimage.png)](https://hugeerp10.co.za/hsofmanual/uploads/images/gallery/2024-10/OEyimage.png)
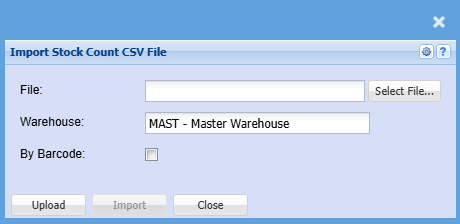
# Export file

<span class="ts23"> </span><span class="ts10">Video manual 2020 - </span>[Click Here](https://vimeo.com/493960815)

<span class="ts0"> </span><span class="ts0">When exporting, keep file format the same but save as a CSV format with comma seperator.</span>

<span class="ts0">Only make changes on the Stock Take Quantity.</span>

<span class="ts0">Then import the file and do a spot check on the quantities changed.</span>

<span class="ts0"> </span>![](https://hugeerp0.co.za/csp/webhelp/topics/images/image(3289).png)

<span class="ts0"> </span><span class="ts0">Note:</span>

<span class="ts0">Remember that the exported file is NOT sorting by stock code or description, it is easier to sort by stock code and then once capturing has completed to sort BACK by ID code, as this is what the import file will look at</span><span class="ts31">.</span>

![](https://hugeerp0.co.za/csp/webhelp/topics/images/image(240).png)

# Warehouse Transfer Menu

# Warehouse Transfers

<span class="ts0">Warehouse transfer is used to transfer items from one warehouse to another.</span>

<span class="ts0">You have to have taken multi- warehouse add on module in Huge ERP and working in more than one warehouse.</span>

<span class="ts0">To access warehouse transfers</span>

**<span class="ts0"><span class="ts15" style="color: rgb(45, 194, 107);">Inventory Module&gt;Activity&gt;Warehouse Transfers</span></span>**

[![image.png](https://hugeerp10.co.za/hsofmanual/uploads/images/gallery/2024-02/scaled-1680-/UIMimage.png) ](https://hugeerp10.co.za/hsofmanual/uploads/images/gallery/2024-02/UIMimage.png)

---

#### Warehouse Transfer

[![image.png](https://hugeerp10.co.za/hsofmanual/uploads/images/gallery/2024-02/scaled-1680-/d2Oimage.png)](https://hugeerp10.co.za/hsofmanual/uploads/images/gallery/2024-02/d2Oimage.png)
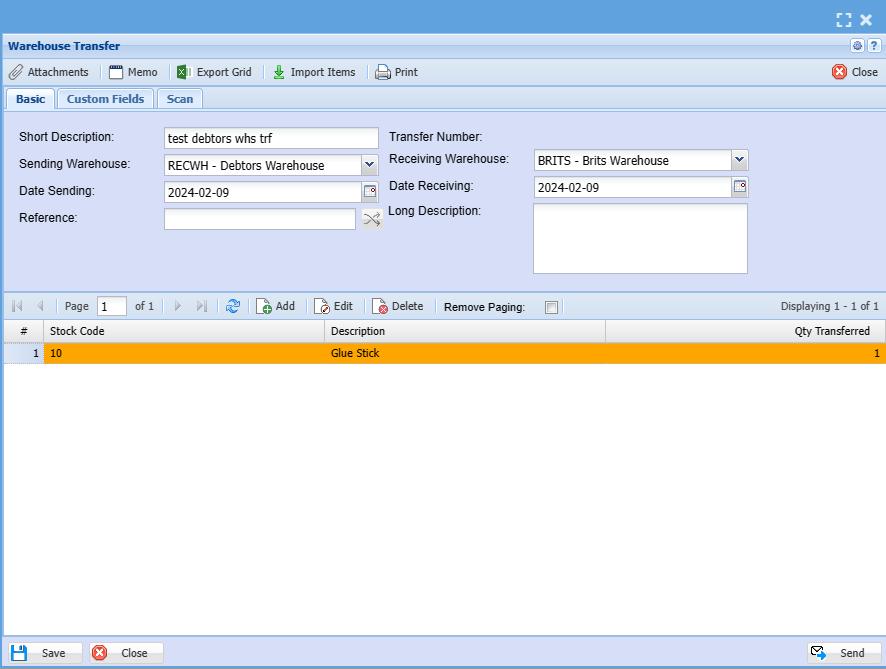
<table border="1" id="bkmrk-short-description-th" style="border-collapse: collapse; width: 100%; height: 208.578px;"><colgroup><col style="width: 30.3087%;"></col><col style="width: 69.8149%;"></col></colgroup><tbody><tr style="height: 29.7969px;"><td style="height: 29.7969px;">Short Description</td><td style="height: 29.7969px;"><span class="ts0">The Short description regarding stock</span></td></tr><tr style="height: 29.7969px;"><td style="height: 29.7969px;">Sending Warehouse</td><td style="height: 29.7969px;"><span class="ts0">Is the company warehouse that you are transferring stock from</span></td></tr><tr style="height: 29.7969px;"><td style="height: 29.7969px;">Date Sending</td><td style="height: 29.7969px;"><span class="ts0">is the date the stock is sent out</span></td></tr><tr style="height: 29.7969px;"><td style="height: 29.7969px;">Reference</td><td style="height: 29.7969px;">  
</td></tr><tr style="height: 29.7969px;"><td style="height: 29.7969px;">Receiving Warehouse</td><td style="height: 29.7969px;"><span class="ts0">is the warehouse receiving the stock.</span></td></tr><tr style="height: 29.7969px;"><td style="height: 29.7969px;">Date Receiving</td><td style="height: 29.7969px;"><span class="ts0">is the date stock was received</span></td></tr><tr style="height: 29.7969px;"><td style="height: 29.7969px;">Long Description</td><td style="height: 29.7969px;"> </td></tr></tbody></table>

---

#### Import Items

[![image.png](https://hugeerp10.co.za/hsofmanual/uploads/images/gallery/2024-10/scaled-1680-/Enuimage.png)](https://hugeerp10.co.za/hsofmanual/uploads/images/gallery/2024-10/Enuimage.png)

[![image.png](https://hugeerp10.co.za/hsofmanual/uploads/images/gallery/2024-10/scaled-1680-/wF6image.png)](https://hugeerp10.co.za/hsofmanual/uploads/images/gallery/2024-10/wF6image.png)
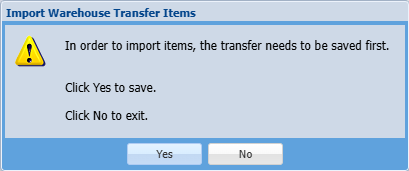
[![image.png](https://hugeerp10.co.za/hsofmanual/uploads/images/gallery/2024-10/scaled-1680-/sxYimage.png)](https://hugeerp10.co.za/hsofmanual/uploads/images/gallery/2024-10/sxYimage.png)
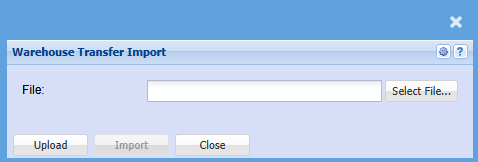
---

#### Add Stock Item

<span class="ts0">Once completed filling the information above click save so you can be able to add items </span>

<span class="ts0">After clicking safe add click on **Add**</span>

<span class="ts0">When selecting the inventory item make sure that there is stock available to avoid processing errors.</span>

[![image.png](https://hugeerp10.co.za/hsofmanual/uploads/images/gallery/2024-02/scaled-1680-/6Erimage.png)](https://hugeerp10.co.za/hsofmanual/uploads/images/gallery/2024-02/6Erimage.png)

The screen below will appear.

Complete all the information related to an item that you are transferring from one warehouse to another.

[![image.png](https://hugeerp10.co.za/hsofmanual/uploads/images/gallery/2024-02/scaled-1680-/TGtimage.png)](https://hugeerp10.co.za/hsofmanual/uploads/images/gallery/2024-02/TGtimage.png)
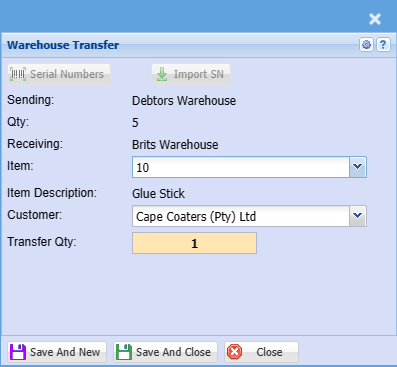
<table border="1" id="bkmrk-sending-qty-receivin" style="border-collapse: collapse; width: 100%; height: 178.781px;"><colgroup><col style="width: 25.46%;"></col><col style="width: 74.54%;"></col></colgroup><tbody><tr style="height: 29.7969px;"><td style="height: 29.7969px;">Sending</td><td style="height: 29.7969px;">  
</td></tr><tr style="height: 29.7969px;"><td style="height: 29.7969px;">Qty</td><td style="height: 29.7969px;">  
</td></tr><tr style="height: 29.7969px;"><td style="height: 29.7969px;">Receiving</td><td style="height: 29.7969px;">  
</td></tr><tr style="height: 29.7969px;"><td style="height: 29.7969px;">Item</td><td style="height: 29.7969px;">  
</td></tr><tr style="height: 29.7969px;"><td style="height: 29.7969px;">Item Description</td><td style="height: 29.7969px;">  
</td></tr><tr style="height: 29.7969px;"><td style="height: 29.7969px;">Customer</td><td style="height: 29.7969px;"> </td></tr><tr><td>Transfer Qty</td><td>  
</td></tr></tbody></table>

---

#### Transfer

<span class="ts0">Search for the created list of inventory to be transferred and select it.</span>

[![image.png](https://hugeerp10.co.za/hsofmanual/uploads/images/gallery/2024-02/scaled-1680-/pXRimage.png)](https://hugeerp10.co.za/hsofmanual/uploads/images/gallery/2024-02/pXRimage.png)

<span class="ts0">This is useful because you need to have items available on hand to effect the warehouse transfer.</span>

<span class="ts0">NB Adding items onto a transfer does not allocate it or prevent it from being sold to a client</span>

<span class="ts0"> </span>

<span class="ts0"> </span>

<span class="ts0"> </span>![](https://hugeerp0.co.za/csp/webhelp/topics/images/image(3295).png)

<span class="ts0">Click Process tab at the bottom of the window and Select Transfer button to start the process of transferring the stock.</span>

<span class="ts0">When you click transfer the items are allocated to the in transit status and removed from on hand inventory, this means that they are no longer available for selling.</span>

<span class="ts0"> </span><span class="ts0">The Following window will pop up.</span>

<span class="ts0"> </span>![](https://hugeerp0.co.za/csp/webhelp/topics/images/image(3296).png)

<span class="ts0"> </span><span class="ts0"> </span><span class="ts0">From here on the stock can now be received into the warehouse. A printout report of the stock being transferred can be generated and emailed to the receiving clerk of the other warehouse.</span>

<span class="ts0">Click receive button, once the inventory items are received at the destination warehouse the transfer is complete and will increase the stock in that warehouse.</span>

<span class="ts0"> </span><span class="ts0">Once done proceed as shown on page 4- 7</span>

<span class="ts0">Common errors that may prevent the transfer not to be processed is “the availability of stock from the sending warehouse.”</span>

<span class="ts0">And the warehouse not being linked to stock items being transferred. </span>

---

#### <span class="ts0"> Print Button</span>

[![image.png](https://hugeerp10.co.za/hsofmanual/uploads/images/gallery/2024-10/scaled-1680-/KH5image.png)](https://hugeerp10.co.za/hsofmanual/uploads/images/gallery/2024-10/KH5image.png)

[![image.png](https://hugeerp10.co.za/hsofmanual/uploads/images/gallery/2024-10/scaled-1680-/XqUimage.png)](https://hugeerp10.co.za/hsofmanual/uploads/images/gallery/2024-10/XqUimage.png)
# Warehouse Import and Export

##### <span class="ts15">Inventory Module&gt;Activity&gt;Warehouse Transfers</span>

<span class="ts0"> </span><span class="ts0">Warehouse transfer data can be exported to Excel.</span>

<span class="ts0">Warehouse transfer data can be imported into the document</span>

<span class="ts0"> </span>![](https://hugeerp0.co.za/csp/webhelp/topics/images/image(3297).png)

# Warehouse Removal from Items

**<span class="ts50">Inventory Module&gt; Configuration &gt; Inventory setu</span><span class="ts50">p</span>**

<span class="ts50"> </span><span class="ts7">Search for your stock items</span>

![](https://hugeerp0.co.za/csp/webhelp/topics/images/image(605).png)

<span class="ts7">Highlight the item you want to fix on the warehouses and double click or amend the item</span>

<span class="ts7"> </span>![](https://hugeerp0.co.za/csp/webhelp/topics/images/image(606).png)

<span class="ts7">Click on the warehouse button</span>

<span class="ts7"> </span><span class="ts7">Highlight the warehouse which you want to remove and click on Delete button, this will remove the warehouse from the item.</span>

![](https://hugeerp0.co.za/csp/webhelp/topics/images/image(607).png)

<span class="ts7">Click on Yes to remove warehouse</span>

![](https://hugeerp0.co.za/csp/webhelp/topics/images/image(608).png)

<span class="ts7"> </span><span class="ts7">Successfully removed</span>

![](https://hugeerp0.co.za/csp/webhelp/topics/images/image(609).png)

<span class="ts7">Once you are complete, the warehouses will be removed</span>

![](https://hugeerp0.co.za/csp/webhelp/topics/images/image(610).png)

<span class="ts0"></span>

# Warehouse Receive Menu

# Warehouse Receive Search

[![image.png](https://hugeerp10.co.za/hsofmanual/uploads/images/gallery/2024-10/scaled-1680-/4rMimage.png)](https://hugeerp10.co.za/hsofmanual/uploads/images/gallery/2024-10/4rMimage.png)
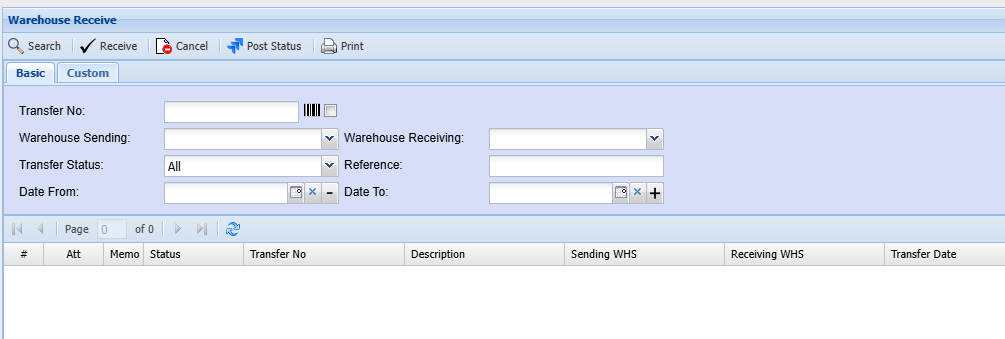
<table border="1" id="bkmrk-search-%C2%A0-receive-can" style="border-collapse: collapse; width: 100%;"><colgroup><col style="width: 22.1482%;"></col><col style="width: 77.9507%;"></col></colgroup><tbody><tr><td>**Search**</td><td> </td></tr><tr><td>**Receive**</td><td>  
</td></tr><tr><td>**Cancel**</td><td>  
</td></tr><tr><td>**Post Status**</td><td>  
</td></tr><tr><td>**Print**</td><td>  
</td></tr><tr><td>**Transfer No.**

</td><td>  
</td></tr><tr><td>**Warehouse Sending**

</td><td>  
</td></tr><tr><td>**Transfer Status**

</td><td>  
</td></tr><tr><td>**Date From and To**

</td><td>  
</td></tr><tr><td>**Warehouse Receiving**

</td><td>  
</td></tr><tr><td>**Reference**

</td><td>  
</td></tr></tbody></table>

---

#### Receive Button

<span style="text-decoration: underline;">Basic Tab</span>

[![image.png](https://hugeerp10.co.za/hsofmanual/uploads/images/gallery/2024-10/scaled-1680-/mNximage.png)](https://hugeerp10.co.za/hsofmanual/uploads/images/gallery/2024-10/mNximage.png)

<span style="text-decoration: underline;">Scan Tab</span>

[![image.png](https://hugeerp10.co.za/hsofmanual/uploads/images/gallery/2024-10/scaled-1680-/NQpimage.png)](https://hugeerp10.co.za/hsofmanual/uploads/images/gallery/2024-10/NQpimage.png)

# Location Transfer Menu

# Location Transfer Search

[![image.png](https://hugeerp10.co.za/hsofmanual/uploads/images/gallery/2024-10/scaled-1680-/cqoimage.png)](https://hugeerp10.co.za/hsofmanual/uploads/images/gallery/2024-10/cqoimage.png)
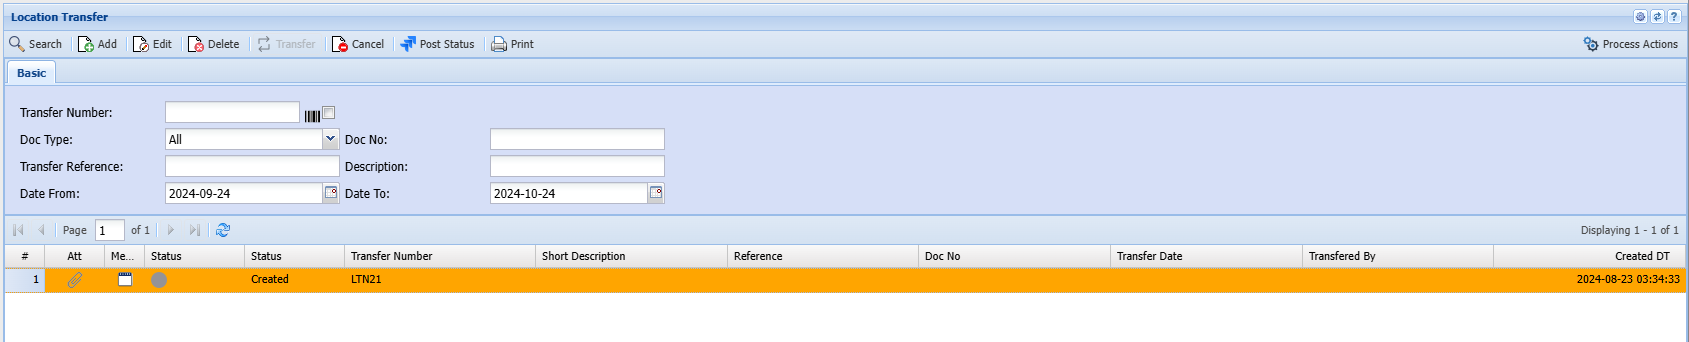
<table border="1" id="bkmrk-search-%C2%A0-add-edit-de" style="border-collapse: collapse; width: 100%;"><colgroup><col style="width: 19.4044%;"></col><col style="width: 80.5708%;"></col></colgroup><tbody><tr><td>**Search**</td><td> </td></tr><tr><td>**Add**</td><td>  
</td></tr><tr><td>**Edit**</td><td>  
</td></tr><tr><td>**Delete**</td><td>  
</td></tr><tr><td>**Transfer**</td><td>  
</td></tr><tr><td>**Cancel**</td><td>  
</td></tr><tr><td>**Post Status**</td><td>  
</td></tr><tr><td>**Print**</td><td>  
</td></tr><tr><td>**Transfer Number**</td><td>  
</td></tr><tr><td>**Doc Type**</td><td>  
</td></tr><tr><td>**Doc No.**</td><td>  
</td></tr><tr><td>**Transfer Reference**</td><td>  
</td></tr><tr><td>**Description**</td><td>  
</td></tr><tr><td>**Date From and To**</td><td>  
</td></tr></tbody></table>

---

#### Add or Edit

[![image.png](https://hugeerp10.co.za/hsofmanual/uploads/images/gallery/2024-10/scaled-1680-/2BEimage.png)](https://hugeerp10.co.za/hsofmanual/uploads/images/gallery/2024-10/2BEimage.png)

##### Add Line

[![image.png](https://hugeerp10.co.za/hsofmanual/uploads/images/gallery/2024-10/scaled-1680-/RvLimage.png)](https://hugeerp10.co.za/hsofmanual/uploads/images/gallery/2024-10/RvLimage.png)
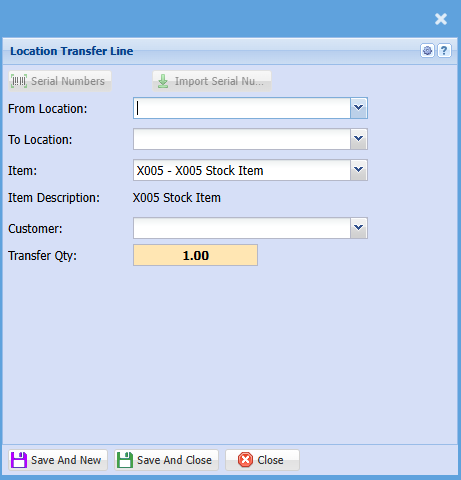
---

#### Process Actions Button

[![image.png](https://hugeerp10.co.za/hsofmanual/uploads/images/gallery/2024-10/scaled-1680-/kSdimage.png)](https://hugeerp10.co.za/hsofmanual/uploads/images/gallery/2024-10/kSdimage.png)

[![image.png](https://hugeerp10.co.za/hsofmanual/uploads/images/gallery/2024-10/scaled-1680-/uQ2image.png)](https://hugeerp10.co.za/hsofmanual/uploads/images/gallery/2024-10/uQ2image.png)
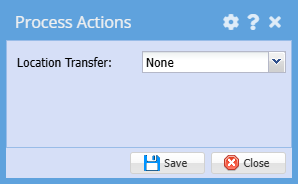
# Bill Of Materials Menu

# Bill Of Material 2010 Manual

#### <span class="ts2">bill of materials process</span>

**<span class="ts0"> </span><span class="ts0">Inventory Activity Bill of Materials</span>**

<span class="ts0">To create a Bill of Materials stock for manufacturing, go to the activity menu group.</span>

<span class="ts0"> </span>![](https://hugeerp0.co.za/csp/webhelp/topics/images/image(288).png)

<span class="ts0"> </span><span class="ts0"> </span><span class="ts0">To insert a new Bill of Material manufacturing click on the insert button. Fill in the information for the BOM and then click on Save and Close.</span>

<span class="ts0"> </span>![](https://hugeerp0.co.za/csp/webhelp/topics/images/image(289).png)

<span class="ts0"> </span><span class="ts0">Resulting Item – This is the end result or manufactured item. Also is the item which was flagged a BOM item.</span>

<span class="ts0">Description – This comes from the BOM setup and gives the description of the end result item.</span>

<span class="ts0">Sourced from BOM – One needs to select a recipe for manufacture, there could be multiple recipes to one end result item.</span>

<span class="ts0">Quantity – The quantity one wants to manufacture of this item.</span>

<span class="ts0">End Date – When do you expect this BOM to be completed</span>

<span class="ts0">Resident Warehouse – when manufacturing is complete where do you want the quantities to update which warehouse.</span>

<span class="ts0">Job No Link – Link this BOM to a Job costing job number. This means you will be able to see how many BOMs are been manufactured on a Job Costing.</span>

<span class="ts0"> </span><span class="ts0"> </span><span class="ts0">The line of the BOM window will be updated but no BOM number has been allocated, this will only allocate when one clicks on the Activate Button.</span>

<span class="ts0"> </span>![](https://hugeerp0.co.za/csp/webhelp/topics/images/image(290).png)

<span class="ts0"> </span><span class="ts0"> </span><span class="ts0">Activating the BOM</span>

<span class="ts0">Highlight the BOM which needs to be activated and click on the button called activate.</span>

<span class="ts0"> </span>![](https://hugeerp0.co.za/csp/webhelp/topics/images/image(291).png)

<span class="ts0"> </span><span class="ts0">Click on OK to Active the BOM</span>

<span class="ts0"> </span>![](https://hugeerp0.co.za/csp/webhelp/topics/images/image(292).png)

<span class="ts0"> </span><span class="ts0"> </span><span class="ts0">To active the BOM you will have to click on the Insert button.</span>

<span class="ts0"> </span><span class="ts0">One will have also noticed that the BOM has been allocated a BOM number.</span>

<span class="ts0">At this stage no raw materials stock items have been moved to Work In Progress (WIP).</span>

<span class="ts0"> </span>![](https://hugeerp0.co.za/csp/webhelp/topics/images/image(293).png)

<span class="ts0"> </span><span class="ts0"> </span><span class="ts0"> </span><span class="ts0">Click on insert to start the BOM manufacture</span>

<span class="ts0"> </span>![](https://hugeerp0.co.za/csp/webhelp/topics/images/image(294).png)

<span class="ts0"> </span><span class="ts0">The reason there are two screens to go into is that you can part manufacture a BOM run. This means if you are manufacturing 50 items and 10 are complete you can complete the sub BOM of 10 and put it into stock for resale.</span>

<span class="ts0"> </span><span class="ts0">If you want to change the manufacturing quantity make the change and click on Refresh. But for this example we will manufacture all stock items.</span>

<span class="ts0"> </span><span class="ts0">Click on Verify button to check that there is enough stock to complete this BOM.</span>

<span class="ts0"> </span><span class="ts0">If you are working with serial number the buttons with the 3 dots … will allow you to allocate serial numbers to be used.</span>

<span class="ts0"> </span><span class="ts0"> </span><span class="ts0">After the verify button click on Save OR Save and Close to save your changes.</span>

<span class="ts0"> </span>![](https://hugeerp0.co.za/csp/webhelp/topics/images/image(295).png)

<span class="ts0"> </span><span class="ts0"> </span><span class="ts0">Under the Print Tab and Edit BOM Lines there are other buttons</span>

<span class="ts0"> </span>![](https://hugeerp0.co.za/csp/webhelp/topics/images/image(296).png)

<span class="ts0"> </span><span class="ts0">Print Tab</span>

<span class="ts0"> </span><span class="ts0">Print – Print the BOM information of stock required</span>

<span class="ts0"> </span>![](https://hugeerp0.co.za/csp/webhelp/topics/images/image(297).png)

<span class="ts0"> </span><span class="ts0"> </span><span class="ts0"> </span><span class="ts0">Print Detail – A Detail print out of the BOM including Custom type items and service type items</span>

<span class="ts0"> </span>![](https://hugeerp0.co.za/csp/webhelp/topics/images/image(298).png)

<span class="ts0"> </span><span class="ts0"> </span><span class="ts0">Edit BOM Lines</span>

<span class="ts0"> </span><span class="ts0">This allows one to on the fly edit BOM items where the recipe has changed slightly from the original. The original recipe stays the same but you might have used more items, different items etc to manufacture this batch.</span>

<span class="ts0"> </span><span class="ts0">Insert – Inserts new inventory items to a BOM</span>

<span class="ts0">Amend – Allows one to change current inventory items in the BOM</span>

<span class="ts0">Delete - Allows one to delete current inventory items in the BOM</span>

<span class="ts0"> </span><span class="ts0">Saving changes to BOM</span>

<span class="ts0">After clicking on Save and Close lines are updated</span>

<span class="ts0"> </span>![](https://hugeerp0.co.za/csp/webhelp/topics/images/image(299).png)

<span class="ts0"> </span><span class="ts0"> </span><span class="ts0">This updates the BOM recipe and allocates a number to the BOM to be manufactured. Ie BOM1.1</span>

<span class="ts0"> </span><span class="ts0">This means it is for BOM1 batch</span>

<span class="ts0">Dot 1 means it is the first manufacture process of this batch.</span>

<span class="ts0">Still at this stage no stock has moved off to Work in Progress.</span>

<span class="ts0"> </span><span class="ts0"> </span>![](https://hugeerp0.co.za/csp/webhelp/topics/images/image(300).png)

<span class="ts0"> </span><span class="ts0">To activate the BOM and move raw materials into Work in Progress click on the Activate button on the Process tab.</span>

<span class="ts0"> </span>![](https://hugeerp0.co.za/csp/webhelp/topics/images/image(301).png)

<span class="ts0"> </span>![](https://hugeerp0.co.za/csp/webhelp/topics/images/image(302).png)

<span class="ts0"> </span><span class="ts0"> </span><span class="ts0">At this stage stock is now moved to Work in Progress and the BOM is waiting completion.</span>

<span class="ts0"> </span><span class="ts0">When BOM is complete click on the Complete button.</span>

<span class="ts0"> </span>![](https://hugeerp0.co.za/csp/webhelp/topics/images/image(303).png)

<span class="ts0"> </span>![](https://hugeerp0.co.za/csp/webhelp/topics/images/image(304).png)

<span class="ts0"> </span>![](https://hugeerp0.co.za/csp/webhelp/topics/images/image(305).png)

<span class="ts0"> </span><span class="ts0">Now the Bill of Materials for the Cake is complete. Raw materials have been taken out of the Work in Progress and taken out of the system. The finished goods have been replaced with the total raw material value in stock.</span>

<span class="ts0"> </span><span class="ts0"> </span><span class="ts0">Check up on the BOM.</span>

<span class="ts0"> </span><span class="ts0">Go to Inventory Analysis BOM History</span>

<span class="ts0">After clicking on search you will see your BOM complete</span>

<span class="ts0"> </span>![](https://hugeerp0.co.za/csp/webhelp/topics/images/image(306).png)

<span class="ts0"> </span><span class="ts0">At the bottom of this page you will see some buttons.</span>

<span class="ts0"> </span>![](https://hugeerp0.co.za/csp/webhelp/topics/images/image(307).png)

<span class="ts0"> </span><span class="ts0"> </span><span class="ts0">View – allows one to view the original BOM without making any changes.</span>

<span class="ts0">Print – Prints out the Bill of Materials that was manufactured.</span>

<span class="ts0">Picking Slip – Allows one to print out the picking slip from the manufactured BOM</span>

<span class="ts0">Related Transactions – This shows the accounting entries completed in the transaction</span>

<span class="ts0"> </span>![](https://hugeerp0.co.za/csp/webhelp/topics/images/image(308).png)

<span class="ts0"> </span><span class="ts0">Reports</span>

<span class="ts0"> </span><span class="ts0">There are a number of BOM reports one can print, see these under</span>

<span class="ts0">Inventory Reports Report List – Select inventory category.</span>

<span class="ts0"> </span>![](https://hugeerp0.co.za/csp/webhelp/topics/images/image(309).png)

<span class="ts0"> </span><span class="ts0">BOM - Distribution of inventory items in BOMS - Distribution of inventory items in BOMS Report</span>

<span class="ts0">BOM Forecast - Shows the BOM created on all status on the quantity requested versus what was created, activated, posted and the balances left.</span>

<span class="ts0">BOM Report - A detailed report showing each BOM created with recipe of the quantity and cost price created.</span>

<span class="ts0">BOM Usage - A summary report showing each BOM created with it's recipe of the quantity and cost price created.</span>

<span class="ts0">BOM Value Report - Summary report showing the stock, service and custom type items values for each BOM and total value of the BOM.</span>

<span class="ts0"></span>

# Bill Of Material 2014 Manual

##### <span class="ts2">bill of materials process</span>

<span class="ts0"> </span><span class="ts0">Inventory Activity Bill of Materials</span>

<span class="ts0">To create a Bill of Materials stock for manufacturing, go to the activity menu group.</span>

<span class="ts0"> </span>![](https://hugeerp0.co.za/csp/webhelp/topics/images/image(288).png)

<span class="ts0"> </span><span class="ts0">To insert a new Bill of Material manufacturing click on the insert button. Fill in the information for the BOM and then click on Save and Close.</span>

<span class="ts0"> </span>![](https://hugeerp0.co.za/csp/webhelp/topics/images/image(289).png)

<span class="ts0"> </span><span class="ts0">Resulting Item – This is the end result or manufactured item. Also is the item which was flagged a BOM item.</span>

<span class="ts0">Description – This comes from the BOM setup and gives the description of the end result item.</span>

<span class="ts0">Sourced from BOM – One needs to select a recipe for manufacture, there could be multiple recipes to one end result item.</span>

<span class="ts0">Quantity – The quantity one wants to manufacture of this item.</span>

<span class="ts0">End Date – When do you expect this BOM to be completed</span>

<span class="ts0">Resident Warehouse – when manufacturing is complete where do you want the quantities to update which warehouse.</span>

<span class="ts0">Job No Link – Link this BOM to a Job costing job number. This means you will be able to see how many BOMs are been manufactured on a Job Costing.</span>

<span class="ts0"> </span><span class="ts0"> </span><span class="ts0">The line of the BOM window will be updated but no BOM number has been allocated, this will only allocate when one clicks on the Activate Button.</span>

<span class="ts0"> </span>![](https://hugeerp0.co.za/csp/webhelp/topics/images/image(290).png)

<span class="ts0"> </span><span class="ts0"> </span><span class="ts0">Activating the BOM</span>

<span class="ts0">Highlight the BOM which needs to be activated and click on the button called activate.</span>

<span class="ts0"> </span>![](https://hugeerp0.co.za/csp/webhelp/topics/images/image(291).png)

<span class="ts0"> </span><span class="ts0">Click on OK to Active the BOM</span>

<span class="ts0"> </span>![](https://hugeerp0.co.za/csp/webhelp/topics/images/image(292).png)

<span class="ts0"> </span><span class="ts0"> </span><span class="ts0">To active the BOM you will have to click on the Insert button.</span>

<span class="ts0"> </span><span class="ts0">One will have also noticed that the BOM has been allocated a BOM number.</span>

<span class="ts0">At this stage no raw materials stock items have been moved to Work In Progress (WIP).</span>

<span class="ts0"> </span>![](https://hugeerp0.co.za/csp/webhelp/topics/images/image(293).png)

<span class="ts0"> </span><span class="ts0"> </span><span class="ts0">Click on insert to start the BOM manufacture</span>

<span class="ts0"> </span>![](https://hugeerp0.co.za/csp/webhelp/topics/images/image(294).png)

<span class="ts0"> </span><span class="ts0">The reason there are two screens to go into is that you can part manufacture a BOM run. This means if you are manufacturing 50 items and 10 are complete you can complete the sub BOM of 10 and put it into stock for resale.</span>

<span class="ts0"> </span><span class="ts0">If you want to change the manufacturing quantity make the change and click on Refresh. But for this example we will manufacture all stock items.</span>

<span class="ts0"> </span><span class="ts0">Click on Verify button to check that there is enough stock to complete this BOM.</span>

<span class="ts0"> </span><span class="ts0">If you are working with serial number the buttons with the 3 dots … will allow you to allocate serial numbers to be used.</span>

<span class="ts0"> </span><span class="ts0"> </span><span class="ts0">After the verify button click on Save OR Save and Close to save your changes.</span>

<span class="ts0"> </span>![](https://hugeerp0.co.za/csp/webhelp/topics/images/image(295).png)

<span class="ts0"> </span><span class="ts0"> </span><span class="ts0">Under the Print Tab and Edit BOM Lines there are other buttons</span>

<span class="ts0"> </span>![](https://hugeerp0.co.za/csp/webhelp/topics/images/image(296).png)

<span class="ts0"> </span><span class="ts0">Print Tab</span>

<span class="ts0"> </span><span class="ts0">Print – Print the BOM information of stock required</span>

<span class="ts0"> </span>![](https://hugeerp0.co.za/csp/webhelp/topics/images/image(297).png)

<span class="ts0"> </span><span class="ts0"> </span><span class="ts0">Print Detail – A Detail print out of the BOM including Custom type items and service type items</span>

<span class="ts0"> </span>![](https://hugeerp0.co.za/csp/webhelp/topics/images/image(298).png)

<span class="ts0"> </span><span class="ts0"> </span><span class="ts0">Edit BOM Lines</span>

<span class="ts0"> </span><span class="ts0">This allows one to on the fly edit BOM items where the recipe has changed slightly from the original. The original recipe stays the same but you might have used more items, different items etc to manufacture this batch.</span>

<span class="ts0"> </span><span class="ts0">Insert – Inserts new inventory items to a BOM</span>

<span class="ts0">Amend – Allows one to change current inventory items in the BOM</span>

<span class="ts0">Delete - Allows one to delete current inventory items in the BOM</span>

<span class="ts0"> </span><span class="ts0">Saving changes to BOM</span>

<span class="ts0">After clicking on Save and Close lines are updated</span>

<span class="ts0"> </span>![](https://hugeerp0.co.za/csp/webhelp/topics/images/image(299).png)

<span class="ts0"> </span><span class="ts0"> </span><span class="ts0">This updates the BOM recipe and allocates a number to the BOM to be manufactured. Ie BOM1.1</span>

<span class="ts0"> </span><span class="ts0">This means it is for BOM1 batch</span>

<span class="ts0">Dot 1 means it is the first manufacture process of this batch.</span>

<span class="ts0">Still at this stage no stock has moved off to Work in Progress.</span>

<span class="ts0"> </span>![](https://hugeerp0.co.za/csp/webhelp/topics/images/image(300).png)

<span class="ts0"> </span><span class="ts0">To activate the BOM and move raw materials into Work in Progress click on the Activate button on the Process tab.</span>

<span class="ts0"> </span>![](https://hugeerp0.co.za/csp/webhelp/topics/images/image(301).png)

<span class="ts0"> </span>![](https://hugeerp0.co.za/csp/webhelp/topics/images/image(302).png)

<span class="ts0"> </span><span class="ts0"> </span><span class="ts0">At this stage stock is now moved to Work in Progress and the BOM is waiting completion.</span>

<span class="ts0"> </span><span class="ts0">When BOM is complete click on the Complete button.</span>

<span class="ts0"> </span>![](https://hugeerp0.co.za/csp/webhelp/topics/images/image(303).png)

<span class="ts0"> </span>![](https://hugeerp0.co.za/csp/webhelp/topics/images/image(304).png)

<span class="ts0"> </span>![](https://hugeerp0.co.za/csp/webhelp/topics/images/image(305).png)

<span class="ts0"> </span><span class="ts0">Now the Bill of Materials for the Cake is complete. Raw materials have been taken out of the Work in Progress and taken out of the system. The finished goods have been replaced with the total raw material value in stock.</span>

<span class="ts0"> </span><span class="ts0"> </span><span class="ts0">Check up on the BOM.</span>

<span class="ts0"> </span><span class="ts0">Go to Inventory Analysis BOM History</span>

<span class="ts0">After clicking on search you will see your BOM complete</span>

<span class="ts0"> </span>![](https://hugeerp0.co.za/csp/webhelp/topics/images/image(306).png)

<span class="ts0"> </span><span class="ts0">At the bottom of this page you will see some buttons.</span>

<span class="ts0"> </span>![](https://hugeerp0.co.za/csp/webhelp/topics/images/image(307).png)

<span class="ts0"> </span><span class="ts0">View – allows one to view the original BOM without making any changes.</span>

<span class="ts0">Print – Prints out the Bill of Materials that was manufactured.</span>

<span class="ts0">Picking Slip – Allows one to print out the picking slip from the manufactured BOM</span>

<span class="ts0">Related Transactions – This shows the accounting entries completed in the transaction</span>

<span class="ts0"> </span>![](https://hugeerp0.co.za/csp/webhelp/topics/images/image(308).png)

<span class="ts0"> </span><span class="ts0">Reports</span><span class="ts0"> </span>

<span class="ts0">There are a number of BOM reports one can print, see these under</span>

<span class="ts0">Inventory Reports Report List – Select inventory category.</span>

<span class="ts0"> </span>![](https://hugeerp0.co.za/csp/webhelp/topics/images/image(309).png)

<span class="ts0"> </span><span class="ts0">BOM - Distribution of inventory items in BOMS - Distribution of inventory items in BOMS Report</span>

<span class="ts0">BOM Forecast - Shows the BOM created on all status on the quantity requested versus what was created, activated, posted and the balances left.</span>

<span class="ts0">BOM Report - A detailed report showing each BOM created with recipe of the quantity and cost price created.</span>

<span class="ts0">BOM Usage - A summary report showing each BOM created with it's recipe of the quantity and cost price created.</span>

<span class="ts0">BOM Value Report - Summary report showing the stock, service and custom type items values for each BOM and total value of the BOM.</span>

<span class="ts0"></span>

# Creating Resultant Item

#### <span class="ts2">CREATE THE RESULTANT(End-Product) ITEM</span>

<span class="ts23"> </span>**<span class="ts15">Go to Inventory Module &gt; Configuration&gt; Inventory Set up</span>**

<span class="ts0">2.Click Add</span>

![](https://hugeerp0.co.za/csp/webhelp/topics/images/image(3298).png)

<span class="ts0">3: Enter an Item Code</span>

<span class="ts0">4: Enter the required item descriptions</span>

<span class="ts0">Enter the cost price</span>

<span class="ts0">Click Save</span>

<span class="ts0">Click the Bill of material Tab</span>

![](https://hugeerp0.co.za/csp/webhelp/topics/images/image(3299).png)

<span class="ts0">Tick “Activate Bill of Material” Box</span>

<span class="ts0">Click Save and Close</span>

<span class="ts0">Enter any other details required by clicking on the Tabs and completing the information</span>

<span class="ts0">Click Save</span>

# CREATING THE BILL OF MATERIAL (BOM) RECIPE

**<span class="ts23"> </span><span class="ts15">Go to inventory module&gt; Configuration&gt; Bill of Material Setup</span>**

<span class="ts43">1 Click Add, a window will open.</span>

![](https://hugeerp0.co.za/csp/webhelp/topics/images/image(3300).png)

<span class="ts43">2: Enter a BOM Code</span>

<span class="ts43">3: Enter the BOM Description</span>

<span class="ts43">4: Select the resultant item (This is the item code you created above)</span>

<span class="ts43">Click Save</span>

<span class="ts43">5: Click Add</span>

![](https://hugeerp0.co.za/csp/webhelp/topics/images/image(3301).png)

<span class="ts43">This Is where you Select the list item(s) required to make up the resultant item(End-Product)</span>

<span class="ts43">Enter the quantity required</span>

<span class="ts43">Select Warehouse this BOM will be available on.</span>

<span class="ts43">Click Save and New to continue adding more items on your list</span>

<span class="ts43">Click Save and Close when the last item has been selected</span>

# CREATING THE BOM ITEM

<span style="color: rgb(45, 194, 107);"><span class="ts23"> </span>**<span class="ts15">Go to inventory module&gt; Activity&gt;Bill of Materials</span>**</span>

![](https://hugeerp0.co.za/csp/webhelp/topics/images/image(3302).png)

1.<span class="ts43">Select the resultant Item</span>

2.<span class="ts43">Select the BOM source (This is the Recipe you created above)</span>

3.<span class="ts43">Select form Drop Down</span>

4.<span class="ts43">Enter the required quantity of the resultant item</span>

5.<span class="ts43">Select the Warehouse you wish this item to be stored in</span>

<span class="ts43">Click Save and close/new</span>

<span class="ts43">Click Search</span>

<span class="ts43">Highlight the required BOM</span>

![](https://hugeerp0.co.za/csp/webhelp/topics/images/image(3303).png)

<span class="ts12">Click Manage BOM</span>

![](https://hugeerp0.co.za/csp/webhelp/topics/images/image(3304).png)

<span class="ts12">Click OK</span>

<span class="ts12">Click Insert</span>

![](https://hugeerp0.co.za/csp/webhelp/topics/images/image(3305).png)

---

#### Complete Button

[![image.png](https://hugeerp10.co.za/hsofmanual/uploads/images/gallery/2024-10/scaled-1680-/56Ximage.png)](https://hugeerp10.co.za/hsofmanual/uploads/images/gallery/2024-10/56Ximage.png)

---

#### Add or Edit Line

[![image.png](https://hugeerp10.co.za/hsofmanual/uploads/images/gallery/2024-10/scaled-1680-/Co6image.png)](https://hugeerp10.co.za/hsofmanual/uploads/images/gallery/2024-10/Co6image.png)
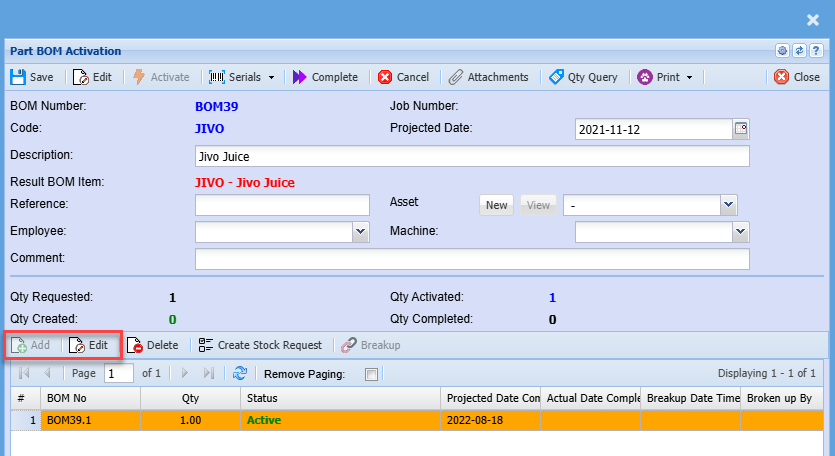
[![image.png](https://hugeerp10.co.za/hsofmanual/uploads/images/gallery/2024-10/scaled-1680-/Lu4image.png)](https://hugeerp10.co.za/hsofmanual/uploads/images/gallery/2024-10/Lu4image.png)
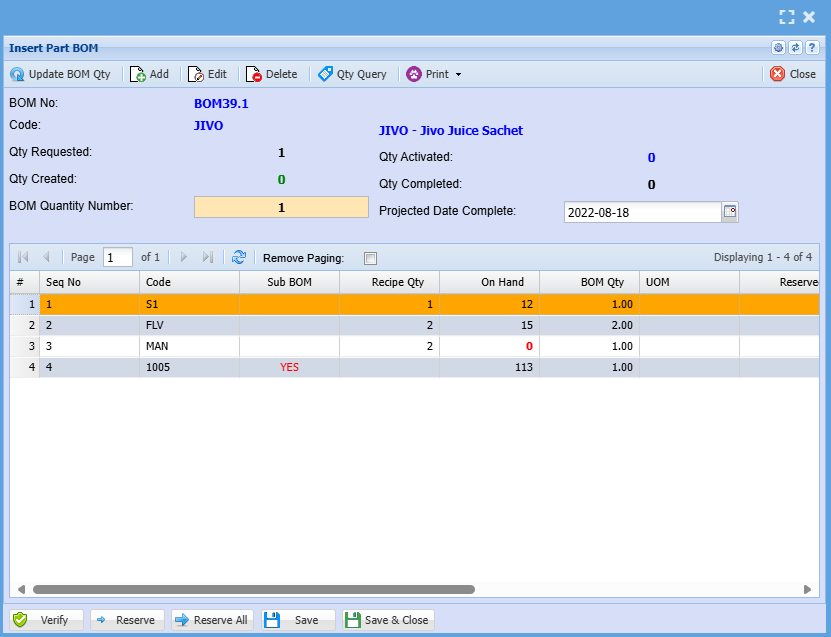
[![image.png](https://hugeerp10.co.za/hsofmanual/uploads/images/gallery/2024-10/scaled-1680-/Axyimage.png)](https://hugeerp10.co.za/hsofmanual/uploads/images/gallery/2024-10/Axyimage.png)
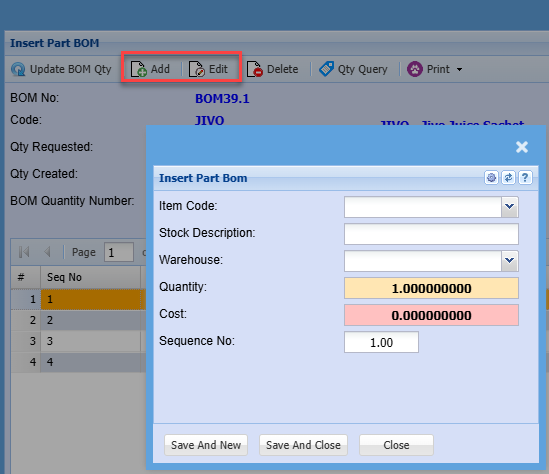
---

#### Create Stock Request

[![image.png](https://hugeerp10.co.za/hsofmanual/uploads/images/gallery/2024-10/scaled-1680-/5ldimage.png)](https://hugeerp10.co.za/hsofmanual/uploads/images/gallery/2024-10/5ldimage.png)

# Change Control Menu

# Change Control Add

[![image.png](https://hugeerp10.co.za/hsofmanual/uploads/images/gallery/2024-10/scaled-1680-/uOIimage.png)](https://hugeerp10.co.za/hsofmanual/uploads/images/gallery/2024-10/uOIimage.png)
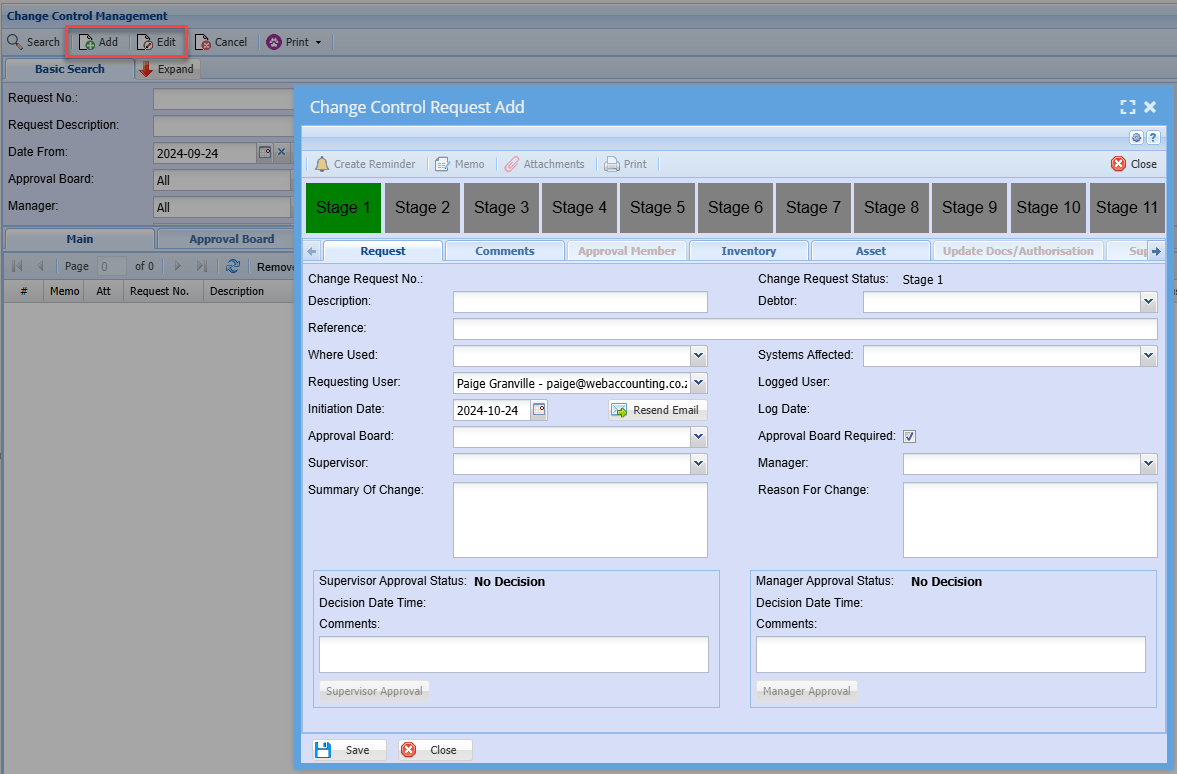
<div id="bkmrk-stages-%25-complete-ac"><table class="align-c tbl0"><tbody><tr class="row0"><td class="cell17"><span class="ts11">Stages</span>

</td><td class="cell15"><span class="ts11">% Complete</span>

</td><td class="cell18"><span class="ts11">Action</span>

</td></tr><tr class="row0"><td class="cell17"><span class="ts0">Stage 1</span>

<span class="ts0"> </span>

</td><td class="cell15"><span class="ts0">0%</span>

</td><td class="cell18"><span class="ts0">Creation of Change Request</span>

</td></tr><tr class="row0"><td class="cell17"><span class="ts0">Stage 2</span>

<span class="ts0"> </span>

</td><td class="cell15"><span class="ts0">10%</span>

</td><td class="cell18"><span class="ts0">Supervisor Approval</span>

</td></tr><tr class="row0"><td class="cell17"><span class="ts0">Stage 3</span>

<span class="ts0"> </span>

</td><td class="cell15"><span class="ts0">20%</span>

</td><td class="cell18"><span class="ts0">Manager Approval</span>

</td></tr><tr class="row0"><td class="cell17"><span class="ts0">Stage 4</span>

<span class="ts0"> </span>

</td><td class="cell15"><span class="ts0">30%</span>

</td><td class="cell18"><span class="ts0">Without any of the board members approving the request</span>

</td></tr><tr class="row0"><td class="cell17"><span class="ts0">Stage 5</span>

<span class="ts0"> </span>

</td><td class="cell15"><span class="ts0">40%</span>

</td><td class="cell18"><span class="ts0">Only when ALL board members have approved the request</span>

</td></tr><tr class="row0"><td class="cell17"><span class="ts0">Stage 6</span>

<span class="ts0"> </span>

</td><td class="cell15"><span class="ts0">50%</span>

</td><td class="cell18"><span class="ts0">Meeting request has been actioned</span>

</td></tr><tr class="row0"><td class="cell17"><span class="ts0">Stage 7</span>

<span class="ts0"> </span>

</td><td class="cell15"><span class="ts0">60%</span>

</td><td class="cell18"><span class="ts0">Update documentation</span>

</td></tr><tr class="row0"><td class="cell19"><span class="ts0">Stage 8</span>

<span class="ts0"> </span>

</td><td class="cell20"><span class="ts0">70%</span>

</td><td class="cell21"><span class="ts0">Authorisation of request</span>

</td></tr><tr class="row0"><td class="cell19"><span class="ts0">Stage 9</span>

<span class="ts0"> </span>

</td><td class="cell20"><span class="ts0">80%</span>

</td><td class="cell21"><span class="ts0">Authorisation and Close request</span>

</td></tr><tr class="row0"><td class="cell19"><span class="ts0">Stage 10</span>

<span class="ts0"> </span>

</td><td class="cell20"><span class="ts0">90%</span>

</td><td class="cell21"><span class="ts0">Processing of tasks / support logs</span>

</td></tr><tr class="row0"><td class="cell19"><span class="ts0">Stage 11</span>

<span class="ts0"> </span>

</td><td class="cell20"><span class="ts0">100%</span>

</td><td class="cell21"><span class="ts0">Once all tasks / support logs have been finalised and the manager has completed the change request</span>

</td></tr></tbody></table>

</div><span class="ts0"> </span>

# Change Control Management Search

<span style="text-decoration: underline;">Main Tab</span>

[![image.png](https://hugeerp10.co.za/hsofmanual/uploads/images/gallery/2024-10/scaled-1680-/fVOimage.png)](https://hugeerp10.co.za/hsofmanual/uploads/images/gallery/2024-10/fVOimage.png)

<span style="text-decoration: underline;">Approval Board Tab</span>

[![image.png](https://hugeerp10.co.za/hsofmanual/uploads/images/gallery/2024-10/scaled-1680-/7Ptimage.png)](https://hugeerp10.co.za/hsofmanual/uploads/images/gallery/2024-10/7Ptimage.png)

Clicking Add

[![image.png](https://hugeerp10.co.za/hsofmanual/uploads/images/gallery/2024-10/scaled-1680-/r8timage.png)](https://hugeerp10.co.za/hsofmanual/uploads/images/gallery/2024-10/r8timage.png)

After adding in your code and description you can click add.

after clicking add you can add a Member

[![image.png](https://hugeerp10.co.za/hsofmanual/uploads/images/gallery/2024-10/scaled-1680-/Jldimage.png)](https://hugeerp10.co.za/hsofmanual/uploads/images/gallery/2024-10/Jldimage.png)

<span style="text-decoration: underline;">Change Control Defaults Tab</span>

[![image.png](https://hugeerp10.co.za/hsofmanual/uploads/images/gallery/2024-10/scaled-1680-/HLKimage.png)](https://hugeerp10.co.za/hsofmanual/uploads/images/gallery/2024-10/HLKimage.png)

# Selling Price Update Menu

# Selling Price Update Search

[![image.png](https://hugeerp10.co.za/hsofmanual/uploads/images/gallery/2024-10/scaled-1680-/7s2image.png)](https://hugeerp10.co.za/hsofmanual/uploads/images/gallery/2024-10/7s2image.png)

<table border="1" id="bkmrk-search-%C2%A0-add-edit-ca" style="border-collapse: collapse; width: 100%;"><colgroup><col style="width: 50%;"></col><col style="width: 50%;"></col></colgroup><tbody><tr><td>**Search**</td><td> </td></tr><tr><td>**Add**</td><td>  
</td></tr><tr><td>**Edit**</td><td>  
</td></tr><tr><td>**Cancel**</td><td>  
</td></tr><tr><td>**Process**</td><td>  
</td></tr><tr><td>**Print**</td><td>  
</td></tr><tr><td>**SPU Number**</td><td>  
</td></tr><tr><td>**Status**</td><td>  
</td></tr><tr><td>**Description**</td><td>  
</td></tr><tr><td>**Date From and To**</td><td>  
</td></tr></tbody></table>

#### Adding or Editing

<span style="text-decoration: underline;">Print</span>

[![image.png](https://hugeerp10.co.za/hsofmanual/uploads/images/gallery/2024-10/scaled-1680-/a39image.png)](https://hugeerp10.co.za/hsofmanual/uploads/images/gallery/2024-10/a39image.png)

<span style="text-decoration: underline;">Search Lines Tab</span>

[![image.png](https://hugeerp10.co.za/hsofmanual/uploads/images/gallery/2024-10/scaled-1680-/8Tlimage.png)](https://hugeerp10.co.za/hsofmanual/uploads/images/gallery/2024-10/8Tlimage.png)

<span style="text-decoration: underline;">Update Lines Tab</span>

[![image.png](https://hugeerp10.co.za/hsofmanual/uploads/images/gallery/2024-10/scaled-1680-/Kcsimage.png)](https://hugeerp10.co.za/hsofmanual/uploads/images/gallery/2024-10/Kcsimage.png)

<span style="text-decoration: underline;">Update Price Type Tab</span>

[![image.png](https://hugeerp10.co.za/hsofmanual/uploads/images/gallery/2024-10/scaled-1680-/ovHimage.png)](https://hugeerp10.co.za/hsofmanual/uploads/images/gallery/2024-10/ovHimage.png)

# Fixed Asset Audit Menu

# Fixed Audit Trail

<span class="ts0">Fixed assets represent all tangible assets owned or held under finance that are used</span>

![](https://hugeerp0.co.za/csp/webhelp/topics/images/image(3306).png)

<span class="ts0"> </span>

<span class="ts0"> </span>

<span class="ts0">Search Tab allows the user to search by selecting from the following:</span>

<span class="ts0">Fixed Asset Audit No – search by entering asses audit number</span>

<span class="ts0">Debtor – search by selecting the debtor</span>

<span class="ts0">Operator/Employee – search by selecting operator from the drop down arrow</span>

<span class="ts0">Date From – search by selecting the date from which the audit search will run from</span>

<span class="ts0">Warehouse – search by selecting the warehouse</span>

<span class="ts0">Audit Status – search by selecting an audit status</span>

<span class="ts0">Date To – search by selecting the date to, in order to limit the</span>

<span class="ts0">Standard Tab</span>

<span class="ts0">Audit Assets button –</span>

<span class="ts0">Cancel –</span>

<span class="ts0">Manual Import FAA Files –</span>

<span class="ts0">Extras Tab</span>

<span class="ts0">Upload – Upload a fixed asset of your choice.</span>

<span class="ts0">Import – Import an already created Fixed Asset.</span>

<span class="ts0">Print Tab</span>

<span class="ts0">Print – The print button will print the currently selected Fixed Asset.</span>

# Upload Fixed Audit asset

![](https://hugeerp0.co.za/csp/webhelp/topics/images/image(3309).png)<span class="ts2"> </span>

<span class="ts23"> </span>![](https://hugeerp0.co.za/csp/webhelp/topics/images/image(3308).png)

<span class="ts0"> </span>

<span class="ts0">Fixed Asset Audit Import</span>

<span class="ts0">It allows the user to import fixed asset audit.</span>

<span class="ts0">Browse button – browse through the documents to find a file in a csv format to be uploaded</span>

<span class="ts0">Upload button – to upload the file</span>

<span class="ts0">Close button – to close the form</span>

# Batch Serial Number

Batch Serial numbers

# Batch Serial numbers

Batch serial numbers allows one to create multiple serial numbers on the fly for stock items.

[![image.png](https://hugeerp10.co.za/hsofmanual/uploads/images/gallery/2025-03/scaled-1680-/lOZimage.png)](https://hugeerp10.co.za/hsofmanual/uploads/images/gallery/2025-03/lOZimage.png)
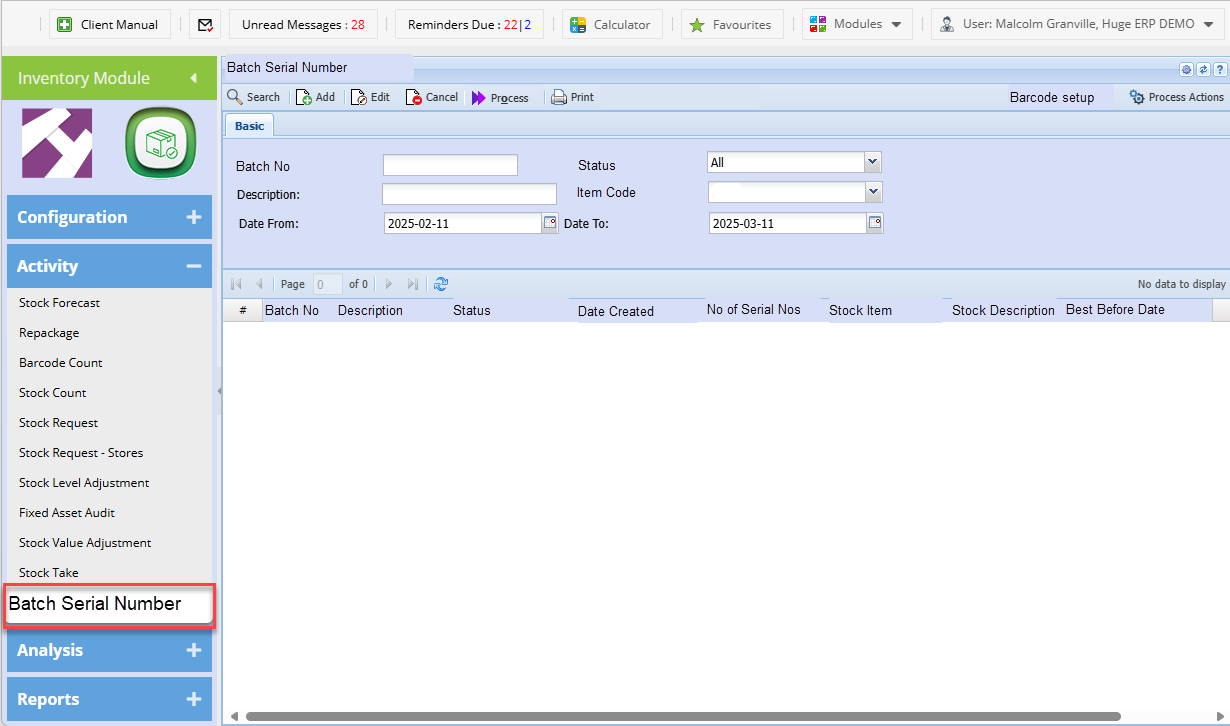
<table border="1" id="bkmrk-search-search-for-ba" style="border-collapse: collapse; width: 100%;"><colgroup><col style="width: 23.0358%;"></col><col style="width: 77.0834%;"></col></colgroup><tbody><tr><td>**Search**</td><td>Search for Batch Serial number batches</td></tr><tr><td>**Add**</td><td>Add a new batch with created serial numbers</td></tr><tr><td>**Edit**</td><td>Edit batch</td></tr><tr><td>**Cancel**</td><td>Cancel a batch</td></tr><tr><td>**Process**</td><td>Process a batch to stock level adjustment

Process action will determine whether it just creates the stock level or

Creates and processes

</td></tr><tr><td>**Print**</td><td>Print a batch to show the serial numbers created for a items</td></tr><tr><td>**Barcode setup**</td><td>Setup the default parameters for the barcode criteria</td></tr><tr><td>**Process setup**</td><td>Sets whether process will create stock level adjustment or creates and processes</td></tr></tbody></table>

<table border="1" id="bkmrk-status-preparation%2C-" style="border-collapse: collapse; width: 100%;"><colgroup><col style="width: 23.631%;"></col><col style="width: 76.4882%;"></col></colgroup><tbody><tr><td>Status</td><td>Preparation, Completed and Cancelled</td></tr><tr><td>Created</td><td>Batch serial number keeps the date and time and user who created the batch</td></tr><tr><td>Processed</td><td>Batch serial number keeps the date and time and user who processed the batch</td></tr></tbody></table>

---

##### Reference value setup for Batch Serial number

Hotfix will be created to setup the Default values for Batch serial number

[![image.png](https://hugeerp10.co.za/hsofmanual/uploads/images/gallery/2025-03/scaled-1680-/IcYimage.png)](https://hugeerp10.co.za/hsofmanual/uploads/images/gallery/2025-03/IcYimage.png)
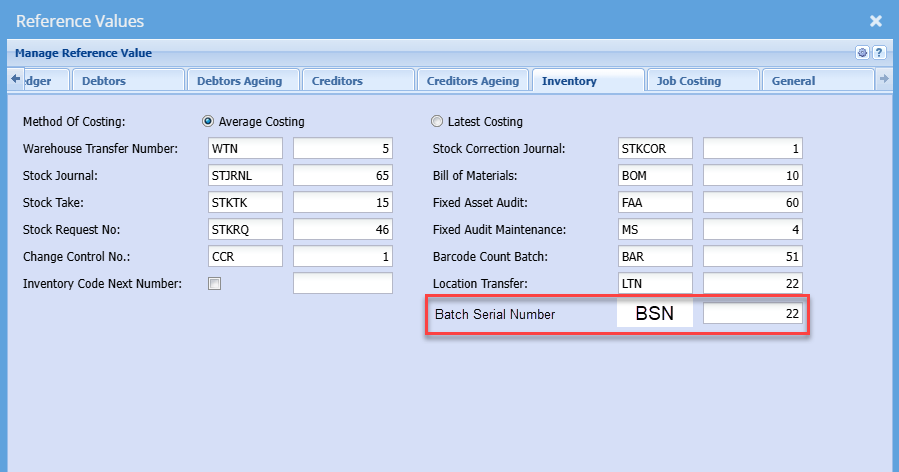
---

##### Serial number search

Serial numbers contain new columns and information from created barcodes (serial numbers)

[![image.png](https://hugeerp10.co.za/hsofmanual/uploads/images/gallery/2025-03/scaled-1680-/97Simage.png)](https://hugeerp10.co.za/hsofmanual/uploads/images/gallery/2025-03/97Simage.png)
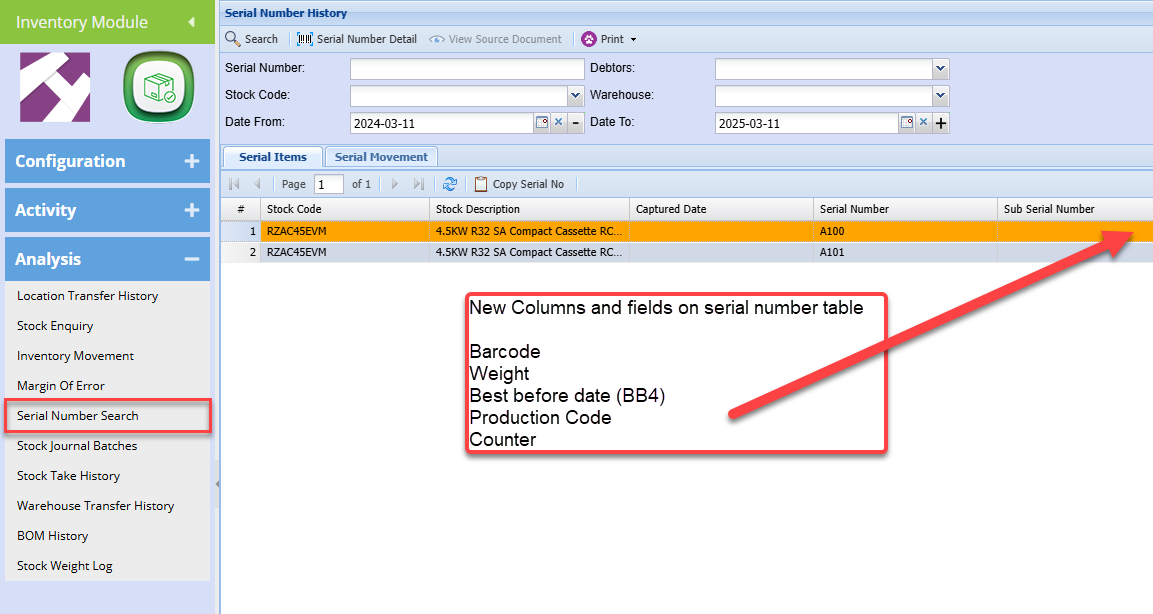
Information is shown on the serial number detail

[![image.png](https://hugeerp10.co.za/hsofmanual/uploads/images/gallery/2025-03/scaled-1680-/zEaimage.png)](https://hugeerp10.co.za/hsofmanual/uploads/images/gallery/2025-03/zEaimage.png)
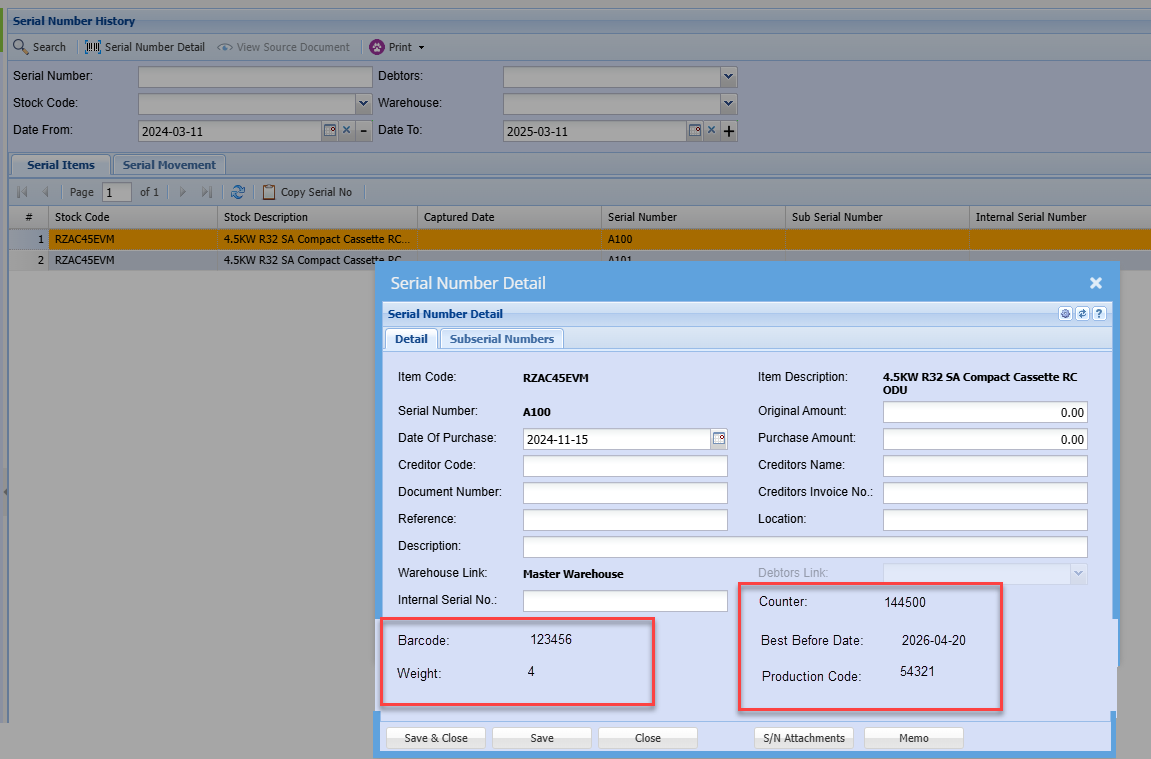
---

##### Process setup

Process Option is set to Create by default

Counter Start gives the first number that will start the counter number

Once the first Serial number is created, then the counter start will be disabled

[![image.png](https://hugeerp10.co.za/hsofmanual/uploads/images/gallery/2025-03/scaled-1680-/O61image.png)](https://hugeerp10.co.za/hsofmanual/uploads/images/gallery/2025-03/O61image.png)
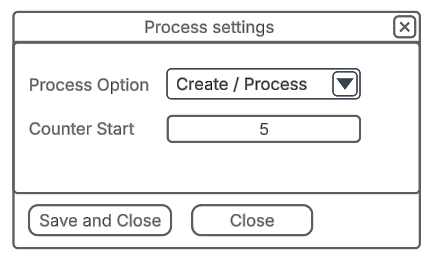
---

##### Barcode setup

Barcode setup, sets the parameter and sequence the barcode is setup

[![image.png](https://hugeerp10.co.za/hsofmanual/uploads/images/gallery/2025-03/scaled-1680-/8Kvimage.png)](https://hugeerp10.co.za/hsofmanual/uploads/images/gallery/2025-03/8Kvimage.png)
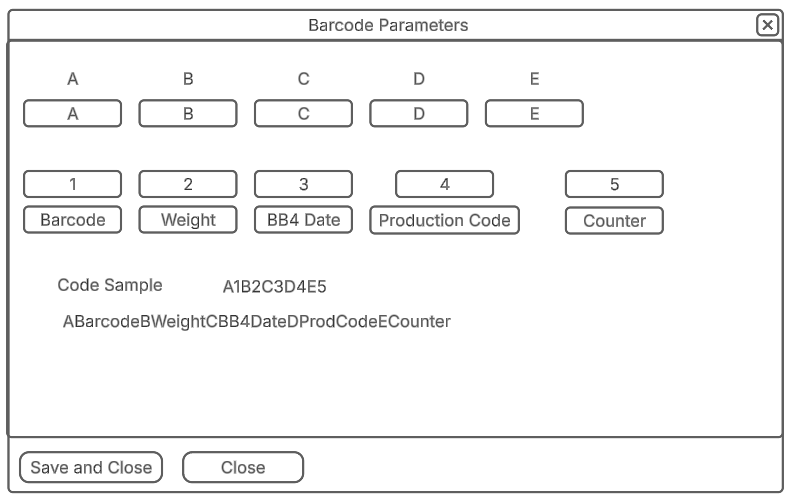
<table border="1" id="bkmrk-a-to-e-fields-sets-p" style="border-collapse: collapse; width: 100%;"><colgroup><col style="width: 24.5834%;"></col><col style="width: 75.5358%;"></col></colgroup><tbody><tr><td>**A to E fields**</td><td>Sets parameters to set for Barcode serial number</td></tr><tr><td>**1 to 5**</td><td>Sets the sequence of values to enter</td></tr><tr><td>**Barcode**</td><td>Picks up from Item barcode</td></tr><tr><td>**Weight**</td><td>Picks up from Item weight</td></tr><tr><td>**BB4 Date**</td><td>Best Before Date picks up from item number of days of Shelf life from production date</td></tr><tr><td>**Production Code**</td><td>Open text field</td></tr><tr><td>**Counter**</td><td>Field that automatically increments</td></tr></tbody></table>

---

##### Adding Serial numbers from Batch

[![image.png](https://hugeerp10.co.za/hsofmanual/uploads/images/gallery/2025-03/scaled-1680-/MYUimage.png)](https://hugeerp10.co.za/hsofmanual/uploads/images/gallery/2025-03/MYUimage.png)
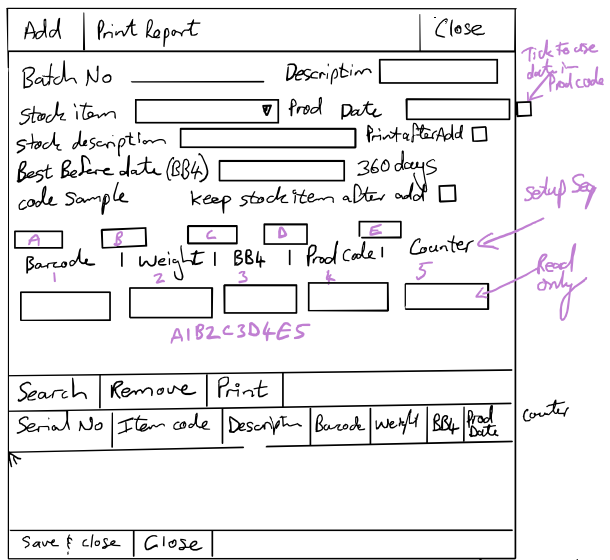
# Printing Batch Numbers from a Stock Level Adjustment

Printing a label for an item that is tracked using batch numbers is different from printing a label for a standard inventory item.

In order to print a label where the barcode will have the batch number you will need to print this label from the Stock Journal History.

<span style="color: rgb(45, 194, 107);">**Inventory Module &gt; Analysis &gt; Stock Journal Batches**</span>

As shown below these were 2 separate bulk stock level adjustments that brought in stock with batch numbers.

[![image.png](https://hugeerp10.co.za/hsofmanual/uploads/images/gallery/2026-02/scaled-1680-/jRkimage.png)](https://hugeerp10.co.za/hsofmanual/uploads/images/gallery/2026-02/jRkimage.png)
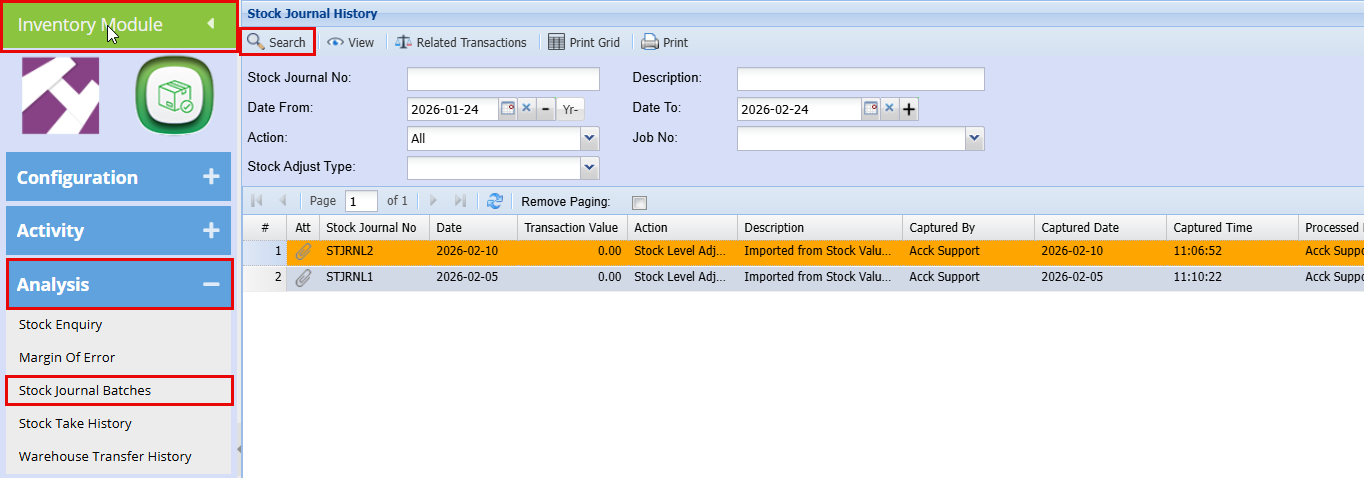
- <div>Click to highlight the line you want to print labels for.  
    </div>
- <div>Then click **View**.</div>

[![image.png](https://hugeerp10.co.za/hsofmanual/uploads/images/gallery/2026-02/scaled-1680-/5vpimage.png)](https://hugeerp10.co.za/hsofmanual/uploads/images/gallery/2026-02/5vpimage.png)

- Double‑click the inventory item you want to print a label for.

[![image.png](https://hugeerp10.co.za/hsofmanual/uploads/images/gallery/2026-02/scaled-1680-/Z87image.png)](https://hugeerp10.co.za/hsofmanual/uploads/images/gallery/2026-02/Z87image.png)
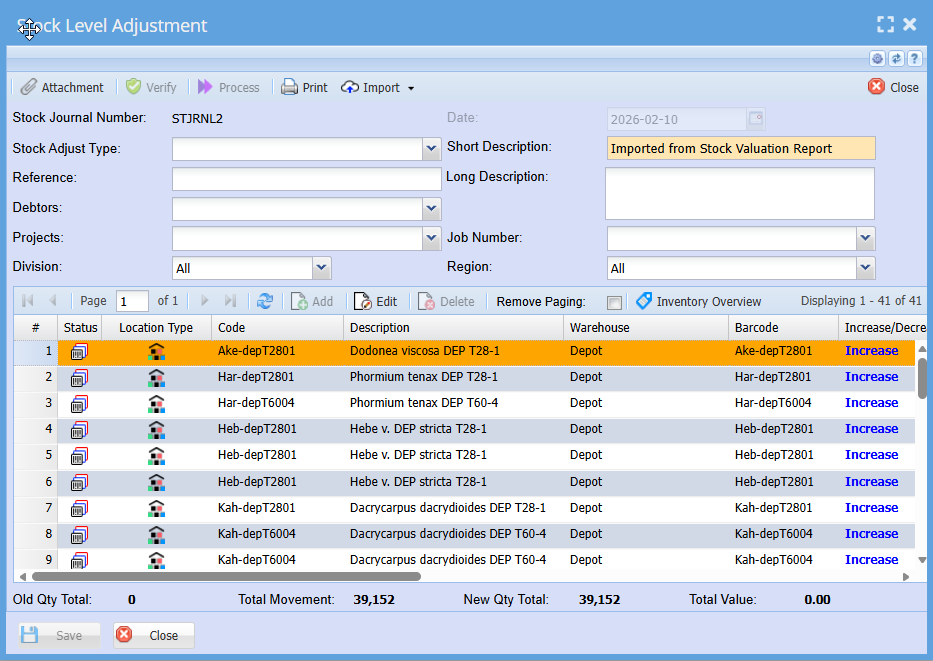
- Click on the **Batch Nos** Button

[![image.png](https://hugeerp10.co.za/hsofmanual/uploads/images/gallery/2026-02/scaled-1680-/4FPimage.png)](https://hugeerp10.co.za/hsofmanual/uploads/images/gallery/2026-02/4FPimage.png)
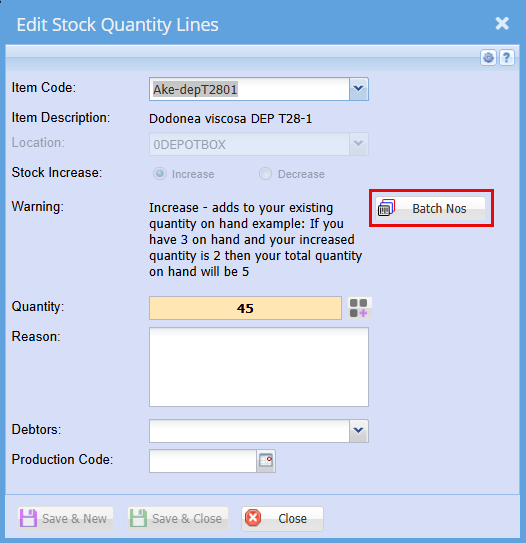
- <div>**Click** to highlight the line you want to print labels for.  
    </div>
- <div>Then click the **Black Barcode** as shown below.</div>

[![image.png](https://hugeerp10.co.za/hsofmanual/uploads/images/gallery/2026-02/scaled-1680-/AOzimage.png)](https://hugeerp10.co.za/hsofmanual/uploads/images/gallery/2026-02/AOzimage.png)

- <div>Enter the number of label copies you want to print</div>
- Click **Ok**

[![image.png](https://hugeerp10.co.za/hsofmanual/uploads/images/gallery/2026-02/scaled-1680-/BpWimage.png)](https://hugeerp10.co.za/hsofmanual/uploads/images/gallery/2026-02/BpWimage.png)