BGL Activity
- GL Journals Menu
- Expenses Menu
- BankIt Menu
- BankIT Process
- BankIT Banks Supported
- BankIt default settings
- BankIt Intelligence Setup
- BankIt customer and supplier setup
- Bankit - Adding a Manual Rule
- Manage Duplicate Import Items
- Bankit Intelligence Import and Export
- GL Cashbook Menu
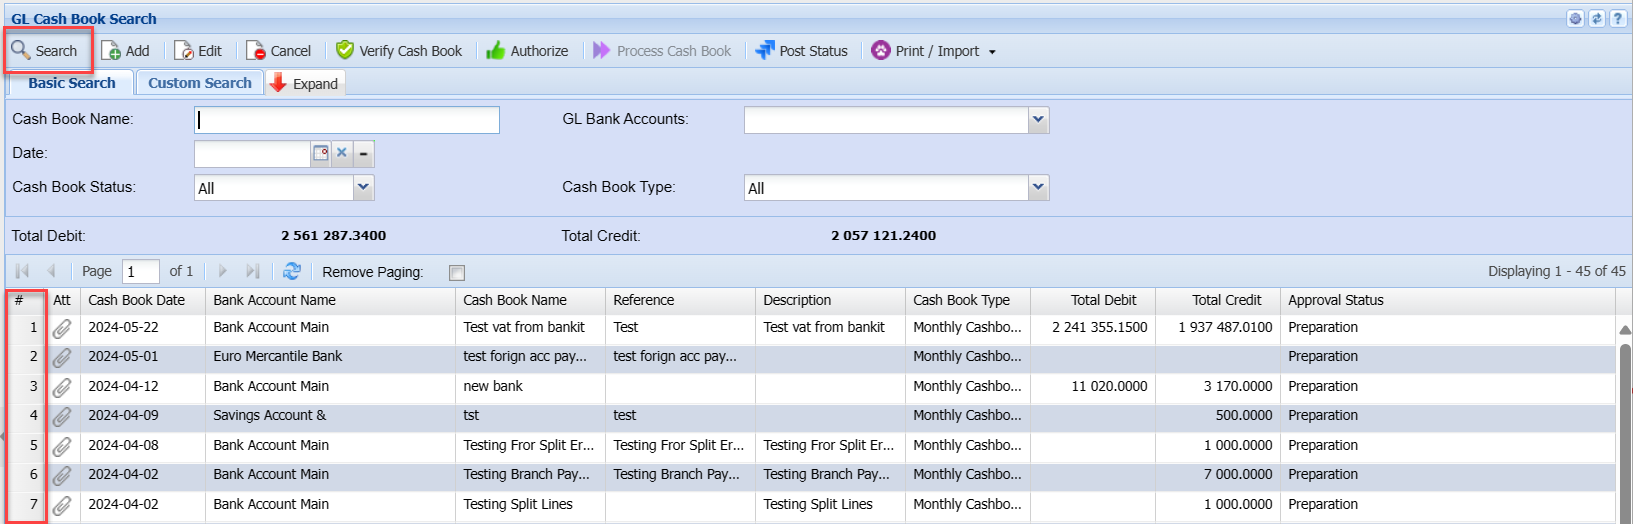
- Cashbook Search
- Add GL Cashbook
- Cashbook Branch Lines
- Cashbook Split Line
- Cashbook Line Allocations
- Print/Import Drop Down
- Cashbook Receipt - Foreign Debtor
- Bank Reconciliation Menu
- Budgeting Menu
- GL Template List Menu
- GST Submission
GL Journals Menu
General Ledger Journals
General Ledger>Activity>GL Journals
Journals are posted for:
| 1. | Opening Balances |
| 2. | Corrections |
| 3. | Payroll |
Huge ERP allows users to create Journals on the fly. Journal batches are kept in this section until they are processed to the books where they are moved to the Journal History section of the package.
This can be found under General Ledger > Analysis > Journal History.
All Journals processed are saved in Journal History and can be reprinted at any stage.
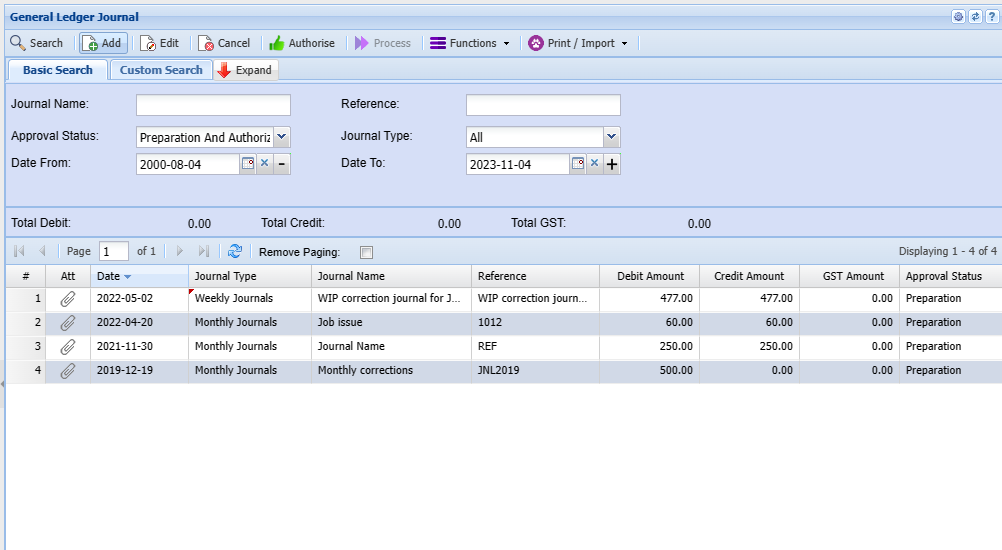
All processed Journals are allocated a number which is collected from the Reference table in the system under System Configuration >Administration >Reference Values.
These values consist of a prefix followed by a number – JNL305 which when broken up is JNL = General Ledger Journal batch number 305.
To search for saved Journals which have not being processed you click on the Search Button.
A User can search for saved Journals three different ways:
| 1 | Name of Journal |
| 2 | Date Created |
| 3 | Approval Status |
If any of the search criteria fields are left blank, the system will search for all saved Journals.
New Journal
To Add a new Journal click on the Add button.
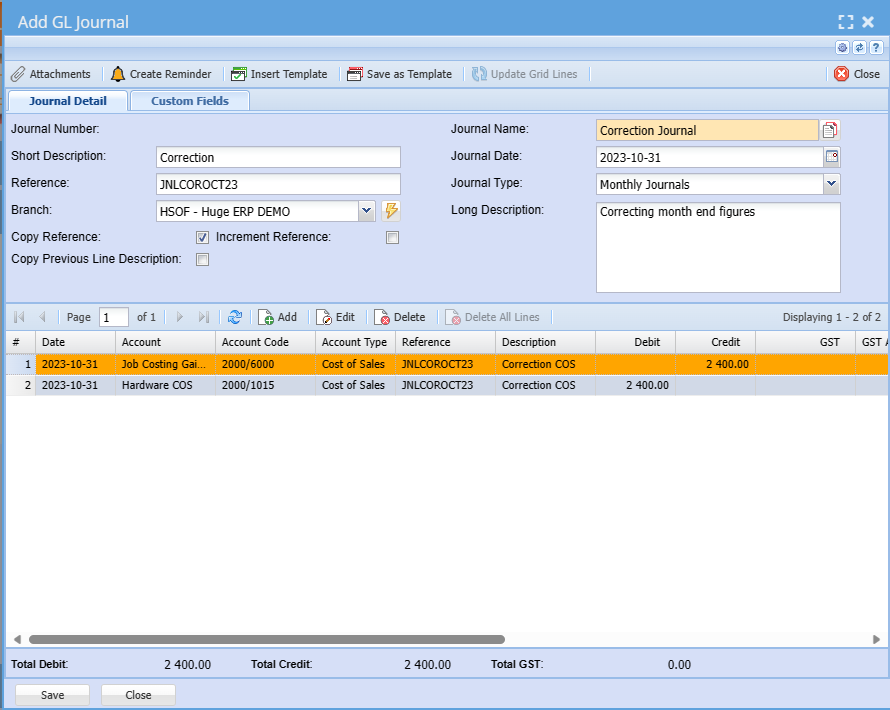
Fill in the information required for the Batch Header, the minimum requirement is the Journal Name. When you click on the Save button the batch Header information and the batch is saved, this also opens up the insert button.
| Journal Number | Allocated after the Journal is posted |
| Journal Name | A required field to describe the Journal. |
| Reference | Enter a Reference number, Also note that when there is a tick active then the reference will be copied to each line inserted. Should the tick be off no reference is inserted per line. |
| Short Description | Quick description of the Journal |
| Description | A Long description of the journal. |
Journal Line
To insert a line, click on the Add button after you have saved the Journal batch.
| Date | The date the journal entry will reflect and in which period it will be posted to. |
| Reference | The reference of the journal line. |
| Account Code | Select which Ledger account is to be affected, ledger accounts can be selected in three ways |
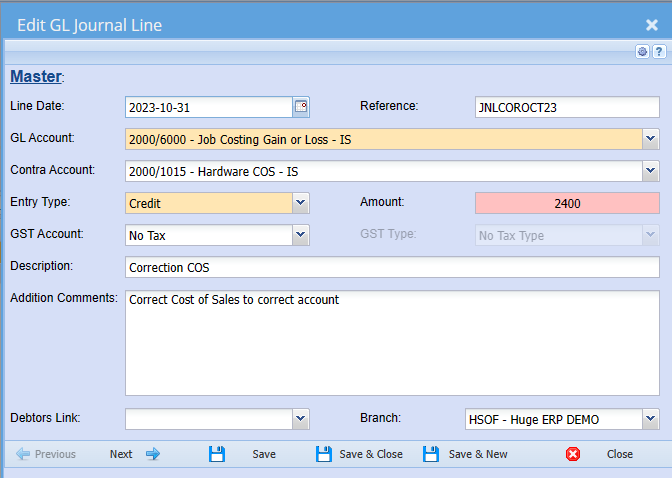
To select an account, select the account dropdown and click on the enter button on your keyboard. Notice that there is no accounts when you first open the drop down but after clicking on the enter button the drop down is populated with the ledger accounts. It is sorted by account code. One can also use your down arrow keys on the keyboard to scroll down to the desired ledger account
NOTE: The reason that this drop down is done in this manner is to increase speed, if the company has a lot of ledger accounts then the drop down takes a long period to populate and the user might want to use the long search method to find an account which is much faster.
| Post Dated Cheque | Tick this option to show that this entry is post dated |
| Entry Type | Debit or Credit |
| Entry Amount | The amount that is to be posted on this line. It is not necessary to enter a .00 after 500.00 as the system will automatically assume that when an amount is entered there is no decimals. |
| Tax Account | Select the tax account |
| Tax Type | If the Tax Account is entered a tax type needs to be filled in. |
| Description | Short description of what this line is about. |
| Additional Comments | A long description that is used to describe why this entry is being done. |
| Job | This is used to allocated the amount to a job – it is relevant when using the Job Costing Module. |
| Projects | Add this amount to a project |
Journals will not be posted if they do not balance with the Debit and Credit amounts equal. The journal must balance in the relevant periods that are being changed.
To Amend any changes highlight the line that needs changing and click on the Amend button or double click on the line in the grid.
A debit and a credit line is required to balance the journal, in this example I have only made one entry but one journal batch can have as many lines as you want.
Journal Templates
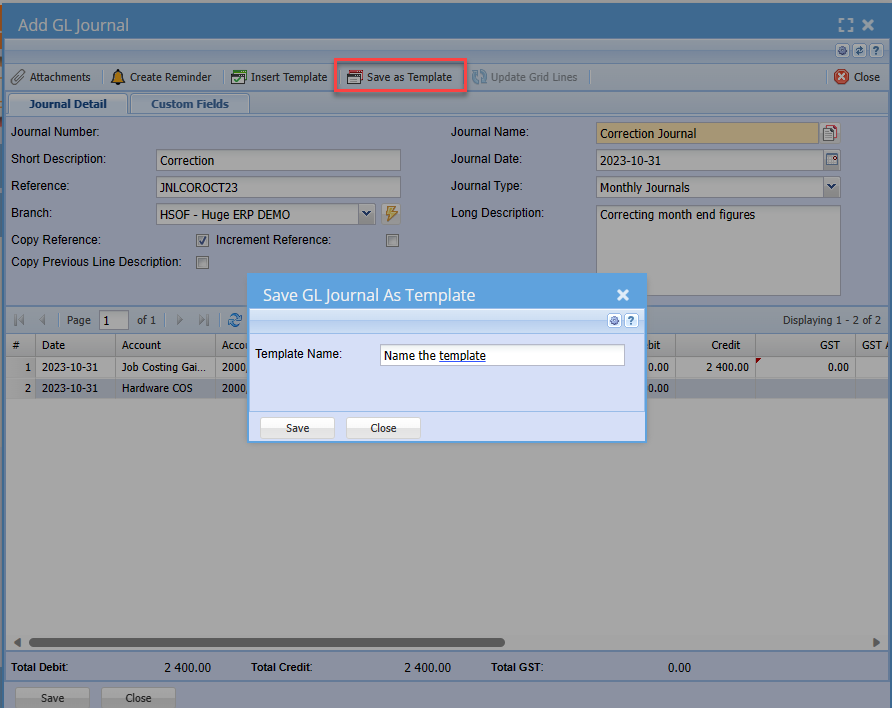
Journal templates are useful to save repetitive Journals each month, instead of capturing all the lines every month. Create the initial Journal and then click on the Template Tab and click on the “Save as Template”. Insert a Name for the template so you can recall it at anytime.
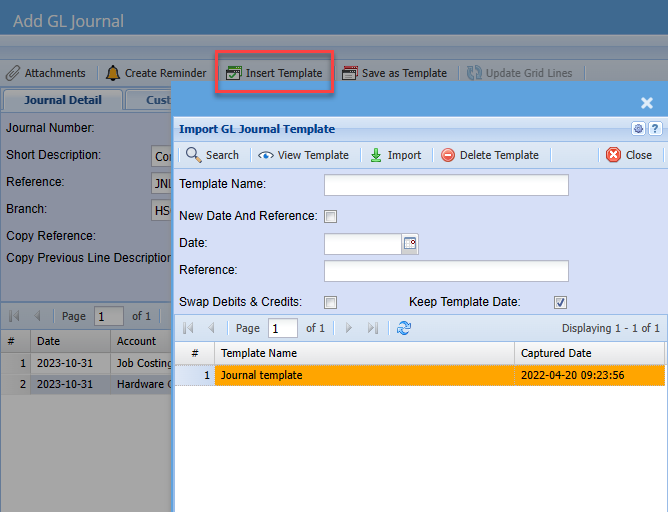
Inserting of a saved journal is simple, create a new Journal batch and save your Journal Headers. Click on the Template Tab and click on the Insert Template button. Select the Journal that you have saved and click on the Import button. Your saved journal template will now be put into the current Journal batch. The Dates of the lines will be inserted with today’s date.
To process a journal click on the Process tab, a journal cannot be processed without being authorized first. Highlight the Journal and click on the Authorise Button and you will notice that the journal has changed statuses from Preparation to Authorised. The Process button now becomes active and you can process the journal.
NOTE: The reason for authorize and then process is to eliminate mistakes in your books as well as running a workflow procedure. A clerk can capture and a manager can release to the books.
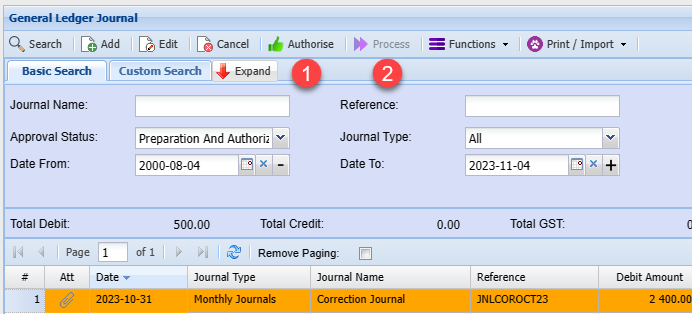
Once the journal has been posted to your books it will disappear off this search screen and will be transferred to the Journal history section.
General Ledger > Analysis > Journal History
NOTE: If you cancel the journal it will be moved to the Journal History window
Update Grid Lines
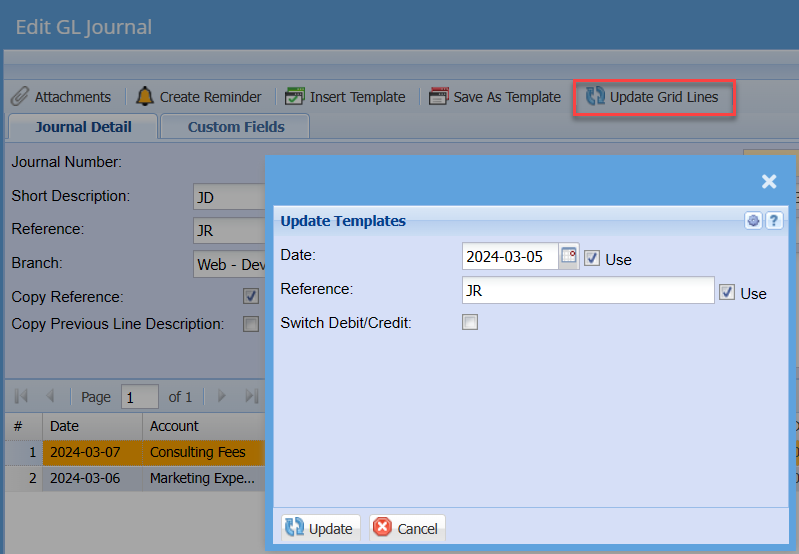
| Date | |
| Reference | |
| Switch Debit/Credit Tick | |
| Use Tick |
Printing of Journal
This can be done in the Activity – Journal screen or in the Analysis – Journal History screen.
Click on the Print tab at the bottom of the page and highlight the Journal you want to print and click on the Print button. A criteria screen comes up to allow the general ledger journal to be sort by a. Account b. Account Code c. Date d. Description e. Reference
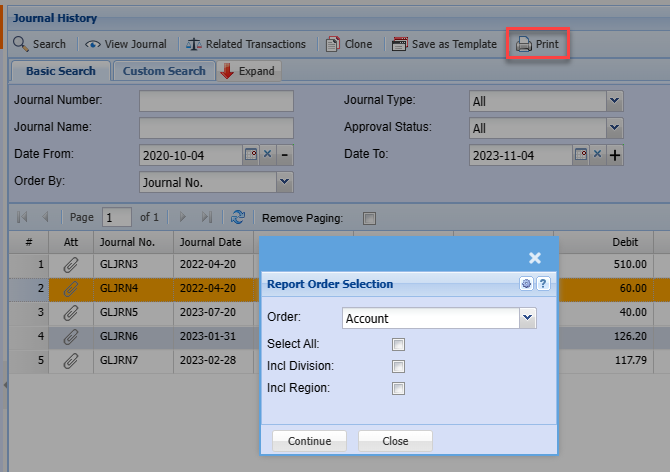
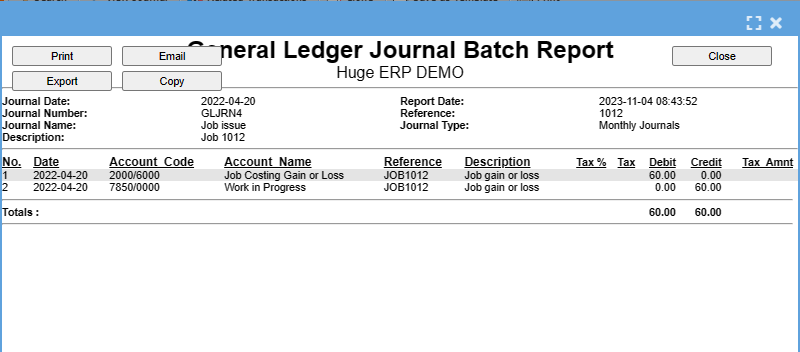
A Journal can either be printed, Emailed or copy to Clipboard where it can be taken to programs like Excel.
Post Status
Question- What happens if I cannot find my Journal in Activity – Journal or in Analysis Journal History after I have processed the Journal? It has just disappeared.
First thing to check is that you are searching in the correct DATE Range OR
The missing journal can be found in the Post Status screen where it lies between saved and posted status, almost like a Journal WIP (Work In Progress). The accounting package will not process any Journals which could have a problem when posting – some examples are:
| 1 | Journal not in balance |
| 2 | Journal not in balance for specific period |
| 3 | Ledger account on hold |
| 4 | Period blocked |
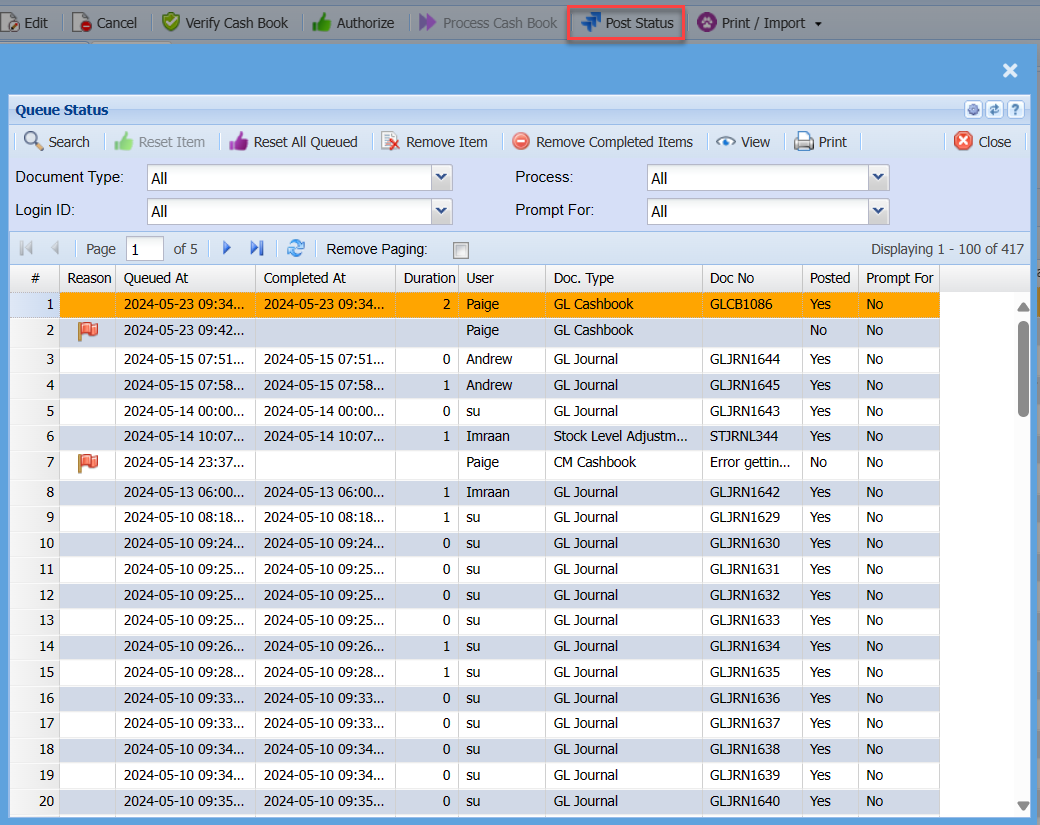
Go to General Ledger > Activity > Journal, click on the bottom tab called Process and click on the button called “Post Status”
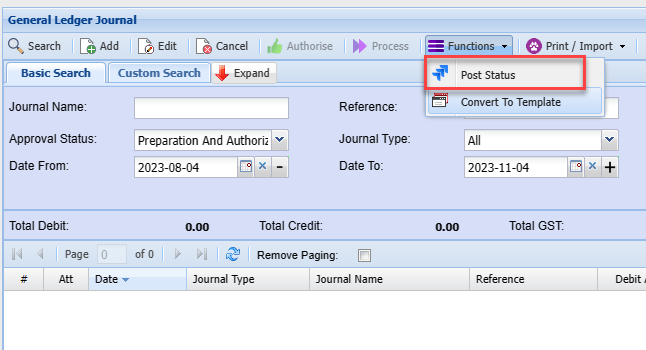
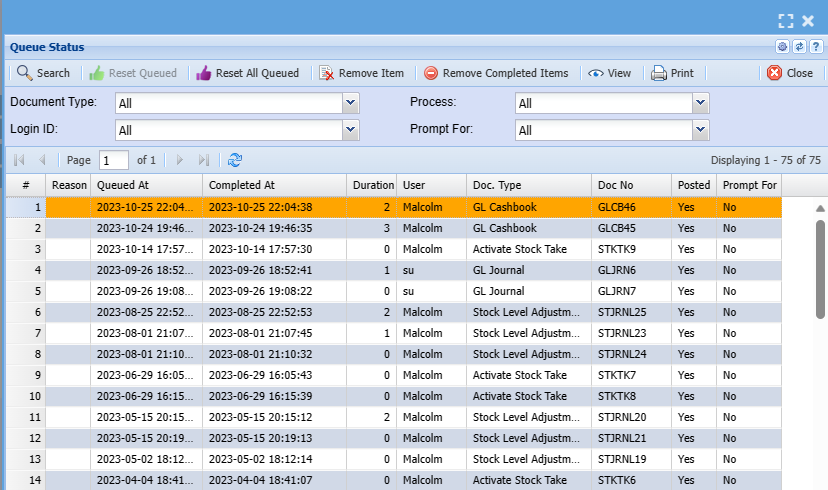
In the above screen one can find your Journal, check the column called Posted and see if there is a Yes, if so then the journal was successfully posted. If the answer is no, then the button with the red flag should be highlighted and when you click on this button it will give you the reason why the journal failed.
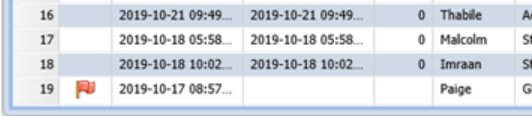
To take the Journal out of Journal WIP highlight the line and click on the “Reset Item / Queued” button. This will delete the Journal in WIP and put it back into Activity – Journal screen where you can edit it and fix the problem. Once the problem is fixed you can process again.
Payroll Journal
Payroll Journals need to be done on a monthly basis to ensure that the PAYE and other deductions are expensed.
Normally PAYE is paid on the 7th of the following month, but salaries are paid monthly.
Therefore, if you do not create a journal which expenses the cost and put the rest to a liability account your Balance sheet and income statement are incorrectly stated.
This intern changes your Nett Profit figures.
A monthly journal is created for monthly salaries and a weekly wages journal is created.
Once you have created one of the journals you can save it as a temple for later use.
This saves time on having to remember what goes where and what to add.
After the journal has been done an amount lies in the liability account – lets say PAYE, now comes the 7th of the following month and you pay the PAYE.
You will create a cashbook, select the bank that you paid the money out of, select PAYE liability account and click on the Payment type of the Cashbook.
This will then balance out the liability account of not show up on your balance sheet.
Should you pay your PAYE when you pay your salaries you do not need to do the journal.
You create the cashbook, select your bank, you will then have two lines in the cashbook, one of the amount you paid the staff member selecting Salary Expense account.
The second one you will select the Salary Expense account, but your description will be that of PAYE payment.
This means that the Gross amount of the salary will appear under the income statement. Example.
Gross amount of salary for employee is R5000-00, nett amount that the employee gets paid into his bank account is R4500-00, R500-00 is what needs to be paid to PAYE.
The total amount that you have paid the staff member is R5000-00 and this is what shows up on the income statement.
Lets assume the following example
.png)
.png)
Create your liability accounts in General Ledger > Configuration > General Ledger Accounts
.png)
Now create various accounts in Expense structure
.png)
I would then also create a MIDCO Account with sub accounts under it.
.png)
Now for the Monthly Journal
Create new Journal header
.png)
Journal detail
.png)
Example of Journal
Notice that MIBCO is divided up.
.png)
Once your Journal is created, create a template of the journal
.png)
Now to do the monthly cashbooks
First cashbook which is done at the end of the month.
.png)
Create a template of cashbook
.png)
Cashbook print out example
.png)
Cashbook which is processed on the 7th of the following month when liabilities are paid.
This example assumes we are also paying MIBCO, Liberty Provident Fund and Discovery after month end.
Should you pay them at the end of the month, then you exclude them from the journal and add them to the month end cashbook.
If you are paying MIBCO at the end of the month, in the month end cashbook use a split line to capture.
.png)
Create a Template
.png)
There is a split line on the SARS payment so that it balances each liability accounts and one figure which comes out of your bank.
.png)
In Summary, let’s look at the reports
Balance sheet for February 2010
.png)
Level 3 detail
.png)
Income statement for February 2010
The R749 500-00 is made up of Salary bill of R700 000-00 and company contribution of R49 500-00 made up of Liberty 19000, SDL 7000, Discovery 16500 and MIBCO 7000
.png)
Balance sheet for March 2010
.png)
Looking at the account analysis, you will see that the account for Payroll Liabilities PAYE balances.
.png)
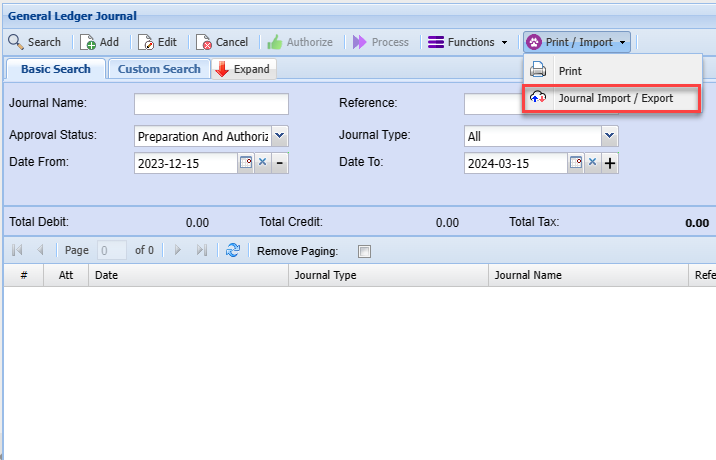
GL Journal Import
Creating a new import from Excel file
See attached file layout for GL journal import - Journal Import Temp 202403.xlsx
Expenses Menu
Expenses
The expenses function allows you to process claims for reimbursement
Benefits of Expenses:
- Accurate and timely expense claim routing
- Increase in organisational efficiency
- Faster expense processing
- Employee satisfaction
- Expense processing costs cuts
- Reduce errors and mistakes done by manual claim process
- Increased expense claim and transparency
User
Go to General Ledger> Activity> Expenses
To add a new Expense Click add or click search to see a list of existing Expenses
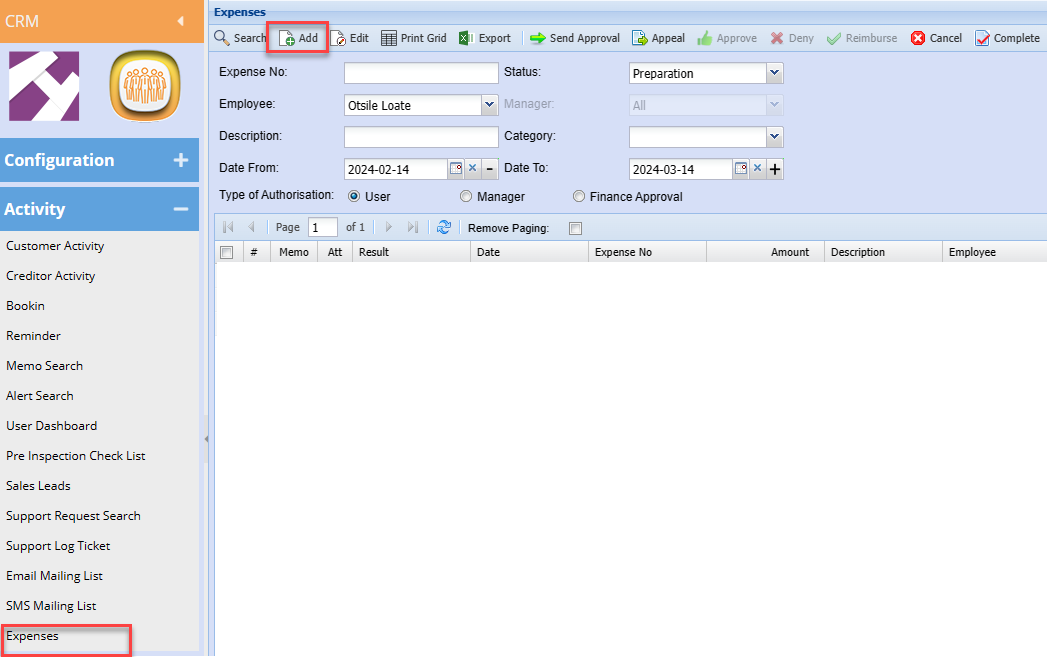
After clicking Add a screen below will appear, Add all necessary information as shown below
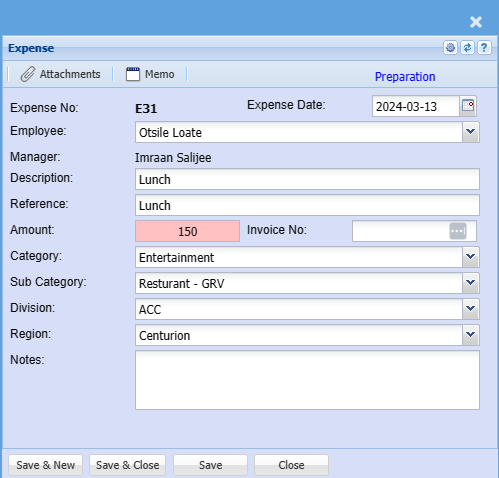
|
Employee |
Select the employee who is claiming on the dropdown list |
| Manager | The assigned approver will populate this field |
| Description | Enter claim description |
| Reference | Enter Claim reference |
| Amount | Enter the expense amount |
| Category | Select Category from the drop-down selection |
| Sub Category | Select the correct sub-category if there is more than one |
| Division | Enter division |
| Region | Enter region |
| Notes | Add detailed additional notes if applicable |
| Expense Date | Enter the correct date for the claim |
| Invoice No |
Enter the supporting document number if you have This is not compulsory |
Once you are done capturing you can load the receipt as proof on the attachments
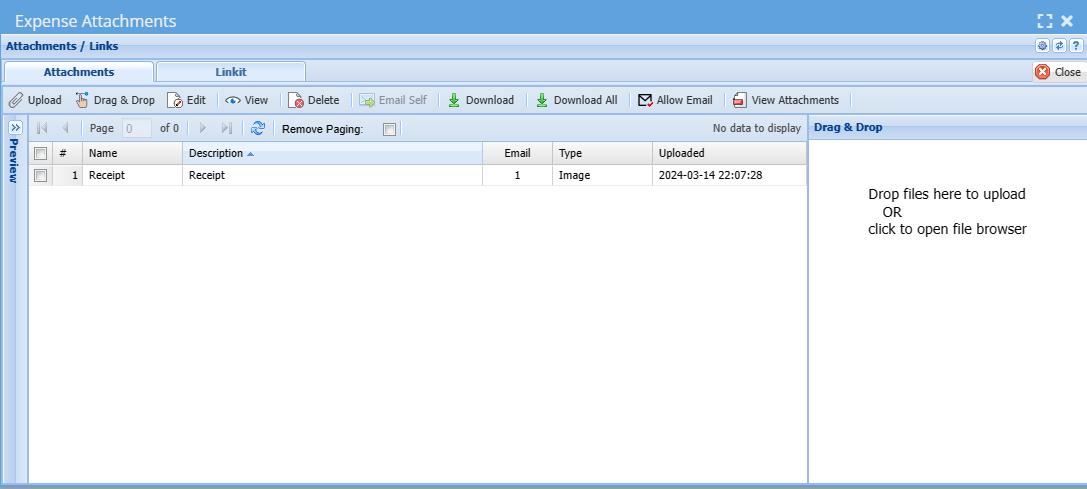
Once the information has been captured and all receipts are loaded then save and close your expense claim,
Go back to the grid
Select the expense claim from the grid and click Send Approval
This will email the approver (Manager) a request to review and approve the expense claim

Manager
The status of the expense claim will now change to awaiting approval
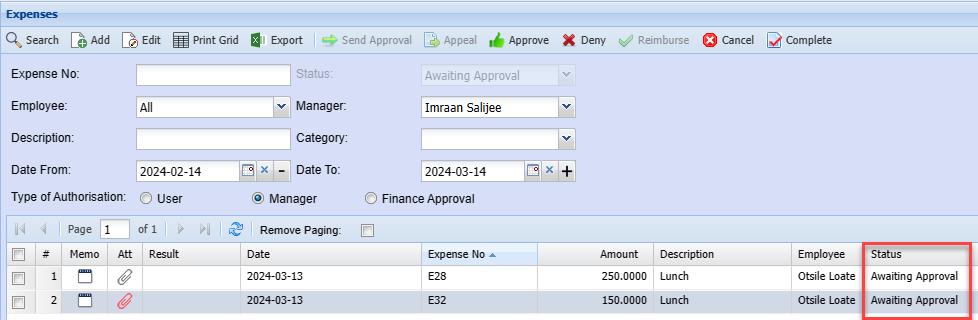
The Manager can then approve or deny the claim,
Once the manager approves the sales rep will receive an email confirming that the claim has been approved.
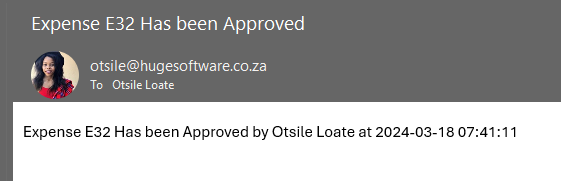
Finance Approval
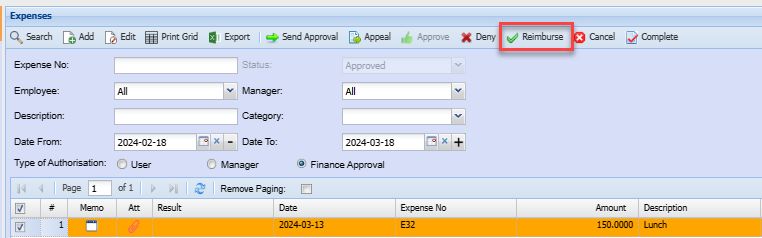
The finance manager will then Appeal, Deny or Reimburse the expense claim.
Once the expense claim is reimbursed a journal will automatically be created
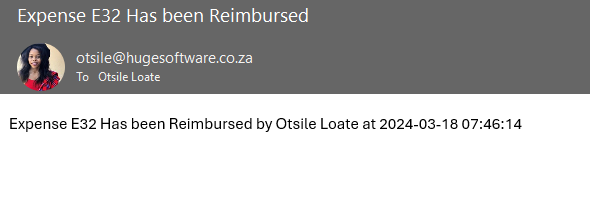
Once the fiance approval makes the decision the sales rep will receive an email informing them if they claim is going denied or going to be reimbursed.
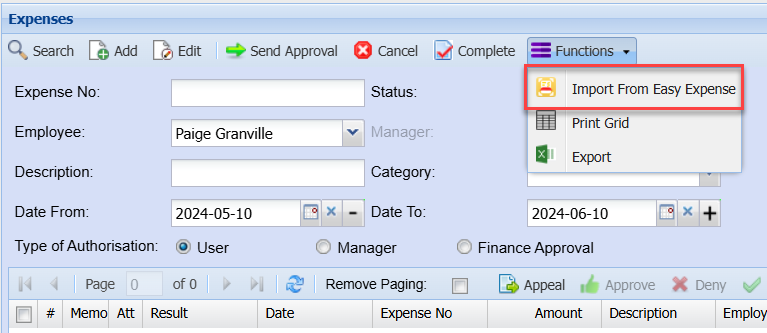
Functions
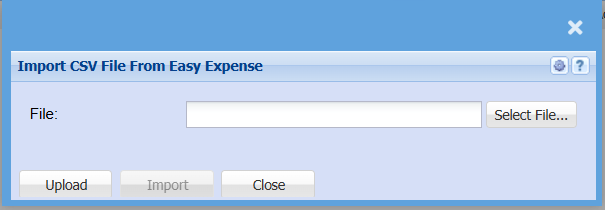
Import From Easy Expense
BankIt Menu
BankIT Process
The Bankit bank feed intelligence assist users to allocate general ledger accounts automatically before creating a cashbook.
General Ledger>Activity>BankIt
BankIT Flow chart
Below is a chart of the process to complete bank transactions to cash book processing
.png)
BankIT Search
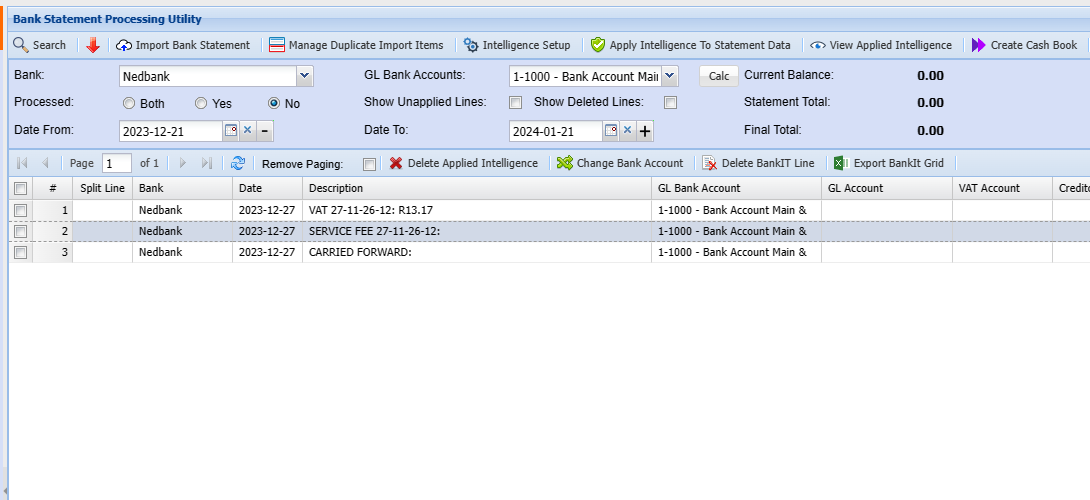
Buttons explained
| Search | Search to see bank transactions (this is based on date and whether processed or not - default is No) |
| Delete Bankit line | This does not actually delete the line. The line is marked as deleted and records date and time the line was deleted and by whom. (use this to remove a duplicate imported bank line) |
| Show Deleted Lines | When ticked, the result of the search will only display the deleted lines for the selected bank, bank account and date range |
| Import bank statement | Import the bank statement from your bank |
| Intelligence setup | view all the bank intelligence rules setup including system and manual |
| Apply intelligence to statement data | run this utility to assign intelligence to the imported data |
| Delete intelligence on this line | if intelligence was incorrectly applied, delete the intelligence and re-apply |
| Change bank account | if you have imported the bank lines into the wrong bank account, select records and change to another bank account |
.png)
| View Applied intelligence | view the what intelligence was applied to the line. Change applied intelligence |
| Export Bankit grid | export all the data view on the grid to Excel |
| Create cash book | once the intelligence is applied, run the final step of creating a cash book |
| Calc | View the balances of bank imported data and cash book balance to give final total - match with actual bank statement balance |
BankIt Import
After you have downloaded your bank statement into a CSV file, the data needs to be imported into the system
The positive feature of Bankit is that the system remembers the original bank file format. This means that you can view past bank statement information.
| Bank | Select your bank |
| General Ledger bank accounts | select your bank account that you are importing |
| File | Find your file you downloaded. |
Process will be to Upload file and then Import file.
NOTE: it is important to import into the correct GL bank account
.png)
After import, data will be displayed
Next step is to Apply Intelligence to statement data
.png)
Apply Intelligence to the Bank Statement Data
This is the screen where all the Rules that have been created are applied to the bank statement data.
Click on Start to get the process going.
Once the process had finished and the message appears "Completed Automatic Intelligence Allocation."
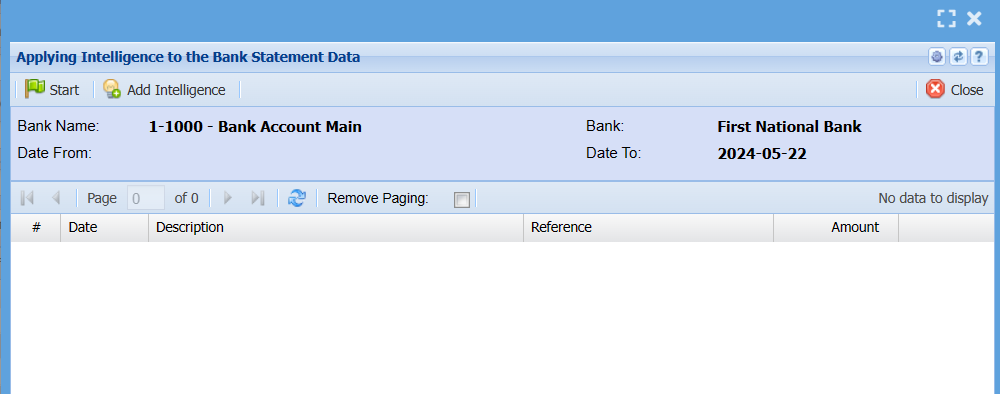
Click on Ok and the grid will be populated with all the records that were not processed by the automatic intelligence allocation. Either double click on a selected line or click on the line and click on the Add Intelligence button. The Bank Rules Maintenance screen will appear.
You can now apply a specific rule for this line using one of the four options and the appropriate parameter to ensure that in future this line will be satisfied by the rule that is being created.
Select the applicable GL Account, and if the GL Account happens to be either the Debtors Control or Creditors Control then either a Debtor or Creditor must be selected in the appropriate dropdown.
Enter the transaction description that will be used when these lines are promoted to a cash book.
Once satisfied that the rule will handle this line click on Save / Save and Close. This rule will immediately be applied to the line on the grid and that line will disappear from the grid.
If there are addition lines still on the grid that this new rule will apply to, Do Not Create another rule for the same condition. Simply click on Start button again and the process will run through the Apply Intelligence Process again and apply this rule to any lines to which it applies.
This process should be repeated until all the lines have been satisfied with a rule and next time when new bank statement lines have been imported all these rules will be applied to the new lines.
.png)
If there are lines on the grid that are a once off transaction and creating a rule for them would be a waste then these lines can be handled in one of two ways.
| 1 | Either use the default GL Account that is offered when the Create Cash Book button is clicked and there is a debit or credit GL Account to be selected there. These lines can then be edited again in the cash book to apply a different GL Account to it. |
| 2 | Exit this screen to the Main BankIt screen click in the tick box Show Unapplied Lines and click on Search. This will display only those lines that were not satisfied by the Apply Intelligence Process |
Either double click on a selected line or select a line and click on the View Applied Intelligence button. A screen will appear where a specific rule can be entered for this line i.e. GL Account, Debtor / Creditor (if applicable), Transaction, Region, Division and Project. This rule is not saved in the Rules Setup and is only ever applicable to this line.
Manual Intelligence
Check the intelligence applied, double click online to check intelligence and correct.
or double click to add a manual intelligence WITHOUT adding to the intelligence rules.
This could be a once off transaction which does not require a rule to be setup.
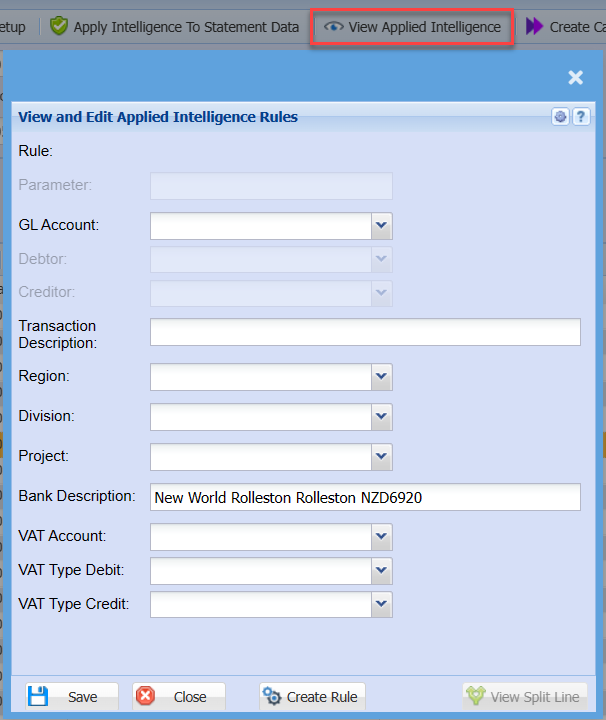
Blank lines intelligence
One does not have to allocate every line for Bankit, you can leave it blank.
The system will automatically allocate to the default general account when processing to the cash book.
This can be fixed at cash book level or will need to be fixed with a journal later on as it is allocated to a suspense account.
.png)
Bank Payment information
Once Intelligence has been applied to the bank statement data.
One can update the payment information that was setup against the creditor and payment ledger accounts.
Payment information can be applied to both processed bank data and not processed data as long as intelligence has been applied.
This information added, helps for reporting for BankIT Payments out.
There are three functions that can be done on the lines
| 1 | Update Payment information - This will check the bank statement line and if intelligence has been applied to the Creditor or GL account, it will update the default information that was setup in Creditors setup and GL accounts setup. |
| 2 | Update CB Reference - Update Cashbook Reference on lines, Bulk update bank lines with the Cashbook reference. Future work will be to use this Cashbook reference to update actual cashbook |
| 3 | Edit line after Intelligence and update payment information actions have run. |
.png)
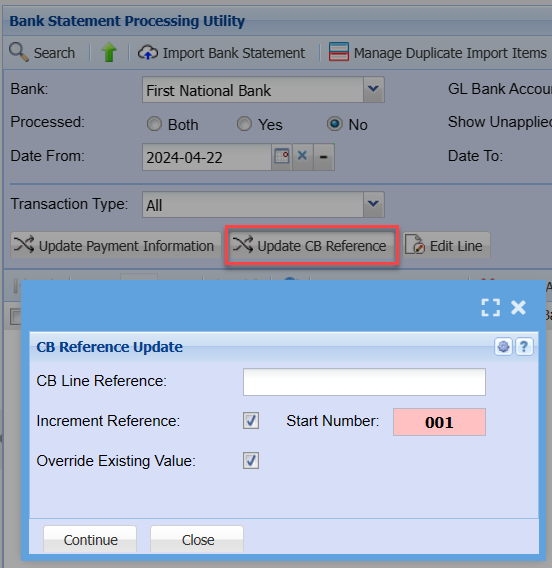
Cashbook process from BankIt
When all intelligence has being applied, process the data to the cash book
There are a couple of defaults that will populate the cash book screen so that you don't have to fill this in all the time.
These defaults are found under the System Configuration Module > Administration > Defaults
The Cash book Name, description and reference will pick up from the last created cash book from the BankIt.
Remember to change these when creating a new cash book
.png)
Defaults from System Configuration
.png)
Cancelling a Cashbook will revert all BankIt information as unprocessed and will appear in your next process to cashbook function
BankIT Banks Supported
Huge ERP is consistently updating new bank feeds for intelligence.
Current bank feeds support are:
South Africa
| ABSA Bank |
| ABSA cash focus bank |
| First National bank (FNB) |
| First National bank (FNB) - Enterprise |
| Mercantile bank |
| Nedbank |
| Nedbank Corporate Account |
| Standard bank |
| Standard bank business |
New Zealand
| ANZ bank |
| ANZ credit card |
| BNZ Bank |
| BNZ credit card |
| Kiwibank |
| Westpac |
BankIt default settings
Setting up default accounts for Bankit
These defaults are found under the System Configuration Module > Administration > Defaults
Bankit Import start date - this is the date you want the bankit to import bank statements from.
This is important so that you don't bring in bank transactions that is already in the cashbooks. Used when you start your company
| Bank | Select the bank mostly used |
| GL Bank account | select the general ledger account mostly used |
| Deposit and payment accounts | select the default accounts to allocate blank and unallocated intelligence lines |
.png)
BankIt Intelligence Setup
The BankIt Intelligence Rule consists of the following components.
| 1 | Description | Which is defined by the Description dropdown. |
| 2 | Parameter | each category has different parameters. |
| 3 | GL Account | The GL Account that this rule will use when creating the cash book. |
| 4 | Debit Description | The Debit Description will be used when the statement amount is positive. |
E.g. Payment received from …
| 5 | Credit Description | The Credit Description will be used when the statement amount is negative. |
E.g. Payment made to …
| 6 | Region | |
| 6.1 | No Action | No Region will be retrieved and written into the cash book line. |
| 6.2 | Use Defaults |
The Default Region will be retrieved from the GL Account, Debtor or Creditor and written into the cash book line. |
| 6.3 | Apply |
A specific region can be selected from the dropdown for this rule and written into the cash book line. |
| 7 | Division |
|
| 7.1 | No Action |
No Division will be retrieved and written into the cash book line. |
| 7.2 | Use Defaults |
The Default Division will be retrieved from the GL Account, Debtor or Creditor and written into the cash book line. |
| 7.3 | Apply |
A specific division can be selected from the dropdown for this rule and written into the cash book line. |
| 8 | Project |
|
| 8.1 | No Action |
No Project will be retrieved and written into the cash book line. |
| 8.2 | Apply |
A specific project can be selected from the dropdown for this rule and written into the cash book line. |
| 9 | Apply |
The rules can be switch on and off be either ticking or unticking the apply tick box. |
.png)
There are 6 categories of intelligence rules.
1. Test All Debtors – There can only be one occurrence of this rule.
The system will not allow another one to be created. This is a System rule and cannot be deleted.
Parameters – All.
| GL Account | Typically Debtors Control Account. |
| Debit Description | Payment Receive From (special characters in the description. |
The following code will be replaced by [C] debtor code, [N] debtor name, [CN] code and name.
| Credit Description | Payment Reversed To (special characters in the description. |
| Region | Only No Action or Use Defaults is applicable. |
| Division | Only No Action or Use Defaults is applicable. |
| Project | Only No Action or Apply. Select a specific Project from the dropdown. |
| Apply | Switch On or Off |
How the rule is applied: Each statement line is tested for the various debtor code.
Each statement line is tested for the debtor name. Each individual word in the debtor name is tested against the words in the statement line.
At least two word must match and no word less than three characters is tested.
2.Test All Creditors – There can only be one occurrence of this rule.
The system will not allow another one to be created.
This is a System rule and cannot be deleted.
Parameters – All.
| GL Account | Typically Creditors Control Account. |
| Debit Description | Made Payment To (special characters in the description. |
The following code will be replaced by [C] creditor code, [N] creditor name, [CN] code and name.
Credit Description – Payment Reversed To (special characters in the description.
Region – Only No Action or Use Defaults is applicable.
Division – Only No Action or Use Defaults is applicable.
Project – Only No Action or Apply. Select a specific Project from the dropdown.
Apply – Switch On or Off
How the rule is applied: Each statement line is tested for the various creditor code.
Each statement line is tested for the creditor name.
Each individual word in the creditor name is tested against the words in the statement line.
At least two word must match and no word less than three characters is tested.
3. Compare Words in a line – Test accuracy and weight %.
This rule can be created with difference parameters as many times as necessary.
Parameters – Any words that may appear in the statement line.
The words do not have to be in any specific order as each word is individually tested.
GL Account – Any GL Account that would apply to the bank statement transaction.
Debit Description – Payment from
Credit Description – Payment to.
Region – All options are available for use.
Division – All options are available for use.
Project – Only No Action or Apply. Select a specific Project from the dropdown.
Apply – Switch On or Off
How the rule is applied : Each individual word in the parameters is tested against the words in the statement line.
At least two word must match and no word less than three characters is tested.
4. Test First X characters and what to search for.
This rule can be created with difference parameters as many times as necessary.
Parameters – 7||Vodacom. The parameter must consist of 3 components, a number representing the number of characters that are to be search for in the statement line.
2 vertical line (pipes) which are used as the separator between the number and the actual word or words.
The last component is the word or words that are to be tested for.
If the word component is more than one word then the words must be as would be expected to be found in the statement line.
GL Account - Any GL Account that would apply to the bank statement transaction.
If either the Debtors Control Account or the Creditors Control Account is used then the process will attempt to find the debtors or creditor name in the statement line.
If the debtor or creditor is not found then this rule will be skipped as unsuccessful.
Debit Description – Payment from
Credit Description – Payment to.
Region – All options are available for use.
Division – All options are available for use.
Project – Only No Action or Apply. Select a specific Project from the dropdown.
Apply – Switch On or Off
How the rule is applied : E.g. 7||Vodacom The process takes the word part of the parameter and attempts to find it in the first (in this case) 7 characters of the statement line.
Spaces between words also count as characters.
5. Test Last X characters and what to search for.
This rule can be created with difference parameters as many times as necessary.
Parameters – 8||& Petrol.
The parameter must consist of 3 components, a number representing the number of characters that are to be search for in the statement line.
2 vertical line (pipes) which are used as the separator between the number and the actual word or words.
The last component is the word or words that are to be tested for.
If the word component is more than one word then the words must be as would be expected to be found in the statement line.
GL Account - Any GL Account that would apply to the bank statement transaction.
If either the Debtors Control Account or the Creditors Control Account is used then the process will attempt to find the debtors or creditor name in the statement line.
If the debtor or creditor is not found then this rule will be skipped as unsuccessful.
Debit Description – Payment from
Credit Description – Payment to.
Region – All options are available for use.
Division – All options are available for use.
Project – Only No Action or Apply. Select a specific Project from the dropdown.
Apply – Switch On or Off
How the rule is applied : E.g. 8||& Petrol The process takes the word part of the parameter and attempts to find it in the last (in this case) 8 characters of the statement line.
Spaces between words also count as characters.
6. Test In Line for words and phrases. This rule can be created with difference parameters as many times as necessary.
Parameters – Any word or words (phrase) that could appear in the statement line, typically words that would appear together.
GL Account - Any GL Account that would apply to the bank statement transaction.
If either the Debtors Control Account or the Creditors Control Account is used then the process will attempt to find the debtors or creditor name in the statement line.
If the debtor or creditor is not found then this rule will be skipped as unsuccessful.
Debit Description – Payment from
Credit Description – Payment to.
Region – All options are available for use.
Division – All options are available for use.
Project – Only No Action or Apply. Select a specific Project from the dropdown.
Apply – Switch On or Off
How the rule is applied: The process takes the word or words and attempts to find it in the statement line.
BankIt Rules Maintenance (Adding or Editing)

| Rule Type | |
| Parameter | |
| GL Account | |
| Debit Description | |
| Credit Description | |
| Select Region | |
| Select Division | |
| Select Project | |
| Apply Tick | |
| System Rule | |
| Run Last |
Print Rules
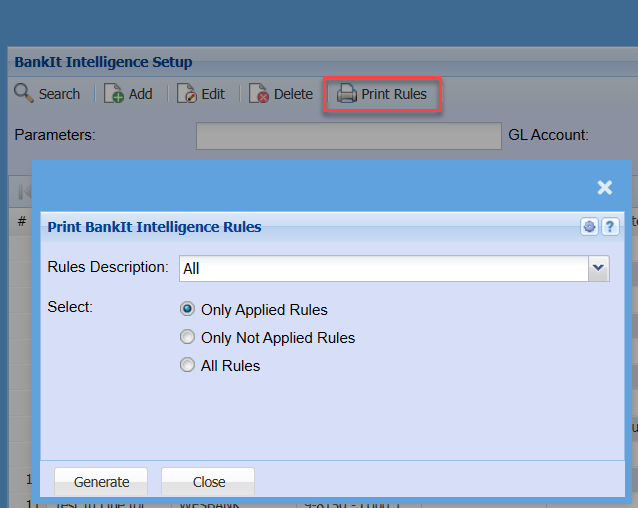
| Rules Description | |
| Select |
BankIt customer and supplier setup
Setup additional rules for the system intelligence to apply
Exclude
| Exclude customer from intelligence | use this to exclude the customer or supplier from the system intelligence |
This can be used when a supplier is only setup for information and not to be used as a supplier control
.png)
Key words
Use the keywords to apply further intelligence.
In some cases the company name is not being picked up by the intelligence as the customer or supplier is using a different name on the bank reference.
Use this section for the system intelligence on the customer and supplier to be applied correctly.
In the example below the MBN on the bank feed is not being picked up, however the Ballymorris and MBN will then find this customer.
Bank feed line example
.png)
.png)
Bankit - Adding a Manual Rule
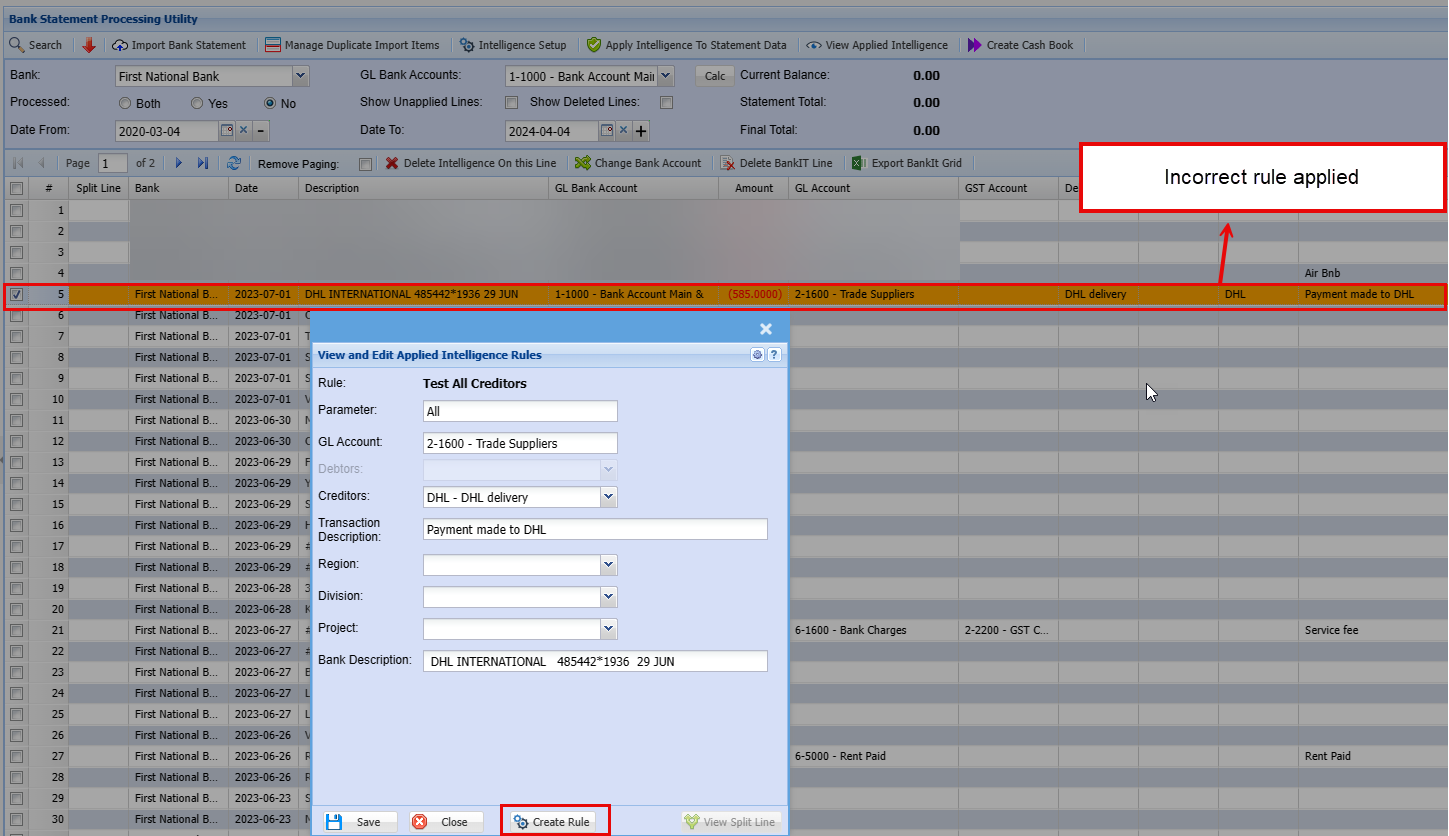
When using the "Allied Intelligence To Statement Data" and you see that one has been incorrectly applied this can be manually changed by double clicking on the line and updating the fields.
Once you are happy with the corrections made, you can create a new rule for future allocations by clicking the "Create Rule" button at the bottom.
This can also be applied to an incorrect Allocation as well as an entry that was not auto allocated.
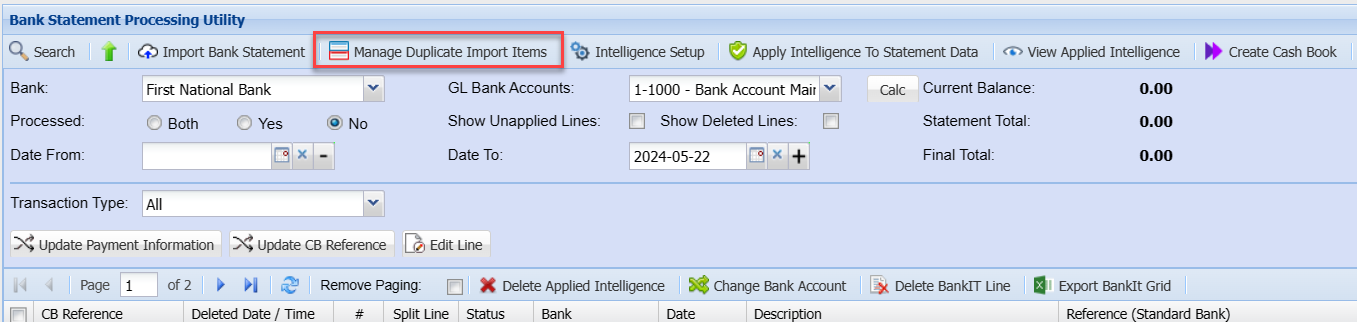
Manage Duplicate Import Items
The purpose of this window is to identify and delete records that have been imported and have been duplicated.
Duplicated Items are determined by the Date and Amount being the same. However not all items that have the same Date and Amount are duplicates. Analyze the items carefully.
The Duplicate Item in the right panel must be aligned with the Original Item in the left panel. This is achieved by dragging and dropping the items to align them.
Multiple or Single items can be selected and dragged and dropped either in the same panel or the opposite panel.
Finally tick the Tick box of the Duplicate Item(s) that are to be deleted.
If a Duplicated Item has been processed it cannot selected.
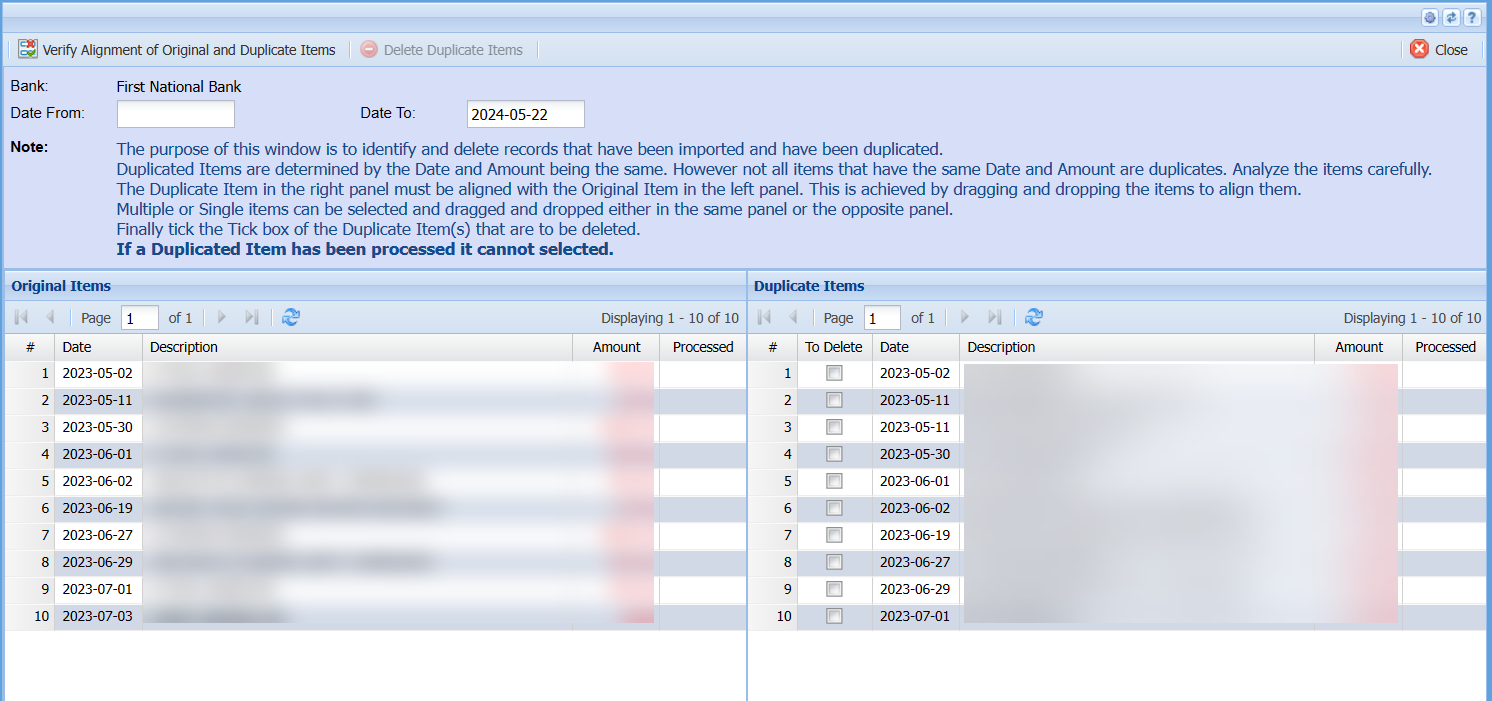
| Verify Alignment of Original and Duplicate Items | |
| Delete Duplicate Items | |
| Date From/Date To |
Bankit Intelligence Import and Export
When deciding what type of import to use for banking intelligence, it is based on the following:
- Maintaining current rules and fixing
- Creating new rules and importing
Maintain Bankit intelligence rules by exporting and fixing and importing back.
Maintaining current rules and fixing
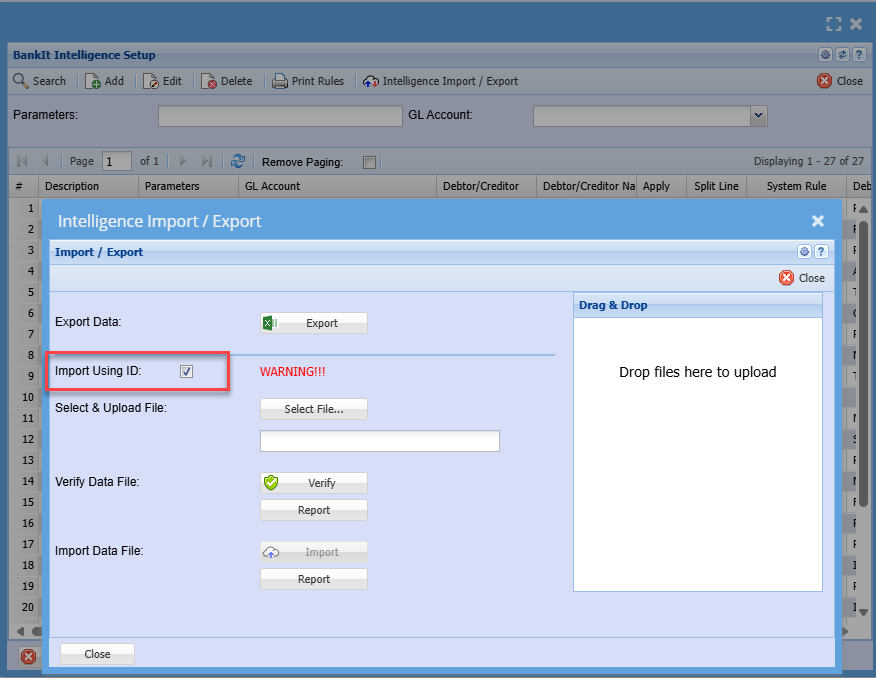
Use the tick for export and import using ID
This is used so that you can change information on existing intelligence, so when importing the system knows what rule to update.
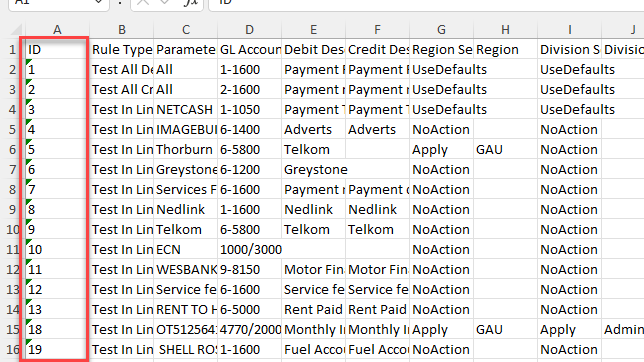
Excel export with ID field
Maintain structure of the Excel sheet and keep the id field in the first column.
Change the information required and save your excel sheet.
When importing and using the id structure, tick the import using ID box
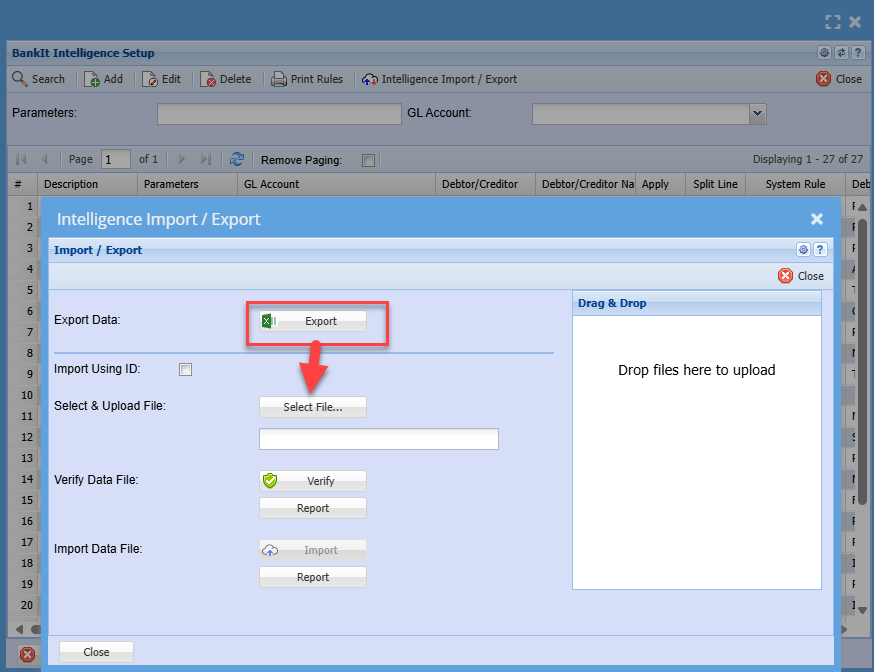
Creating new rules and importing
When creating new rules, one does not use the ID tick box.
There should be no other rules in here except the ones you want to create as new rules.
When exporting you are only getting the headers so that you know the structure for the import.
Here is a list of the Rule Types
These need to be exact wording to link to the rule type
Attached is an example of the exported intelligence
| Test In Line for words or phrase |
| Test First X characters and what to search for |
| Compare Words in line - Test accuracy and weight % |
| Test In Line for words or phrase |
GL Cashbook Menu
Cashbook Search
Process bank transactions
General Ledger>Activity>Cash Book
.png)
Buttons
| Search | This Button will allow the user to find information relating to the cashbook |
| Add | Is used to add a new Cash book |
| Edit | Allows The user to edit the Cashbook lines. |
| Cancel | This button will allow the user to cancel a cashbook |
| Verify Cash Book | when a user needs to eliminate errors, she or he can first verify the cashbook by using this button, and the report generated will show if there are any existing errors that requires rectifying before processing. |
| Authorise | Cashbook needs to be Authorised before processing. |
| Process Cash Book | when this button is selected the cashbook will be Processed and a GL number will be generated. |
| Post Status | The Post status will let the user know if the Cashbook was successfully processed |
| Print/Import | The Drop down has three functions |
The User Can Print the general ledger cash book report or upload a cashbook saved in A CSV format and then import the uploaded file into the system.
Basic Search tab:
| Cash Book Name | Search using Cash Book name |
| Date | Search using date Criteria |
| GL Bank Accounts | Search using GL Bank Account |
| Cash Book Status | Search Using Cash Book status |
| Cash Book Type | Search using Cash Book type |
| Custom Search | This will be a customised search according to how the company has set up their custom fields. |
| Expand | Allows the user to see more available search criteria’s. |
Cashbook status
There are a couple of statuses a General Ledger Cashbook goes through.
| 1 | Preparation |
| 2 | Authorized |
| 3 | Post Status – Processing section |
| 4 | Posted or completed |
Preparation
Cashbooks that are in Preparation and Authorized exist under the General Ledger Module> Activity> Cashbooks
A cashbook that is in Preparation Status is in this state when you have created a new cashbook and saved it.
To change a cashbook to Authorized Status click on the Process Tab and then click on the Authorize button. This will change the status to Authorized.
.png)
Authorized
Cashbooks that are Authorized exist under the General Ledger Module> Activity> Cashbooks
A cashbook that is in Authorized Status is in this state just before processing into the books.
To change a cashbook to Processing Status click on the Process Tab and then click on the Process button. This will change the status to Processing Status.
Processing Status
To check whether a Cashbook has been successful posted to the books one will click on the Post Status button under the
General Ledger Module> Activity> Cashbooks> Process Tab.
This will open a new window to check whether the Cashbook has been successfully posted. Check the column that says “Posted”, if there is a Yes then the Cashbook was successfully posted into the books. However, if there is a No, check the button with the three dots “…” as to why it was not posted.
You can then “Reset the Item” under the tab called Queued and a button called Reset Item. This will remove the Cashbook book from this status and put it back into authorized status. You can then correct the problem and try and repost.
.png)
Posted or Completed Status
To check whether a Cashbook has been successful posted to the books one will click on the Post Status button under the
General Ledger Module> Analysis> Cashbooks History.
.png)
Post Status
Add GL Cashbook
Go to General Ledger Module > Activity > Cashbooks
Click on the Search button to check for any open cashbooks
Creating a new cashbook, click on the Add button.
Select the bank account which is going to affect this batch.
| Enter a Cashbook Name | As per your company preference |
| Enter Reference field | As per your company preference |
Click on Save-to-save changes to your header batch details. These details filled in are only relevant to search and find the actual cashbook.
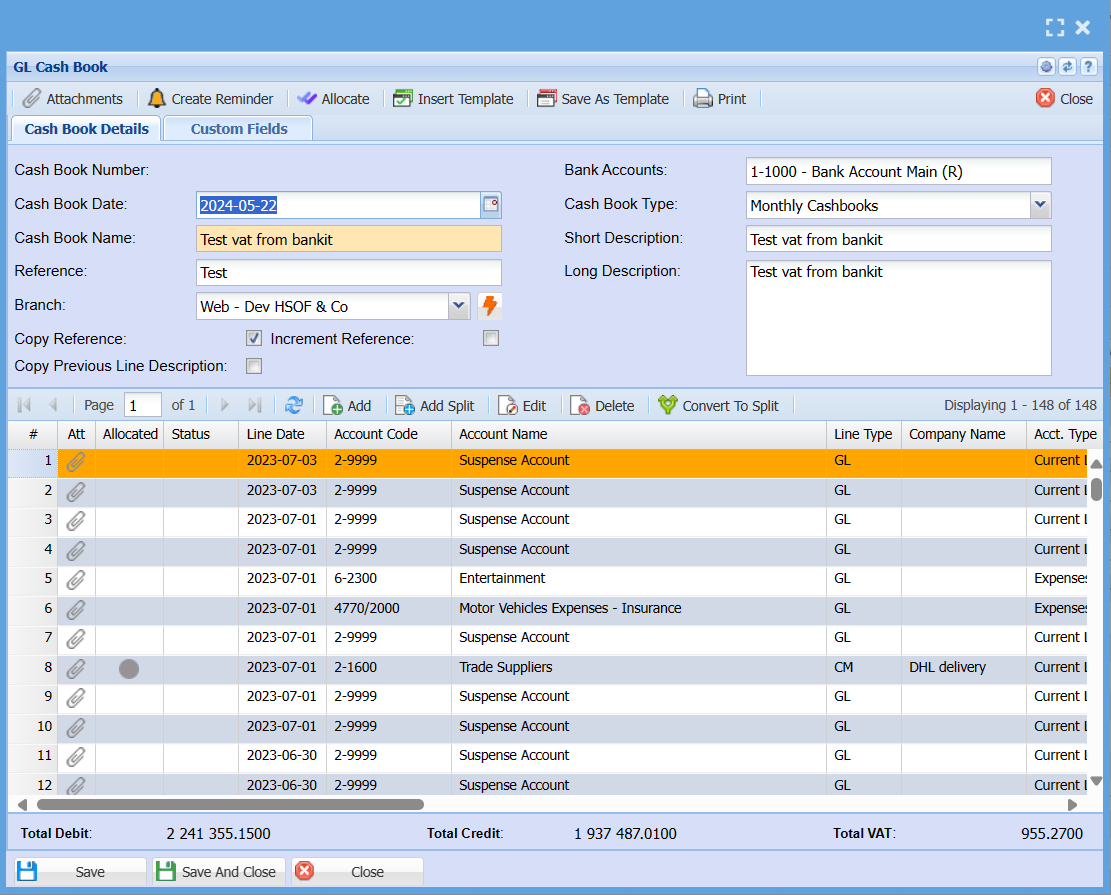
Your cashbook lines contain the actual data seen on documents.
After saving one will notice the Insert, Amend and Delete buttons become available.
Click on the Add button to, Add cashbook transaction line.
There are three ways to enter a line – General Ledger is the default.
| General Ledger | This searches ledger accounts and affects the bank and ledger account selected. |
| Debtors | This searches customer accounts and affects the bank and the customer account selected. |
| Creditors | This searches supplier accounts and affects the bank and the supplier account selected. |
Cashbook Type: General Ledger type selected
Select the date of the transaction that is per the bank statement date.
One will notice the reference is copied from your batch header, you can change it if you want.
(to increment reference put a tick on Increment Reference on the Batch header).
Select the account.
There are three ways to search for an account:
| a. | Short Search | just type in part of the code or name and hit enter on the keyboard and select the account. |
| b. | Tree Search | Clicking on the square with three dots allows you to find the account via the Tree view. |
| c. | Long Search | Clicking on the Arrow button opens a new window where you can search on the code or name. |
Select the entry type:
a. Payment / Credit
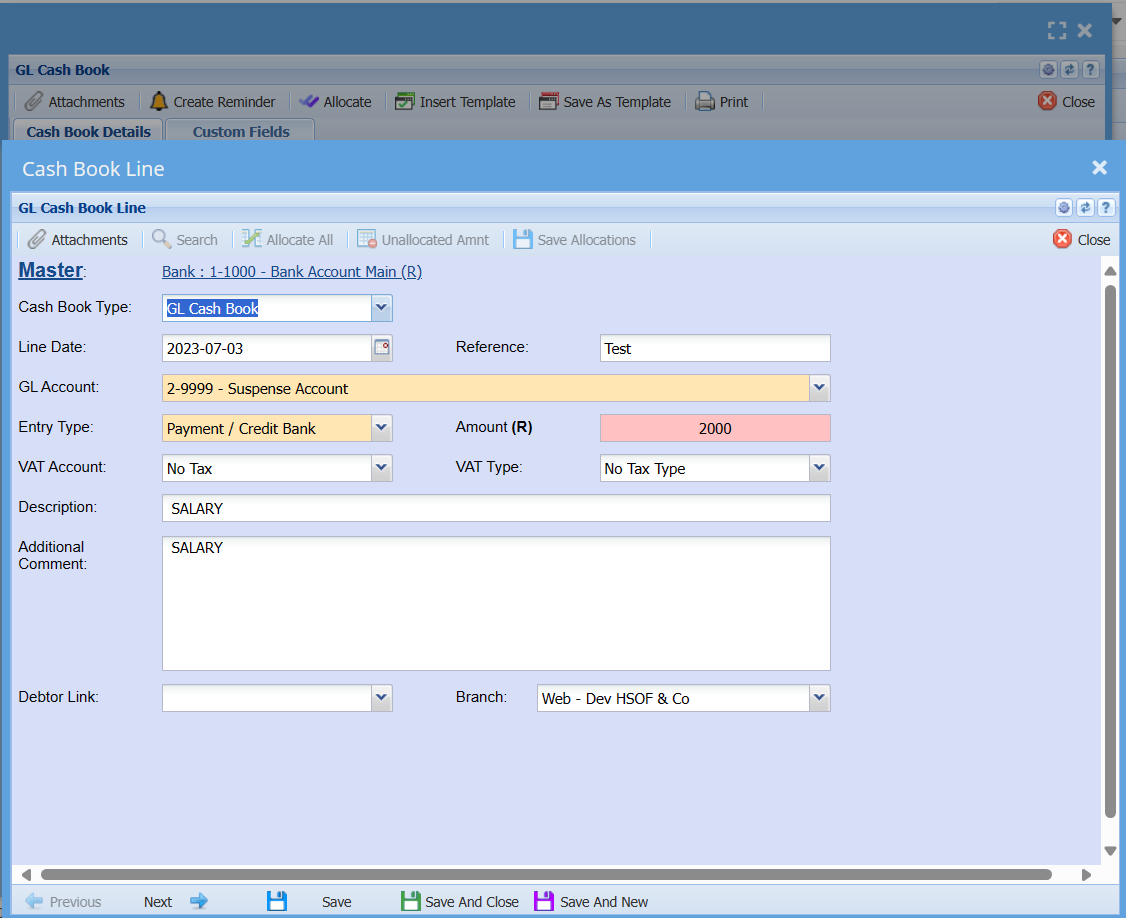
This is when one is paying money out of the bank account
Debit – Bank and Credit – Ledger account
b. Deposit / Debit
This is when one is depositing money into the bank account
Credit – Bank and Debit – Ledger account
| Entry Amount | enter the amount including VAT that affects the bank. |
| Tax Account | you will notice that if one selects the Payment entry type the VAT control ledger account comes up with the Tax Type being 4 Cashbook VAT. If one selects the Deposit entry type the VAT control ledger comes up with No Tax, therefore not allocating to the VAT control account. |
| Description | Enter the name of the company you are paying or deposited from. |
| Additional Comments | Enter comments for later information needed. |
| Job | assign this cost to a Job |
| Projects | assign this cost to a Project |
Click on Save and Close
OR Click on Save and New to enter another entry.
Allocate
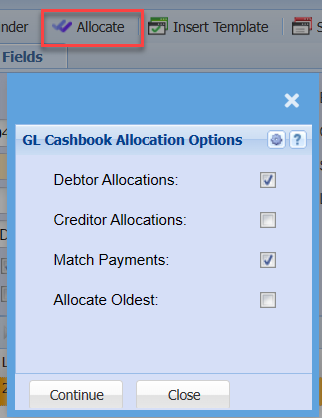
| Debtor Allocations | |
| Creditor Allocations | |
| Match Payments | |
| Allocate Oldest |
Template tab
Templates are good to use when one has the same transactions every month eg. Monthly debit orders or monthly salary payments.
There are two options
| a. | Insert Template |
| b. | Save as Template |
Insert Template
Once you have saved a template from a previously captured cashbook, you can insert this into the cashbook.
Save as Template
Allows you to save this cashbook lines as a template for further use.
Insert Template
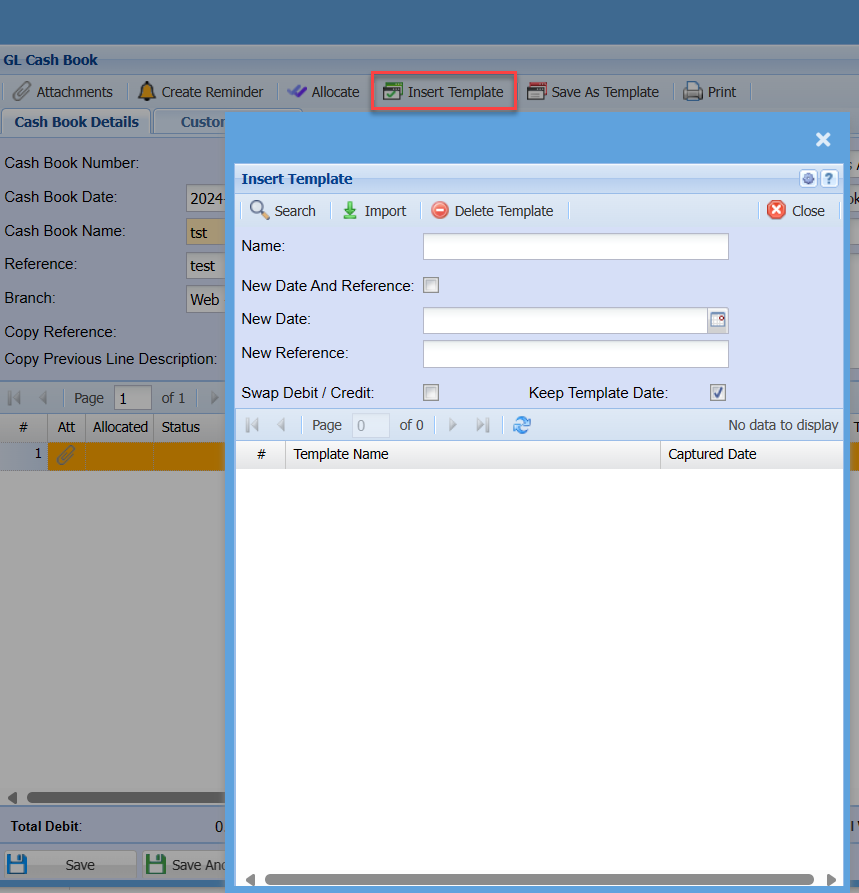
| Search | |
| Import | |
| Delete Template | |
| Name | |
| New Date and Reference Tick | |
| New Date | |
| New Reference | |
| Swap Debit / Credit Tick | |
| Keep Template Date Tick |
Save As Template
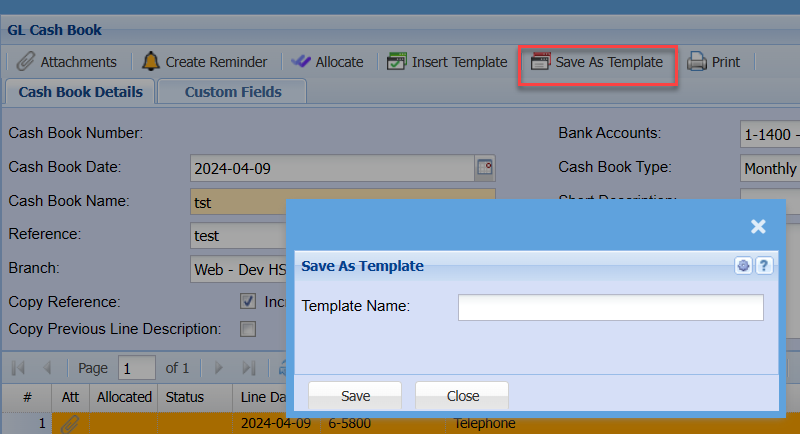
| Template Name |
Cashbook Branch Lines
The cashbooks have been enhanced to include the branch per line.
The line will automatically takes the branch at the header, but the user can change this branch.
If you have an old cashbook that has not logged the branch, then one needs to update the lines.
.png)
Error occurs when trying to process an old cashbook
.png)
Reset the cashbook out of the post status screen
.png)
Update all lines with the new branch.
.png)
Cashbook Split Line
Inserting a split line
Split Transactions are used to show a series of costs as one entry in the cashbook
Click on the Add Split button as shown below
.png)
Enter a description for your split transaction and save
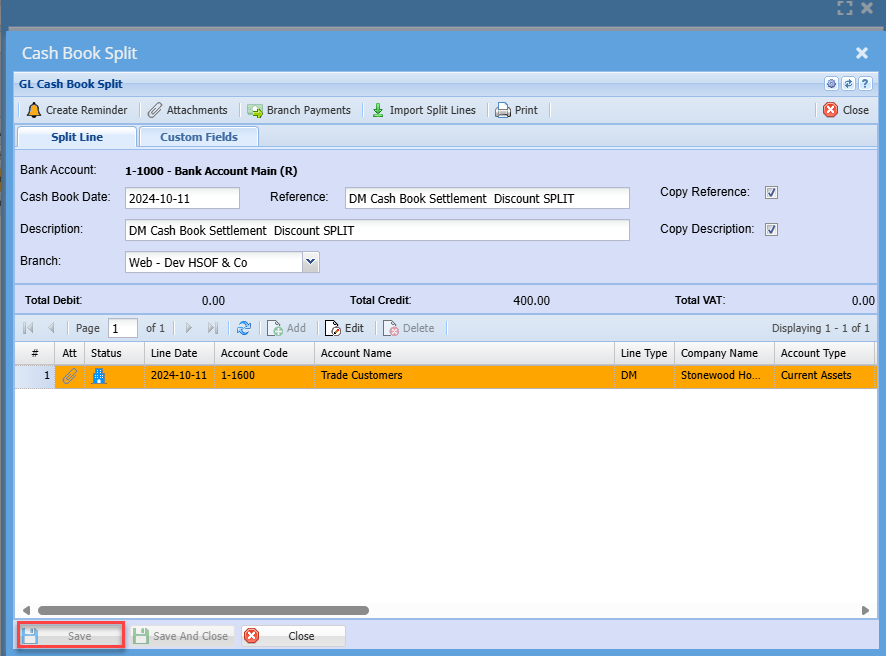
You will now have access to add the split transaction lines
Enter all the transactions relating to this payment or deposit (see explanation of each type below)
when you close and save, the totals will be shown on the cashbook line.
.png)
Select the entry type:
a. Payment / Credit
This is when one is paying money out of the bank account
Debit – Bank and Credit – Ledger Account
b. Deposit / Debit
This is when one is depositing money into the bank account
Credit – Bank and Debit – Ledger account
| Description | Enter the name of the company you are paying or deposited from. |
Click on save
After saving one will notice the Add, Amend and Delete buttons become available.
In the split line the Date, Entry Type is disabled as they need to match the full entry.
Select the Account
There are three ways to search for an account:
| a. | Short Search | just type in part of the code or name and hit enter on the keyboard and select the account. |
| b. | Tree Search | Clicking on the square with three dots allows you to find the account via the Tree view. |
| c. | Long Search | Clicking on the Arrow button opens a new window where you can search on the code or name. |
| Entry Amount | enter the amount including VAT that affects the bank. |
| Tax Account | you will notice that if one selects the Payment entry type the VAT control ledger account comes up with the Tax Type being 4 Cashbook VAT. If one selects the Deposit entry type the VAT control ledger comes up with No Tax, therefore not allocating to Vat control account. |
| Description | Enter the name of the company you are paying or deposited from. |
| Additional Comments | Enter comments for later information needed. |
| Job | assign this cost to a Job |
| Projects | assign this cost to a Project |
Click on Save and Close
OR Click on Save and New to enter another entry.
Click on Close and you will be brought back to the main batch
Branch Payments

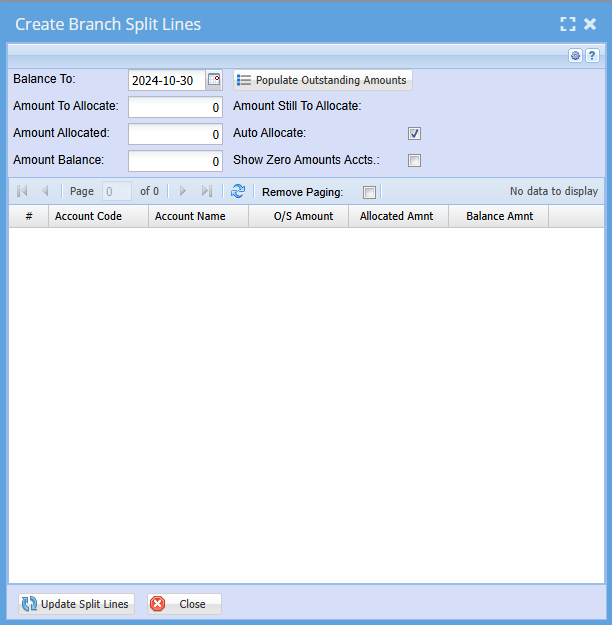
Import Split Lines

Cashbook Line Allocations
A payment can be allocated as and when it's been captured on the cashbook
for example
A deposit from debtor Account has been captured as per below screen
.png)
click save and click next until you reach the allocations screen
you will see in the allocations screen transaction list that has not been allocated against this debtor
.png)
Allocate the amount by double clicking anywhere on the selected line except the allocate amount field
this only allows a user to enter the amount to be allocated manually .
the line allocated will have the allocated status line showing in green and the total amount allocated will be shown on the grid
.png)
the user still needs to save the allocations
.png)
.png)
The allocated status will show on the cashbook line
.png)
Attachments can be added against each line or overall cashbook
on the cashbook you can click on the attachment icon it will open an option to add it could be an invoice that was paid
.png)
When there is an attachment added the icon will display in Red
this is helpful in keeping all documents you might need later for audit purposes.
.png)
Print/Import Drop Down

Print Button

| Order | |
| Select All | |
| Incl Division | |
| Incl Region |
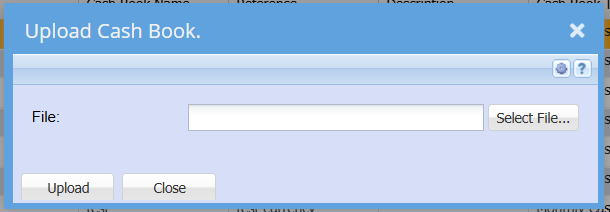
Upload Cash Book
Select File you wish to upload then click upload
Import Cash Book
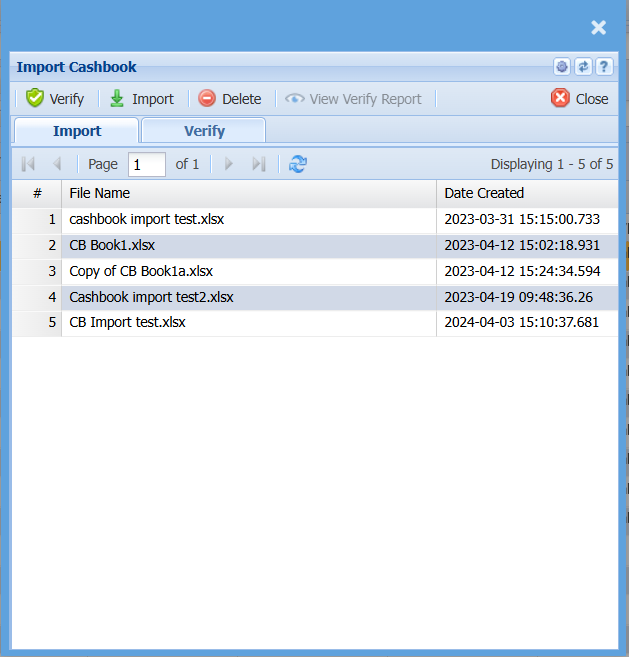
| Verify | |
| Import | |
| Delete | |
| View Verify Report |
Cashbook Receipt - Foreign Debtor
If you trade in multicurrency and have foreign debtors, these debtors will likely pay in the respective foreign currency.
Using multicurrency will typically imply that you may have debtors that are invoiced in the USD as an example
As such the debtor, when making payment will pay their account in USD. This receipt can be entered into a Foreign currency bank account or a ZAR bank account.
Receipts into a ZAR bank account:
Create a cashbook as normal for the local (ZAR) bank account the money was paid into
When entering the receipt, select the respective debtor
you will note the currency indicated will display USD
Enter the USD amount paid
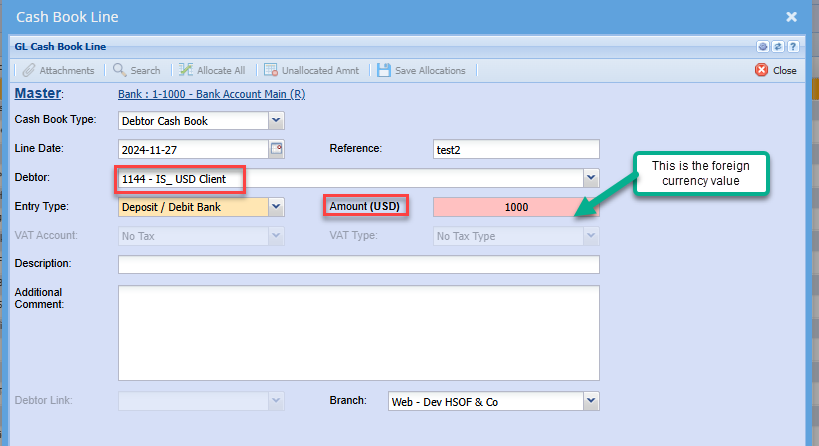
Click Next
Enter the applicable exchange rate
note: The Rand equivalent value is populated
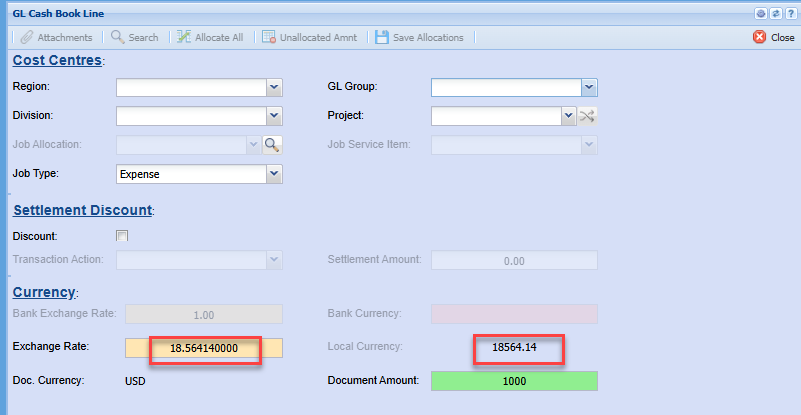
Proceed with the cashbook as normal
Save and Close
Process the cashbook
Allocation of the receipt
Allocation of receipts from foreign debtors must be done in both the foreign currency as well as Rand
go to: Activity>Allocation
search the debtor as normal
Change the currency
Click search
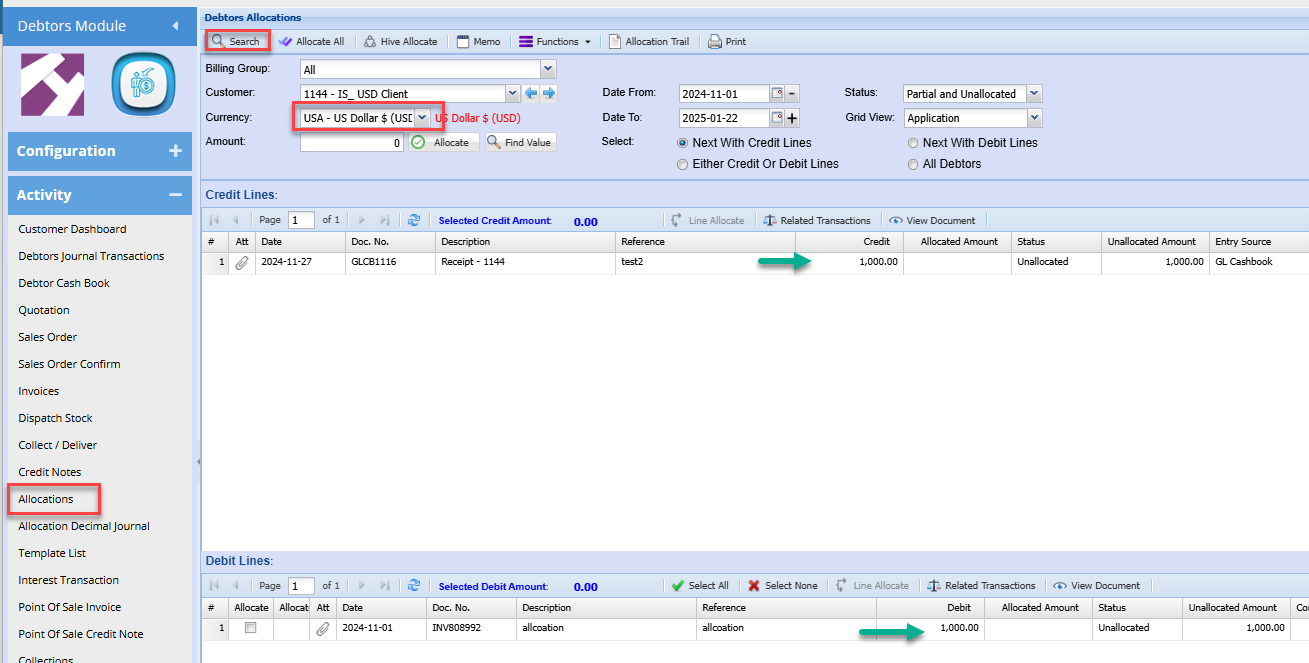
note the values will be displayed in the foreign currency
The Invoice and receipt values will typically match. and you can allocate as normal
Change the currency to Rand and search
Note: the values may differ because the invoice would have been done at a different exchange rate to the receipt
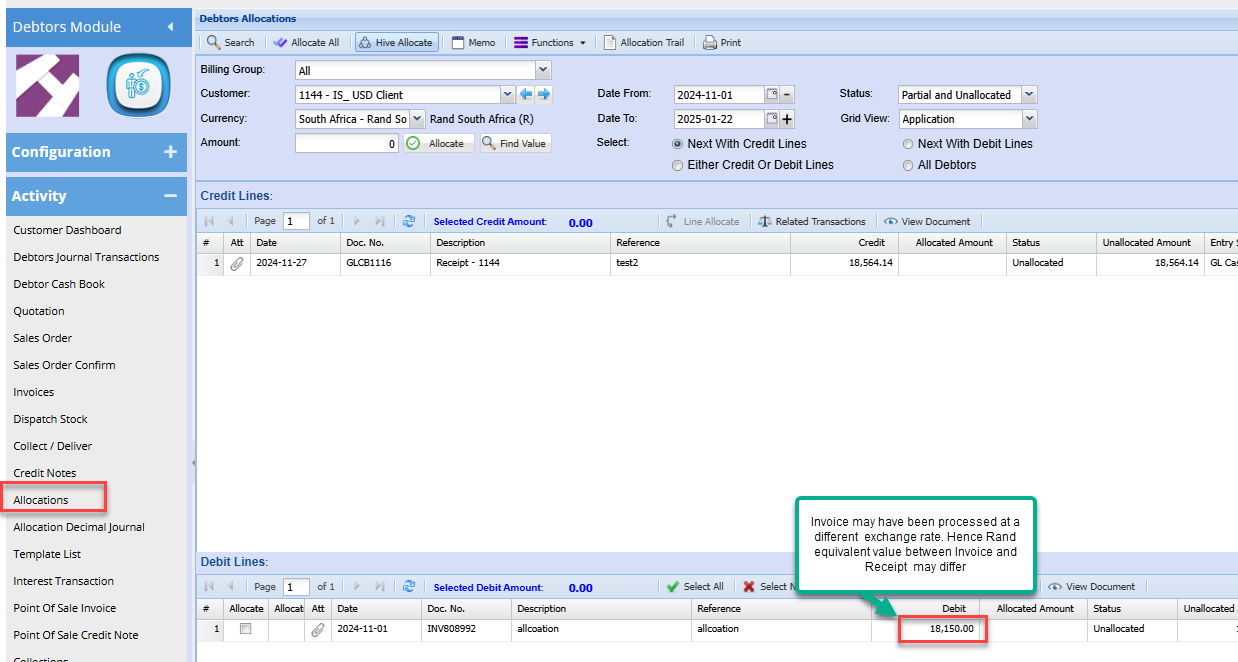
You can allocate these entries and you will note an exchange gain / loss difference remaining on the allocations
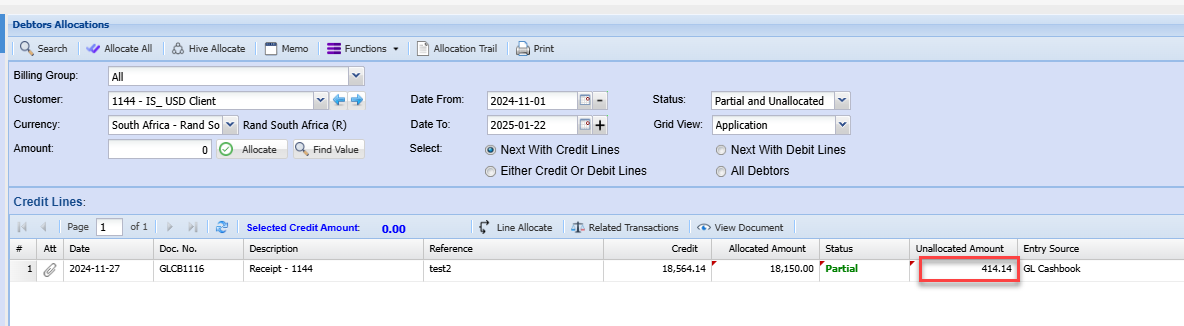
This amount will need to be cleared with a Rand debtors journal on the debtor account
refer to Debtors gain / loss journal manual to create the journal
Bank Reconciliation Menu
Bank Reconciliation
General Ledger>Activity>Bank Reconciliation
A bank reconciliation is performed to verify that transactions recorded in the cash book accurately match those shown on the bank statement.
To complete the reconciliation process, you will need a current bank statement.
If you are using BankIT to import your bank transactions, the reconciliation process will be significantly faster and easier, as many transactions will already be matched automatically.
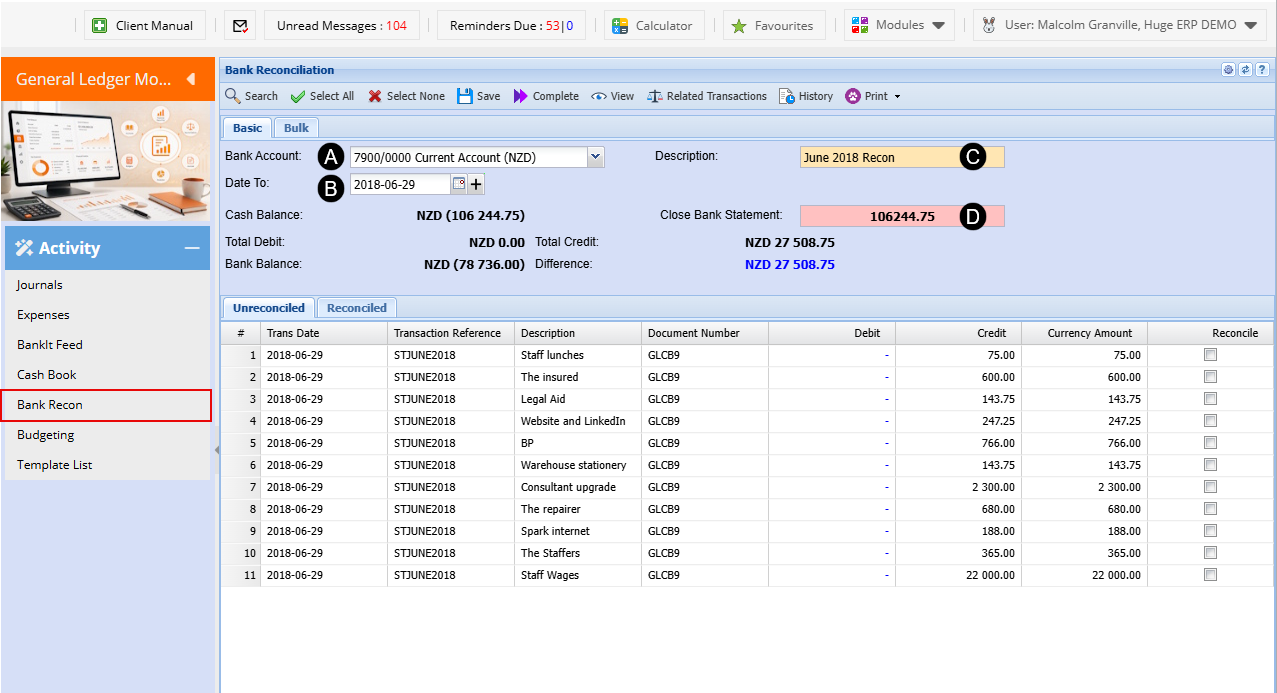
| Action | Description |
| Bank account | Select the bank account that you will be reconciling |
| Bank reconciliation date | Select the date two based on your bank statement |
| Description | Enter a description for the bank reconciliation |
| Closing Bank statement | Enter the closing value of your bank statement based on the date that you selected |
Bank Reconciliation Process
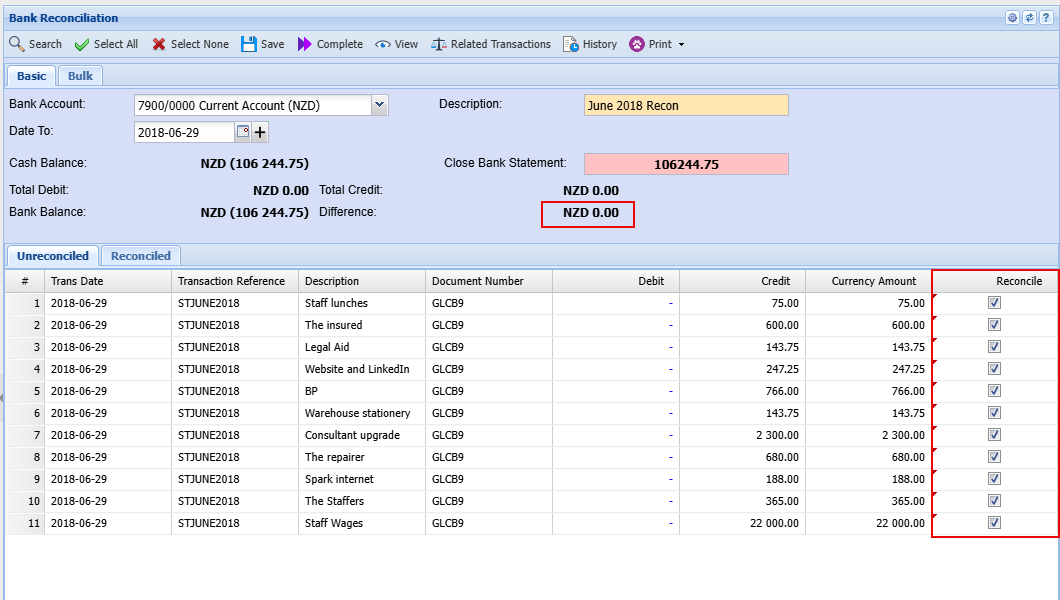
The quickest way to verify that your bank reconciliation balances is to click Select All. This will automatically select all visible transactions in the reconciliation window.
If the reconciliation is correct, the difference between the Cash Book Balance and the Bank Balance will be $0.00. A zero difference confirms that the bank reconciliation has been completed successfully.
Once the reconciliation balances, click Save and then Complete Bank Reconciliation to finalize the process.
All reconciled transactions will be moved to the Reconciled tab, where they can be reviewed at any time.
After completing one month's reconciliation, proceed to the following month and repeat the process until all outstanding periods have been reconciled.
For the most efficient and accurate results, it is recommended that reconciliations are completed one month at a time.
Bank Reconciliation History
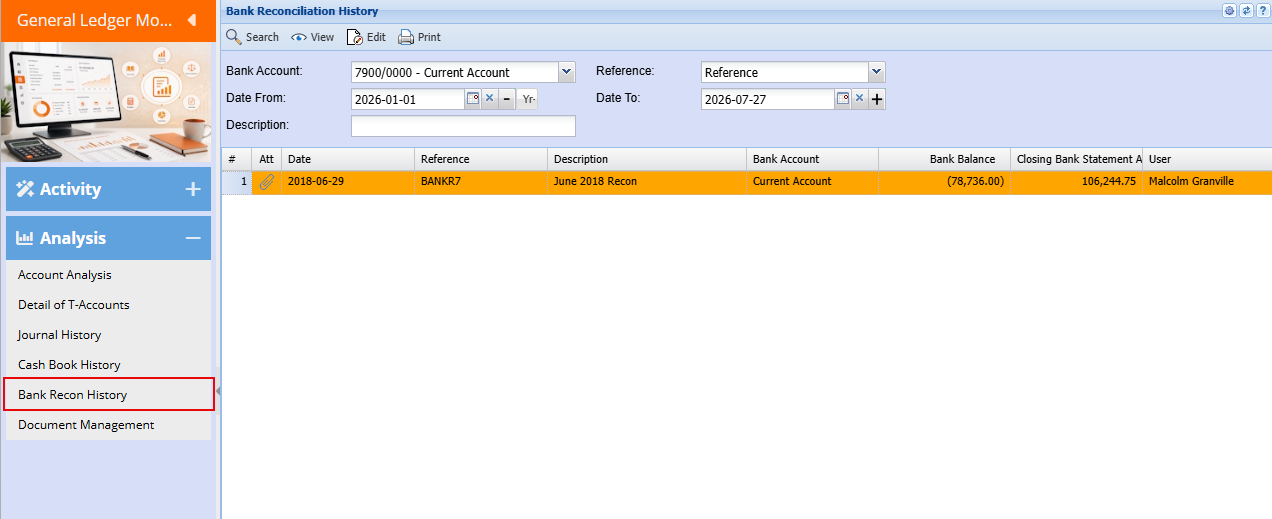
To view your bank reconciliation history, navigate to:
General Ledger → Analysis → Bank Reconciliation History
From this screen, you can view and print completed bank reconciliations for any period.
For audit and record-keeping purposes, it is recommended that you attach a copy of the corresponding bank statement to each reconciliation. Doing so provides supporting documentation and allows auditors to quickly verify that the bank statement and cash book balances have been reconciled accurately.
Maintaining these attachments creates a clear audit trail and simplifies future reviews and compliance checks.
Resolving Bank Reconciliation Differences
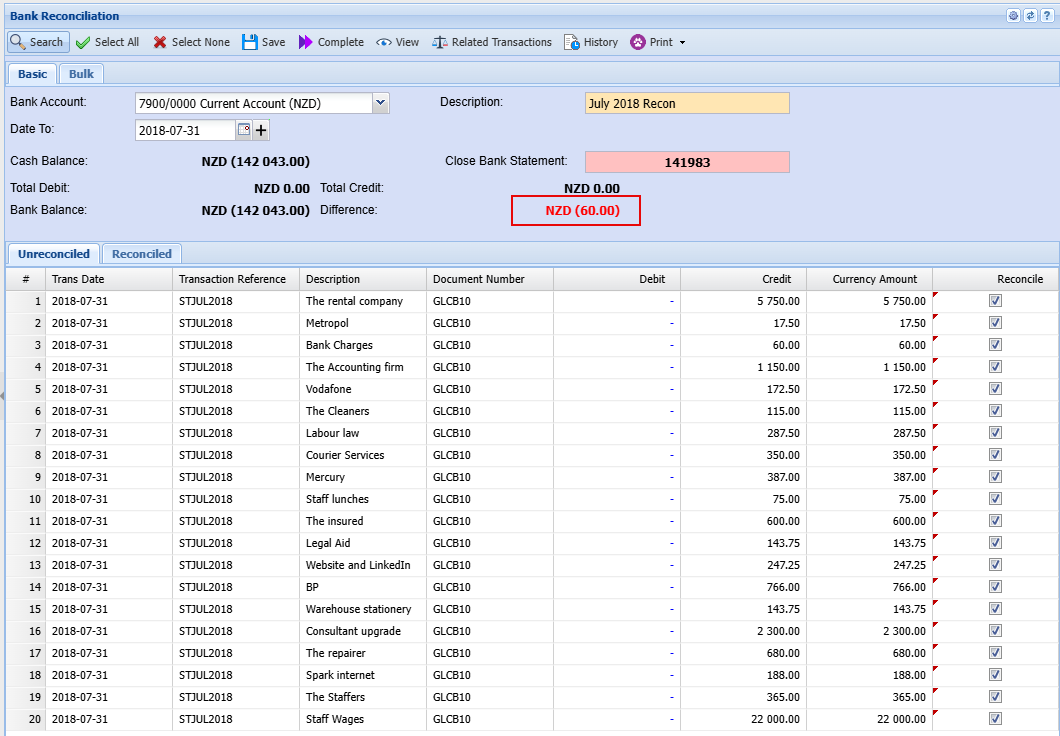
In this example, after clicking Select All, a difference remains between the Cash Book Balance and the Bank Balance. This indicates that one or more transactions have been incorrectly selected or require further investigation.
If the discrepancy is obvious, simply untick the incorrect transaction(s) until the reconciliation balances.
If the source of the difference is not immediately apparent, the reconciliation should be completed manually. To do this, click Select None to clear all selections and use your bank statement as a reference.
Work through the bank statement transaction by transaction, ticking each matching entry in the cash book. As you do so, compare the running bank balance to ensure it agrees with the balance shown on the statement. This method helps identify any missing, duplicated, or incorrect entries.
Once you have processed all transactions on the bank statement, any remaining unticked entries are typically transactions that have been recorded in the cash book but have not yet appeared on the bank statement.
This commonly occurs at month-end when transactions have been entered into the accounting system but have not yet been processed by the bank. These outstanding items will usually appear on the following month's bank statement.
When you perform the next month's reconciliation, these outstanding transactions can then be matched and cleared as part of the normal reconciliation process.
Completing the Reconciliation
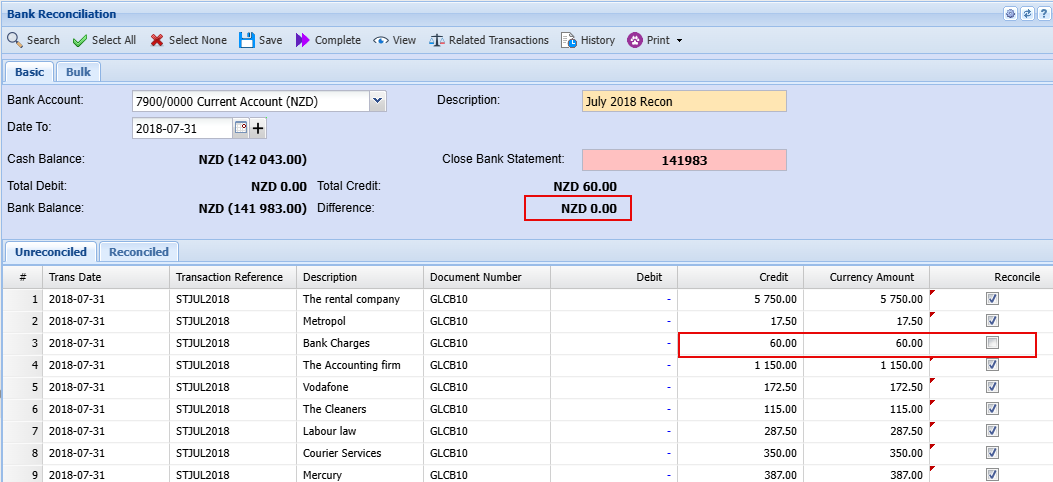
In this example, the Bank Entry Not Found amount remains as an outstanding item, and the bank reconciliation balances successfully.
Once the Difference is $0.00 and the reconciliation is balanced, click Save to store your work.
To finalize the process, click Complete Bank Reconciliation. This will move all reconciled transactions to the Reconciled tab and close the reconciliation period.
At this point, the bank reconciliation is complete and the cash book has been successfully reconciled to the bank statement
Bank Recon Date
Bank Recon Fixes
Make Sure that the date that is used on the Date To is the one that is saved on the bank recon.
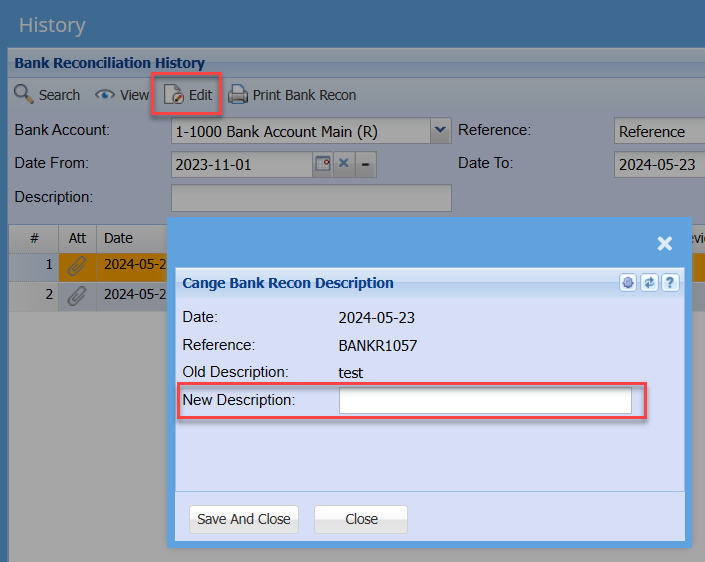
On the bank recon history
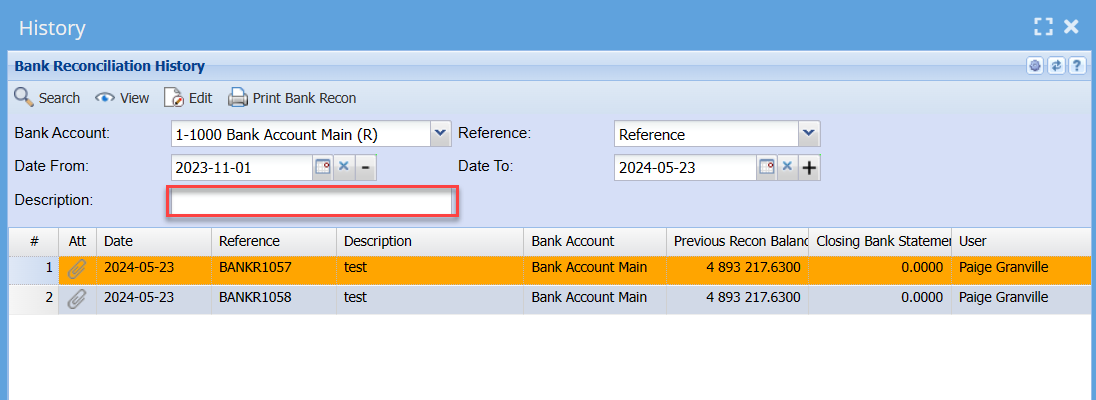
Added in a search for Description field.
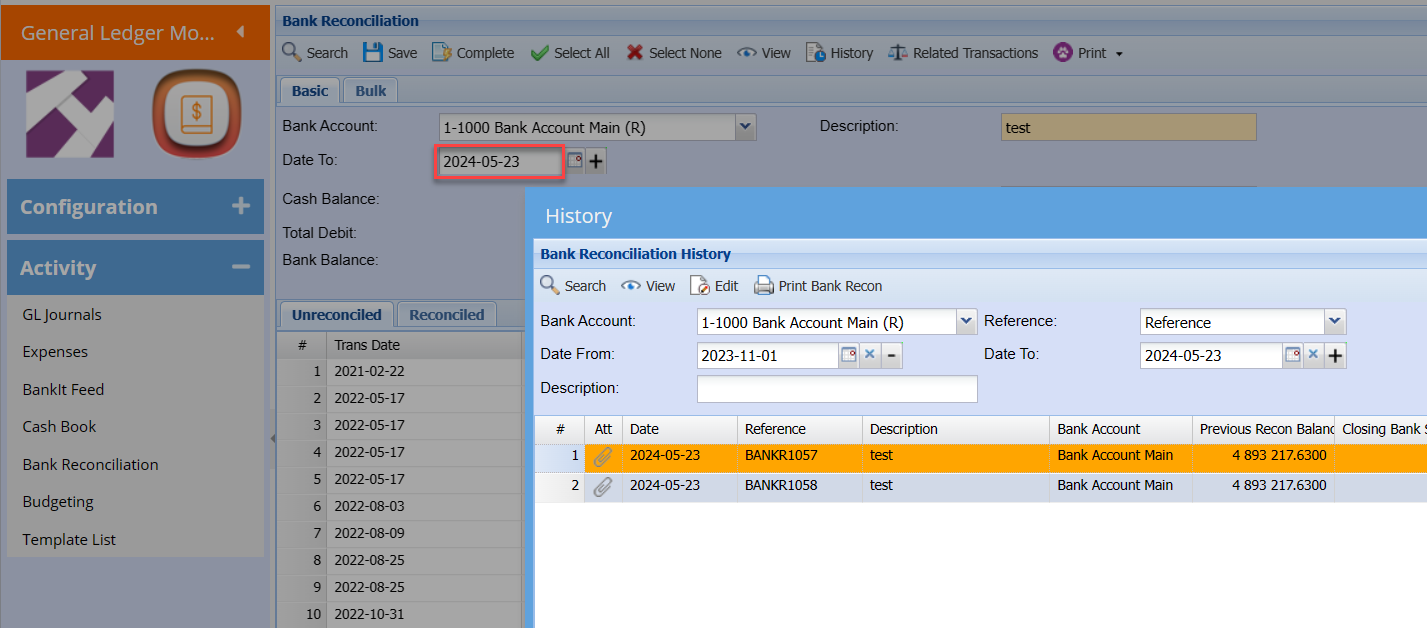
The bank reconciliation history is a reconciled financial statement which is owned by both the business itself and the bank statement
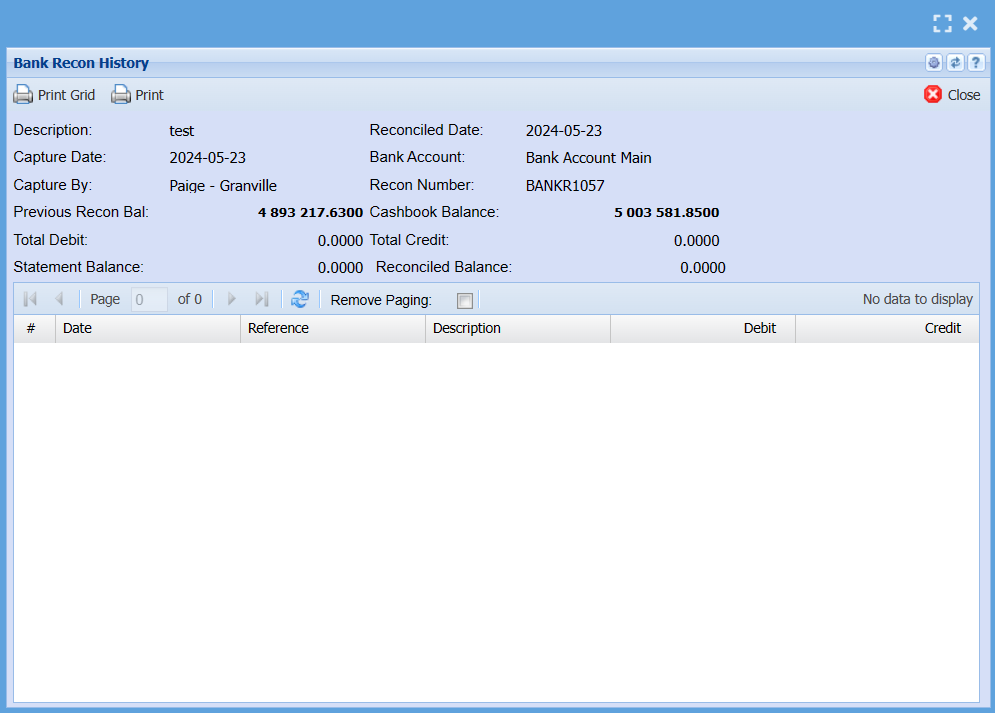
View Button
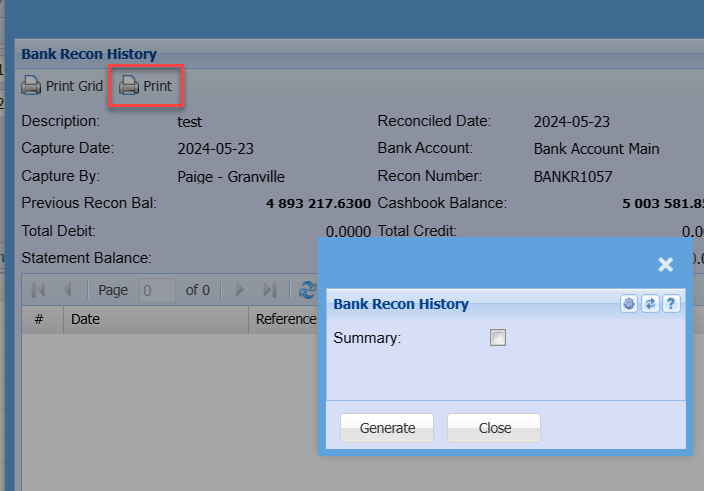
Edit Bank Recon Description
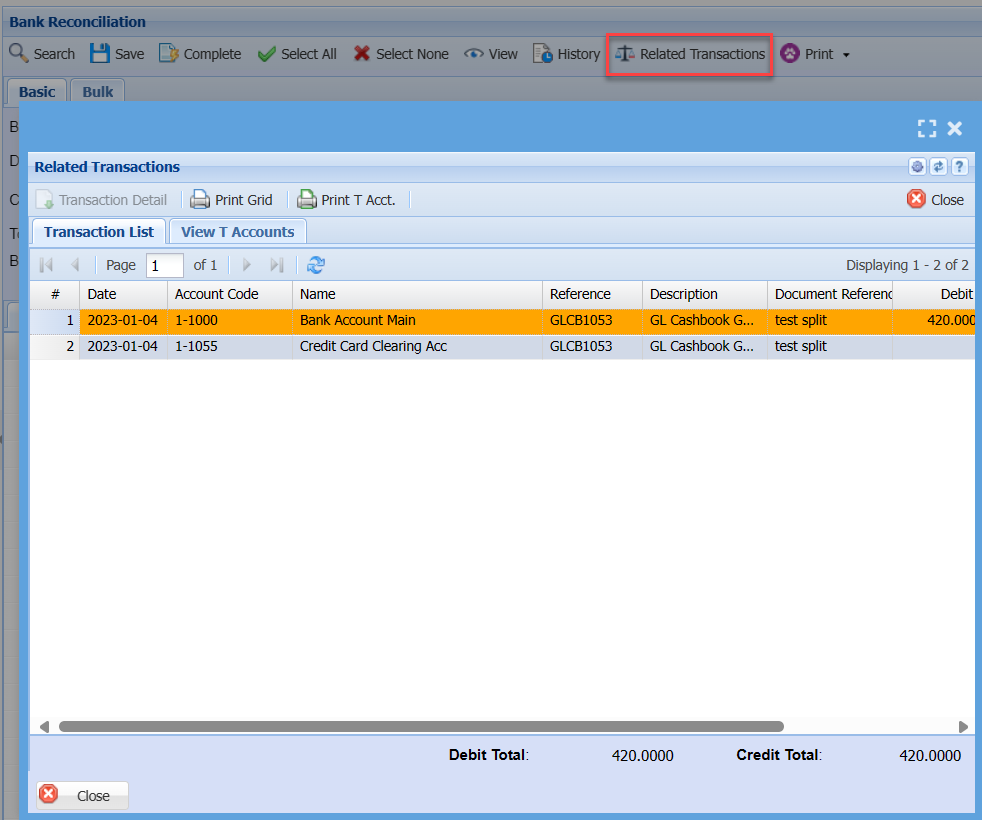
Related Transactions
This part shows the accounts involved in a transaction.
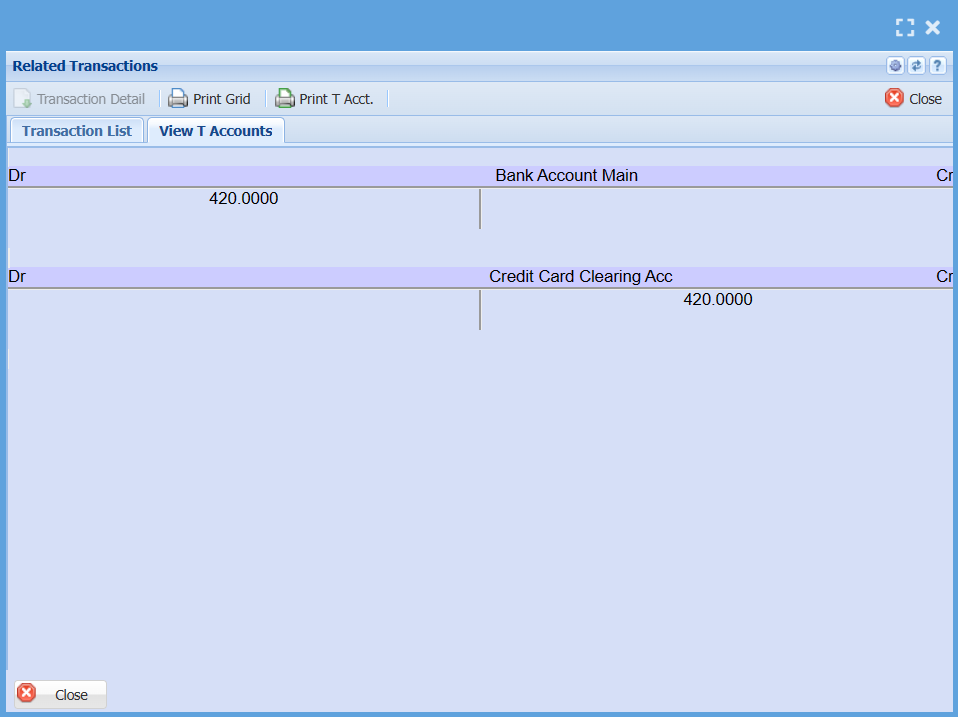
| Transaction Detail | |
| Print Grid | to print the transactions |
| Print T Acct. | to print the T accounts |
| Transaction List | shows a list of transactions involved |
| View T Accounts | to view the t-accounts |
Budgeting Menu
GL Budgeting
Set up Budgets for each month for your income and expense accounts.
General Ledger>Activity>Budgeting
This will help you track progress throughout the year.
The budgeted amount is highlighted in blue under the budgeted column.
Manually insert this month by month or insert the total amount and allocate, this amount will be allocated equally throughout the months.
For your convenience this can also be imported.
Includes
| 1. | Budget replacement for months that don’t have actuals |
| 2. | Budget per month |
| 3. | Budget compare from previous year |
| 4. | Budget variance percentage |
| 5. | Operational and non-operational Income statement / Profit and loss |
| 6. | Budget template import for budget and revised budget |
.png)
A budget is a financial document used to project future income and expenses.
Basic Search Tab
| Financial Year | to search by selecting the financial year from the drop-down arrow and entering the total year amount |
| Account | to search by selecting the account from the drop down arrow |
| Allocate button | to apportion funds for a specific purpose for a selected financial year |
Reports
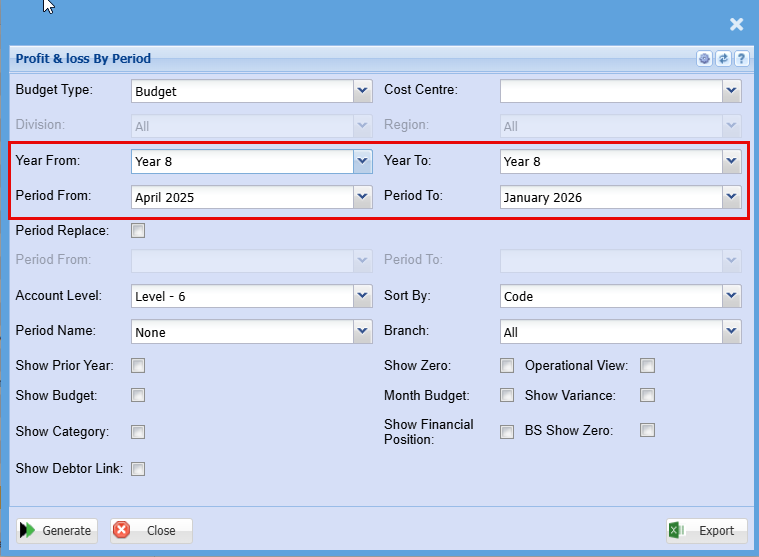
Run your Profit and Loss report by period to establish a clear baseline for your budget.
General Ledger > Reports > Report List
- Select the General Ledger category to refine the list
- Then click the Profit and Loss by Period report
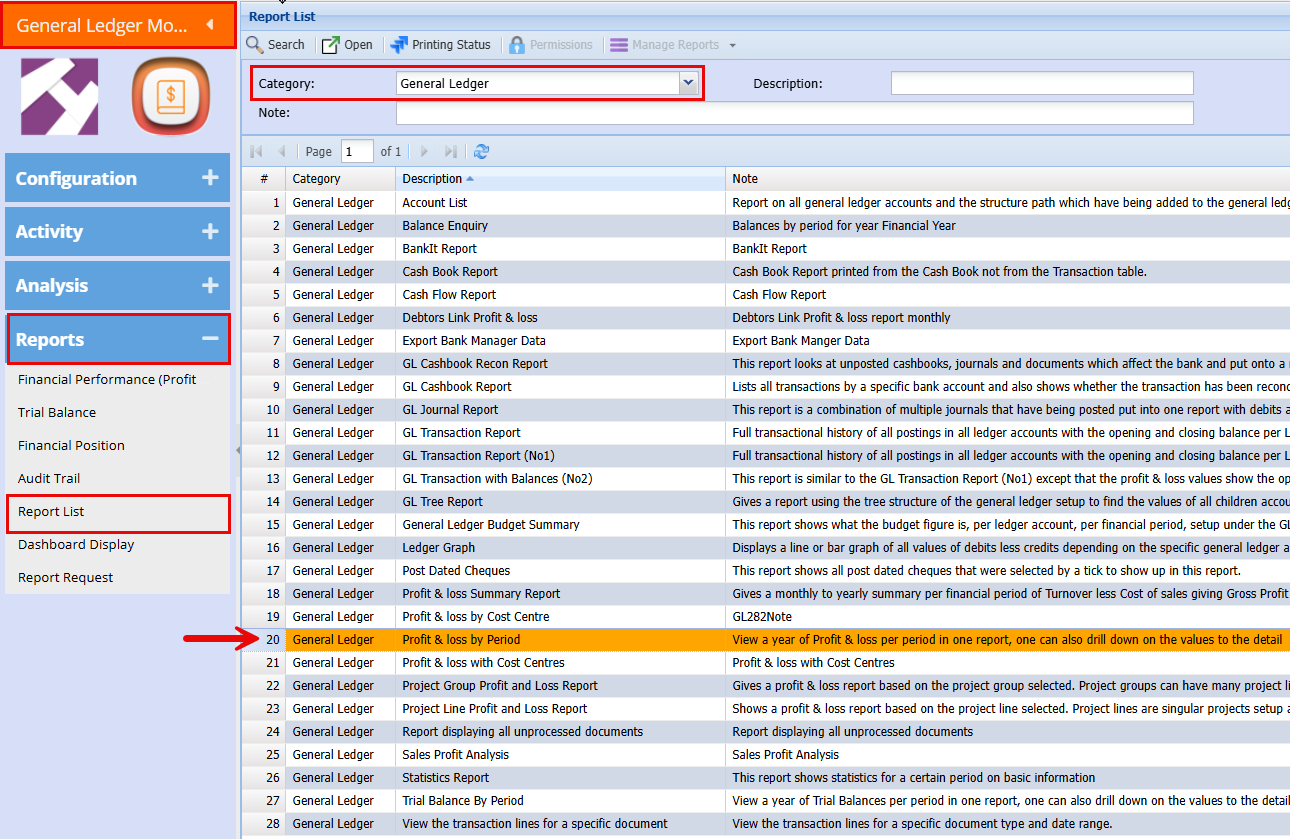
- Select the "Year From" and "Year To" for your report
- Click "Generate" to run the report
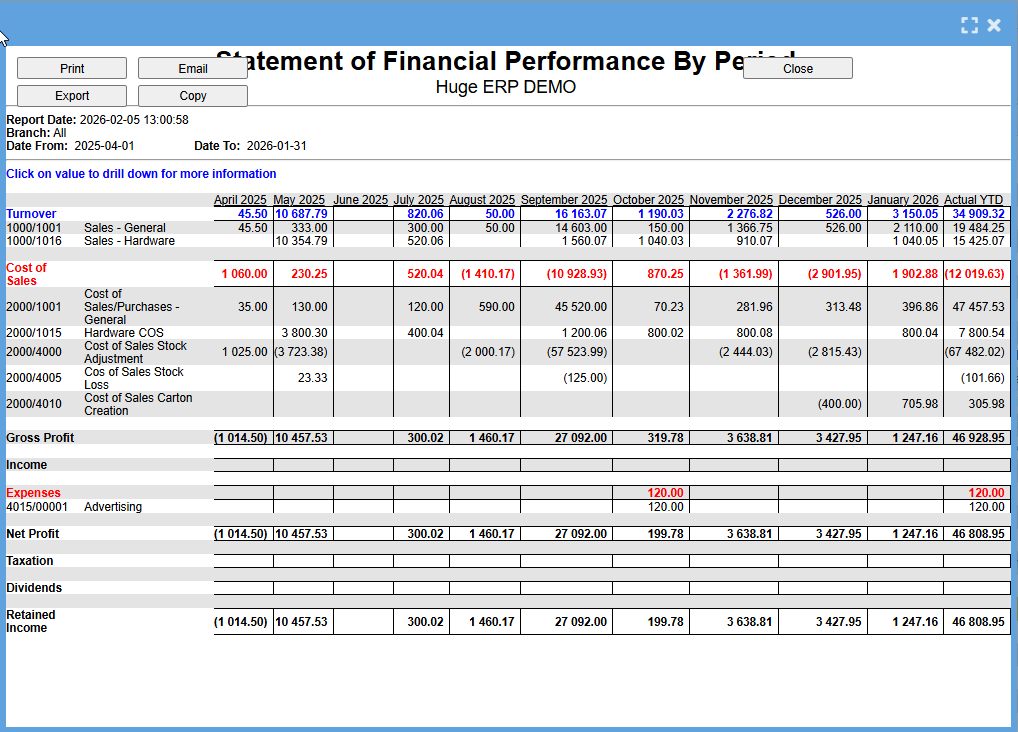
With this report, you’ll be able to see your monthly expenses by cost centre for the previous financial year.
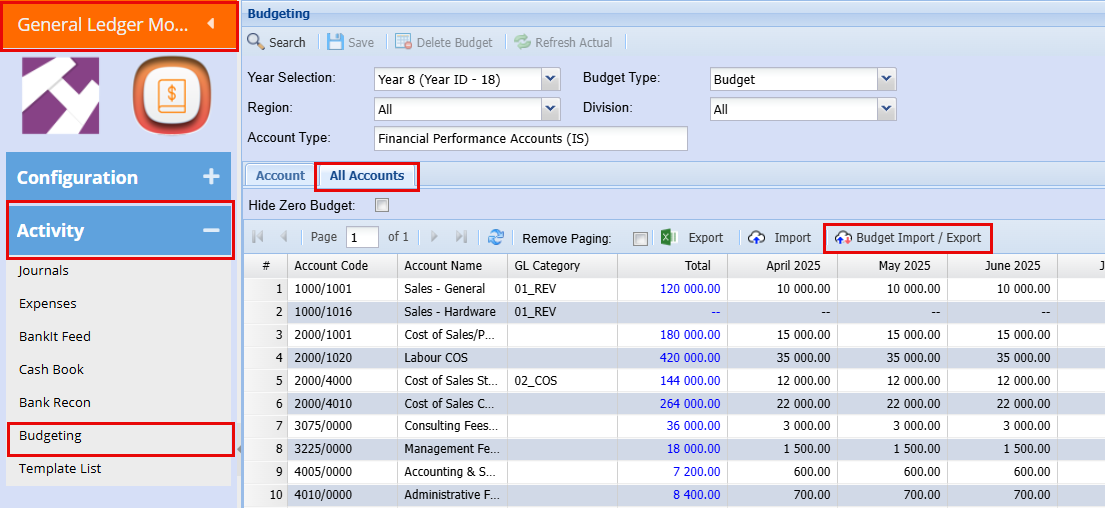
Import / Export Template
General Ledger > Activity > Budgeting
“Here you can generate an export of the selected accounts for the previous financial year.
- Click on the "Budget Import Export"
- Click "Export"
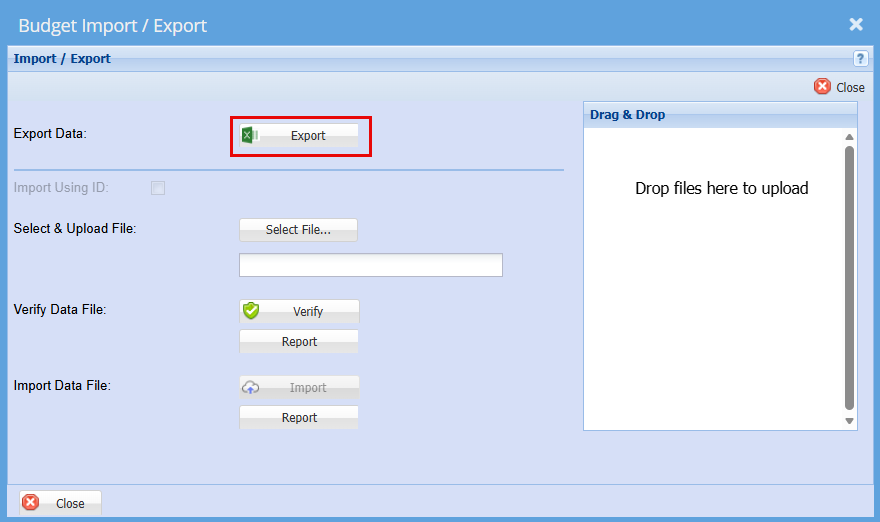
- Select the accounts you want to export a template for
- Click "Continue"
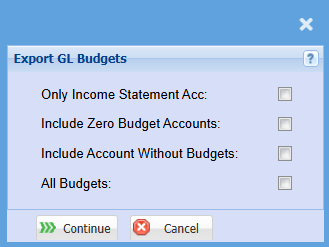
| Only Income Statement Acc | This will only export the accounts from your Income Statement |
| Include Zero Budget Accounts Tick |
By ticking this box, accounts with a budget but no spending for the financial year will also be included in your export with a zero value.
|
| Include Accounts Without Budgets Tick |
By ticking this box, accounts that had no budget created in the past will also be included in your export and shown with a zero value. |
| All Budgets | This will include all Cost Centre Accounts |
This will generate an export of the selected accounts for the previous financial year.
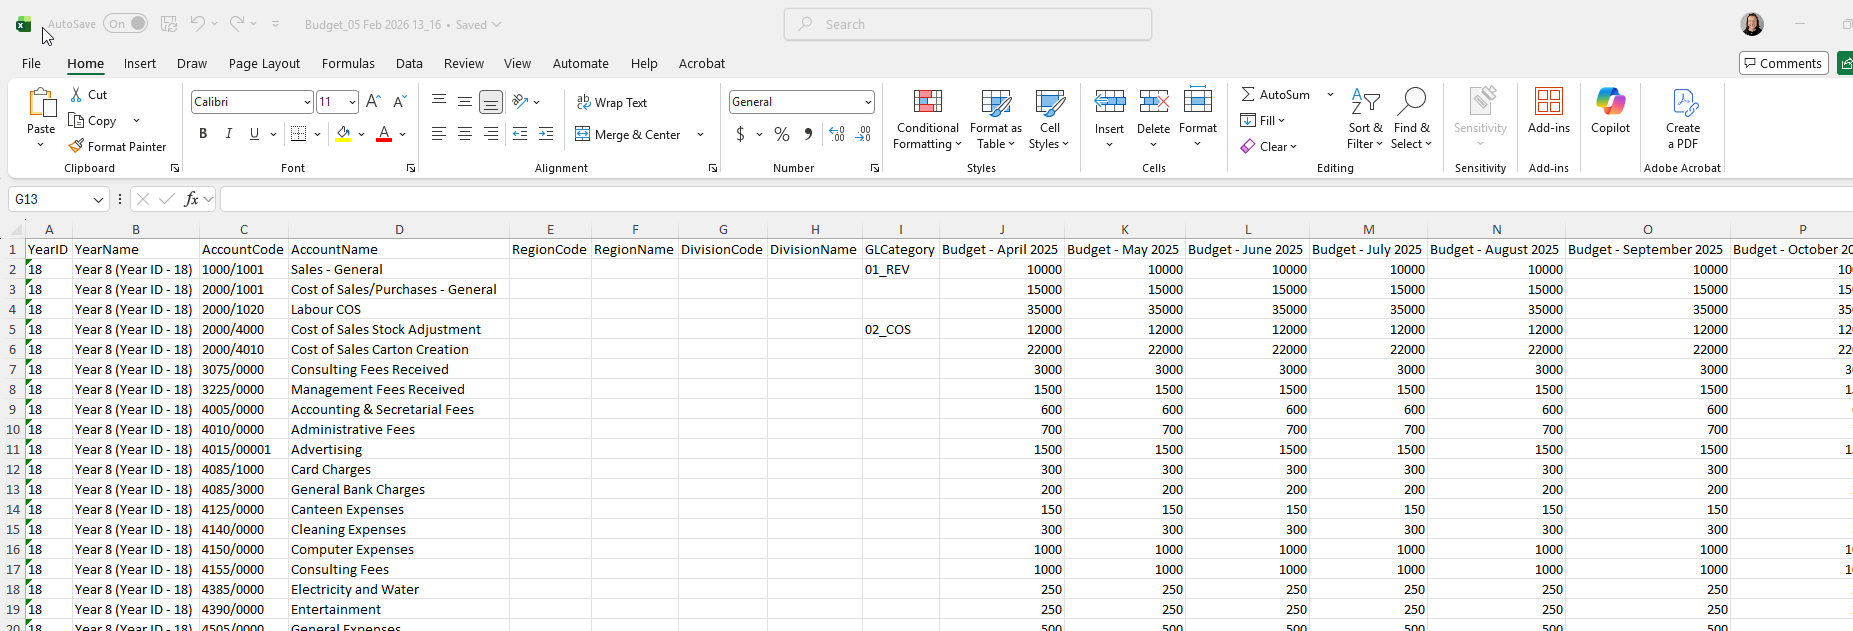
Import
Once you’ve updated your budget and are satisfied with the results, you can import the Excel file back into the system.
General Ledger > Activity > Budgeting
- Click on the "Budget Import Export"
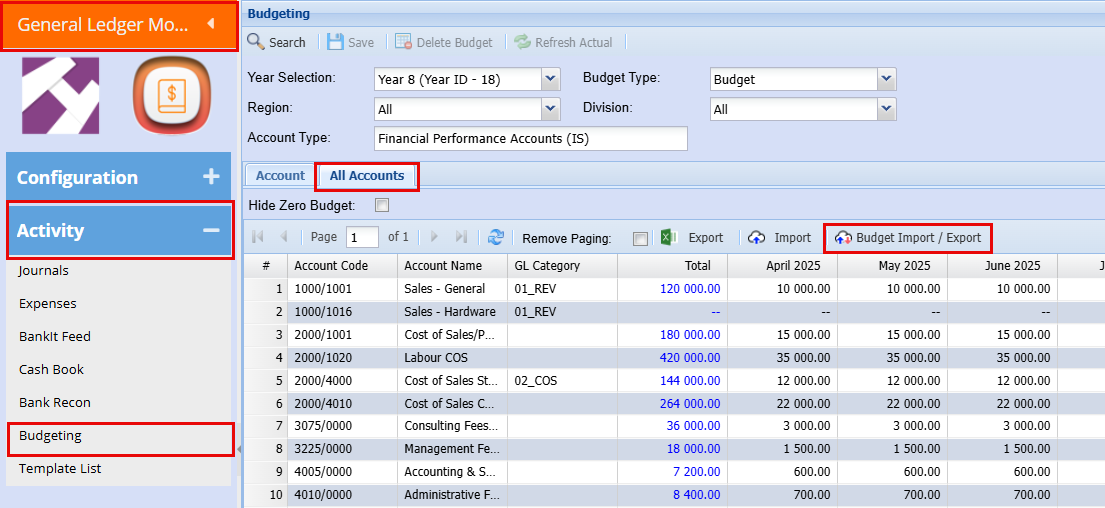
- Click Select File and choose the file to import
- When it shows Success, click Verify
- After verification is successful, click Import.
- Click "Close"
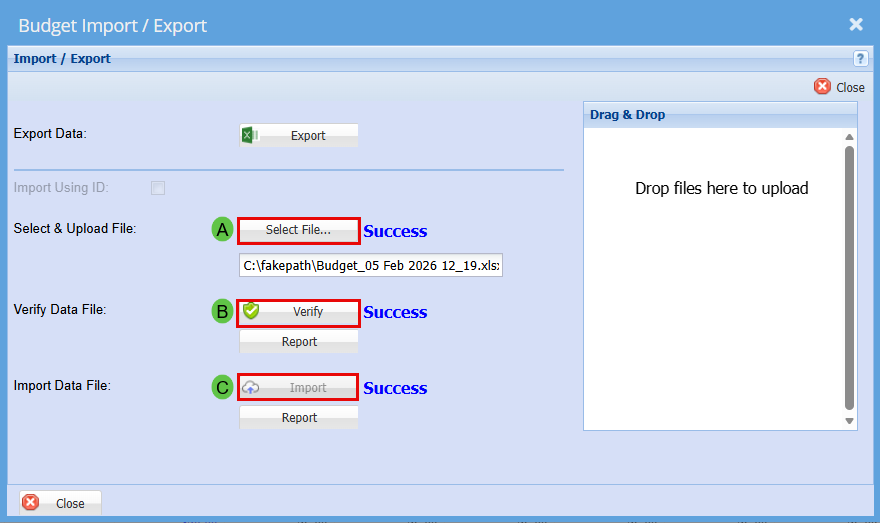
You have now imported your new budget for the next financial year
Video manual 2021 - Click Here
GL Template List Menu
GL Template List
List all Cashbook and Journal templates
General Ledger>Activity>Template List
.png)
Functions
Template Type – search by selecting template type from the drop down arrow
Template Name – search by entering template name
Date From – search by entering the date from which the template list will be running from
Date To – search by entering the date to
Buttons
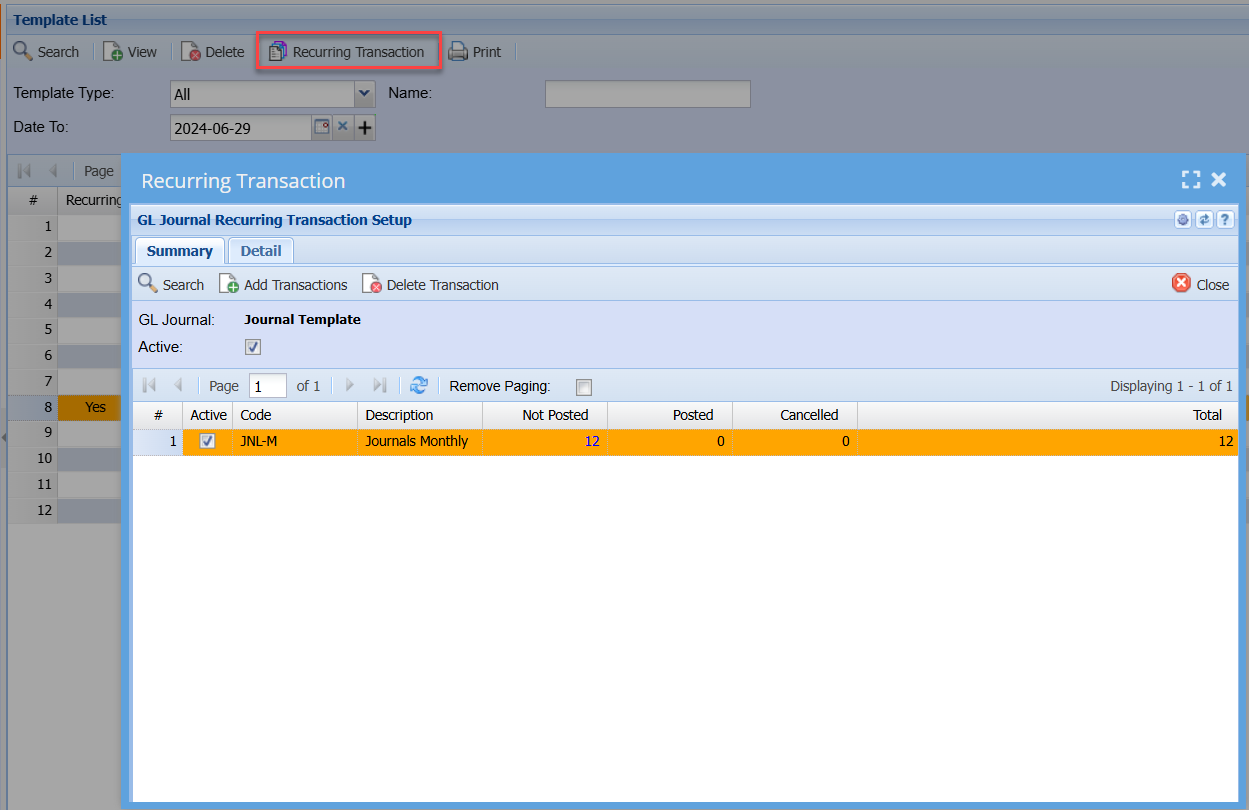
Recurring Transaction
General Ledger>Activity>Template List
GST Submission
Steps to prepare for submission
General Ledger Module > Reports >Report List
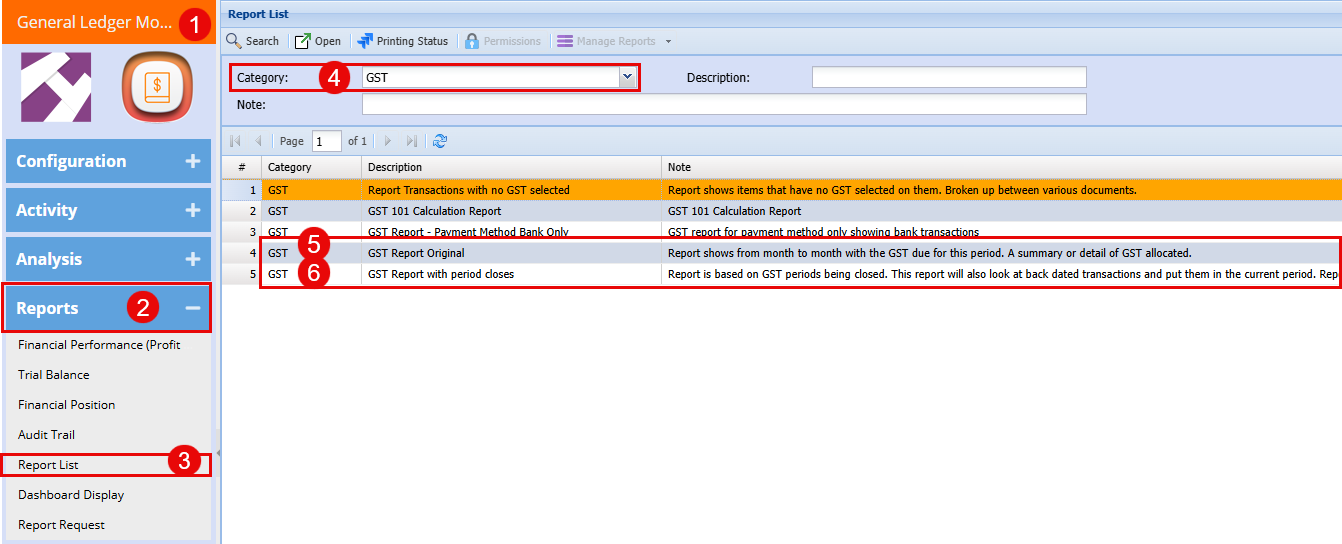
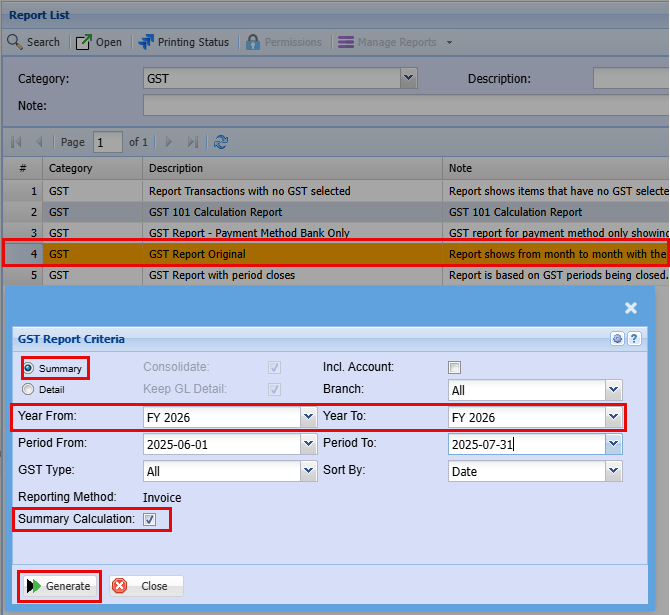
Double click on the "GST Report Original"
Run the Summary report
- Please choose the appropriate date range for your bi-monthly GST filing.
This ensures your submission reflects the correct reporting period and meets compliance requirements.
- Make sure the "Summary Calculation" box is ticked as this will help with the total to complete during submission
Note: Accurate date selection is essential for correct tax period calculation.
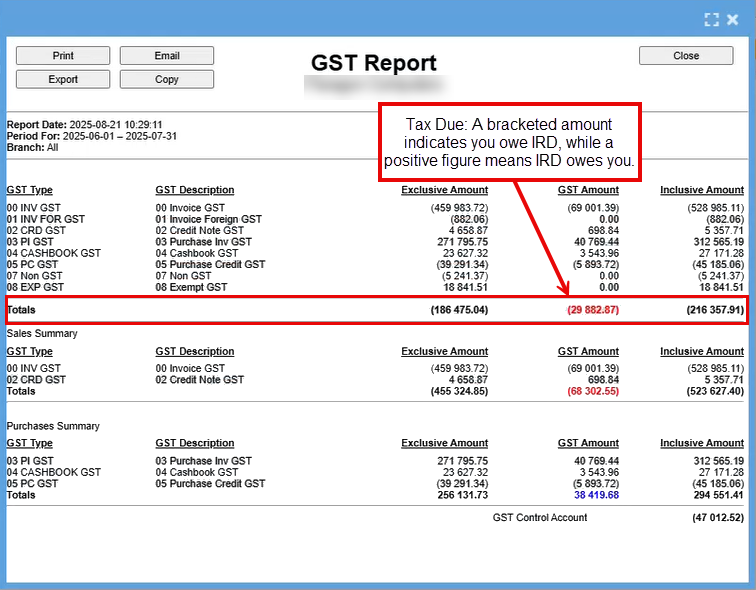
After clicking "Generate," a report will be produced, as shown below.
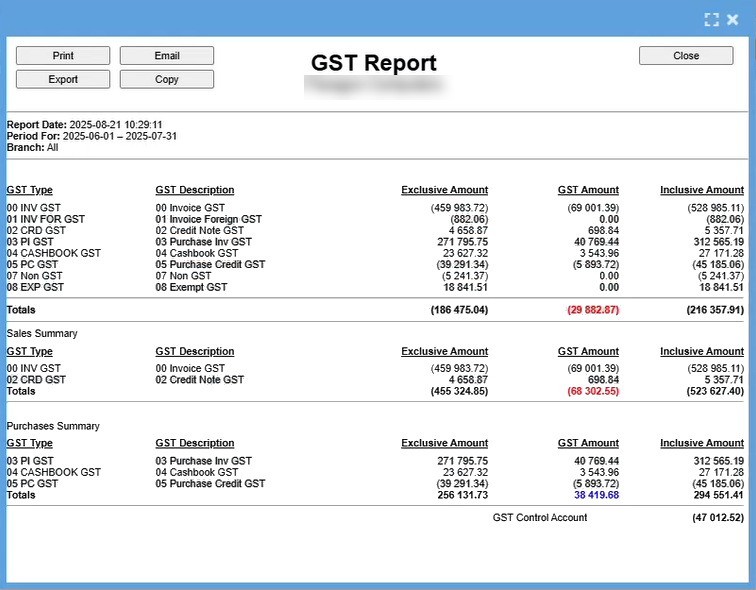
The figures displayed at the top represent your actual reported values, while the bottom section is formatted to assist with your IRD submission.
Print this document as a PDF and name it "GST Summary" add the date or month and year to easily identify this period.
Run the detailed report
Run the detailed report for the same period
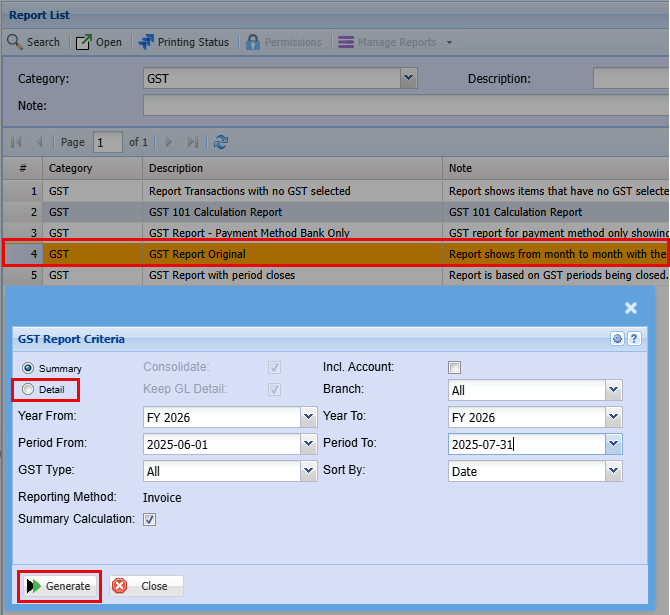
After clicking "Generate," a report will be produced, as shown below.
This report will give you every line of the invoice and is grouped by the different categories.
Review the report by scrolling through, and under the "Invoice" category, verify that all entries appear consistent and there are no irregularities.
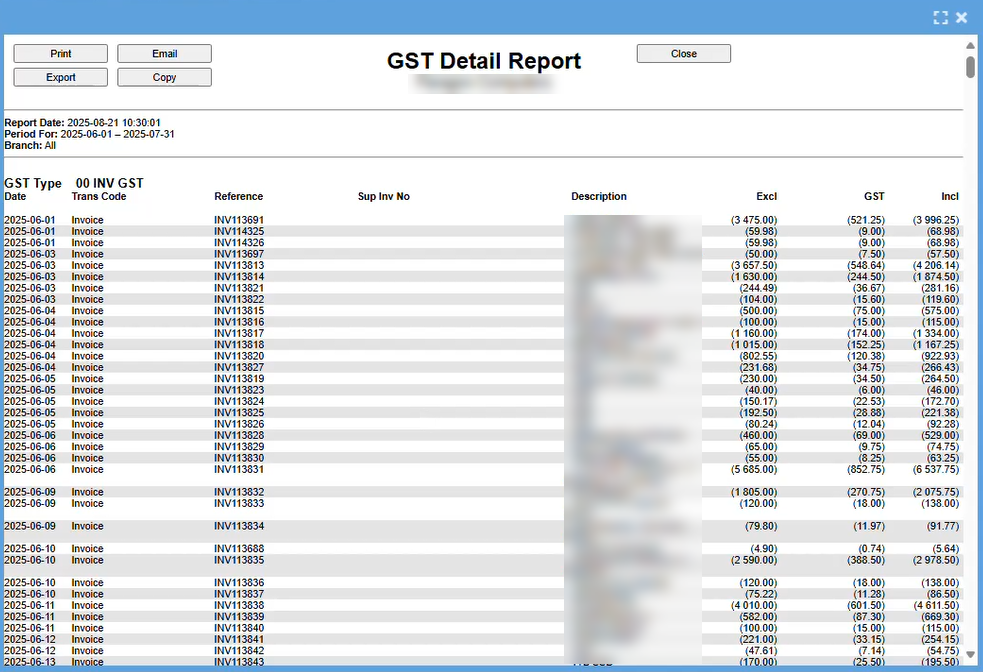
The next section covers non-GST invoices.
IRD requires visibility into the total value of transactions where GST was not applied, to ensure accurate reporting and compliance.
Again, verify that all entries appear consistent and there are no irregularities.

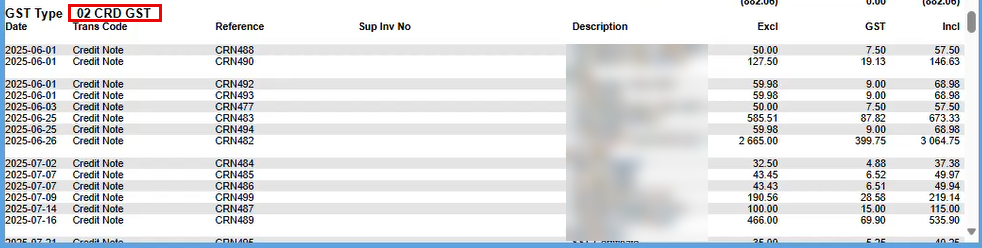
The next section covers credit notes.
Again, verify that all entries appear consistent and there are no irregularities.
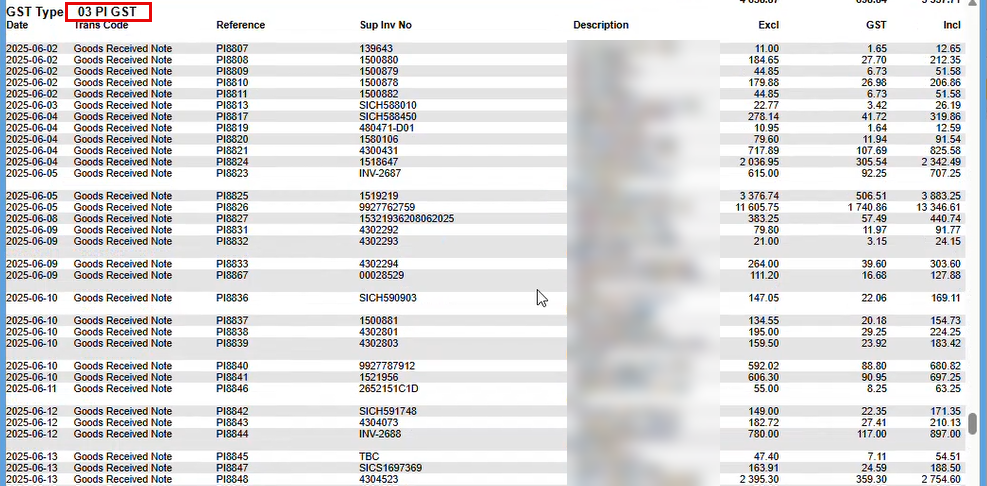
The next section covers Goods Received.
Again, verify that all entries appear consistent and there are no irregularities.
The next section pertains to the Cashbook.
As with previous sections, ensure all entries are consistent and free from anomalies.
Note: In some workflows, 'Goods Received' and 'Cashbook' may overlap, while in others they are maintained as distinct records.
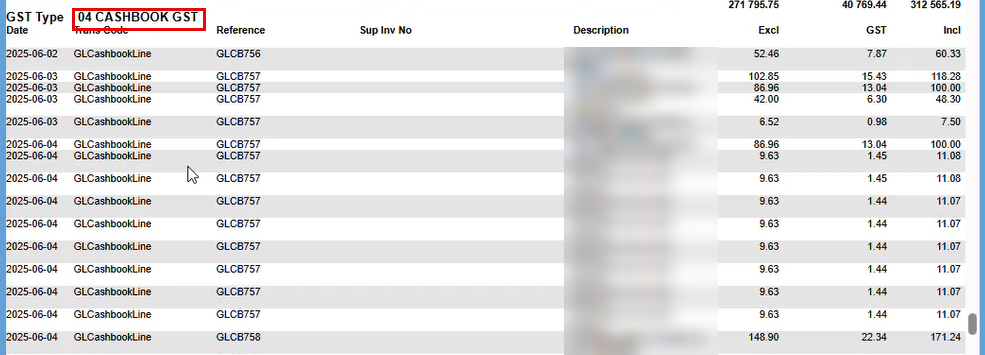
Once you are happy with your report Print this document as a PDF and name it "GST Detailed" and again add the date or month and year to easily identify this period.
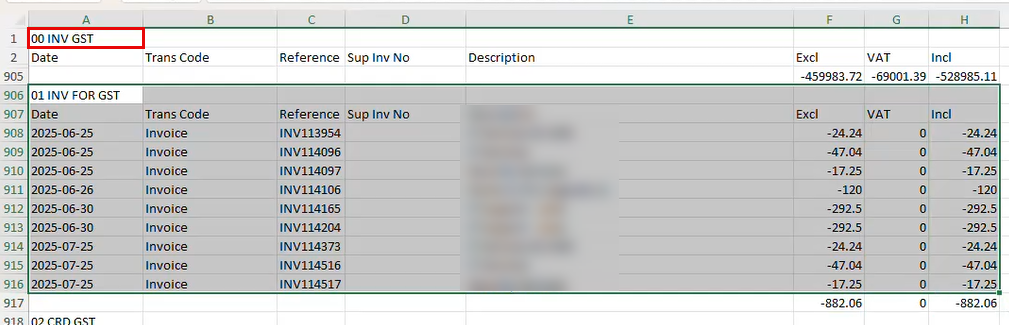
Once you have saved this report we need to expert the data out to a spreadsheet.
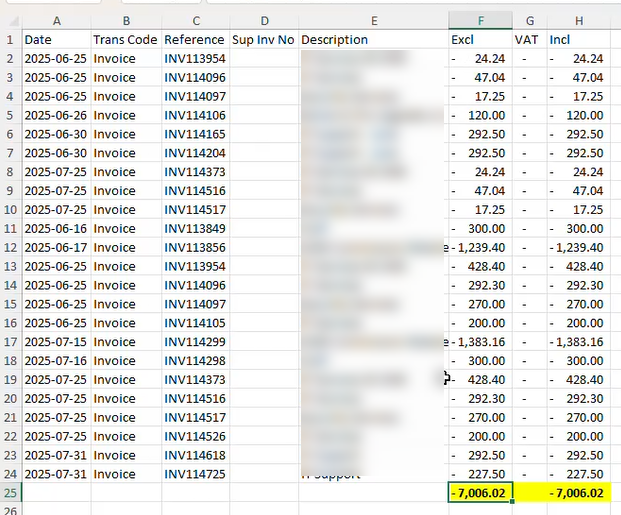
We are interested in the below section of the data:
Copy the below and save it to another Tab (Tab 2) and delete the "Good Received Note" lines
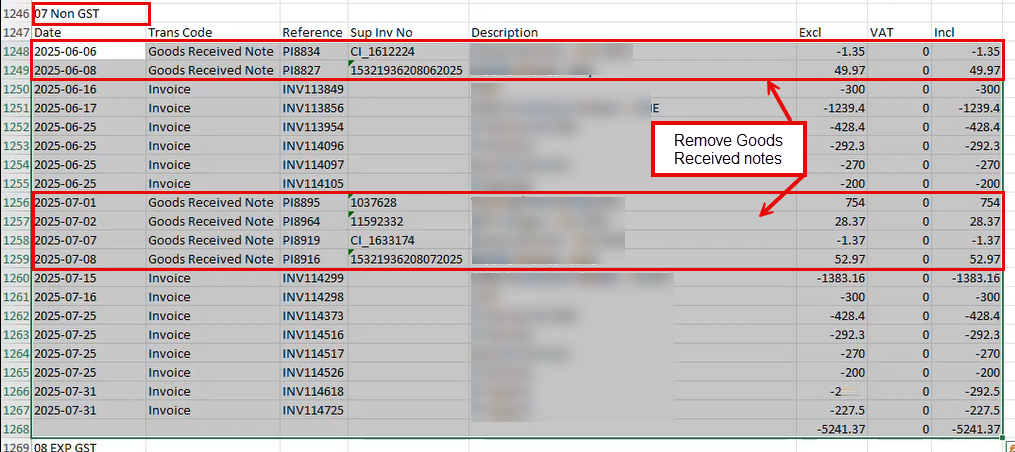
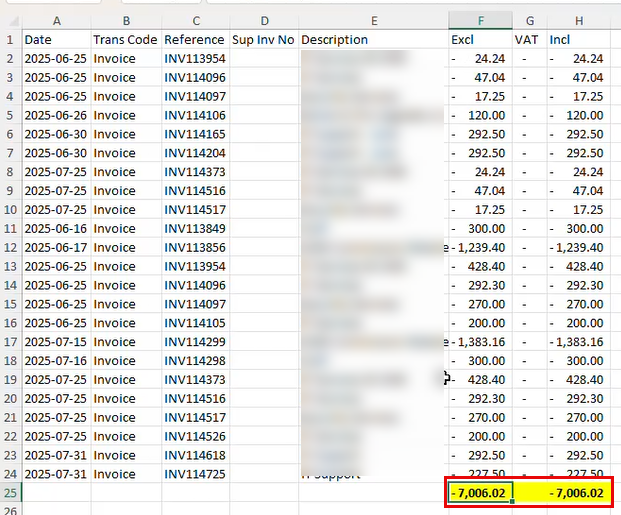
In the second tab consolidate the totals from both sections.
This summary is used to present IRD with the total value of transactions where GST was not applied.
Submission
Once you have completed the above steps to get the information needed you will now need the below two screens to complete the submission
- Consolidated Totals for IRD Reporting (GST-Exempt Transactions) and
- GST Summary Report
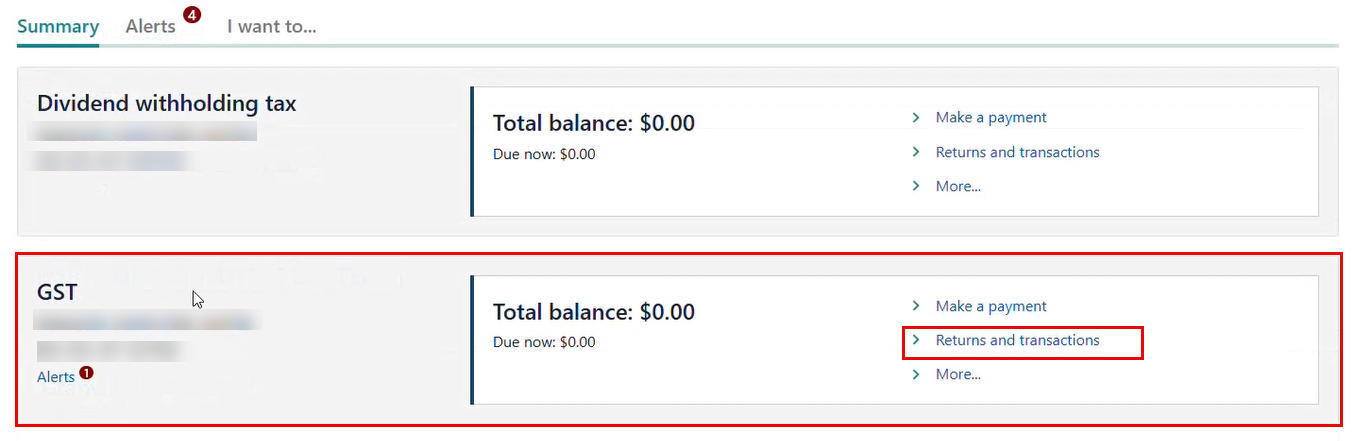
Login to IRD
- GST
- Returns and Transactions
Open the File return due
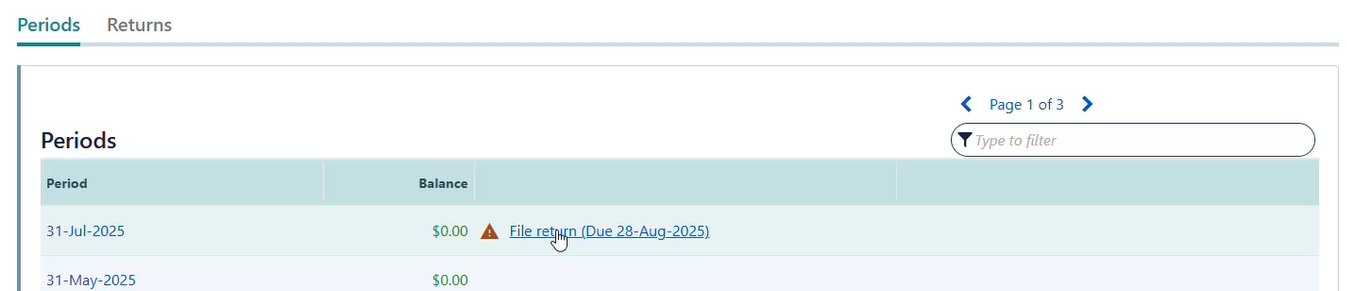
Filing Options
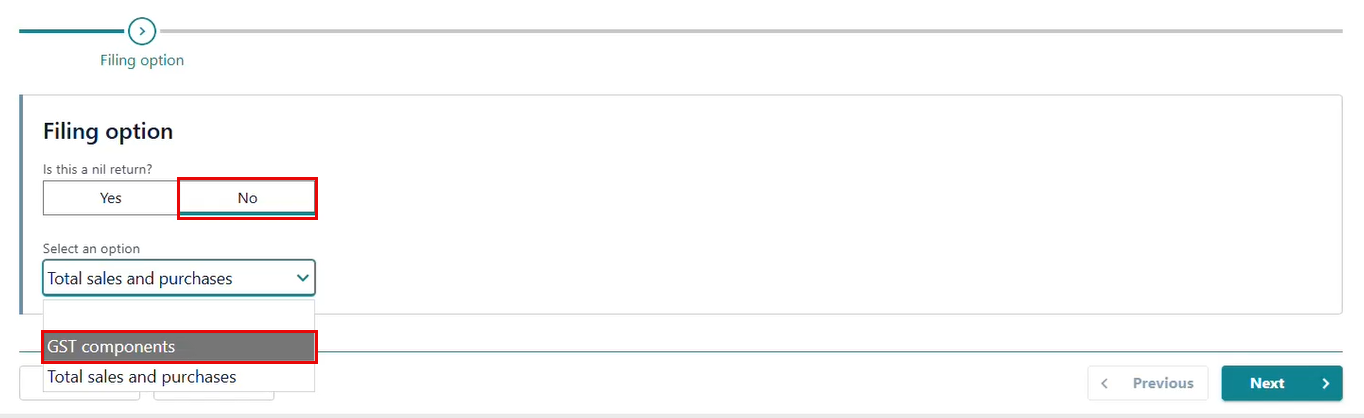
Always select "No," as GST submissions are made on behalf of a registered company.
Ensure "GST Components" is selected to guarantee the submission is calculated precisely to the cent.
Click "Next" to proceed.
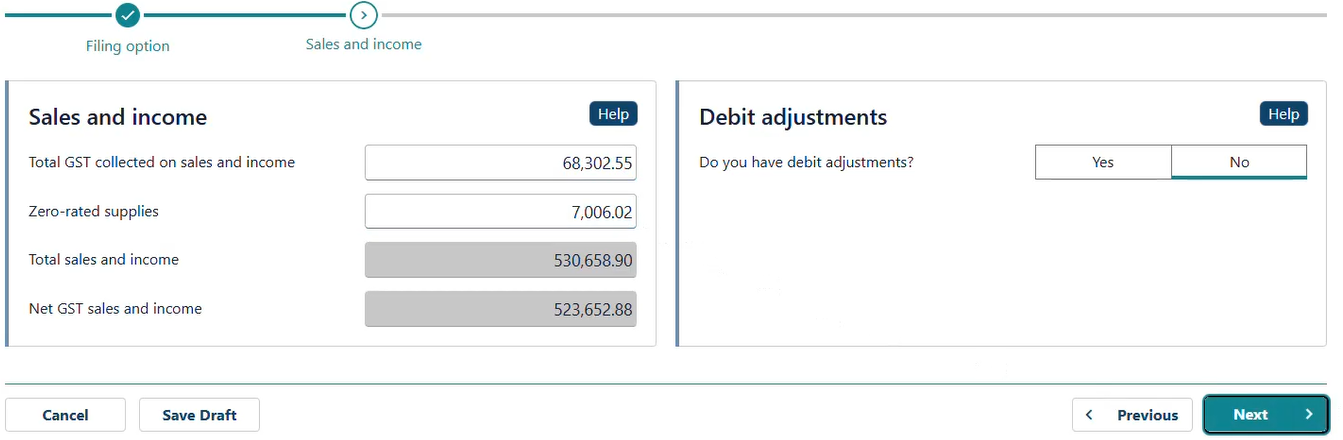
Sales and Income
Complete the following fileds:
- Total GST Collected on sales and income
- Zero Rated Supplies
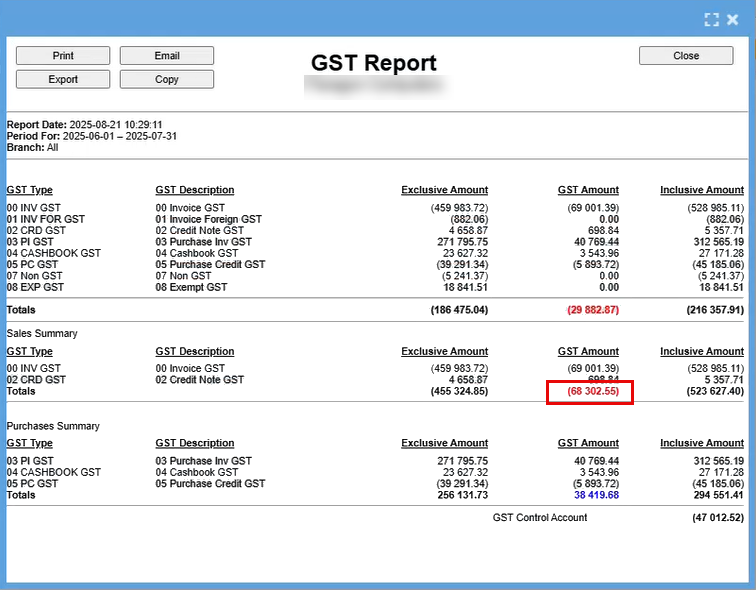
Total GST Collected on sales and income - this will be found on the GST Summary Report as shows below
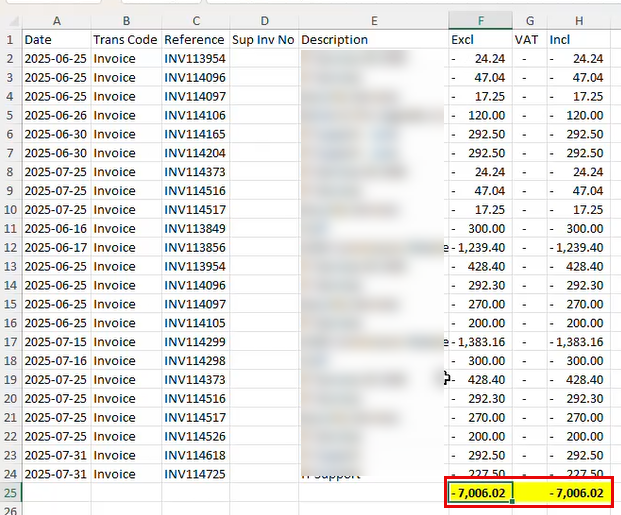
Zero Rated Supplies will be what you calculated in your Consolidated Totals for IRD Reporting (GST-Exempt Transactions) as shown below:
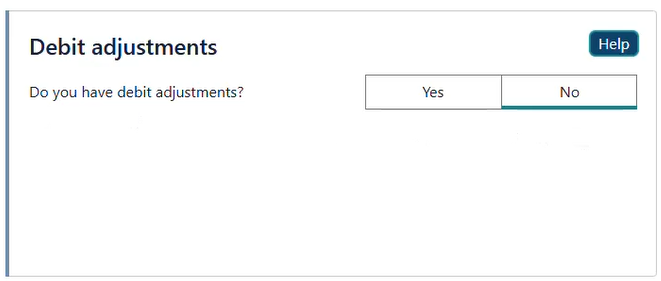
The "Debt Adjustment" section applies only if you're claiming GST back from the IRD based on the scenarios listed below.
If there's nothing to claim, simply select "No."
Click "Next" to continue.

Purchase and Expenses
Here the IRD whats to know what purchased you made and what GST you paid on these purchases.
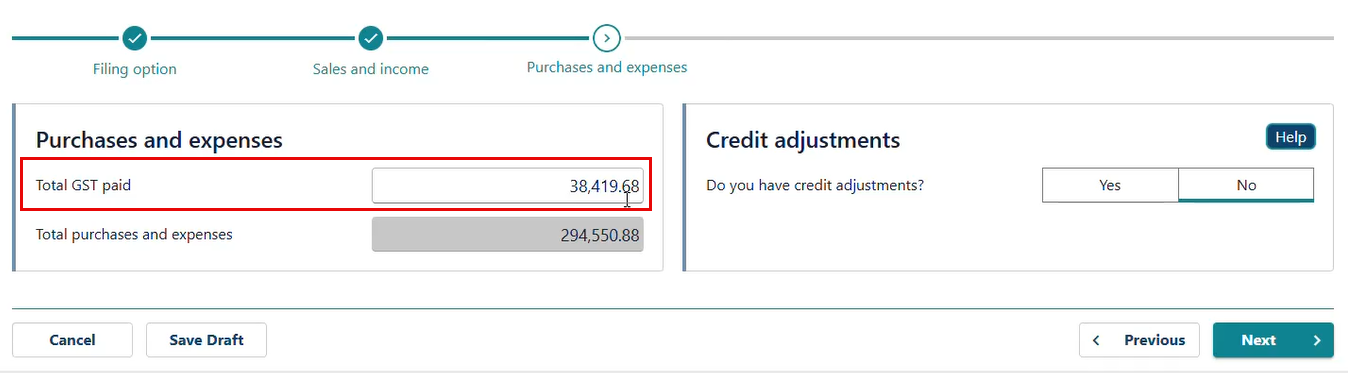
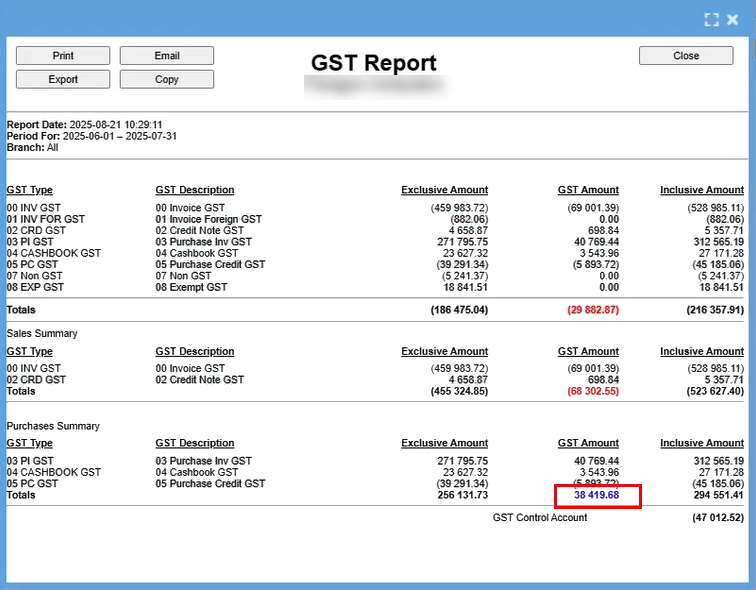
This figure you will again find in your "GST Report"
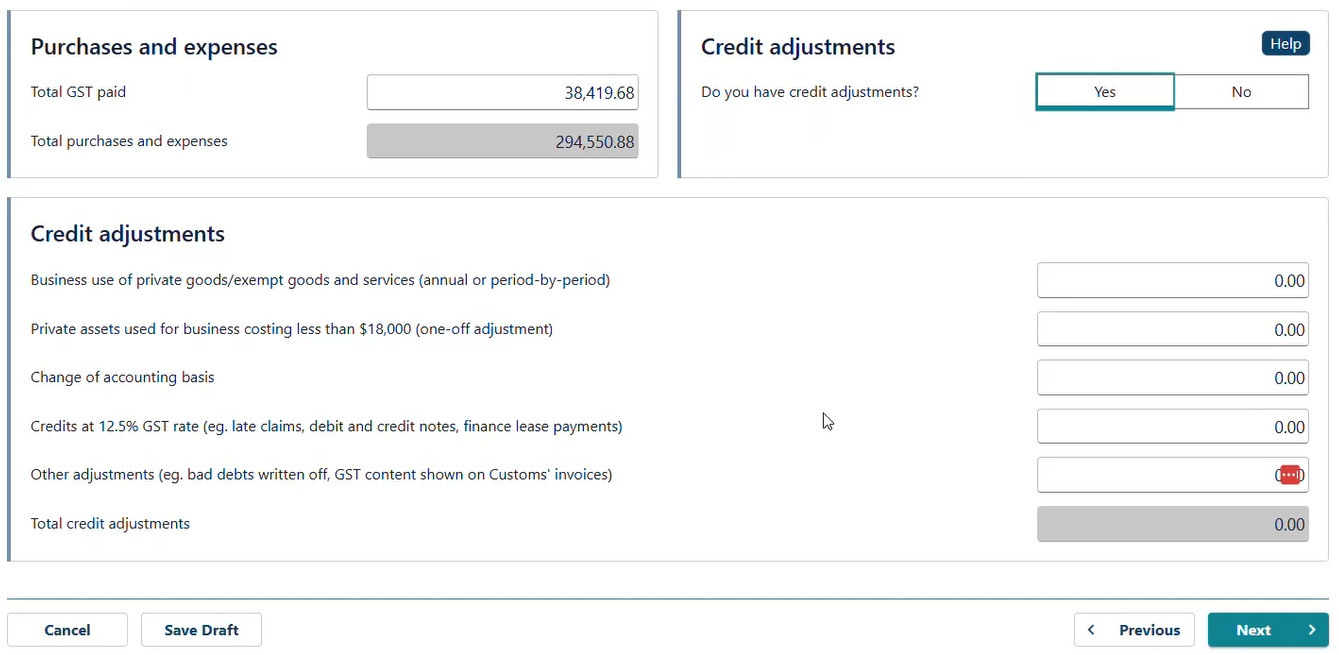
Credit Adjustments
Credit adjustments will apply

Use the "Debt Adjustment" section only when you're claiming GST credits from the IRD under the applicable scenarios listed below.
If no credit applies, select "No."
Click "Next" to proceed.
Provisional Tax Payments Calculation
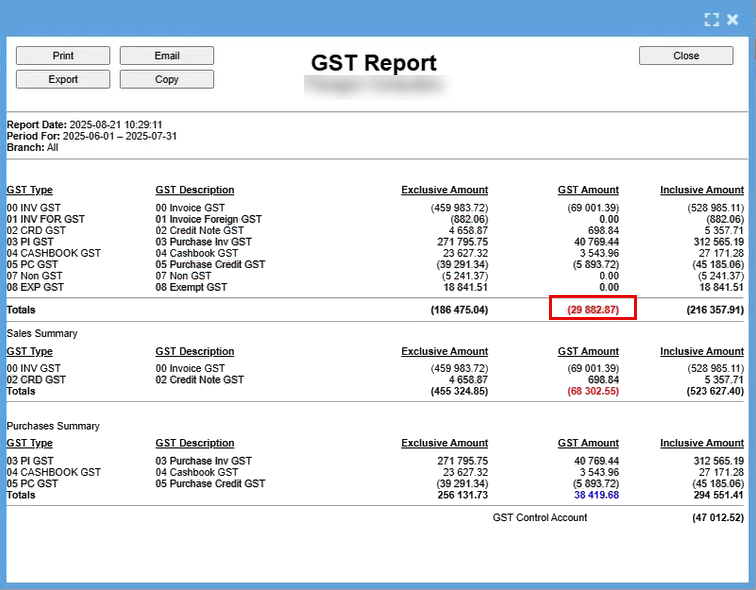
Your GST to pay should match that of your "GST Report" as shown below
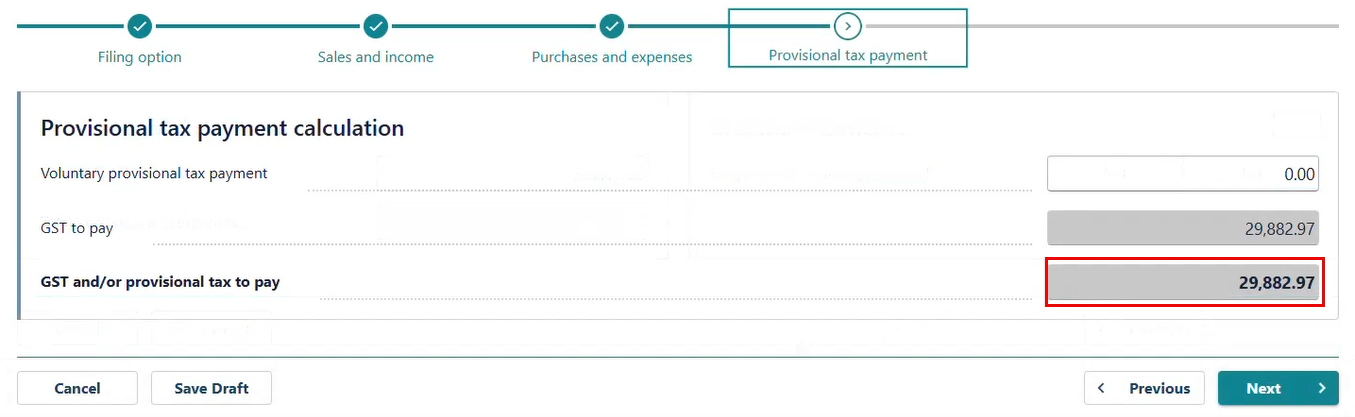
This should be accurate. If the figures don’t reconcile, you’ll need to backtrack through the entries to identify where the discrepancy occurred.
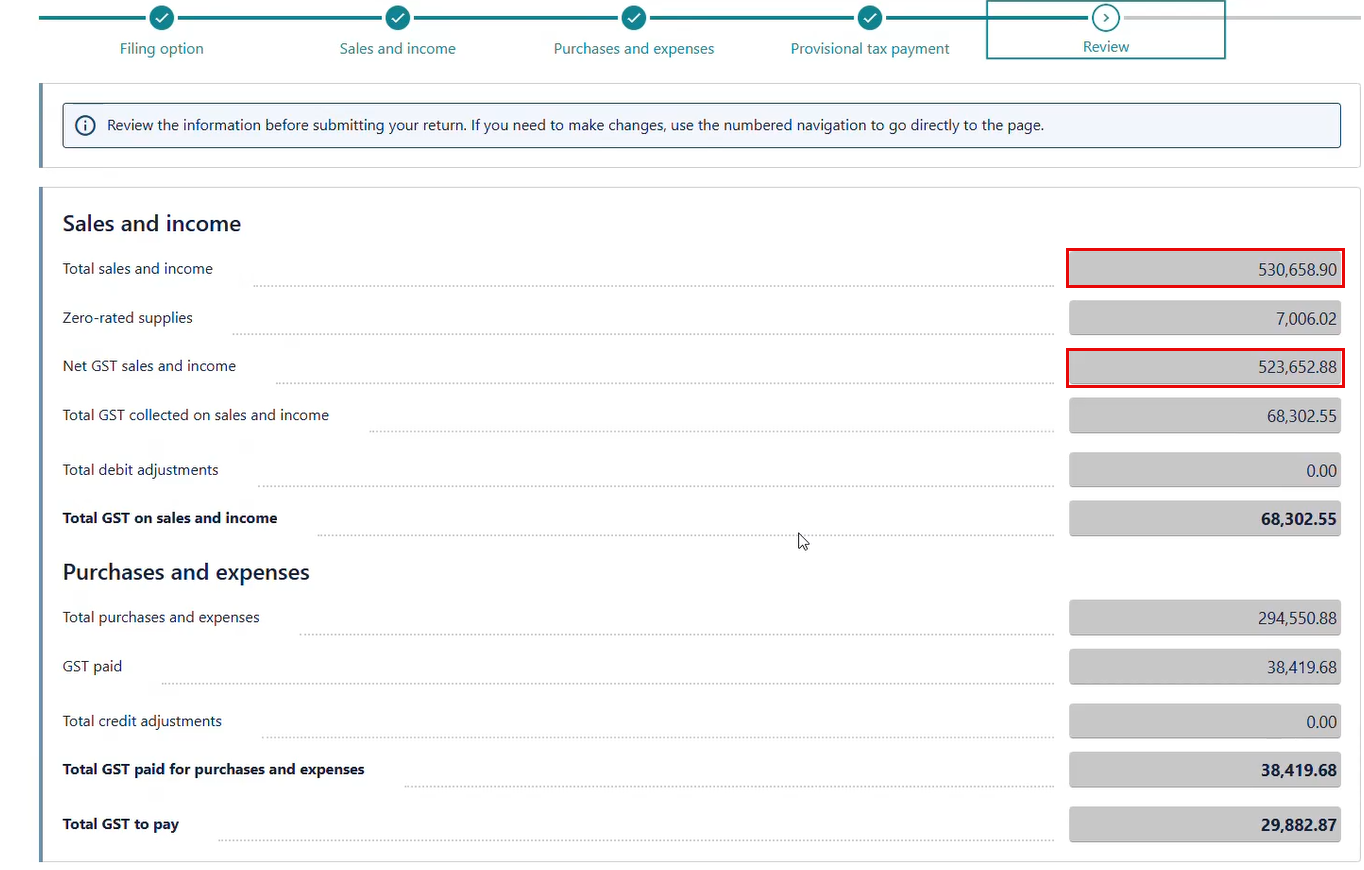
Review
During the review, you may notice slight discrepancies between figures such as Total Sales and Income, and Net GST Sales and Income, compared to your GST Report.
This is why it's important to select the "GST Components" option at the outset—it ensures greater accuracy and alignment with your official report.
The final GST payable amount will match the report exactly
Once you've completed your review and are satisfied with the GST return, tick the Declaration box to confirm that the information provided is true and correct.
Then, click ‘Next’ to proceed.
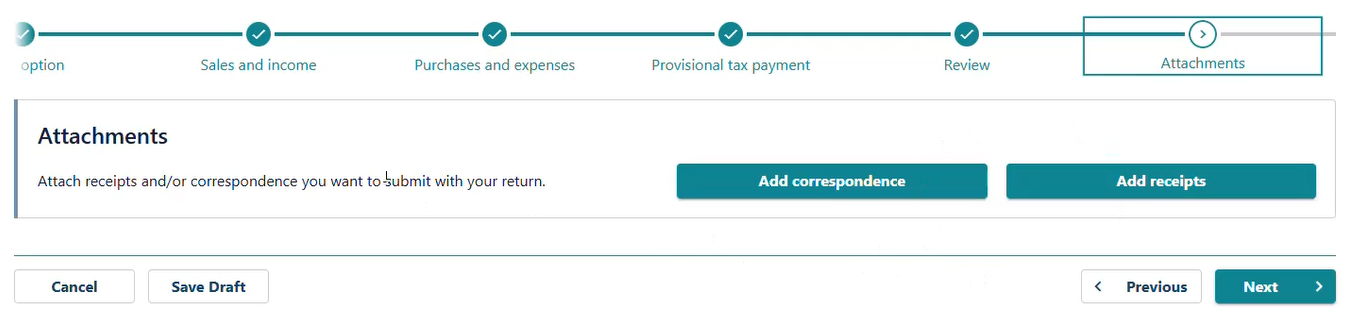
Attachments
If you have any big claims or adjustments, you can now attach any supporting documentation.
Then, click ‘Next’ to proceed.
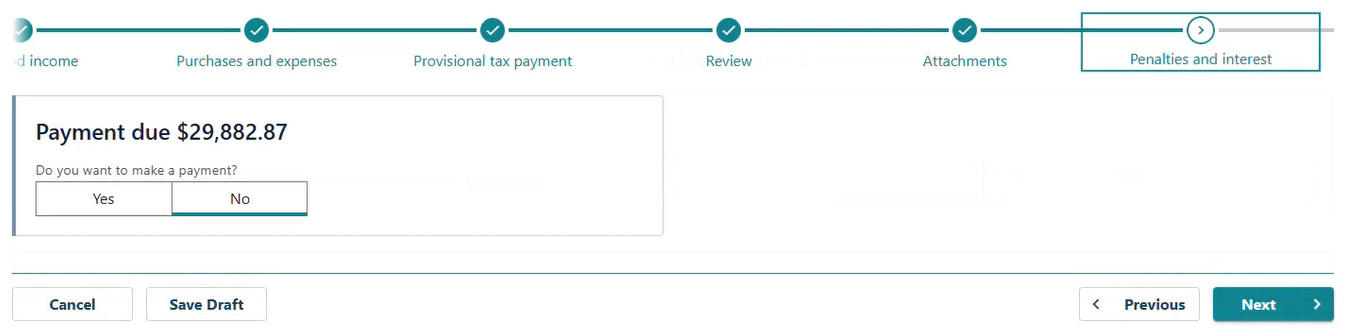
Payment
At this step, you can choose to make the payment immediately. If you prefer to pay on the due date, simply select “No.” and click ‘Next’ to proceed.
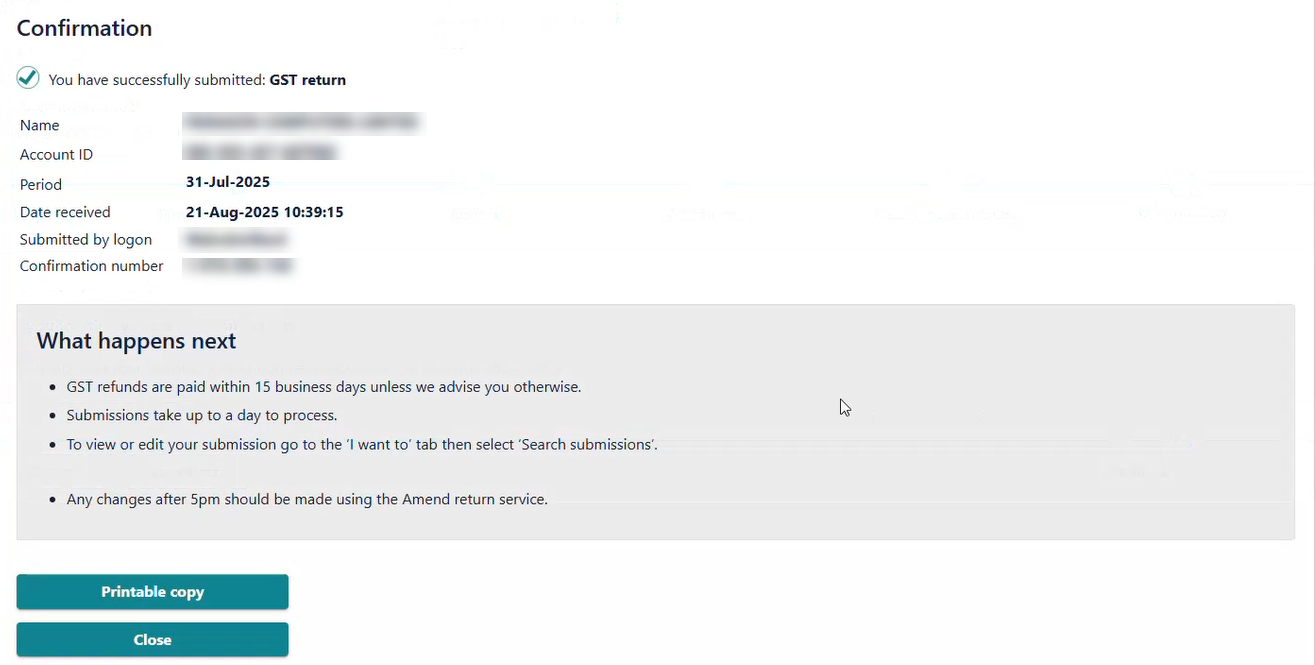
Confirmation
By clicking Submit you are finalize this submission.
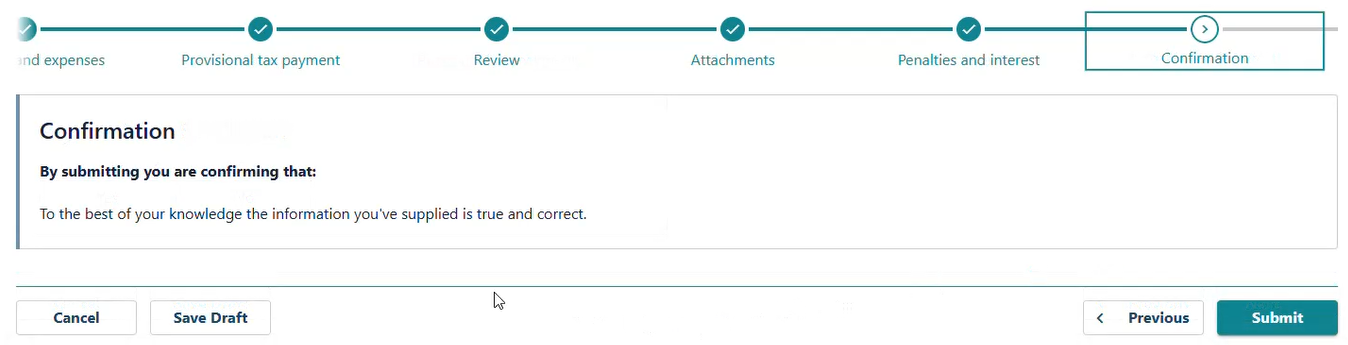
From here you can save a printable copy for your records which you can save along with your earlier reports and spreadsheet.