# BDM Activity
# Customer Dashboard Menu
# Customer Dashboard
**Debtors Module> Activity> Customer Dashboard**
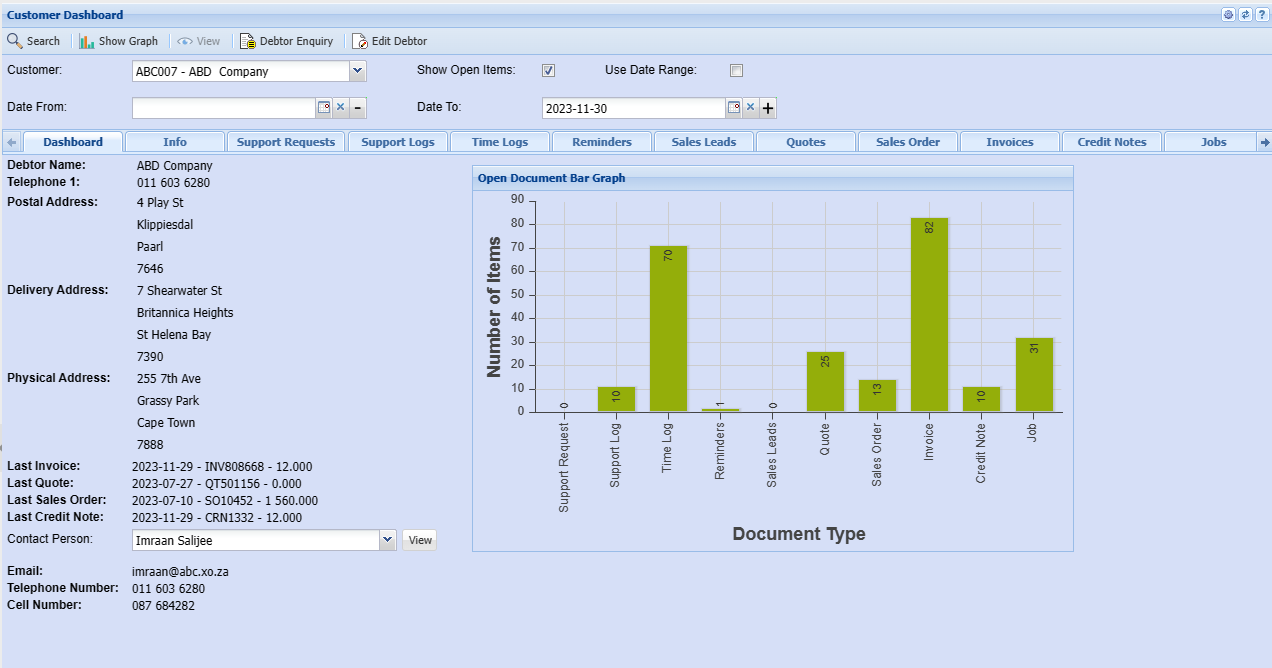
Customer dashboard is like your personal control center for all things related to your customers. It's a webpage or screen that brings together important info and key stats about your interactions with customers.
Customer dashboards give you an overview of a clients activities and transactions
You can only select one client at a time
If you do not select a debtor/ customer you will receive an error
[](https://hugeerp10.co.za/hsofmanual/uploads/images/gallery/2023-11/b1jimage.png)
| **Show Graph** | Shows a graph with a summary of client's activities |
| **Debtor/ Customer Enquiry** | The customer inquiry window allows you to view the customer at a quick glance Information on invoices in payments.
Debtor enquiry allows you to view all transactions against the client
|
| **Edit Debtor/ Customer** | This button will take you back to customer setup screen to edit debtor/customer details
For a detailed manual on how to edit debtor/ customer click [here ](https://hugeerp10.co.za/hsofmanual/books/adm-configuration/page/add-debtor)
|
| **Customer** | Select a debtor/ customer you want to view the dashboard for |
| **Show Open Items** | Include items that are not yet completed to the dashboard |
| **Use Date Range** | You can also view by date range |
| **Date From / Date To** | Choose the date range for which you want to view the report from
Select a date range of when you want to see the report to |
# Debtors Transactions Menu
# Debtors Journal Transactions Import
#### Print / Import function
This function allows you to print existing debtor/customer journal transactions and import new journals to the system.
Import clone refers to loading an existing debtor from the system. All you need to do is make changes as per current journal.
**Debtors Module >Activity > Debtors Transactions > Print /Import**
.png)
Print option will take you to print the selected debtor's transaction.
.png)
Import takes you to the option of bringing in data from a saved csv file
.png)
See the process of importing a debtor/ customer journal transaction into the system:
1. Click Select
2. Upload
3. After, uploading the CSV file the import button will open allowing you to import the file into the system
4. Once, complete click close
Important CSV File notes and format tips:
- The file must be saved as a CSV
- Don't put commas in your file
- Fields for values mostly require codes of those fields
- The date format must be 2020/01/01 YYYY/MM/DD
- The column headings can be left in the import file.
See the file Layout for CSV file:
| 1
| AccountCode
| Required
|
| 2
| Date
| Required
|
| 3
| Reference
| Required
|
| 4
| Description
| Required
|
| 5
| Amount Inc Vat
| Required
|
| 6
| ExchangeRate
| Required (Default 1)
|
| 7
| Action
| Required
|
| 8
| TaxType
| Enter the applicable VAT type
|
| 9
| AutoAllocate
| 1/0
|
| 10
| CheckZero
| 1/0
|
| 11
| Division
| Enter the Division code (if applciable)
|
| 12
| Region
| enetyr the Region code (if applciable)
|
| 13
| GL Account
| Required
|
---
| **Action** | Select journal Action from the drop down list e.g debtor journal debit
Enter the action of the journal transaction
This governs how the transaction will update general ledger accounts
|
| **Date** | Enter the correct date of the journal |
| **Debtor/ Customer** | Select the customer who is affected by the journal transaction |
| **Currency** | Currency becomes available if the customer is a multi-currency
then select currency
|
| **Amount Inc VAT/GST** | The amount entered will include VAT/GST |
| **VAT/ GST Account** | Select the tax general ledger account |
| **Description** | Enter the amount and description
|
| **Additional Comment** | Aff more information regarding the journal |
| **Outstanding Balance** | Displays the total amount outstanding |
| **Reference** | Enter a reference for the journal transaction |
| **Exchange Rate** | When currency is selected, enter the exchange rate |
| **VAT/GST Type** | If the Tax account is selected enter the Tax type |
---
.png)
Click save and click on Next
Next takes you to another window where extra information can be added
.png)
Select a region, division, project or TrackIt item related to this journal entry
This field does not apply to every client
You can click Next again to go to the posting window
.png)
| **Region** | If you have Regions, this will add Regions to the report. |
| **Division** | If you have multiple Divisions, by selecting this will add this column to your report. |
| **Project** | Select the Project |
| **TrackIt** | Select the TrackIt asset affected |
---
#### Contra Journal
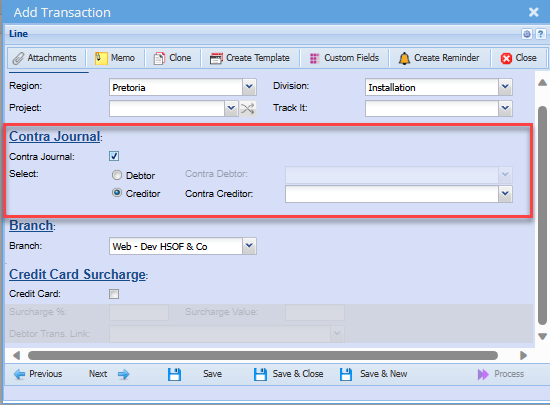
Contra journal is used to ensure accurate reconciliation of debtor/customer-related transactions
[](https://hugeerp10.co.za/hsofmanual/uploads/images/gallery/2023-12/fnBimage.png)
| **Contra Journal tick** | Put a tick on if you want an additional journal to be posted |
| **Debtor** | Used when you want to move values from one customer to another |
| **Creditor** | Used when you want to move values from one supplier to another |
---
#### Credit Card Surcharge
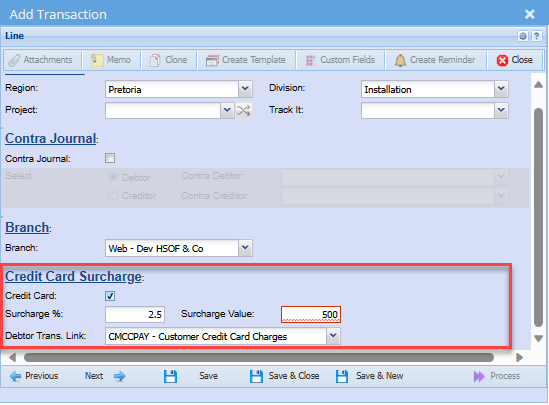
A credit card surcharge is an additional fee imposed by a merchant when a customer uses a credit card for a transaction
[](https://hugeerp10.co.za/hsofmanual/uploads/images/gallery/2023-12/ELCimage.png)
| **Credit Card** | Select if charging a credit card surcharge with the payment |
| **Surcharge %** | Populates from a setup with the percentage charged for credit card |
| **Debtor Transaction Link** | Shows the default debtor transaction |
| **Surcharge Value** | Displays the surcharge value |
---
#### GL Links
The default GL Accounts will populate this window, but you have a choice to change the other leg of the posting to go to any other desired GL account
.png)
Once satisfied with the posting entries click save and next
The process button will be activated to continue processing this transaction.
Or alternatively, save and close to process at a later stage.
---
#### Process in the search window
To post transactions in the system
select it either by highlighting it or adding a tick in the tick box
.png)
---
#### Custom Fields
[](https://hugeerp10.co.za/hsofmanual/uploads/images/gallery/2024-10/MKpimage.png)
[](https://hugeerp10.co.za/hsofmanual/uploads/images/gallery/2024-10/IcEimage.png)
# Transaction Procedure - Gains/Losses
**Debtors/ Customer Module> Activity> Debtors/ Customer Transactions **
Things to note about the Journal entries for foreign debtors
- The journal entry in the foreign currency – creates a dual entry in that currency and in Rand
- Ensure you are using the correct exchange rate
- Ideally, capture gains and losses immediately after capturing the payment
#### Scenario 1
We sold goods to an American US-dollar company
When the initial sale was made the amount of the invoice was R2800 at an exchange rate of 14 = 200 dollars
When the invoice is paid
The exchange rate was 14.5 which is still 200 dollars but at R2900
The difference will need to be journalized in the debtor’s transactions
.png)
From these entries, we can note that the dollar amount will clear
However, there will be a gain in the rand account whereby an extra hundred rand is gained due to the differing exchange rate at the time of the transaction
Since this is a credit balance, we will add a debit journal to clear it out into the Gains GL Account
[Click here](https://hugeerp10.co.za/hsofmanual/books/bdm-activity/page/add-debtors-journal-transaction "Add/Edit") to add a new journal
# Debtors Gains/ Loss Journal
This journal is typically used in foreign currency transactions when there is a difference between the foreign currency balance and the Rand balance.
Following from the Procedure Gains/ loss manual, a journal is necessary to clear the R 100 balance (gain)
[Transaction Procedure Gains/loss](https://hugeerp10.co.za/hsofmanual/books/bdm-activity/page/transaction-procedure-gainslosses "Transaction Procedure - Gains/Losses")
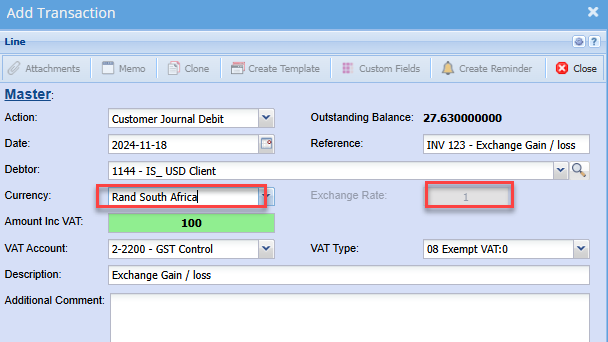
to Create the journal the steps are the same as adding a debtors' journal transaction. with the only exception being that you will change the currency on the journal to Rand
When a journal for a foreign debtor is created in Rands, then no corresponding foreign amount is created. Thus, the journal only processes in the Rand currency.
Add a debtor journal as normal,
You will note by default, once the foreign debtor is selected, the currency populates in the respective foreign currency
[](https://hugeerp10.co.za/hsofmanual/uploads/images/gallery/2024-11/xBmimage.png)
click the drop down and select Rands as the currency.
note the exchange rate field is now disabled
[](https://hugeerp10.co.za/hsofmanual/uploads/images/gallery/2024-11/eN4image.png)
Ensure all remaining details, are entered
Click next as normal to process the journal
Edit and select the necessary contra GL account
Then click process
[](https://hugeerp10.co.za/hsofmanual/uploads/images/gallery/2024-11/Sxyimage.png)
# Move a payment to another customer
**Debtors Module> Analysis> Debtor Analysis**
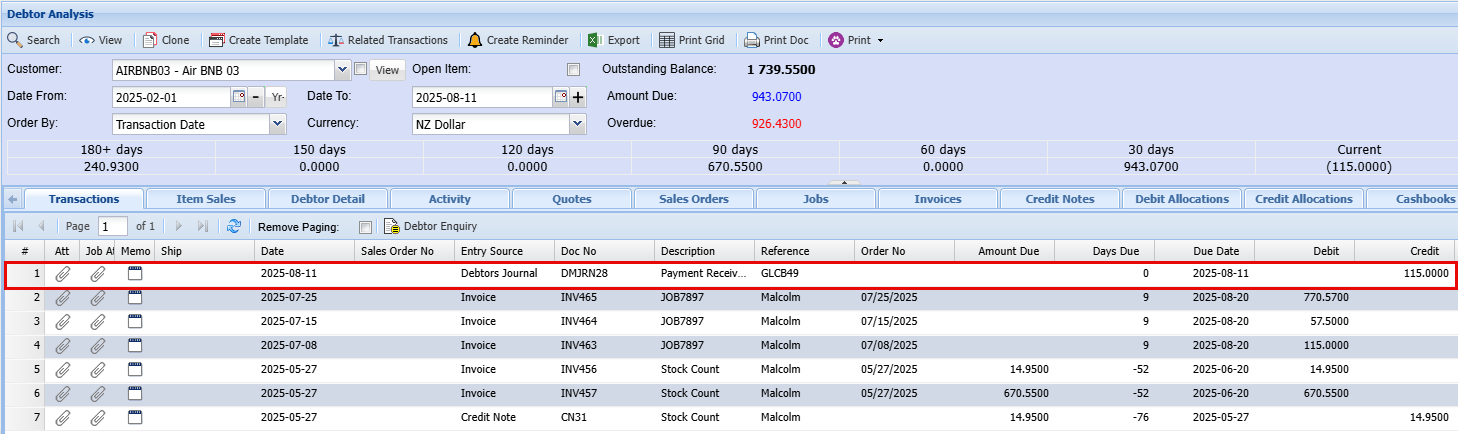
Move a payment to another customer when payment was incorrectly processed to the wrong customer account.
They currently show an outstanding balance of $115 but have confirmed payment.
[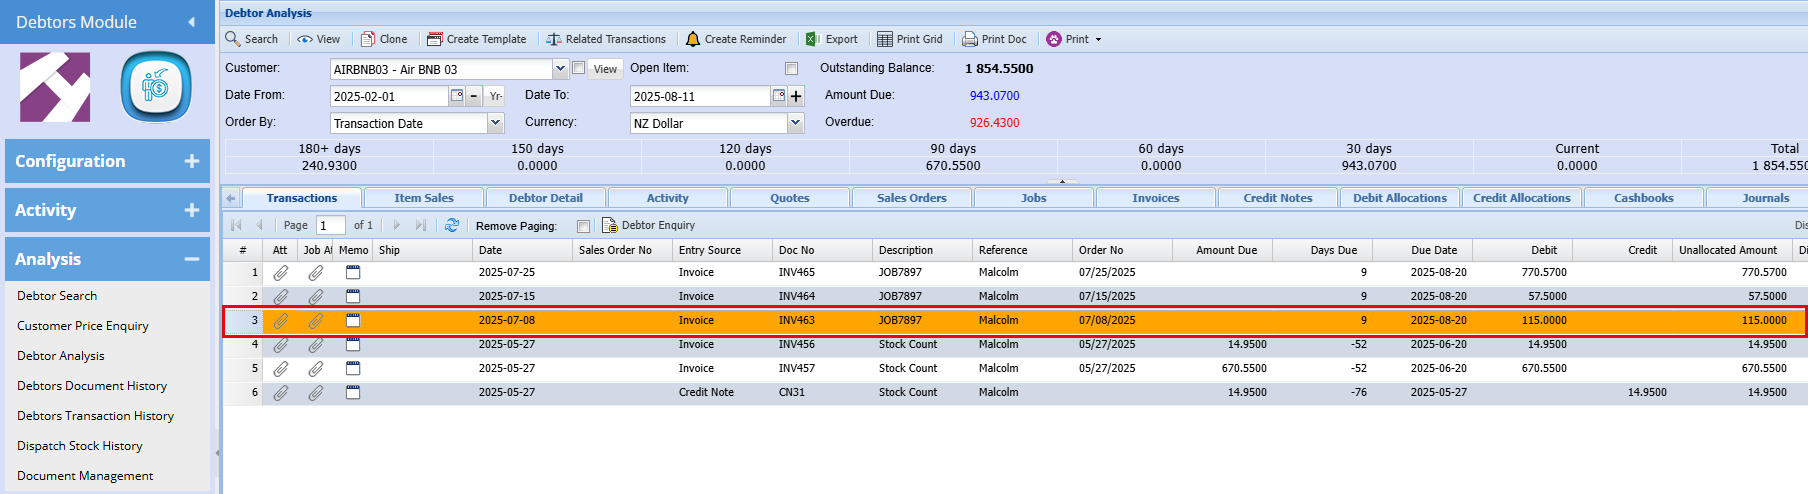](https://hugeerp10.co.za/hsofmanual/uploads/images/gallery/2025-08/image.png)
A payment was mistakenly applied to the wrong customer account. Upon review of the cashbook, you find the funds were incorrectly allocated to **AIR BMB 01** instead of **AIR BMB 03**.
[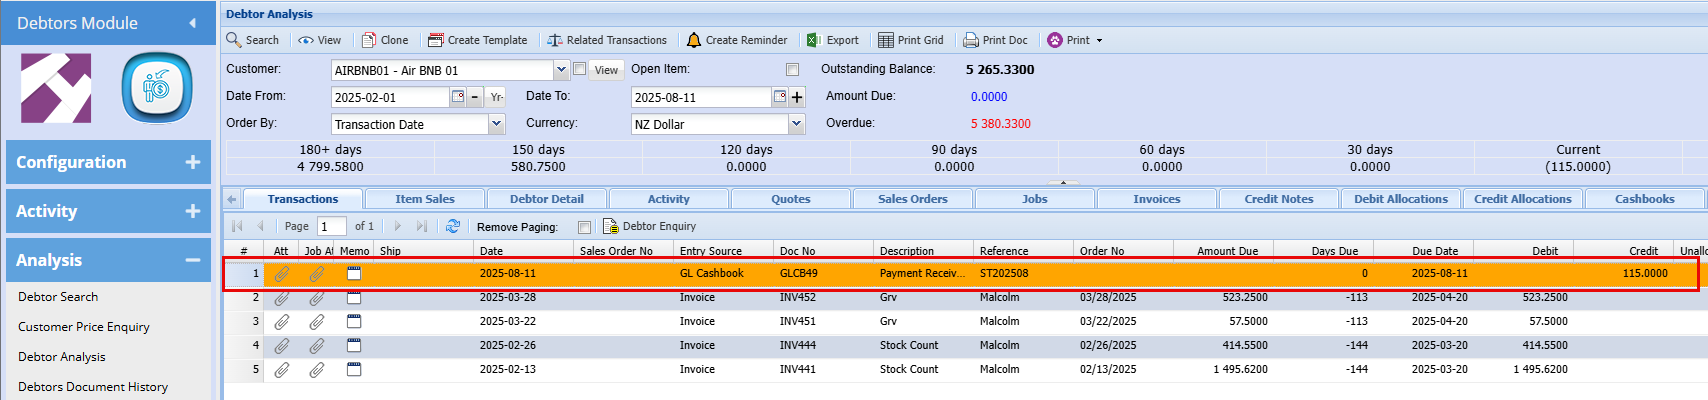](https://hugeerp10.co.za/hsofmanual/uploads/images/gallery/2025-08/fgsimage.png)
To resolve this, we need to adjust the incorrect account which in this case is **AIR BMB 01**. When determining whether to apply a debit or credit, simply perform the opposite of what currently appears in the account.
In this case, as shown below the $115 is in the **Credit** column and you’ll therefore need to process a **Debit** to AIR BMB 01 to reverse the misallocation.
[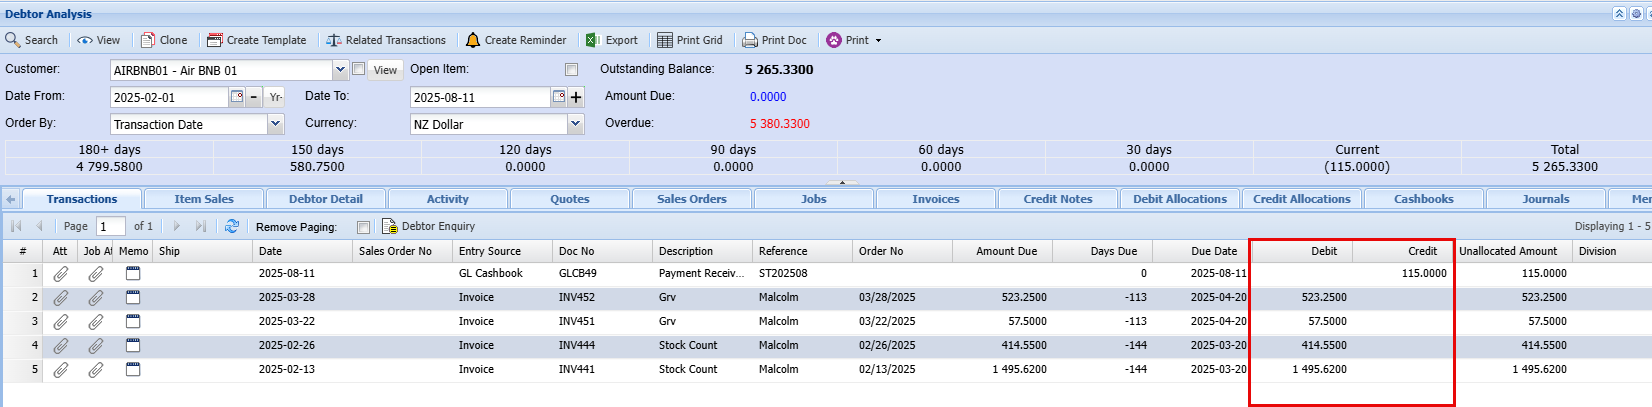](https://hugeerp10.co.za/hsofmanual/uploads/images/gallery/2025-08/8yeimage.png)
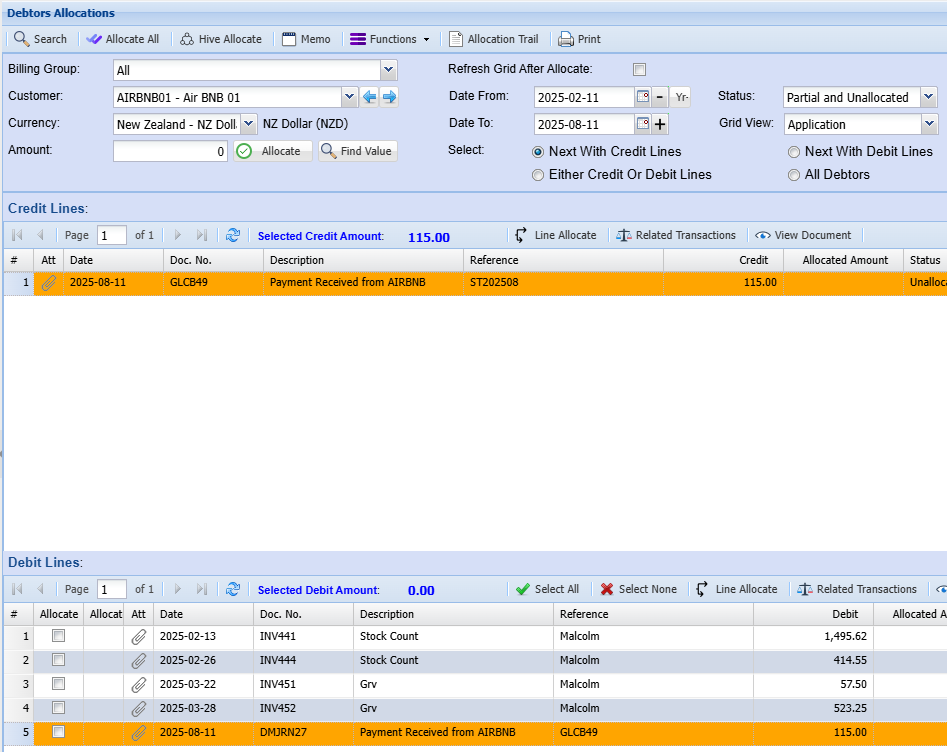
If you're working within the **Allocations** screen, the same principle applies:
When the amount appears in the **Credit** lines, you’ll need to process a **Debit** to correct it
[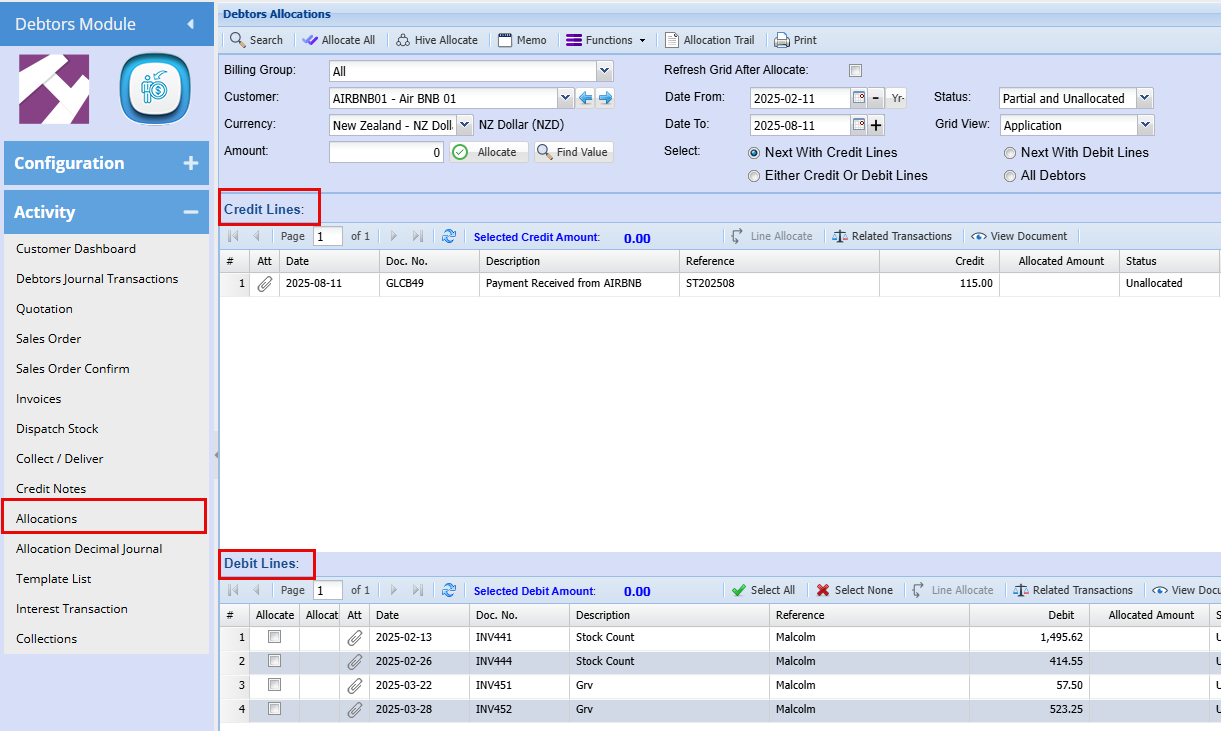](https://hugeerp10.co.za/hsofmanual/uploads/images/gallery/2025-08/VTKimage.png)
We now need to process a **Debtors Journal Transaction** to counter this error
##### **Creating a Debtors Journal Debit**
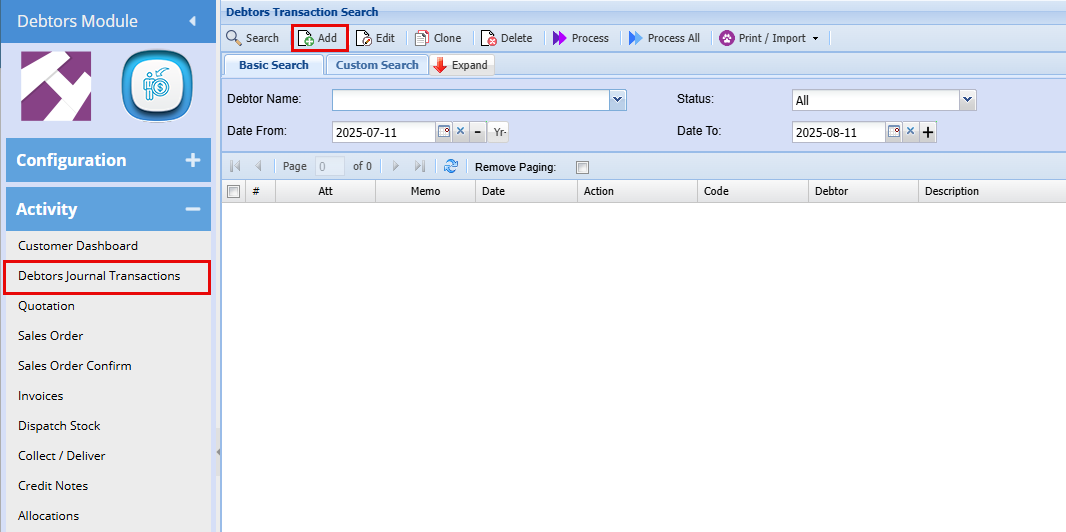
**Debtors Module> Activity> Debtors Journal Transaction**
[](https://hugeerp10.co.za/hsofmanual/uploads/images/gallery/2025-08/IiMimage.png)
Click **“Add”** to begin a new transaction.
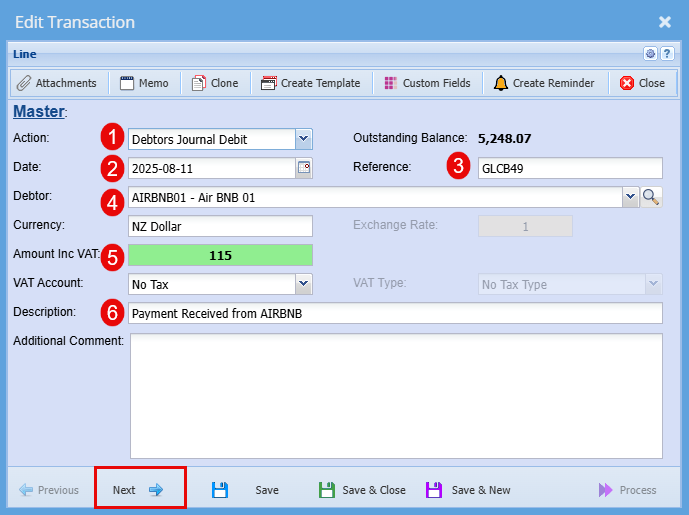
Complete the required fields, then click **“Next.**
[](https://hugeerp10.co.za/hsofmanual/uploads/images/gallery/2025-08/bRgimage.png)
| Action | Select Debtors Journal **Debit** |
| Date | Ideally, use the same date the payment was received to ensure accurate reconciliation
|
| Reference | Use a reference that links directly to the transaction you're correcting—such as the original document number.
|
| Debtor | Select the name of the debtor associated with the correction. |
| Amount | Enter the exact amount being corrected, inclusive of GST if applicable. |
| Description | For consistency, use the same description that appeared on the original payment (e.g., “Payment Received from AIRBNB”). |
##### **Applying a Payment via Contra Journal**
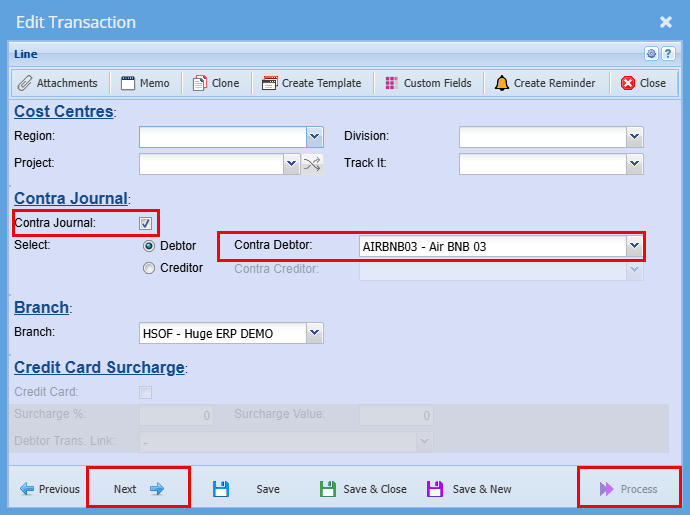
1. **Tick the “Contra Journal” checkbox** to indicate this is a contra entry.
2. **Select the appropriate debtor** from the “Contra Debtor” dropdown, this is the account the payment will be applied to.
3. Once all relevant fields are completed, click **“Next"** this will open the Process button.
4. Click **“Process”** to apply the journal entry and update the debtor’s account accordingly.
[](https://hugeerp10.co.za/hsofmanual/uploads/images/gallery/2025-09/lKmimage.png)
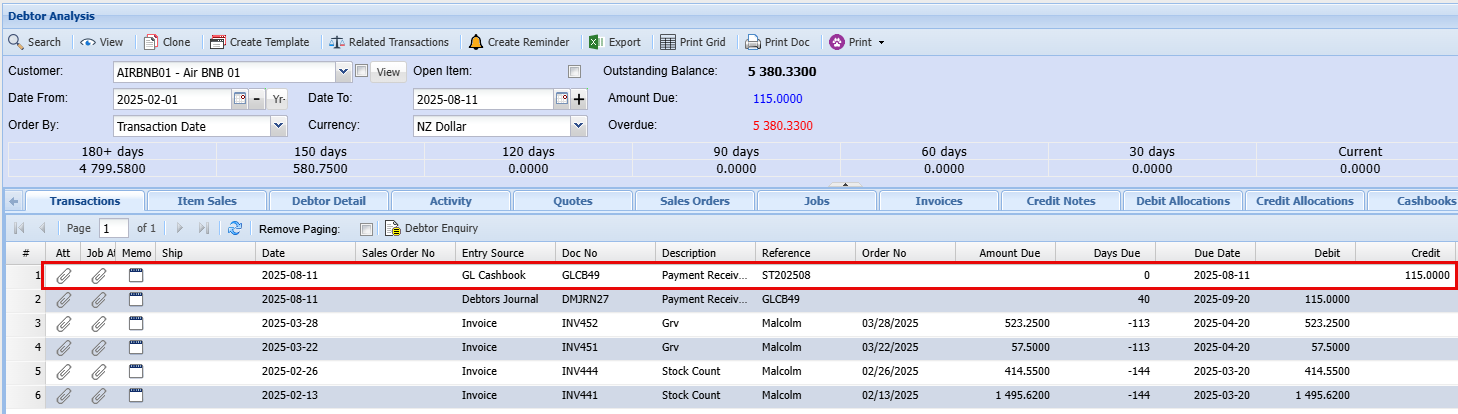
If you have a look at each of the customers now you will see the correction.
[](https://hugeerp10.co.za/hsofmanual/uploads/images/gallery/2025-08/7Qgimage.png)
[](https://hugeerp10.co.za/hsofmanual/uploads/images/gallery/2025-08/scsimage.png)
To finalize the process correctly, you’ll need to complete allocations on **both debtor accounts**. This ensures that all transactions are accurately reconciled, and the accounts reflect the intended balances
##### **Allocations**
**Debtors Module> Activity> Allocations**
[](https://hugeerp10.co.za/hsofmanual/uploads/images/gallery/2025-08/qpzimage.png)
****
- **Locate matching entries** in both the **Credit** and **Debit** sections.
Focus on transactions with the same **amount**, **date**, and **reference**—such as a payment received and its corresponding invoice or debit note.
1. **Select the matching lines** by highlighting the relevant transaction in the **Credit** section and ticking the checkbox beside the corresponding entry in the **Debit** section.
2. Once both lines are selected, click **Allocate** to process the transaction.
This action reconciles the payment against the appropriate debit entry, ensuring accurate account alignment.
# Debtor Cash Book Menu
# Debtor Cash Book Search
Video Training Manual 2016 - [Click Here](https://vimeo.com/357004905)
This allows a user to prepare a debtor’s financial records.
#### Debtor/Customer Cash Book Basic Search
You can search by the following:
- Cash Book Name
- Cash book Date
- GL Bank Accounts
- Cash Bool Status
- Cash Book Type
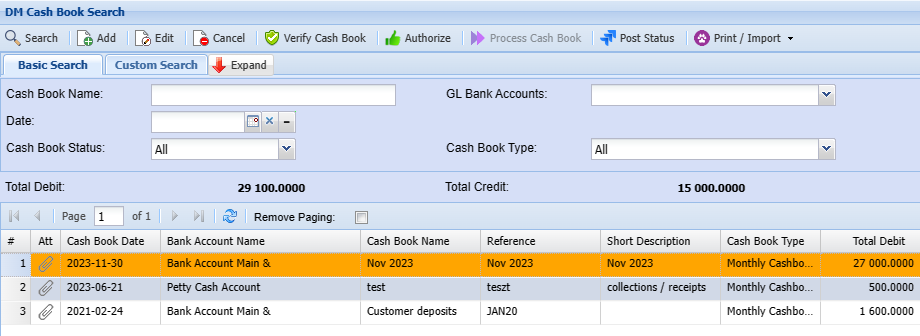
Debtors Cashbook is where we capture Debtors'/ Customer's payment entries
**Debtors Module> Activity> Debtors Cash Book**
[](https://hugeerp10.co.za/hsofmanual/uploads/images/gallery/2024-04/h5Wimage.png)
| **Search** | Search for an already created cashbook |
| **Add** | Add a new cashbook |
| **Edit** | Edit existing Lines function |
| **Cancel** | cancel a cashbook |
| **Verify Cashbook** | Verify the cashbook lines before posting |
| **Authorize** | Authorize the cashbook before processing this activates the process button |
| **Process Cashbook** | Post to the ledger account |
| **Post Status** | Check the posted status |
| **Print/Import** | Print the cashbook grid or import data from Excel |
---
#### Post Status Button
.png)
Allows a user to check if the cashbook has been posted or not
| **Search** | Search for posted cashbook |
| **Reset Item** | Reset the item |
| **Reset All Qued** | Reset all qued items at once |
| **Remove Item** | Remove item from the list |
| **Remove completed item** | Remove the completed items from the list |
| **View** | View the transaction |
| **View button** | Allows a user to view the cashbook |
| **Print button** | Allows a user to print the cashbook |
---
#### Print / Import Button
.png)
Print
Print cashbook
.png)
Order: allows you to order it by date, account, account date, description, and reference
Upload Cashbook
.png)
Import Cashbook
Once the cashbook has been uploaded it will be found under the import list
.png)
Select cashbook
Verify the cashbook for any errors
click on import
(refer to the import menu for the cashbook import format file)
# Add Debtors Cashbook
#### Adding a Cash Book
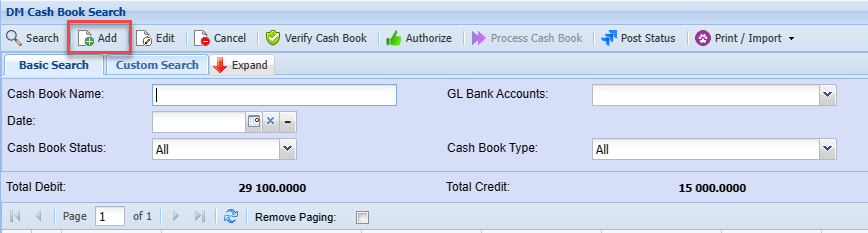
**Go to Debtors Module> Activity> Debtor Cash Book**
Click Add to create a new debtor Cash Book
[](https://hugeerp10.co.za/hsofmanual/uploads/images/gallery/2024-04/JNwimage.png)
Once complete, capture the details below:
[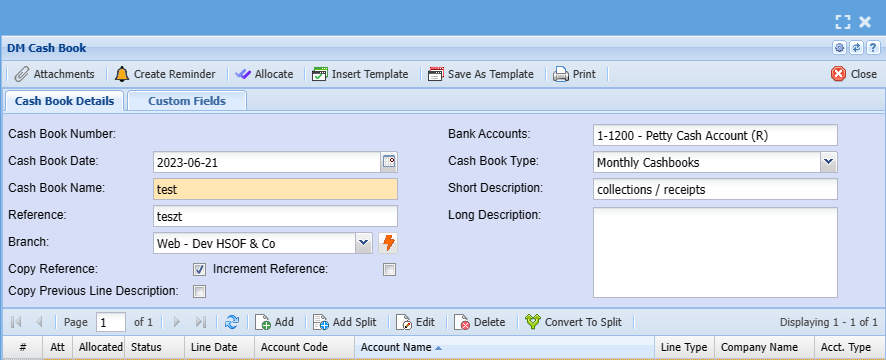](https://hugeerp10.co.za/hsofmanual/uploads/images/gallery/2024-04/FHDimage.png)
| **Cashbook Number** | This is the Number that is Generated in the system when a Cashbook is saved. |
| **Cash book Date** | The System defaults to today’s date the user can adjust the date of the cashbook. |
| **Bank Accounts** | This is a list of company bank accounts for transactions. |
| **Cash Book Name** | This will be the way the Cashbook is identified in the company books |
| **Cashbook Type** | This will be either Daily Cashbook or Weekly or Monthly. |
| **Reference** | This will be the reference for this cashbook. |
| **Short Description** | The Given Short Description for the Cashbook. |
| **Long Description** | The Long Description for the Cashbook. |
| **Increment Reference** | It Increases the number by one example if the user Reference is CB 1 and the tick is added on the ‘increment reference’, when you add a new line, it will add one to the number. |
| **Copy Reference** | It Copies the reference. |
---
#### Add Cashbook Items
To add cash book items, you need to click on the middle Add below
[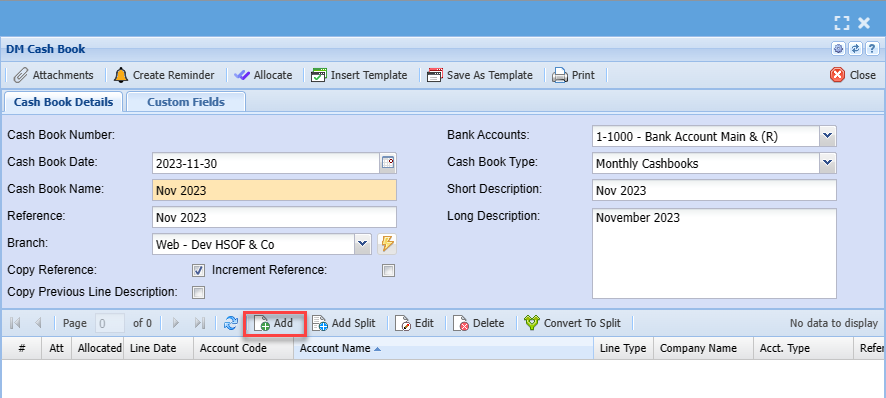](https://hugeerp10.co.za/hsofmanual/uploads/images/gallery/2023-12/KJmimage.png)
After clicking on the middle add you will see the screen below:
[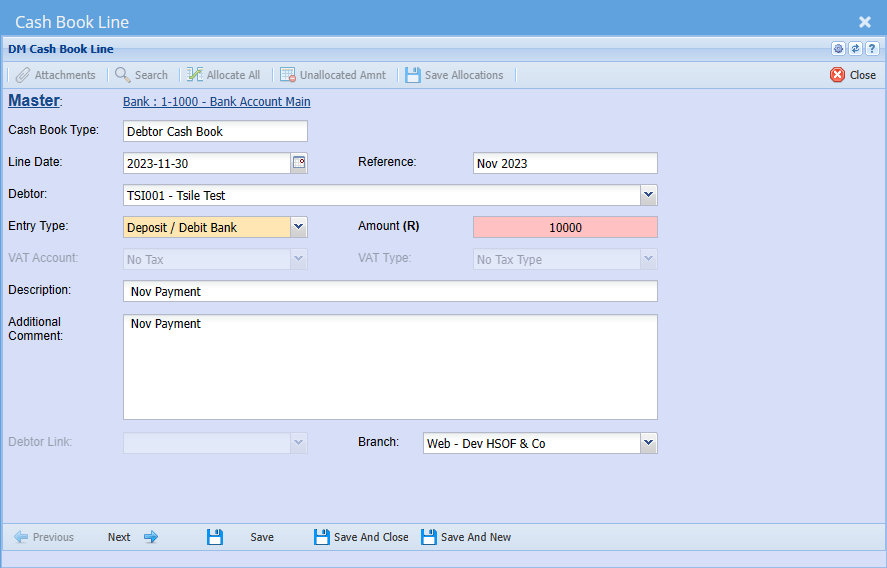](https://hugeerp10.co.za/hsofmanual/uploads/images/gallery/2023-12/wU0image.png)
| **Cash Book Type** | Cash book type should be debtor/ customer cash book |
| **Line Date** | Add a date the payment was received |
| **Reference** | Add appropriate reference |
| **Debtor/ Customer** | Enter debtor name |
| **Entry Type** | Select entry type on the dropdown menu |
| **Amount** | Enter the amount reflecting on the payment |
| **VAT/ GST Account** | Select VAT/GST Account on the drop-down menu |
| **VAT/ GST Type** | Select VAT/GST type on the drop-down menu |
| **Description** | Add description for cash book |
| **Additional Comment** | Add additional comment if any |
| **Debtor Link** | This is used to link an expense to an existing customer to track what a customer may be costing the company. Eg: taking a customer to lunch |
| **Branch** | The default branch will show, they you want to change the branch then select the right on the drop-down menu |
once all information has been captured, click Next
[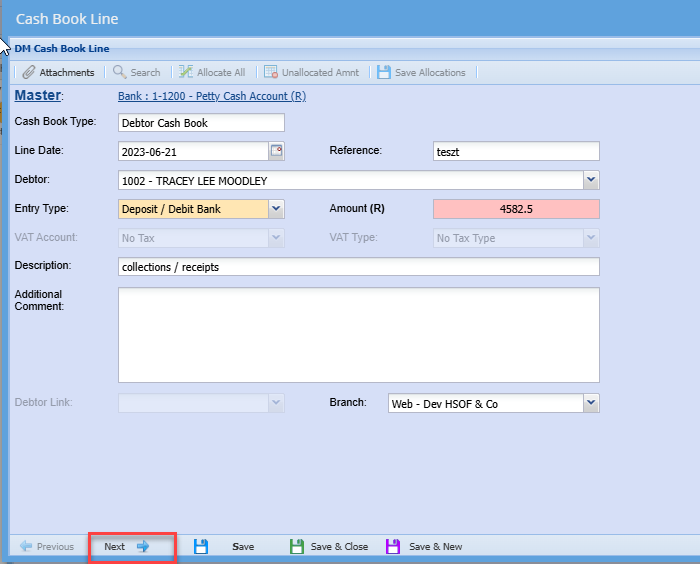](https://hugeerp10.co.za/hsofmanual/uploads/images/gallery/2024-11/FaNimage.png)
This screen caters for allocation to Division, Region, etc.
You can also enter the settlement discount amount on this screen
to enter a settlement discount, click the discount box
this will enable the fields for you to select the action and amount
Enter the amount
Select Journal action: Debtors / Customer Discount
[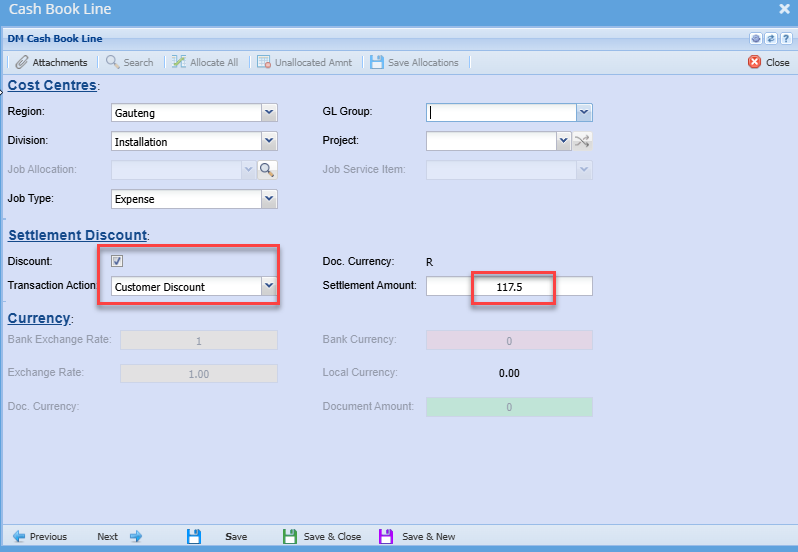](https://hugeerp10.co.za/hsofmanual/uploads/images/gallery/2024-11/xH4image.png)
Once the cashbook is processed a debtor journal transaction will also be created automatically for the settlement discount portion.
Youi can click next to allocate the payment amount to the specific invoice
Note: if settlement discount amount is applied, once the cashbook has been processed you will need to do the allocation for the discount portion separately on debtors Allocation
Save and Close to capture the next entry or
Click Save and Close
[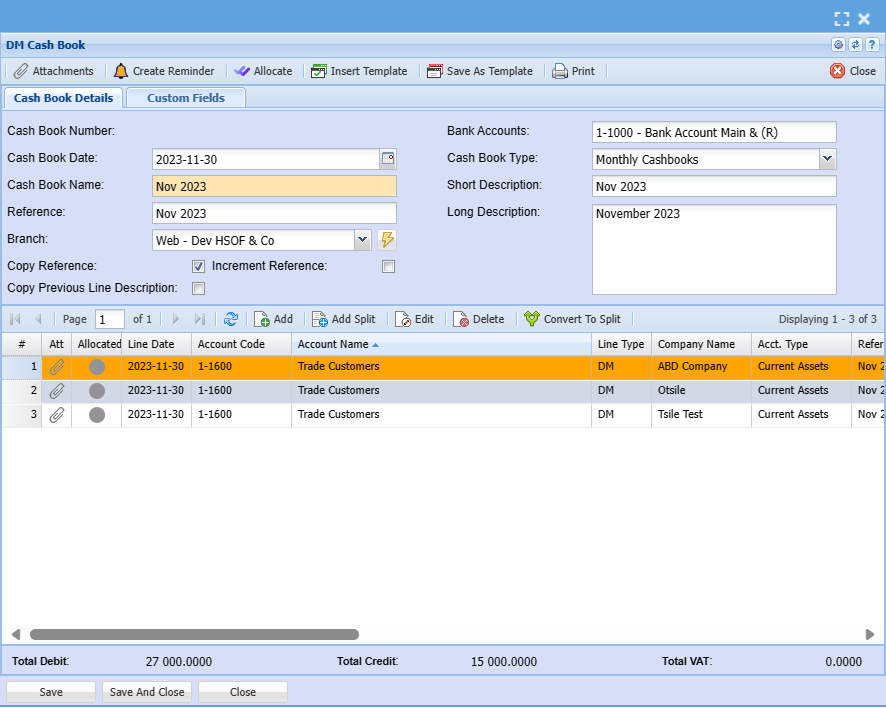](https://hugeerp10.co.za/hsofmanual/uploads/images/gallery/2023-12/TpXimage.png)
The Cashbook can then be authorized and processed
Click on the Authorize button, the message below will show click ok
.png)
Once authorised the option to process cashbook will be available and you can click on the process button to process the Cashbook
.png)
---
#### Insert Template
.png)
| **Search** | Search for existing Templates |
| **Import** | import template information |
| **Delete Template** | delete an existing template |
| **New Date and Reference** | Tick here to change existing template with New date and New reference |
| **New date** | Enter a date that you want your cashbook lines to change to |
| **New Reference** | Enter a reference that you want your cashbook lines to change to |
| **Swop Debit/Credit** | Allows you to swop the debit and credit lines around
Excellent if you want to reverse the cashbook
|
| **Keep Template date** | This tick retains the transaction dates as per the cashbook template being imported.
If the tick is off, then current date will be applied to the imported entries.
|
# Quotation Menu
# Quotation Search
Video training manual 2016 - [Click Here](https://vimeo.com/357005020)
**Debtors Module> Activity> Quotation**
#### Basic Search
[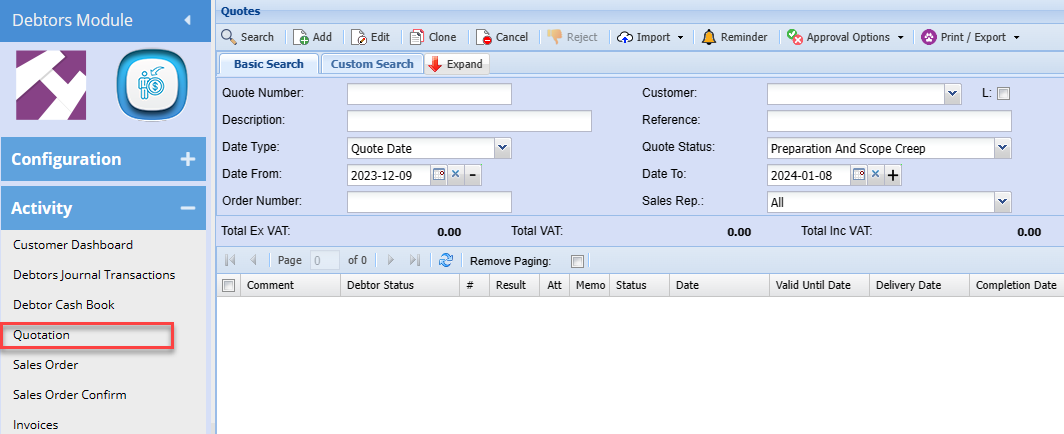 ](https://hugeerp10.co.za/hsofmanual/uploads/images/gallery/2024-01/Bxhimage.png)
On the Basic Search Tab, the user can search the quotes by entering information on the following fields
| **Quote Number** | Search by entering the quote number |
| **Description** | Search by entering the description of the quote |
| **Date Type** | Select the quotes based on date type being Quote date, Quote valid to date, Quote completing date or Quote Delivery date |
| **Date From / Date To** | Select the date range for which you want to view the report from
Select a date range of when you want to see the report to |
| **Order Number** | Search for quote based on client order number |
| **Customer** | Search by selecting the customer |
| **Reference** | Search quote by reference entered |
| **Quote Status** | Select status quote you want to search by on the drop down |
| **Sales Rep** | Search the quotes by selecting the sales rep from the drop-down menu |
#### Expand
Displays additional search criteria options
[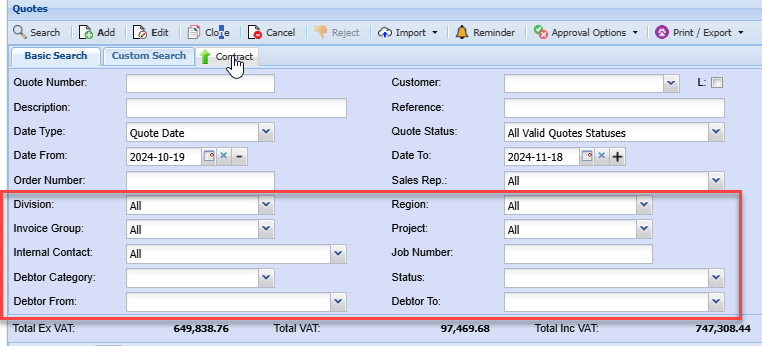](https://hugeerp10.co.za/hsofmanual/uploads/images/gallery/2024-11/iWPimage.png)
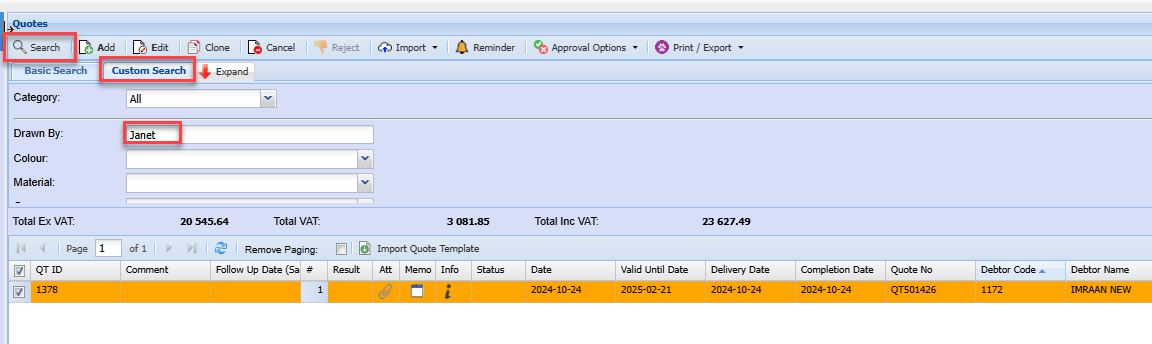
#### **Custom Search**
One can create your own custom fields on the system that are specific to your business and link these to various documents, such as quotation.
The custom search, then allows you to search base off these fields. Example:
[](https://hugeerp10.co.za/hsofmanual/uploads/images/gallery/2024-11/d8Uimage.png)
### Import Quote from CSV
.png)
The file to be imported must be in a CSV format.
Click on the Select Files… button to open the navigate window allowing the user to navigate to the file to be imported.
Once the desired file has been located either double click in the file or click the Open button.
Now click on the Upload button. If the upload was successful a window will appear confirming that the upload was successful. Click Ok.
The Import button now becomes enabled allowing the user to click on the Import button to import the file.
An Import Report will open displaying any errors in the import or displaying the successful quotes that were imported.
Note: Please request the Quote Import – Template file from Huge ERP Support.
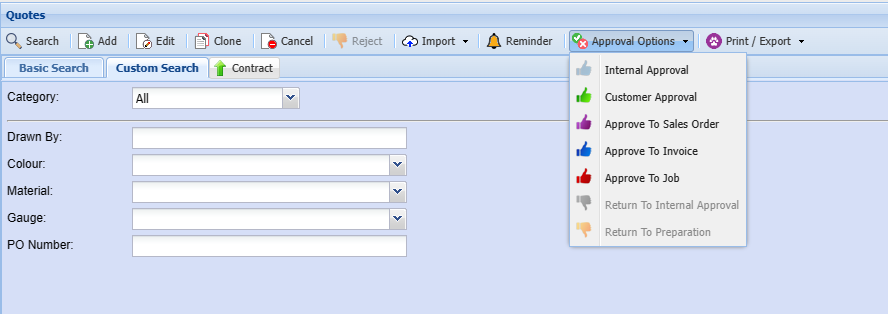
#### **Approvals Options**
[](https://hugeerp10.co.za/hsofmanual/uploads/images/gallery/2024-04/14zimage.png)
Approve Tab has the following buttons
| **Internal Approval** | For the supervisors / managers to approve the quote prior to sending to client. |
| **Customer Approval** | This indicates that the quote has been sent to the customer and awaiting approval |
| **Approve to Sales Order** | Promotes the quote to a sales order |
| **Approve To Invoice** | Promotes the quote to an invoice |
| **Approve To Job** | Approves the selected Quote to be a job. |
| **Return to Internal Approval** | Reverts the quote status from Customer approval to Internat approval |
| **Return to Preparation** | Reverts the quote status from Internat approval to Preparation |
---
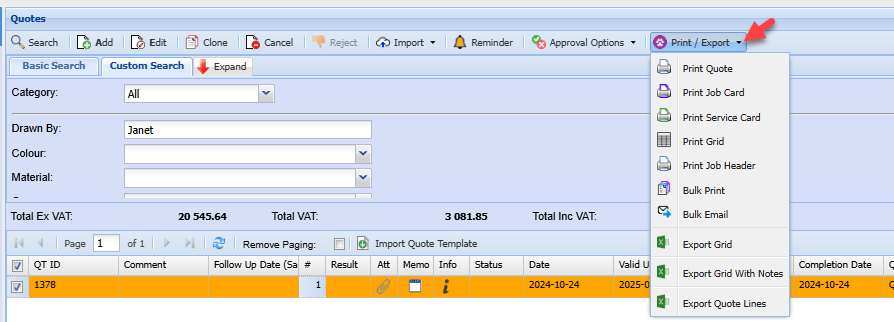
#### **Print / Import**
Print Tab has the following options
[](https://hugeerp10.co.za/hsofmanual/uploads/images/gallery/2024-11/dfeimage.png)
---
#### Print Quote
Debtors> Activity> Quotation> Print /Export
Print quote from here and email to your clients
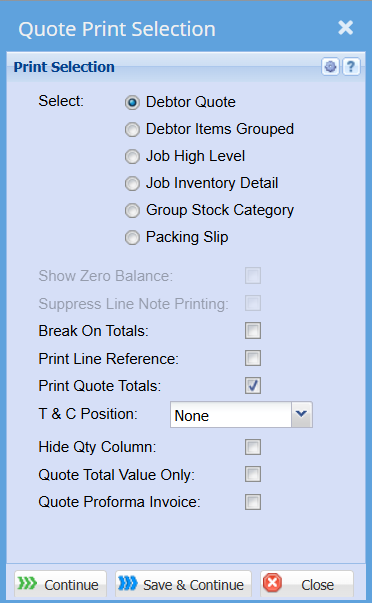
| **Debtor Quote** |
|
| **Debtor Items Grouped** |
|
| **Job High Level**
|
|
| **Job Inventory Detail**
|
|
| **Group Stock Category** |
|
| **Packing Slip** |
|
| **Show Zero Balance** |
|
| **Suppress Line Note Printing** |
|
| **Break On Totals** |
|
| **Print Line Reference** |
|
| **Print Quote Totals** |
|
| **T & C Position** |
|
| **Hide Qty Column** |
|
| **Quote Total Value Only** |
|
| **Quote Proforma Invoice** | When printing the quote, there is an option to make the quote a Proforma Invoice. This will change the header of the quote and labels to read Proforma Invoice. The Proforma number will be the quote number |
[](https://hugeerp10.co.za/hsofmanual/uploads/images/gallery/2025-08/zWkimage.png)
.png)
---
#### Cancel Bulk Quotes
To cancel bulk quotes, tick the checkboxes next to the quotes you want to cancel on the left-hand side, as shown below.
- Then click "**Cancel**"
[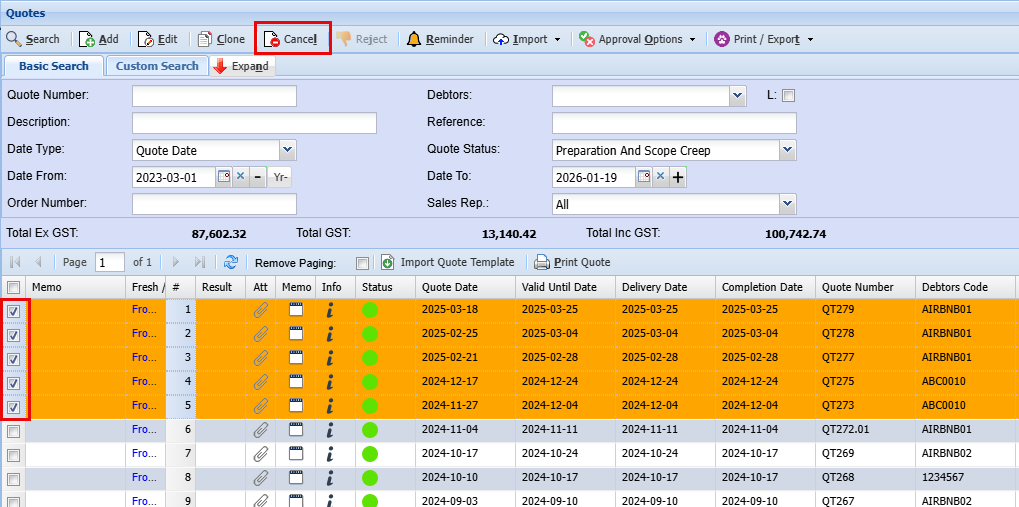](https://hugeerp10.co.za/hsofmanual/uploads/images/gallery/2026-01/y9Aimage.png)
---
#### Print Job Card
Debtors> Activity> Quotation> Print /Export
Select A quote that has a job number and select print job Card form the drop-down arrow.
.png)
.png)
---
#### Print Service Card
Debtors> Activity> Quotation> Print /Export
| Print a service card | Select a quote with a job number and print a service card from the drop-down menu |
.png)
---
#### Print Grid
Debtors> Activity> Quotation> Print /Export
.png)
| **Email** | Opens Up the email function. |
| **Copy** | Copies to clipboard to enable exporting to excel |
| **Print** | Print a hard copy for use. |
---
#### Print Job Header
Select Job Header Print Help
Debtors> Activity> Quotation> Print /Export
| Generate | Generates a print layout according to the information contained in that specific Job History Item |
.png)
.png)
---
#### Bulk Print
Quote Print Selection Popup Help
Debtors> Activity> Quotation> Print /Export
.png)
This popup window allows the user to select the layout of the quote to be printed.
Debtor Quote is typically used for Debtor Quotes and Standard Job Quotes.
Job High Level is typically used for Job Costing Quotes where Task items have been selected as a line item in the quote. This layout option will print all standard items e.g. Stock, Service and Custom as normal and only the Task Code and Description with the total value of the Task.
Job Detail Contex is typically used to Job Costing Quotes where Task items have been selected as a line item in the quote. This layout option will print all standard items e.g. Stock, Service and Custom as normal and in the case of the Task items, the actual Stock, Service or Custom code will be printed, and the actual item’s description will be preceded by the Task’s description e.g. Task Description…Standard Item’s Description with the actual quantity and value of the Stock, Service or Custom item.
Job Inventory Items is typically used for Job Costing Quotes where Task items have been selected as a line item in the quote. This layout option will print only the standard Stock, Service or Custom items on the quote.
---
#### Bulk Email
Quote Print Selection Popup Help
Debtors> Activity> Quotation> Print /Export
.png)
.png)
This popup window allows the user to select the layout of the quote to be emailed.
Debtor Quote is typically used for Debtor Quotes and Standard Job Quotes.
Job High Level is typically used for Job Costing Quotes where Task items have been selected as a line item in the quote. This layout option will print all standard items e.g. Stock, Service and Custom as normal and only the Task Code and Description with the total value of the Task.
Job Detail Contex is typically used to Job Costing Quotes where Task items have been selected as a line item in the quote. This layout option will print all standard items e.g. Stock, Service and Custom as normal and in the case of the Task items, the actual Stock, Service or Custom code will be printed, and the actual item’s description will be preceded by the Task’s description e.g. Task Description…Standard Item’s Description with the actual quantity and value of the Stock, Service or Custom item.
Job Inventory Items is typically used for Job Costing Quotes where Task items have been selected as a line item in the quote. This layout option will print only the standard Stock, Service or Custom items on the quote.
---
#### Export Grid
Debtors> Activity> Quotation> Print /Export
Exports the document search grid to excel
.png)
#### Keyboard quick keys
Quick keys help access functions using the keyboard
Used with Alt + Letter
[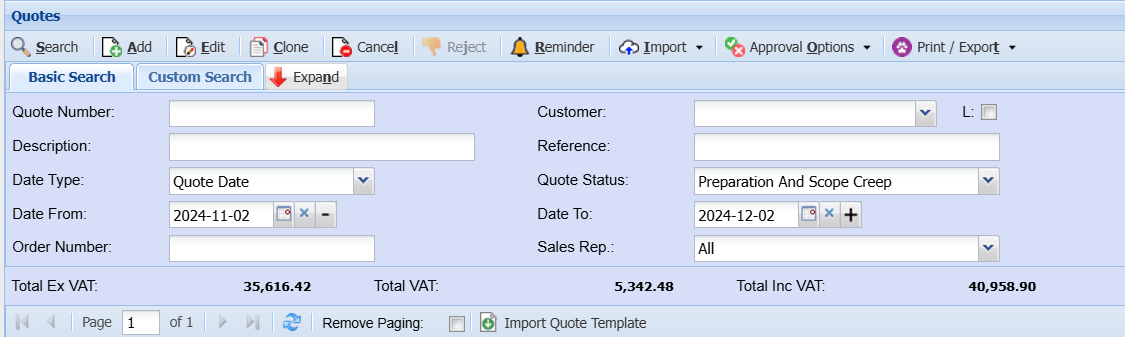](https://hugeerp10.co.za/hsofmanual/uploads/images/gallery/2024-12/h3oimage.png)
| **S**earch | Alt + s | Search for Quotes |
| **A**dd | Alt + a | Add a new Quote |
| **E**dit | Alt + e | Edits the Quote that is highlighted |
| **C**lone | Alt + c | Clone the highlighted Quote |
| Cance**l** | Alt + l | Cancel the Quote that is highlighted |
| Re**j**ect | Alt + j | Reject the selected Quote |
| Expa**n**d / Co**n**tract | Alt + n | Expands / Contracts the header section of the window |
| Create **R**eminder | Alt + r | Creates a reminder to highlighted Quote |
| **I**mport | Alt + i | Focus on the Import split button |
| **F**unctions | Alt + f | Focus on the Function split button |
| Approval **O**ptions | Alt + o | Focus on the Approval Options split button |
| Print / Expor**t** | Alt + t | Focus on the Print / Export split button |
| Tab Basic Search | Alt + 1 | Basic Search |
| Tab Custom Search | Alt + 2 | Custom Search |
# Basic: Add Quotation
#### Detail Tab
**Debtors Module> Activity> Quotation**
The quotes screen will open
To search for existing quotations, select your search criteria and click search
Search criteria can be quote description, order number, customer name, etc
Select a date range
To create a new quotation, Click the Add Button as shown below
[](https://hugeerp10.co.za/hsofmanual/uploads/images/gallery/2024-07/cc6image.png)
This will display the New Quote screen
[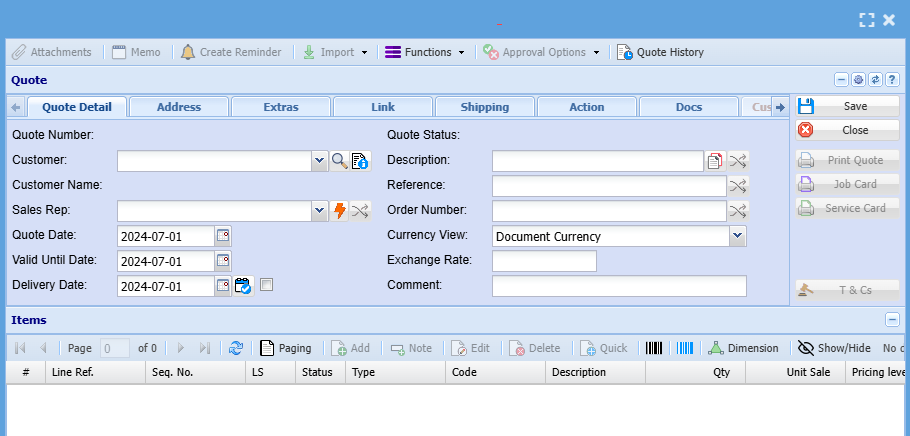](https://hugeerp10.co.za/hsofmanual/uploads/images/gallery/2024-07/8hhimage.png)
Add information below so that the greyed-out buttons can be activated:
- Select the customer/ debtor you are creating a quotation for, from the drop-down menu.
- Select the sales rep on the drop-down selection, if applicable
- Update dates if necessary
- Add description and reference
- Add order number, if applicable
Then, once you are done adding all relevant information click Save and all the greyed-out buttons will be active as shown below:
[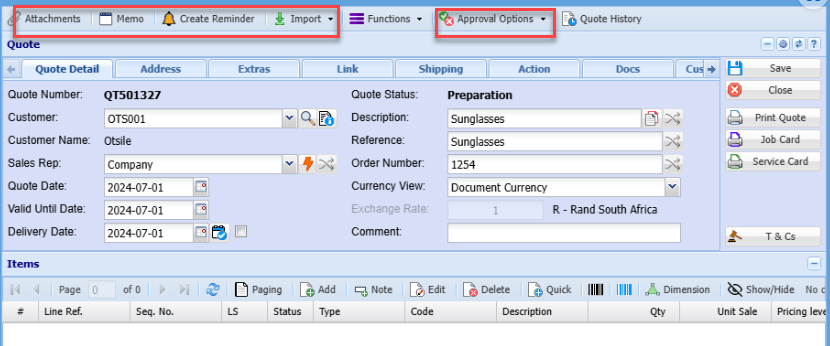](https://hugeerp10.co.za/hsofmanual/uploads/images/gallery/2024-11/4gCimage.png)
##### Address Tab
Click the Address Tab to check if address details are correct
You can edit the address if necessary
Note: if details are edited on the quote, this will only apply to the specific quote and not update the debtor setup unless the debtor setup is access and updated as well.
[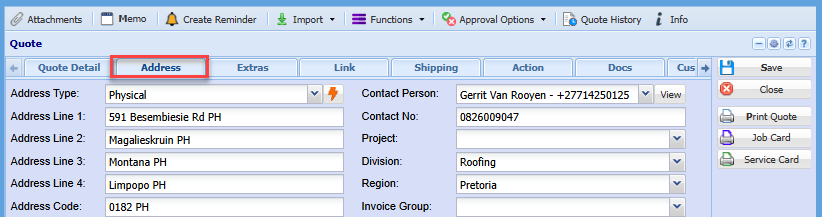](https://hugeerp10.co.za/hsofmanual/uploads/images/gallery/2024-11/1zyimage.png)
On the address tab you can also select the respective contact person and check if their details, such as contact number and email address are correct
[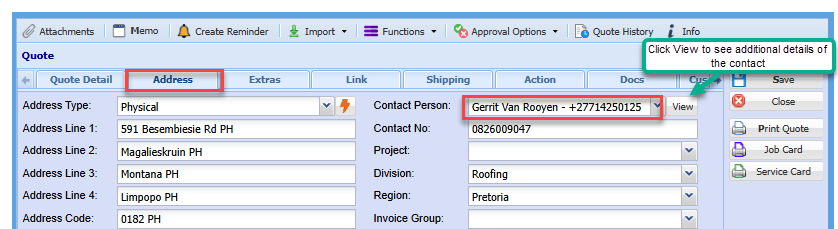](https://hugeerp10.co.za/hsofmanual/uploads/images/gallery/2024-11/P2oimage.png)
Once all the necessary quote header details have been loaded click the Save button.
This will activate the Add button in the centre of the page
This Add button allows the user to add line items to be added to the quote
#### Line Items
You can only add a line item after adding all the necessary information needed on the quote detail tab and all greyed buttons have been greyed out
[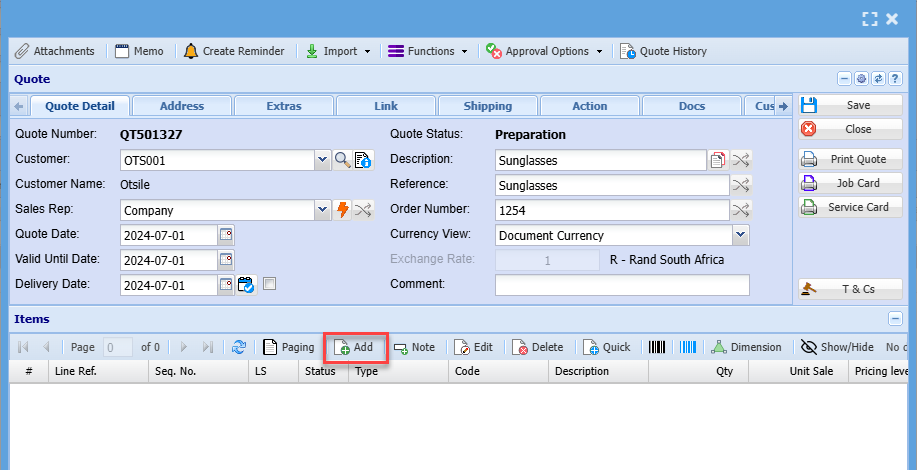](https://hugeerp10.co.za/hsofmanual/uploads/images/gallery/2024-07/2WTimage.png)
Then the screen below will appear
[](https://hugeerp10.co.za/hsofmanual/uploads/images/gallery/2024-12/T2Mimage.png)
Select the item you want to quote on the drop-down selection by typing part of the item code or description.
Once the options appear, click on the relevant item option
Enter the quantity you are quoting the customer/ debtor on
Make sure pricing is correct
Select a relevant warehouse if you have multiple warehouses
Select the correct VAT Type
Click Save & New if capturing numerous line items
Click Save & Close if capturing a single line item
Once done
All line items will appear on the grid below:
[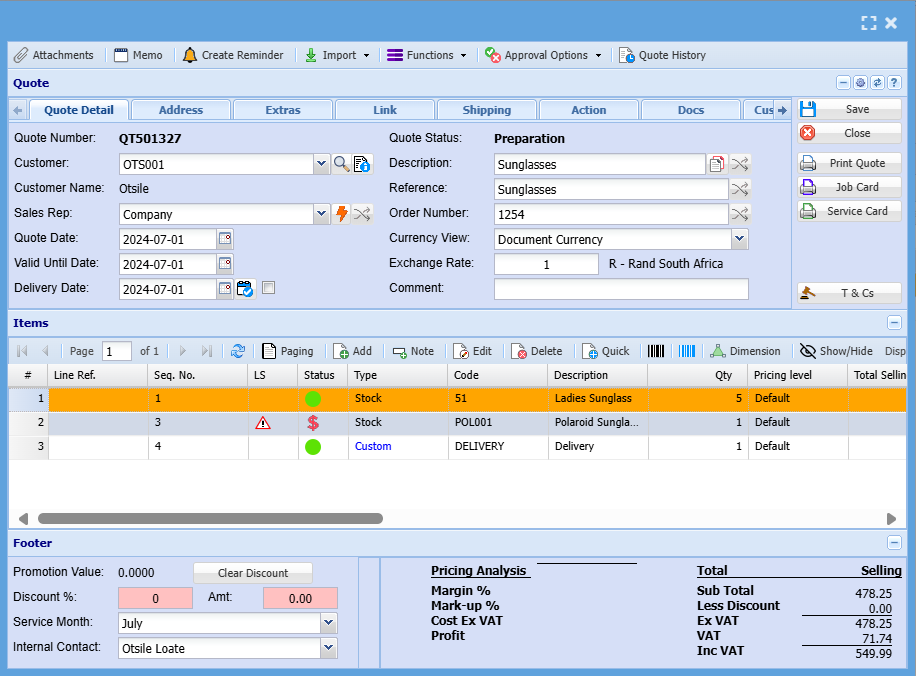](https://hugeerp10.co.za/hsofmanual/uploads/images/gallery/2024-07/tE7image.png)
| Paging | If you have more than the default 100 lines on the quote, paging removes multiple pages and displays all items in a single page on the grid. |
| Add | Enables user to add another item line to the quote |
| Note | Allows the user to add a note as an item line on the quote. this will, be printed on the quote. |
| Edit | Enables the user to edit an item line added to the quote |
| Delete | Deletes and removes a selected item line from the quote |
| Quick | Enables the user to select items to be added to the quote quickly without entering item code or descriptions, but by using the Brand make model search options |
---
#### Note Button
[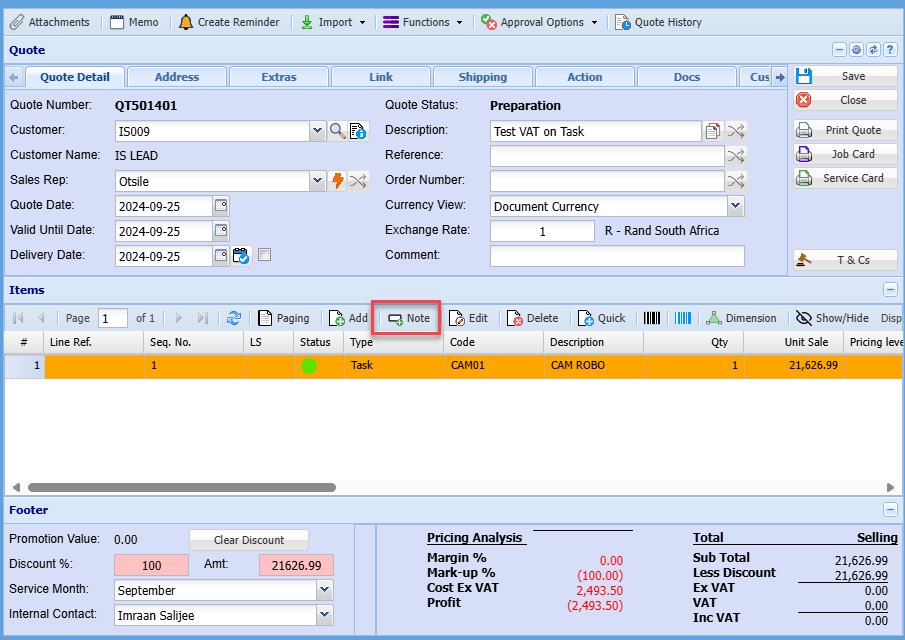](https://hugeerp10.co.za/hsofmanual/uploads/images/gallery/2024-10/8fQimage.png)
[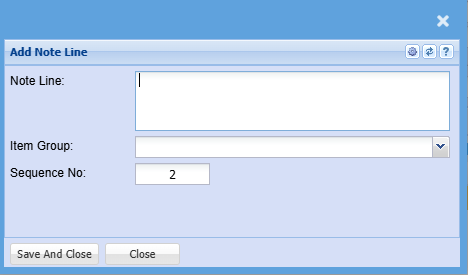](https://hugeerp10.co.za/hsofmanual/uploads/images/gallery/2024-10/88Gimage.png)
Type a note that you wish to display on the quote
Once all items have been captured, you can then click Save
Close
Send the quote for Internal approval if necessary. Alternatively, click print
The quote will print to screen. check all r=details and if satisfied, you can then email the client or print a hard copy of the quote
---
#### Attachments
Should you wish to attach any additional information such as drawings, specifications, workings, you can attach the document to the quote
Click the Attachment Button
Either drag and drop from a folder on your computer
or search the file and upload
[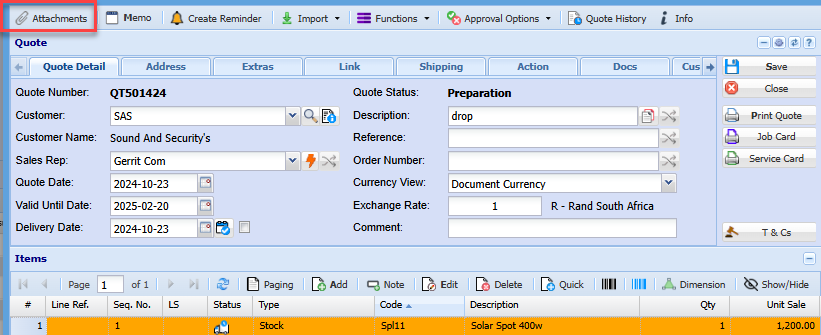](https://hugeerp10.co.za/hsofmanual/uploads/images/gallery/2024-11/4vuimage.png)
[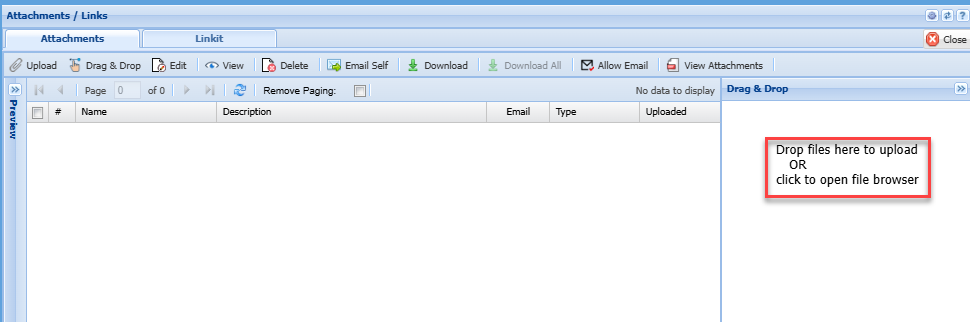](https://hugeerp10.co.za/hsofmanual/uploads/images/gallery/2024-11/7FAimage.png)
[](https://hugeerp10.co.za/hsofmanual/uploads/images/gallery/2024-11/7lGimage.png)
---
#### Keyboard quick keys for Quote Detail
Quick keys help access functions using the keyboard
Used with Alt + Letter
[](https://hugeerp10.co.za/hsofmanual/uploads/images/gallery/2024-12/pBLimage.png)
| Attachmen**t** | Alt + t | Opens the Attachment window |
| **M**emo | Alt + m | Opens the Memo window |
| Create **R**eminder | Alt + r | Opens the Reminder window |
| Qu**o**te History | Alt + o | Opens the Quote History window |
| **I**nfo | Alt + i | Opens the Quote Info window |
| **F**unctions | Alt + f | Focus on the Function split button |
| **S**ave | Alt + s | Saves the quote |
| **C**lose | Alt + c | Closes the quote window |
| **P**rint Quote | Alt + p | Print the quote
|
| **J**ob Card | Alt + j | Pring the Job Card for the quote
|
| Ser**v**ice Card | Alt + v | Print the Service Card for the quote
|
| **A**dd
| Alt + a | Opens a New Quote Line Detail window
|
| **E**dit | Alt + e | Opens the Quote Line Detail window for the selected quote line
|
| **D**elete | Alt + d | Deletes the selected line from the quote
|
| **Q**uick Add | Alt + q | Opens the quick add window to add a quote line to the quote
|
| Dimensio**n** | Alt + n | Opens the Dimensions wind for the selected quote line
|
| Tab Quote Detail | Alt + 1 | Sets the tab notebook to the Quote Detail tab |
|
| Alt + 2 | Pressing Alt + 2 repeatedly will step through the various tabs in the tabnotebook |
#### Keyboard quick keys for Quote Line Item Detail
Quick keys help access functions using the keyboard
Used with Alt + Letter
[](https://hugeerp10.co.za/hsofmanual/uploads/images/gallery/2024-12/bOZimage.png)
[](https://hugeerp10.co.za/hsofmanual/uploads/images/gallery/2024-12/cZjimage.png)
| Inventory **O**verview | Alt + t | Opens the Inventory Overview window |
| View **I**mage | Alt + i | Opens the View Image window |
| **S**pecial Item | Alt + s | Opens the Special Item window |
| **C**lose | Alt + c | Closes the quote window |
| **R**eminder | Alt + r | Opens the Reminder window |
| **F**unctions | Alt + f | Focus on the Function split button |
| Save & **N**ew | Alt + n | Saves the Quote Item Detail window and opens a new Quote Item window
|
| Sa**v**e & Close | Alt + v | Saves the Quote Item Detail window and then closes the window
|
| **U**pdate Cost
| Alt + u | Updates the cost of the selected item to the latest cost price
|
| Tab Quote Item Detail | Alt + 1 | Sets the tab notebook to the Quote Item Detail tab |
|
| Alt + 2 | Pressing Alt + 2 repeatedly will step through the various tabs in the tab notebook |
# Advanced Add Quote Process
#### Functions Drop Down
[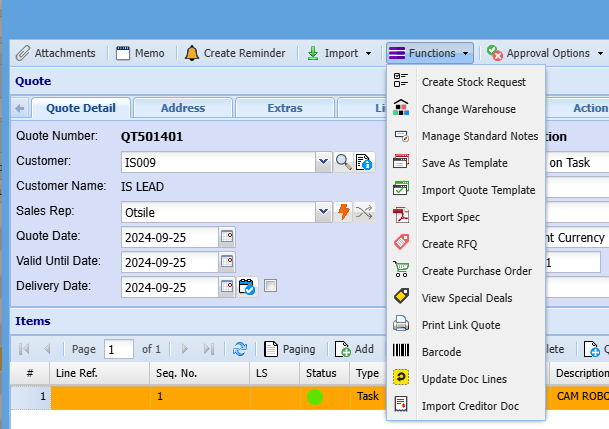](https://hugeerp10.co.za/hsofmanual/uploads/images/gallery/2024-10/PXZimage.png)
##### Create Stock Request
[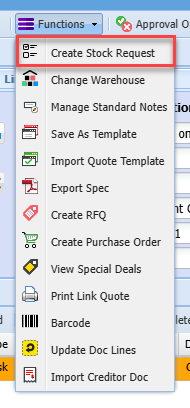](https://hugeerp10.co.za/hsofmanual/uploads/images/gallery/2024-10/mo5image.png)
[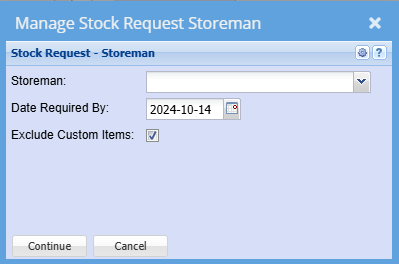](https://hugeerp10.co.za/hsofmanual/uploads/images/gallery/2024-10/lleimage.png)
---
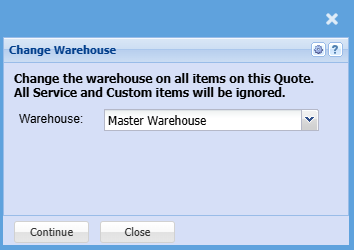
##### Change Warehouse
[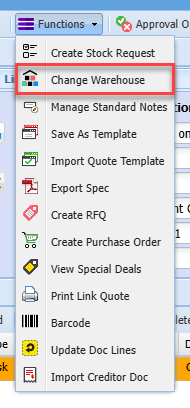](https://hugeerp10.co.za/hsofmanual/uploads/images/gallery/2024-10/PVTimage.png)
[](https://hugeerp10.co.za/hsofmanual/uploads/images/gallery/2024-10/qbTimage.png)
---
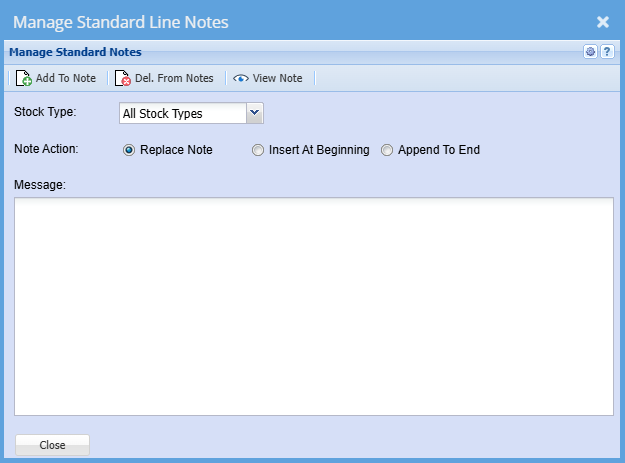
##### Manage Standard Notes
[](https://hugeerp10.co.za/hsofmanual/uploads/images/gallery/2024-10/PCgimage.png)
This window allows the user to add a specific Note to each line on a Quote.
The **Stock Type** drop down will allow the user to specify **All** lines or lines of a selected inventory type e.g. Stock, Service etc.
The **Note Action** radio buttons allows the user to modify the note to a limited extent by either replacing the whole note, inserting a new note in front of the existing note and keeping the existing note or adding a new note to the end of an existing note.
Click the **Add To Note** button to add the Note to the lines subject to the previous two selections.
Once the note has been added and also based on the selection of the **Stock Type** drop down the user can view the resulting note by clicking on the **View Note** button.
By clicking on the **Delete Notes** button and subject to the selection of the **Stock Type** drop down the notes can be removed from the quote lines.
[](https://hugeerp10.co.za/hsofmanual/uploads/images/gallery/2024-10/royimage.png)
---
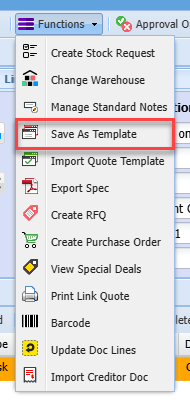
##### Save As Template
[](https://hugeerp10.co.za/hsofmanual/uploads/images/gallery/2024-10/XVAimage.png)
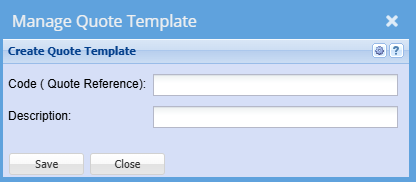
It allows a user to create a quote template by filling in the Code and Description.
[](https://hugeerp10.co.za/hsofmanual/uploads/images/gallery/2024-10/cvYimage.png)
---
##### Import Quote Template
[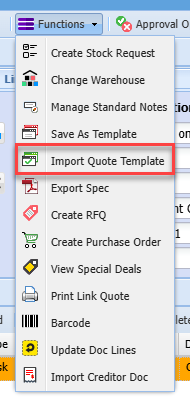](https://hugeerp10.co.za/hsofmanual/uploads/images/gallery/2024-10/DCSimage.png)
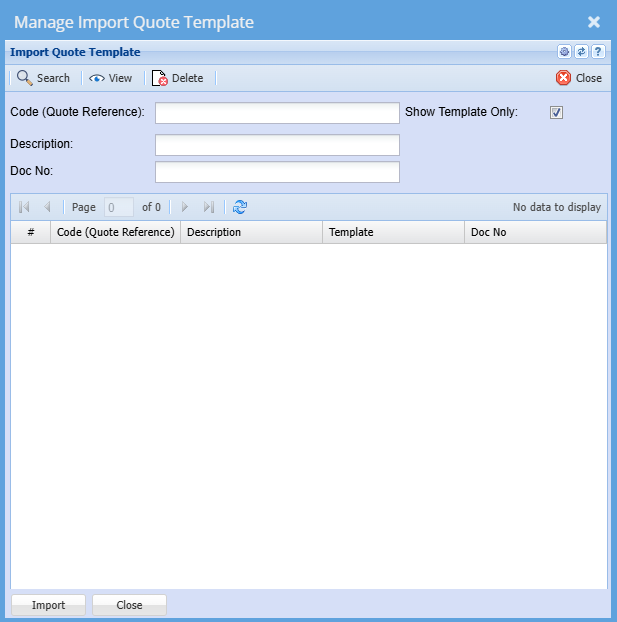
This allows a user to import a copy of a quote that was previously saved as a Quote Template.
Code – enter the code of the quote template and then click on the **Search** button.
Description – enter the description of the quote template and then click on the **Search** button.
If Code and Description are left blank, the system search will retrieve all quote templates.
Once the desired template has been located select that template and either click on the **Import** button or double click on the grid line.
**Import** button – allows a user to import a quote template into the currently opened quote.
[](https://hugeerp10.co.za/hsofmanual/uploads/images/gallery/2024-10/jL5image.png)
---
##### Export Spec
[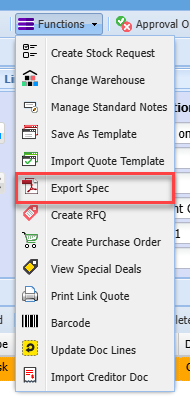](https://hugeerp10.co.za/hsofmanual/uploads/images/gallery/2024-10/LqHimage.png)
If there were any specification captured, these will be exported
---
##### Create RFQ
[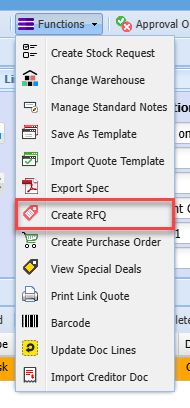](https://hugeerp10.co.za/hsofmanual/uploads/images/gallery/2024-10/4pwimage.png)
Allows one to create Requests for quotes (RFQ) from your suppliers for the items on the selected quote
##### Create Purchase Order
[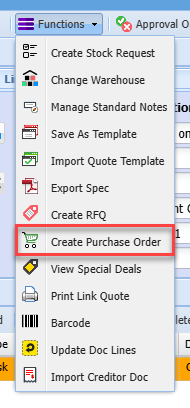](https://hugeerp10.co.za/hsofmanual/uploads/images/gallery/2024-10/Bbximage.png)
Creates a purchase order automatically to be sent to your supplier(s) for items on the quote.
The default supplier as per the item setup will be used, unless edited/ updated on the PO create.
---
##### View Special Deals
[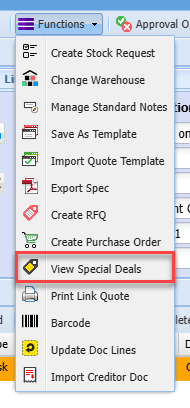](https://hugeerp10.co.za/hsofmanual/uploads/images/gallery/2024-10/gKpimage.png)
Displays a list of Specials or Deals that have been setup on the system.
[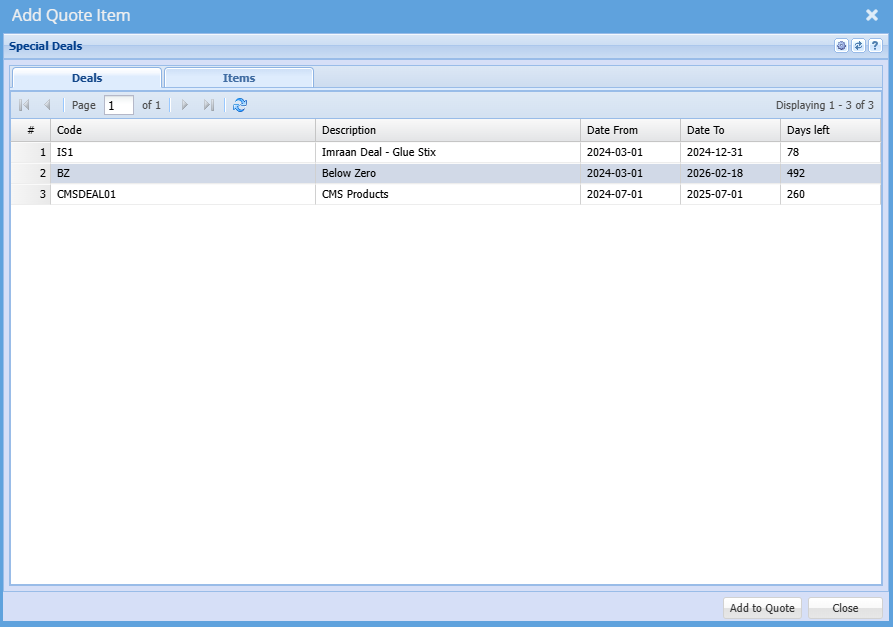](https://hugeerp10.co.za/hsofmanual/uploads/images/gallery/2024-10/YSEimage.png)
---
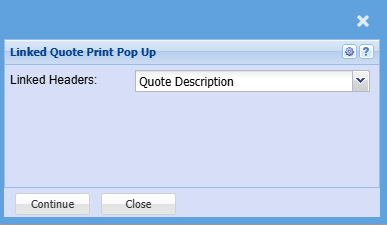
##### Print Link Quote
[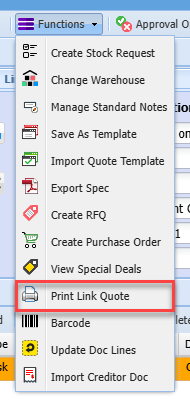](https://hugeerp10.co.za/hsofmanual/uploads/images/gallery/2024-10/SMmimage.png)
[](https://hugeerp10.co.za/hsofmanual/uploads/images/gallery/2024-10/6ZIimage.png)
---
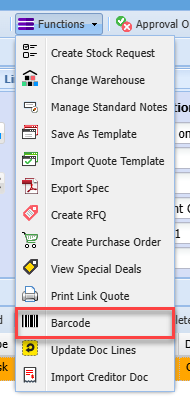
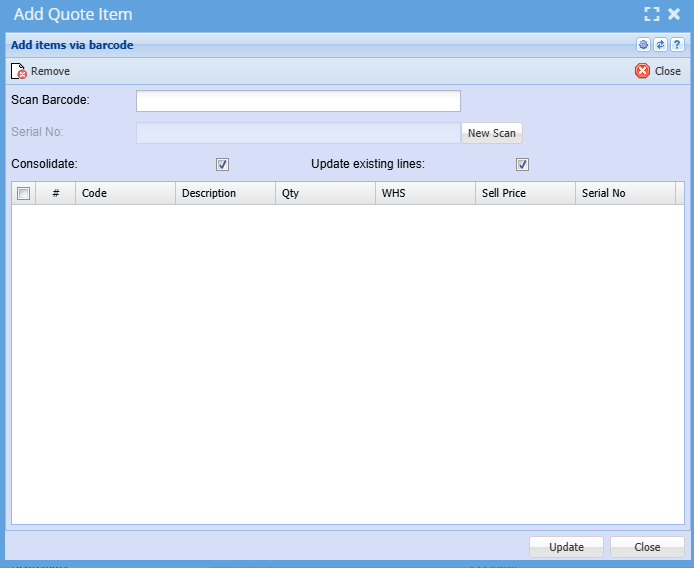
##### Barcode
[](https://hugeerp10.co.za/hsofmanual/uploads/images/gallery/2024-10/vSaimage.png)
[](https://hugeerp10.co.za/hsofmanual/uploads/images/gallery/2024-10/KZximage.png)
---
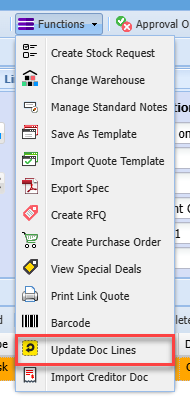
##### Update Doc Lines
[](https://hugeerp10.co.za/hsofmanual/uploads/images/gallery/2024-10/m4Eimage.png)
Allows the user to update certain fields on quote lines. in the event that there are multiple item lines on the quote, this option saves the user from having to edit each line individually.
[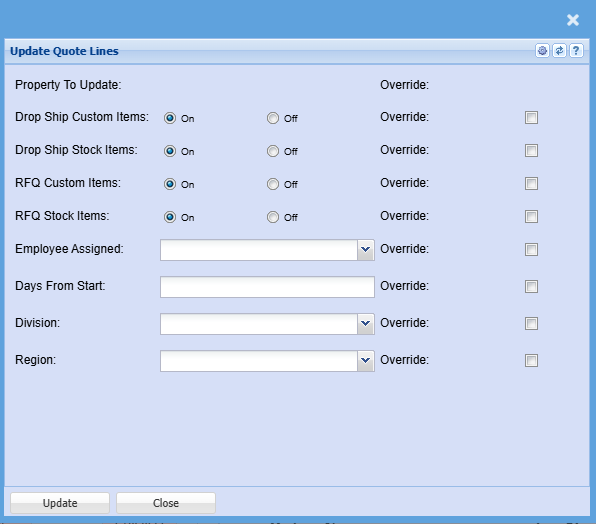](https://hugeerp10.co.za/hsofmanual/uploads/images/gallery/2024-10/SZwimage.png)
---
##### Import Creditor Doc
[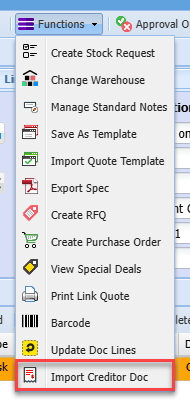](https://hugeerp10.co.za/hsofmanual/uploads/images/gallery/2024-10/yu2image.png)
This option allows the user to import a creditors document such as Purchase order or Goods received Note (GRV) into a quote
[](https://hugeerp10.co.za/hsofmanual/uploads/images/gallery/2024-10/vHzimage.png)
---
#### Info Button
[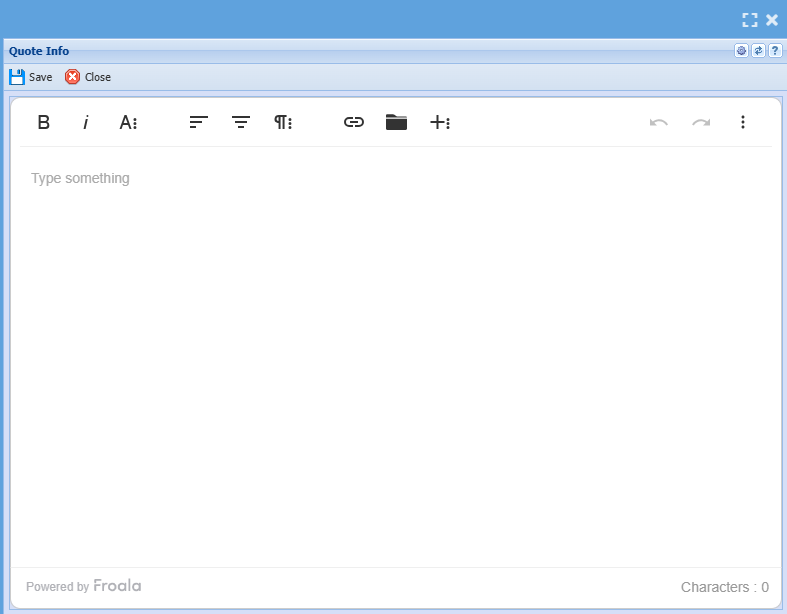](https://hugeerp10.co.za/hsofmanual/uploads/images/gallery/2024-10/mxnimage.png)
The screen allows for any additional info to be captured against the quote
| **Customer ** | Select the customer you are creating a quotation for on the drop-down |
| **Sales Rep** | This is where you select the specific sales rep if you have sales reps set up. |
| **Quote Date** | This is the date captured on the quote |
| **Valid Until Date** | This will be the date on which the quote will expire. |
| **Delivery Date** | This is the date on which the goods or service will be delivered. |
| **Description** | This is a general description of the items on the quote. |
| **Reference** | Reference captured on the quote |
| **Order Number** | If a client requests for a specific purchase order number to be put on the quote. |
| **Currency View** | This allows one to toggle between |
| **Comment** |
|
Go to Address Tab and insert the additional properties such as Division, Region, invoice Group if applicable) and Click Save
Next the items that you want to put on the quote have to be inserted. To do this click Add.
.png)
---
Next the items that you want to put on the quote have to be inserted. To do this click Add.
The following screen will appear.
.png)
| Category | Select the type of inventory item i.e. Stock, Service or Custom. |
| Item Code | This is where you search for the item that you want on the quote. |
| Item Description | This will be filled in automatically once the item is selected. |
| Quantity | The quantity of the specific item that you want on the quote. |
| System & Total Cost | Leave this as it is. |
| Warehouse | Select the warehouse that you want to take the stock out of from this drop-down menu. |
| Selling Inc. VAT | If you want to enter the selling price per item including vat then tick this box. This will open up the “Selling Including VAT” field so that you can enter the inclusive selling price. |
| Selling Exc. VAT | If you prefer to enter the exclusive selling price then you should not tick the “Selling Including VAT” box and just enter the exclusive amount. |
Once you have entered either the inclusive or exclusive amounts per item then the system will work out the rest of the amounts for you.
.png)
| Line Discount | If you want to give a discount on the specific line then a percentage can be entered here. If you choose not to give a discount, then just leave this field blank. |
| Vat | This is where you select the Vat type for this transaction. |
| Mark Up | This will default to your system mark-up that was selected when the company was first configured however it can be changed for each transaction. |
| Unit Of Measure | Select the unit of measure for the specific item from this drop down. |
| Lead Time | This is the time the supplier takes to deliver ordered items from the order date to the date that the items are physically delivered to the client. |
| Order Date | This is the date on which the order for the items should be placed from the supplier. |
| Reminder Date | This date is a final reminder to order items. Own discretion should be used when adding this date. This date should be about a week after your order date. |
| Required Date | This is the date on which the specific item is needed. This means that the item should be ordered, delivered and ready to be used on the intended job. |
| Payment Method | This is the account terms that you have with the supplier of the specific item. These include COD, 30 days, 60 days, 90 days, 120 days, 150 days or 180 days. |
| Supplier | This will default on the default supplier of the specific item, but other suppliers can be chosen or added. |
| Internal Note | This is any note about the item or supplier that you want to add. This will not appear on any printed documents. |
After all the info has been entered click either the Save & Close button or the Save & New button. Save & New is to add another line item and Save & Close if you only want the one-line item.
After clicking on the Save & Close button you will be back on the New Quote screen. Notice that your line items also appear on the screen with the amounts at the bottom.
Once you are happy with all the details you can click Save and then Close. Now you will be back on the main quote screen
Click on Search and your quote should appear on this screen.
.png)
If you are happy with the quote, it can be approved.
Click the approve tab at the top of the screen.
.png)
Here you will see 5 different approval buttons.
| Internal Approval | This is when all involved parties that work for the company are happy with the quote then it can be approved internally. |
| Customer Approval | After the quote has been approved internally it can be sent for customer approval. |
| Approve To Invoice | If the client is happy with the quote, it can be approved to invoice. |
| Approve To Sales Order | If you want to approve the quote to a Sales Order. |
| Approve to Job | if you want to approve the quote to a Job |
You will notice that all four options mentioned above are sub menus under activity on the left.
Depending on the approval stage this is where the quote will appear. So, for example, if you approved a quote internally it will move out of New Quote Search and into Internal Quote Approval.
Any of the approval stages can be skipped. This means that if you would like to create a quote and immediately approve it to an Invoice or Sales Order instead of Internal Quote Approval or Customer Quote Approval then you can do this.
Once the quote has been approved to Sales Order or Invoice then it can be treated as a normal Sales Order or Invoice from there on out
---
### Button Functions Explained
#### Change Warehouse
Debtors / Customer Module> Activity> Quotes
Video training manual 2016 - [Click Here](https://vimeo.com/357004213)
[](https://hugeerp10.co.za/hsofmanual/uploads/images/gallery/2023-07/Ginimage.png)
---
#### Import Dropdown
[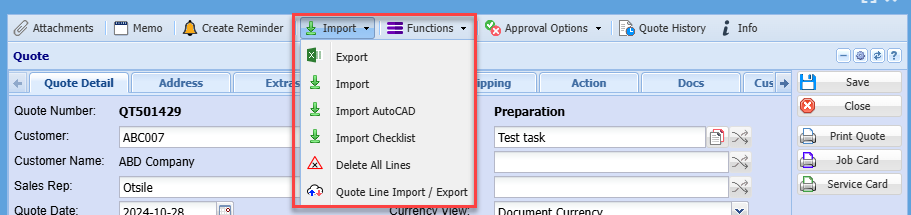](https://hugeerp10.co.za/hsofmanual/uploads/images/gallery/2024-10/qstimage.png)
##### Import
[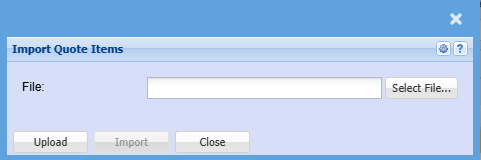](https://hugeerp10.co.za/hsofmanual/uploads/images/gallery/2024-10/T6fimage.png)
##### Import AutoCAD
[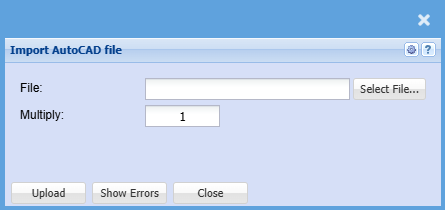](https://hugeerp10.co.za/hsofmanual/uploads/images/gallery/2024-10/mKUimage.png)
##### Import Checklist
[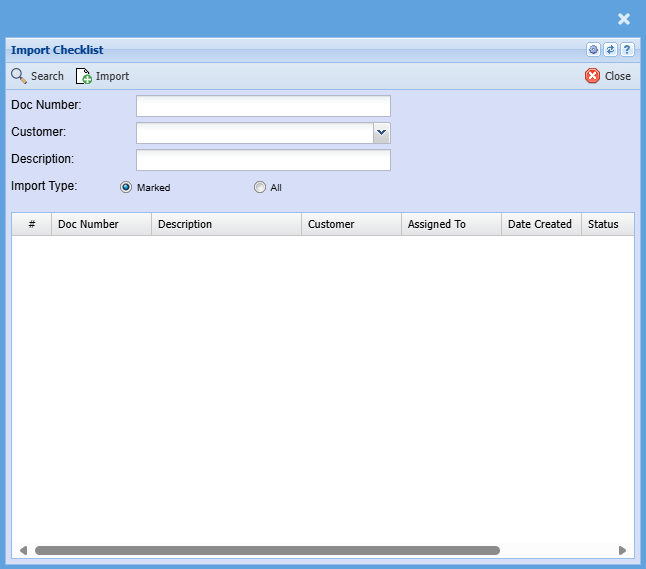](https://hugeerp10.co.za/hsofmanual/uploads/images/gallery/2024-10/eZ6image.png)
# Approval Options Drop Down
**Debtors> Activity> Quotation> Approval Options**
[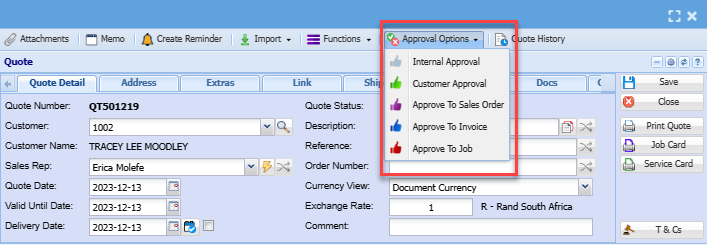](https://hugeerp10.co.za/hsofmanual/uploads/images/gallery/2024-01/Pf3image.png)
| **Internal Approval** | This is when all involved parties that work for the company are happy with the quote then it can be approved internally. |
| **Customer Approval** | After the quote has been approved internally it can be sent for customer approval. |
| **Approve to Sales Order** | If you want to approve the quote to a Sales Order. |
| **Approve to Invoice** | If you want to approve the quote to an Invoice |
| **Approve to Job** | If you want to approve the quote to a Job |
| **Return to Internal Approval** | This button allow you to return the quote for internal approval |
| **Return to Preparation** | Return the quote to preparation status |
# Email attachments alert
I would like to put an alert on the emailing of documents where the flag to email an attachment is on
If a user has uploaded an attachment and wants to email it.
When we get to email and the user forgets to select the attachment he wants to send with the email.
An alert to come up to say
You have uploaded attachments to be sent with this email, but you have not selected the ones you want to send with this email
Continue without sending any attachments
Cancel to go and select attachments
Continue
Cancel
If the user has selected the attachments, then you don’t need to pop up this message
This is to help the user remember that he attached documents to send with the email, but most times people forget to select them to email
.png)
# Build Kit
**Build Kit Update Quantity tick box**
There is an alert for the user who wants to remove the tick box
Relevant for the following documents
| 1 | Quote |
| 2 | Sales Order |
| 3 | Invoice |
| 4 | Credit Note |
WARNING
If you remove this tick for Update Quantity for Build Kit quantity, one runs the risk of not matching the build to the line quantity.
Click on Continue to accept risk
.png)
# Quote Proforma Invoice
Create a quote to be a Proforma Invoice
When printing the quote, there is an option to make the quote a Proforma Invoice
[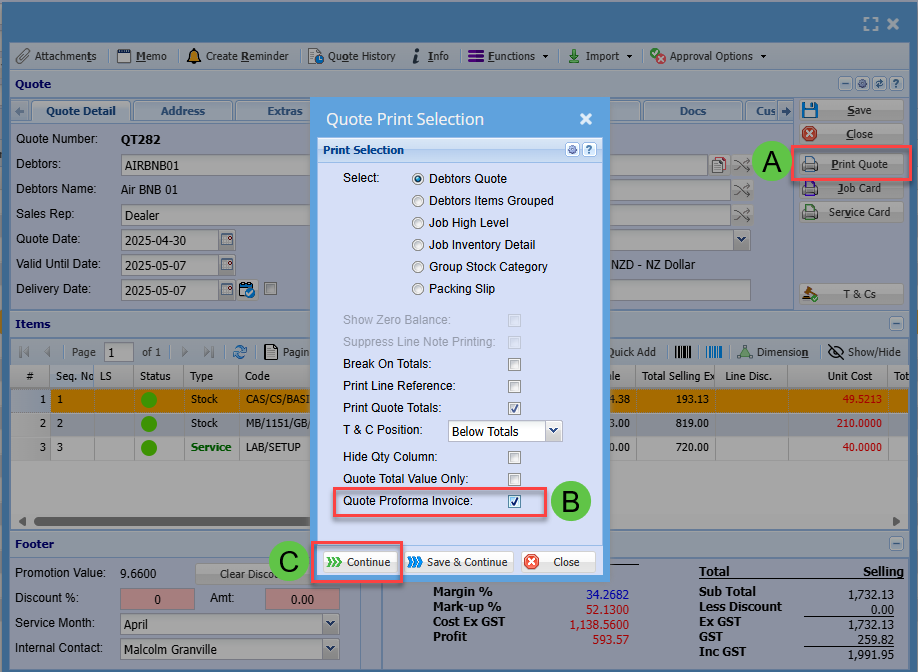](https://hugeerp10.co.za/hsofmanual/uploads/images/gallery/2025-08/gjtimage.png)
This will change the header of the quote and labels to read Proforma Invoice.
The Proforma number will be the quote number
[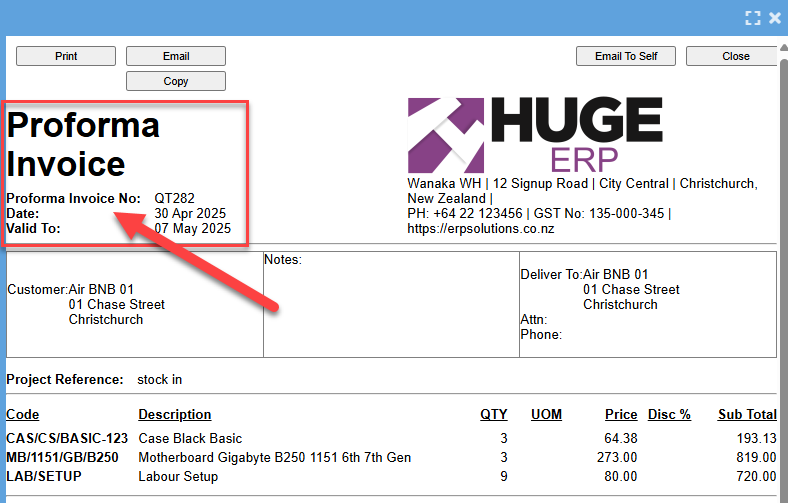](https://hugeerp10.co.za/hsofmanual/uploads/images/gallery/2025-08/zwcimage.png)
# Sales Order Menu
# Sales Order Search
Debtors Module> Activity> Sales Order
Video training manual 2016 - [Click Here](https://vimeo.com/357006403)
.png)
Sales Order processing occurs after receipt of a sales order from a customer.
.png)
Buttons defined
| **Search** | Search for an existing sales Order |
| **Add** | Add a new Sales Order |
| **Edit** | edit an existing sale Order |
| **Cancel** | Cancel a sales order |
| **Close** | Close a sales Order |
| **Create reminder** | Create a reminder for the sales order |
| **Create Stock request** | create a stock request |
| **Actions** | This button opens up action items that can authorize, unauthorize, confirm, confirm quantity, process a sales order |
| **Print/Export** | print sales order - or export sales order details to excel. |
Search options
| **Customer Name** | Allows a user to search by customer and the system will pull only the sales order for that selected customer |
| **Date From** | Select the date from which the sales order will be functional from |
| **Sales Order Number** | Search by selecting the sales order number |
| **Sales Rep** | Search by selecting the sales Rep from the drop-Down Menu |
| **Date to** | Search by selecting the date to |
Custom Fields Tab
.png)
Contract / Expand Tab
Search by Selecting from the category from the drop down arrow
.png)
---
#### Import Document
[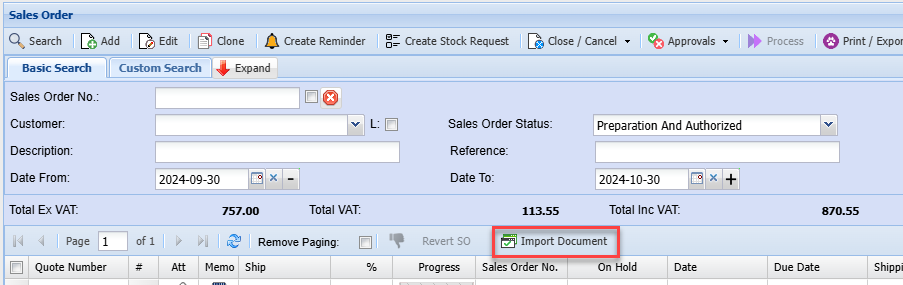](https://hugeerp10.co.za/hsofmanual/uploads/images/gallery/2024-10/AlBimage.png)
[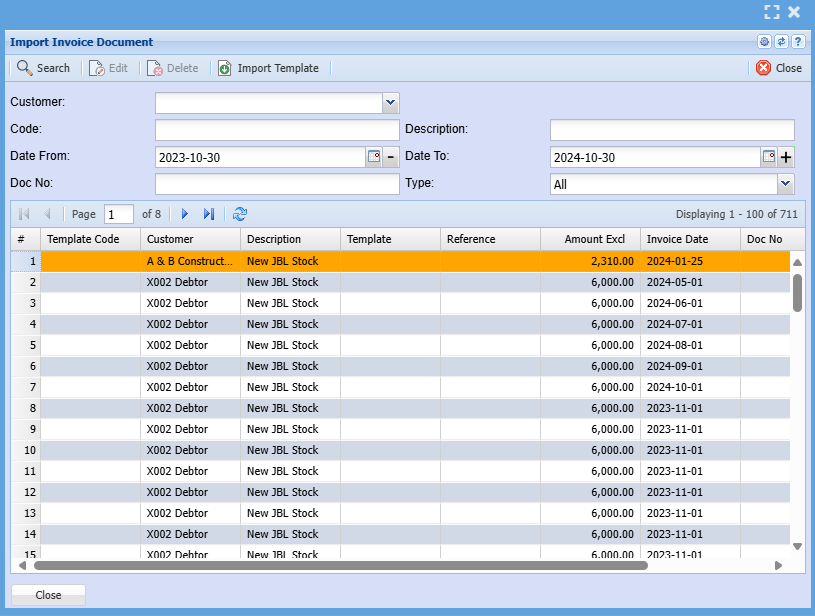](https://hugeerp10.co.za/hsofmanual/uploads/images/gallery/2024-10/ceeimage.png)
Import Template
[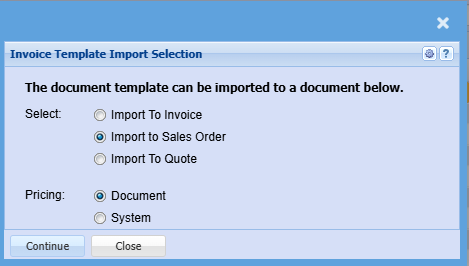](https://hugeerp10.co.za/hsofmanual/uploads/images/gallery/2024-10/1w7image.png)
---
#### Approvals
[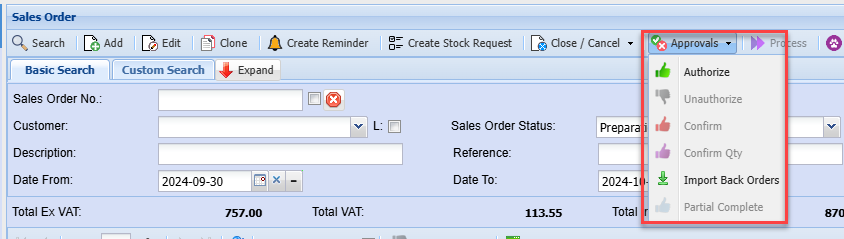](https://hugeerp10.co.za/hsofmanual/uploads/images/gallery/2024-10/CdSimage.png)
**Import Back Orders**
[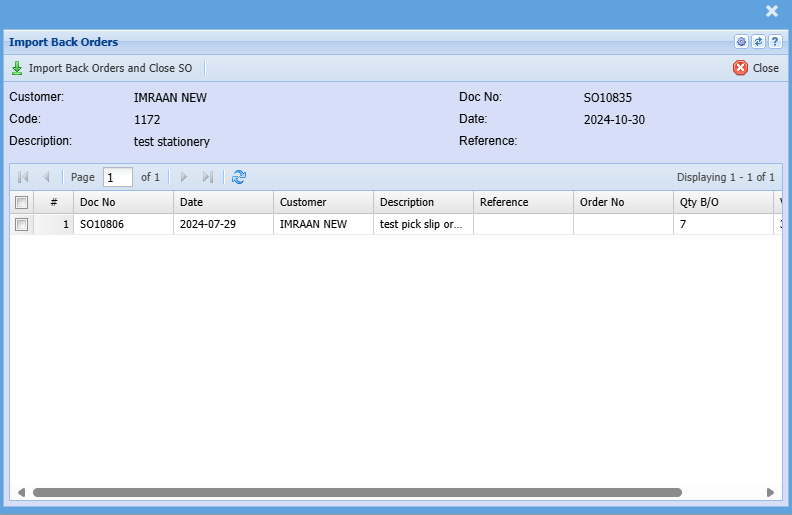](https://hugeerp10.co.za/hsofmanual/uploads/images/gallery/2024-10/TBoimage.png)
---
##### Import / Export
[](https://hugeerp10.co.za/hsofmanual/uploads/images/gallery/2024-10/xCvimage.png)
[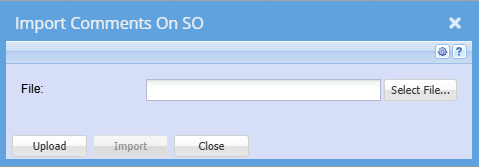](https://hugeerp10.co.za/hsofmanual/uploads/images/gallery/2024-10/MYNimage.png)
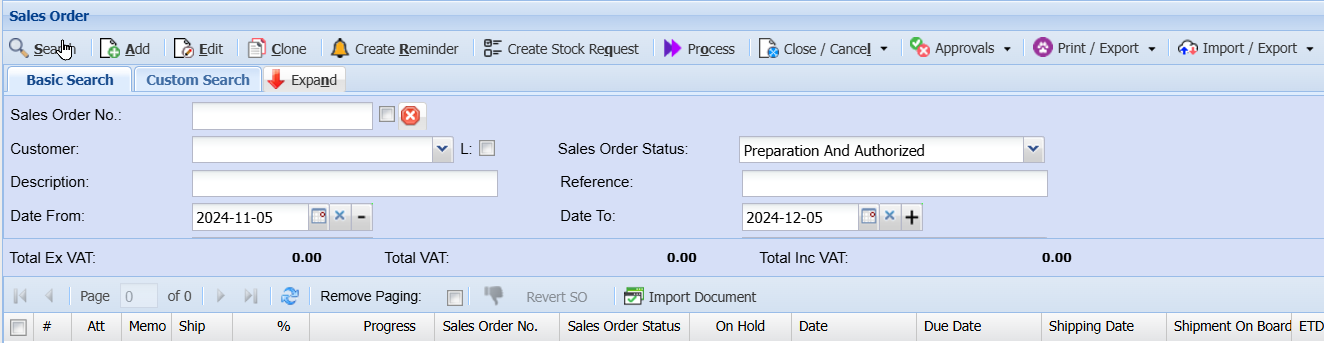
#### Keyboard quick keys
Quick keys help access functions using the keyboard
Used with Alt + Letter
[](https://hugeerp10.co.za/hsofmanual/uploads/images/gallery/2024-12/7b7image.png)
| **S**earch | Alt + s | Search for Quotes |
| **A**dd | Alt + a | Add a new Quote |
| **E**dit | Alt + e | Edits the Quote that is highlighted |
| **C**lone | Alt + c | Clone the highlighted Quote |
| Create **R**eminder | Alt + r | Creates a reminder to highlighted Quote |
| Create Stock Re**q**uest | Alt + q | Opens the dialog window for Stock Request |
| Pr**o**cess | Alt + o | Process Sales Order |
| **P**rint Sales Order | Alt + p | Print Sales Order |
| Expa**n**d / Co**n**tract | Alt + n | Expands / Contracts the header section of the window |
| Close / Cance**l** | Alt + l | Focus on the Close / Cancel split button |
| Tab Basic Search | Alt + 1 | Basic Search |
| Tab Custom Search | Alt + 2 | Custom Search |
# Add Sales Order
#### Detail Tab
**Debtors Module> Activity> Sales Order**
The Sales Orders screen will open
To search for existing Sales Orders, select your search criteria and click search
Search criteria can be sales order description, order number, customer name, etc
Select a date range
To create a new Sales Order, Click the Add Button as shown below
[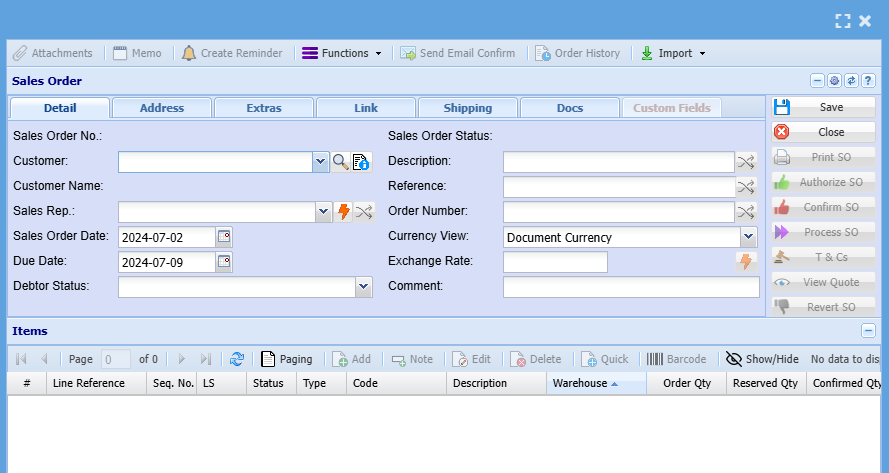](https://hugeerp10.co.za/hsofmanual/uploads/images/gallery/2024-07/vNwimage.png)
After clicking Add the screen below will appear
[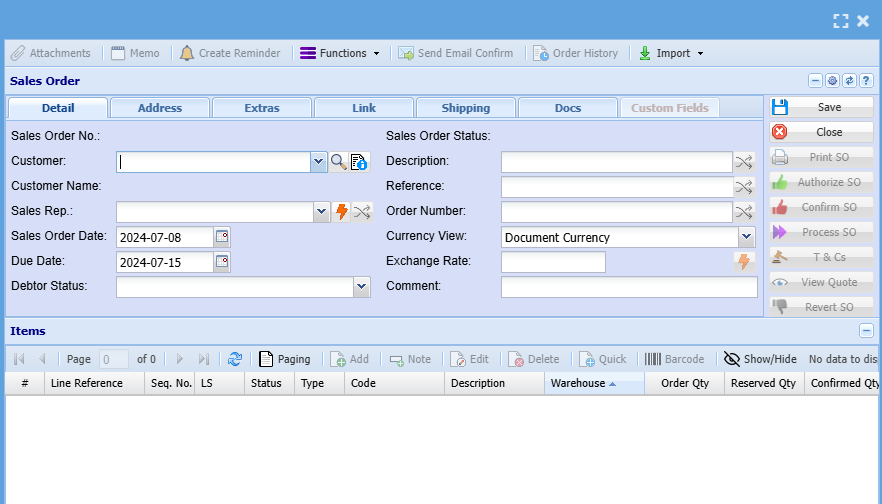](https://hugeerp10.co.za/hsofmanual/uploads/images/gallery/2024-07/ZW8image.png)
Add information below so that the greyed-out buttons can appear:
- Select the customer/ debtor you are creating a sales order for, from the drop-down menu.
- Select the sales rep on the drop-down selection, if applicable
- Update dates if necessary
- Add description and reference
- Add order number, if applicable
Then, once you are done adding all relevant information click Save and all the greyed-out buttons will be opened as shown
[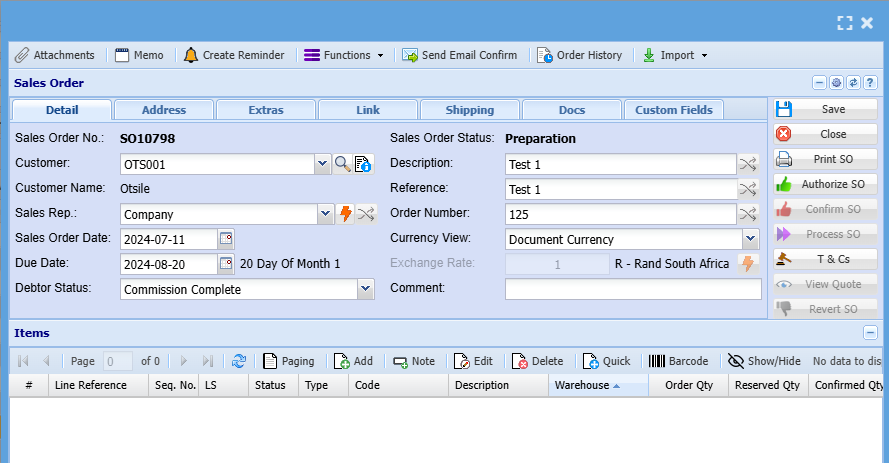](https://hugeerp10.co.za/hsofmanual/uploads/images/gallery/2024-08/byximage.png)
---
#### Add Line Items
You can only add a line item after adding all the necessary information needed on the sales order details tab and all greyed buttons have been greyed out
To add line items click on the middle Add Button shown below
[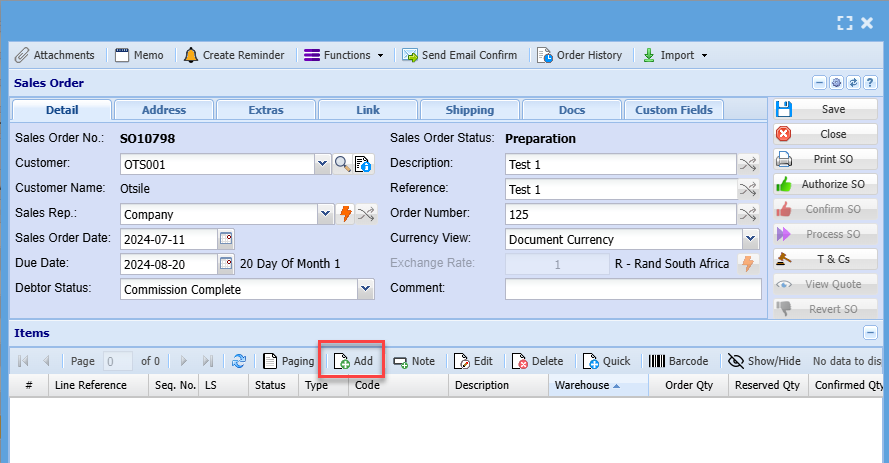](https://hugeerp10.co.za/hsofmanual/uploads/images/gallery/2024-08/kRGimage.png)
Then the screen below will appear
[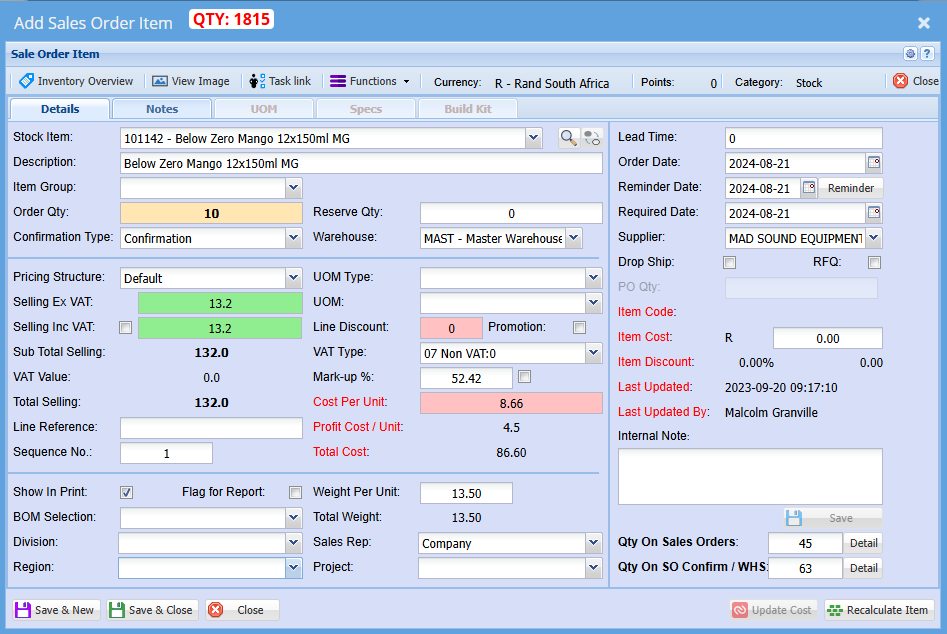](https://hugeerp10.co.za/hsofmanual/uploads/images/gallery/2024-08/v78image.png)
Select the item you wish to create a sales order for on the drop-down selection
You can also search for the item by using part of the code or the name of the item
You can change the description to match what you want to see on a sales order or leave it as it is
Enter the quantity or how many items you creating a sales order for
Make sure pricing is correct
Select a relevant warehouse if you have multiple warehouses
Select the correct VAT Type
Click Save & Close if capturing numerous line items
Click Save & Close if capturing a single line item
Once done
All line items will appear on the grid below
[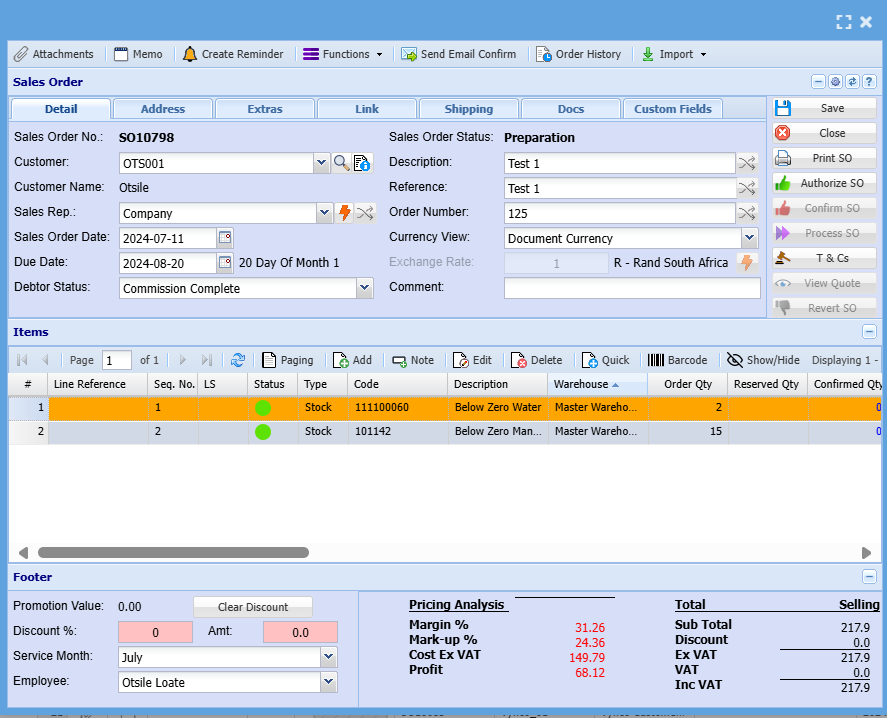](https://hugeerp10.co.za/hsofmanual/uploads/images/gallery/2024-08/ujTimage.png)
After capturing you can send it to a relevant person to authorize the SO
Once a PO is authorized you can confirm it so the warehouse staff can confirm the quantity and start picking stock
---
#### Sales order Printing Options
After clicking confirm the printing options will pop up below:
[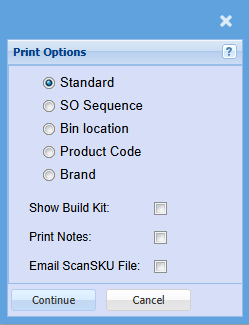](https://hugeerp10.co.za/hsofmanual/uploads/images/gallery/2024-08/IBpimage.png)
Click [here](https://hugeerp10.co.za/hsofmanual/books/bdm-activity/page/sales-order-confirm-qty "Confirm Sales order quantity") to see a manual on how to confirm sales order quantity
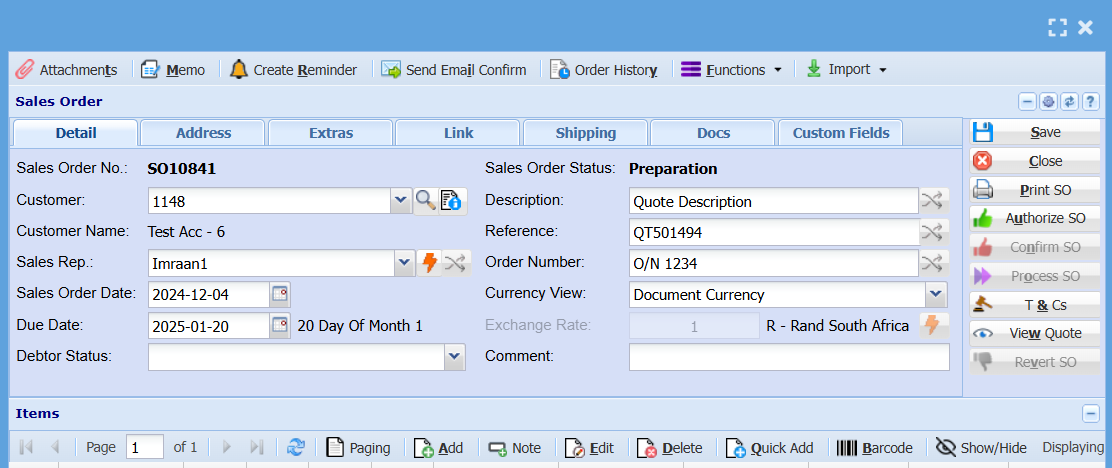
#### Keyboard quick keys for Sales Order Detail
Quick keys help access functions using the keyboard
Used with Alt + Letter
[](https://hugeerp10.co.za/hsofmanual/uploads/images/gallery/2024-12/DJoimage.png)
| Attachmen**t** | Alt + t | Opens the Attachment window |
| **M**emo | Alt + m | Opens the Memo window |
| Create **R**eminder | Alt + r | Opens the Reminder window |
| Send Ema**i**l Confirmation | Alt + i | Sends an email to the contact person on Confirmation of Sales Order |
| Order Histor**y** | Alt + o | Opens the Order History window |
| **F**unctions | Alt + f | Focus on the Function split button |
| **S**ave | Alt + s | Saves the sales order |
| **C**lose | Alt + c | Closes the sales order window |
| **P**rint SO | Alt + p | Print the Sales Order
|
| A**u**thorize SO | Alt + u | Authorize the Sales Order
|
| Co**n**firm SO | Alt + n | Confirm the Sales Order
|
| Pr**o**cess SO | Alt + o | Process the Sales Order
|
| T **&** Cs | Alt + & | Opens the Terms and Conditions window
|
| Vie**w** Quote | Alt + w | Opens the associated quote for viewing (if applicable)
|
| Re**v**ert SO | Alt + v | Resets the Sales Order to Preparation Status
|
| **A**dd
| Alt + a | Opens a New Sales Order Line Detail window
|
| **E**dit | Alt + e | Opens the Sales Order Line Detail window for the selected sales order line
|
| **D**elete | Alt + d | Deletes the selected line from the sales order
|
| **Q**uick Add | Alt + q | Opens the quick add window to add a sales order line to the sales order
|
| **B**arcode | Alt + b | Opens the Barcode window to add an item using barcode scanning
|
| Attachment Button | Alt + 0 | Focus on the Attachment button |
| Tab Sales Order Detail | Alt + 1 | Sets the tab notebook to the Sales Order Detail tab |
|
| Alt + 2 | Pressing Alt + 2 repeatedly will step through the various tabs in the tabnotebook |
#### Keyboard quick keys for Sales Order Line Item Detail
Quick keys help access functions using the keyboard
Used with Alt + Letter
[](https://hugeerp10.co.za/hsofmanual/uploads/images/gallery/2024-12/eQpimage.png)
[](https://hugeerp10.co.za/hsofmanual/uploads/images/gallery/2024-12/TSTimage.png)
| Inventory **O**verview | Alt + o | Opens the Inventory Overview window |
| View **I**mage | Alt + i | Opens the View Image window |
| **T**ask Link | Alt + t | Opens the Special Item window |
| **C**lose | Alt + c | Closes the Sales Order window |
| **R**eminder | Alt + r | Opens the Reminder window |
| **F**unctions | Alt + f | Focus on the Function split button |
| Save & **N**ew | Alt + n | Saves the Sales Order Item Detail window and opens a new SO Item window
|
| Sa**v**e & Close | Alt + v | Saves the Sales Order Item Detail window and then closes the window
|
| **U**pdate Cost
| Alt + u | Updates the cost of the selected item to the latest cost price
|
| Reca**l**culate Item | Alt + l | Recalculates the Sales Order Item's values Mark-Up %, Costs etc.
|
| Inventory Overview | Alt + 0 | Focus on the Inventory Over button
|
| Tab Quote Item Detail | Alt + 1 | Sets the tab notebook to the Quote Item Detail tab |
|
| Alt + 2 | Pressing Alt + 2 repeatedly will step through the various tabs in the tab notebook |
# Advanced Add Sales Order
Adding a new Sales order
Click on Add button to add a new sales order
.png)
Sales order window
.png)
### Sales Order
Choose The Debtor by entering a customer Code
Detail Tab
.png)
| **Short Details** | Short Details Of the sales Order Item |
| **Reference** | Give it A Reference |
| **Order Number** | Enter an Order Number |
| **Sales Rep** | Select a Sales Rep |
---
Address Tab
.png)
---
Extras Tab
.png)
---
### Sales Order Lines
Details tab
.png)
Category select the category from the drop down arrow
Item Code to select an item code by hitting enter or using the”? “Long search button
| Item Description | comes up when the code is selected but can be edited |
| Order quantity | quantity of Items Needed |
Reserve Quantity this is the allocated quantity Company:
Selling Including Vat
If the Selling price including vat is not ticked
The Selling Including Vat will Be Greyed Out Company:
---
#### Authorise Sales Order
Changes The sales order Status to Authorized
.png)
#### Unauthorize Sales Order
Reverts the Authorized Sales order back to preparation Stage
.png)
---
#### Change Warehouse
The change warehouse allows the user to change the warehouse selected on the items lines to another warehouse that has the stock available.
.png)
---
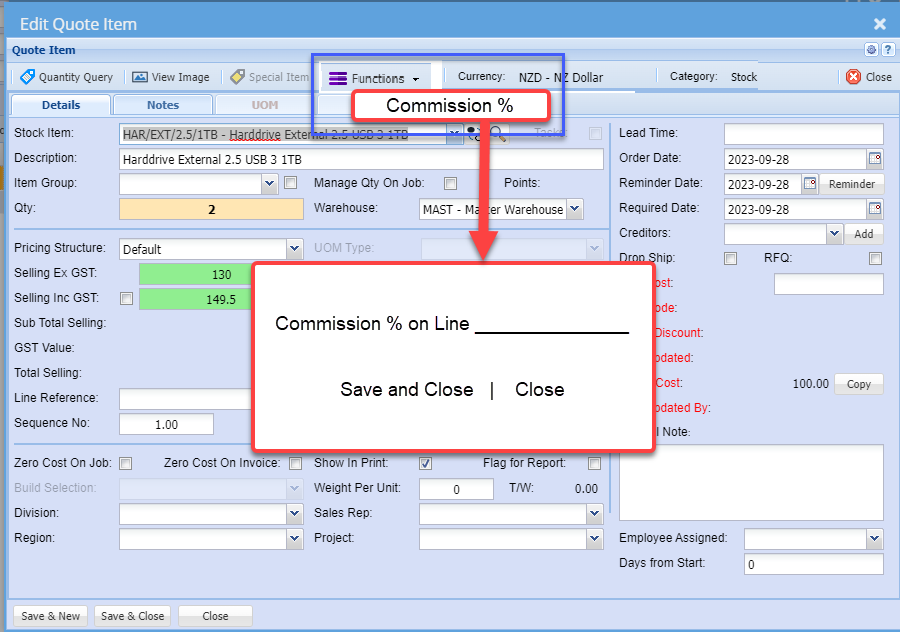
#### Commission line item percentage update
Commission line item percentage will be updated to documents at the time it adds the line.
There is a new field on each document line to handle the line percentage.
All documents to contain this line percentage
1. Quote
2. Sales Order
3. Invoice
4. Credit Note
When promoting the document, the original percentage will be copied between the documents.
When the Sales order is promoted from Sales order to commercial invoice, the percentage will be worked out on the percentage saved on the line.
If the commission line is blank, then the commission % will be gotten from the item line
[](https://hugeerp10.co.za/hsofmanual/uploads/images/gallery/2023-10/t48image.png)
---
#### Import sales order items
Debtors>Activity> Sales Order> Import Items
Importing items in the system is the quickest way to bring in large data at once and this can be done for a sales order items
1. Click on Import items
2. Select your file to upload
3. Import
4. and close.
### .png)
The file to be imported must be in a CSV format.
Click on the Select Files… button to open the navigate window allowing the user to navigate to the file to be imported.
Once the desired file has been located either double click on the file or click the Open button.
Now click on the Upload button. If the upload was successful a window will appear confirming that the upload was successful. Click Ok.
The Import button now becomes enabled allowing the user to click on the Import button to import the file.
An Import Report will open displaying any errors in the import or displaying the successful sales order items import.
Please Note: All successful records will be imported, and errors will be skipped. The column headings can be left in the import file providing that the heading is as per the sample below.
Confirmation Type
The 3 types to be used are:
| Confirmation |
| Invoice |
| Invoice & Process |
Import File Layout
| No.
| Heading
| Value
|
| 1
| ItemCode
| PEN001
|
| 2
| Description
| Red Pen
|
| 3
| OrderQTY
| 2
|
| 4
| ReserveQty
| 0
|
| 5
| ConfirmationType
| Confirmation
|
| 6
| SellingExVAT
| 100
|
| 7
| CostExVAT
| 75
|
| 8
| Warehouse
| Master
|
| 9
| LineDiscount
|
|
| 10
| LineRef
|
|
| 11
| Notes
|
|
| 12
| ItemGroup
|
|
| 13
| Points
| 15
|
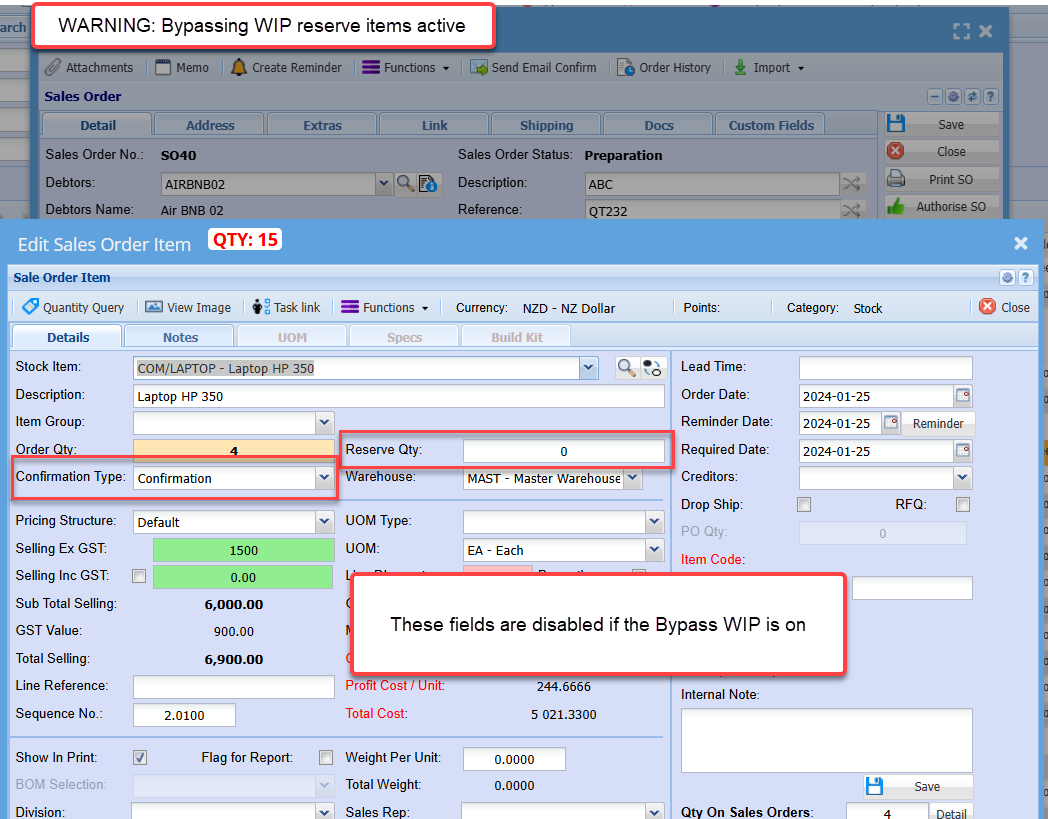
WARNING:
Activating this tick will not reserve stock and does not check for stock.
Full sales order will be moved to invoice, no part sales orders used
No part sales orders are allowed if Bypass WIP is active
[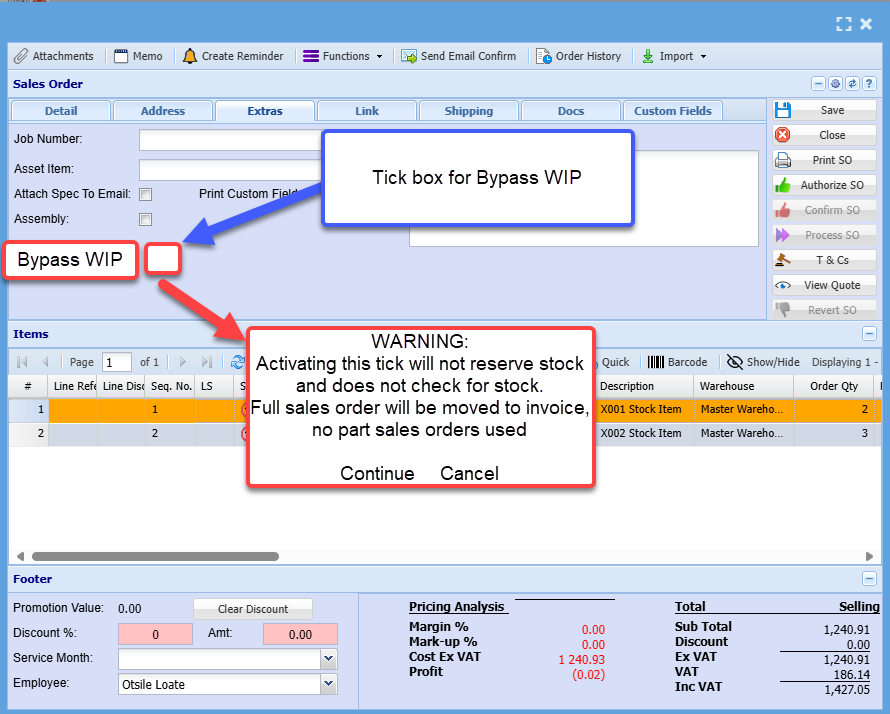](https://hugeerp10.co.za/hsofmanual/uploads/images/gallery/2024-08/qt5image.png)
Sales order warning
[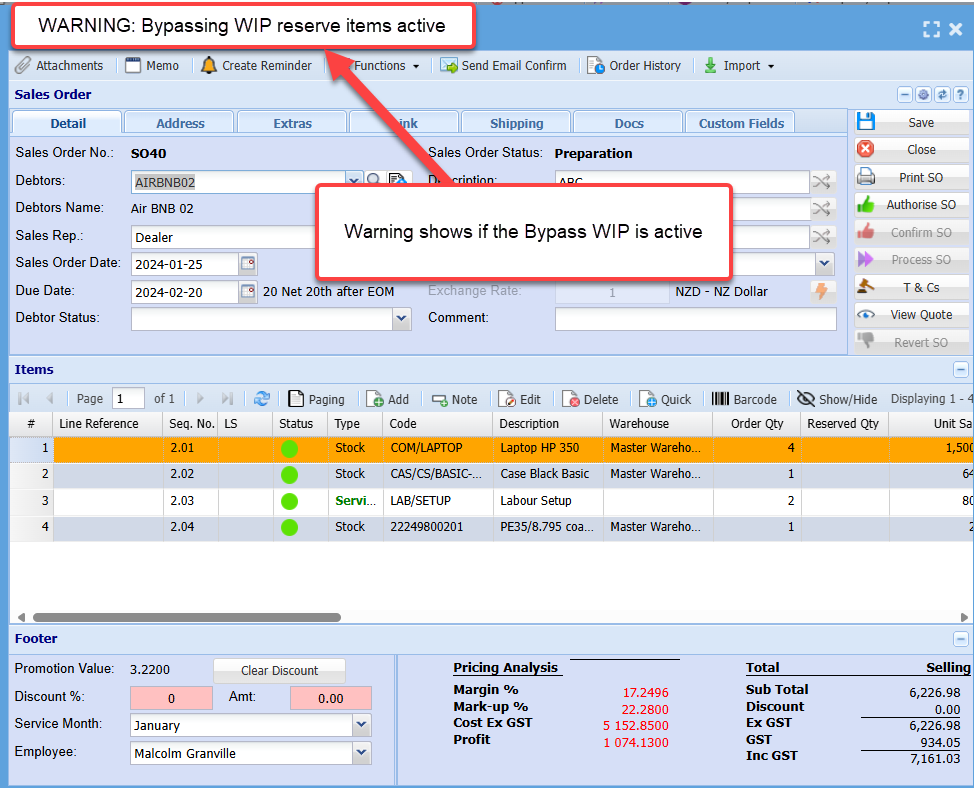](https://hugeerp10.co.za/hsofmanual/uploads/images/gallery/2024-08/BqAimage.png)
Sales order lines disabled
[](https://hugeerp10.co.za/hsofmanual/uploads/images/gallery/2024-08/RwOimage.png)
---
#### Sales Order Confirmation
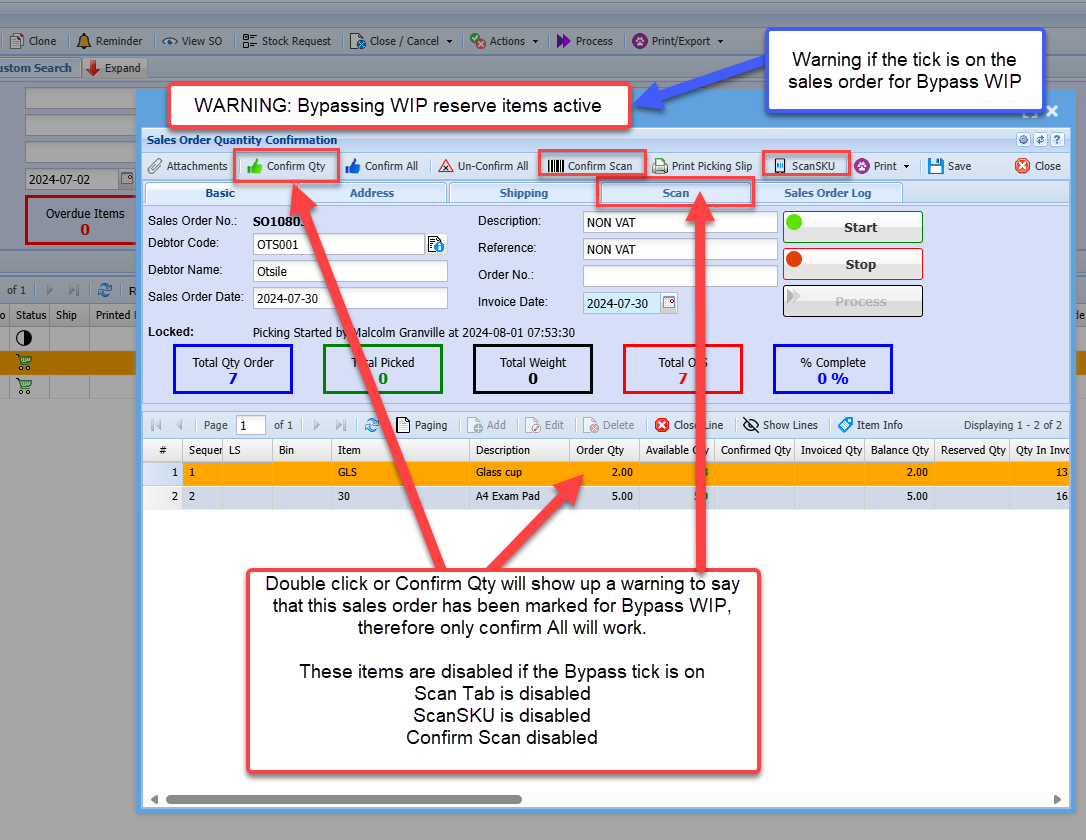
Individual confirms are disable if the Bypass WIP is on
Double click or Confirm Qty will show up a warning to say that this sales order has been marked for Bypass WIP, therefore only confirm All will work.
These items are disabled if the Bypass tick is on
Scan Tab is disabled
ScanSKU is disabled
Confirm Scan disabled
Confirm All works and will confirm all the items, whether there is stock or not.
The reason for this is because no stock movements take place for WIP and no stock is reserved.
[](https://hugeerp10.co.za/hsofmanual/uploads/images/gallery/2024-08/nNvimage.png)
Only Confirm All and Un-confirm All is available
Confirm All ignores quantity on hand as it is not moving any items to WIP or reserving items
[](https://hugeerp10.co.za/hsofmanual/uploads/images/gallery/2024-08/Lfzimage.png)
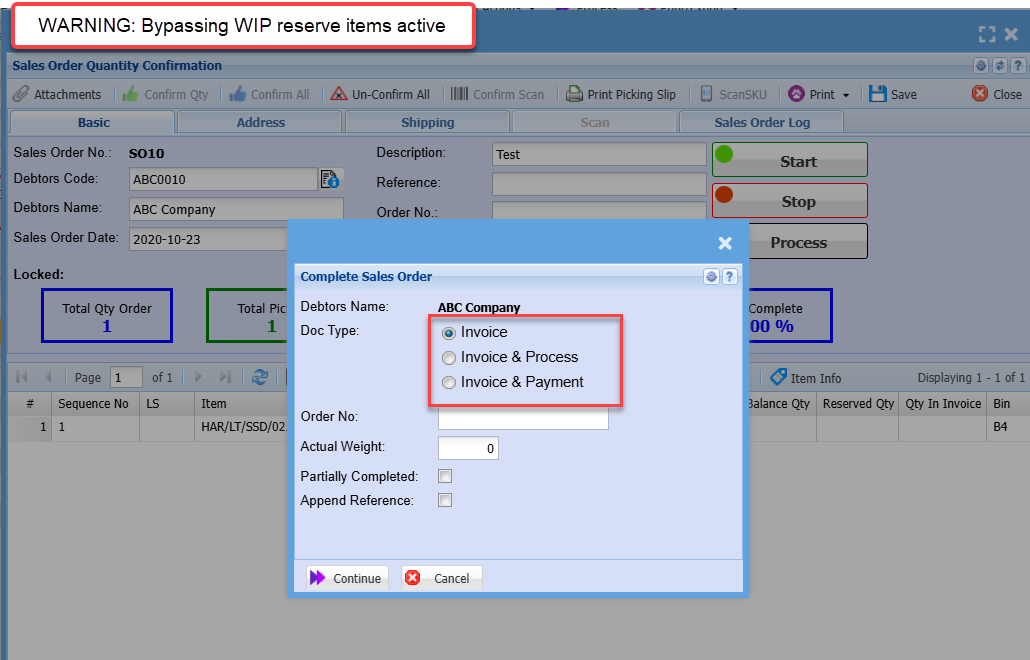
Processing a Bypass WIP sales order
| **Invoice** | This moves the sales order to invoice but does not reserve anything in the invoice WIP or moves anything out of sales order WIP as it did not have anything reserved in sales order WIP
This does the same function as the Sales order to invoice release WIP
|
| **Invoice and Process** | Processes the invoice but does not take anything out of sales order WIP or invoice WIP it will run like a normal invoice taking stock out of one hand |
| **Invoice and Payment** | Processes the invoice but does not take anything out of sales order WIP or invoice WIP it will run like a normal invoice taking stock out of one hand |
[](https://hugeerp10.co.za/hsofmanual/uploads/images/gallery/2024-08/t7nimage.png)
# Serial Number Import (Sales Order Confirm)
When picking large orders leaving from CSN, serials can be picked using this import.
An example XML file is attached.
See attached video. [Click Here](https://hugeerp.co.nz/manual/attachments/33)
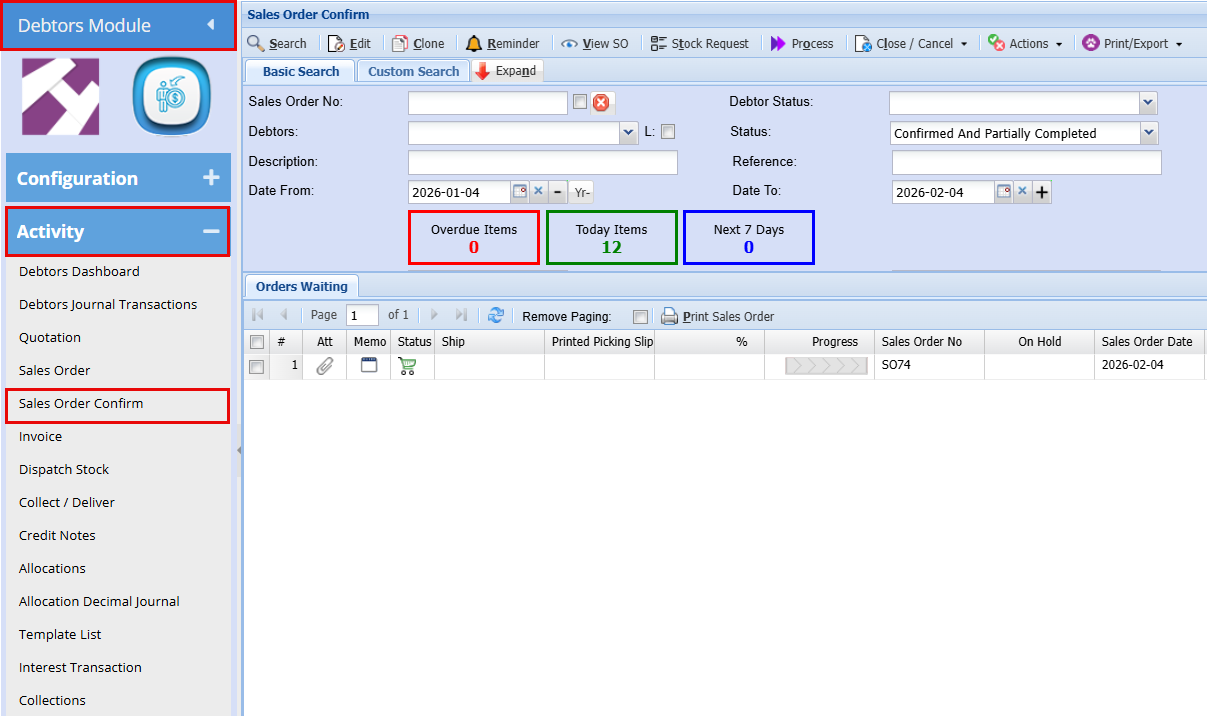
**Debtors Module > Activity > Sales Order Confirm**
- Find the sales order you are wanting to import serial numbers for
- Double click to open the sales order
[](https://hugeerp.co.nz/manual/uploads/images/gallery/2026-02/LYdimage.png)
- Click **Start** to begin your picking. You won’t be able to import serial numbers until you have clicked **Start**.
[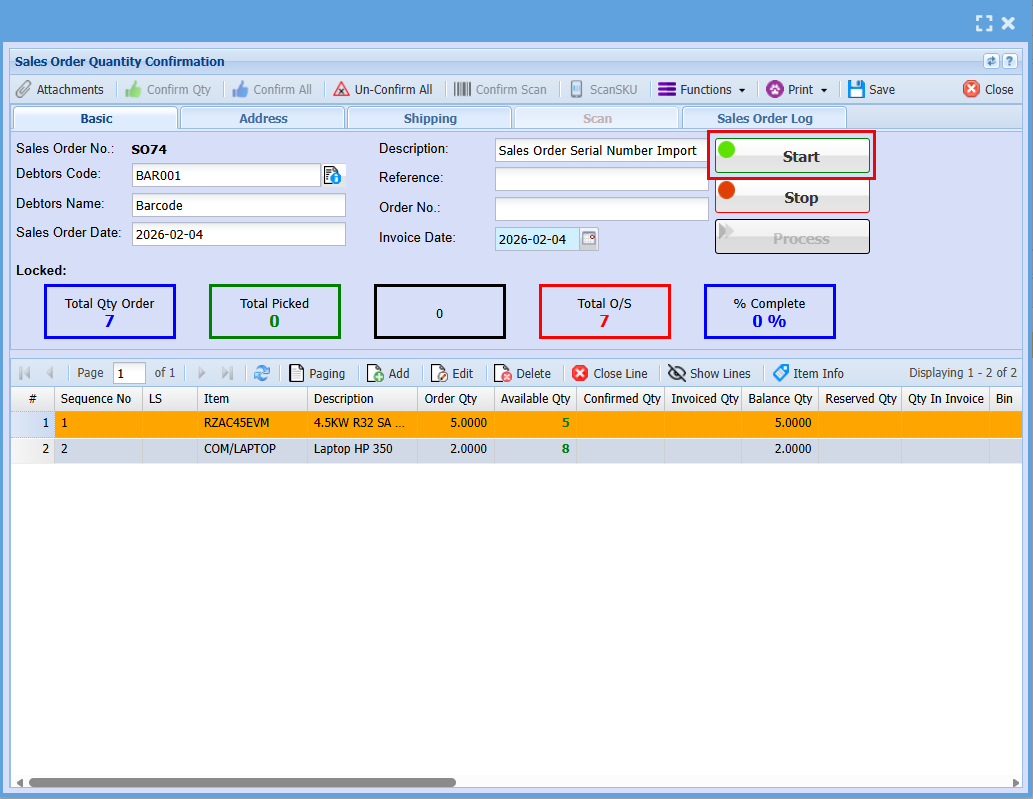](https://hugeerp.co.nz/manual/uploads/images/gallery/2026-02/EZBimage.png)
- Click the "**Functions**" drop-down menu
- Click on "**Serial Import/Export**"
[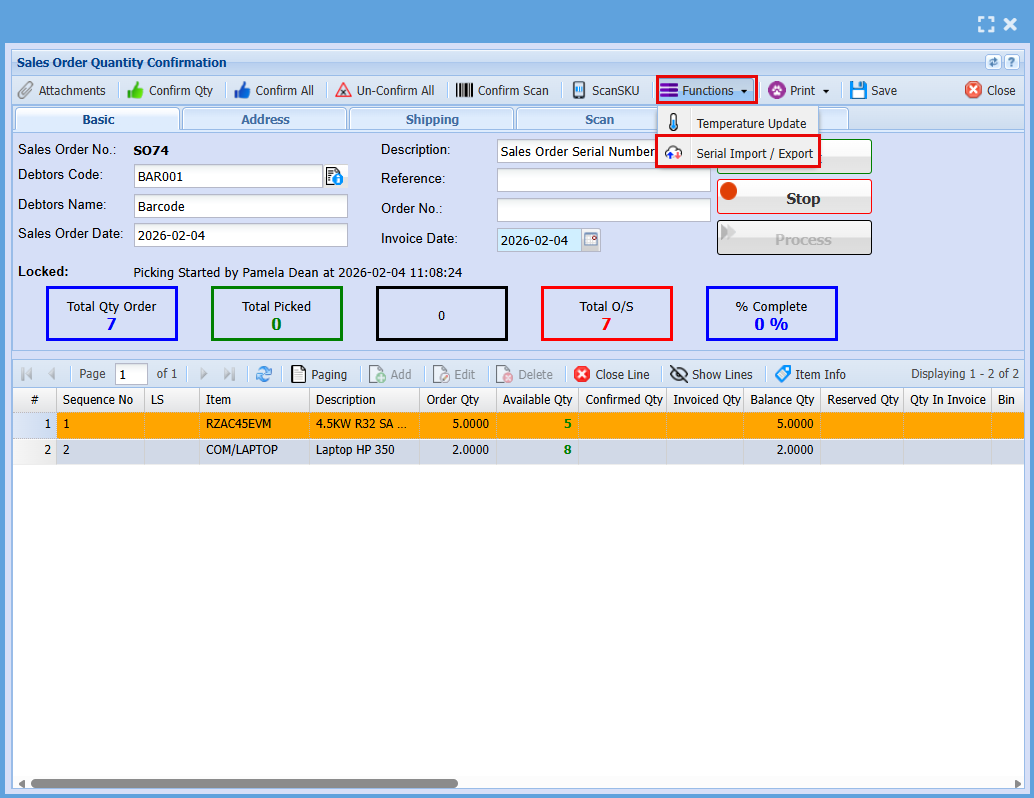](https://hugeerp.co.nz/manual/uploads/images/gallery/2026-02/EsPimage.png)
A window will appear allowing you to export a template that can be used for the import.
- Click on "**Template**" this will download an excel file
[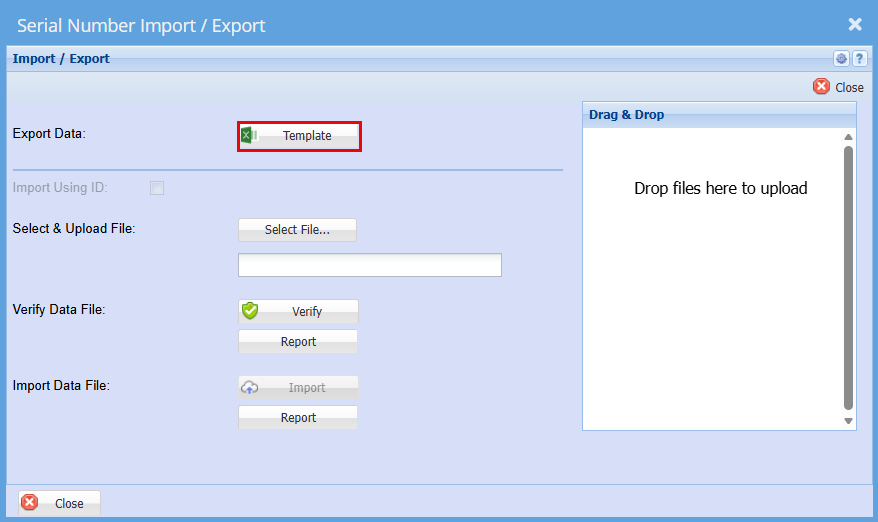](https://hugeerp10.co.za/hsofmanual/uploads/images/gallery/2026-02/mNtimage.png)
- Enter the serial numbers into the spreadsheet, with each item listed on a separate line as shown below.
- Save the file to your computer.
[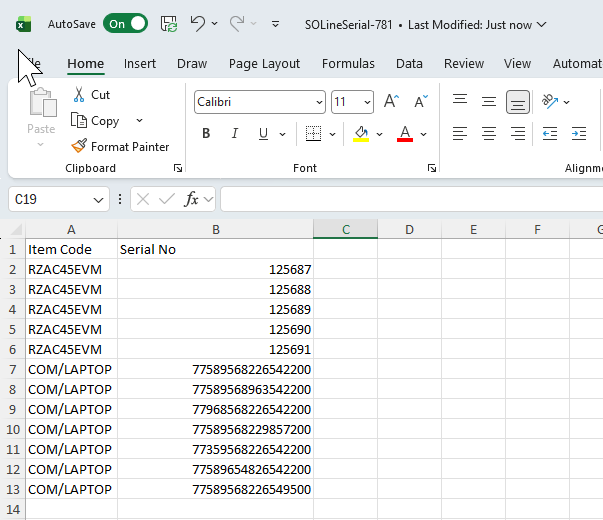](https://hugeerp.co.nz/manual/uploads/images/gallery/2026-02/OErimage.png)
- Go back to the "**Serial Number Import/Export**" Screen
- Click "**Select File**"
[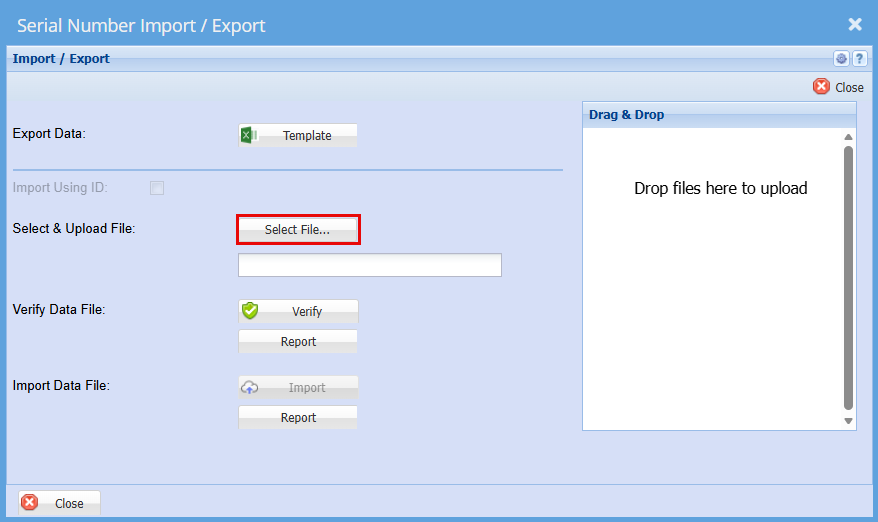](https://hugeerp10.co.za/hsofmanual/uploads/images/gallery/2026-02/xzzimage.png)
- Find the file you have saved.
- "**Double Click**" the file or click "**Open**"
[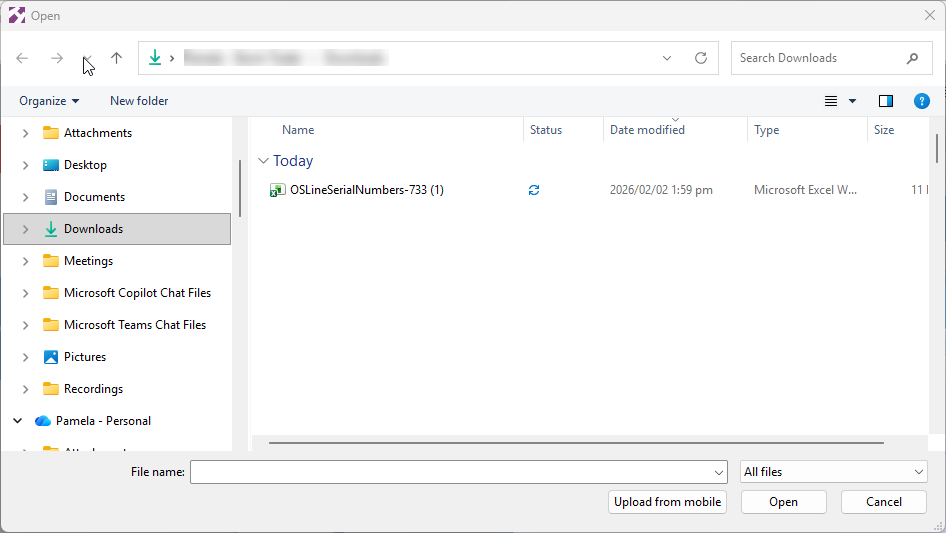](https://hugeerp10.co.za/hsofmanual/uploads/images/gallery/2026-02/wz2image.png)
You should get a Successful Import
- Click "**Verify**"
[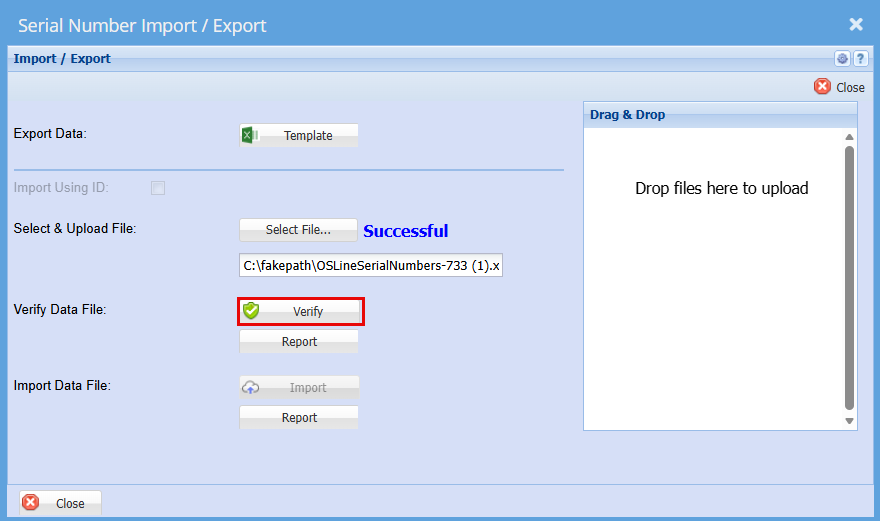](https://hugeerp10.co.za/hsofmanual/uploads/images/gallery/2026-02/QRLimage.png)
You should again get a successful for verification
- Click "**Import**"
[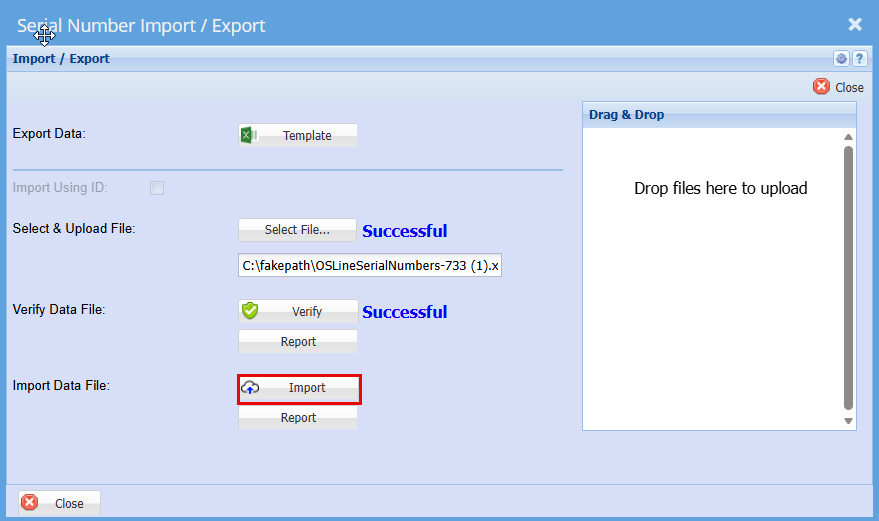](https://hugeerp10.co.za/hsofmanual/uploads/images/gallery/2026-02/FNRimage.png)
You should then get a Successful for Import.
Click "**Close**"
[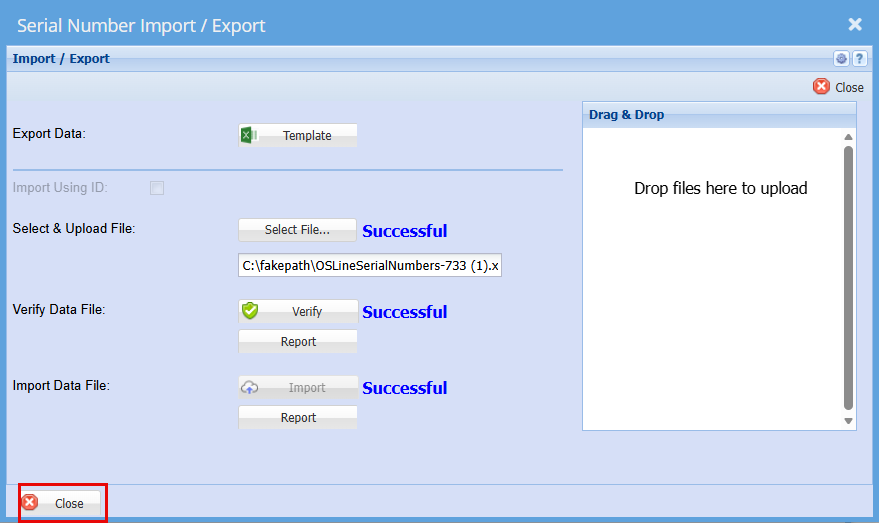](https://hugeerp10.co.za/hsofmanual/uploads/images/gallery/2026-02/GZ6image.png)
You can go check to make sure by clicking the "**Show Lines**" button
You will see the "**Received Qty**" values update.
[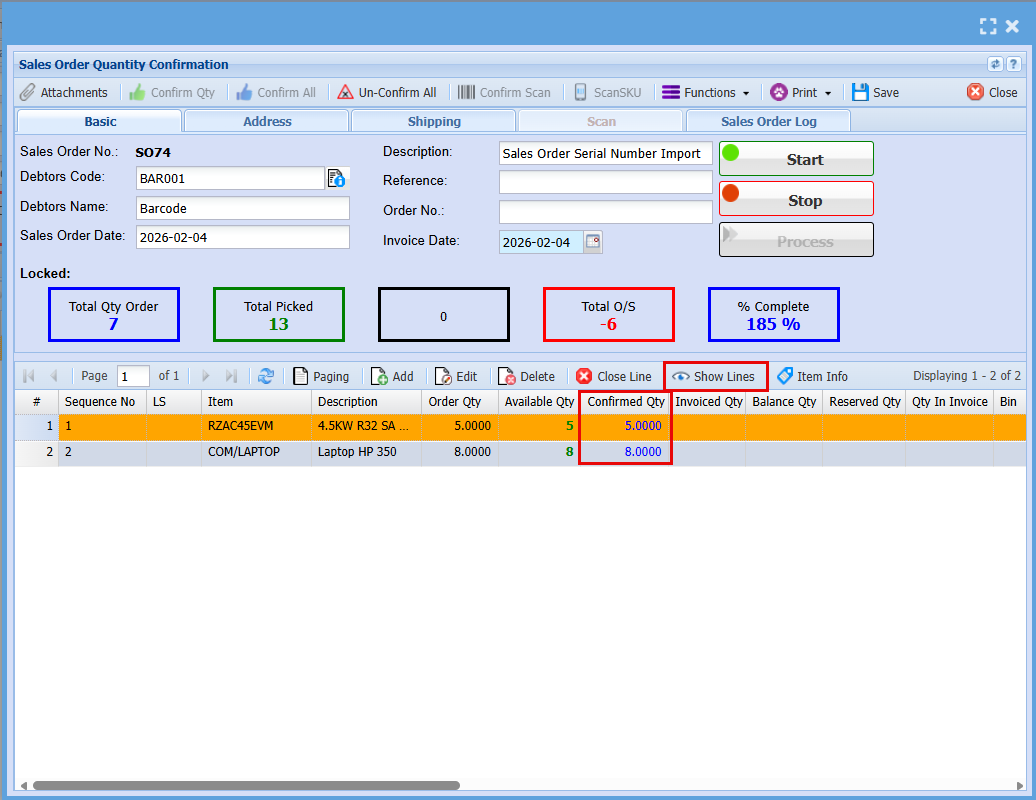](https://hugeerp.co.nz/manual/uploads/images/gallery/2026-02/bcmimage.png)
# Sales Order Confirm
Sales order confirm (Warehouse Dispatch)
# Sales Order functions
Multiple functions for Sales Order Confirm
#### Picking started
When picking is started on a sales order, the Add, Edit and Delete buttons are disabled.
One can only add or edit items when not picking
[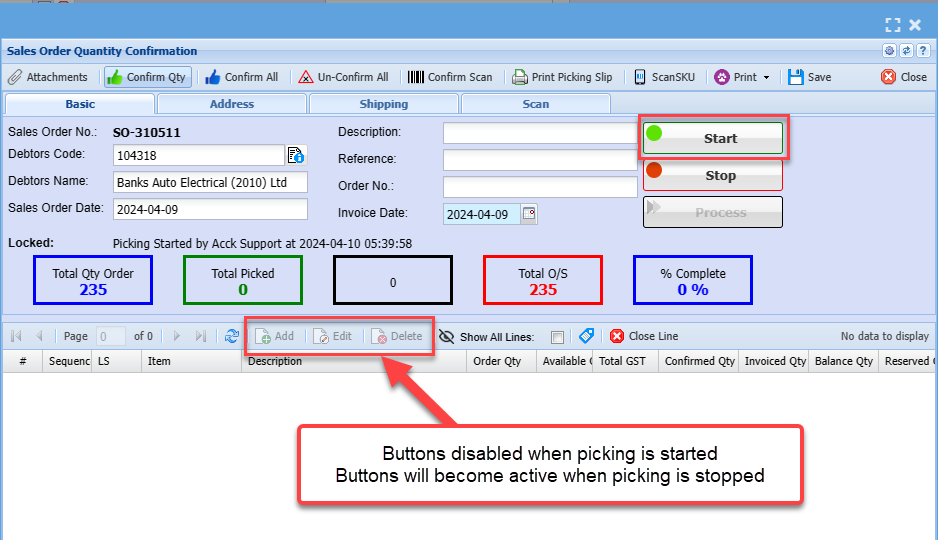](https://hugeerp10.co.za/hsofmanual/uploads/images/gallery/2024-04/Ovwimage.png)
---
#### Sales Order code disabled
Sales order editing a line will disable changing the item if
1. The line item has confirmed the quantity
2. The line item has invoiced quantity
[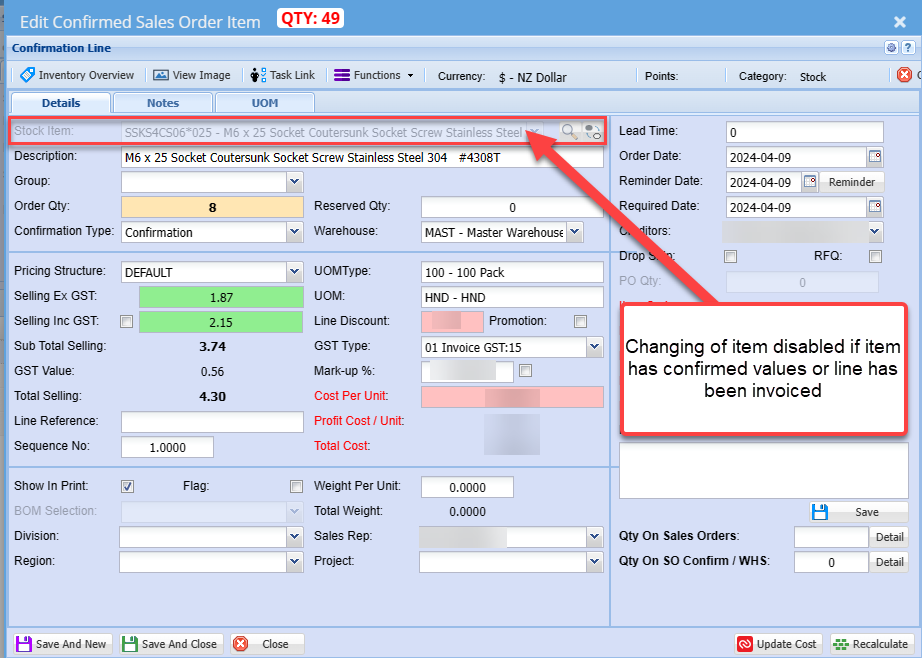](https://hugeerp10.co.za/hsofmanual/uploads/images/gallery/2024-04/AQwimage.png)
Lines items disabled on confirmed and invoiced quantities
[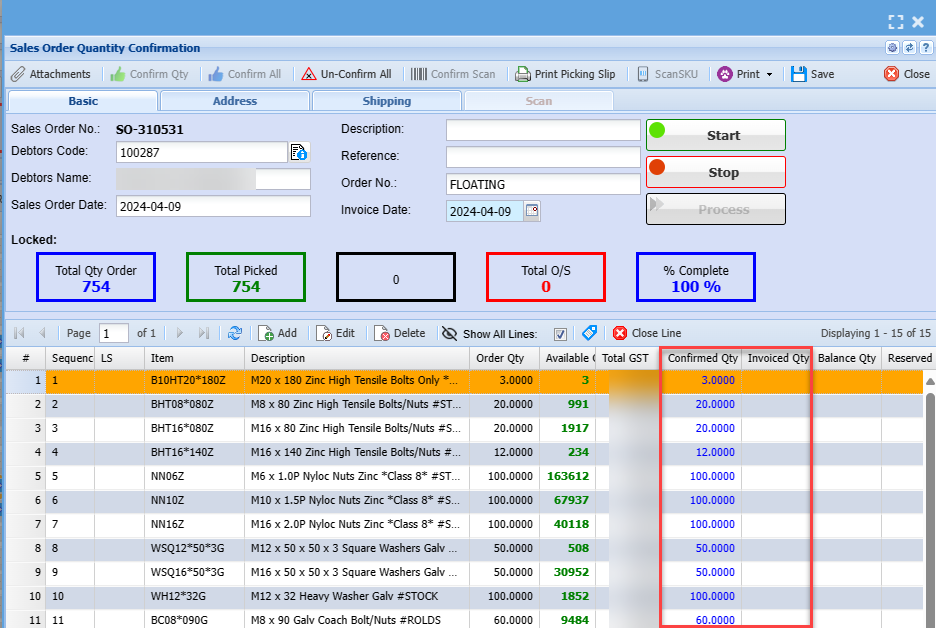](https://hugeerp10.co.za/hsofmanual/uploads/images/gallery/2024-04/LIlimage.png)
---
#### Unlocking a Sales Order in Started picking state
When a sales order is has a blue lock, it means that it is in the process of been picked and is locked by the user picking.
To unlock the sales order, unlock
[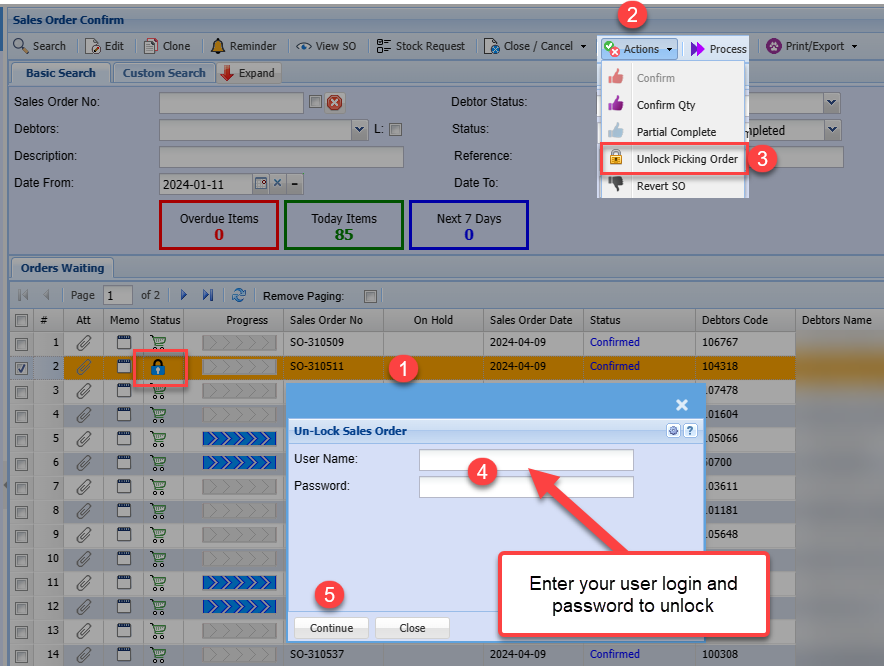](https://hugeerp10.co.za/hsofmanual/uploads/images/gallery/2024-04/8fJimage.png)
---
##### Debtor Info
[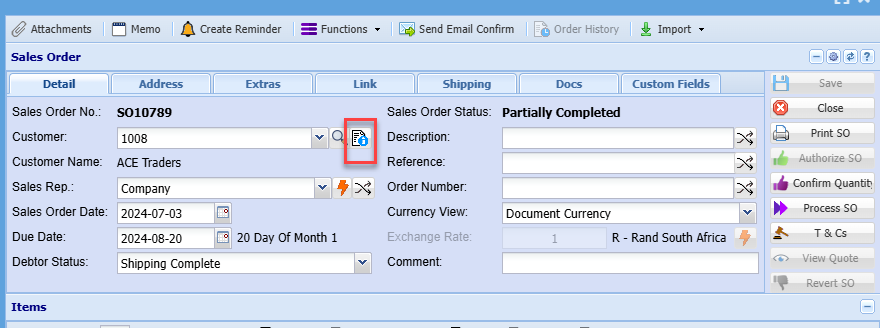](https://hugeerp10.co.za/hsofmanual/uploads/images/gallery/2024-10/2lTimage.png)
[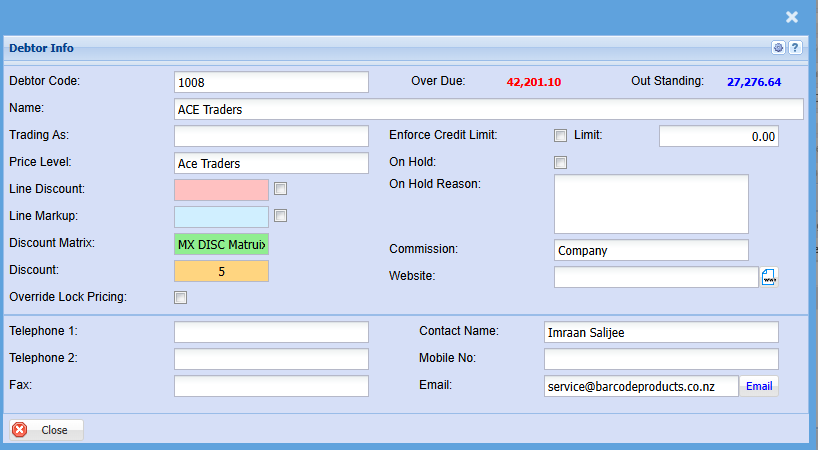](https://hugeerp10.co.za/hsofmanual/uploads/images/gallery/2024-10/GDYimage.png)
---
#### Actions
[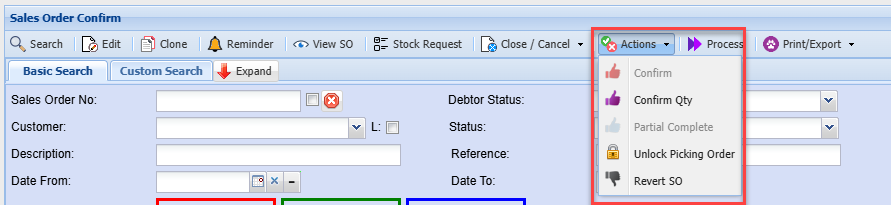](https://hugeerp10.co.za/hsofmanual/uploads/images/gallery/2024-10/x6dimage.png)
##### Unlock Picking Order
[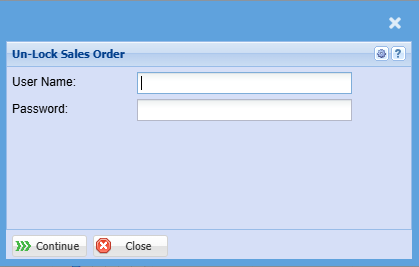](https://hugeerp10.co.za/hsofmanual/uploads/images/gallery/2024-10/NjRimage.png)
---
#### Print Picking Slip
[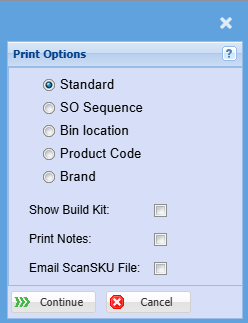](https://hugeerp10.co.za/hsofmanual/uploads/images/gallery/2024-10/O9Zimage.png)
# Sales Order Confirm Qty
Confirming your quantity on the sales order can be done in multiple ways.
1. Receive quantity single check items
2. Receive all quantity
3. Barcode scan products to check the correct stock picked and quantity
4. Import ScanSKU barcode scan order
Once a sales order is under confirmed status
Go to Debtors **Module> Activity> Sales Order Confirm**
To confirm quantity click start
[](https://hugeerp10.co.za/hsofmanual/uploads/images/gallery/2024-08/K1timage.png)
---
#### Confirm Qty
Confirm qty allows you to confirm each stock item based on how much stock needs to be invoiced out or is available to be picked
Click confirm qty
The screen below will pop up
Then confirm all quantities, click next if you do not wish to confirm qty
If you add a number you wish to confirm and click next, the confirmed qty won't save
Click qty add the quantity you want to confirm then save and new to confirm a new stock item
[](https://hugeerp10.co.za/hsofmanual/uploads/images/gallery/2024-08/WAZimage.png)
##### Serial number confirm and import
File is a .csv file layout
First column is SerialNumber
[](https://hugeerp10.co.za/hsofmanual/uploads/images/gallery/2026-01/N6Rimage.png)
---
#### Confirm All
This is a quick button to confirm that all quantities on the sales order are fully received.
Click[ here](https://hugeerp10.co.za/hsofmanual/books/bdm-activity/page/sales-order-unconfirm-quantity "Un-Confirm All") for a step-by-step manual on un-confirm All
[](https://hugeerp10.co.za/hsofmanual/uploads/images/gallery/2024-08/I3Wimage.png)
---
#### Un-Confirm All
Un-Confirm All allows you to clear all confirmed quantities on a sales order
[](https://hugeerp10.co.za/hsofmanual/uploads/images/gallery/2024-08/jREimage.png)
---
Barcode Confirm Scan
Using a barcode scanner, scan each item to confirm that it is the correct item with the correct picked stock item
[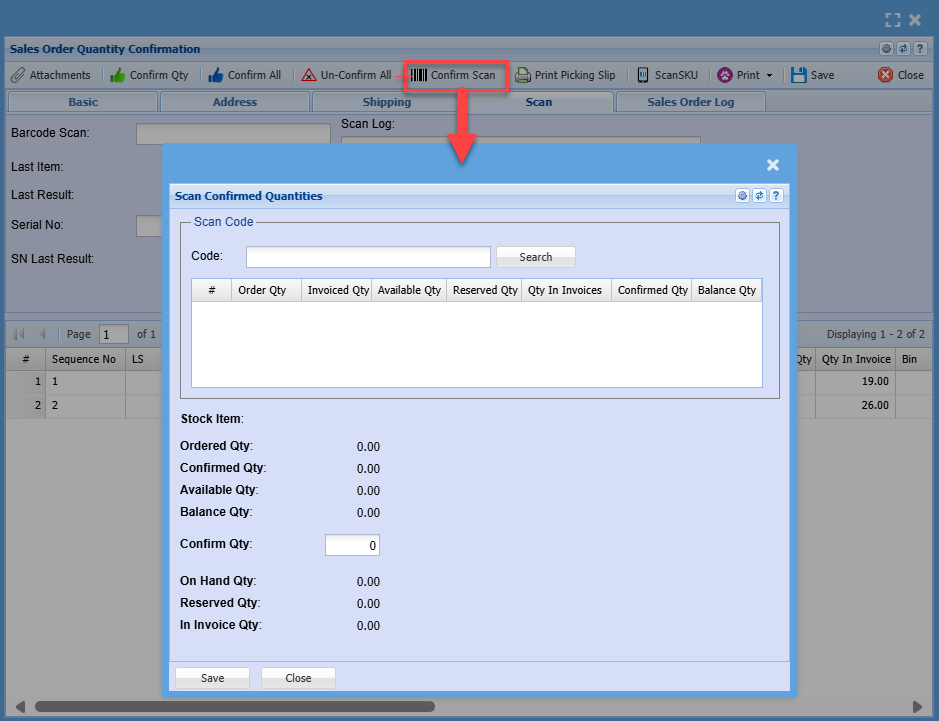](https://hugeerp10.co.za/hsofmanual/uploads/images/gallery/2024-08/bzoimage.png)
---
# Sales Order Unconfirm Quantity
**Go to Debtors Module> Activity> Sales Orders**
Search the required Sales order
You need to change the search screen status to find Sales orders that have already been confirmed and migrated from preparation status
[](https://hugeerp10.co.za/hsofmanual/uploads/images/gallery/2024-08/MR5image.png)
Once you have found the required sales order, Double-click the line
The sales order will open and you can verify the details of the order
You will be able to see the respective quantities confirmed on each item line
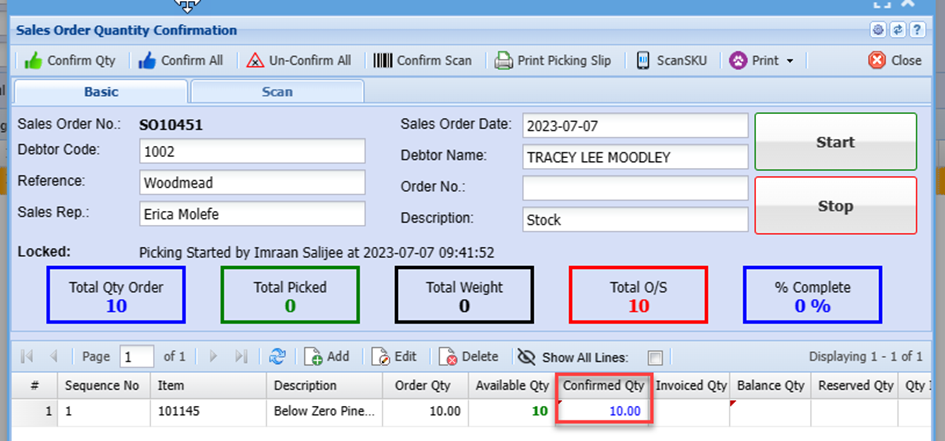
Note: Once item quantities have been confirmed, the line will be hidden from the grid. This is so the user can easily see which items are still outstanding in cases where you have large orders with many item lines.
To unhide these confirmed lines, click on Show All Lines button
This displays all the sales order item lines
[](https://hugeerp10.co.za/hsofmanual/uploads/images/gallery/2024-08/96himage.png)
You can then search for the item you wish to un-confirm quantities on
Double-click the line
Click the Clear Confirmed Qty Button
[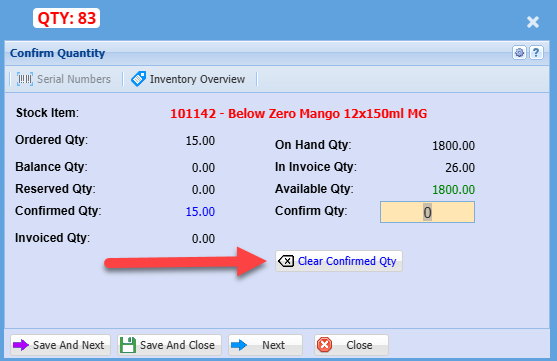](https://hugeerp10.co.za/hsofmanual/uploads/images/gallery/2024-08/tRdimage.png)
If you have multiple item lines on the sales order that have confirmed quantities and you wish to un-confirm all the lines, then click the Un-Confirm All Button
[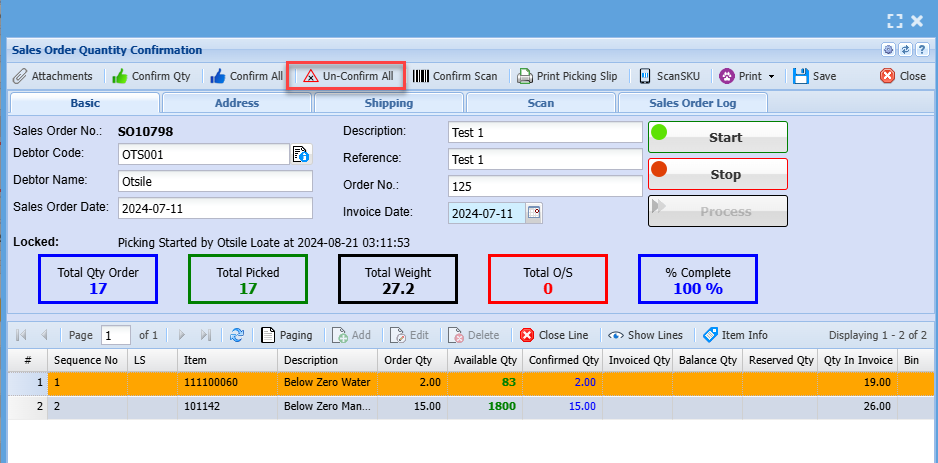](https://hugeerp10.co.za/hsofmanual/uploads/images/gallery/2024-08/Suyimage.png)
You can then reconfirm the items with amended quantities, or
You can Unauthorise the sales order and this will allow you to edit the line items and add addition items if need be.
# Sales Order Picking Slip logs
When confirming a Sales Order and printing a picking slip.
Logs will be created to on picking slip screen and print picking slip.
Sales Order confirm screen will show a small Print icon to indicate that a picking slip was printed.
[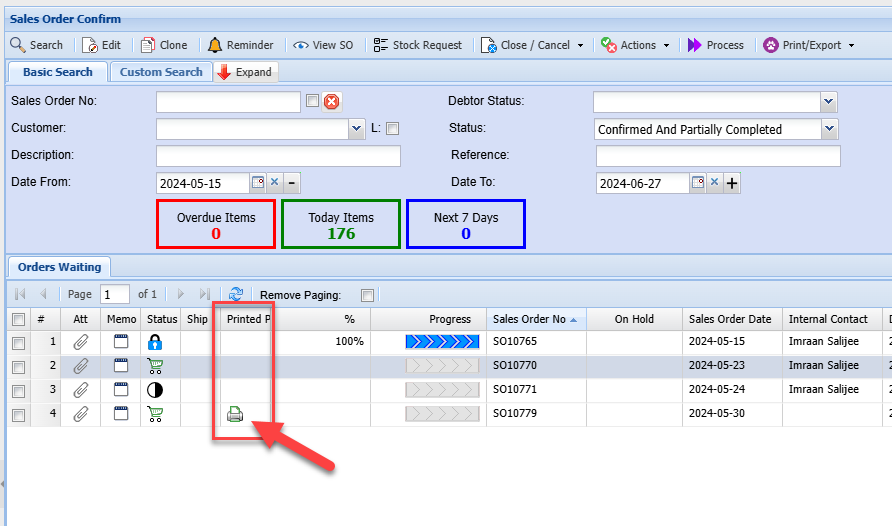](https://hugeerp10.co.za/hsofmanual/uploads/images/gallery/2024-06/z9Rimage.png)
Clicking on the icon will open up the sales order log file
Best to sort Log Date Time with latest date at the top
[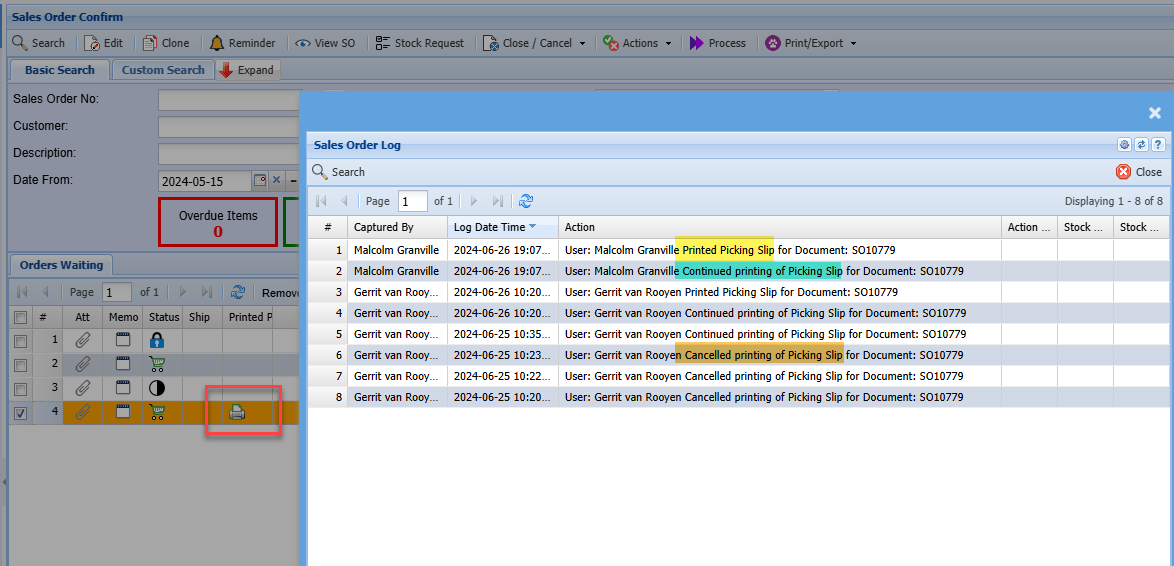](https://hugeerp10.co.za/hsofmanual/uploads/images/gallery/2024-06/kiYimage.png)
The log will log on print options for both Continue and Cancel buttons
[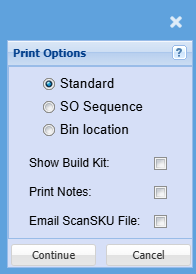](https://hugeerp10.co.za/hsofmanual/uploads/images/gallery/2024-06/vUyimage.png)
The log will log for Print and Email buttons
Print button logs that the user clicked on the print button, however this does not mean that they physically printed the document. As they could have cancelled the print button in windows.
[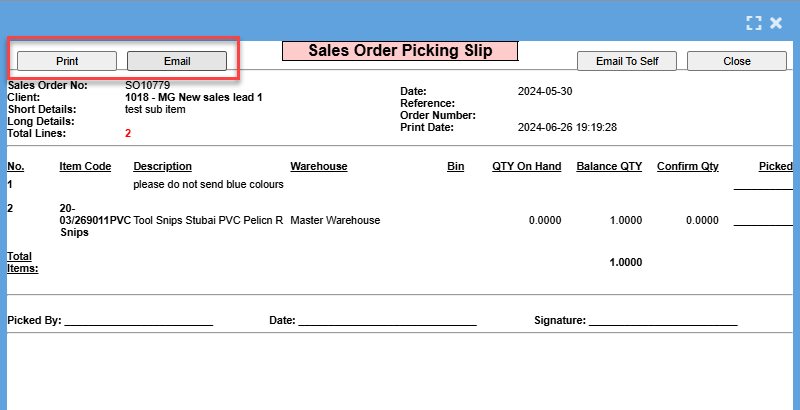](https://hugeerp10.co.za/hsofmanual/uploads/images/gallery/2024-06/hqMimage.png)
---
##### Sales order print indicated
The sales order confirm screen shows the icon on the window to show that a print picking slip was done.
[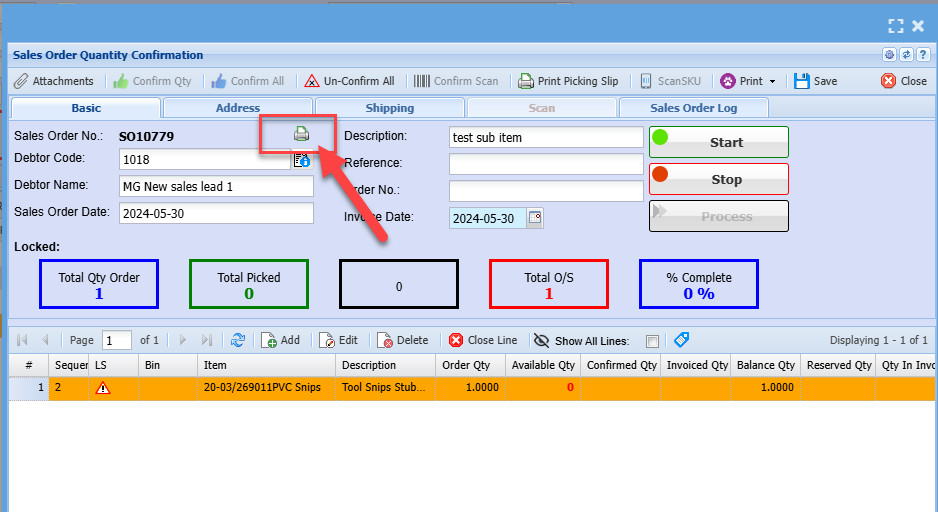](https://hugeerp10.co.za/hsofmanual/uploads/images/gallery/2024-06/wBiimage.png)
The sales order log tab will indicate the logs on the sales order
[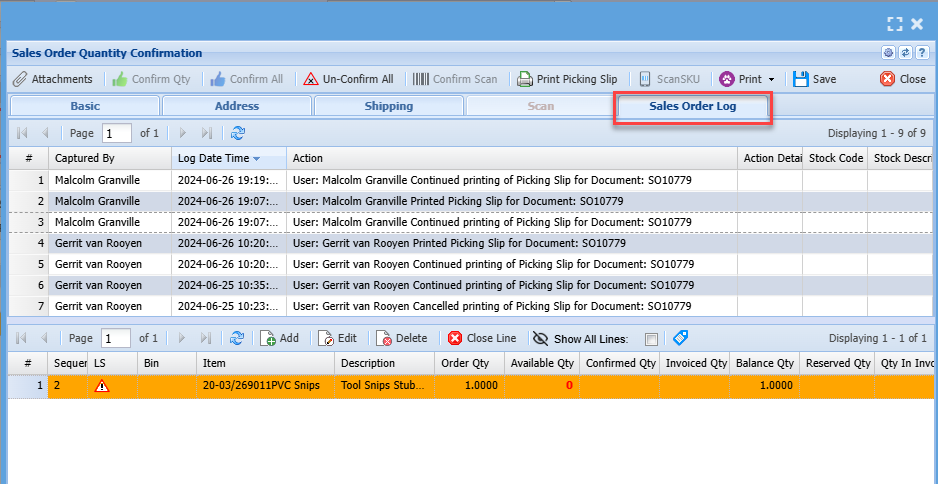](https://hugeerp10.co.za/hsofmanual/uploads/images/gallery/2024-06/6B2image.png)
---
##### User Access log
Logs are recorded in the user access log
[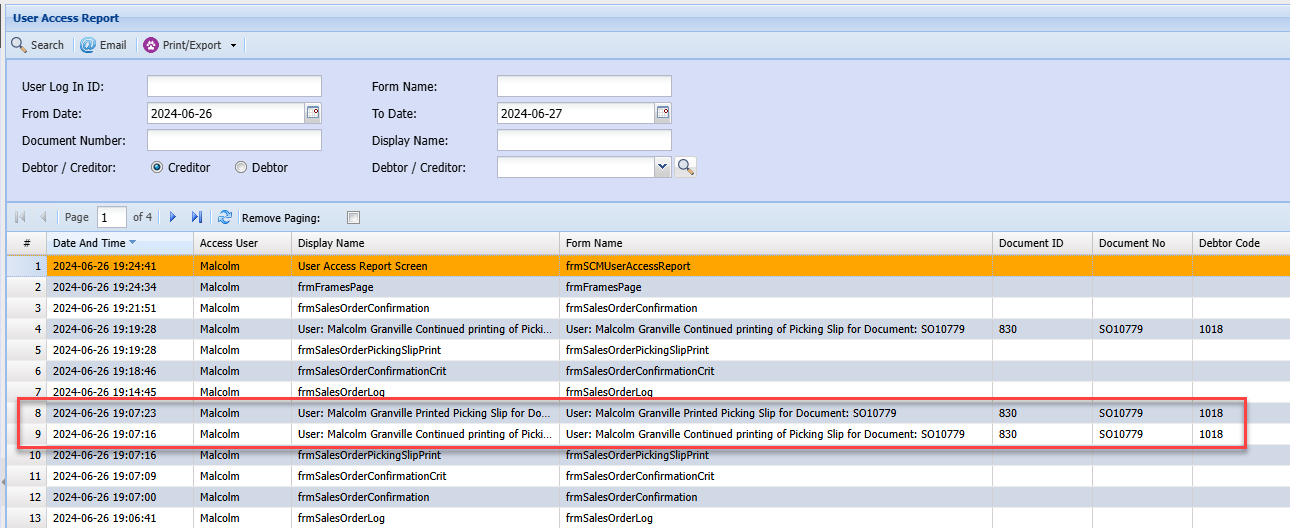](https://hugeerp10.co.za/hsofmanual/uploads/images/gallery/2024-06/Nl8image.png)
# ScanSKU Confirm
Using a ScanSKU scanner
Watch video manual on how to [scan from ScanSKU device](https://hugeerp0.co.za/csp/webhelp/topics/idh-topic10750.htm)
#### Picking via a ScanSKU device
Email the file for picking
When promoting the Sales order as confirmed, an option will appear to email the sales order file to the ScanSKU device
.png)
---
#### Import ScanSKU file
Once the scan has been completed, click on the ScanSKU to import scanned picked quantities.
Drag directly from your email into this section
The file will do the following:
| 1 | Upload the file |
| 2 | Attach the file to the sales order |
| 3 | Import the items |
| 4 | Update the received quantity on the lines |
| 5 | Produce an error report should there be a problem |
.png)
---
#### Email ScanSKU file if not emailed
Email ScanSKU file from Confirm Screen
.png)
---
#### ScanSKU email setup per user
Go to System Configuration> General> User Setup
Each user can have a unique email address to send to for their specific scanner.
Each Barcode scanner should have their own Gmail account for Android.
.png)
# Sales Order Confirm Search
Confirmation search screen is where confirming of picking of stock is done. Generally in the warehouse.
[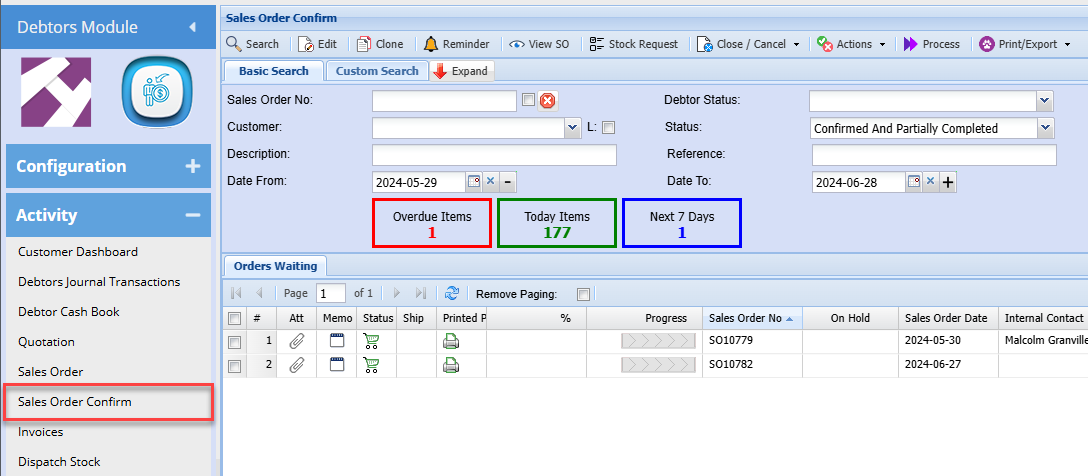](https://hugeerp10.co.za/hsofmanual/uploads/images/gallery/2024-06/rihimage.png)
# Sales Order Confirmation Functions
Sales order confirmation the following function was recently added
1. Close button function
2. Item information button
3. Sorting on columns - This allows you to sort by column when clicking on the column
[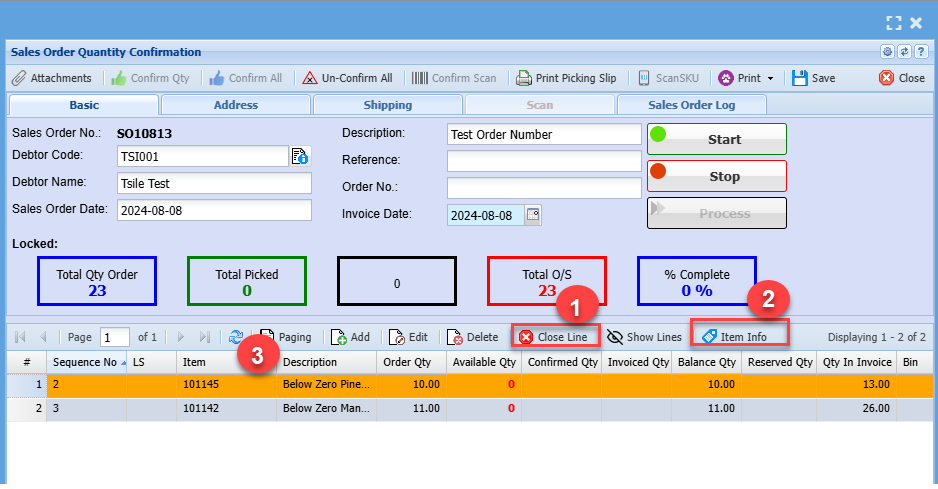](https://hugeerp10.co.za/hsofmanual/uploads/images/gallery/2024-08/CB8image.png)
---
#### Close Line Button
Allows you to close a line item from sales order confirmation without having to close the whole order
When clicking on the close line button the screen below will pop up to alert you that you are about to close a line and ask you to confirm
Click **Yes** to Close a line
[](https://hugeerp10.co.za/hsofmanual/uploads/images/gallery/2024-08/sRyTmIimage.png)
---
#### Item Info
The item information button will take you to the inventory overview window
The inventory overview window allows quick access to view information on an item.
[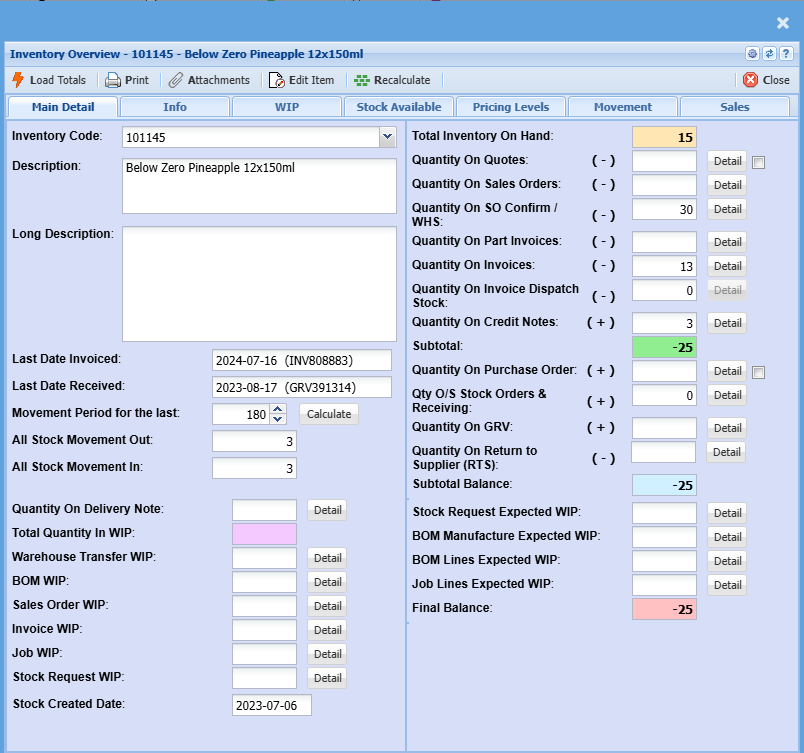](https://hugeerp10.co.za/hsofmanual/uploads/images/gallery/2024-08/iBTimage.png)
# Sales Order Log
The sales order log tracks and manages sales orders under the sales order quantity confirmation stage
The sales order log gives a trail of what happens to a sales log order under the sales order confirmation
It Looks at who captured the sales order, Action Time when the action took place and Action details
[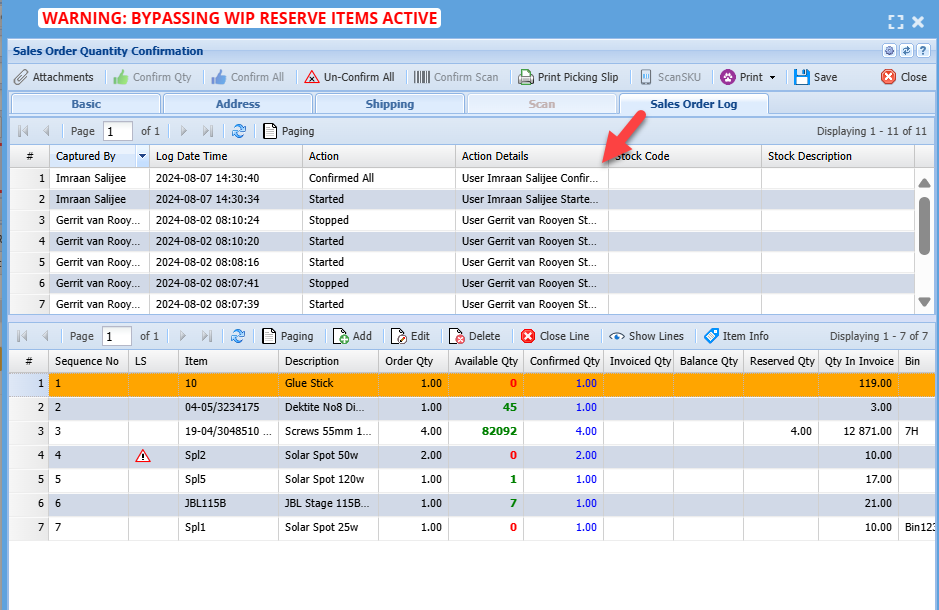](https://hugeerp10.co.za/hsofmanual/uploads/images/gallery/2024-08/RfYimage.png)
# Sales Order Close
This function allows one to close the sales order OR close sales order and create a new sales order with the balance quantity.
| Close SO | Close Sales Order |
| Close current SO and create new SO with balance Qty | Closes the current sales order
Creates a new sales order with items that have a balance quantity
|
[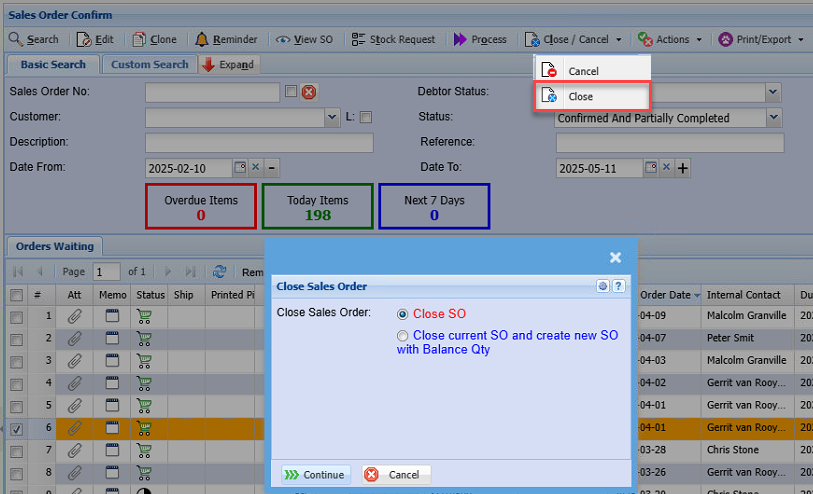](https://hugeerp10.co.za/hsofmanual/uploads/images/gallery/2025-04/Iw6image.png)
# Invoices Menu
# Invoice Search
To search for invoices go to:
**Debtors Module> Activity Invoice**
The screen recalls invoices based on the invoice status and date range selected.
[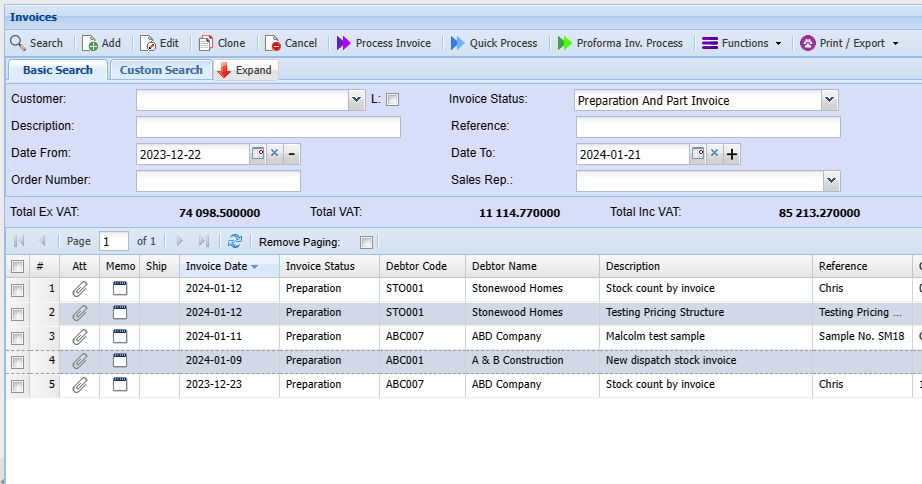](https://hugeerp10.co.za/hsofmanual/uploads/images/gallery/2024-01/FsSimage.png)
Buttons explained
| **Search** | Search open invoices, Preparation, Pro-forma invoices |
| **Add** | Add a new invoice |
| **Edit** | Edit an existing invoice |
| **Clone** | Copy an existing invoice |
| **Cancel** | Cancel Invoice |
| **Process invoice** | Process a single invoice |
| **Quick Process** | Process multiple selected invoices |
| **Proforma Invoice Process** | Process a Proforma invoice |
| **Functions** | Click drop-down for the function |
| **Print / Export** | Print invoice
Print grid
Export
|
---
#### L Tick in Search
The L tick searches for the customer link and not the customer
.png)
The customer link is on the Link tab
.png)
---
### Functions dropdown
**Debtors/Customers> Activity> Invoice> Functions Dropdown**
[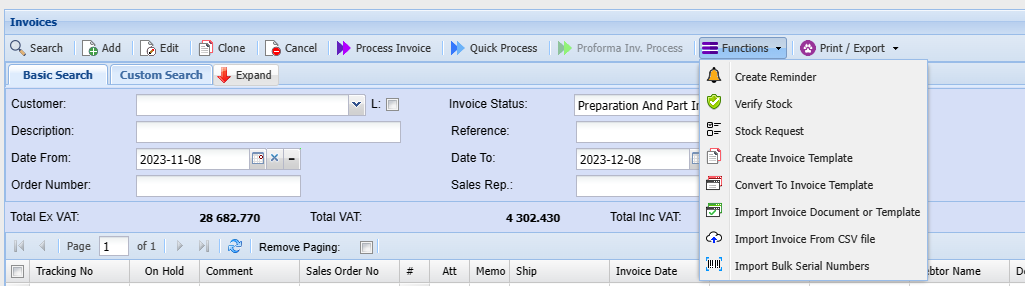 ](https://hugeerp10.co.za/hsofmanual/uploads/images/gallery/2023-12/Bf7image.png)
| **Create Reminder** | Create reminder allows you to create a reminder on a specific invoice or invoices |
| **Verify Stock** | A report gets generated that confirms if stock items are available to process the invoice. |
| **Stock Request** | Stock request - In a case where stock is not available a stock request can be generated |
| **Create Invoice Template** | Create a template for later use. |
| **Convert To Invoice Template** | Allows you to change an invoice to a template
|
| **Import Invoice Document or Template** | This feature allows one to import posted, non-posted and template invoices and quotes into a new invoice or quote. |
| **Import Invoice From CSV File** | Allows you to bring in multiple invoices to the system |
| **Import Bulk Serial Numbers** | Allows you to bring in multiple serial numbers into the system |
---
#### Verify Stock
Verify Stock- A report gets generated that confirms if stock items are available to process the invoice.
Stock request - In a case where stock is not available a stock request can be generated.
.png)
---
#### Stock Request
This function creates a stock request automatically for the items on the invoice. The stock request is then used bt the storeman to draw the require stock form the stores.
[Refer to Stock Request manual](https://hugeerp10.co.za/hsofmanual/books/bim-activity/page/stock-request "Stock Request")
#### Create Invoice Template
Create Invoice Template - create a template for later use.
Convert to Invoice Template
.png)
Clone Invoice Help
An Invoice Clone is a copy of the selected invoice.
Once a clone has been created the clone can be used repeatedly to create that same invoice
by importing the invoice clone.
When creating a clone a Code and Description is required.
Enter a suitable Code and Description and click Continue.
If the cloning process was successful a message stating “Invoice Clone created successfully.”
Click the Close button to return to the Invoice Search window.
Import Invoice Template
Clicking on the Search button with a combination of a Code and/or Description entered will return a result of the search in the grid.
The Code and Description can be left empty which will return all templates.
Clicking the Edit button will allow you to edit the invoice template.
Clicking the Delete button will allow you to delete the selected invoice template.
Clicking the Import Template will import the selected template and create a new invoice.
Once the import has been completed the new invoice will open
---
#### Convert To Invoice Template
This function will create an invoice template, which can be used to import for future invoices or recurring invoices
In order to do this, one needs to capture the invoice to begin with
Capture the invoice as follows:
**Debtors Module> Activity> Invoices> Functions Drop Down> Convert To Invoice Template**
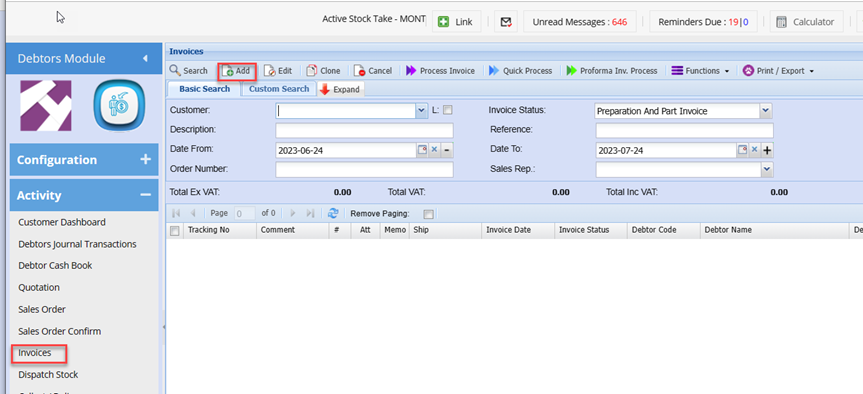
Capture the invoice as normal
Once the invoice detail has been captured and saved, click the extra Drop Down
Select **Convert to invoice template**
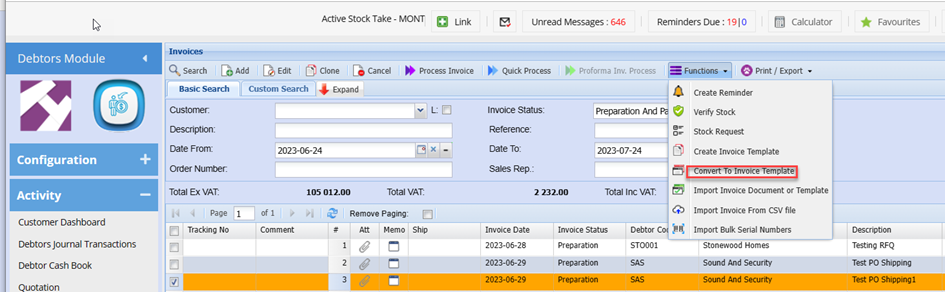
Enter the code for your template
Enter the description for your template.
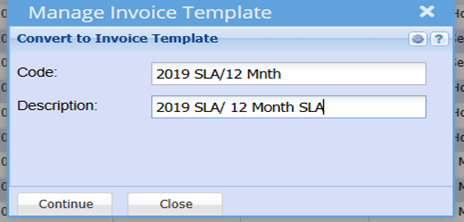
Click Continue
This now completes the creation for your invoice Template
Import Invoice Document or Template
##### Invoice and quote import
This feature allows one to import posted, non-posted and template invoices and quotes into a new invoice or quote.
Note the following when you import an invoice or quote that the following is set
Go to Extras drop down and click on Import Invoice template or document
.png)
Select to import as a quote or invoice
.png)
#### Import Invoice From CSV File
[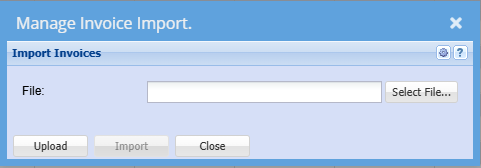](https://hugeerp10.co.za/hsofmanual/uploads/images/gallery/2024-10/NGcimage.png)
Click on the Select File… button, this will open a window to allow you to navigate to the location of the file to be imported.
Click on the Upload button to upload the file onto the server where the actual import will take place.
Once the Upload has been successfully completed click on the Import button to launch the actual import.
An Invoice Import Report will open indicating any errors that may have occurred during the import or a success message if there were no errors during the import.
If there were error during the import the whole import is rolled back i.e. no invoices are imported.
Please Note : The file to be imported must be in CSV format.
Please contact the Huge ERP office for the Invoice Import template to be emailed to you.
---
#### Import Bulk Serial Numbers
Import Serial Numbers into Invoices
| 1 | Click the Browse button to locate the CSV file to be imported. |
| 2 | Click Upload to upload the CSV file into the Huge ERP file structure. |
| 3 | Click Import S/N to import the Serial Numbers as specified in the CSV file. |
| 4 | A report will be produced on the import process. If there are any errors during the import the user will be informed of these errors in the report. All these errors need to be corrected before the import will be successful. |
The CSV file requires the following columns;
Debtor Code, Stock Code, Warehouse Code and Serial Number.
.png)
In the event that the invoice item has a quantity greater than 1 then as per the example above separate the serial numbers with an under score (Shift Minus).
If for example the item requires a quantity of 3 then column D would appear as follows: SerialNumber1\_SerialNumber2\_SerialNumber3
If the item requires 1 serial number, then column D will appear as follows: SerialNumber1
Please Note: This import process will add the serial number(s) in the import file to any invoice in the system that is in a Preparation state is linked to the same debtor as in the import file and also has the same stock item. This applies to any invoices that are outside of the search range of the search criteria
#### Keyboard quick keys
Quick keys help access functions using the keyboard
Used with Alt + Letter
[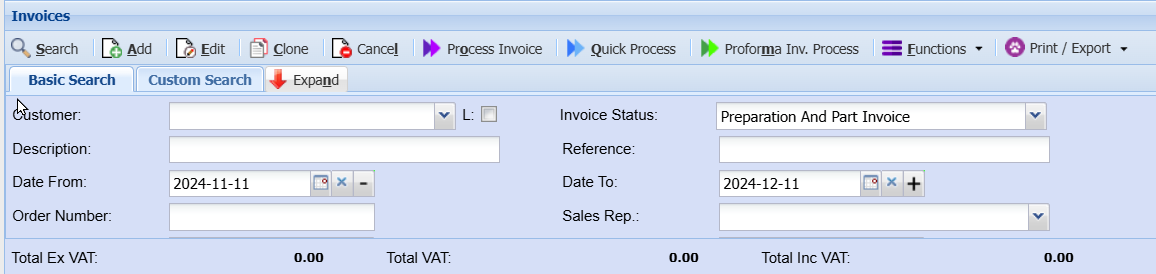](https://hugeerp10.co.za/hsofmanual/uploads/images/gallery/2024-12/qyoimage.png)
| **S**earch | Alt + s | Search for Invoices |
| **A**dd | Alt + a | Add a new Invoice |
| **E**dit | Alt + e | Edits the Invoice that is highlighted |
| **C**lone | Alt + c | Clone the highlighted Invoice |
| Cance**l** | Alt + l | Cancel the Invoice that is highlighted |
| Pr**o**cess Invoice | Alt + o | Process selected Invoice(s) |
| **Q**uick Process
| Alt + q | Quick Process selected Invoice(s) |
| Profor**m**a Invoice Process | Alt + m | Only Invoices marked as Part Invoice can be processed from this option |
| Expa**n**d / Co**n**tract | Alt + n | Expands / Contracts the header section of the window |
| Create **R**eminder | Alt + r | Creates a reminder to highlighted Quote |
| **P**rint Invoice | Alt + p | Print the selected Invoice |
| **F**unctions | Alt + f | Focus on the Function split button |
| Tab Basic Search | Alt + 1 | Basic Search |
| Tab Custom Search | Alt + 2 | Custom Search |
# Add Invoice
Video training manual 2016 - [Click Here](https://vimeo.com/357005532)
#### Detail Tab
**Debtors Module> Activity>Invoice**
The Invoice screen will open
To search for existing invoices, select your search criteria and click search
Search criteria can be invoice status, reference, customer name, etc
Select a date range
To create a new invoice, Click the Add Button as shown below
[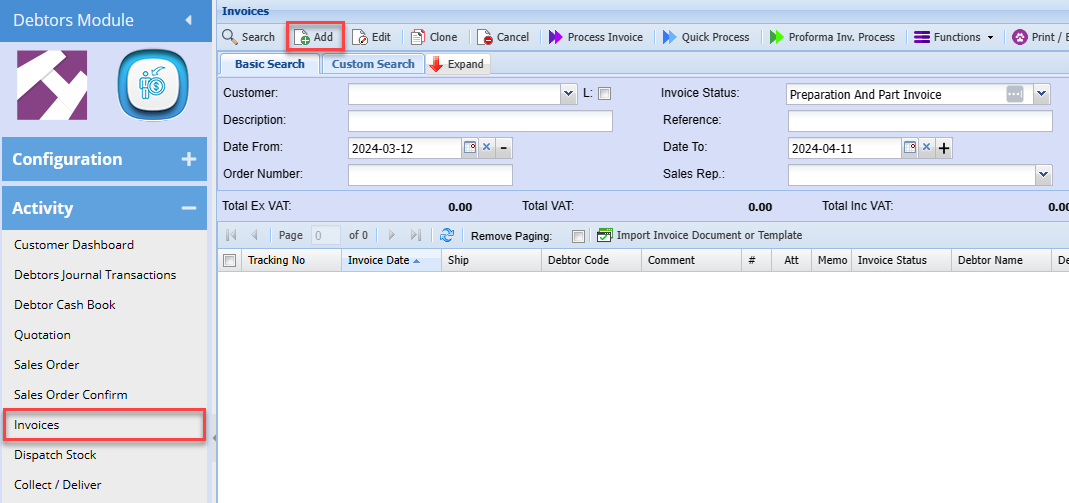](https://hugeerp10.co.za/hsofmanual/uploads/images/gallery/2024-04/ljlimage.png)
This will display the New Invoice screen
[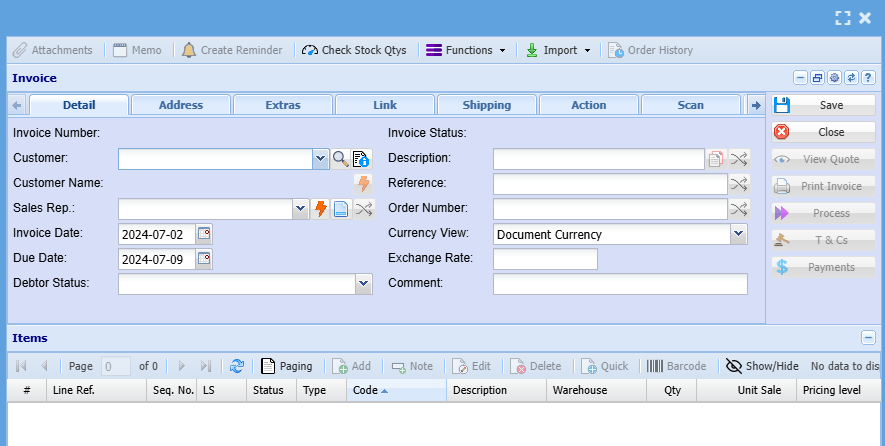](https://hugeerp10.co.za/hsofmanual/uploads/images/gallery/2024-07/PSBimage.png)
Add information below so that the greyed-out buttons become active:
- Select the customer/ debtor you are creating an invoice for, from the drop-down menu.
- Select the sales rep on the drop-down selection, if applicable
- Update dates if necessary
- Add description and reference
- Add order number, if applicable
Then, once you are done adding all relevant information click Save and all the greyed-out buttons will be opened as shown below:
[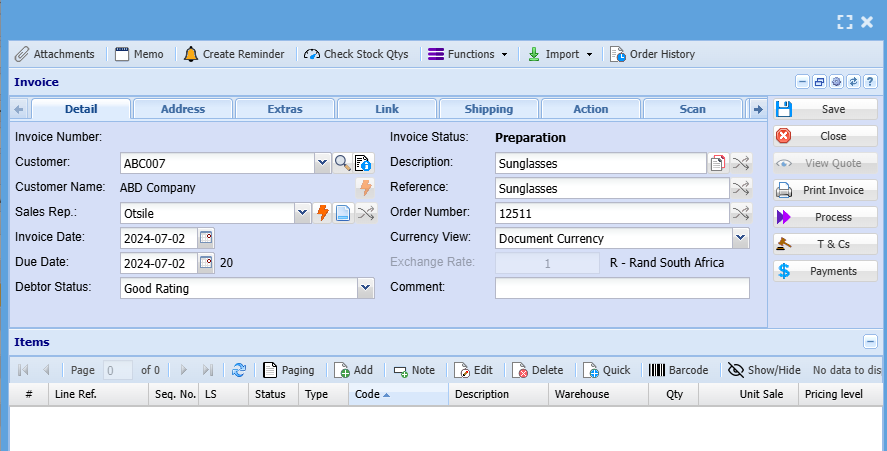](https://hugeerp10.co.za/hsofmanual/uploads/images/gallery/2024-07/c8Nimage.png)
---
#### Line Items
To add line items click on the middle Add Button shown below
[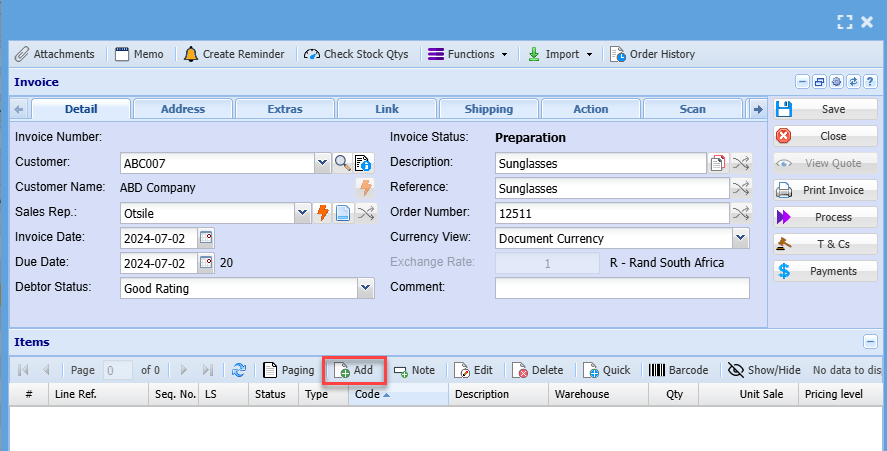](https://hugeerp10.co.za/hsofmanual/uploads/images/gallery/2024-07/Fc8image.png)
Then the screen below will appear
[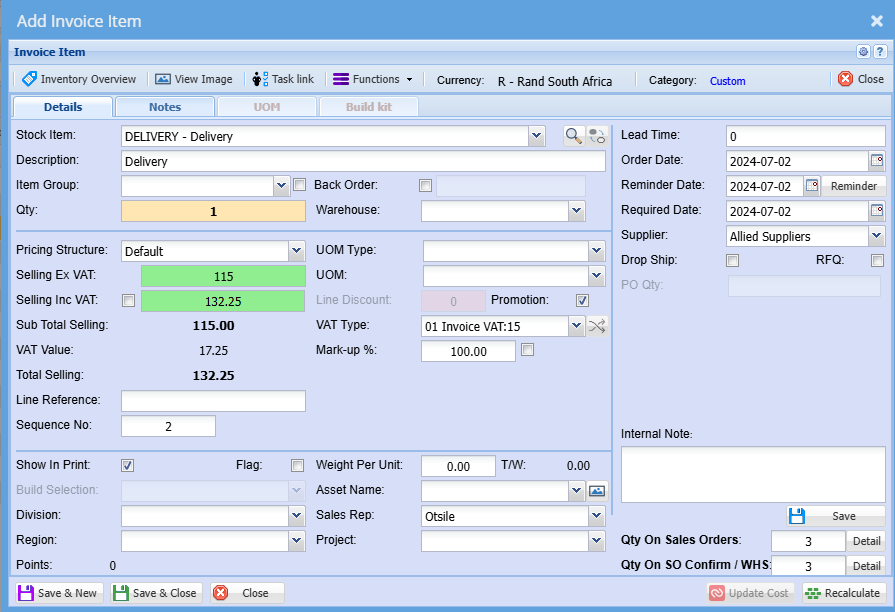](https://hugeerp10.co.za/hsofmanual/uploads/images/gallery/2024-07/aR2image.png)
Select the item you want to invoice on the drop-down selection
You can also search for the item by using part of the code or the name of the item you wish to invoice
You can change the description to match what you want to see on the quote or leave it as it is
Enter the quantity you are invoicing the customer/ debtor on
Make sure pricing is correct
Select a relevant warehouse if you have multiple warehouses
Select the correct VAT Type
Click Save & Close if capturing numerous line items
Click Save & Close if capturing a single line item
Once done
All line items will appear on the grid below:
[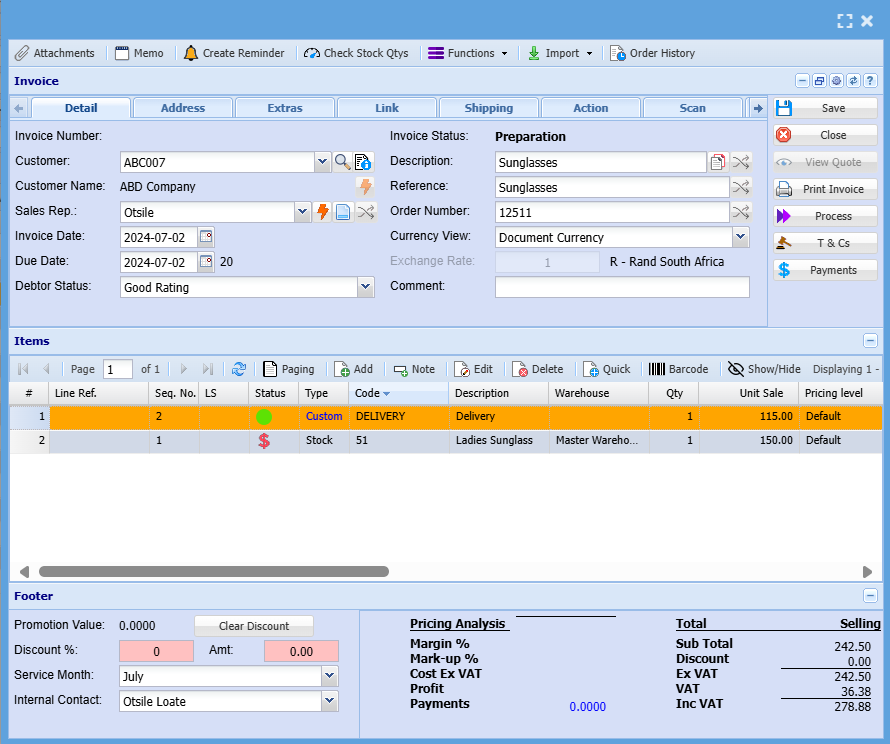](https://hugeerp10.co.za/hsofmanual/uploads/images/gallery/2024-07/pbjimage.png)
You can then print an invoice and send it to a customer/ debtor
Or process it and send them a processed invoice reflecting an invoice number
# Advanced Add Invoice
Video training manual 2016 - [Click Here](https://vimeo.com/357005532)
**Debtors Module> Activity>Invoice**
#### Detail Tab
Click Add to capture a new Invoice
[](https://hugeerp10.co.za/hsofmanual/uploads/images/gallery/2024-04/ljlimage.png)
Select the customer you want to create the invoice to and enter invoice header details as shown in the table below this image.
Once complete click save so all the created out buttons can open
[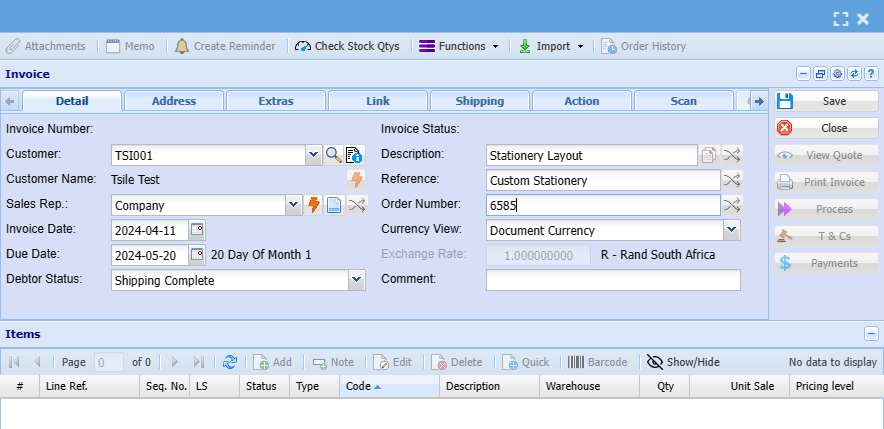](https://hugeerp10.co.za/hsofmanual/uploads/images/gallery/2024-04/oDLimage.png)
| **Customer** | Select the customer that has to be invoiced. |
| **Customer Name** | This field will automatically be filled in when the customer is selected. |
| **Date** | This is the invoice date which defaults on the current date. |
| **Short Details** | A short description of the items on the invoice. |
| **Reference** | Any reference for example the person you talked to. |
| **Order No** | The clients order number. |
| **Sales Rep** | If you have sales reps set up then you select the sales rep here. |
---
#### Address Tab
The information under the address tab will pull through from the debtor set up
[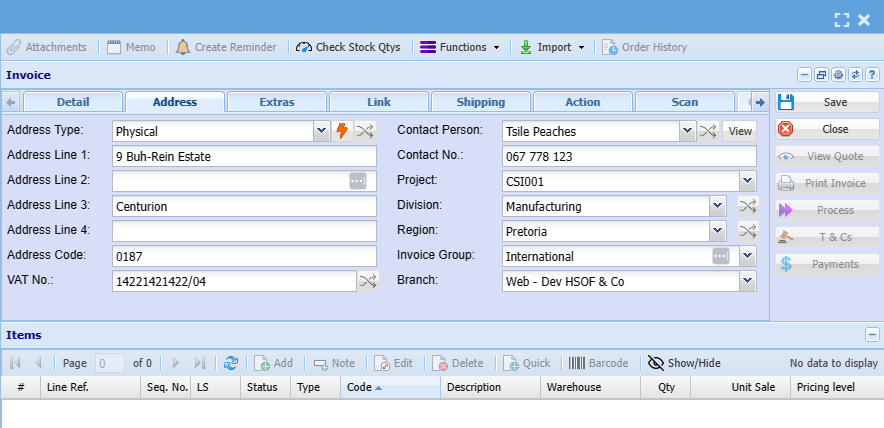](https://hugeerp10.co.za/hsofmanual/uploads/images/gallery/2024-04/jKqimage.png)
| **Address Type** | Select the default address from the drop-down
|
| **Contact Person** | Select the correct contact person from the drop down |
| **Project** | Link a project to the invoice if applicable |
| **Division** | Select the division from the drop down if required for reporting purposes |
| **Region** | Select the region from the drop down or this will populate from the debtor set up |
| **Invoice Group** | Select the invoice group from the drop down |
| **Branch** | Select branch from the drop down if applicable |
---
#### Extras Tab
[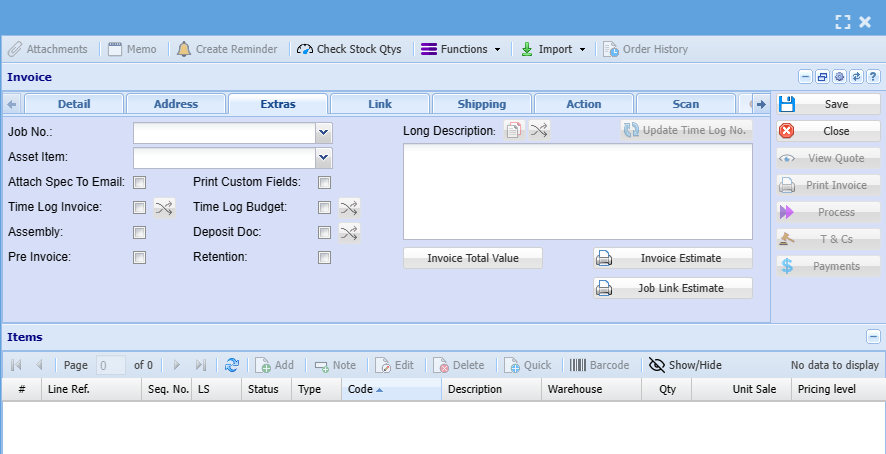](https://hugeerp10.co.za/hsofmanual/uploads/images/gallery/2024-04/Ry5image.png)
| **Job No** | Enter a job number to link the invoice to a job on the job costing module |
| **Asset Item** | Enter an Asset number to link to an asset listed on the Asset tracker module |
| **Attach Spec To Email** | Attaches specification doc with invoice when emailed |
| **Time Log Invoice** | Marks the invoice a time log invoice, linked to time log |
| **Assembly** | Flags the invoice as an assembly invoice. Typically used in job costing. but can be used to differentiate invoices |
| **Pre Invoice** | Flags the invoice as pre invoice |
| **Print Custom Fields** | If custom fields are linked on the invoice this indicator dictates if these custom fields are to be printed on the invoice |
| **Time Log Budget** | This indicator allocates the invoice value to the time log budget |
| **Deposit Doc** | Flags the invoice as a deposit document |
| **Retention** | Flags the invoice retention invoice |
| **Long Description** | Enter any additional details relating to the invoice. |
| **Update Time Log No** | Allows one to update the time log number. This button works in conjunction with the Time Log Invoice Indicator |
| **Invoice Total Value** |
|
| **Invoice Estimate** |
|
| **Job Link Estimate** |
|
---
#### Link Tab
[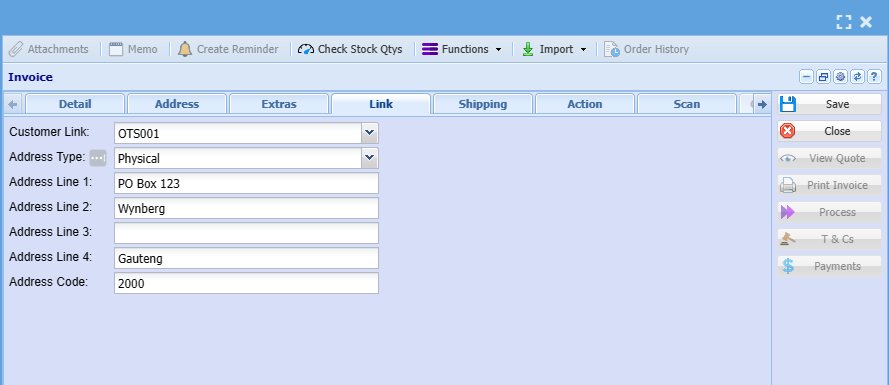](https://hugeerp10.co.za/hsofmanual/uploads/images/gallery/2024-04/XISimage.png)
| **Customer Link** |
|
| **Address Type** | Specify the primary address to be used to print on the document |
---
#### Shipping Tab
this tab is predominant.ly used if you are doing overseas shipping or deliveries via courier
[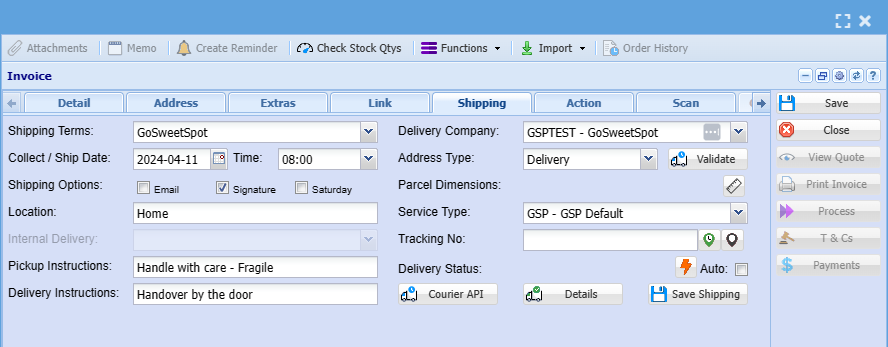](https://hugeerp10.co.za/hsofmanual/uploads/images/gallery/2024-04/yUUimage.png)
| **Shipping Terms** | Select any of the pre-defined shipping terms setup. examples: Free on Board (FOB), Delivery Duty Paid (DDP) |
| **Collect/ Ship Date** | Enter the collection or shipping date |
| **Shipping Options** | Select the respective shipping options |
| **Location** | Enter the Location. This is an open field and can be used as required. |
| **Internal Delivery** | Select the internal delivery option. Used if delivery is done by the company |
| **Pickup Instructions** | Enter any relevant pick-up instructions |
| **Delivery Instructions** | Enter any relevant delivery instruction for the courier/ shipping agent |
| **Delivery Company** | Select the name of the delivery company |
| **Address Type** | Select the address type. Note the physical address of the customer could be different to the deliver address. |
| **Parcel Dimensions** | Enter the Parcel dimensions. if these are pre setup, you can select from the options available. |
| **Service Type** | Select the service type. eg. Economy, Priority, |
| **Tracking No** | Enter the tracking number from the Courier service |
| **Delivery Status** | This will populate if you have an API activated with the courier service software |
---
#### Action Tab
[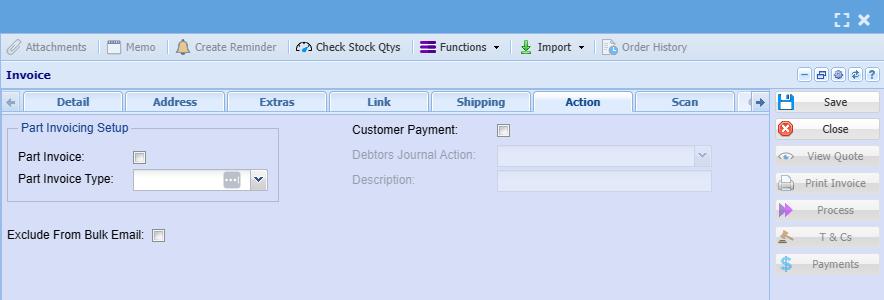](https://hugeerp10.co.za/hsofmanual/uploads/images/gallery/2024-04/Clpimage.png)
| **Part Invoice** | This indicator flags the invoice as a pro forma invoice |
| **Part Invoice Type** | Select the relevant option.
Part: Processes the sales leg of the transaction only.
when the pro forma invoices completed, the stock leg gets processed.
All; Process the sale and stock leg of the transaction
|
| **Exclude From Bulk Email** | this indicator excludes the document for bulk mails emailed from the system |
| **Customer Payment** | This indicator activates a payment option. select the journal action. when the invoice is processed, a journal is also created for the payment. |
| **Debtors Journal Action** | This fields is activated if the Customer payment indicated is selected |
| **Description** | This is the description for the payment journal. |
---
#### Scan Tab
the scan tab allows the user to scan items instead of entering item codes on the keyboard
[](https://hugeerp10.co.za/hsofmanual/uploads/images/gallery/2024-04/NUcimage.png)
| **Scan Barcode** | if you have barcodes setup and using scanners, you can scan the items to be invoiced |
| **Serial No** | Allows you to scan the item serial number |
| **Scan Log** | Displays items previous scanned on the specific document |
---
#### Docs Tab
The Docs tab allows the user to link any open documents to the current document.
example, if you have an open sales lead and you now do an invoice, the user can add the sales lead to be linked to the Invoice
[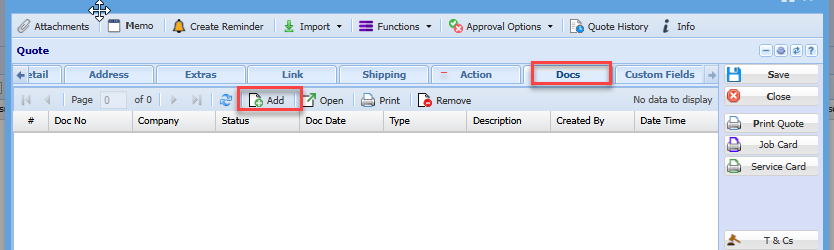](https://hugeerp10.co.za/hsofmanual/uploads/images/gallery/2024-11/0gaimage.png)
After all the details have been entered click on Save
.png)
---
#### Invoice Lines
Click on Add to insert new inventory item
.png)
This screen is where the invoice line items are going to be selected and where the prices are entered.
| **Category** | From this drop down you select whether you want a Stock, Service or Custom item. |
| **Item Code** | Search for the item you want either by code or description. |
| **Item Description** | This will automatically be filled in once the item is selected. |
| **Quantity** | The quantity of the specified item you want on the invoice. |
| **Warehouse** | Select the warehouse you want the item to come out of from this drop down. |
| **Selling Including Vat** | If you want to enter the selling price including Vat then the block on top needs to be flagged and this will then open up the Selling Including Vat block. |
| **Selling Excluding Vat** | Enter the price excluding Vat here. If you entered the selling price including vat then this will be calculated automatically. Same goes for entering the selling price excluding vat. Then the selling price including vat will be calculated. |
| **Line Discount** | If you want to give discount on this specific item. |
| **Vat** | Select the type of Vat for this transaction. |
| **Notes** | If you want to add notes about this specific item. This will also appear on the printed invoice. |
After all details have been entered click on Save and Close.
This will take you back to the main invoice screen.
.png)
---
#### Invoice Payment
Invoice payment allows one to capture a payment at the point of creating the invoice.
It acts similar to a Point of Sale (POS) system.
There is a setup that is required in order for this to work correctly
See both videos on Payment options
Payment invoice intro - [Invoice\_Payment.mp4](https://hugeerp10.co.za/hsofmanual/attachments/22)
Payment invoice setup requirements - [Invoice\_Payment\_setups.mp4](https://hugeerp10.co.za/hsofmanual/attachments/23)
[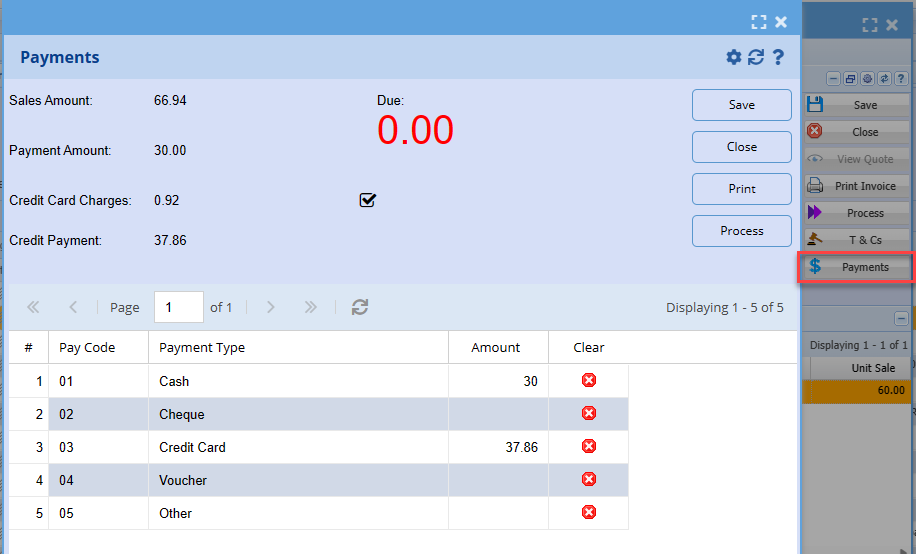](https://hugeerp10.co.za/hsofmanual/uploads/images/gallery/2023-10/z8nimage.png)
---
When all details have been inserted click Save
The next step is to generate an invoice number by processing this invoice and e-mail to the client.
Click on process invoice
.png)
.png)
When you click continue the Invoice will print to screen.
you can then email or print you invoice
Once you have clicked process invoice, this will complete the invoice and move it into Document History under Analysis. Remember that after this is done no changes can be made to the invoice and the only way to correct mistakes is by making an opposite entry into the system.
# Part /Proforma Invoice
The proforma invoice is used when you want to generate an invoice without affecting stock
**Debtors > Invoice> Add/Edit Invoice > Action Tab**
[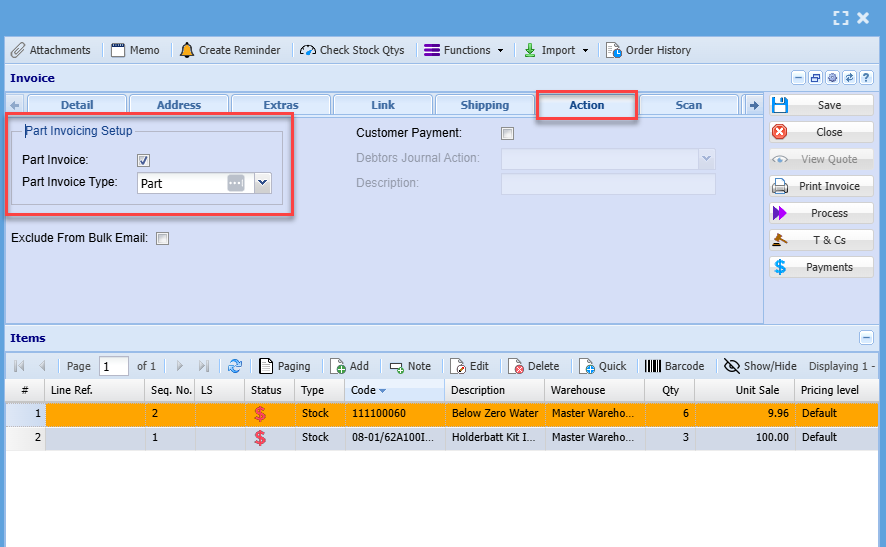](https://hugeerp10.co.za/hsofmanual/uploads/images/gallery/2024-07/MKgimage.png)
Add invoice as per normal. See how to capture an invoice [here](https://hugeerp10.co.za/hsofmanual/books/bdm-activity/page/add-invoice "Add invoice")
1. After capturing your invoice click on Action Tab
2. Add a tick where it says part invoice
3. Save and close
This option will only process the sales leg of the transaction ie debtors control, Sales account, and VAT entries. It will not process the cost of sales leg, since no stock is allocated and moved with this option.
This option processes no GL entries. All postings only occur when you finalize the proforma invoice. However, when you click proforma invoice process after capturing, the system will allocate an invoice number to the document.
When you later process and finalize the Proforma invoice, all the postings will occur on that date. The stock movement will also take place on the finalized date.
When you search the invoice on the grid, you will notice the status is preparation but it will indicate this is Proforma in red
The usual process button will be greyed out and the Proforma invoice process button will be active
[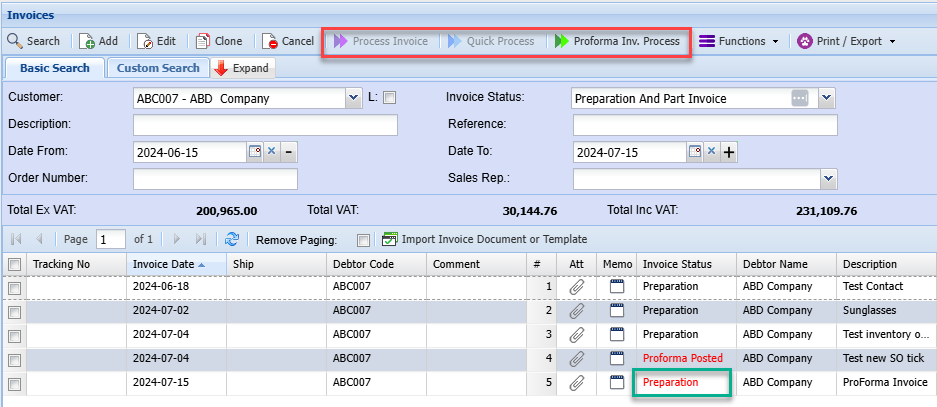](https://hugeerp10.co.za/hsofmanual/uploads/images/gallery/2024-07/iYOimage.png)
.png)
Once the Proforma invoice has been processed it will remain under Activity> Invoice status > Part Invoice.
It will remain here until all stock is in, process the proforma invoice again to complete all stock movements and finalise proforma invoice.
.png)
You can run a stock verification report to check if you have enough stock to complete the proforma
.png)
Once the stock is available you can then process the rest of the proforma
---
#### Cancel a Proforma Invoice
Proforma invoices are official invoices.
They cannot be cancelled but have to be fully completed by clicking on Proforma Invoice Process.
If you cannot complete the proforma invoice process, it is because you don’t have enough stock on hand.
You will have to put stock into the system by doing a stock level adjustment, then process the proforma invoice which will take out the stock.
Then you will be able to do a credit note, then take stock out of the system by stock level adjustment again.
Steps defined:
1. Add stock into the system via Stock Level Adjustment
2. Process the invoice via Proforma Invoice Process
3. Credit the invoice via a Credit note
4. Remove the stock out of the system via the Stock Level Adjustment
.png)
# Sales Rep Change on Processed document
System allows one to change the Sales Rep on processed invoices and completed quotes.
To make the change you go to the processed document searches.
#### Invoices
Debtors Module > Analysis > Document History
---
#### Quotes
Debtors Module > Analysis > New Quote Search
Find the invoice that you want to change the rep.
Edit the document and go to the section for Sales Rep
You will notice a Question mark next to the Sales Rep
.png)
After clicking on the Question mark, change the rep and click on save
.png)
Sales rep is now updated.
---
#### User Audit trail
We keep a user audit log of all changes.
Go to System Configuration > Reports > User Access Report
Search for the user
.png)
The same process works for quotes that have been completed
# Courier Shipping invoice
**Shipping Tab - Courier API**
The shipping tab works with a Courier company API.
This API once set up Will allow you to create a shipping document on the Courier system.
After you have filled in the information for the Courier company, click on the create shipping document button to create the shipping document on the Courier company system.
To enter the parcel dimensions come out you can do the following:
Enter the parcel number followed by the space bar, this will automatically put in the centimeters and the length
Enter the width by putting in the number and space bar
Enter the height by putting the number and hitting the space bar
Enter the weight of the parcel and click on the space bar which will automatically fill in the kilograms
This is a quick and easy way of entering the parcel dimensions
Before creating the document on the courier system, there will be a few checks that take place.
Herewith the following errors:
| 1 | The parcel dimensions are not entered correctly. |
| 2 | The address type does not have the correct Geo location for latitude and longitude. |
| 3 | The delivery address does not have the following. |
| 4 | Address line 1 is not filled in correctly it does not contain the first address, it must not contain the building number in the first address line. |
| 5 | The postal code is incorrect. |
| 6 | The country code is not filled in. |
| 7 | The latitude and longitude are incorrect. |
| 8 | The internal contact for the invoice does not contain a valid mobile number, email address or is not filled in. |
| 9 | The company profile does not have the correct address details filled in example - Geo location etc. |
| 10 | The invoice does not have a contact person with valid information filled in. |
So, if the create shipment document button does not work, it is because of certain fields missing.
There is a minimum requirement of information that needs to be sent to the Courier company.
If the shipping document is successfully created, the tracking number and delivery status will be populated.
The lightning bolt button is used to update the delivery status from the Courier company.
If you put the tick on auto, and you have a tracking number, it means that when you open up the invoice the system will automatically check the delivery status.
.png)
# Invoices - Bulk Email
We have added an option to exclude invoices from bulk mail
Add an option on invoices to exclude them from bulk email. By default, this checkbox is not selected on all invoices.
When the checkbox is selected, the choice is automatically saved without needing to click 'Save'
[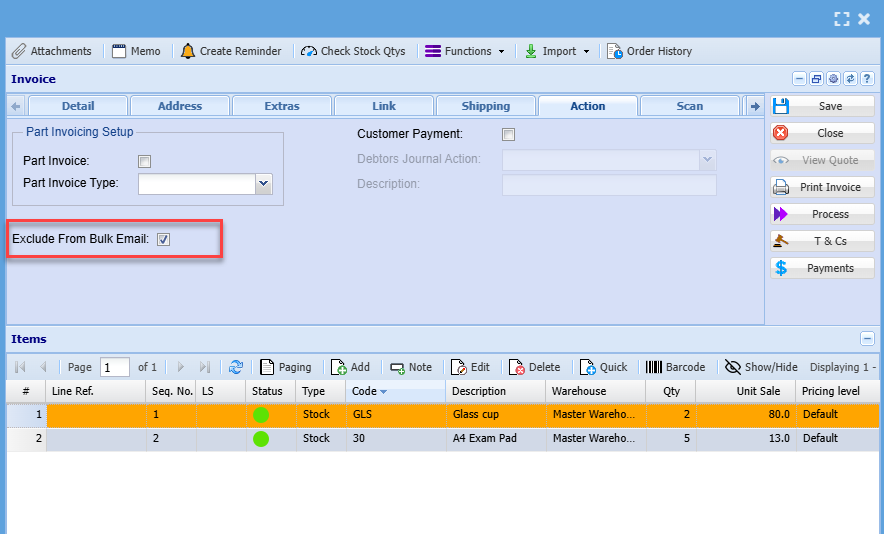](https://hugeerp10.co.za/hsofmanual/uploads/images/gallery/2024-08/SV0image.png)
# Dispatch Stock Menu
Dispatch Stock
# Dispatch Stock Search
Dispatch Stock works with Part Proforma invoices
Video intro on Dispatch stock 2023/10 - [Dispatch\_Stock.mp4](https://hugeerp10.co.za/hsofmanual/attachments/2)
It allows the customer to pay for stock upfront and receive stock based on their request.
This means that you can send some of the stock and send the remaining stock later.
Dispatch stock records all the stock movements and does postings on the ledger.
You can print the dispatch stock document for the stock that is going out or detailed document that shows the stock that is out and a detailed document that shows both.
**Debtors Module> Activity> Dispatch Stock**
[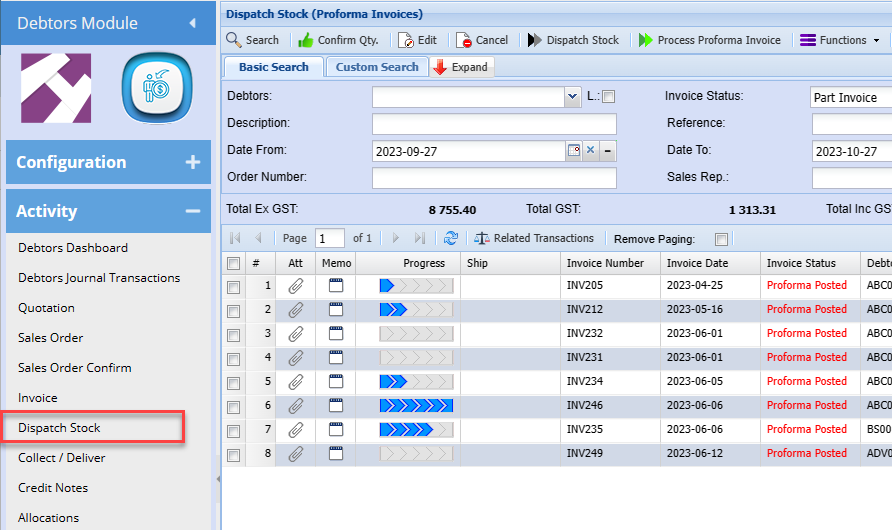](https://hugeerp10.co.za/hsofmanual/uploads/images/gallery/2023-10/mCXimage.png)
# Collect / Deliver
# Collect / Deliver Search
**Debtors Module>Activity>Collect / Deliver**
[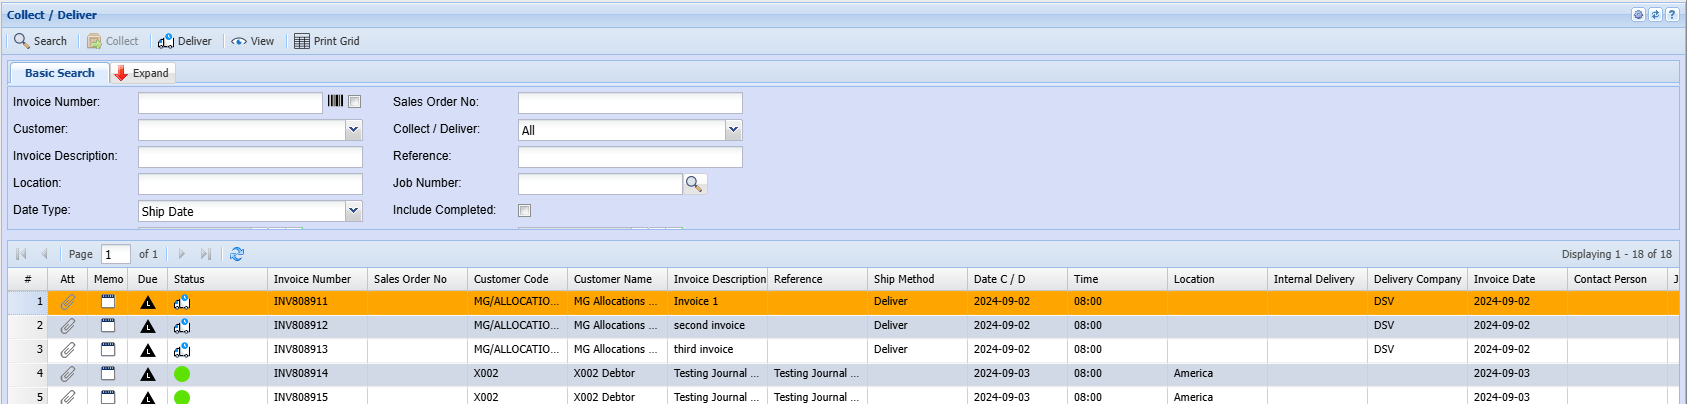](https://hugeerp10.co.za/hsofmanual/uploads/images/gallery/2024-10/67simage.png)
[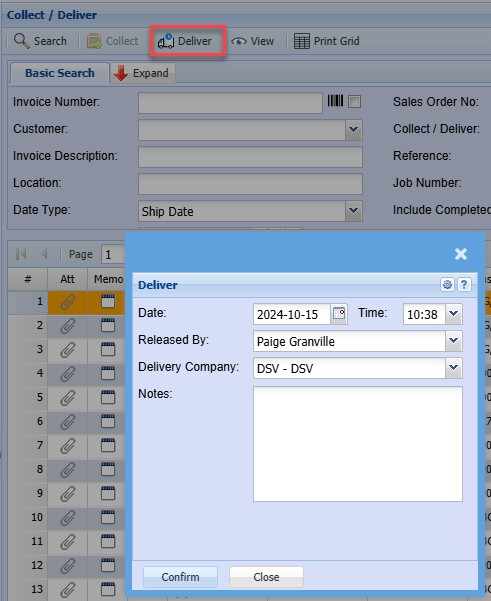](https://hugeerp10.co.za/hsofmanual/uploads/images/gallery/2024-10/i9simage.png)
# Credit Notes Menu
# Credit Notes Search
The correct process to reverse a posted invoice affecting stock is by raising and processing a credit note
this process will offset the original invoice.
the below demonstrates the manual capturing of this process
Video Training Manual 2016 - [Click Here](https://vimeo.com/357004648)
[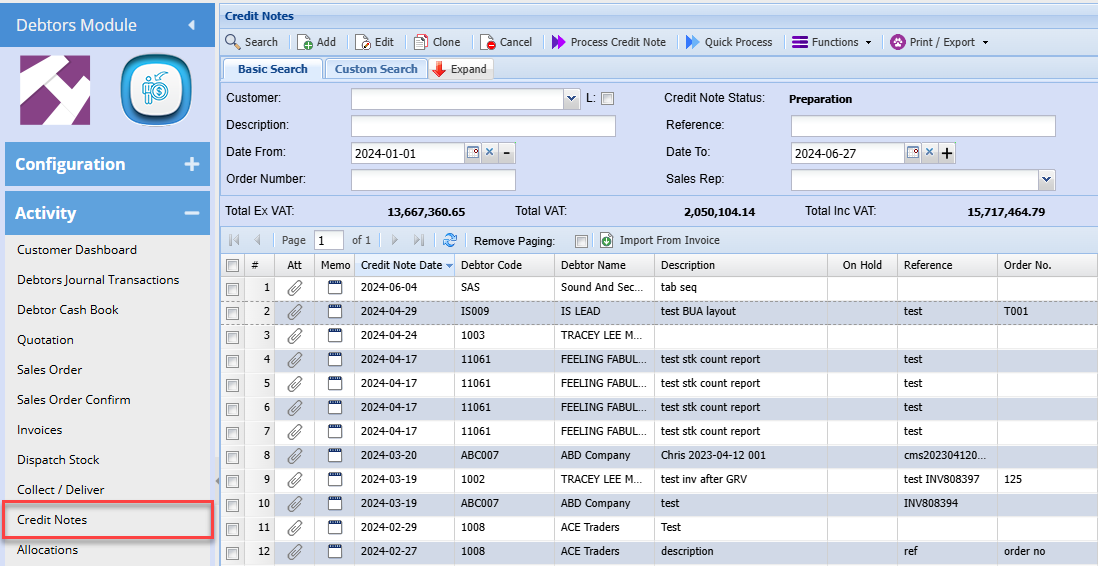](https://hugeerp10.co.za/hsofmanual/uploads/images/gallery/2024-06/saPimage.png)
---
#### Functions Drop Down
[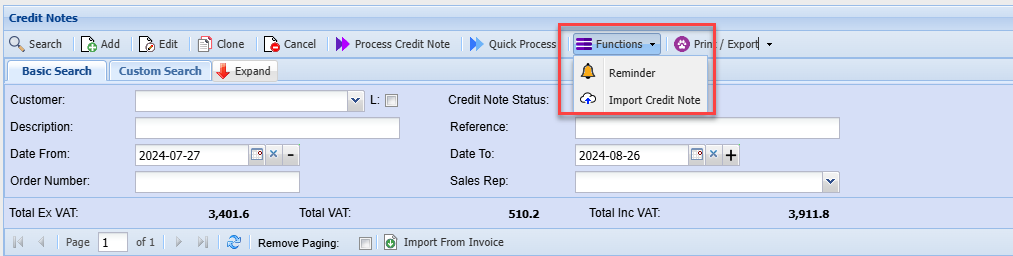](https://hugeerp10.co.za/hsofmanual/uploads/images/gallery/2024-08/YkTimage.png)
| **Reminder** | Allows you to create a reminder for a particular credit note |
| **Import credit Note** | Allows you to import credit notes into the system |
---
##### Import credit note
.png)
Click on the **Select File** button. This will open a window allowing you to navigate to the location of the file to be imported.
Click on the **Upload** button to upload the file onto the Huge ERP system, where the actual import will take place.
Once the upload has been successfully, completed click on the **Import** button to initiate the actual import process.
A Credit Note Import Report will open, indicating any errors that may have occurred during the import or displaying a success message if there were no errors.
If there were any errors during the import, the entire process will be rolled back, meaning no Credit Notes will be imported.
The file to be imported must be in CSV format.
# Add Credit Note
To create a new credit note or search for an existing one go to
**Debtors Module> Activity> Credit Note**
The credit note screen will open
To search for existing credit notes, select your search criteria and click search
Search criteria can be customer/ debtor name credit note description or reference, etc
Select a date range
Then click search
To create a new Credit Note, Click the Add Button as shown below
[](https://hugeerp10.co.za/hsofmanual/uploads/images/gallery/2024-07/kECimage.png)
After clicking Add,
This new credit note screen will display
[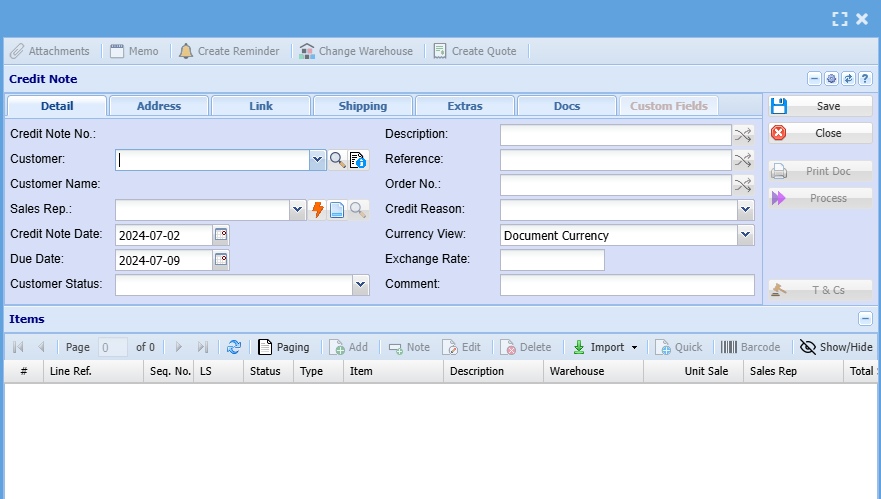](https://hugeerp10.co.za/hsofmanual/uploads/images/gallery/2024-07/9PRimage.png)
Add information below so that the greyed-out buttons can appear:
- Select the customer/ debtor from the drop-down menu to create a credit note
- Select the sales rep on the drop-down selection, if applicable
- Update dates if necessary
- Add description and reference
- Add order number, if applicable
- Select the credit note reason from the drop down
Then, once you are done adding all relevant information click Save and all the greyed-out buttons will be opened as shown below:
[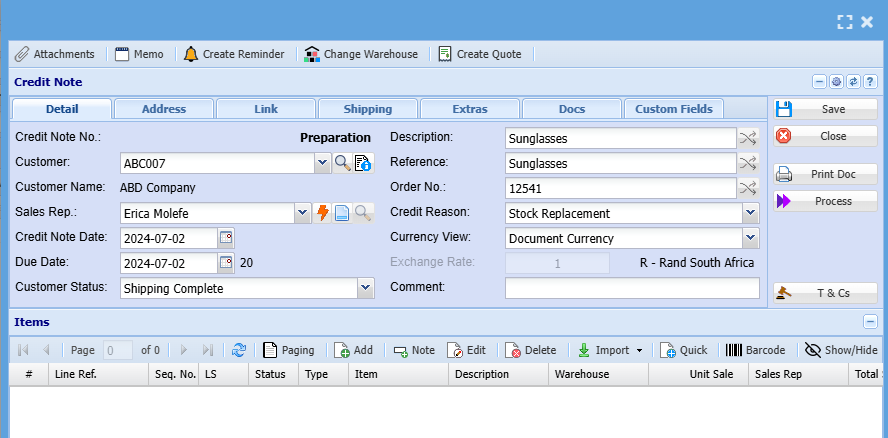](https://hugeerp10.co.za/hsofmanual/uploads/images/gallery/2024-07/srsimage.png)
---
#### Line Items
You can only add line items after adding all the necessary information needed on the credit note details tab and all greyed buttons have been greyed out
To add line items click on the middle Add Button shown below
[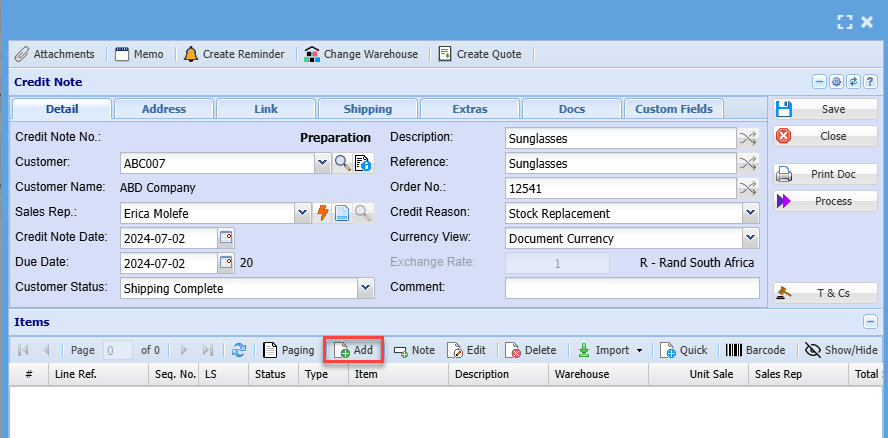](https://hugeerp10.co.za/hsofmanual/uploads/images/gallery/2024-07/Fkximage.png)
After clicking the middle add button the screen below will appear
[](https://hugeerp10.co.za/hsofmanual/uploads/images/gallery/2024-07/eSjimage.png)
Select the item you wish to credit on the drop-down selection
You can also search for the item by using part of the code or the name of the item you wish to credit the customer on
You can change the description to match what you want to see on the credit note or leave it as it is
Enter the quantity you are crediting the customer/ debtor on
Make sure pricing is correct
Select a relevant warehouse if you have multiple warehouses
Select the correct VAT Type
Click Save & Close if capturing numerous line items
Click Save & Close if capturing a single line item
Once done
All line items will appear on the grid below:
[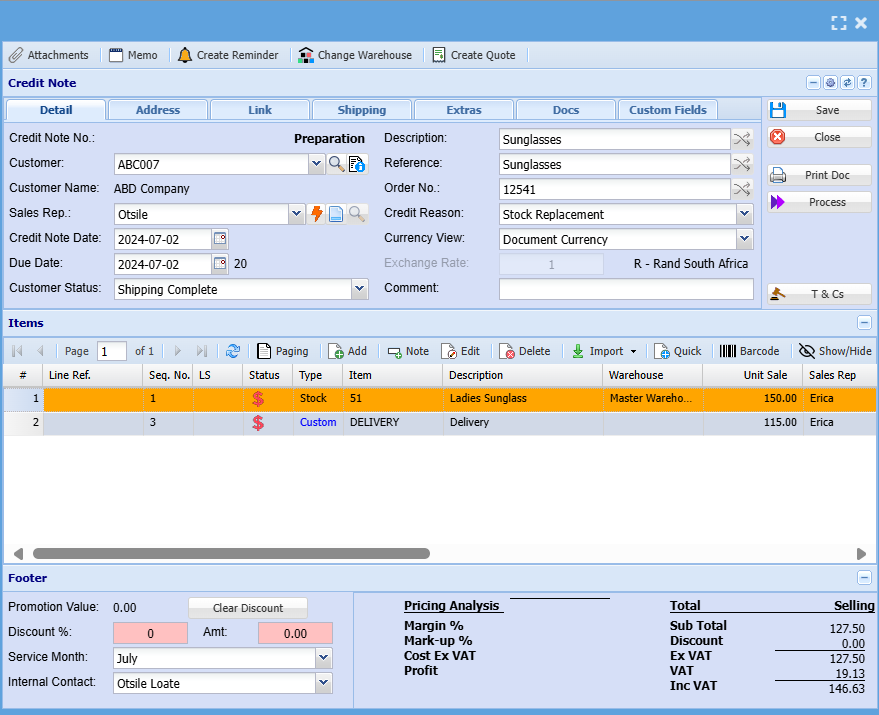](https://hugeerp10.co.za/hsofmanual/uploads/images/gallery/2024-07/ineimage.png)
You can then process the credit note and send it to a customer/ debtor
---
#### Print Doc
[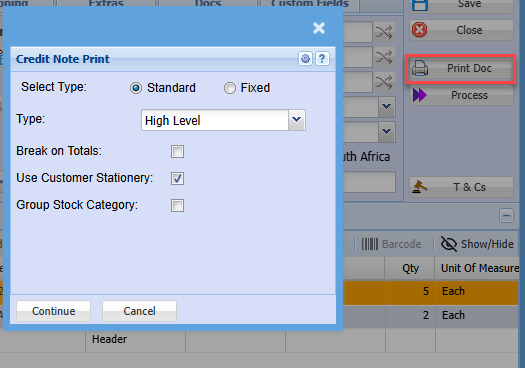](https://hugeerp10.co.za/hsofmanual/uploads/images/gallery/2024-10/wk1image.png)
---
#### Note
[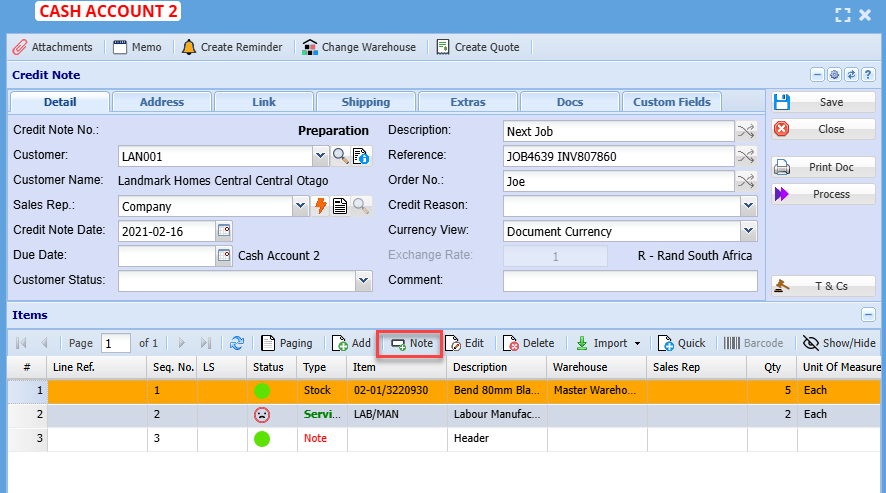](https://hugeerp10.co.za/hsofmanual/uploads/images/gallery/2024-10/6Izimage.png)
[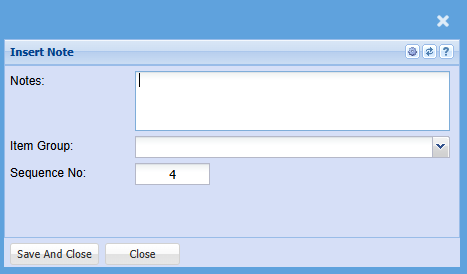](https://hugeerp10.co.za/hsofmanual/uploads/images/gallery/2024-10/zGuimage.png)
---
#### Commission Notes
[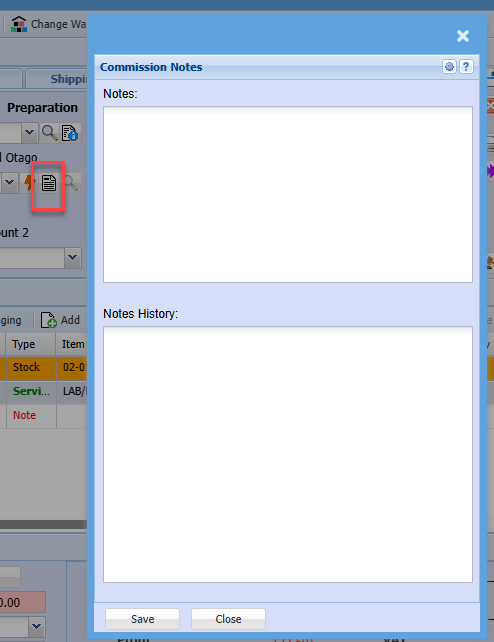](https://hugeerp10.co.za/hsofmanual/uploads/images/gallery/2024-10/d0himage.png)
# Importing Invoice to Credit note warning
When importing an invoice to a credit note and the invoice been imported has a credit note allocated to it.
There is a warning to indicate that the credit note was done for this invoice.
This warning only works if:
1. When using the Import From Invoice button
2. The invoice import has a credit note allocated to it
[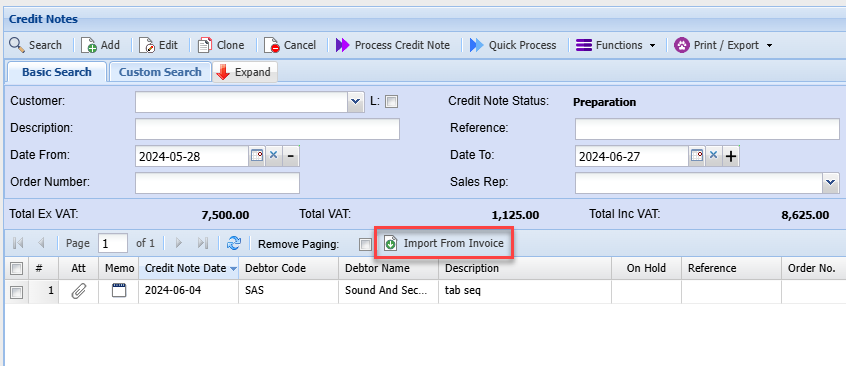](https://hugeerp10.co.za/hsofmanual/uploads/images/gallery/2024-06/fulimage.png)
When importing, a warning to alert you that a credit note was done against the invoice you are importing
[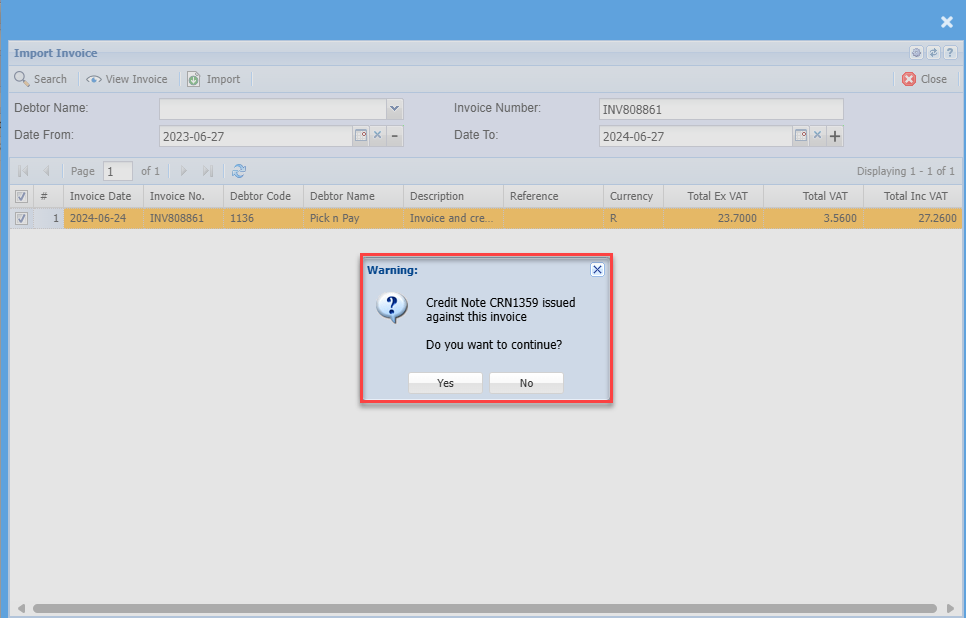](https://hugeerp10.co.za/hsofmanual/uploads/images/gallery/2024-06/MnDimage.png)
# Import Invoice to Credit Note
The simplest way of creating a credit note by simply “Import from invoice”
You can however use the long method of capturing
**Open Debtors Module> Activity > Credit Note**
Select Import from Invoice
[](https://hugeerp10.co.za/hsofmanual/uploads/images/gallery/2024-06/kwrimage.png)
Search by document number or customer, remember the date range also counts.
The default option is to import from an invoice or import from a quote.
Importing from quote helps keep the Task build structure in place for Credit note
You can view the invoice to verify that it’s the correct one you want to reverse by clicking on the view invoice button.
Click on the Import button to create a credit note
[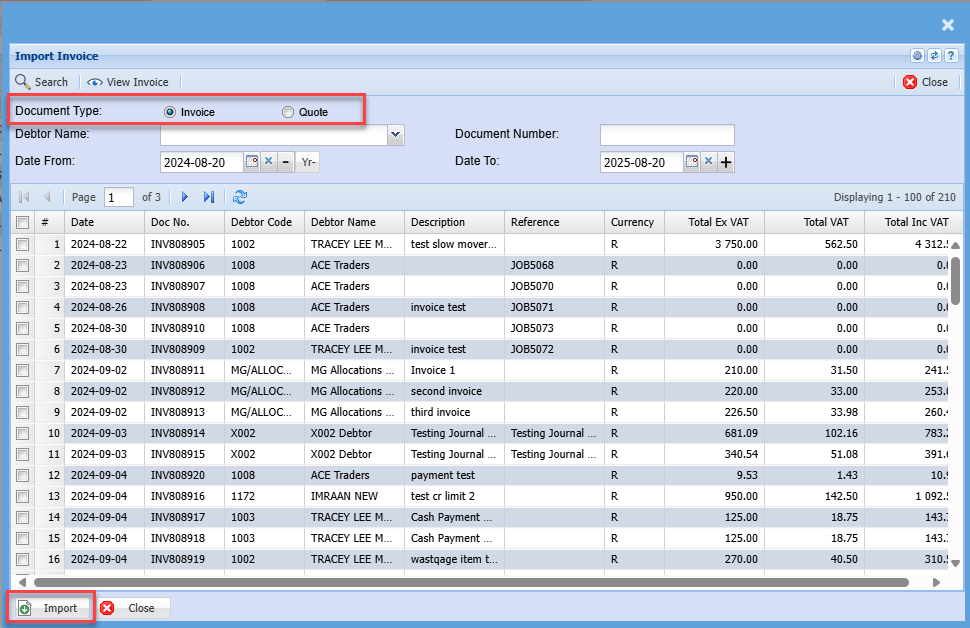](https://hugeerp10.co.za/hsofmanual/uploads/images/gallery/2025-08/fsgimage.png)
And Click Continue
[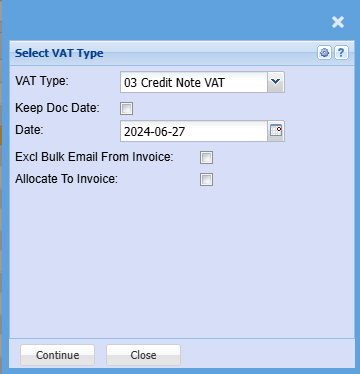](https://hugeerp10.co.za/hsofmanual/uploads/images/gallery/2024-06/9FIimage.png)
| **VAT / GST Type** | Select the correct Tax Type for Credit Note |
| **Keep Doc Date** | Enforce credit note to make date same as invoice date |
| **Date** | Put in a date for credit note |
| **Excl Bulk Email from Invoice** | Put this tick on to mark invoice to not be sent out when using Bulk email invoice function |
| **Allocate to Invoice** | Automatically allocate the credit note to invoice after processing the credit note |
If one changes the customer of the imported invoice to credit note, the Allocate to invoice will be cleared. No automatic allocation will occur
The credit note will now be under preparation status in the credit notes waiting to be processed
.png)
Click On process Credit note to process this document
.png)
# GRA Number for Credit Note
Return Authorization Document for Credit Note
Often called:
- **RMA (Return Merchandise Authorization)** – Common in retail and manufacturing.
- **GRA (Goods Return Authorization)** – More typical in wholesale or distribution.
These are **pre-numbered documents** issued before the actual credit note is finalized. They serve as placeholders and authorization for goods to be returned, inspected, and eventually credited.
GRA Number setup in Reference Values
[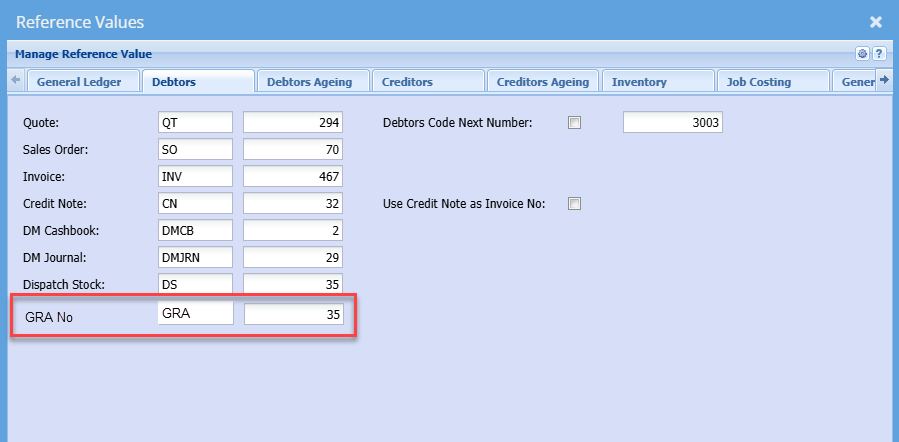](https://hugeerp10.co.za/hsofmanual/uploads/images/gallery/2025-08/W3iimage.png)
Assign a GRA number
[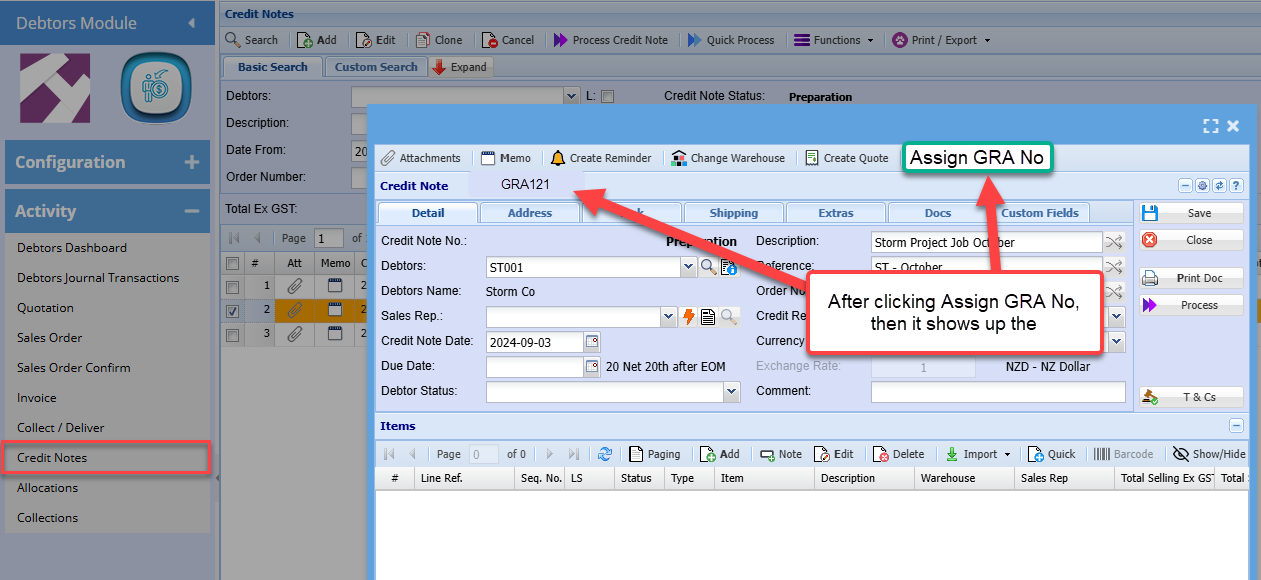](https://hugeerp10.co.za/hsofmanual/uploads/images/gallery/2025-08/50Nimage.png)
Print out for Credit note
If the credit note has a GRA number, then it will add these to the Credit Note
[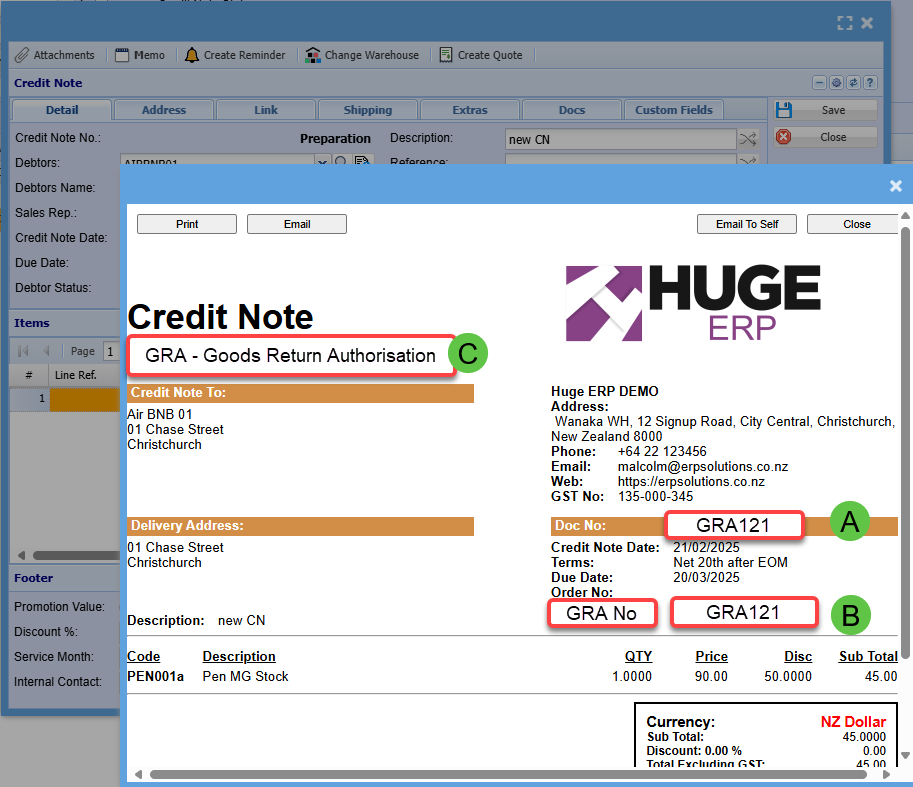](https://hugeerp10.co.za/hsofmanual/uploads/images/gallery/2025-08/SvNimage.png)
---
##### Search grids
GRA Number on grid with icon
[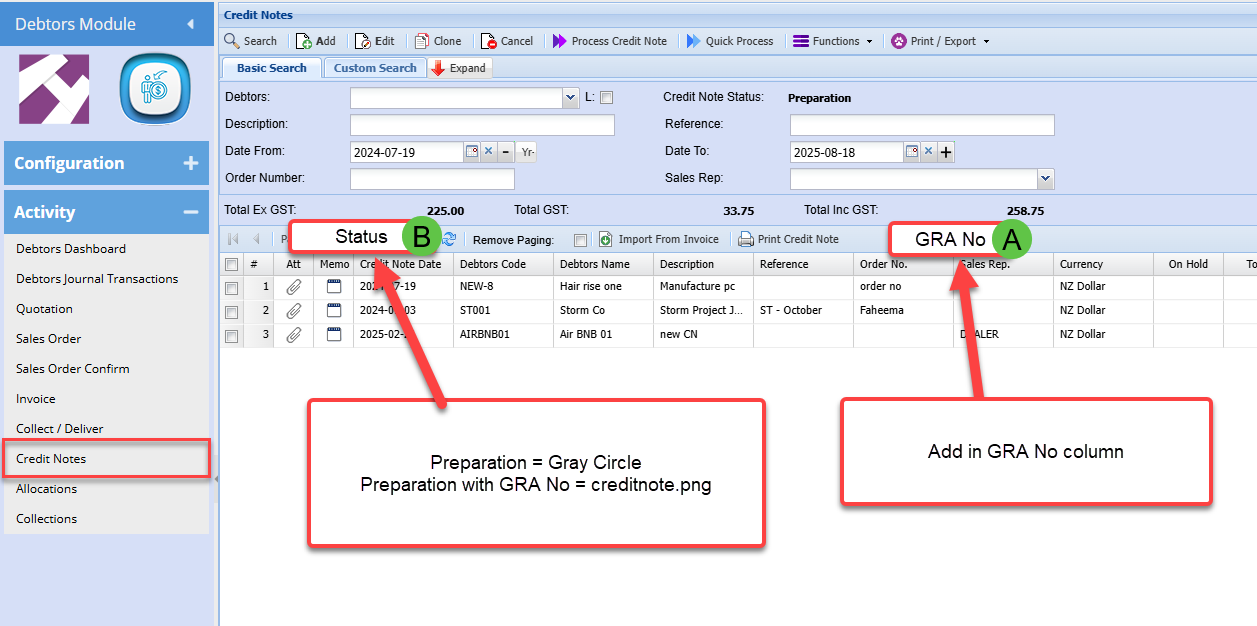](https://hugeerp10.co.za/hsofmanual/uploads/images/gallery/2025-08/E1Jimage.png)
History grid will show GRA number
[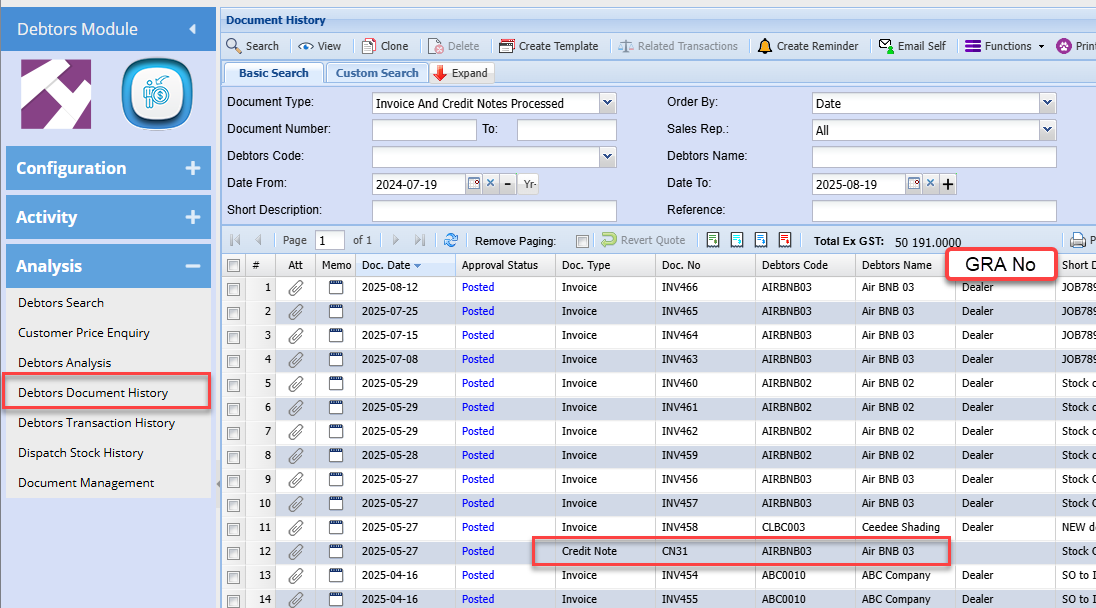](https://hugeerp10.co.za/hsofmanual/uploads/images/gallery/2025-08/oZKimage.png)
# Allocations Menu
# Debtors Allocations
Allocations tie the payments to an invoice or invoices.
**Go to Debtors Module > Activity > Allocations**
[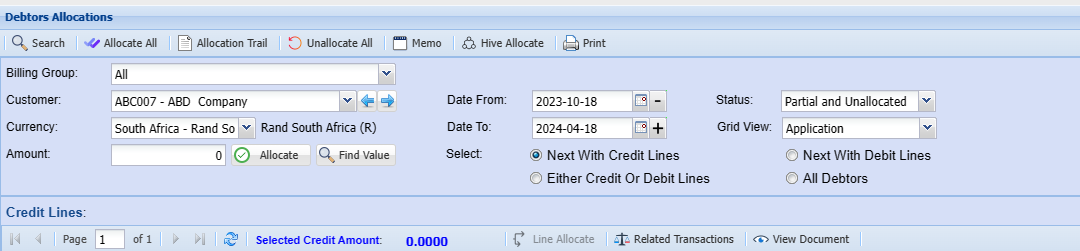](https://hugeerp10.co.za/hsofmanual/uploads/images/gallery/2024-04/QPgimage.png)
| **Billing Group** |
|
| **Customer** | to select a debtor |
| **Currency** | currency used by the debtor comes up when the debtor is selected |
| **Amount** | You can add a specific amount here that you would like to allocate to a Debtor |
| **Date From and Date To** | select the date from and the date to which the invoices will be running from |
| **Select** |
|
| **Status** | the option to filter by using the status of the transaction (All, Allocated, partial and unallocated and unallocated) |
| **Grid View** | this gives the option to select how you want the transactions amount to be allocated displayed, the default is application another available option is system, System Option shows all the rounded decimals. |
| **Credit Lines Tab** | shows the payments lines according to the selection made on General tab |
| **Associated Debit Lines Tab** | shows the invoice associated with the payment |
| **Debit Lines Tab** | shows the invoice lines according to the selection made on General tab |
| **Memo** | allows a user to make notes on allocations |
| **Date from** | enter the date from which the allocation will run from |
| **Date To** | enter the date to |
| **Amount** | amount to be allocated |
| **Allocate button** | the command button to allocate |
| **Find Value button** | find a value to be allocated |
---
Allocation Buttons
[](https://hugeerp10.co.za/hsofmanual/uploads/images/gallery/2024-04/N5Limage.png)
On the grid of either credit line or debit line you will see these buttons
---
#### Allocations
Select the Debtor or Creditor to allocate and then click on search.
The data goes back 6 months, should you want to go further back change your date from.
The status setting is set to Partial and unallocated; this means the allocations screen will only show transactions which have not be allocated or are partially allocated. If the transaction is fully allocated it will not show on this setting.
.png)
To Allocate a payment to an invoice highlight the Credit line or payment, or top grid and select a corresponding invoice, debit line on the bottom grid. Once highlighted, click on the allocated button either at the top or the green tick [ ](https://hugeerp10.co.za/hsofmanual/uploads/images/gallery/2024-09/Wisimage.png)to the right of the debit line tick box.
One can also allocate a specific amount of payment to an invoice by changing the amount field and clicking on allocate.
After you have allocated click on the search button to clear transactions which are fully allocated.
After the transaction has been allocated and there is still an amount to be allocated, one will notice that in the unallocated column there is an amount outstanding.
There are two ways to confirm an allocation. allocated column is the amount which has been allocated to the invoice you need to select your credit line and your debit line.
[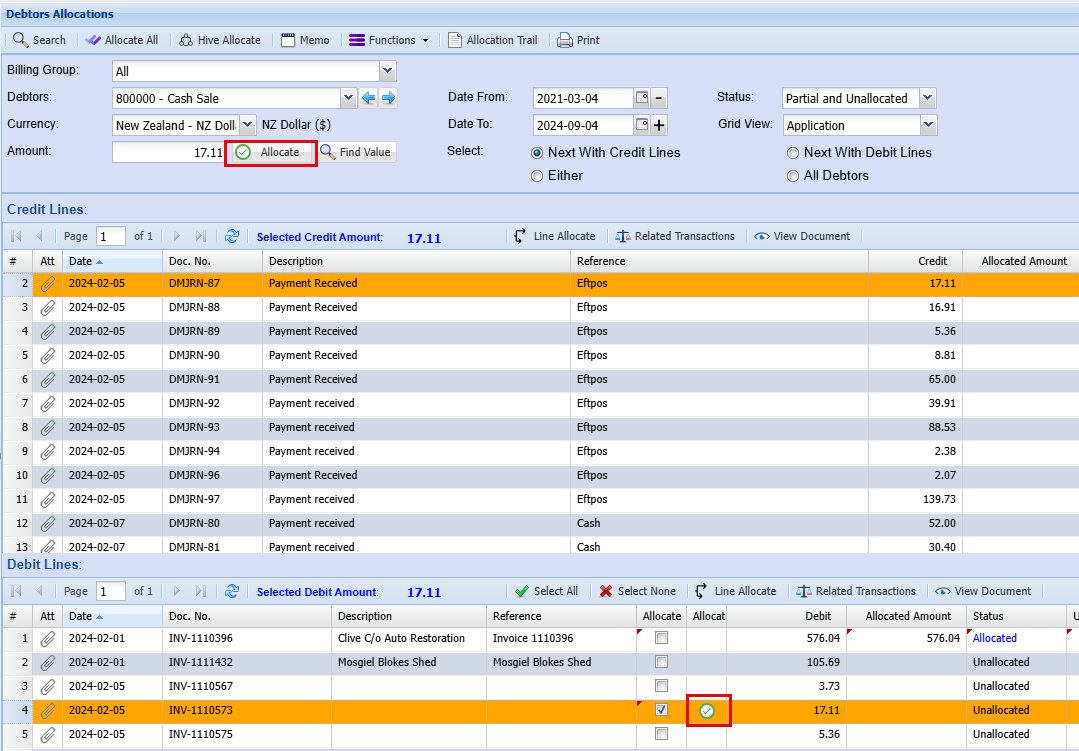](https://hugeerp10.co.za/hsofmanual/uploads/images/gallery/2024-09/DHtimage.png)
Continue to allocate until all your transactions are allocated.
---
#### Un-allocate
Change the Status drop down to say All and click on search. This means you want to see all transactions that are allocated, unallocated, partially allocated.
.png)
To un-allocate a transaction select the Allocated status in the search Grid
Find the transaction you want to un-allocate
Select it and click on "Line Allocate" button
.png)
A window will open showing transactions that have been allocated
Select lines that need to be un-allocated.
Click on the un-allocate button
.png)
---
#### Hive Allocate
[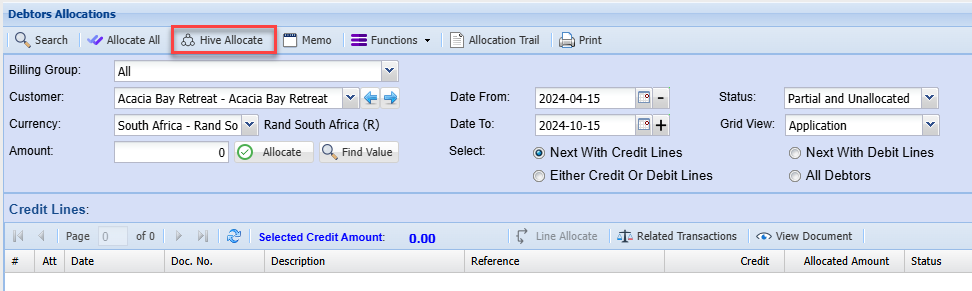](https://hugeerp10.co.za/hsofmanual/uploads/images/gallery/2024-10/kSyimage.png)
[](https://hugeerp10.co.za/hsofmanual/uploads/images/gallery/2024-10/bDVimage.png)
# Allocation Fix
This button allows one to fix any odd allocations on this line
| 1 | Partial allocation that does not add up |
| 2 | Allocation that shows allocated, but there is nothing on the grid |
This will fix and unallocate any documents linked behind the screens that the user cannot see.
This saves having to fully unallocate all to fix the problem.
The button is available on both Debtors and creditors allocations
.png)
# Allocation Decimal Journal Menu
# Debtors Allocation Decimal Journals
Used to correct decimal places after two decimals. (no longer used since 2018)
Note: System caters to handle multiple decimal places automatically since 2018, there should be no need to use this function
Debtors> Activity> debtors Allocations Journal
Click Create to begin the process of decimal journal allocations.
.png)
| **Debtor from and Debtor To** | Add a specific debtor to run the allocations journal for or alternatively leave blank to affect all existing debtors |
| **Journal date** | Select the date the preferable date this journal will be processed into |
| **Currency** | select the currency applicable |
| **Vat Type** | select the Vat Type Applicable |
| **Description** | Add description |
| **reference** | Add Reference |
| **Process** | Process this Journal |
.png)
Upon Processing
A Journal report will be generated and showing the journal number and the amount allocated per debtor
.png)
.png)
This part shows if the debtors allocation decimal journals processed have been successful or not.
On Basic Tab the status allows a user to search with the selection made from the drop down arrow.
Standard Tab
# Debtors Template List Menu
# Template List
Debtors Module> Activity>Template List
A List of templates can be created in the system for Use
We have four main template list
| •Cashbook |
| •Journal |
| •Invoice |
| •Quote |
.png)
| For example | An Invoice Template Is created from an invoice menu |
.png)
Click Create template
.png)
Give it a code and description.
Click Continue
The template will be moved to template list.
.png)
# Debtors Interest Transaction Menu
# Debtors Interest Search
Search all interest batches
Interest will only run on debtors that have been flagged with an interest active
[](https://hugeerp10.co.za/hsofmanual/uploads/images/gallery/2024-01/BBJimage.png)
| **Search** | Search interest batches |
| **Add** | Add a new interest batch |
| **Edit** | Edit an existing batch |
| **Cancel** | Cancel an open batch |
| **Print** | Print interest batch |
# Add Debtors Interest Journals
This utility will calculate and create a Debtor Journal for each debtor that is Checked to have interest charges against them for outstanding balances.
The interest is calculated per age period per debtor for the outstanding amount per age period.
The interest percentage is setup on the Debtor Master Detail window.
**Debtors> Activity> Interest Transactions> Add**
[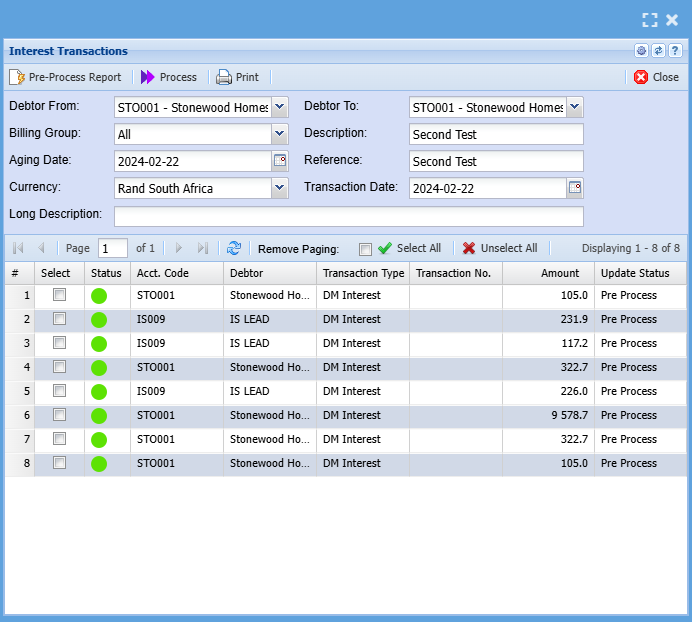](https://hugeerp10.co.za/hsofmanual/uploads/images/gallery/2024-07/image.png)
| **Debtor From**
| Select the from debtor. (The From and to can be left blank to include all debtors)
|
| **Debtor To**
| Select the To debtor.
|
| **Billing Group**
| A selectable value from a dropdown to create journals for a specific debtor billing group.
|
| **Aging Date**
| This is the date that the aging for the debtors will be based on.
|
| **Description**
| Enter a description for you interest batch.
e.g. Interest on overdue account
|
| **Currency**
| Select the currency from the drop down.
|
| **Reference**
| Enter a reference of your choice.eg, Interest on Overdue Account. This is the reference that will appear on your interest transaction line on the debtors statement
|
| **Transaction Date**
| This is the actual transaction date for the debtor journal.
|
| **Long Description**
| Enter a description regarding the interest journal.
|
| **Standard Tab has four buttons**
|
| **Pre-Process Report**
| Pre-process runs the journal calculations but does not process the actual transaction, this allows for assessment and scrutiny before actually processing the interest journals.
|
| **Process**
| Actually run debtors interest utility.
|
| **Close button**
| Closes the window.
|
| **Print button**
| Print debtor’s interest run report
|
Note: If you click “Process” This will post the interest transaction to the respective debtor's accounts. Typically, you will only Process these transactions on month end, prior to running the debtor's statements and if you are satisfied that the interest amounts are correct.
If you process and there is an error in a particular calculation, you will need to do a journal to correct the mistakes.
---
Interest Calculation Example
Assume you wish to charge ABC Stores interest of 10% on their outstanding account.
Using the interest setup of 10%, Zero Minimum amount, Period From 30 Days.
| **Debtor From** | ABC Stores |
| **Debtor To** | ABC Stores |
| **Billing Group** |
|
| **All Description** | Interest on overdue account |
| **Ageing Date** | 30/04/2012 |
| **Reference** | Interest on overdue account |
| **Currency** | Rands |
| **Transaction Date** | 30/04/2012 |
| 180days | 150days | 120days | 90days | 60days | 30days | Current | Balance |
| 0 | 0 | 0 | 1200 | 1000 | 500 | 0 | 2700 |
30/04/2012 Interest calculations:
Current: 31/01/2012 to 29/02/2012 Interest not applicable – zero balance
30 Days:01/03/2012 to 31/03/2012 Interest = R 0.00 (Due to From Period set at 30days)
60 Days: 01/04/2012 to 30/04/2012 Interest = R 8.33(1000 \* 10%) / 12
90 Days:
Therefore on 30/04/2012 the ABC stores account will reflect a journal of R 8.32 for the interest calculate from 30-60days.
| Debtors Account | Dr | Cr | Balance |
| 01/04/2012 Opening Balance | 1000.00 |
| 1000.00 |
| 30/04/2012 Interest on overdue account | 8.33 |
| 1008.33 |
# Interest Activation Setup
Setup interest to be run in Debtors setup
Debtors Module> Configuration> Debtors Setup
Select the debtor> Amend> Account Details> Interest Setup
.png)
.png)
| **Tick the Activate Option** | This will activate interest calculations on that particular debtor |
| **Minimum Amount** | This amount is the minimum amount that interest will be calculated from. That is, if the amount outstanding is less than this amount, no interest will be calculated |
| **Period From** | This field indicates from how many days outstanding to start calculating interest. ie, if you choose 30 Days as an example, the system will start calculating interest if the amount outstanding is more than 30 days old |
| **Interest Rate** | Enter the interest rate, number only |
No need to enter a %, only a number
Interest Rate: This is an annual percentage.
If you wish to have interest calculated on all debtors, you will have to follow this process for every debtor.
# Point Of Sale Invoice
# Point Of Sale Credit Note
# Collections Menu
# Collections
**Debtors Module> Activity> Collection**
[](https://hugeerp10.co.za/hsofmanual/uploads/images/gallery/2024-10/6UNimage.png)
[](https://hugeerp10.co.za/hsofmanual/uploads/images/gallery/2024-10/jwVimage.png)
---
#### Printing Options
[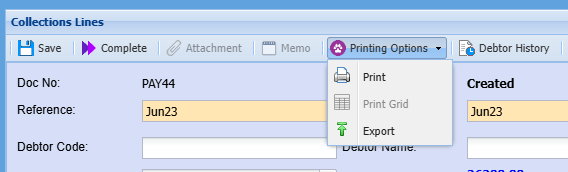](https://hugeerp10.co.za/hsofmanual/uploads/images/gallery/2024-10/5wAimage.png)
[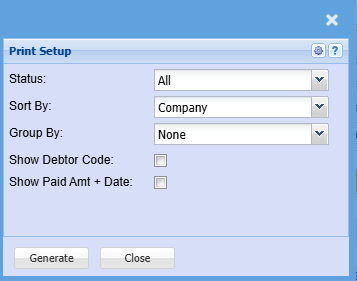](https://hugeerp10.co.za/hsofmanual/uploads/images/gallery/2024-10/sibimage.png)
# Debtor Collections
The collections is a schedule of outstanding debtors
the collections schedule allows one to enter notes on correspondence with clients that have monies due
to create a collections schedule go to:
**Debtors Module> Reports >Age analysis**
Serach the period you wish to see outstanding debtors for.
Click the Collections button
[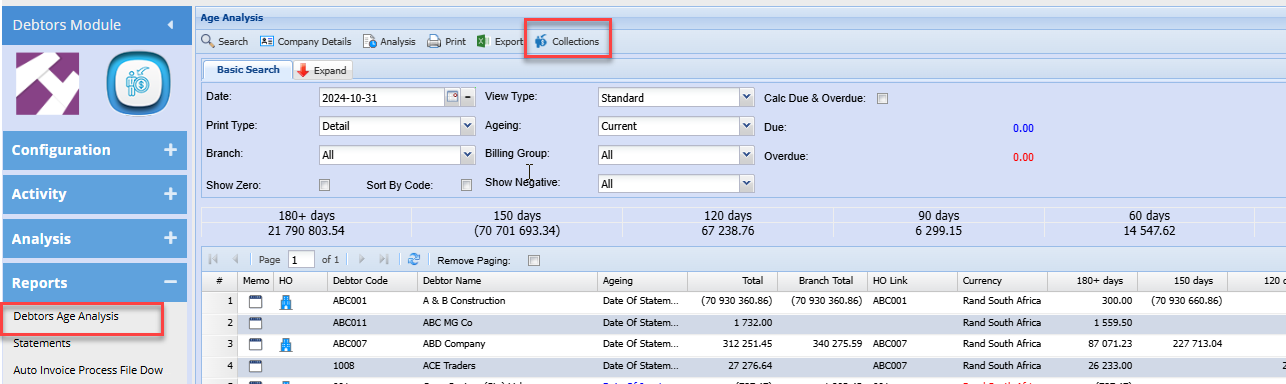](https://hugeerp10.co.za/hsofmanual/uploads/images/gallery/2024-11/SFIimage.png)
Enter a code
Enter a description
[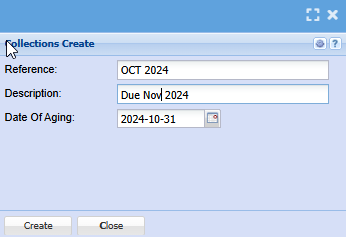](https://hugeerp10.co.za/hsofmanual/uploads/images/gallery/2024-11/8Omimage.png)
Click the Create button
Then go to Activity
Collections
[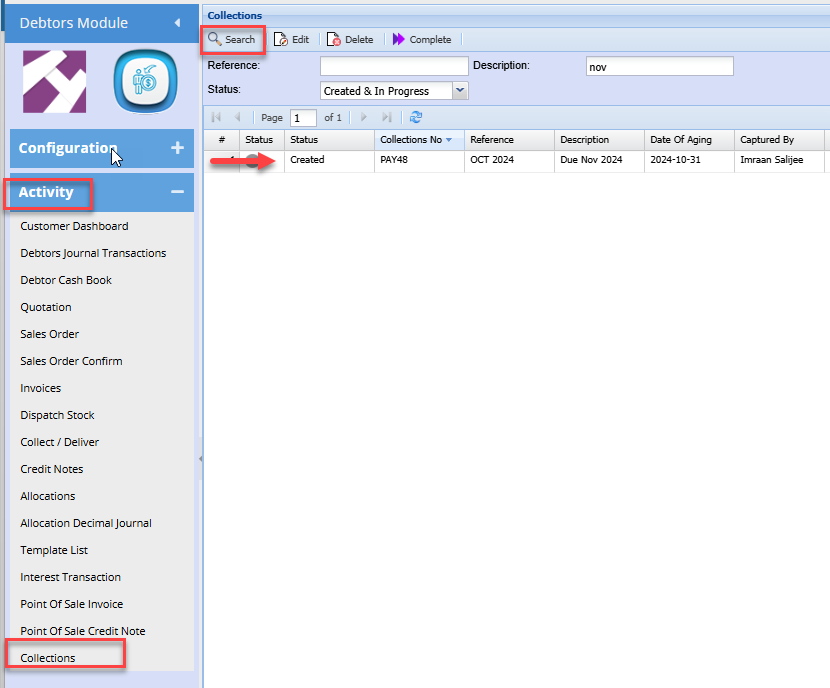](https://hugeerp10.co.za/hsofmanual/uploads/images/gallery/2024-11/klpimage.png)
You will note your collections schedule has been created
Double click to open the collections list
[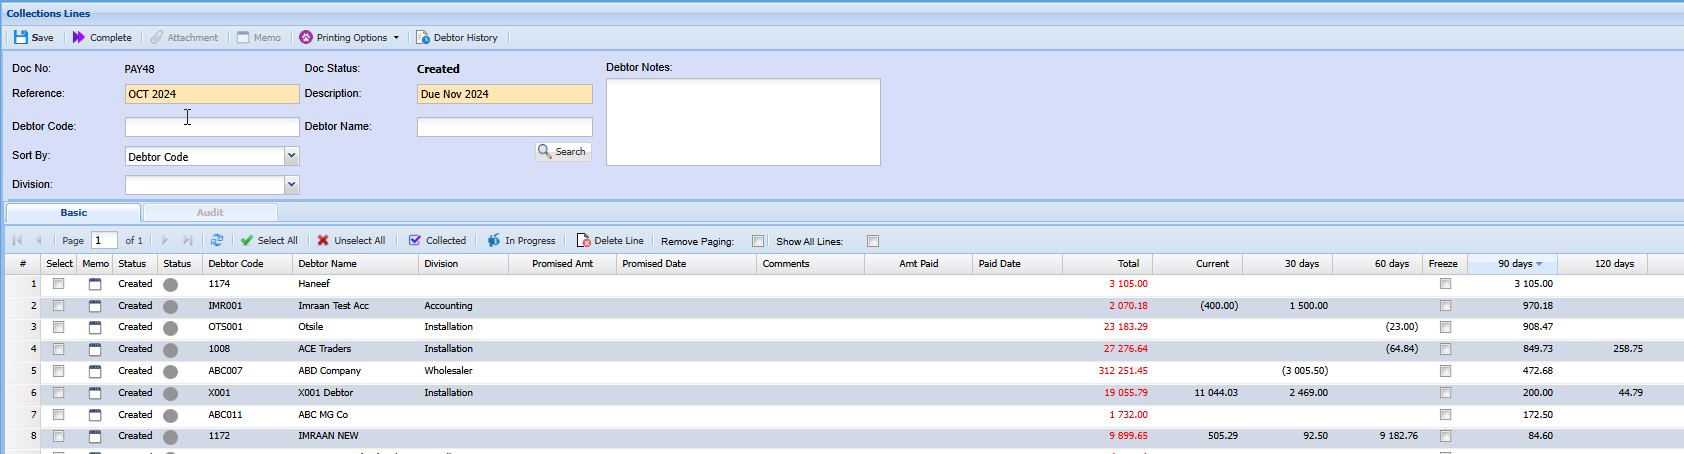](https://hugeerp10.co.za/hsofmanual/uploads/images/gallery/2024-11/H14image.png)
| **Complete** | Marks the schedule as complete and removes it from the grid. You will need to tick the select tick box and then the collected button |
| **Debtor History** | Displays the selected debtors' transaction history over the given date range |
| **Collected** | Marks the selected line as collected and hides it from the schedule |
| **Delete Line** | Deletes the selected line from the grid |
| **Remove paging** | Displays all debtors on a single page If the debtors list exceeds the default 100 lines |
| **Show All lines** | Displays all debtor lines including the hidden lines that have been marked as collected |
| **Promised Amount** | Enter the amount the debtor promised to pay |
| **Promised Date** | Enter the date the debtor promised to pay |
| **Comments** | Enter any comments or notes from correspondence with respective debtor |
| **Paid Amount** | Enter the amount paid |
| **Paid Date** | Enter the paid date |
# Shopify Guide - Building Your Shopify Store
### Recommended Shopify Image Sizes (2025)
Here’s a breakdown of optimal dimensions for various image types in your store:
| **Image Type** | **Recommended Size** | **Aspect Ratio** | **Notes** |
| **Product Images** | 2048 x 2048 px | 1:1 | Best for zoom and clarity
|
| **Collection Images** | 1024 x 1024 px | 1:1 | Used in collection grids
|
| **Collection Banners** | 2800 x 1000 px | 2.8:1 | Full-width headers
|
| **Homepage Banners (Desktop)** | 1200 x 400 px | 3:1 | Horizontal layout |
| **Homepage Banners (Mobile)** | 800 x 600 px | 4:3 | Optimized for mobile |
| **Blog Featured Images** | 1920 x 1080 px | 16:9 | For blog headers |
| **Blog Thumbnails** | 1200 x 800 px | 3:2 | For previews and listings |
| **Logo** | Up to 450 x 250 px | Varies | Keep file size small for fast loading |
Tips for Uploading to Your Main System
- **Use JPG or WebP formats** for best balance of quality and load speed.
- **Compress images** before uploading to avoid slowing down your site.
- **Maintain consistent aspect ratios** to avoid cropping or distortion.
- **Avoid overly large files** Shopify limits image uploads to 20 MB.
---
### Selecting Your Theme
**A Shopify online store theme is a customizable template that controls the look, layout, and functionality of your storefront.** It defines how your products, pages, and navigation appear to customers across desktop and mobile.
Click on **“Online Store”** in the left-hand menu, then select **“Themes.”**
The **Dawn theme** is installed by default for new stores.
If you'd like to explore other themes, scroll down and click **“Visit Theme Store”** to browse free and paid options.
[ ](https://hugeerp10.co.za/hsofmanual/uploads/images/gallery/2025-11/vxvimage.png)[](https://hugeerp10.co.za/hsofmanual/uploads/images/gallery/2025-11/uzbimage.png)
---
### Customize your Store
To customize your store, click on "**Customize**" this will take you into the store editor.
[](https://hugeerp10.co.za/hsofmanual/uploads/images/gallery/2025-11/6rlimage.png)
---
### Main Header (Home Page)
#### Announcement Bar
The **Announcement Bar** in Shopify is a customizable banner that appears at the top of your online store, used to highlight important messages like promotions, shipping updates, or store news. It’s a simple but powerful tool to grab attention and guide customer behavior.
[](https://hugeerp10.co.za/hsofmanual/uploads/images/gallery/2025-11/2Baimage.png)
Commonly Used for:
- “Free shipping on orders over $50”
- “Holiday sale ends Sunday!”
- “We’re currently experiencing shipping delays”
- “New gift cards now available”
How to Add or Edit It
1. Go to **Online Store > Themes > Customize**
2. Select the **Header** or **Announcement Bar** section
3. Enter your message, choose colors, and set visibility from the
##### Announcement Bar Settings
[](https://hugeerp10.co.za/hsofmanual/uploads/images/gallery/2025-11/UPGimage.png)
Time to Next Announcement
- **Slider (e.g., 5 sec):** Controls how long each announcement stays visible before switching to the next one (if you have multiple messages rotating).
Appearance
- **Section Width:**
- **Page:** Keeps the bar aligned with your page content width.
- **Full (selected):** Stretches the bar across the entire screen width for maximum visibility.
- **Color Scheme:** Choose a predefined color palette (e.g., Scheme 1) that matches your store’s branding.
- **Divider Thickness:** Adds a horizontal line below the bar. The slider (e.g., 1 px) controls how thick that line is.
Padding
- **Top & Bottom (e.g., 15 px):** Adds space above and below the announcement bar to control its vertical spacing. Useful for visual balance and readability.
Custom CSS
- Expandable section where you can add custom styling rules (CSS) to fine tune the look, like font tweaks, animations, or responsive behavior.
You can delete this bar as well by hovering over "Announcement" and clicking on the Bin icon
[](https://hugeerp10.co.za/hsofmanual/uploads/images/gallery/2025-11/JW1image.png)
#### Header Bar
The **header bar** is the top section of your store that displays your logo, navigation menu, search, and cart icons. It helps customers find key pages like Shop or Contact, return to the homepage, and access their cart.
[](https://hugeerp10.co.za/hsofmanual/uploads/images/gallery/2025-11/T08image.png)
##### Header Menu Settings
[ ](https://hugeerp10.co.za/hsofmanual/uploads/images/gallery/2025-11/9toimage.png)[](https://hugeerp10.co.za/hsofmanual/uploads/images/gallery/2025-11/BRkimage.png)
Logo
- **Position:** Choose where your logo appears—Left, Center, or Right.
Menu
- **Position:** Set the horizontal alignment of your navigation menu.
- **Row:** Choose whether the menu appears on the Top or Bottom row of the header.
Customer Account
- **Visibility:** Manage whether the customer account icon is shown. Note: legacy accounts are not supported.
Search
- **Search Icon:** Toggle visibility of the search icon.
- **Position:** Align the icon to the Left or Right.
- **Row:** Choose Top or Bottom placement within the header.
Localization
- **Country/Region:** Toggle to show or hide country/region selector.
- **Flag:** Toggle to display country flags.
- **Language Selector:** Toggle to enable language switching.
- **Manage Countries/Languages:** Access settings to configure available regions and languages.
Font Settings
- **Font:** Select the font style used in the header.
- **Size:** Choose the font size (e.g., 18px).
- **Position & Row:** Control where the text appears—Left or Right, Top or Bottom.
Appearance
- **Width:** Choose between “Page” (aligned with page content) or “Full” (spans entire screen).
- **Height:** Select “Compact” for a slim header or “Standard” for a taller layout.
Color and Transparency Settings
These settings control the visual styling of your header and page backgrounds:
- **Color Scheme:** Choose from predefined schemes (e.g., Scheme 1, Scheme 8, Inverse) to match your brand.
- **Bottom Row Scheme:** Apply a separate color scheme to the lower portion of the header if supported.
- **Transparent Backgrounds:**
- **Home Page:** Toggle transparency for a clean, overlay-style header.
- **Product Page:** Enable transparency to let product imagery shine through.
- **Collection Page:** Combine transparency with color schemes for visual consistency.
Theme Settings
- **Custom CSS:** Expand this section to apply advanced styling rules for full control over header appearance.
#### Logo
The **Logo tab** controls how your store’s logo appears in the header. This is a key branding element that helps customers recognize your business and navigate back to the homepage.
[](https://hugeerp10.co.za/hsofmanual/uploads/images/gallery/2025-11/lihimage.png)
##### Logo Settings
[](https://hugeerp10.co.za/hsofmanual/uploads/images/gallery/2025-11/iIvimage.png)
Edit Logo
- **Edit logo in theme settings:**
To change the logo image itself (upload, replace, or resize), go to your theme’s main settings panel.
Visibility
- **Hide logo on home page (toggle):**
If enabled, the logo will be hidden on the homepage but will still appear when the sticky header is active (e.g., during scrolling). Useful for minimalist designs or when the homepage already features a large logo elsewhere.
Desktop Padding
Controls the spacing around your logo on desktop devices:
- **Top / Bottom / Left / Right (px):**
Use sliders or input fields to fine-tune the logo’s placement.
- Example: Increase top padding to lower the logo vertically
- Set left/right padding to center or offset the logo horizontally
Position:
Choose where the logo appears within the header:
- **Left:** Common for traditional layouts
- **Center:** Ideal for minimalist or symmetrical designs
- **Right:** Less common, but useful for specific branding styles
Best Practices
- Use a high-resolution logo with a transparent background (PNG format recommended).
- Keep the logo size proportionate to your header height for visual balance.
- Ensure it’s clickable, most themes link the logo to your homepage by default.
#### Menu - Main
When you click on Menu > Main menu in Shopify’s theme editor, you're customizing how your store’s primary navigation menu looks and behaves across desktop and mobile.
[](https://hugeerp10.co.za/hsofmanual/uploads/images/gallery/2025-11/qjwimage.png)
##### Main Menu Settings
[](https://hugeerp10.co.za/hsofmanual/uploads/images/gallery/2025-11/YjTimage.png)
- **Menu:** Selects which navigation menu to display (e.g., “Main menu” from your Shopify Navigation settings).
- **Color scheme:** Applies a predefined color palette to your menu (e.g., background, text, hover states).
Typography
- **Top level size:** Controls the font size of your main menu items (e.g., Home, Shop, Contact).
- **Submenu text style:** Sets the size or emphasis of dropdown items (e.g., bold, large).
- **Font:** Chooses the font style for menu text (e.g., Subheading, Body).
- **Case:** Toggles between default casing and uppercase for menu labels.
Submenu Feature
This section enhances dropdown menus with visual content:
- **Media type:** Lets you display images or featured products within dropdowns.
- “Featured products” pulls product images from linked collections.
- **Image ratio:** Defines the shape of images (e.g., Portrait, Square).
- **Image corner radius:** Adjusts how rounded the image corners are (0 px = sharp corners).
Mobile Layout
Controls how the menu behaves on mobile devices:
- **Navigation bar:** Toggles a sticky top bar for mobile navigation.
- **Navigation bar color scheme:** Sets the color palette for the mobile nav bar.
- **Accordion:** Enables collapsible menu groups for easier mobile browsing.
- **Expand first group:** Automatically opens the first menu group on mobile.
- **Dividers:** Adds visual separators between menu items.
#### Divider
In Shopify theme settings, the **divider** refers to a thin horizontal line used to visually separate sections, often between the header and the rest of the page or within the announcement bar.
[](https://hugeerp10.co.za/hsofmanual/uploads/images/gallery/2025-11/gxfimage.png)
##### Divider Settings
[](https://hugeerp10.co.za/hsofmanual/uploads/images/gallery/2025-11/ldlimage.png)
Divider
- **Color Scheme:**
Select a predefined color palette (e.g., Scheme 1) that matches your store’s branding. This affects the divider’s color.
- **Width:**
- **Page:** Aligns the divider with your page content width.
- **Full:** Stretches the divider across the entire screen for a bold, clean break.
- **Thickness:**
Adjusts how thick the line appears. For example, 2.5 px creates a medium weight divider, visible but not overpowering.
- **Length:**
Controls how much horizontal space the divider spans (e.g., 100% = full width). You can reduce this for a centered or stylized look.
Padding
- **Top & Bottom Padding:**
Adds vertical spacing above and below the divider (e.g., 16 px). This helps balance layout and prevent crowding.
Custom CSS
- Expand this section to apply advanced styling rules—such as dashed lines, animations, or responsive behavior.
#### Add Section
[Video Link](https://www.bing.com/videos/riverview/relatedvideo?&q=explain+the+%22Add+Section%22+in+shopify&&mid=41CBDF1EDFADF2BE4EF041CBDF1EDFADF2BE4EF0&&FORM=VRDGAR)
The **Add Section** tool lets you insert new content blocks into your store’s pages, like your homepage, product pages, or custom templates. It’s a flexible way to build and organize your layout without editing code.
[](https://hugeerp10.co.za/hsofmanual/uploads/images/gallery/2025-11/jlqimage.png)
What You Can Add
- **Visual elements:** Hero banners, slideshows, images, videos
- **Product displays:** Featured collections, product grids, product cards
- **Text blocks:** Headings, testimonials, rich text, FAQs
- **Functional tools:** Announcement bars, dividers, custom Liquid, contact forms
- **Apps:** If installed, app-based sections may appear here too
How to Use It
1. In the theme editor, click **“Add Section”**
2. Use the **search bar** or browse tabs like **Sections** and **Apps**
3. Select a section (e.g., Divider, Featured Collection)
4. Customize its content, layout, and styling using the right-hand panel
5. Drag to reorder or remove as needed
Layout Tip
Sections are modular, each one can be added, removed, or repositioned independently. This makes it easy to test layouts, highlight seasonal content, or tailor pages to your business needs.
---
### Template
#### Hero Image
A hero image in Shopify is the large, eye-catching banner at the top of your homepage that creates your store’s first impression. It’s often the first thing visitors see and plays a key role in setting the tone, showcasing your brand, and guiding users toward action.
[](https://hugeerp10.co.za/hsofmanual/uploads/images/gallery/2025-11/FMyimage.png)
##### Hero Settings
[ ](https://hugeerp10.co.za/hsofmanual/uploads/images/gallery/2025-11/cSrimage.png)[](https://hugeerp10.co.za/hsofmanual/uploads/images/gallery/2025-11/txkimage.png)
Navigate to the Home Page
- In the left sidebar, make sure you're editing the **Home page**
- Scroll to find the **Hero** section — or click **Add section** and choose **Hero** if it’s not already there
Upload Media
1. - **Media 1**: Upload your “first” logo image.
- **Media 2**: Upload the "Second" logo image.
- Set both media types to **Image**.
Configure Layout
1. - **Direction**: Choose **Vertical** or **Horizontal** depending on how you want the images and text stacked.
- **Alignment**: Set to **Left**, **Center**, or **Right**.
- **Position**: Choose **Bottom** to anchor content lower in the section.
- **Gap**: Set to **24 px**.
- **Width**: Select **Full** for edge-to-edge display.
- **Height**: Choose **Medium** for balanced vertical space.
Add Section Link
1. - Paste your desired URL (e.g., product page or collection).
- Toggle **Open in new tab** if needed.
Set Appearance
1. - **Color scheme**: Use **Scheme 6** (customizable in theme settings).
- **Media overlay**: Leave **off** unless you want a semi-transparent layer over images.
- **Overlay color**: Set to `#00000003` for a subtle tint.
- **Overlay style**: Choose **Solid** or **Gradient**.
- **Blurred reflection**: Leave **off** unless you want a mirrored effect below images.
Adjust Padding
1. - **Top**: Set to **100 px**.
- **Bottom**: Set to **72 px**.
Optional: Add Custom CSS
- Use this field to fine-tune styles (e.g., font size, button styling).
#### Heading
In Shopify’s **Online Store > Theme > Customize** view, the **“Heading” under the Hero section in the Template** refers to the **main title text** that appears inside your hero banner on the homepage.
[](https://hugeerp10.co.za/hsofmanual/uploads/images/gallery/2025-11/xHnimage.png)
##### Heading Settings
[ ](https://hugeerp10.co.za/hsofmanual/uploads/images/gallery/2025-11/NUvimage.png)[](https://hugeerp10.co.za/hsofmanual/uploads/images/gallery/2025-11/GQ0image.png)
Text Field
- **Heading**: This is where you type the main title that appears in your Hero section.
Formatting Toolbar
- **H1**: Sets the heading level (H1 is the largest and most prominent).
- **B**: Bold
- **I**: Italic
- **Link icon**: Insert a hyperlink into the heading text
- Other icons may include underline, strikethrough, or list formatting depending on your theme
Layout Options
- **Width**:
- **Fit**: The heading only takes up as much space as the text needs
- **Fill**: The heading stretches to fill the available space
- **Max Width**: Controls how wide the heading can grow (e.g., “Normal” keeps it readable)
- **Alignment**: Aligns the heading text to the **Left**, **Center**, or **Right**
Typography
- **Preset**: Applies a predefined style (e.g., “Heading 2” uses a specific font, size, and weight)
- **Edit presets in theme settings**: Opens the theme’s typography settings where you can customize fonts, sizes, and styles globally
Color Settings
- **Text**: Color of any regular text
- **Heading**: Color of the heading itself
- **Link**: Color of any links added to the heading
Background
- **Toggle Background ON** to enable color behind the block
- **Background color**: Set the colour of the background
- **Corner radius**: Use the slider to set the roundness of the corners
Padding
- Adjust padding sliders
These settings create a clean, edge-to-edge block with a soft background and rounded corners — ideal for overlaying text on images without clutter.
Save Your Changes
- Click **Save** in the top right to apply the block styling
#### Feature Collection
A **featured collection** is a curated group of products displayed prominently on your store, often on the homepage.
It’s used to showcase:
- **Best sellers**
- **New arrivals**
- **Seasonal promotions**
- **Product categories**
[](https://hugeerp10.co.za/hsofmanual/uploads/images/gallery/2025-11/mn9image.png)
##### Feature Collection Setup
**Step 1: Create a Collection**
This interface lets you create a collection, which is a group of products organized around a theme (e.g., “Summer Picks,” “Under $100,” “Mobile Scanners”). Collections help customers browse and discover products more easily.
##### [](https://hugeerp10.co.za/hsofmanual/uploads/images/gallery/2025-11/Jt6image.png)
1. Go to **Shopify Admin > Products > Collections**
2. Click **Add collection**
[](https://hugeerp10.co.za/hsofmanual/uploads/images/gallery/2025-11/RIJimage.png)
Title
- **Purpose**: Name your collection.
- **Example**: “ScanSKU Mobile Scanners” or “Barcode Essentials”
- This title appears on your storefront and in navigation menus.
Description
- **Purpose**: Add a short explanation or marketing message for the collection.
- **Example**: “Explore our top-rated mobile barcode scanners designed for warehouse and retail environments.”
- You can format text (bold, italic, links) using the toolbar.
Collection Type
Choose how products are added:
\- Manual
- You **hand-pick** products for the collection.
- Best for curated selections or promotional groups.
\- Smart (Automated)
- Products are added **automatically** based on rules (e.g., tag = “scanner” or price < $100).
- Great for dynamic collections that update as inventory changes.
Products
- **Search or browse** to add products (for manual collections).
- You’ll see a list of added products here.
- You can sort them (e.g., by best selling, price, alphabetical).
Search Engine Listing
- **Purpose**: Customize how this collection appears in Google or other search engines.
- Add a **SEO title** and **meta description** to improve visibility.
Publishing
- Choose where this collection is available:
- **Online Store**
- **Shop and Point of Sale**
- You can also schedule visibility or hide it temporarily.
Image
- Upload a **cover image** for the collection.
- Appears on collection pages and in featured sections.
Theme Template
- Choose which template **layout** to use for the collection page.
- Most stores use **Default collection**, but custom templates can be created.
Save Button
- Click **Save** to create the collection and make it available for use in your store.
##### Add the Collection to Your Homepage
- Go to **Online Store > Themes > Customize**
- In the left sidebar, click **Add section**
- Scroll down to **Collections**
- Select what you would like to add
[](https://hugeerp10.co.za/hsofmanual/uploads/images/gallery/2025-11/OGiimage.png)
### Personalize the view of your Template
[](https://hugeerp10.co.za/hsofmanual/uploads/images/gallery/2025-11/eDvimage.png)
Each tab includes configurable settings located in the panel on the right-hand side of the screen when you click on it.
#### Featured Collection
This is the overall container for showcasing a group of products from a specific collection.
##### Carousel Settings
[](https://hugeerp10.co.za/hsofmanual/uploads/images/gallery/2025-11/Hjnimage.png) [](https://hugeerp10.co.za/hsofmanual/uploads/images/gallery/2025-11/6vpimage.png)
Collection
Select which product collection to display in the carousel (e.g., “Car Accessories”).
Type
Choose the layout style — in this case, “Carousel” means products scroll horizontally.
Product count
Sets how many products from the collection will be shown in the carousel.
Columns
Controls how many product cards are displayed side-by-side on desktop screens.
Mobile columns
Sets how many product cards appear per row on mobile devices (typically 1 or 2).
Horizontal gap
Adjusts the spacing (in pixels) between product cards in the carousel.
**Carousel Navigation Settings**
Icon
Selects the style of navigation arrows (e.g., arrows, chevrons) used to scroll through products.
Icon background
Defines the shape or style behind the navigation icons:
- **None**: Icons appear without a background.
- **Circle**: Icons are placed inside circular backgrounds.
- **Square**: Icons are placed inside square backgrounds.
**Section Layout Settings**
Width
Determines how wide the section spans across the page:
- - **Page**: Aligns with your site's standard content width.
- **Full**: Stretches the section edge-to-edge across the screen.
Alignment
Sets the horizontal positioning of content within the section:
- - - **Left**, **Center**, or **Right**.
Gap
Controls the spacing between elements inside the section (e.g., between product cards or blocks). Measured in pixels.
Color scheme
Applies a predefined theme color set (e.g., background, text, buttons) based on your store’s design system — “Scheme 1” is one of those presets.
**Padding Settings**
Top / Bottom
Adjusts the vertical spacing above and below the section. Useful for creating breathing room between sections.
**Theme Settings**
Custom CSS
Allows you to apply custom styling rules if you want advanced control beyond the built-in options (e.g., font tweaks, hover effects).
**Remove Section**
Deletes the entire section from your homepage layout.
#### Header
Controls the top part of the featured collection display.
[](https://hugeerp10.co.za/hsofmanual/uploads/images/gallery/2025-11/Jzsimage.png)
- **Add block**: Lets you insert additional header elements like text, images, or buttons.
- **Collection title**: Displays the name of the collection (e.g., “Car Accessories”).
- **View all button**: Adds a clickable button that links to the full collection page.
##### Header Settings
[ ](https://hugeerp10.co.za/hsofmanual/uploads/images/gallery/2025-11/znQimage.png)[](https://hugeerp10.co.za/hsofmanual/uploads/images/gallery/2025-11/TgBimage.png)
Layout Settings
Controls how header elements (like title, subtitle, buttons) are arranged:
- - **Vertical** stacks them top-to-bottom.
- **Horizontal** places them side-by-side.
Vertical on mobile
Forces a vertical layout on smaller screens for better readability and spacing.
- **Alignment: Space between**
Defines how elements are spaced within the header. “Space between” pushes items to the edges with space in between. Other options may include “Start,” “Center,” or “End.”
- **Position: Top / Center / Bottom**
Sets the vertical placement of the header content within the section.
- **Align text baseline**
Ensures that text elements align along their baseline for a cleaner, more consistent look — especially useful when mixing font sizes.
- **Gap (12 px)**
Adjusts the spacing between individual header elements (e.g., between title and button).
Size
- **Width: Fit / Fill / Custom**
Controls how wide the header content stretches:
- **Fit**: Content takes up only as much space as needed.
- **Fill**: Content stretches to fill the available space.
- **Custom**: Lets you define a specific width.
- **Mobile width: Fit / Fill / Custom**
Same as above, but applies specifically to mobile view.
- **Height: Fit / Fill / Custom**
Controls the vertical height of the header block:
- **Fit**: Adjusts to content height.
- **Fill**: Stretches to fill the section height.
- **Custom**: Allows manual height setting.
Appearance Settings
- **Inherit color scheme**
When toggled on, the section adopts the color palette defined by your theme (e.g., background, text, button colors). Turning it off lets you apply custom styling.
- **Background media**
Choose what appears behind the content:
- **None**: No background media.
- **Image**: Upload or select an image as the background.
- **Video**: Use a video as the background for dynamic visual impact.
- **Borders**
Controls whether the section has a visible border:
- **None**: No border.
- **Solid**: Adds a solid line around the section.
- **Corner radius (0 px)**
Adjusts how rounded the corners of the section are.
- **0 px** = sharp corners
- Higher values = more rounded corners
Padding Settings
Controls the internal spacing between the content and the edges of the section:
- **Top / Bottom / Left / Right**
Each slider sets the padding in pixels for that side.
- Increasing the value adds more breathing room between the content and the section’s edge