Invoices Menu
- Invoice Search
- Add Invoice
- Advanced Add Invoice
- Part /Proforma Invoice
- Sales Rep Change on Processed document
- Courier Shipping invoice
- Invoices - Bulk Email
Invoice Search
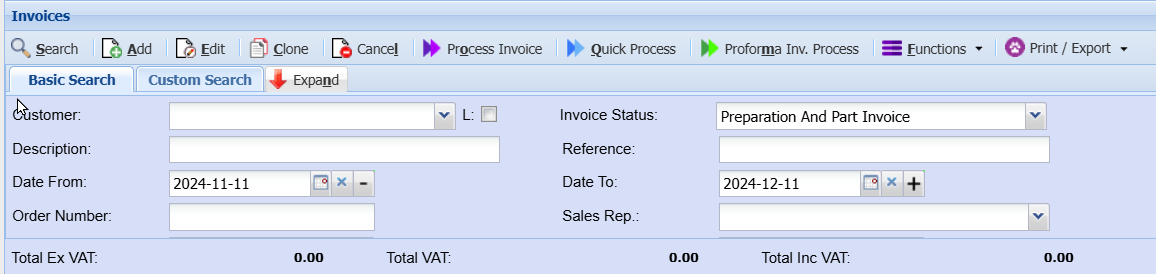
To search for invoices go to:
Debtors Module> Activity Invoice
The screen recalls invoices based on the invoice status and date range selected.
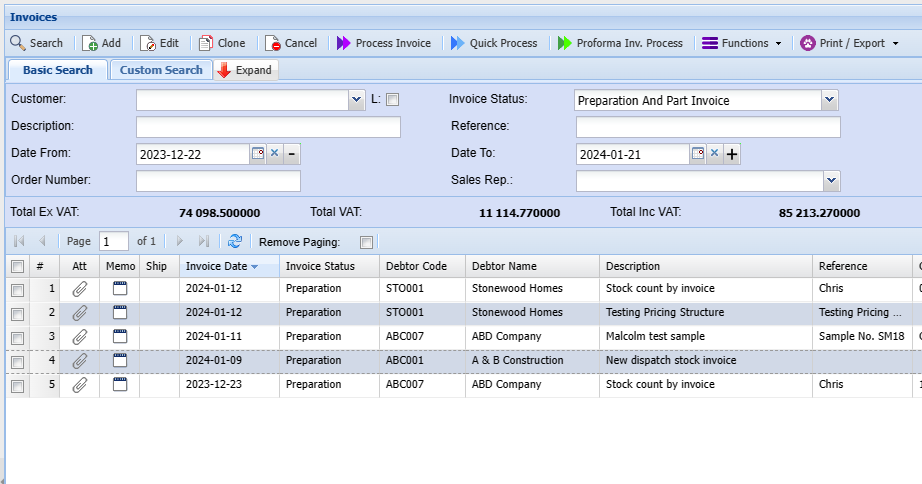
| Search | Search open invoices, Preparation, Pro-forma invoices |
| Add | Add a new invoice |
| Edit | Edit an existing invoice |
| Clone | Copy an existing invoice |
| Cancel | Cancel Invoice |
| Process invoice | Process a single invoice |
| Quick Process | Process multiple selected invoices |
| Proforma Invoice Process | Process a Proforma invoice |
| Functions | Click drop-down for the function |
| Print / Export |
Print invoice Print grid Export |
L Tick in Search
The L tick searches for the customer link and not the customer
.png)
The customer link is on the Link tab
.png)
Functions dropdown
Debtors/Customers> Activity> Invoice> Functions Dropdown
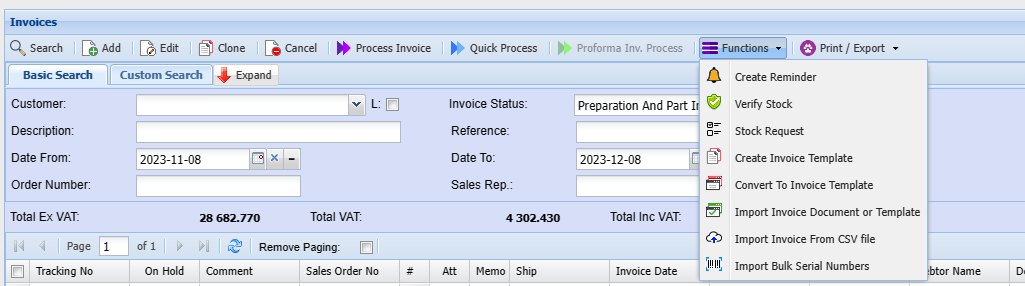
| Create Reminder | Create reminder allows you to create a reminder on a specific invoice or invoices |
| Verify Stock | A report gets generated that confirms if stock items are available to process the invoice. |
| Stock Request | Stock request - In a case where stock is not available a stock request can be generated |
| Create Invoice Template | Create a template for later use. |
| Convert To Invoice Template |
Allows you to change an invoice to a template |
| Import Invoice Document or Template | This feature allows one to import posted, non-posted and template invoices and quotes into a new invoice or quote. |
| Import Invoice From CSV File | Allows you to bring in multiple invoices to the system |
| Import Bulk Serial Numbers | Allows you to bring in multiple serial numbers into the system |
Verify Stock
Verify Stock- A report gets generated that confirms if stock items are available to process the invoice.
Stock request - In a case where stock is not available a stock request can be generated.
.png)
Stock Request
This function creates a stock request automatically for the items on the invoice. The stock request is then used bt the storeman to draw the require stock form the stores.
Create Invoice Template
Create Invoice Template - create a template for later use.
Convert to Invoice Template
.png)
Clone Invoice Help
An Invoice Clone is a copy of the selected invoice.
Once a clone has been created the clone can be used repeatedly to create that same invoice
by importing the invoice clone.
When creating a clone a Code and Description is required.
Enter a suitable Code and Description and click Continue.
If the cloning process was successful a message stating “Invoice Clone created successfully.”
Click the Close button to return to the Invoice Search window.
Import Invoice Template
Clicking on the Search button with a combination of a Code and/or Description entered will return a result of the search in the grid.
The Code and Description can be left empty which will return all templates.
Clicking the Edit button will allow you to edit the invoice template.
Clicking the Delete button will allow you to delete the selected invoice template.
Clicking the Import Template will import the selected template and create a new invoice.
Once the import has been completed the new invoice will open
Convert To Invoice Template
This function will create an invoice template, which can be used to import for future invoices or recurring invoices
In order to do this, one needs to capture the invoice to begin with
Capture the invoice as follows:
Debtors Module> Activity> Invoices> Functions Drop Down> Convert To Invoice Template

Capture the invoice as normal
Once the invoice detail has been captured and saved, click the extra Drop Down
Select Convert to invoice template

Enter the code for your template
Enter the description for your template.

Click Continue
This now completes the creation for your invoice Template
Import Invoice Document or Template
Invoice and quote import
This feature allows one to import posted, non-posted and template invoices and quotes into a new invoice or quote.
Note the following when you import an invoice or quote that the following is set
| 1 | All information on Header and grid will be copied |
| 2 | Date of document will be set to current date |
| 3 | Due Date is 7 days forward from current date |
| 4 | Service date is set to the current month |
Go to Extras drop down and click on Import Invoice template or document
.png)
Select to import as a quote or invoice
.png)
Import Invoice From CSV File
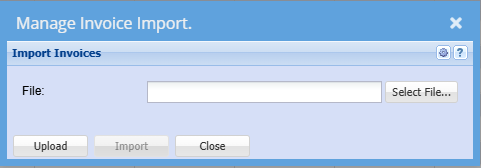
Click on the Select File… button, this will open a window to allow you to navigate to the location of the file to be imported.
Click on the Upload button to upload the file onto the server where the actual import will take place.
Once the Upload has been successfully completed click on the Import button to launch the actual import.
An Invoice Import Report will open indicating any errors that may have occurred during the import or a success message if there were no errors during the import.
If there were error during the import the whole import is rolled back i.e. no invoices are imported.
Please Note : The file to be imported must be in CSV format.
Please contact the Huge ERP office for the Invoice Import template to be emailed to you.
Import Bulk Serial Numbers
Import Serial Numbers into Invoices
| 1 | Click the Browse button to locate the CSV file to be imported. |
| 2 | Click Upload to upload the CSV file into the Huge ERP file structure. |
| 3 | Click Import S/N to import the Serial Numbers as specified in the CSV file. |
| 4 | A report will be produced on the import process. If there are any errors during the import the user will be informed of these errors in the report. All these errors need to be corrected before the import will be successful. |
The CSV file requires the following columns;
Debtor Code, Stock Code, Warehouse Code and Serial Number.
.png)
In the event that the invoice item has a quantity greater than 1 then as per the example above separate the serial numbers with an under score (Shift Minus).
If for example the item requires a quantity of 3 then column D would appear as follows: SerialNumber1_SerialNumber2_SerialNumber3
If the item requires 1 serial number, then column D will appear as follows: SerialNumber1
Please Note: This import process will add the serial number(s) in the import file to any invoice in the system that is in a Preparation state is linked to the same debtor as in the import file and also has the same stock item. This applies to any invoices that are outside of the search range of the search criteria
Keyboard quick keys
Quick keys help access functions using the keyboard
Used with Alt + Letter
| Search | Alt + s | Search for Invoices |
| Add | Alt + a | Add a new Invoice |
| Edit | Alt + e | Edits the Invoice that is highlighted |
| Clone | Alt + c | Clone the highlighted Invoice |
| Cancel | Alt + l | Cancel the Invoice that is highlighted |
| Process Invoice | Alt + o | Process selected Invoice(s) |
| Quick Process |
Alt + q | Quick Process selected Invoice(s) |
| Proforma Invoice Process | Alt + m | Only Invoices marked as Part Invoice can be processed from this option |
| Expand / Contract | Alt + n | Expands / Contracts the header section of the window |
| Create Reminder | Alt + r | Creates a reminder to highlighted Quote |
| Print Invoice | Alt + p | Print the selected Invoice |
| Functions | Alt + f | Focus on the Function split button |
| Tab Basic Search | Alt + 1 | Basic Search |
| Tab Custom Search | Alt + 2 | Custom Search |
Add Invoice
Video training manual 2016 - Click Here
Detail Tab
Debtors Module> Activity>Invoice
The Invoice screen will open
To search for existing invoices, select your search criteria and click search
Search criteria can be invoice status, reference, customer name, etc
Select a date range
To create a new invoice, Click the Add Button as shown below

This will display the New Invoice screen
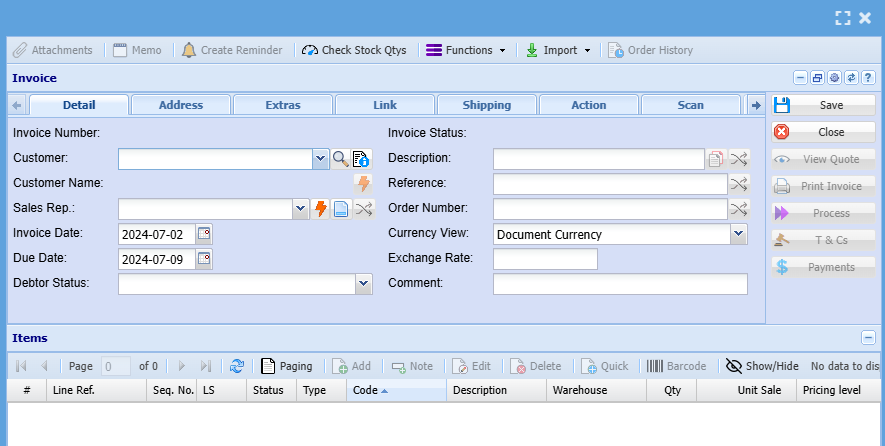
Add information below so that the greyed-out buttons become active:
- Select the customer/ debtor you are creating an invoice for, from the drop-down menu.
- Select the sales rep on the drop-down selection, if applicable
- Update dates if necessary
- Add description and reference
- Add order number, if applicable
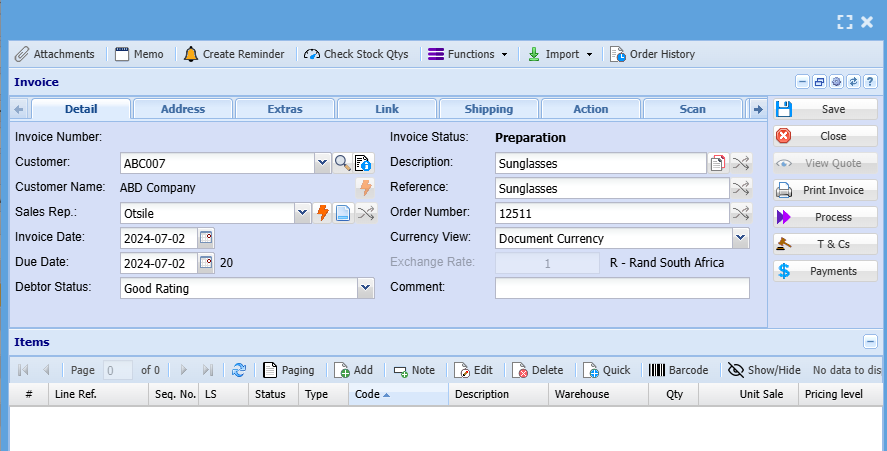
Then, once you are done adding all relevant information click Save and all the greyed-out buttons will be opened as shown below:
Line Items
To add line items click on the middle Add Button shown below
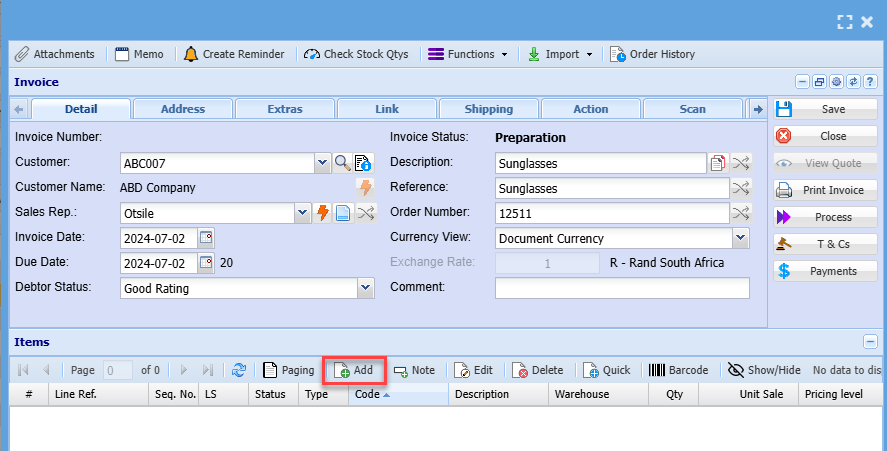
Then the screen below will appear
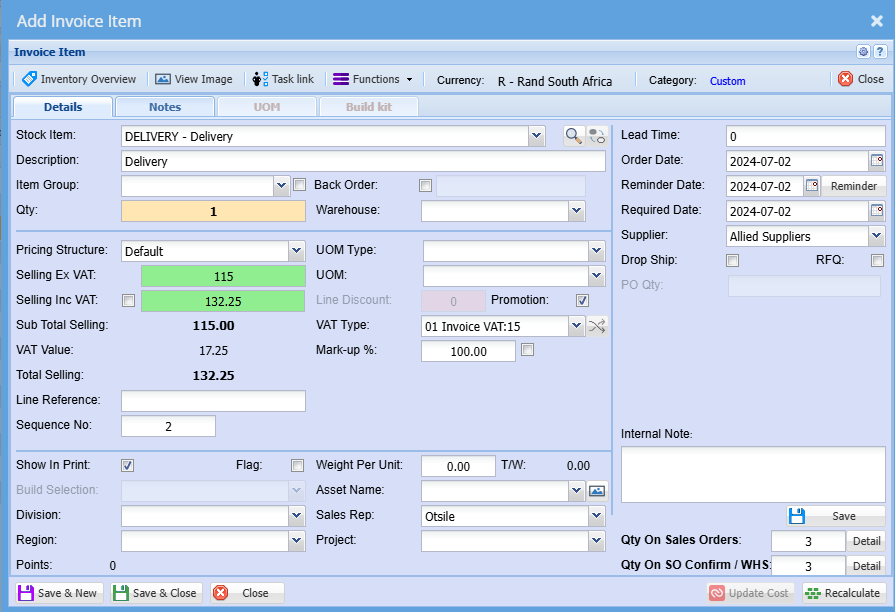
Select the item you want to invoice on the drop-down selection
You can also search for the item by using part of the code or the name of the item you wish to invoice
You can change the description to match what you want to see on the quote or leave it as it is
Enter the quantity you are invoicing the customer/ debtor on
Make sure pricing is correct
Select a relevant warehouse if you have multiple warehouses
Select the correct VAT Type
Click Save & Close if capturing numerous line items
Click Save & Close if capturing a single line item
Once done
All line items will appear on the grid below:
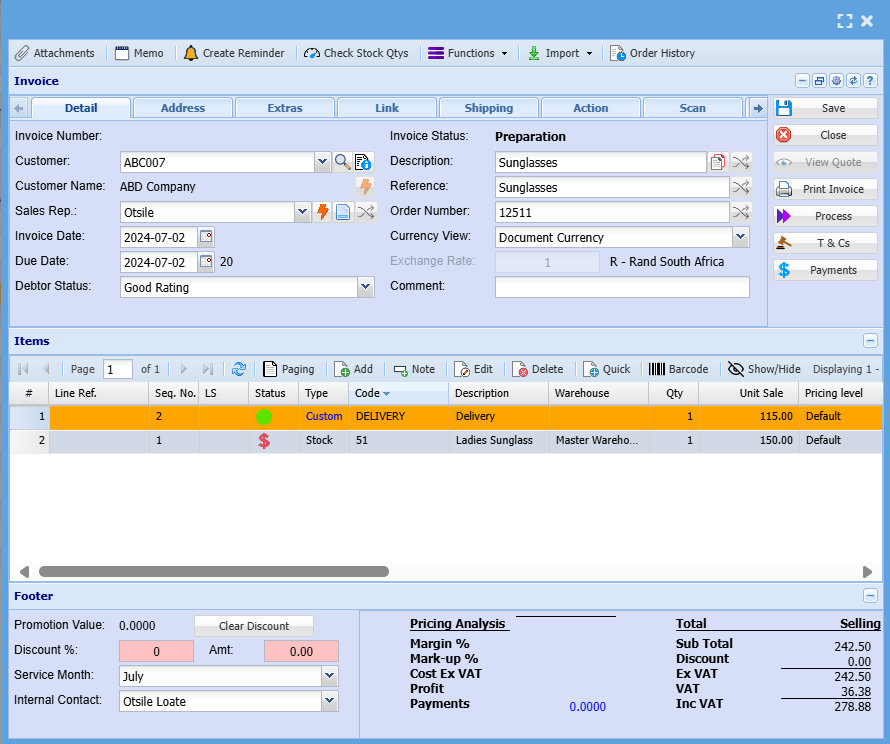
You can then print an invoice and send it to a customer/ debtor
Or process it and send them a processed invoice reflecting an invoice number
Advanced Add Invoice
Video training manual 2016 - Click Here
Debtors Module> Activity>Invoice
Detail Tab
Click Add to capture a new Invoice
Select the customer you want to create the invoice to and enter invoice header details as shown in the table below this image.
Once complete click save so all the created out buttons can open
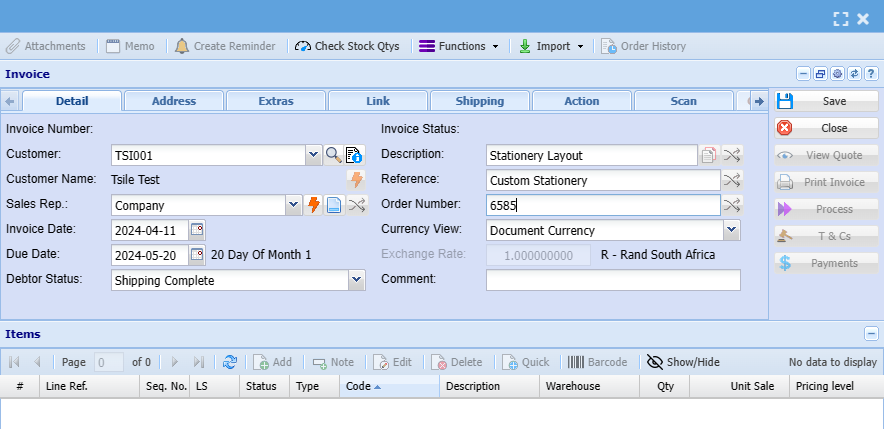
| Customer | Select the customer that has to be invoiced. |
| Customer Name | This field will automatically be filled in when the customer is selected. |
| Date | This is the invoice date which defaults on the current date. |
| Short Details | A short description of the items on the invoice. |
| Reference | Any reference for example the person you talked to. |
| Order No | The clients order number. |
| Sales Rep | If you have sales reps set up then you select the sales rep here. |
Address Tab
The information under the address tab will pull through from the debtor set up
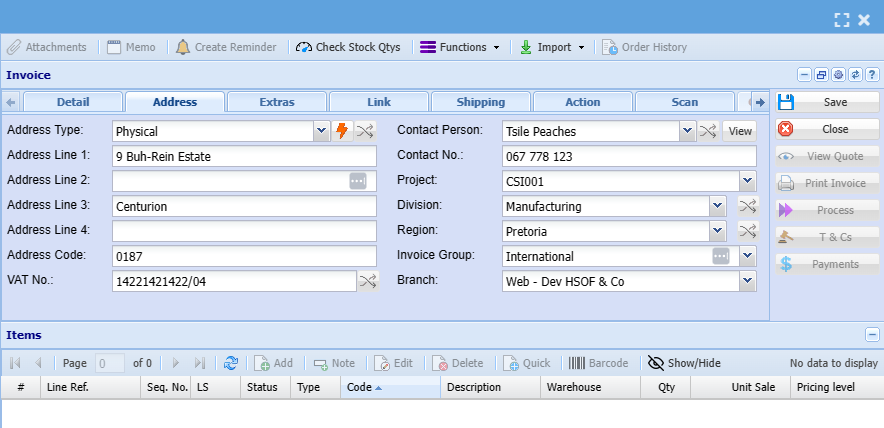
| Address Type |
Select the default address from the drop-down |
| Contact Person | Select the correct contact person from the drop down |
| Project | Link a project to the invoice if applicable |
| Division | Select the division from the drop down if required for reporting purposes |
| Region | Select the region from the drop down or this will populate from the debtor set up |
| Invoice Group | Select the invoice group from the drop down |
| Branch | Select branch from the drop down if applicable |
Extras Tab

| Job No | Enter a job number to link the invoice to a job on the job costing module |
| Asset Item | Enter an Asset number to link to an asset listed on the Asset tracker module |
| Attach Spec To Email | Attaches specification doc with invoice when emailed |
| Time Log Invoice | Marks the invoice a time log invoice, linked to time log |
| Assembly | Flags the invoice as an assembly invoice. Typically used in job costing. but can be used to differentiate invoices |
| Pre Invoice | Flags the invoice as pre invoice |
| Print Custom Fields | If custom fields are linked on the invoice this indicator dictates if these custom fields are to be printed on the invoice |
| Time Log Budget | This indicator allocates the invoice value to the time log budget |
| Deposit Doc | Flags the invoice as a deposit document |
| Retention | Flags the invoice retention invoice |
| Long Description | Enter any additional details relating to the invoice. |
| Update Time Log No | Allows one to update the time log number. This button works in conjunction with the Time Log Invoice Indicator |
| Invoice Total Value | |
| Invoice Estimate | |
| Job Link Estimate |
Link Tab
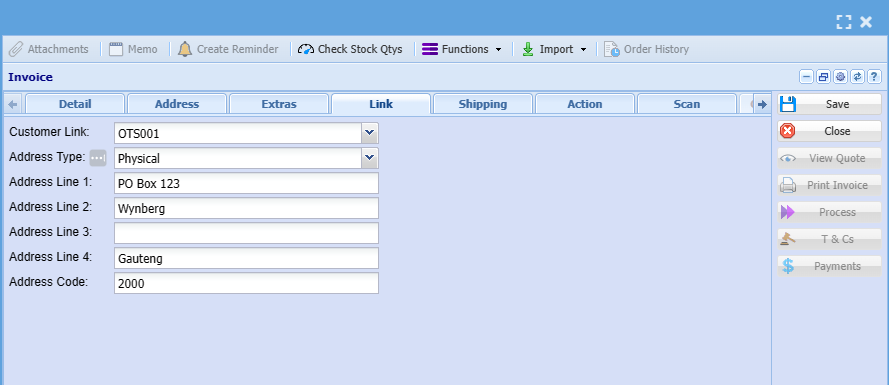
| Customer Link | |
| Address Type | Specify the primary address to be used to print on the document |
Shipping Tab
this tab is predominant.ly used if you are doing overseas shipping or deliveries via courier
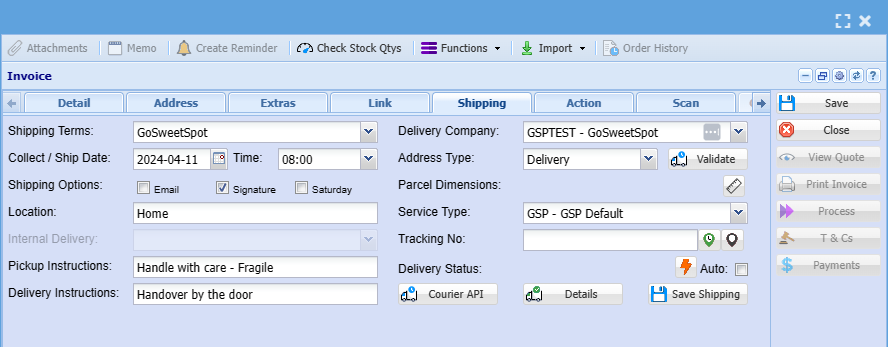
| Shipping Terms | Select any of the pre-defined shipping terms setup. examples: Free on Board (FOB), Delivery Duty Paid (DDP) |
| Collect/ Ship Date | Enter the collection or shipping date |
| Shipping Options | Select the respective shipping options |
| Location | Enter the Location. This is an open field and can be used as required. |
| Internal Delivery | Select the internal delivery option. Used if delivery is done by the company |
| Pickup Instructions | Enter any relevant pick-up instructions |
| Delivery Instructions | Enter any relevant delivery instruction for the courier/ shipping agent |
| Delivery Company | Select the name of the delivery company |
| Address Type | Select the address type. Note the physical address of the customer could be different to the deliver address. |
| Parcel Dimensions | Enter the Parcel dimensions. if these are pre setup, you can select from the options available. |
| Service Type | Select the service type. eg. Economy, Priority, |
| Tracking No | Enter the tracking number from the Courier service |
| Delivery Status | This will populate if you have an API activated with the courier service software |
Action Tab
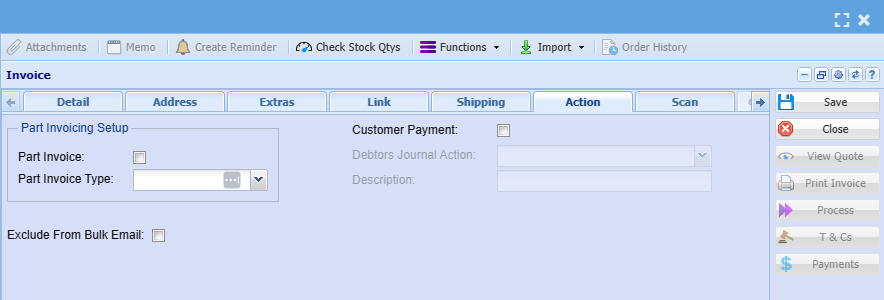
| Part Invoice | This indicator flags the invoice as a pro forma invoice |
| Part Invoice Type |
Select the relevant option. Part: Processes the sales leg of the transaction only. when the pro forma invoices completed, the stock leg gets processed. All; Process the sale and stock leg of the transaction |
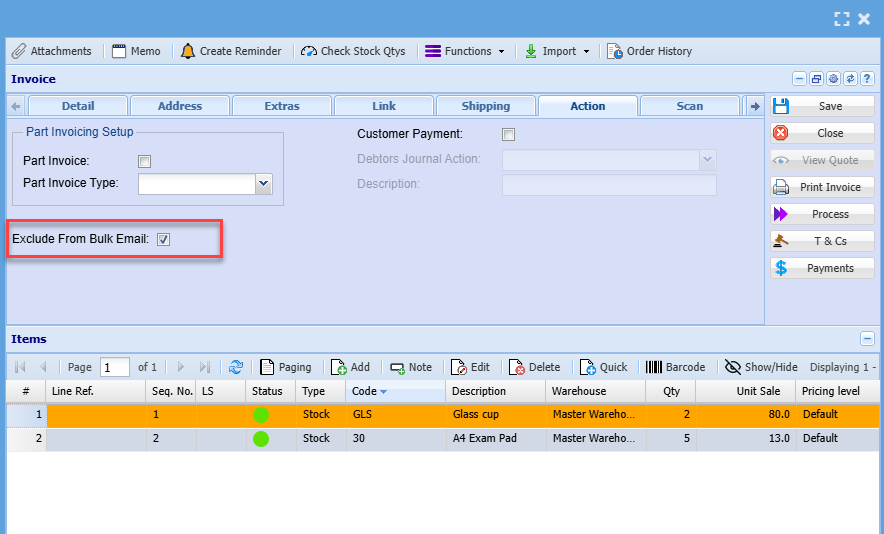
| Exclude From Bulk Email | this indicator excludes the document for bulk mails emailed from the system |
| Customer Payment | This indicator activates a payment option. select the journal action. when the invoice is processed, a journal is also created for the payment. |
| Debtors Journal Action | This fields is activated if the Customer payment indicated is selected |
| Description | This is the description for the payment journal. |
Scan Tab
the scan tab allows the user to scan items instead of entering item codes on the keyboard
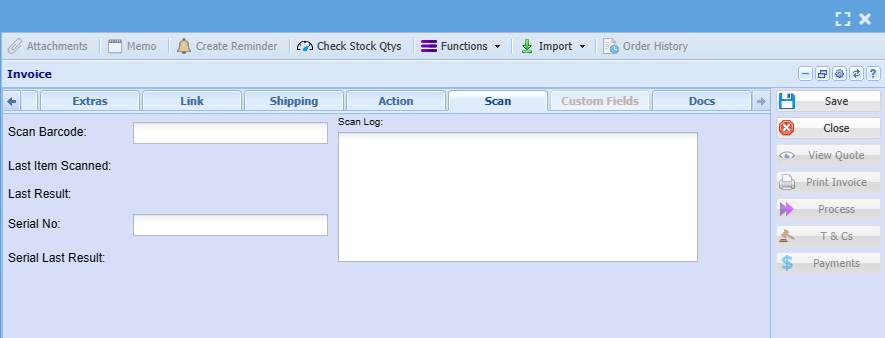
| Scan Barcode | if you have barcodes setup and using scanners, you can scan the items to be invoiced |
| Serial No | Allows you to scan the item serial number |
| Scan Log | Displays items previous scanned on the specific document |
Docs Tab
The Docs tab allows the user to link any open documents to the current document.
example, if you have an open sales lead and you now do an invoice, the user can add the sales lead to be linked to the Invoice
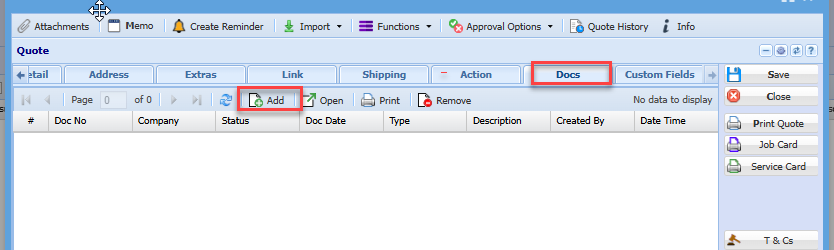
After all the details have been entered click on Save
.png)
Invoice Lines
Click on Add to insert new inventory item
.png)
This screen is where the invoice line items are going to be selected and where the prices are entered.
| Category | From this drop down you select whether you want a Stock, Service or Custom item. |
| Item Code | Search for the item you want either by code or description. |
| Item Description | This will automatically be filled in once the item is selected. |
| Quantity | The quantity of the specified item you want on the invoice. |
| Warehouse | Select the warehouse you want the item to come out of from this drop down. |
| Selling Including Vat | If you want to enter the selling price including Vat then the block on top needs to be flagged and this will then open up the Selling Including Vat block. |
| Selling Excluding Vat | Enter the price excluding Vat here. If you entered the selling price including vat then this will be calculated automatically. Same goes for entering the selling price excluding vat. Then the selling price including vat will be calculated. |
| Line Discount | If you want to give discount on this specific item. |
| Vat | Select the type of Vat for this transaction. |
| Notes | If you want to add notes about this specific item. This will also appear on the printed invoice. |
After all details have been entered click on Save and Close.
This will take you back to the main invoice screen.
.png)
Invoice Payment
Invoice payment allows one to capture a payment at the point of creating the invoice.
It acts similar to a Point of Sale (POS) system.
There is a setup that is required in order for this to work correctly
See both videos on Payment options
Payment invoice intro - Invoice_Payment.mp4
Payment invoice setup requirements - Invoice_Payment_setups.mp4
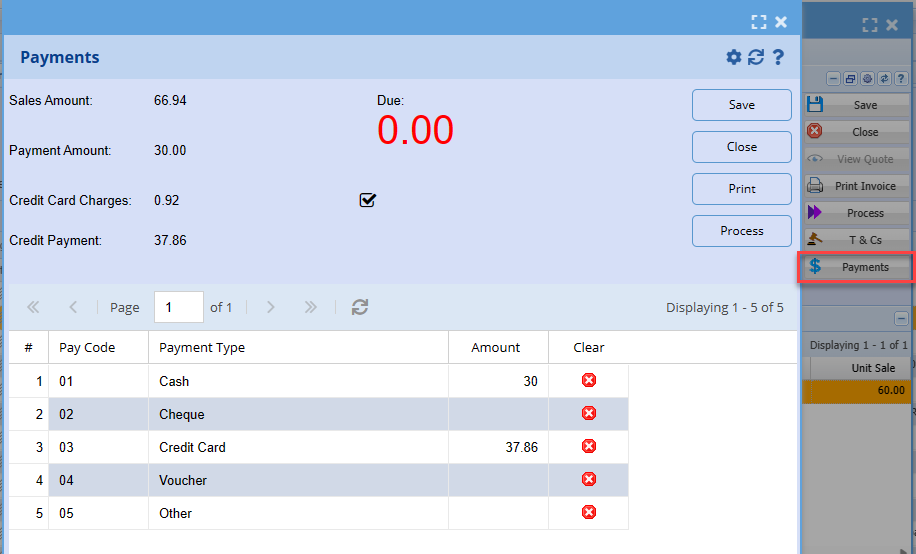
When all details have been inserted click Save
The next step is to generate an invoice number by processing this invoice and e-mail to the client.
Click on process invoice
.png)
.png)
When you click continue the Invoice will print to screen.
you can then email or print you invoice
Once you have clicked process invoice, this will complete the invoice and move it into Document History under Analysis. Remember that after this is done no changes can be made to the invoice and the only way to correct mistakes is by making an opposite entry into the system.
Part /Proforma Invoice
The proforma invoice is used when you want to generate an invoice without affecting stock
Debtors > Invoice> Add/Edit Invoice > Action Tab
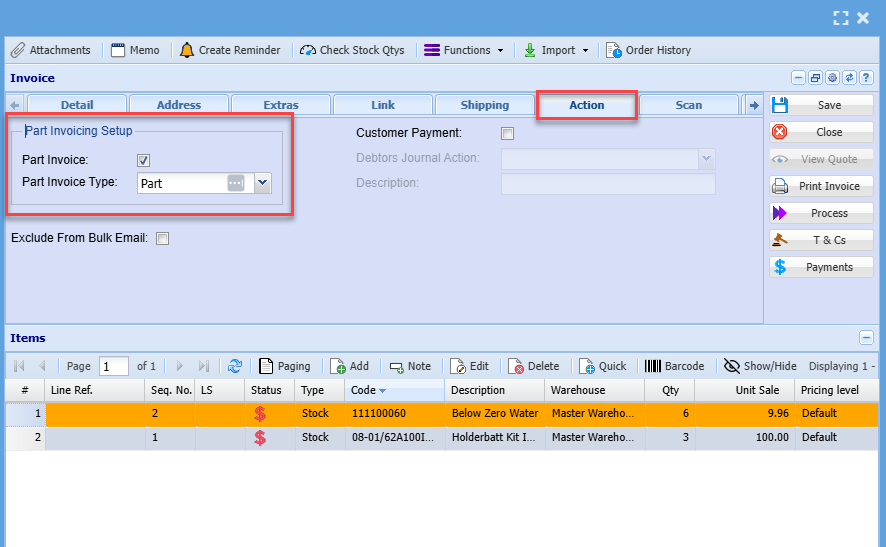
Add invoice as per normal. See how to capture an invoice here
- After capturing your invoice click on Action Tab
- Add a tick where it says part invoice
- Save and close
This option will only process the sales leg of the transaction ie debtors control, Sales account, and VAT entries. It will not process the cost of sales leg, since no stock is allocated and moved with this option.
This option processes no GL entries. All postings only occur when you finalize the proforma invoice. However, when you click proforma invoice process after capturing, the system will allocate an invoice number to the document.
When you later process and finalize the Proforma invoice, all the postings will occur on that date. The stock movement will also take place on the finalized date.
When you search the invoice on the grid, you will notice the status is preparation but it will indicate this is Proforma in red
The usual process button will be greyed out and the Proforma invoice process button will be active
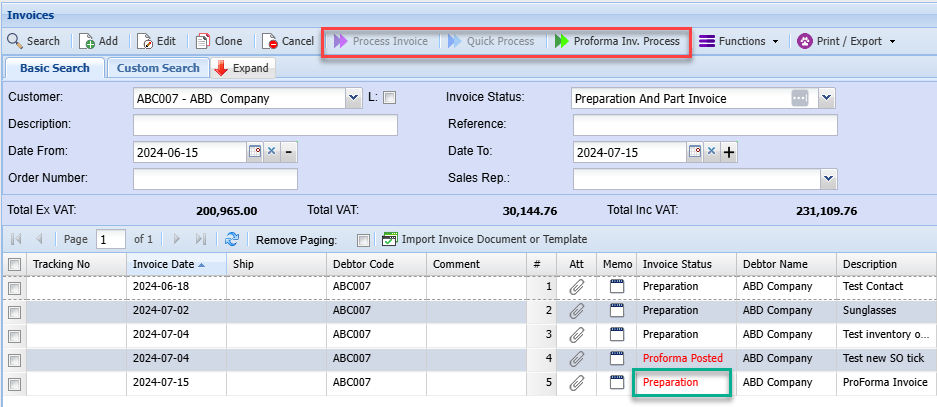
.png)
Once the Proforma invoice has been processed it will remain under Activity> Invoice status > Part Invoice.
It will remain here until all stock is in, process the proforma invoice again to complete all stock movements and finalise proforma invoice.
.png)
You can run a stock verification report to check if you have enough stock to complete the proforma
.png)
Once the stock is available you can then process the rest of the proforma
Cancel a Proforma Invoice
Proforma invoices are official invoices.
They cannot be cancelled but have to be fully completed by clicking on Proforma Invoice Process.
If you cannot complete the proforma invoice process, it is because you don’t have enough stock on hand.
You will have to put stock into the system by doing a stock level adjustment, then process the proforma invoice which will take out the stock.
Then you will be able to do a credit note, then take stock out of the system by stock level adjustment again.
Steps defined:
- Add stock into the system via Stock Level Adjustment
- Process the invoice via Proforma Invoice Process
- Credit the invoice via a Credit note
- Remove the stock out of the system via the Stock Level Adjustment
.png)
Sales Rep Change on Processed document
System allows one to change the Sales Rep on processed invoices and completed quotes.
To make the change you go to the processed document searches.
Invoices
Debtors Module > Analysis > Document History
Quotes
Debtors Module > Analysis > New Quote Search
Find the invoice that you want to change the rep.
Edit the document and go to the section for Sales Rep
You will notice a Question mark next to the Sales Rep
.png)
After clicking on the Question mark, change the rep and click on save
.png)
Sales rep is now updated.
User Audit trail
We keep a user audit log of all changes.
Go to System Configuration > Reports > User Access Report
Search for the user
.png)
The same process works for quotes that have been completed
Courier Shipping invoice
Shipping Tab - Courier API
The shipping tab works with a Courier company API.
This API once set up Will allow you to create a shipping document on the Courier system.
After you have filled in the information for the Courier company, click on the create shipping document button to create the shipping document on the Courier company system.
To enter the parcel dimensions come out you can do the following:
Enter the parcel number followed by the space bar, this will automatically put in the centimeters and the length
Enter the width by putting in the number and space bar
Enter the height by putting the number and hitting the space bar
Enter the weight of the parcel and click on the space bar which will automatically fill in the kilograms
This is a quick and easy way of entering the parcel dimensions
Before creating the document on the courier system, there will be a few checks that take place.
Herewith the following errors:
| 1 | The parcel dimensions are not entered correctly. |
| 2 | The address type does not have the correct Geo location for latitude and longitude. |
| 3 | The delivery address does not have the following. |
| 4 | Address line 1 is not filled in correctly it does not contain the first address, it must not contain the building number in the first address line. |
| 5 | The postal code is incorrect. |
| 6 | The country code is not filled in. |
| 7 | The latitude and longitude are incorrect. |
| 8 | The internal contact for the invoice does not contain a valid mobile number, email address or is not filled in. |
| 9 | The company profile does not have the correct address details filled in example - Geo location etc. |
| 10 | The invoice does not have a contact person with valid information filled in. |
So, if the create shipment document button does not work, it is because of certain fields missing.
There is a minimum requirement of information that needs to be sent to the Courier company.
If the shipping document is successfully created, the tracking number and delivery status will be populated.
The lightning bolt button is used to update the delivery status from the Courier company.
If you put the tick on auto, and you have a tracking number, it means that when you open up the invoice the system will automatically check the delivery status.
.png)
Invoices - Bulk Email
We have added an option to exclude invoices from bulk mail
Add an option on invoices to exclude them from bulk email. By default, this checkbox is not selected on all invoices.
When the checkbox is selected, the choice is automatically saved without needing to click 'Save'