BCR Activity
- Bookin Menu
- Reminder
- Memo Search Menu
- Alert Search Menu
- User Dashboard
- Pre-Inspection Check List Menu
- Sales Leads
- Sales Leads Search
- Sales lead Process
- Create a Quote From Sales leads
- Sales Leads - Reminder Create
- Sales Leads import export
- Support Request Search
- Support Log Ticket Menu
- Support Log Ticket Search
- Add Support Log Ticket
- Support Website logging
- Support Log Capture Process
- Support Log recurring tickets
- Debtor/Lead Interactions
- Email Mailing Menu
- Email Mailing List Search
- Creating and Send Bulk Mail CRM (Debtors)
- Mail Chimp
- Creating Debtors Email Mailing List
- SMS Mailing List
- Expenses Menu
Bookin Menu
Book In Search
Allows the user to search, book in, edit, create quote and book out
CRM Module> Activity> Bookin
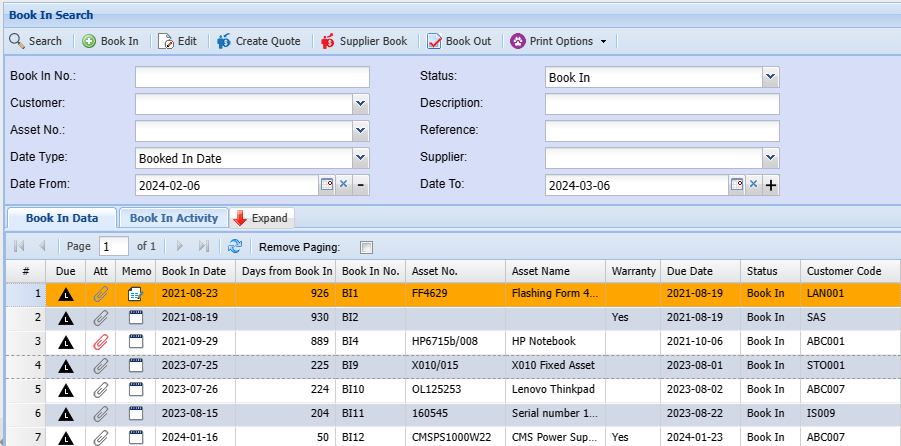
| Book In | Enter a Book In which you wish to search for |
| Customer | Select the customer relating to the book you wish to search for |
| Asset No | Enter the Asset Number to narrow down search results |
| Data Type | Select the date type |
| Date From | Enter the estimated period in which the book in was made |
| Status | Search by status |
| Description | Enter a description specific to the booking to narrow down search results |
| Reference | Enter a reference specific to the booking to narrow down search results. |
| Supplier | Select the supplier on the drop down selection |
| Date To | Add the date you want to search to |
Reminder
Reminder Search Help
.png)
It helps one to create a reminder of something, works like an alarm. It allows a user to search according to preference.
If the search tab items are left blank, the system will pull out all the all the reminders on the system
Search Tab
User – search by entering the user name
Reference – search by reference
Description – search by description
Date From – search by selecting the date and the system will pull out the reminders according the date selected
Document Type – select the document type of a reminder from the drop down arrow
Document Number – search by entering the document number
Interaction Type – select the interaction type from the drop down arrow
Date To – Select the date to
Show Completed – if the box is ticked, then the system searches only completed reminders
Search Results Tab shows a list of the reminders searched according the preference
Standard Tab
Insert button – to insert the reminder
Amend button – allows changes on the reminder
Complete button – to complete the reminder
Print Grid button – to print reminder report
Print Summary button – to print reminder summary report
View Doc Detail button – to view reminder details
Memo Search Menu
Memo Search
Memo is used to keep track of communication
CRM Module> Activity> Memo Search
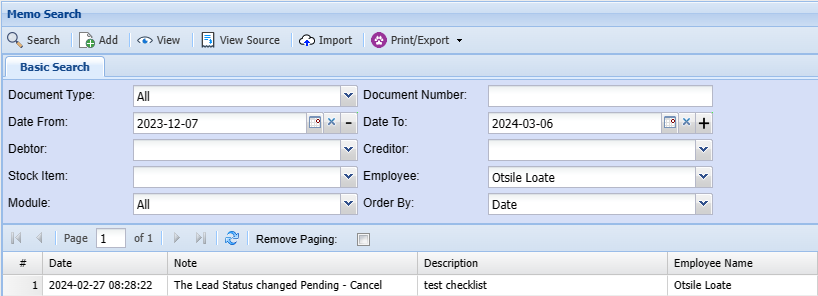
| Document Type | Here you can search all memos relating to a specific document type |
| Date From | Limit the data returned by using a date range |
| Debtor | Search for all memos relating to a specific Debtor |
| Stock Item | Search for memos on an inventory item |
| Module | Search for all memos in a specific Module |
| Document Number | Search for all memos related to a specific document number |
| Date To | Limit the data returned by using a date range |
| Creditor | Search for all memos relating to a specific Creditor |
| Employee | Search for all memos made by a specific employee/ All employees |
| Order By | Select order by on the drop down |
Alert Search Menu
Add Alerts
Alerts allow an automatic pop-up to occur when selecting a specific customer, supplier, stock item and other sections within the system.
When creating the alert it will be in an active state
If you want to remove the alert, make the alert inactive or Cancel the alert
Alerts can be created across the system for various document types
CRM Module> Activity> Alert Search
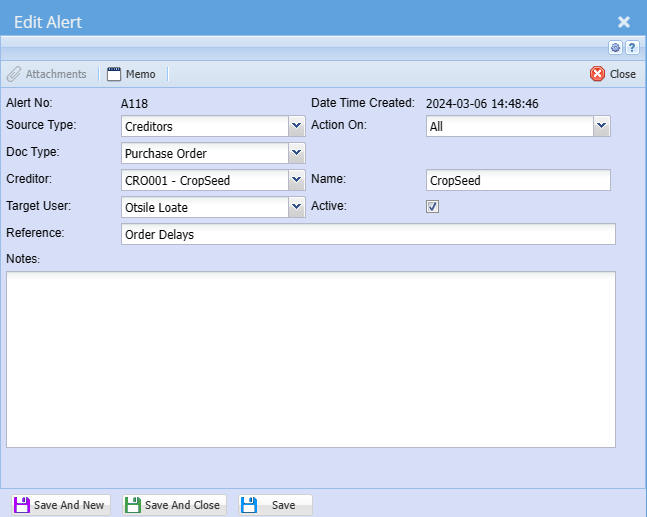
| Source Type | Select the source type you are creating an alert for on the drop down selection |
| Doc Type | Select the document type you are creating an alert for on a drop down selection |
| Creditor/ Debtor |
Select the creditor or customer you are creating an alert for on a drop down selection This will change based on the source type selection |
| Target User | Select the user who must see this alert on the drop down selection. You can also send it to all users |
| Reference | Add alert search reference |
| Action on | Select when the alert must pop-up on the drop down selection |
| Name | The name of the creditor, Debtor or inventory item |
| Active | The tick means that the alert is active and no tick means that the alert is inactive |
Alert Search
This is where you search for active an inactive alerts
CRM Module> Activity> Alert Search
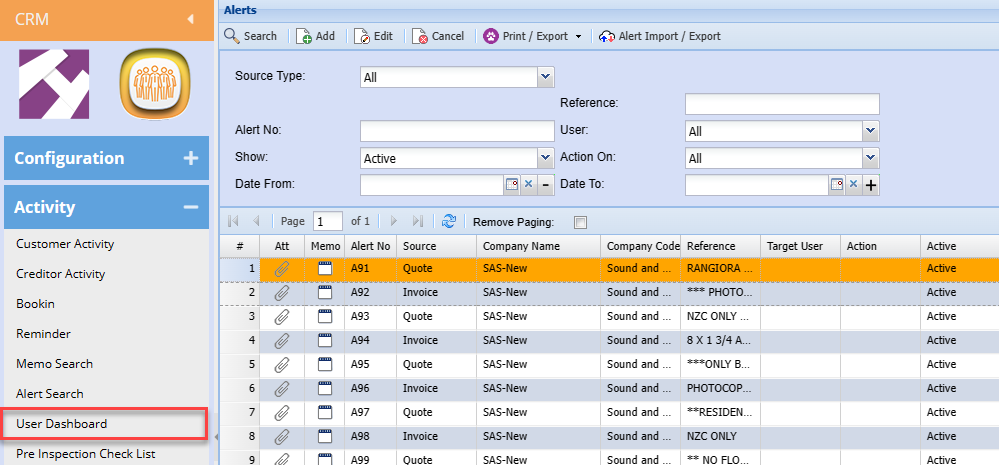
| Source Type | |
| Alert No | |
| Show | |
| Date From | |
| Reference | |
| User | |
| Action On | |
| Date To | |
| Grid |
User Dashboard
User Dashboard
Webatar > Activity> User dashboard
.png)
Purpose:
The User dashboard was designed to give easy access to documents. The dashboard will show the user the last records that they opened and can be filtered by document type.
Controls:
Document Type Combo Box: Gives a list of all document that the user can choose from. If you require a specific document type to be added to the list, please contact Huge ERP support.
View Button: Allows the user to view the selected document.
Refresh Button: This will load the documents that the user has recently worked on according to the document type selected.
Refresh All Button: Refresh all grids where the document type selected does not equal “All”
Number of Records Textbox: Allows the user to change the number of records that is displayed in the grid.
Notes:
You will see “blank lines” on the grid when you open a document create screen and then close it again. So if you open the screen to create a quote, but change your mind and close the screen again. This will appear as a blank line on the grid.
Pre-Inspection Check List Menu
Pre-Inspection Check List Search
Allows the user to search, add, edit and delete pre-inspection checksheets
CRM Module> Activity> Pre Inspection Check List
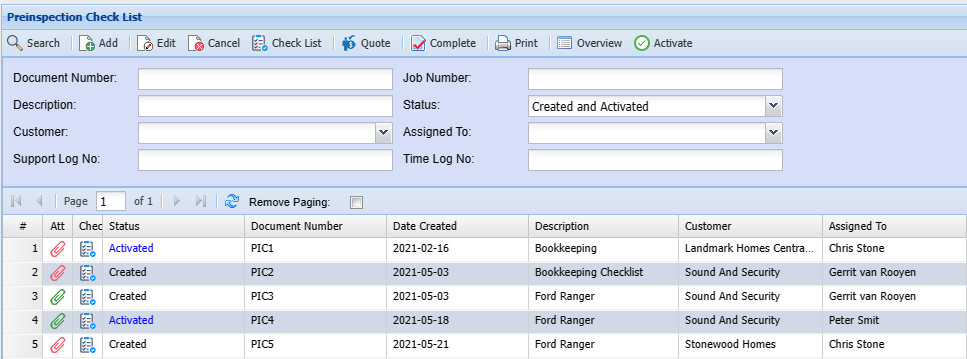
| Document Number | Enter a document number you wish to search for |
| Description | Enter a description specific to the document you need to search for |
| Customer | Select the customer relating to the checksheet you wish to search for |
| Support Loh No | |
| Job Number | |
| Status | Search by status |
| Assigned To | If you know who the checksheet was assigned to. Enter it to narrow down search results |
| Time Log No |
Add Pre Inspection Check List
Check List Group
This help document describes how to create and maintain a Pre Inspection Checksheet.
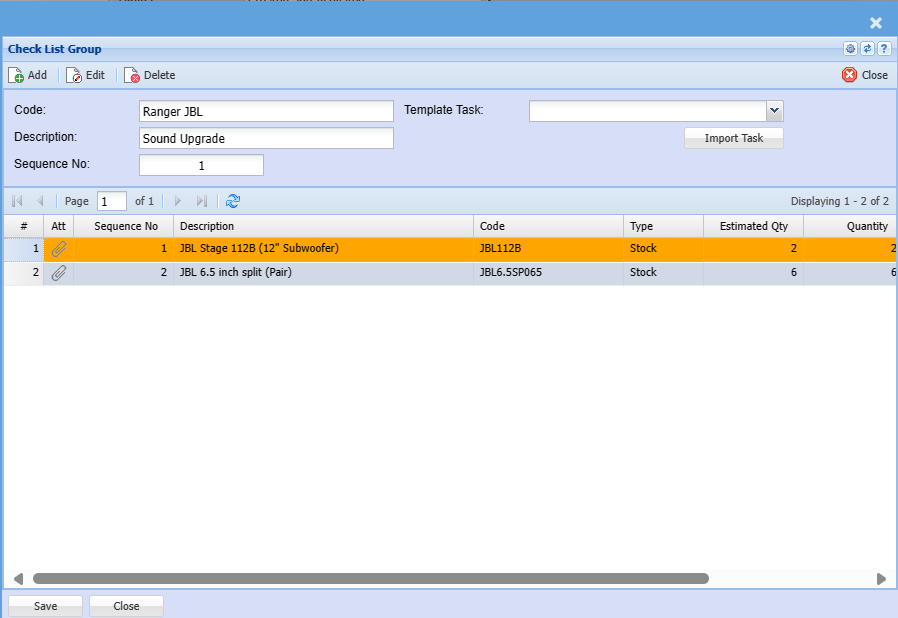
| Code | |
| Description | |
| Sequence No | |
| Template Task | |
| Import |
Check List Item
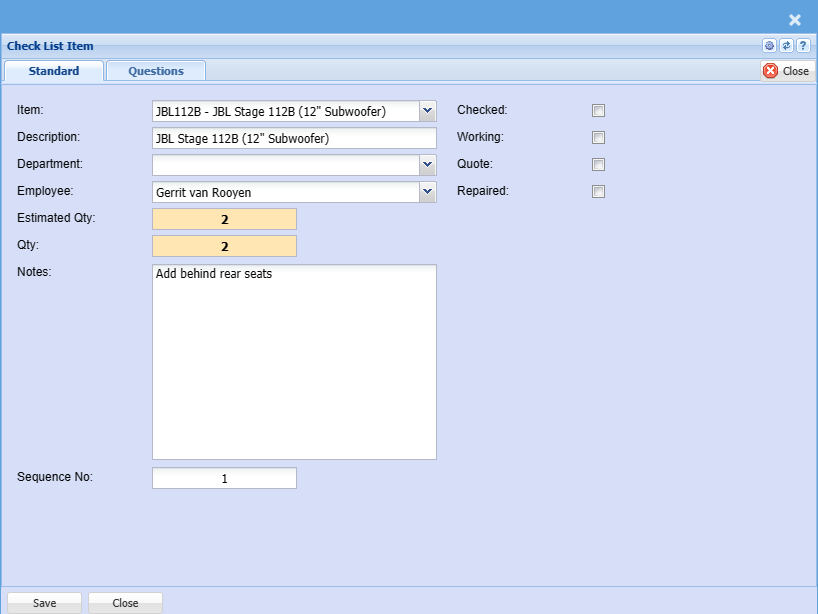
| Item | |
| Description | |
| Department | |
| Employee | |
| Estimate Qty | |
| Qty | |
| Notes | This tab allows you to link notes to the Pre Inspection Checksheet |
| Sequence No | |
| Checked | |
| Working | |
| Quote | |
| Repaired |
Check List Item Questions
this tab allows you to link questions to the Pre Inspection Checksheet
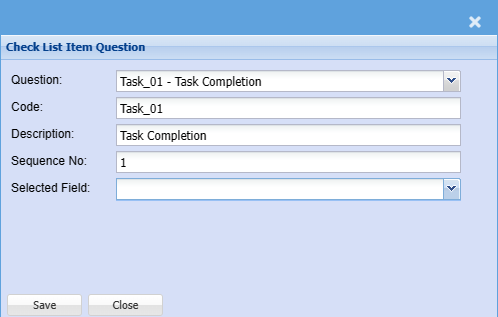
| Question | |
| Code | |
| Description | |
| Sequence No | |
| Selected Field |
Sales Leads
Sales Leads Search
The Sales Leads screen allows users to create new Sales Leads or search for existing ones.
Video training manual 2016 - Click Here
Webatar > Activity> Sales Leads
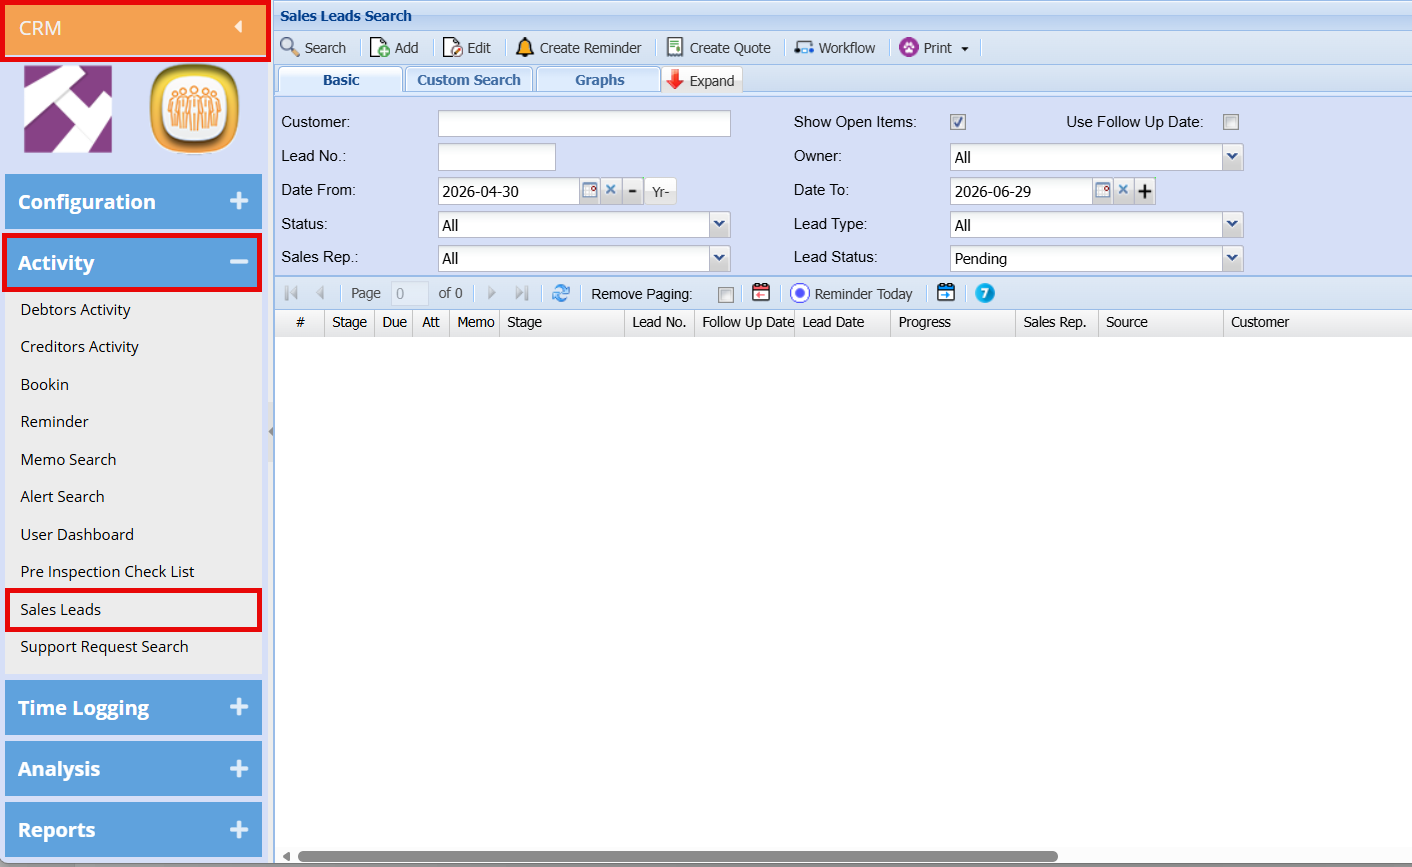
Search Functionality
The search panel enables users to filter and locate Sales Leads using criteria such as Customer, Lead Number, Date Range, Status, Sales Representative, Owner, and Lead Type.
- Select the desired filters and click Search to refine results.
- If no filters are applied, all Sales Leads will be displayed in the grid.
| Customer Field | Searches on the Debtors Code, Debtors Name, email address, telephone number and mobile number fields |
Use the Expand button to show additional search filters, or Contract to hide them.
Action Buttons
Located on the top navigation ribbon:
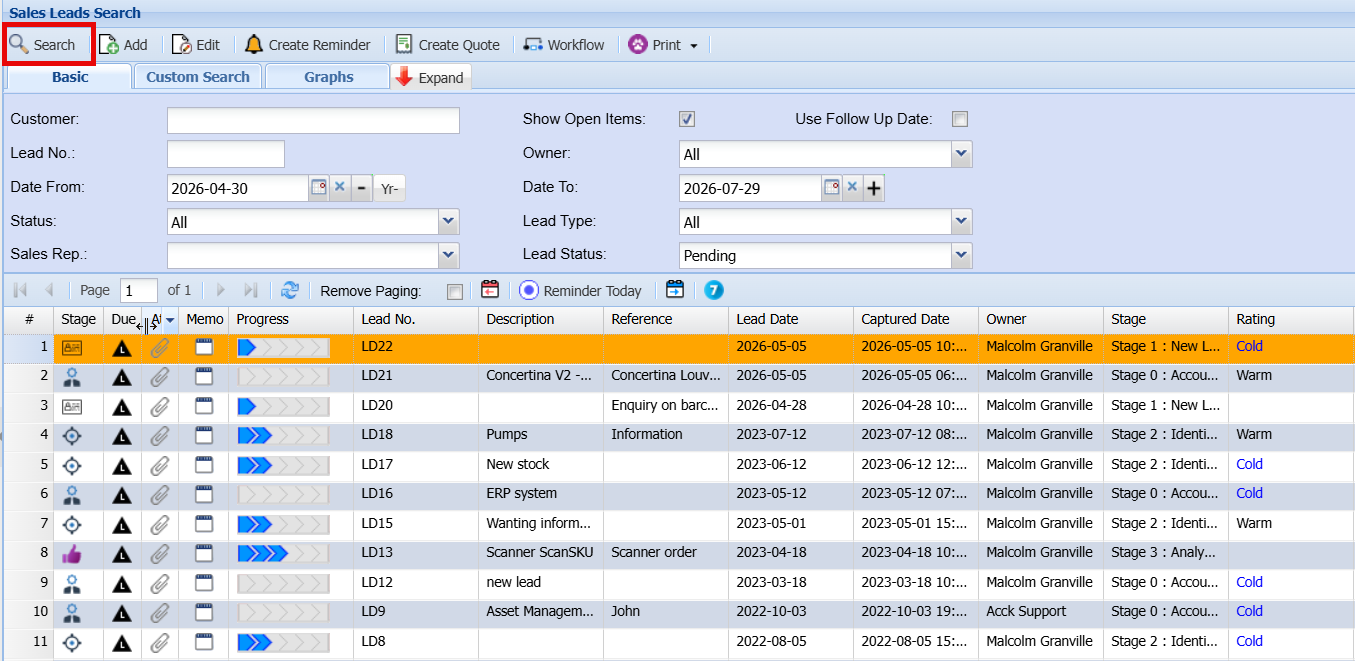
| Search |
Runs the search based on selected filters. |
| Add | Creates a new Sales Lead. |
| Edit | Opens the selected Sales Lead for editing. |
|
Create Reminder |
Sets a reminder linked to a Sales Lead. |
| Create Quote | Generates a quote from the selected Sales Lead. |
| Workflow | Access workflow-related actions. |
| Opens print and export options. |
Print / Export Options
The Print dropdown provides the following:
| Export | Export Sales Leads to an Excel file. |
|
Print Grid |
Print all Sales Leads currently displayed in the grid. |
| Print Lead Details | Print details of the selected Sales Lead. |
| Print Lead Form | rint a blank Sales Lead form template. |
Results Grid
The lower section of the screen displays the results grid, showing all matching Sales Leads with key details such as:
- Stage
- Due Date
- Lead Number
- Follow-Up Date
- Lead Date
- Progress
- Sales Representative
- Source
- Customer
Graph tab
- Change any filter and refresh to update the graph dynamically.
- Use different combinations of Graph Type and Graph Category to gain deeper insights into Sales Lead activity and trends.
- This feature is useful for monitoring pipeline health, identifying bottlenecks, and supporting reporting.
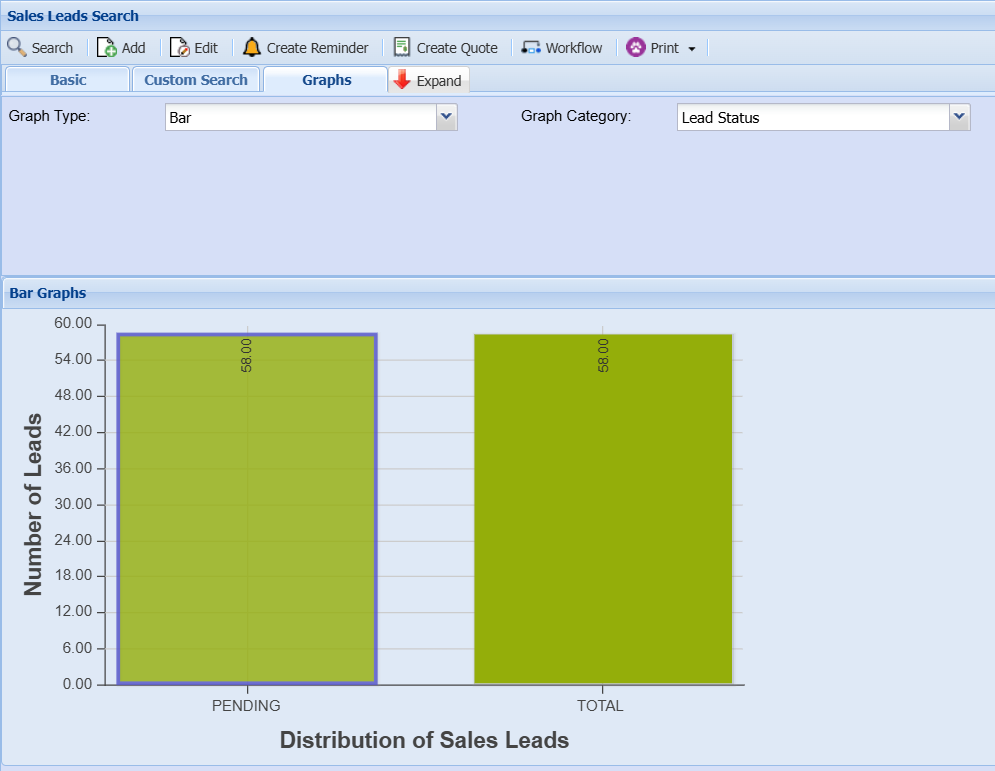
Graph Filters
The following fields are available to customise the graph display:
-
Graph Type
Select the type of chart to display from the dropdown options (e.g. Bar, Line, Pie). This determines how the data is visually presented. -
Graph Category
Select the data grouping for the graph. For example, choosing Lead Status will display leads grouped by their current status (e.g. Pending, Closed). -
Date From / Date To
Define the date range for the data to be included in the graph. Only Sales Leads within this period will be displayed.
Graph Display
The graph is shown below the filter section and updates based on the selected criteria.
- In the example shown, a Bar Graph is used to display the distribution of Sales Leads by Lead Status.
- The vertical axis represents the Number of Leads, while the horizontal axis shows the selected category (e.g. Pending, Total).
- Each bar visually represents the volume of leads for that category, making it easy to compare performance at a glance.
Sales lead Process
CRM Module> Activity> Sales Leads
A Sales Lead is a person or organisation that has shown interest in purchasing a product or service and has the authority to do so. This represents the first stage of the sales process.
Creating a new prospect
The Add Lead screen is used to capture and manage all relevant information for a new Sales Lead. Below is an explanation of each field and function.
CRM Module> Activity> Sales Leads
- Click Add
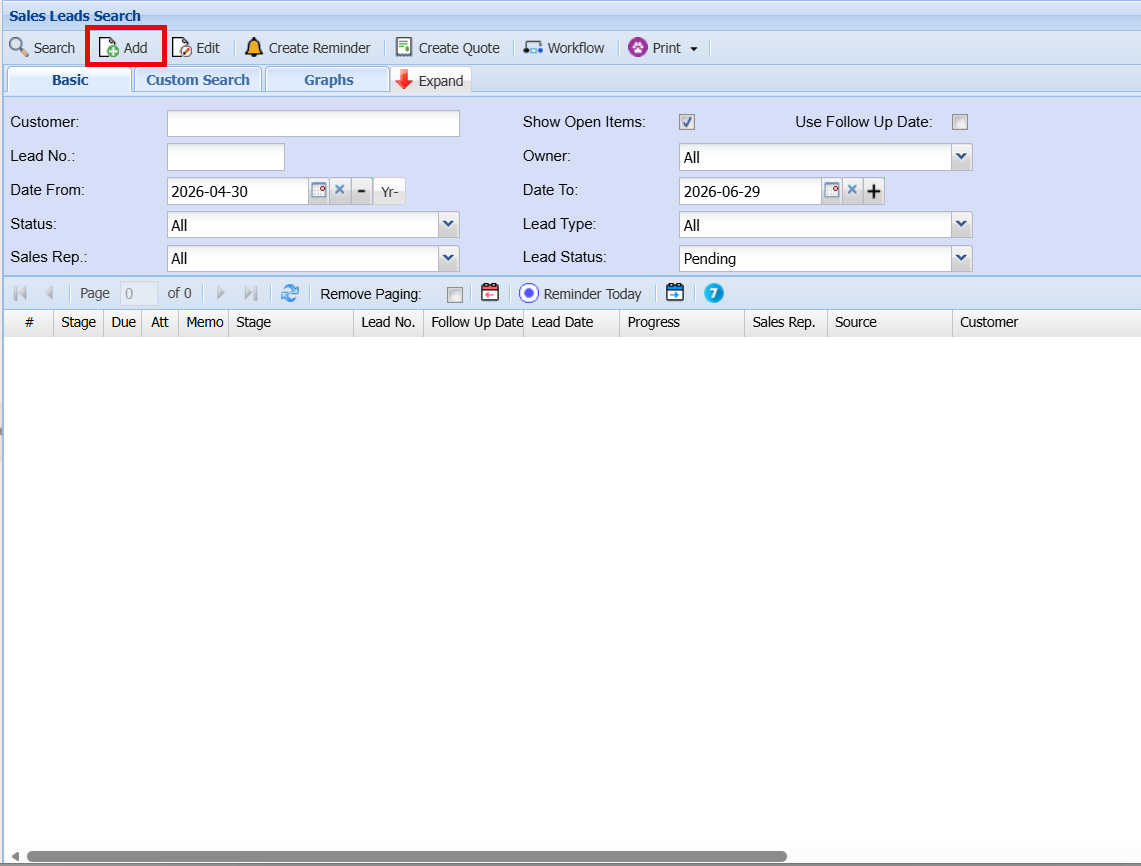
Add Sales Lead Screen
If the customer already exists and is interested in additional business, you can either enter their name or select it from the Customer dropdown list.
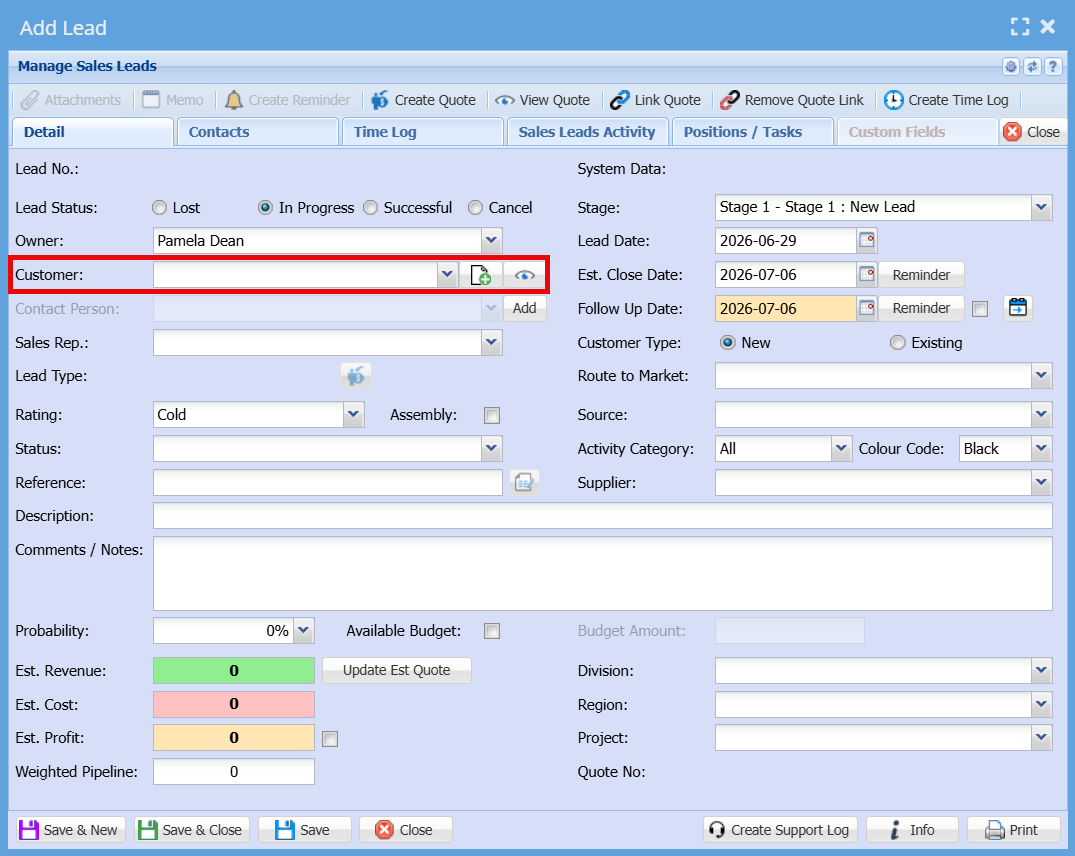
General Information
| Owner | The person responsible for managing and progressing the lead. |
| Customer |
The individual or organisation interested in your product or service.
|
| Contact Person | Displays or allows selection of the contact linked to the chosen customer. |
| Sales Rep | The sales representative responsible for the lead and associated commission. |
Lead Details
| Stage | Defines the current stage of the lead (e.g. New Lead, Qualified, etc.). |
| Lead Date | The date the lead was first identified. |
| Follow Up Date | The date scheduled for the next action or follow-up. |
| Est. Close Date | The expected date the sale will be finalised. |
| Customer Type | Indicates whether the customer is New or Existing. |
| Rating | Classifies the lead as Hot, Warm, or Cold based on likelihood. |
| Status | Specifies the current status of the lead (e.g. In Progress, Lost, Successful). |
| Reference | Enter any relevant reference number or identifier. |
| Description | Provide a brief summary of the opportunity. |
| Comments / Notes | Add detailed notes or additional information about the lead. |
Classification Fields
| Route to Market | Select how the lead was brought in (e.g. direct, partner, online). |
| Source | Indicates where the lead originated from. |
| Activity Category | Categorises the type of sales activity. |
| Colour Code | Assign a colour to visually identify or prioritise the lead. |
| Division / Region / Project | Assign organisational structure details for reporting purposes. |
Financial Information
| Probability (%) | The estimated chance of closing the deal. |
| Estimated Revenue | Expected income from the lead. |
| Estimated Cost | Anticipated cost associated with fulfilling the sale. |
| Estimated Profit | Calculated or entered expected profit. |
| Weighted Pipeline | A calculated value based on revenue and probability. |
| Available Budget | Indicates if a budget is confirmed and allows entry of the budget amount. |
Tabs
| Contacts Tab | Displays all contact persons linked to this Sales Lead. |
| Sales Leads Activity Tab |
Tracks activities related to the lead.
|
Action Buttons
| Save & New | Save the current lead and open a new blank form. |
| Save & Close | Save the lead and exit the screen. |
| Save | Save changes without closing the screen. |
| Close | Exit the screen without saving changes. |
Contacts Tab
The Contacts tab within the Edit Lead screen displays and manages all contact persons linked to the selected Sales Lead.
- Time logs help monitor effort spent on each Sales Lead and support productivity tracking.
- This feature can also assist with billing where time-based charges apply.
- Keeping time logs updated ensures accurate reporting and accountability.
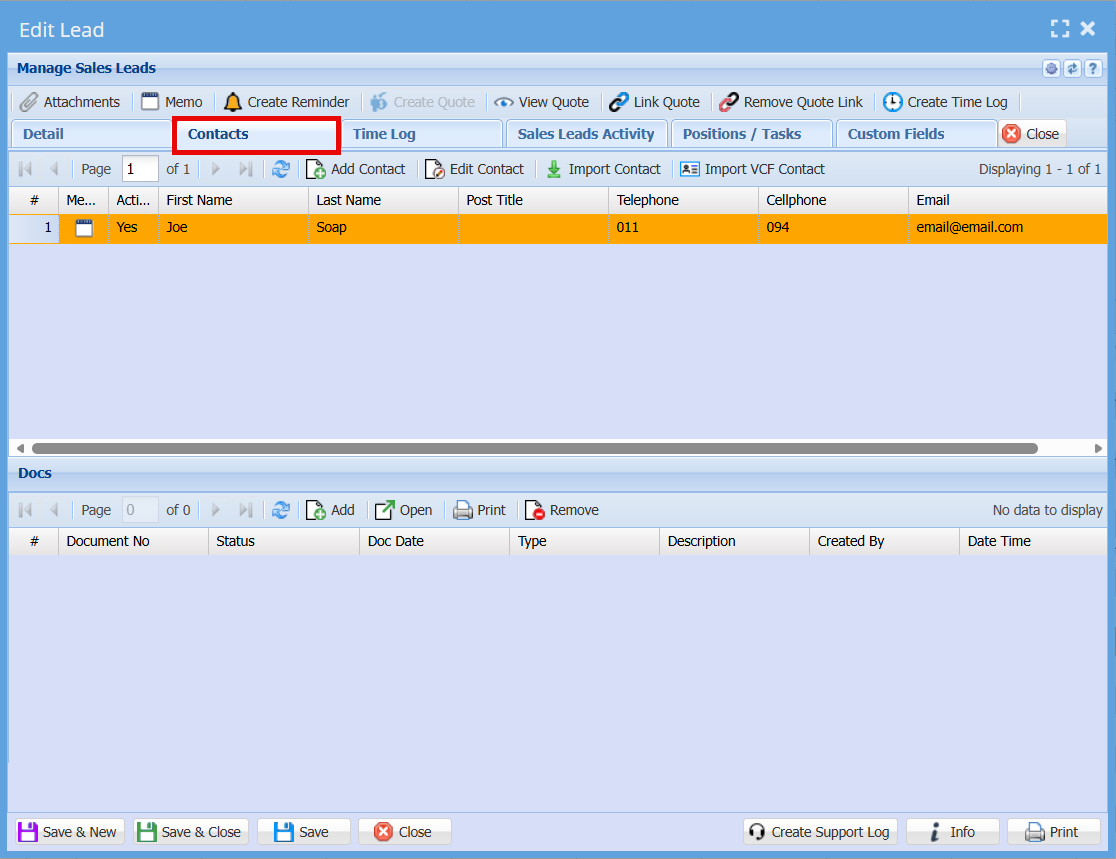
The grid shows a list of all contacts associated with the lead, including key details such as:
- First Name and Last Name
- Position/Title
- Telephone and Cellphone numbers
- Email Address
- Active status (indicates whether the contact is currently active)
Each row represents an individual contact linked to the Sales Lead.
Action Buttons
Located above the contact grid:
-
Add Contact
Allows you to create and link a new contact to the Sales Lead. -
Edit Contact
Enables you to update the details of a selected contact. -
Import Contact
Import contact information from an external source. -
Import VCF Contact
Upload and import contacts from a VCF (vCard) file.
Documents Section (Docs)
The lower section of the screen displays documents linked to the Sales Lead, such as files or attachments.
Available actions include:
- Add – Attach a new document
- Open – View a selected document
- Print – Print the document
- Remove – Delete the selected document
If no documents are linked, the grid will display “No data to display.”
Additional Notes
- Contacts linked here are directly associated with the selected Sales Lead and can be used for communication and tracking purposes.
- Keeping contact details up to date ensures accurate follow-ups and reporting.
Time Log
The Time Log tab allows users to view and manage time entries linked to the selected Sales Lead. This feature is useful for tracking time spent on activities related to the lead.
- Time logs help monitor effort spent on each Sales Lead and support productivity tracking.
- This feature can also assist with billing where time-based charges apply.
- Keeping time logs updated ensures accurate reporting and accountability.
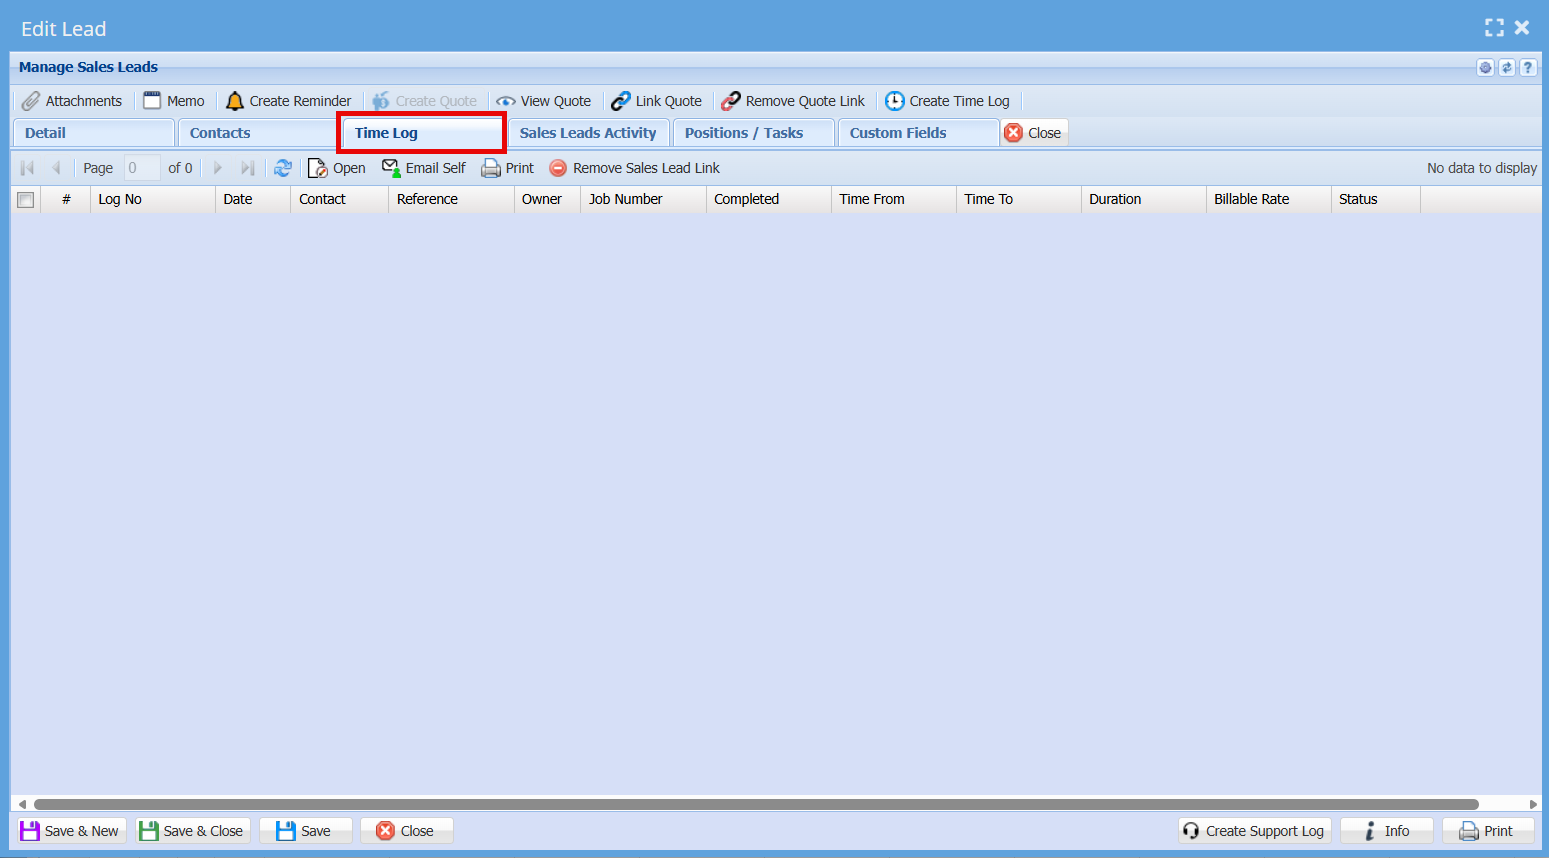
Time Log Grid
The grid displays a list of all recorded time entries. Each entry includes the following information:
- Log No – Unique reference number for the time entry
- Date – The date the activity took place
- Contact – The contact person associated with the activity
- Reference – Additional reference or description for the entry
- Owner – The user who created or is responsible for the time log
- Job Number – Linked job or project reference (if applicable)
- Completed – Indicates whether the activity has been completed
- Time From / Time To – Start and end times of the activity
- Duration – Total time spent on the activity
- Billable Rate – Rate applied if the time is billable
- Status – Current status of the time entry
If no time entries have been recorded, the grid will display “No data to display.”
Action Buttons
Located above the grid, the following options are available:
-
Open
View or open the selected time log entry. -
Email Self
Send the time log details to your own email for reference. -
Print
Print the selected time log entry or list. -
Remove Sales Lead Link
Unlink the selected time log entry from the Sales Lead. -
Create Time Log (available on the top ribbon)
Create a new time entry linked to the Sales Lead.
Create a Quote From Sales leads
Create a quote
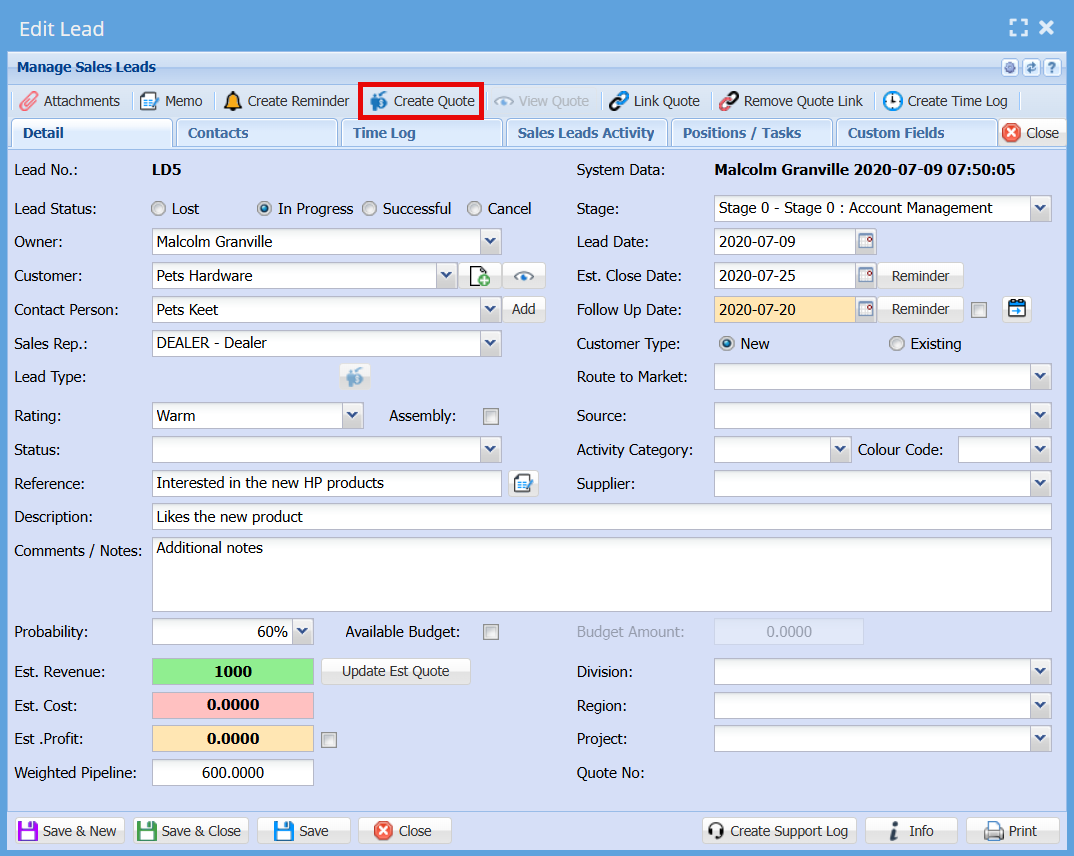
The system allows users to generate a Quote directly from an existing Sales Lead, helping streamline the sales process and avoid re-entering information.
Click on "Create Quote" button
View Quote
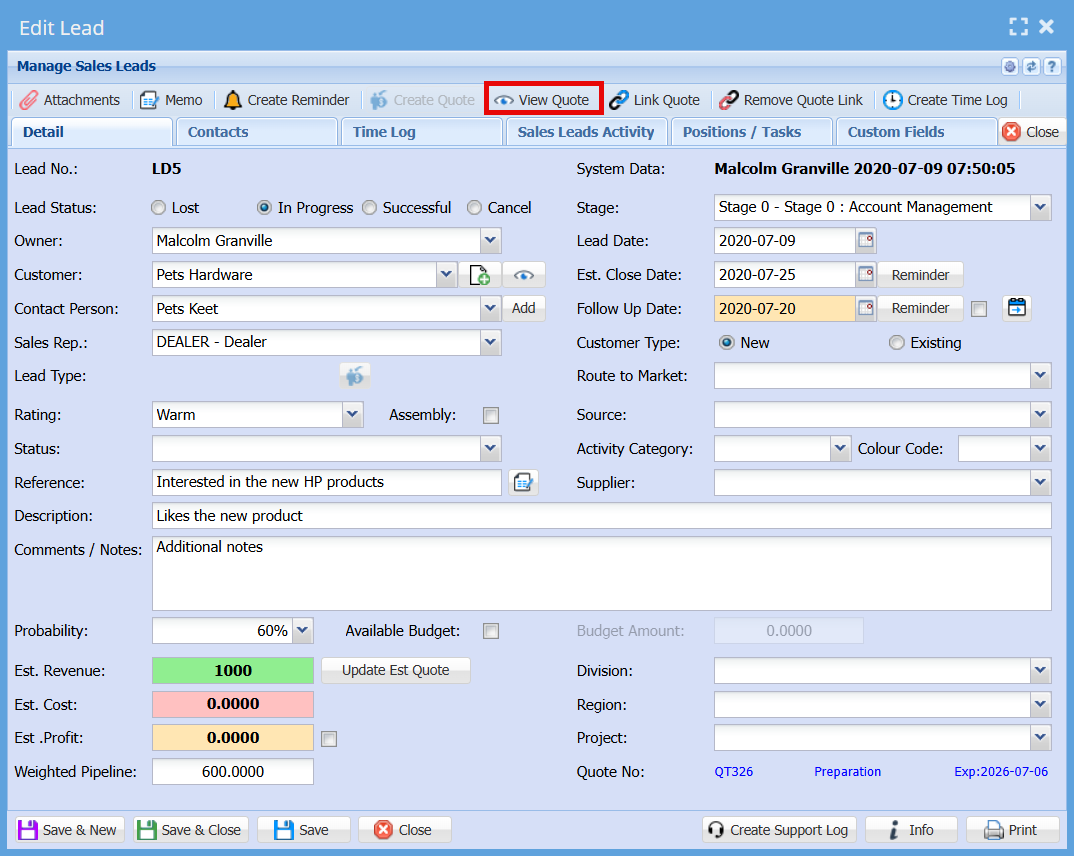
Once a quote has been created and linked to a Sales Lead, it can be easily accessed using the "View Quote" function.
Only one quote can be linked to a Sales Lead at any given time.
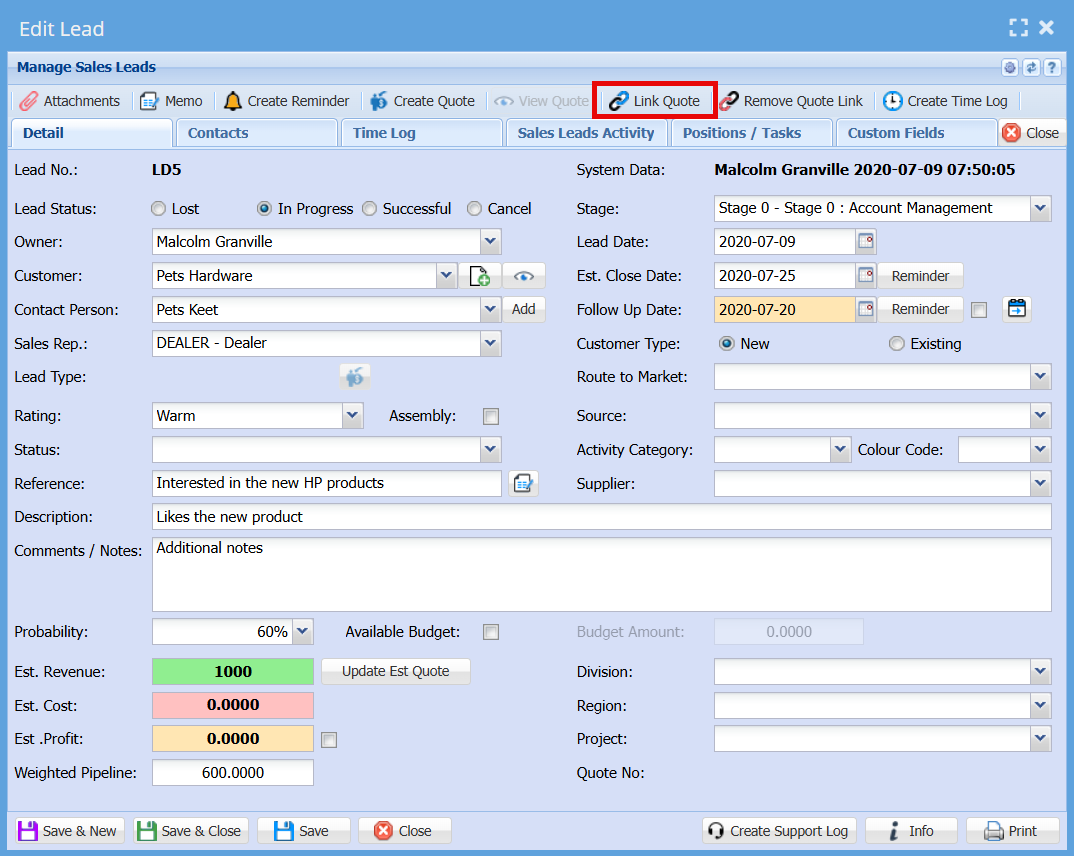
Link Quote
The Link Quote function allows you to connect an existing quote to a Sales Lead after the quote has already been created in the Debtors module.
When to Use Link Quote
- Use this option when a quote was not created directly from the Sales Lead.
- For example, if a quote was created separately in the Debtors module, it can still be linked back to the relevant Sales Lead for tracking purposes.
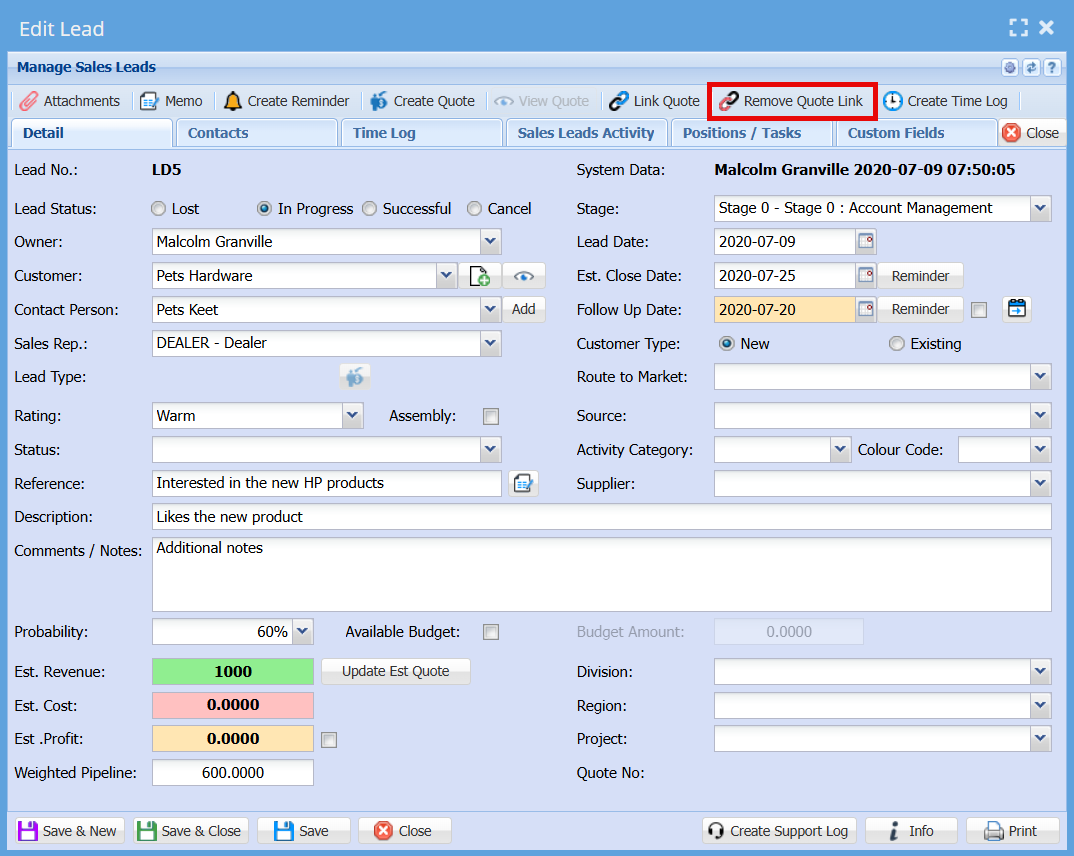
Remove Quote Link
The Remove Quote Link function allows you to disconnect a linked quote from a Sales Lead.
- Open the Sales Lead in Edit Lead mode
- Click the Remove Quote Link button on the top navigation ribbon
- The system will remove the association between the Sales Lead and the quote
When to Use Remove Quote Link
- When the incorrect quote has been linked to the Sales Lead
- When you need to replace the existing quote with a different one
- When the quote is no longer relevant to the Sales Lead
Important Notes
- Removing the link does not delete the quote from the system
- The quote remains available in the Debtors module and can be reused or linked to another Sales Lead if required
- Only the connection between the Sales Lead and the quote is removed
Sales Leads - Reminder Create
This section of the Edit Lead screen controls key date fields and reminder functionality for managing follow-ups and expected closure.
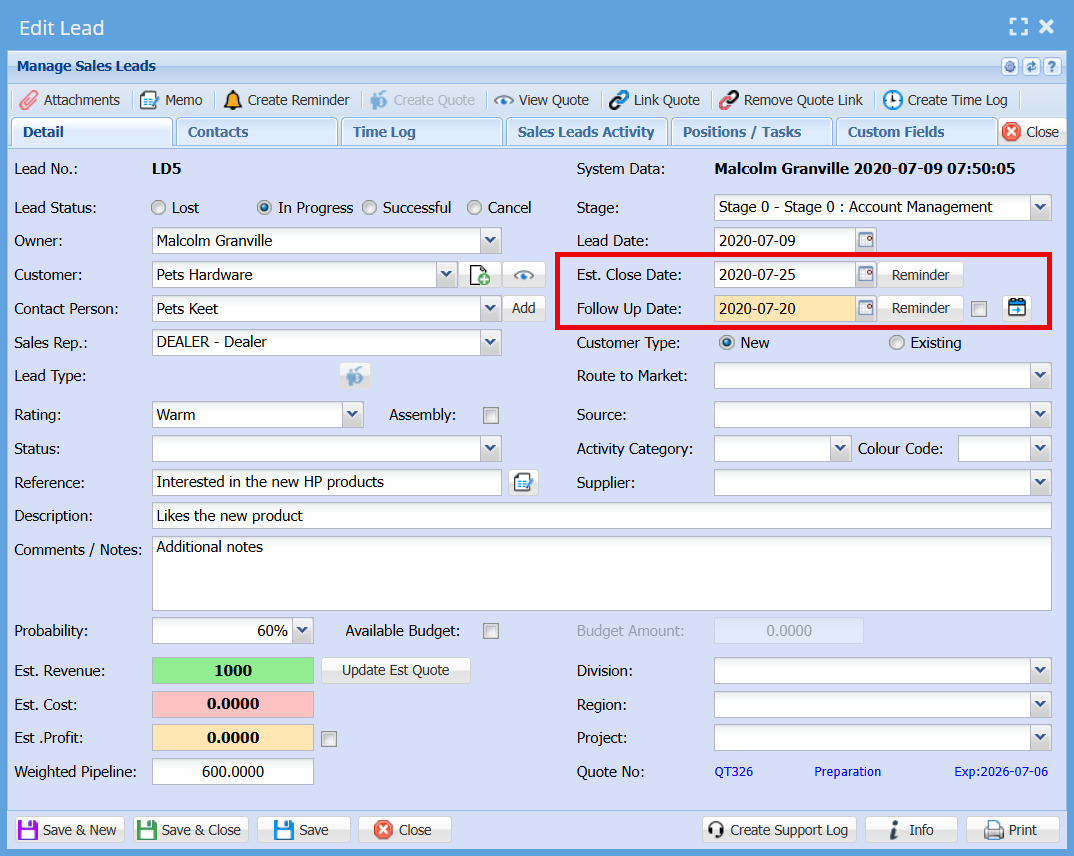
Field Layout & Display
- The date fields are reduced in size to improve screen layout and usability.
- The Follow Up Date is positioned below the Estimated Close Date (swapped from the original layout).
- The Follow Up Date field is highlighted with a cream background, making it easily identifiable as a priority action item.
Reminder Buttons
Follow Up Reminder Tick Box
A tick box is located next to the Follow Up Date field, controlling automatic reminder creation.
Behaviour:
-
When adding a new Sales Lead
- The tick box is selected (on) by default.
-
When editing an existing Sales Lead
- The tick box is unselected (off) by default.
-
When saving the lead (Save or Save & Close)
- If the tick box is selected, a reminder is automatically created based on the Follow Up Date.
-
If the Follow Up Date is changed
- The user must re-select (tick) the box to confirm a new reminder should be created.
-
When saving again with the tick box selected
- A new reminder is created using the updated Follow Up Date.
.png)
Sales Leads import export
This feature allows for exporting and importing of sales leads.
It can be used to import new leads or update existing leads.
Sales leads import export function is disabled by default.
Enable via Form security
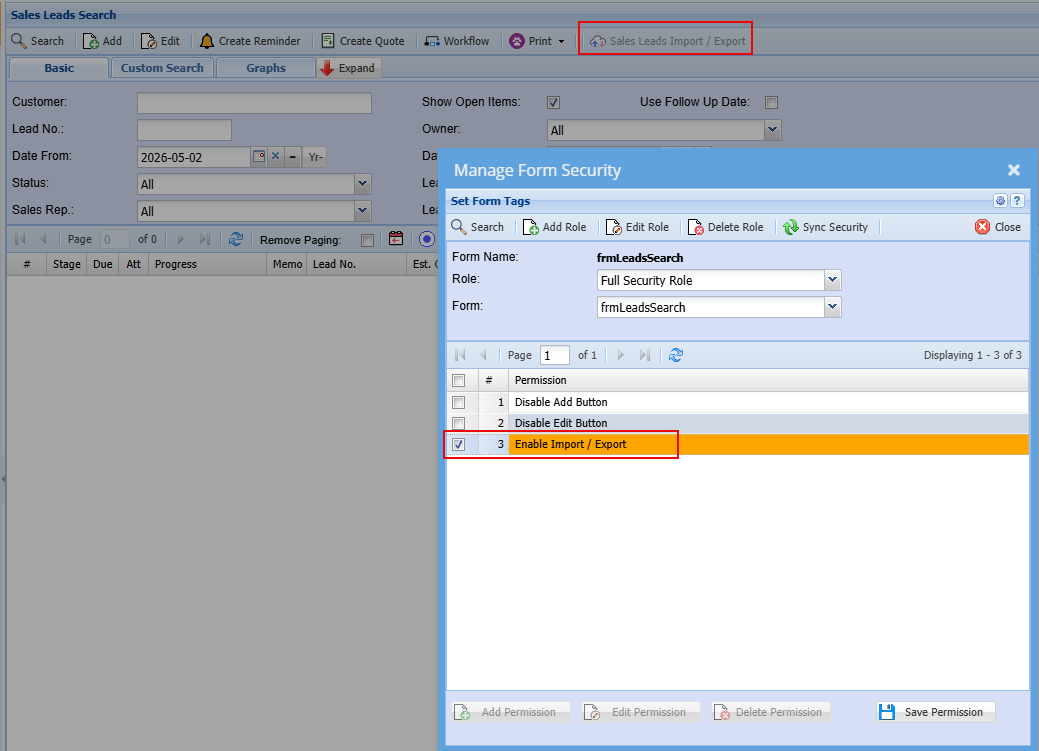
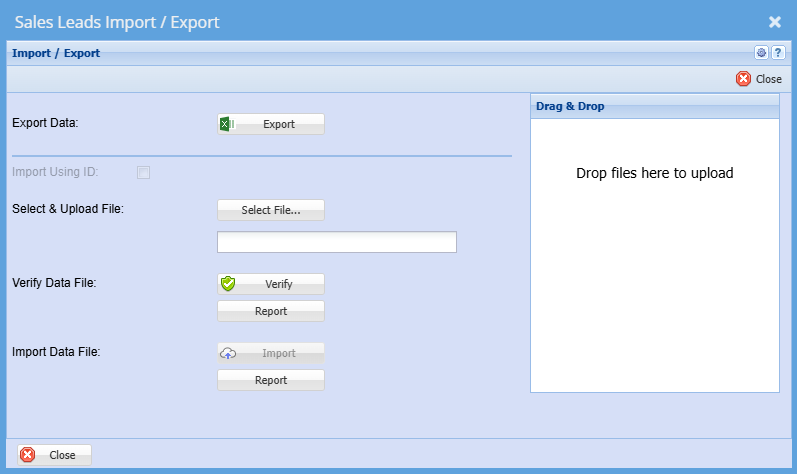
Export the data based on the search
This will give you the template layout as well as the data
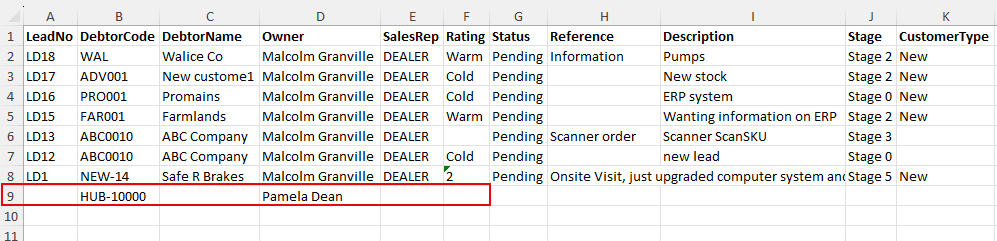
Exported Data
To add a new Sales, leave the Lead number blank and enter the DebtorCode
| Field | Default setting | Can set to |
| Contact Person | default contact person of setup | N/A |
| Lead Status | In Progress | N/A |
| Sale Rep | default to the prospect or customer setup. If none, leave blank | Sales Rep code |
| Rating | Cold | Cold, Warm or Hot |
| Probability | 0% | 10, 20, 30 etc |
| Stage | First one on the list - Stage0 | Stage codes |
| Est Close Date | 7 days from Imported date | N/A |
| Follow up date | same as Est close date | N/A |
| Customer Type | New | New or Existing |
| Division | Default to customer setup | Division Code |
| Region | Default to customer setup | Region Code |
Support Request Search
Support Request
.png)
A support request search entails the list of requests sent through from the Website Support
This is where they will be listed in the system
Normally all our command ribbons are at the top of the screen in WebAccounting
When you click on the Search Button It will give you the list of Support Request available
.png)
To view the details of the support request click on the view button
.png)
The support request can be promoted to a time log by a click of a button “to Time Log”
Or The Support Request can be promoted to a support log to be assigned to a specific person to handle the query.
The support request can also be promoted to a sales lead
.png)
Once the support log is promoted to either time log, support log or sales leads it will be moved from the support request search and can be found at the relevant allocation
Support Log Ticket Menu
Support Log Ticket Search
The Support Log Ticket is essential and serves as a centralised repository for all relevant support log queries
In the Debtor setup search, you will see two search tabs
| Basic Search tab | If you know the log number or part of the support log number you can search here |
| Custom Search tab | If you have setup custom fields in support log tickets, you can search for the items in this area. |
If you leave the basic search blank it will bring up all support log ticket codes
CRM Module> Activity> Support Log
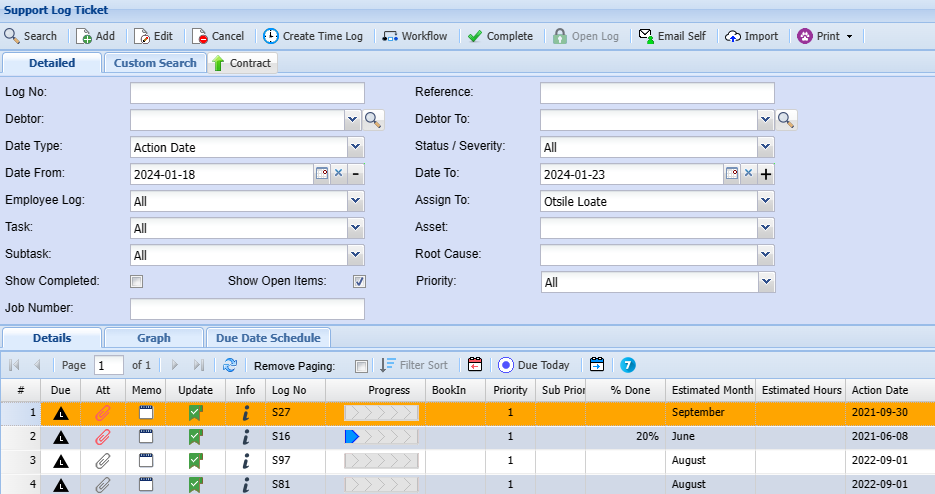
| Log No | search using a support log number |
| Date From | search by entering the from which the support log will run from |
| Date To | search by entering the date to, in order to limit to search run |
| Employee Log | search by selecting the employee from the drop down arrow |
| Assign To | search by selecting the person the support log is assigned to a certain user |
| Task | search by selecting the status from the drop down arrow |
| Show Completed | tick the box to search for completed support log |
| Support Tasks | |
| Status |
System Buttons
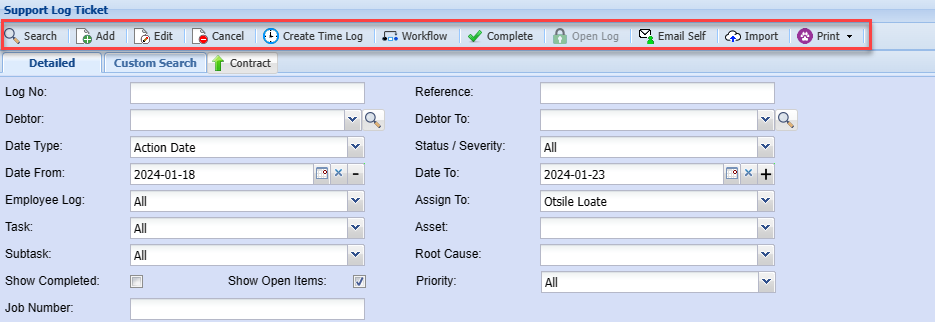
| Search | The search function will return support log ticket records based on the search criteria entered. |
| Add | Allows you to create a new support log ticket |
| Edit | Allows you to make changes to an existing support log ticket |
| Cancel | Allows you to cancel support log ticket |
| Create Time Log | Duplicate an existing debtor or customer |
| Workflow | Allows you to load a workflow and move support logs around |
| Complete | Allows you to highlight a support log and complete it |
| Email Self | Allows you to email support logs to yourself |
| Import | Allows you to import support logs |
| Print Dropdown | Allows you to print your Support log ticket in PDF or download an Excel sheet of your support log tickets |
Add Support Log Ticket
Detail Tab
Video training manual 2016 - Click Here
Support log tickets are used to capture work for internal and technical staff.
Customer problems or support issues.
CRM Module > Activity > Support log ticket
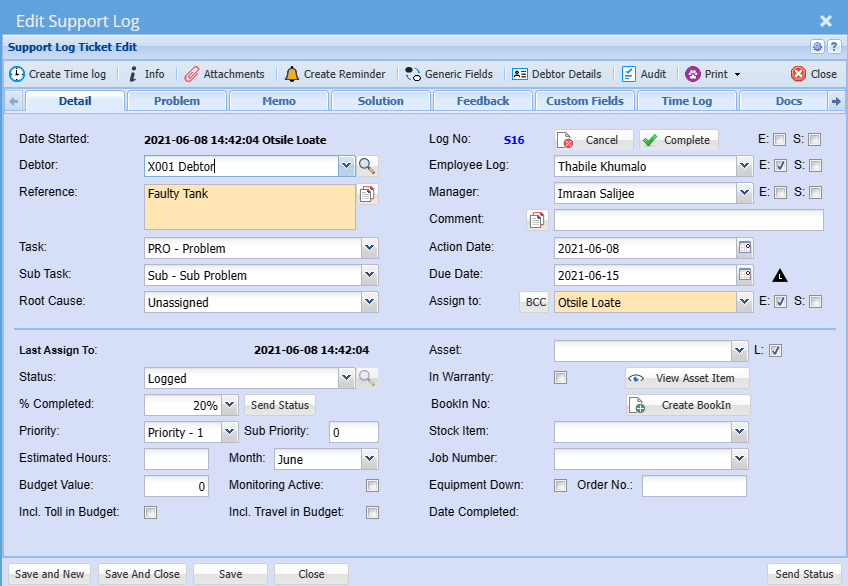
It shows a list of support log from customers
Search according to user’s preference
Search
Log No – search using a support log number
Reference – search by entering the reference of the support log
Employee Log – search by selecting the employee from the drop down arrow
Assign To – search by selecting the person the support log is assigned to a certain user
Debtor – search by the debtor
Date From – search by entering the from which the support log will run from
Date To – search by entering the date to, in order to limit to search run
Task – search by selecting the status from the drop down arrow
Show Completed – tick the box to search for completed support logs
Details Tab - to show the support log details
Support Tasks Tab – to show support log tasks
Status Tab - to show and allocate different colours to the status codes
Standard Tab has five buttons
Extras Tab
Create Time Log button – to create a time log
New Features
Colour Code Status of Task
Colour code in the the Support Log Status makes it easier to view the different status of support tasks sitting in the Support Log Queue.
The user has the ability to change the status colours themselves.
Colour Codes On the due date - denotes at a glance wich support logs need urgent attention.
Closing or Cancelling of Service Logs
Service Logs cannot be deleted off the Webaccounting system and the only way in which they can be resolved is by either closing or cancelling the Service Log.
To search for completed and cancelled Service Logs tick the Added Show Completed tick box.
Status Task Percentage Complete
The Service Log progress can be monitored by assigning a % completed.
Support Website logging
With Webaccounting we can integrate a logging system so that customers can go to your website, click on a support button and log a ticket.
This feature also allows the company to publish basic support manuals to their customers by using the Search Help files button.
This ticket is then sent to Webaccounting system.
The path will be as follows:
https://Name of server/csp/name of database/wab/acck/frmServiceSelect1.csp
.png)
Once the customer proceeds with the support, a new window will come up.
If the customer knows his customer code, he can enter it in the Company Code and when he clicks on tab.
It will bring up the companies list of contact persons. If the person logging the call is on the system then they can select their name.
The person can also update their information.
If you don't know your company code then skip the first line and go and enter your company name and details to log a support log.
For the company codes, we suggest putting random four digit numbers after the code. (like a bank code)
Example
ABC company code is usually ABC001
But this is easy for people to guess your code and therefore read the users.
So we suggest doing your code as usual but with a code after - ABC001-2681
The company Code enter, must be an exact match inorder for information to be displayed.
.png)
Support Log Capture Process
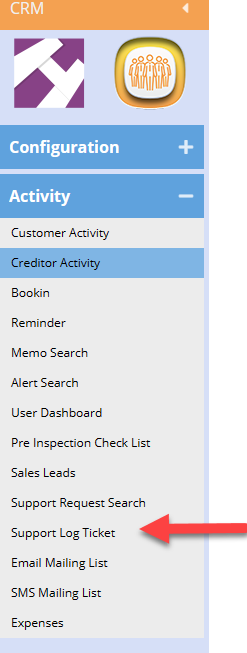
CRM Module> Activity> Support Log Ticket
Select: Support Log Ticket Menu Item
 bv
bv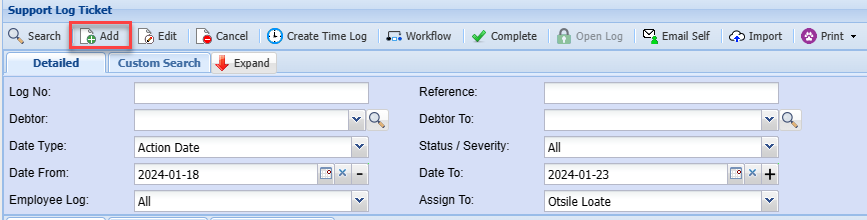
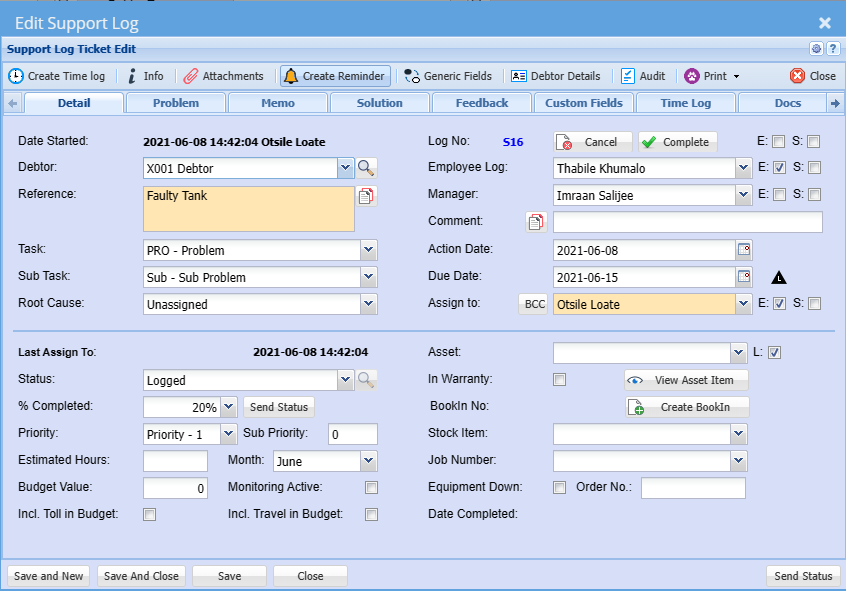
| Debtor |
Enter the Company Name |
| Reference | Enter a Reference for the Support Call |
| Task | Select a Task from the Drop Down |
| Sub Task | Select a Sub Task from the Drop down |
| Action Date | Enter the Action Date: Typically, this would be the date the task will be done |
| Due Date | Enter the Due date for the Task to be completed |
| Assign To | Select the Technician that the Support Call is to be assigned to |
| Status | Select the Support Call Status |
Click Save
Click the Problem Tab
Enter the details of the problem or task that is required to be performed
After clicking save you note that the notes typed will move to the right-hand side
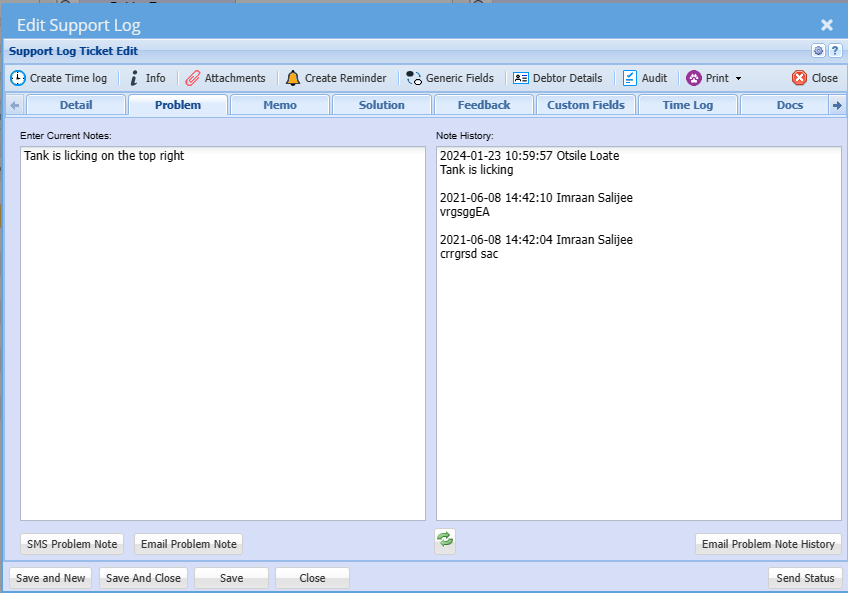
And the date time and user who captured the note is logged
.png)
Click the Feedback tab
Enter details of the feedback that you wish to forward to the client
.png)
Click Save
Once again, the note is moved to the right-hand side and logged with Time, date and user.
If you wish to email the client feedback as well, you can click the Save and Send Button.
This will email the Client and the Technician the notes captured.
.png)
Once the technician has been to site and performed the relevant tasks, he can enter further details on this page and again Save or Save and Send.
Upon completion of the Support Call, the technician can then call up the Support Log Ticket and enter and further details as well as enter the “Root Cause” if applicable.
.png)
Creating a Time Log from Support Log Ticket
If you wish for the Technician to log their time spent on the Support Call, while on the Support Log Ticket, the Technician can opt to create a time log as follows:
The Technician can Search for the Support Ticket
Debtor Module> Interactions> Support Log Ticket
Enter the client name or date range or log number
And click Search
.png)
Highlight (click Once) on the required Support log Ticket
Click the Create Time Log Button
.png)
.png)
Click Yes
.png)
1.Select the Agreement Contract
2.Select the Task performed from the drop down
3.Select the respective sub task
4.Select the respective Billing Rate
5.Capture details of the task performed
check the time log date is correct
1.Enter Time Started
2.Enter the Time Ended
The time log can then be either printed or emailed to yourself and then forwarded to the client for signature and /or their records.
Support Log recurring tickets
Create multiple future recurring tickets.
Useful when creating tickets for monthly maintenance on items.
Create one recurring ticket and save and close
Go to support ticket and highlight, click on Create Recurring Tickets button
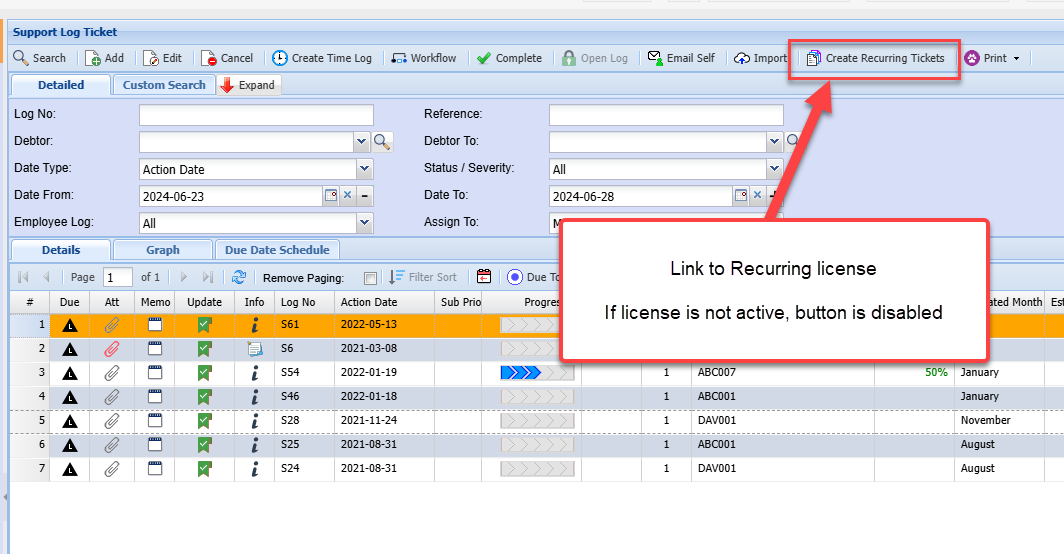
Specify the recurring occurrences and click on create
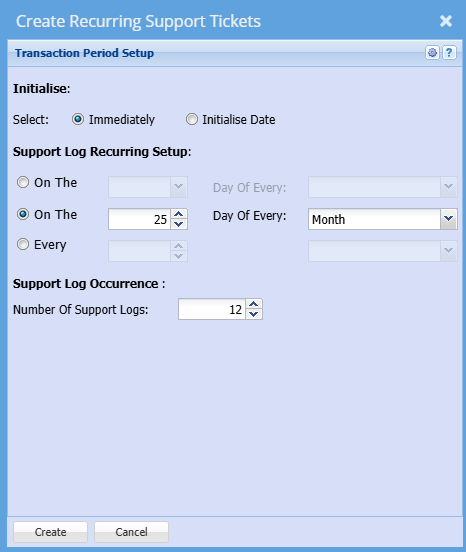
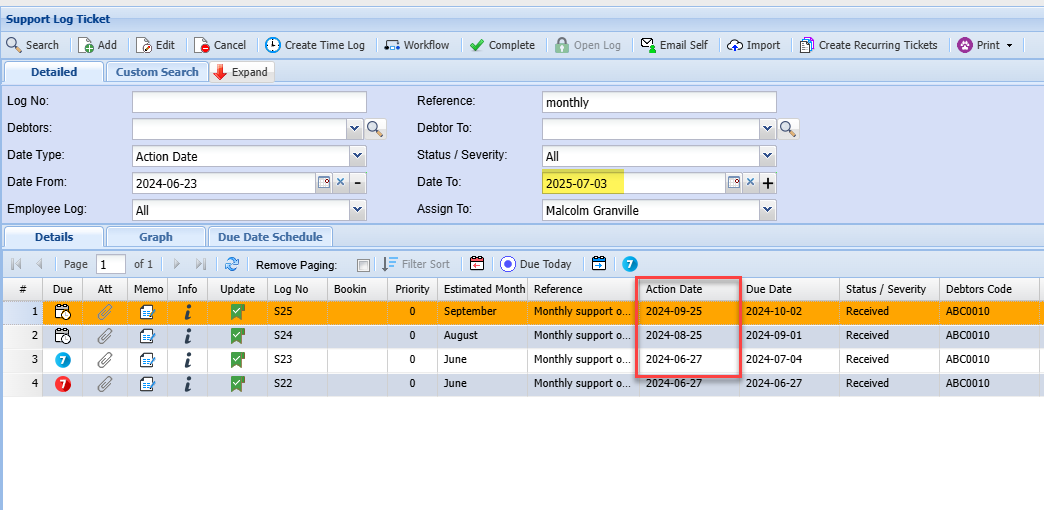
This will create future recurring tickets
If you want to see the future tickets, change your date to into the future
Debtor/Lead Interactions
Debtor/Lead Interactions Help
.png)
This allows a user to interact with the customers.
Basic Tab – Search button
Debtor/Lead - search by debtor
Interaction Type – select interaction type from the drop down arrow
Date From – select the date from and the Date To, and search
Order By – select the order from the drop down arrow
Detailed Tab – searches the interaction details according to the Follow Up Date selection
Custom Fields – search by selecting the category from the drop down arrow.
Standard Tab
Insert button – to insert debtor’s interaction
Amend button – allows changes
Delete button – to delete the interaction
Send button – to send the interaction
Email Mailing Menu
Email Mailing List Search
Existing Mailing List
This is where you search for an existing Email Mailing List
Video Training Manual 2016 - Click Here
CRM Module> Activity> Email Mailing List
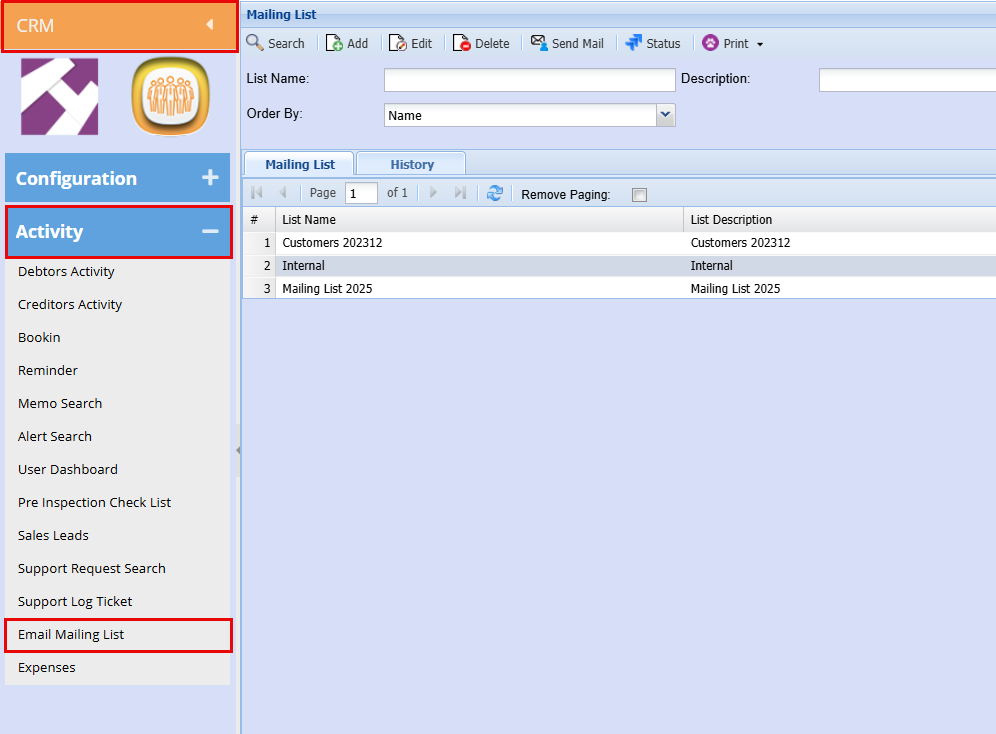
| List Name | Search for your list-by-list name |
| Description | Search for your list by description name |
| Order By | Search for your list by order either by name, description or captured by |
Creating and Send Bulk Mail CRM (Debtors)
CRM > Activity > Email Mailing List
- Click on the template that you would like to send out
- Click "Send Mail"
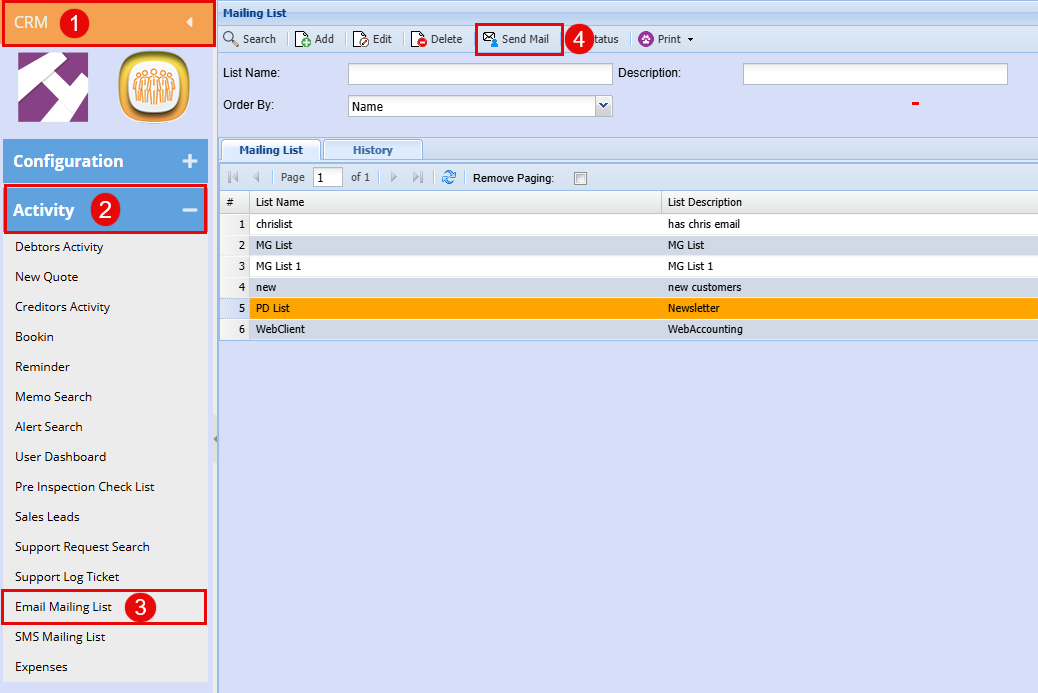
The below screen will open.
- Choose a Letter Template from the drop-down menu to determine the content of your outgoing message.
- Select a Mailing List using the "List Selection" drop-down to specify your email recipients.
- Manage Attachments by double-clicking an item to move it between the "Available Attachments" and "Selected Attachments" sections. Double-click again to remove it if needed.
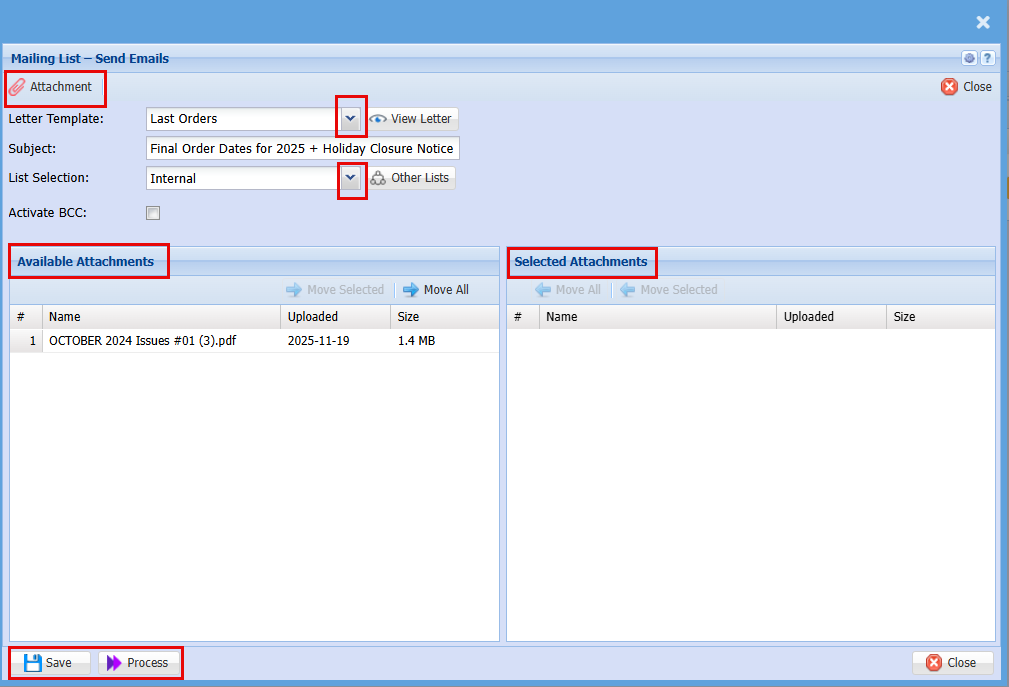
| Attachment | Here you can upload any attachment you would like to send out with your email |
| Letter Template | Select your email template from the drop-down menu |
| View Letter | Click to view the Template you have selected |
| Subject | The Subject line should auto populate with the description from when you created the template |
| List Selection | Select the list of contact you wish to send the letter too. |
|
Other Lists |
By clicking Other Lists, you can add multiple contact lists to send the mail out too. |
| Activate BCC | |
| Available Attachments | These are the attachments that have already been uploaded and available for selection. |
| Selected Attachments | These are the attachments that have already been selected to be sent out with the email. |
| Save | By Clicking Save you will save all the setting you have created and selected |
| Process | By clicking Process your letter will be emailed out |
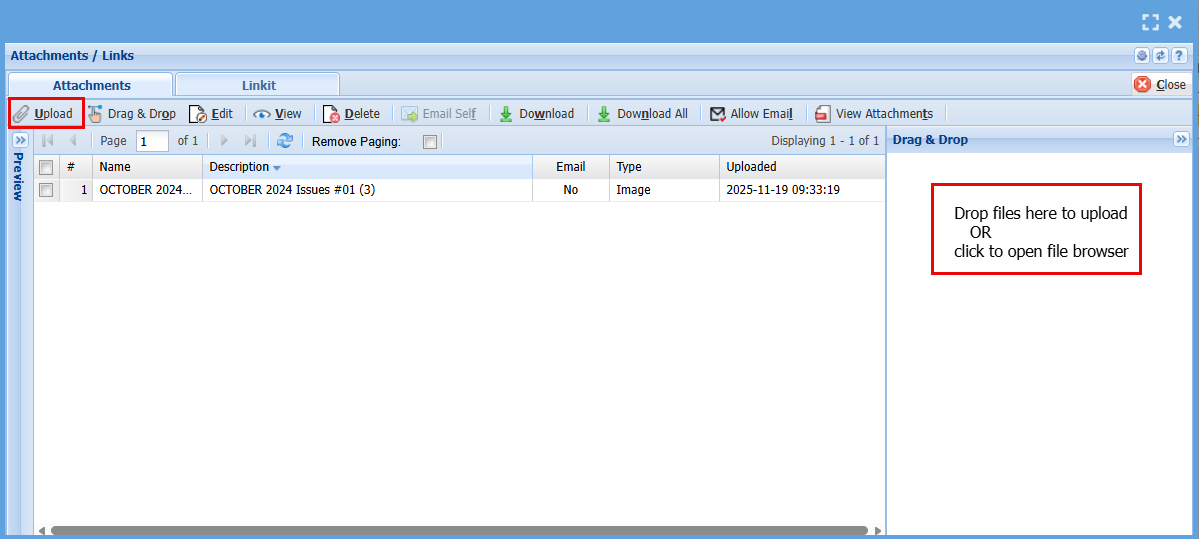
To add an attachment:
- Click "Attachment" and the below screen will open
- Click "Upload" or drag and drop your attachment in the "Drag & Drop" box
Mail Chimp
Mail Chimp Email Out
Video training manual 2019 - Click Here
Webatar > Activity > Email Mailing List
In Huge ERP we allow for email mailing list to be exported and imported to mail chimp.
Having created a central database in your customer setup files, you can create different mailing lists for targeted markets.
You can use the web accounting system to email out to the clients as a bulk email out, however this is not as effective as MailChimp.
Web accounting can send out the mailing list with attachments, but we do not keep a record of whether the recipient has read the Mail, opened it and whether that email address is valid.
While MailChimp has all these advanced features, we have added a function to export to MailChimp.
The exported file will have the name, surname, email address and the list name which you can use as a tag in MailChimp to email out.
When you export out, check your file first to make sure that it is comma delimited and not semi colon delimited.
Open the file app in notepad and replace all semi colons with commas.
Log into your Mail chimp profile and import your new list. This will update existing email addresses and put a tag against those customers.
MailChimp allows for multiple tags.
.png)
Creating Debtors Email Mailing List
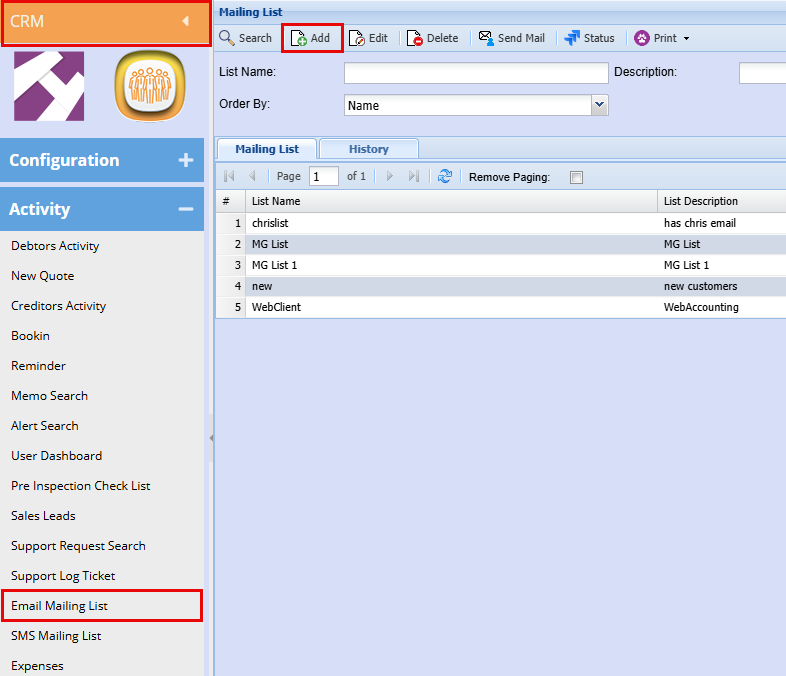
CRM Module> Activity> Email Mailing List
- Click "Add"
- Add the Mailing List Name and a Description
- Click "Save"
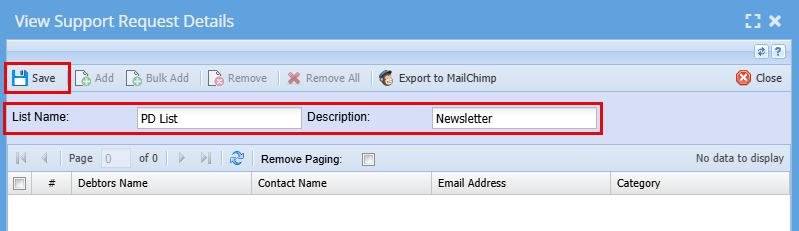
Click Save a new a window will open
Here you can start adding your contact for the mail.
- Click "Add"
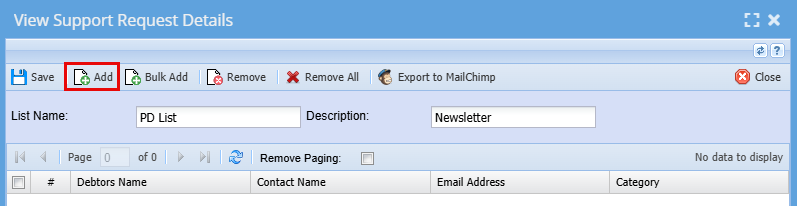
- Use the filters to limit your search results
- Click "Search" - The contacts grid will populate with Contacts
- Either double click on the contact you want to add to the Selected column or use the Arrows to move these contacts over.
- Click "Close" when you are happy with your list
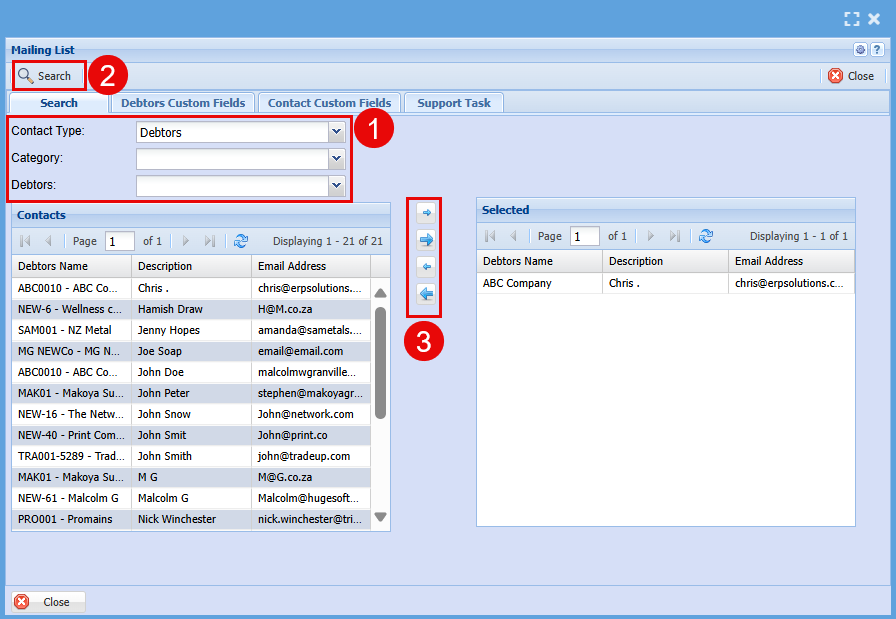
| Contact Type | Select the Contact Type you wish to add contact from (Debtors, Prospects, Opportunities, Users, Employees) These may be different depending on what has been setup. |
| Category | Select the Category you would like to add contact from, these will also depend on what has been setup (Purchasing, Sales, Marketing, Finance, Executive) |
| Debtors | Select one debtor to add to your mailing list |
When you click "Close", you will see your mailing list that you created in the list and will be available for selection when you have a mail to send out.
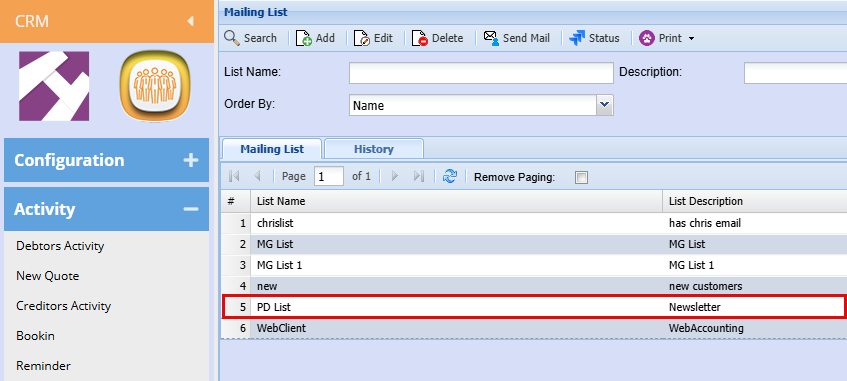
From here you can double click to open the list to make any changes needed.
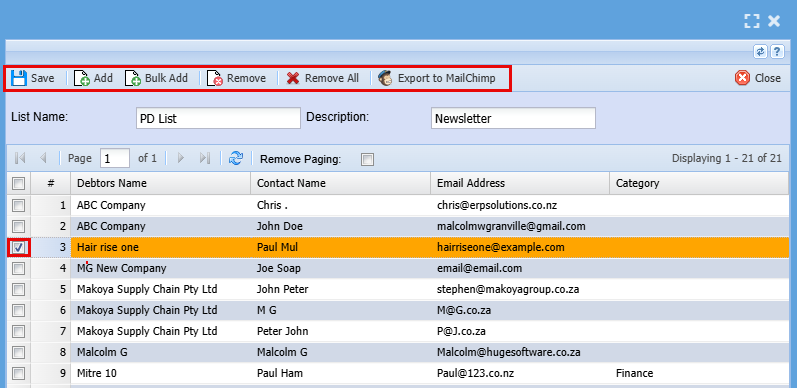
| Save | Click Save to save any changes made |
| Add | Click Add to add a contact that may have been missed |
| Bulk Add | Click Bulk Add to add a bulk amount of Contact to the mailing list (Maybe from a different Contact Type or Category.) |
| Remove | Highlight the line you want to remove by clicking on the line and clicking Remove. |
| Remove All | Click Remove All if you want to delete all contacts in the mailing list |
| Export to Mail Chimp | Click Export to Mail chimp to create this mail list in Mail Chimp. |
Bulk Add
You can add an Email mailing list in bulk or by group like all debtors or creditors.
- Click "Bulk Add" and the below screen will open
- By using the filters, you can create a quick mailing list
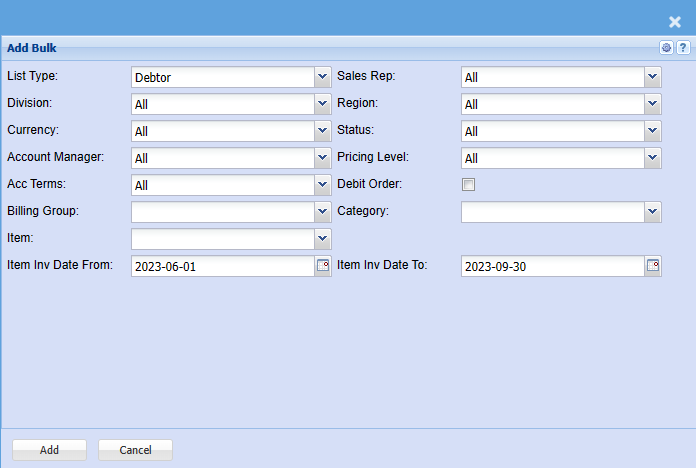
| List Type |
Select the list type you would like to add from (Debtors, Prospect, Opportunities) |
| Division | If you have set up divisions for your debtors, you can pull the report for all your debtors or you can select a specific Division from the drop-down menu. |
| Currency | If you are using multi-currency you can select it here |
| Account Manager | You can pull the report for all your debtors, or you can select a specific Account manager from the drop-down menu if you have set up Account Managers for your debtors. |
| Acc Terms | You can filter for specific Account Terms (30 Days, 60 Days, 90 Days etc.) |
| Billing Group | If you have billing groups like, Subscriptions, you can pull a report for these specific groups, or you can pull a report that will include all transactions. |
| Item | You can filter for Debtors/Customers who have purchased a specific inventory item |
| Item Inv Date From / Item Inv Date to | You can select the date range you want to filter for of a specific inventory item that has been purchased |
| Sales Rep | If you want to run a report by a specific sales rep, then you will need to select the sales rep on the drop-down menu. If you leave the sales rep on all the report will run by all sales rep. |
| Region | You can pull the report for all your debtors, or you can select a specific Region from the drop-down menu if you have set up Regions for your debtors. |
| Status | If you select all the report will pull all statuses. If you want to view report by status, select the status on the drop-down menu |
| Pricing Level | You can filter for specific Pricing Levels (In Season, Out of Season, Specials) |
| Debit Order | Tick the box if you would like to filter for Debit orders |
| Category | To generate the report, the user has to select the category from the drop-down menu |
SMS Mailing List
SMS Mailing List Help
Video training manual 2016 - Click Here
.png)
Details Tab: Shows all the mailing list created.
History Tab: Shows the history of sms mailing lists with the messages that was sent.
Add Button: Allows the user to create a new mailing list.
Edit Button: Allows the user to change/update a mailing list.
Show Message Button: This is to show the message that was sent in the past. The button is only enabled on the History Tab.
Delete Button: Allows the user to delete a mailing list. This button is only enabled on the details tab.
Print Button: Gives a printout of all the contacts for a particular mailing list.
Print All Layout 1: Gives a list of all the mailing lists as well as the contacts for each list.
Print All Layout 2: Gives a list of all contacts in the different mailing lists ordered by contact name.
Create SMS Button: Allows the user to create and send an sms.
Show List Status Button: Gives a list containing whether or not the message was sent successfully.
List Name Textbox: Search according to the list name
List Description Textbox: Search according to the list description
Order by:
• Name
• Captured By
• Captured Date
• Description
Expenses Menu
Expenses
Expenses are used to process claims for reimbursement.
Expenses help with accurate and timely expense claiming
Faster expense processing.
Employee satisfaction.
Experience processing cuts costs
Reduce errors and mistakes done by the manual traditional process.
Increased expense claim transparency.
CRM Module> Activity> Expenses
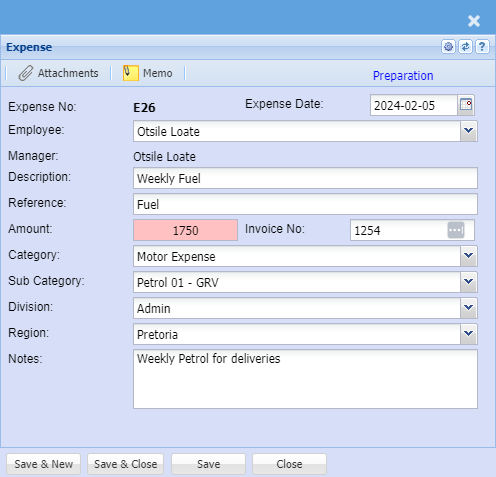
| Expense Date | Capture the correct date for the expense you are claiming for |
| Employee | Select the employee who is claiming on the drop down list. |
| Manager | The assigned approver will populate in this field |
| Description | Enter the expense description. |
| Reference | Enter the expense reference |
| Amount | Enter the expense amount. |
| Invoice No | Enter the supporting document number |
| Category | Select the category on the drop down |
| Sub Category | Select the sub category on the drop down |
| Division | Select the division on the drop down |
| Region |
Select the region on the drop down |
| Note | Allows you to add additional notes on the expense/ claim |
You can attach
.png)
Once the information has been captured
the user clicks on send approval - this emails the approver regarding this claim.
.png)
The status of the expense claim will now change to awaiting approval.
.png)
Expenses Process
The expenses function allows you to process claims for reimbursement
Benefits of Expenses:
- Accurate and timely expense claim routing
- Increase in organisational efficiency
- Faster expense processing
- Employee satisfaction
- Expense processing costs cuts
- Reduce errors and mistakes done by manual claim process
- Increased expense claim and transparency
User
Go to CRM Module> Activity> Expenses
To add a new Expense Click add or click search to see a list of existing Expenses
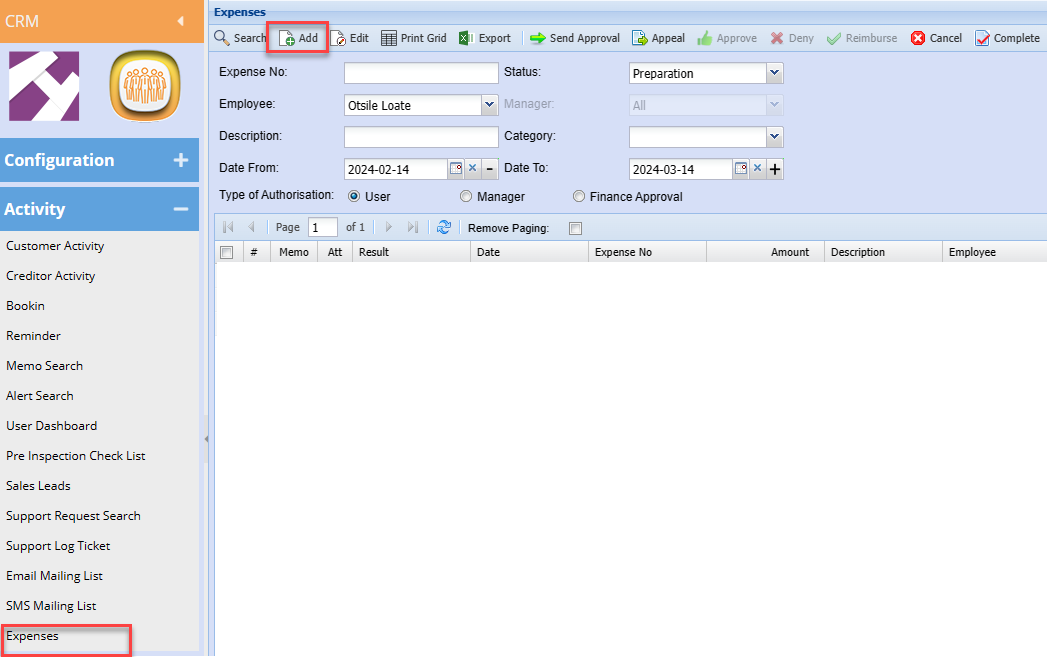
After clicking Add a screen below will appear, Add all necessary information as shown below
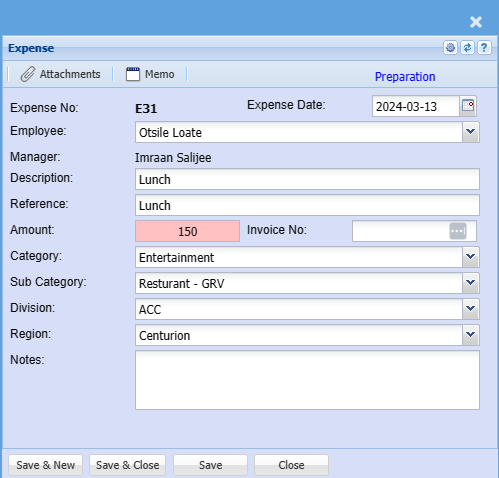
|
Employee |
Select the employee who is claiming on the dropdown list |
| Manager | The assigned approver will populate this field |
| Description | Enter claim description |
| Reference | Enter Claim reference |
| Amount | Enter the expense amount |
| Category | Select Category from the drop-down selection |
| Sub Category | Select the correct sub-category if there is more than one |
| Division | Enter division |
| Region | Enter region |
| Notes | Add detailed additional notes if applicable |
| Expense Date | Enter the correct date for the claim |
| Invoice No |
Enter the supporting document number if you have This is not compulsory |
Once you are done capturing you can load the receipt as proof on the attachments
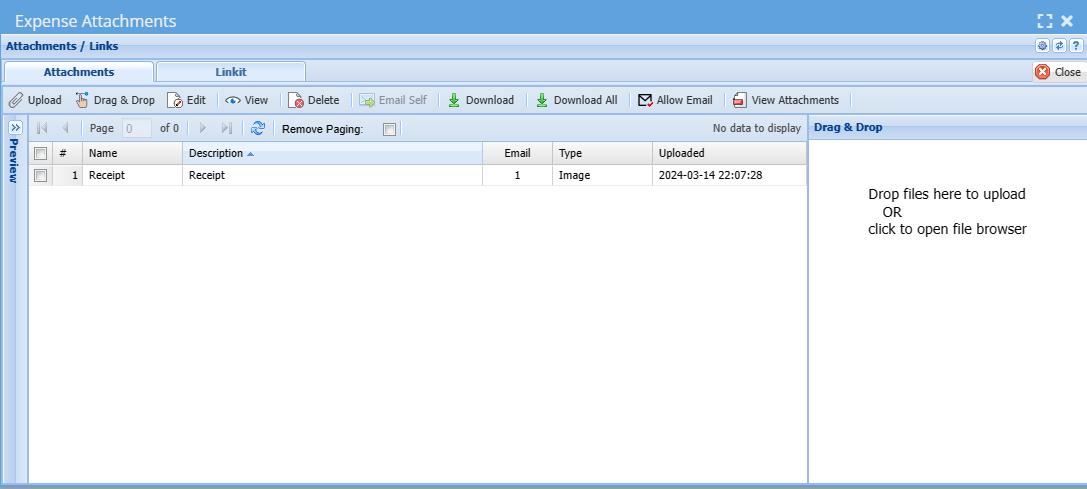
Once the information has been captured and all receipts are loaded then save and close your expense claim,
Go back to the grid
Select the expense claim from the grid and click Send Approval
This will email the approver (Manager) a request to review and approve the expense claim

Manager
The status of the expense claim will now change to awaiting approval
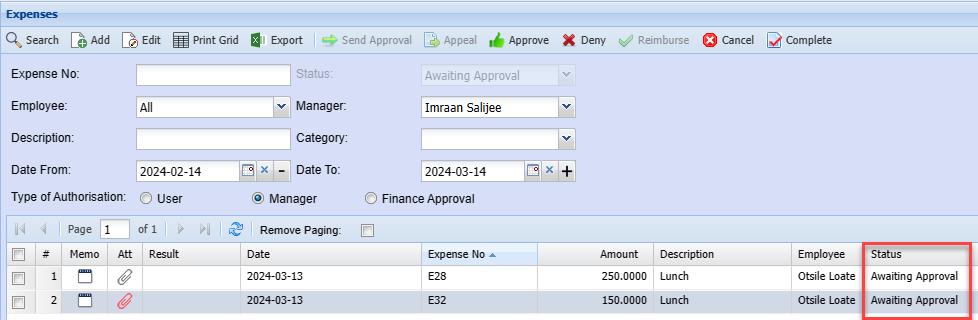
The Manager can then approve or deny the claim,
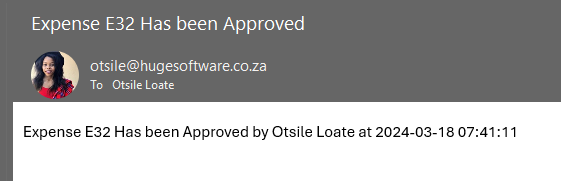
Once the manager approves the sales rep will receive an email confirming that the claim has been approved.
Finance Approval
The finance manager will then Appeal, Deny or Reimburse the expense claim.
Once the expense claim is reimbursed a journal will automatically be created
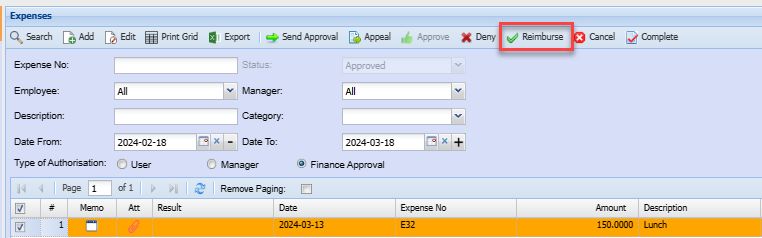
Once the fiance approval makes the decision the sales rep will receive an email informing them if they claim is going denied or going to be reimbursed.