Email Mailing Menu
- Email Mailing List Search
- Creating and Send Bulk Mail CRM (Debtors)
- Mail Chimp
- Creating Debtors Email Mailing List
Email Mailing List Search
Existing Mailing List
This is where you search for an existing Email Mailing List
Video Training Manual 2016 - Click Here
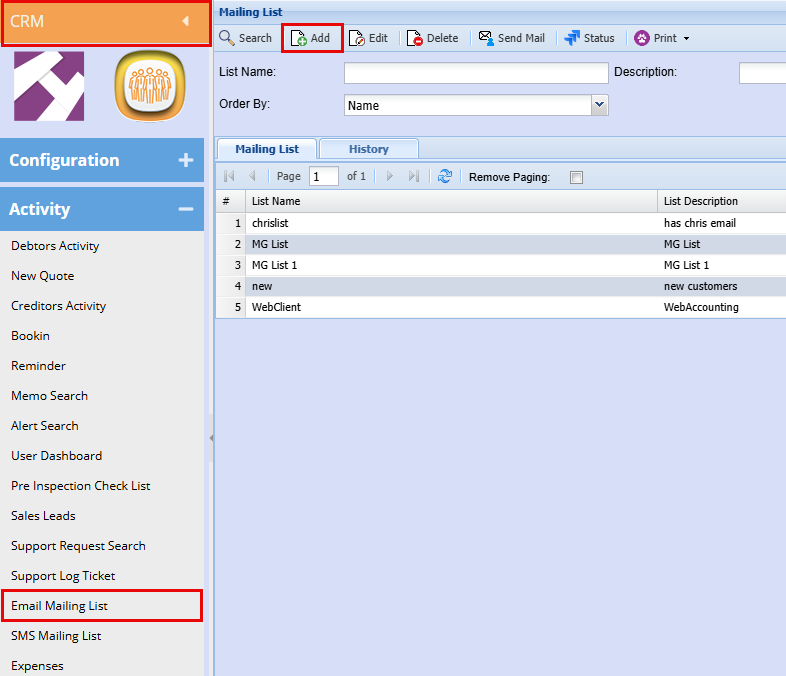
CRM Module> Activity> Email Mailing List
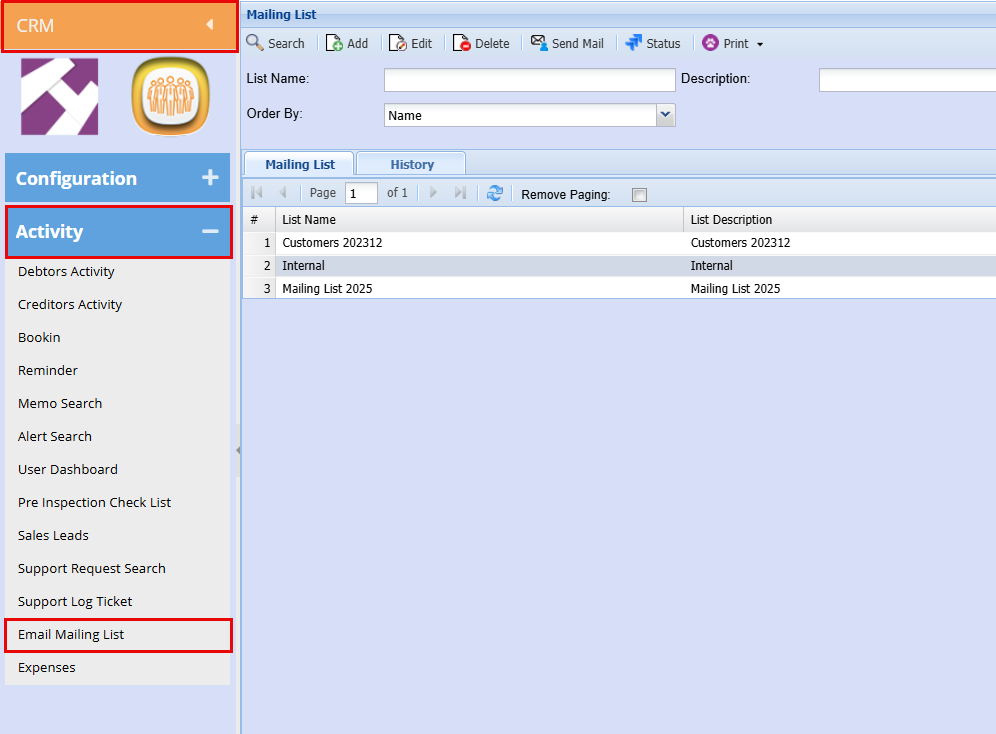
| List Name | Search for your list-by-list name |
| Description | Search for your list by description name |
| Order By | Search for your list by order either by name, description or captured by |
Creating and Send Bulk Mail CRM (Debtors)
CRM > Activity > Email Mailing List
- Click on the template that you would like to send out
- Click "Send Mail"
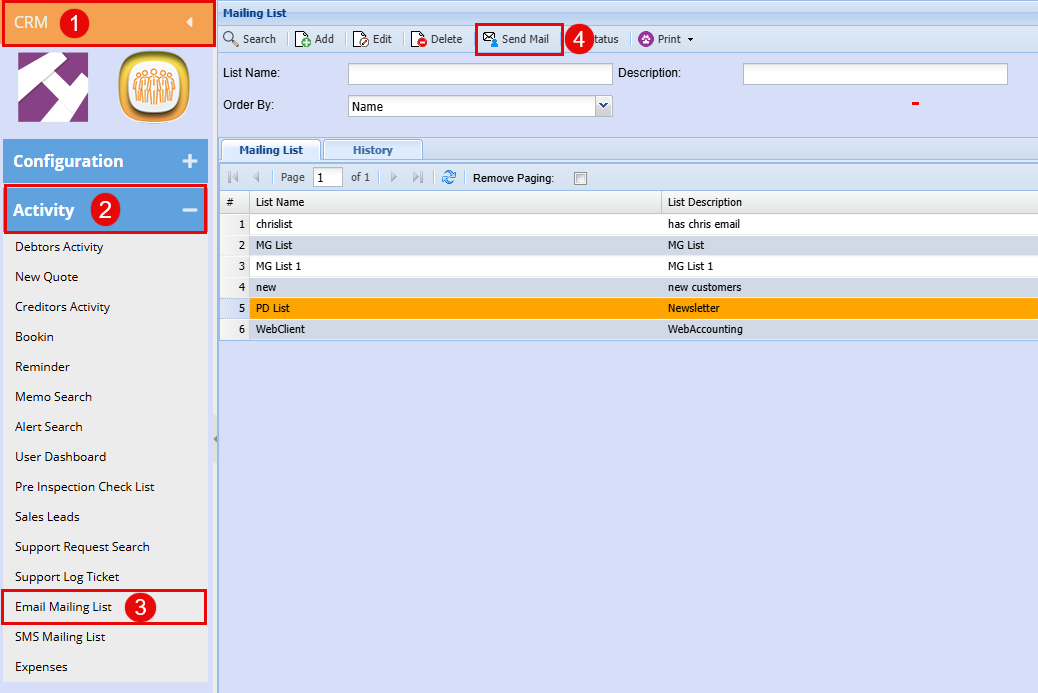
The below screen will open.
- Choose a Letter Template from the drop-down menu to determine the content of your outgoing message.
- Select a Mailing List using the "List Selection" drop-down to specify your email recipients.
- Manage Attachments by double-clicking an item to move it between the "Available Attachments" and "Selected Attachments" sections. Double-click again to remove it if needed.
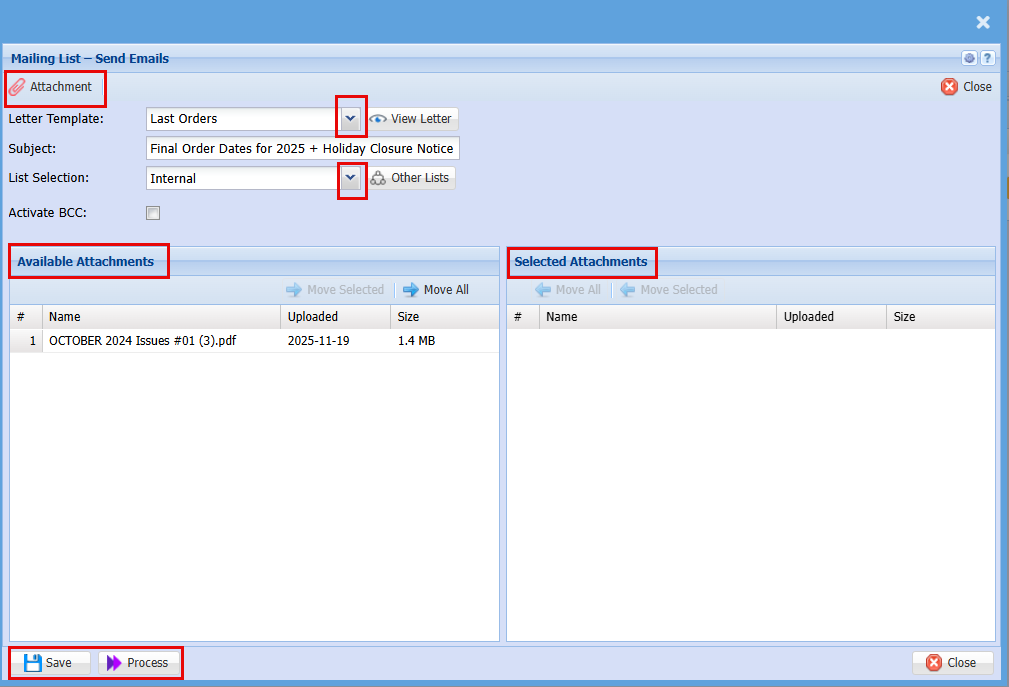
| Attachment | Here you can upload any attachment you would like to send out with your email |
| Letter Template | Select your email template from the drop-down menu |
| View Letter | Click to view the Template you have selected |
| Subject | The Subject line should auto populate with the description from when you created the template |
| List Selection | Select the list of contact you wish to send the letter too. |
|
Other Lists |
By clicking Other Lists, you can add multiple contact lists to send the mail out too. |
| Activate BCC | |
| Available Attachments | These are the attachments that have already been uploaded and available for selection. |
| Selected Attachments | These are the attachments that have already been selected to be sent out with the email. |
| Save | By Clicking Save you will save all the setting you have created and selected |
| Process | By clicking Process your letter will be emailed out |
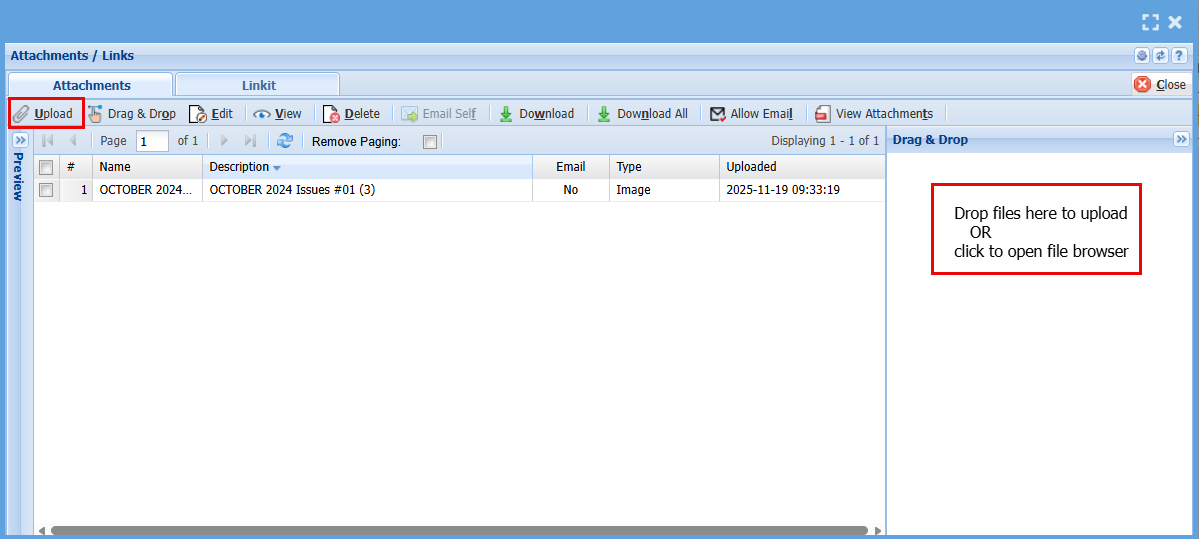
To add an attachment:
- Click "Attachment" and the below screen will open
- Click "Upload" or drag and drop your attachment in the "Drag & Drop" box
Mail Chimp
Mail Chimp Email Out
Video training manual 2019 - Click Here
Webatar > Activity > Email Mailing List
In Huge ERP we allow for email mailing list to be exported and imported to mail chimp.
Having created a central database in your customer setup files, you can create different mailing lists for targeted markets.
You can use the web accounting system to email out to the clients as a bulk email out, however this is not as effective as MailChimp.
Web accounting can send out the mailing list with attachments, but we do not keep a record of whether the recipient has read the Mail, opened it and whether that email address is valid.
While MailChimp has all these advanced features, we have added a function to export to MailChimp.
The exported file will have the name, surname, email address and the list name which you can use as a tag in MailChimp to email out.
When you export out, check your file first to make sure that it is comma delimited and not semi colon delimited.
Open the file app in notepad and replace all semi colons with commas.
Log into your Mail chimp profile and import your new list. This will update existing email addresses and put a tag against those customers.
MailChimp allows for multiple tags.
.png)
Creating Debtors Email Mailing List
CRM Module> Activity> Email Mailing List
- Click "Add"
- Add the Mailing List Name and a Description
- Click "Save"
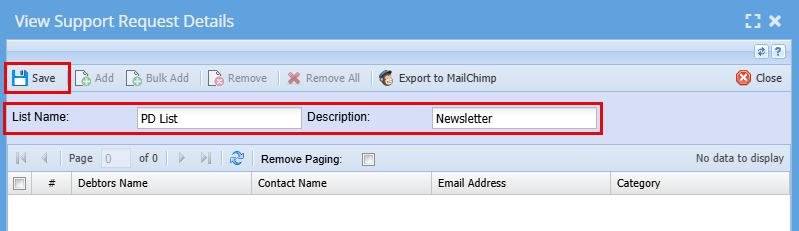
Click Save a new a window will open
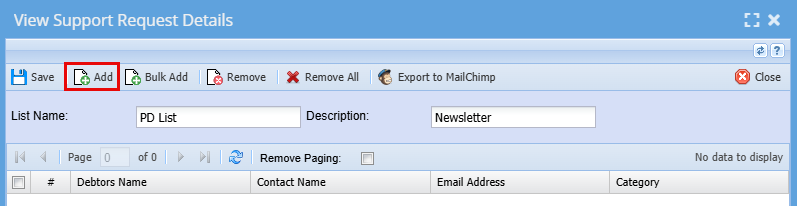
Here you can start adding your contact for the mail.
- Click "Add"
- Use the filters to limit your search results
- Click "Search" - The contacts grid will populate with Contacts
- Either double click on the contact you want to add to the Selected column or use the Arrows to move these contacts over.
- Click "Close" when you are happy with your list
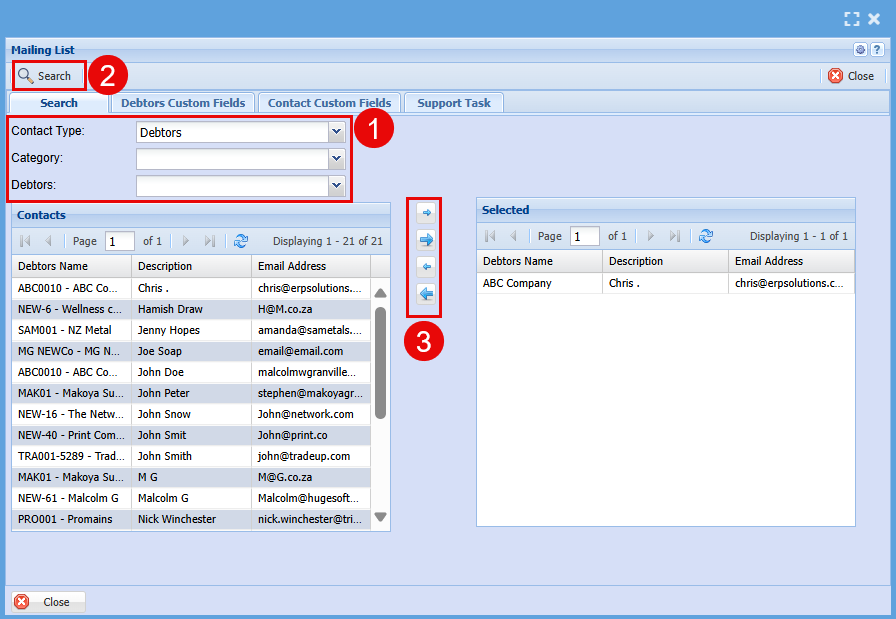
| Contact Type | Select the Contact Type you wish to add contact from (Debtors, Prospects, Opportunities, Users, Employees) These may be different depending on what has been setup. |
| Category | Select the Category you would like to add contact from, these will also depend on what has been setup (Purchasing, Sales, Marketing, Finance, Executive) |
| Debtors | Select one debtor to add to your mailing list |
When you click "Close", you will see your mailing list that you created in the list and will be available for selection when you have a mail to send out.
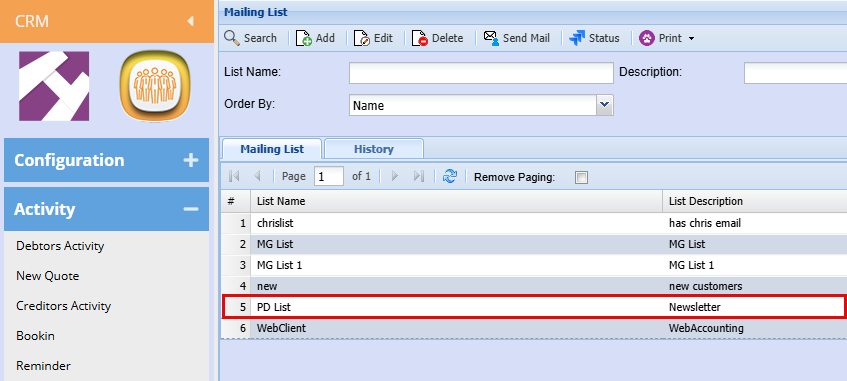
From here you can double click to open the list to make any changes needed.
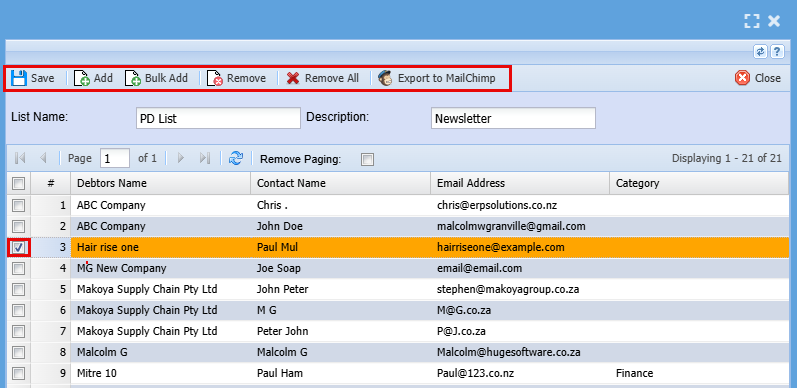
| Save | Click Save to save any changes made |
| Add | Click Add to add a contact that may have been missed |
| Bulk Add | Click Bulk Add to add a bulk amount of Contact to the mailing list (Maybe from a different Contact Type or Category.) |
| Remove | Highlight the line you want to remove by clicking on the line and clicking Remove. |
| Remove All | Click Remove All if you want to delete all contacts in the mailing list |
| Export to Mail Chimp | Click Export to Mail chimp to create this mail list in Mail Chimp. |
Bulk Add
You can add an Email mailing list in bulk or by group like all debtors or creditors.
- Click "Bulk Add" and the below screen will open
- By using the filters, you can create a quick mailing list
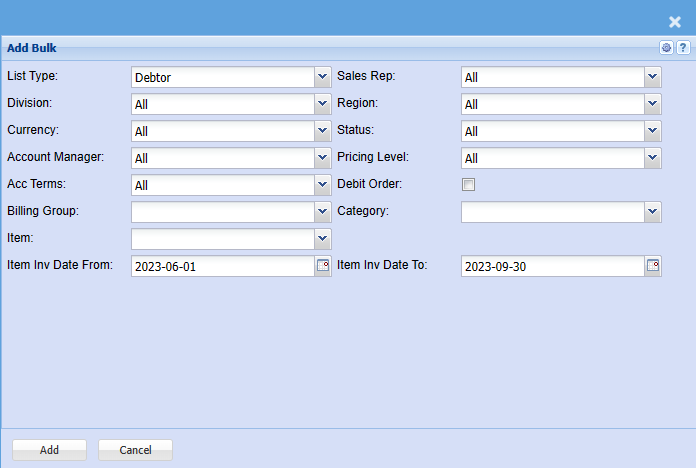
| List Type |
Select the list type you would like to add from (Debtors, Prospect, Opportunities) |
| Division | If you have set up divisions for your debtors, you can pull the report for all your debtors or you can select a specific Division from the drop-down menu. |
| Currency | If you are using multi-currency you can select it here |
| Account Manager | You can pull the report for all your debtors, or you can select a specific Account manager from the drop-down menu if you have set up Account Managers for your debtors. |
| Acc Terms | You can filter for specific Account Terms (30 Days, 60 Days, 90 Days etc.) |
| Billing Group | If you have billing groups like, Subscriptions, you can pull a report for these specific groups, or you can pull a report that will include all transactions. |
| Item | You can filter for Debtors/Customers who have purchased a specific inventory item |
| Item Inv Date From / Item Inv Date to | You can select the date range you want to filter for of a specific inventory item that has been purchased |
| Sales Rep | If you want to run a report by a specific sales rep, then you will need to select the sales rep on the drop-down menu. If you leave the sales rep on all the report will run by all sales rep. |
| Region | You can pull the report for all your debtors, or you can select a specific Region from the drop-down menu if you have set up Regions for your debtors. |
| Status | If you select all the report will pull all statuses. If you want to view report by status, select the status on the drop-down menu |
| Pricing Level | You can filter for specific Pricing Levels (In Season, Out of Season, Specials) |
| Debit Order | Tick the box if you would like to filter for Debit orders |
| Category | To generate the report, the user has to select the category from the drop-down menu |