BCM Activity
- Creditors Dashboard Menu
- Creditors Journal Transactions Menu
- Creditors Journal Transaction Search
- Add Creditor Journal Transaction
- Creditors Journal Xero Processing
- Creditors Payment Menu
- Creditors Cashbooks Menu
- Stock Order Menu
- Purchase Orders Menu
- Purchase Order Overview
- Purchase Order Search
- Purchase Order Reminder Function
- Purchase Order Processing
- Purchase Order MOQ
- Reverting Purchase Orders
- Approval Levels Setup
- Purchase Order Job Allocations
- PO Receiving Stock- Barcode Scan
- Purchase Order Authorisation
- Purchase Order Shipping Tab
- Adding Purchase Order
- Purchase Order Serial Number Import
- Serial Number Import (Purchase Order)
- Receive Stock Menu
- Delivery Note Processing Menu
- Goods Received Notes (GRV) Menu
- Goods Received Note (GRV) Search
- Edit Goods Received Note
- Goods Received Voucher (GRV) Process
- GRV Attachments
- Prompt For Post
- Outsourcing Work
- GRV with Importation Split
- GRV posting detail per line on GL
- New GRV Importation Split Manual Scansku
- GRV with Importation Split from Purchase Order (Generic)
- GRV lines import
- Serial Number Import (GRV)
- Stock Return Notes Menu
- Creditors Allocations Menu
- Creditors Allocation Decimal Journal Menu
- Creditor Interactions Menu
- Creditors Template List Menu
- Creditors Interest charge Menu
- Request For Quote (RFQ)
- Supplier Processes
Creditors Dashboard Menu
Creditors Dashboard
Video training manual 2016 - Click Here
Dashboard Tab
Clicking on Show Graph Button will show you the Bar Graph
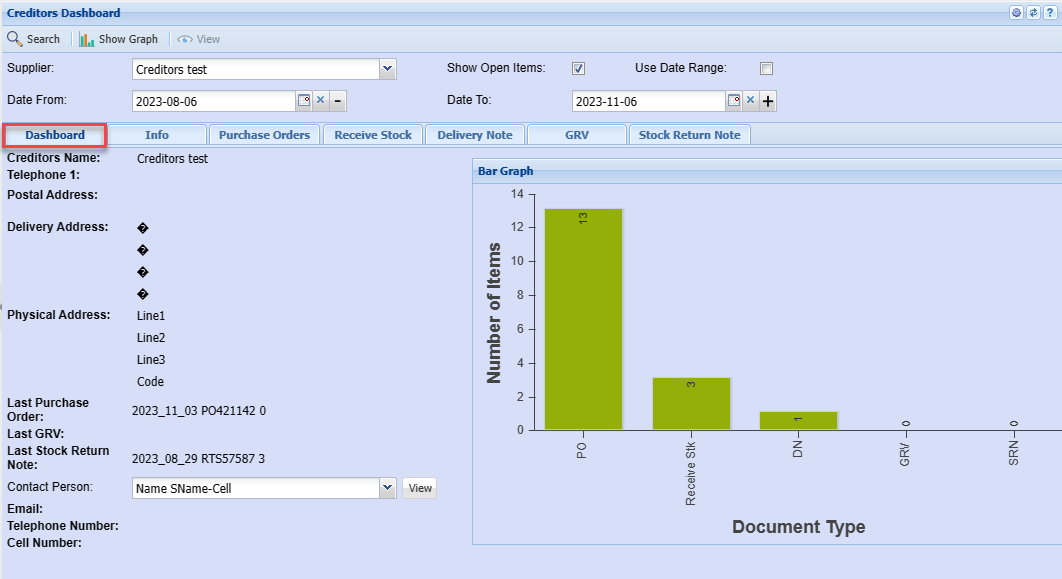
| Supplier | |
| Show Open Items Tick | |
| Use Date Range Tick | |
| Date From | |
| Date To |
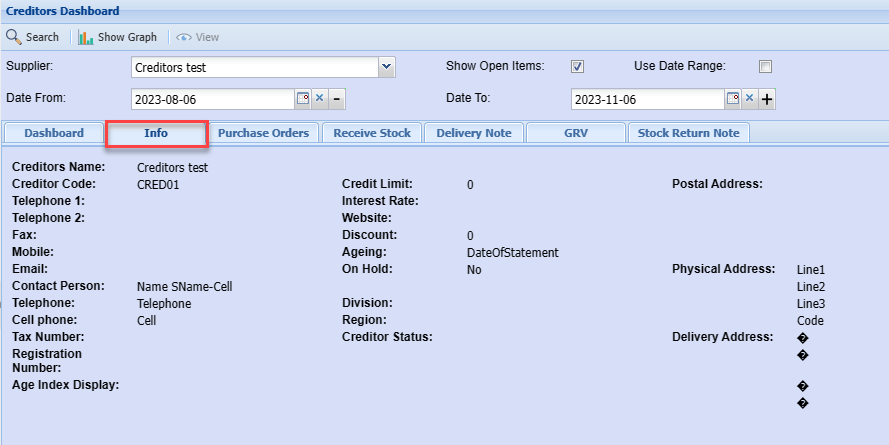
Info Tab
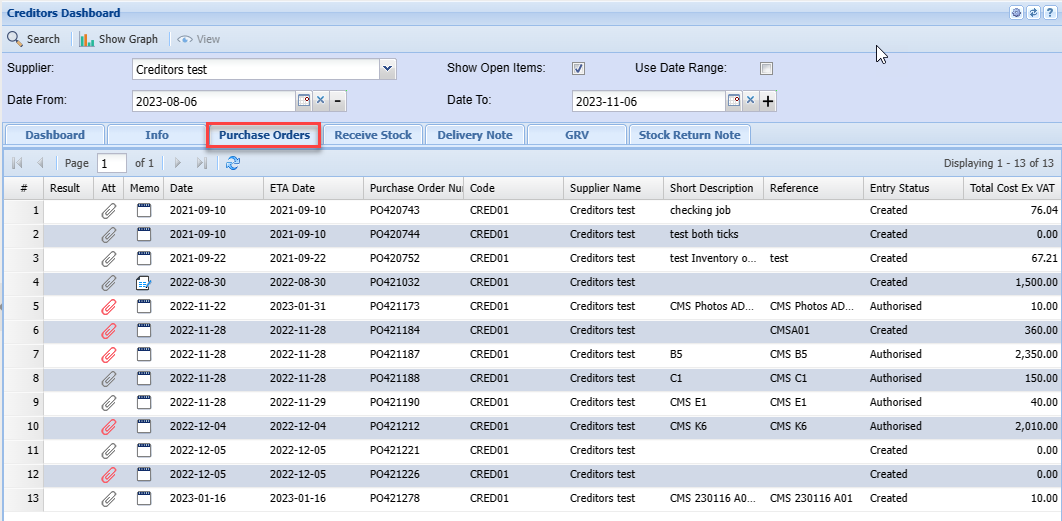
Purchase Orders Tab
Receive Stock Tab
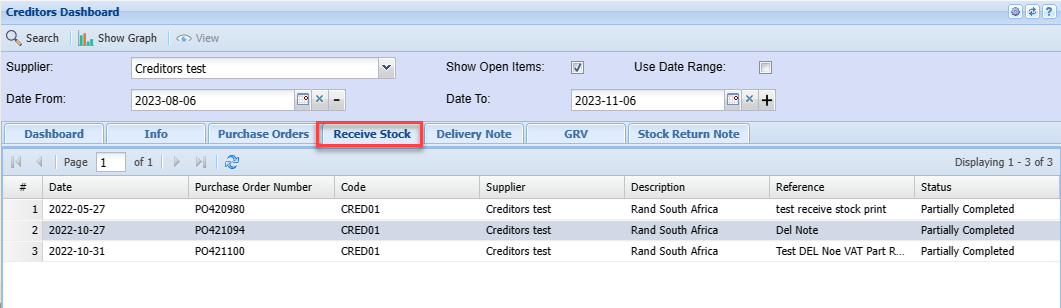
Delivery Note Tab
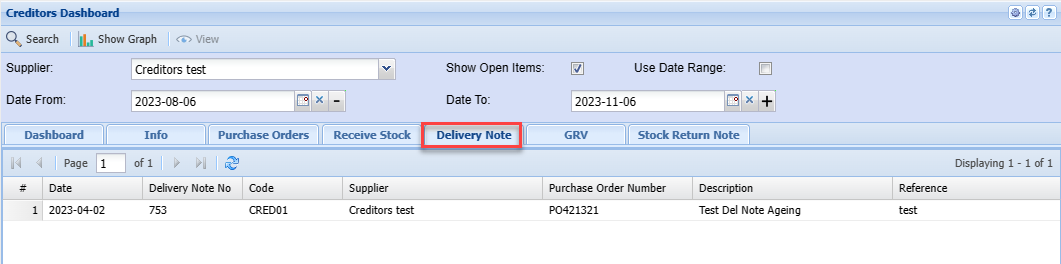
GRV Tab
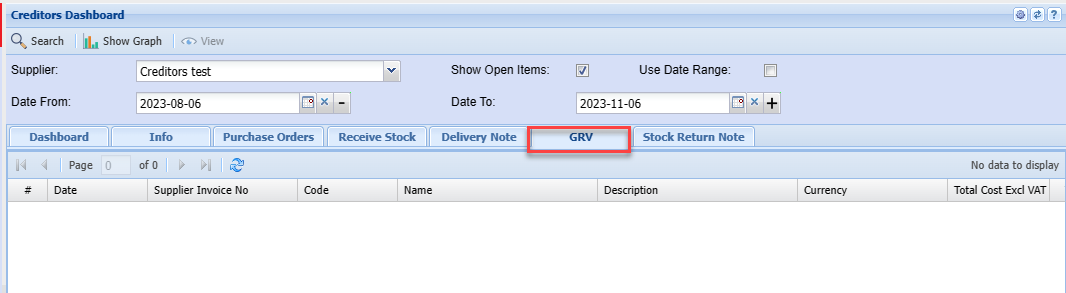
Stock Return Note Tab
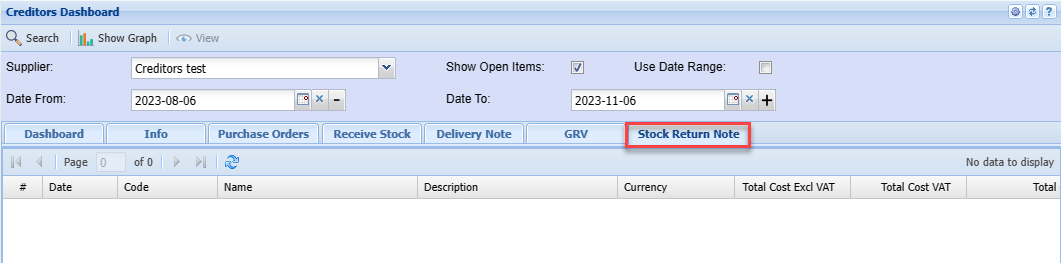
Creditors Journal Transactions Menu
Creditors Journal Transaction Search
Click on Creditors Module> Activity> Creditors Journal
Always click on search to avoid duplication of transactions.

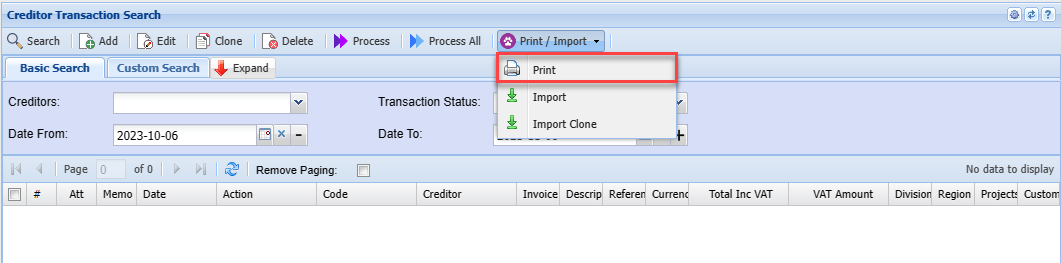
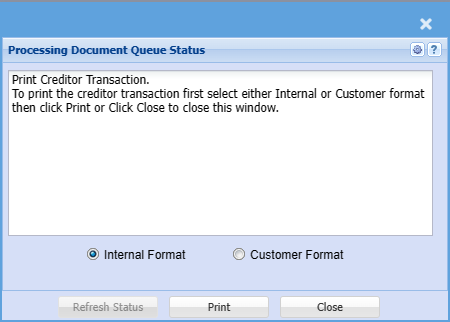
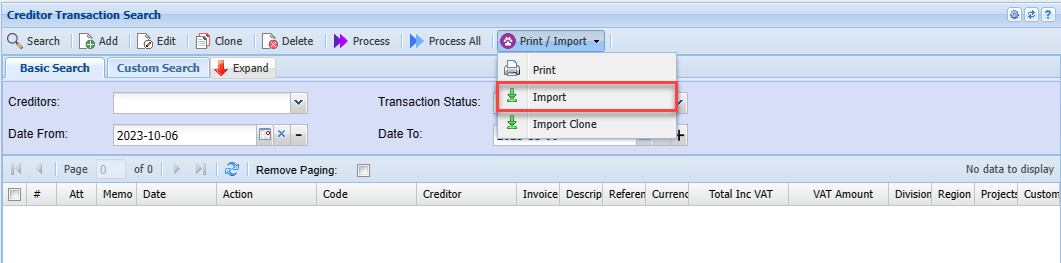
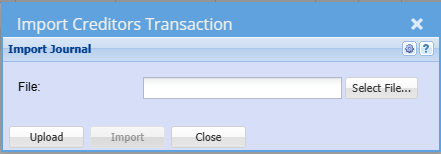
Import
Print Clone
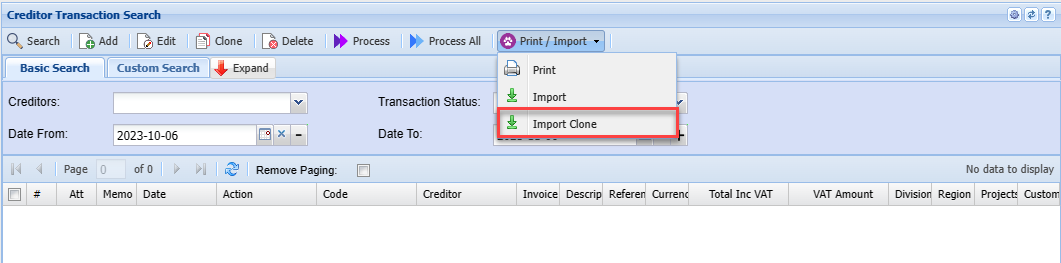
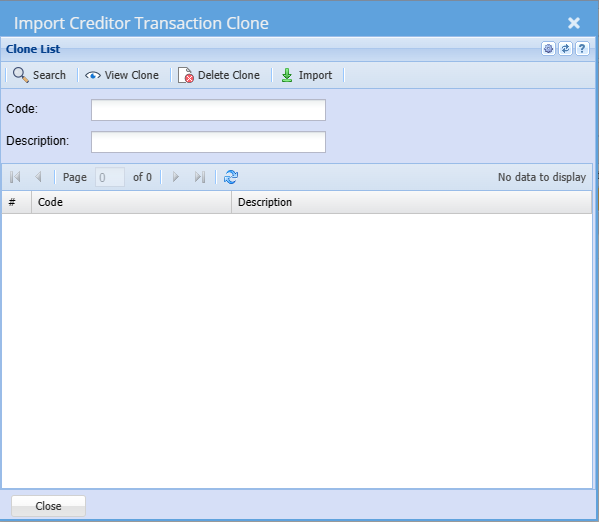
| Search | |
| View Clone | |
| Delete Clone | |
| Import |
Add Creditor Journal Transaction

| Attachments | |
| Memo | |
| Clone | |
| Create Template | |
| Custom Fields | |
| Create Reminder |
Note: each action listed has a corresponding Contra GL Account set on the system as a default.
The system can be set to allow the user to change default contra account.

| Action | Select the action from the drop-down box. e.g. Creditors Journal Credit |
| Date | Enter the transaction date for the journal. |
| Creditor | Select a Creditor for the Short Search – just type in part of the code or name and hit enter on the keyboard and select the Debtor. e.g. STO001 |
| Customer Link | |
| Currency | |
| Amount Inc VAT | Enter the amount including VAT the system will automatically work out the Tax Amount and the Amount Excluding VAT. |
| VAT Account | |
| Description | Add the Description – e.g. GRV - Telkom |
| Additional Comment | Add in additional comments if required. |
| Outstanding Balance | |
| Reference | Enter a Reference e.g. Telkom |
| Supplier Inv. No. | Enter Supplier Invoice Number. e.g. INV1234 (if applicable) |
| Exchange Rate | |
| Importation VAT | |
| VAT Type | Select the VAT Type on the drop-down Box e.g. GRV VAT |
Click on Next Arrow
If you are categorizing and allocating entries to Regions and Division, select the respective option from the drop down
If not allocating transaction to Divisions/Regions then you can leave this Blank
The Contra Transaction box allows for contra journals to be created and processed at the same time
Contra Journals are typically used in the case of intercompany accounts or where you have a supplier that happens to also be a Debtor on the system and you simply offset the accounts against one another.

Cost Centres
| Region | |
| Project | |
| Job Allocation | |
| Division | |
| Track It | |
|
Job Service Item |
Contra Transaction
| Contra Transaction Tick | Once this tick is on it will allow you to see the greyed-out section |
| Contra Debtor | |
| Contra Creditor |
Branch
| Branch |
Click Next
If the system is set to allow changing the contra GL account, you can enter the required GL account and select or click the drop-down arrow and search for the required account.

Split Account
If the transaction has to be split to various Contra accounts, you can click on the Split Lines Tick box. Ten click the Add in the centre of the screen and add the respective Contra GL Accounts with the respective amounts.
Tick this box only if the entry is being split.
Alternatively, click Next.

This screen allows the user to Allocate the entry to a specific transaction(s)

Tick the relevant transaction and then click the Save Allocation Button
This saves the User from having to do the Allocations separately once the journal is processed.
Click Next

| Search | |
| Allocate All | |
| Unallocate All | |
| Save Allocation |
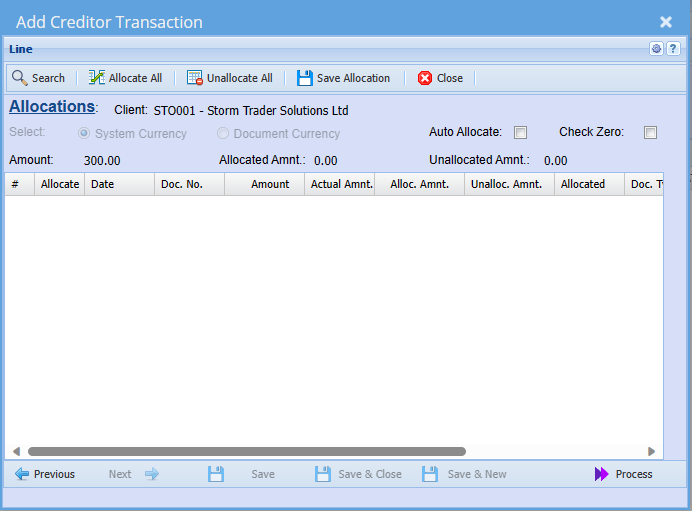
When ready, click the Process button.
This will then process the journal and post the relevant entries
A Pop-up message will occur with the Journal number if successfully processed, alternatively the message will display any error found.

Creditors Journal Xero Processing
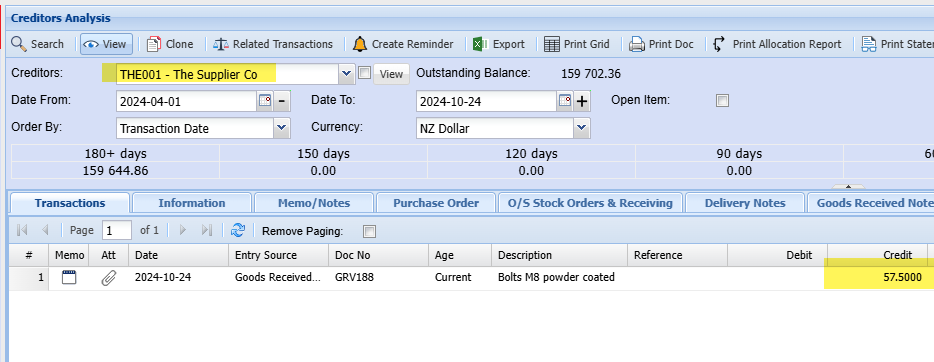
Creditors journal can be processed to Xero for Invoices and credit Notes.
This will create a Bill in Xero with a line item.
Setting up for Xero processing.
- Setup a custom item for Xero item line for Bill
- Setup GL Links for Creditors and Debtors journals
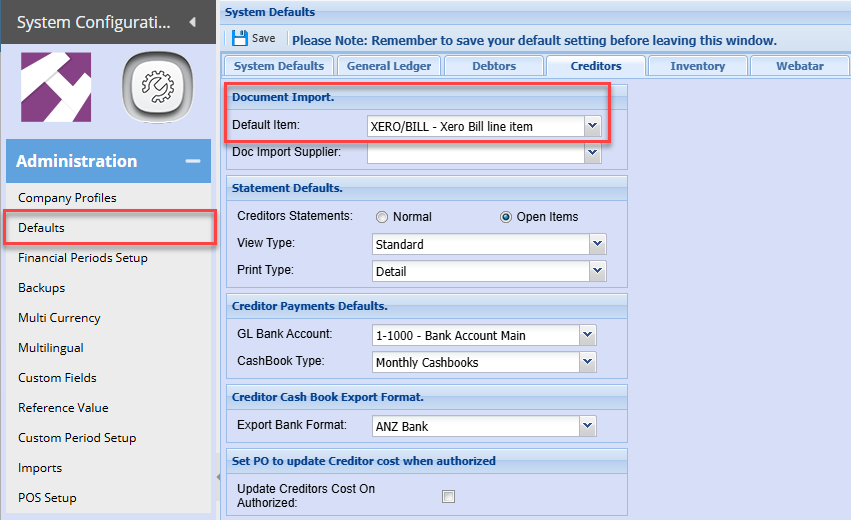
Setup a custom item for Xero
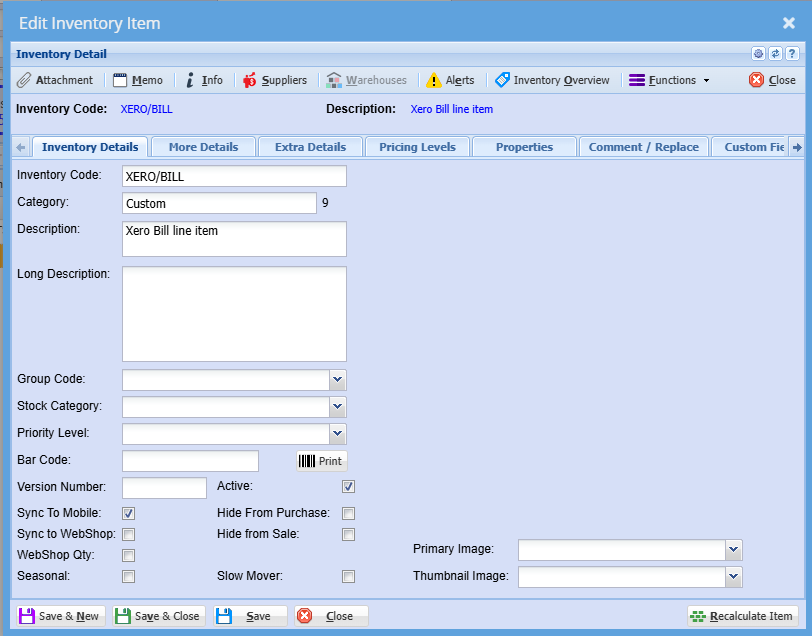
Set the custom item in System Defaults
This setting will be used in the GRV importation split lines.
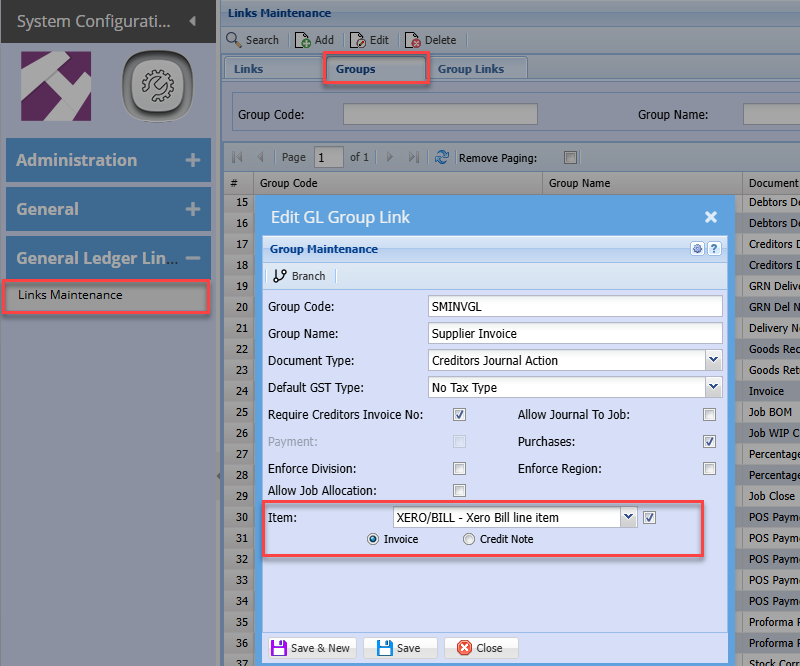
GL Links setup
Setup the Supplier Invoice and credit note
The tick next to the Xero/Bill item is to set to active if you want the Journal to be posted to Xero. If the tick is OFF then the Journal will NOT be sent to Xero.
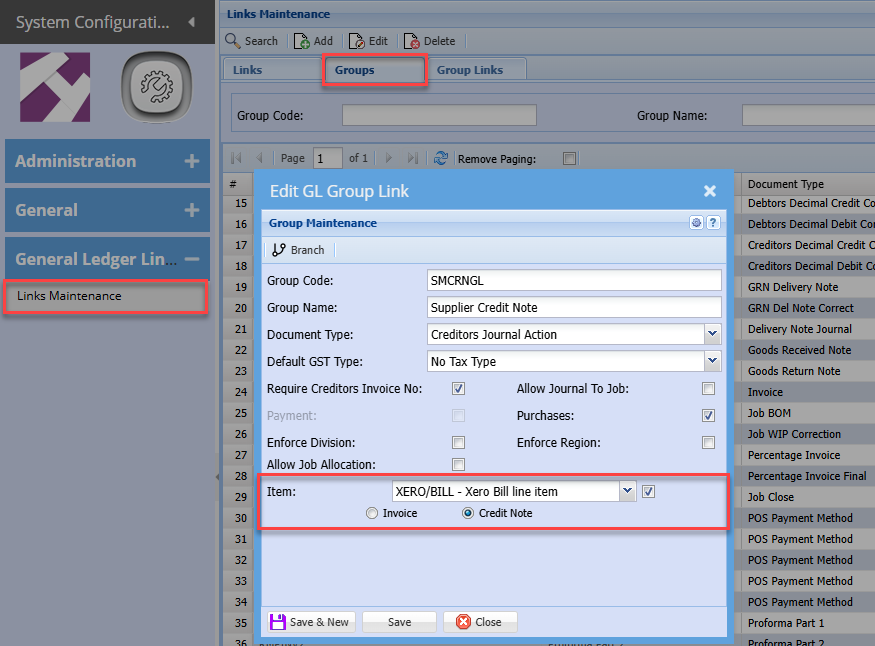
Set the Credit note side
Creditors Payment Menu
Creditors Payment Search
Video manual 2020 - Click Here
Creditors Module > Activity > Creditors Payment
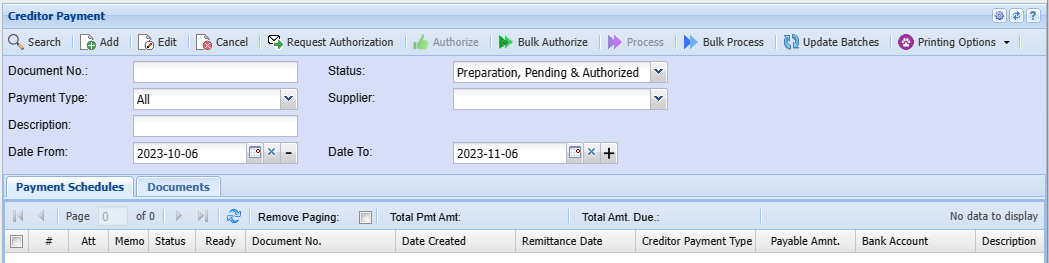
| Search | |
| Add | |
| Edit | |
| Cancel | |
| Request Authorization | |
| Authorize | |
| Bulk Authorize | |
| Process | |
| Bulk Process | |
| Update Batches |
Printing Options

| Print Creditor Payment | |
| Print Grid | |
| Print Remittance | |
| Bulk Remittance Email | |
| Bulk Print |
Documents Tab
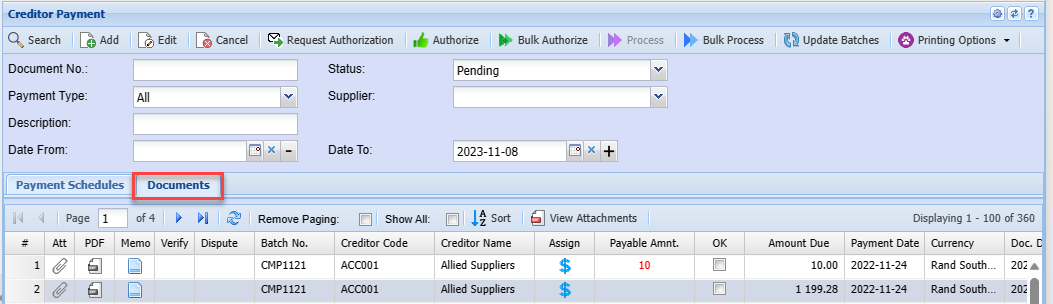
| Remove Paging Tick | |
| Show All Tick | |
| Sort |
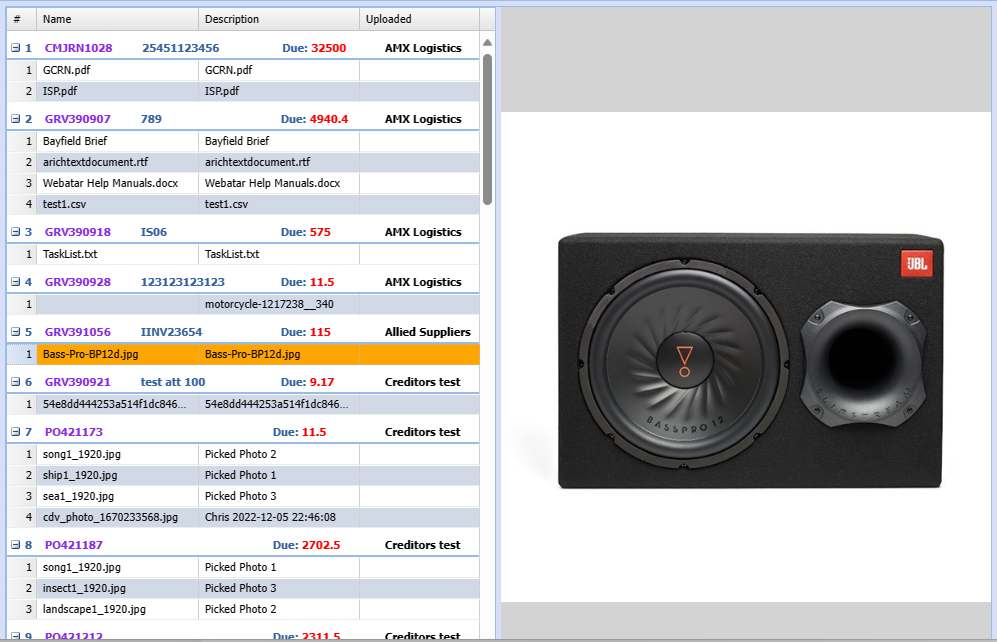
View Attachments
Allows you to view all attachments.

Add Creditor Payment
Click on Creditors Module> Activity> Creditor Payment Search

| Authorize | |
| Process | |
| Attachment | |
| Memo Note | |
| View Document | |
| Creditor History | |
| Add New Documents | |
| View Attachments |
Printing Options Dropdown

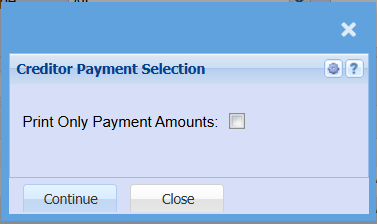
| Print Payment Doc | |
| Print Documents | |
| Print Remittance |
Print Payment Doc
All Creditors
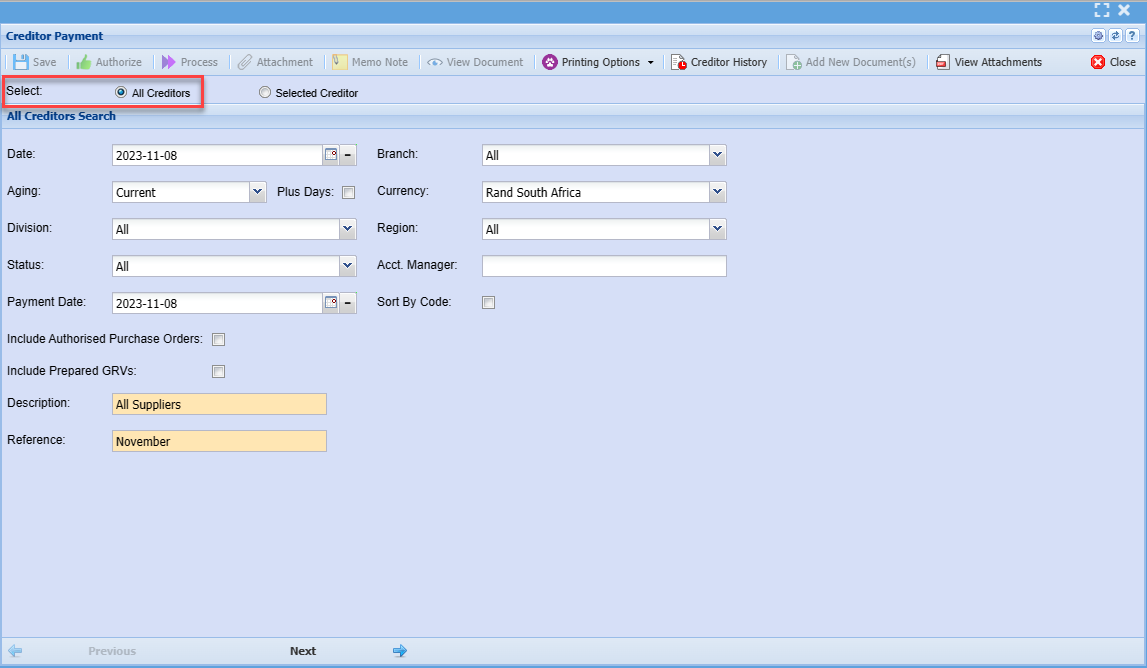
| Date | |
| Branch | |
| Aging | |
| Plus Days | |
| Currency | |
| Division | |
| Region | |
| Status | |
| Acct. Manager | |
| Payment Date | |
| Sort By Code | |
| Include Authorised Purchase Orders | |
| Include Prepared GRVs | |
| Description | |
| Reference |
Selected Creditor
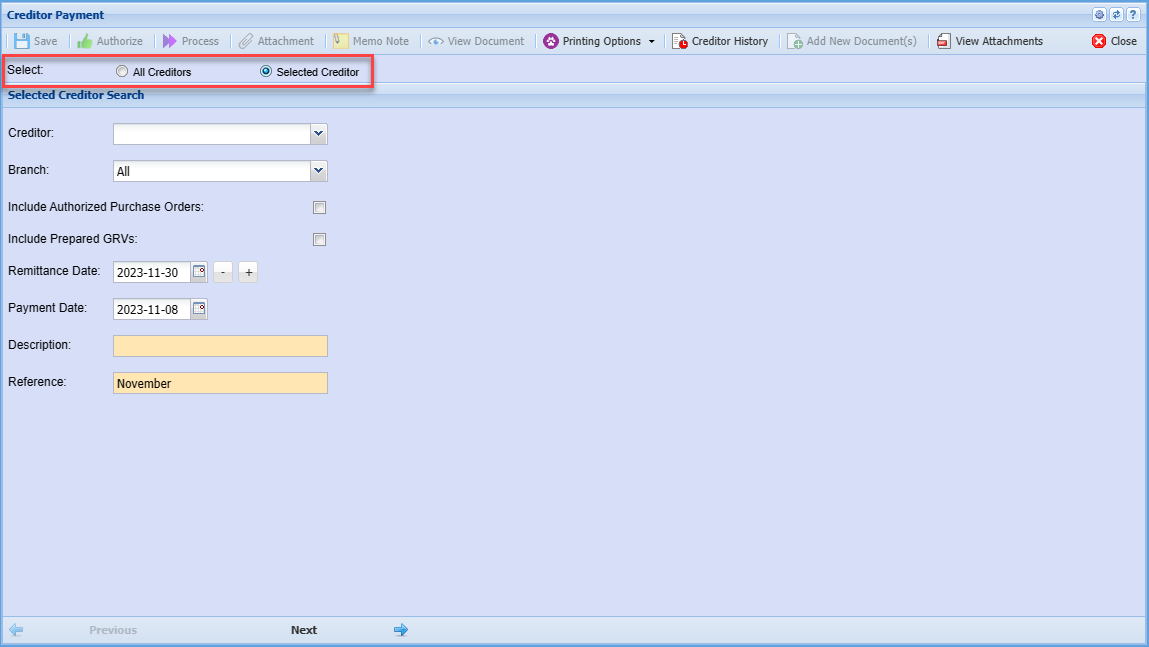
| Creditor | |
| Branch | |
| Include Authorized Purchase Orders Tick | |
| Include Prepared GRVs Tick | |
| Remittance Date | |
| Payment Date | |
| Description | |
| Reference |
Click Next
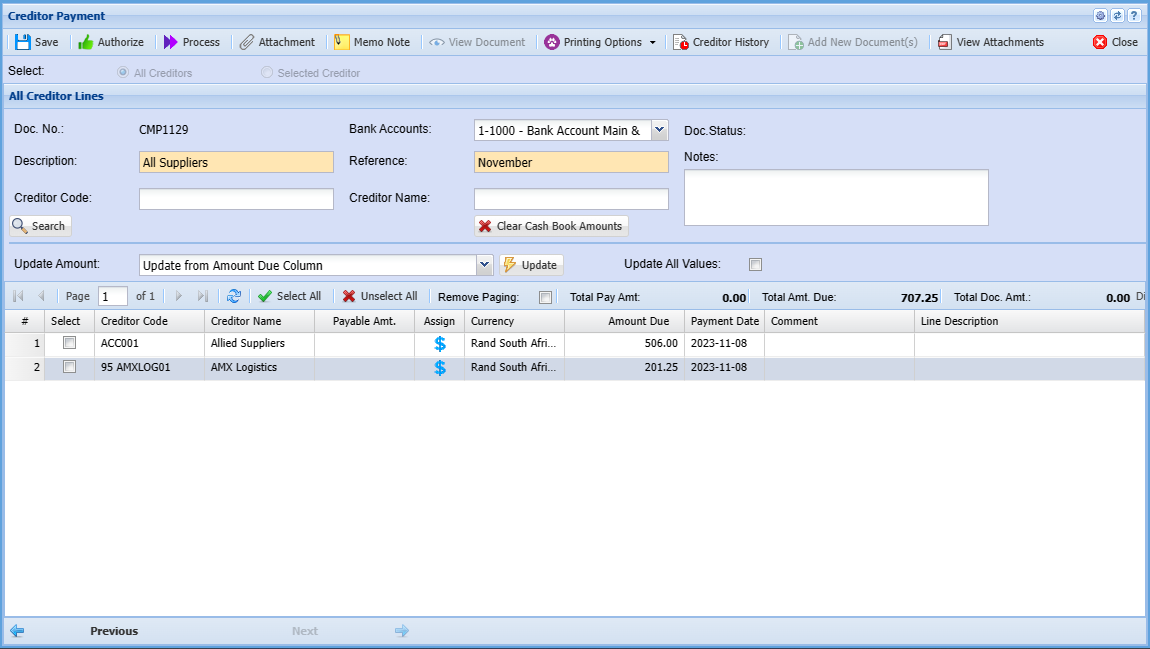
| Doc. No. |
|
| Description | |
| Creditor Code | |
| Bank Accounts | |
| Reference | |
| Creditor Name | |
| Doc. Status | |
| Notes | |
| Clear Cash Book Amounts | |
| Update | |
| Update All Values |
Payment Verify Lines
Supplier Payments batch includes a verify data to ensure that all lines are valid and checks for any changes
| 1 | Removes invoice lines that are already fully allocated |
| 2 | Updates payment balances due on supplier invoices |
| 3 | Updates allocation comments which are blank on the payment batch |
.png)
Force New Cashbook
The system allows one to create multiple cash book payments for the same day but separate them as individual cashbooks.
If you put the tick on for “force new cash book” then this will not add to existing cash book but create new cash books.
This will not work on bulk process batches.
This will sort out issues where you want to create multiple payment cash books for the same day.
.png)
Add New Document(s)
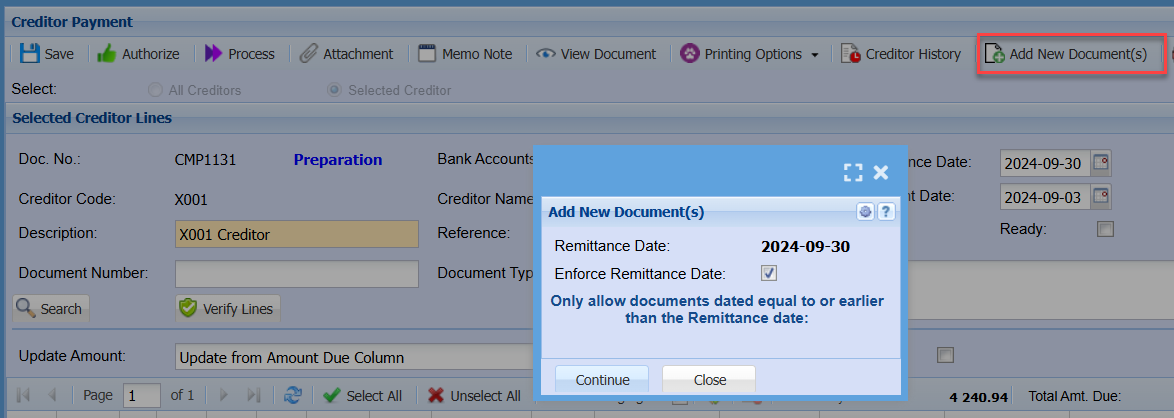
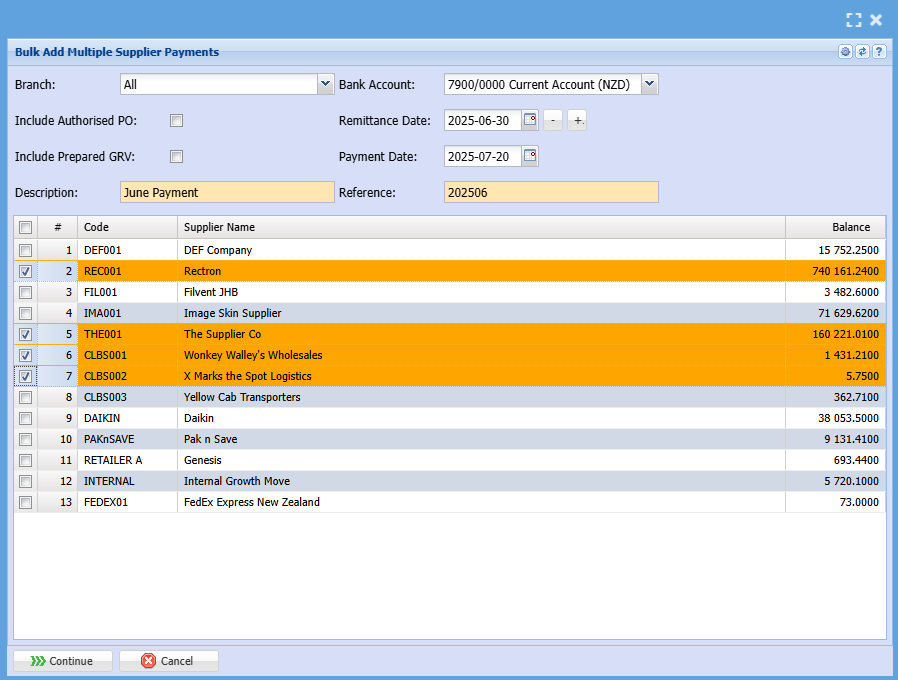
Bulk Add Creditor Payments
This function allows one to add multiple suppliers for payments
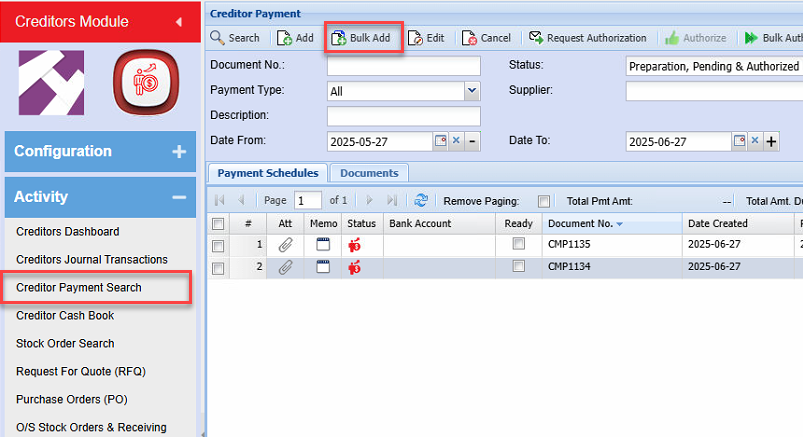
Select options for suppliers and then tick suppliers for payments
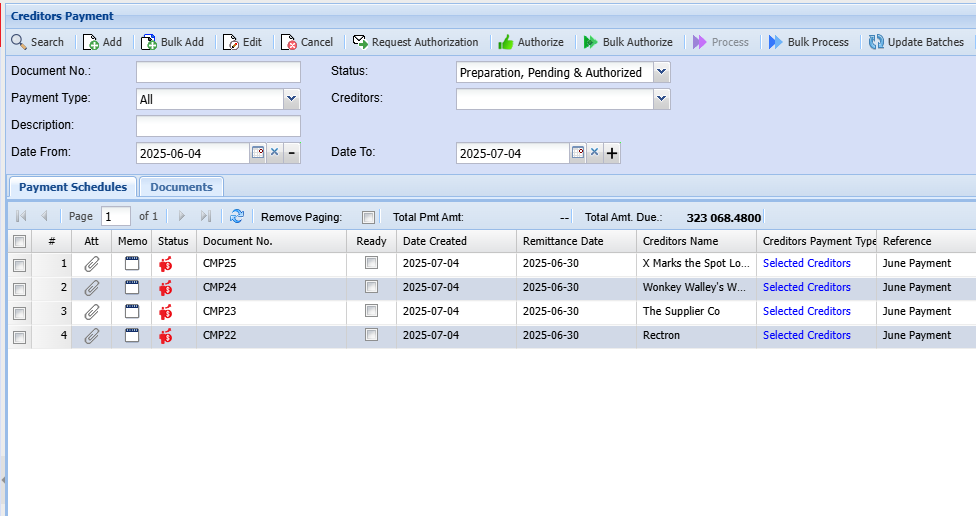
Creditors payments created
Creditors Cashbooks Menu
Creditors Cashbook Search
Video training manual 2016 - Click Here
Creditors cashbook is used to control payments to creditors.
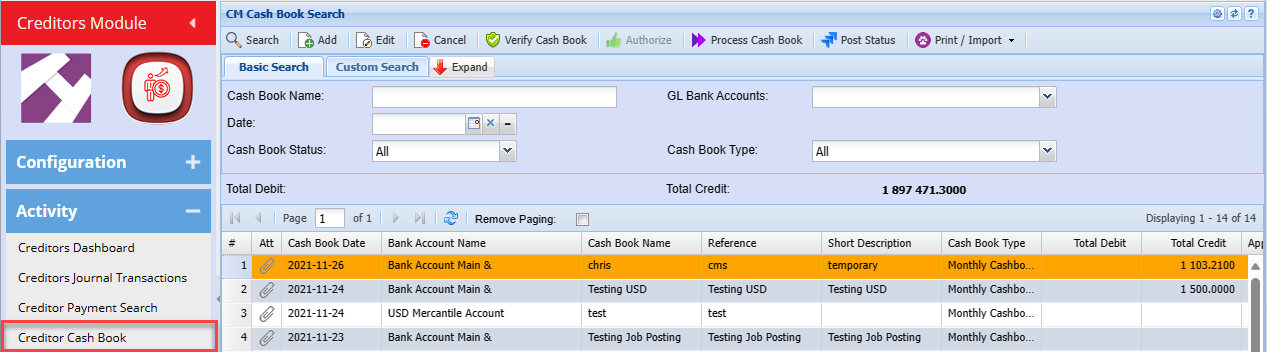
| Search | |
| Add | |
| Edit | |
| Cancel | |
| Verify Cash Book | |
| Authorize | |
| Process Cash Book | |
| Post Status |
Print/Import Drop Down

| Upload Cashbook | |
| Import Cash Book | |
| Export Cash Book |
Basic Search

| Cash Book Name | |
| Date | |
| Cash Book Status | |
| GL Bank Accounts | |
| Cash Book Type |
Custom Search

| Category |
Add Creditors Cashbook
Click Add to create a new cashbook

| Attachments | |
| Create Reminder | |
| Allocate | |
| Insert Template | |
| Save As Template | |
| Export Cash Book |
Cash Book Details

| Cash Book Number | |
| Cash Book Date | |
| Cash Book Name | |
| Reference | |
| Branch | |
| Copy Reference | |
| Copy Previous Line Description | |
| Increment Reference | |
| Bank Accounts | |
| Cash Book Type | |
| Short Description | |
| Long Description |
Cash Book Line
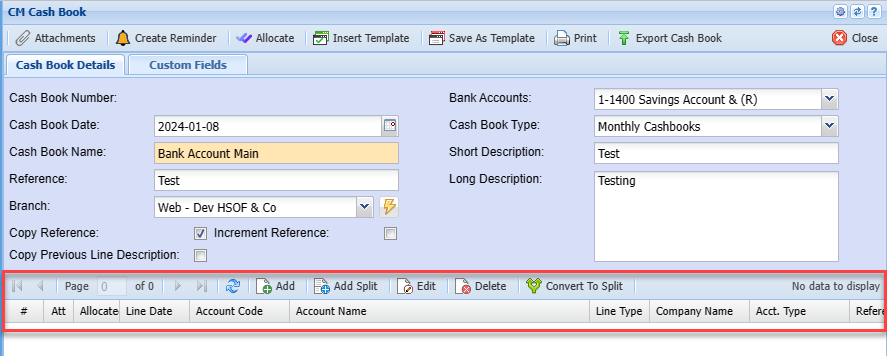
| Add | |
| Add Split | |
| Edit | |
| Delete | |
| Convert To Split |
Cash Book Adding Line
Creditors payments can be captured separately in the creditor's cashbook
this is ideal for Creditors Clerks who deal with creditors only

| Attachments | |
| Search | |
| Allocate All | |
| Unallocated Amnt | |
| Save Allocations |
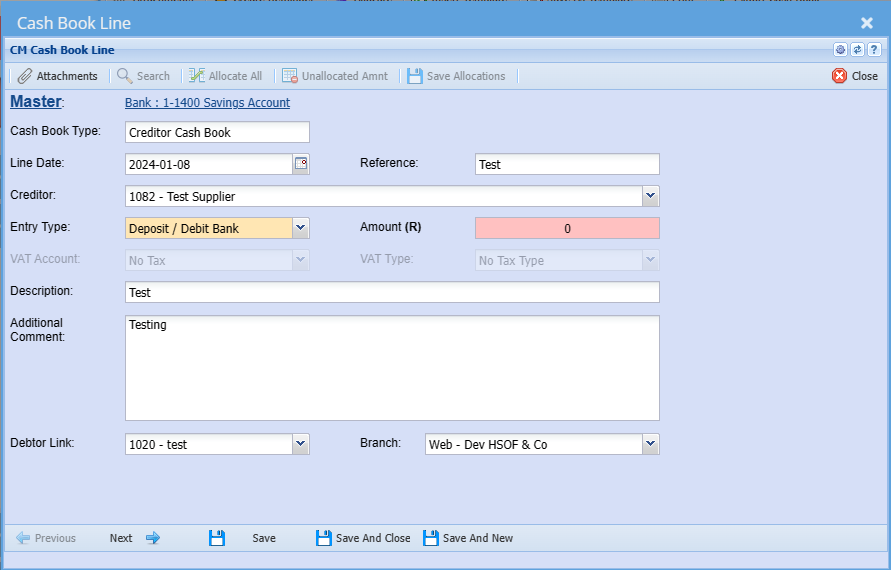
| Cash Book Type | |
| Line Date | Transaction date |
| Reference | Add reference |
| Creditor | Select Creditor being paid |
| Entry Type | Entry Type will be Payment (Money going out of the selected bank account) |
| Amount | The Amount being paid |
| VAT Account | |
| VAT Type | |
| Description | Enter Description for this transaction |
| Additional Comment | |
| Debtor Link | |
| Branch |
In the next window you can select the divisions , GL Group, Projects and Add the discount function if applicable
When you tick the discount box – you will be required to add the transaction action
You can select from the drop down list
Then click Next to go to the Allocations Window or Alternatively Save and close
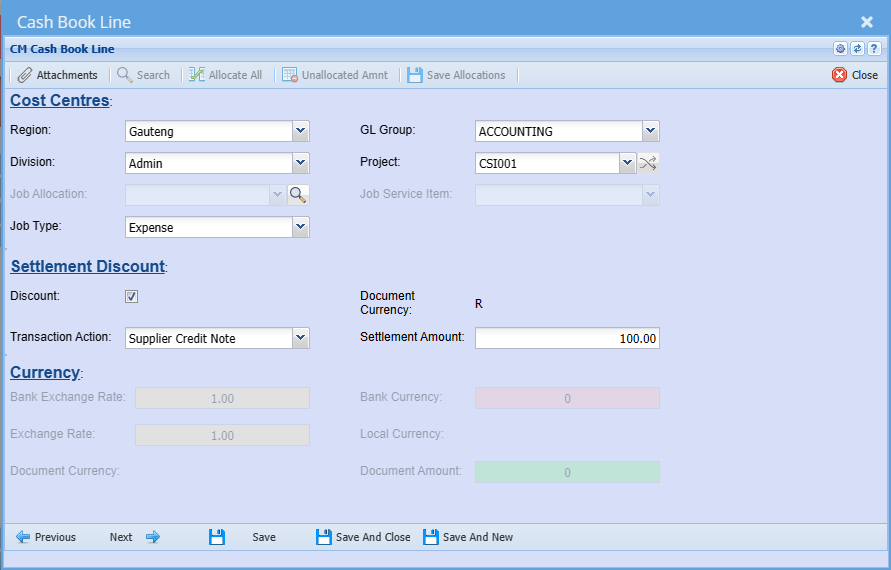
| Cost Centres: | |
| Region | |
| Division | |
| Job Allocation | |
| Job Type | |
| GL Group | |
| Project | |
| Job Service Item | |
| Settlement Discount: | |
| Discount | |
| Transaction Action | |
| Document Currency | |
| Settlement Amount | |
| Currency: | |
| Bank Exchange Rate | |
| Exchange Rate | |
| Document Currency | |
| Bank Currency | |
| Local Currency | |
| Document Amount |
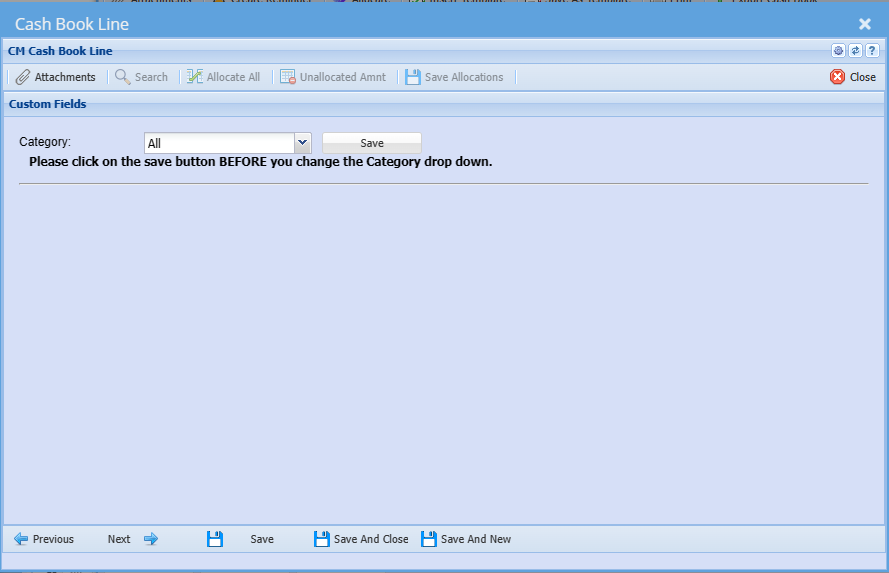
| Category |
Add Split
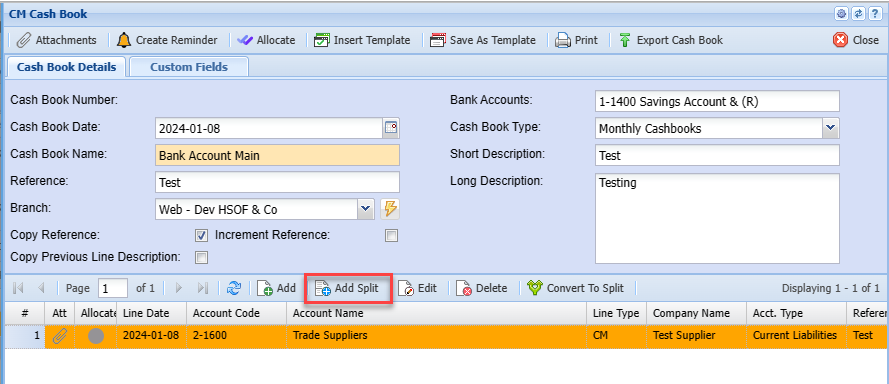

| Create Reminder | |
| Attachments | |
| Import Split Lines | |
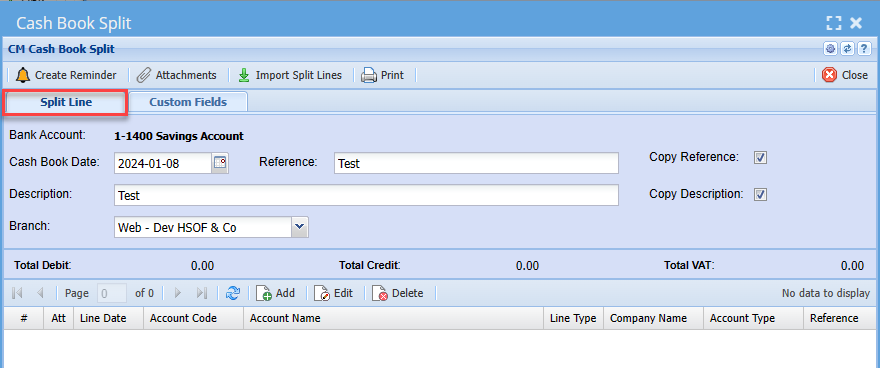
| Bank Account | |
| Cash Book Date | |
| Reference | |
| Description | |
| Branch | |
| Copy Reference Tick | |
| Copy Description Tick |
Adding New Line in Cash Book Split
After Clicking Add
Fill in the information on the first 2 pages same as in Cash Book Adding Line on the 3rd page in Cash Book Split you can Seach and Allocate.
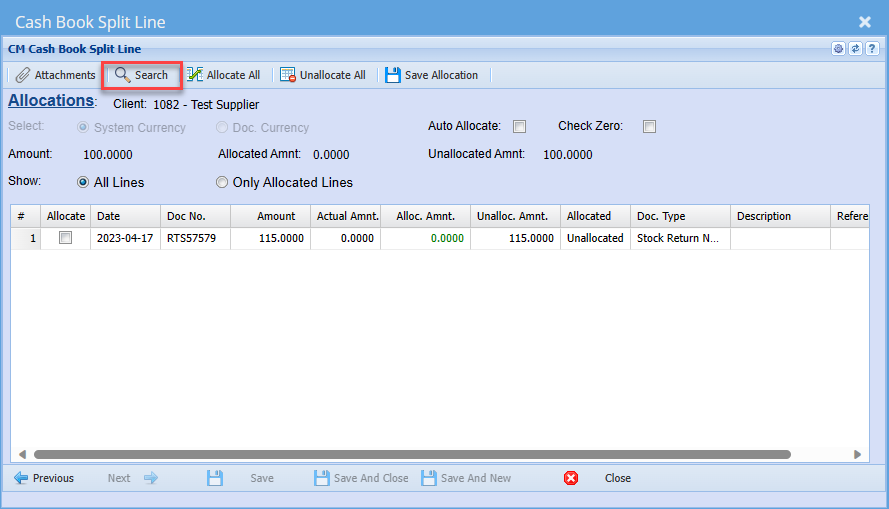
A list of available transactions against this client will be listed
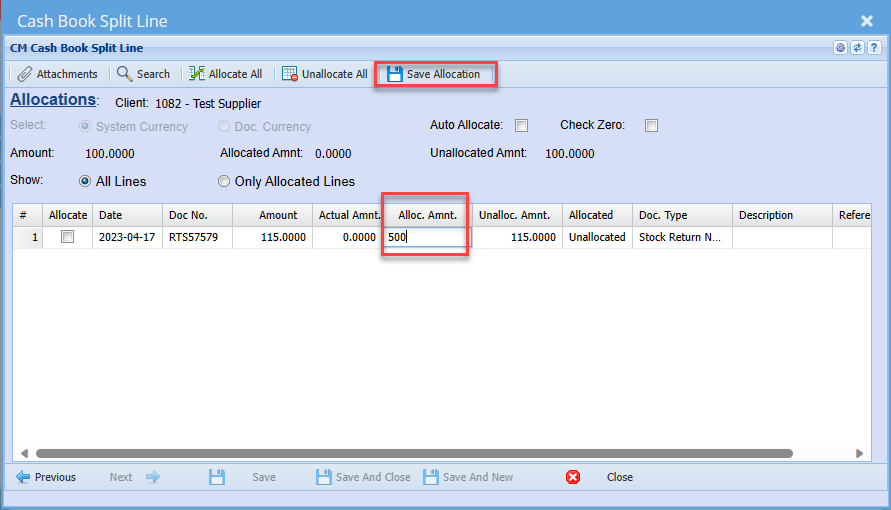
Select one that you want to allocate this captured payment to and add the amount
You can manually type in the amount
When you have entered the amount remember to save Allocations before closing this window
The Message below will come up after saving
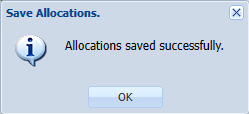
The cashbook can be authorized and processed
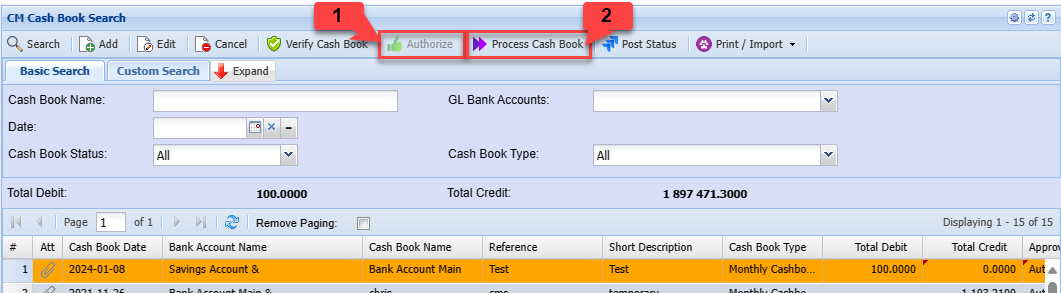
Export Bank File
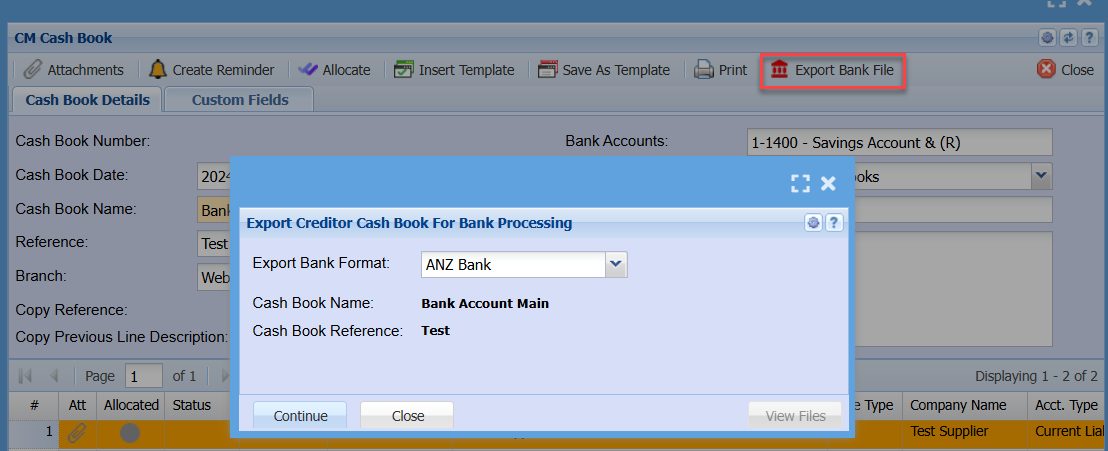
Clicking on the View Files button
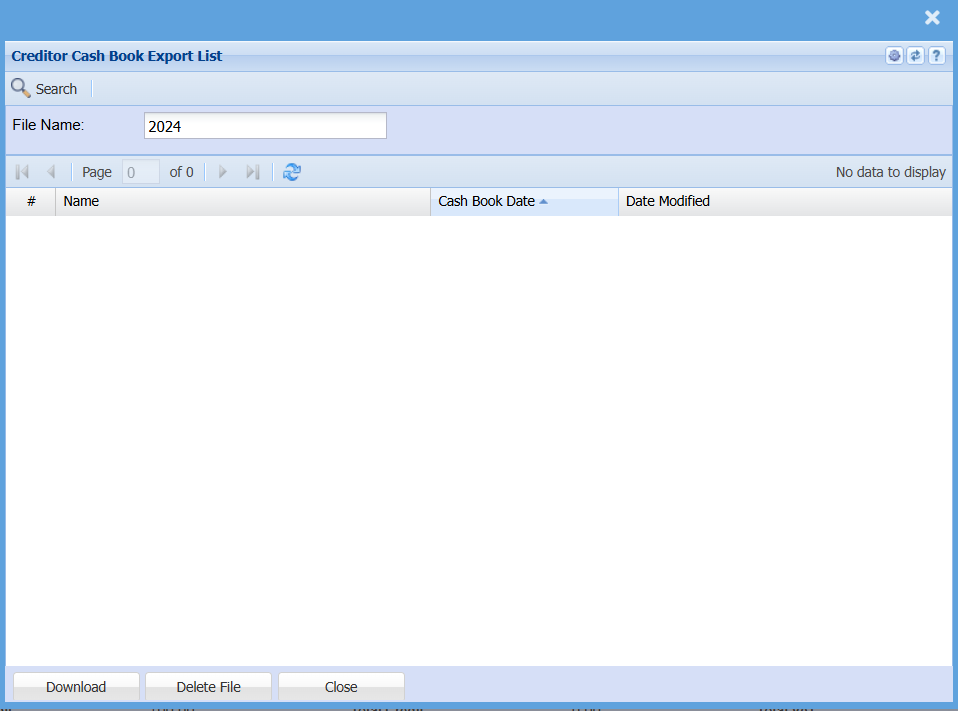
Bank Payment Schedule Export
Bulk supplier payment Export bank file
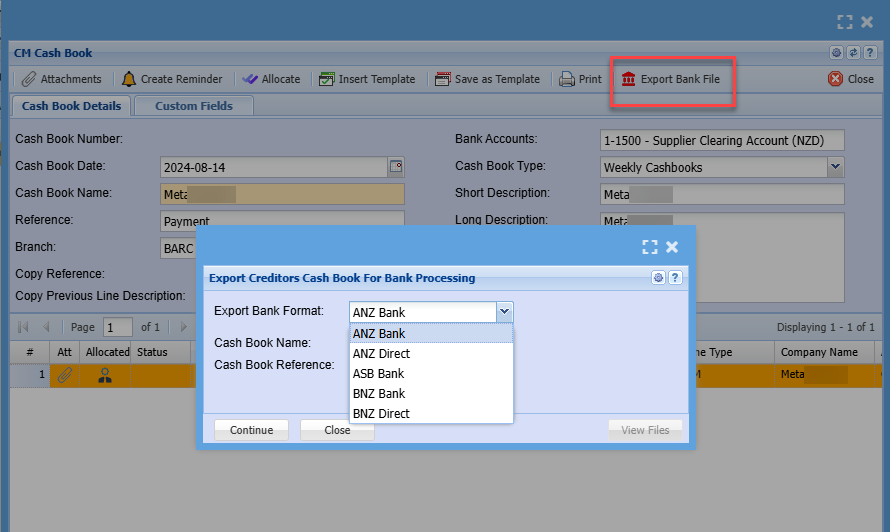
Supported banks
- ANZ Bank
- ANZ Direct
- ASB Bank
- BNZ Bank
- BNZ Direct
Bank export files have specific algorithms which check for any changes to bank accounts and amounts. This is to ensure that files are not tampered with, so be careful on opening the file to make any changes. This will create the file invalid.
Reference fields
Setup reference fields for suppliers for bank references
| A | Supplier code used |
| B | Suppler name |
| C | Supplier account number |
| D | Beneficiary reference |
Some banks have limits on beneficiary reference, please check how many characters are allowed
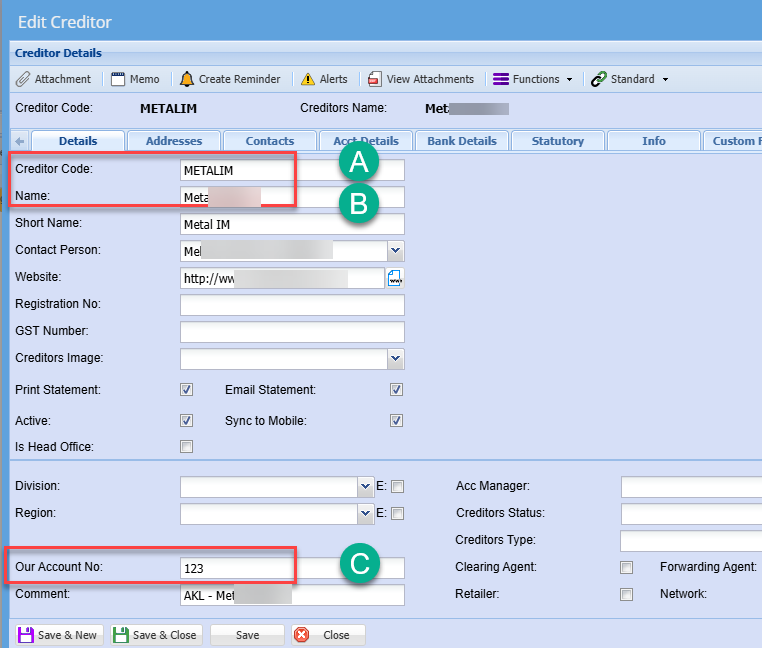
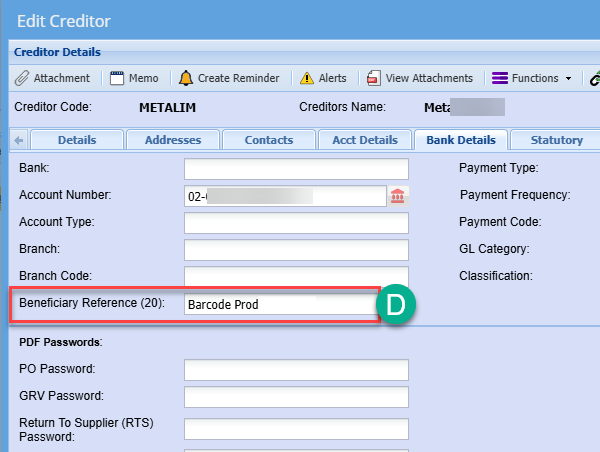
ANZ Bank and ANZ Direct reference fields
After the bank file has been imported these are the fields that will show.
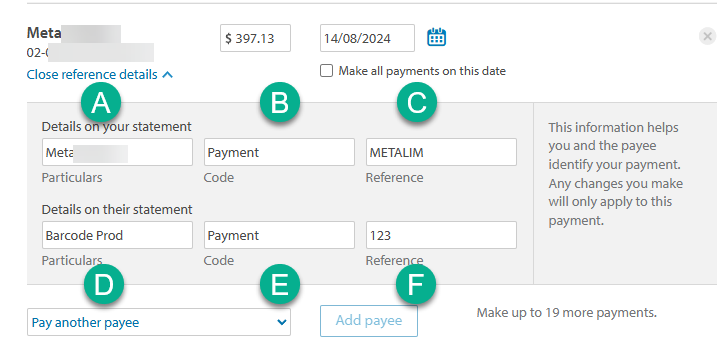
| A | Supplier Name ((Limited to 12 characters) |
| B | Hardcoded to say Payment |
| C | Supplier Code |
| D | Beneficiary reference (Limited to 12 characters) |
| E | Hardcoded to say Payment |
| F | Our Account Number (supplier account number) |
Bank export file is a txt file
1 to 9 are positions in the bank file

Stock Order Menu
Stock Order Search
Creditors Module > Activity > Stock Order Search
Double click on the Stock Order you are wanting to continue working on.
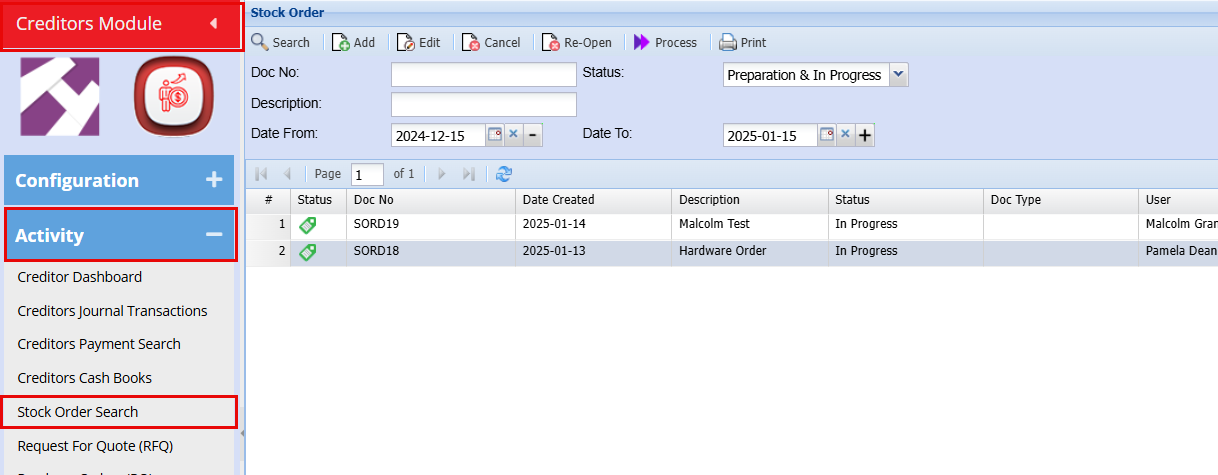
Stock Order Features
Stock Order feature does require a few setups to be in place for optimum use:
|
Default supplier setup on each item |
|
| Minimum, Maximum, Preferred, Reorder levels on each item |
|
| Using Brand / Make setup |
|
| Using Item Group setup |
|
Enter a description that will be used on the Purchase order(s)
Click Save on the top Right
This will activate the Update button
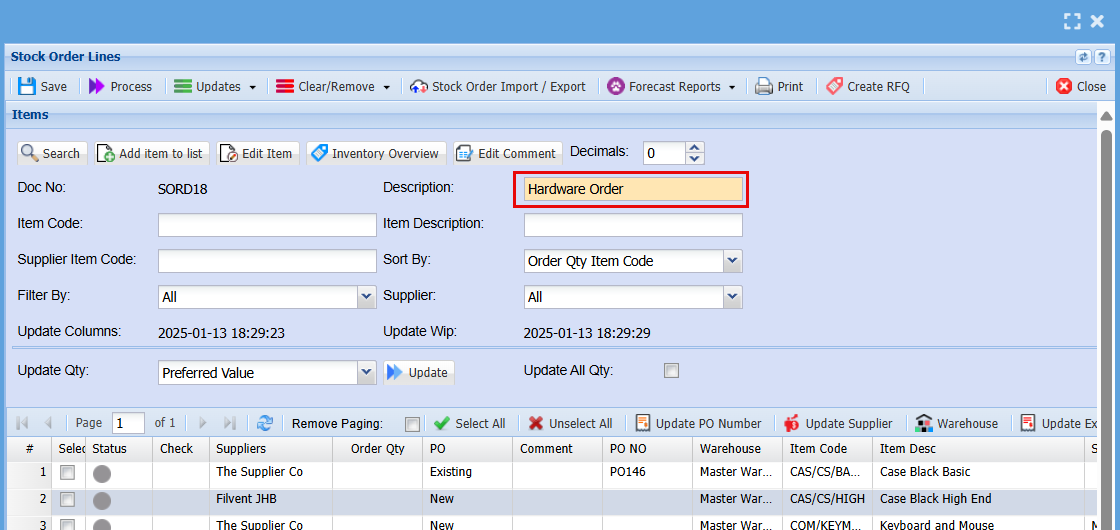
You now need to determine which calculation you wish to apply in order to update the required order quantities for each item.
The order quantities applied to each respective item can be determined from a number of options:
Click the Update Qty drop down to see the list of options:

1. Max Value
Populates the order quantities to equal the Maximum qty as per item setup
2. Preferred Value
Populate the order quantities to equal the Preferred Quantity as per item setup
3. Min Order Qty (MOQ)
Will populate the Order Quantities to equal Minimum order quantity as per item setup.
Note the Minimum quantity and the Minimum order Quantity are different
Minimum quantity is the minimum holding quantity.
Minimum order quantity is the minimum quantity that can be ordered from the supplier.
4. Order to Max + Purchase from on hand
Populates the order quantities to be Item Maximum Qty less Qty on Hand less qty on open Purchase orders
5. Order to Max from on hand
The difference between the maximum quantity and the on hand quantity
6. Order to Preferred from on hand
The difference between the Preferred item Quantity and the on hand quantity
7. Order to Reorder from on hand
8. The difference between the Reorder quantity and the quantity on hand
You can then review the quantities to be ordered
Should you wish to override any of the quantities, click the select box
Then click on the order quantity field
Enter the amended quantity
Once you are satisfied with the quantities to be ordered from supplier, click the Process button to create the Purchase order(s)
Minimum Order Quantity (MOQ) rules
In stock order there is an option for Minimum order quantity MOQ
Works with Update docs columns for MOQ values
If Order quantity is greater than MOQ then ignore updating column.
If Order quantity is less than MOQ, take MOQ quantity as order quantity
Add Stock Order
The stock order function enables the automatic creation of one or multiple supplier purchase orders. This means you don't have to generate purchase orders for each supplier or add items individually.
This feature does require a few setups to be in place for optimum use:
| Default supplier setup on each item | This is so that the system knows which supplier to create the Purchase order against |
| Min / Max quantity levels on each item | Used on some of the options to determine order quantities. |
To Create a new stock order, go to Creditors Module > Activity > Stock Order Search
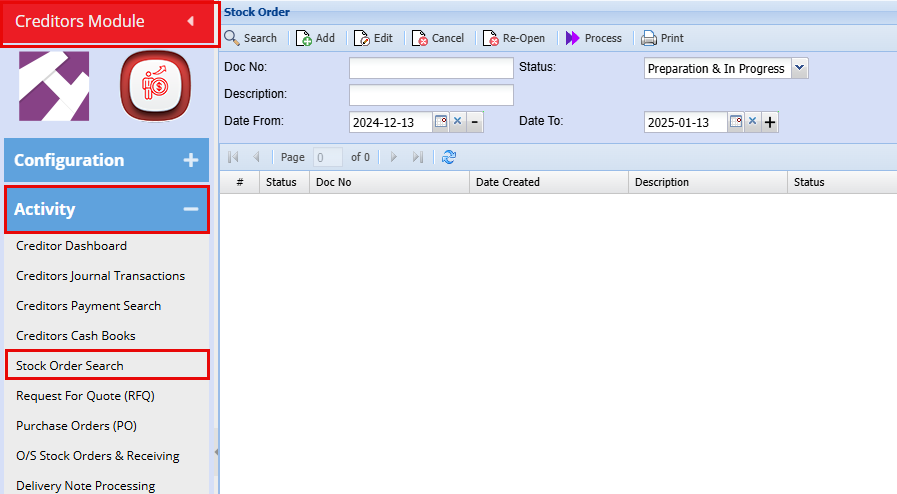
| Search | Allows you to search for an existing Stock Order. |
| Add | Allows you to create a new Stock Order. |
| Edit | Allows you to edit an existing Stock Order. |
| Cancel | Allows you to cancel/Delete an existing Stock Order |
| Process | Allows you process a Stock Order once you are happy with it. |
| Allows you to Print Out the Stock order into an excel format. |
Click Add to create a new Stock Order batch.
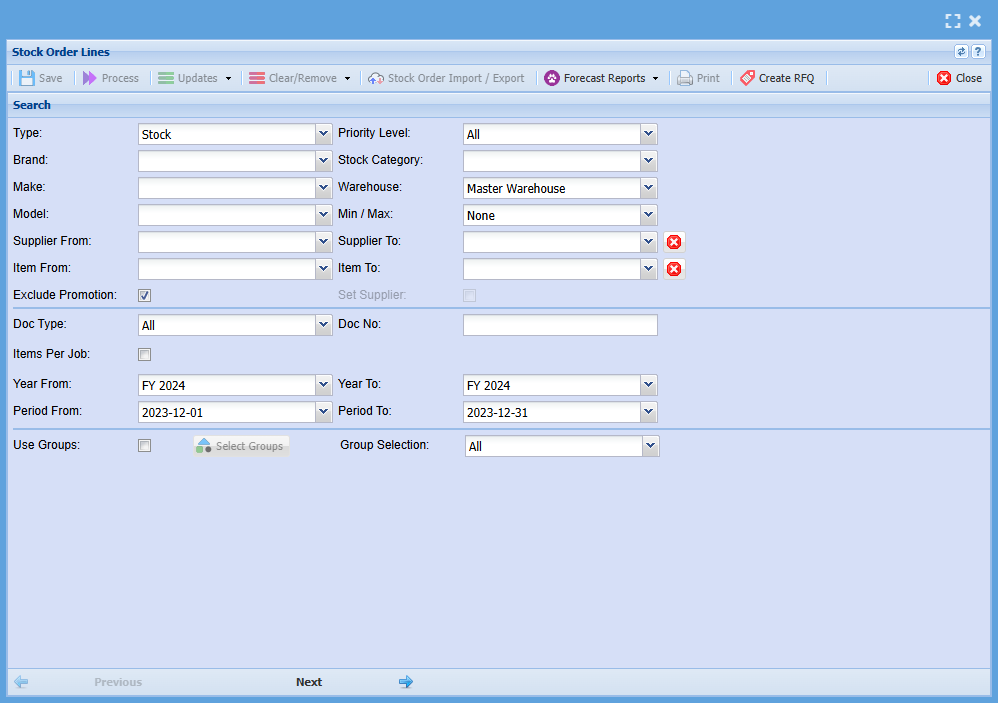
| Type | Select the type of Item you are wanting to process a Stock order for, normally this would stay as Stock. |
| Brand | Select the brand from the drop-down menu to refine your selection for your Order |
| Make | Select the Make from the drop-down menu to refine your selection for your Order. |
| Model | Select the Model from the drop-down menu to refine your selection for your Order. |
| Supplier From / Supplier To | Select a Suppliers/ you wish to create an Order for. |
| Item From / Item To | If you leave the stock item fields blank, all stock items will be displayed. If you choose specific stock items, the Stock Order will include only those items. |
| Exclude Promotions | If you tick this box, it will exclude items that are currently on Promotion. |
| Priority Level | Priority levels are setup at the Item Setup stage, if you use Priority Levels you can refine your Order here by filtering for the desired items. |
| Stock Category | Stock Categories are setup at the Item Setup stage, if you use Categories, you can refine your Order here by filtering for the desired Stock Category. |
| Warehouse | If you have multiple warehouses, you can select all warehouses the system will fetch stock items from all warehouses. If you want to filter by a specific warehouse, select the warehouse from the drop-down menu. |
| Min / Max | Select Min/Max if you want to filter your inventory items by stock level, leave it on none if you do not wish to filter by min/max. |
| Doc Type | Select the document type from the drop-down menu. |
| Doc Number | Add the document number to filter for items that are associated with that specific document. |
| Items per Job | If you are ordering stock for specific jobs, by ticking this box it will separate the order by job. |
| Year From / Year To | Select the year From and Year To Dates from the drop-down menu |
| Period From / Period To | Select the period From and the Period To from the drop-down menu |
| Use Groups | If you would like to create a Stock order using groups tick the box, this will open two columns which you can shift stock items from what is available to the second column that will filter for your order. |
| Group Selection | If you have groups set up, you can select a group from the drop-down menu to refine your stock order. |
There are 2 option to add items to the order batch in bulk:
| Using Brand / Make setup | Using Item Group setup |
|
This is the Brand and Make the item is linked to.
Using this option, selecting a particular Brand, will result in all items linked to the selected Brand being automatically added to the batch without you having to select each item individually. |
This option looks at the Group code the Item is linked to and pulls through all items linked to the selected Group(s).
Click on the Brand Drop down to see the list of Brands. To use the group code option, tick the box “Use Groups”. Double click on the required item Group code in the left (available) box to move the group to the selection box on the right. |
When using Groups to filter your stock items for your order:
Tick the "Use Groups" Box, and then Click on the Select Groups button as shown below
Double click on one of the groups under the Available list, this will add it to the Selected List
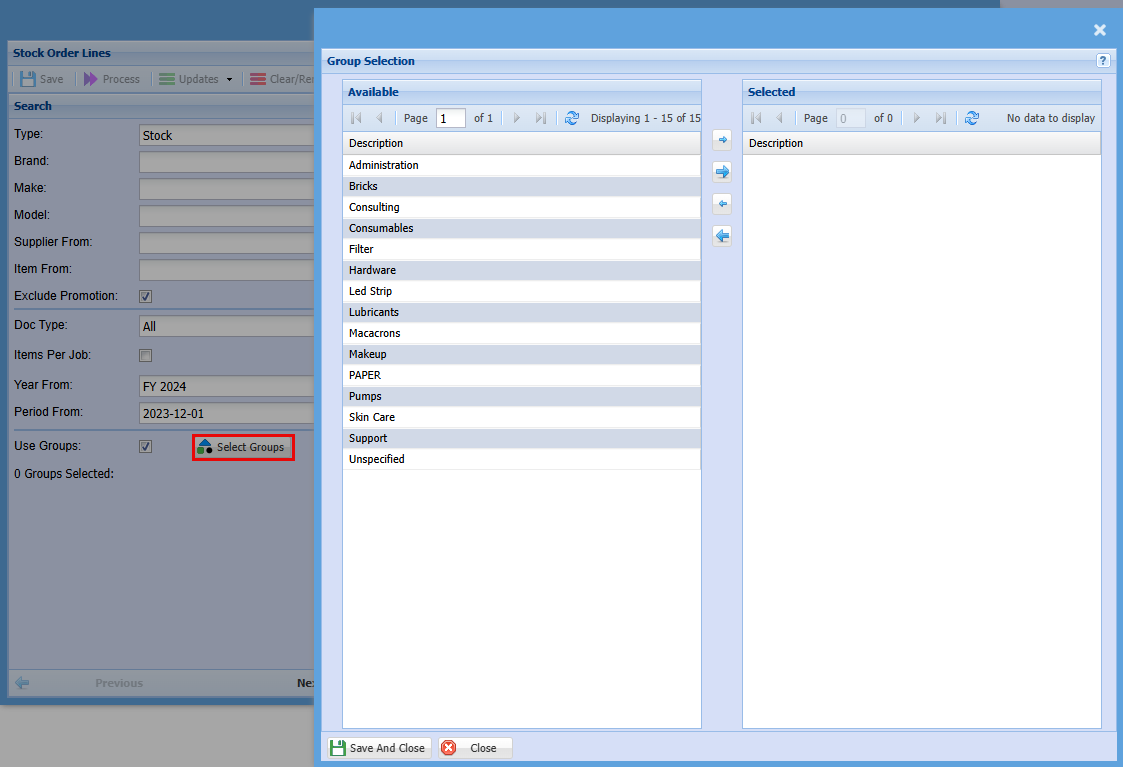
Once the require Brand/ group code(s) have been selected, click Save and Close, and then click Next at the bottom of the screen

This will open a window with all items linked to Group code you have chosen. You will see how many items this group has pulled through to your Stock Order to the right just about the grid.
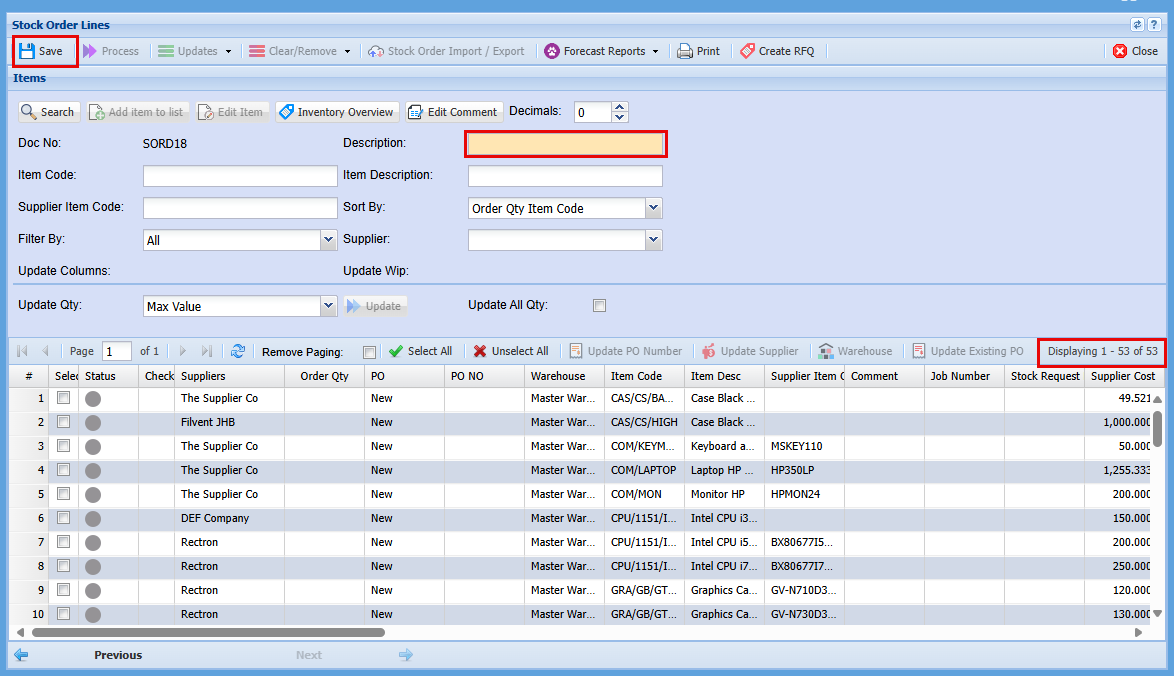
Enter a description (Yellow Block) that will be used on this Purchase order
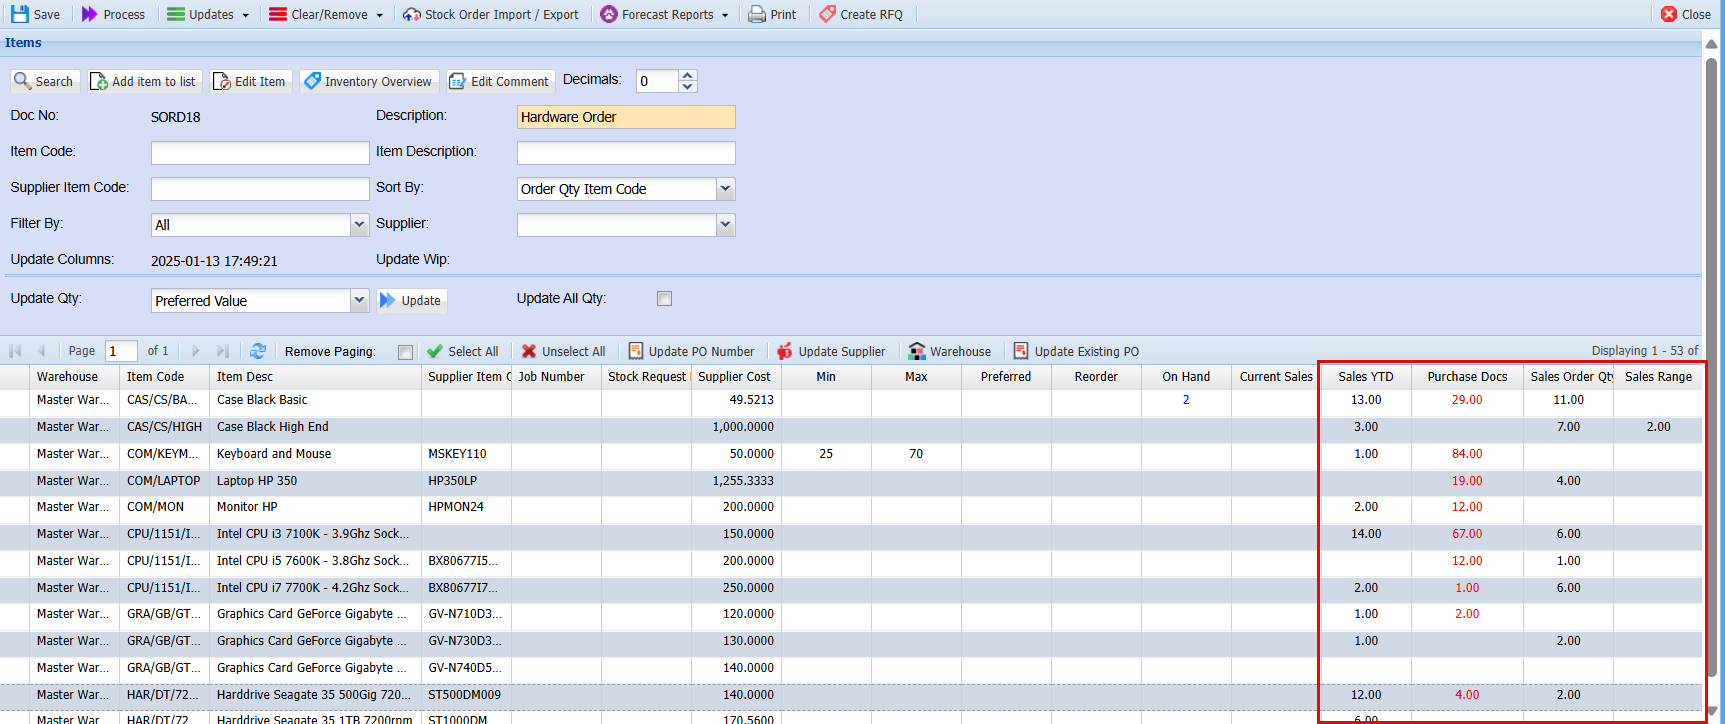
Columns Explained - Click Here
By clicking 'Save' will activate the Stock Order and the button at the top of the screen. At this point, the Stock Order functions as a 'Snapshot' of the stock data from the main system. You can make changes to the order without affecting the main system, unless the changes are made in the 'Edit item' tab. Changes made to the main system will not be reflected in your Stock Order because it is a 'Snapshot'. Therefore, any necessary changes should be made to the individual lines of the order.

| Save | Click save to save changes made to the Stock Order |
| Process | Click Process when you are happy with your Stock Order and you want to finalise the Order which will create a purchase order for each supplier. |
| Updates | These are the 3 steps you need to complete to populate the grid columns containing all your stock items in your Stock Order |
| Clear / Remove | This will either remove a Stock Item from the Stock Order or you can clear the quantities in the order |
| Stock Order Import /Export | This allows you to export your stock Order list, allowing you the opportunity to update it in Excel if you prefer, once you are happy with your spreadsheet you can import it back in. |
| Forecast Report | Here you will find a few reports you can print. |
| Click print to print the Stock order you have created | |
| Create RFQ | You can request a Quote from here as well for a specific stock item by highlighting the line and clicking this button |
Updating the Stock Order Columns
When you look at the stock items and scroll to the right you will see many fields that need to be filled in before you can process this Stock Order. To do so you need to complete the 3 steps under the "Update" Dropdown tab.
Check that you have cleared all filters from the search criteria and click search to make sure that all items are showing in the Stock Order Grid when follow the next 3 steps.
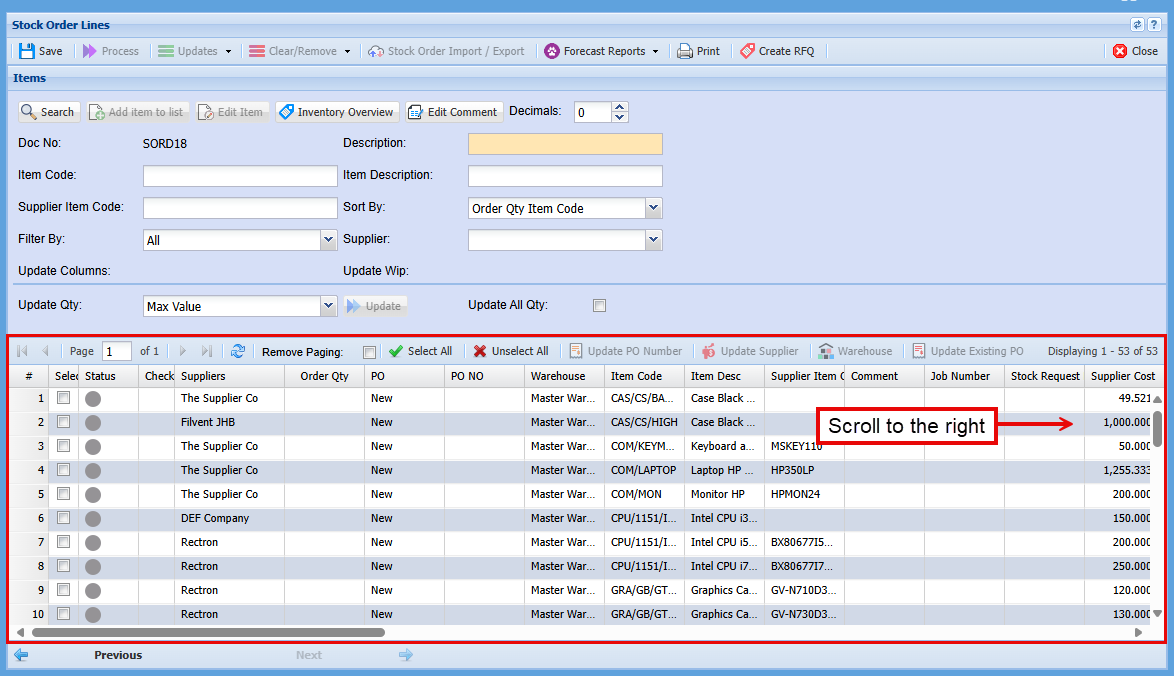
Updates Dropdown
These are the 3 steps you need to complete to populate the Stock item grids columns.
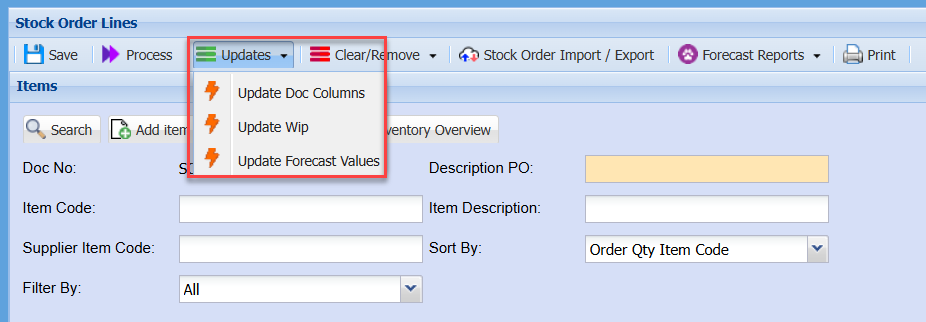
Update Doc Columns
Select the tick boxes of what you would like to update in you Stock order
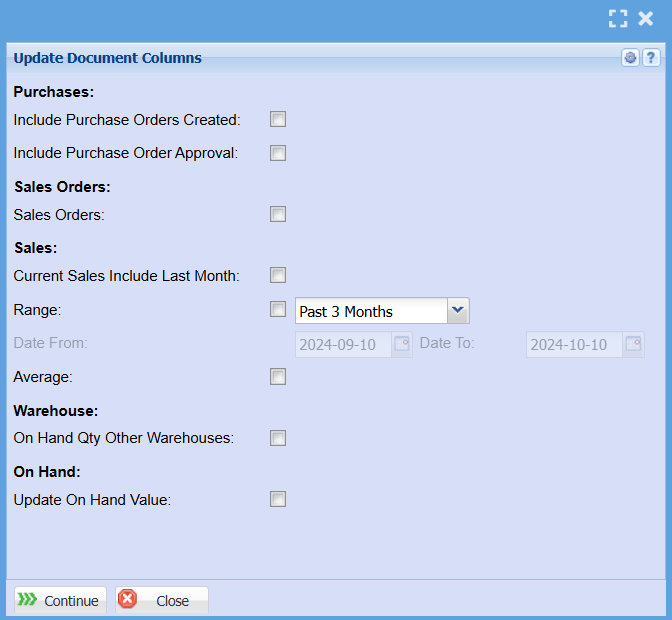
| Include Purchase Orders Created | When creating a Stock Order, it's essential to know the quantities of each item already on Purchase Orders to avoid duplication. This is particularly crucial when multiple individuals are handling purchase orders. |
| Include Purchase Orders Approval | Since Stock Orders display only the snapshot of stock quantities at the time of their creation, it's useful to know which orders have been approved since then to avoid duplications. This is important as Stock Orders can remain open for days, or even weeks. |
| Sales Orders | When creating a Stock Order, it's important to know the quantities of each item allocated to open sales orders. This helps ensure you order enough stock to fulfill all open sales orders and maintain sufficient inventory for future orders. |
| Current Sales Included in Last Month | This is useful for forecasting future sales orders and determining an average quantity to order. |
| Range | You can analyze data from the past 3 or 6 months and choose to include the current month if it affects the figures. There is also an option to select Custom Dates. |
| Date From / To | If you select a Custom Date, you can then select you From and To dates to pull the data from. |
| Average | You can choose to pull an average figure of sales over the time period selected. |
| On Hand Qty Other Warehouses | You can select to pull the overall quantity you have on hand and in multiple warehouses as this order is only based on the selected warehouse. |
| Update Onhand Value | When the Stock order was created, it would have pulled quantity figures at that specific time. If this Stock order has been open for a week or multiple weeks that figure may have changed and by selecting this, you will get an updated quantity onhand. |
Once you have selected your criteria you a click "Continue" which will then run the query for all these columns in your Stock Order with your sales trends allowing you to make an informed decision when placing an order.
Update WIP
WIP looks at all Work in progress, and what stock is still to go out or allocated.
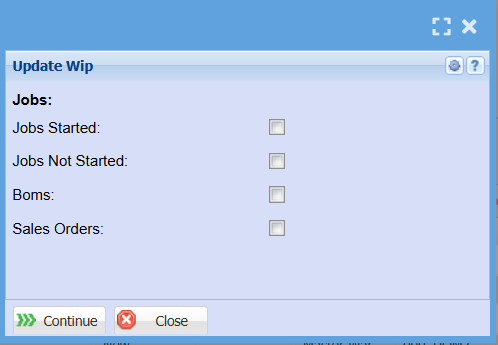
| Jobs Started | Inventory allocated to a job may still appear as in stock; however, it is no longer available. The stock levels will be updated once the job is invoiced. This will only be applicable if you use jobs. |
| Jobs Not Started | Same with Jobs not started, Inventory allocated to a job may still appear as in stock; however, it is no longer available. The stock levels will be updated once the job is invoiced. This will only be applicable if you use jobs. |
| BOMS | A Bill of Materials (BOM) will accumulate items until they are invoiced. It does not remove the stock from inventory but merely allocates it to the BOM. When managing inventory, it's important to understand this process to get an accurate view of current available stock. By ticking this box you will know the true quantity of stock on hand. This will only be applicable if you use BOMS. |
| Sales Orders | This is where stock is allocated but not yet dispatched, which can make it appear as current stock. However, this can be misleading as the stock is still pending shipment. This will only be applicable if you use Sales Orders. |
Update Forecast Values
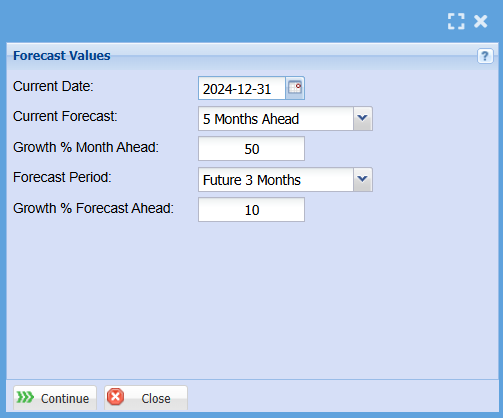
| Current Date | Typically, you would use today's date. However, if today is too early in the month, it may skew the figures when forecasting over several months. |
| Current Forecast | Here you can select to forecast for 1, 2, 3, 4, 5, or 6 months. This will give us an idea on what we should order based on the past however many months we have chosen. |
| Growth % Month Ahead | A growth percentage forecast looks at the upcoming month and estimates the expected increase percentage based on the current forecast. For example, if we sold 10 units in the past 5 months and expect a 50% increase, we should sell 3 units per month for the next 5 month and therefore would need 15 items in stock. |
| Forecast Period | The Forecast Period examines the period following the Growth Forecast mentioned above. In the example where we looked at 5 months, this forecast period allows us to extend the analysis to an additional 3 or 6 months. |
| Growth % Forecast Ahead | This forecast will examine the additional 3 or 6 months of growth percentage following our initial prediction of a 50% increase over the first 5 months. For example, we predict a further 10% increase in the 3-6 months following the initial 5-month 50% increase. |
You now need to determine which calculation you wish to apply in order to update the required order quantities for each item.
The order quantities applied to each respective item can be determined from a number of options:
Click the Update Qty drop down to see the list of options:
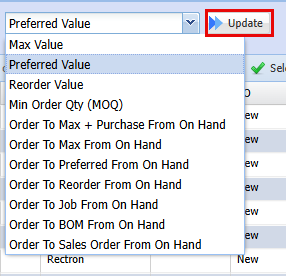
| Max Value | Populates the order quantities to equal the Maximum qty as per item setup |
| Preferred Value | Populate the order quantities to equal the Preferred Quantity as per item setup |
| Min Order Qty (MOQ) |
Will populate the Order Quantities to equal Minimum order quantity as per item setup. Note the Minimum quantity and the Minimum order Quantity are different Minimum quantity is the minimum holding quantity. Minimum order quantity is the minimum quantity that can be ordered from the supplier. |
| Order To Max + Purchase From On Hand | Populates the order quantities to be Item Maximum Qty less Qty on Hand less qty on open Purchase orders |
| Order To Max From On Hand | The difference between the maximum quantity and the on hand quantity |
| Order To Preferred From On Hand | The difference between the Preferred item Quantity and the on hand quantity |
| Order To Reorder From On Hand | |
| Order to Job From On Hand | |
| Order To BOM (Bill of Material) From On Hand | |
| The difference between the Reorder quantity and the quantity on hand |
In this example, we are going to be using the Reorder from on hand option This will calculate the difference between the Reorder level on the item setup and the current on hand quantity. And update the order quantity on this batch with this difference. |
The Difference between the Reorder quantity and the Quantity on hand
- You can then review the quantities to be ordered
- Should you wish to override any of the quantities, click the select box
- Then click on the order quantity field
- Enter the amended quantity
- Once you are satisfied with the quantities to be ordered from supplier, click the Process button to create the Purchase order(s)
Minimum Order Quantity (MOQ) rules
- In stock order there is an option for Minimum order quantity MOQ
- Works with Update docs columns for MOQ values
- If Order quantity is greater than MOQ then ignore updating column.
- If Order quantity is less than MOQ, take MOQ quantity as order quantity

| 1. | Click the Select All Button |
| 2. | Select: Order to Reorder from on hand |
| 3. | Click the Update button |
| 4. | You will notice the order quantities on the grid have been populated with the respective quantities |
You can then review the quantities to be ordered
Should you wish to override any of the quantities, click the select box
Then click on the order quantity field
Enter the amended quantity
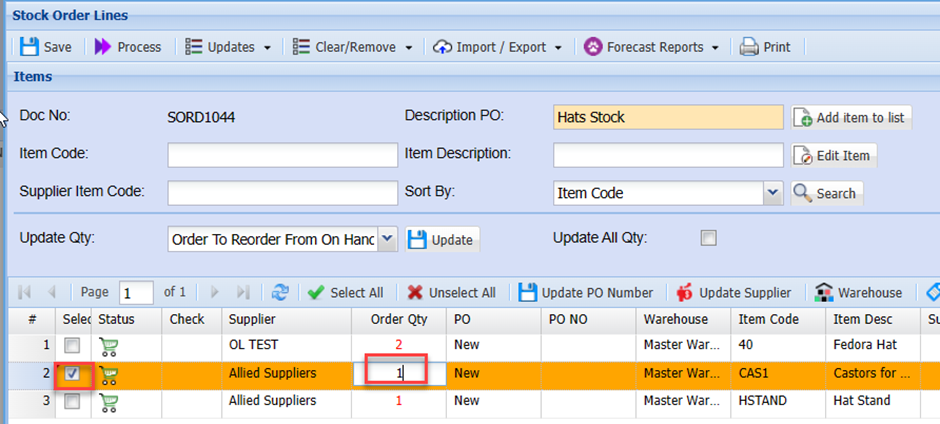
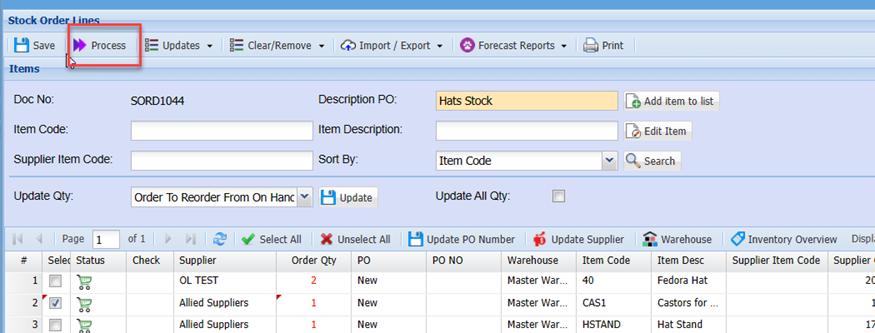
Once you are satisfied with the quantities to be ordered from supplier, click the Process button to create the Purchase order(s)
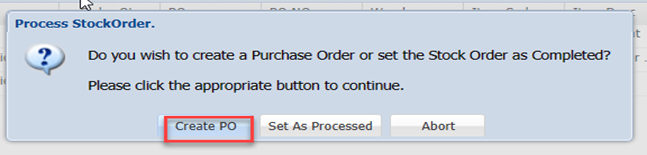
Select Create PO
Click Ok
To view the Purchase order:
Go to Activity > Purchase Orders
Search
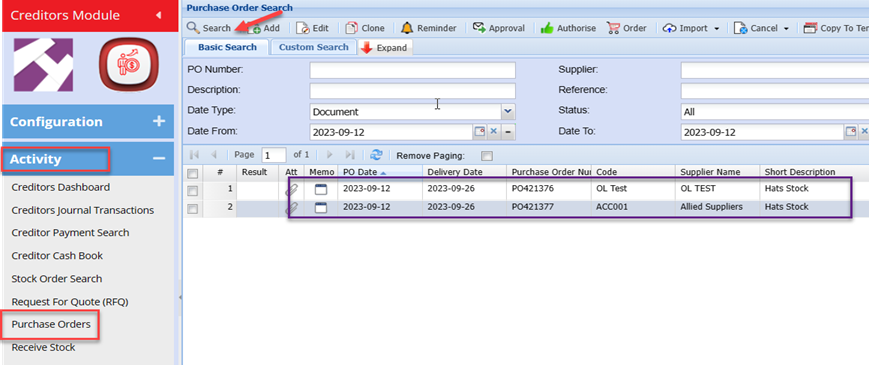
You should now see the purchase orders listed and can process these using the normal purchase order authorisation and order procedures.
Note: you may find several purchase orders, this is because a purchase order is created for each of the default supplies (if the items have different default suppliers linked)
You can still edit the supplier and any other details before finalizing the Purchase order.
Stock Order Functions Explained
Buttons Explained
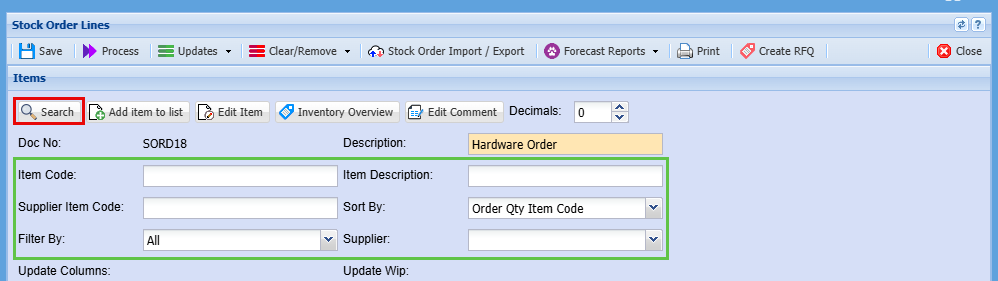
Items
Work out your quantities to order and send them to Purchase Orders
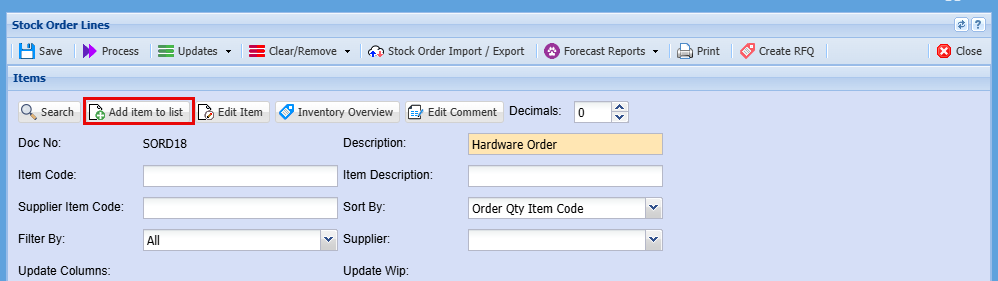
Add Item To List Button
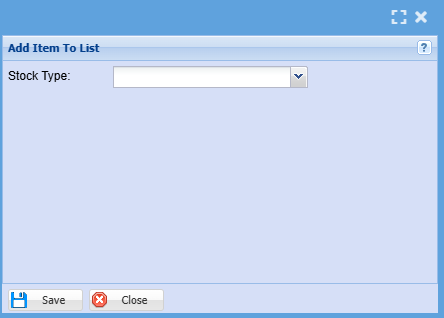
You may find that an item is not on the Stock Order list, you can search for this item and add it to the order
Select or search for an item in the drop-down menu and click "Save"
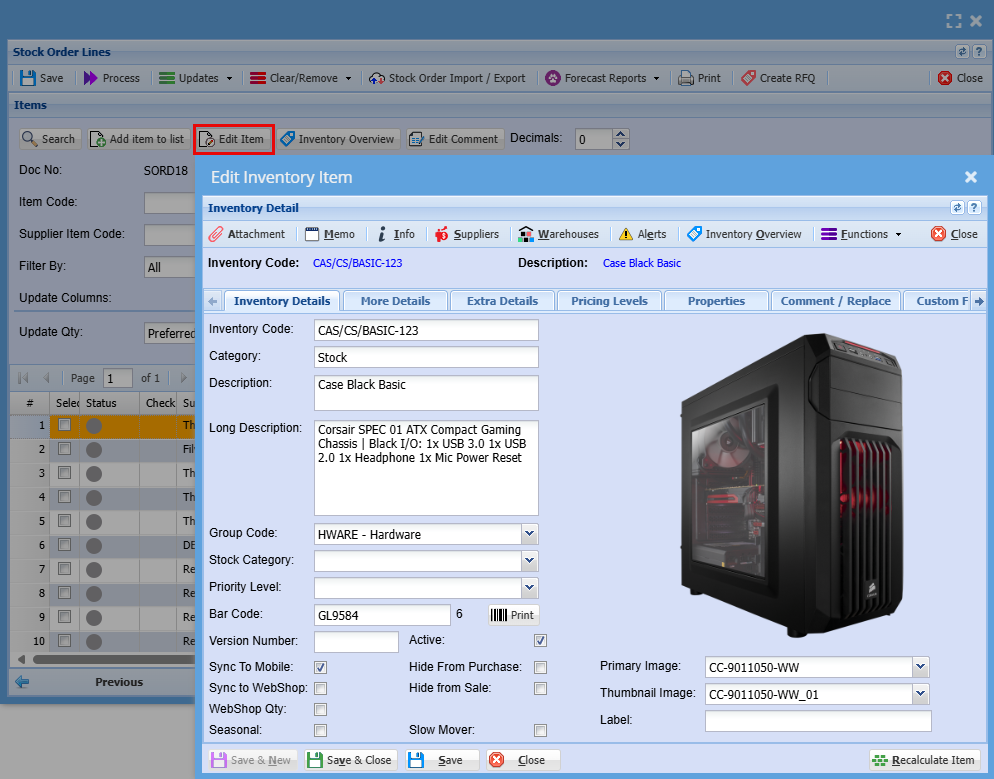
You can highlight a row and click the Edit Item button which will take you to the item to make any changes you require to the main system. Changes will not show in your Stock Order as this is like a snapshot of the data at the time if "Save" being clicked. You will need to double click on the line item and make changes to your Stock Order lines.
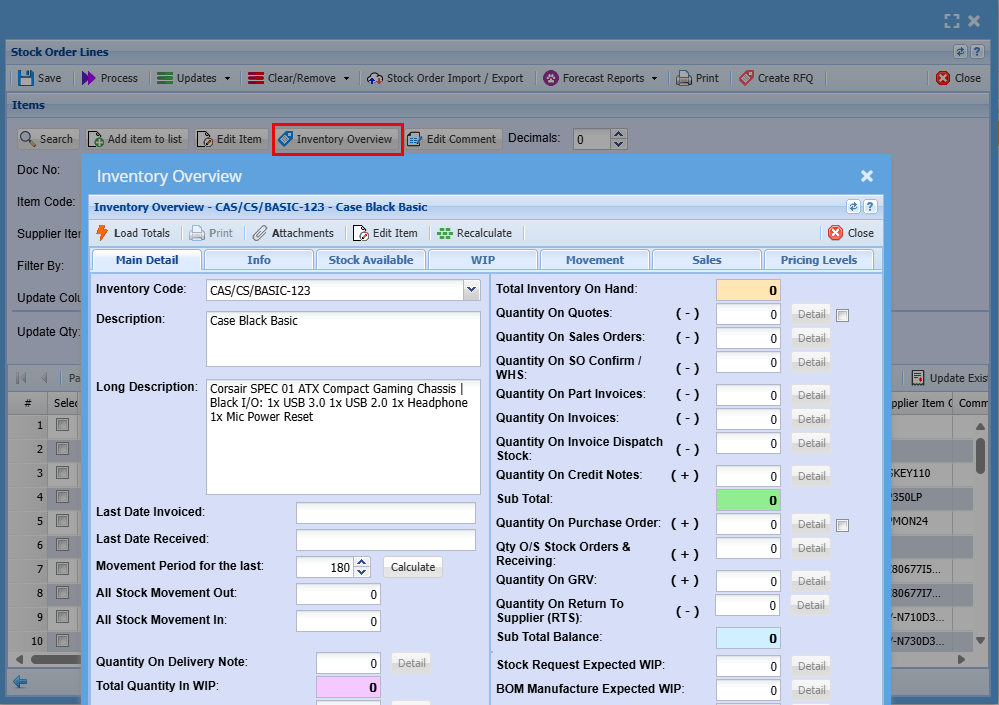
Inventory Overview Button
The inventory overview window allows a quick access to view information on an item.
It is accessed in most windows where stock items are present
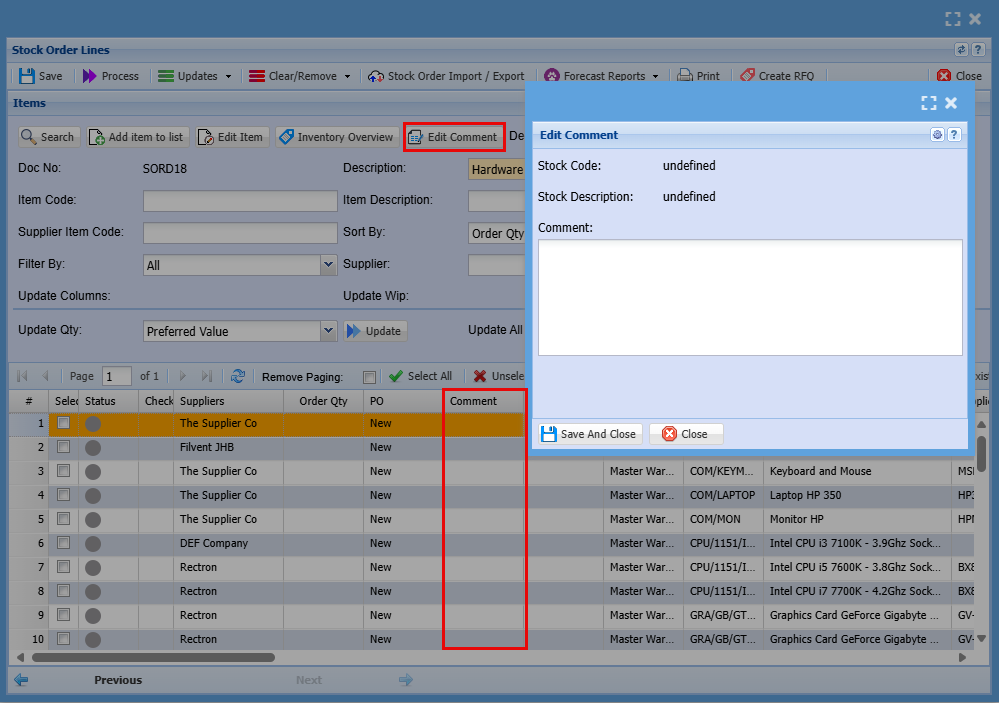
Here you can edit comments made for each item
Grid Buttons Explained
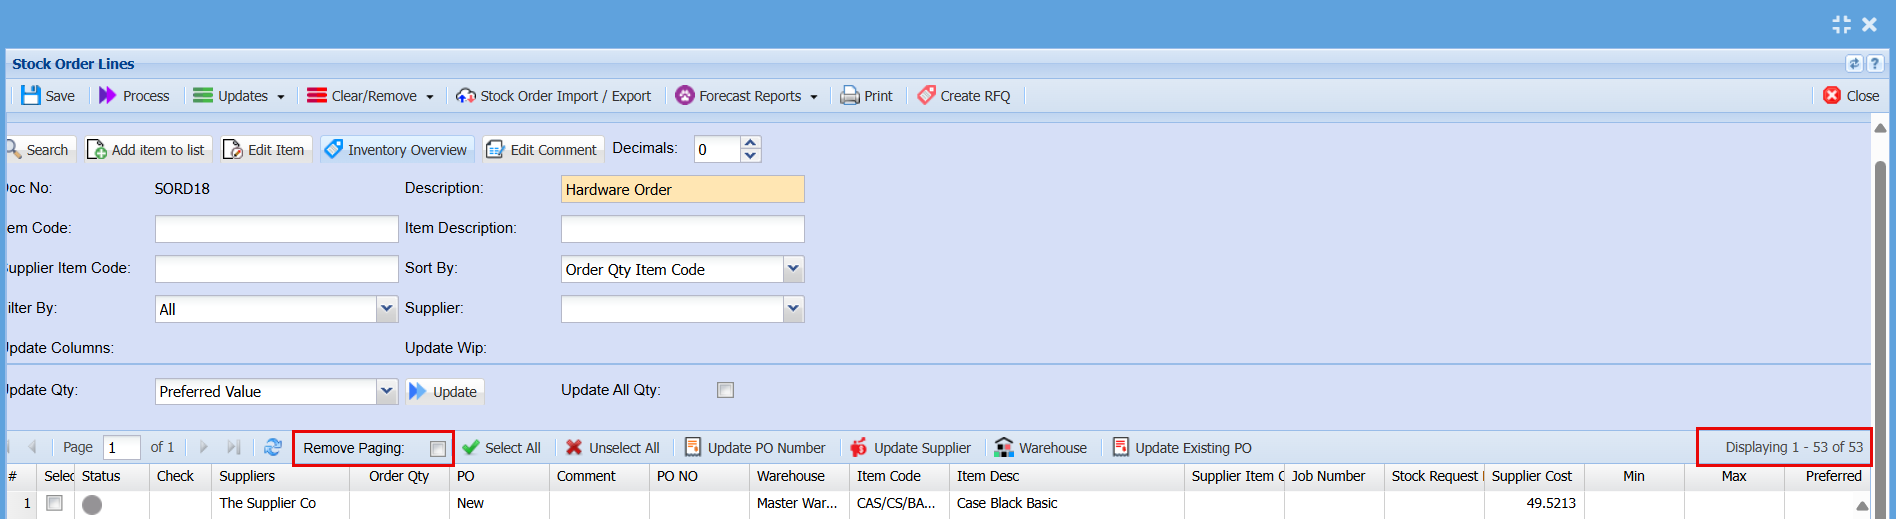
Remove Paging
Put this tick on to displays all Stock Order items on a single page If the Order list exceeds the default 100 lines. If this box is not ticked and you have more than 100 items, you will need to click through the pages with the arrows 
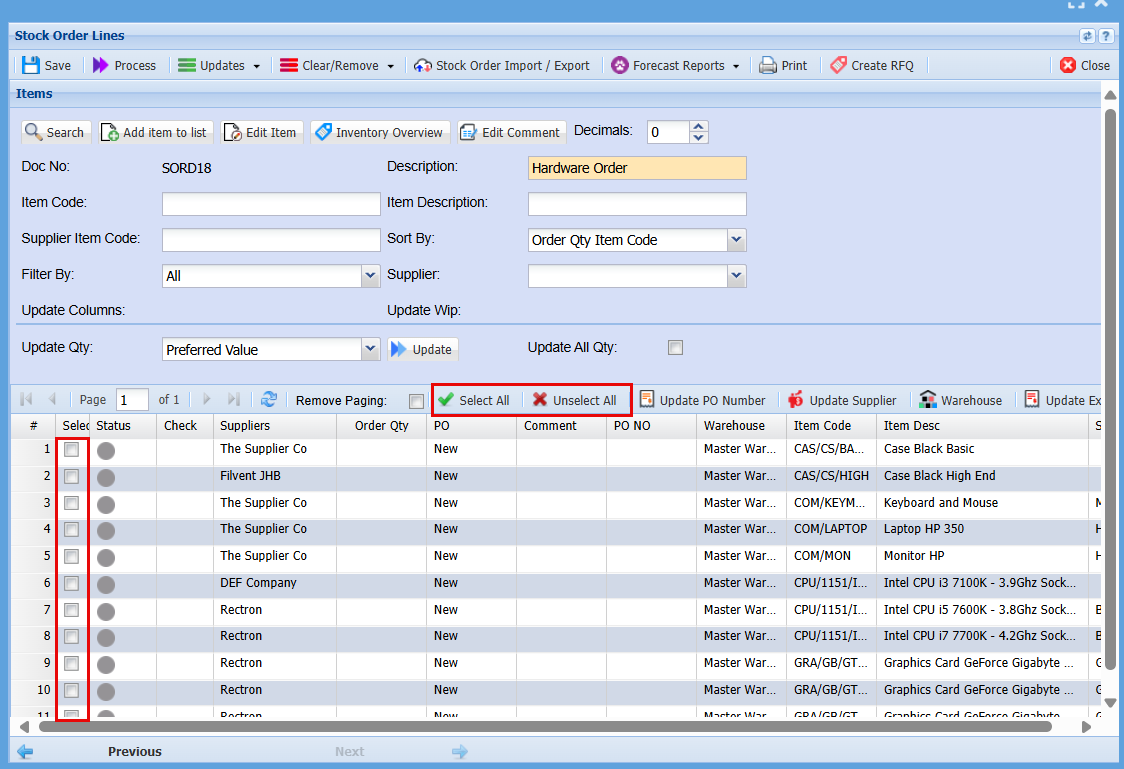
Select All / Unselect All
The Stock Order Lines can be all selected and unselected by clicking on the Select All or Unselect All button. Or you can tick the boxes individually.
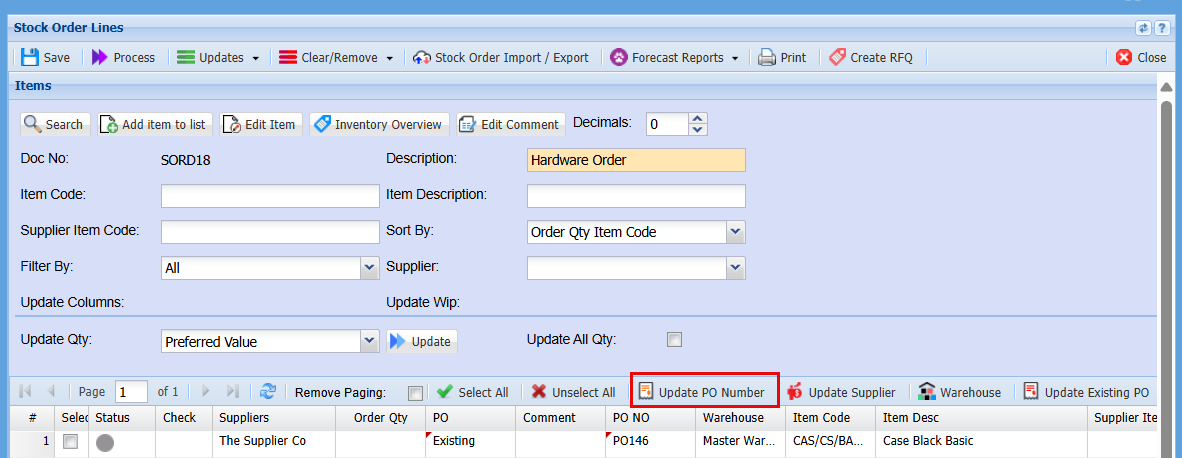
Update PO Number
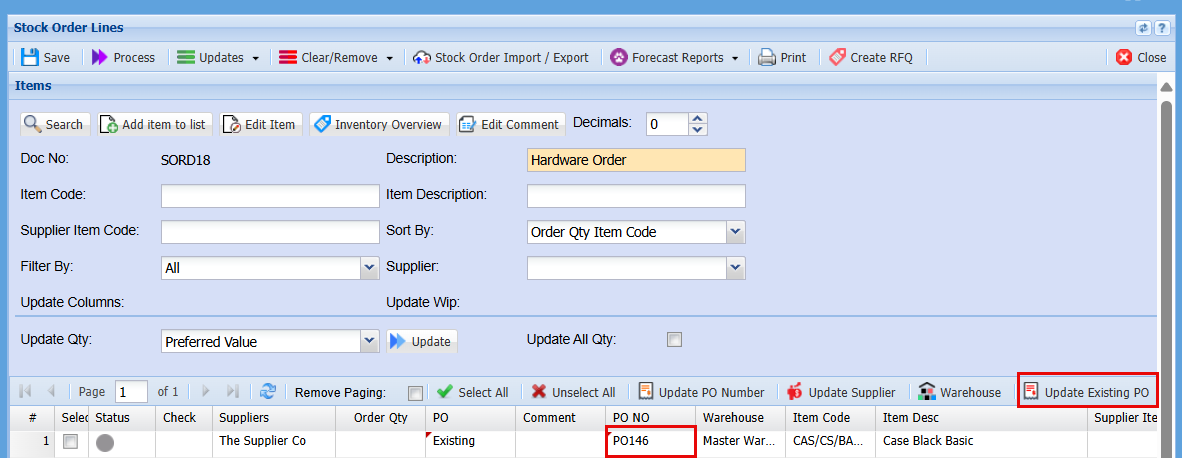
All purchase orders will appear as new when a Stock Order is created. If a purchase order already exists for a supplier and you want to add an item to that order, tick the select the checkbox for the item and click the 'Update Existing Number' button. This will change the status of the PO from 'New' to 'Existing and add the Existing PO number to the PO NO Column.
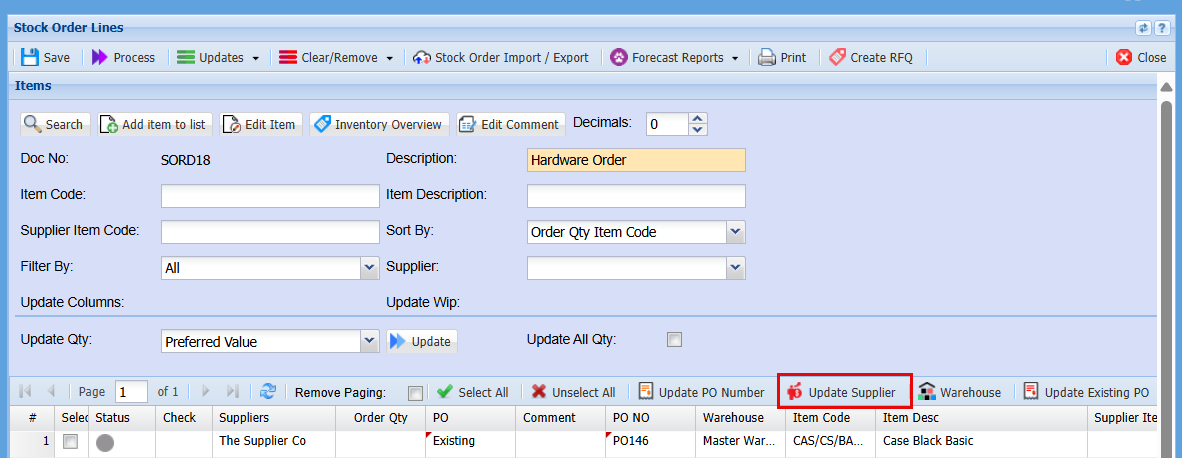
Update Supplier
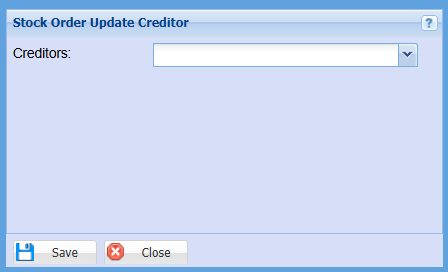
When a Stock Order is created, the Default Supplier will automatically populate in the order. If you need to change the supplier for a stock item, highlight the relevant line, click the 'Update Supplier' button, select the desired supplier from the drop-down menu, and click 'Save'
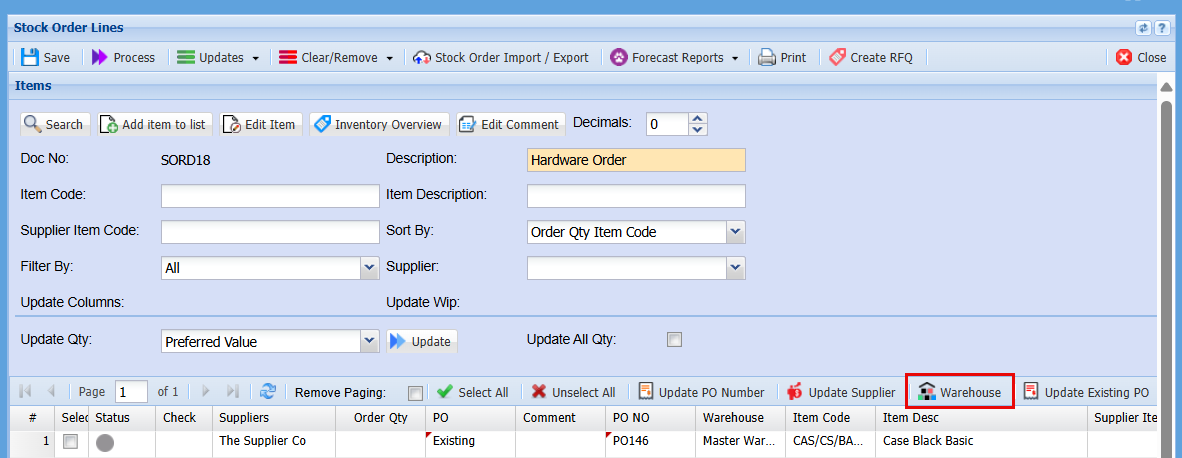
Warehouse and Minimum and Maximum Quantities
If you are working with multiple Warehouses and are wanting to order for a different warehouse, highlight the line you want to change, click the "Warehouse" button, select your warehouse form the list and click "Save".
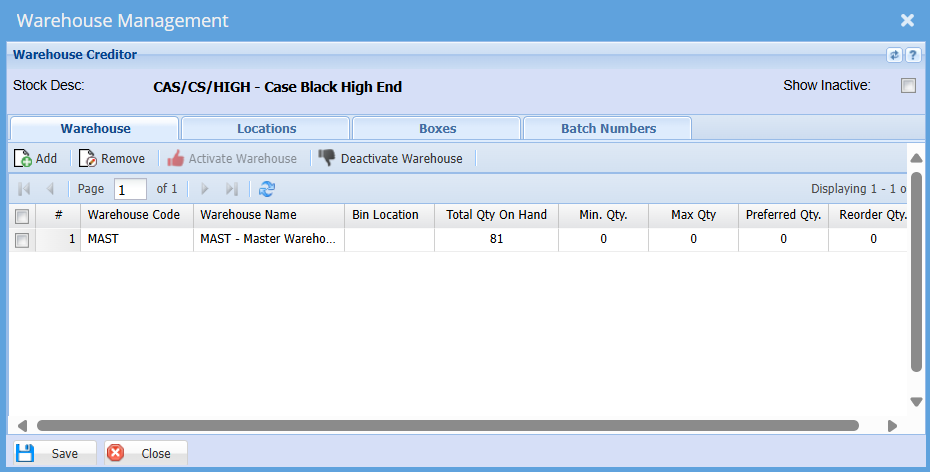
While in the Warehouse, you can view the minimum and maximum quantities for a specific item. At this stage, you can update your minimum and maximum quantities, as well as your preferred and reorder quantities to assist with future ordering and forecasting.
Once these quantities are set, you can configure the system to send you daily email updates when stock quantities reaching the minimum level. These notifications will inform you when to reorder and how much to reorder based on your specified quantities.
Update Existing PO
If you already have an existing PO Number associated with a stock item in your Stock Order and you want to change it, you can click the "Update Existing PO" button and select a different Purchase Order from the list.
Stock Order columns explained
Stock Order Columns
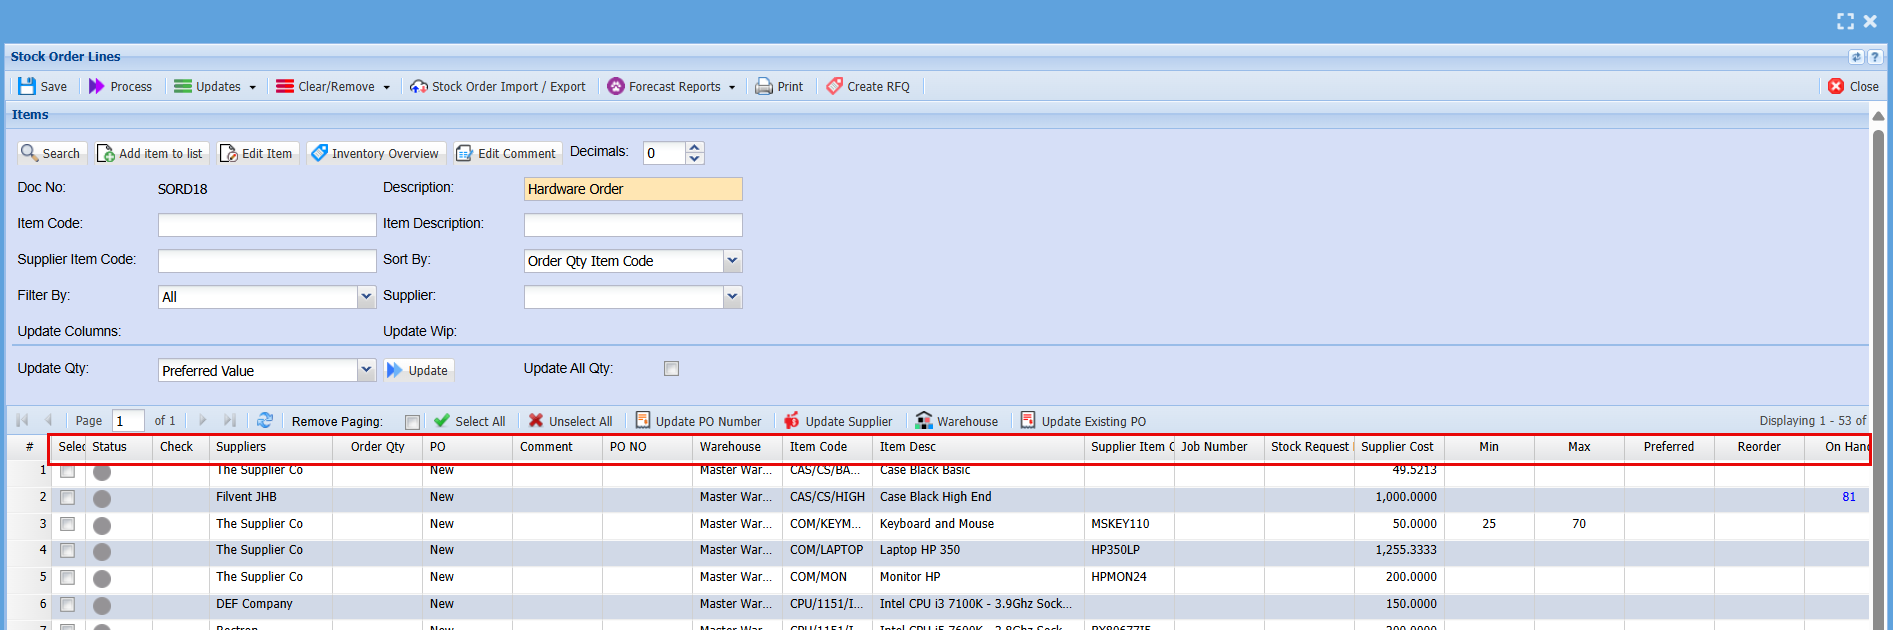
| Select | Tick the box of the items you would like to select, you can select more than one item at a time. |
| Status | The Status colour will change as it moves through the ordering process eg: Grey means you have no current order for this item. |
| Check | |
| Supplier | This will be the supplier you will be ordering from, if you have multiple suppliers, you can change the supplier here by ticking the Select box and then clicking the "Update Supplier" button to change the supplier. |
| Order Qty | This will show the quantity of each inventory item you are ordering |
| PO | All purchase orders will show as new when a Stock order is created. If there is already a purchase order created for a supplier, and you just want to add this item to the existing purchase order by ticking the select box for this line and clicking the "Update Existing PO" Button. This will change the PO from New to Existing. |
| PO No. | Once you have updated the PO to show existing, you can select a Purchase Order from the list you want to add an item to and when you click "Save" the PO number will show in this column. |
| Warehouse | If you are working with multiple Warehouses, you can select the Warehouse you are ordering for here. |
| Item Code | This will show your item Code |
|
Supplier Item code |
This will show the Suppliers Item Code |
|
Job Number |
If you were ordering an item for a specific Job, you can add the Job number here |
|
Stock Request |
If you have a Stock Request number, you can add it here. |
|
Supplier Cost |
If you have Stock Costs in your setup it will show here |
|
Min / Max |
If you have set up you Min and Max stock Quantities at Setup for each stock Item, that will show here. |
|
Preferred |
If you have set up you Preferred stock Quantities at Setup for each stock Item, that will show here. |
|
Reorder |
If you have set up you Reorder stock Quantities at Setup for each stock Item, that will show here. |
|
Onhand |
If you have set up you Onhand stock Quantities at Setup for each stock Item, that will show here. |
Purchase Orders Menu
Purchase Order Overview
Overall process
.png)
The Purchase Order process can run in multiple options from simple steps to multiple steps dependent on how the company wants to run the system:
Below are the various options:
| Option 1 | GRV process |
The quickest and easiest route to get stock into the system and update the supplier. Skips all the steps. Has two basic steps:
|
| Option 2 | PO to GRV |
|
| Option 3 | PO with authorise to GRV |
|
| Option 4 | PO to Receive stock (All) to GRV |
|
| Option 5 | PO to Receive stock (Part) to GRV |
|
| Option 6 |
PO to Receive stock (All) to GRV Foreign Supplier - Multicurrency
Multicurrency Supplier CANNOT go via Delivery note and must go GRV route.
This is because freight and shipping costs are added to the supplier invoice to change the cost of items to landed cost. |
|
| Option 7 |
PO to Receive stock (All) to Delivery Note to GRV
If going the Delivery note route, Purchase Order should have correct costs.
If not, then the average or latest cost will be changed on the item. |
|
| Option 8 |
PO to Receive stock (Part) to Delivery Note to GRV
If going the Delivery note route, Purchase Order should have correct costs.
If not, then the average or latest cost will be changed on the item. |
|
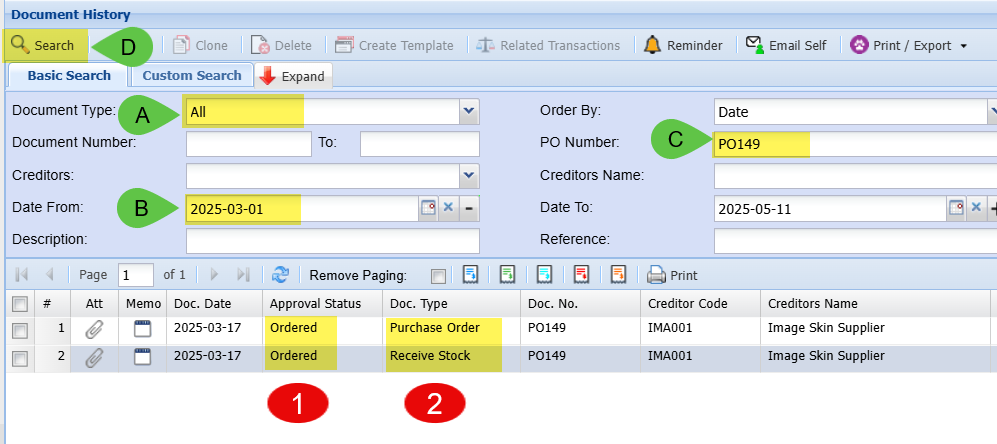
Find where the Purchase Order is in the process:
Best place to look is in Creditors Module > Analysis > Creditors Document History
Note: If you find the document here, one CANNOT EDIT the document, one must go to the Activity section and find the document.
Ensure the following settings are correct
| A | Ensure Document Type is set to ALL |
| B | Check dates |
| C | Enter the Purchase Order Number |
| D | Click on Search |
View the results
| 1 |
Check Approval Status This will tell you the status |
| 2 |
Doc Type This will tell you where the document is |
Review Purchase Order after authorised
When a Purchase Order is authorised, all fields are disabled.
However if one needs to change the purchase order, click on Review button to change status back to Preparation.
Purchase Order will have to be authorised again.
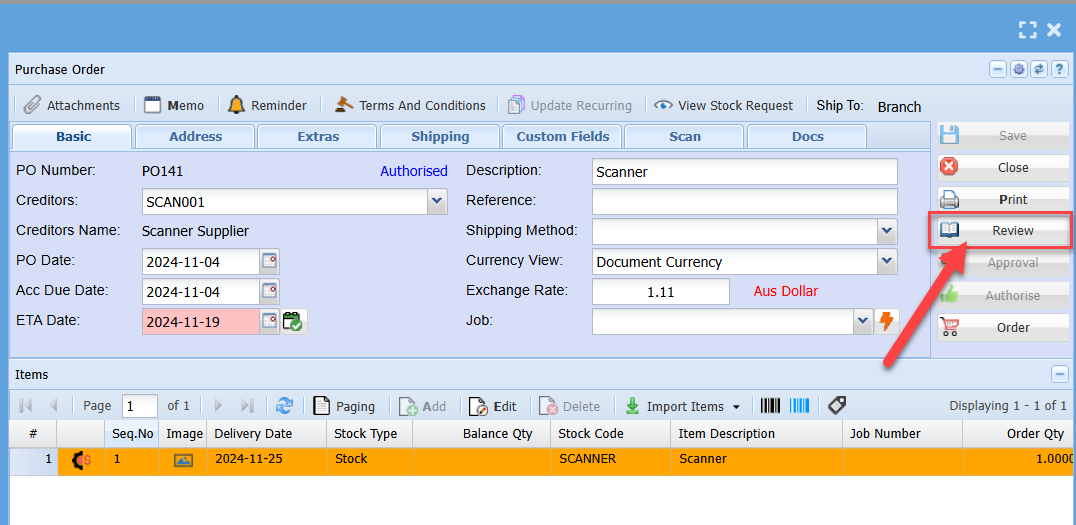
Revert Purchase Order from Receive stock back to Purchase Order
A Purchase Order that is in Receive Stock section can be moved back to Purchase Order section.
By clicking on Revert Purchase Order, it will move the Purchase Order back to preparation.
Note: A Purchase Order that has received stock CANNOT be Reverted back to preparation
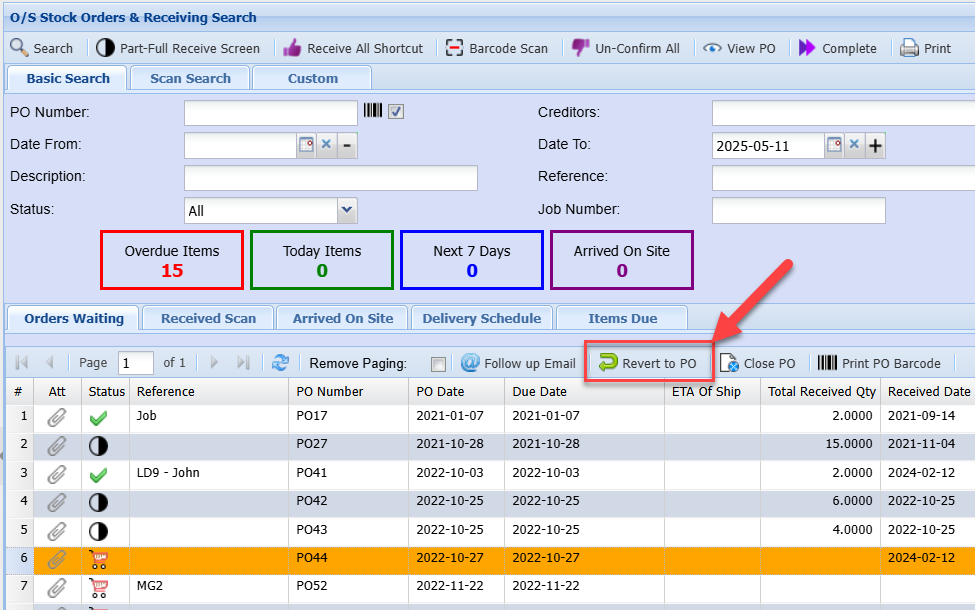
Purchase Order Flow Summary
The following steps are taken to ensure that all purchases from the company goes through the Creditors Module.
| 1 | Create the purchase order |
| 2 | Ensure all the supplier details are correct |
| 3 | Select the correct item, Stock item or Ledger custom item |
| 4 | Attach the original supplier quote |
| 5 | Send for approval |
| 6 | The manager receives an email to approve a specific purchase order |
| 7 | Manager to go into Webatar App (or main system) and finds the necessary purchase order for approval |
| 8 | The manager checks the supplier quote and how the purchase order is captured |
| 9 | The manager approves the purchase order |
| 10 | At this stage an email will be sent back to the originator who sent the purchase order for approval, that the purchase order has been approved |
| 11 | The capturer then pushes the purchase order to receive stock and sends the approved purchase order to the supplier |
| 12 | Upon Receipt of the goods or invoice, the goods or invoices checked that the quantities and confirms. |
| 13 | The clerk will then Confirm all or part and pushes the purchase invoice to a goods receive voucher (GRV) |
| 14 |
An email will be sent to the accounts Department, where they will be notified that the goods received voucher (GRV) document is ready to be processed to the system. |
| 15 | The purchase invoice from the supplier attached and is checked for the final time and then processed into the system. |
.png)
Video training manual 2016 - Click Here
Purchase Order Search
Creditors Module> Activity> Purchase Order

| Search | Allows you to search for an existing Purchase Order, Inventory Item, Creditor or Debtor based on system fields and which module you are in. |
| Add | Allows you to create a new Purchase Order, Inventory item, Creditor or Debtor depending on the Module you are in. |
| Edit | Allows you to edit the purchase order |
| Clone | Allows you to Clone an existing Inventory Item, Creditor or Debtor depending on the module you are in |
| Reminder | You can set a reminder to follow up on a PO or to send the PO off for Authorisation etc. |
| Approval | Click the Approval button to send the PO for approval |
| Authorise | Click the Authorise button to authorise a PO |
| Order | Once the PO is Authorised the order can be placed by clicking the Order button |
| Import | If you have a really long order that you have in the excel format, you can upload this order to create the PO rather than entering them one by one. |
| Cancel | Click Cancel to Cancel a PO |
| Copy To Template | If you have templates set up for your PO you can copy one PO over to another template. |
| Print/Export | You can export your PO to excel, or you can choose to print a copy. |
Basic Search

| PO Number | Use your PO number if you know it to search for a specific Purchase Order |
| Description | If you know the description of your Purchase Order you can use that to search |
| Date Type | Select the date you want to search by (Document Date, ETA date or Due Date) |
| Date From / Date To | You can search for Purchase Orders in a specific date range |
| Supplier | You can search for Purchase Orders for a specific supplier |
| Reference | If you know the reference for the Purchase Order you can search using that |
| Status | You can search for a PO in a specific status, select your status choice form the drop-down menu (All, Created, Approved, Authorised or Recurring Transactions) |
Custom Search

| Category | Search for a PO in a specific category if you have categories set up. |
| Actual Delivery Date | Search for a PO that has already been delivered and processed by using the actual delivery date. |
Print/Export

If you want to print a list of your Purchase Orders, you can select to have breaks on all totals, you can choose to consolidate all totals and you select to have Quantity only shown on your report.
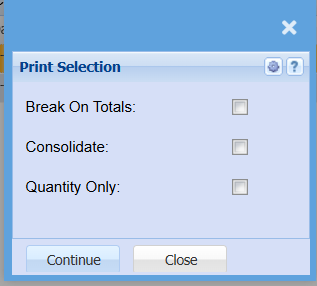
Purchase Order Reminder Function
Create Reminder
Purchase order item> Create reminder tick box
Should you wish to create a reminder for the Receiving clerk (or Yourself) you can tick the
“Create Reminder” tick box and select the person you wish send the reminder to.
.png)
Purchase Order Processing
Select Creditors Module
Activity> Purchase Orders

Should you wish to edit and existing purchase order, click the Search button.
Highlight the required Purchase order on the grid by clicking once and click edit button or double click on the Purchase order line.
Make the required changes and click save and close.
Click Add to capture a new Purchase Order

| 1 | Enter the Supplier Name or Account Code and Select the Supplier by clicking on it from the drop down options. |
| 2 | Enter a description related to the purchase Order |
| 3 | Enter a reference pertaining to the Order |
| 4 | Check that the dates are correct |
ETA is the expected date the goods are due to arrive.
Due Date: This is the due date for this purchase order to be paid.
The due dates are auto populated based on the account terms on the Creditors Setup.
Click Save
Click Add in the centre of the screen to add the item lines to be purchased.

| Enter the item code or part of the Item description to search for the required item. A list of Items will be displayed. Click on the required item. |
| Enter the required quantity. |
| Check that the price is correct. |
| Ensure that your warehouse for which this order is being place is correct. In the event of Ordering nonstock items such as Office Stationery, the warehouse is not applicable. |
|
Select GRV VAT (if VAT is applicable) |
Should you wish to create a reminder for the Receiving clerk (or Yourself) you can tick the
“Create Reminder” tick box and select the person you wish send the reminder to.
Click Save New to add another item.
Click Save and Close if you only ordering the one item.

Once you click the save button, the below screen will appear. This screen records the “default Supplier” for the item as well as the suppliers latest price.
Click Save and Close

Should you wish the default supplier on the item setup to be updated, tick the set default box.
You will only see this, the first time that you process a purchase order for this item from this particular supplier.
ATTACHING THE SUPPLIER QUOTE TO THE PURCHASE ORDER
Click on the Attachment Button

Click the Upload Button
Click the Upload button, Select File and browse for the quote from the Supplier that you would have saved on your PC.
Retain the file name if you prefer or change the name as required.
You can also click the Drag & Drop button which will allow you to simply drag the document from the source destination, eg. Your email, or folder the document was saved in.

Click Close
You can print the Purchase Order to check all details are correct.
You will notice that there is no Document number (PO Number). This is because the Purchase order needs to be authorised before you can send to the Supplier.

The stationery layout can be customized to the client’s preference upon request.
Refer to Purchase Order Approval Manual for the authorization Procedure>>>>
Purchase Order MOQ
Added in the new field for MOQ which fetches it from the item and the supplier
Put the value in, this value is NOT editable but for information for the user
Rules
When clicking on save and close or save and New
And the MOQ is higher than the quantity
Bring up an alert to inform the user that the Order quantity is lower than the MOQ quantity
| Continue | Normal saving |
| Cancel | Take the person back to the screen to change quantity |
Please DO NOT use Alert if the MOQ is blank or Zero
MOQ must have a valid number
.jpg)
Reverting Purchase Orders
Under System Configuration>General >User Setup
.png)
Find the name of the User you want to give Purchase Supervisor to
Go to User Details 2 Tab and look at the list on your right with tick boxes
Find Purchase Supervisor and add a tick on the tick box.
Only when this setup is done then the user will be able to revert purchase orders.
Open Creditors module >Activity> Receive Stock> Search
.png)
Select the Purchase Order you want to revert
Click on Process tab and Select the Revert to Purchase Order Button
The Window Opens up select your username from the drop down arrow
And enter your password (This Is the same password you use to log into webaccounting)
And Click on OK.
.png)
Approval Levels Setup
Systems Configuration> Security> Approval Levels
The administrator will setup approval levels for the user
this will give authorization to the selected users to authorize purchase orders created.
this is a control management function and done under systems configuration.
.png)
Purchase Order Job Allocations
Add the Job number to the header of the Purchase order so that when you enter a line on the purchase order it will assign the job number
.png)
PO Receiving Stock- Barcode Scan
In this scan we are going to scan the item which will find it and mark up the receive quantity.
If the item is a serialized item, then we need to go to serialized items to scan.
We need a way to move the cursor between barcode and serial number by using a barcode marker.
A barcode marker will allow the user to scan a barcode that will move the cursor between the barcode and the serial number fields.
It is easier that once we finish scanning all the serial numbers, when we want to move on to the next item, scan the barcode marker and then you carry on scanning the new items.
.png)
Barcode markers setup
.png)
Purchase Order Authorisation
This procedure caters for this manual process of printing hard copies of documents to be automated and electronic.
Once all items have been captured on the Purchase order and all details checked for correctness, click the Approve Button.
Click Close.

Should you not wish to send the PO for authorization at this point, you can close the screen.
When ready to Approve, search for the captured PO as follows:
On the Purchase Order Menu, enter the Supplier name or Code, check the date range and click Search.
Click on the required order once to highlight it, click the Approve Button.

This then sends an email to the Manager informing him/ her that there is a PO awaiting authorization.
The PO status will now change from Created to Approval indicating that the PO has been sent for Authorization.

AUTHORISATION PROCESS
The Manager will then log onto the system or via the Webatar APP search the required PO and perform the necessary checks.
Go to Creditors Module > Activity
Select Purchase Orders Menu Item

Enter the Supplier code or name.
Enter the respective date range that the Purchase Order was captured.
Click Search

You can further filter your search by clicking on the Expand Button
And entering any of the other criteria that you may have on hand, e.g. Division, Region

All Purchase orders within the selected criteria will be displayed in the grid.
Click the Attachments shortcut to view ant attachments.
The icon will be red if any attachment are uploaded
If not, this icon will be grey.

Should you need to check and verify any details of the order, double click on the required PO to open the lines.
Once you have reviewed the PO and performed the necessary checks and ready to Authorize,
Highlight the required purchase order and click the Authorize Button

You will notice the status has changed to “Authorized”.

An email is then sent to the capturer that the PO has been authorized and he/she may proceed to forward the PO to the Supplier.
SUBMITTING PO
Search for the PO as per the standard steps:
Creditors Module> Activity> Purchase Orders
Enter the Search criteria
Click Search

Check that the status is set at Authorized.

Click Yes

Click Continue
The purchase order will Print to Screen.
Select Email to send the PO to the Supplier
Note: Should you not have segregation of duty, i.e.. A clerk capturer the Order and a manager then Authorizes Orders, the below steps can then all be done by the same person (if authorized to do so) capturers Authorize, and Order steps as outlined above can all be done at the time of capturing the PO by the Authorized person.

Click the Email Button
Verify the email address is correct.
Enter your message.

Click Send
This will send an Email with PDF attachment of the PO to your Supplier.
You can CC yourself and any other colleagues if necessary.
Click the Users tab and double click on the required names in the Left Column to select.

Click Send
Purchase Order Shipping Tab
The shipping Tab is related to the delivery of goods
To ship goods go to:
Creditors/ Suppliers Module> Activity> Purchase Order> Shipping Tab
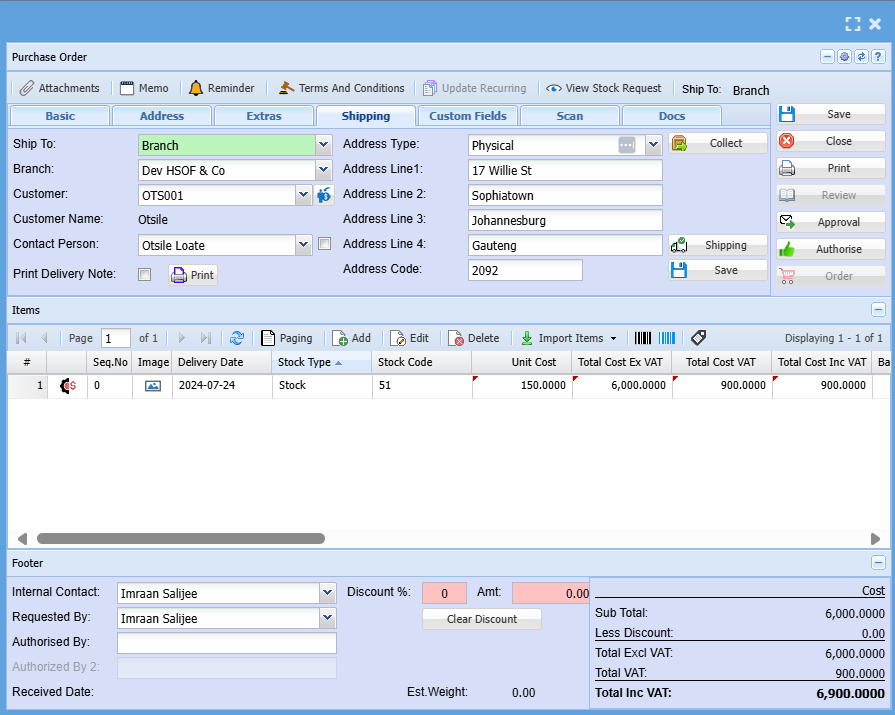
| Ship To | Select where you want to ship the parcel to on the drop down menu selection |
| Branch | Select Branch on the drop down |
| Customer | Select a customer you want to ship parcels to on the drop down |
| Customer Name | Customer name will be automatically populated |
| Contact Person | Select the contact person on the drop down |
| Print Delivery Note | This button allows you to print a delivery note |
| Delivery Type | select the destination address where the goods should be delivered |
| Collect | This a new button added which allows automatic collection for customers who want to collect the goods instead of having them delivered |
| Shipping | This is where you add all shipment information and instructions |
Adding Purchase Order
Creditors>Activity>Purchase Orders
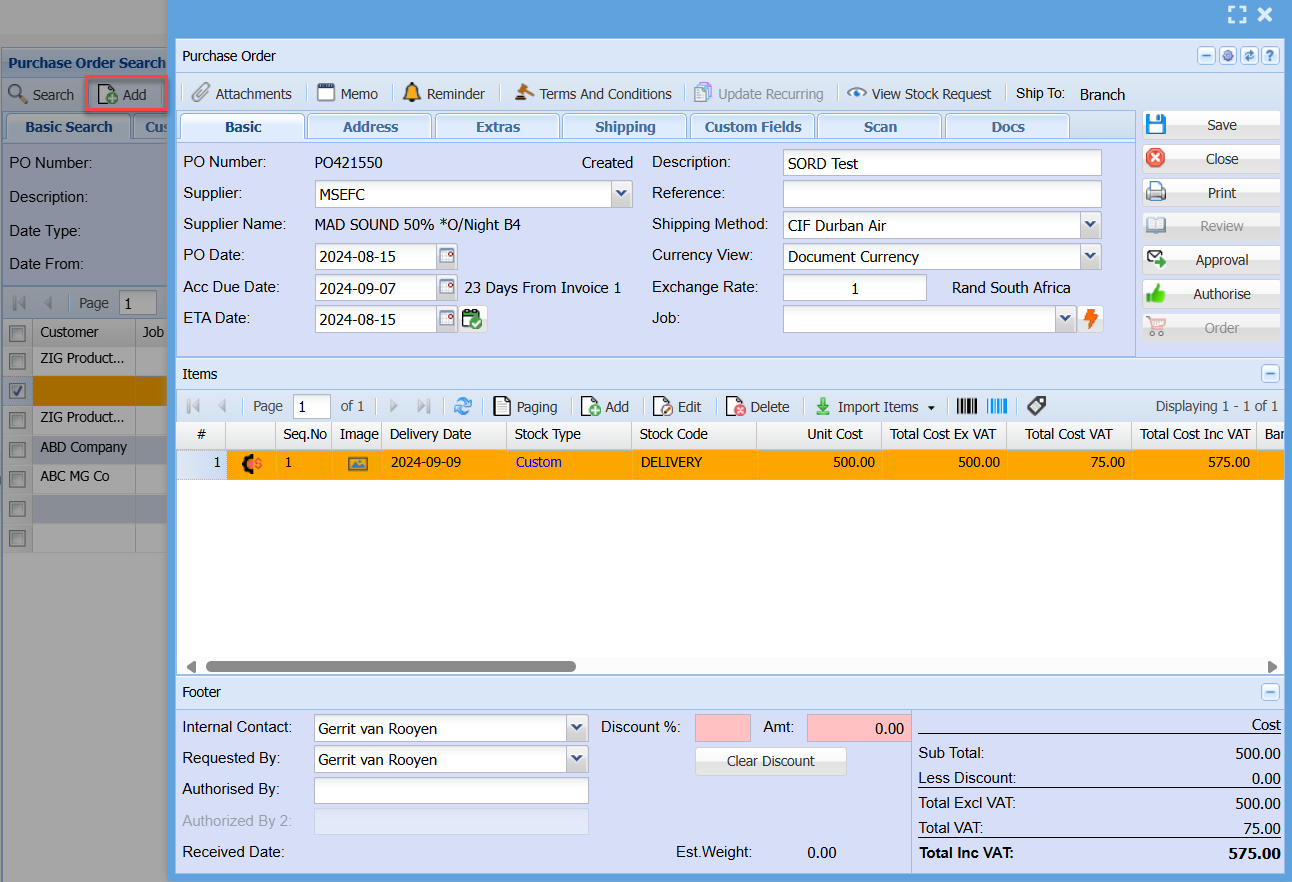
Select a Supplier: Short Search – just type in part of the code or name and hit enter on the keyboard and select the Creditor.
Drop down Search - Clicking on the arrow allows you to find the Creditor via the drop-down menu
Click on Insert button.
Basic Tab
Description - e.g. PO – Hard drive
Reference - Type in the Reference for your Purchase order
Date - Is the current date of the document
Due Date - Allows you to select the due date of the supplier
Save/ close - Click on the save Button to save your information
Close if you wish to close your Purchase order window without saving
Notice that: as you click save, the other buttons that were greyed out they are now accessible
Currency View - The Drop-Down menu gives you a list of Multi currency views you can select the currency type you want to view
Currency - This is the default currency of the Purchase order.
Note - Accknowledge allows users to maintain Creditors accounts in foreign and local currencies, as well as send invoices and statements in foreign currencies. In addition, the application also maintains the foreign rate of exchange used at the time of the transaction.
Address Tab – Shows the Default address of the Supplier
Contact Person – Shows the Default contact person for that supplier
Extras Tab
Job - Select in the drop-down menu a job number if this purchase order is linked to a JOB
Completion Date - Type in or select on the calendar the completion date
Long Description – Add a detailed description
Process GRV to Job - Tick this box if you want to process GRV to JOB
Print Custom fields - Tick This Box if you want custom fields to appear in Print
Notes – Add notes in here relevant to your Purchase order and Save
Custom Fields Tab
Request By - The System User requesting stock
Costing Centres - Will be the centre requesting stock
Special Notes - Add special notes
Use the arrows down or up to see more details
Job - Is the Job Number this stock will typically be required for and click on Save
Purchase Order Serial Number Import
Once you receive your order, you many have multiple serial numbers to import into the Purchase Order before pushing it through to GRV,
Creditors Module > Activity > O/S Stock Orders & Receiving
- Click on the "Functions" drop-down menu
- Click on "Serial Import/Export"
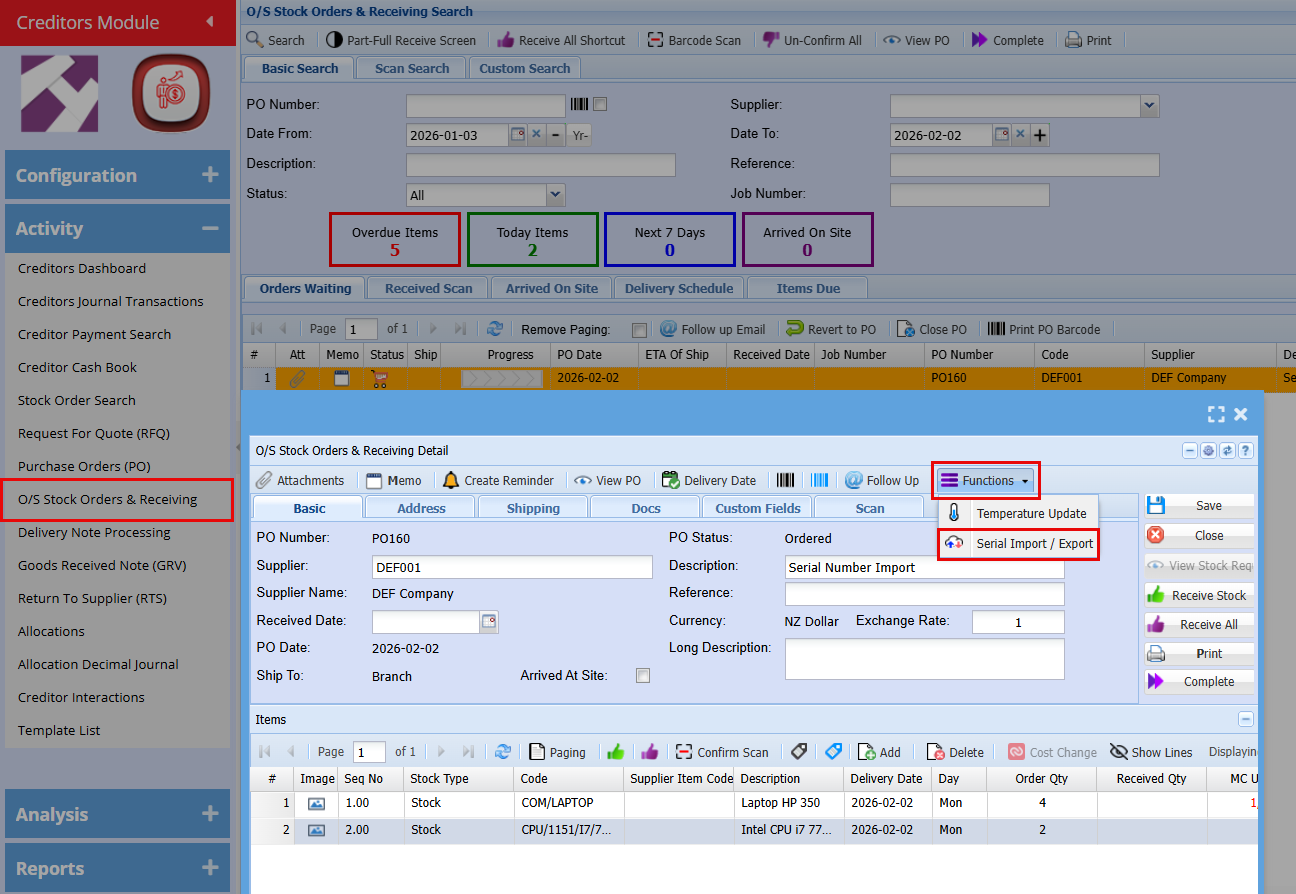
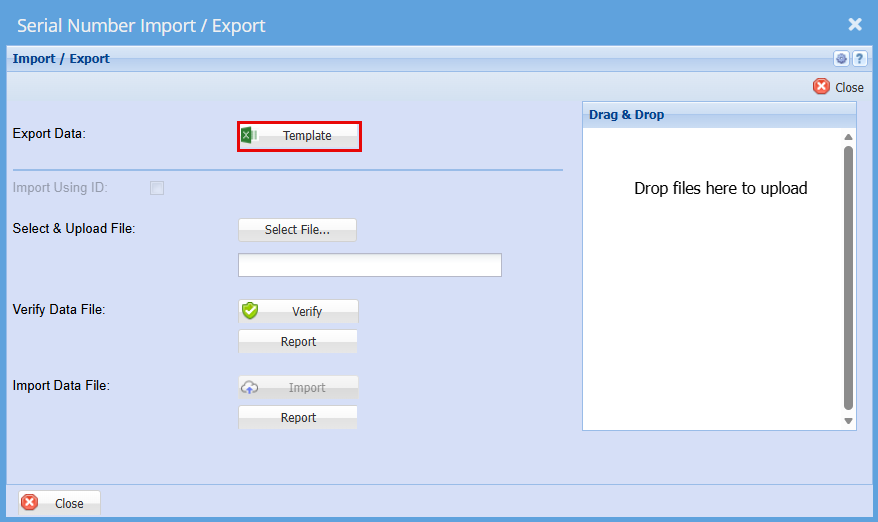
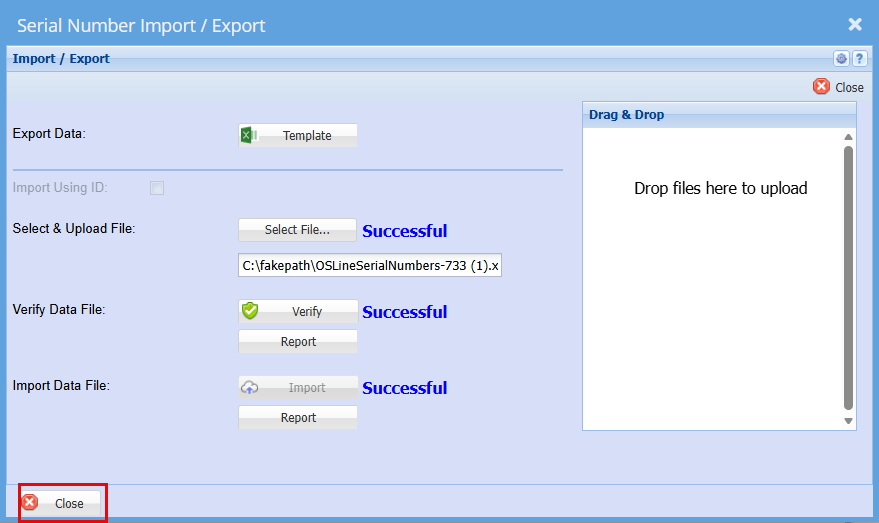
A window will appear allowing you to export a template that can be used for the import.
- Click on "Template" this will download an excel file
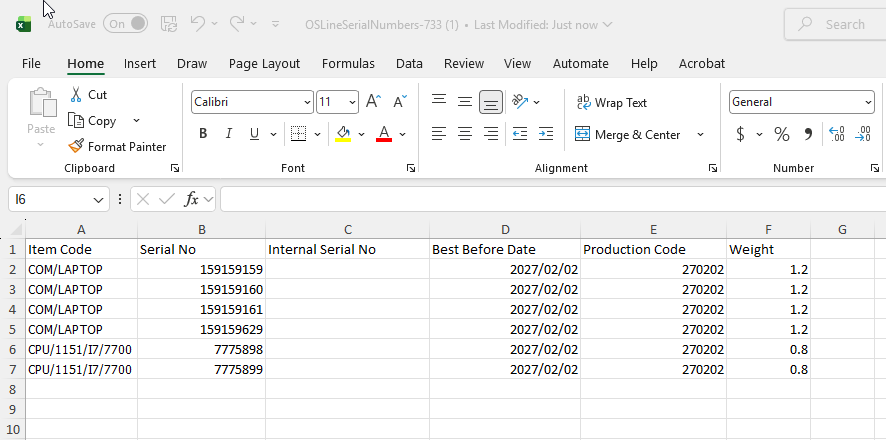
- Enter the serial numbers here, with each item listed on a separate line as shown below.
- Save the file to your computer.
- Go back to the "Serial Number Import/Export" Screen
- Click "Select File"
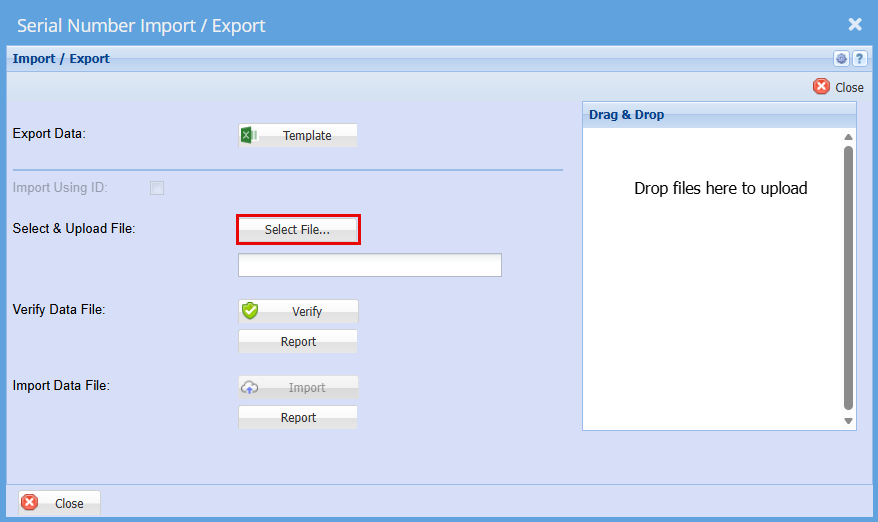
- Find the file you have saved.
- "Double Click" the file or click "Open"
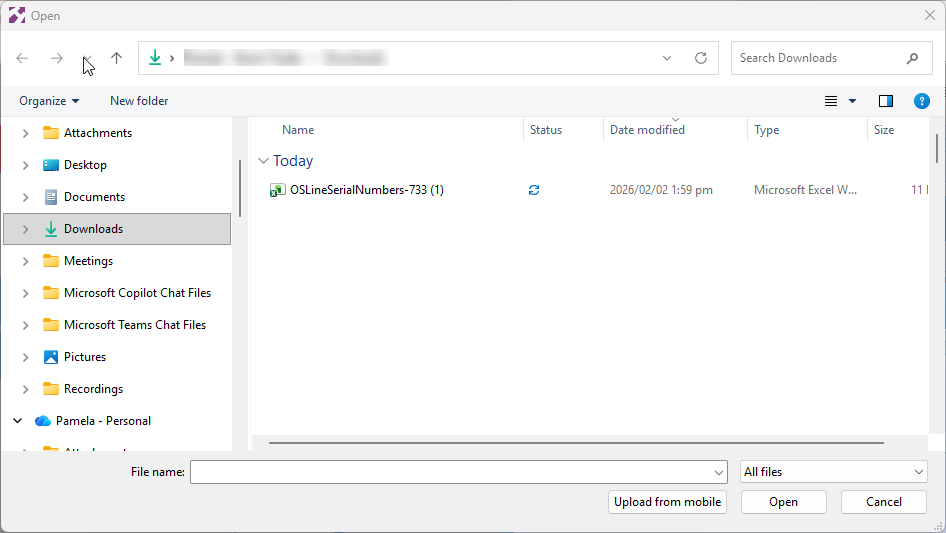
You should get a Successful Import
- Click "Verify"
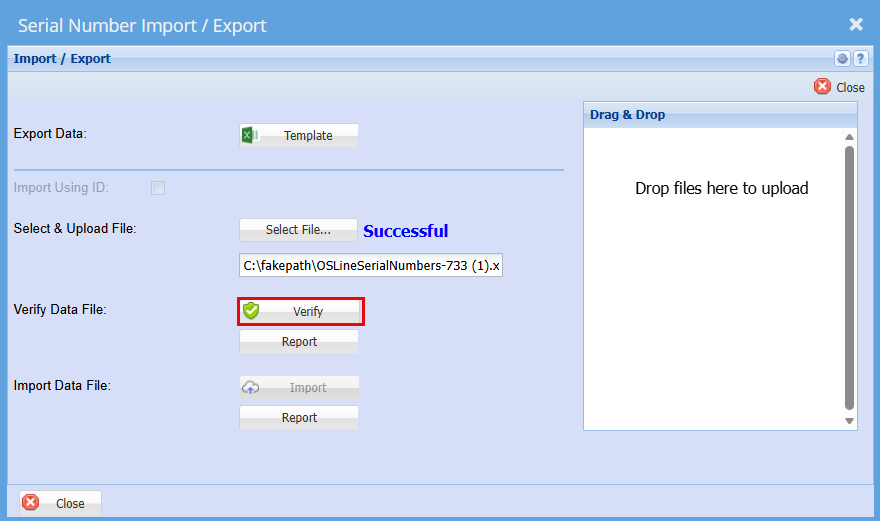
You should again get a successful for verification
- Click "Import"
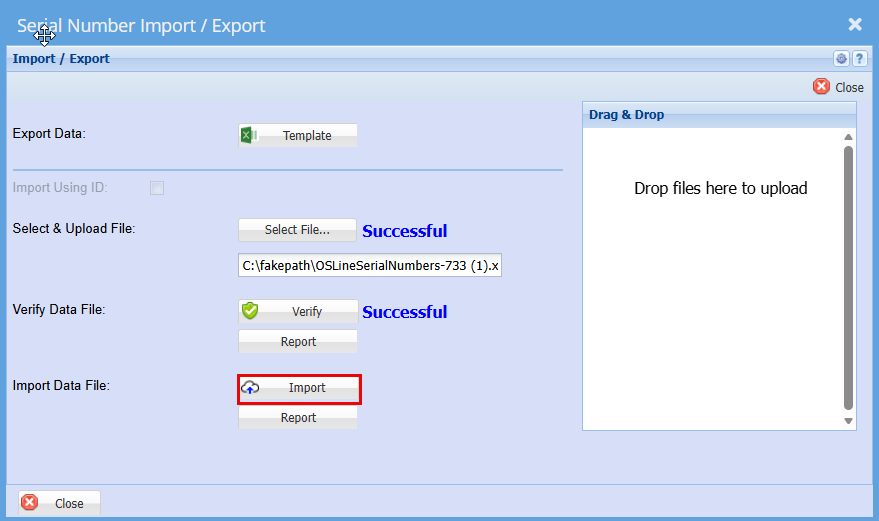
You should then get a Successful for Import.
Click "Close"
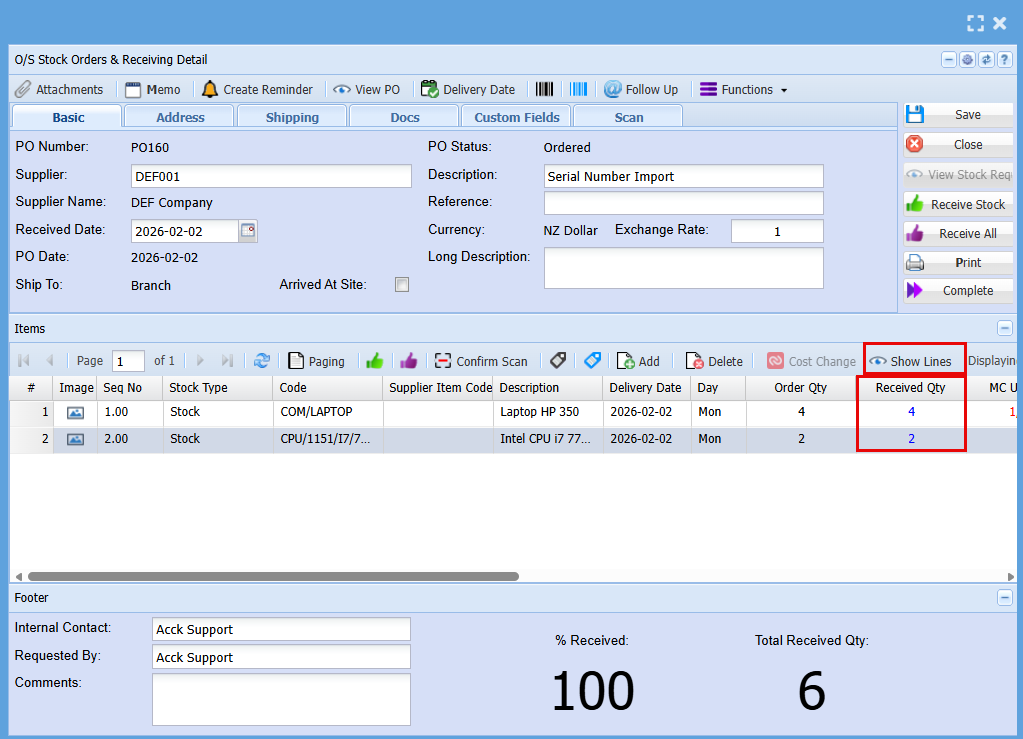
You can go check to make sure by clicking the "Show Lines" button
You will see the "Received Qty" values update.
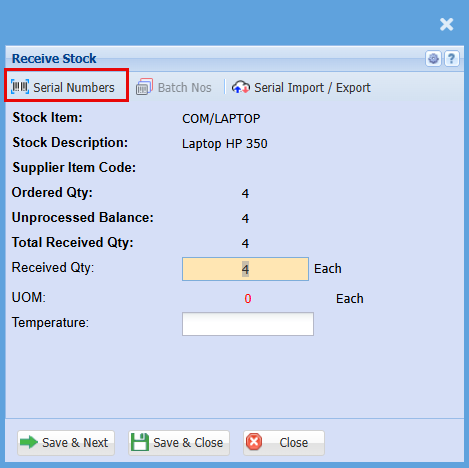
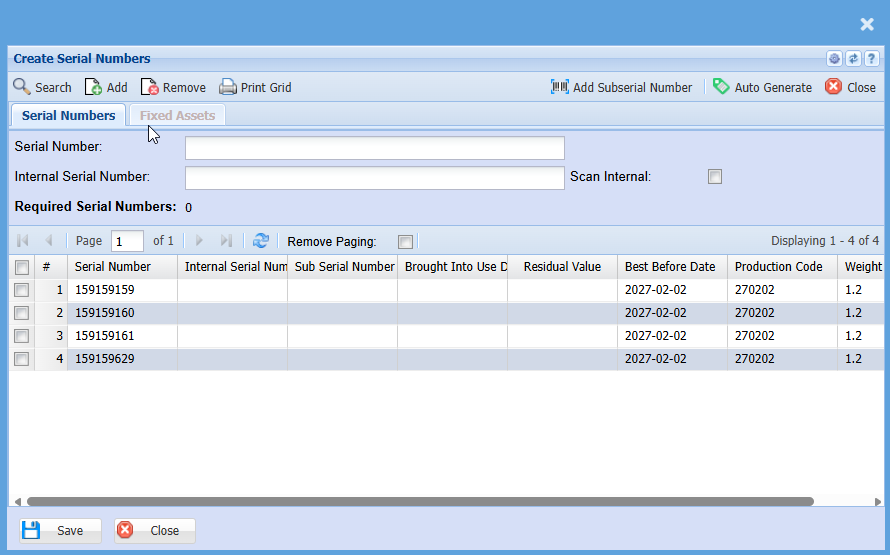
- To view the serial number, double click on the Serialised item line.
- Click on "Serial Numbers"
Serial Number Import (Purchase Order)
Once you receive your order, you many have multiple serial numbers to import into the Purchase Order before pushing it through to GRV,
Purchase Order Serial Number Import
Creditors Module > Activity > O/S Stock Orders & Receiving
- Click on the "Functions" drop-down menu
- Click on "Serial Import/Export"
A window will appear allowing you to export a template that can be used for the import.
- Click on "Template" this will download an excel file
- Enter the serial numbers here, with each item listed on a separate line as shown below.
- Save the file to your computer.
- Go back to the "Serial Number Import/Export" Screen
- Click "Select File"
- Find the file you have saved.
- "Double Click" the file or click "Open"
You should get a Successful Import
- Click "Verify"
You should again get a successful for verification
- Click "Import"
You should then get a Successful for Import.
Click "Close"
You can go check to make sure by clicking the "Show Lines" button
You will see the "Received Qty" values update.
- To view the serial number, double click on the Serialised item line.
- Click on "Serial Numbers"
Receive Stock Menu
Receive Stock Search
Creditors Module > Activity> Receive Stock
The Receive Stock process is the procedure to properly inspect all incoming ordered goods in the system.
Once your Purchase Order has been Ordered, the next step is to receive the items and that process is done in the receive stock menu item
The system allows one to receive all ordered items at once or partially receive items
Receive All
.png)
Select the Receive Stock Menu Item
.png)
The search criteria allows to search by Entering the name of the Supplier or Supplier account code and Press enter (You need only enter the first few letters of the name)
Click on the required Supplier from the drop-down list
Check the date range that the purchase order was done
Click Search.
If you know the Purchase Order Number, you can enter the number and click search as well
Double Click on the required Purchase Order Line
The receive stock window will open up
.png)
If you are sure that you physically received all the correct items and quantities, you can click on the “Receive All” button.
This saves you time from having to receive each item individually. (in the case where you have ordered several items).
Alternatively, click the Receive Stock button
Enter the quantity of the respective item received
.png)
Enter the Actual quantity received of the item.
Click Save and close.
Or Save and Next (if there are more than one item)
The window below shows you at the bottom how much quantity of this Purchase order items was received you can then close the window
Click Close
.png)
.png)
Receive stock to GRV
Once the items have been received, they can now be moved to either a delivery note route or GRV route
Click the Process button and select complete function in the drop down
.png)
On the document type drop down select - GRV
.png)
Enter the Supplier Invoice Number
Click continue
The order now moves to Goods received (GRV).
Receive Stock to Delivery Note
Once the items have been received they can now be moved to either a delivery note route or GRV route
Click the Process button and select complete function in the drop down
On the document type drop down select - Delivery Note
.png)
Enter the Delivery Number
Click continue
The order now moves to Delivery
Receive Stock
Creditors Module > Activity> Receive Stock
The Receive Stock process is the procedure to properly inspect all incoming ordered goods in the system.
Once your Purchase Order has been Ordered, the next step is to receive the items and that process is done in the receive stock menu item.
Huge ERP allows to receive all ordered items at once or
Partially receive items.

Select the Receive Stock Menu Item

The search criteria allows to search by Entering the name of the Supplier or Supplier account code and Press enter (You need only enter the first few letters of the name)
Click on the required Supplier from the drop-down list
Check the date range that the purchase order was done
Click Search.
If you know the Purchase Order Number, you can enter the number and click search as well
Double Click on the required Purchase Order Line
The receive stock window will open up

If you are sure that you physically received all the correct items and quantities, you can click on the “Receive All” button.
This saves you time from having to receive each item individually. (in the case where you have ordered several items).
Alternatively, click the Receive Stock button
Enter the quantity of the respective item received

Enter the Actual quantity received of the item.
Click Save and close.
Or Save and Next (if there are more than one item)
The window below shows you at the bottom how much quantity of this Purchase order items was received you can then close the window.
Click Close

Complete Receive Stock process to GRV
Once the items have been received, the transaction can now be moved to either a delivery note route or GRV route
Select the required PO (Receive stock) from the grid and click the Complete Button
Click the Process button and select complete function in the drop down

On the document type drop down select - GRV

Enter the Supplier Invoice Number
Click continue
The entry now moves to Goods received (GRV).
Note: At this point even though the stock has been physically received, the system will not show the stock available until the GRV is Processed.
If you receive the stock via a Delivery note or wish the stock to be available immediately, even though the GRV is not processed, then you need to select the “Delivery Note” option from the document type drop down on the above screen.
To complete the procurement cycle, you need to process the Goods Received Voucher (GRV) process.
Refer to GRV processing Manual>>>>
Email send on receive stock
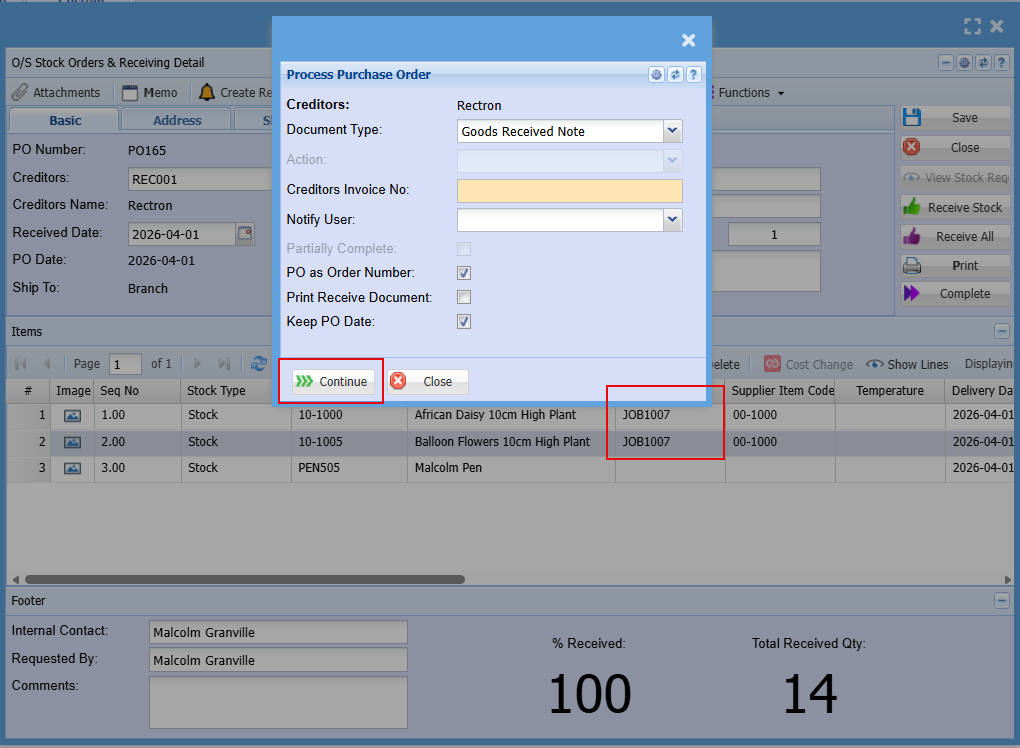
This will only work with Stock Receive lines that are linked to a Job.
Any item that is flagged for sending an email to a customer based on the job number
Setup of items flagged for Receive stock emailing
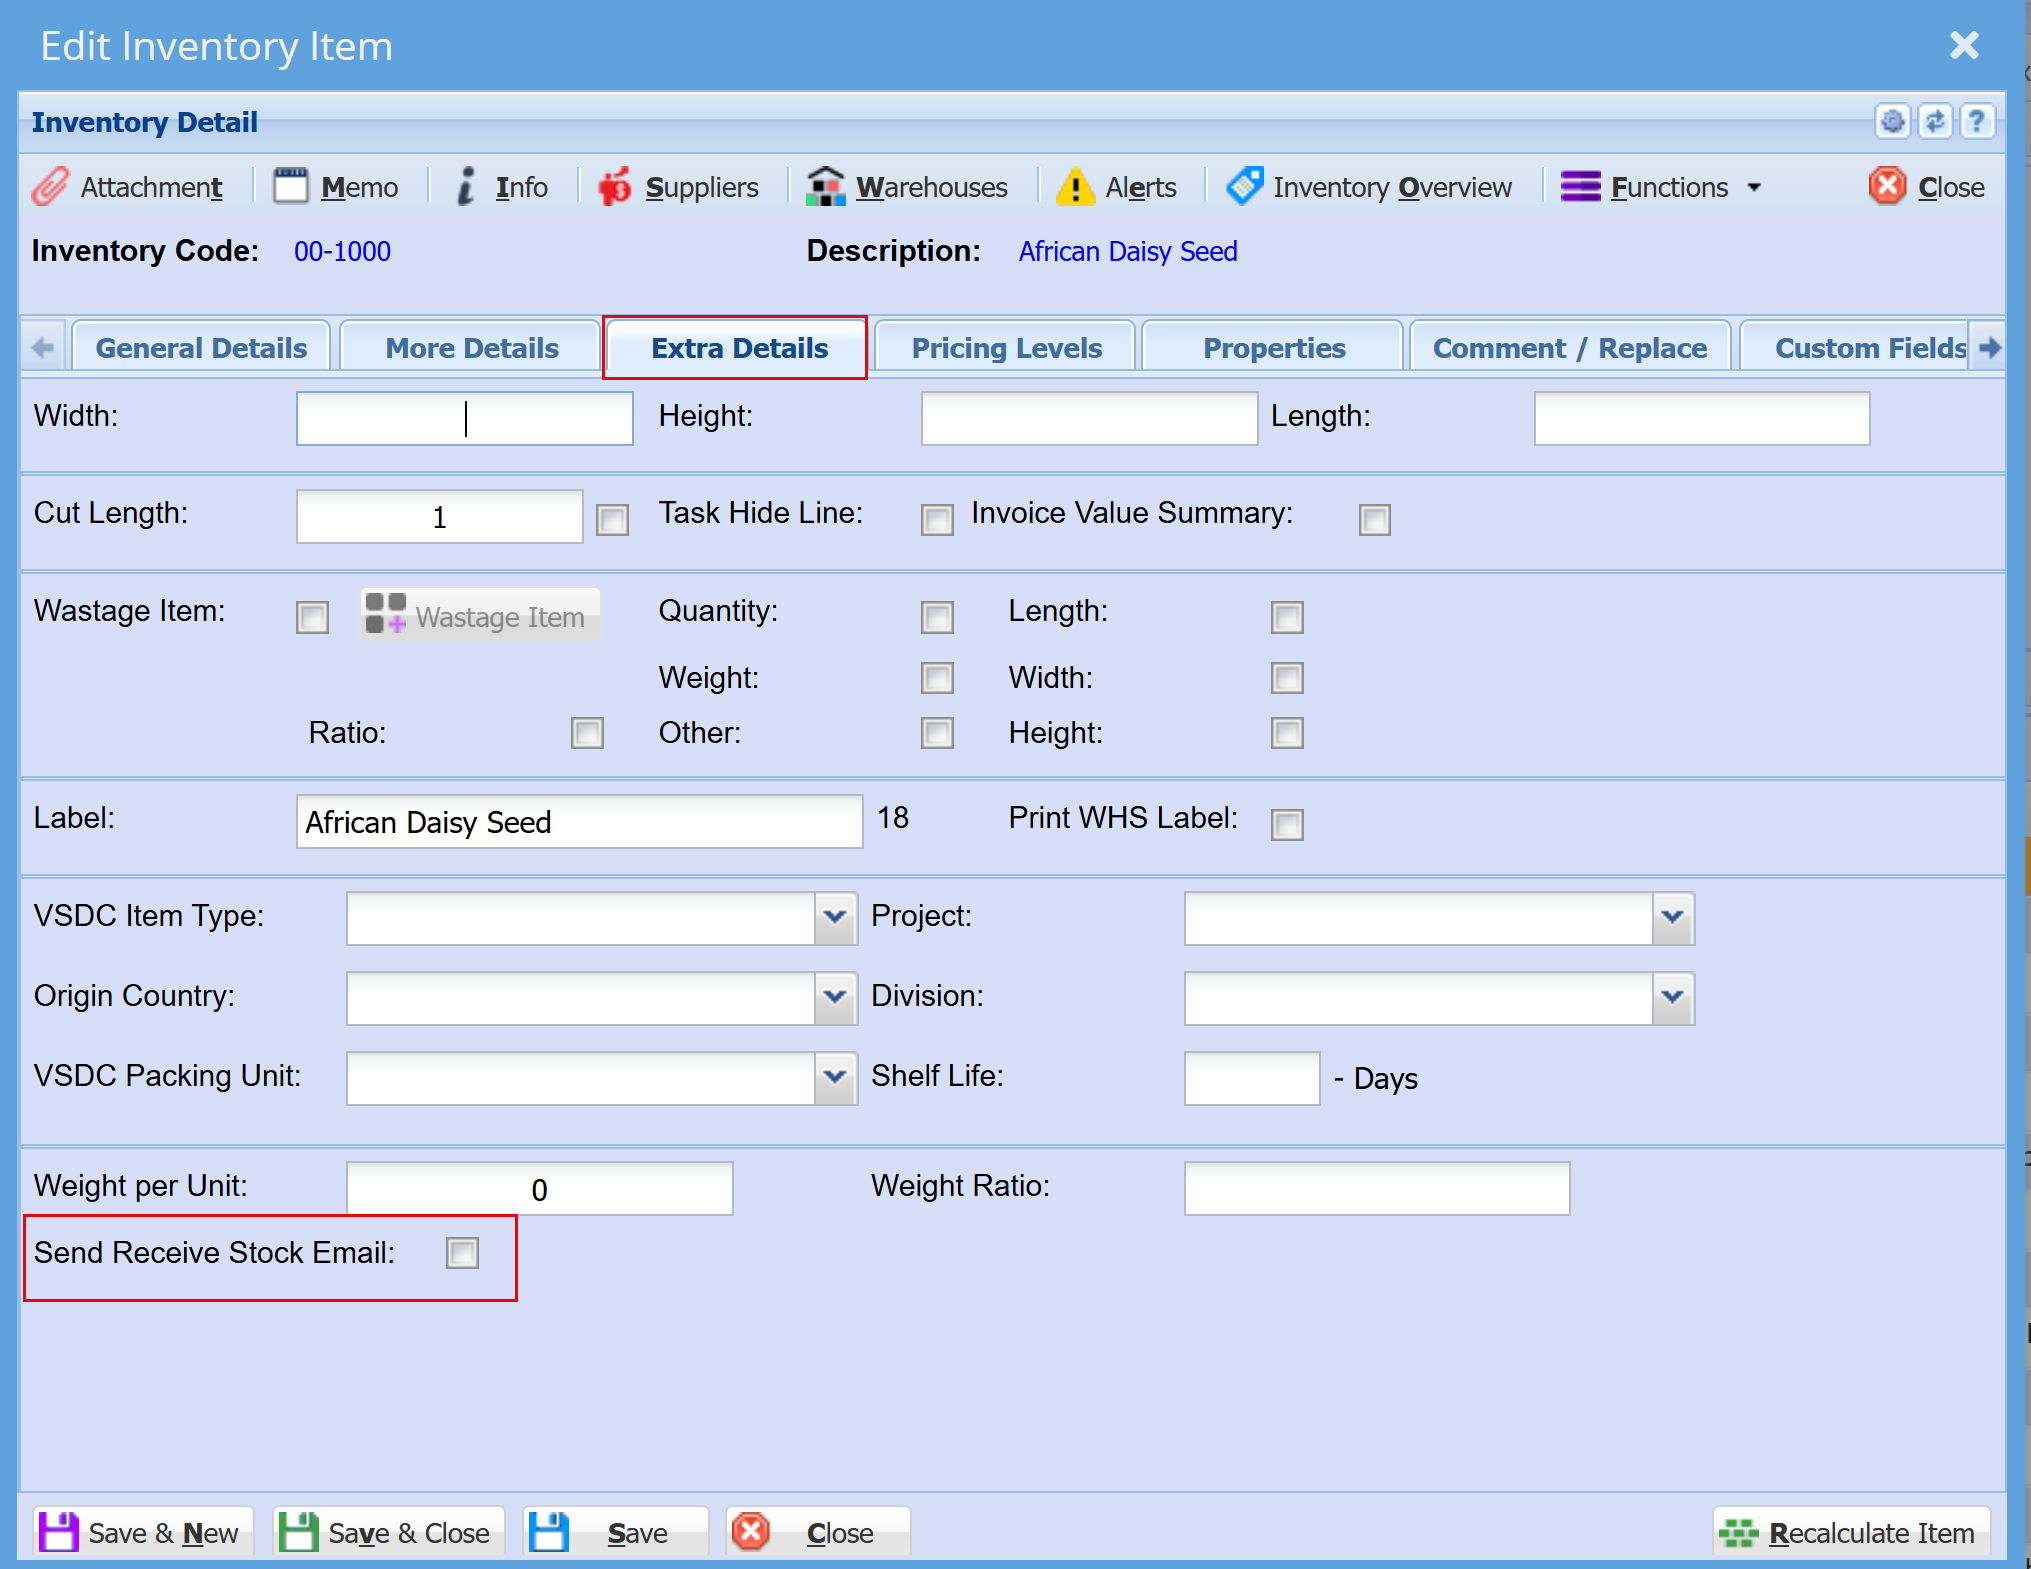
Inventory Module >Configuration > Extra Details
Enable the stock item to allow an email to be sent to the customer of the job line.
- Double click on the item to open and under the Extra Details tab, tick the "Send Receive Stock Email" box
- Click "Save"
On complete of receive stock, an email will be sent to the customer notifying them that stock has been received.
Only the items with job numbers will be sent.
The customer will receive one email with information on the items received that were flagged for Receive stock email.
Email template
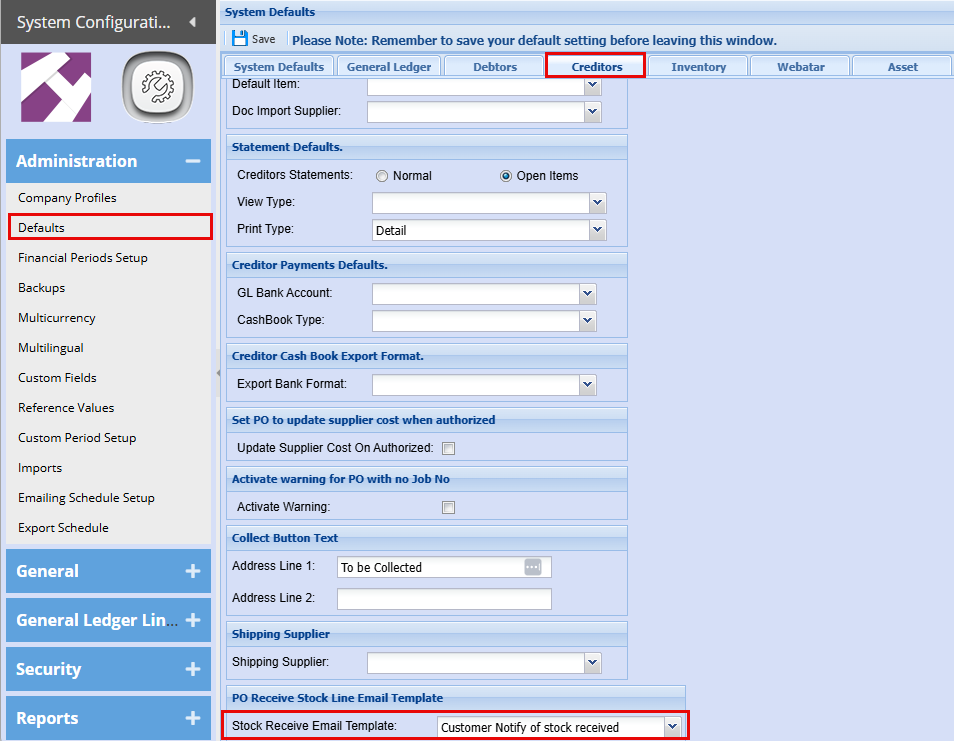
The email template is found in CRM, Configuration setup called Email templates
The type if Receive stock job email
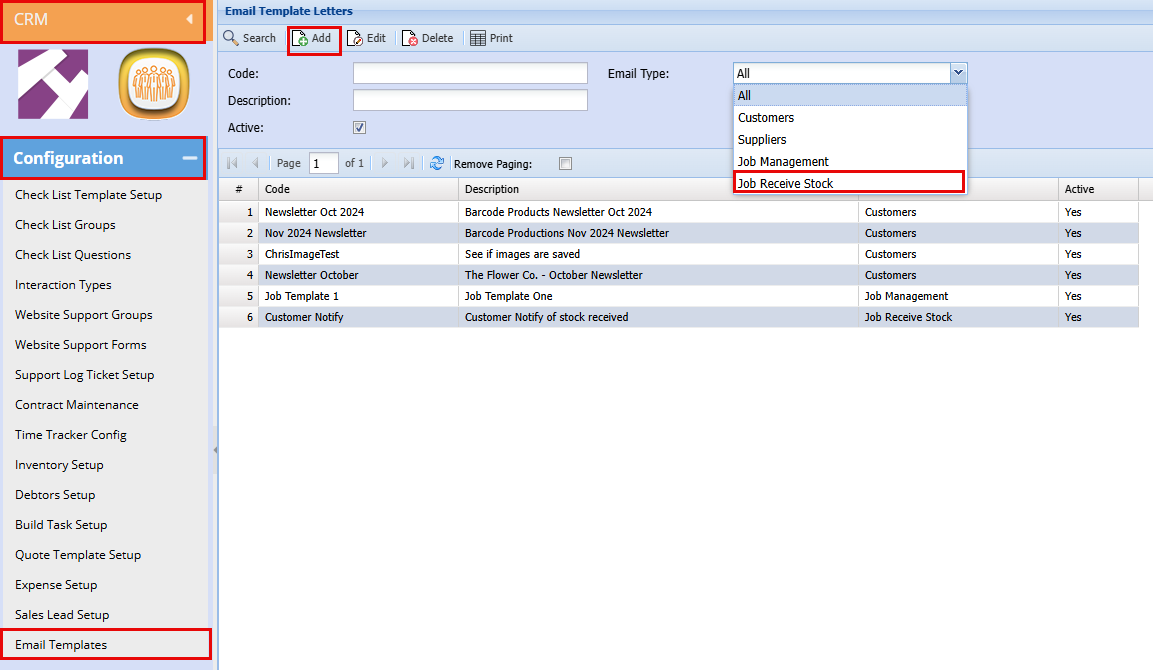
New type for Receive Stock Job line email
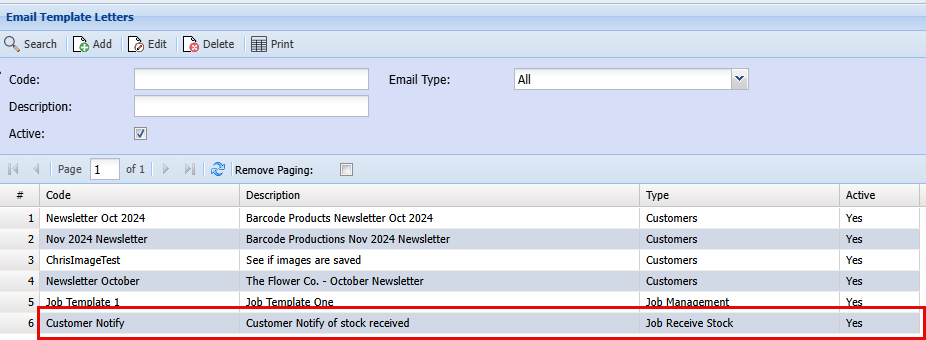
Setup default email template for system
This dropdown will only look at types: Receive Stock Job Line
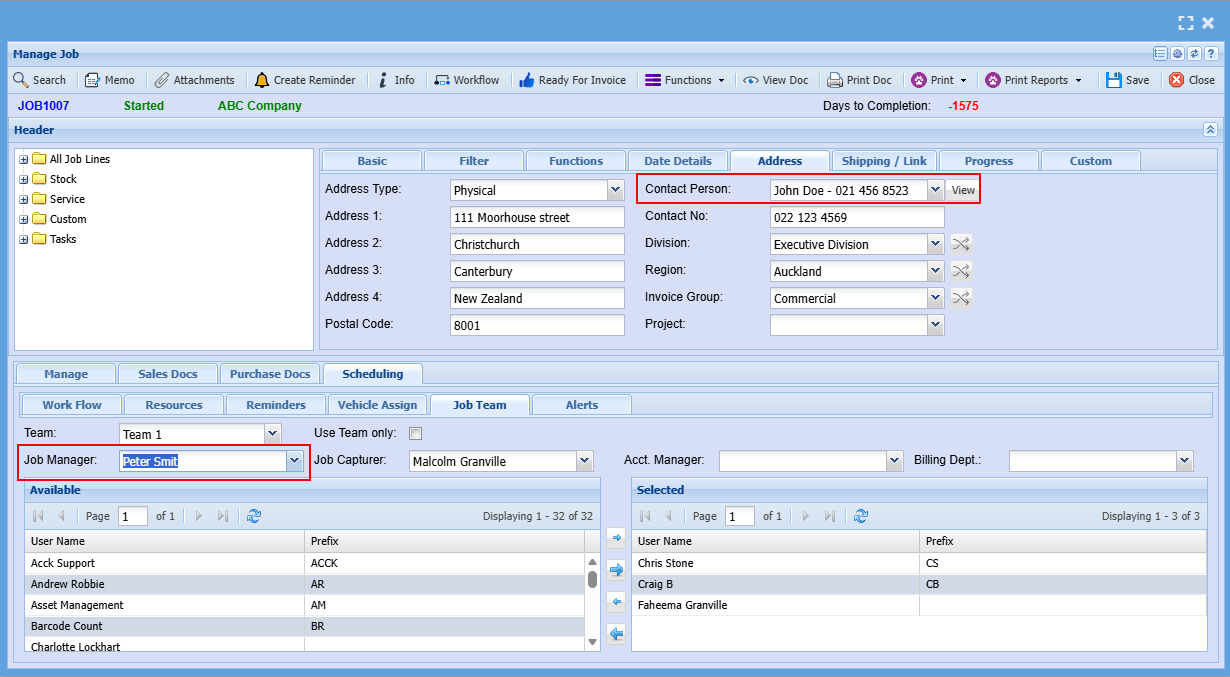
Email will go to two people
- Default contact person of Job
- Job Manager
Delivery Note Processing Menu
Delivery Note Processing Search
Creditors Module> Activity> Delivery Note Processing
.png)
Delivery notes are working documents, integral to the business process of receiving goods.
Advance Search Tab Allows the user to search by selecting from the following:
| Supplier | search by selecting the supplier |
| PO Number | search by entering the PO number |
| Date | search by selecting the From and the date To, |
| Custom Search Tab | search by selecting from the category |
| Standard Tab | has two buttons |
| Amend | allows the user to view or make some changes on the delivery note |
| Process | to processes the selected delivery Note. |
| Print Tab | to print the selected Delivery Note |
Edit Delivery Note

| Attachments | |
| Create Reminder | |
| View Purchase Order | |
| Inventory Overview | |
| Set lines to supplier cost | |
| Split Del Note |
Standard Tab
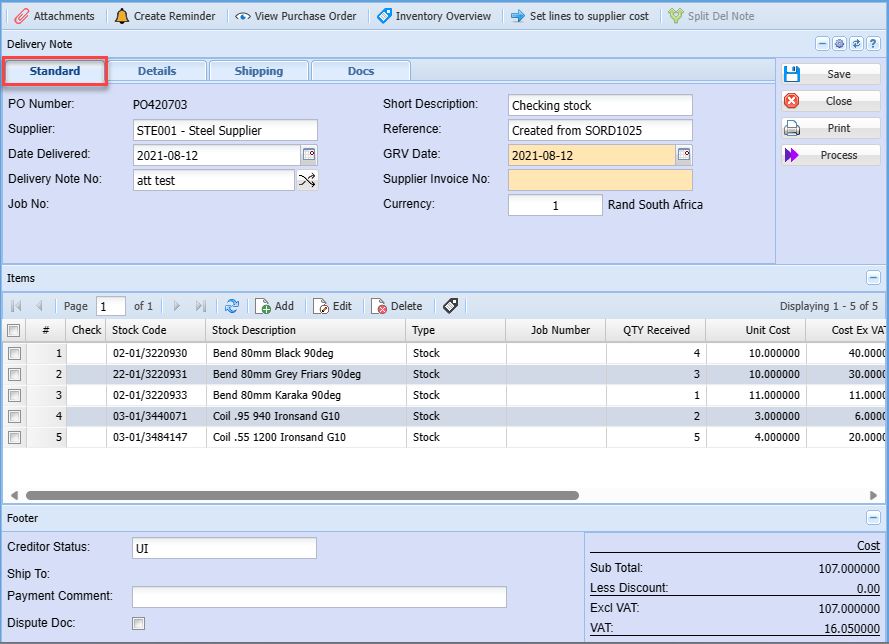
| Supplier | shows the selected supplier |
| Date Delivered | to select the date the item was delivered |
| Delivery Note No. | |
| Job No. | |
| Short Description | delivery note description |
| Reference | delivery note reference |
| GRV Date | |
| Supplier Invoice No. | to enter supplier invoice unique document number |
| Currency |
Details Tab
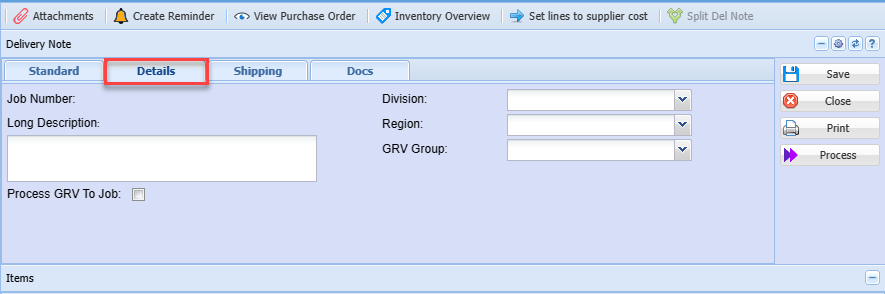
| Job Number | |
| Long Description | detailed description of the delivery note |
| Process GRV To Job | |
| Division | to select the division from the drop down arrow |
| Region | to select he region from the drop down arrow |
| GRV Group | to select the GRV group from the drop down arrow |
Shipping Tab
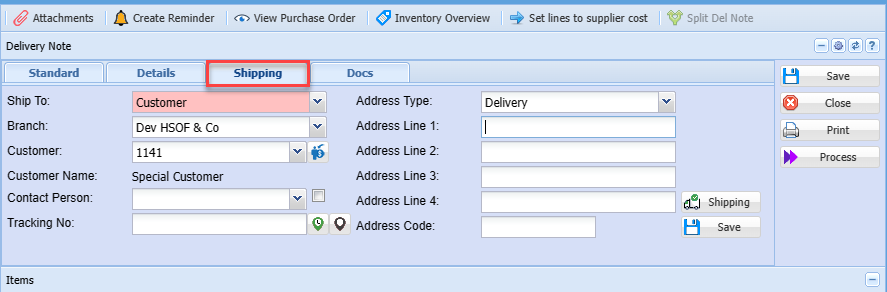
| Ship To | select the customer you shipping to |
| Branch | select the branch you wish to use |
| Customer | select the customer |
| Customer Name | this will automatically show customer name when customer is selected |
| Contact Person | Select the contact person |
| Tracking No. | |
| Address Type |
Docs Tab
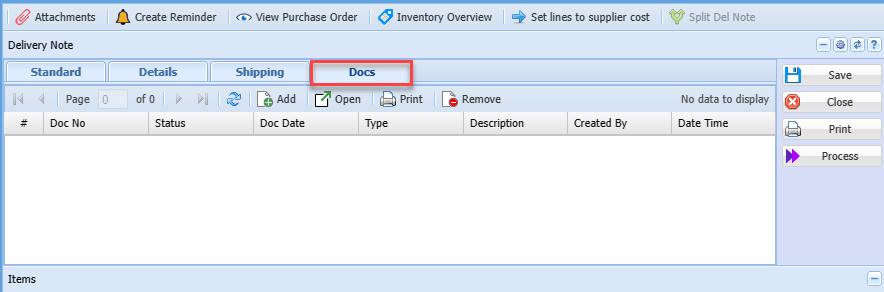
| Add | |
| Open | |
| Remove |
Delivery Note Process
Creditors Module>Activity> Delivery Note processing
Delivery note process is where a company can receive stock into the system with a delivery note and without a supplier invoice.
When completing the receive stock quantities, select the Delivery note option on complete
.png)
Click Ok.
.png)
The Purchase Order will now move to the 'delivery note' menu item.
For quick search use the basic search field tab and search using - Use the delivery note number, or Purchase Order Number, Or Reference
Enter the details and click search
.png)
After the receive stock has been completed, the document will change status to Delivery note, where one can match the Delivery note to the actual supplier invoice.
Should there be any changes to the delivery note price to the supplier price, one can amend and change the price of the items.
Only price changes can be made, quantities cannot be changed.
Amending the price of an item, changing the price from a unit cost of 10.00 to a unit cost of 15.00, that means an increase in price change of 5.00. This change will update the ledger account called Cost Price Variance.
The Delivery note can be processed.
Two things will happen.
GRV will be created, processed and the delivery note general ledger account is balanced
General Ledger postings for Delivery Note
There are two stages to the General Ledger postings for Delivery note to Supplier Invoice (GRV)
When stock is received without the supplier invoice, one can receive the stock into the system.
The cost price of the stock will be based on the Purchase Order value.
VAT / GST is not taken into account until the supplier invoice is captured.
The creditors delivery note value is the potential value owed to a supplier based on goods received without an invoice.
See ledger accounts updated.
| Account | Debit | Credit |
| Creditors Delivery Note | 50.00 | |
| Stock control account | 50 |
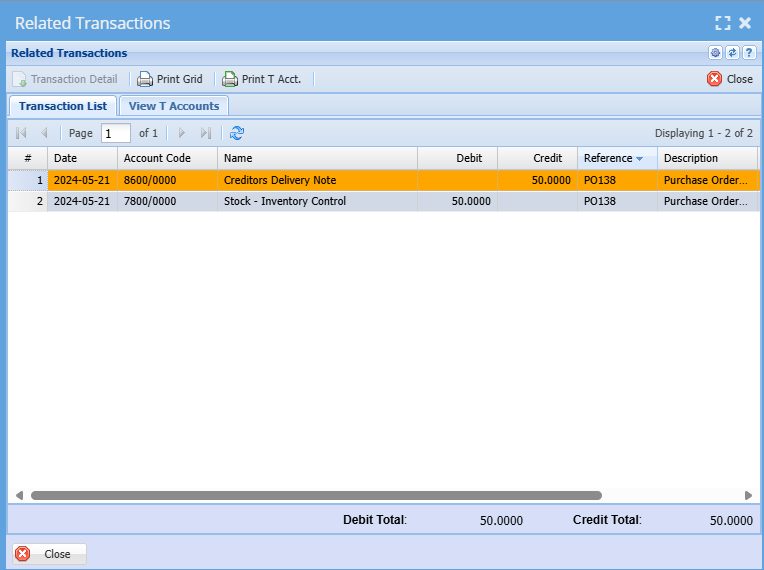
When the invoice is received, check the invoice against the value of the purchase order. If there is a difference capture the value difference in the delivery note confirmation screen.
Process the delivery note to a supplier Invoice (GRV).
After you have processed the delivery note, the amount will appear on your Creditors age analysis.
The cost price variance account will only update IF the value between the purchase order and the supplier invoice are different.
See ledger accounts updated.
| Account | Debit | Credit |
| Creditors Control Account | 57.50 | |
| Creditors Delivery Note | 50.00 | |
| VAT / GST Control | 7.50 | |
| Cost Price Variance |
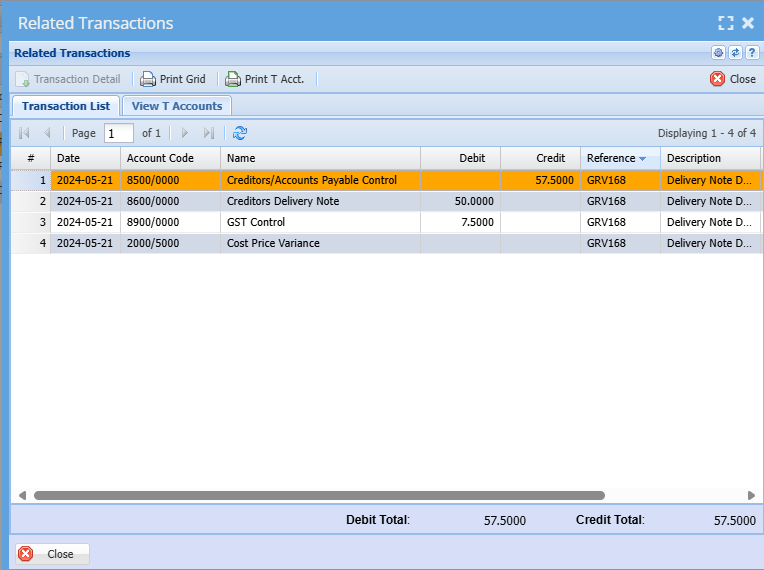
Creditors Delivery note account should always equal to zero IF you have received all the invoices from the suppliers.
A balance can happen at month end or year end, if one has not received the matching supplier invoice.
There can be a timing difference between the date receipted of goods to the date of processing the supplier invoice.
Reports
To add the new reports for Delivery note, go to System Configuration Module>Security>Report Security
Click on the Permissions button to add the permissions to the user role to add the reports.
The two reports are:
| Delivery note Age Analysis | this report shows the outstanding amounts in an age analysis format of delivery notes received but not posted to Creditors Control Account. This report should also balance to your Delivery Note Creditors Ledger account on your Trial Balance |
| Purchase Order to GRV unit price variance | This shows a report on all stock items that have had a price variance alternated between the Purchase Order unit cost. Receipt of the stock at that unit cost price and the change price of the Delivery note GRV. |
Reports
| 1 | Delivery note Age Analysis |
| 2 | Purchase Order to GRV unit price variance |
Goods Received Notes (GRV) Menu
Goods Received Note (GRV) Search
Video training manual 2016 - Click Here
Creditors > Activity> Goods Received Note
Record of goods received at the point of receipt. This record is used to confirm all goods that have been received
.png)
Clone GRV
.png)
Clone Function
Select the GRV you want to clone and click on Clone Button
Import
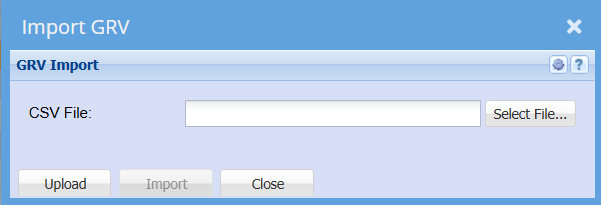
Import XML into GRV
Creditors > Activity > Goods Received Note
.png)
Import into GRVs from XML Help
The function of this window is to import data from a predefined XML file into GRV documents.
The following action are carried out during the importation process
| 1 | The XML file is read and GRVs are created and processed. |
| 2 | Create a reciprocating invoice converted it to a PDF file and attached it to the GRV. |
| 3 | Create a Creditors Cash Book for all the successfully processed GRVs. |
At various stages during the above action an email will be sent to the selected recipient reporting on the errors or failures of the process.
When initially opening the import window only the Select File button is active. Click on this button and navigate to the location of the XML file that is to be imported. Once the file has been located and select click on the Upload button. A confirmation message will be displayed if the file was successfully uploaded. Click OK to continue.
The input items are required and cannot be skipped.
Select a user from the drop down / quick search box to email the error / failure report to.
Select the Bank Account that will be used when creating the Creditors Cash Book.
Enter a name for the Creditors Cash Book.
Cash Book Reference.
Cash Book Date.
Once all the above have been selected / entered then click on the Import button.
Farmland Invoices Import
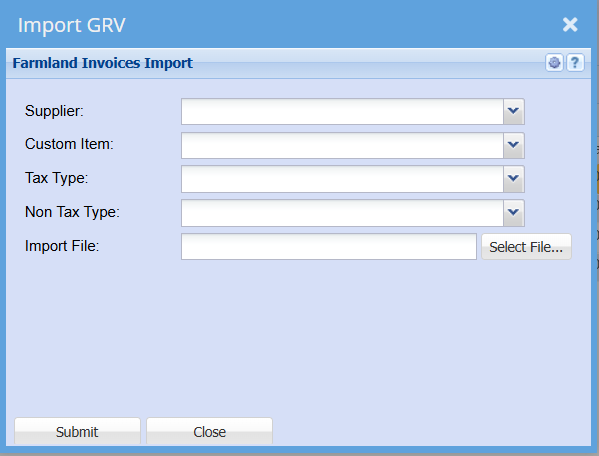
Edit Goods Received Note
This is where GRV is created
Basic Tab
.png)
| Supplier Name | will show the name of the supplier once it has been selected and saved. |
| Supplier | to select the supplier |
| Date Received | to enter the date on the suppliers invoice |
| Short Description | to add brief description of the invoice |
| Reference | to enter the reference of the invoice |
| Order Number | to enter the order number of the invoice |
| Supplier Invoice No | to enter supplier’s invoice number |
| Debtor Status | enter creditor’s status |
| Address Tab | shows a creditors address details |
| Save button | saves above details and the rest of the functions will be visible |
| More Details button | allows a user to add some details relating to the invoice |
| Process button | to process the invoice |
| Close button | closes goods received note screen |
| Document Currency Tab | shows goods received note lines currency details |
| System Currency Tab | shows goods received note lines system currency details |
| Clear Discount button | removes the discount |
| Insert | to create GRV lines |
| Edit | view or allow some changes to be done on the invoice lines |
| Delete button | to delete selected GRV lines |
| Print button | to print the GRV |
| Import S/N Tab | is used to import serial number items |
| Extra Tab | allows the user to view how the GRV was prepared from purchase order |
| Reminder Tab | to set up a reminder of anything, works like an alarm |
Goods Received Voucher (GRV) Process
Go to Creditors Module> Activity
Select Goods Received Note (GRV) menu item

Enter the Supplier Name and select the required Date Range
Click Search

You can Double Click the Line or Click the Edit button in which case the GRV will open and you can then verify any details.
Typically, there would be no need to make any changes at this stage.
The Supplier invoice should now be attached to the GRV:
Click on the Attachments Icon

As shown in prior manuals, you can upload the document from a folder on your PC or you can Drag &Drop the document.

Enter a Name and description for the document.
The document will be uploaded.
You can click once on the attachment line in the grid and then click View button to view the document attached.

Once you are satisfied that the entry is correct and all supporting documents attached, you can now process the GRV
To do this, highlight the transaction on the grid and click the Process button

Click Yes on the Pop up message
The GRV will then Print to screen.
You can then print if needed. This is not necessary as all documents are stored on the system and can be retrieved at any time.

The Goods Received Voucher (GRV) is now processed, which updates the Stock control account, Stock Quantities and the Supplier Account.
In the event that a Purchase order relates to non-stock items, then the respective General Ledger Accounts as setup on the Custom Items setup will replace the stock control account.
Alternatively, the administrator could set the system to prompt for Posting:
This feature allows the user to select the GL account to be posted to for transactions.
Eg: in the case of a custom item, let’s say Telephone expense:
When you process the GRV, the below screen can be triggered which allows you to select the required contra GL account

| 1 | Tick the Box to edit the respective line |
| 2 | Select the required GL Account |
| 3 | Click Saves Changes to Grid |
| 4 | Click Save |
| 5 | Click Continue |

Processing GRV from Delivery Note
With the receive stock process we mentioned that stock could be received via the Delivery note option.
If this option is selected at receive stock, then the entry will be found under the delivery note Processing Menu item and not the Goods Received Note Menu

Search for the required PO ( Delivery note entry)
Ø Double click or click the edit button to open the transaction
Ø Enter the Supplier Invoice number
Ø Click Save and Process

This then processes the Delivery note and the GRV
GRV Attachments
Select Goods Received Note (GRV) menu item
Enter the Supplier Name and select the required Date Range
Click Search
.png)
You can Double Click the Line or Click on Amend, in which case the GRV will open and you can then verify any details.
Typically, there would be not need to make any changes at this stage.
The Supplier invoice should now be attached to the GRV:
Double click the line (on the above screen)
.png)
Click on the Attachments Tab
Click Upload Attachment
.png)
Enter a description for the document
Click on Browse to search for the files saved on your PC
Once found and selected, click the Upload Button
.png)
The document will be uploaded.
You can click on “View Attachment” Button to view the document
Prompt For Post
Creditors > Activity >Goods Received Note > Process
When the prompt for posting screen comes up and you want to change the ledger account that it posts to, tick on the box next to the transaction.
.png)
Once the ledger account is changed click on the save changes to grid button to change the account.
.png)
To change the next account you will need to tick the second line. Do the same as the above.
Now that the changes has occurred you can click on save button and Continue button.
After clicking on continue the GRV will be processed.
This is a view of the related transactions after processing the GRV.
.png)
This part shows the accounts involved in a transaction.
| Transaction List Tab | shows a list of transactions involved |
| View Accounts Tab | to view the t-accounts |
| Print Grid button | to print the transactions |
| Print T Account button | to print the T accounts |
Outsourcing Work
This manual describes how one can receive a product and send this product out to an external supplier. This supplier changes the product and charges you an admin fee for the work done, however you receive a different product back into stock with the additional value.
The first thing one must do is work out what products are been created.
Example
Raw material Aluminum sheet- Cost R1000-00 per sheet
Qty
L-shape bracket 1 R200-00
U-shape bracket 1 R500-00
T-shape bracket 1 R300-00
Cutting cost by Supplier R500-00
End products coming back into stock – Total cost of this must be R1500-00
The system will also work out the additional price per product.
Qty
L-shape bracket 1 R400-00
U-shape bracket 1 R600-00
T-shape bracket 1 R500-00
Here is the process you will follow.
| 1 | Bring in raw material stock |
| 2 | Create a outsource supplier |
| 3 | Do a stock return for the value of the stock item to this outsource supplier |
| 4 | Do a GRV with importation spilt of the new items against this outsource supplier |
Brining in current stock via a GRV
.png)
Create an outsource supplier – normally the name of the supplier with outsource in front.
.png)
Sending out the sheets to the supplier
When capturing the stock to go out to the outsource supplier, make sure it is at the average cost price of the item.
Make sure that you select Non-VAT, as you have already claimed the VAT on the actual GRV of raw materials stock.
.png)
Stock return to Outsource supplier
This way you can track how much stock the supplier has that you have sent him.
.png)
You will notice in your outsource supplier age analysis that it is in credit
.png)
GRV incoming of new stock
Some points to remember
The stock items must be the cost value of the cost price of the Aluminium.
Value out equals value in.
.png)
Next step is to add the value of the cutting of the other supplier onto the GRV. We will do this by doing the importation split.
On the GRV, click on More details button
.png)
Then click on the Importation Split
.png)
Then click on the Insert Line button to add the invoice from the supplier who charged for the cutting of the sheet.
.png)
This is where you will insert the supplier invoice with the VAT.
.png)
Click on close to update the GRV lines and then SAVE and CLOSE button
.png)
The GRV lines will be updated with the new additional unit cost of the cutting which then gets added to the item cost.
.png)
If you are not happy with the additional cost per item you can manually allocate the additional costs to the items.
Go to More details button and then click on Manual Importation Split button, this allows one to put your own cost price in per item.
.png)
In this one action, the new finished goods are updated, the added value to the items are updated and the supplier invoice is captured into the system.
The Outsource Creditor will balance to zero,
IF the value does not balance you can journal out the value to a Cost of sales account to balance the creditor account.
.png)
Creditor who did the cutting
.png)
Outsource GRV Ledger accounts
As you can see the stock has increased by the new value
.png)
Outsource Creditor
GRV with Importation Split
Creditors/Suppliers > Activity> GRV
Typically, one would only use the importation split function when purchasing from a foreign supplier in the respective foreign currency.
Let’s use the below sample data:
| Foreign Supplier | IS Foreign Supplier |
| Item Purchased | Brother LC23 Value Pack at cost price of $30 |
| Quantity Purchased | 2 |
| Shipping Details | |
| Cartage Company | DHL Couriers |
| Non-Vatable cartage/Shipping charges | R 200 |
| Custom VAT: (100% of which is VAT) | R 3000 |
| Standard Vatable cartage/shipping charges | R 1800 |
| Capture the GRV as you would normally do | |
| Select the Foreign supplier | |
| Enter the Date | |
| Enter the Description | |
| Enter the Reference | |
| Enter the exchange Rate applicable | in this case 14 |
This is the exchange rate at which the item was secured. Also know as Spot rate in most cases.
Ener the Supplier Invoice Number. This is the Invoice number from the supplier of the item.
Your screen will now look as follow:
.png)
Proceed to enter the item(s) purchased
Select the item
Enter the quantity
Enter the Purchase price (in the foreign currency, in this case $30)
Change the VAT type to: Non-VAT
Click Save and Close
Repeat these item entries for each different item you purchased.
Your screen should then look as follows:
.png)
.png)
Once all the items have been captured, you can proceed to capture the Shipping invoice:
On the above screen, click the Importation Split Button
Then click the Add Button
On this screen you are going to enter the details on the Shipping or Cartage company Invoice
Select the shipping Company in the Creditor field
Enter the invoice number (invoice number of the shipping company)
Enter a Reference
Enter the Order number
Enter the Description: The description could be the line-item description on the shipping invoice, if you are capturing each line individually.
OR you could capture all the Non-Vatable Line Items as a single line and the al the Vatable Lines items as another line
And finally, the Custom VAT line item as the 3rd Line
.png)
.png)
.png)
Once the transaction is processed
Vat report will reflect these entries as shown below
Report List> VAT> VAT Report Original
GRV VAT Portion
.png)
NON-VAT Portion
.png)
Import Tax Portion
.png)
View Image Button
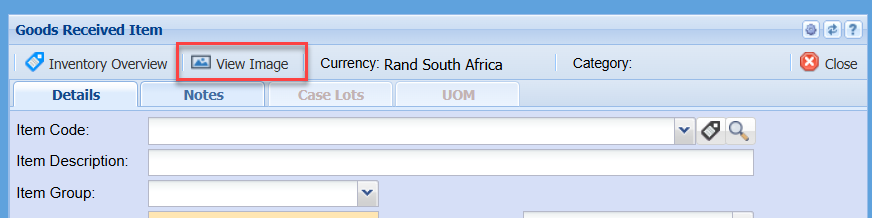
GRV posting detail per line on GL
When Processing Goods received notes (GRVs) the document header description is used by default as the transaction description on the general ledger.
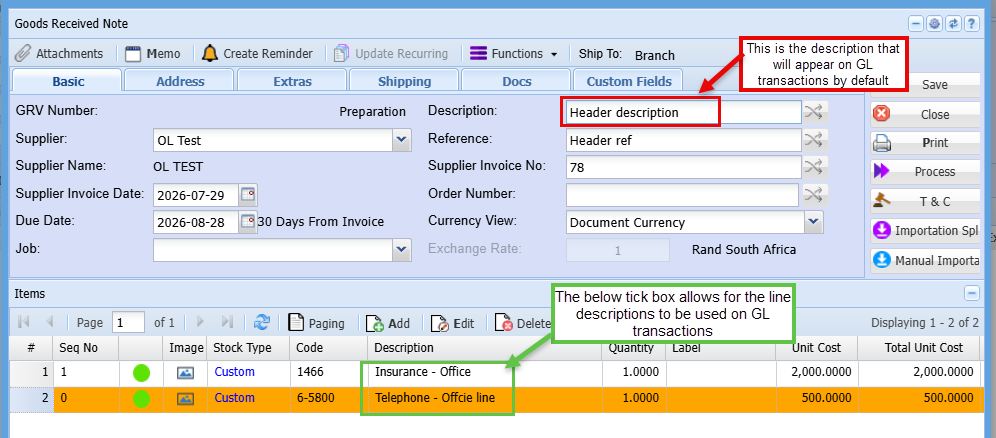
Should you prefer the line item description to be used as the GL transaction description, then you will need to activate the:
Detail per line on GL tick box
Click the Extras Tab
tick the Detail per line on GL box
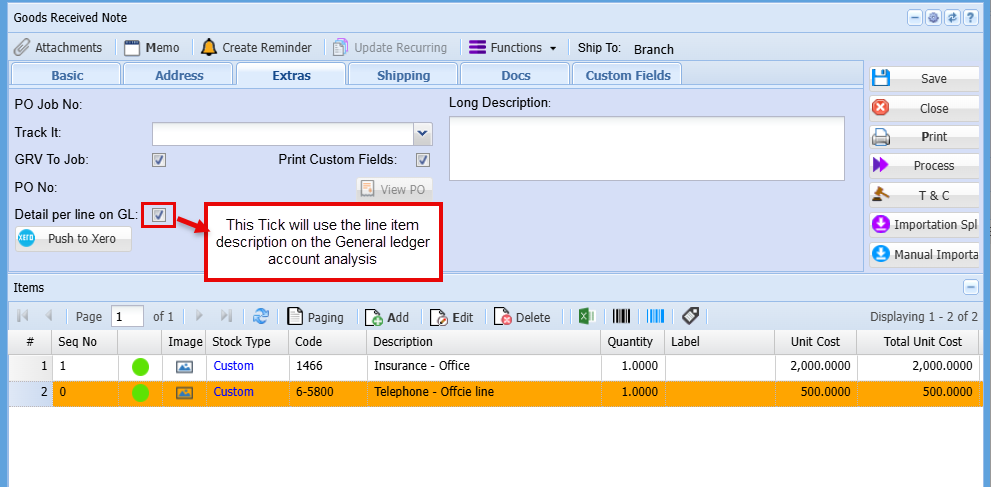
This will then show the line description on the GL accounts.
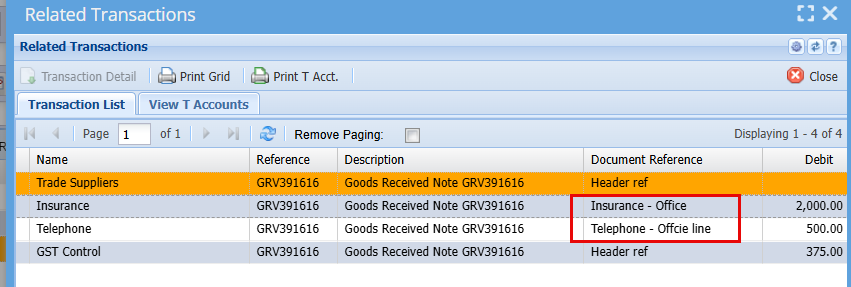
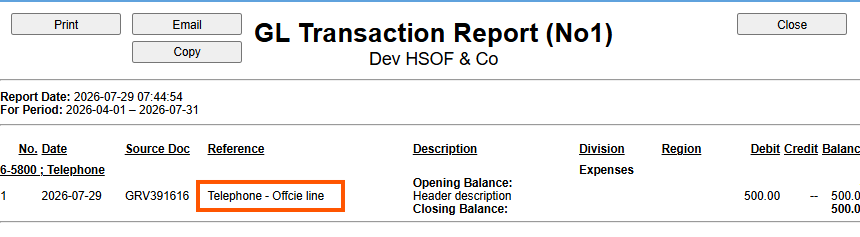
New GRV Importation Split Manual Scansku
GRV with Importation Split from Purchase Order for ScanSku
Once you receive stock from a supplier and added all the serial numbers as required, you now need to GRV the stock in.
Go to the Goods Received Note tab under activity: Double click on the PO you are bringing in. To add the costs of freight to your landing costs you need to add the freight amount at the bottom of the Footer section, as per the screen below, or you can add this as a separate Creditors Shipping line item when you do the importation split.

Once all the items have been captured, you can proceed to capture the Shipping invoice:
Click Importation Split Button found at the Top right of the Goods Received Note (GRV)

Then click the Add Button


On this screen you are going to enter the details on the Shipping or Cartage company Invoice
Select the shipping Company in the Creditor field
Enter the invoice number (invoice number of the shipping company)
Enter a Reference
Enter the Order number
Enter the Description: The description could be the line-item description on the shipping invoice, if you are capturing each line individually.
OR you could capture all the Non-Vatable Line Items as a single line and the al the Vatable Lines items as another line


Once you have added your lines you can look back at the GRV Note and you will see the additional cost added to the landing cost of each stock item.

Before processing the GRV we would recommend updating the Exchange rate to reflect what it was the day payment was made to the supplier, this will save you having to do another entry later to offset the difference.

GRV with Importation Split from Purchase Order (Generic)
GRV with Importation Split from Purchase Order
Once you receive stock from a supplier and added all the serial numbers as required, you now need to GRV the stock in.
Go to the Goods Received Note tab under activity: Double click on the PO you are bringing in. To add the costs of freight to your landing costs you need to add the freight amount at the bottom of the Footer section, as per the screen below, or you can add this as a separate Creditors Shipping line item when you do the importation split.
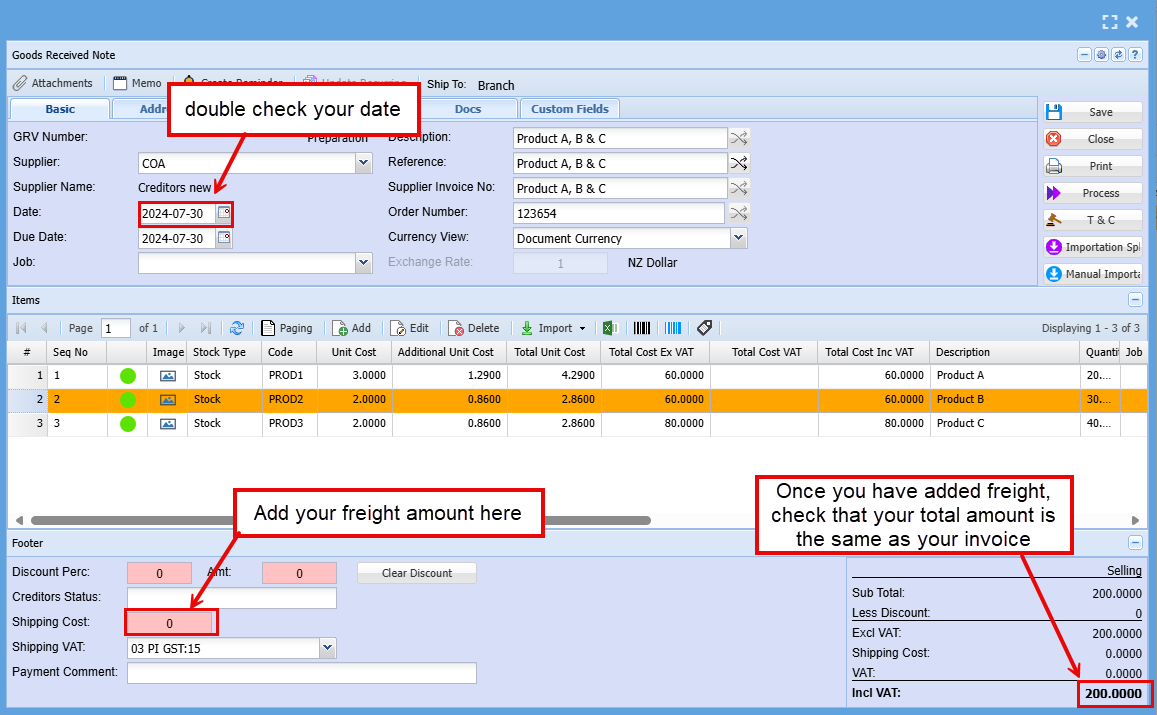
Once all the items have been captured, you can proceed to capture the Shipping invoice:
Click Importation Split Button found at the Top right of the Goods Received Note (GRV)
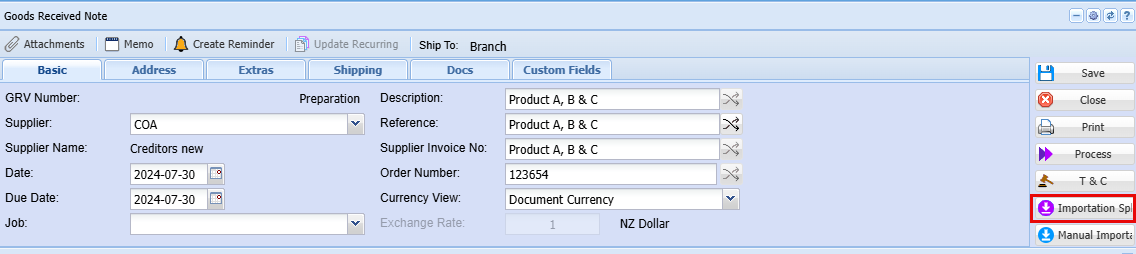
Then click the Add Button
On this screen you are going to enter the details on the Shipping or Cartage company Invoice
Select the shipping Company in the Creditor field
Enter the invoice number (invoice number of the shipping company)
Enter a Reference
Enter the Order number
Enter the Description: The description could be the line-item description on the shipping invoice, if you are capturing each line individually.
OR you could capture all the Non-Vatable Line Items as a single line and the al the Vatable Lines items as another line
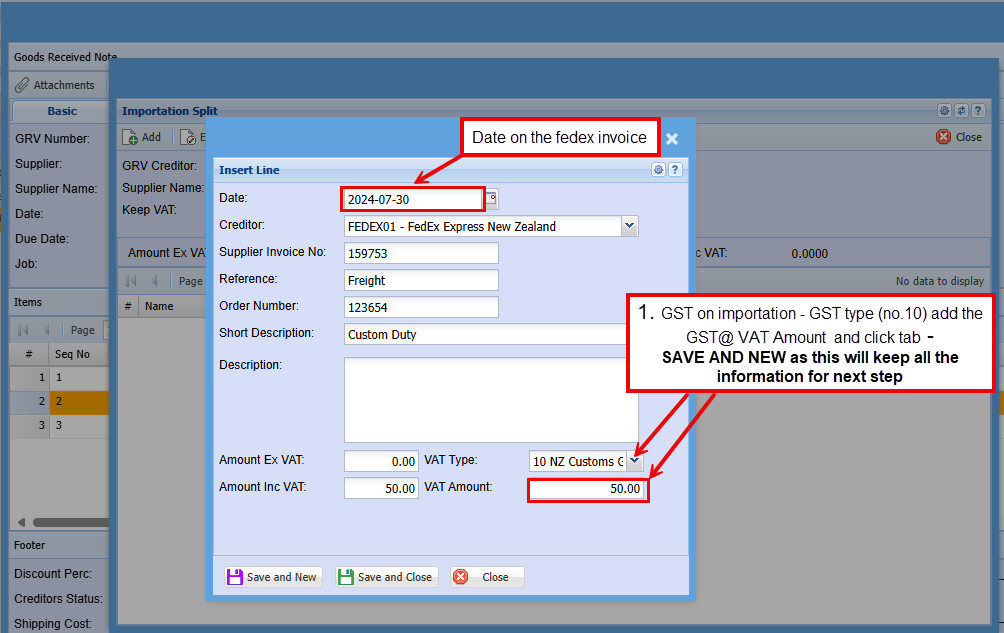
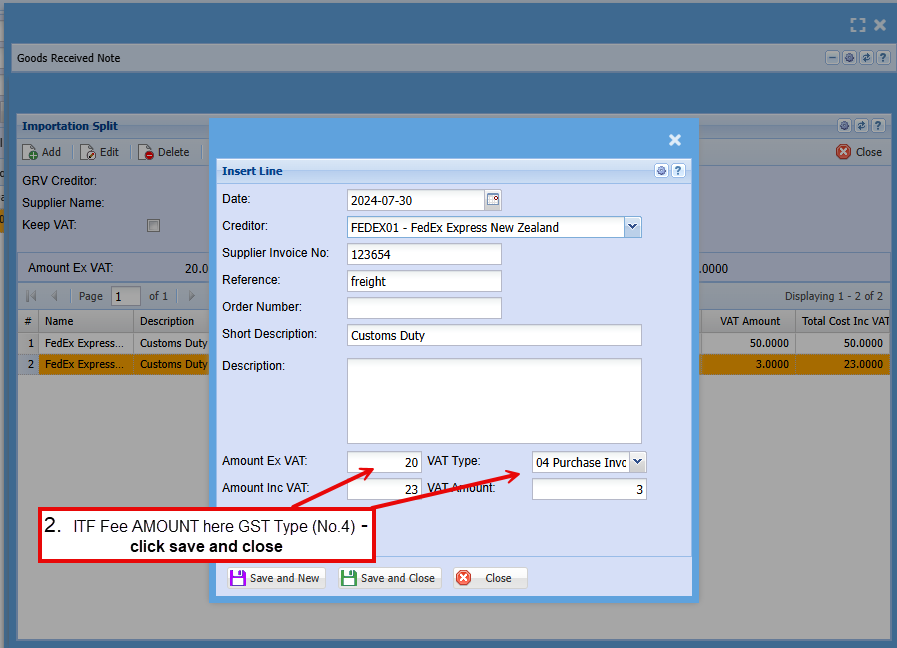
Once you have added your lines you can look back at the GRV Note and you will see the additional cost added to the landing cost of each stock item.
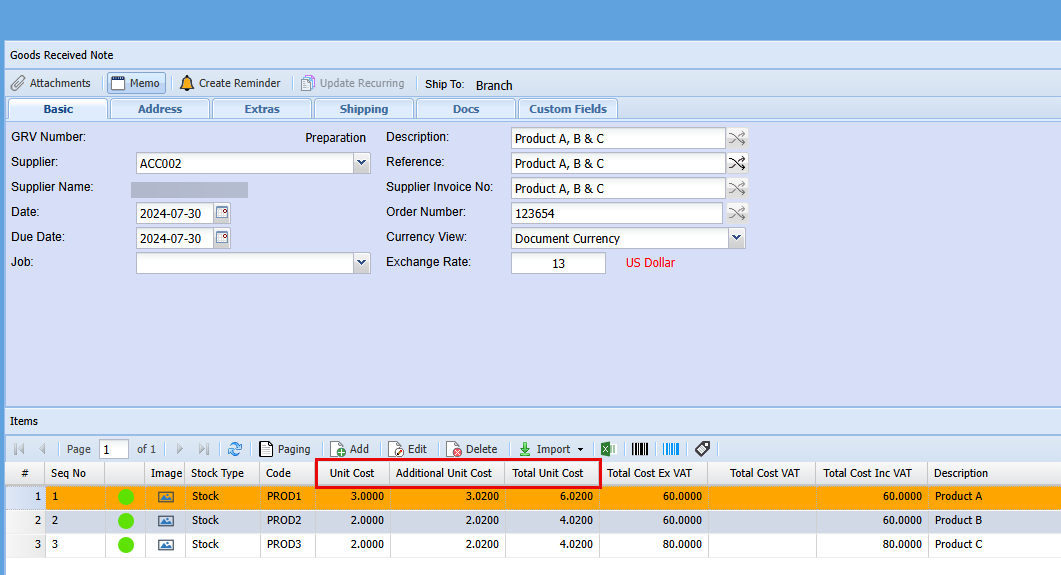
Before processing the GRV we would recommend updating the Exchange rate to reflect what it was the day payment was made to the supplier, this will save you having to do another entry later to offset the difference.
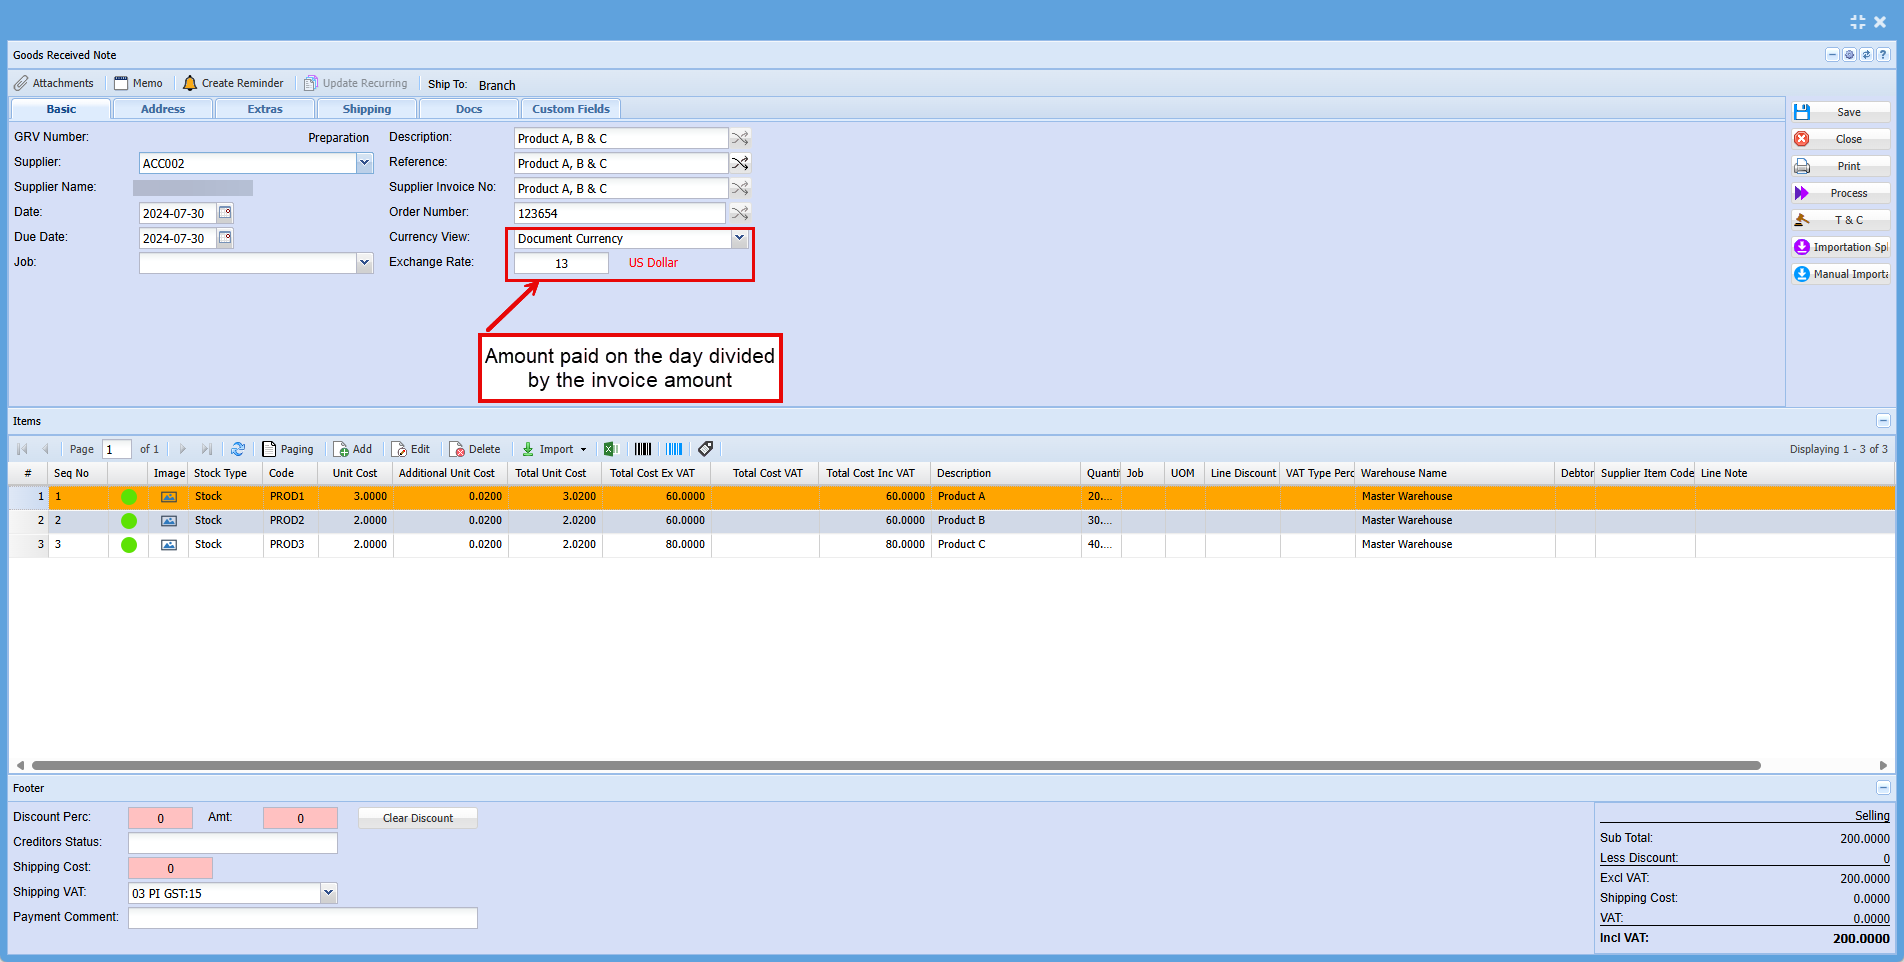
At this stage you should be able to process your invoice as long as the amount on the supplier invoice and the system are the same.
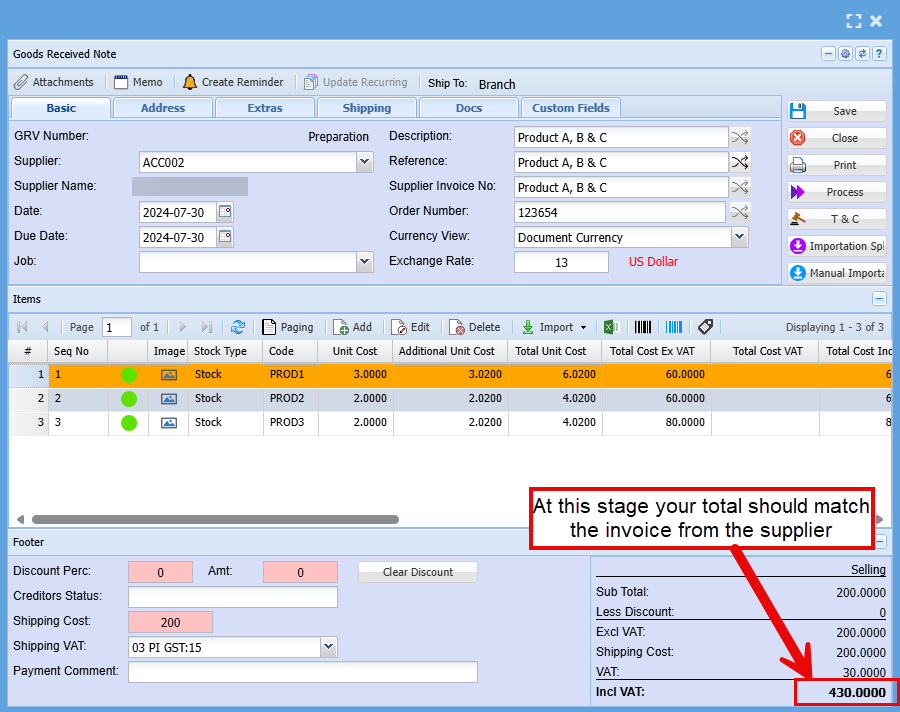
GRV lines import
There are multiple options to import data into the GRV

Import SN (Serial Number)
Excel file import - Import SN.xlsx
File layout as below, file to have header
| Item Code | Required |
|
Item Description |
|
| Warehouse Code | Required |
| Serial number | Required |
| Sub Serial number | |
| Best Before Date | Date format 2025/05/15 |
| Production Code | |
| Weight |
Serial Number Import (GRV)
Using the GRV import for serial numbers is appropriate when you do not have a purchase order and want to skip that step, going straight to creating the GRV.
Creditors Module > Activity > Goods Received Note (GRV)
- Search for your GRV
- Double Click on your GRV to open
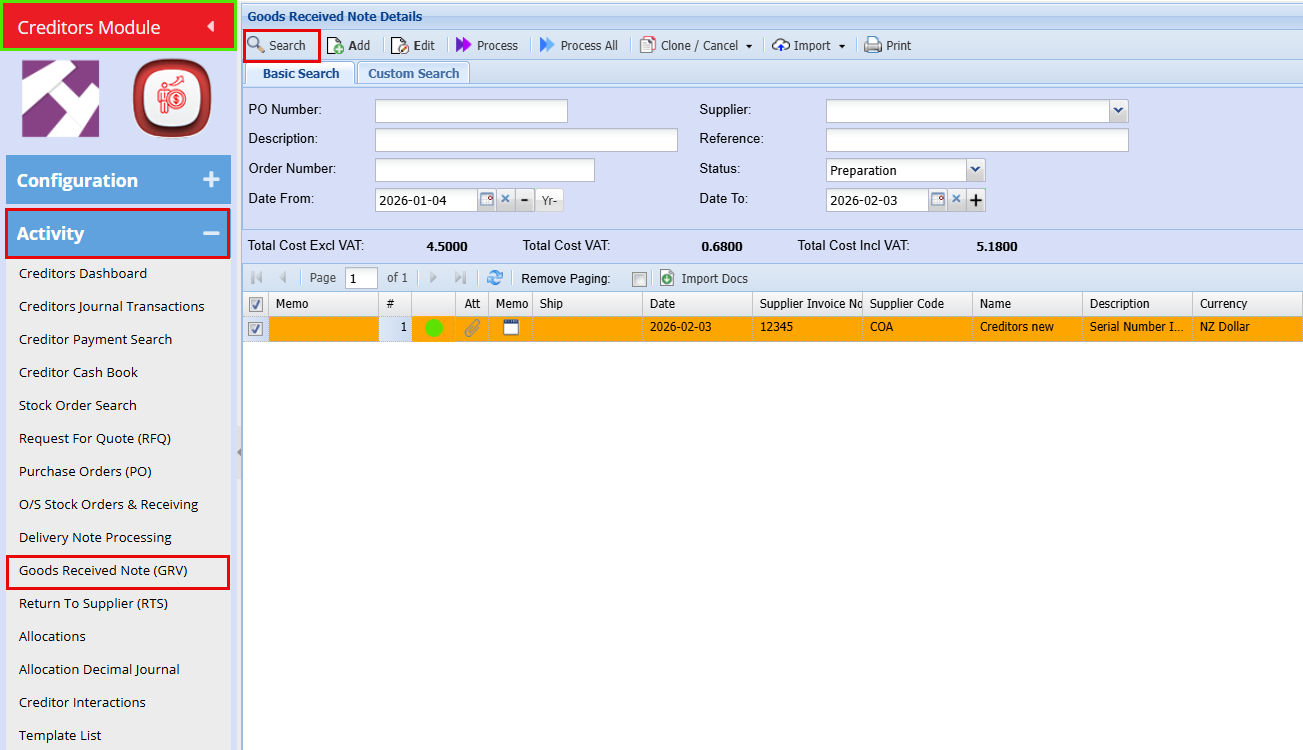
- Open the GRV by double‑clicking it
- Click on "Functions"
- Click on Serial Import/Export
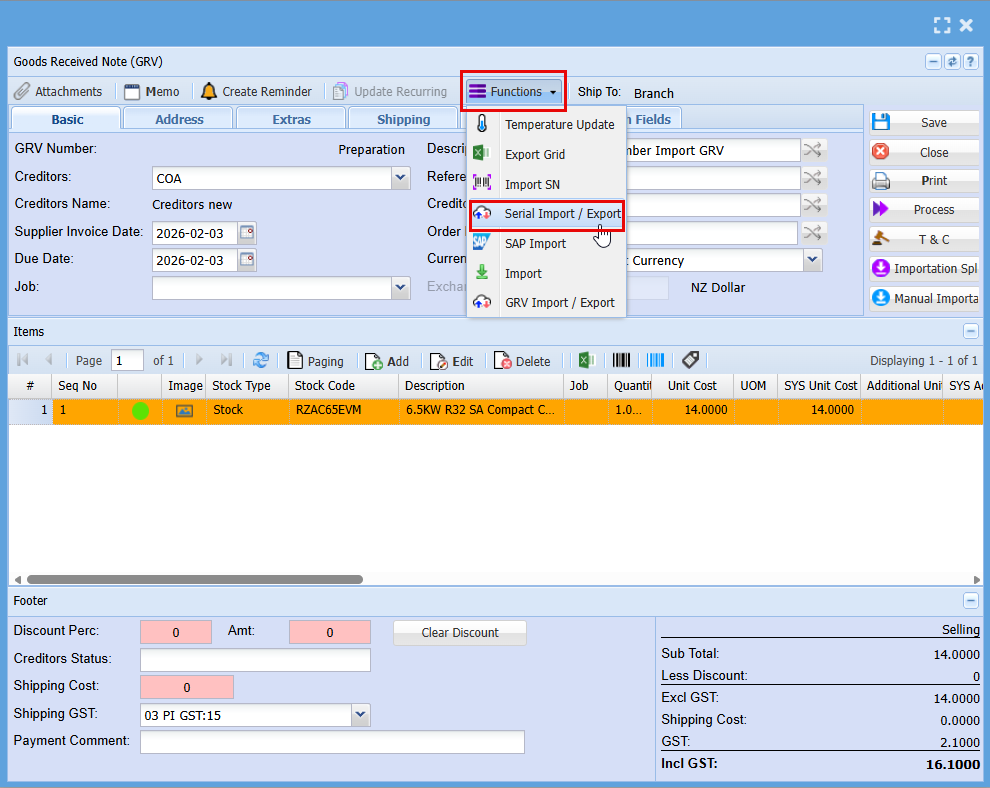
A window will appear allowing you to export a template that can be used for the import.
- Click on "Template" this will download an excel file
- Enter the serial numbers here, with each item listed on a separate line as shown below.
- Save the file to your computer.
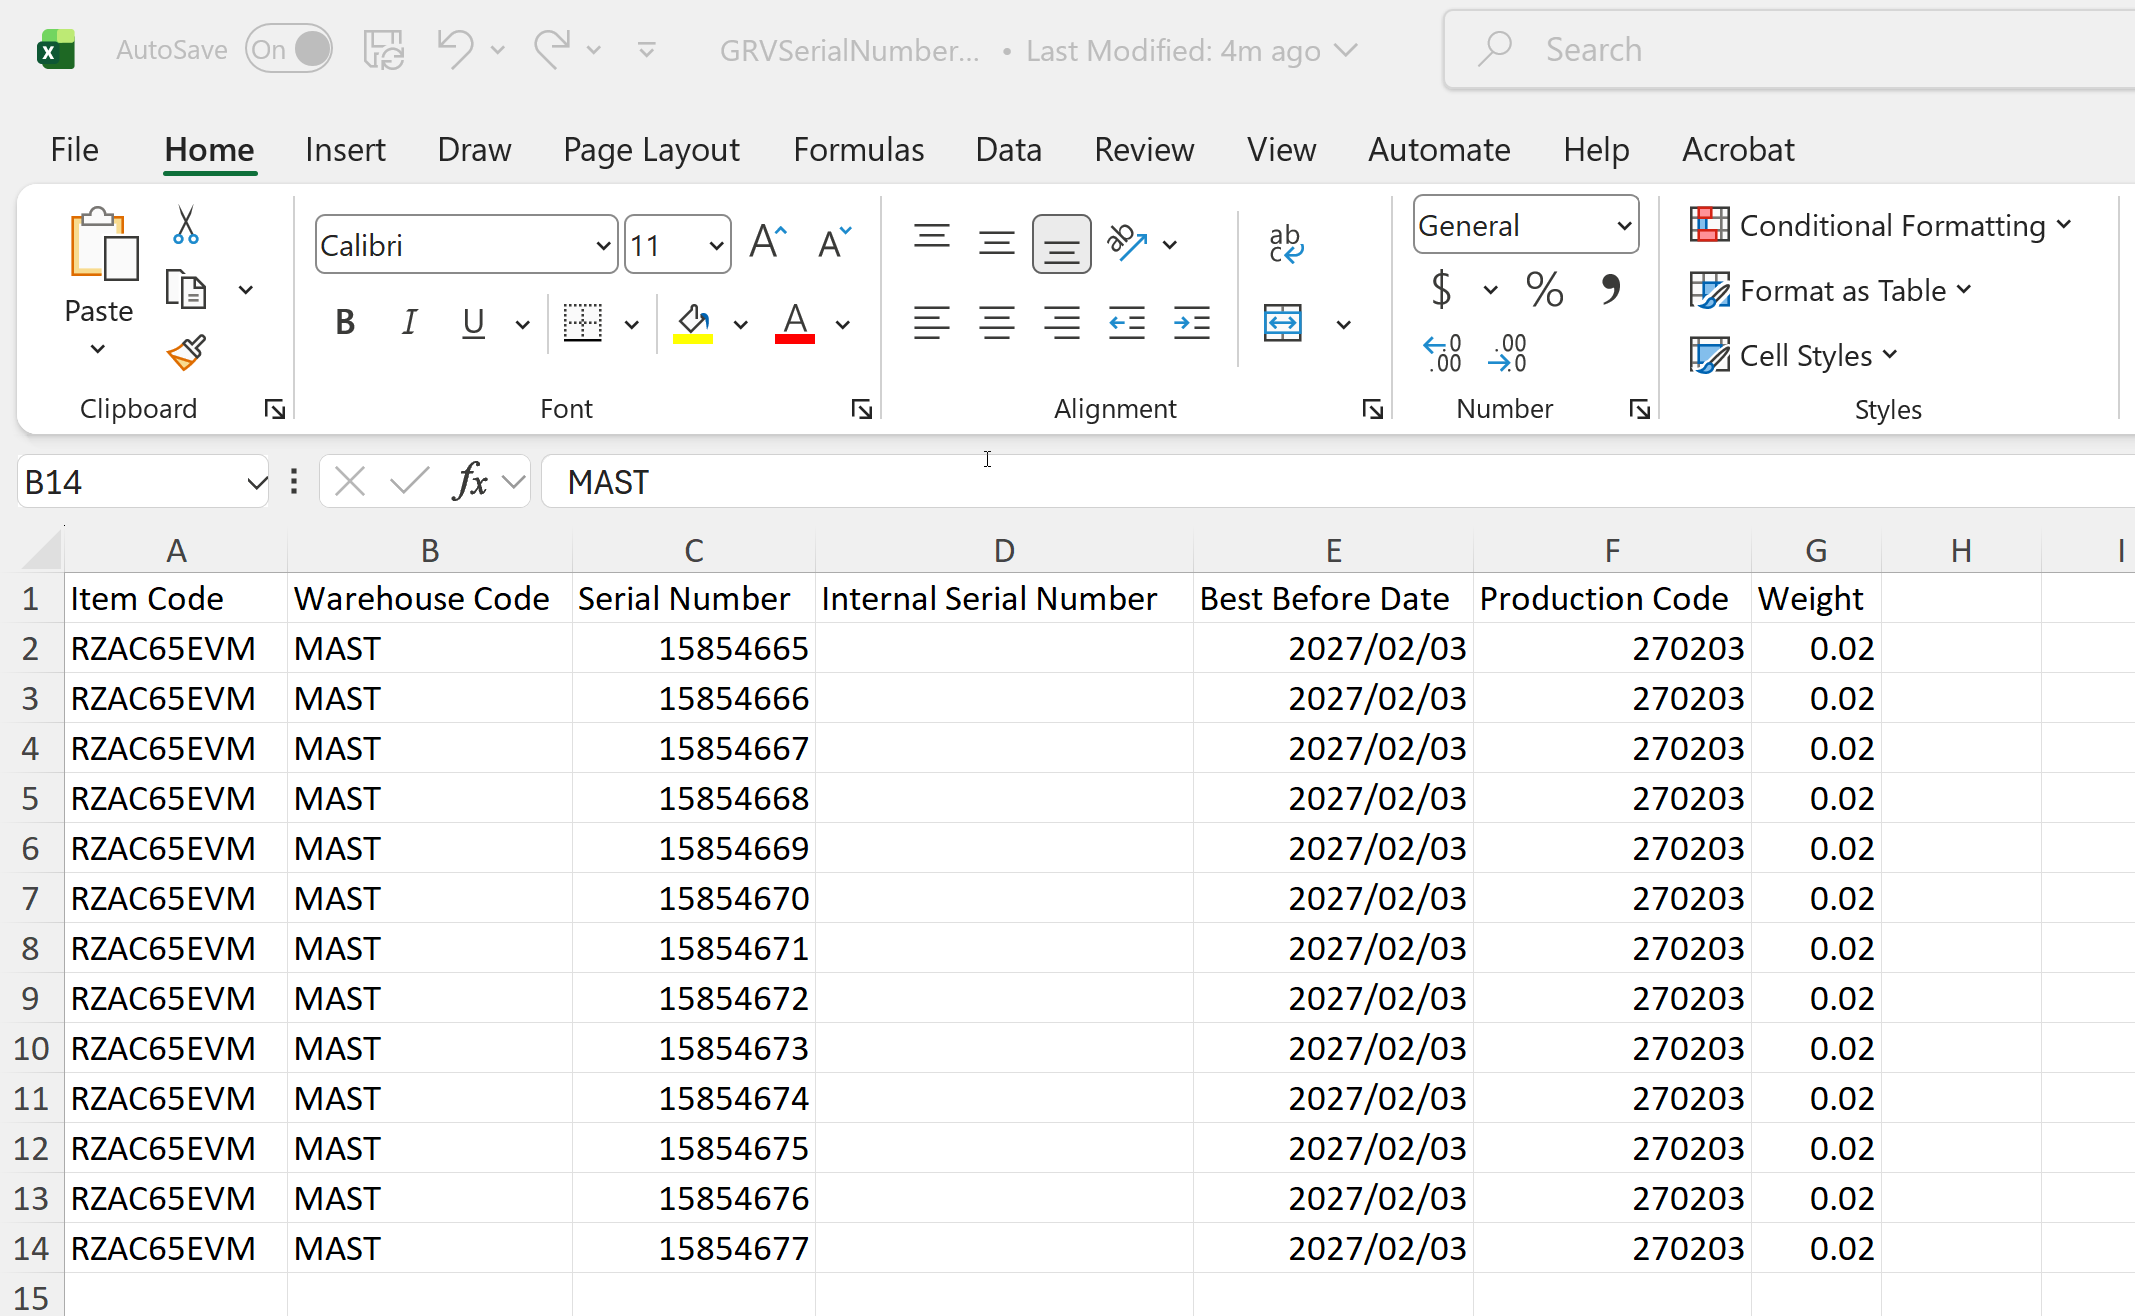
- Go back to the "Serial Number Import/Export" Screen
- Click "Select File"
- Find the file you have saved.
- "Double Click" the file or click "Open"
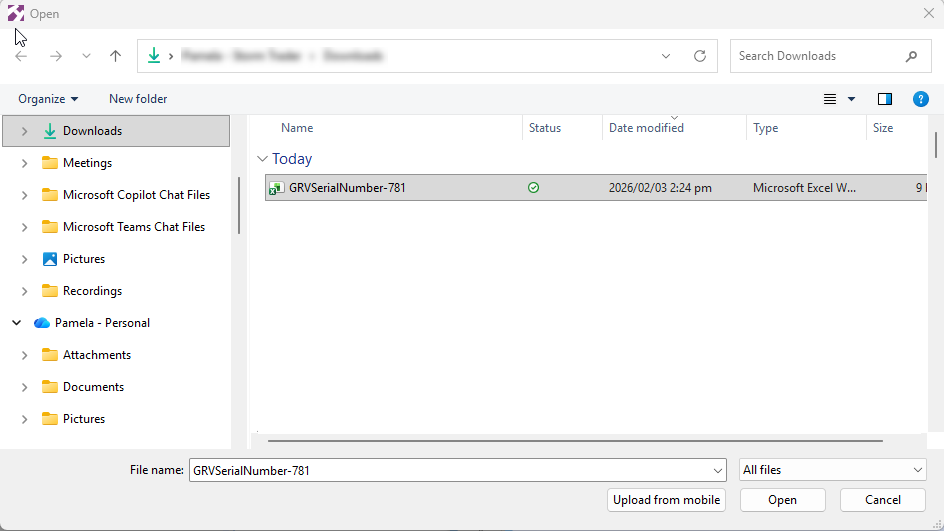
You should get a Successful Import
- Click "Verify"
You should again get a successful for verification
- Click "Import"
You should then get a Successful for Import.
Click "Close"
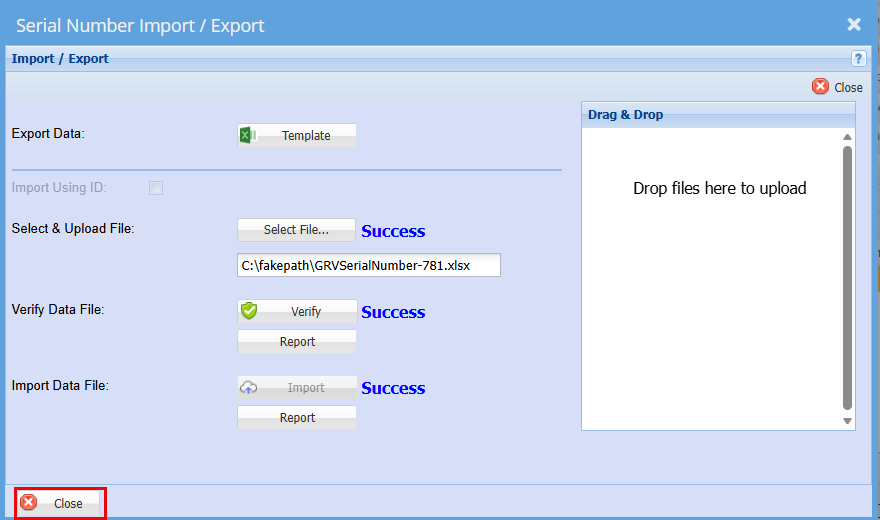
• Click the “Serial Nos” button.
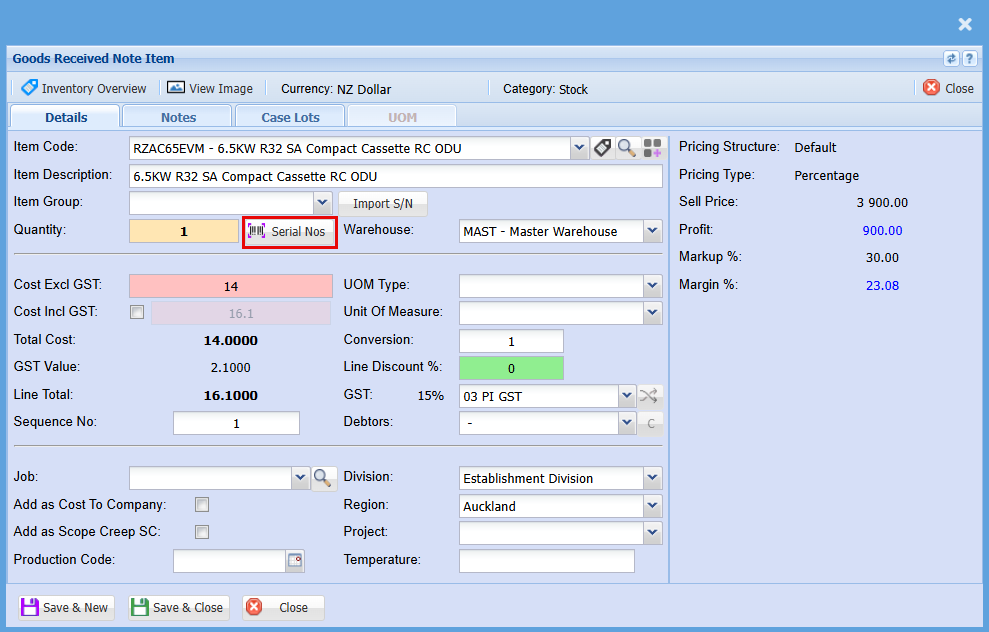
This will show you all your serial numbers per item
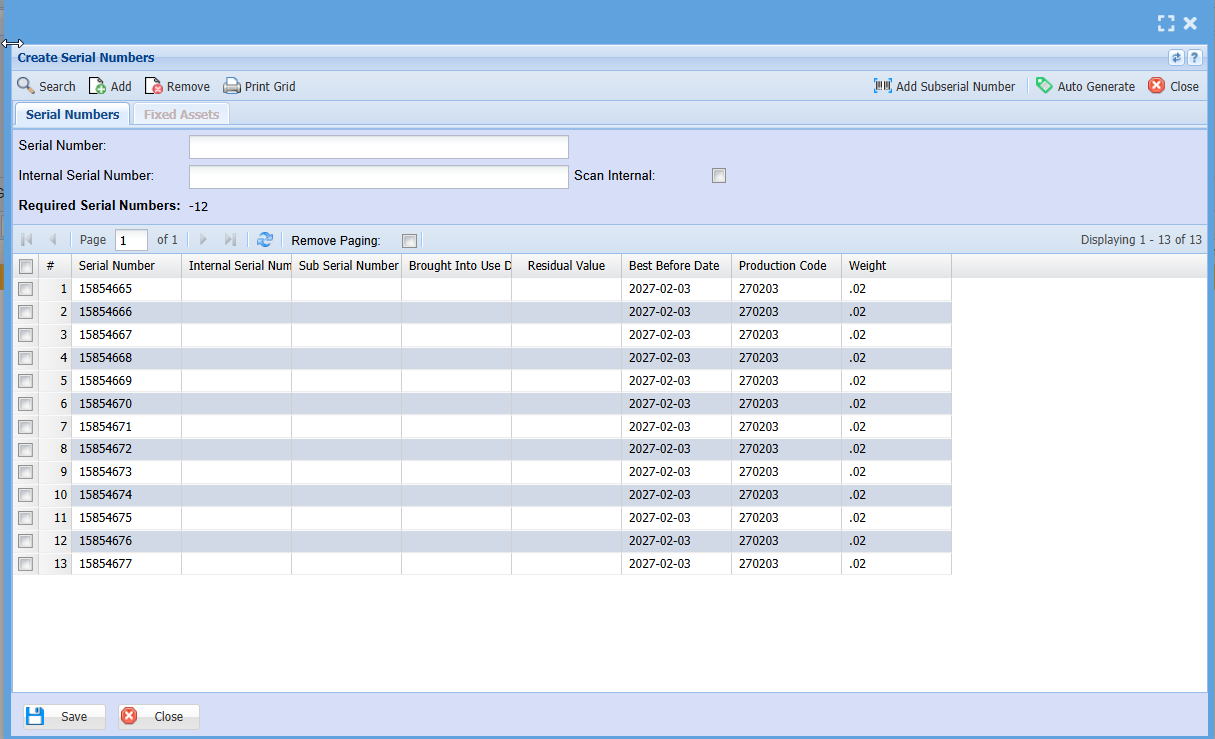
Stock Return Notes Menu
Stock Return Note Search
Creditors >Activity >Stock Return Note
This record is used to confirm all goods that have been received and being returned
.png)
| Advanced Search Tab | |
| Supplier invoice Number | search by selecting the supplier invoice number |
| Date | search by selecting the date From and the date To |
| Custom Fields Tab | searches according to the category selection |
| Standard Tab | |
| Add button | to create a new Stock Return |
| Edit button | allows the user to view or make some changes on an existing Stock Return |
| Delete button | to delete the Stock Return |
| Process button | to process the selected Stock Return |
| Import | Import GRV |
| Print button | to print the Stock Return |
Import GRV to Stock Return
Return goods back to the supplier or reverse GRV
Click on Import Doc
.png)
the window opens that allows you to search for a posted GRV that you need to return
Search by the supplier or GRV Number
Select the GRV from the list and click on Import button
.png)
New Window appears so that one is required to enter GRV Tax and reference
.png)
Click On select
.png)
The Stock return note can now be processed.
.png)
Add Stock Return Note
Stock return notes are usually done in the event that stock purchased and received from a supplier are incorrect or faulty and need to be returned to the supplier for credit.
There are 2 ways one can create a stock return note:
| 1 | Capture manually |
| 2 | Import from GRV Document |
Capture Manually
Creditors Module>Activity Menu>Stock Return Notes
Select the Creditor
Enter the description
Enter a Reference: this could be the original Supplier invoice number
Enter the respective date
Click Save
You can create standard reason typically for stock being returned and select the respective reason from the Drop down

Click Add to enter the item details being returned
The capture process here is the same as one would capture a Purchase order

Enter the Quantity of the items you are returning.
Enter the Cost Price per item.
Select the VAT Type from the drop down box which will be Stock Return VAT
Click on save and new button to add another item
Or Save an Close if no other items are being returned
Click on Process button
The document will be generated and you can print if needs to be send with the Stock being returned.
The Stock return note can also be emailed directly to the Creditor from the system.

Import from GRV Document
Go to Creditors > Activity> Stock Return Note

Search for the required Goods Received Voucher (GRV)
Select and Click the Import Button

Edit and details on the document header
Double click the item line if any edit is required. Eg. Changing the quantity being returned
Delete any item not be returned ( in the event the Imported GRV had more than 1 item line)
Process the Stock return note and Print/ email in the same manner as with manually capturing (see above)
Creditors Allocations Menu
Creditors Allocations
.png)
Allocating a receipt to a specific invoice
General Tab
| Creditor Code | to select a creditor |
| Currency | currency used by the creditor comes up when the creditor is selected |
| Date From and Date To | select the date from and the date to which the invoices will be running from |
| Status | select the allocation status from the drop down arrow |
| Grid View | select the grid view from the drop down arrow |
| Credit Lines Tab | shows the payments lines according to the selection made on General tab |
| Associated Debit Lines Tab | shows the invoice associated with the payment |
| Debit Lines Tab | shows the invoice lines according to the selection made on General tab |
| Associated Credit Lines Tab | the payment associated with the invoice |
| Notes Tab | allows a user to make notes on allocations |
| Contact | Select the contact from the drop down arrow |
| Date from | enter the date from which the allocation will run from |
| Sort By | select from the drop down arrow |
| Show Complete | select from the drop down arrow |
| Date To | enter the date to |
| Insert button | to insert a reminder |
| Amend | to make changes on the reminder |
| Delete button | delete the reminder |
| View button | view the reminder |
| Send button | send the reminder to a selected contact person |
Allocations
Allocations is where you tie up the payment to an invoice.
Go to debtors/Creditors> Activity> Allocations
Select the debtor or Creditor to allocate and then click on Search
The data goes back 6 Months , Should you want to go further back change your date from.
The Status settings is set to partial and Un-Allocated, This Means the allocations screen will only show transactions which have not been allocated or are partially allocated
If the transaction is fully allocated it will not show on this setting.
.png)
Select the debit line (1) to allocate to the credit line (2)
And click Allocate at the top (3)
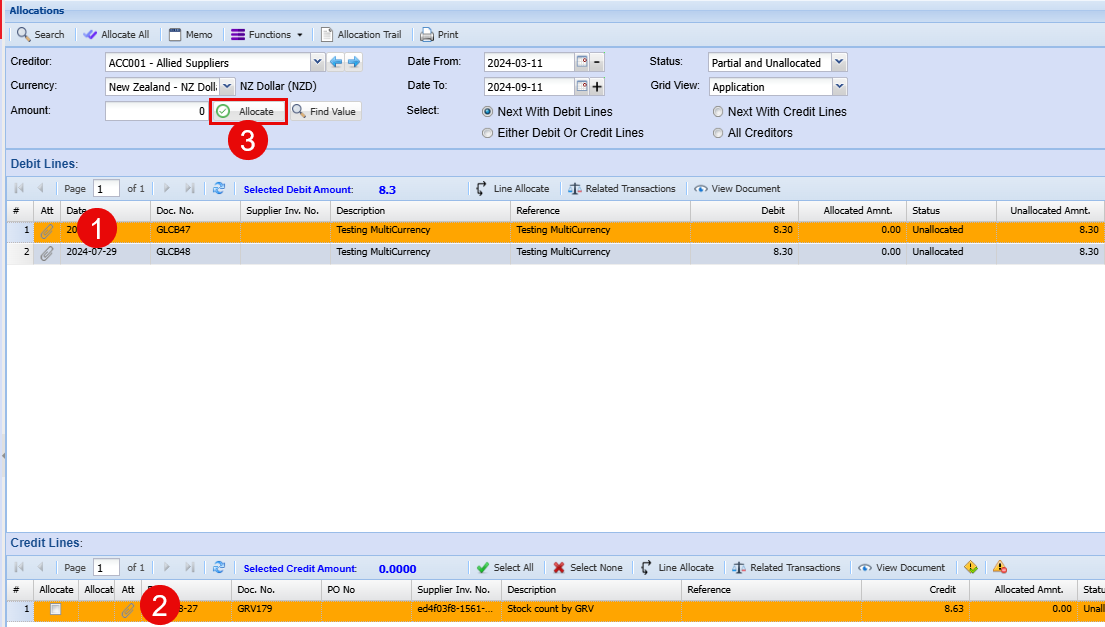
In the case where a transaction was wrongly allocated
Change the status to Allocated and search
.png)
Select the transaction and click (just above the line) a button called Line Allocate
A window will open, and you will be able to tick on the tick box to select the transaction you wish to un – allocate
.png)
.png)
Creditors Allocation Decimal Journal Menu
Creditors Allocation Decimal Journal
Creditors> Activity> Allocations Decimal Journal
.png)
This part shows if the Creditors allocation decimal journals processed have been successful or not.
On Basic Tab the status allows a user to search with the selection made from the drop-down arrow.
Standard Tab
| Create button | to create debtors allocation decimal journal |
| Print button | to print decimal fix report |
Creditor Interactions Menu
Creditor Interaction Search
Creditors> Activity >Creditor Interactions
.png)
This allows the user to interact with the creditors by email or SMS.
| Basic Tab | Search button searches according to user’s preference |
| Creditor | search by selecting creditor |
| Interaction Type | search by selecting interaction type from the drop down arrow |
| Date From | select the date from and the Date To, and search |
| Order By | select the order from the drop down arrow |
| Detailed Tab | searches the interaction details according to the Follow Up Date selection |
| Custom Fields | search by selecting the category from the drop down arrow. |
Buttons
| Add | to insert creditor’s interaction |
| Edit | to view or make changes on an existing type of interaction |
Add Creditor Interaction
This part allows a user to insert the interactions.
.png)
Details Tab
| Creditors | select creditor for interaction |
| Message Type | select the message type from the drop down arrow |
| Date | select the date |
| Follow Update | enter follow up date |
| Contact | select the contact person from the drop down arrow added from the creditor’s setup interactions |
| Cell number | enter the cell number but normally comes up as soon as the contact is selected if it has been added |
| Email Address | email address as well comes up as the contact is selected but can be edited |
| Subject | to enter the subject of the interaction |
| Notes | to add some notes |
| Reminder For | for a reminder, select from the drop down arrow |
| Create Reminder button | to create the reminder |
Custom Fields Tab
It allows a user to select the category from the drop down arrow and save the selection
Creditors Template List Menu
Creditors Template List Search
Creditors Module>Activity>template List
A List of templates can be created in the system to use for cashbooks
.png)
This list can be created form a Cashbook
Creditors Interest charge Menu
Supplier interest charge
Creditors Interest setup
Before using Creditors Interest ensure all setups are completed first
GL Links Setup
Setting up the GL Links in System Configuration
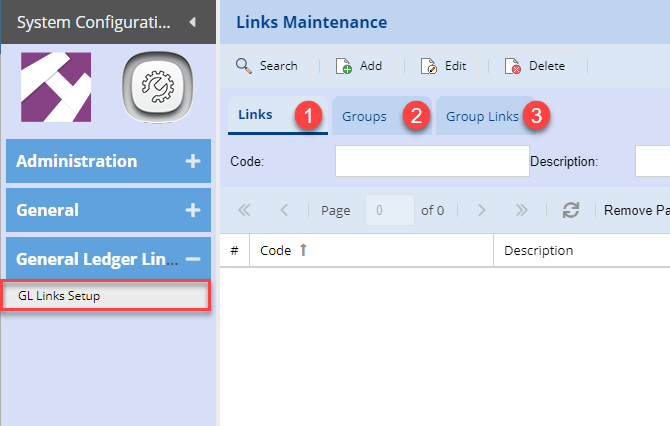
Links Tab
Setup a Supplier Interest Link
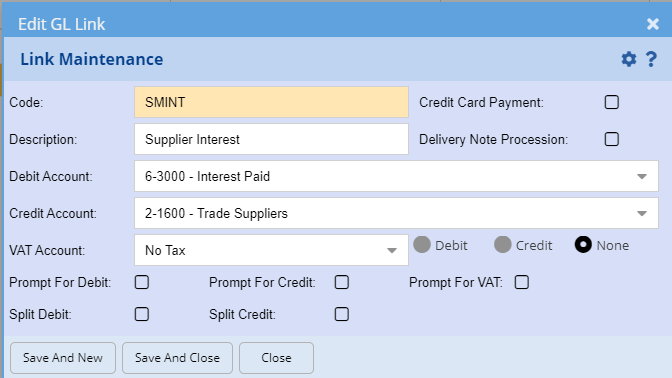
Group Tab
Setup the Supplier Group
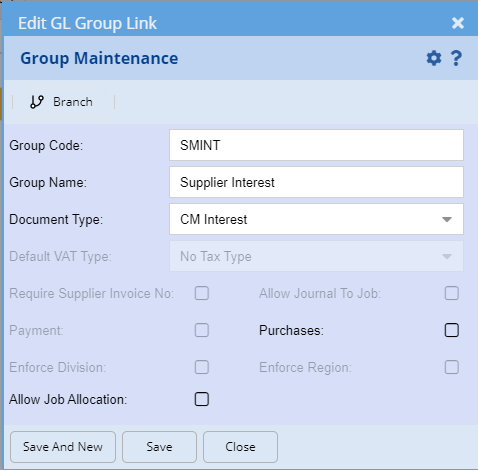
Group Link Tab
Link with the group together
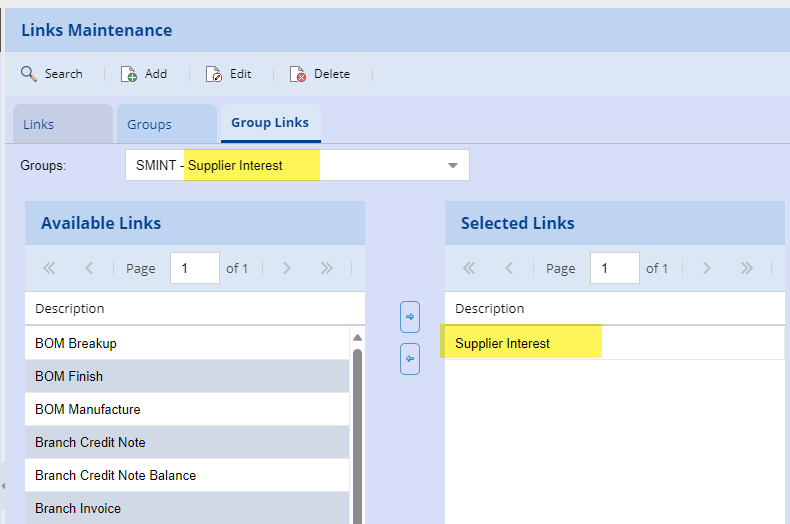
Company Profile GL Links
Link the Company profile with the interest charge
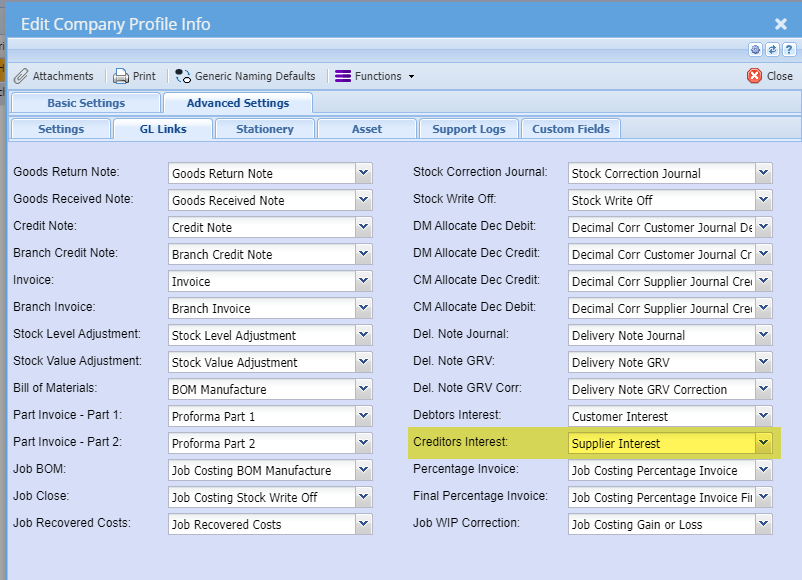
Creditors setup for interest
Setup the various Creditors for interest
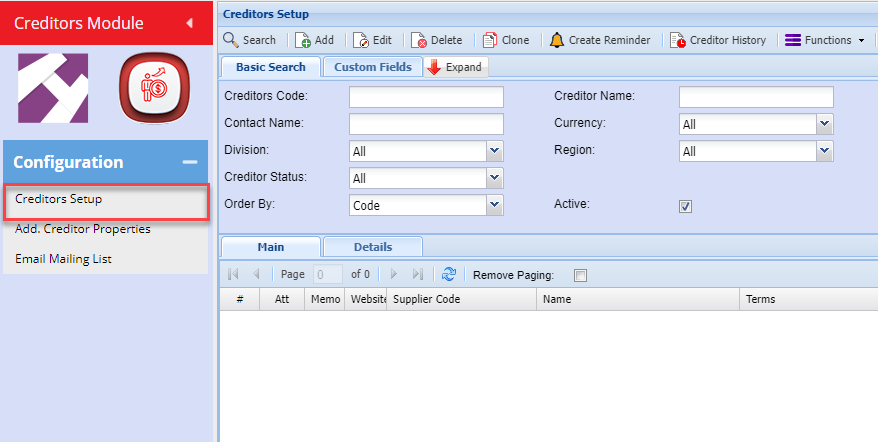
Search for the Creditor that you want to setup
Edit the Creditor and go to Acct Details tab, click on Interest button
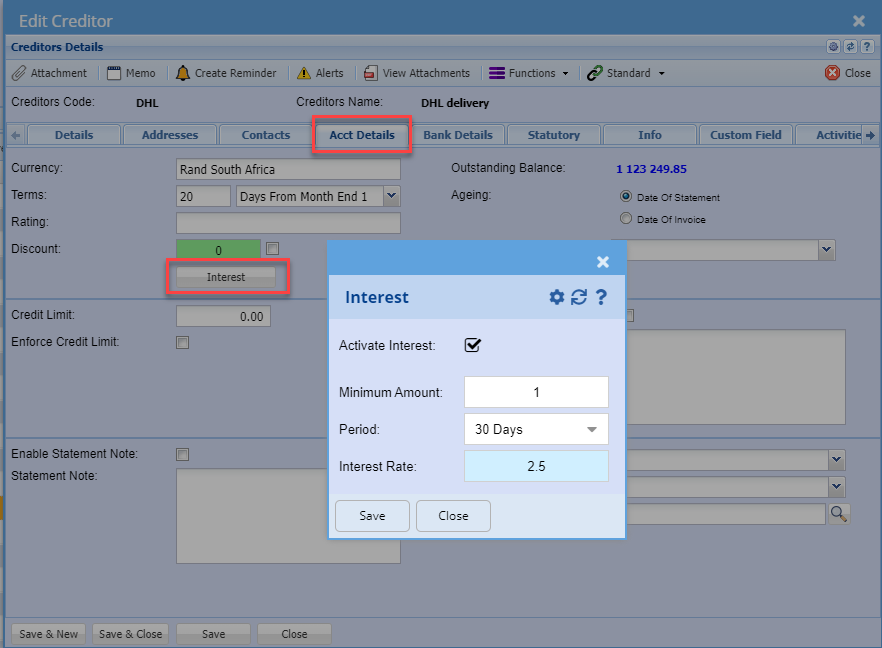
| Activate Interest | Click on Activate Interest on this Creditor to run interest on |
| Minimum Amount | Specify a minimum amount that interest should start charging on |
| Period | Specify a period great than Current in order for interest to be calculated |
| Interest Rate | Enter a value for the interest rate |
Creditors interest Journal
Run the Creditors interest transaction journal
This will run an interest run for all creditors that are activated with creditors interest tick on.
One can run a pre-interest run to work out which journals you want to process.
Found in the Creditors Module> Activity
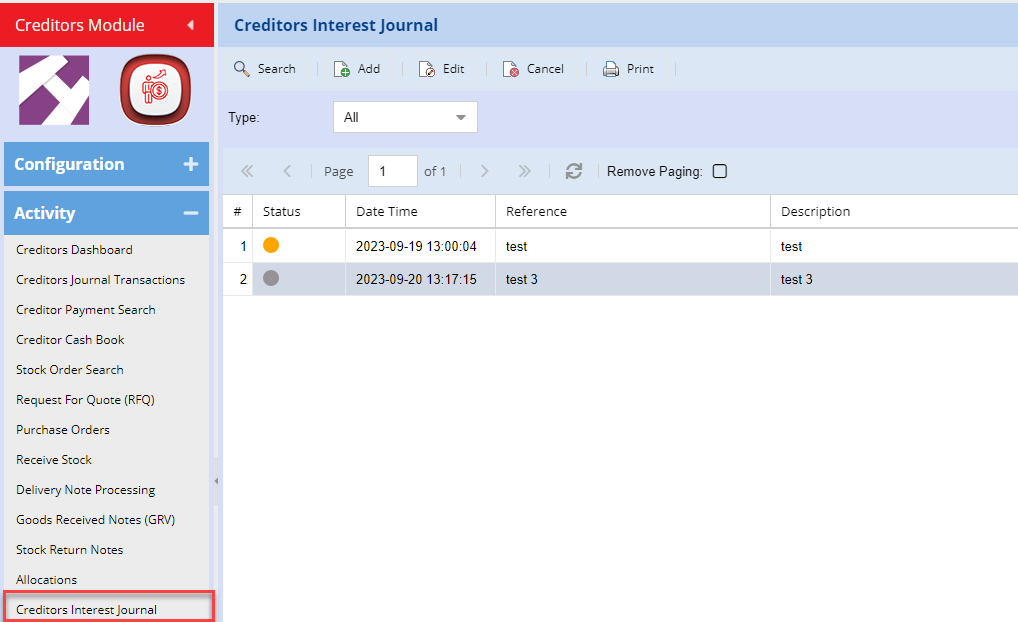
Add Creditors interest journal
Click on Add to prepare the creditors interest journal
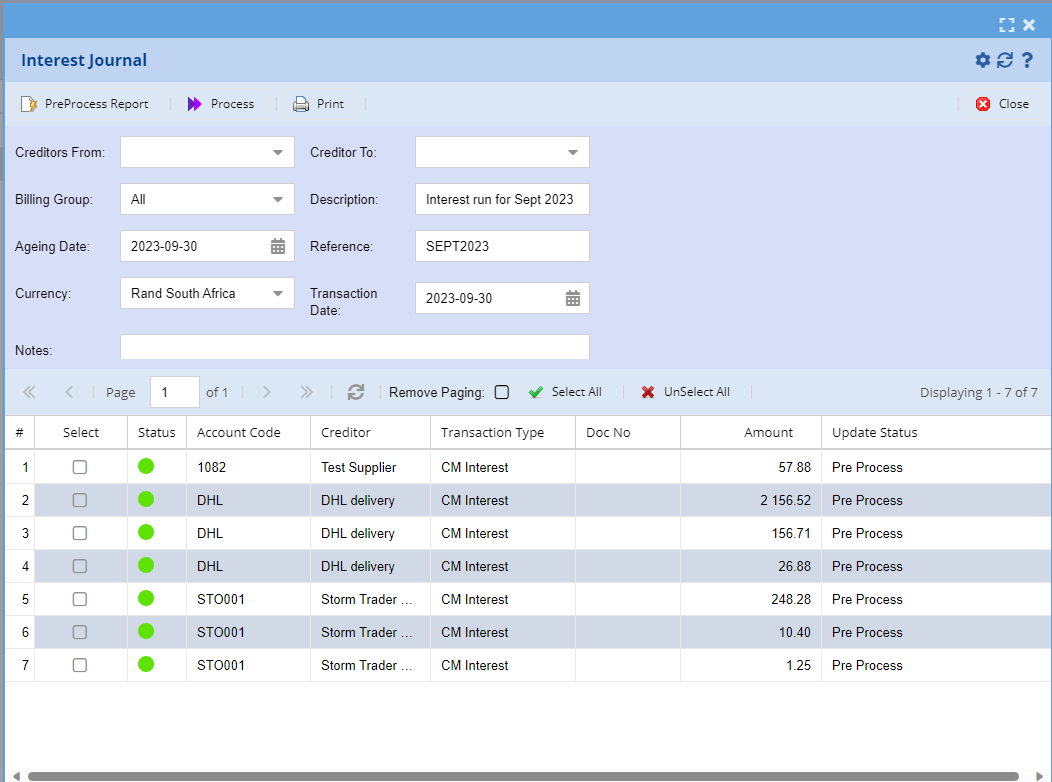
| Buttons | Details |
| Pre-process Report | Run a report in the grid to see what journals will be processed |
| Process | Process the selected interest journals |
| Print the report on Pre-processed or processed journals | |
| Select All | Select all the journals to be processed in the grid |
| Unselect All | De-Select all the journals not be processed in the grid |
| Interest Journal | Details |
| Creditors From and To |
Filter by Creditors from and to Blank, means all |
| Billing Group | Filter by Billing group of aging |
| Description | Enter a description here to appear on all journal descriptions |
| Ageing Date |
This date is used to work out the ageing values to be posted Important date for transaction calculations |
| Reference | Enter a reference to appear on all journals |
| Currency | Filter by currency |
| Transaction Date | The date that the creditors journals will be posted on |
| Notes | Add notes for all journals |
Creditors Interest Print
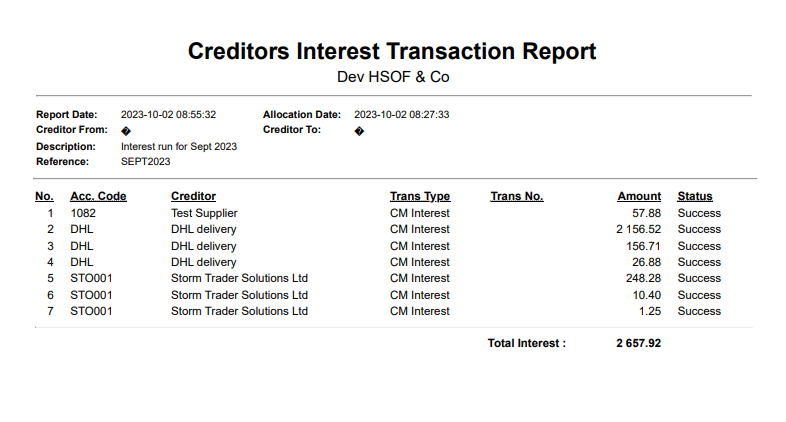
Creditors Interest History search
Search for processed creditors Interest journals
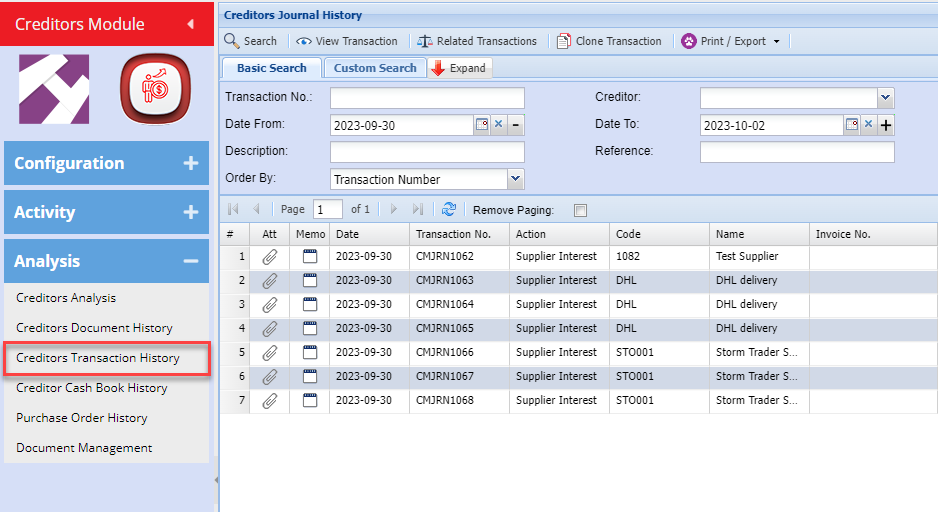
Request For Quote (RFQ)
Request For Quote Search
Creditors Module>Activity>Request For Quote (RFQ)
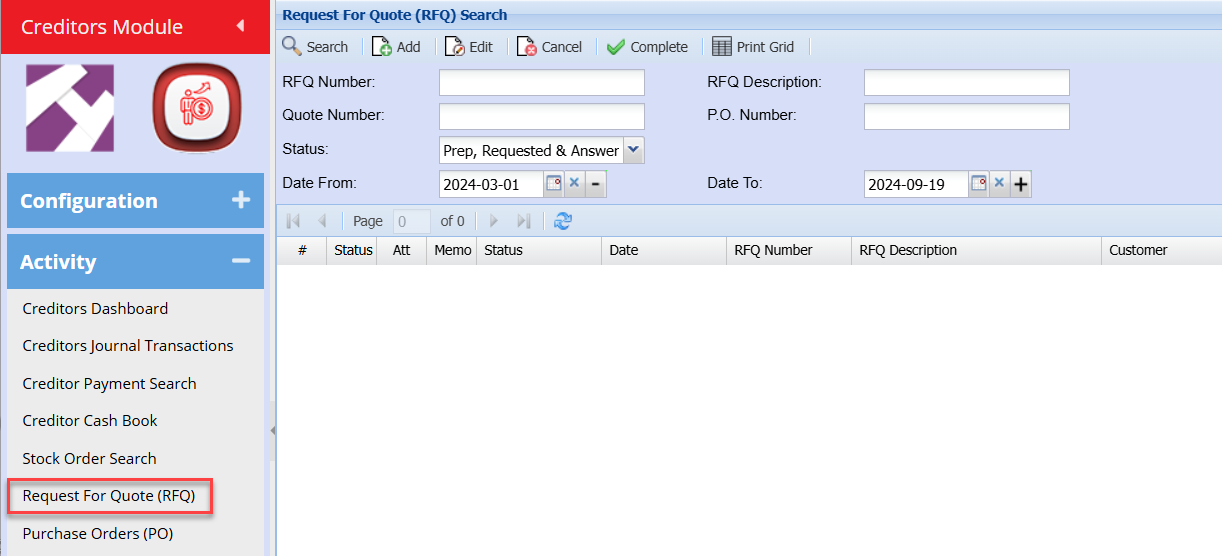
Click Add
Item Lines Tab
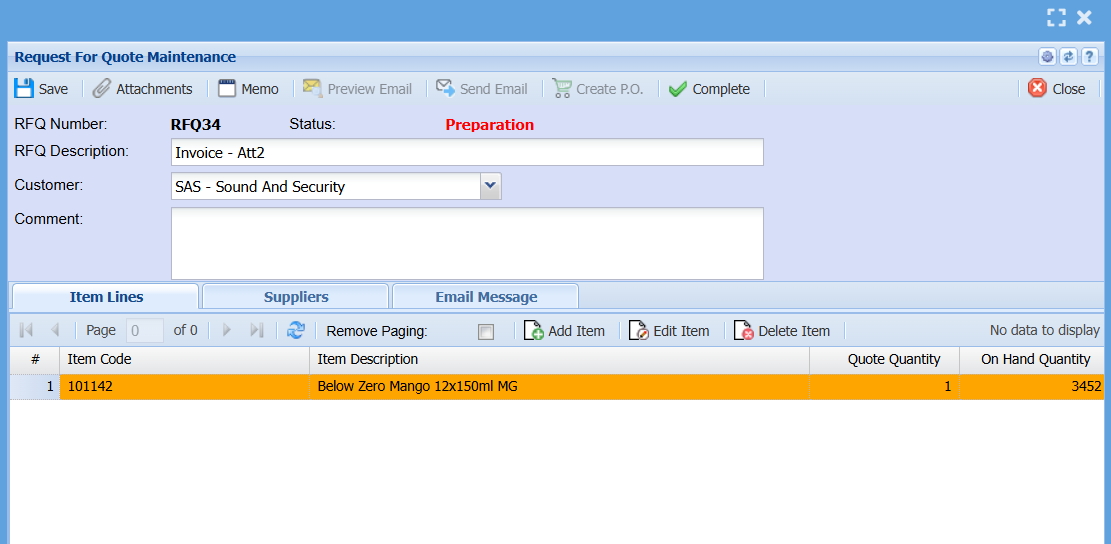
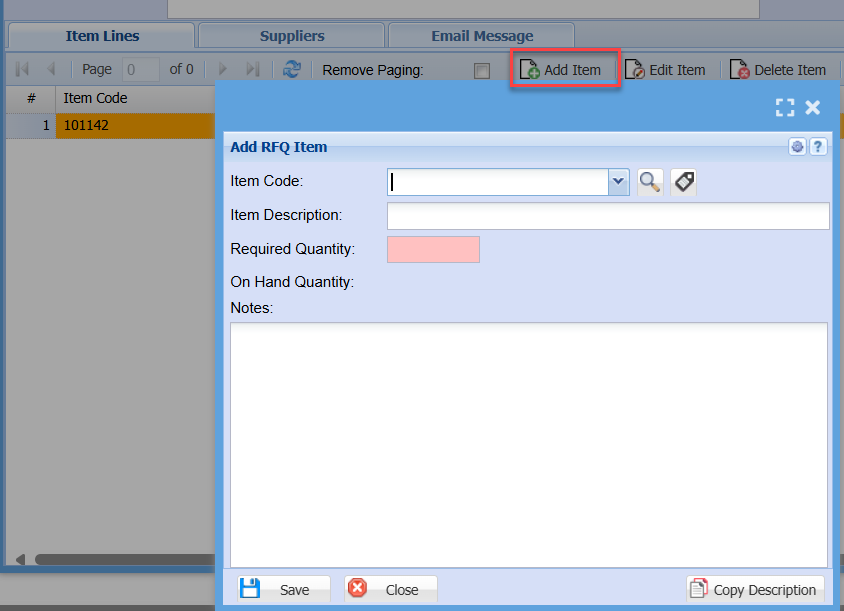
Suppliers Tab
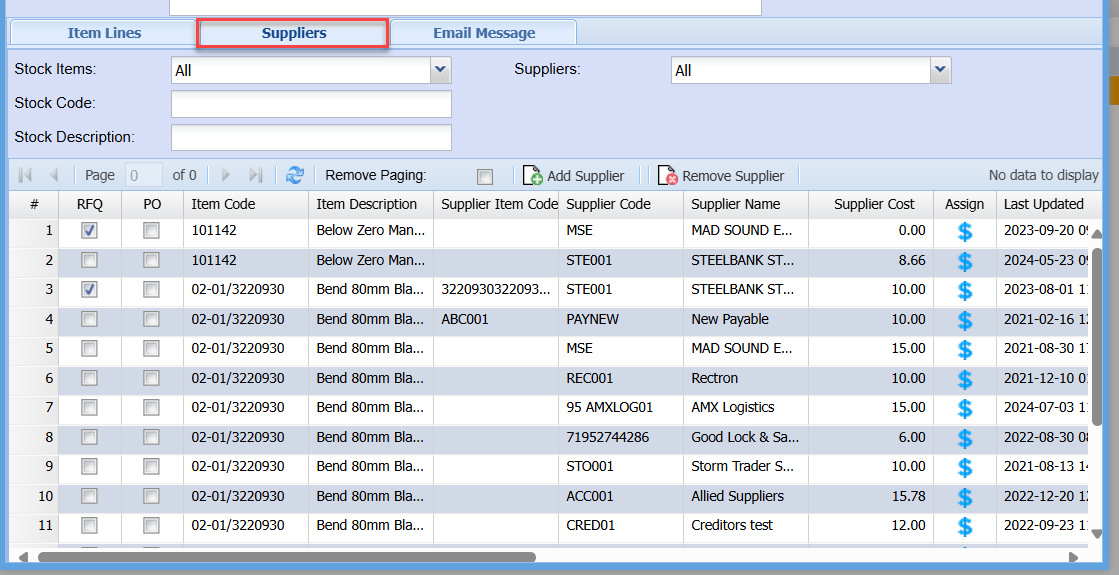
Add Supplier
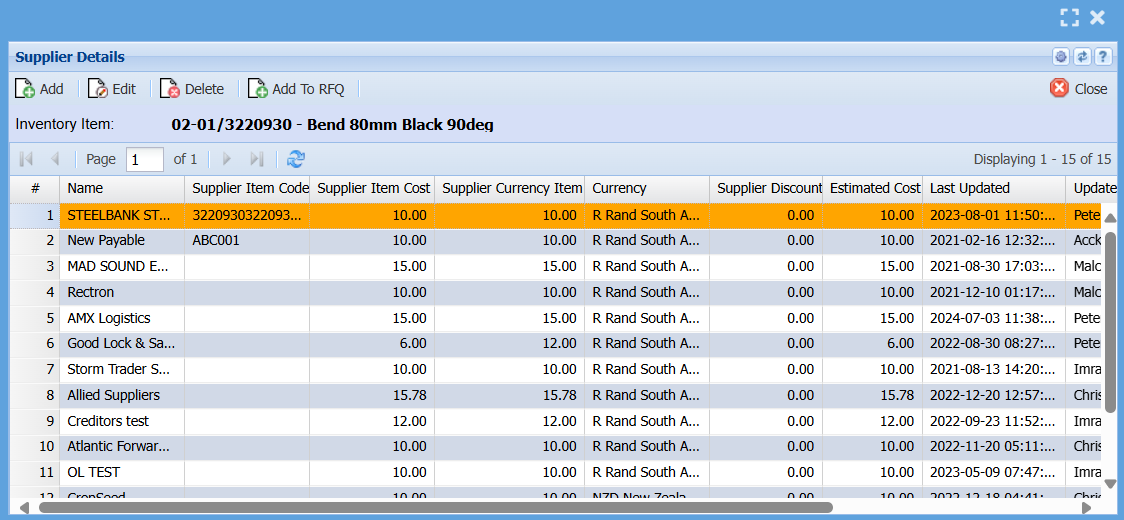
Click Add
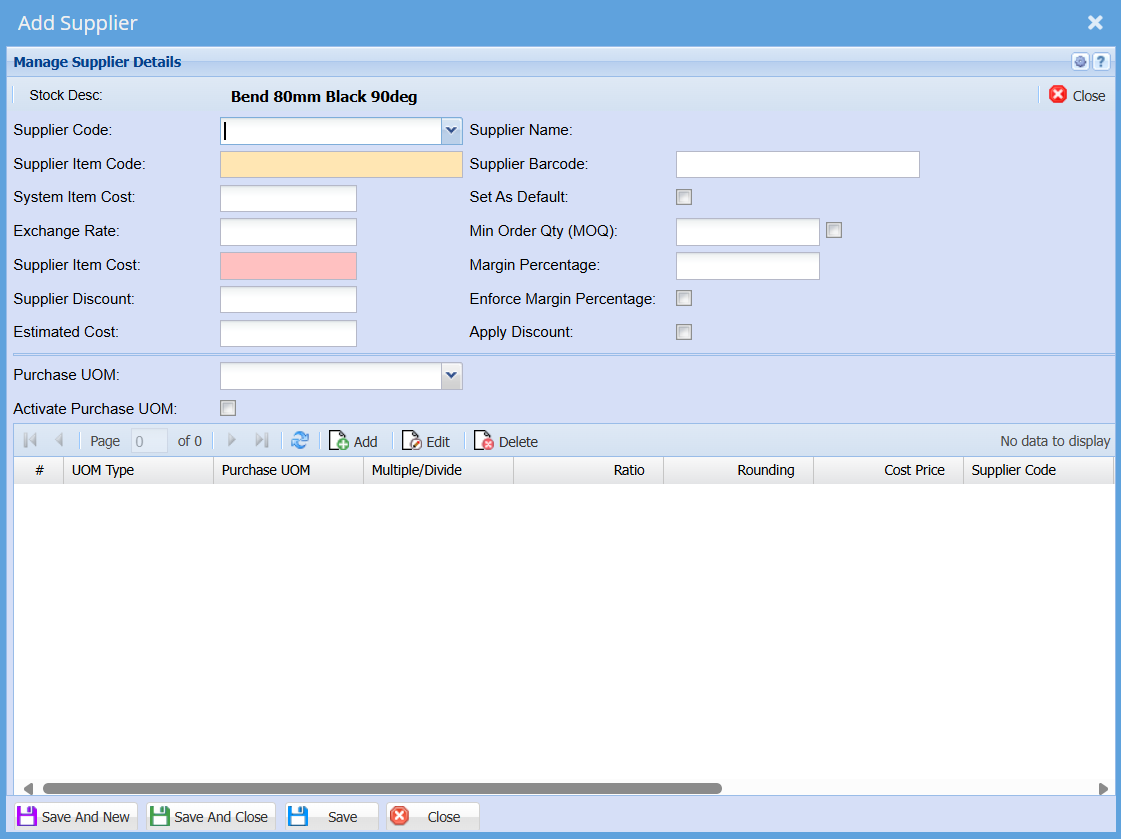
Click Add
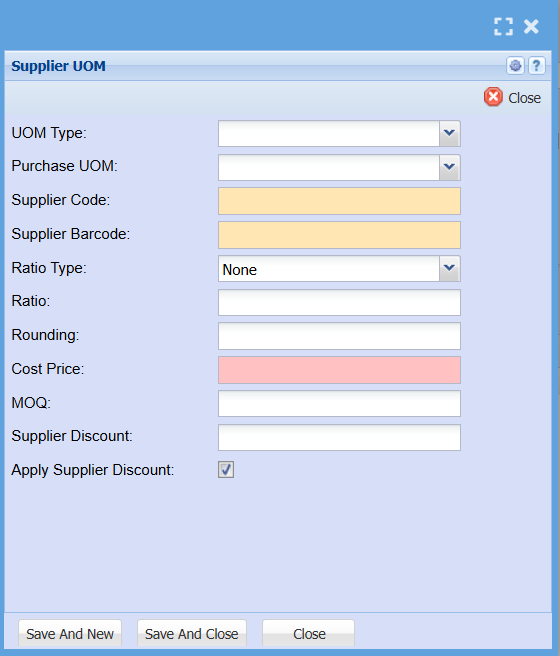
Email Message Tab
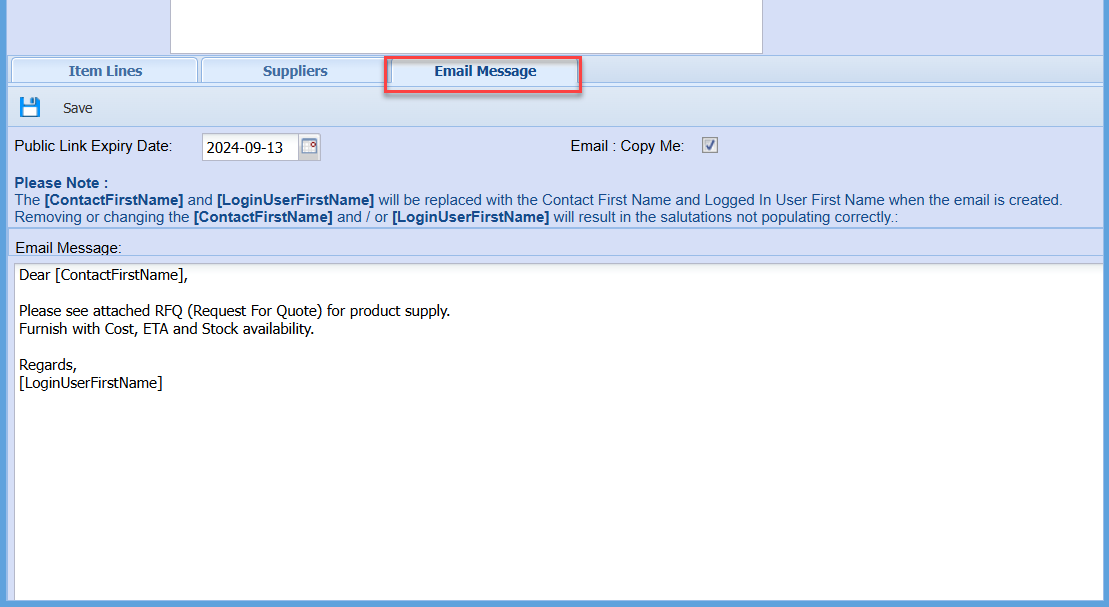
Supplier Processes
Powder Coating
Here we have an example on how to deal with enhanced value to a product.
One example is Powder coating, we buy an item from a supplier and then send it out for powder coating which increases the value of the stock item. It generally comes back as a new item.
The process will have the following benefits:
- Control which items are sent for Powder Coating
- Know who has the items
- Shows the value powder coating
The first thing we need to do is create an internal Creditor account for powder coating.
If you have multiple suppliers who handle enhanced value to a product, then it is best to create an internal creditor account for each. This way one knows which supplier has the stock that was sent for powder coating.
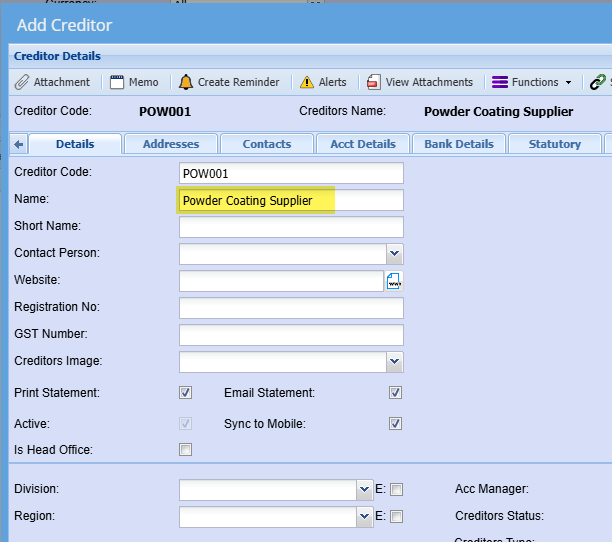
Make this creditor a Non VAT / GST supplier
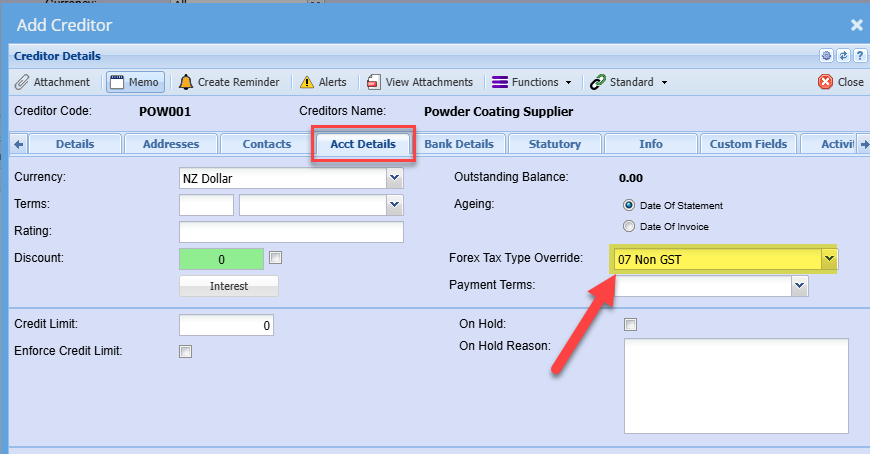
Setup the linked supplier to update cost
Go to the item to setup a supplier cost link.
This means that when the stock that is purchased from the actual supplier, updates the internal supplier with the cost.
When sending the stock to the Powder coating supplier for this item, it will bring the correct cost in, which will always be updated.
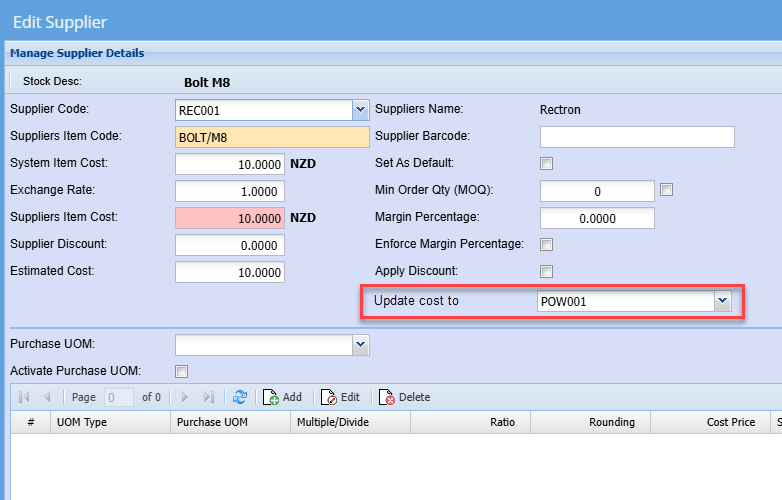
Sending the stock to the powder coating supplier
Create a Stock Return Document of the stock that will be sent to the supplier.
Ensure that your cost of the item is the same value that you purchased it at
Process and print a Stock Return delivery note.
Delivery note will not show value to Powder coating supplier, but shows items sent to them.
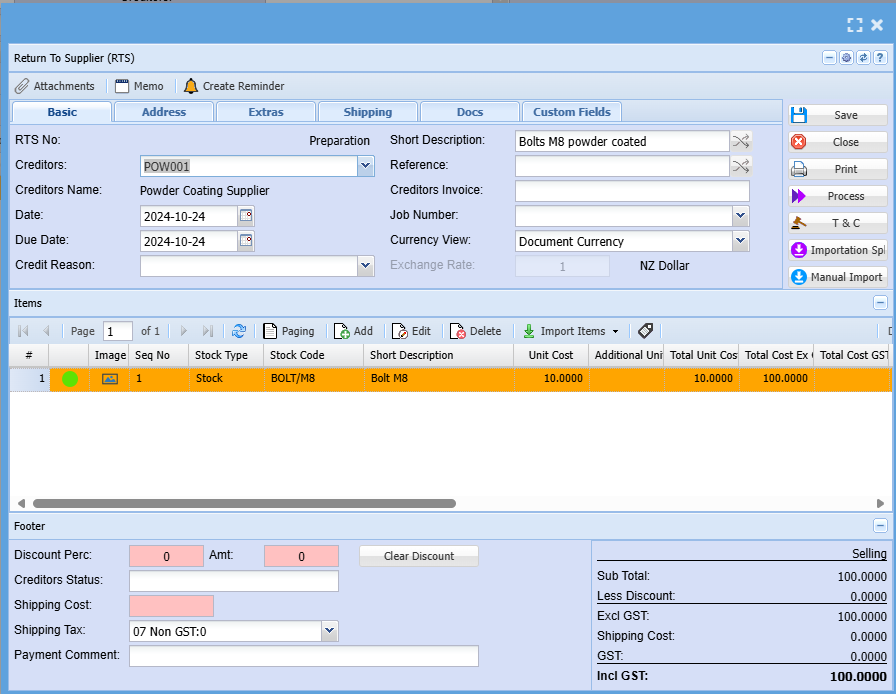
Delivery note to send with stock
The supplier will show a negative value, which tells us that the Powder coating company has our stock.
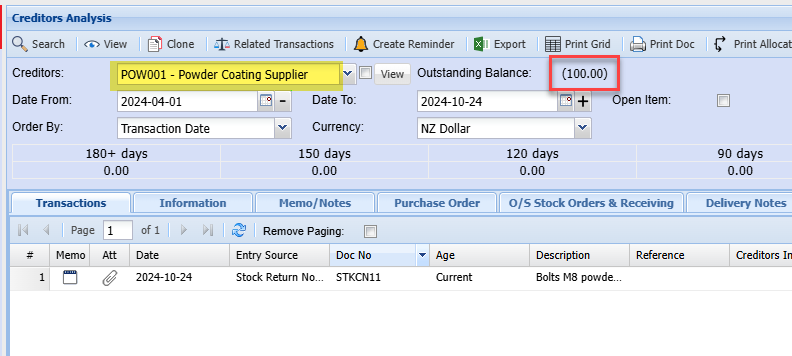
Stock movement reflects inwards and outwards to powder coating
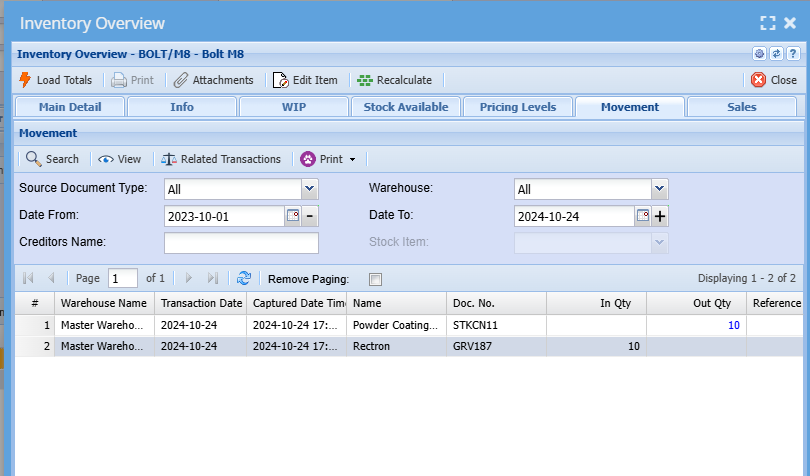
Receiving stock from Powder Coating
When receiving the stock back from the Powder coater.
Select the new item with the same cost as what you sent it out on.
By doing this the internal Powder coating supplier will equal zero.
This can be run from the PO or GRV documents
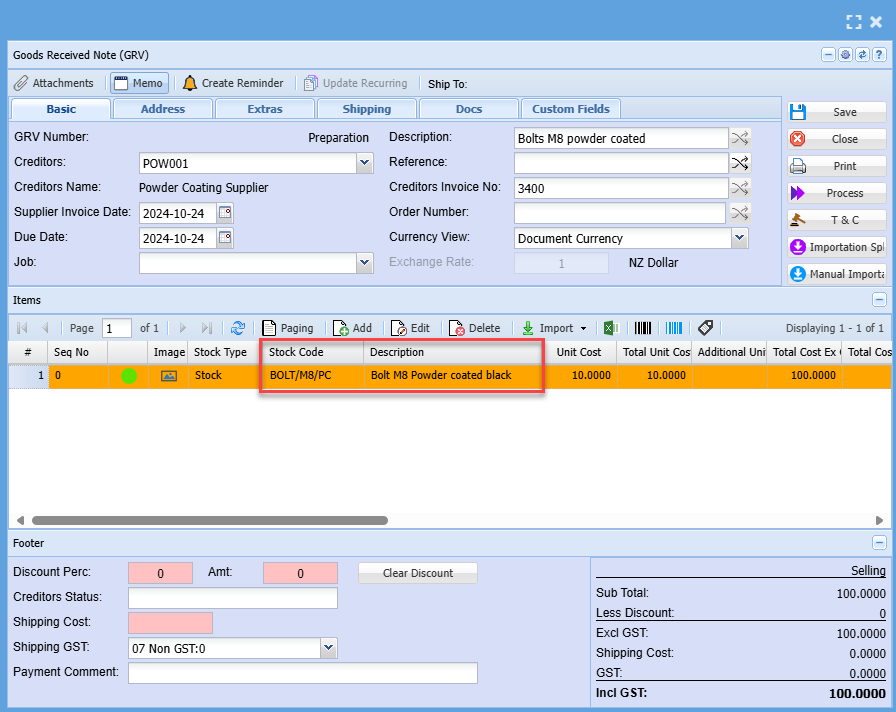
Enter the Powder coating actual company in the importation split.
If the supplier charges VAT / GST, select the correct Tax type
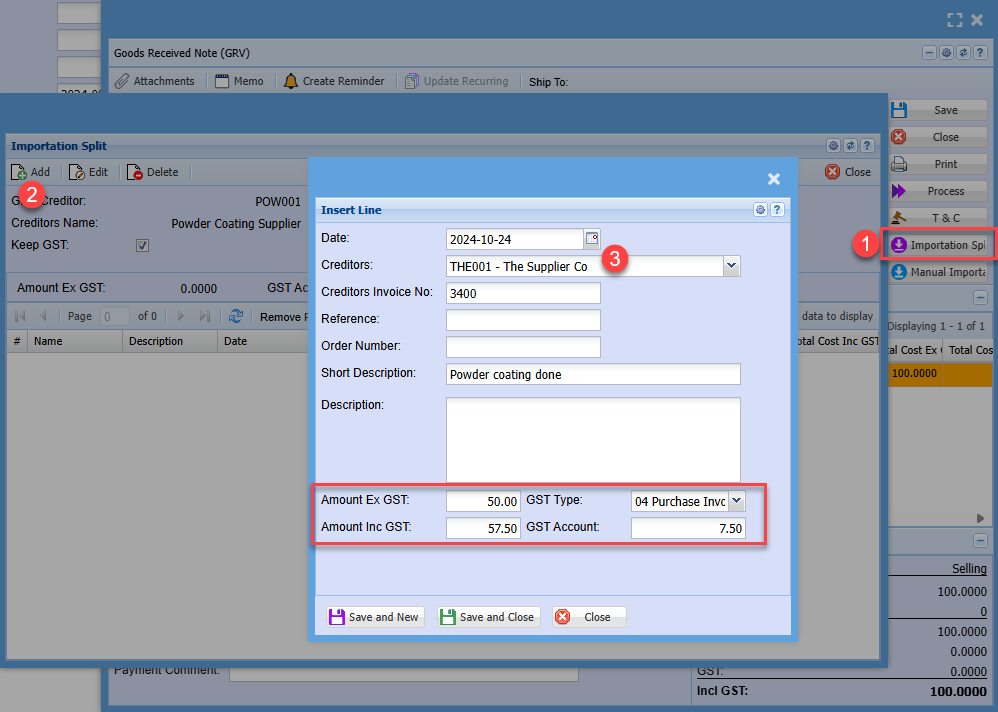
This will add the additional cost to the item, thus increasing the value of the stock item.
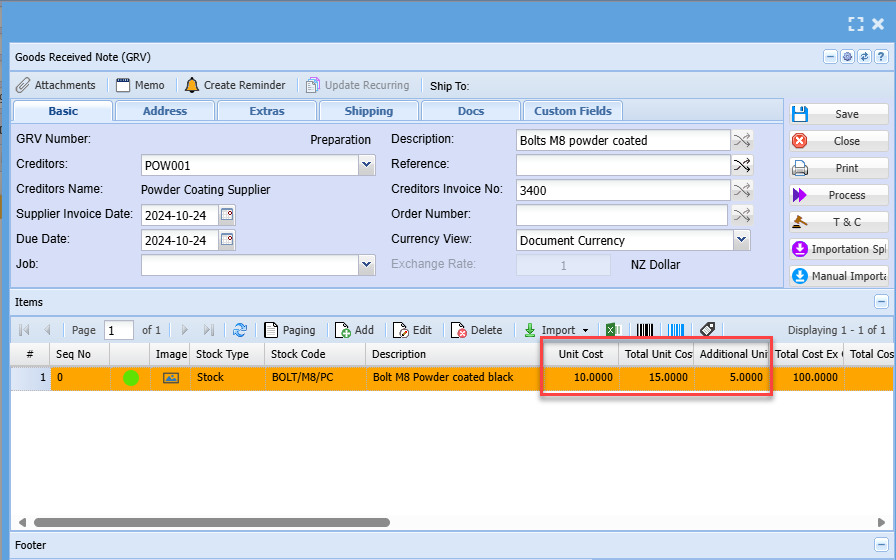
After processing the following will happen
- Powder coating internal company is balanced out
- New stock comes in with increased value
- Supplier who did powder coating is due for the value
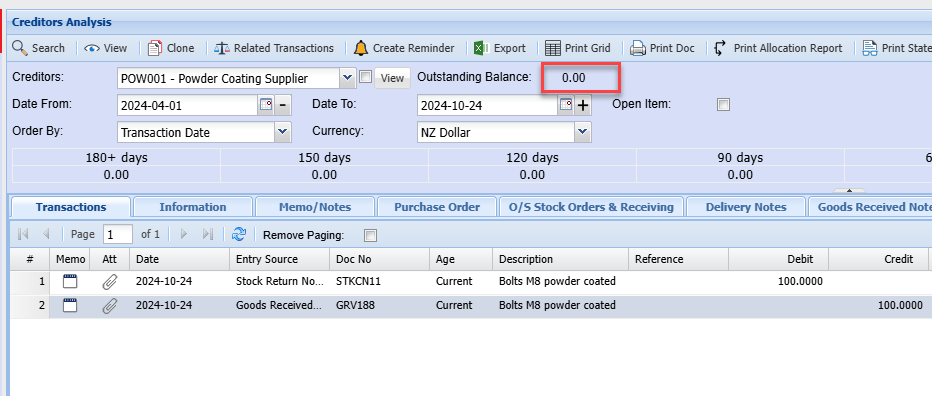
New stock comes in at correct pricing
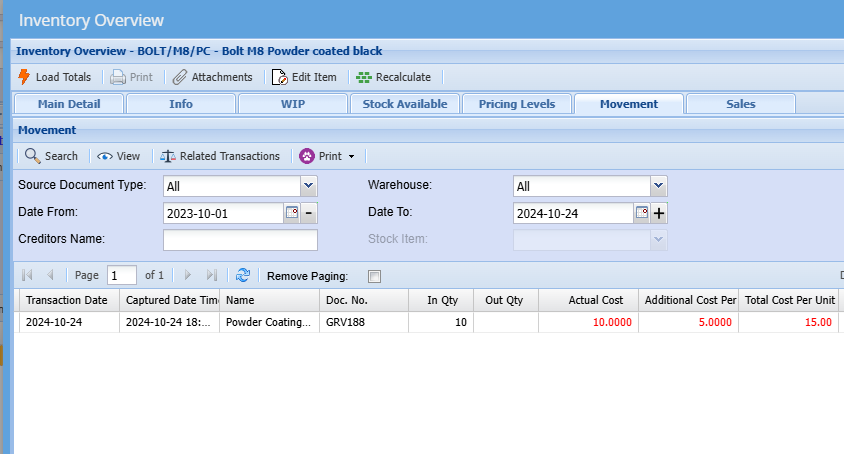
The supplier is owed the correct amount for powder coating