# Stock Order Menu

# Stock Order Search

<span style="color: rgb(45, 194, 107);">**Creditors Module &gt; Activity &gt; Stock Order Search**</span>

Double click on the Stock Order you are wanting to continue working on.

[![image.png](https://hugeerp10.co.za/hsofmanual/uploads/images/gallery/2025-01/scaled-1680-/cveimage.png)](https://hugeerp10.co.za/hsofmanual/uploads/images/gallery/2025-01/cveimage.png)

####  

#### Stock Order Features

<span lang="EN-US" style="mso-bidi-font-family: Calibri; mso-bidi-theme-font: minor-latin; color: black; mso-themecolor: text1; mso-ansi-language: EN-US;">Stock Order feature does require a few setups to be in place for optimum use:</span>

<table border="1" id="bkmrk-default-supplier-set" style="border-collapse: collapse; width: 100%;"><colgroup><col style="width: 28.7381%;"></col><col style="width: 71.3572%;"></col></colgroup><tbody><tr><td>**<span lang="EN-US" style="color: black;">Default supplier setup on each item</span>**

</td><td>- <span lang="EN-US" style="mso-bidi-font-family: Calibri; mso-bidi-theme-font: minor-latin; color: black; mso-themecolor: text1; mso-ansi-language: EN-US;">This is so that the system knows which supplier to create the Purchase order against</span>

</td></tr><tr><td>**<span lang="EN-US" style="color: black;">Minimum, Maximum, Preferred, Reorder levels on each item</span>**</td><td>- <span lang="EN-US" style="mso-bidi-font-family: Calibri; mso-bidi-theme-font: minor-latin; color: black; mso-themecolor: text1; mso-ansi-language: EN-US;">To Create a new stock order:</span>
- <span lang="EN-US" style="mso-bidi-font-family: Calibri; mso-bidi-theme-font: minor-latin; color: black; mso-themecolor: text1; mso-ansi-language: EN-US;">Click Add to create a new Stock Order batch.</span>
- <span lang="EN-US" style="mso-bidi-font-family: Calibri; mso-bidi-theme-font: minor-latin; color: black; mso-themecolor: text1; mso-ansi-language: EN-US;">There are 2 option to add items to the order batch in bulk:</span>

</td></tr><tr><td>**<span lang="EN-US" style="color: black;">Using Brand / Make setup</span>**</td><td>- <span lang="EN-US" style="mso-bidi-font-family: Calibri; mso-bidi-theme-font: minor-latin; color: black; mso-themecolor: text1; mso-ansi-language: EN-US;">This is the Brand and Make the item is linked to:</span>
- <span lang="EN-US" style="mso-bidi-font-family: Calibri; mso-bidi-theme-font: minor-latin; color: black; mso-themecolor: text1; mso-ansi-language: EN-US;">Using this option, selecting a particular Brand, will result in all item linked to the selected Brand being automatically added to the batch without you having to select each item individually.</span>

</td></tr><tr><td>**<span lang="EN-US" style="color: black;">Using Item Group setup</span>**</td><td>- <span lang="EN-US" style="mso-bidi-font-family: Calibri; mso-bidi-theme-font: minor-latin; color: black; mso-themecolor: text1; mso-ansi-language: EN-US;">This option looks at the Group code the Item is linked to and pulls through all items linked to the selected Group(s).</span>
- <span lang="EN-US" style="mso-bidi-font-family: Calibri; mso-bidi-theme-font: minor-latin; color: black; mso-themecolor: text1; mso-ansi-language: EN-US;"><span lang="EN-US" style="mso-bidi-font-family: Calibri; mso-bidi-theme-font: minor-latin; mso-ansi-language: EN-US;">Click on the Brand Drop down to see the list of Brands</span></span>
- <span lang="EN-US" style="mso-bidi-font-family: Calibri; mso-bidi-theme-font: minor-latin; color: black; mso-themecolor: text1; mso-ansi-language: EN-US;"><span lang="EN-US" style="mso-bidi-font-family: Calibri; mso-bidi-theme-font: minor-latin; mso-ansi-language: EN-US;">To use the group code option, tick the box “Use Groups”</span></span>
- <span lang="EN-US" style="mso-bidi-font-family: Calibri; mso-bidi-theme-font: minor-latin; color: black; mso-themecolor: text1; mso-ansi-language: EN-US;"><span lang="EN-US" style="mso-bidi-font-family: Calibri; mso-bidi-theme-font: minor-latin; mso-ansi-language: EN-US;">Double click on the required item Group code in the left (available) box to move the group to the selection box on the right.</span></span>
- <span lang="EN-US" style="mso-bidi-font-family: Calibri; mso-bidi-theme-font: minor-latin; color: black; mso-themecolor: text1; mso-ansi-language: EN-US;"><span lang="EN-US" style="mso-bidi-font-family: Calibri; mso-bidi-theme-font: minor-latin; mso-ansi-language: EN-US;">Once the require Brand/ group code(s) have been selected, click on Next</span></span>
- <span lang="EN-US" style="mso-bidi-font-family: Calibri; mso-bidi-theme-font: minor-latin; color: black; mso-themecolor: text1; mso-ansi-language: EN-US;"><span lang="EN-US" style="mso-bidi-font-family: Calibri; mso-bidi-theme-font: minor-latin; mso-ansi-language: EN-US;">This will open a window with all items linked to Group code, listed in the grid</span></span>

</td></tr></tbody></table>

<span lang="EN-US" style="mso-bidi-font-family: Calibri; mso-bidi-theme-font: minor-latin; mso-ansi-language: EN-US;">Enter a description that will be used on the Purchase order(s)</span>

<span lang="EN-US" style="mso-bidi-font-family: Calibri; mso-bidi-theme-font: minor-latin; mso-ansi-language: EN-US;">Click Save on the top Right</span>

<span lang="EN-US" style="mso-bidi-font-family: Calibri; mso-bidi-theme-font: minor-latin; mso-ansi-language: EN-US;">This will activate the Update button</span>

[![image.png](https://hugeerp10.co.za/hsofmanual/uploads/images/gallery/2025-01/scaled-1680-/Sroimage.png)](https://hugeerp10.co.za/hsofmanual/uploads/images/gallery/2025-01/Sroimage.png)

<span lang="EN-US" style="mso-bidi-font-family: Calibri; mso-bidi-theme-font: minor-latin; mso-ansi-language: EN-US;">You now need to determine which calculation you wish to apply in order to update the required order quantities for each item.</span>

<span lang="EN-US" style="mso-bidi-font-family: Calibri; mso-bidi-theme-font: minor-latin; color: black; mso-themecolor: text1; mso-ansi-language: EN-US;">The order quantities applied to each respective item can be determined from a number of options:</span>

<span lang="EN-US" style="mso-bidi-font-family: Calibri; mso-bidi-theme-font: minor-latin; color: black; mso-themecolor: text1; mso-ansi-language: EN-US;">Click the Update Qty drop down to see the list of options:</span>

<span lang="EN-US" style="mso-bidi-font-family: Calibri; mso-bidi-theme-font: minor-latin; color: black; mso-themecolor: text1; mso-ansi-language: EN-US; mso-no-proof: yes;">![](https://hugeerp10.co.za/hsofmanual/uploads/images/gallery/2023-09/embedded-image-mhpjdyqj.png)  
</span>

<span lang="EN-US" style="mso-bidi-font-family: Calibri; mso-bidi-theme-font: minor-latin; color: black; mso-themecolor: text1; mso-ansi-language: EN-US;"><span style="mso-list: Ignore;">1.<span style="font: 7.0pt 'Times New Roman';"> </span></span></span><span lang="EN-US" style="mso-bidi-font-family: Calibri; mso-bidi-theme-font: minor-latin; color: black; mso-themecolor: text1; mso-ansi-language: EN-US;"><span style="mso-spacerun: yes;"> </span><span style="text-decoration: underline;">Max Value</span></span>

<span lang="EN-US" style="mso-bidi-font-family: Calibri; mso-bidi-theme-font: minor-latin; color: black; mso-themecolor: text1; mso-ansi-language: EN-US;">Populates the order quantities to equal the Maximum qty as per item setup </span>

<span lang="EN-US" style="mso-bidi-font-family: Calibri; mso-bidi-theme-font: minor-latin; color: black; mso-themecolor: text1; mso-ansi-language: EN-US;"><span style="mso-list: Ignore;">2.<span style="font: 7.0pt 'Times New Roman';"> </span></span></span><span style="text-decoration: underline;"><span lang="EN-US" style="color: black; text-decoration: underline;">Preferred Value</span></span>

<span lang="EN-US" style="mso-bidi-font-family: Calibri; mso-bidi-theme-font: minor-latin; color: black; mso-themecolor: text1; mso-ansi-language: EN-US;">Populate the order quantities to equal the Preferred Quantity as per item setup</span>

<span lang="EN-US" style="mso-bidi-font-family: Calibri; mso-bidi-theme-font: minor-latin; color: black; mso-themecolor: text1; mso-ansi-language: EN-US;"><span style="mso-list: Ignore;">3.<span style="font: 7.0pt 'Times New Roman';"> </span></span></span><span style="text-decoration: underline;"><span lang="EN-US" style="color: black; text-decoration: underline;">Min Order Qty (MOQ)</span></span>

<span lang="EN-US" style="mso-bidi-font-family: Calibri; mso-bidi-theme-font: minor-latin; color: black; mso-themecolor: text1; mso-ansi-language: EN-US;">Will populate the Order Quantities to equal Minimum order quantity as per item setup.</span>

<span lang="EN-US" style="mso-bidi-font-family: Calibri; mso-bidi-theme-font: minor-latin; color: black; mso-themecolor: text1; mso-ansi-language: EN-US;">Note the Minimum quantity and the Minimum order Quantity are different</span>

<span lang="EN-US" style="mso-bidi-font-family: Calibri; mso-bidi-theme-font: minor-latin; color: black; mso-themecolor: text1; mso-ansi-language: EN-US;">Minimum quantity is the minimum holding quantity.</span>

<span lang="EN-US" style="mso-bidi-font-family: Calibri; mso-bidi-theme-font: minor-latin; color: black; mso-themecolor: text1; mso-ansi-language: EN-US;">Minimum order quantity is the minimum quantity that can be ordered from the supplier.</span>

<span lang="EN-US" style="mso-bidi-font-family: Calibri; mso-bidi-theme-font: minor-latin; color: black; mso-themecolor: text1; mso-ansi-language: EN-US;"><span style="mso-list: Ignore;">4.<span style="font: 7.0pt 'Times New Roman';"> </span></span></span><span style="text-decoration: underline;"><span lang="EN-US" style="color: black; text-decoration: underline;">Order to Max + Purchase from on hand</span></span>

<span lang="EN-US" style="mso-bidi-font-family: Calibri; mso-bidi-theme-font: minor-latin; mso-ansi-language: EN-US;">Populates the order quantities to be Item Maximum Qty less Qty on Hand less qty on open Purchase orders</span>

<span lang="EN-US" style="mso-bidi-font-family: Calibri; mso-bidi-theme-font: minor-latin; color: black; mso-themecolor: text1; mso-ansi-language: EN-US;"><span style="mso-list: Ignore;">5.<span style="font: 7.0pt 'Times New Roman';"> </span></span></span><span style="text-decoration: underline;"><span lang="EN-US" style="color: black; text-decoration: underline;">Order to Max from on hand</span></span>

<span lang="EN-US" style="mso-bidi-font-family: Calibri; mso-bidi-theme-font: minor-latin; color: black; mso-themecolor: text1; mso-ansi-language: EN-US;">The difference between the maximum quantity and the on hand quantity</span>

<span lang="EN-US" style="mso-bidi-font-family: Calibri; mso-bidi-theme-font: minor-latin; color: black; mso-themecolor: text1; mso-ansi-language: EN-US;"><span style="mso-list: Ignore;">6.<span style="font: 7.0pt 'Times New Roman';"> </span></span></span><span style="text-decoration: underline;"><span lang="EN-US" style="color: black; text-decoration: underline;">Order to Preferred from on hand</span></span>

<span lang="EN-US" style="mso-bidi-font-family: Calibri; mso-bidi-theme-font: minor-latin; color: black; mso-themecolor: text1; mso-ansi-language: EN-US;">The difference between the Preferred item Quantity and the on hand quantity</span>

<span lang="EN-US" style="mso-bidi-font-family: Calibri; mso-bidi-theme-font: minor-latin; color: black; mso-themecolor: text1; mso-ansi-language: EN-US;"><span style="mso-list: Ignore;">7.<span style="font: 7.0pt 'Times New Roman';"> </span></span></span><span style="text-decoration: underline;"><span lang="EN-US" style="color: black; text-decoration: underline;">Order to Reorder from on hand</span></span>

<span lang="EN-US" style="mso-bidi-font-family: Calibri; mso-bidi-theme-font: minor-latin; color: black; mso-themecolor: text1; mso-ansi-language: EN-US;"><span style="mso-list: Ignore;">8.<span style="font: 7.0pt 'Times New Roman';"> </span></span></span><span style="text-decoration: underline;"><span lang="EN-US" style="color: black; text-decoration: underline;">The difference between the Reorder quantity and the quantity on hand</span></span>

<span lang="EN-US" style="mso-bidi-font-family: Calibri; mso-bidi-theme-font: minor-latin; color: black; mso-themecolor: text1; mso-ansi-language: EN-US;">You can then review the quantities to be ordered</span>

<span lang="EN-US" style="mso-bidi-font-family: Calibri; mso-bidi-theme-font: minor-latin; color: black; mso-themecolor: text1; mso-ansi-language: EN-US;">Should you wish to override any of the quantities, click the select box</span>

<span lang="EN-US" style="mso-bidi-font-family: Calibri; mso-bidi-theme-font: minor-latin; color: black; mso-themecolor: text1; mso-ansi-language: EN-US;">Then click on the order quantity field</span>

<span lang="EN-US" style="mso-bidi-font-family: Calibri; mso-bidi-theme-font: minor-latin; color: black; mso-themecolor: text1; mso-ansi-language: EN-US;">Enter the amended quantity</span>

<span lang="EN-US" style="mso-bidi-font-family: Calibri; mso-bidi-theme-font: minor-latin; color: black; mso-themecolor: text1; mso-ansi-language: EN-US;">Once you are satisfied with the quantities to be ordered from supplier, click the Process button to create the Purchase order(s)</span>

---

<span class="ts0">Minimum Order Quantity (MOQ) rules</span>

<span class="ts0">In stock order there is an option for Minimum order quantity MOQ</span>

<span class="ts0">Works with Update docs columns for MOQ values</span>

<span class="ts0">If Order quantity is greater than MOQ then ignore updating column.</span>

<span class="ts0">If Order quantity is less than MOQ, take MOQ quantity as order quantity</span>

# Add Stock Order

The stock order function enables the automatic creation of one or multiple supplier purchase orders. This means you don't have to generate purchase orders for each supplier or add items individually.

This feature does require a few setups to be in place for optimum use:

<table border="1" id="bkmrk-default-supplier-set" style="border-collapse: collapse; width: 100%;"><colgroup><col style="width: 36.7161%;"></col><col style="width: 63.3828%;"></col></colgroup><tbody><tr><td>**Default supplier setup on each item**</td><td>This is so that the system knows which supplier to create the Purchase order against</td></tr><tr><td>**Min / Max quantity levels on each item**</td><td>Used on some of the options to determine order quantities.</td></tr></tbody></table>

To Create a new stock order, go to <span style="color: rgb(45, 194, 107);">**Creditors Module &gt; Activity &gt; Stock Order Search**</span>

[![image.png](https://hugeerp10.co.za/hsofmanual/uploads/images/gallery/2025-01/scaled-1680-/ARiimage.png)](https://hugeerp10.co.za/hsofmanual/uploads/images/gallery/2025-01/ARiimage.png)

<table border="1" id="bkmrk-search-add-%C2%A0-edit-ca" style="border-collapse: collapse; width: 100%; height: 177.781px;"><colgroup><col style="width: 14.3704%;"></col><col style="width: 85.7284%;"></col></colgroup><tbody><tr style="height: 29.7969px;"><td style="height: 29.7969px;">**Search**</td><td style="height: 29.7969px;">Allows you to search for an existing Stock Order.</td></tr><tr style="height: 29.7969px;"><td style="height: 29.7969px;">**Add**</td><td style="height: 29.7969px;">Allows you to create a new Stock Order.</td></tr><tr style="height: 28.7969px;"><td style="height: 28.7969px;">**Edit**</td><td style="height: 28.7969px;">Allows you to edit an existing Stock Order.</td></tr><tr style="height: 29.7969px;"><td style="height: 29.7969px;">**Cancel**</td><td style="height: 29.7969px;">Allows you to cancel/Delete an existing Stock Order</td></tr><tr style="height: 29.7969px;"><td style="height: 29.7969px;">**Process**</td><td style="height: 29.7969px;">Allows you process a Stock Order once you are happy with it.</td></tr><tr style="height: 29.7969px;"><td style="height: 29.7969px;">**Print**</td><td style="height: 29.7969px;">Allows you to Print Out the Stock order into an excel format.</td></tr></tbody></table>

Click Add to create a new Stock Order batch.

[![image.png](https://hugeerp10.co.za/hsofmanual/uploads/images/gallery/2025-01/scaled-1680-/9Ylimage.png)](https://hugeerp10.co.za/hsofmanual/uploads/images/gallery/2025-01/9Ylimage.png)

<table border="1" id="bkmrk-type-select-the-type" style="border-collapse: collapse; width: 100%; height: 699.987px;"><colgroup><col style="width: 22.2859%;"></col><col style="width: 77.7141%;"></col></colgroup><tbody><tr style="height: 29.7875px;"><td style="height: 29.7875px;">Type</td><td style="height: 29.7875px;">Select the type of Item you are wanting to process a Stock order for, normally this would stay as Stock.</td></tr><tr style="height: 29.7875px;"><td style="height: 29.7875px;">Brand</td><td style="height: 29.7875px;">Select the brand from the drop-down menu to refine your selection for your Order</td></tr><tr style="height: 29.7875px;"><td style="height: 29.7875px;">Make</td><td style="height: 29.7875px;">Select the Make from the drop-down menu to refine your selection for your Order.</td></tr><tr style="height: 29.7875px;"><td style="height: 29.7875px;">Model</td><td style="height: 29.7875px;">Select the Model from the drop-down menu to refine your selection for your Order.</td></tr><tr style="height: 29.7875px;"><td style="height: 29.7875px;">Supplier From / Supplier To</td><td style="height: 29.7875px;">Select a Suppliers/ you wish to create an Order for. </td></tr><tr style="height: 46.5875px;"><td style="height: 46.5875px;">Item From / Item To</td><td style="height: 46.5875px;">If you leave the stock item fields blank, all stock items will be displayed. If you choose specific stock items, the Stock Order will include only those items.</td></tr><tr style="height: 29.7875px;"><td style="height: 29.7875px;">Exclude Promotions</td><td style="height: 29.7875px;">If you tick this box, it will exclude items that are currently on Promotion.</td></tr><tr style="height: 46.5875px;"><td style="height: 46.5875px;">Priority Level</td><td style="height: 46.5875px;">Priority levels are setup at the Item Setup stage, if you use Priority Levels you can refine your Order here by filtering for the desired items.</td></tr><tr style="height: 46.5875px;"><td style="height: 46.5875px;">Stock Category</td><td style="height: 46.5875px;">Stock Categories are setup at the Item Setup stage, if you use Categories, you can refine your Order here by filtering for the desired Stock Category.</td></tr><tr style="height: 63.3875px;"><td style="height: 63.3875px;">Warehouse</td><td style="height: 63.3875px;">If you have multiple warehouses, you can select all warehouses the system will fetch stock items from all warehouses.  
If you want to filter by a specific warehouse, select the warehouse from the drop-down menu.</td></tr><tr style="height: 46.5875px;"><td style="height: 46.5875px;">Min / Max</td><td style="height: 46.5875px;">Select Min/Max if you want to filter your inventory items by stock level, leave it on none if you do not wish to filter by min/max.</td></tr><tr style="height: 29.7875px;"><td style="height: 29.7875px;">Doc Type</td><td style="height: 29.7875px;">Select the document type from the drop-down menu.</td></tr><tr style="height: 29.7875px;"><td style="height: 29.7875px;">Doc Number</td><td style="height: 29.7875px;">Add the document number to filter for items that are associated with that specific document.</td></tr><tr style="height: 29.7875px;"><td style="height: 29.7875px;">Items per Job</td><td style="height: 29.7875px;">If you are ordering stock for specific jobs, by ticking this box it will separate the order by job.</td></tr><tr style="height: 29.7875px;"><td style="height: 29.7875px;">Year From / Year To</td><td style="height: 29.7875px;">Select the year From and Year To Dates from the drop-down menu</td></tr><tr style="height: 29.6px;"><td style="height: 29.6px;">Period From / Period To</td><td style="height: 29.6px;">Select the period From and the Period To from the drop-down menu</td></tr><tr style="height: 46.5875px;"><td style="height: 46.5875px;">Use Groups</td><td style="height: 46.5875px;">If you would like to create a Stock order using groups tick the box, this will open two columns which you can shift stock items from what is available to the second column that will filter for your order.</td></tr><tr style="height: 46.5875px;"><td style="height: 46.5875px;">Group Selection</td><td style="height: 46.5875px;">If you have groups set up, you can select a group from the drop-down menu to refine your stock order.</td></tr></tbody></table>

There are 2 option to add items to the order batch in bulk:

<table border="1" id="bkmrk-using-brand-%2F-make-s" style="border-collapse: collapse; width: 100%;"><colgroup><col style="width: 50%;"></col><col style="width: 50%;"></col></colgroup><tbody><tr><td><span style="text-decoration: underline;">**Using Brand / Make setup**</span></td><td><span style="text-decoration: underline;">**Using Item Group setup**</span></td></tr><tr><td><span lang="EN-US">This is the Brand and Make the item is linked to.</span>

<span lang="EN-US">Using this option, selecting a particular Brand, will result in all items linked to the selected Brand being automatically added to the batch without you having to select each item individually.</span>

</td><td><span lang="EN-US">This option looks at the Group code the Item is linked to and pulls through all items linked to the selected Group(s).</span>

<span lang="EN-US">Click on the Brand Drop down to see the list of Brands.</span>

<span lang="EN-US">To use the group code option, tick the box “Use Groups”.</span>

<span lang="EN-US">Double click on the required item Group code in the left </span>

<span lang="EN-US">(available) box to move the group to the selection box on the right.</span>

</td></tr></tbody></table>

When using Groups to filter your stock items for your order:

Tick the "Use Groups" Box, and then Click on the Select Groups button as shown below

Double click on one of the groups under the Available list, this will add it to the Selected List

[![image.png](https://hugeerp10.co.za/hsofmanual/uploads/images/gallery/2025-01/scaled-1680-/pZLimage.png)](https://hugeerp10.co.za/hsofmanual/uploads/images/gallery/2025-01/pZLimage.png)

Once the require Brand/ group code(s) have been selected, click Save and Close, and then click Next at the bottom of the screen

[![image.png](https://hugeerp10.co.za/hsofmanual/uploads/images/gallery/2025-01/scaled-1680-/6nEimage.png)](https://hugeerp10.co.za/hsofmanual/uploads/images/gallery/2025-01/6nEimage.png)

This will open a window with all items linked to Group code you have chosen. You will see how many items this group has pulled through to your Stock Order to the right just about the grid.

Enter a description (Yellow Block) that will be used on this Purchase order

[![image.png](https://hugeerp10.co.za/hsofmanual/uploads/images/gallery/2025-01/scaled-1680-/LaJimage.png)](https://hugeerp10.co.za/hsofmanual/uploads/images/gallery/2025-01/LaJimage.png)

<p class="callout info">Columns Explained - [Click Here](https://hugeerp10.co.za/hsofmanual/books/bcm-activity/page/stock-order-columns-explained)</p>

By clicking 'Save' will activate the Stock Order and the button at the top of the screen. At this point, the Stock Order functions as a 'Snapshot' of the stock data from the main system. You can make changes to the order without affecting the main system, unless the changes are made in the 'Edit item' tab. Changes made to the main system will not be reflected in your Stock Order because it is a 'Snapshot'. Therefore, any necessary changes should be made to the individual lines of the order.

[![image.png](https://hugeerp10.co.za/hsofmanual/uploads/images/gallery/2025-01/scaled-1680-/W8Timage.png)](https://hugeerp10.co.za/hsofmanual/uploads/images/gallery/2025-01/W8Timage.png)

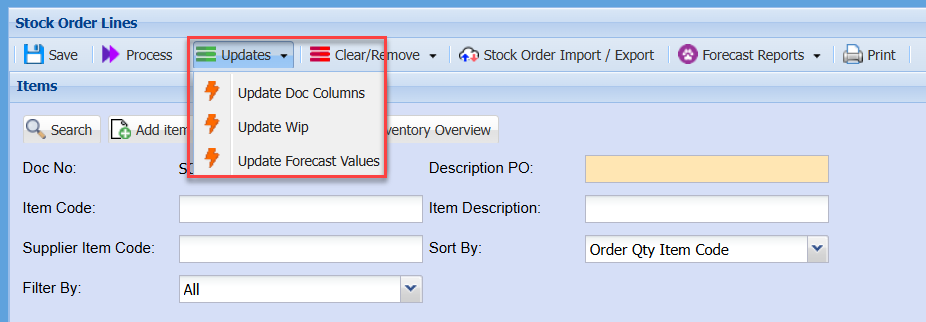
<table border="1" id="bkmrk-save-click-save-to-s" style="border-collapse: collapse; width: 100%; height: 288.766px;"><colgroup><col style="width: 14.301%;"></col><col style="width: 85.699%;"></col></colgroup><tbody><tr style="height: 29.7969px;"><td style="height: 29.7969px;">**Save**</td><td style="height: 29.7969px;">Click save to save changes made to the Stock Order</td></tr><tr style="height: 46.5938px;"><td style="height: 46.5938px;">**Process**</td><td style="height: 46.5938px;">Click Process when you are happy with your Stock Order and you want to finalise the Order which will create a purchase order for each supplier.</td></tr><tr style="height: 46.5938px;"><td style="height: 46.5938px;">**Updates**</td><td style="height: 46.5938px;">These are the 3 steps you need to complete to populate the grid columns containing all your stock items in your Stock Order </td></tr><tr style="height: 29.7969px;"><td style="height: 29.7969px;">**Clear / Remove**</td><td style="height: 29.7969px;">This will either remove a Stock Item from the Stock Order or you can clear the quantities in the order</td></tr><tr style="height: 46.5938px;"><td style="height: 46.5938px;">**Stock Order Import /Export**</td><td style="height: 46.5938px;">This allows you to export your stock Order list, allowing you the opportunity to update it in Excel if you prefer, once you are happy with your spreadsheet you can import it back in. </td></tr><tr style="height: 29.7969px;"><td style="height: 29.7969px;">**Forecast Report**</td><td style="height: 29.7969px;">Here you will find a few reports you can print.</td></tr><tr style="height: 29.7969px;"><td style="height: 29.7969px;">**Print** </td><td style="height: 29.7969px;">Click print to print the Stock order you have created</td></tr><tr style="height: 29.7969px;"><td style="height: 29.7969px;">**Create RFQ**</td><td style="height: 29.7969px;">You can request a Quote from here as well for a specific stock item by highlighting the line and clicking this button</td></tr></tbody></table>


---

#### Updating the Stock Order Columns

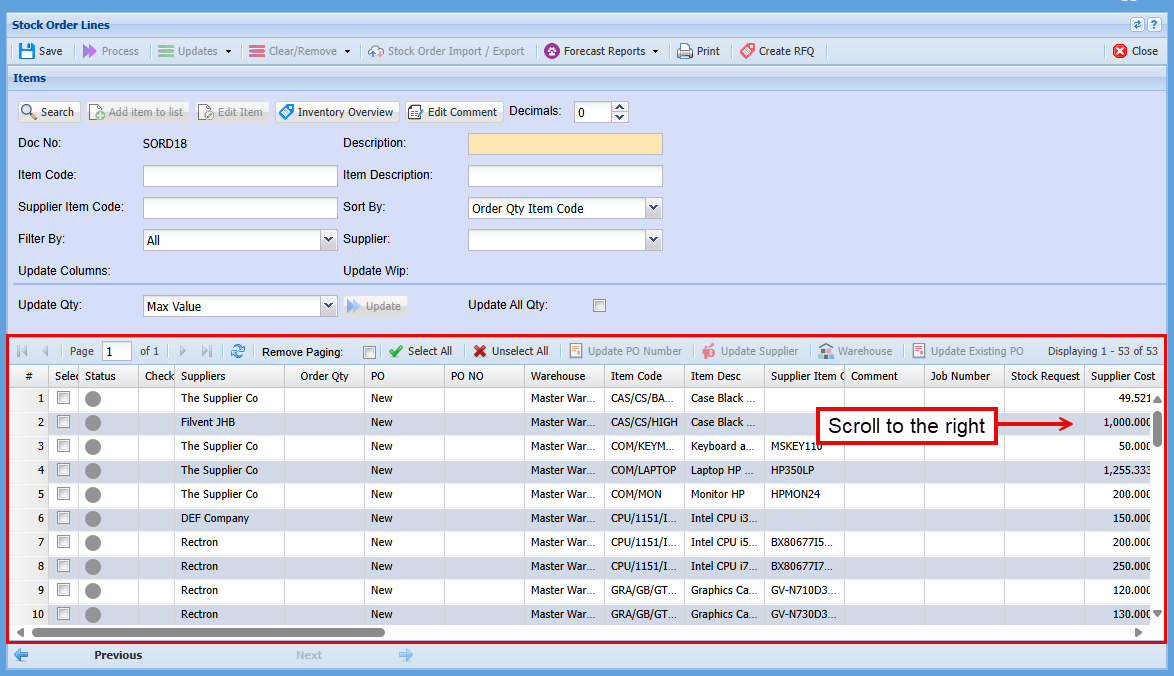
When you look at the stock items and scroll to the right you will see many fields that need to be filled in before you can process this Stock Order. To do so you need to complete the 3 steps under the "Update" Dropdown tab.

<p class="callout warning">Check that you have cleared all filters from the search criteria and click search to make sure that all items are showing in the Stock Order Grid when follow the next 3 steps.</p>

[![image.png](https://hugeerp10.co.za/hsofmanual/uploads/images/gallery/2025-01/scaled-1680-/pXLimage.png)](https://hugeerp10.co.za/hsofmanual/uploads/images/gallery/2025-01/pXLimage.png)

##### Updates Dropdown

These are the 3 steps you need to complete to populate the Stock item grids columns.

[![image.png](https://hugeerp10.co.za/hsofmanual/uploads/images/gallery/2024-09/scaled-1680-/ZSYimage.png)](https://hugeerp10.co.za/hsofmanual/uploads/images/gallery/2024-09/ZSYimage.png)
##### Update Doc Columns

Select the tick boxes of what you would like to update in you Stock order

[![image.png](https://hugeerp10.co.za/hsofmanual/uploads/images/gallery/2024-09/scaled-1680-/4klimage.png)](https://hugeerp10.co.za/hsofmanual/uploads/images/gallery/2024-09/4klimage.png)
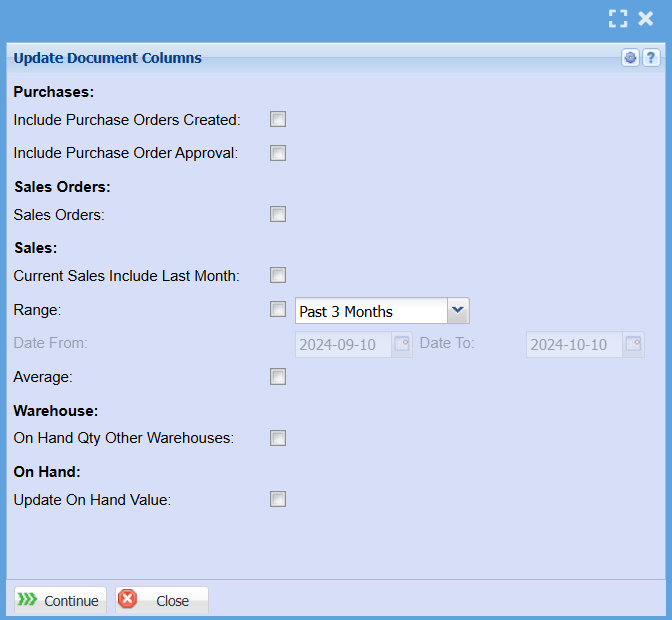
<table border="1" id="bkmrk-include-purchase-ord" style="border-collapse: collapse; width: 100%; height: 283.2px;"><colgroup><col style="width: 22.8743%;"></col><col style="width: 77.1019%;"></col></colgroup><tbody><tr style="height: 46.4px;"><td style="height: 46.4px;">Include Purchase Orders Created</td><td style="height: 46.4px;">When creating a Stock Order, it's essential to know the quantities of each item already on Purchase Orders to avoid duplication. This is particularly crucial when multiple individuals are handling purchase orders.</td></tr><tr style="height: 29.6px;"><td style="height: 29.6px;">Include Purchase Orders Approval</td><td style="height: 29.6px;">Since Stock Orders display only the snapshot of stock quantities at the time of their creation, it's useful to know which orders have been approved since then to avoid duplications. This is important as Stock Orders can remain open for days, or even weeks.</td></tr><tr style="height: 29.6px;"><td style="height: 29.6px;">Sales Orders</td><td style="height: 29.6px;">When creating a Stock Order, it's important to know the quantities of each item allocated to open sales orders. This helps ensure you order enough stock to fulfill all open sales orders and maintain sufficient inventory for future orders.</td></tr><tr style="height: 29.6px;"><td style="height: 29.6px;">Current Sales Included in Last Month</td><td style="height: 29.6px;">This is useful for forecasting future sales orders and determining an average quantity to order. </td></tr><tr style="height: 29.6px;"><td style="height: 29.6px;">Range</td><td style="height: 29.6px;">You can analyze data from the past 3 or 6 months and choose to include the current month if it affects the figures. There is also an option to select Custom Dates.</td></tr><tr><td>Date From / To</td><td>If you select a Custom Date, you can then select you From and To dates to pull the data from.</td></tr><tr style="height: 29.6px;"><td style="height: 29.6px;">Average</td><td style="height: 29.6px;">You can choose to pull an average figure of sales over the time period selected.</td></tr><tr style="height: 29.6px;"><td style="height: 29.6px;">On Hand Qty Other Warehouses</td><td style="height: 29.6px;">You can select to pull the overall quantity you have on hand and in multiple warehouses as this order is only based on the selected warehouse.</td></tr><tr style="height: 29.6px;"><td style="height: 29.6px;">Update Onhand Value</td><td style="height: 29.6px;">When the Stock order was created, it would have pulled quantity figures at that specific time. If this Stock order has been open for a week or multiple weeks that figure may have changed and by selecting this, you will get an updated quantity onhand.</td></tr></tbody></table>

Once you have selected your criteria you a click "Continue" which will then run the query for all these columns in your Stock Order with your sales trends allowing you to make an informed decision when placing an order.

[![image.png](https://hugeerp10.co.za/hsofmanual/uploads/images/gallery/2025-01/scaled-1680-/K4aimage.png)](https://hugeerp10.co.za/hsofmanual/uploads/images/gallery/2025-01/K4aimage.png)

<p class="callout info">Grid Buttons Explained - [Click Here](https://hugeerp10.co.za/hsofmanual/link/1639#bkmrk-grid-tabs)</p>

##### Update WIP

WIP looks at all Work in progress, and what stock is still to go out or allocated.

[![image.png](https://hugeerp10.co.za/hsofmanual/uploads/images/gallery/2024-09/scaled-1680-/qw6image.png)](https://hugeerp10.co.za/hsofmanual/uploads/images/gallery/2024-09/qw6image.png)
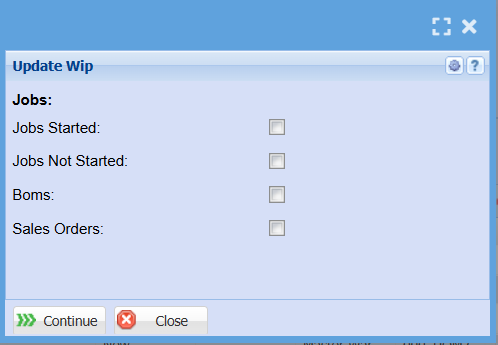
<table border="1" id="bkmrk-jobs-started-invento" style="border-collapse: collapse; width: 100%; height: 147.8px;"><colgroup><col style="width: 15.881%;"></col><col style="width: 84.2143%;"></col></colgroup><tbody><tr style="height: 29.6px;"><td style="height: 29.6px;">Jobs Started</td><td style="height: 29.6px;">Inventory allocated to a job may still appear as in stock; however, it is no longer available. The stock levels will be updated once the job is invoiced. This will only be applicable if you use jobs.</td></tr><tr style="height: 29.6px;"><td style="height: 29.6px;">Jobs Not Started</td><td style="height: 29.6px;">Same with Jobs not started, Inventory allocated to a job may still appear as in stock; however, it is no longer available. The stock levels will be updated once the job is invoiced. This will only be applicable if you use jobs.</td></tr><tr style="height: 42.2px;"><td style="height: 42.2px;">BOMS</td><td style="height: 42.2px;">A Bill of Materials (BOM) will accumulate items until they are invoiced. It does not remove the stock from inventory but merely allocates it to the BOM. When managing inventory, it's important to understand this process to get an accurate view of current available stock. By ticking this box you will know the true quantity of stock on hand. This will only be applicable if you use BOMS.</td></tr><tr style="height: 46.4px;"><td style="height: 46.4px;">Sales Orders</td><td style="height: 46.4px;">This is where stock is allocated but not yet dispatched, which can make it appear as current stock. However, this can be misleading as the stock is still pending shipment. This will only be applicable if you use Sales Orders.</td></tr></tbody></table>

##### Update Forecast Values

[![image.png](https://hugeerp10.co.za/hsofmanual/uploads/images/gallery/2025-01/scaled-1680-/iwVimage.png)](https://hugeerp10.co.za/hsofmanual/uploads/images/gallery/2025-01/iwVimage.png)

<table border="1" id="bkmrk-current-date-typical" style="border-collapse: collapse; width: 100%; height: 198.4px;"><colgroup><col style="width: 23.0239%;"></col><col style="width: 77.0715%;"></col></colgroup><tbody><tr style="height: 46.4px;"><td style="height: 46.4px;">Current Date</td><td style="height: 46.4px;">Typically, you would use today's date. However, if today is too early in the month, it may skew the figures when forecasting over several months.</td></tr><tr style="height: 46.4px;"><td style="height: 46.4px;">Current Forecast</td><td style="height: 46.4px;">Here you can select to forecast for 1, 2, 3, 4, 5, or 6 months. This will give us an idea on what we should order based on the past however many months we have chosen. </td></tr><tr style="height: 46.4px;"><td style="height: 46.4px;">Growth % Month Ahead</td><td style="height: 46.4px;">A growth percentage forecast looks at the upcoming month and estimates the expected increase percentage based on the current forecast. For example, if we sold 10 units in the past 5 months and expect a 50% increase, we should sell 3 units per month for the next 5 month and therefore would need 15 items in stock.</td></tr><tr style="height: 29.6px;"><td style="height: 29.6px;">Forecast Period</td><td style="height: 29.6px;">The Forecast Period examines the period following the Growth Forecast mentioned above. In the example where we looked at 5 months, this forecast period allows us to extend the analysis to an additional 3 or 6 months.</td></tr><tr style="height: 29.6px;"><td style="height: 29.6px;">Growth % Forecast Ahead</td><td style="height: 29.6px;">This forecast will examine the additional 3 or 6 months of growth percentage following our initial prediction of a 50% increase over the first 5 months. For example, we predict a further 10% increase in the 3-6 months following the initial 5-month 50% increase.</td></tr></tbody></table>

You now need to determine which calculation you wish to apply in order to update the required order quantities for each item.

The order quantities applied to each respective item can be determined from a number of options:

Click the Update Qty drop down to see the list of options:

[![image.png](https://hugeerp10.co.za/hsofmanual/uploads/images/gallery/2025-01/scaled-1680-/B55image.png)](https://hugeerp10.co.za/hsofmanual/uploads/images/gallery/2025-01/B55image.png)

<table border="1" id="bkmrk-max-value-populates-" style="border-collapse: collapse; width: 100%;"><colgroup><col style="width: 37.1988%;"></col><col style="width: 62.7765%;"></col></colgroup><tbody><tr><td>**Max Value**</td><td>Populates the order quantities to equal the Maximum qty as per item setup</td></tr><tr><td>**Preferred Value**</td><td>Populate the order quantities to equal the Preferred Quantity as per item setup</td></tr><tr><td>**Min Order Qty (MOQ)**</td><td><span lang="EN-US">Will populate the Order Quantities to equal Minimum order quantity as per item setup.</span>

<span lang="EN-US">Note the Minimum quantity and the Minimum order Quantity are different</span>

<span lang="EN-US">Minimum quantity is the minimum holding quantity.</span>

<span lang="EN-US">Minimum order quantity is the minimum quantity that can be ordered from the supplier.</span>

</td></tr><tr><td>**Order To Max + Purchase From On Hand**</td><td>Populates the order quantities to be Item Maximum Qty less Qty on Hand less qty on open Purchase orders</td></tr><tr><td>**Order To Max From On Hand**</td><td>The difference between the maximum quantity and the on hand quantity</td></tr><tr><td>**Order To Preferred From On Hand**</td><td>The difference between the Preferred item Quantity and the on hand quantity</td></tr><tr><td>**Order To Reorder From On Hand**</td><td>  
</td></tr><tr><td>**Order to Job From On Hand**</td><td>  
</td></tr><tr><td>**Order To BOM (Bill of Material) From On Hand**</td><td>  
</td></tr><tr><td>**The difference between the Reorder quantity and the quantity on hand**</td><td><span lang="EN-US"> </span><span lang="EN-US">In this example, we are going to be using the Reorder from on hand option</span>

<span lang="EN-US">This will calculate the difference between the Reorder level on the item setup and the current on hand quantity. And update the order quantity on this batch with this difference.</span>

</td></tr></tbody></table>

**<span lang="EN-US" style="mso-bidi-font-family: Calibri; mso-bidi-theme-font: minor-latin; color: black; mso-themecolor: text1; mso-ansi-language: EN-US;">The Difference between the Reorder quantity and the Quantity on hand</span>**

- <span lang="EN-US" style="mso-bidi-font-family: Calibri; mso-bidi-theme-font: minor-latin; color: black; mso-themecolor: text1; mso-ansi-language: EN-US;">You can then review the quantities to be ordered</span>
- <span lang="EN-US" style="mso-bidi-font-family: Calibri; mso-bidi-theme-font: minor-latin; color: black; mso-themecolor: text1; mso-ansi-language: EN-US;">Should you wish to override any of the quantities, click the select box</span>
- <span lang="EN-US" style="mso-bidi-font-family: Calibri; mso-bidi-theme-font: minor-latin; color: black; mso-themecolor: text1; mso-ansi-language: EN-US;">Then click on the order quantity field</span>
- <span lang="EN-US" style="mso-bidi-font-family: Calibri; mso-bidi-theme-font: minor-latin; color: black; mso-themecolor: text1; mso-ansi-language: EN-US;">Enter the amended quantity</span>
- <span lang="EN-US" style="mso-bidi-font-family: Calibri; mso-bidi-theme-font: minor-latin; color: black; mso-themecolor: text1; mso-ansi-language: EN-US;">Once you are satisfied with the quantities to be ordered from supplier, click the Process button to create the Purchase order(s)</span>

**<span class="ts0">Minimum Order Quantity (MOQ) rules</span>**

- <span class="ts0">In stock order there is an option for Minimum order quantity MOQ</span>
- <span class="ts0">Works with Update docs columns for MOQ values</span>
- <span class="ts0">If Order quantity is greater than MOQ then ignore updating column.</span>
- <span class="ts0">If Order quantity is less than MOQ, take MOQ quantity as order quantity</span>

[![image.png](https://hugeerp10.co.za/hsofmanual/uploads/images/gallery/2024-01/scaled-1680-/Jivimage.png)](https://hugeerp10.co.za/hsofmanual/uploads/images/gallery/2024-01/Jivimage.png)

<table border="1" id="bkmrk-1.-click-the-select-" style="border-collapse: collapse; width: 100%; height: 118.4px;"><colgroup><col style="width: 8.19758%;"></col><col style="width: 91.9013%;"></col></colgroup><tbody><tr style="height: 29.6px;"><td class="align-center" style="height: 29.6px;">**1.**</td><td style="height: 29.6px;">Click the Select All Button</td></tr><tr style="height: 29.6px;"><td class="align-center" style="height: 29.6px;">**2.**</td><td style="height: 29.6px;">Select: Order to Reorder from on hand</td></tr><tr style="height: 29.6px;"><td class="align-center" style="height: 29.6px;">**3.**</td><td style="height: 29.6px;">Click the Update button</td></tr><tr style="height: 29.6px;"><td class="align-center" style="height: 29.6px;">**4.**</td><td style="height: 29.6px;">You will notice the order quantities on the grid have been populated with the respective quantities</td></tr></tbody></table>

You can then review the quantities to be ordered

Should you wish to override any of the quantities, click the select box

Then click on the order quantity field

Enter the amended quantity

[![image.png](https://hugeerp10.co.za/hsofmanual/uploads/images/gallery/2024-01/scaled-1680-/11Uimage.png)](https://hugeerp10.co.za/hsofmanual/uploads/images/gallery/2024-01/11Uimage.png)

Once you are satisfied with the quantities to be ordered from supplier, click the Process button to create the Purchase order(s)

[![image.png](https://hugeerp10.co.za/hsofmanual/uploads/images/gallery/2024-01/scaled-1680-/y1iimage.png)](https://hugeerp10.co.za/hsofmanual/uploads/images/gallery/2024-01/y1iimage.png)

Select Create PO

Click Ok

[![image.png](https://hugeerp10.co.za/hsofmanual/uploads/images/gallery/2024-01/scaled-1680-/eusimage.png)](https://hugeerp10.co.za/hsofmanual/uploads/images/gallery/2024-01/eusimage.png)

To view the Purchase order:

Go to <span style="color: rgb(45, 194, 107);">**Activity &gt; Purchase Orders**</span>

Search

[![image.png](https://hugeerp10.co.za/hsofmanual/uploads/images/gallery/2024-01/scaled-1680-/35Vimage.png)](https://hugeerp10.co.za/hsofmanual/uploads/images/gallery/2024-01/35Vimage.png)

You should now see the purchase orders listed and can process these using the normal purchase order authorisation and order procedures.

Note: you may find several purchase orders, this is because a purchase order is created for each of the default supplies (if the items have different default suppliers linked)

You can still edit the supplier and any other details before finalizing the Purchase order.

---

# Stock Order Functions Explained

#### Buttons Explained

#### Items

<span class="ts0">Work out your quantities to order and send them to Purchase Orders</span>

**Search Button**

The search button will filter for any of the criteria competed in the green square below. Eg: if you add an Item Code and click Search it will filter your Stock items by Item Code. You can choose more than one filter to refine your search.

[![image.png](https://hugeerp10.co.za/hsofmanual/uploads/images/gallery/2025-01/scaled-1680-/lbOimage.png)](https://hugeerp10.co.za/hsofmanual/uploads/images/gallery/2025-01/lbOimage.png)

**Add Item To List Button**

You may find that an item is not on the Stock Order list, you can search for this item and add it to the order

[![image.png](https://hugeerp10.co.za/hsofmanual/uploads/images/gallery/2025-01/scaled-1680-/hLaimage.png)](https://hugeerp10.co.za/hsofmanual/uploads/images/gallery/2025-01/hLaimage.png)

Select or search for an item in the drop-down menu and click "Save"

[![image.png](https://hugeerp10.co.za/hsofmanual/uploads/images/gallery/2025-01/scaled-1680-/EvKimage.png)](https://hugeerp10.co.za/hsofmanual/uploads/images/gallery/2025-01/EvKimage.png)

**Edit Item Button**

You can highlight a row and click the Edit Item button which will take you to the item to make any changes you require to the main system. Changes will not show in your Stock Order as this is like a snapshot of the data at the time if "Save" being clicked. You will need to double click on the line item and make changes to your Stock Order lines.

[![image.png](https://hugeerp10.co.za/hsofmanual/uploads/images/gallery/2025-01/scaled-1680-/agEimage.png)](https://hugeerp10.co.za/hsofmanual/uploads/images/gallery/2025-01/agEimage.png)

**Inventory Overview Button**

The inventory overview window allows a quick access to view information on an item.

It is accessed in most windows where stock items are present

[![image.png](https://hugeerp10.co.za/hsofmanual/uploads/images/gallery/2025-01/scaled-1680-/jMyimage.png)](https://hugeerp10.co.za/hsofmanual/uploads/images/gallery/2025-01/jMyimage.png)

**Edit Comment Button**

Here you can edit comments made for each item

[![image.png](https://hugeerp10.co.za/hsofmanual/uploads/images/gallery/2025-01/scaled-1680-/NCiimage.png)](https://hugeerp10.co.za/hsofmanual/uploads/images/gallery/2025-01/NCiimage.png)

---


#### Grid Buttons Explained

##### Remove Paging

Put this tick on to displays all Stock Order items on a single page If the Order list exceeds the default 100 lines. If this box is not ticked and you have more than 100 items, you will need to click through the pages with the arrows [![image.png](https://hugeerp10.co.za/hsofmanual/uploads/images/gallery/2025-01/scaled-1680-/AaMimage.png)](https://hugeerp10.co.za/hsofmanual/uploads/images/gallery/2025-01/AaMimage.png)

[![image.png](https://hugeerp10.co.za/hsofmanual/uploads/images/gallery/2025-01/scaled-1680-/2ewimage.png)](https://hugeerp10.co.za/hsofmanual/uploads/images/gallery/2025-01/2ewimage.png)


##### Select All / Unselect All

<span class="ts0">The Stock Order Lines can be all selected and unselected by clicking on the Select All or Unselect All button. Or you can tick the boxes individually.</span>

[![image.png](https://hugeerp10.co.za/hsofmanual/uploads/images/gallery/2025-01/scaled-1680-/pMLimage.png)](https://hugeerp10.co.za/hsofmanual/uploads/images/gallery/2025-01/pMLimage.png)


##### Update PO Number

All purchase orders will appear as new when a Stock Order is created. If a purchase order already exists for a supplier and you want to add an item to that order, tick the select the checkbox for the item and click the 'Update Existing Number' button. This will change the status of the PO from 'New' to 'Existing and add the Existing PO number to the PO NO Column.

[![image.png](https://hugeerp10.co.za/hsofmanual/uploads/images/gallery/2025-01/scaled-1680-/8YFimage.png)](https://hugeerp10.co.za/hsofmanual/uploads/images/gallery/2025-01/8YFimage.png)


##### Update Supplier

When a Stock Order is created, the Default Supplier will automatically populate in the order. If you need to change the supplier for a stock item, highlight the relevant line, click the 'Update Supplier' button, select the desired supplier from the drop-down menu, and click 'Save'

[![image.png](https://hugeerp10.co.za/hsofmanual/uploads/images/gallery/2025-01/scaled-1680-/k4Nimage.png)](https://hugeerp10.co.za/hsofmanual/uploads/images/gallery/2025-01/k4Nimage.png)

[![image.png](https://hugeerp10.co.za/hsofmanual/uploads/images/gallery/2025-01/scaled-1680-/WoBimage.png)](https://hugeerp10.co.za/hsofmanual/uploads/images/gallery/2025-01/WoBimage.png)


##### Warehouse and Minimum and Maximum Quantities

If you are working with multiple Warehouses and are wanting to order for a different warehouse, highlight the line you want to change, click the "Warehouse" button, select your warehouse form the list and click "Save".

[![image.png](https://hugeerp10.co.za/hsofmanual/uploads/images/gallery/2025-01/scaled-1680-/1Ejimage.png)](https://hugeerp10.co.za/hsofmanual/uploads/images/gallery/2025-01/1Ejimage.png)

While in the Warehouse, you can view the minimum and maximum quantities for a specific item. At this stage, you can update your minimum and maximum quantities, as well as your preferred and reorder quantities to assist with future ordering and forecasting.

Once these quantities are set, you can configure the system to send you daily email updates when stock quantities reaching the minimum level. These notifications will inform you when to reorder and how much to reorder based on your specified quantities.

[![image.png](https://hugeerp10.co.za/hsofmanual/uploads/images/gallery/2025-01/scaled-1680-/KVcimage.png)](https://hugeerp10.co.za/hsofmanual/uploads/images/gallery/2025-01/KVcimage.png)

##### Update Existing PO

If you already have an existing PO Number associated with a stock item in your Stock Order and you want to change it, you can click the "Update Existing PO" button and select a different Purchase Order from the list.

[![image.png](https://hugeerp10.co.za/hsofmanual/uploads/images/gallery/2025-01/scaled-1680-/1Fnimage.png)](https://hugeerp10.co.za/hsofmanual/uploads/images/gallery/2025-01/1Fnimage.png)

# Stock Order columns explained

#### Stock Order Columns

[![image.png](https://hugeerp10.co.za/hsofmanual/uploads/images/gallery/2025-01/scaled-1680-/Zfsimage.png)](https://hugeerp10.co.za/hsofmanual/uploads/images/gallery/2025-01/Zfsimage.png)

<table border="1" id="bkmrk-select-tick-the-box-" style="border-collapse: collapse; width: 100%; height: 587.2px;"><colgroup><col style="width: 16.0857%;"></col><col style="width: 83.8904%;"></col></colgroup><tbody><tr style="height: 29.6px;"><td style="height: 29.6px;">**Select**</td><td style="height: 29.6px;">Tick the box of the items you would like to select, you can select more than one item at a time.</td></tr><tr style="height: 46.4px;"><td style="height: 46.4px;">**Status**</td><td style="height: 46.4px;">The Status colour will change as it moves through the ordering process eg: Grey means you have no current order for this item.</td></tr><tr style="height: 29.6px;"><td style="height: 29.6px;">**Check**</td><td style="height: 29.6px;">  
</td></tr><tr style="height: 46.4px;"><td style="height: 46.4px;">**Supplier**</td><td style="height: 46.4px;">This will be the supplier you will be ordering from, if you have multiple suppliers, you can change the supplier here by ticking the Select box and then clicking the "Update Supplier" button to change the supplier.</td></tr><tr style="height: 29.6px;"><td style="height: 29.6px;">**Order Qty**</td><td style="height: 29.6px;">This will show the quantity of each inventory item you are ordering</td></tr><tr style="height: 63.2px;"><td style="height: 63.2px;">**PO**</td><td style="height: 63.2px;">All purchase orders will show as new when a Stock order is created. If there is already a purchase order created for a supplier, and you just want to add this item to the existing purchase order by ticking the select box for this line and clicking the "Update Existing PO" Button. This will change the PO from New to Existing.</td></tr><tr style="height: 46.4px;"><td style="height: 46.4px;">**PO No.**</td><td style="height: 46.4px;">Once you have updated the PO to show existing, you can select a Purchase Order from the list you want to add an item to and when you click "Save" the PO number will show in this column.</td></tr><tr style="height: 29.6px;"><td style="height: 29.6px;">**Warehouse**</td><td style="height: 29.6px;">If you are working with multiple Warehouses, you can select the Warehouse you are ordering for here.</td></tr><tr style="height: 29.6px;"><td style="height: 29.6px;">**Item Code**</td><td style="height: 29.6px;">This will show your item Code</td></tr><tr style="height: 29.6px;"><td style="height: 29.6px;">**Supplier Item code**

</td><td style="height: 29.6px;">This will show the Suppliers Item Code</td></tr><tr style="height: 29.6px;"><td style="height: 29.6px;">**Job Number**

</td><td style="height: 29.6px;">If you were ordering an item for a specific Job, you can add the Job number here</td></tr><tr style="height: 29.6px;"><td style="height: 29.6px;">**Stock Request**

</td><td style="height: 29.6px;">If you have a Stock Request number, you can add it here.</td></tr><tr style="height: 29.6px;"><td style="height: 29.6px;">**Supplier Cost**

</td><td style="height: 29.6px;">If you have Stock Costs in your setup it will show here</td></tr><tr style="height: 29.6px;"><td style="height: 29.6px;">**Min / Max**

</td><td style="height: 29.6px;">If you have set up you Min and Max stock Quantities at Setup for each stock Item, that will show here. </td></tr><tr style="height: 29.6px;"><td style="height: 29.6px;">**Preferred**

</td><td style="height: 29.6px;">If you have set up you Preferred stock Quantities at Setup for each stock Item, that will show here. </td></tr><tr style="height: 29.6px;"><td style="height: 29.6px;">**Reorder**

</td><td style="height: 29.6px;">If you have set up you Reorder stock Quantities at Setup for each stock Item, that will show here. </td></tr><tr style="height: 29.6px;"><td style="height: 29.6px;">**Onhand**

</td><td style="height: 29.6px;">If you have set up you Onhand stock Quantities at Setup for each stock Item, that will show here. </td></tr></tbody></table>