Purchase Orders Menu
- Purchase Order Overview
- Purchase Order Search
- Purchase Order Reminder Function
- Purchase Order Processing
- Purchase Order MOQ
- Reverting Purchase Orders
- Approval Levels Setup
- Purchase Order Job Allocations
- PO Receiving Stock- Barcode Scan
- Purchase Order Authorisation
- Purchase Order Shipping Tab
- Adding Purchase Order
- Purchase Order Serial Number Import
- Serial Number Import (Purchase Order)
Purchase Order Overview
Overall process
.png)
The Purchase Order process can run in multiple options from simple steps to multiple steps dependent on how the company wants to run the system:
Below are the various options:
| Option 1 | GRV process |
The quickest and easiest route to get stock into the system and update the supplier. Skips all the steps. Has two basic steps:
|
| Option 2 | PO to GRV |
|
| Option 3 | PO with authorise to GRV |
|
| Option 4 | PO to Receive stock (All) to GRV |
|
| Option 5 | PO to Receive stock (Part) to GRV |
|
| Option 6 |
PO to Receive stock (All) to GRV Foreign Supplier - Multicurrency
Multicurrency Supplier CANNOT go via Delivery note and must go GRV route.
This is because freight and shipping costs are added to the supplier invoice to change the cost of items to landed cost. |
|
| Option 7 |
PO to Receive stock (All) to Delivery Note to GRV
If going the Delivery note route, Purchase Order should have correct costs.
If not, then the average or latest cost will be changed on the item. |
|
| Option 8 |
PO to Receive stock (Part) to Delivery Note to GRV
If going the Delivery note route, Purchase Order should have correct costs.
If not, then the average or latest cost will be changed on the item. |
|
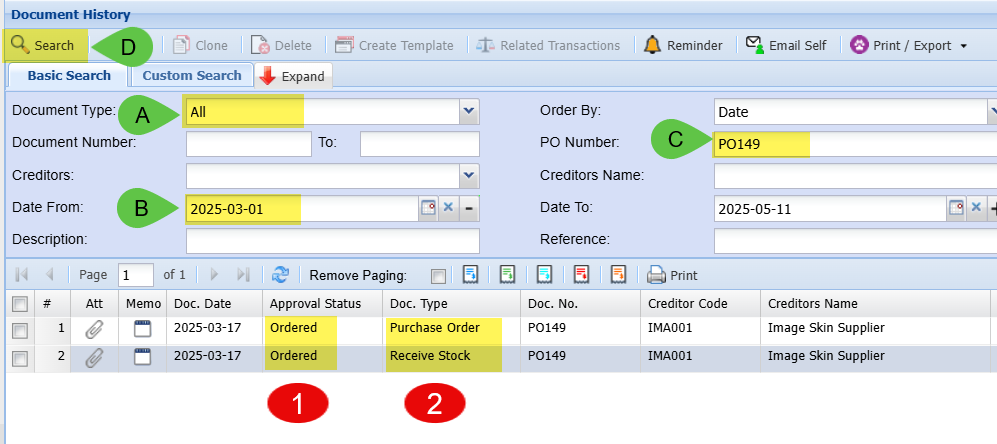
Find where the Purchase Order is in the process:
Best place to look is in Creditors Module > Analysis > Creditors Document History
Note: If you find the document here, one CANNOT EDIT the document, one must go to the Activity section and find the document.
Ensure the following settings are correct
| A | Ensure Document Type is set to ALL |
| B | Check dates |
| C | Enter the Purchase Order Number |
| D | Click on Search |
View the results
| 1 |
Check Approval Status This will tell you the status |
| 2 |
Doc Type This will tell you where the document is |
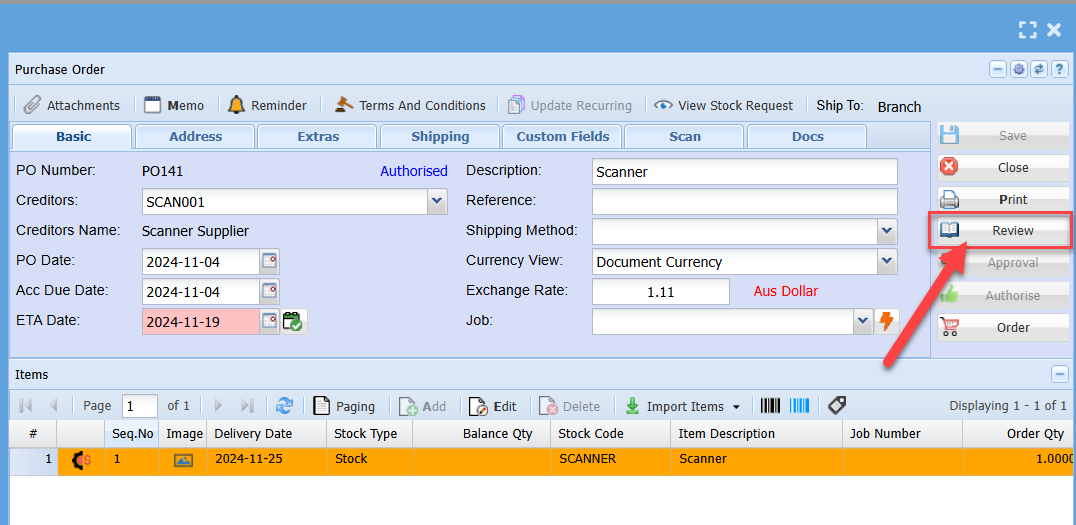
Review Purchase Order after authorised
When a Purchase Order is authorised, all fields are disabled.
However if one needs to change the purchase order, click on Review button to change status back to Preparation.
Purchase Order will have to be authorised again.
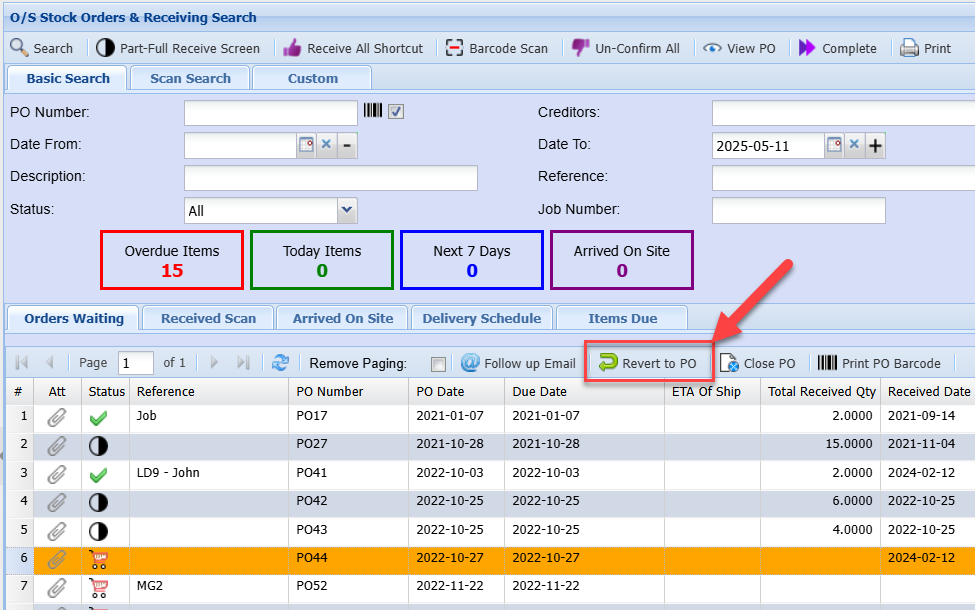
Revert Purchase Order from Receive stock back to Purchase Order
A Purchase Order that is in Receive Stock section can be moved back to Purchase Order section.
By clicking on Revert Purchase Order, it will move the Purchase Order back to preparation.
Note: A Purchase Order that has received stock CANNOT be Reverted back to preparation
Purchase Order Flow Summary
The following steps are taken to ensure that all purchases from the company goes through the Creditors Module.
| 1 | Create the purchase order |
| 2 | Ensure all the supplier details are correct |
| 3 | Select the correct item, Stock item or Ledger custom item |
| 4 | Attach the original supplier quote |
| 5 | Send for approval |
| 6 | The manager receives an email to approve a specific purchase order |
| 7 | Manager to go into Webatar App (or main system) and finds the necessary purchase order for approval |
| 8 | The manager checks the supplier quote and how the purchase order is captured |
| 9 | The manager approves the purchase order |
| 10 | At this stage an email will be sent back to the originator who sent the purchase order for approval, that the purchase order has been approved |
| 11 | The capturer then pushes the purchase order to receive stock and sends the approved purchase order to the supplier |
| 12 | Upon Receipt of the goods or invoice, the goods or invoices checked that the quantities and confirms. |
| 13 | The clerk will then Confirm all or part and pushes the purchase invoice to a goods receive voucher (GRV) |
| 14 |
An email will be sent to the accounts Department, where they will be notified that the goods received voucher (GRV) document is ready to be processed to the system. |
| 15 | The purchase invoice from the supplier attached and is checked for the final time and then processed into the system. |
.png)
Video training manual 2016 - Click Here
Purchase Order Search
Creditors Module> Activity> Purchase Order

| Search | Allows you to search for an existing Purchase Order, Inventory Item, Creditor or Debtor based on system fields and which module you are in. |
| Add | Allows you to create a new Purchase Order, Inventory item, Creditor or Debtor depending on the Module you are in. |
| Edit | Allows you to edit the purchase order |
| Clone | Allows you to Clone an existing Inventory Item, Creditor or Debtor depending on the module you are in |
| Reminder | You can set a reminder to follow up on a PO or to send the PO off for Authorisation etc. |
| Approval | Click the Approval button to send the PO for approval |
| Authorise | Click the Authorise button to authorise a PO |
| Order | Once the PO is Authorised the order can be placed by clicking the Order button |
| Import | If you have a really long order that you have in the excel format, you can upload this order to create the PO rather than entering them one by one. |
| Cancel | Click Cancel to Cancel a PO |
| Copy To Template | If you have templates set up for your PO you can copy one PO over to another template. |
| Print/Export | You can export your PO to excel, or you can choose to print a copy. |
Basic Search

| PO Number | Use your PO number if you know it to search for a specific Purchase Order |
| Description | If you know the description of your Purchase Order you can use that to search |
| Date Type | Select the date you want to search by (Document Date, ETA date or Due Date) |
| Date From / Date To | You can search for Purchase Orders in a specific date range |
| Supplier | You can search for Purchase Orders for a specific supplier |
| Reference | If you know the reference for the Purchase Order you can search using that |
| Status | You can search for a PO in a specific status, select your status choice form the drop-down menu (All, Created, Approved, Authorised or Recurring Transactions) |
Custom Search

| Category | Search for a PO in a specific category if you have categories set up. |
| Actual Delivery Date | Search for a PO that has already been delivered and processed by using the actual delivery date. |
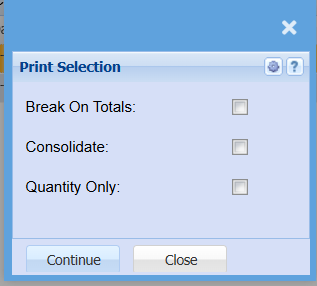
Print/Export

If you want to print a list of your Purchase Orders, you can select to have breaks on all totals, you can choose to consolidate all totals and you select to have Quantity only shown on your report.
Purchase Order Reminder Function
Create Reminder
Purchase order item> Create reminder tick box
Should you wish to create a reminder for the Receiving clerk (or Yourself) you can tick the
“Create Reminder” tick box and select the person you wish send the reminder to.
.png)
Purchase Order Processing
Select Creditors Module
Activity> Purchase Orders

Should you wish to edit and existing purchase order, click the Search button.
Highlight the required Purchase order on the grid by clicking once and click edit button or double click on the Purchase order line.
Make the required changes and click save and close.
Click Add to capture a new Purchase Order

| 1 | Enter the Supplier Name or Account Code and Select the Supplier by clicking on it from the drop down options. |
| 2 | Enter a description related to the purchase Order |
| 3 | Enter a reference pertaining to the Order |
| 4 | Check that the dates are correct |
ETA is the expected date the goods are due to arrive.
Due Date: This is the due date for this purchase order to be paid.
The due dates are auto populated based on the account terms on the Creditors Setup.
Click Save
Click Add in the centre of the screen to add the item lines to be purchased.

| Enter the item code or part of the Item description to search for the required item. A list of Items will be displayed. Click on the required item. |
| Enter the required quantity. |
| Check that the price is correct. |
| Ensure that your warehouse for which this order is being place is correct. In the event of Ordering nonstock items such as Office Stationery, the warehouse is not applicable. |
|
Select GRV VAT (if VAT is applicable) |
Should you wish to create a reminder for the Receiving clerk (or Yourself) you can tick the
“Create Reminder” tick box and select the person you wish send the reminder to.
Click Save New to add another item.
Click Save and Close if you only ordering the one item.

Once you click the save button, the below screen will appear. This screen records the “default Supplier” for the item as well as the suppliers latest price.
Click Save and Close

Should you wish the default supplier on the item setup to be updated, tick the set default box.
You will only see this, the first time that you process a purchase order for this item from this particular supplier.
ATTACHING THE SUPPLIER QUOTE TO THE PURCHASE ORDER
Click on the Attachment Button

Click the Upload Button
Click the Upload button, Select File and browse for the quote from the Supplier that you would have saved on your PC.
Retain the file name if you prefer or change the name as required.
You can also click the Drag & Drop button which will allow you to simply drag the document from the source destination, eg. Your email, or folder the document was saved in.

Click Close
You can print the Purchase Order to check all details are correct.
You will notice that there is no Document number (PO Number). This is because the Purchase order needs to be authorised before you can send to the Supplier.

The stationery layout can be customized to the client’s preference upon request.
Refer to Purchase Order Approval Manual for the authorization Procedure>>>>
Purchase Order MOQ
Added in the new field for MOQ which fetches it from the item and the supplier
Put the value in, this value is NOT editable but for information for the user
Rules
When clicking on save and close or save and New
And the MOQ is higher than the quantity
Bring up an alert to inform the user that the Order quantity is lower than the MOQ quantity
| Continue | Normal saving |
| Cancel | Take the person back to the screen to change quantity |
Please DO NOT use Alert if the MOQ is blank or Zero
MOQ must have a valid number
.jpg)
Reverting Purchase Orders
Under System Configuration>General >User Setup
.png)
Find the name of the User you want to give Purchase Supervisor to
Go to User Details 2 Tab and look at the list on your right with tick boxes
Find Purchase Supervisor and add a tick on the tick box.
Only when this setup is done then the user will be able to revert purchase orders.
Open Creditors module >Activity> Receive Stock> Search
.png)
Select the Purchase Order you want to revert
Click on Process tab and Select the Revert to Purchase Order Button
The Window Opens up select your username from the drop down arrow
And enter your password (This Is the same password you use to log into webaccounting)
And Click on OK.
.png)
Approval Levels Setup
Systems Configuration> Security> Approval Levels
The administrator will setup approval levels for the user
this will give authorization to the selected users to authorize purchase orders created.
this is a control management function and done under systems configuration.
.png)
Purchase Order Job Allocations
Add the Job number to the header of the Purchase order so that when you enter a line on the purchase order it will assign the job number
.png)
PO Receiving Stock- Barcode Scan
In this scan we are going to scan the item which will find it and mark up the receive quantity.
If the item is a serialized item, then we need to go to serialized items to scan.
We need a way to move the cursor between barcode and serial number by using a barcode marker.
A barcode marker will allow the user to scan a barcode that will move the cursor between the barcode and the serial number fields.
It is easier that once we finish scanning all the serial numbers, when we want to move on to the next item, scan the barcode marker and then you carry on scanning the new items.
.png)
Barcode markers setup
.png)
Purchase Order Authorisation
This procedure caters for this manual process of printing hard copies of documents to be automated and electronic.
Once all items have been captured on the Purchase order and all details checked for correctness, click the Approve Button.
Click Close.

Should you not wish to send the PO for authorization at this point, you can close the screen.
When ready to Approve, search for the captured PO as follows:
On the Purchase Order Menu, enter the Supplier name or Code, check the date range and click Search.
Click on the required order once to highlight it, click the Approve Button.

This then sends an email to the Manager informing him/ her that there is a PO awaiting authorization.
The PO status will now change from Created to Approval indicating that the PO has been sent for Authorization.

AUTHORISATION PROCESS
The Manager will then log onto the system or via the Webatar APP search the required PO and perform the necessary checks.
Go to Creditors Module > Activity
Select Purchase Orders Menu Item

Enter the Supplier code or name.
Enter the respective date range that the Purchase Order was captured.
Click Search

You can further filter your search by clicking on the Expand Button
And entering any of the other criteria that you may have on hand, e.g. Division, Region

All Purchase orders within the selected criteria will be displayed in the grid.
Click the Attachments shortcut to view ant attachments.
The icon will be red if any attachment are uploaded
If not, this icon will be grey.

Should you need to check and verify any details of the order, double click on the required PO to open the lines.
Once you have reviewed the PO and performed the necessary checks and ready to Authorize,
Highlight the required purchase order and click the Authorize Button

You will notice the status has changed to “Authorized”.

An email is then sent to the capturer that the PO has been authorized and he/she may proceed to forward the PO to the Supplier.
SUBMITTING PO
Search for the PO as per the standard steps:
Creditors Module> Activity> Purchase Orders
Enter the Search criteria
Click Search

Check that the status is set at Authorized.

Click Yes

Click Continue
The purchase order will Print to Screen.
Select Email to send the PO to the Supplier
Note: Should you not have segregation of duty, i.e.. A clerk capturer the Order and a manager then Authorizes Orders, the below steps can then all be done by the same person (if authorized to do so) capturers Authorize, and Order steps as outlined above can all be done at the time of capturing the PO by the Authorized person.

Click the Email Button
Verify the email address is correct.
Enter your message.

Click Send
This will send an Email with PDF attachment of the PO to your Supplier.
You can CC yourself and any other colleagues if necessary.
Click the Users tab and double click on the required names in the Left Column to select.

Click Send
Purchase Order Shipping Tab
The shipping Tab is related to the delivery of goods
To ship goods go to:
Creditors/ Suppliers Module> Activity> Purchase Order> Shipping Tab
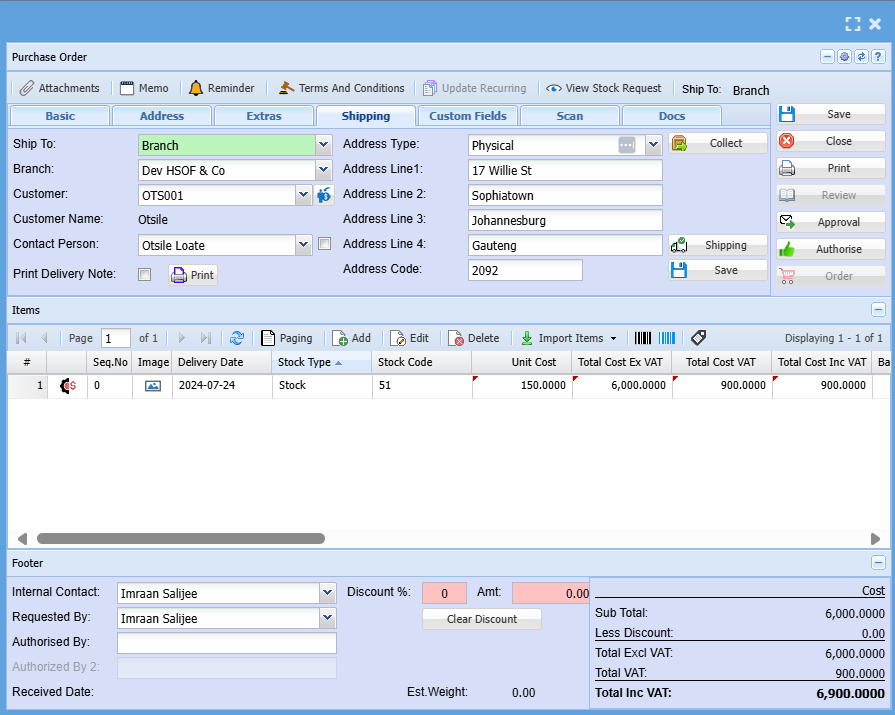
| Ship To | Select where you want to ship the parcel to on the drop down menu selection |
| Branch | Select Branch on the drop down |
| Customer | Select a customer you want to ship parcels to on the drop down |
| Customer Name | Customer name will be automatically populated |
| Contact Person | Select the contact person on the drop down |
| Print Delivery Note | This button allows you to print a delivery note |
| Delivery Type | select the destination address where the goods should be delivered |
| Collect | This a new button added which allows automatic collection for customers who want to collect the goods instead of having them delivered |
| Shipping | This is where you add all shipment information and instructions |
Adding Purchase Order
Creditors>Activity>Purchase Orders
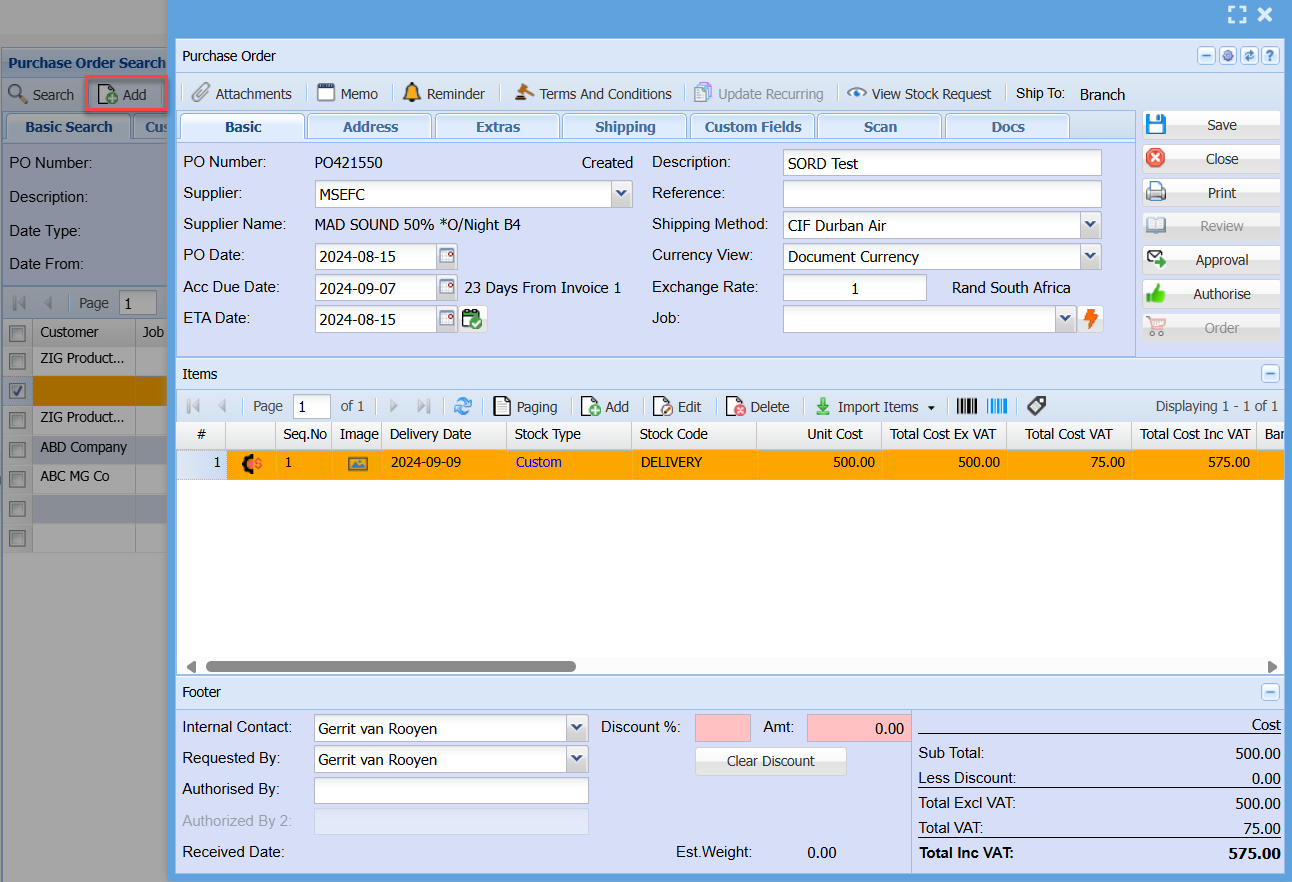
Select a Supplier: Short Search – just type in part of the code or name and hit enter on the keyboard and select the Creditor.
Drop down Search - Clicking on the arrow allows you to find the Creditor via the drop-down menu
Click on Insert button.
Basic Tab
Description - e.g. PO – Hard drive
Reference - Type in the Reference for your Purchase order
Date - Is the current date of the document
Due Date - Allows you to select the due date of the supplier
Save/ close - Click on the save Button to save your information
Close if you wish to close your Purchase order window without saving
Notice that: as you click save, the other buttons that were greyed out they are now accessible
Currency View - The Drop-Down menu gives you a list of Multi currency views you can select the currency type you want to view
Currency - This is the default currency of the Purchase order.
Note - Accknowledge allows users to maintain Creditors accounts in foreign and local currencies, as well as send invoices and statements in foreign currencies. In addition, the application also maintains the foreign rate of exchange used at the time of the transaction.
Address Tab – Shows the Default address of the Supplier
Contact Person – Shows the Default contact person for that supplier
Extras Tab
Job - Select in the drop-down menu a job number if this purchase order is linked to a JOB
Completion Date - Type in or select on the calendar the completion date
Long Description – Add a detailed description
Process GRV to Job - Tick this box if you want to process GRV to JOB
Print Custom fields - Tick This Box if you want custom fields to appear in Print
Notes – Add notes in here relevant to your Purchase order and Save
Custom Fields Tab
Request By - The System User requesting stock
Costing Centres - Will be the centre requesting stock
Special Notes - Add special notes
Use the arrows down or up to see more details
Job - Is the Job Number this stock will typically be required for and click on Save
Purchase Order Serial Number Import
Once you receive your order, you many have multiple serial numbers to import into the Purchase Order before pushing it through to GRV,
Creditors Module > Activity > O/S Stock Orders & Receiving
- Click on the "Functions" drop-down menu
- Click on "Serial Import/Export"
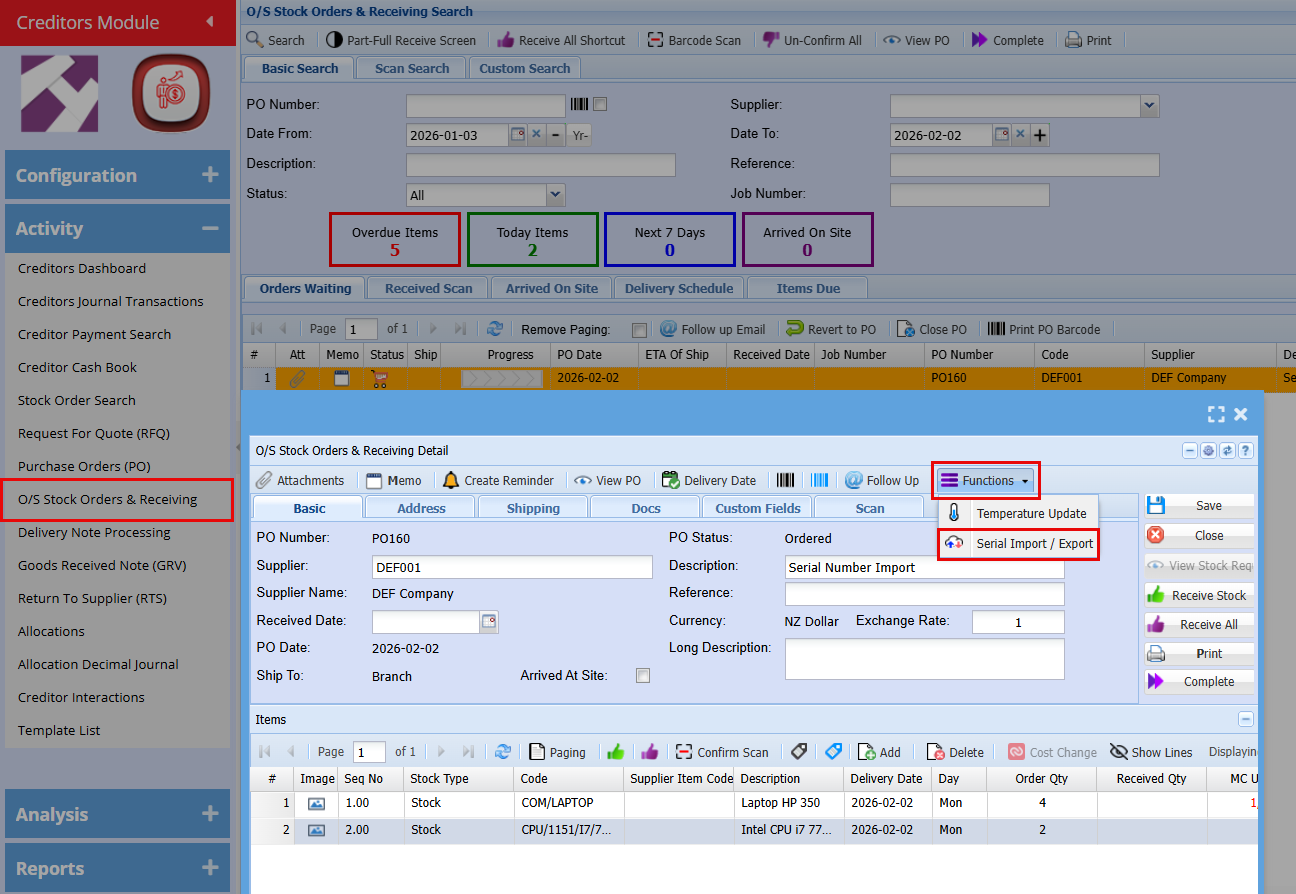
A window will appear allowing you to export a template that can be used for the import.
- Click on "Template" this will download an excel file
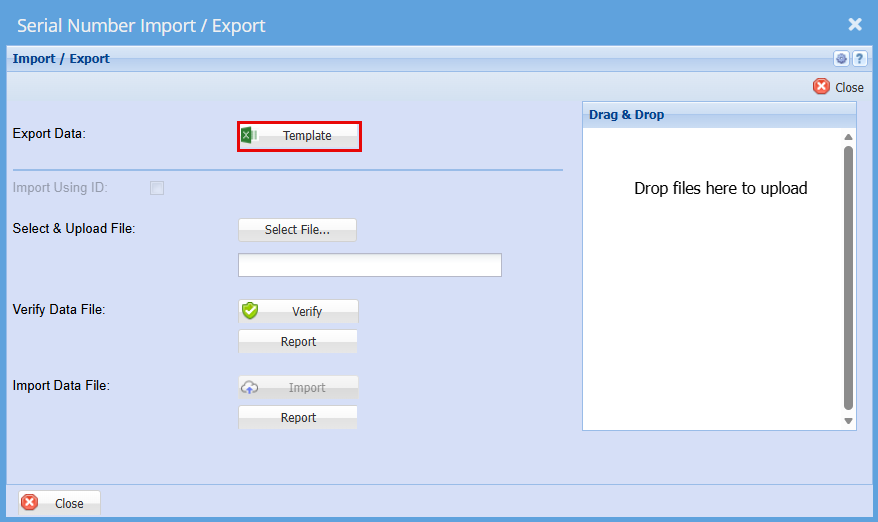
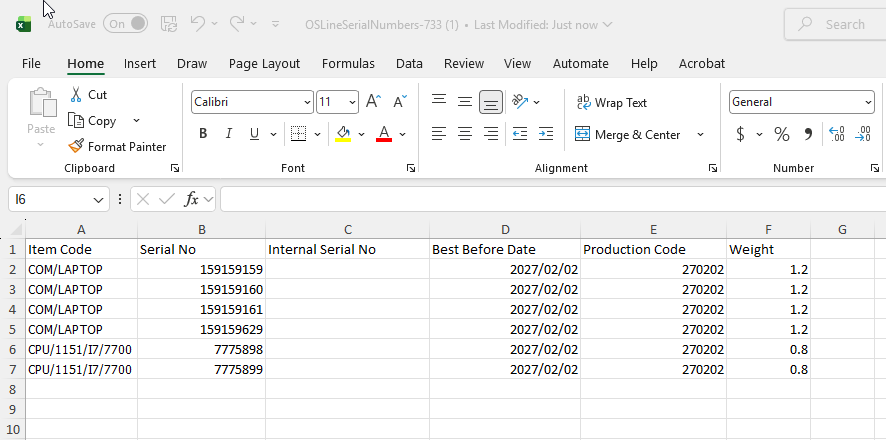
- Enter the serial numbers here, with each item listed on a separate line as shown below.
- Save the file to your computer.
- Go back to the "Serial Number Import/Export" Screen
- Click "Select File"
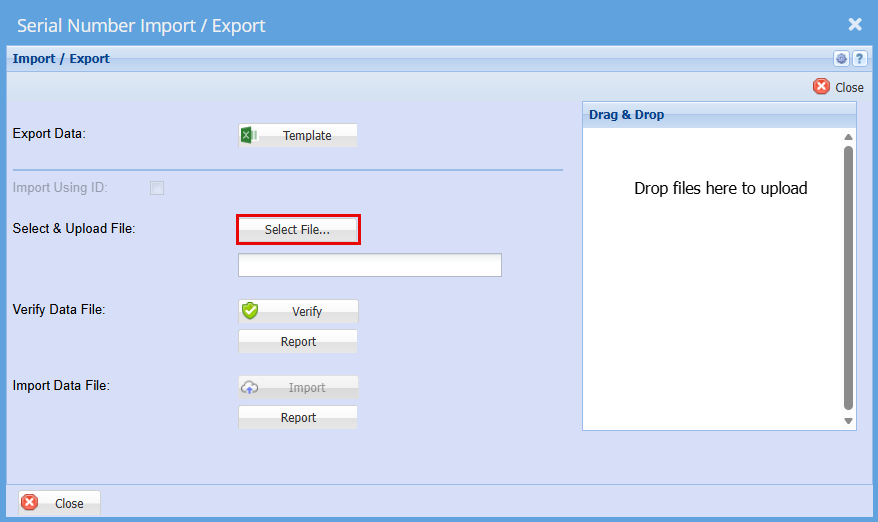
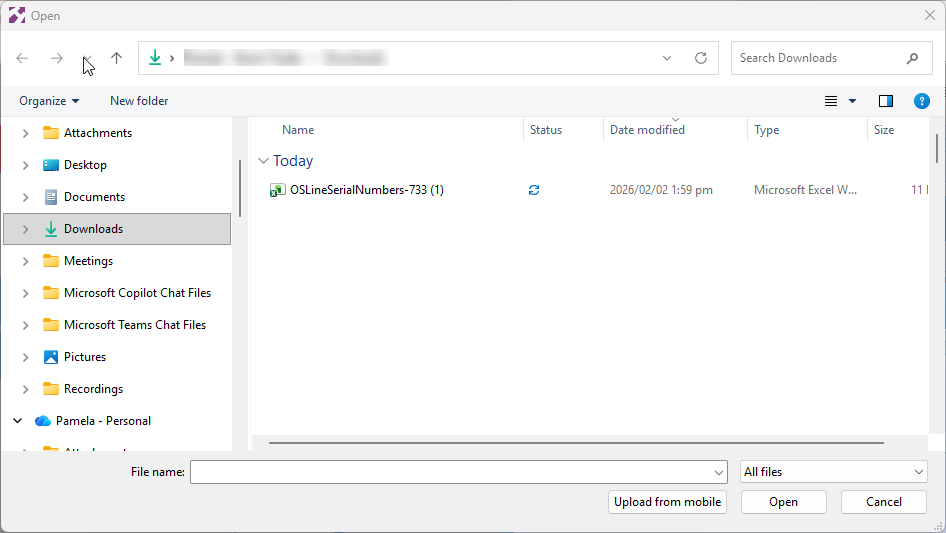
- Find the file you have saved.
- "Double Click" the file or click "Open"
You should get a Successful Import
- Click "Verify"
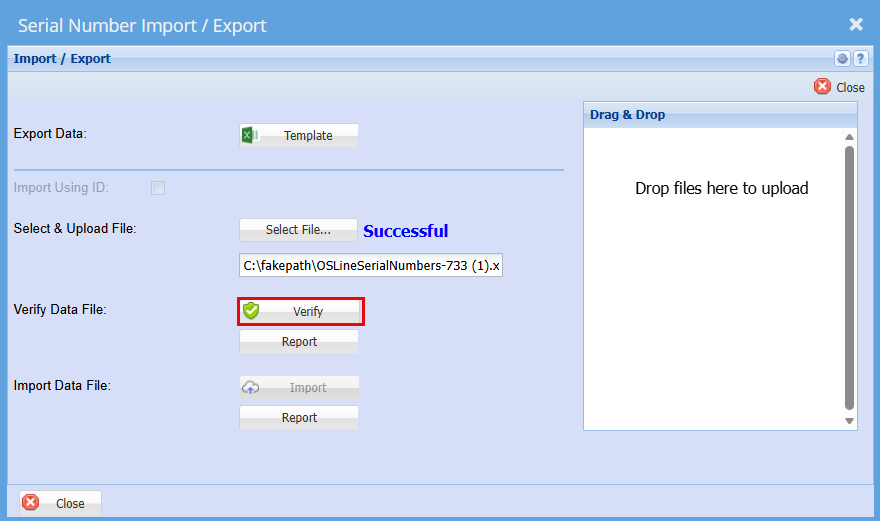
You should again get a successful for verification
- Click "Import"
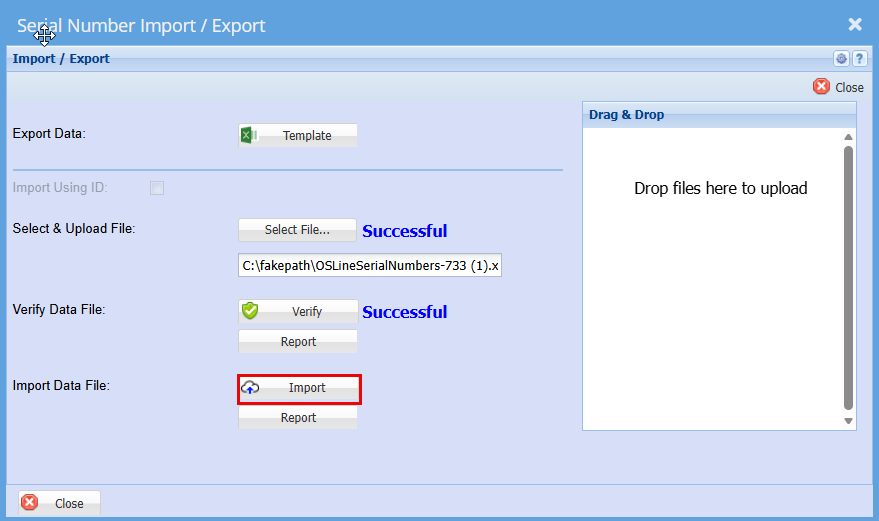
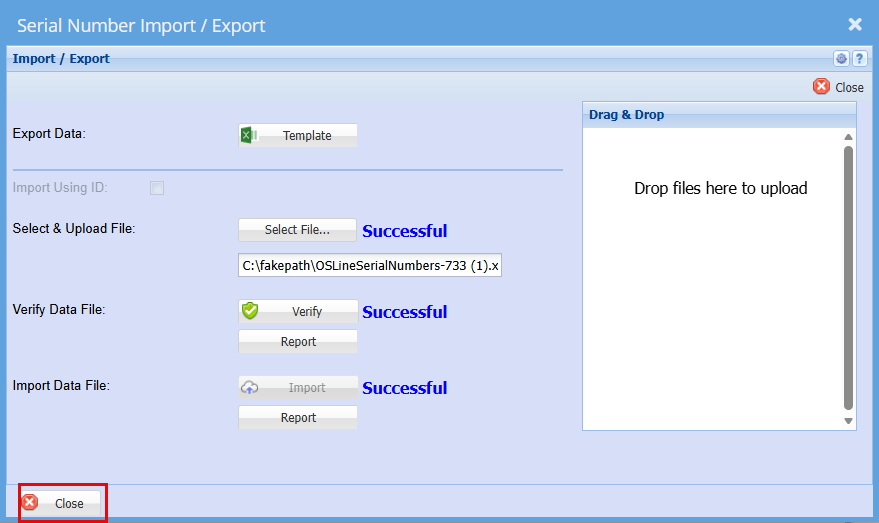
You should then get a Successful for Import.
Click "Close"
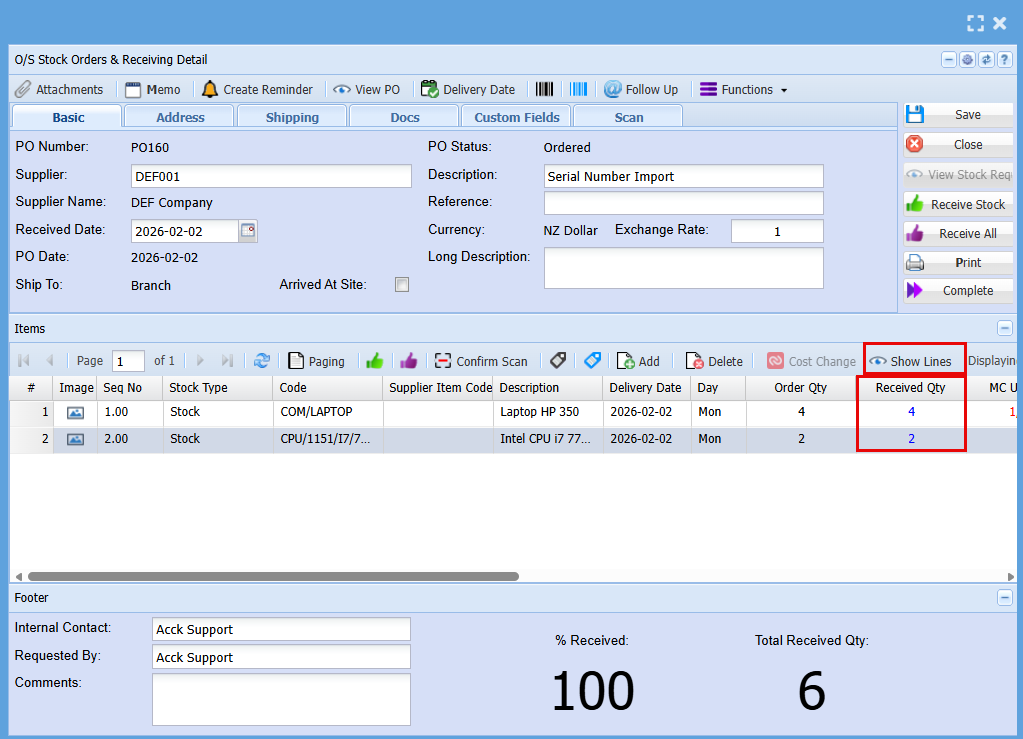
You can go check to make sure by clicking the "Show Lines" button
You will see the "Received Qty" values update.
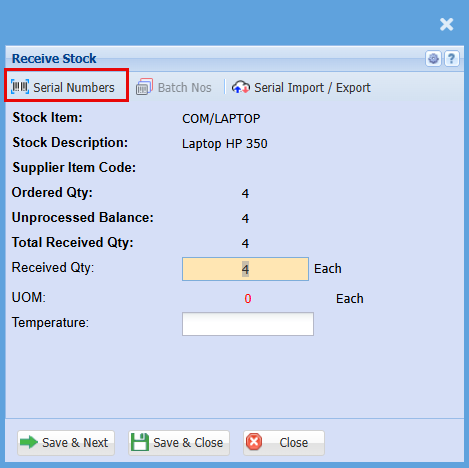
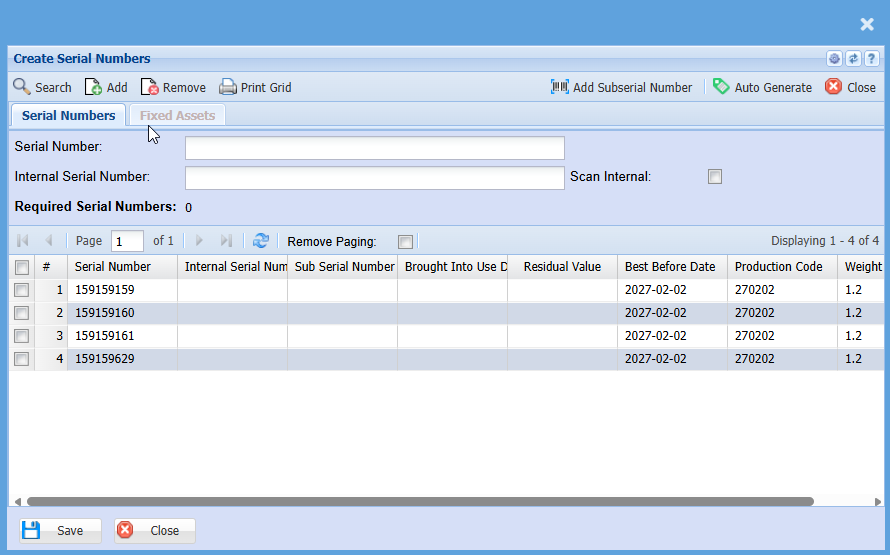
- To view the serial number, double click on the Serialised item line.
- Click on "Serial Numbers"
Serial Number Import (Purchase Order)
Once you receive your order, you many have multiple serial numbers to import into the Purchase Order before pushing it through to GRV,
Purchase Order Serial Number Import
Creditors Module > Activity > O/S Stock Orders & Receiving
- Click on the "Functions" drop-down menu
- Click on "Serial Import/Export"
A window will appear allowing you to export a template that can be used for the import.
- Click on "Template" this will download an excel file
- Enter the serial numbers here, with each item listed on a separate line as shown below.
- Save the file to your computer.
- Go back to the "Serial Number Import/Export" Screen
- Click "Select File"
- Find the file you have saved.
- "Double Click" the file or click "Open"
You should get a Successful Import
- Click "Verify"
You should again get a successful for verification
- Click "Import"
You should then get a Successful for Import.
Click "Close"
You can go check to make sure by clicking the "Show Lines" button
You will see the "Received Qty" values update.
- To view the serial number, double click on the Serialised item line.
- Click on "Serial Numbers"