Goods Received Notes (GRV) Menu
- Goods Received Note (GRV) Search
- Edit Goods Received Note
- Goods Received Voucher (GRV) Process
- GRV Attachments
- Prompt For Post
- Outsourcing Work
- GRV with Importation Split
- GRV posting detail per line on GL
- New GRV Importation Split Manual Scansku
- GRV with Importation Split from Purchase Order (Generic)
- GRV lines import
- Serial Number Import (GRV)
Goods Received Note (GRV) Search
Video training manual 2016 - Click Here
Creditors > Activity> Goods Received Note
Record of goods received at the point of receipt. This record is used to confirm all goods that have been received
.png)
Clone GRV
.png)
Clone Function
Select the GRV you want to clone and click on Clone Button
Import
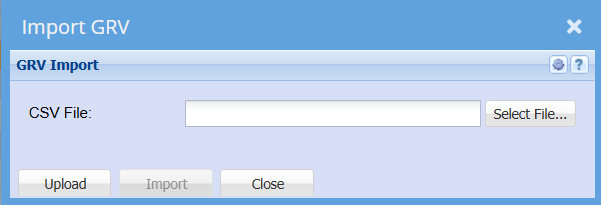
Import XML into GRV
Creditors > Activity > Goods Received Note
.png)
Import into GRVs from XML Help
The function of this window is to import data from a predefined XML file into GRV documents.
The following action are carried out during the importation process
| 1 | The XML file is read and GRVs are created and processed. |
| 2 | Create a reciprocating invoice converted it to a PDF file and attached it to the GRV. |
| 3 | Create a Creditors Cash Book for all the successfully processed GRVs. |
At various stages during the above action an email will be sent to the selected recipient reporting on the errors or failures of the process.
When initially opening the import window only the Select File button is active. Click on this button and navigate to the location of the XML file that is to be imported. Once the file has been located and select click on the Upload button. A confirmation message will be displayed if the file was successfully uploaded. Click OK to continue.
The input items are required and cannot be skipped.
Select a user from the drop down / quick search box to email the error / failure report to.
Select the Bank Account that will be used when creating the Creditors Cash Book.
Enter a name for the Creditors Cash Book.
Cash Book Reference.
Cash Book Date.
Once all the above have been selected / entered then click on the Import button.
Farmland Invoices Import
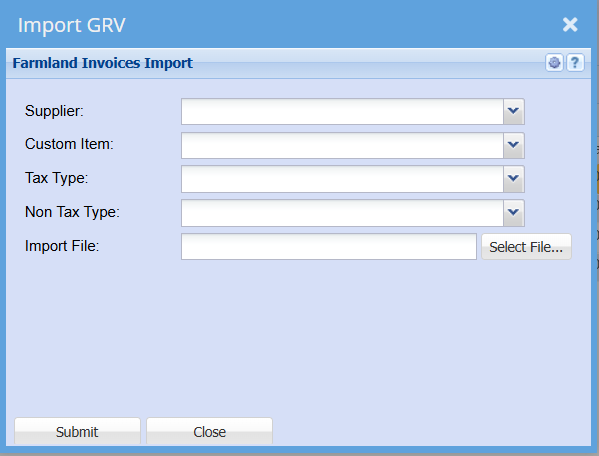
Edit Goods Received Note
This is where GRV is created
Basic Tab
.png)
| Supplier Name | will show the name of the supplier once it has been selected and saved. |
| Supplier | to select the supplier |
| Date Received | to enter the date on the suppliers invoice |
| Short Description | to add brief description of the invoice |
| Reference | to enter the reference of the invoice |
| Order Number | to enter the order number of the invoice |
| Supplier Invoice No | to enter supplier’s invoice number |
| Debtor Status | enter creditor’s status |
| Address Tab | shows a creditors address details |
| Save button | saves above details and the rest of the functions will be visible |
| More Details button | allows a user to add some details relating to the invoice |
| Process button | to process the invoice |
| Close button | closes goods received note screen |
| Document Currency Tab | shows goods received note lines currency details |
| System Currency Tab | shows goods received note lines system currency details |
| Clear Discount button | removes the discount |
| Insert | to create GRV lines |
| Edit | view or allow some changes to be done on the invoice lines |
| Delete button | to delete selected GRV lines |
| Print button | to print the GRV |
| Import S/N Tab | is used to import serial number items |
| Extra Tab | allows the user to view how the GRV was prepared from purchase order |
| Reminder Tab | to set up a reminder of anything, works like an alarm |
Goods Received Voucher (GRV) Process
Go to Creditors Module> Activity
Select Goods Received Note (GRV) menu item

Enter the Supplier Name and select the required Date Range
Click Search

You can Double Click the Line or Click the Edit button in which case the GRV will open and you can then verify any details.
Typically, there would be no need to make any changes at this stage.
The Supplier invoice should now be attached to the GRV:
Click on the Attachments Icon

As shown in prior manuals, you can upload the document from a folder on your PC or you can Drag &Drop the document.

Enter a Name and description for the document.
The document will be uploaded.
You can click once on the attachment line in the grid and then click View button to view the document attached.

Once you are satisfied that the entry is correct and all supporting documents attached, you can now process the GRV
To do this, highlight the transaction on the grid and click the Process button

Click Yes on the Pop up message
The GRV will then Print to screen.
You can then print if needed. This is not necessary as all documents are stored on the system and can be retrieved at any time.

The Goods Received Voucher (GRV) is now processed, which updates the Stock control account, Stock Quantities and the Supplier Account.
In the event that a Purchase order relates to non-stock items, then the respective General Ledger Accounts as setup on the Custom Items setup will replace the stock control account.
Alternatively, the administrator could set the system to prompt for Posting:
This feature allows the user to select the GL account to be posted to for transactions.
Eg: in the case of a custom item, let’s say Telephone expense:
When you process the GRV, the below screen can be triggered which allows you to select the required contra GL account

| 1 | Tick the Box to edit the respective line |
| 2 | Select the required GL Account |
| 3 | Click Saves Changes to Grid |
| 4 | Click Save |
| 5 | Click Continue |

Processing GRV from Delivery Note
With the receive stock process we mentioned that stock could be received via the Delivery note option.
If this option is selected at receive stock, then the entry will be found under the delivery note Processing Menu item and not the Goods Received Note Menu

Search for the required PO ( Delivery note entry)
Ø Double click or click the edit button to open the transaction
Ø Enter the Supplier Invoice number
Ø Click Save and Process

This then processes the Delivery note and the GRV
GRV Attachments
Select Goods Received Note (GRV) menu item
Enter the Supplier Name and select the required Date Range
Click Search
.png)
You can Double Click the Line or Click on Amend, in which case the GRV will open and you can then verify any details.
Typically, there would be not need to make any changes at this stage.
The Supplier invoice should now be attached to the GRV:
Double click the line (on the above screen)
.png)
Click on the Attachments Tab
Click Upload Attachment
.png)
Enter a description for the document
Click on Browse to search for the files saved on your PC
Once found and selected, click the Upload Button
.png)
The document will be uploaded.
You can click on “View Attachment” Button to view the document
Prompt For Post
Creditors > Activity >Goods Received Note > Process
When the prompt for posting screen comes up and you want to change the ledger account that it posts to, tick on the box next to the transaction.
.png)
Once the ledger account is changed click on the save changes to grid button to change the account.
.png)
To change the next account you will need to tick the second line. Do the same as the above.
Now that the changes has occurred you can click on save button and Continue button.
After clicking on continue the GRV will be processed.
This is a view of the related transactions after processing the GRV.
.png)
This part shows the accounts involved in a transaction.
| Transaction List Tab | shows a list of transactions involved |
| View Accounts Tab | to view the t-accounts |
| Print Grid button | to print the transactions |
| Print T Account button | to print the T accounts |
Outsourcing Work
This manual describes how one can receive a product and send this product out to an external supplier. This supplier changes the product and charges you an admin fee for the work done, however you receive a different product back into stock with the additional value.
The first thing one must do is work out what products are been created.
Example
Raw material Aluminum sheet- Cost R1000-00 per sheet
Qty
L-shape bracket 1 R200-00
U-shape bracket 1 R500-00
T-shape bracket 1 R300-00
Cutting cost by Supplier R500-00
End products coming back into stock – Total cost of this must be R1500-00
The system will also work out the additional price per product.
Qty
L-shape bracket 1 R400-00
U-shape bracket 1 R600-00
T-shape bracket 1 R500-00
Here is the process you will follow.
| 1 | Bring in raw material stock |
| 2 | Create a outsource supplier |
| 3 | Do a stock return for the value of the stock item to this outsource supplier |
| 4 | Do a GRV with importation spilt of the new items against this outsource supplier |
Brining in current stock via a GRV
.png)
Create an outsource supplier – normally the name of the supplier with outsource in front.
.png)
Sending out the sheets to the supplier
When capturing the stock to go out to the outsource supplier, make sure it is at the average cost price of the item.
Make sure that you select Non-VAT, as you have already claimed the VAT on the actual GRV of raw materials stock.
.png)
Stock return to Outsource supplier
This way you can track how much stock the supplier has that you have sent him.
.png)
You will notice in your outsource supplier age analysis that it is in credit
.png)
GRV incoming of new stock
Some points to remember
The stock items must be the cost value of the cost price of the Aluminium.
Value out equals value in.
.png)
Next step is to add the value of the cutting of the other supplier onto the GRV. We will do this by doing the importation split.
On the GRV, click on More details button
.png)
Then click on the Importation Split
.png)
Then click on the Insert Line button to add the invoice from the supplier who charged for the cutting of the sheet.
.png)
This is where you will insert the supplier invoice with the VAT.
.png)
Click on close to update the GRV lines and then SAVE and CLOSE button
.png)
The GRV lines will be updated with the new additional unit cost of the cutting which then gets added to the item cost.
.png)
If you are not happy with the additional cost per item you can manually allocate the additional costs to the items.
Go to More details button and then click on Manual Importation Split button, this allows one to put your own cost price in per item.
.png)
In this one action, the new finished goods are updated, the added value to the items are updated and the supplier invoice is captured into the system.
The Outsource Creditor will balance to zero,
IF the value does not balance you can journal out the value to a Cost of sales account to balance the creditor account.
.png)
Creditor who did the cutting
.png)
Outsource GRV Ledger accounts
As you can see the stock has increased by the new value
.png)
Outsource Creditor
GRV with Importation Split
Creditors/Suppliers > Activity> GRV
Typically, one would only use the importation split function when purchasing from a foreign supplier in the respective foreign currency.
Let’s use the below sample data:
| Foreign Supplier | IS Foreign Supplier |
| Item Purchased | Brother LC23 Value Pack at cost price of $30 |
| Quantity Purchased | 2 |
| Shipping Details | |
| Cartage Company | DHL Couriers |
| Non-Vatable cartage/Shipping charges | R 200 |
| Custom VAT: (100% of which is VAT) | R 3000 |
| Standard Vatable cartage/shipping charges | R 1800 |
| Capture the GRV as you would normally do | |
| Select the Foreign supplier | |
| Enter the Date | |
| Enter the Description | |
| Enter the Reference | |
| Enter the exchange Rate applicable | in this case 14 |
This is the exchange rate at which the item was secured. Also know as Spot rate in most cases.
Ener the Supplier Invoice Number. This is the Invoice number from the supplier of the item.
Your screen will now look as follow:
.png)
Proceed to enter the item(s) purchased
Select the item
Enter the quantity
Enter the Purchase price (in the foreign currency, in this case $30)
Change the VAT type to: Non-VAT
Click Save and Close
Repeat these item entries for each different item you purchased.
Your screen should then look as follows:
.png)
.png)
Once all the items have been captured, you can proceed to capture the Shipping invoice:
On the above screen, click the Importation Split Button
Then click the Add Button
On this screen you are going to enter the details on the Shipping or Cartage company Invoice
Select the shipping Company in the Creditor field
Enter the invoice number (invoice number of the shipping company)
Enter a Reference
Enter the Order number
Enter the Description: The description could be the line-item description on the shipping invoice, if you are capturing each line individually.
OR you could capture all the Non-Vatable Line Items as a single line and the al the Vatable Lines items as another line
And finally, the Custom VAT line item as the 3rd Line
.png)
.png)
.png)
Once the transaction is processed
Vat report will reflect these entries as shown below
Report List> VAT> VAT Report Original
GRV VAT Portion
.png)
NON-VAT Portion
.png)
Import Tax Portion
.png)
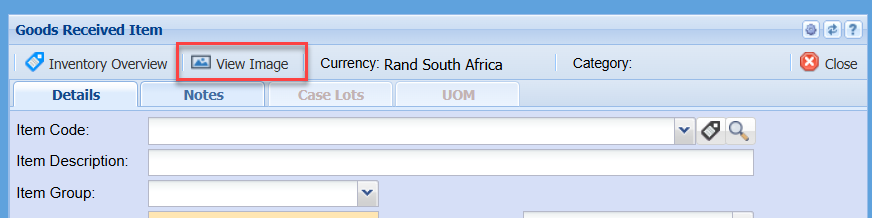
View Image Button
GRV posting detail per line on GL
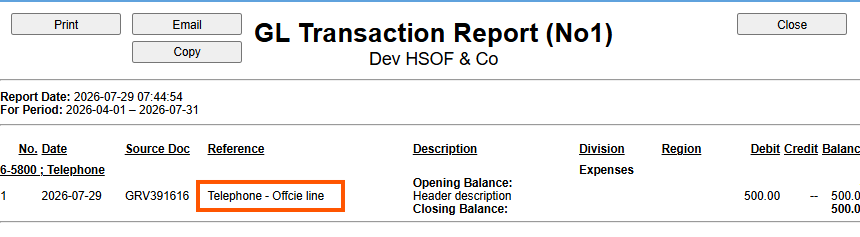
When Processing Goods received notes (GRVs) the document header description is used by default as the transaction description on the general ledger.
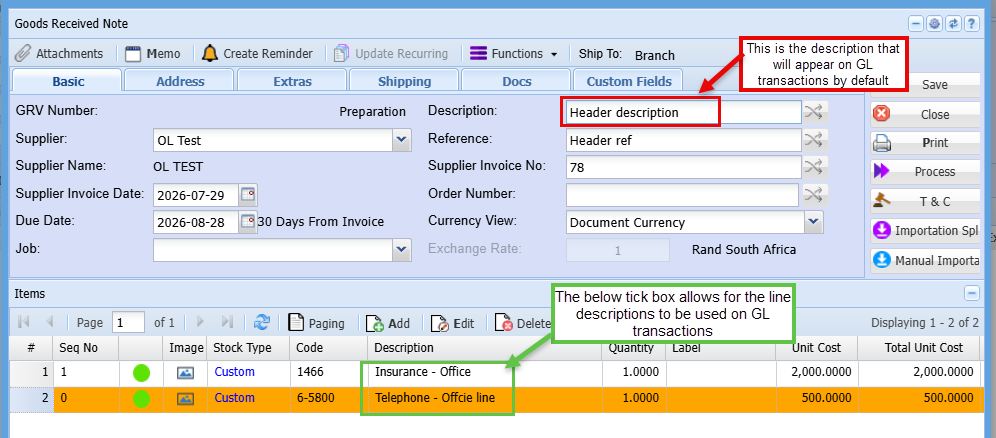
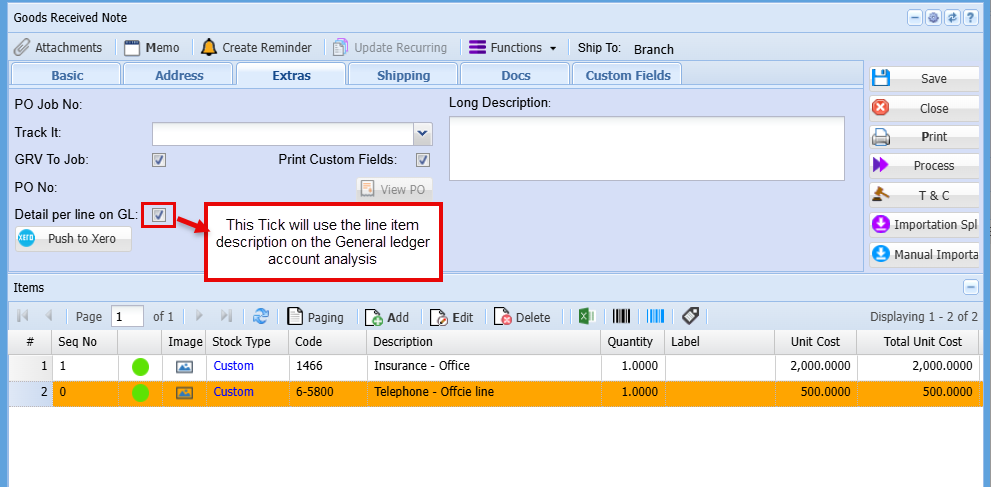
Should you prefer the line item description to be used as the GL transaction description, then you will need to activate the:
Detail per line on GL tick box
Click the Extras Tab
tick the Detail per line on GL box
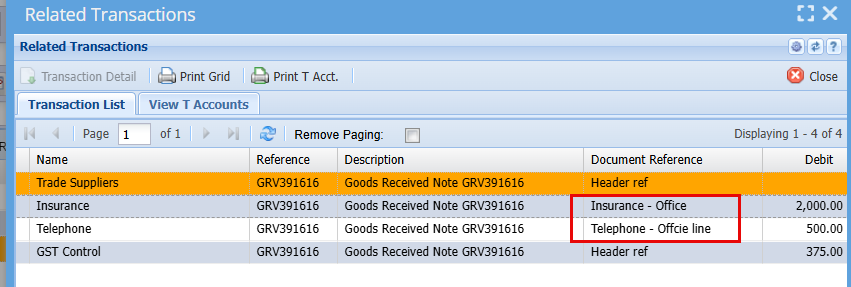
This will then show the line description on the GL accounts.
New GRV Importation Split Manual Scansku
GRV with Importation Split from Purchase Order for ScanSku
Once you receive stock from a supplier and added all the serial numbers as required, you now need to GRV the stock in.
Go to the Goods Received Note tab under activity: Double click on the PO you are bringing in. To add the costs of freight to your landing costs you need to add the freight amount at the bottom of the Footer section, as per the screen below, or you can add this as a separate Creditors Shipping line item when you do the importation split.

Once all the items have been captured, you can proceed to capture the Shipping invoice:
Click Importation Split Button found at the Top right of the Goods Received Note (GRV)

Then click the Add Button


On this screen you are going to enter the details on the Shipping or Cartage company Invoice
Select the shipping Company in the Creditor field
Enter the invoice number (invoice number of the shipping company)
Enter a Reference
Enter the Order number
Enter the Description: The description could be the line-item description on the shipping invoice, if you are capturing each line individually.
OR you could capture all the Non-Vatable Line Items as a single line and the al the Vatable Lines items as another line


Once you have added your lines you can look back at the GRV Note and you will see the additional cost added to the landing cost of each stock item.

Before processing the GRV we would recommend updating the Exchange rate to reflect what it was the day payment was made to the supplier, this will save you having to do another entry later to offset the difference.

GRV with Importation Split from Purchase Order (Generic)
GRV with Importation Split from Purchase Order
Once you receive stock from a supplier and added all the serial numbers as required, you now need to GRV the stock in.
Go to the Goods Received Note tab under activity: Double click on the PO you are bringing in. To add the costs of freight to your landing costs you need to add the freight amount at the bottom of the Footer section, as per the screen below, or you can add this as a separate Creditors Shipping line item when you do the importation split.
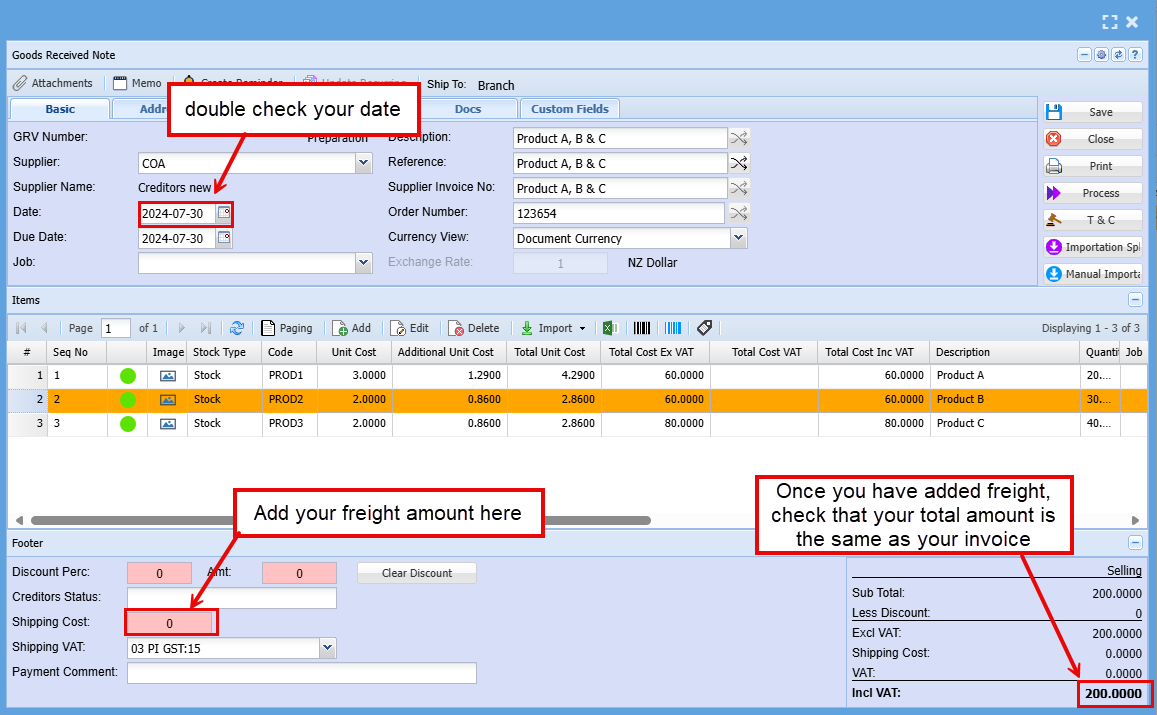
Once all the items have been captured, you can proceed to capture the Shipping invoice:
Click Importation Split Button found at the Top right of the Goods Received Note (GRV)
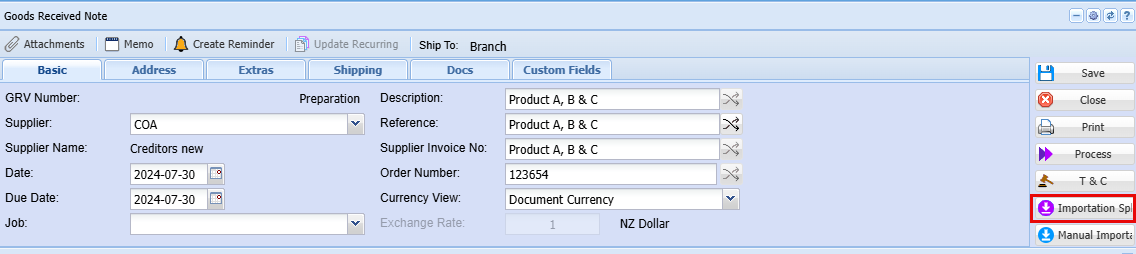
Then click the Add Button
On this screen you are going to enter the details on the Shipping or Cartage company Invoice
Select the shipping Company in the Creditor field
Enter the invoice number (invoice number of the shipping company)
Enter a Reference
Enter the Order number
Enter the Description: The description could be the line-item description on the shipping invoice, if you are capturing each line individually.
OR you could capture all the Non-Vatable Line Items as a single line and the al the Vatable Lines items as another line
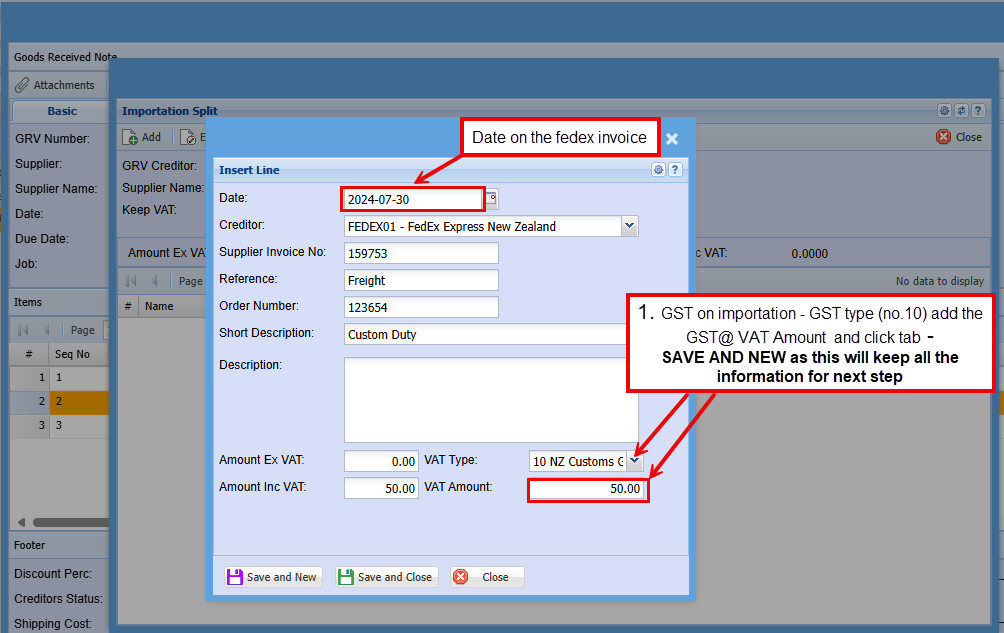
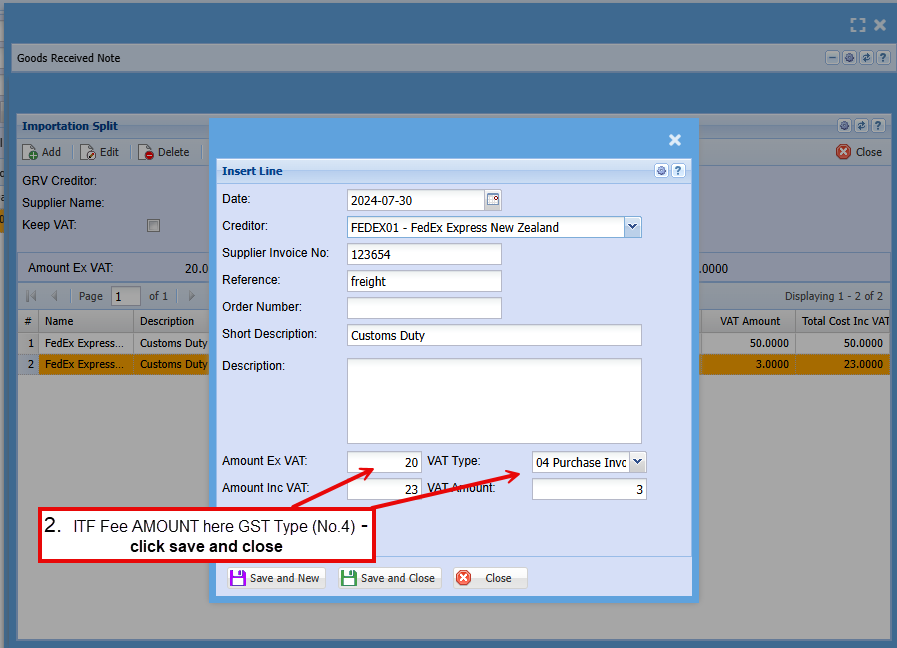
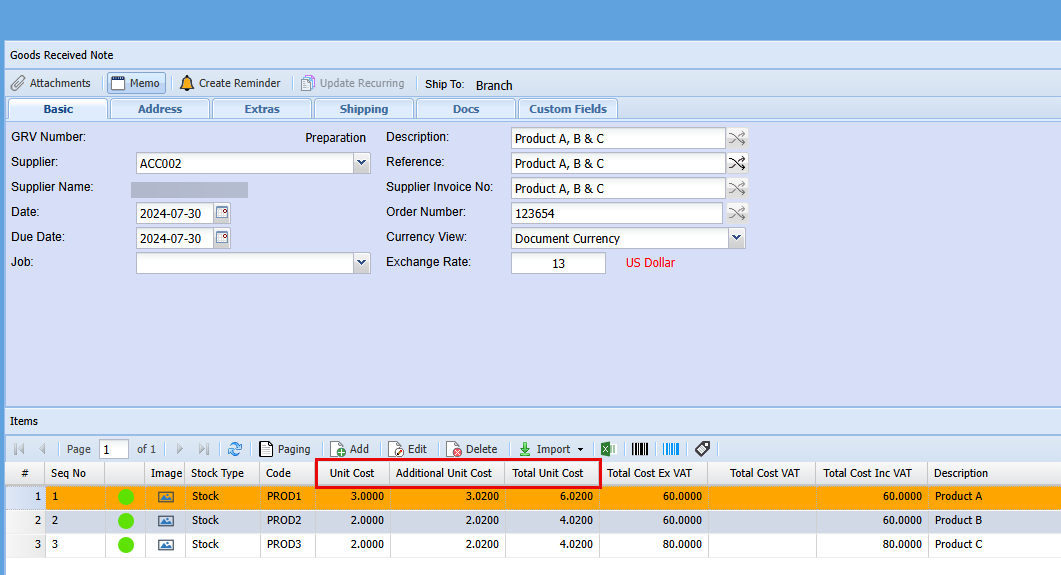
Once you have added your lines you can look back at the GRV Note and you will see the additional cost added to the landing cost of each stock item.
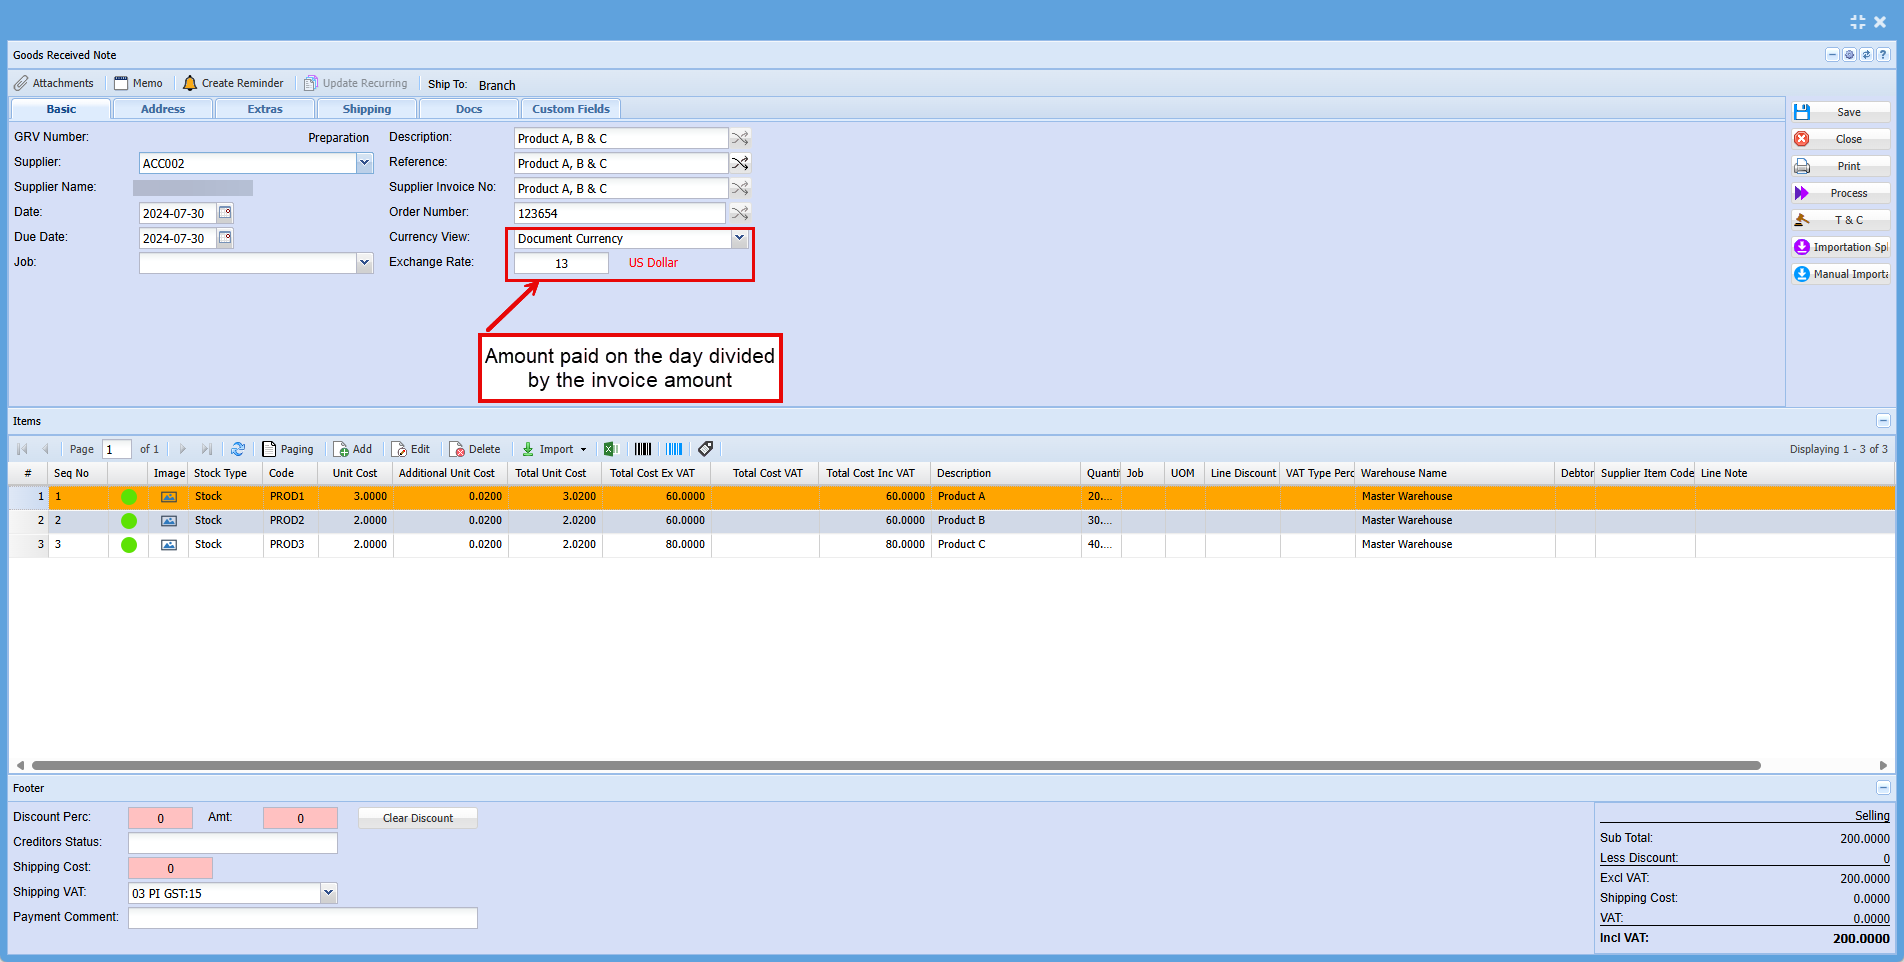
Before processing the GRV we would recommend updating the Exchange rate to reflect what it was the day payment was made to the supplier, this will save you having to do another entry later to offset the difference.
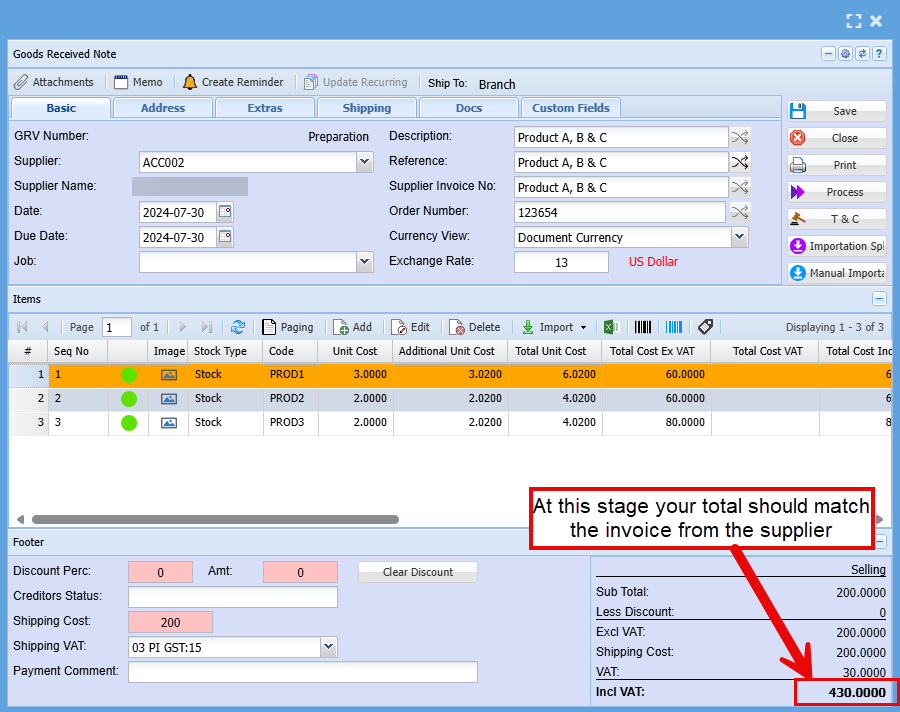
At this stage you should be able to process your invoice as long as the amount on the supplier invoice and the system are the same.
GRV lines import
There are multiple options to import data into the GRV

Import SN (Serial Number)
Excel file import - Import SN.xlsx
File layout as below, file to have header
| Item Code | Required |
|
Item Description |
|
| Warehouse Code | Required |
| Serial number | Required |
| Sub Serial number | |
| Best Before Date | Date format 2025/05/15 |
| Production Code | |
| Weight |
Serial Number Import (GRV)
Using the GRV import for serial numbers is appropriate when you do not have a purchase order and want to skip that step, going straight to creating the GRV.
Creditors Module > Activity > Goods Received Note (GRV)
- Search for your GRV
- Double Click on your GRV to open
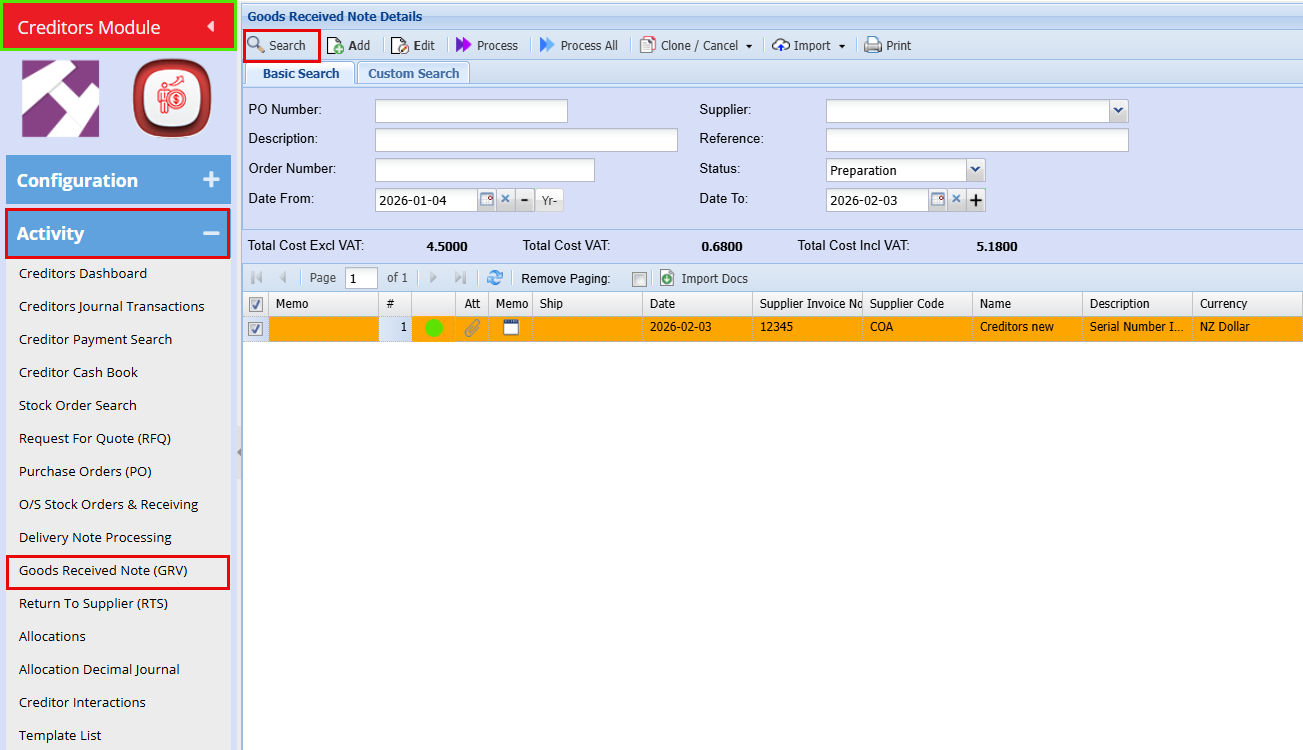
- Open the GRV by double‑clicking it
- Click on "Functions"
- Click on Serial Import/Export
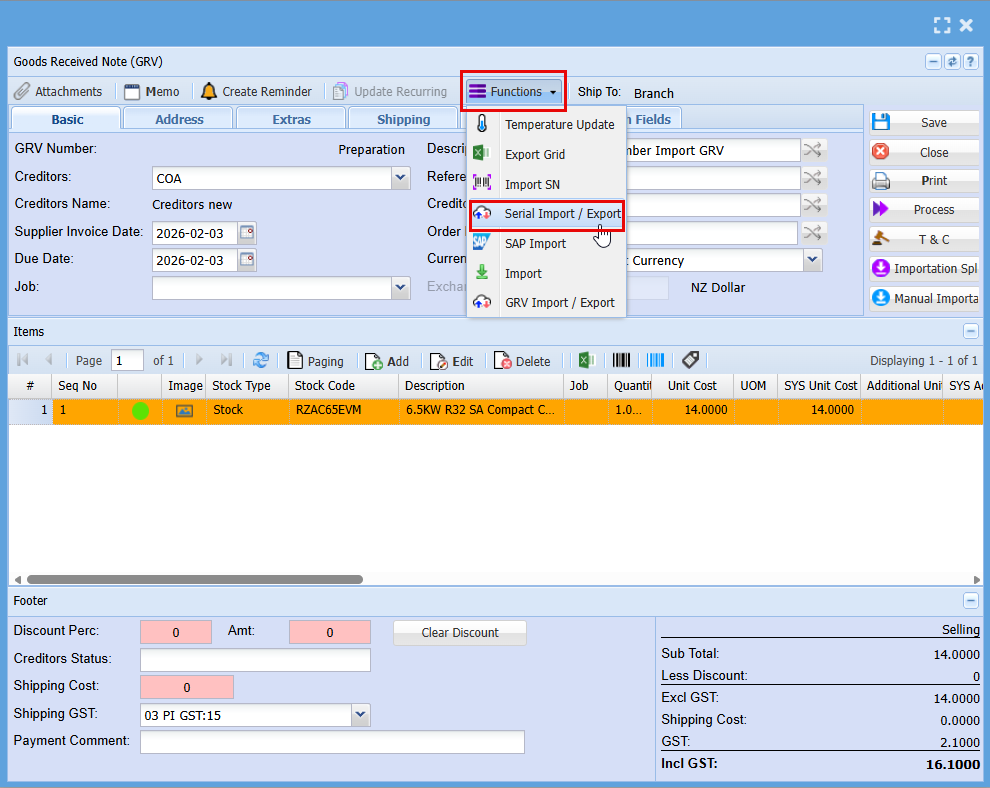
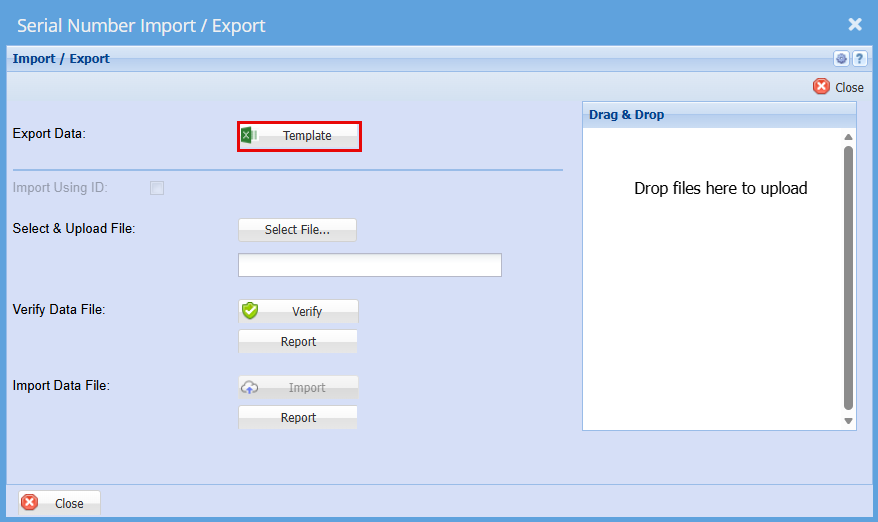
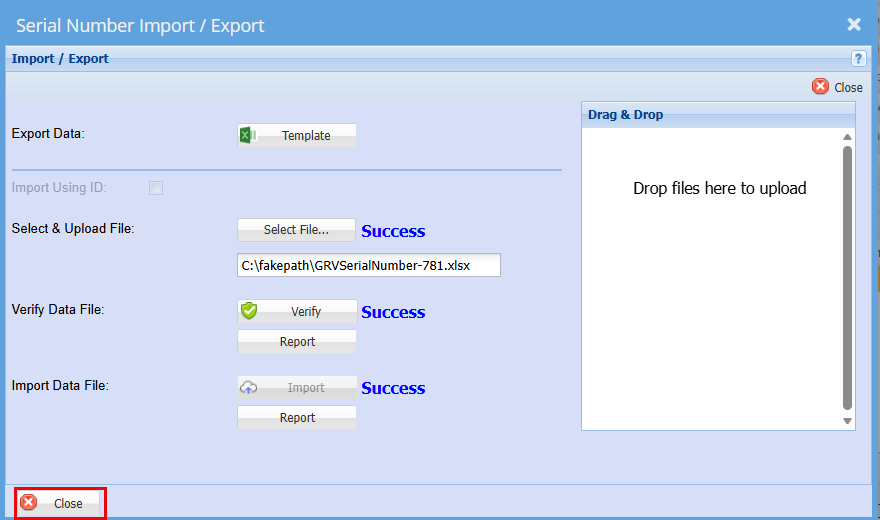
A window will appear allowing you to export a template that can be used for the import.
- Click on "Template" this will download an excel file
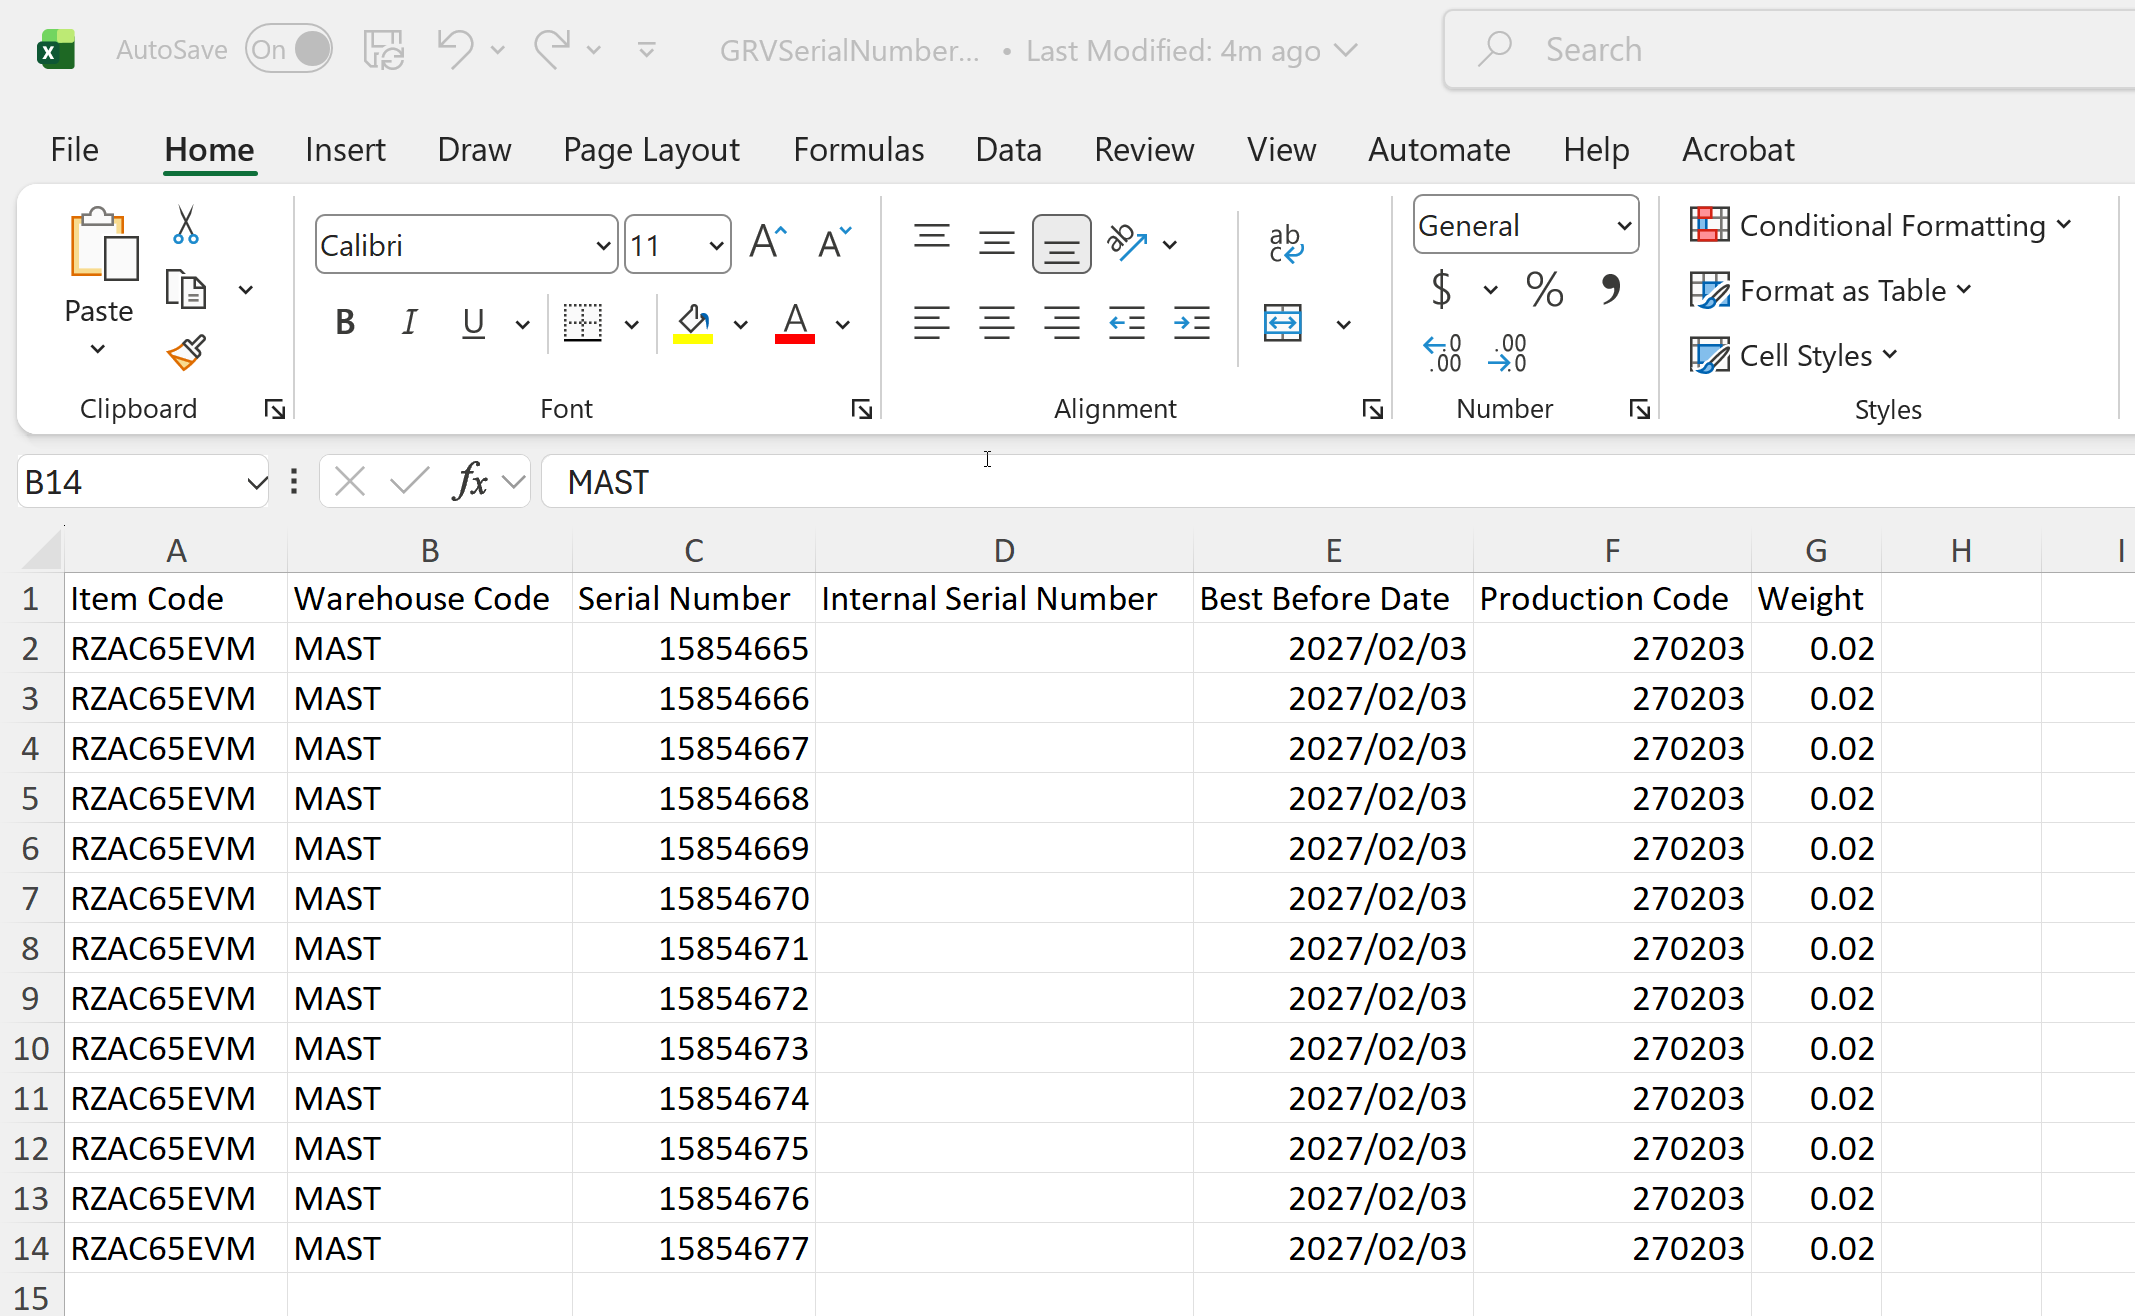
- Enter the serial numbers here, with each item listed on a separate line as shown below.
- Save the file to your computer.
- Go back to the "Serial Number Import/Export" Screen
- Click "Select File"
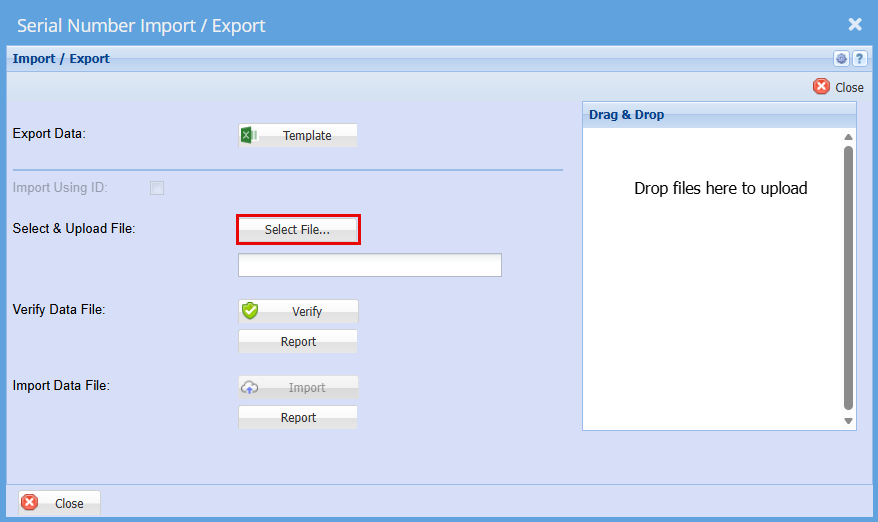
- Find the file you have saved.
- "Double Click" the file or click "Open"
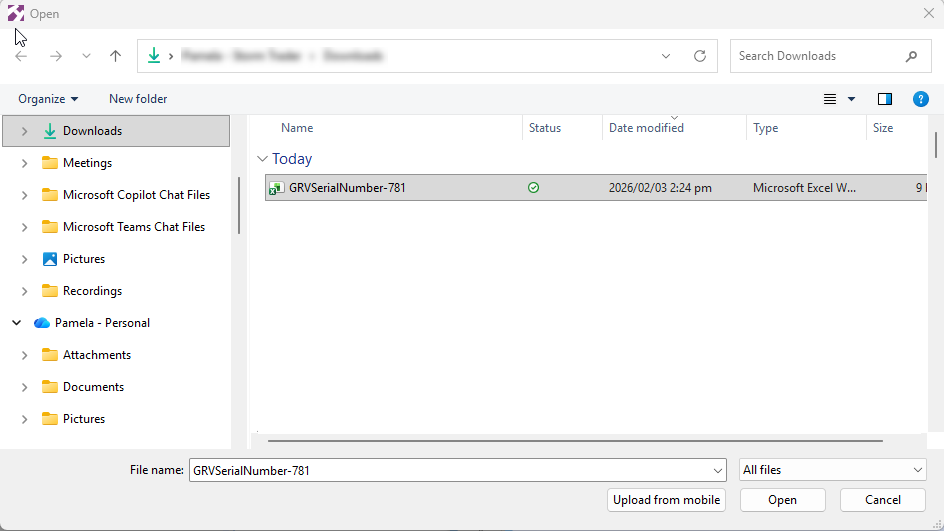
You should get a Successful Import
- Click "Verify"
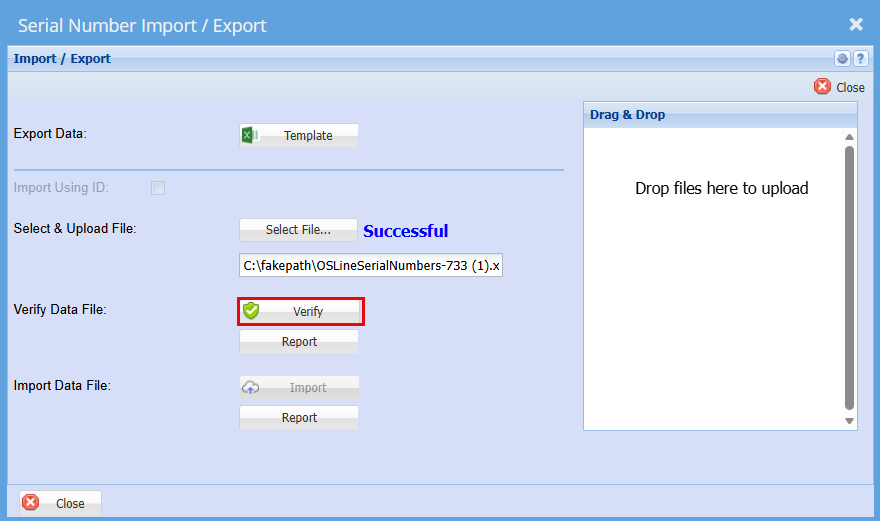
You should again get a successful for verification
- Click "Import"
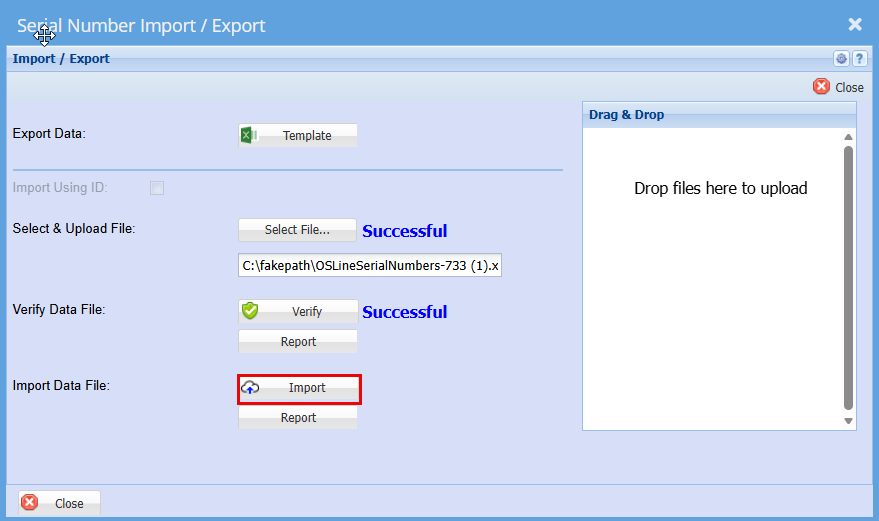
You should then get a Successful for Import.
Click "Close"
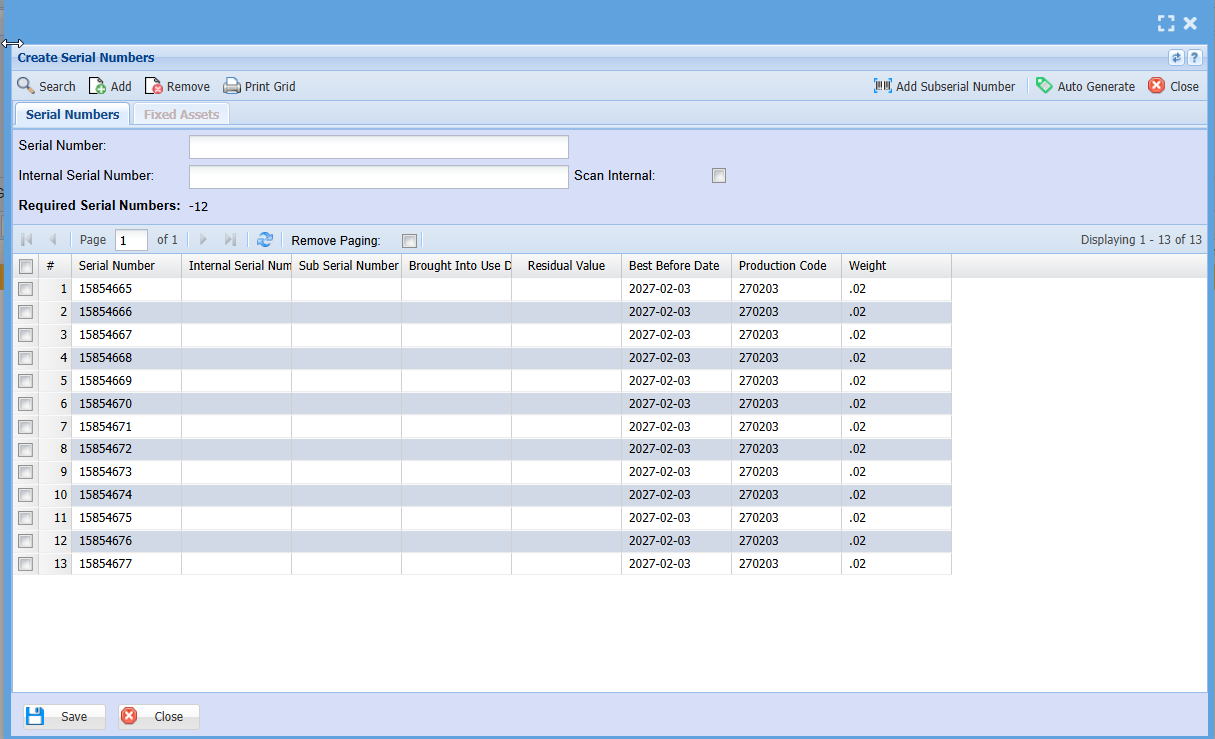
• Click the “Serial Nos” button.
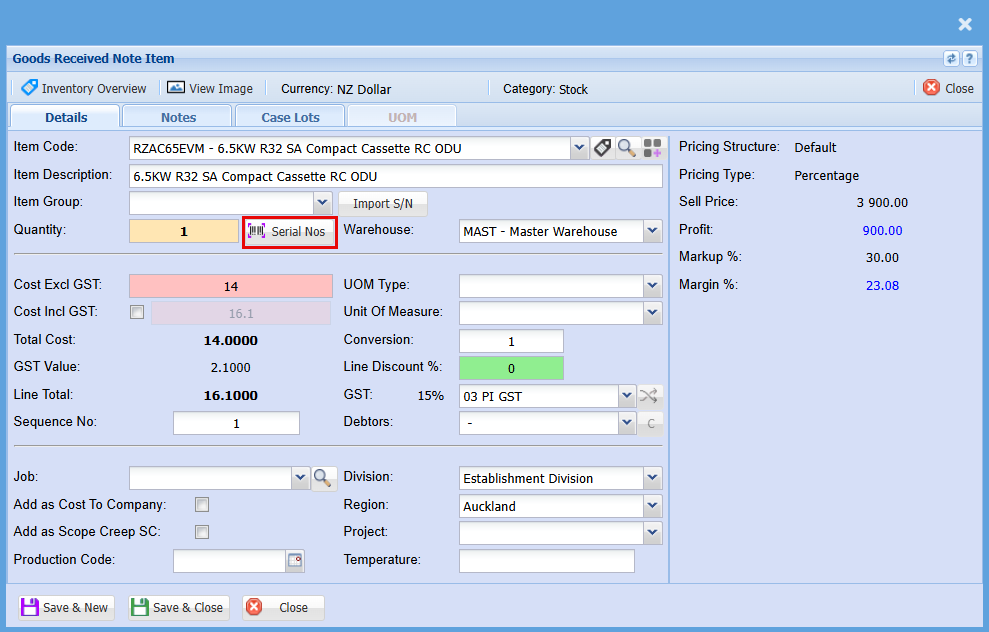
This will show you all your serial numbers per item