Asset Tracker Search
- Asset
- TrackIT / Fixed Asset Item
- Asset Actions
- Statistics Setup
- Fixed Assets Item Setup
- Asset Management Item Setup
- Fixed Asset Depreciation Setup
Asset
The asset item has many tabs and information on the asset
.png)
TrackIT / Fixed Asset Item
Setup your TrackIT or Fixed Asset Item
.png)
Asset Actions
Asset actions are logs against an asset to control various historical actions that an asset has gone through.
One can create a single action log on an asset, this is done within the asset edit screen. It is found in the top right hand corner of the edit screen.
There is no restriction currently on the number of times you can create an action against an asset.
You can create multiple checkins on an asset.
For bulk capturing of asset actions, this is done via the Webatar mobile app for asset actions
.png)
Creating an asset allows one to change three main sections of an asset
1. Issued To
2. Location
3. Condition
If any one of these three main sections is left blank, it will leave the asset in that state.
Once the action has been processed, it creates a log against the asset with a date timestamp and user who logged it.
View the history of a single asset, by going into the tab of that asset for action log.
One can view all action logs, in the menu item called action logs which looks across all assets.
.png)
Webatar app screen for multiple Asset actions
.png)
Statistics Setup
In order for the statistics to auto calculate the number of total assets and the asset utilisation percentage.
This needs to be set up in the system configuration module.
It gives the user the option to automatically specify specific assets that they want to count and mark as asset utilisation.
.png)
System Configuration Module> Administration> Defaults
Click on the asset tab
And the various categories but you want to count his assets.
In most cases, it would be the fixed asset and general category.
Make sure that you save your settings before continuing.
This will then ensure that your statistics calculations work.
.png)
Fixed Assets Item Setup
Creating a Fixed Asset from the Inventory Module
Inventory Module> Configuration> Item Setup
The minimum data requirement for a Fixed Asset Inventory item in the Inventory Module is the item code for the fixed asset item, the description, and basic defaults.

Click Add
Enter a code
Enter the description of the asset item
Select the Group code
Select the Category
Click the More Details Tab
Select the Fixed Asset GL Account

Asset Management Item Setup
Default Setting for Fixed Assets
Before creating a Fixed Asset for Asset Management it is necessary to populate the default values
System Configuration> Administration> Defaults> Asset Tab
Fixed Asset Minimum Balance For Transactions as determined by company policy should be 100

Additional Default Setting for Fixed Asset
General Ledger Module> Configuration> General Ledger Accounts
Search the GL Accounts detail relating to the specific fixed asset GL Item
.
Creating a Fixed Asset
Fixed Assets are created in two ways in the system. The first way would be via a GRV and the second way would be to create a new Fixed Asset directly in the Asset Management Module.
When creating a Fixed Asset via GRV the Fixed Asset should be part of the inventory system and the serial numbers can be tracked throughout the system.
GRV Method
When producing a GRV that will create a Fixed Asset the GRV line item must be a Fixed Asset inventory type and the inventory type must be ticked as a Serial Number Tracking.
One other, requirement is Allow GRV item to Asset Tick box found on:
System Configuration Module> Administration> Company Profile> Advanced Settings
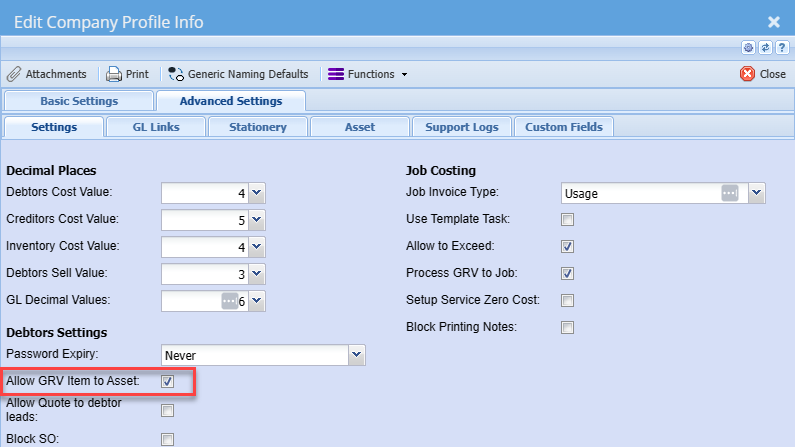
On the GRV line item once the inventory item has been selected and the quantity has been specified click on the create serials button and create the serial numbers as specified on the items being captured

It is important to ensure that a Brought Into Use Date is created for each serial number created. These dates can be edited on the grid if required. Residual values for serial number can also be captured on the grid at this time.
When GRV has processed the Residual value and Brought Into Use Date will be captured into the Fixed Asset along with all other default data discussed above.
Create Asset Directly in Asset Management
Go to Asset Management Module> Activity> Asset Search
Click on the Add button and capture the necessary details for an Asset.
Please note the system will not allow the duplication of Asset Numbers
Assets created directly will not be linked to any inventory item as a serialised item
All fields with yellow or pink backgrounds are compulsory fields.

Asset Management Module
Access the Asset Management Module > Configuration
The items below may require additional entries to satisfy your company requirements.

Access the Asset Management Module -> Activity -> Asset Search
You will notice that the Serial Numbers captured earlier in the GRV now appear in the Asset Tracker Search as individual Fixed Asset Items.

When viewing the Asset Details by selecting and then clicking on the Edit button you will notice that most of the important data has been populated from the various default setups through the GRV processing.
Important Tabs to View When Editing the Asset

The tabs above display the general information about the asset and some of the fields are editable.
The Asset Action Log is a grid displaying all actions that take place against the Asset

The tabs above display the information for dealing with depreciation, selling and disposing assets
The Fixed Asset Log is a grid displaying all the financial transactions that are created against the particular asset starting with GRV which was processed to created an Asset
Fixed Asset Tab> Information

| Brought Into Use Date | Is the day from which the first depreciation will be calculated |
| Fixed Asset Type | The type of depreciation to be applied to this asset (Straight line or Reducing line) |
| Percentage Rate | The percentage depreciation to be calculated at each period. This can be monthly or annually |
Fixed Asset> Journals

Transaction Type: Journal or GRV is still under development
| Activated Journal Schedule |
Ticked - Will be selected in the Fixed Asset Depreciation Schedule which will run at a predetermined time as specified in the Fixed Asset Depreciation Setup. Unticked- Will be ignored by the fixed Asset Depreciation Schedule. |
| Journal Process |
Automatic - The subsequently created depreciation journal will be automatically processed. Manual - The subsequently created depreciation journal will remain in a preparation status to be in General Ledger Module> Activity> GL Journal and click on the search button |
| Asset Account ect |
These are all pre-defined accounts required for the various transactions that will take place against this asset item. e.g Depreciation, Selling, Disposing and ADHOC Journal Transactions. |
Fixed Asset Depreciation Setup
Depreciation Transactions
Depreciation transactions require the following setup:
| Financial Period | Block Period Fixed Asset |
| Schedule Setup | Activate Fixed Asset Depreciation Schedule |
Block Period Fixed Asset
System Configuration> Administration>Financial Periods Setup
Select the year then click on the periods tab to display all the Financial Periods that have been set up for the selected year

The Block Fixed Asset Column:
Select the period and then click the Block Period Fixed Asset. The system works as follows, when the Fixed Asset Depreciation Schedule runs the system will search for the first unblocked period the use the date for this period e.h 2022-12-01 to 2022-12-31 for the date range for calculating the depreciation amount for the Month/ Year for each fixed asset selected in the process. In the case of the first depreciation transaction, the system will calculate the number of days from the Brought Into Use Date to the end of the Month/Year and calculate the depreciation accordingly. As soon as the system detects a difference Blocked Fixed Asset period e.g. the month the system will calculate depreciation for all the selected Fixed Assets for the next month.
In the event of bringing in a new asset with a backdated Brought Into Use Date it will be necessary to select the period corresponding to the date range of the period and then click Unblock period Fixed Asset. When the Fixed Asset Depreciation Schedule next runs the system will create the necessary depreciation transaction for the period for the Fixed Asset. It might be necessary to repeat this several times the backdated Brought Into Use Date was several periods before the last blocked period.
Remember to block all the periods again to get back to the original blocked fixed asset status in the Blocked Fixed Asset Column
To aid in blocking previous year’s Fixed Asset Periods. Select the Year on the Year Tab then click on the Block Fixed Asset Year to block an entire year.

Activated Fixed Asset Depreciation Schedule
System Configuration> Administration> Company Profile
Select the company on the grid and click on the Edit button
Click on the Advanced settings and the Schedule setup button

Select Fixed Asset Depreciation Schedule then click on the Edit Schedule button.
This is a typical Schedule Task Setup. The task will run Once a Day at Midnight every day of the week.

|
Status Column |
Ensure on the selected scheduled task that the Status column is set to Currently Running If not click on the Start Schedule button The status should now read Currently Running. |
| Recipients Column | This column indicates the number of users that have been selected to receive the generated email report when the schedule has been run |

To add or remove Email recipients click on the Email icon in the Email List column.
Run Now Column
To run the Schedule manually select the Fixed Asset Depreciation Schedule entry and then click on the green arrow icon.

And respond accordingly.