ASCM - Administration
Administration
- Company Profiles
- Company Search
- Company Details
- Scheduled Tasks
- Schedules Report
- Manage System Emails
- Escalation and Debit Order Message Setup
- Branch More Details
- Stationery Layout Change
- Setting up restore password
- Customer Access
- Division and Region enforce
- Programme Background Colour
- Defaults
- Defaults
- System Defaults tab
- General Ledger Defaults Tab
- Debtors Defaults Tab
- Creditors Defaults Tab
- Inventory Defaults Tab
- Webatar Defaults Tab
- Job Costing Defaults Tab
- Email Defaults Tab
- Debtors Aging Letters
- Date Defaults Tab
- Financial Periods
- Create a new financial Year
- Financial Periods Setup
- Add Financial Year
- Financial Periods Block
- Recreate Financial Periods Setup
- Financial Periods – VAT / GST Category
- VAT / GST period closes
- Archive Past Financial Years
- Backups
- Backup Liability Customer
- Manual Backup Process
- Automatic Backup Setup
- Creating and Restoring Backup
- Restore Procedure
- Backup download
- Moving a backup
- Backup Restoring
- Backup Download
- Backup Creation
- Clear Backup Files
- Multi-currency
- Multilingual
- Custom Fields
- Reference Values
- Custom Periods setup
- Imports
- Imports
- Pricing Level export and import
- Change Inventory codes import
- Template Maintenance
- Inventory images import
- Email schedule setup
- Export Schedule
- POS Payment Setup
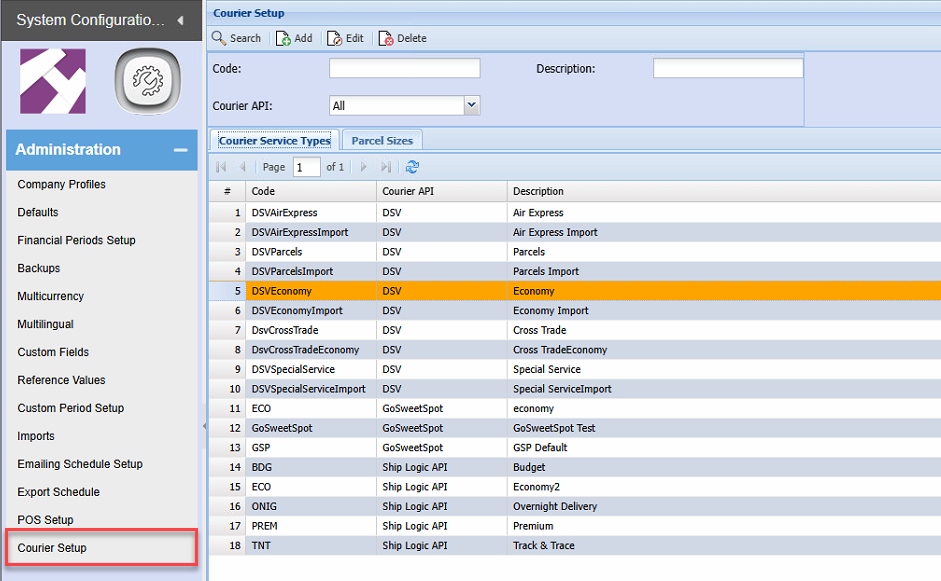
- Courier Setup
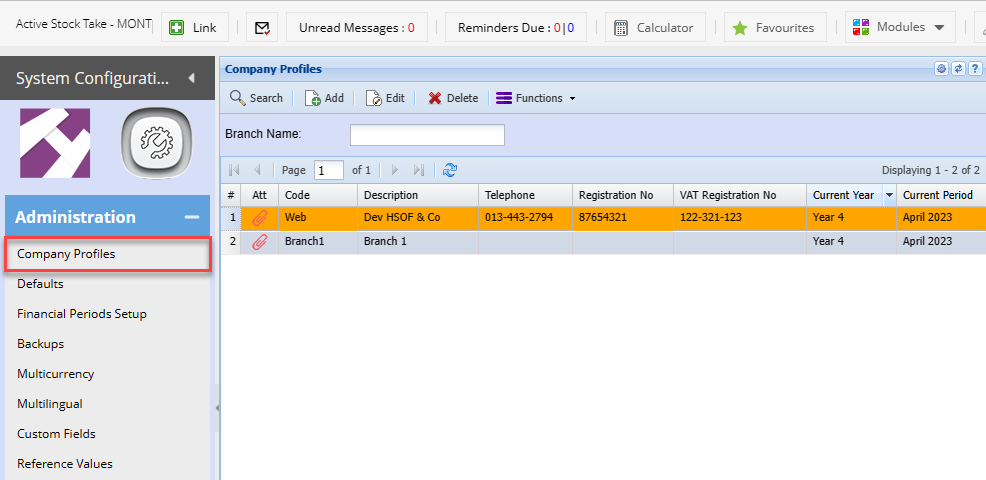
Company Profiles
Company Profiles
Company Search
Searches main company (Head Office) and all branches associated.
Setup the company profile
Setup Branch details
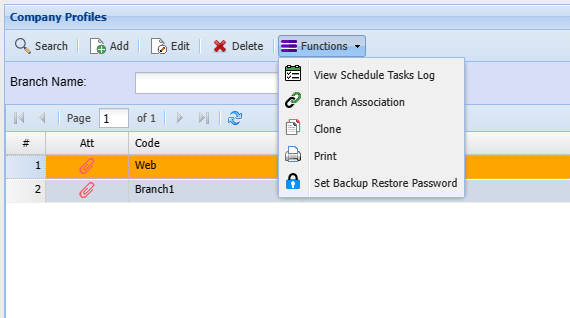
Functions
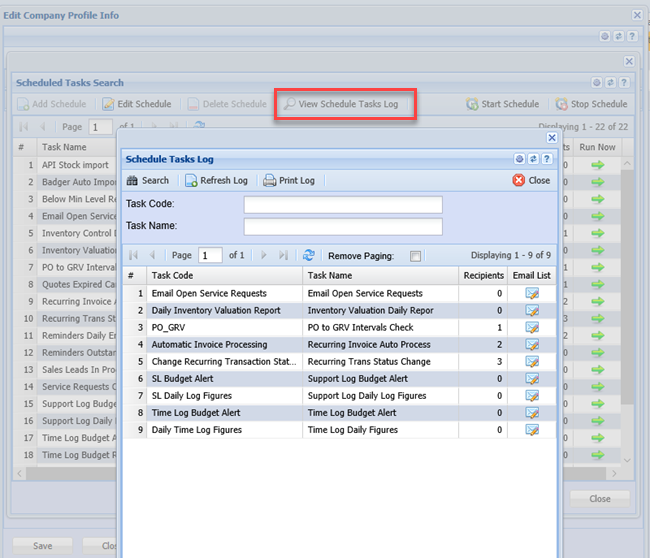
| View schedule tasks log | Print a document of all the scheduled tasks in this company (advisable to print when moving this company to a new namespace or server) |
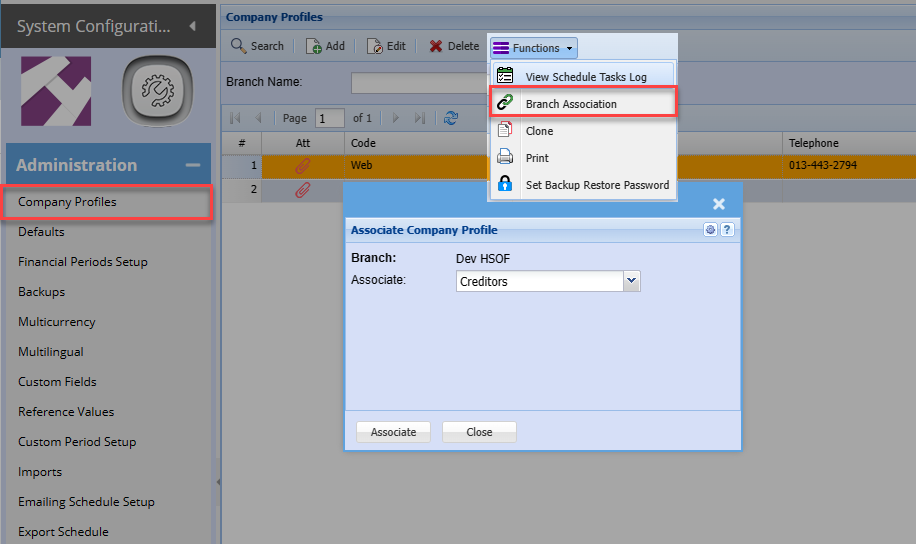
| Branch association | Use this function to link all branches to a module |
| Clone | Clone a branch details for a new branch |
| Print the details in a form | |
| Set backup restore password | Set a password to allow one to download a backup or restore a backup |
Branch Association
- Debtors
- Creditors
- General Ledger accounts
- Inventory
- Group Codes
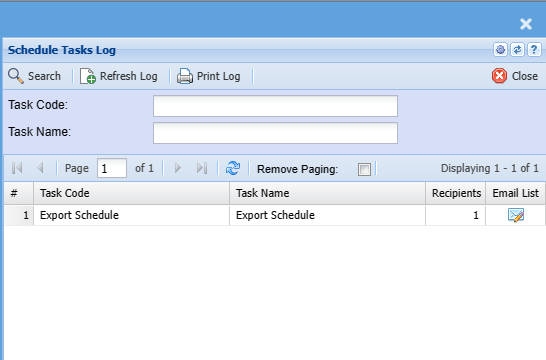
View scheduled tasks log
View all scheduled tasks for this company
Print the log of all the scheduled tasks in this company (advisable to print when moving this company to a new namespace or server)
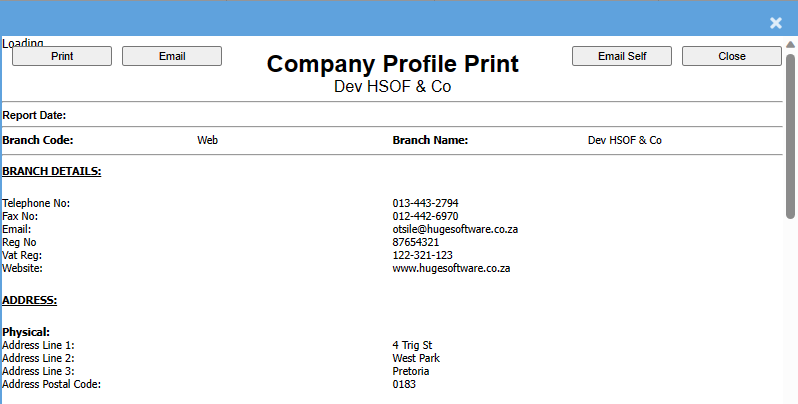
Print company profile details
Use this printout to gather information for the company or see the company details
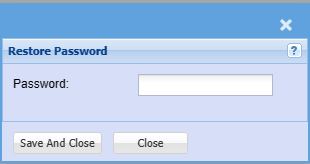
Set a restore password
When restoring a company or downloading a backup, you will require this password.
Company Details
In the company profiles you will find the basic information required to input your company information. This is also the section where the logo appears on the company details will be printed in your documents like the invoice.
Video Training Manual 2016 Part 1 - Click Here
Video Training Manual 2016 Part 2 - Click Here
System Configuration > Administration > Company Profiles
Basic Tab
In this tab of company details, fill in all your information on your company.
You will notice that there is no logo present and when you click on the Company Image drop down arrow it is blank.
This will show when you go to the attachments tab to upload a logo.
This logo will be displayed on all the outgoing source documents.
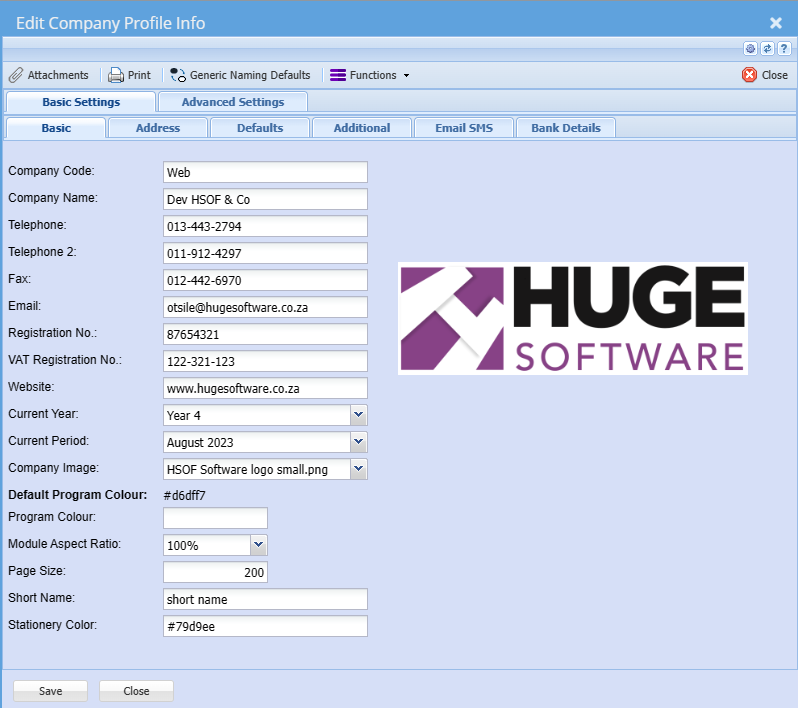
| Company code | Enter code to identify the company. This is also used for exports |
| Company Name | Enter your legal company name which will appear on all documents |
| Telephone | Enter the company telephone number |
| Telephone 2 | Enter the secondary company telephone number |
| Fax | Enter the fax number of the company |
|
Enter the email of the company. This email is also used for the automatic outbound emails as their return address |
|
| Registration number | Enter the legal registration of the company |
| Tax registration number | Enter the tax registration number for the company (VAT or GST) |
| Website | Enter your website address |
| Current year | Select the current year |
| Current period |
Select the current period This is used for reporting as the default period Saves you having to keep changing the dates on your reports |
| Company image | Select the company image that will appear on all documents |
| Default program colour |
#d6dff7 This is the default colour for the system |
| Program colour |
Select a colour to distinguish your company, should you be using multiple companies Requires the html code for the colour |
| Module expect ratio | Opens the module pages in 100 percent full screen |
| Page size |
Set as 100 records in a grid This can be changed to view more records in each search grid |
| Short name |
Select a short name for the company Used in calendar views and exports |
| Stationery colour | Select a stationery colour which best matches your logo for outgoing stationery |
Address Tab
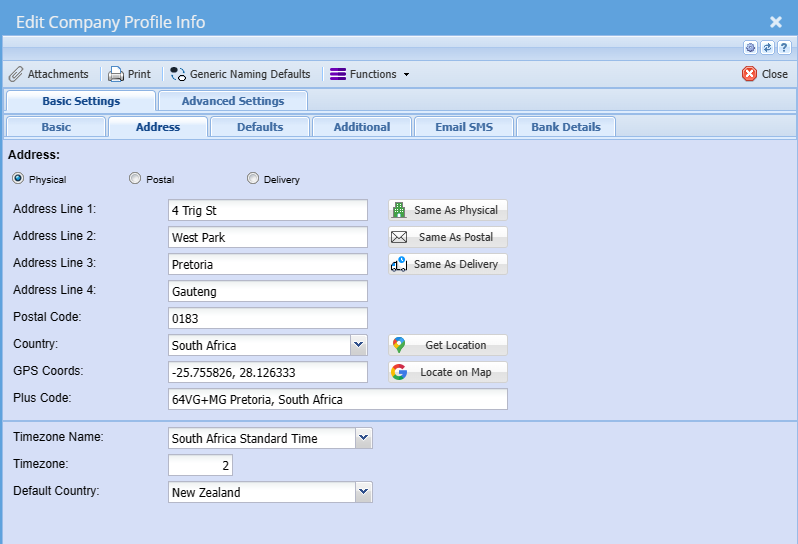
| Physical address | Enter the physical address or legal entity address for company |
| Postal address | Enter the postal address for the company |
| Delivery address | Enter the delivery address for the company |
| Country | Select the country that you are in |
| GPS Coordinates |
Enter the GPS coordinations for the company One can use the button for locate on map, however this needs to be set up first |
| Plus code | Enter the plus code for the company which can be found on Google map search |
| Time zone name |
Select the time zone country Used when entering system log times |
| Time zone | Enter the hours from time zone default |
| Default country |
Select the default country This default country is also used to populate the debtors and creditors address country |
| Same as physical | When in an address section, use this button to copy the physical address |
| Same as postal | When in an address section, use this button to copy the postal address |
| Same as delivery | When in an address section, use this button to copy the delivery address |
| Get location |
Use this button to get your GPS location and plus code This needs to be set up first |
| Locate on map | Click on this button to open up Google Maps to view the location of the company |
Defaults Tab
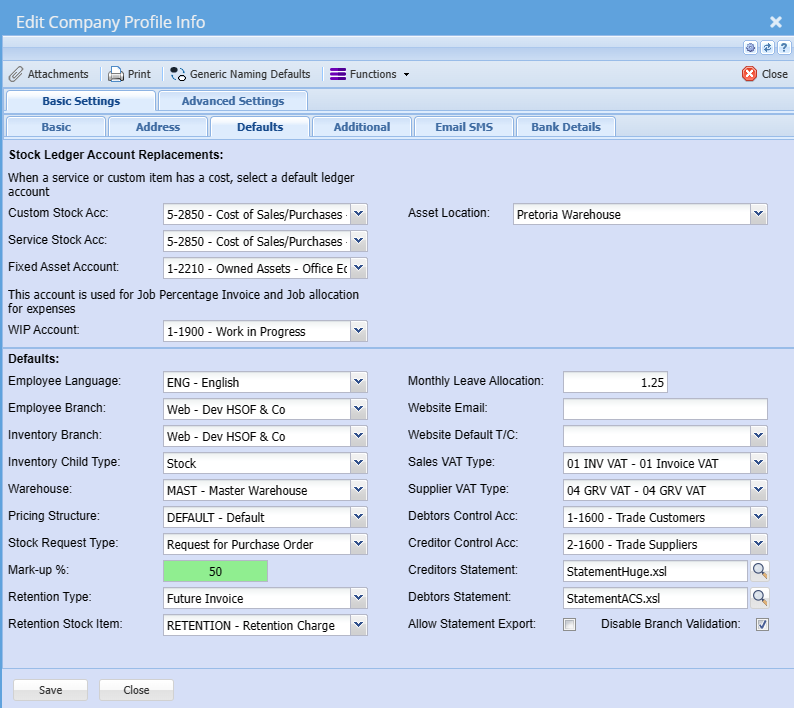
Stock Ledger Account Replacements
These accounts are used to be the defaults when new inventory items are created.
These accounts will always replace the stock control account,
These settings mainly are used when new items are created.
| Custom stock account |
Select a ledger account here. |
| Service stock account | Select a ledger account here. This is where your Service type inventory has a cost attached to it. The ledger account updated cannot be stock control ledger account as this is not a stock item. Only stock items should update the stock control account. The account selected here will replace the stock control ledger account and assign the costs to that account. This default account will automatically be inserted when you created a service inventory item. You can, however, override the account at the inventory setup screen |
| Fixed asset account | Select a default fixed asset account |
| Asset location | Select the default asset location |
| WIP account (Work In Progress) | Select the default work in progress Ledger account |
Defaults
These defaults are used widely across the system when new items are created.
These values are also used for any imports where a user has not specified a specific value.
| Employee language | If the User is part of the branch selected, this will mean that when this employee creates a new employee the default Language will be the one selected. |
| Employee branch | If the User is part of the branch selected, this will mean that when this employee creates a new employee the default branch will be the one selected |
| Inventory branch |
If the User is part of the branch selected, this will mean that when new inventory items are created the default branch will be the one selected. This enables the system to sort inventory by branch and only allow users to see those inventory codes linked to the branch selected |
| Inventory child type |
The inventory child type assists the user from entering line inventory items to default to this inventory category Example – If your business is mostly stock – select stock category, If your business is mostly in the service industry and your inventory setup is mostly service – select service category |
| Warehouse | This is the default warehouse that the system will use when entering documents, example invoice stock lines. We assume it to be a master warehouse where all stock is received Note: If you do not have multi-warehouse module all stock will come in and out of Master warehouse |
| Pricing structure | The pricing structure selected here for the branch will mean that when new inventory items are created the default pricing structure will be the one selected |
| Stock request type | Select the Stock request default action, example Request for Purchase Order |
| Markup percentage | The markup percentage selected here for the branch will mean that when new inventory items are created the default mark up for inventory will be the percentage number entered. |
| Retention type | This is used in job costing for a retention invoice type |
| Retention stock item | When using a retention invoice, it will use the default stock item as the retention line on the invoice |
| Monthly leave allocation | Put in the number of days for monthly leave, used in the leave module to workout the cumulative monthly leave for the employee |
| Website email |
There is a module in the CRM for Website help manuals that can be linked to your website. The email entered here will be the return email that the users see when logging a message |
| Website default T/C (Terms & Conditions) | Select a default Terms and Conditions for clients to view when accessing the online support help manual |
| Sales Tax type | The tax type selected here for the branch will mean that when new inventory items are created the default tax type will be the one selected for Sales |
| Supplier Tax type | The tax type selected here for the branch will mean that when new inventory items are created the default tax type will be the one selected for Suppliers (GRV) |
| Debtors control account | Select the debtors ledger control account |
| Creditors control account | Select the creditors ledger control account |
| Creditors' statement | Select a default creditors remittance statement stationery layout |
| Debtors statement | Select a default debtors statement stationery layout |
| Allow statement export | Function used to allowed external access to export statement data |
| Disable branch validation |
By default, the disabled branch validation is disabled. This speeds up the searches in the system and does not allow an extra search and filtering by branch. Only use this function if you are running multi branches and you want to filter searches by branch |
Additional Tab
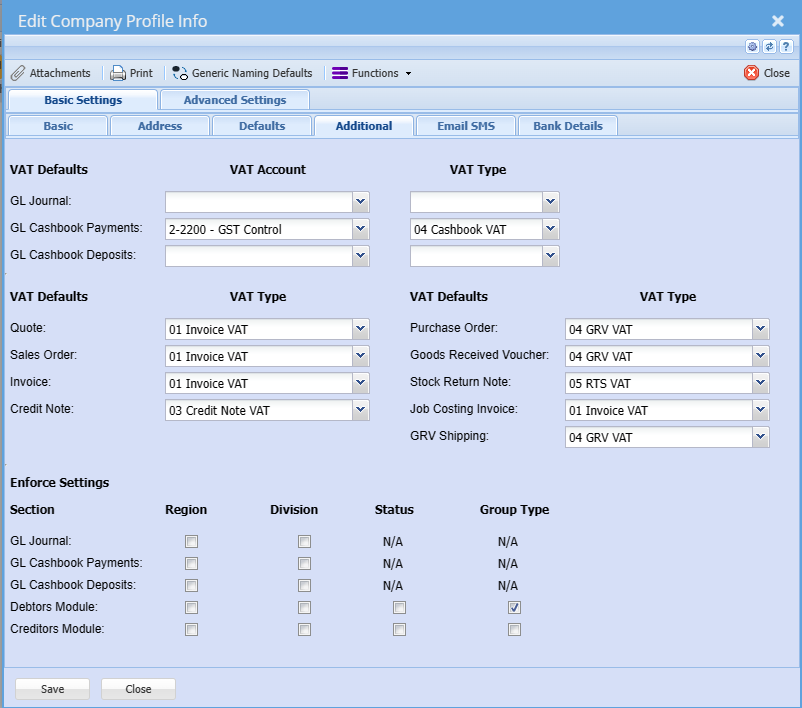
Tax Defaults
| GL Journal | Set the tax type with every journal line added. This is seldom used |
| GL Cashbook Payments | Set the text type for payments so that when you add a cashbook line it will automatically put in the tax account and tax type. |
| GL Cashbook Deposits |
Set the text type for deposits so that when you add a cashbook line it will automatically put in the tax account and tax type. It is recommended not to set a tax account and tax type in deposits |
| Quote | Set a tax type for all quote lines inserted. It is usually an Invoice tax type |
| Sales Order | Set a tax type for all sales order lines inserted. It is usually an Invoice tax type |
| Invoice | Set a tax type for all Invoice lines inserted. It is usually an Invoice tax type |
| Credit Note | Set a tax type for all credit note lines inserted. It is usually a credit note tax type |
| Job Costing Invoice | Set a tax type for all Job Costing Invoice lines inserted. It is usually an Invoice tax type |
| Purchase Order | Set a tax type for all Purchase Order lines inserted. It is usually a supplier / creditor Invoice tax type |
| Good Received Voucher (GRV) | Set a tax type for all GRV lines inserted. It is usually a supplier / creditor tax Invoice type |
| Stock Return Note | Set a tax type for all Stock Return Note lines inserted. It is usually a supplier / creditor stock return tax type |
| GRV Shipping | Set a tax type for all Purchase Order lines inserted. It is usually a supplier / creditor invoice tax type |
Enforce Settings
Enforcing the settings for Region, Division, Status and Group Type
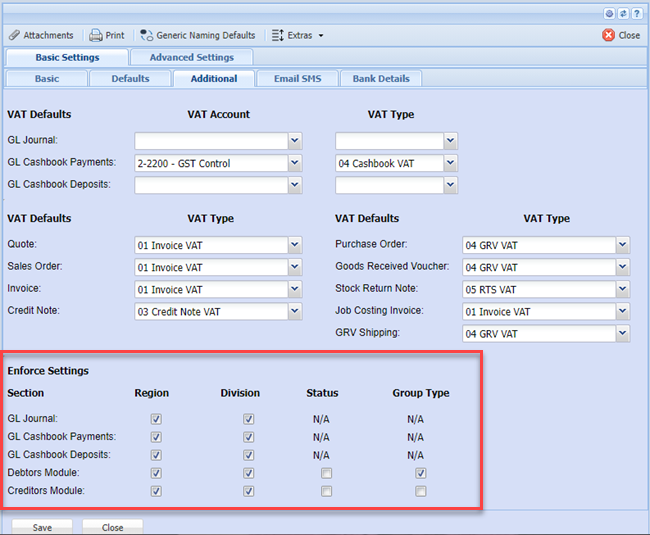
If you need to enforce division sand Regions in some modules the enforce activation is done here by adding a tick on
| Document | Region | Division | Status | Group Type | Comment |
| GL Journal | Yes/No | Yes/No | N/A | N/A | |
| GL Cashbook Payments | Yes/No | Yes/No | N/A | N/A | |
| GL Cashbook Deposits | Yes/No | Yes/No | N/A | N/A | |
| Debtors Module | Yes/No | Yes/No | Yes/No | Yes/No | |
| Creditors Module | Yes/No | Yes/No | Yes/No | Yes/No |
Email SMS Tab
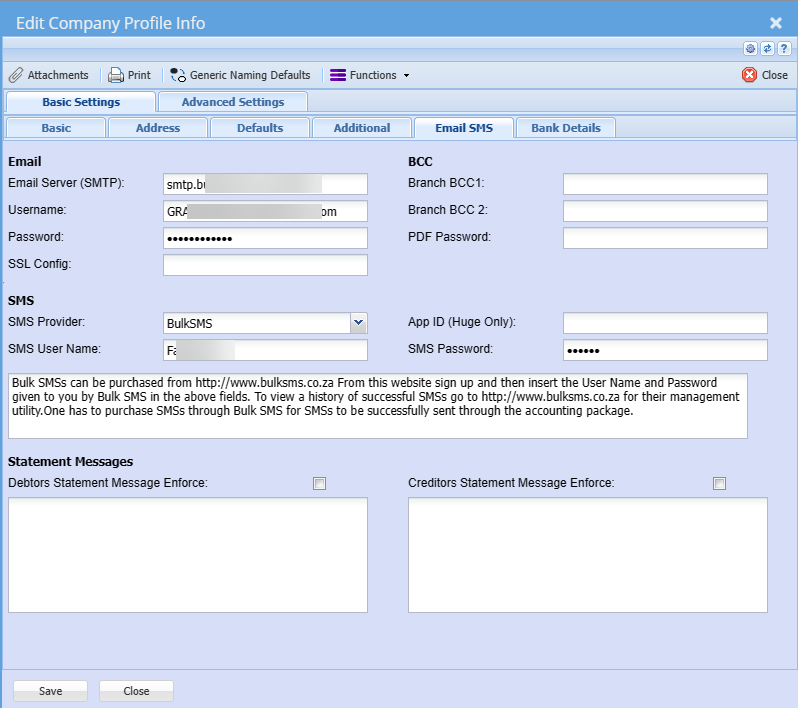
Email Settings
To enable e-mailing documents out of Huge ERP, the SMTP settings and SMS configurations are setup here.
We advise companies to utilize their own service providers.
If you are running Office365, you are able to setup the SMTP through Office365.
| Email Server (SMTP) | Setup an SMTP server path |
| User Name | Enter the username for the SMTP server credentials |
| Password | Enter the password |
| SSL Configuration | This is set in the database of the server, usually set to EMAIL |
| Branch BCC1 | Use this field to blind copy every single email document in the system |
| Branch BCC2 | Use this field to blind copy every single email document in the system to a second person |
| PDF Password |
Set a password for system generated emails that are converted into PDF, Note that you will have to inform the receiving persons of this password Not recommended to use |
SMS Settings
The system can send out SMS information to clients, for example.
Statement amount,
Invoice processed with amount (Not recommended to use as the user will receive a SMS when invoices are processed)
| SMS Provider |
The system caters for BulkSMS and Huge TNS sms providers Sign up with the necessary company and then fill in the credentials |
| SMS User Name | Enter the username provided by the provider |
| SMS Password | Enter the password |
| App ID (Huge Only) | Enter the app ID, This is only applicable to the Huge TNS provider |
| Notes | See the information like the web address of the providers |
Statement Messages
| Debtors statement enforce message | Enable the tick box if you want to send out a global message on all of your statements. Normal something like Merry Christmas, change of bank details etc |
| Debtors statement message | |
| Creditors statement enforce message | |
| Creditors Statement Message |
Bank Details Tab
The system allows for two bank details to be kept for customers to pay.
Under the Bank Details tab please fill in your company Bank Details.
Note: This will appear on your documents, for example invoice.
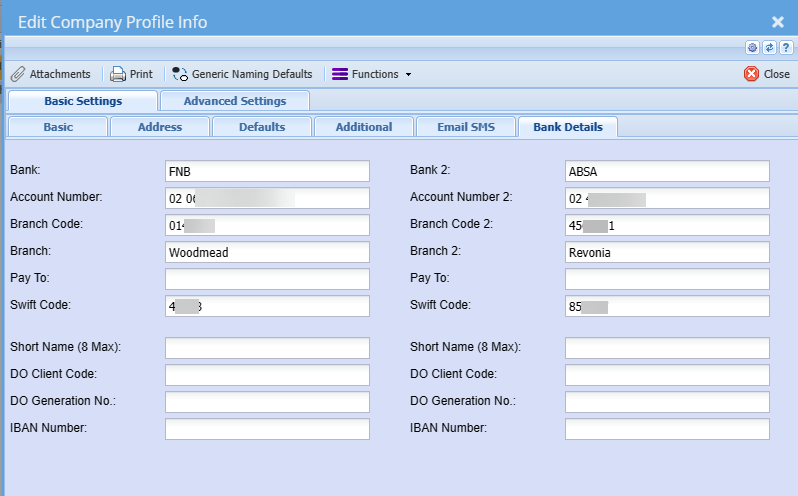
Bank Details 1
| Bank | |
| Account Number | |
| Branch Code | |
| Branch | |
| Pay To | |
| Swift Code | |
| Short Name | |
| DO Client Code | |
| DO Generation No | |
| IBAN Number |
Bank Details 2
| Bank | |
| Account Number | |
| Branch Code | |
| Branch | |
| Pay To | |
| Swift Code | |
| Short Name | |
| DO Client Code | |
| DO Generation No | |
| IBAN Number |
Settings Tab
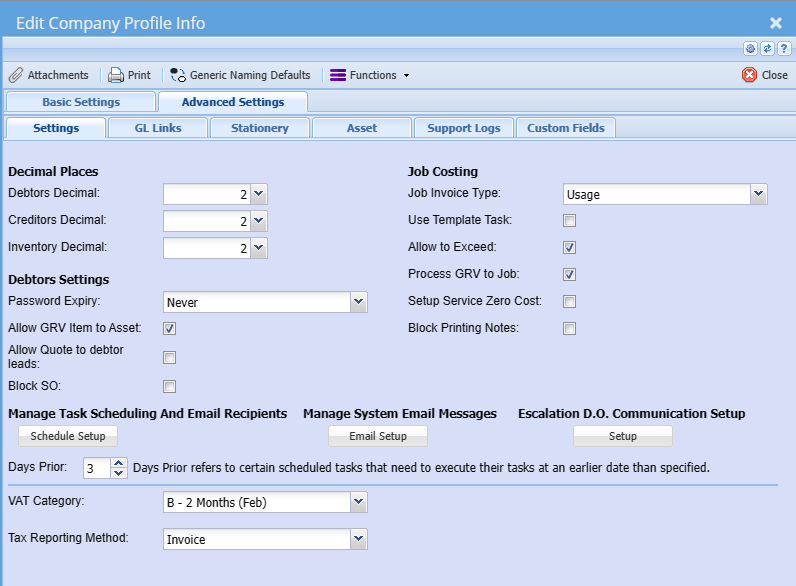
Decimal Places
Set decimal places to read up to 9 digits long.
When you process transactions into your books, the system will retain the original decimal places you specified.
| Debtors Decimal | Affects General Ledger, Debtors and Job costing Modules |
| Creditors Decimal | This will set the viewing of the decimal place only for the Creditors Module (CM = Creditors Module). |
| Inventory Decimal | This will set the viewing of the decimal place only for the Inventory Module (IM = Inventory Module). |
The viewing of decimal places is rounded up. Example 50.855 – if the decimal ends with a 5 and you are viewing 2 decimals then the figure will be 50.86.
The package balances up to 9 decimal places accurate, which means should your trial balance may seem out of balance, change your decimal places to view more decimals and rerun the report.
NOTE: When changing decimal places, log out of the system and then log back in for the decimals to take effect.
Job Costing
| Job Invoice Type | When using job costing module and you are creating an invoice for the job you can automatically set up the default invoice type. This can be percentage or usage, set the default that your business mostly uses. You can, however, override the invoice type at the creation of the job invoice. |
| Use Template Task | When using job costing module and you are authorizing a quote to job status. This setting will automatically be set for you You can, however, override the choice at the authorization process. |
| Allow to Exceed | When using job costing module and you are authorizing a quote to job status. This setting will automatically be set for you. You can, however, override the choice at the authorization process. |
| Process GRV to Job | |
| Setup Service Zero Cost | |
| Block Printing Notes |
Debtors Settings
| Password Expiry | |
| All GRV item to Asset | |
| Allow Quote to debtor leads | |
| Block SO |
Other settings
| Schedule Setup | |
| Email Setup | |
| Escalation Setup | |
| Days Prior | |
| Tax Category |
Refer to section on: |
| Tax Reporting Method |
GL Links Tab
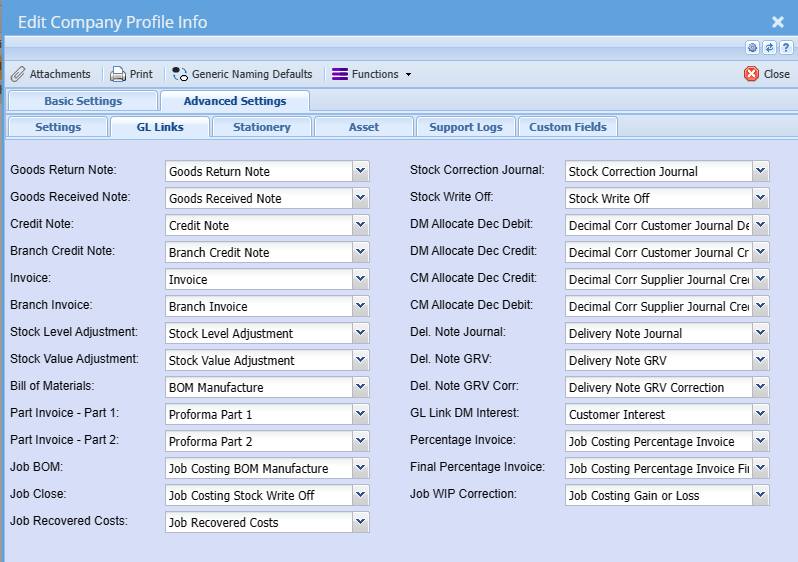
| Goods Return Note | |
| Goods Received Note | |
| Credit Note | |
| Branch Credit Note | |
| Invoice | |
| Branch Invoice | |
| Stock Level Adjustment | |
| Stock Value Adjustment | |
| Bill of Materials | |
| Part Invoice - Part 1 | |
| Part Invoice - Part 2 | |
| Job BOM | |
| Job Close | |
| Job Recovered Costs | |
| Stock Correction Journal | |
| Stock Write Off | |
| DM Allocate Dec Debit | |
| DM Allocate Dec Credit | |
| CM Allocate Dec Debit | |
| CM Allocate Dec Credit | |
| Del Note GRV | |
| Del Note GRV Corr | |
| GL Link DM Interest | |
| Percentage Invoice | |
| Final Percentage Invoice | |
| Job WIP Correction |
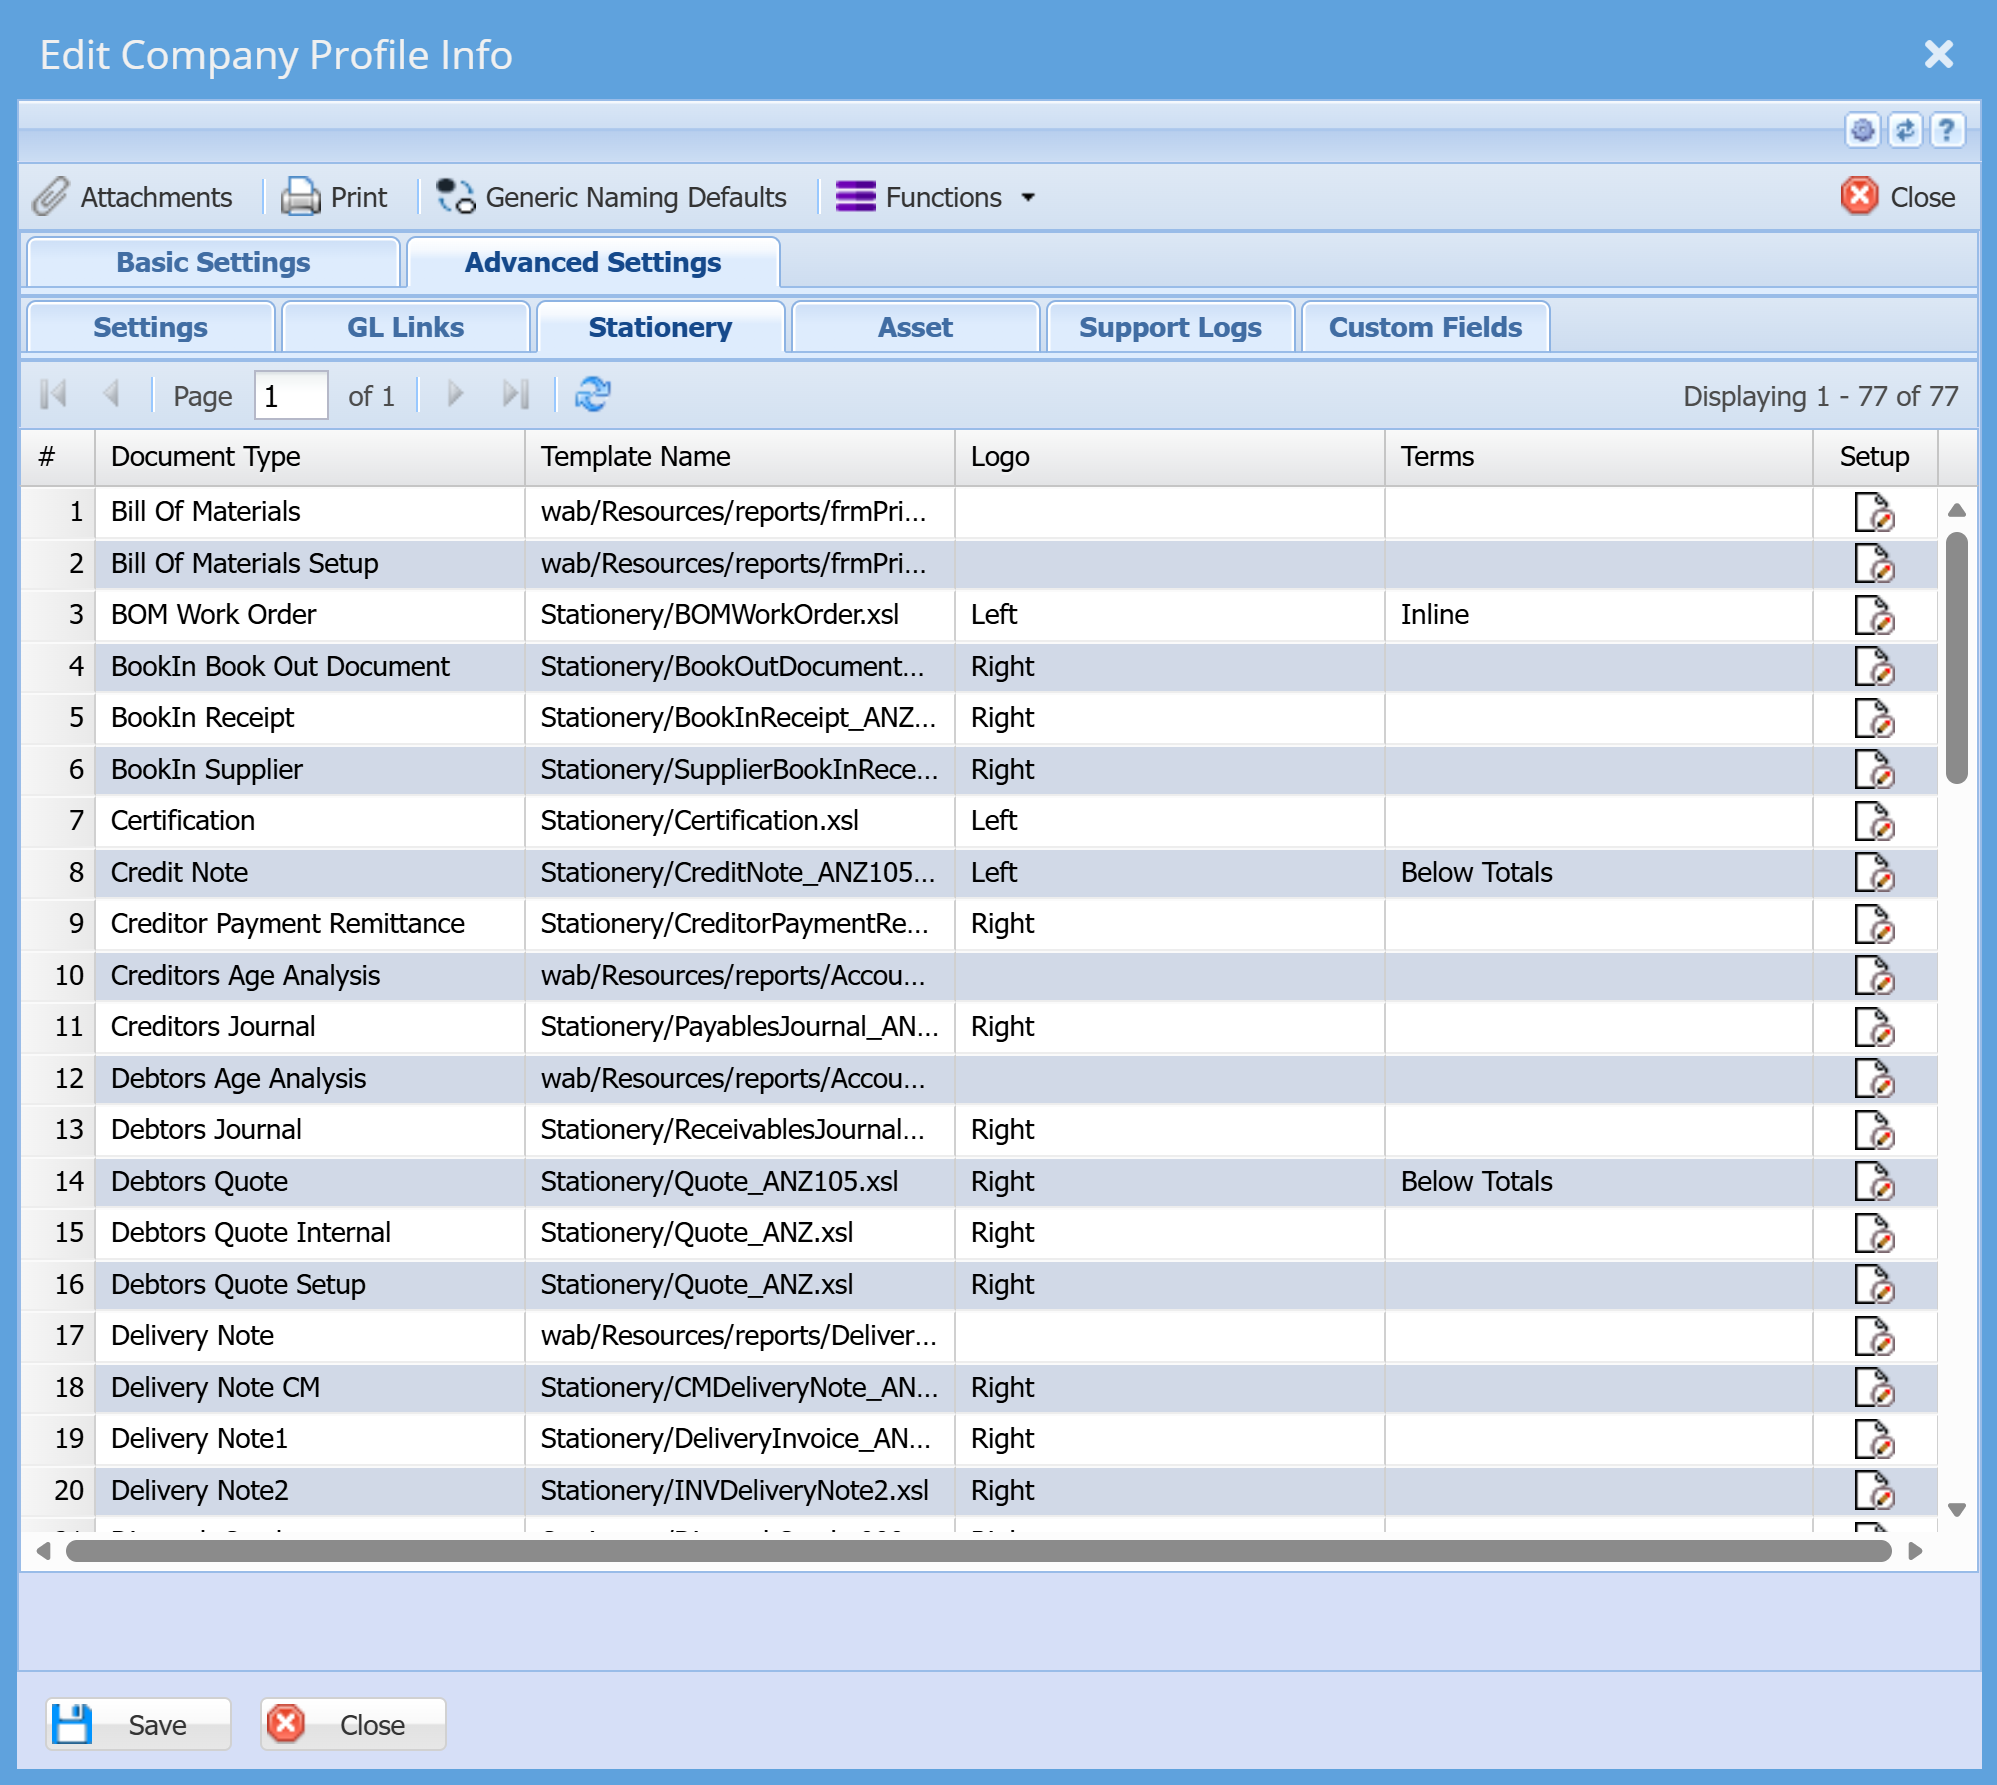
Stationery Tab
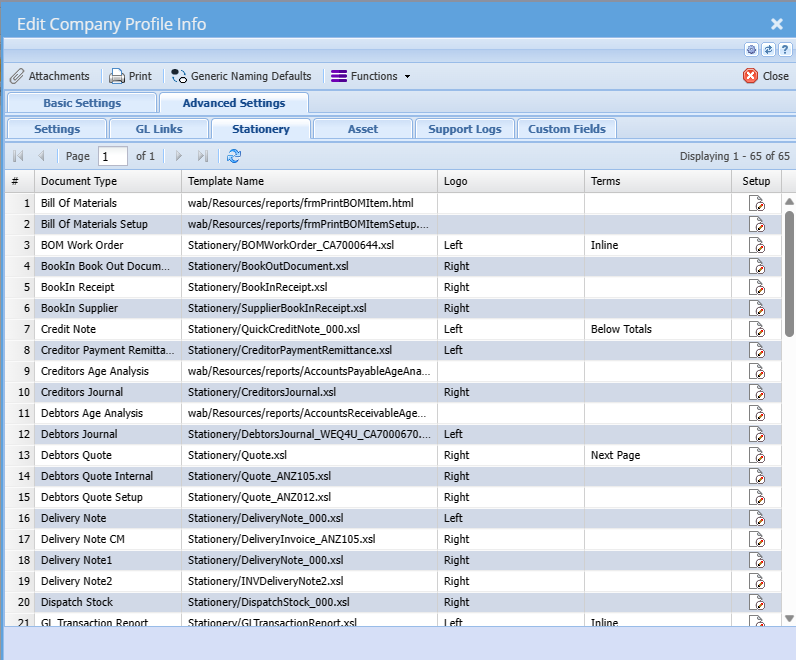
Asset Tracker Tab
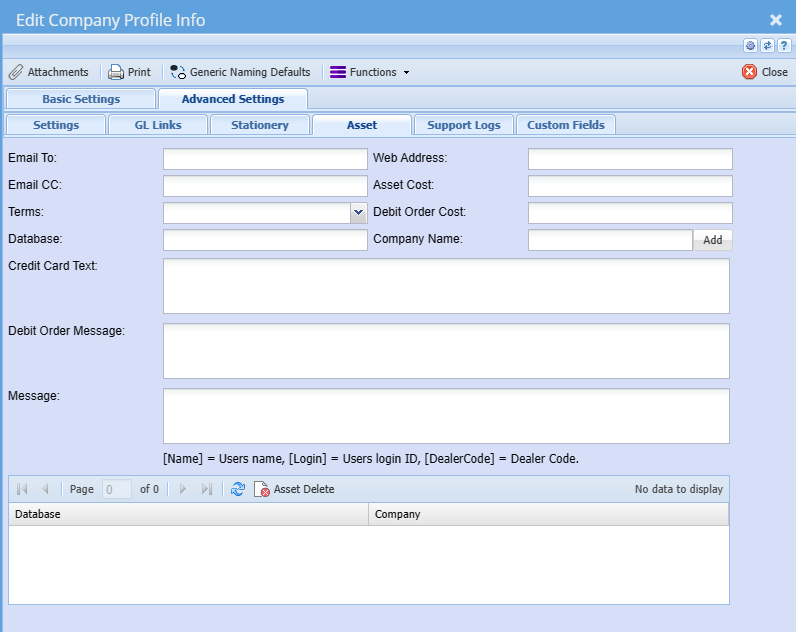
Support Logs Tab
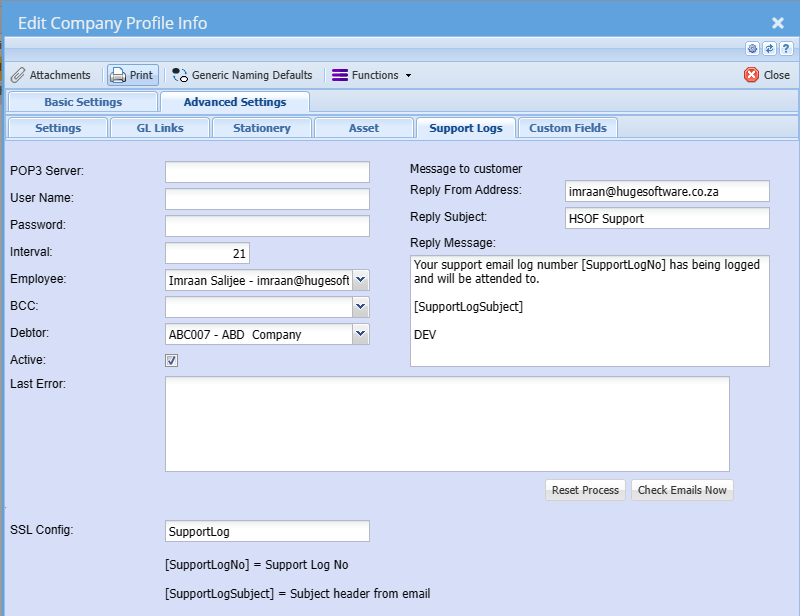
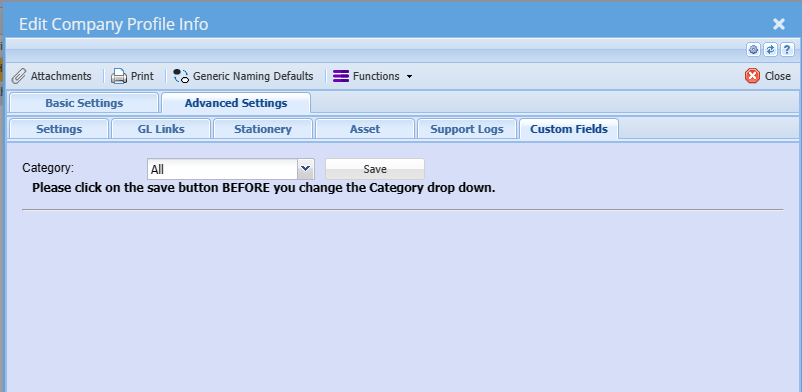
Custom Fields Tab
Under the Custom Fields tab, this is where you can insert predefined user fields.
Add as many custom fields as you require for additional information.
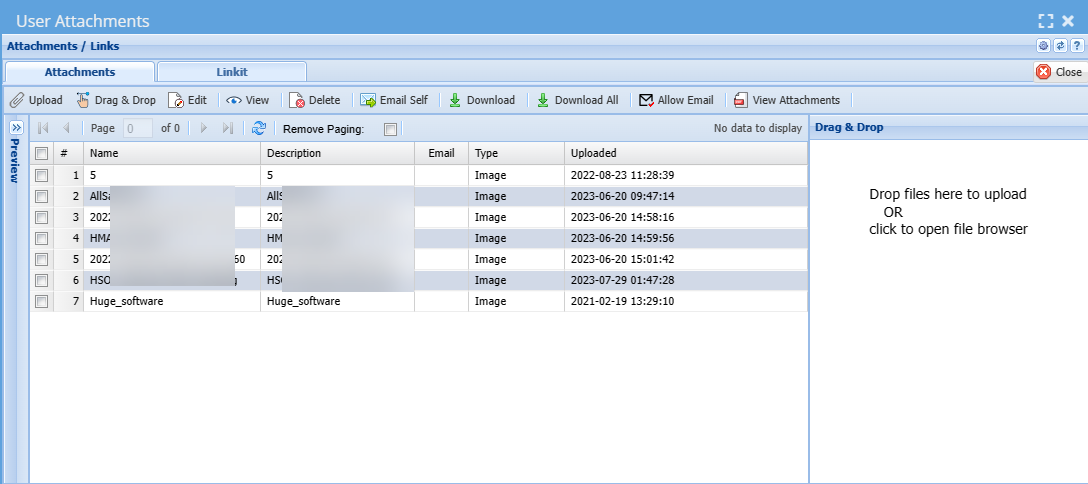
Attachments Button
Under the Attachments, this is where you can insert and upload any type of document into the company details. We give you some categories to upload your documents to.
To insert an attachment, click on the insert attachment button.
The following screen will appear, select the Attachment type and then type in a name that is applicable to you. Then click on the Browse button to find your file which you would like to attach.
Note: When you upload a file, the accounting package takes a copy of the file and puts this into an accounting package file called Uploads. We also change the file name for security reasons.
Once the file has being uploaded it will appear under the Attachment type with the Date and time it was captured along with the capturer, Your attachment name and the file name.
To view the attachment, you highlight the file you wish to view and click on View Attachments button.
This will download and open the file up in your browser and specific program it was saved in.
To remove attachments from the list, highlight the file in the list and click on the delete button.
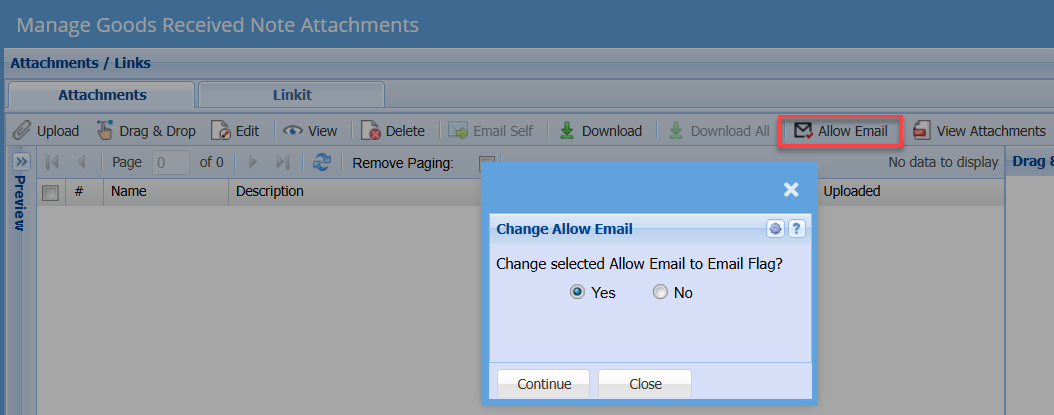
Allow Email
View Attachment
To view all attachments in document
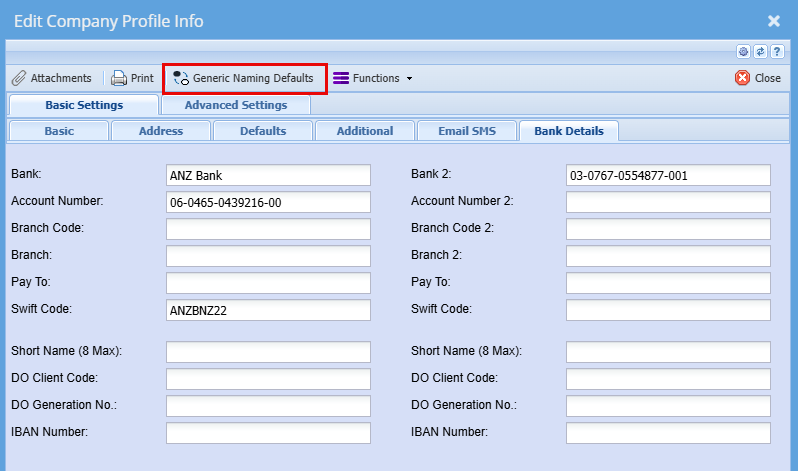
Generic Names Button
Generic name allows you to change some of the generic language tags to suit your needs.
The remaining Generic fields can be used for any addition properties as required.
On the Inventory Detail window on the More Details 2 tab these 9 generic fields will be found where the addition properties data can be captured.
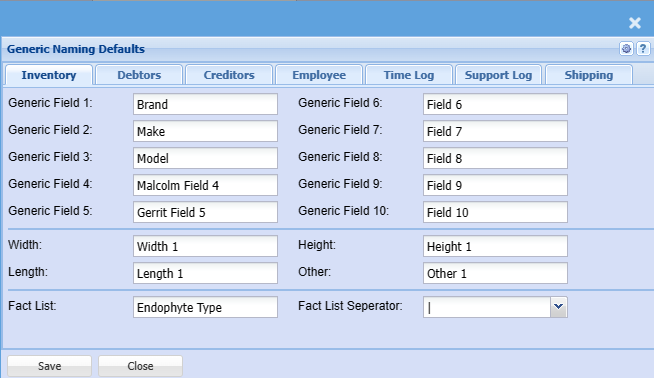
Inventory Tab
| Generic Field 1 | Brand dropdown |
| Generic Field 2 | Make dropdown |
| Generic Field 3 | Model dropdown |
| Generic Field 4 | Generic text field 1 |
| Generic Field 5 | Generic text field 2 |
| Generic Field 6 | Generic text field 3 |
| Generic Field 7 | Generic text field 4 |
| Generic Field 8 | Generic text field 5 |
| Generic Field 9 | Generic text field 6 |
| Generic Field 10 | Generic text field 7 |
| Width | Width |
| Length | Length |
| Height | Height |
| Other | Other |
| Fact List | Create a generic list of facts and predicted values |
| Fact List Seperator |
Allow one to separator the lists This is used in the import and export of the lists |
Provision has been made for 9 generic inventory item property names.
The first 3 names are related to each other and therefore the data that is named Generic 3 will be dependent on the data that will be named by Generic 2 which in turn will be dependent on the data that will be named in Generic 1.
Example : Motor Vehicles
|
Generic 1 - Brand |
Generic 2 - Make |
Generic 3 - Model |
|
Ford |
Fiesta |
Ambiente |
|
|
|
Trend |
|
|
|
Titanium |
|
|
|
Fieste ST |
|
|
Ranger |
Single Cab |
|
|
|
Super Cab |
|
|
|
Double Cab |
|
|
|
Wildtrak |
|
|
Figo |
1.4 Ambiente |
|
|
|
1.4 TDCi Ambiente |
|
|
|
1.4 Trend |
|
|
|
|
|
BMW |
1 Series |
3 Door Model |
|
|
|
5 Door Sport Hatch |
|
|
|
Coupe |
|
|
|
Convertable |
|
|
3 Series |
Sedan |
|
|
|
Coupe |
|
|
|
Convertable |
|
|
|
Gran Turismo |
Debtors Tab
In debtors setup, change the registration field names.
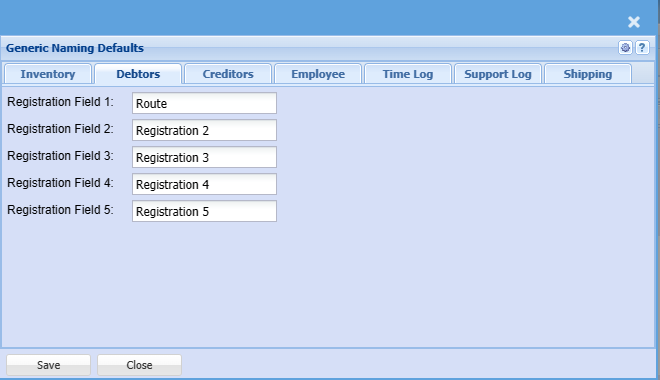
| Registration Field 1 | Registration Field 1 |
| Registration Field 2 | Registration Field 2 |
| Registration Field 3 | Registration Field 3 |
| Registration Field 4 | Registration Field 4 |
| Registration Field 5 | Registration Field 5 |
Creditors Tab
In creditors setup, change the registration field names.
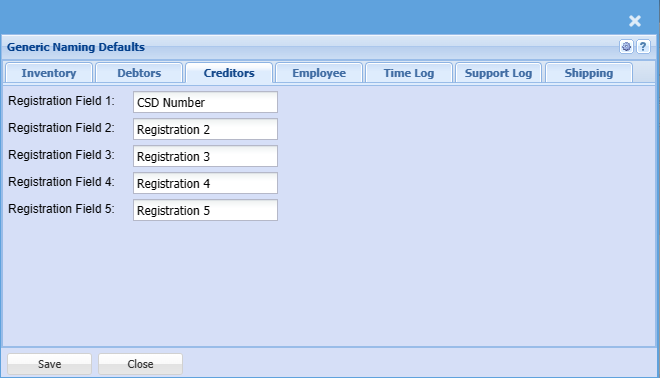
| Registration Field 1 | Registration Field 1 |
| Registration Field 2 | Registration Field 2 |
| Registration Field 3 | Registration Field 3 |
| Registration Field 4 | Registration Field 4 |
| Registration Field 5 | Registration Field 5 |
Employee Tab
In user setup, change the registration field names.
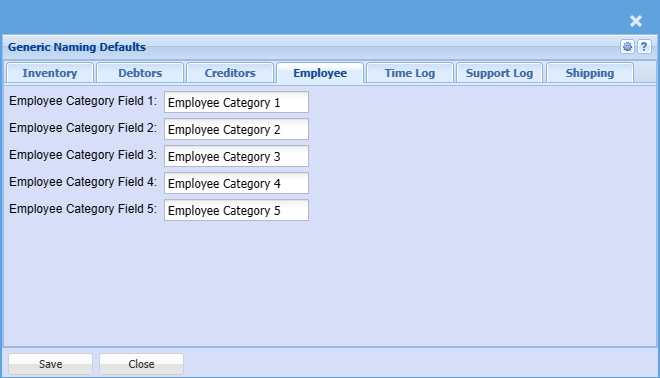
| Employee Category Field 1 | Employee Category Field 1 |
| Employee Category Field 2 | Employee Category Field 2 |
| Employee Category Field 3 | Employee Category Field 3 |
| Employee Category Field 4 | Employee Category Field 4 |
| Employee Category Field 5 | Employee Category Field 5 |
Time Log Tab
In Time log, change the registration field names.
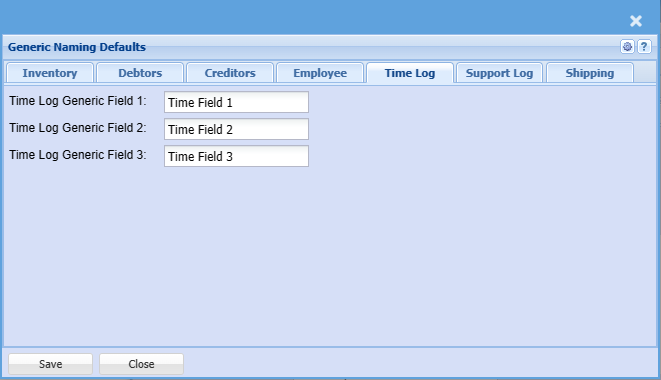
| Time Log Generic Field 1 | Time Field 1 |
| Time Log Generic Field 2 | Time Field 2 |
| Time Log Generic Field 3 | Time Field 3 |
Support Log Tab
In Support Log, change the registration field names.
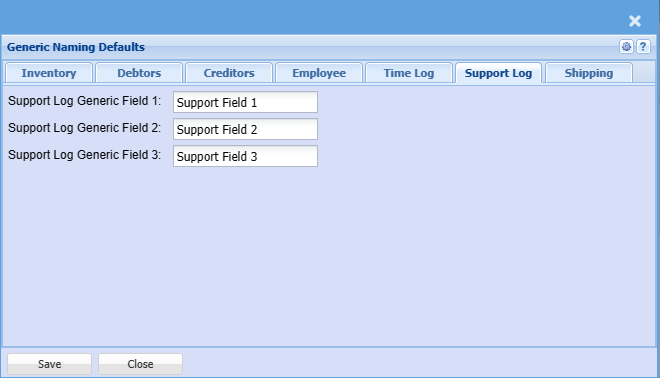
| Support Log Generic Field 1 | Support Field 1 |
| Support Log Generic Field 2 | Support Field 2 |
| Support Log Generic Field 3 | Support Field 3 |
Shipping Tab
In Debtors and creditors shipping information, change the registration field names.
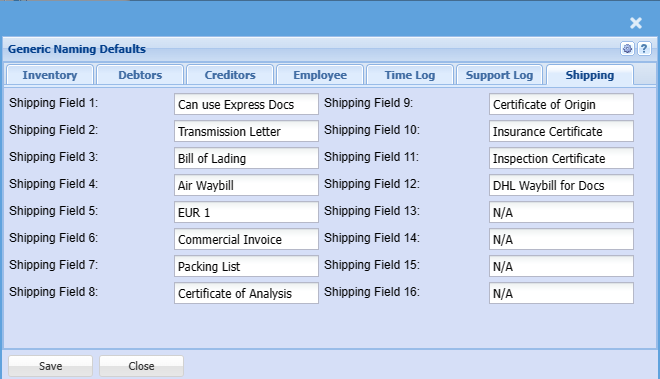
| Shipping Field 1 | Can use Express Docs |
| Shipping Field 2 | Transmission Letter |
| Shipping Field 3 | Bill of Lading |
| Shipping Field 4 | Air Waybill |
| Shipping Field 5 | EUR 1 |
| Shipping Field 6 | Commercial Invoice |
| Shipping Field 7 | Packing List |
| Shipping Field 8 | Certificate of Analysis |
| Shipping Field 9 | Certificate of Origin |
| Shipping Field 10 | Insurance Certificate |
| Shipping Field 11 | Inspection Certificate |
| Shipping Field 12 | DHL Waybill for Docs |
| Shipping Field 13 | N/A |
| Shipping Field 14 | N/A |
| Shipping Field 15 | N/A |
| Shipping Field 16 | N/A |
Functions Menu
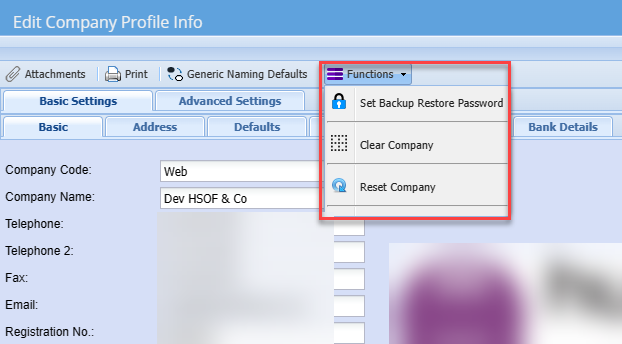
Set Backup and Restore password
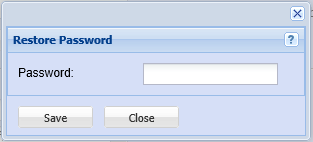
For security reasons this password is only valid once and does not remain in memory.
To setup your temporary password click on the Restore Password Button
Type in your password and click on Save and then on close
Clear Company
Use this to clear all Transactions in the system but retain the master data
Reset Company
WARNING: Do not use this button unless you want all your data reset to zero. This is used when you have multiple companies to setup which use the same master information as your current company.
Basically you will back up the company, set up a new company and restore the backup. Then click on this button to reset
The following menu will come up, tick the necessary Modules to reset and click on Continue button. The system will asks whether you are sure before you proceed. Once this has being done only a backup will help restore your data.
Ensure you have a backup before proceeding.
Scheduled Tasks
System configuration>Administration> Company Profiles> Schedule setup> Scheduled Tasks
Scheduled Tasks
The grid will display all Tasks that have been created for scheduling.
The Active and Status column will indicate whether the Task is currently scheduled or not.
Email notification
The Recipients column will indicate the number of email recipients has been set up for this particular Task.
Please note not all Tasks have an emailing function so therefore the setup Recipients will not receive email from this Task.
Clicking on the button in the Email List column will open the window to select and unselect email recipients for this Task.
The Insert and Delete Schedule buttons are only available for the system’s Super User to access, for all other users these buttons are disabled.
Start and Stop Schedule buttons are as the button names indicate. These buttons allow users to start and stop various tasks as they require them
Scheduled Tasks list
| API Stock Import | |
| Asset Tracker Send Available Return Date Emails | |
| Asset Tracker Send Available Vehicle Due Date Emails | |
| Auto Badger Import | |
| Auto Bulk emailing Processed Invoices | |
| Automatic Invoicing Process | |
| Below Max Level Report | Check items below Maximum level |
|
Below Min Level Report |
Check items below Minimum level |
|
Below Preferred Qty Level Report |
|
|
Below Re-Order Level Report |
|
| Cancel Expired Quotes | Automatically cancel expired quotes |
| Cancel TrackIT Warranty | Automatically cancel asset and TrackIt item warranties |
| Change Recurring Transaction Status | |
| Check PO to GRV Intervals | Check to see Purchase orders to GRV outstanding |
| Creditors Payment Batch Update | |
| Customer Account on Hold | |
| Daily Inventory Valuation Report | Run a daily inventory valuation report. This is saved under the inventory valuation documents. If you are running in stock this should be a required scheduled task. |
| Daily Stock Control Report (WIP Values) | Run a daily stock control report. This is saved under the inventory valuation documents. If you are running in stock this should be a required scheduled task. |
|
Daily Time Log Figures |
Send information on daily time log figures to see if clients are on schedule to budget |
|
Daily WIP Journal |
|
| Debit Order pending message | |
| Email Daily reminders | Email Daily reminders to users |
| Email In Progress Sales leads Alerts | Email in progress sales leads to managers |
| Email Open Service Requests | Email open service requests summary |
| Emailing Schedule | Activate bulk email scheduling. This will email invoices done on a daily basis out to customers |
| Escalate outstanding reminders | Email reminders that have been escalated and are outstanding |
| Exchange Rate Update Fixer | Update the exchange rate on a daily basis using the Fixer API |
|
Export Schedule |
Activate the daily export schedule generally used for Power BI data Analytics |
| Fixed Asset Depreciation Schedule | Run the fixed asset depreciation |
| Monthly Invoices | (View Details) |
| Recurring GL Journal Auto Processing | |
| Recurring GRV Auto Processing | |
| Retention Invoice Auto Processing | |
| Retention Invoice Email Notification | |
| SL Budget Alert | |
| SL Daily Log Figures | |
| Time Log Budget Alert | |
| TimeLog Budget recalculate | |
|
Timelog GPS import |
|
| Timelog GPS Report | |
| Weather Regions Forecast update | |
Monthly Invoices
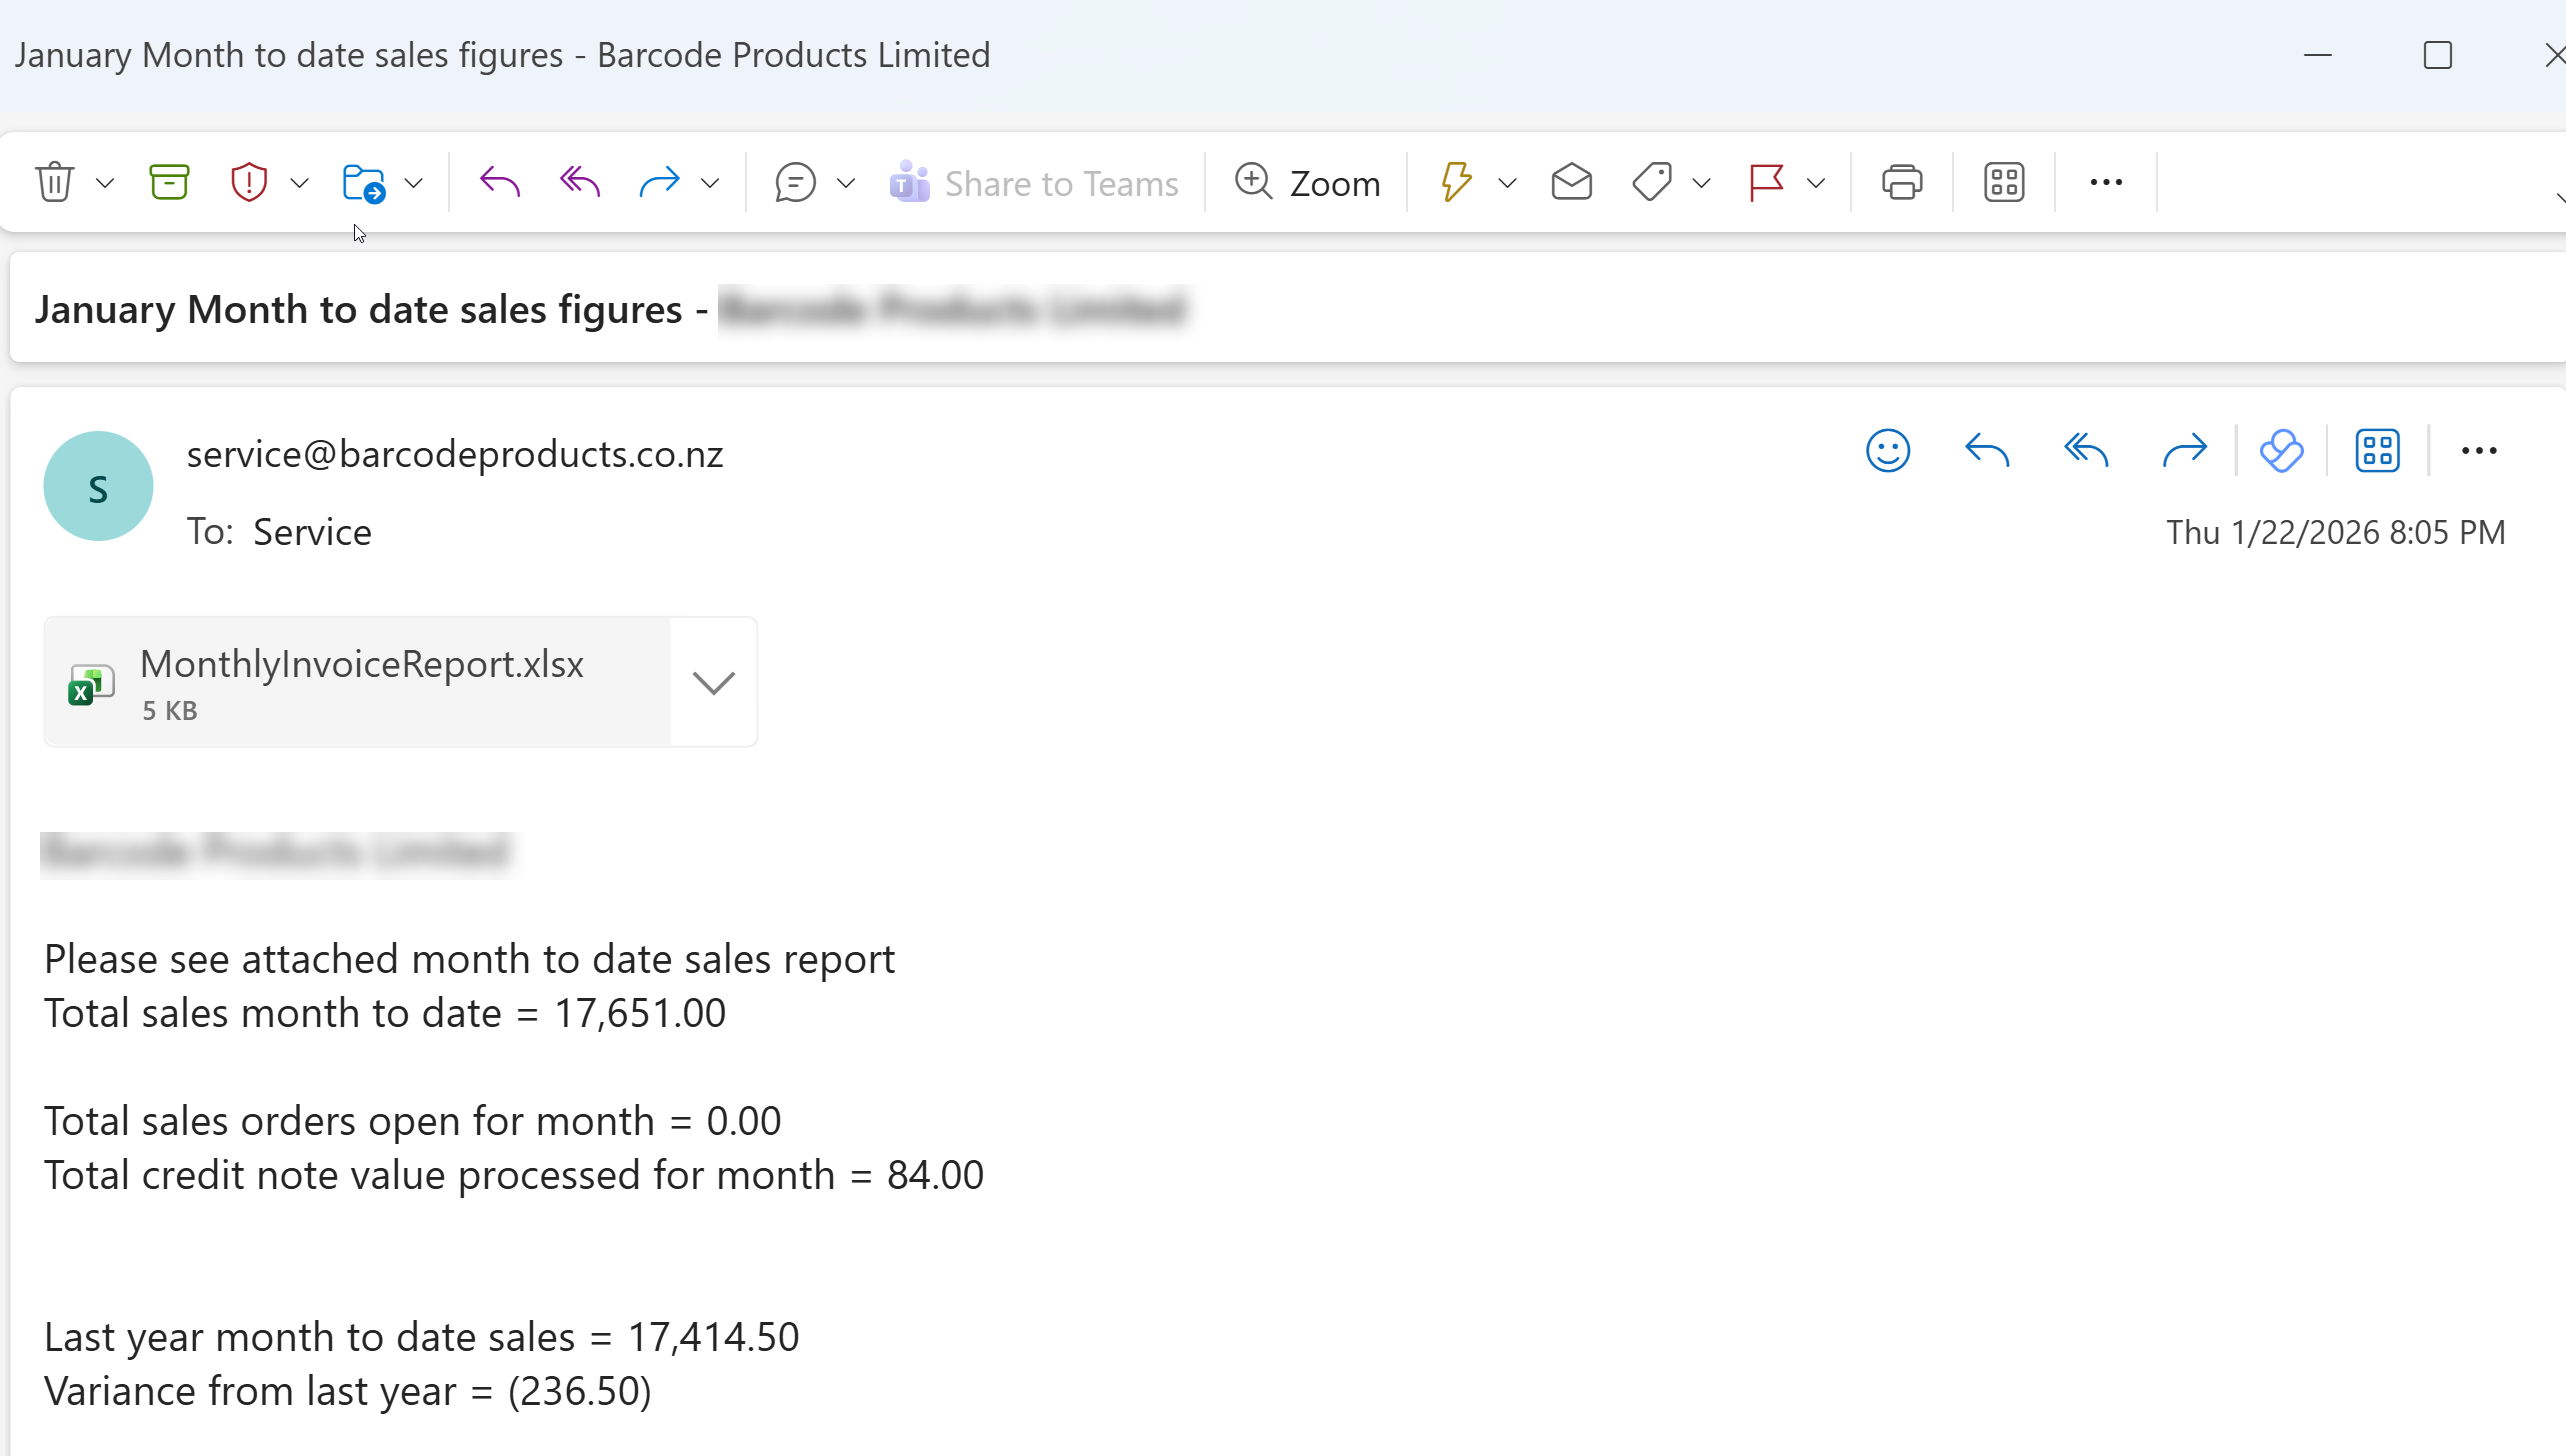
Setup Monthly Invoices
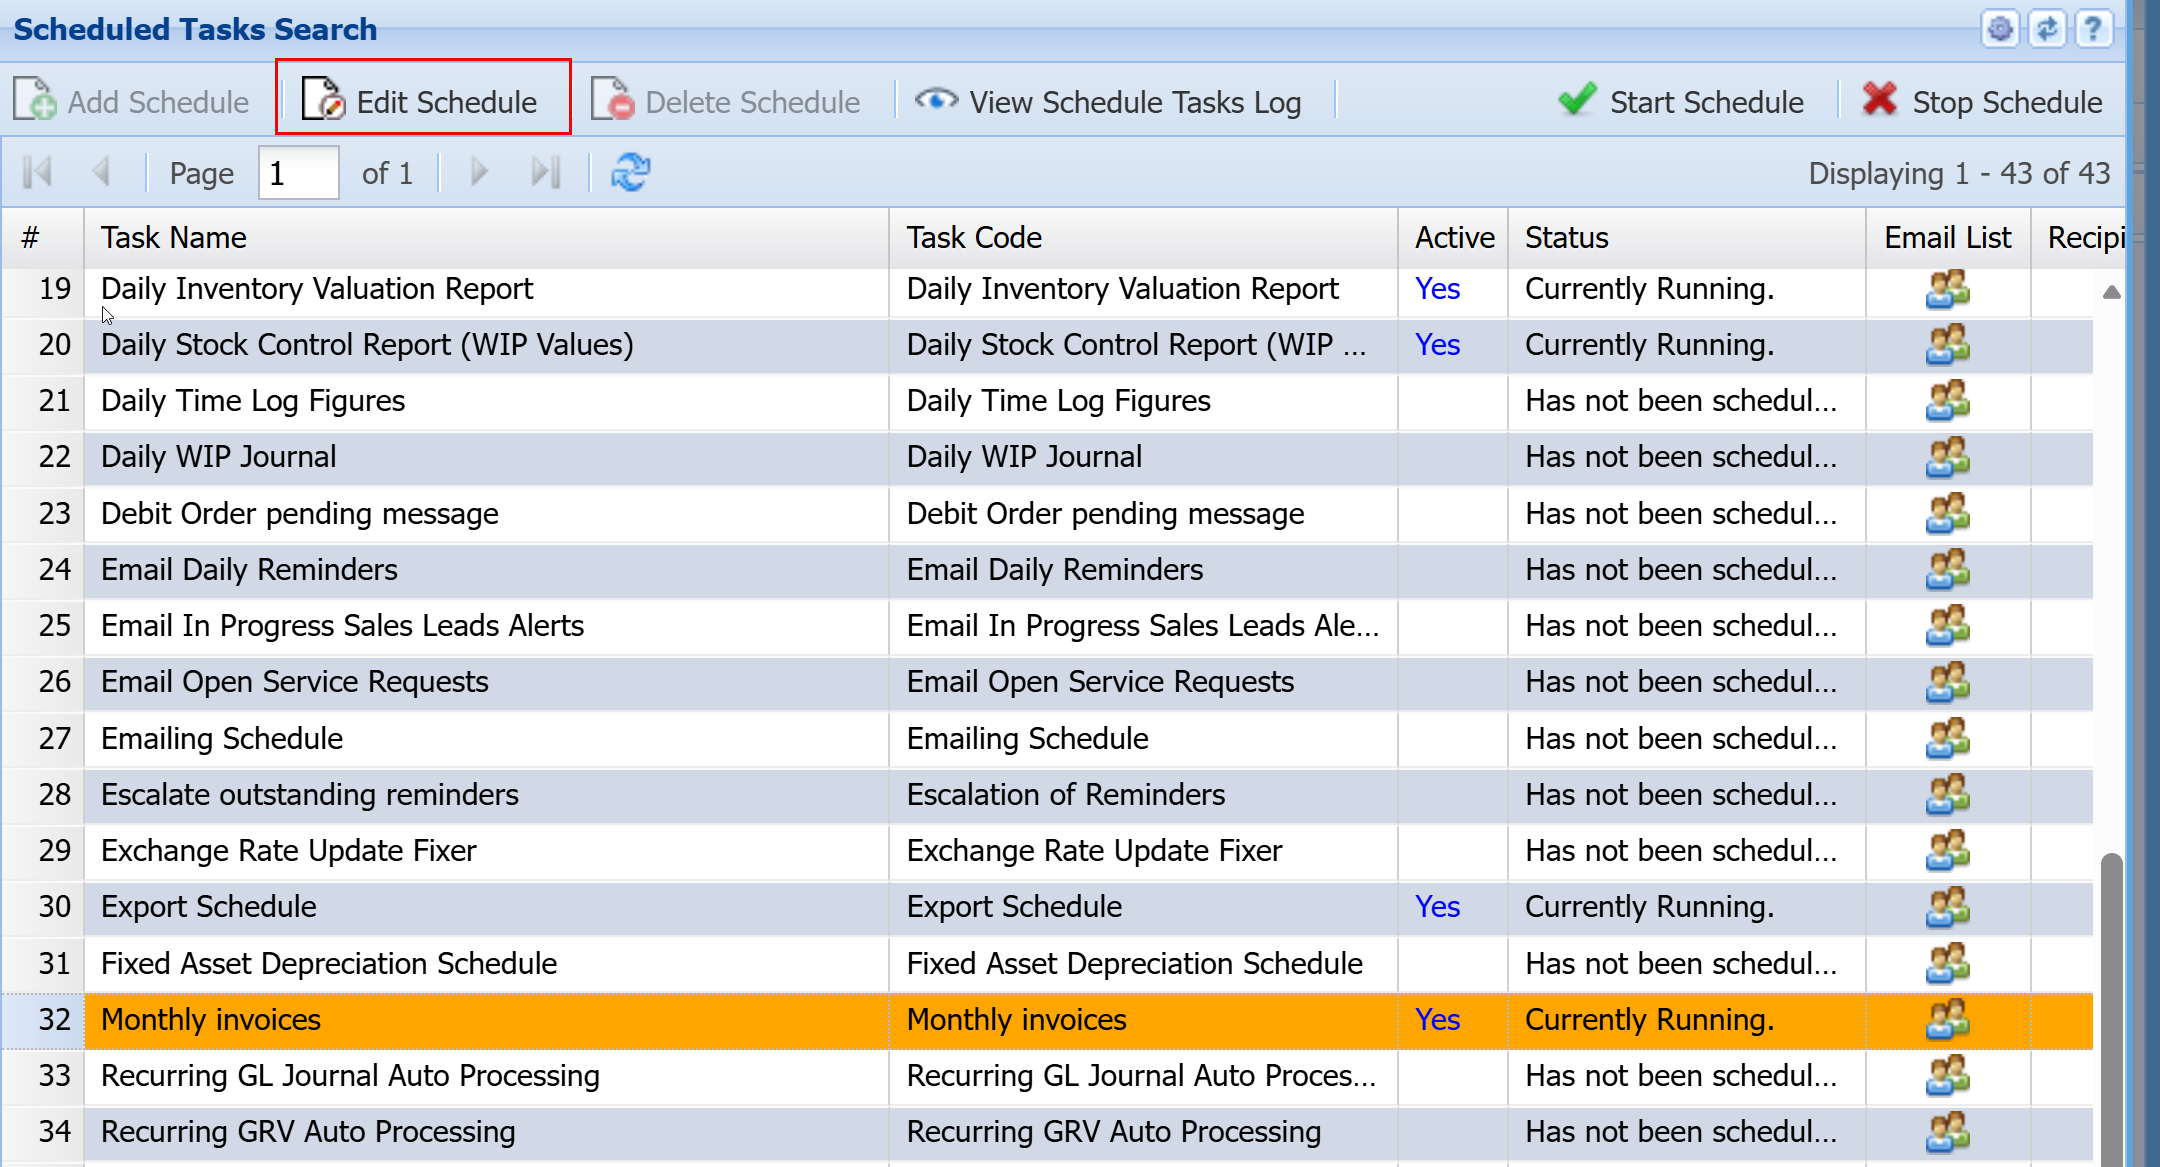
System configuration>Administration> Company Profiles> Schedule setup> Scheduled Tasks
Select the Schedule you want to activate, then click Edit Schedule at the top
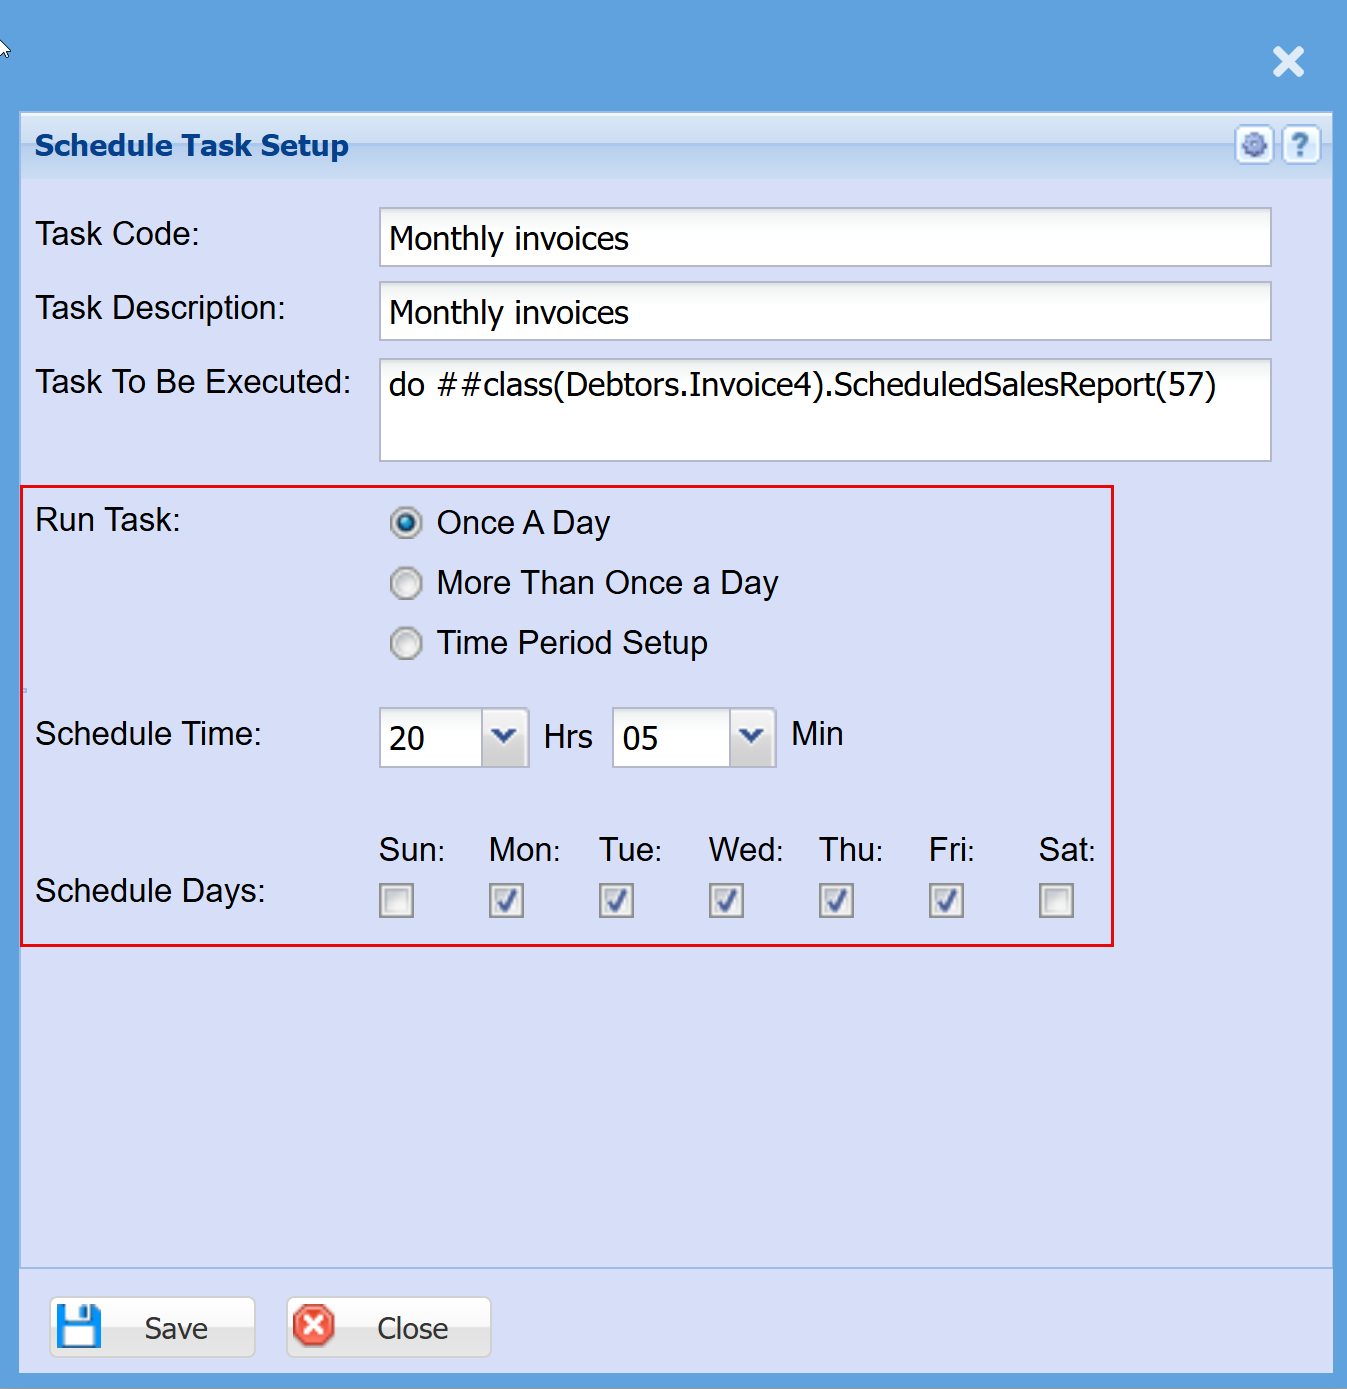
Make the changes to suit your requirements for the below:
- Run Task
- Schedule Time
- Schedule Day
Click "Save"
Schedules Report
System configuration>Administration> Company Profiles> Schedule setup> Scheduled Tasks
There's a new scheduled report which logs any active scheduled tasks .
The reason for this log is that when we are restoring the backup or moving the company to another server. We then tend to lose what the active scheduled tasks were, the reason we lose this is because the scheduled tasks are created in the Cache database.
Manage System Emails
Manage who receives emails when system is sending out emails
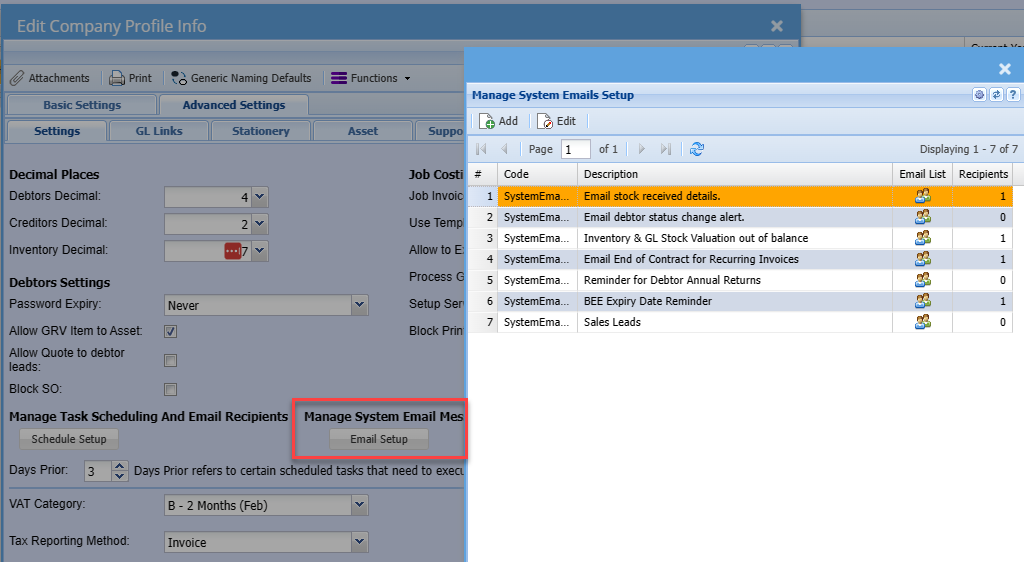
| Email stock received details | |
| Email debtor status change alert | |
| Inventory & GL Stock Valuation out of balance | |
| Email End of Contract for Recurring Invoices | |
| Reminder for Debtor Annual Returns | |
| BEE Expiry Date Reminder | |
| Sales leads |
Escalation and Debit Order Message Setup
Escalation Setup
To ensure that the escalation of outstanding reminders works correctly it is essential that each employee in the system that receives reminders has a manager assigned to him or her.
To assign a manager to the employee go to System Configuration -> General -> User Setup.
Search for the desired employee and click amend.
Go to the User Details 2 tab, find the Manager box and click on the [...] button.
Search for the desired manager and then click on Select.
Save the employee's details.
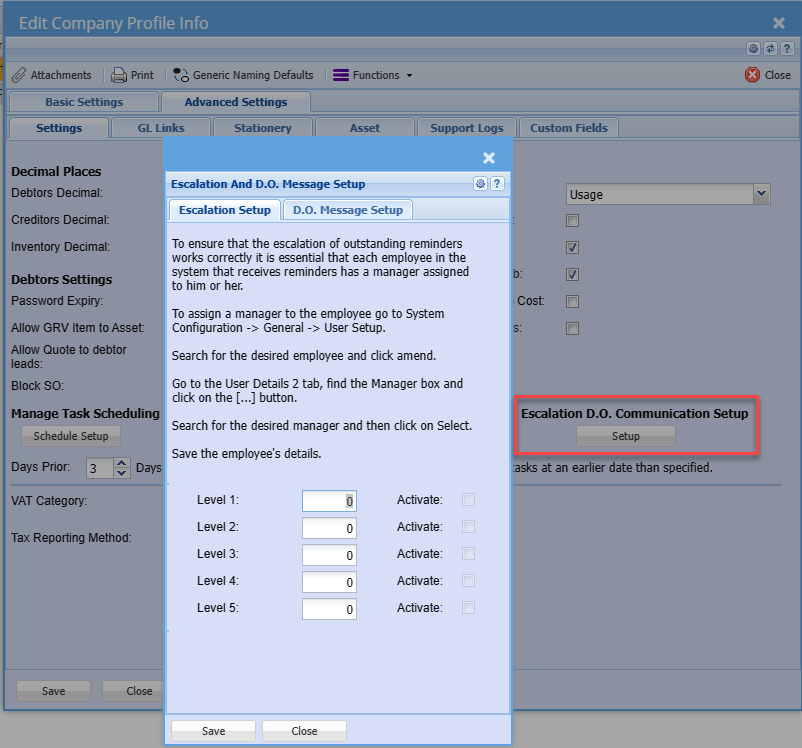
There are five levels of escalation provided for in the system.
In the Level 1 box enter the number of days that will be allowed for the recipient of a reminder to take the necessary action required by the reminder and to complete the reminder before it will be escalated to the recipient’s manager.
E.g. If the reminder date for the reminder is the 5th and the Level 1 value is 3 then the escalation date will be the 8th allowing the recipient 3 days to complete the reminder. So therefore as a rule based on the above example all reminders will be escalated to the first level manager 3 day after the reminder date if it has not been completed.
Level 2 through 5 can be setup to escalate to the next management level by various day increments e.g. 10 days to the 2nd Level 15 to the 3rd level etc.
The tick boxes are to be selected to actually activate the level’s escalation.
Debit Order Message Setup
The Debit Order Message is to provide a mechanism whereby an email message, sms message or both can be sent to a selected contact person/persons at a company a predetermined number of days before the debit order is due to ensure that sufficient funds will be available in the debtor’s bank account on the debit order date.
There is a tick box for both messages types to enable either one or both.
Enter the number of days before the debit order is due, that the message must be sent.
With the scheduler activated this mechanism will run every day or night and will calculate each time if there are debit orders due on a date calculated from today plus the number of days entered and an email or sms or both will be sent to the identified contact persons.
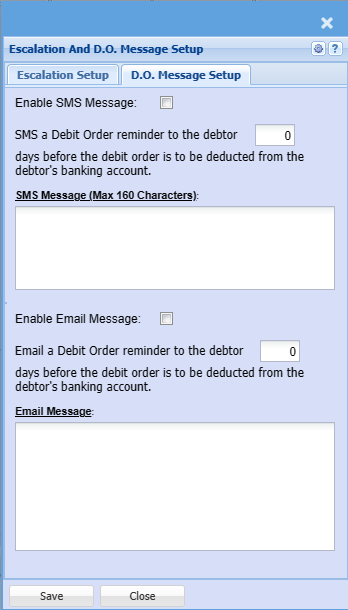
A message box is provided for both email and sms where a custom message can be created that is to be sent.
The sms message is limited to 160 characters and any text exceeding this limit will be removed. There is a counter above the text box displaying the number of characters used.
Special key words have been defined for the messages and will be replaced with actual text for the message. Be very careful when entering these key words as any spelling error will result in the text not being replaced. The square brackets must be included as they are part of the key word.
Key Word Replaced With
[ContactPersonFirstName] Selected contact persons first name
[DebitOrderDate] Debit Order Date
[DebitOrderAmount] The debit order amount to be processed
[CompanyName] Customer name
Example of a SMS Message
This can be copied and pasted into the SMS message box and edited
Hi [ContactPersonFirstName],
On the [DebitOrderDate] the amount of R[DebitOrderAmount] will be processed from the company bank account.
Example of an Email Message
This can be copied and pasted into the Email message box and edited
Dear [ContactPersonFirstName],
Please be informed that on the [DebitOrderDate] the amount of R[DebitOrderAmount] will be processed from [CompanyName] bank account as per the Debit Order agreement.
Please ensure that there are sufficient funds available in the account to cover this amount.
Regards
Huge ERP Accounts Department.
Branch More Details
COMPANY DETAILS
In the company profiles you will find the basic information required to input your company information. This is also the section where the logo appears on the company details will be printed in your documents like invoice.
System Configuration>Administration>Company Profiles
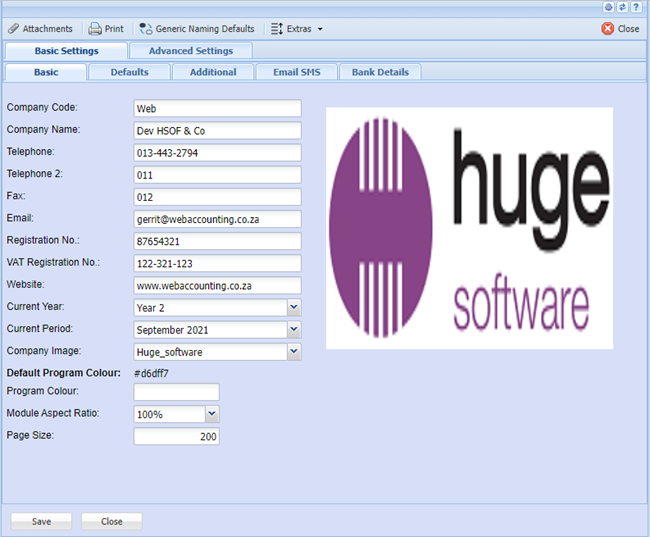
Branch Details Tab
In this tab of company details, fill in all your information on your company. You will notice that there is no logo present and when you click on the Company Image drop down arrow it is blank. This will show when you go to the attachments tab to upload a logo.
Addresses Tab
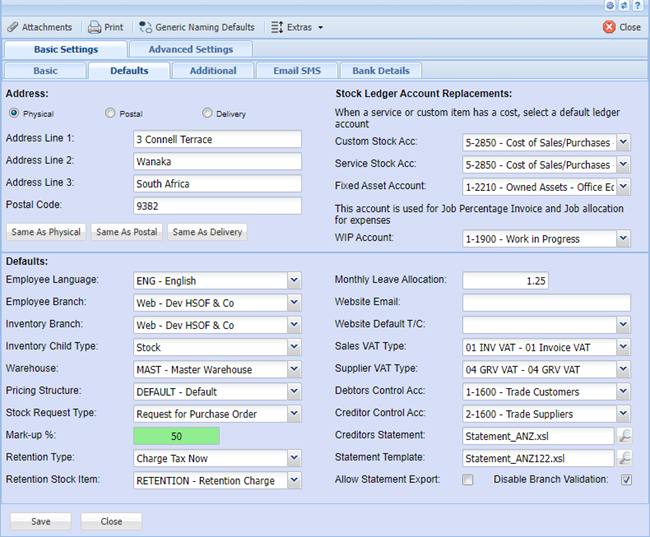
Under the Addresses tab you should fill in all your address information of your company.
Buttons
| As Physical | Will copy the details of information under the Physical |
| As Postal | Will copy the details of information under the Postal |
| As Delivery | Will copy the details of information under the Delivery |
Bank Details Tab
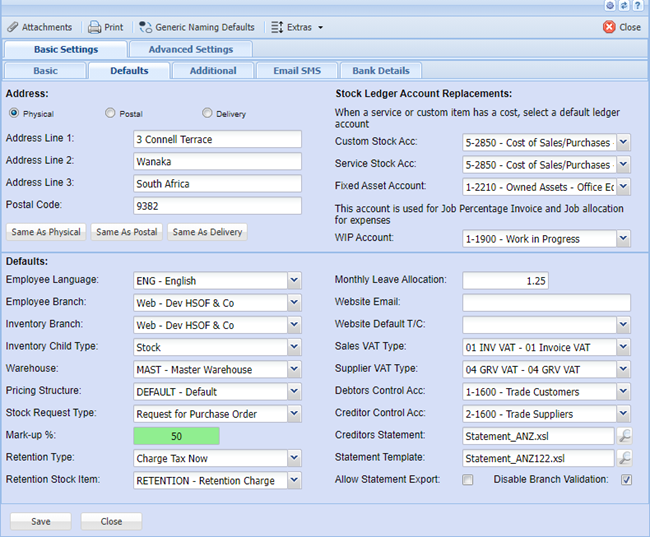
Under the Bank Details tab please fill in your company Bank Details.
Note: This will appear on your documents, for example invoice.
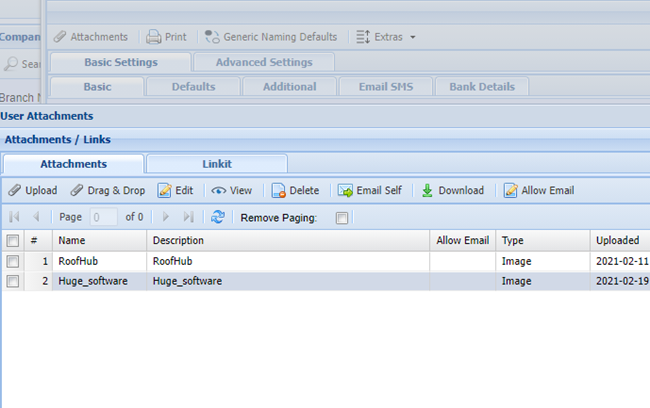
To view the attachment, you highlight the file you wish to view and click on View Attachments button.
This will download and open the file up in your browser and specific program it was saved in.
To remove attachments from the list, highlight the file in the list and click on the Remove Attachments button.
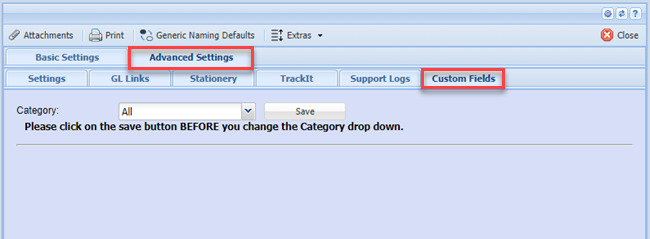
Custom Fields Tab
Under the Custom Fields tab, this is where you can insert predefined user fields. Add as many custom fields as you require for additional information.
Defaults Tab
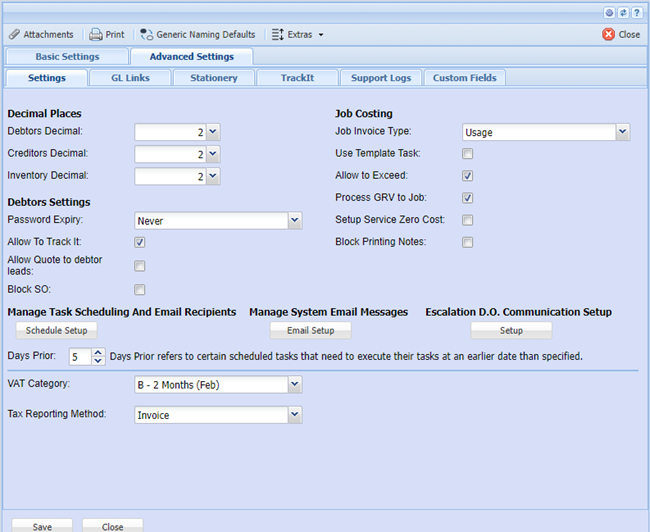
Under the Default Values tab, these are very important values to take note of:
| Inventory Branch | If the User is part of the branch selected, this will mean that when new inventory items are created the default branch will be the one selected. This enables the system to sort inventory by branch and only allow users to see those inventory codes linked to the branch selected. |
| Employee Branch | If the User is part of the branch selected, this will mean that when this employee creates a new employee the default branch will be the one selected. |
| Tax Type | The tax type selected here for the branch will mean that when new inventory items are created the default tax type will be the one selected. |
| System Currency | Once you have set your default System Currency all conversions will be based off this Currency. When setting up multi-currency rates your System Currency should have a rate of 1 (one). The system currency is setup when you first install the accounting package. It cannot be changed afterwards. |
| Markup % | The markup percentage selected here for the branch will mean that when new inventory items are created the default mark up for inventory will be the percentage number entered. |
| Employee Language | If the User is part of the branch selected, this will mean that when this employee creates a new employee the default Language will be the one selected. |
| Pricing Structure | The pricing structure selected here for the branch will mean that when new inventory items are created the default pricing structure will be the one selected. |
| Inventory Child Type | The inventory child type assists the user entering line inventory items to default to this inventory category. Example – If your business is mostly stock – select stock category, if your business is mostly in the service industry and your inventory setup is mostly service – select service category. |
| Current Year | Select the year to which reports will default to, normally current. It is suggested to change this on an annual basis so your report defaults will read current. |
| Current Period | Select the period to which reports will default to, normally current. It is suggested to change this on a monthly basis so your report defaults will read current. |
| Default Warehouse |
This is the default warehouse that the system will use when entering documents example invoice stock lines. We assume it to be master warehouse where all stock is received. Note: If you do not have multi-warehouse module all stock will come in and out of Master warehouse. |
| Auto Resize Picture |
Should your picture in Company Details be too big for the size of the block. You can tick this option to force a resize according to our specified width and height. |
| Custom Stock Acc |
Select a ledger account here. This is where your custom type inventory has a cost attached to it. The ledger account updated cannot be stock control ledger account as this is not a stock item. Only stock items should update the stock control account. The account select here will replace the stock control ledger account and assign the costs to that account. This default account will automatically be inserted when you created a custom inventory item. You can however override the account at the inventory setup level. |
| Service Stock Acc |
Select a ledger account here. This is where your Service type inventory has a cost attached to it. The ledger account updated cannot be stock control ledger account as this is not a stock item. Only stock items should update the stock control account. The account select here will replace the stock control ledger account and assign the costs to that account. This default account will automatically be inserted when you created a service inventory item. You can however override the account at the inventory setup level. |
| DM Terms & Cond |
Stands for Debtors Module Terms and Conditions – The item selected here means that when creating a quote, sales order, invoice or credit note it will insert your standard terms and conditions. You can however override the account at the creation of the document level. |
| CM Terms & Cond |
Stands for Creditors Module Terms and Conditions – The item selected here means that when creating a Purchase Order, Goods Received notes or Goods Returned notes it will insert your standard terms and conditions. You can however override the account at the creation of the document level |
| Help Name Space |
There is a separate installation of a full online help file which contains movie files of the manual. Enter the namespace that the installation was created in. You only need to install one help file and setup all new companies to point to the 1 help install. |
| Job Invoice Type |
When using job costing module and you are creating an invoice for the job you can automatically setup the default invoice type. This can be percentage or usage, set the default that your business mostly uses. You can however override the invoice type at the creation of the job invoice. |
| Use Template Task |
When using job costing module and you are authorizing a quote to job status. This setting will automatically be set for you. You can however override the choice at the authorization process. |
| Allow to Exceed |
When using job costing module and you are authorizing a quote to job status. This setting will automatically be set for you. You can however override the choice at the authorization process. |
Details 2 Tab
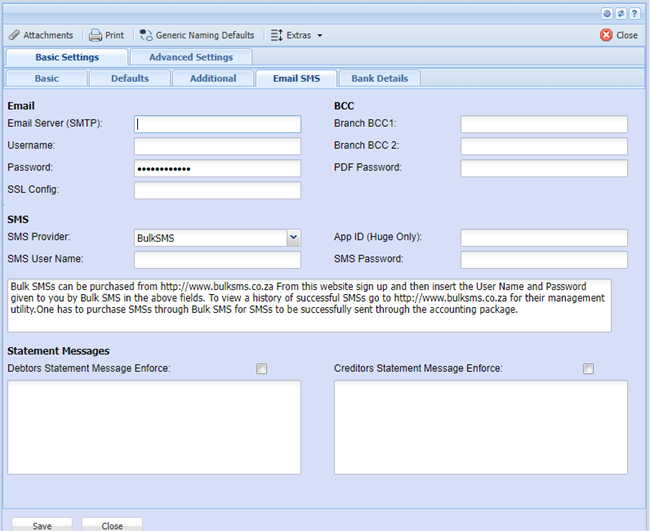
Under the Details 2 tab, this is where you can setup you outgoing pop3 mailbox settings.
Note: This only works if you are on a network with a mailbox setup, does not work if you are a dial up client with mail. You will have to insert your service providers pop3 setting and your username and password.
Enter all the information relevant, we also accommodate 2 blind copies of all email sent from accounting package within the company to a specific person who would want access to this. Normally the Managing Director and or Financial Director.
| Debtor Statement Msg | Stands for Debtor Statement Message, if the tick box is ticked and a message inserted it will mean that a message will be added to all Debtors statements going out | Note: An Individual message for a specific debtor can be setup at the debtor level. If this is done and you also have selected a global message, that debtor will have both messages on it. |
| Creditor Statement Msg | Stands for Creditor Statement Message, if the tick box is ticked and a message inserted it will mean that a message will be added to all Creditors statements going out. | Note: An Individual message for a specific Creditor can be setup at the Creditor level. If this is done and you also have selected a global message, that Creditor will have both messages on it. |
Decimals Tab
| Decimal Places |
You can set your decimal places to read up to 9 digits long. Note: When you Process anything into your books the system will retain the original decimal places you specified. |
| Decimal Places | Affects General Ledger, Debtors and Job costing Modules |
| CM Decimal Places | Affects the Creditors Module only |
| IM Decimal Places | Affects the Inventory Module only |

Stationery Layout Change
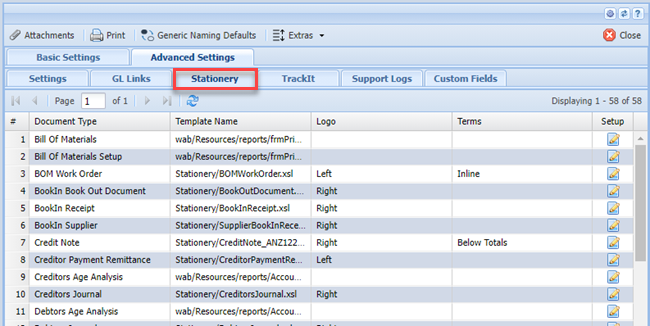
Go to System Configuration >Administration >Company Profiles >Amend the profile and go to More Options >Stationery
You are going to change all 3 quote layouts to be the same (lines 7,8 and 9)
Click on the button with the “…” to lookup the report
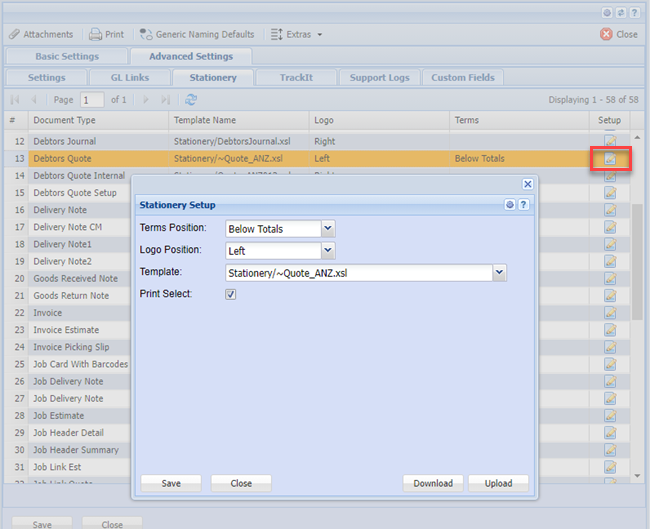
In the file template dropdown, type your search, select this layout. Do this for all three layouts. Click on Save and close till you are back to the module.
You will have to log out and log back in for the new layouts to take affect.
Setting up restore password
System Configuration Module > Administration> Company Profiles> Function Dropdown
More information on this button can be found at Password restore
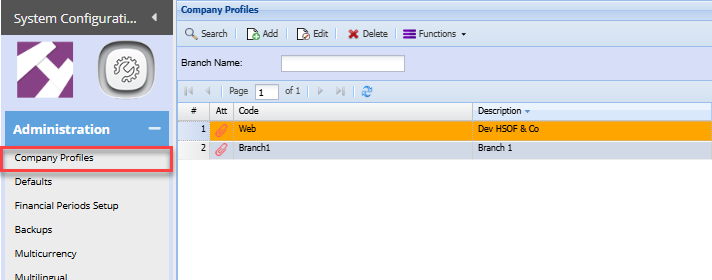
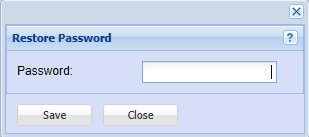
Click on the Functions Drop Down and select Set Backup Restore Password

The window below will pop up and you will enter the restore password
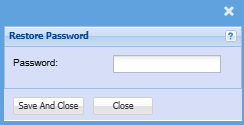
This password will be used for the following reasons:
- Restoring Backups
- Downloading Backups off the system
Customer Access
There are a few areas to take note of when setting up customer access into the package:
| 1 | Branch setup |
| 2 | Branch links to Accounts |
| 3 | Security setup on form |
| 4 | Security form access |
Branch Setup
Create a Branch for the customer so that the customer’s name is the branch.
System Configuration> Administration >Company Profile
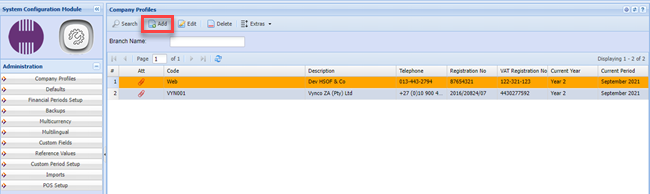
Click on the Add button and create a code and Description for the customer branch
Code: - CUST001
Description - Customer A (name)
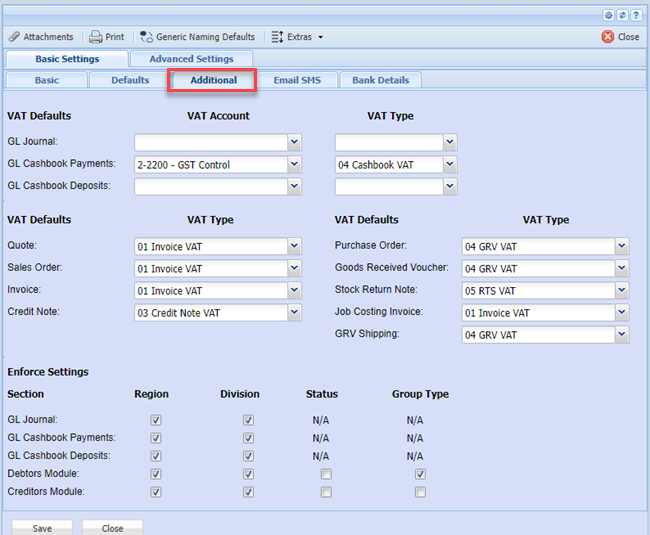
Fill in all the information relevant for the Customer A, you will also have to fill in the details under the “Additional” Button.
Remember to fill in all the information under the Defaults Tab.

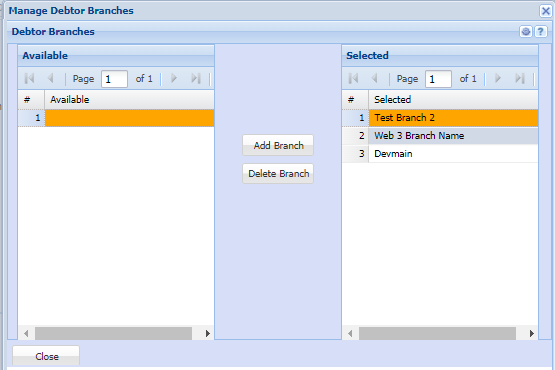
After you have created the branch (Customer Branch), you will notice all setup areas have a button called Branch.
When clicking on that button the following window will appear:
Select which items the customer has access to see by moving the branch from the left column to the right column.
Division and Region enforce
There are several places that the Division and Region is enforced
These are divided into
| 1. Debtors Module | 2. Creditors Module | 3. General Ledger Module |
| All Documents | All Documents | GL, Debtors and Creditors Cashbooks |
| Debtors Journal Transactions | Creditors Journal Transactions | GL Journals |
To enforce Debtors and Creditors Documents
Go to System Configuration>Administration>Company Profiles>Edit>Basic Settings>Additional Tab
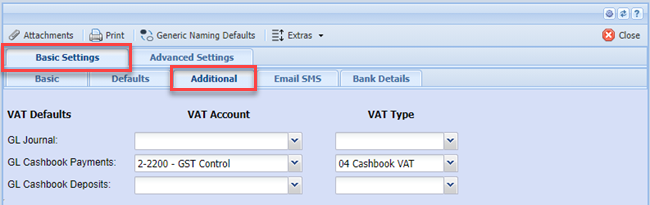
Put the tick on to enforce Division and Region
General Ledger, Debtors and Creditors Cashbooks
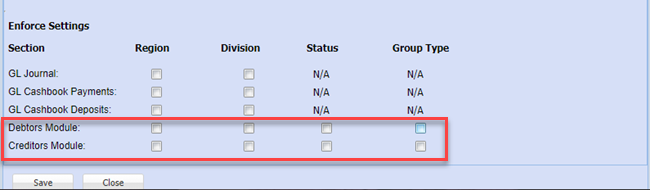
Go to System Configuration>Administration>Company Profiles>edit>Basic settings>Additional tab
One can enforce Division and Region for Cashbooks only on Payments or Deposits
General Ledger Journals
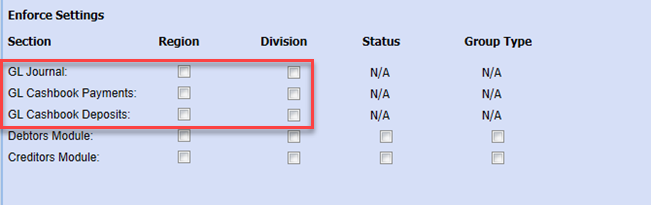
Go to System Configuration>Administration>Company Profiles>Amend>More Options button>GL VAT Info Tab
One can enforce Division and Region for GL Journals
Debtors and Creditors Journal Transactions
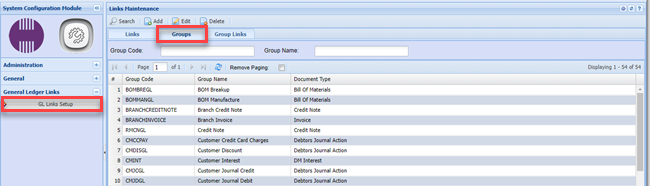
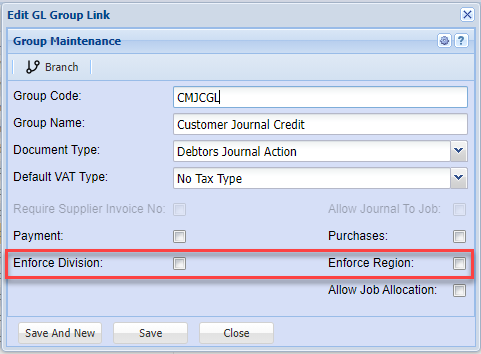
Go to System Configuration>General Ledger Links>GL Links Setup>Groups Tab
Debtors and Creditors Journal Transactions
These enforces are only on the Creditors Journal Actions and Debtor Journal Actions
You will have to enforce on each Journal Action
Programme Background Colour
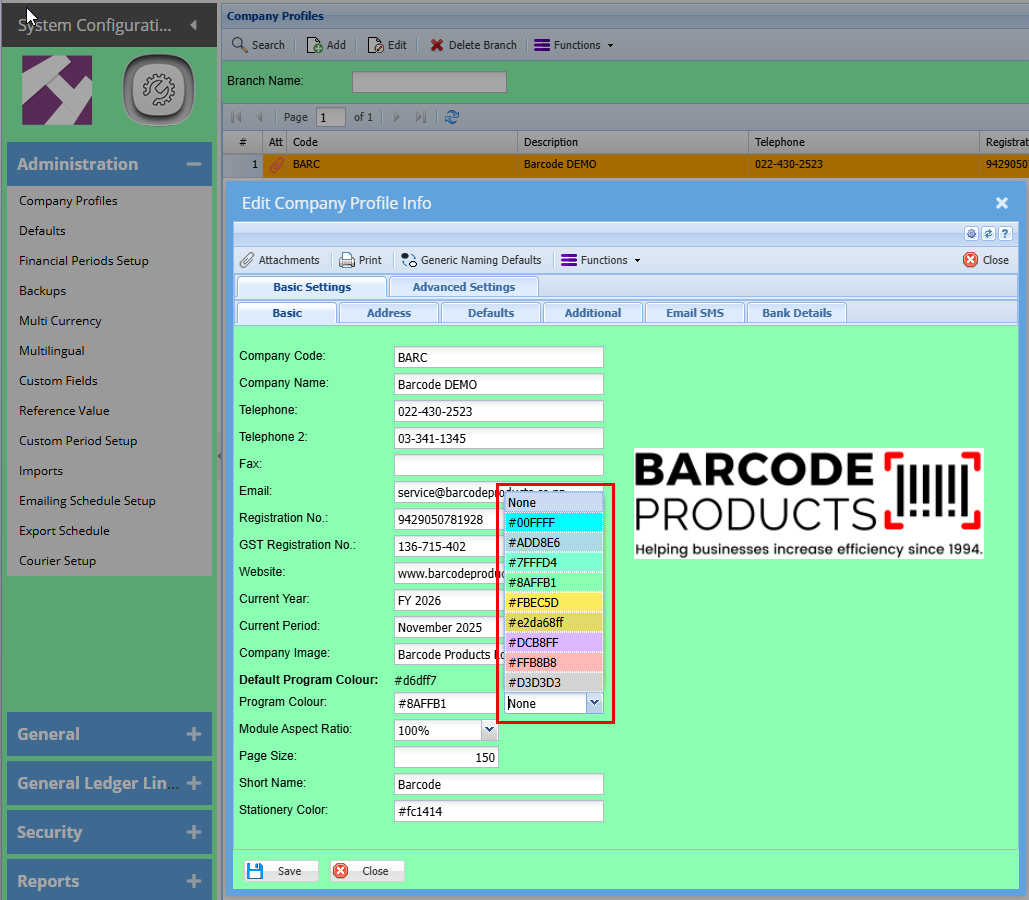
System Configuration> Administration >Company Profile
- Click "Save"
Defaults
Defaults
Defaults
Defaults is found under System Configuration Module
Remember to Save your changes.
Settings here affect the system

System Defaults tab
System Config > Defaults > System Defaults
System Defaults tab have multiple sub functions
Leave Allocation: Time log Defaults
When a person turns leave into a time sheet, the system will use this as the default.
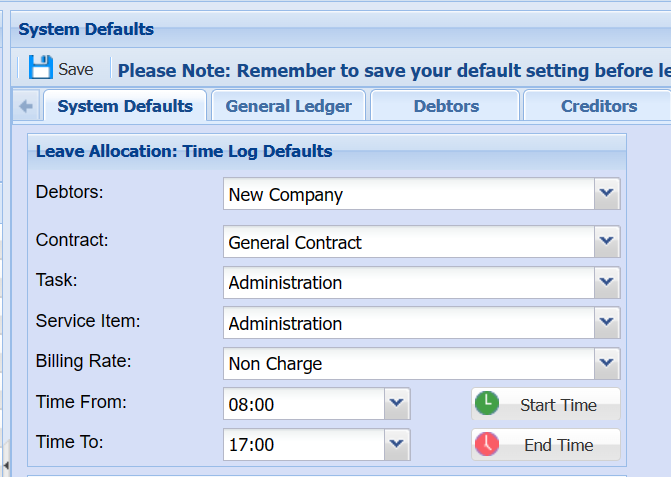
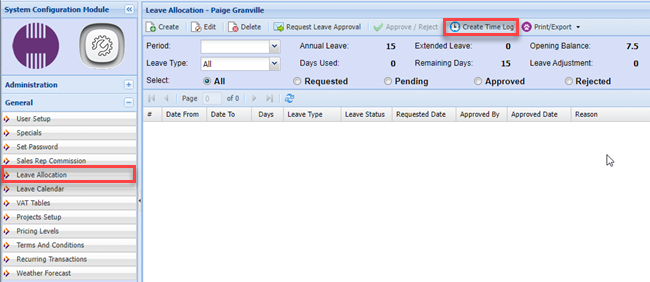
It works with Leave Allocations, when you go to create time log it uses the time log defaults.
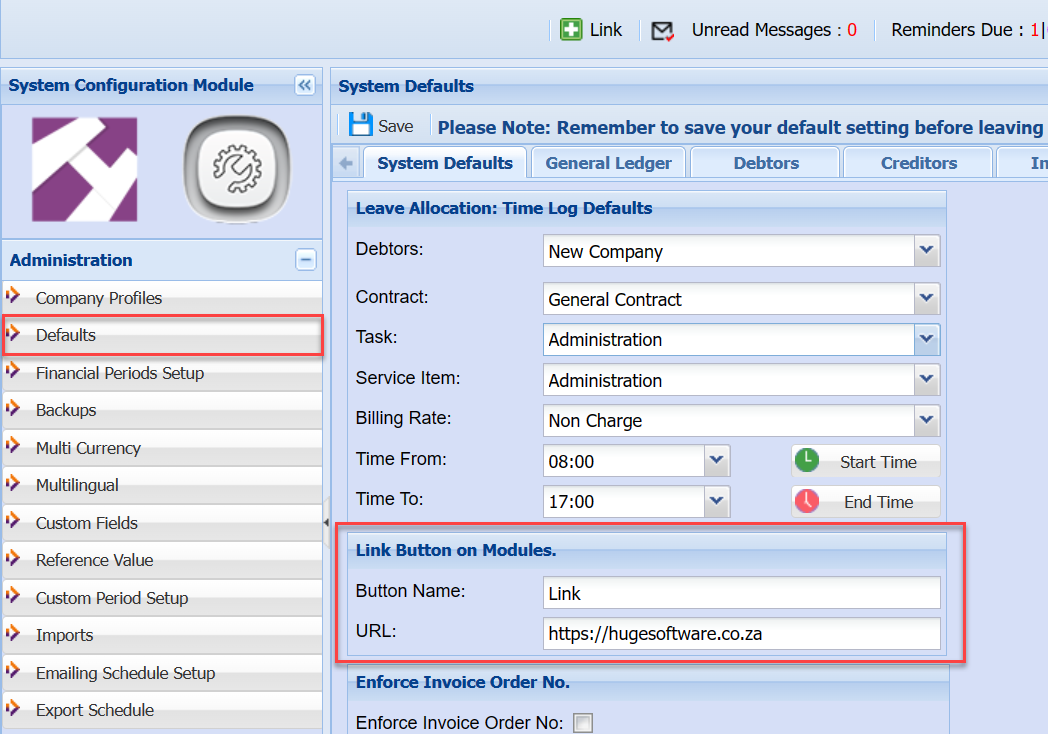
Link Button on Modules
This allows you to change the button name and URL
Create own manual for company

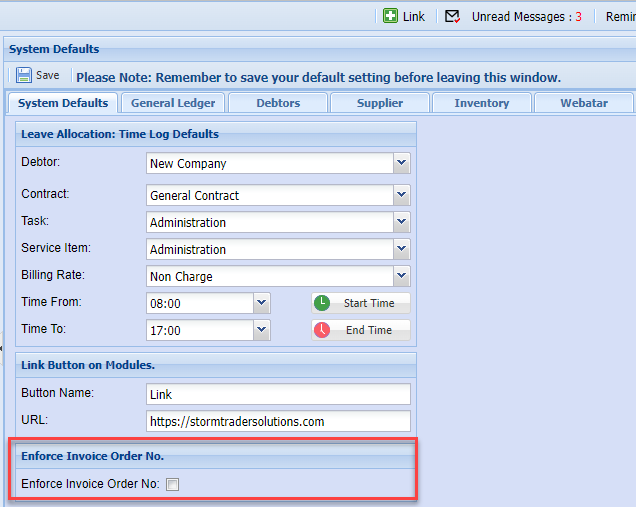
Enforce Invoice Order No
When creating a customer invoice, if the setting is on then it will ask you for an order number on invoice documents.
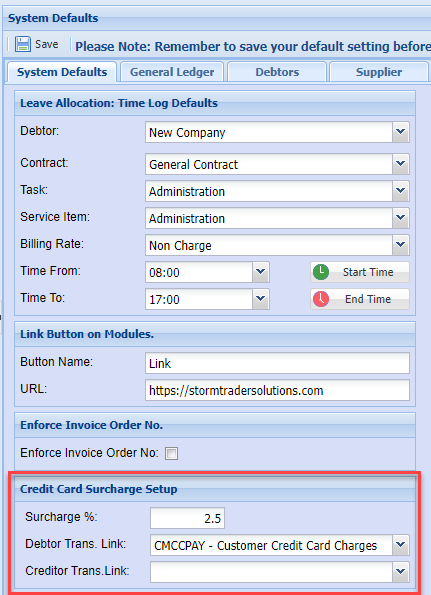
Credit Card Surcharge Setup
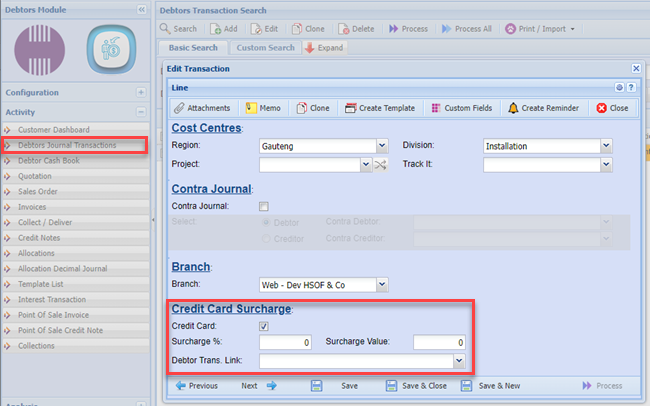
Credit card surcharge is used in the debtors / customer transaction journal.
When a customer makes a payment with a credit card, the system will work out the surcharge on top of the payment.
This will create and additional debtors transaction journal.
After you have saved the journal transaction, proceed to the next screen to view the credit card surcharge.
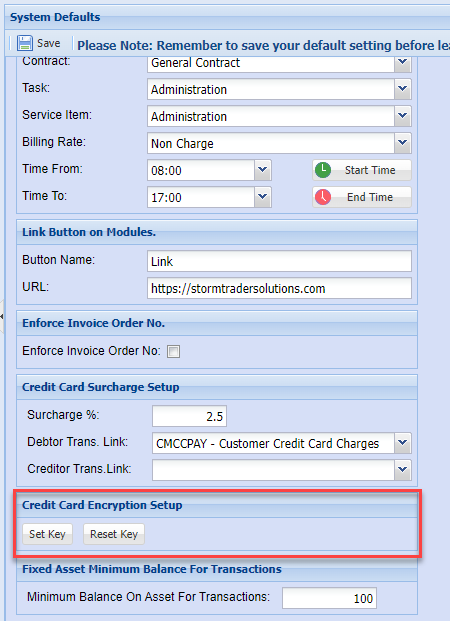
Credit Card Encryption Setup
This is used to set in encryption key to encrypt credit card numbers.
If you lose the key, ask support consultant to reset the key, all previous credit card details will be wiped out.
This is a security feature to ensure their client credit card details are not compromised.
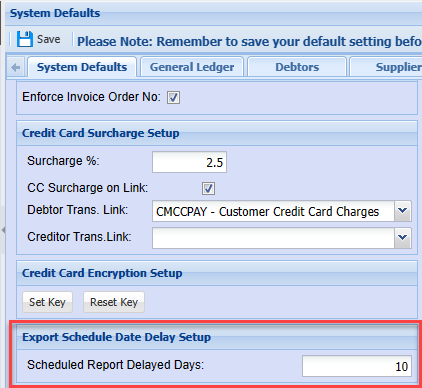
Export Schedule Date Delay Setup
Set the days to be delayed until the scheduled reports for the new month.
Example: Setting the days at 10, means that up to the 10th of a month (using November)
The reports will still report on October month end, after this date it will start to report for November end month
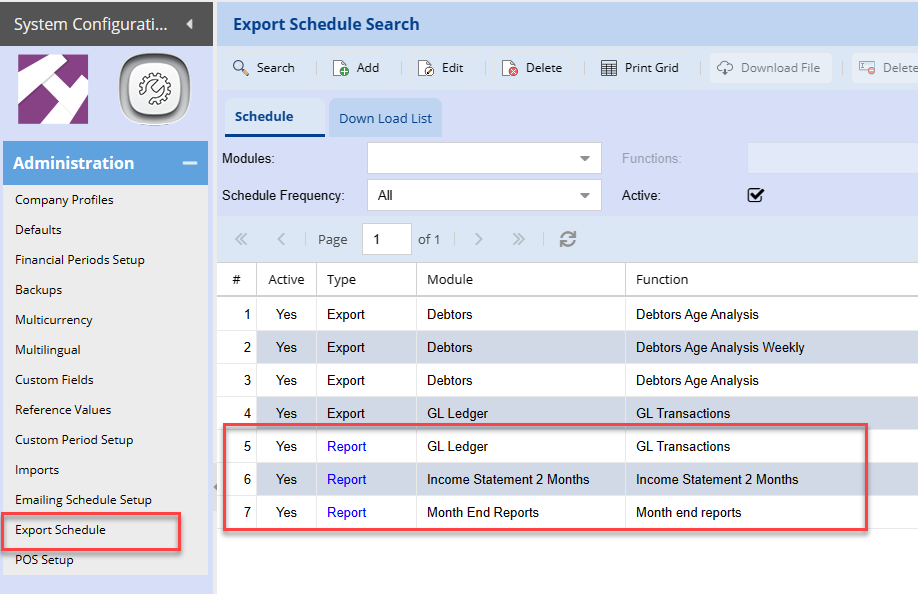
Used for Export schedule automatic reports
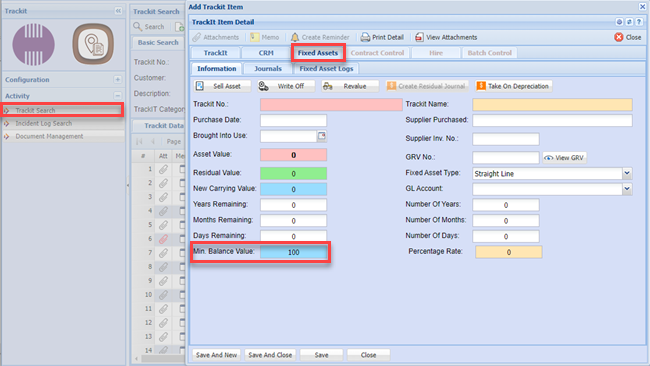
Fixed Asset Minimum Balance for Transactions
This is a value that you can set is the minimum value for fixed assets.
Once a fixed asset reaches this minimum value, it will NOT create a Depreciation journal.
The value used here is used as the default value when setting up a new fixed asset item.
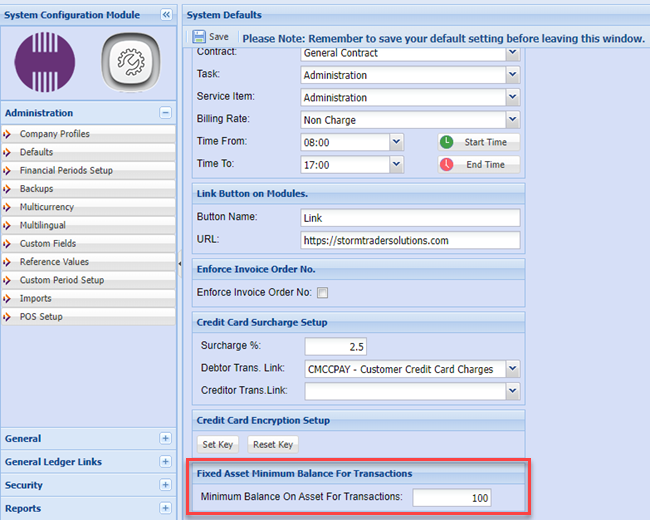
The value is populated in the TrackIT Module for fixed asset.
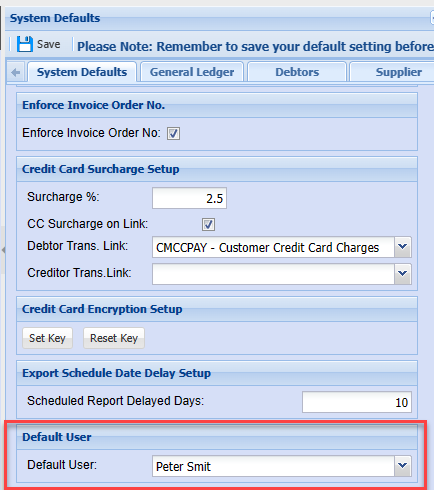
Default User
Used to set the user when it is blank
General Ledger Defaults Tab
System Config > Defaults > General Ledger
These defaults effect the General ledger module
Period Names
These fields are used in the financial performance report any specific to the farming industry.
You can set these for
Number of cows, number of litres produced in value of litres
.png)
Used in the Financial performance by period report
.png)
BankIT import Defaults
Bankit Import displaying the selected banks
Only set the banks that you require the user to view in the system.
By default the system shows all the banks supported.
It is better to only show the banks that you are using.
.png)
These banks are displayed in the drop down in Bankit feed
.png)
Bankit import start date is to ensure that when you import the bank statement that it does not import prior transactions to that date.
Used specifically when you are importing banks in the first couple of months
Set your start date so as not to allow previous bank transactions to be imported into the system
.png)
.png)
Setup the defaults that you want to populate when creating a cash book from the BankIt intelligence
.png)
Cashbook and Journal Types
When creating a cash book or journal, defaults populates the cash book or journal type so the user does not have to fill it in
.png)
.png)
Debtors Defaults Tab
System Config > Defaults > Debtors
COD Popup on Debtor Invoices
If a customer is marked as COD, it will give you a pop up to say its a COD client when creating a sales document.
Quote, sales order, invoice and credit note
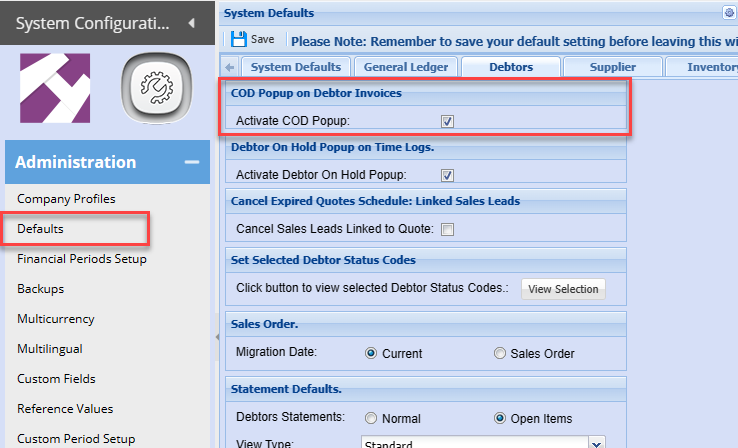
This will work with any customer that is marked as account terms equal to COD
.png)
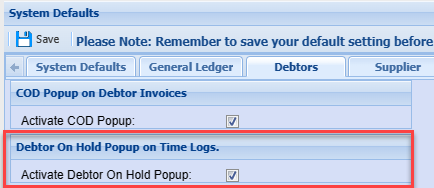
Debtor On Hold Popup on Time Logs
Activate this feature to enable a pop up on time sheets if the customer is on hold.
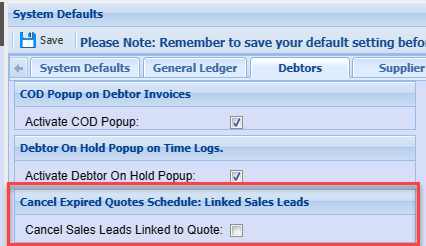
Cancel Expired Quotes Schedule: Linked Sales Leads
When the system runs the scheduled task to cancel expired quotes.
If the quote is expired it will automatically cancel the sales lead when enabled
Set Selected Debtor Status Codes
Use this function to limit the status drop down on sales documents like invoices.
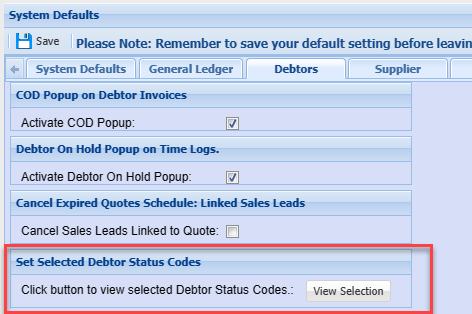
Click on the view selection button to select the status's you want shown
.png)
Invoice document limit status selection
.png)
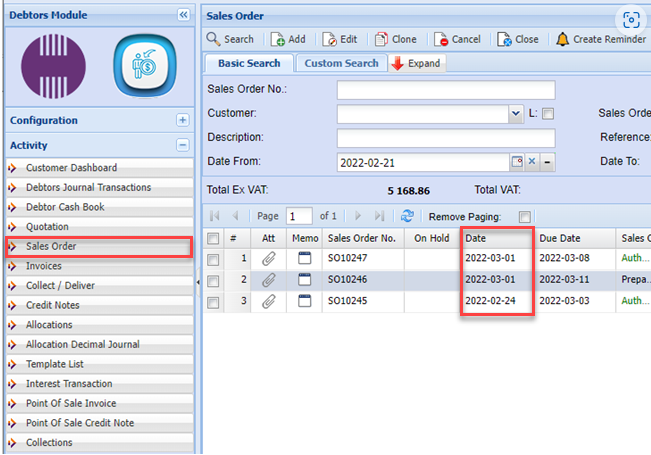
Sales Order
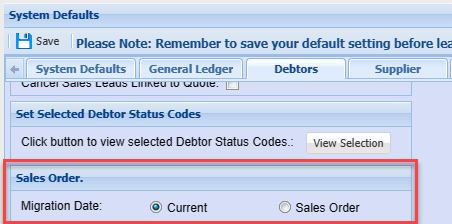
When migrating the sales order to an invoice.
Its either going to take the sales order date or its going to take the current date.
Statement Defaults
Set up statement and age analysis defaults.
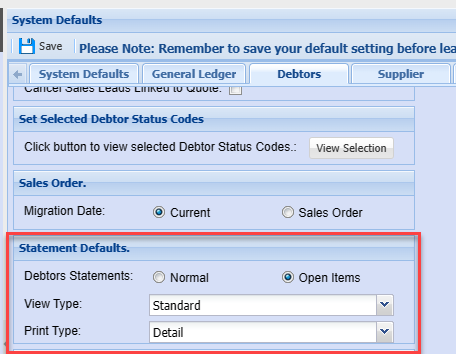
Statements
Sets the Type to Normal or Open item to Statements.
.png)
Debtors Age analysis
Sets the view type to either standard, invoice date or due date
Sets the print type to summary, basic or detail
.png)
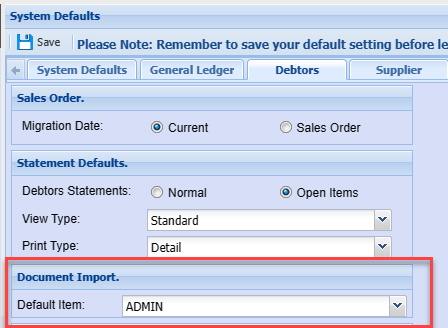
Document Import
When importing documents and the item code used is not recognized, it will use this as the default.
Log item brand against customer on Sales Order
When tick is on, on creating a sales order and authorise it, then the items on the sales order goes and checks all the brands and automatically populates the brands at the debtors setup.
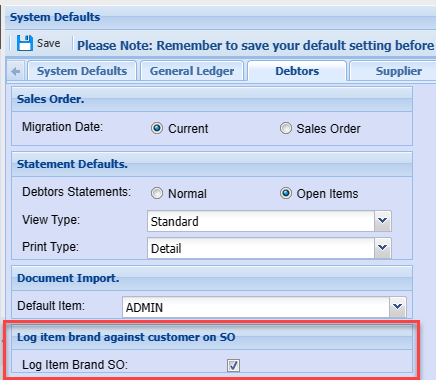
In customer setup, it will automatically select those brands that have been used in orders.
This helps maintain the different types of brands a customer is buying.
.png)
The purchase brands will be listed on the first page of the debtors set up
.png)
Sales Margin Check
This is used on debtors documents to check or enforce margins.
Setting is activated per customer
When a new customer is created, it will take these settings
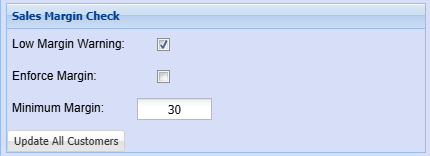
| Low Margin Warning |
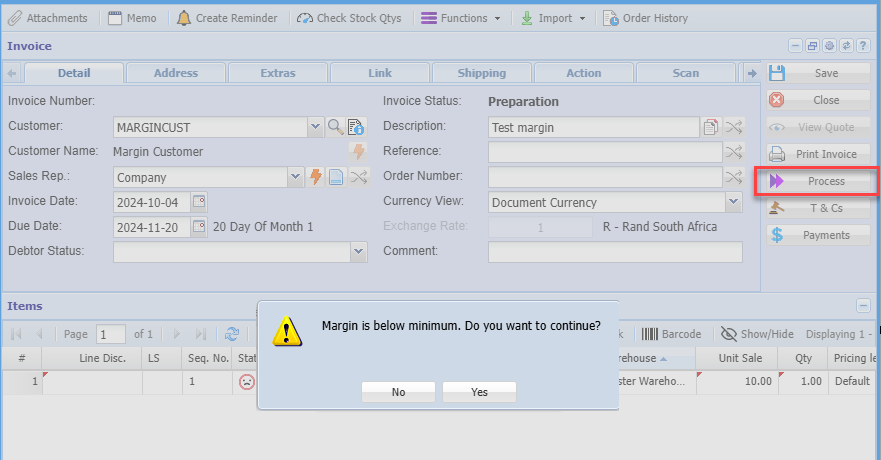
If this is enable it will check low margin on adding an item to a sales document. It will check when invoice is processed, giving a warning to proceed or not |
| Enforce Margin | Will not allow an invoice to process if the user is not a margin supervisor |
| Minimum Margin | Enter value for checking margin percentage |
| Update all Customers | Update all customers with these settings |
Margin check is on each customer
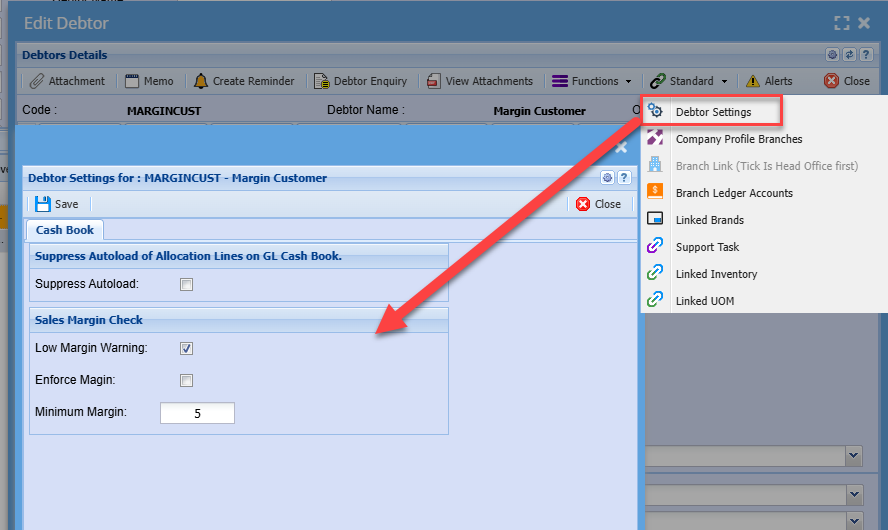
See more information on Margin checks -
Creditors Defaults Tab
System Config > Defaults > Supplier
Document Import
Set the defaults when importing PDF documents from Rossum and Typless, if the items are not found in the system.
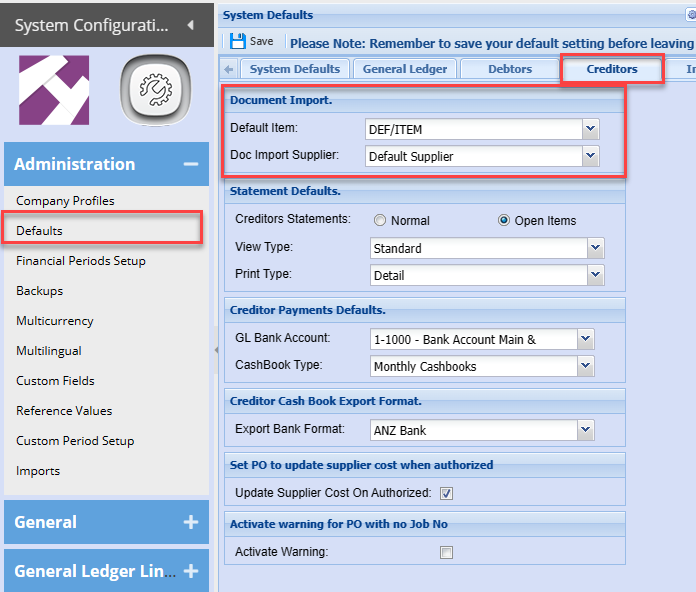
Used in Purchase Order and GRV imports
.png)
.png)
Statement Defaults
Auto set defaults on the creditors statements
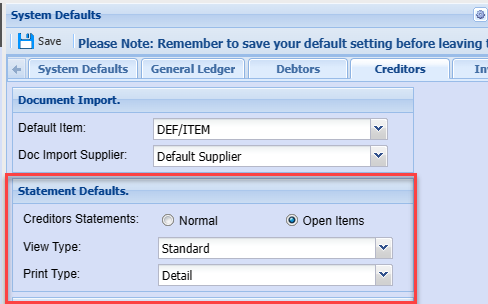
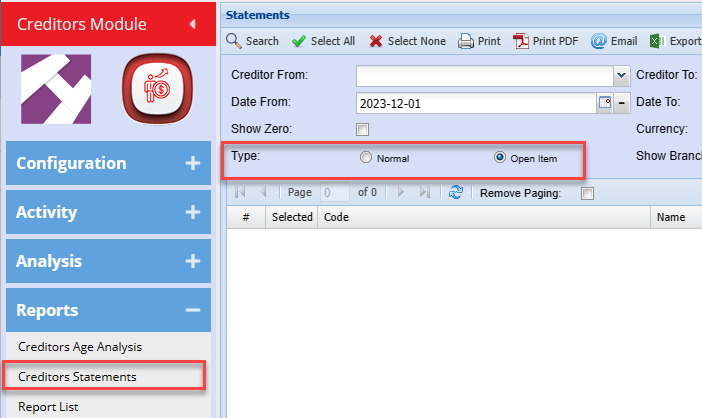
Statements
Set the type for statements
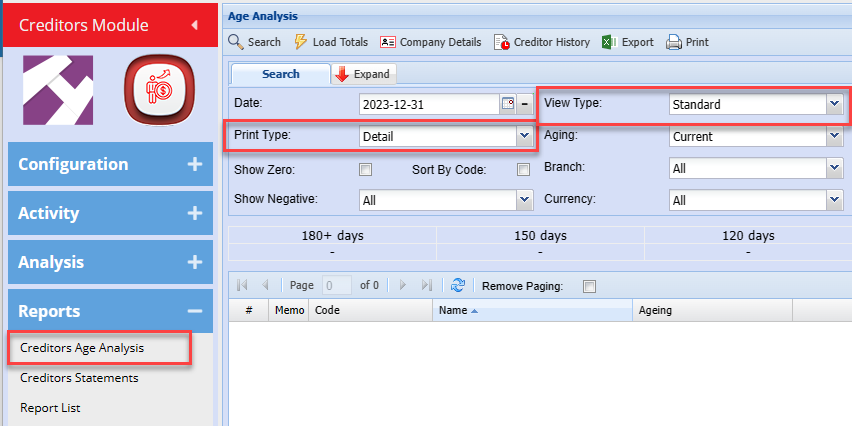
Creditors Age Analysis
Set the Print Type and View Type for Age analysis
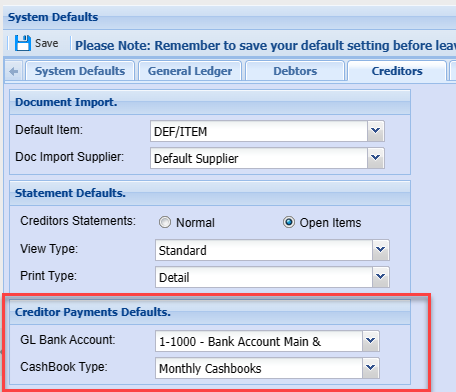
Creditor Payments Defaults
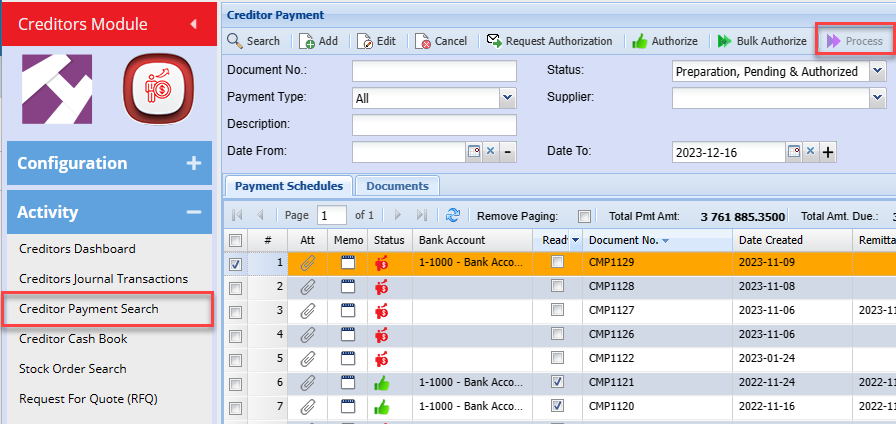
Set the payment defaults for Bank account and Cashbook type when promoting to a cashbook from Creditor Payment
When processing a Creditor payment supplier to a cashbook it will then create the Creditor Payments Defaults.
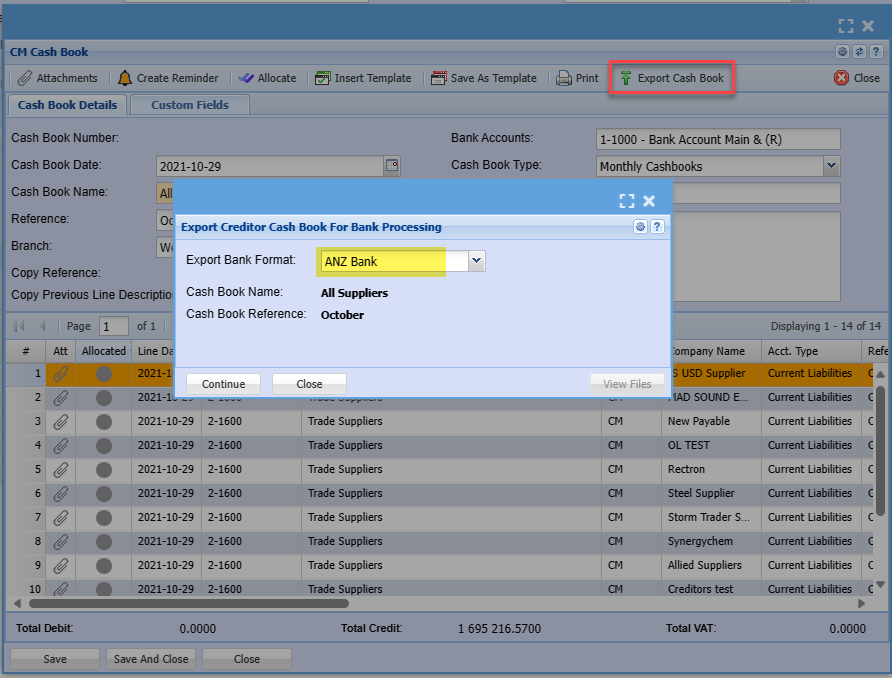
Creditor cashbook export format
Set the bank format when exporting the creditors payments to the bank
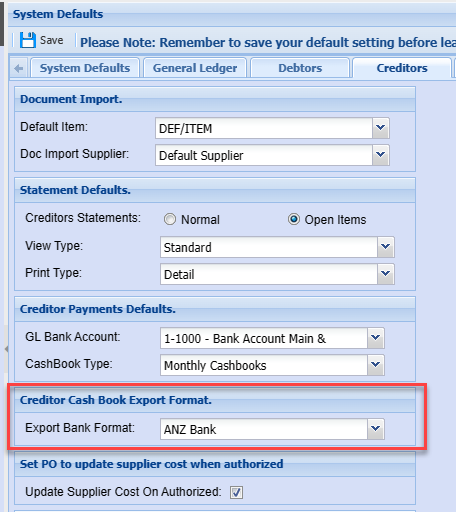
Sets the default for bank export
Set PO to update supplier cost when authorised
Use this to update the cost of the supplier before processing a delivery note or GRV
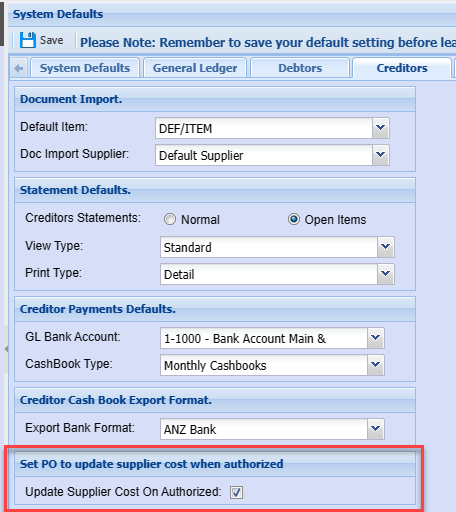
When creating a Purchase Order and authorise, the system will update the supplier cost price against the inventory item set.
.png)
Inventory item updated in the Supplier item cost price.
.png)
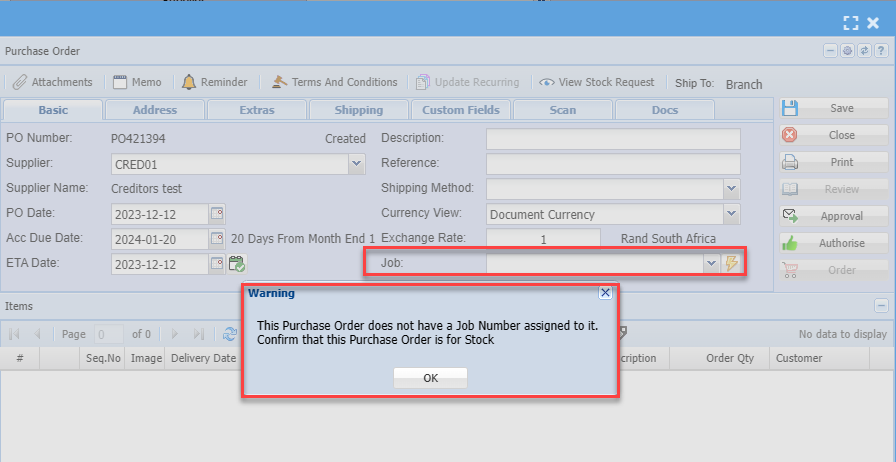
Activate warning for PO with no Job No
Activate a warning in Purchase Order save when Purchase Order does not have a Job number allocated.
Used to prevent purchase order lines from not having a job number allocated.
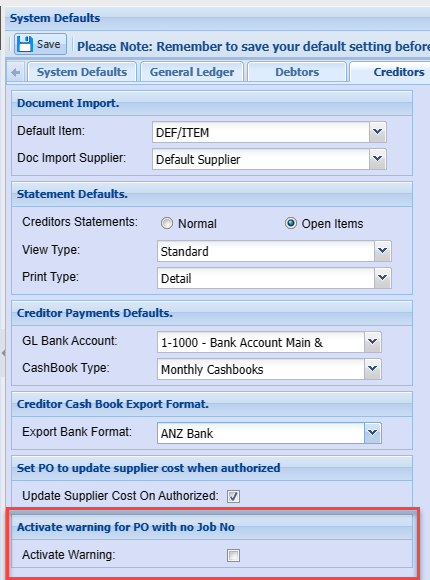
Warning appears on each save to check if job number is added to purchase order
Collect Button Text

Inventory Defaults Tab
System Config > Defaults > Inventory
Inventory Expenses Property allocations fix
Used to enforce a stock category to be selected on inventory setup save
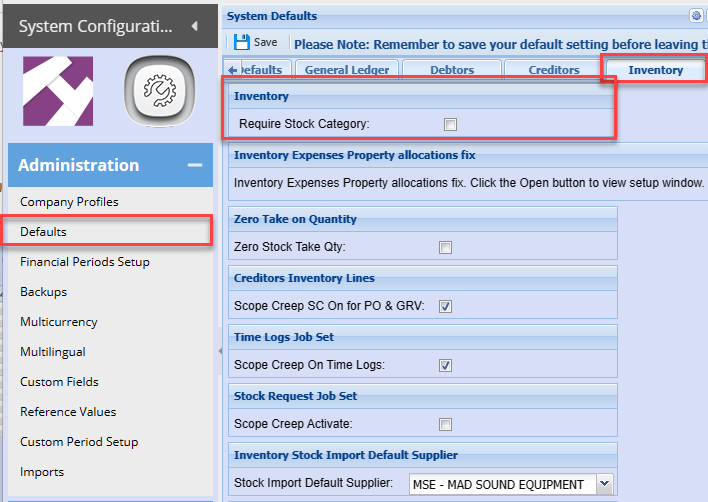
Set to enforce Stock category to be selected
.png)
Inventory Expenses Property allocations fix
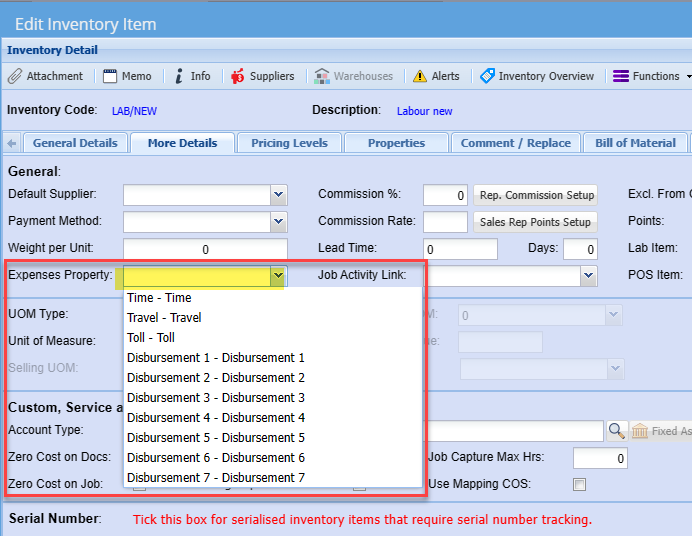
Check all items without an expense property allocated with the Empty Expense Property Report
Appliable to Service and Custom type items
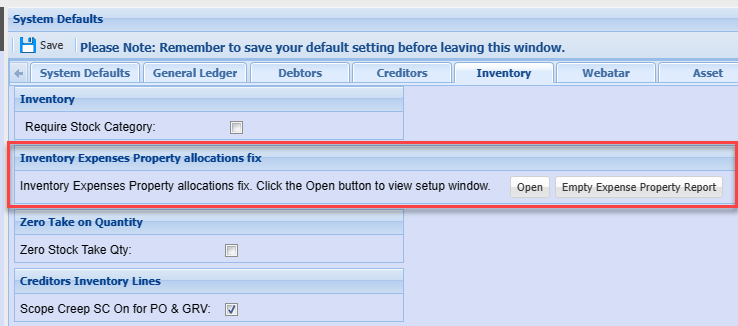
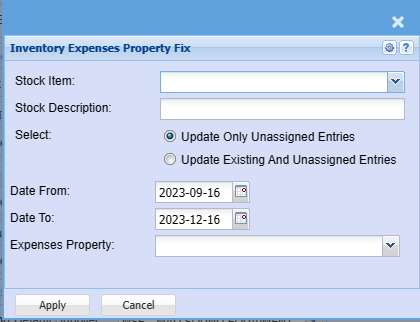
Custom and Service type items
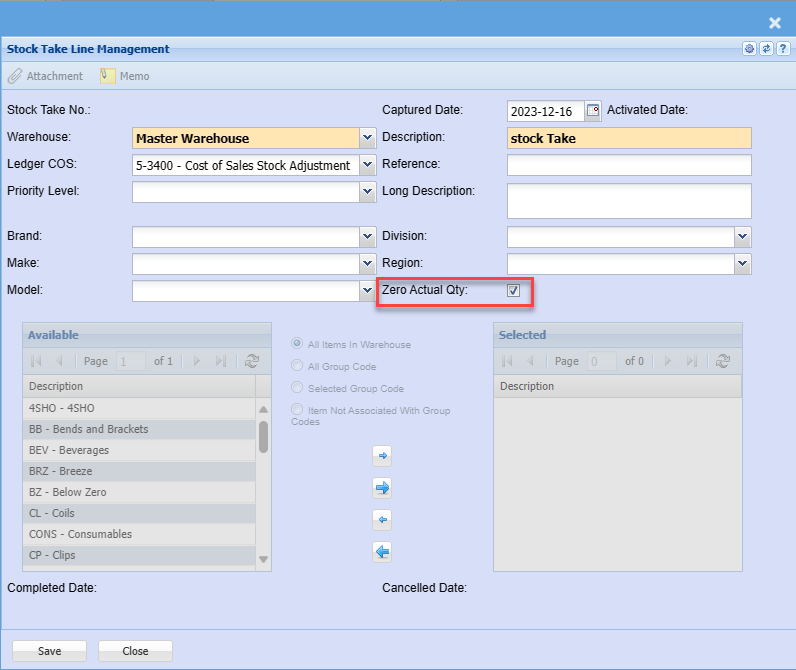
Zero Take on Quantity
Used this to set the tick for zero all items in a stock take

Sets the tick box on for every new stock take created
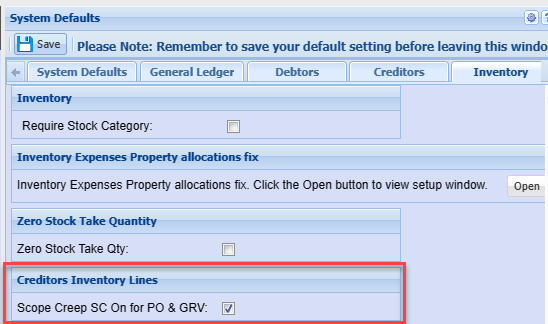
Creditors inventory items
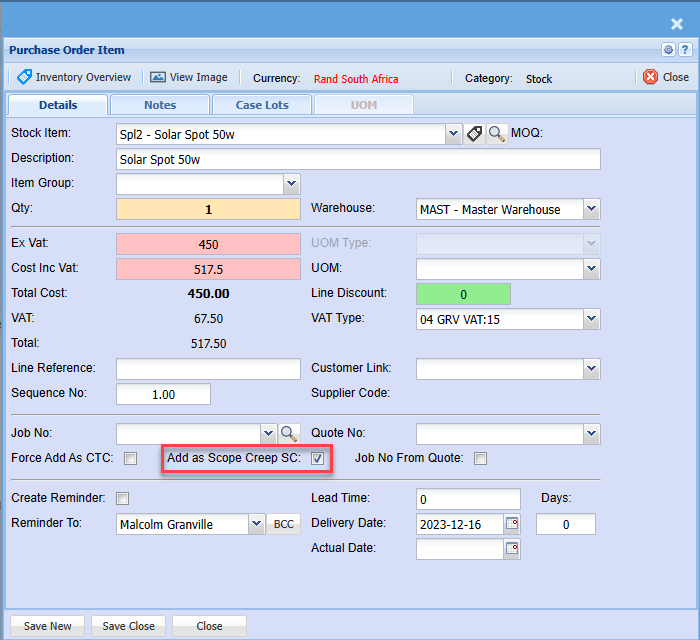
Enforce tick box on for Scope Creep (SC) on all Purchase order and GRV lines
Overrides rules on document ticks for Jobs Scope Creep
Document lines enforce tick
Time Logs Job Set
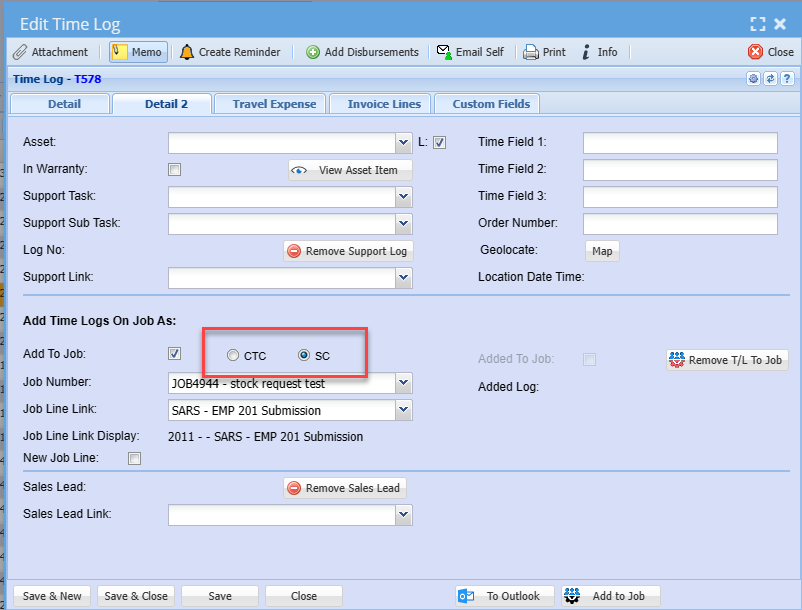
Set Scope Creep on Time Logs
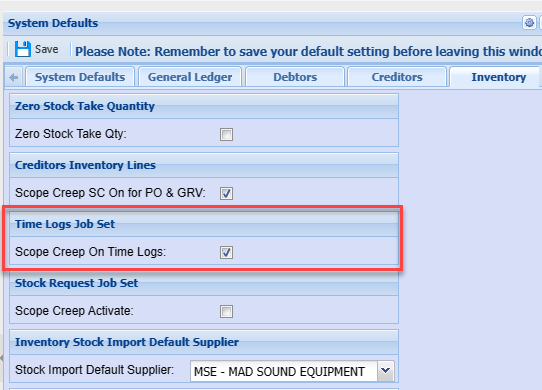
Sets the Job type to SC for time logs
Stock Request Job set
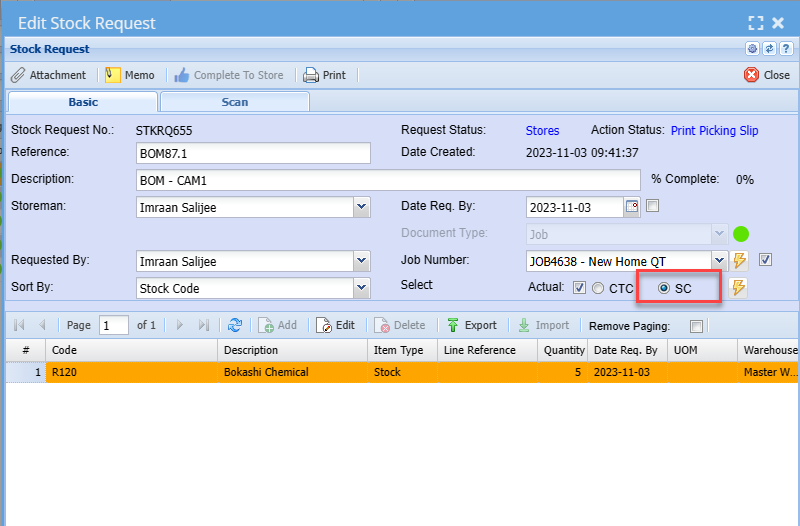
Enforce the Scope Creep on Stock Requests
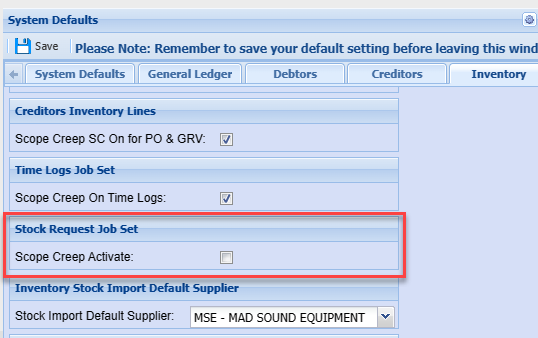
Stock request set to Scope Creep
Inventory Stock Import Default Supplier
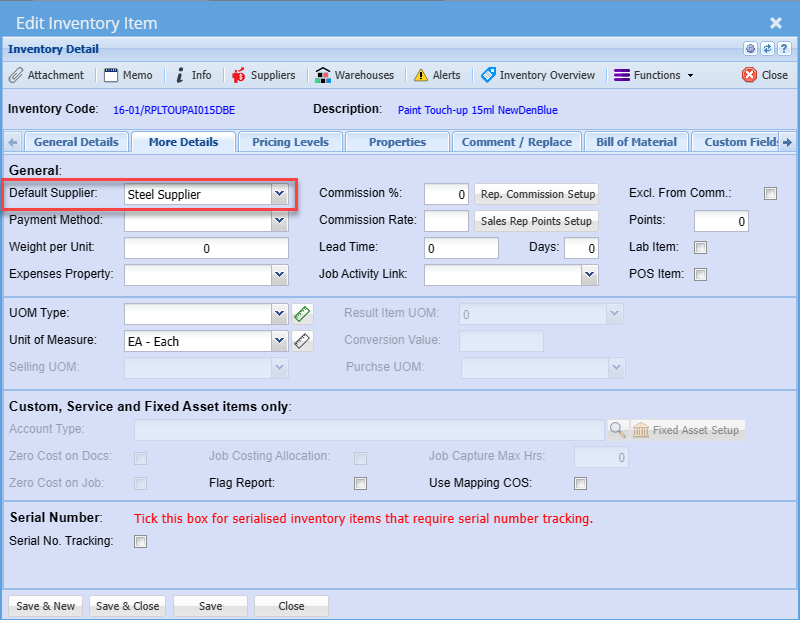
Set a default supplier when importing inventory items.
Useful when the field in the import file for the supplier is left blank, it sets this default supplier
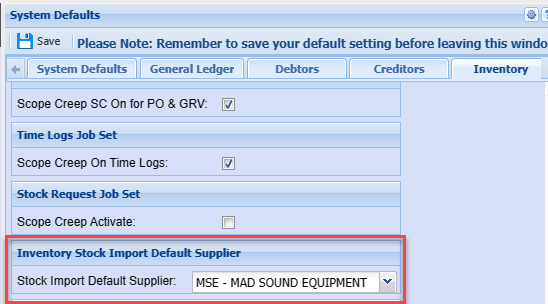
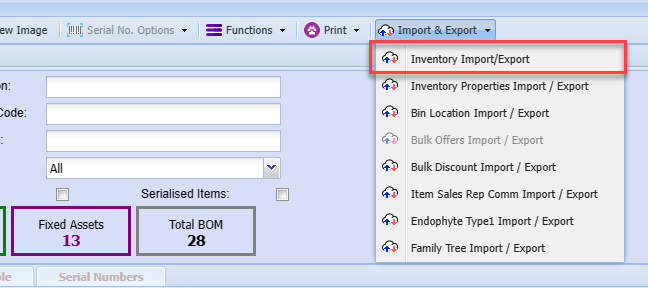
When importing stock
Sets and adds a default supplier when importing
Barcode Printing Style
Setting up Barcode printing from system to GoDex label printers
Print barcodes directly from
- Inventory
- Assets
- Asset Scan and Print
- Debtors Documents
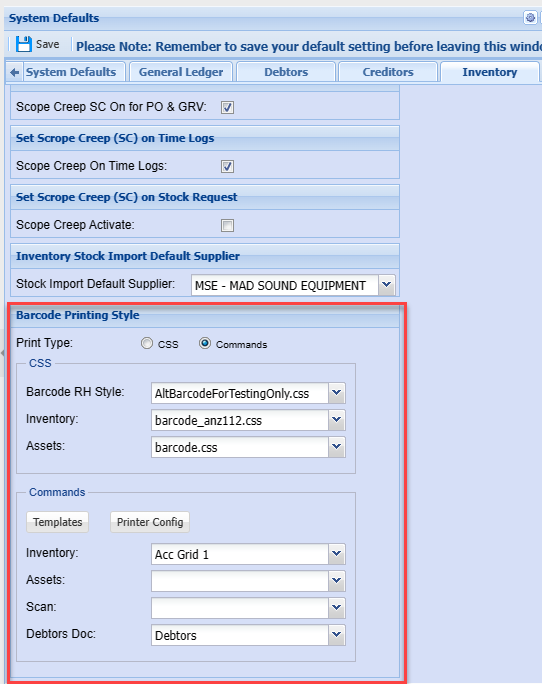
CSS Print Type
Setting a CSS is a predefined label layout (this is going to be discontinued by 2025)
Commands
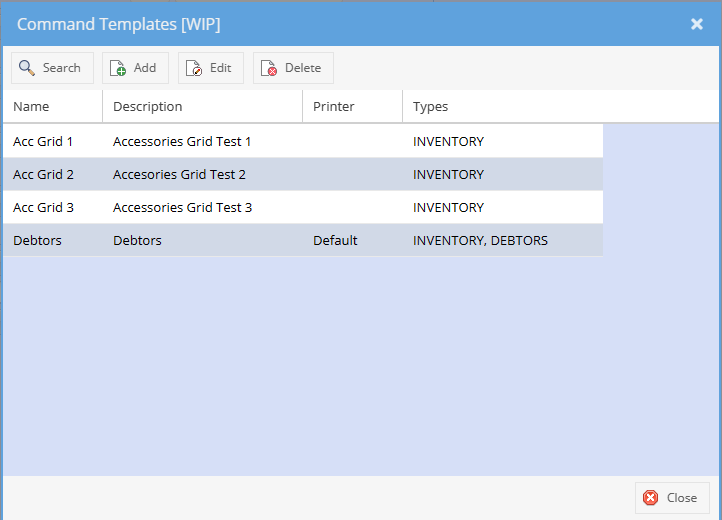
Setting the templates via the GoLabel software
Templates button
Set various templates to use
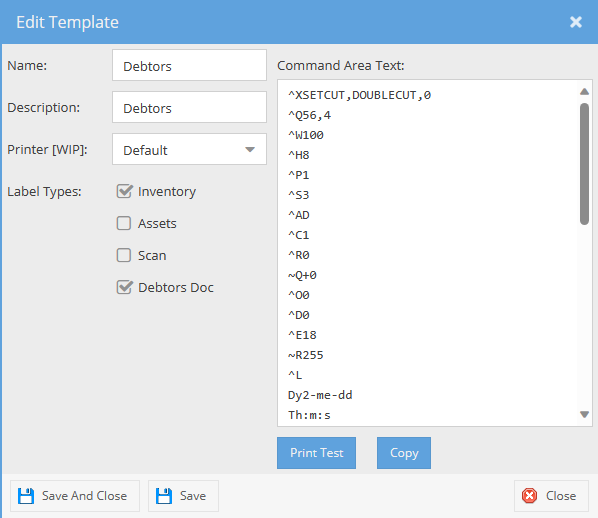
Edit Template
Copy command from GoLabel and paste into Command area
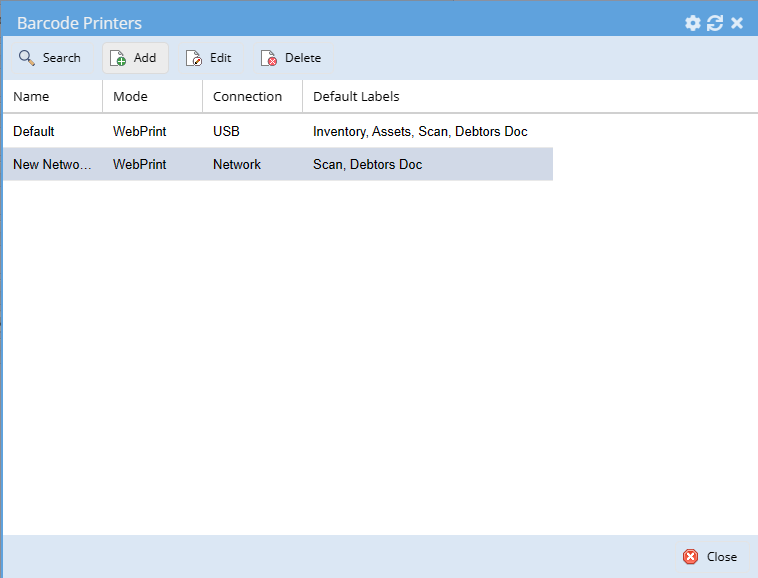
Printer Config Button
Setup how the printer is connected either by USB or Network
Set the Printer defaults
WebPrint it is best to use the port 16327 than 8080
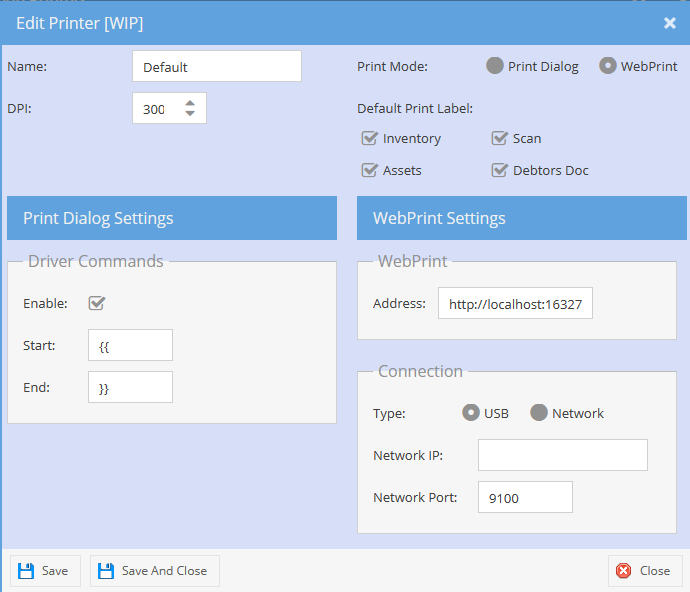
| Printer Name | Name the printer |
| DPI | Set the DPI of the printer 200 or 300 DPI |
| Print Mode: Print Dialog | Used for testing to see print command code to screen when printing |
| Print Mode: WebPrint | Use this as default to print to the printer via the WebPrint |
| Driver Commands | Set as seen above |
| WebPrint |
Setup the Address Use port 8080 or 16327 (best to use 16327 on secure network environments) |
| Connection |
Set USB or Network Enter IP address Enter Network port - usually 9100 |
Webatar Defaults Tab
System Config > Defaults > Webatar
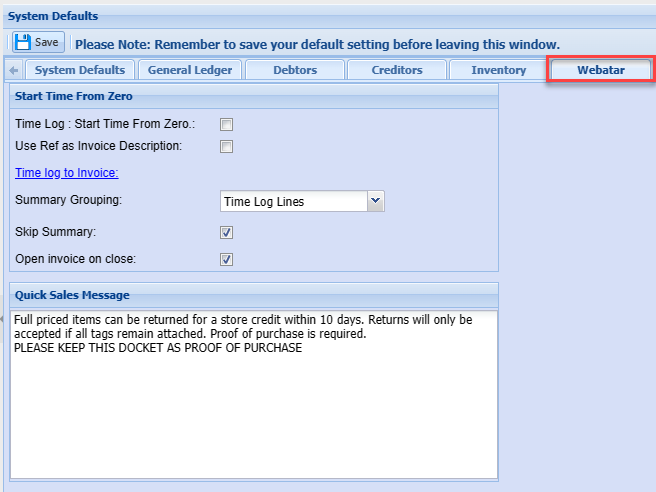
Start Time From Zero
When you put the tick on here this will then put your (Time from) and (Time to) to zero and the user will then only use the Bill Qty
.png)
.png)
Taking your time logs to invoice
.png)
Job Costing Defaults Tab
System Config > Defaults > Job Costing
Enforce Settings
.png)
.png)
Enforce Job number On
Enforce Job number on Stock Requests
.png)
Custom Inventory WIP Enforce
System Config > Defaults > Job Costing
This changes all custom items on Purchase Orders to force it to WIP
.png)
It will overrule this
.png)
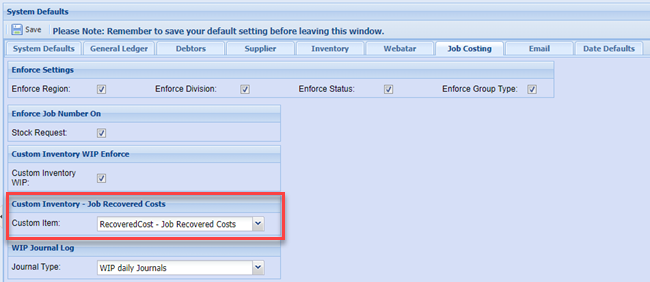
Custom Inventory - Job Recovered Costs
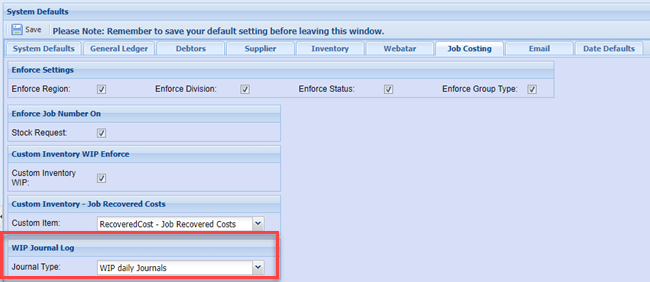
WIP Journal Log
System Config > Defaults > Job Costing
Job Scheduling Tasks
System Config > Defaults > Job Costing
The Job Schedule tasks have a few setups that can be set
| Task Type | Set the Task Type in the Job Schedule search filter as default |
| Task Split Edit |
Set the rule for splitting a task activity a. Value split and % zero - Split the value of the main task with 50% and 50% on split task. Leave % complete on main task as is and make split task start with zero percentage. b. Value zero and % zero - Keep the main task value and percentage the same. Make the split task value and percentage zero. |
| Disable sub and split task value | Disable the values fields of the sub and split tasks so that the user cannot edit |
| Disable sub and Split Task percentage | Disable the percentage fields of the sub and split tasks so that the user cannot edit. |
.png)
Task splits and disabling fields
.png)
Setting the Task Type search default
.png)
Email Defaults Tab
System Config > Defaults > Email
Setup default email messages when emailing customers
Debtors Documents
.png)
.png)
Creditors Documents
.png)
.png)
Debtors Aging Letters
Setup of Debtor Aging Letters
Allows for sending out emails to customers based on their aging. Included in the image below is a sample of what a letter could look like with the necessary tags and formats.
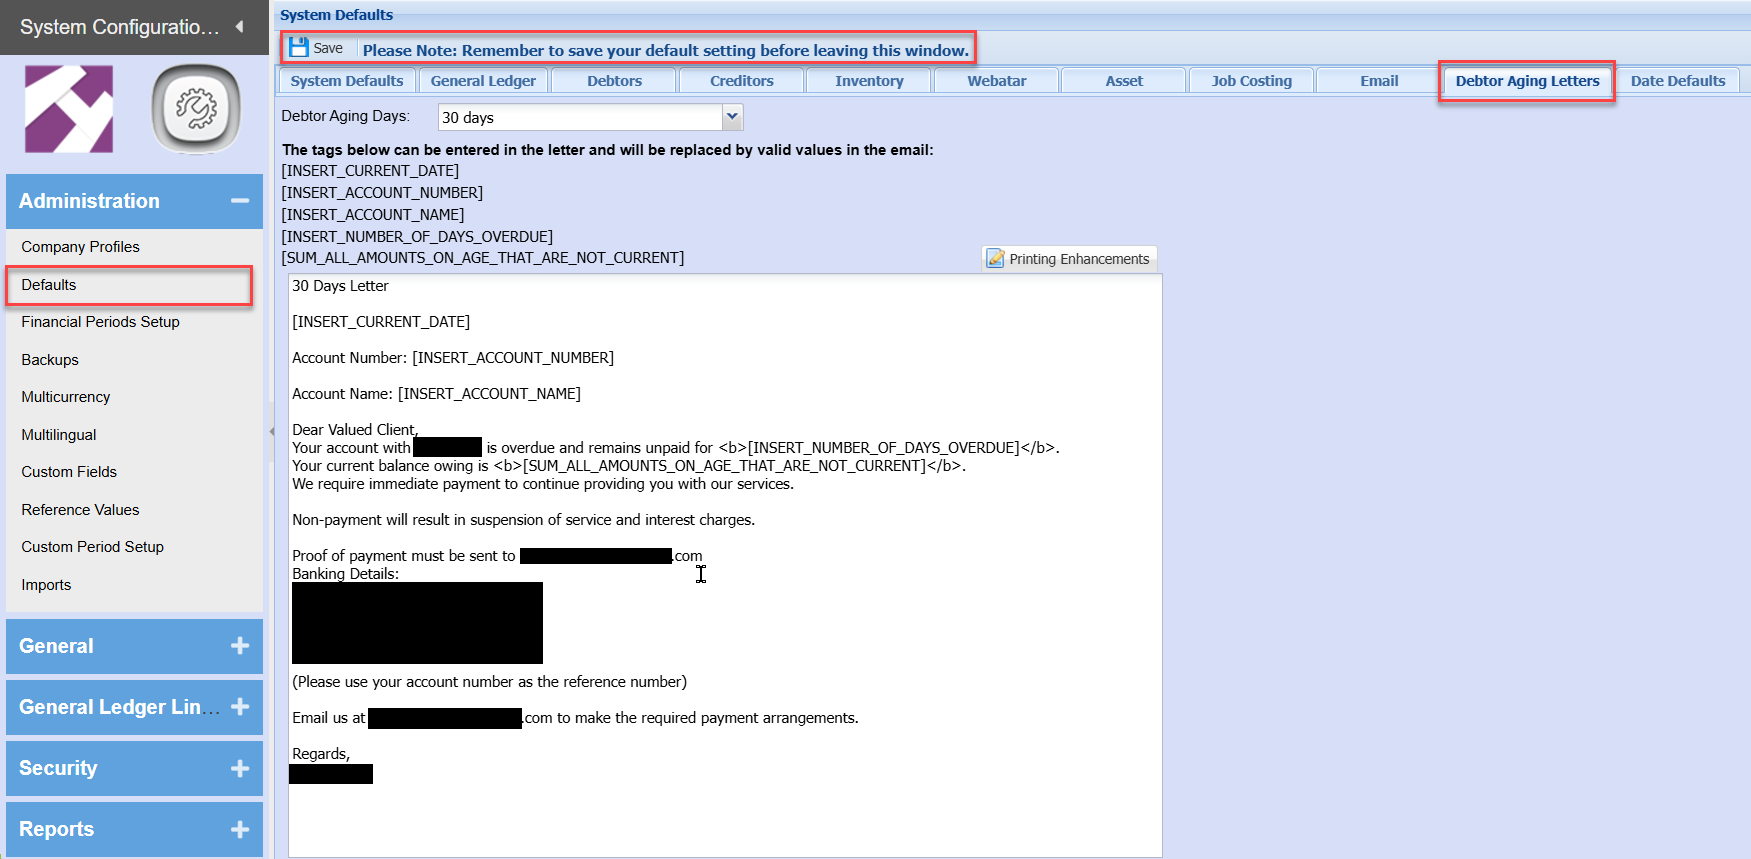
The setup makes allowance for seven different letters to be prepared.
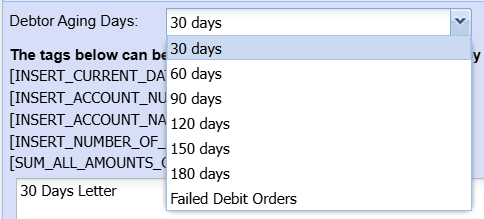
When preparing the various letters the Printing Enhancements can be included into the body of the letter to emphasise pertinent points in the letter.
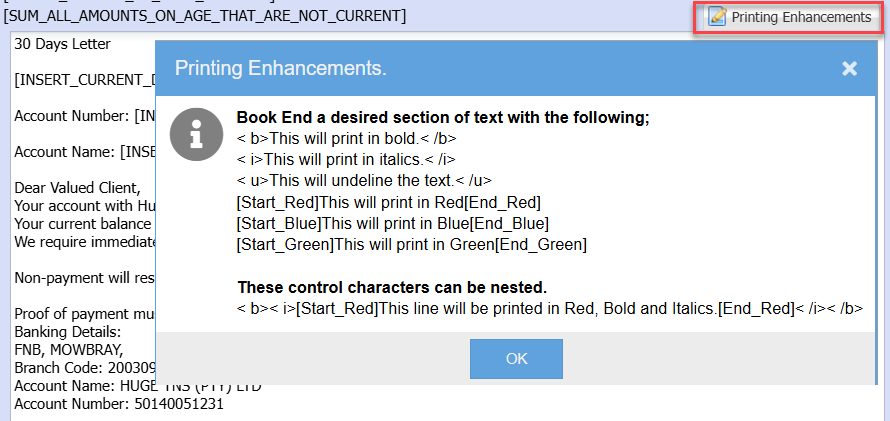
Please remember to save the changes before leaving this window.
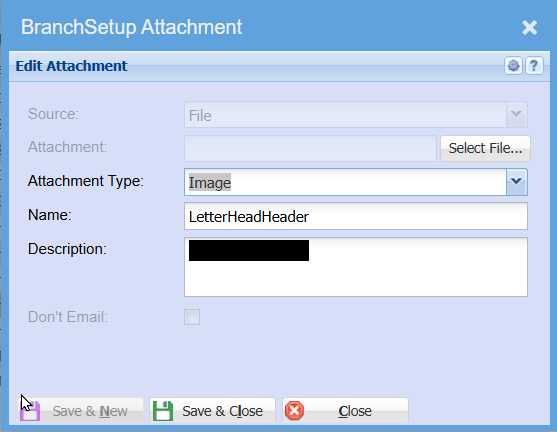
Next step is to go to the System Config Module, open the Company Profile and upload these two jpg files as Attachments. The two images must be uploaded as LetterHeadHeader and LetterHeadFooter. When creating the Email and Preview Email the system will search the company profile attachment table for these two files. If the naming convention is not as indicated above the images will not be retrieved and the Email and Preview Email will not have the desired letter head appearance.
Preparing the data and sending out the Debtor Aging Letters email
Go to Debtors module then click on Reports followed by Debtor Aging Letter
To Create a new dataset click on Add
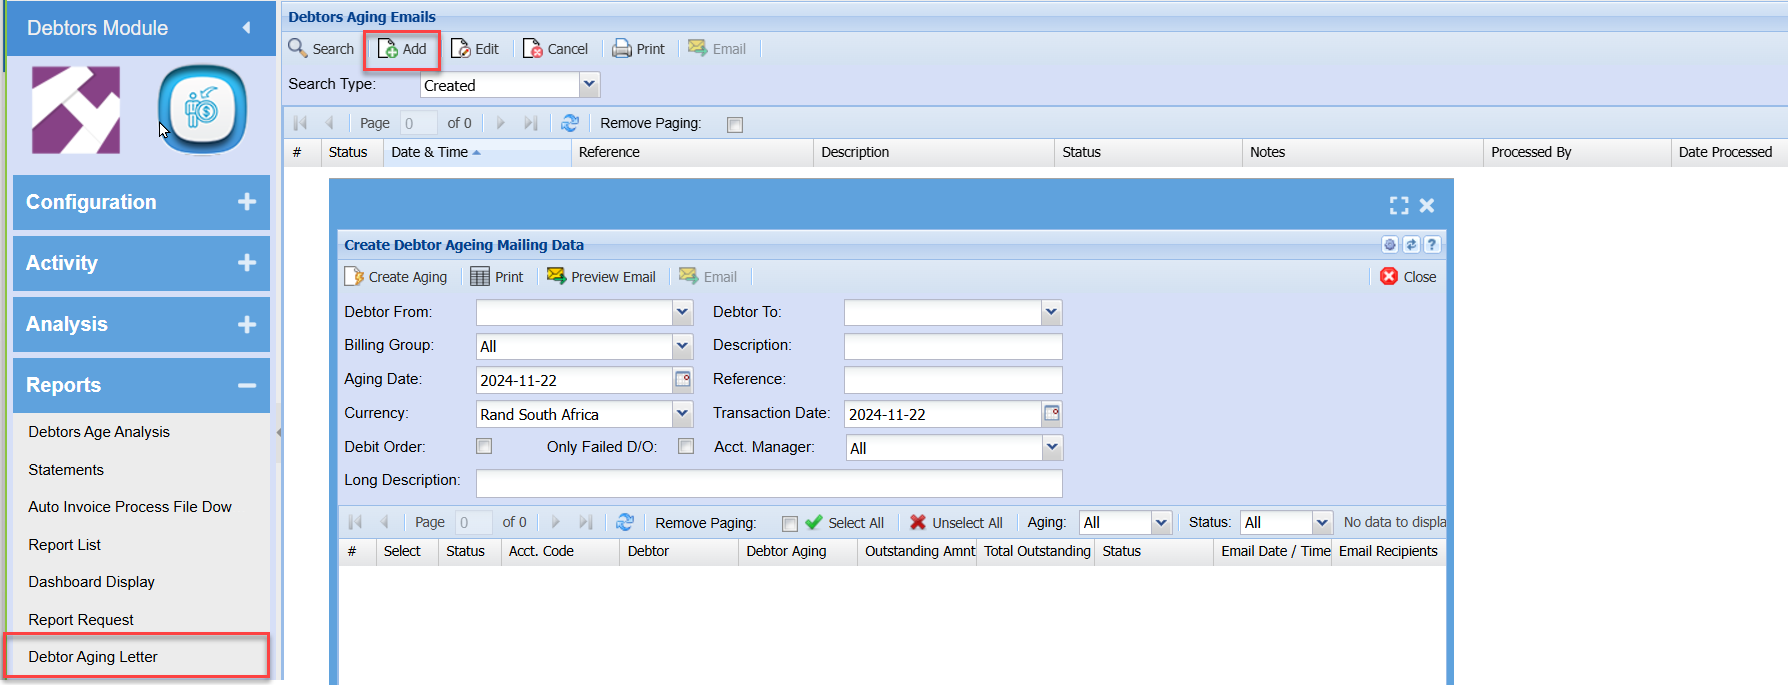
Enter the necessary requirements for this dataset.
Please note that if this is a dataset for Failed Debit Orders the Debit Order and Only Failed D/O tick boxes need to be ticked.
Once the required parameters have been entered click on the Create Aging button. Take note of the warning message. On completion of the create process the window will close and the grid will be updated with the new entry.
Select the newly created entry and then click on the Edit button. A window will appear displaying all the Debtor Aging Entries
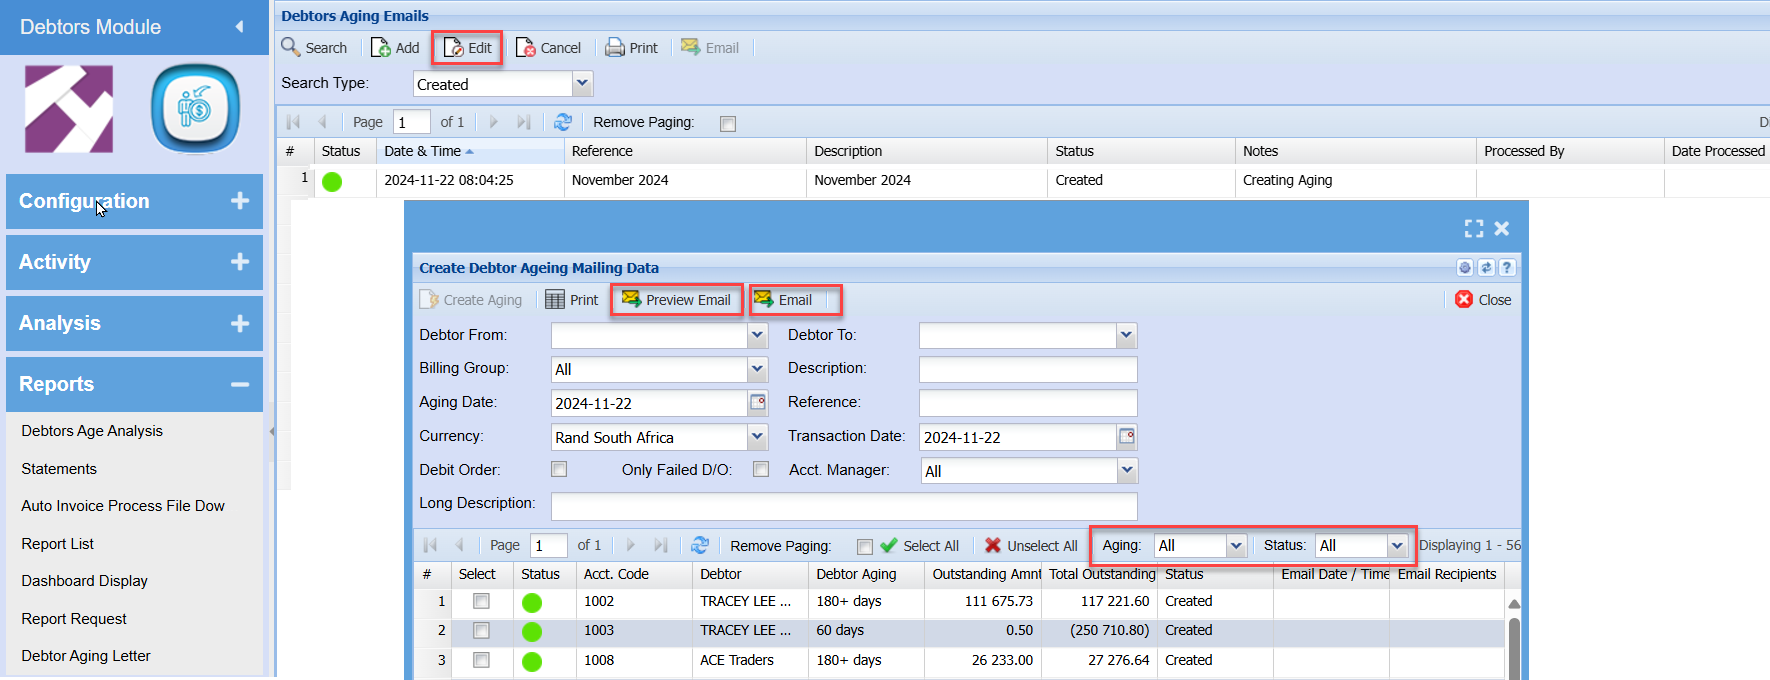
Once this window has opened we have a variety of options available.
- We can select a paticular record and click on Preview Email to see what the letter will look like that the debtor receives. If the letter is not satisfactory then we can go back to the setup to make the necessary changes to the letter.
- Filtering the entries in the grid can be managed by means of the Aging drop down and the Status drop down. Once the desired selection has been made, clicking Select All will select all the lines in the grid and place a tick in the Select tick box column.
- Selecting for example 180+ days will filter the grid to display only the applicable debtors and if the Preview Email was satisfactory then the Email button can be clicked.
- Only lines in the grid that have a tick in the Select column tick box and Debtor Contact Persons who are selected by means of a tick in the Statement Email tick box will be sent a Debtor Aging Letter.
- The emailing process is done on the serve and does not hold up the computer while the email processing is done. As each email is processed that debtor Status on the grid is changed from Created to Emailed and the date and time of the email as well as the recipients are recorded on the grid. Please Note : debtors marked as Emailed cannot be emailed again.
- The widow will close and will require that the record be selected again and the Edit button be clicked if additional emails are to be sent
- If no filtering seletions are made except for Select All and the Email button is clicked the system will automatically send the correct Debtor Aging letter to the Debtor Contact person who has a Tick in the Statement Email tick box. and who's Status on the grid is Created.
Date Defaults Tab
System Config > Defaults > Date Defaults
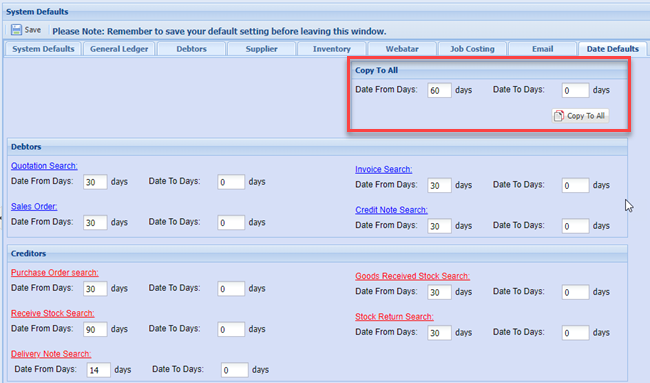
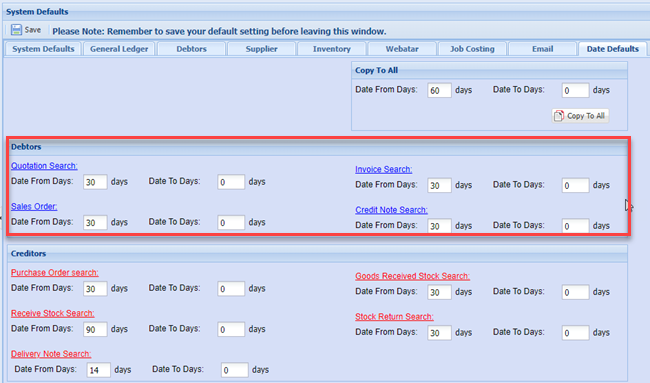
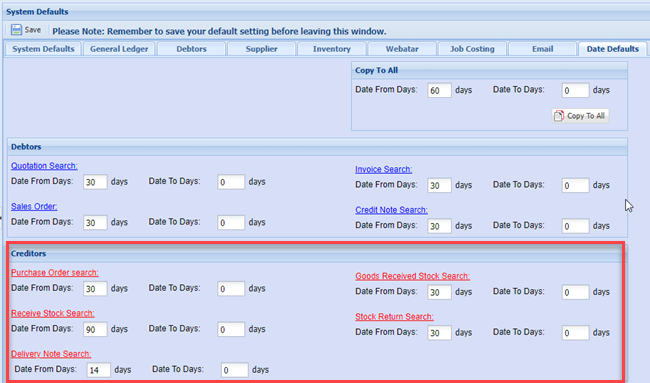
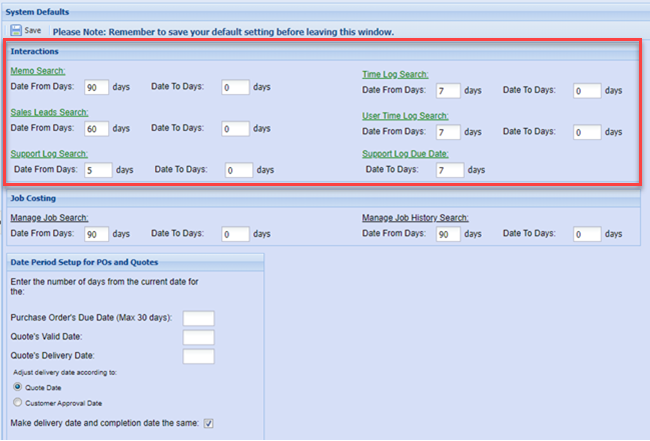
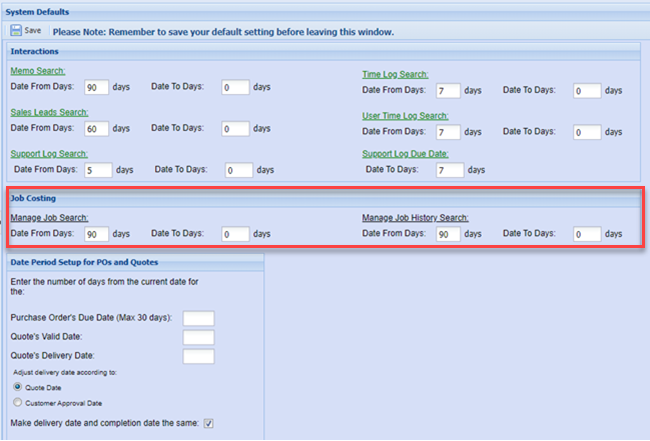
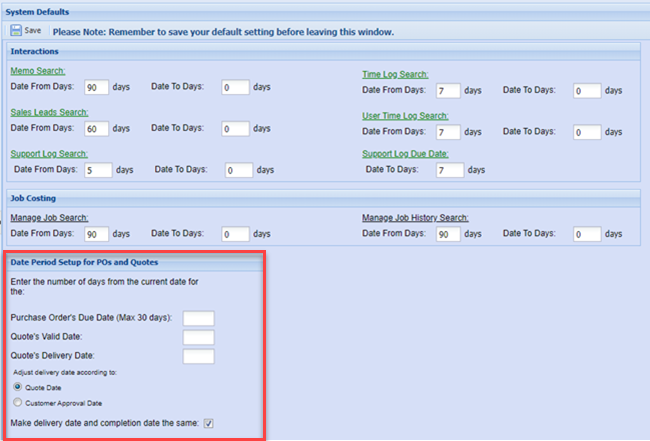
Set the date from and date to for document searches
Copy to All
Debtors searches
Creditors searches
CRM interactions searches
Job costing searches
Date Period setup for POs and quotes
Financial Periods
Financial Periods
Create a new financial Year
Video Training Manual 2016 - Click Here
The creation of a new financial year occurs at the end of a financial year, and there are no new years and periods in the system.
If your financial year is not created, you will not be able to process any transactions
To create a new financial year, Follow the steps below:
Go to System Configuration Module > Administration > Financial Periods setup
- Highlight your last year - See example below
- Click create new
- Then the window for the clone year will appear as shown below.
- Add your next financial year-end
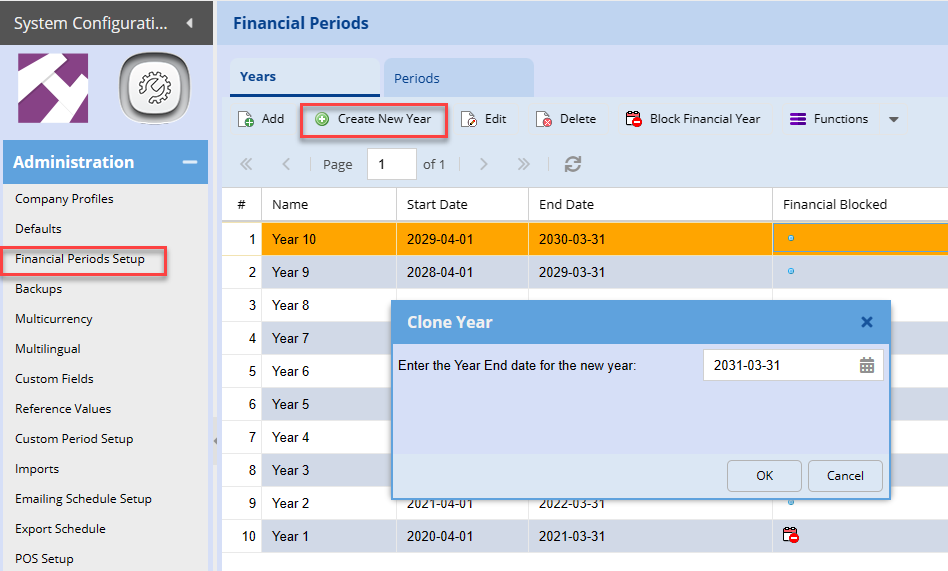
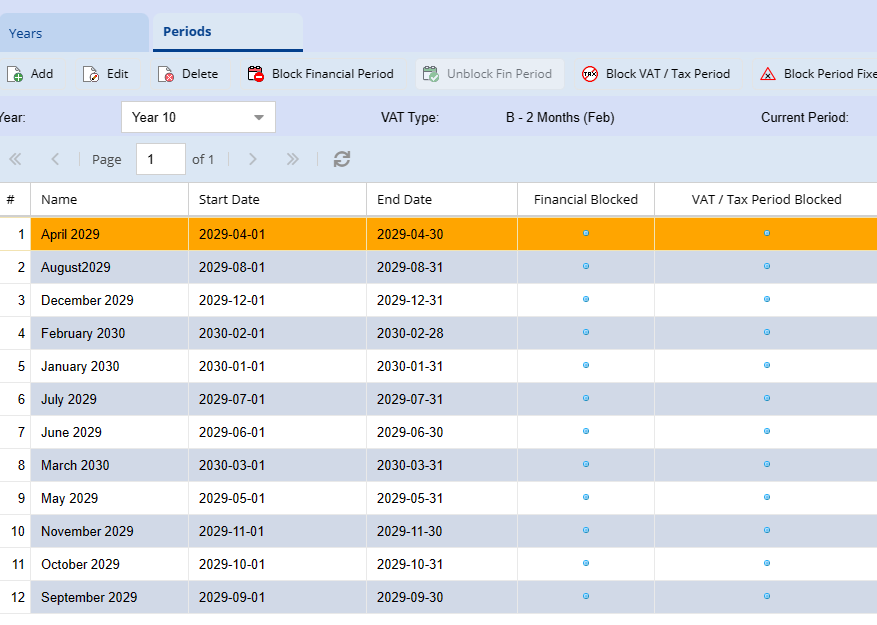
Once the year is created you can click on periods to double-check if they are created correctly.
When you are done, log out of the system then log back in
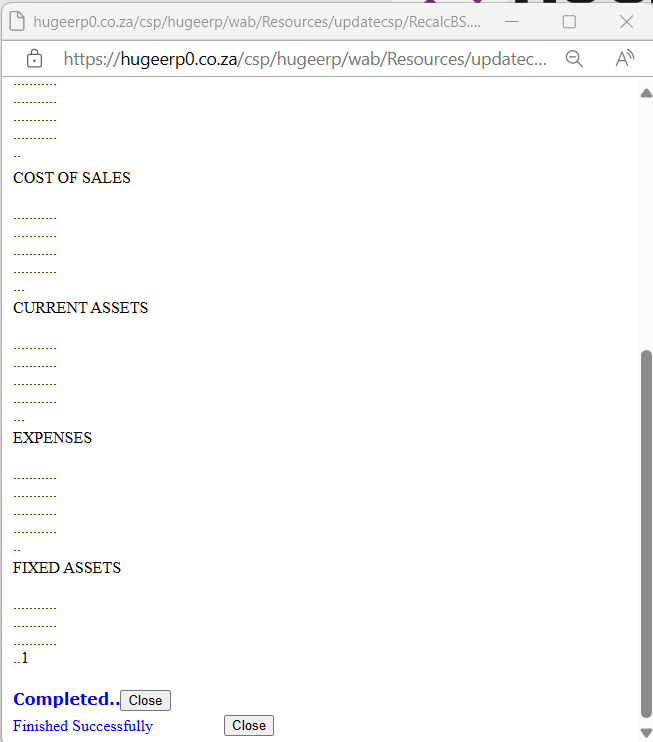
When logging back into your company this window will appear to indicate that, there are changes to the financial years or periods within the system. Click on the OK button to run the Integrity Check.

This will recalculate and integrity check all the ledger accounts in the system. Once complete click on the close button and log into the system.
Financial Periods Setup
Video training manual 2016 - Click Here
Systems Configuration > Administration> Financial Periods Setup
Highlight the current year
Click On Extras tab and select from the drop down
Select “create New year” Function
.png)
This will take the selected year and Create the next financial year period.
Click yes to continue
.png)
Enter the End date of the next financial year
.png)
Amend The Name Of the created new year to reflect the changes.
Rename the description
Next Select the Periods Tab
And amend the Name column to match the dates.
When that process is done save and close and you are ready to post to the new financial year and months.
Add Financial Year
Systems Configuration > Administration> Financial Periods Setup
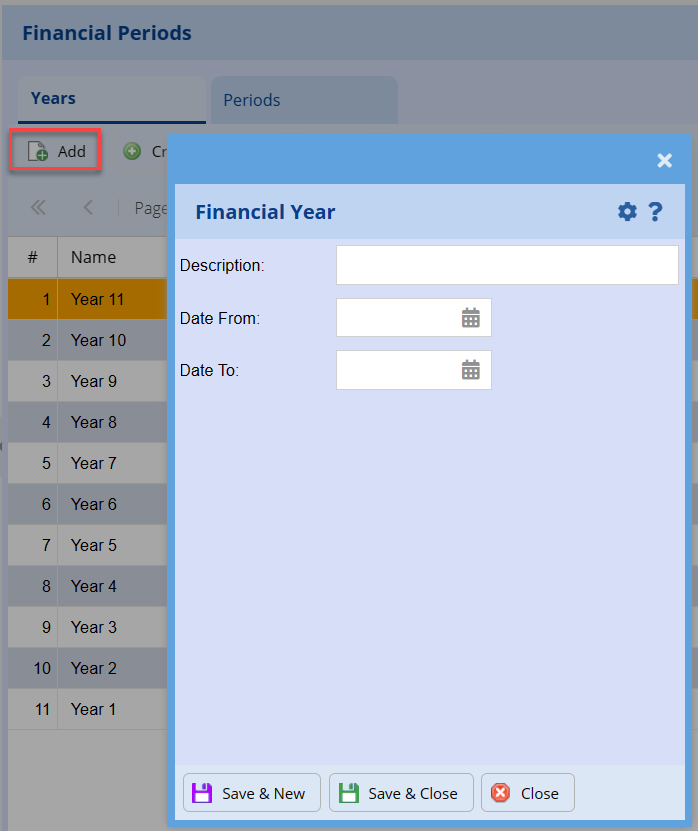
Click Add and fill in the information
| Description | Fill in the description (Example: Year 1) |
| Date From | Fill in the date from you wish to start |
| Date To | Fill in the date to you wish to end |
Financial Periods Block
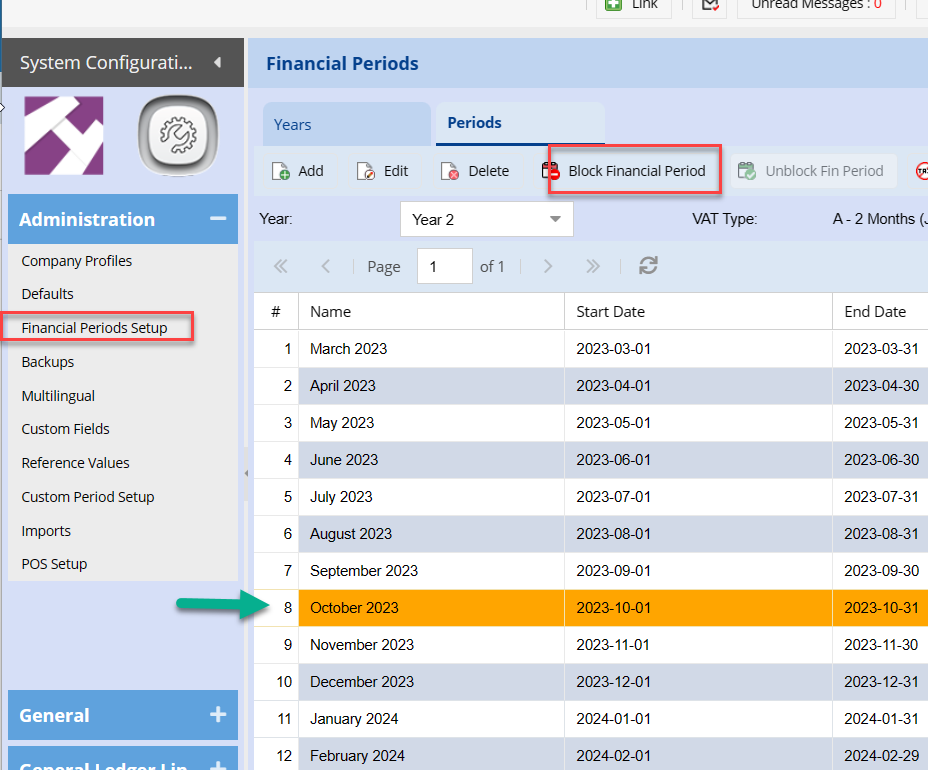
Blocking Financial periods will prevent users from processing in closed off periods.
To block financial periods go to:
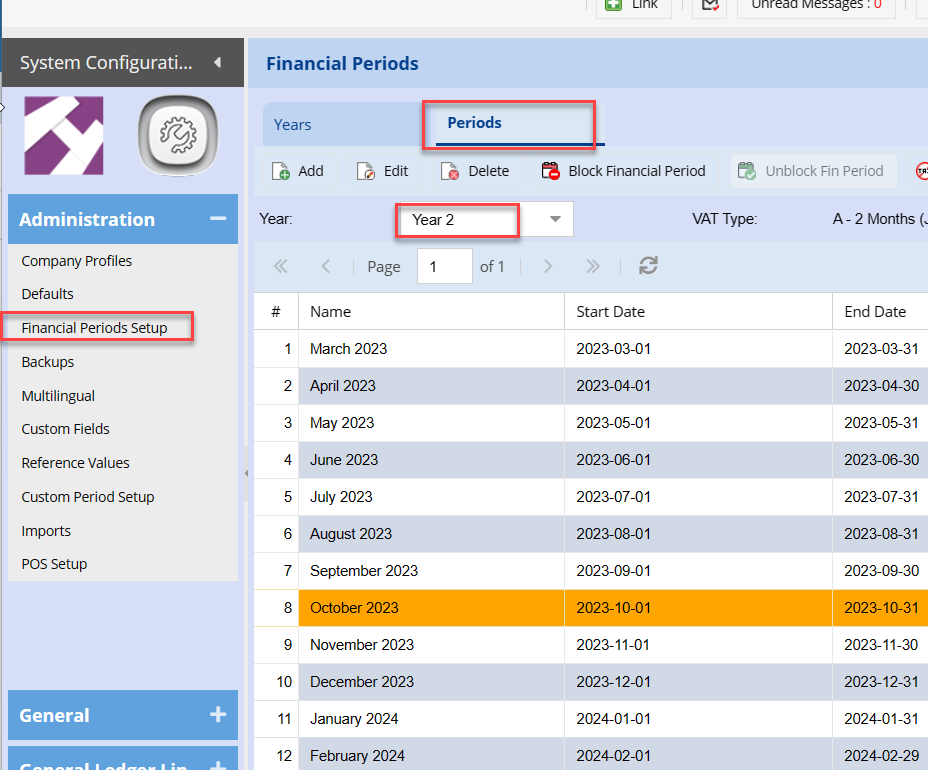
Systems Configuration > Administration> Financial Periods Setup
Click On Periods Tab
Select the required Financial Year
This will display the 12 periods within the financial year selected.
Click once on the Period you wish to Block.
Click the Block Financial Period Button.
Recreate Financial Periods Setup
Systems Configuration > Administration> Financial Periods Setup
Before you run this utility, ensure that you are a financial supervisor right activated.
otherwise, you will not be allowed to continue.
Click On Extras tab and select from the drop down.
Select “Recreate Periods” Function
This function is usually done before you start your company.
.png)
Message will come up to ask if you are going to recreate new financial years.
.png)
Select the first date of the new financial year.
New financial years has been created.
For the periods to take effect, log out of system and then back in
Click OK to run Utility to recalculate.
Financial Periods – VAT / GST Category
A VAT / GST Category drop-down criterion have been added to allow the user to select the financial Tax period for his company.
This integrates into the system by allowing the user to capture VAT / GST in the current vat period for backdated invoices useful for Financial Reporting.
The tax periods and in which category the company falls under is determined by SARS or IRD.
What tax periods are available for VAT / GST?
The available tax periods are classified into five categories namely:
| Category A | Under this category a vendor is required to submit one return for every two calendar months, ending on the last day of January, March, May, July, September and November |
| Category B | Under this category a vendor is required to submit one return for every two calendar months, ending on the last day of February, April, June, August, October and December |
| Category C | A vendor is required to submit one return for each calendar month. A vendor will fall within this category if the turnover exceeds or is likely to exceed R30 million in any consecutive period of 12 months, the vendor has applied in writing to be placed in this category or repeatedly failed to perform any obligations as a vendor |
| Category D | Under this category, a vendor submits one return for every six-calendar month, ending on the last day of February and August. This category applies mainly to a vendor who carries on farming activities with a total turnover of less than R1.5 million for 12 months |
| Category E |
This is commonly referred to as the annual tax period because a vendor is required to submit one return for 12 calendar months. The vendor must, amongst other things, be a company or trust fund to fall within this category. |
VAT / GST period closes
Video training manual 2019 - Click Here
System Configuration > Administration > Financial periods setup
VAT and GST. Closes allows 1 to report on backdated documents that have VAT or GST in them.
The report will check for processed documents that have been posted in a closed GST period.
When you run the report the back dated transactions will be highlighted in blue.
There are three reports, select the report for the VAT / GST period Report.
.png)
Archive Past Financial Years
Huge ERP supports an unlimited number of financial years and can store an unlimited volume of data. When system performance begins to slow due to the amount of stored information, older financial years can be archived to improve speed and efficiency.
A financial year cannot be archived unless the preceding year has already been archived, and you will not be able to archive any year that has not been fully closed off and blocked.
Configuration > Administration >Financial Year Setup
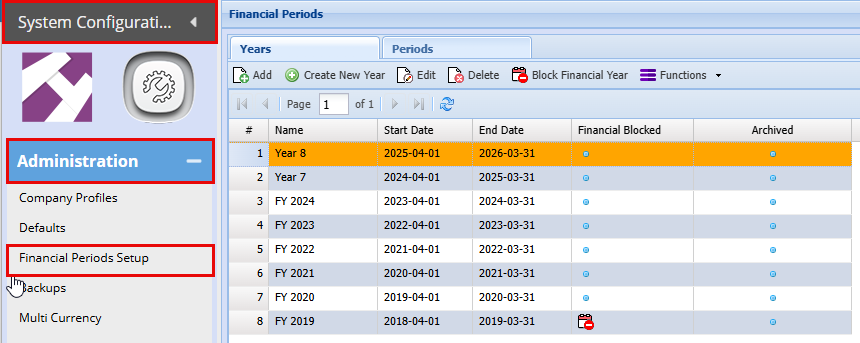
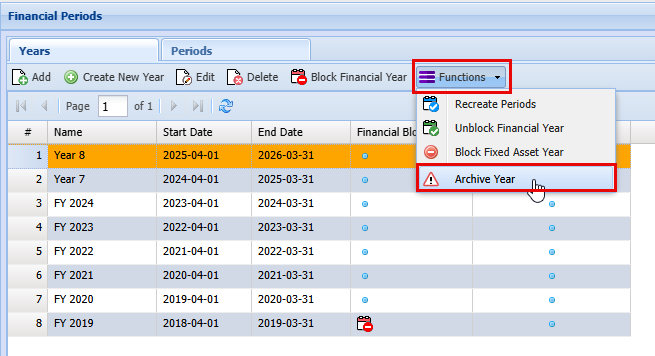
To archive a financial year:
- Configuration > Administration >Financial Year Setup
- Highlight the financial year you want to archive.
- At the top of the grid, click Functions.
- Select Archive Year.
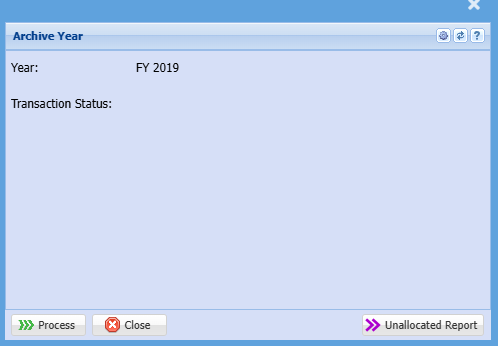
When you click on archive year you can run an Unallocated Report before processing the Archive.
Backups
Backups
Backup Liability Customer
Backup Notice
Huge Software (Pty) Ltd endeavors to maintain a backup of Licensee data, however it is strongly recommended that the User maintains a backup of their data on a weekly basis.
It is highly recommended that the user download a backup, in case all backups fail, then Huge Software will ask the customer (You) for your downloaded backup.
Manual Backup Process
Video training manual 2016 - Click Here
System configuration>Administration> Backups
to manually create a backup
Click on the Create Button and the window will appear.
.png)
Check the name of the backup file and then click on the “Save” button.
.png)
You will be directed back the main window. Click on the Search button until the “Size” Column amount stops growing.
This indicates that the backup is completed.
Backups are stored on the server where the Cache database is stored.
.png)
Automatic Backup Setup
System configuration>Administration> Backups
Click on the Automatic backup button.
.png)
The following window comes Up.
Here you add an automatic schedule to run a backup.
Select the Interval and the time you would prefer the backup to run.
add a tick on the zip and save.
.png)
Creating and Restoring Backup
Creating a Backup
To Create a backup manually, go to:
System configuration>Administration>Backups
Click Create
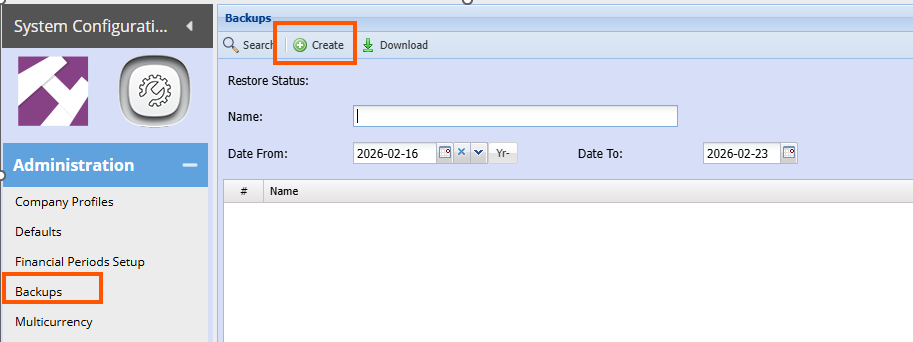
Leave the file path as is and only enter your initials or preferred description at the end of the file name
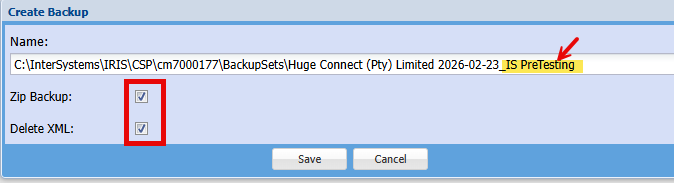
Ensure both tick boxes are ticked
Click Save
Click Search after a minute or 2 and notice the file size
Click Search again
If the file size stops increasing, the backup is complete.

Restoring a Backup
To Restore a backup, ensure all users are logged off the system.
Important: Restoring a backup will erase any transactions or setups and information added on the database subsequent to the date the backup being restored was taken.
Go to : System configuration>Administration>Company Profiles
Search
Select the company name (Click once on the name)
Click the function Drop down
Select Set Backup restore password
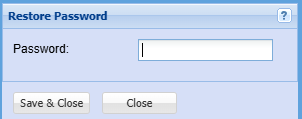
Enter a password
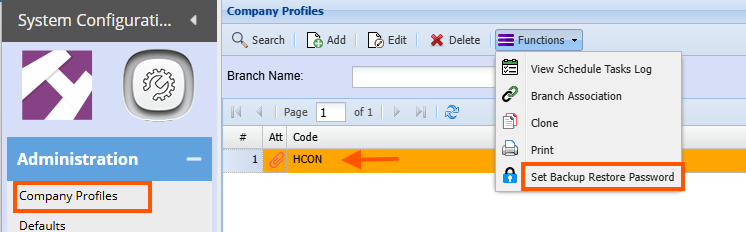
Save and Close
Go to: Administration>Backups
Click Search
Click once on the backup required
Click the Functions drop down and select Extract Backup 
Below message will appear
Wait for a minute or 2 depending on the size of your database
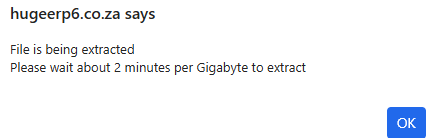
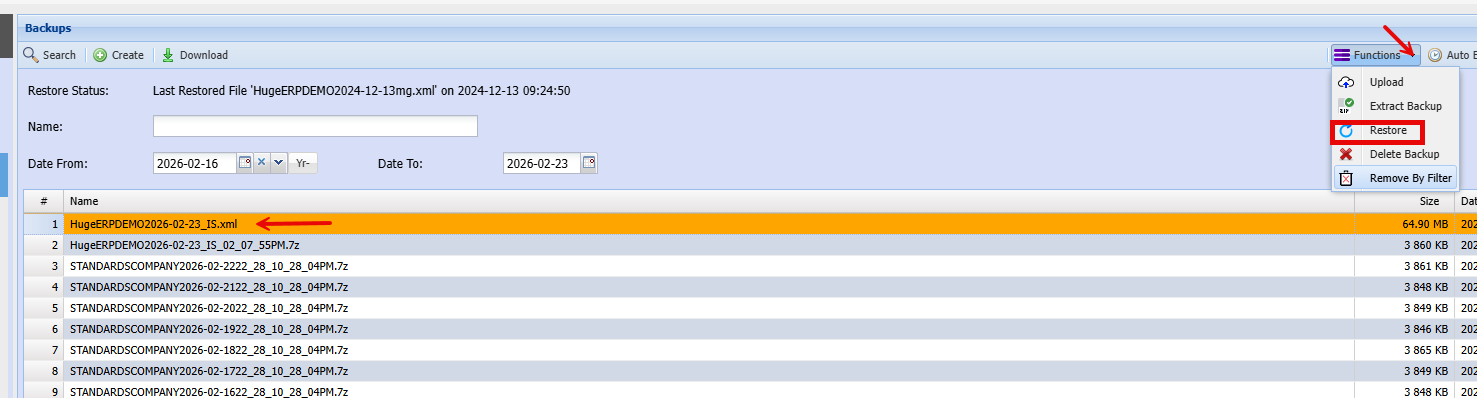
Click Search
Ensure you have selected the .xml backup file (this is the unzipped file you extracted in above step)
Click functions drop down
Select Restore
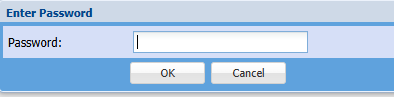
Enter the password you created earlier
Click Ok
The backup will now begin restoring
Click ok to the pop-up message
Once the backup has been restored, you will note the last restore details will be populated with the current date & time
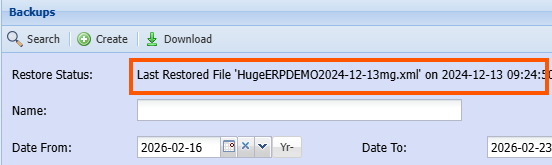
This then completes the backup restore procedure
Restore Procedure
RESTORING OF A BACKUP
1. Ensure that you have a backup of your current data before
restoring.
To restore a backup of your company, there are two steps:
- Create a restore Password
To do this: System Configuration> Administration>Company Profile
Click the Functions dropdown
Select: Set backup Restore Password
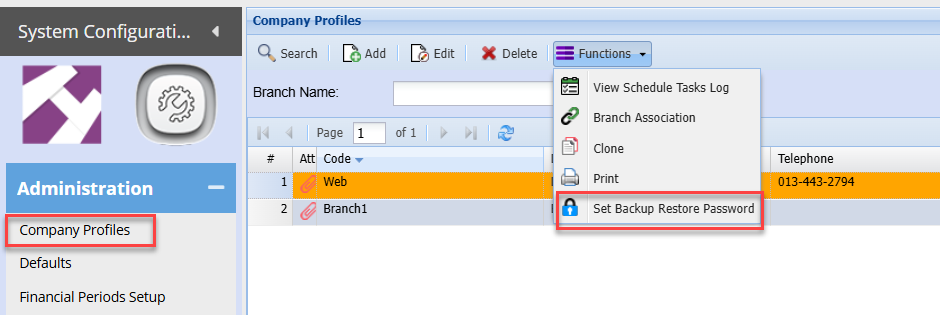
Enter a required password
could be only a number if so deemed, eg. 1
Note: There is no specific criteria for this Password. ie. number of characters, etc
Password could be anything really.
Save and close
2. Restoring the Back up
Go to: System Configuration>Administration>Backups
Search the required backup
Click Functions
Select Extract Backup

Allow the system to unzip the backup file. (if the company data volume is not excessively large, allow approximately 3-5 min)
Search
Then click once on the unzipped file .. this will be indicated by .xml at the end
Click Functions Dropdown again
Select restore
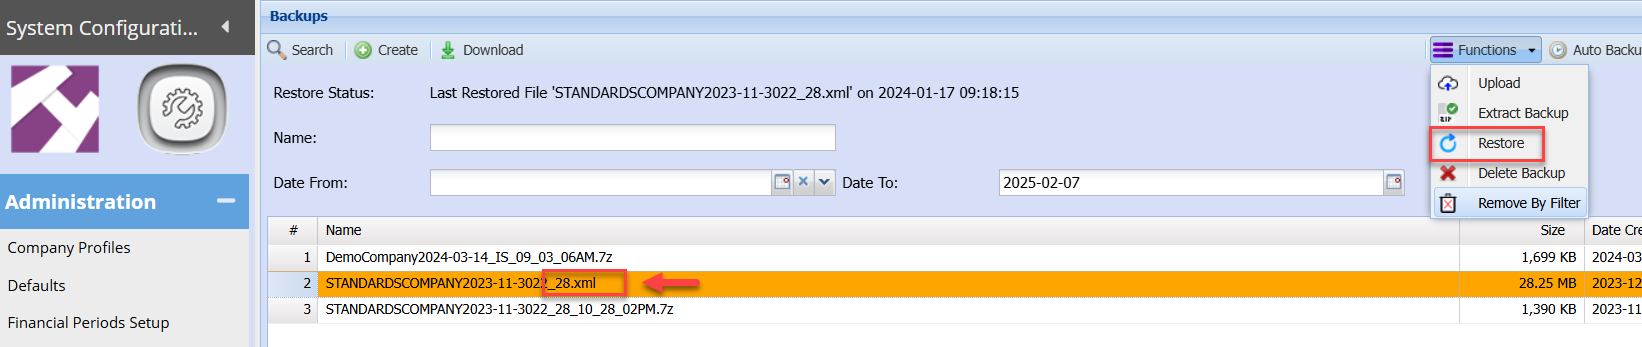
Enter the password created in step 1

Click Ok
Click Ok Again
The system will then start restoring the backup and display on the top next to restore status
Once complete, the status will read "backup... has been restored"
Once the backup has completed please log out and log back into company.
Backup download
Before going to the backup download one has to enable a password to download backups.
To restore a backup one must first create a backup restore PASSWORD which can be created under
System Configuration > Administration > Company Profiles.
Click on the Extras tab and click on the “Set Backup Restore Password” button.
.png)
Enter a password and click on the Save button.
.png)
Click on OK and then on the “Close” button.
Go back to the Backups screen System Configuration Administration Backups.
.png)
Search and find your backup that you want to download.
NOTE: You can only download the files that have a .RAR file extension.
Click on the Restore tab at the bottom of the screen.
.png)
Enter your password.
.png)
Click on Save to Save to your local drive.
Moving a backup
Moving a Backup from One Place to Another
After creating a backup of the set of books on Machine A (See document on how to create a backup).
ON Machine A go to the drive that Cache has being installed on. Browse to the folder C:\CacheSys\CSP\[Company Namespace]\BackupSets. Find the backup that was done and copy it to disk.
MOVING A BACKUP FROM ONE PLACE TO ANOTHER
After creating a backup of the set of books on Machine A (See document on how to create a backup).
ON Machine A go to the drive that Cache has being installed on. Browse to the folder C:\CacheSys\CSP\[Company Namespace]\BackupSets. Find the backup that was done and copy it to disk.
Now go to Machine B and copy the backup to the new location on the machine drive.
C:\CacheSys\CSP\[Company Namespace]\BackupSets. If the folder called “Backup Sets does not exist” create the folder with the Case on the letters indicated.
Backup Restoring
Restoring of a Backup
1. Ensure that you have a backup of your current data before restoring.
.png)
.png)
.png)
.png)
.png)
.png)
Once the backup has completed, please log out and log back into company.
Backup Download
Download backups from Webaccounting
Before going to the backup download one has to enable a password to download backups.
To restore a backup one must first create a backup restore PASSWORD which can be created under
System Configuration > Administration > Company Profiles.
Click on the Extras dropdown AND click on the “Set Backup Restore Password” button.
.png)
Enter a password and click on the Save button
.png)
Click on OK and then on the “Close” button
Go back to the Backups screen System Configuration Administration Backups.
.png)
Search and find your backup that you want to download.
NOTE: You can only download the files that have a .7z file extension.
Click on the Restore tab at the bottom of the screen.
.png)
Enter your password
.png)
Click on Save to Save to your local drive
Backup Creation
To create a backup go to System
Configuration >Administration > Backups.
.png)
Click on the Create Button and the window will appear. Check the name of the backup file and then click on the “Save” button.
.png)
You will be directed back the main window. Keep click on the Search button until the “Size” Column amount stops growing. This indicates that the backup is completed. Backups are stored on the server where the Cache database is stored. It stores it in the following path C:\CacheSys\CSP\[Company Namespace]\BackupSets. All backups are stored in this location, please ensure that you take these backups off the server onto a offsite device such as DVD disks etc.
.png)
Clear Backup Files
This function is used to clear backup files stored in the folder.
Backups are done daily and when you are on the system for a long time, there are many files.
As a general rule for clear of backups is as follows:
| 1 | The company will retain full backups for everyday for a three-month period. |
| 2 | After this the backups are keep for every month end and beginning of month |
| 3 | The backups are backed up into the cloud for storage. |
| 4 | Backups are cleared in the folder |
The function will search for all backups and based on the retention days, will keep those days and then move all other backups to a separate folder.
This folder will be deleted, and files removed from server.
Go to Backups
Select your date range to clear.
The Date From should be set to the last time you cleared the files (It does not matter if you don't have the correct date)
Date To is important to ensure that you don't remove files after that date. (This is the date we govern to ensure we keep 3 months' worth of everyday backups.
Click on the Restore drop down to find the remove by filter function.
.png)
Click on the Remove by Filter
.png)
After you click on Remove by Filter
This window will come up to confirm what you want to remove.
Confirm the Date from and Date to
Keep Month days defined.
| Start Days | set to 2 by default which means it will keep the 1st and 2nd day of every month. |
| End Days | set to 2 by default which means it will keep the last 2 days of the month, let's say 30th and 31st. |
.png)
Wait for function to finished.
After it is complete the grid will refresh, and the files left are first two days of month and last two days of month.
.png)
The data will have moved to a folder under the database in the relevant company database.
If any files were deleted by mistake, you can cut or copy them back to the company.
After the data files have been checked then these will be deleted.
.png)
Multi-currency
Multi-currency
Multicurrency
Video training manual 2016 - Click Here
This menu allows you to Setup additional currency codes, description, symbols and rate.
This is where the default exchange rate of a particular currency will be set.
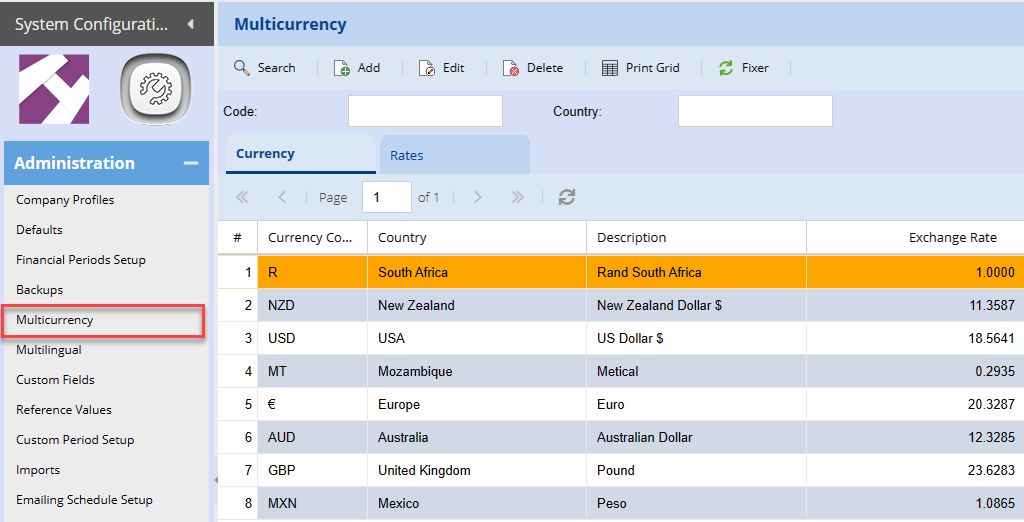
The rate is used at the time of creating a document, one can then override the exchange rate on the document. Otherwise, this default exchange rate will apply.
| Search button | allows the user to search existing multicurrency by code or description |
| Add button | insert a new Multicurrency Item |
| Edit button | view/edit the currently selected Multicurrency Item |
| Delete button | delete the currently selected Multicurrency Item |
| Print Grid button | allows you to print the information displayed on the search grid |
| Fixer | An external website that keeps track of currency rates. |
Adding a new currency
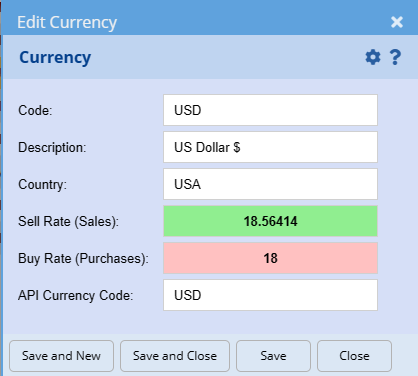
| Code | The symbol for the currency |
| Description | Add a short description of the Currency. Usually it's short name. |
| Country | A description of the country of the Currency. |
| Sell rate | |
| Buy rate | |
| API Currency Code | The international currency code used in the API to Currencies. |
Note: The system uses the cell rate for both debtors and creditors in order for it to work out the rate on the documents.
The buy rate is only an indicator here and is not used in the system.
Setting Up Multi-Currency for Debtor
Video training manual 2016 - Click Here
Debtors module> Configuration> Debtors Setup
.png)
.png)
Add the debtor Information
Under accounts details you will be able to select the preferred currency for the debtor
and select it
.png)
Once an invoice is raised against this debtor the chosen currency is locked to it you will not have an option to change it.
.png)
Setting Up Multi- Currency for Supplier
Creditors Module>Configuration>Creditors Setup
Add supplier details.
.png)
Go to account details and select the preferred currency for the supplier.
Multilingual
Multilingual
Multilingual
Allow users to access the company in a different language
Unlimited amount of languages
Setup all labels in your language
Language Tab
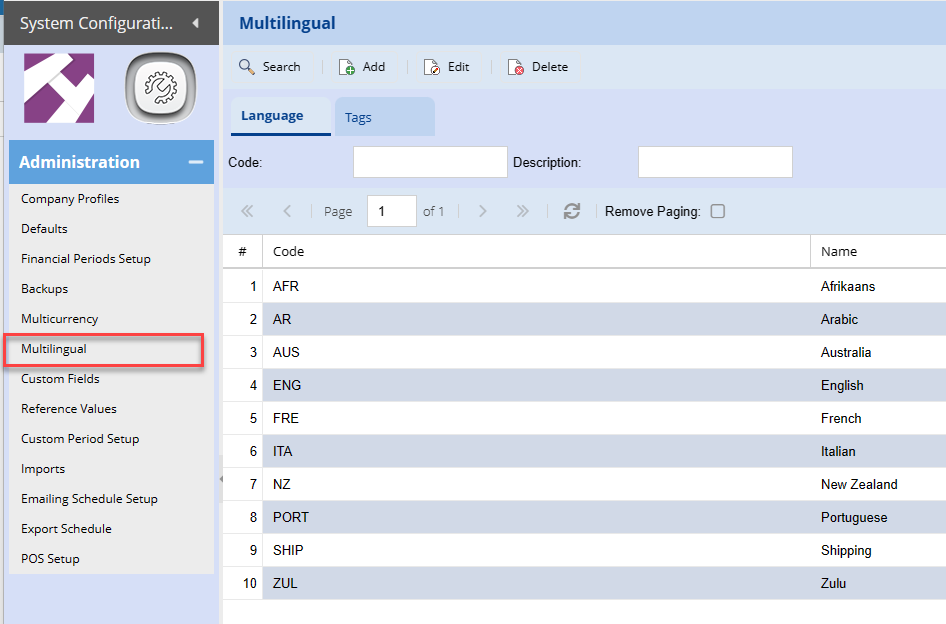
Current maintained languages.
| English | South African English |
| New Zealand | New Zealand and Australia English |
| Shipping | Shipping English, used mainly for the shipping industry |
Discontinued languages.
| Afrikaans | |
| Arabic | |
| French | |
| Italian | |
| Portuguese | |
| Zulu |
Tags Tab
This allows you to maintain and view current language tags for a specific language.
Clicking the tag value cell to edit.
Remember to click save before you exit do another search or exit the page.
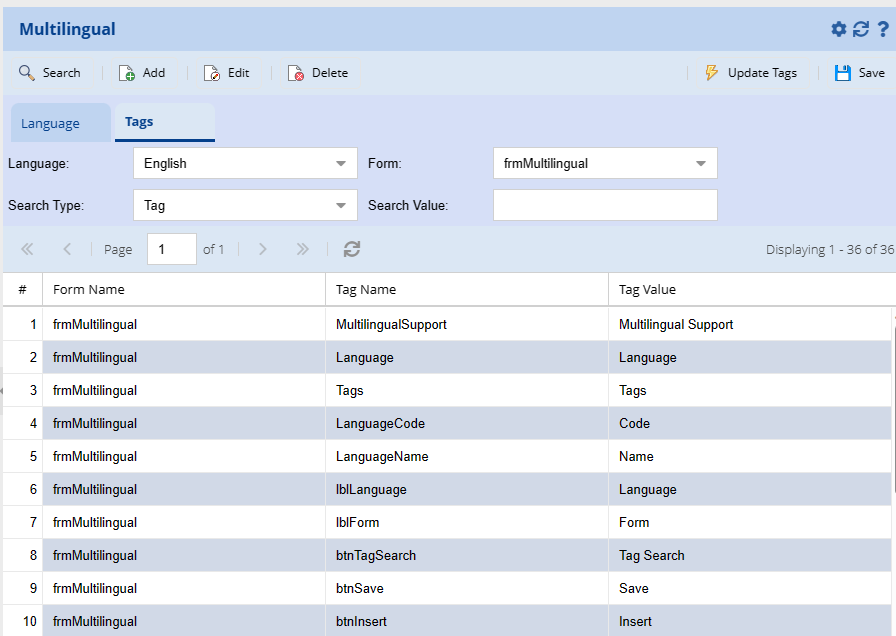
Custom Fields
Custom Fields
Custom Fields
Video training manual 2016 - Click Here
Allow unlimited number of custom fields to be created and then be seen in most documents in the system
Add as many custom fields as you require for additional information.
Custom Fields give you the flexibility to add Specific Information to your customer, Suppliers and User List
It Helps you add and track additional data on items
The customized information can be included in your forms and reports.

Add a custom field
Video training manual 2019 - Click Here
Custom field set up for a checkbox.
I am creating this custom field so that I can set it up against my customers, to distinguish between different categories of customers.
I want to use a checkbox in this case.
First add the custom field and indicate what type of control type it is and whether it be a checkbox or text box.
You can go and create a category that allows you to break up further dropdowns on your custom fields. this is not a requirement however if you have a lot of custom fields it's better to categorize them.
The next tab that you need to go to is the entity links that means you need to link the custom field that you created to somewhere in the system.
You can link one custom field to multiple places in the system, example customer set up, supplier setup an inventory setup using the same custom field.

Custom fields on stationery
In Custom Fields under the Entity Links Tab. Click on the Entity in the drop down that you require and click on search.
Find the custom field that you do not want to appear on the printable documentation and click on Amend.
Take the tick off the Printable tick and click on Save and Close.

By removing the tick on the Printable label this will mean that when printing the document for the customer is will not see that custom field.
Reference Values
Reference Values
Reference Values
Video training manual 2016 - Click Here
Reference Values screen is where all the document numbers are begun in order to run in sequential order. The prefix of the documents can be changed for General ledger, debtors, creditors, Inventory and job costing.
This area is very important for first time startup of books. The next invoice number from the old accounting system should be used in order for the system to run in sequence with the old system.
Useful when you are back dating some transactions with specific number sequences.
The Reference values for all the source documents in the system are set here
General Ledger tab
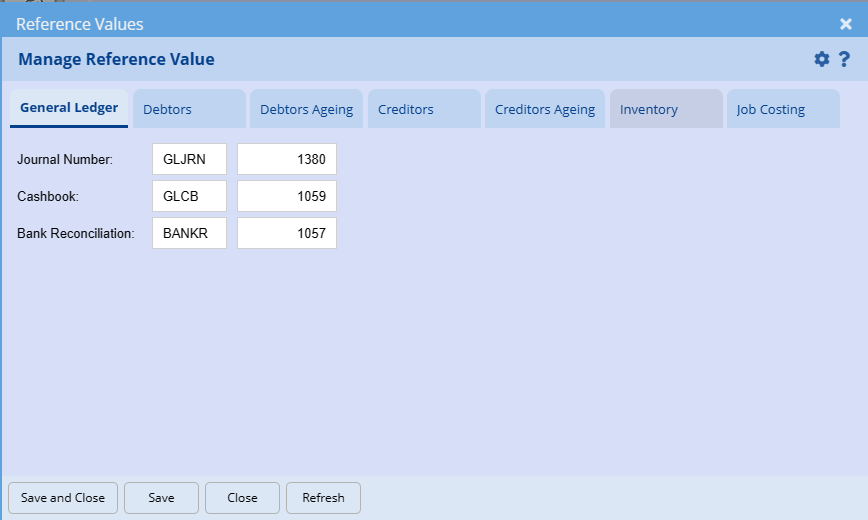
Debtors tab
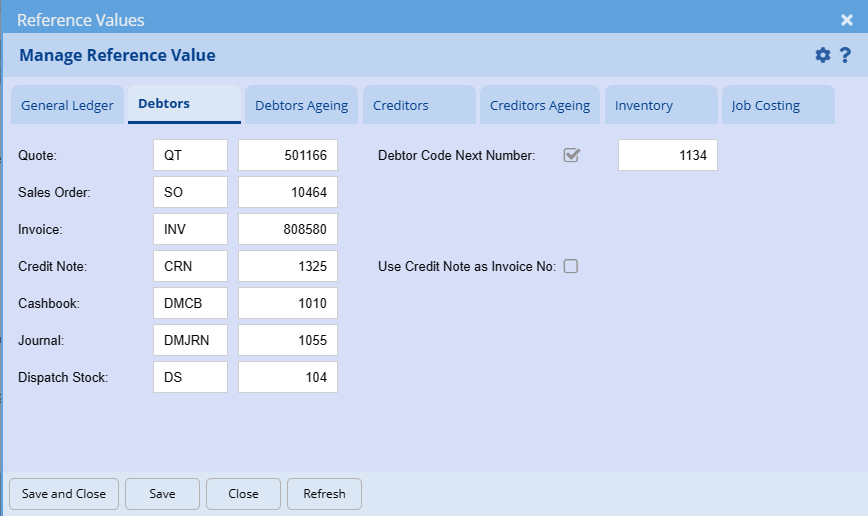
Debtors ageing Tab
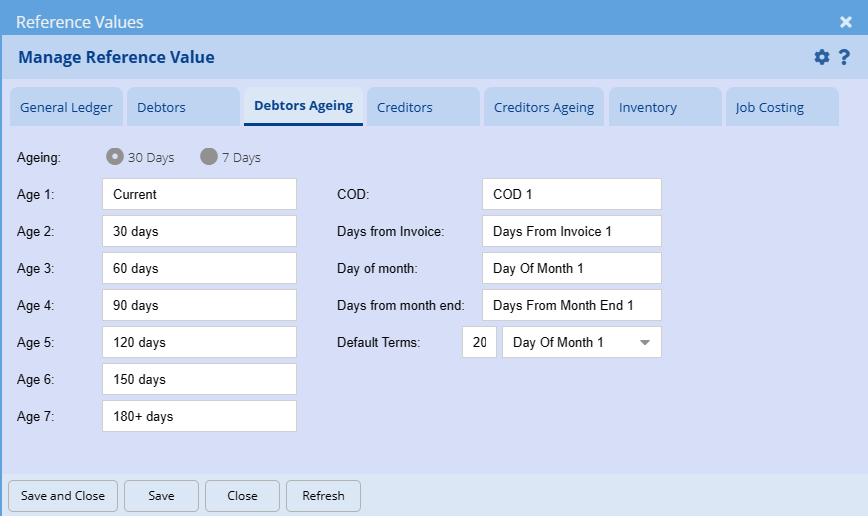
Creditors Tab
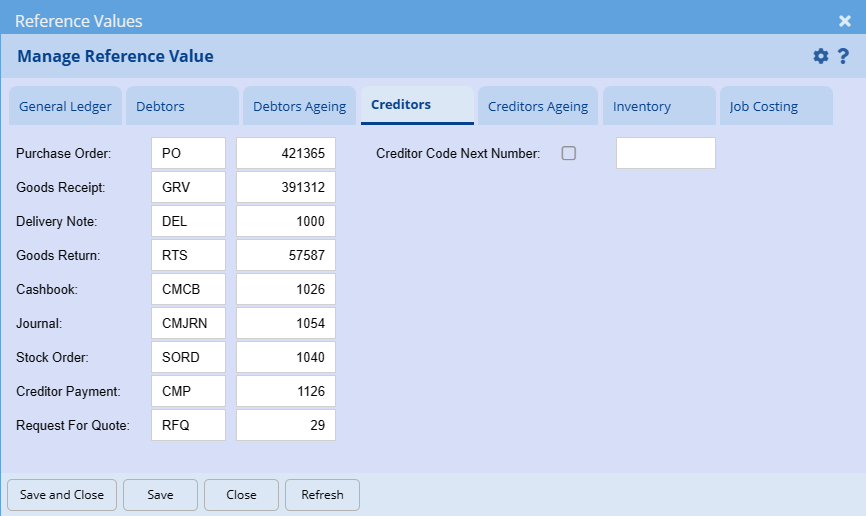
Creditors ageing Tab
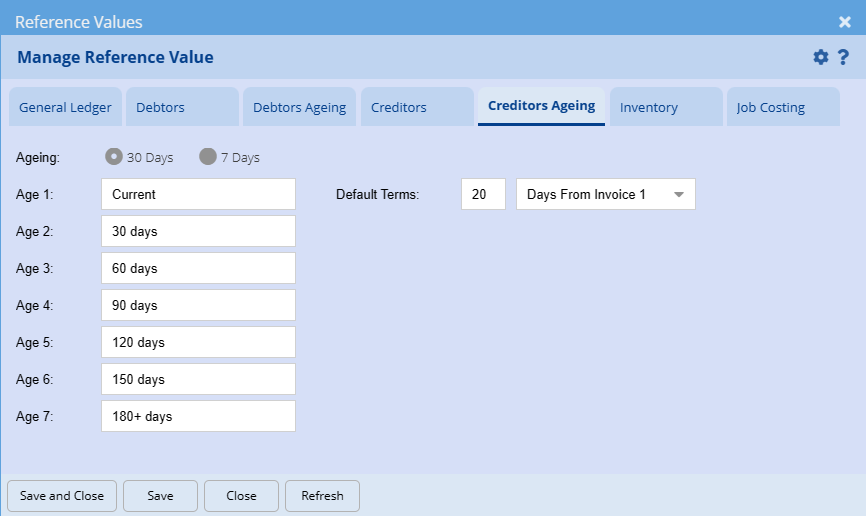
Inventory Tab
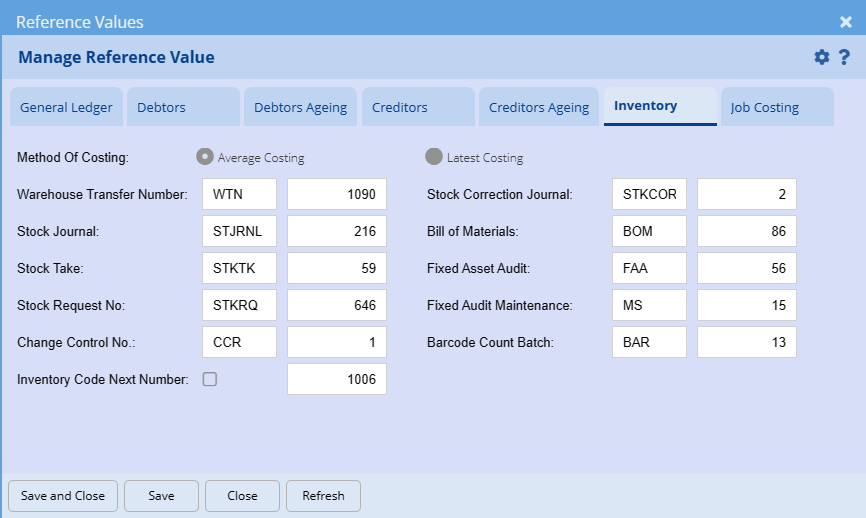
Job costing Tab
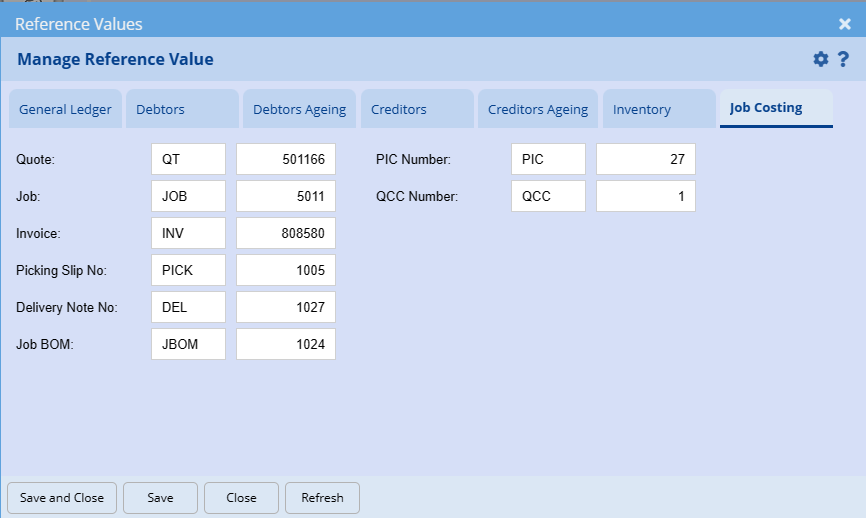
Custom Periods setup
Custom periods
Custom periods setup
Custom periods help you select an alternative way of running reports.
While the financial reports could be running on a monthly.
The custom periods can run on a weekly basis, you could also have it run as an alternative monthly. Running from the 25th to the 26th of the month.
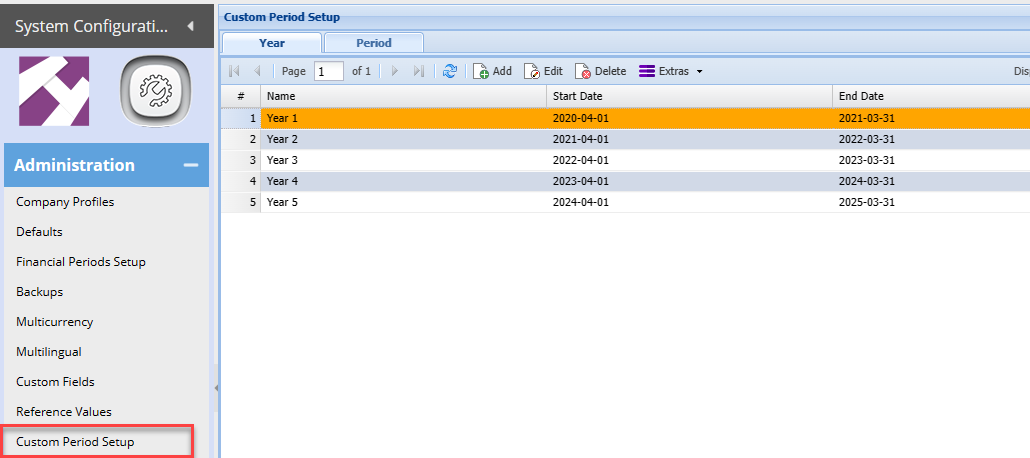
Here is an example of the selection for custom period in a report.
.png)
Imports
Imports
Imports
System Configuration>Administration> Imports
we have updated the system with the imports files that can be downloaded
.png)
Select the file and click on download.
.png)
The file can then be used to populate data and import in the system.
Pricing Level export and import
System Configuration>Administration> Imports
Before proceeding with this, please ensure you have done a backup.
To export your current pricing levels from the system, go to the reports menu group in one of the modules and then click on the report lists menu item.
.png)
Select the inventory costs report under the inventory category. Ensure you have the price levels selected as ALL so that you select all your price level categories. Click on the “Generate Report”
.png)
Once the report is run, click on the copy to clipboard button and take the report to excel (follow the help file on how to use the copy to clipboard function)
.png)
Export the pricing levels once the file is in Excel, remove the headers so you have the stock code at the top of the first row
Remove the columns called
| 1 | Supplier Cost |
| 2 | Unit Cost |
Use the selling price column to amend your prices
.png)
Note:
The price column will contain both the percentage mark-up amount and the actual amount, the column called mark-up or amount will tell the import what to use.
Use the % mark-up column to fill in your Selling Price Column with the percentage that you want to mark-up the item by.
After you have sorted your item prices taking note that you have ensured that the percentage amount is indicated in the selling price column
These columns below are the only columns you will need to effect the import
|
INVENTORYCODE |
Price Level |
Markup / Amount |
Selling Price |
.png)
Click on the upload button and select the import type as pricing level, then click on the browse button to find the CSV file you have saved
.png)
Click upload the file will be displayed under the pricing level tab click on the Import Button to Import the changes.
Change Inventory codes import
Use this function to import and change.
| 1 | New item code |
| 2 | Item description |
| 3 | Long description |
.png)
The fields for import are as follows:
The CSV must be semi-colon (;) separated
|
Old Code |
New Code |
Description |
Long Description |
|
|
|
|
|
|
|
|
|
|
One can import using this file to change the description and long description by using the same item code in the Old Code and New Code
Template Maintenance
Adding and maintaining templates
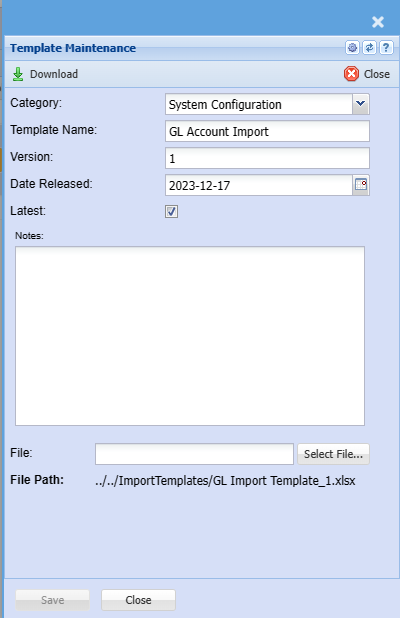
| Download | Download template |
| Category | Specify the Category |
| Template Name | Enter a Name |
| Version | Define version |
| Date Released | When was this released |
| Latest | Is this template the latest version |
| Notes | Add in notes |
| File | Select the template to upload |
| File Path | See the file path |
Inventory images import
System allows for a bulk images import.
This can only be done by a system administrator on the server that you are hosted.
Prepare a folder with all the images.
Prepare the Excel file with links to the images.
| StockCode | Image Description | Image file | Thumbnail Description | Thumbnailfile |
| 1051 | 1051_M | c:\images\beauty\A\1051.jpg | 1051_T | c:\images\beauty\B\1051.jpg |
| 1151 | 1151_M | c:\images\beauty\A\1151.jpg | 1151_T | c:\images\beauty\B\1151.jpg |
| 1271 | 1271_M | c:\images\beauty\A\1271.jpg | 1271_T | c:\images\beauty\B\1271.jpg |
Server code
- Copy data to server
- Go to the Terminal
- Change to Namespace
Run this code
| do ##class(InventoryManagement.Attachments).Import("c:\images\Youngblood\import.txt") |
Email schedule setup
Email schedule setup
Emailing schedule setup
Set up emailing schedules in the asset. in the asset tracker module for the following functions:
| 1 | Guarantee expiry date |
| 2 | Next service date new |
| 3 | Registration due date |
| 4 | Return date |
| 5 | WOF due date |
The reminder emails can be sent up to be sent with a number of prior days or on the day.
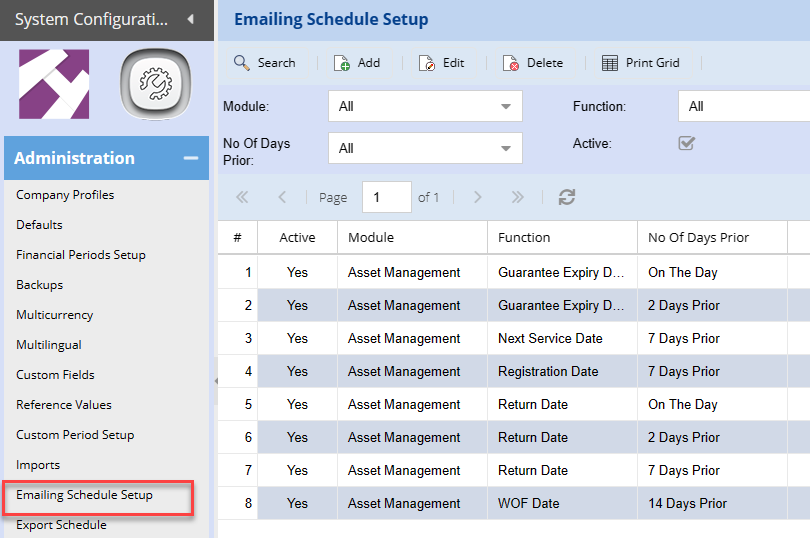
Email Schedule Maintenance
Setting up who receives the email
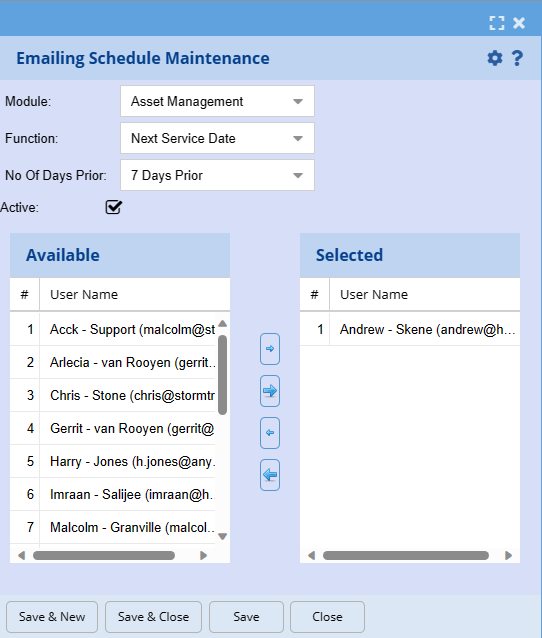
| Module | Select the module |
| Function |
Select the type of function Next Service Date |
| No of Days Prior | How many days prior do you want the report to run |
| Active | Active or inactive |
| Available | Users available to send email to |
| Selected | Selected users receiving the email |
Export Schedule
Export schedule
Exports schedule setup
Set up schedules to export data to csv file to be used in external data analytics programmes like Power BI.
One can also set up batch reporting on a monthly basis, for example. financial position, financial performance and trial balance.
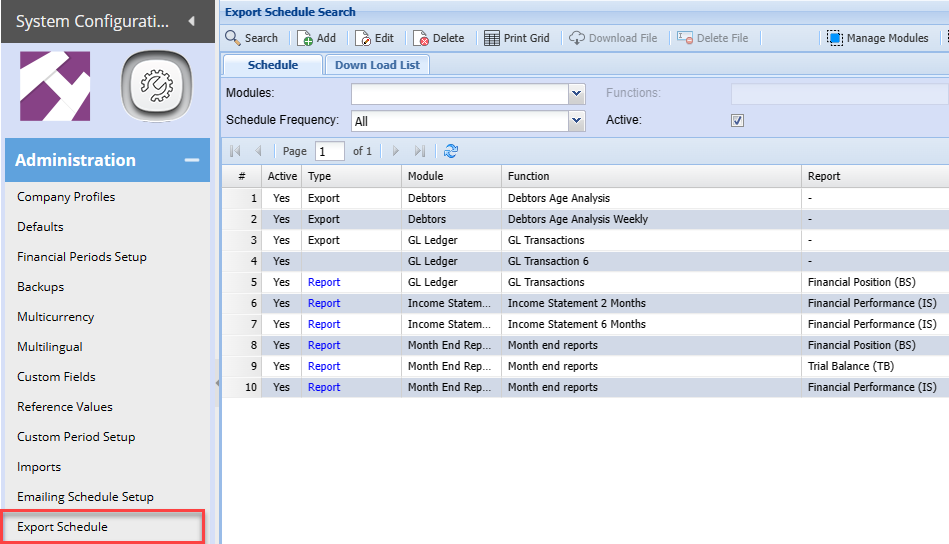
Export multiple files
Select multiple files for download (Use the Download selected highlighted in blue)
Select single files for download (Use the Download File highlighted in red)
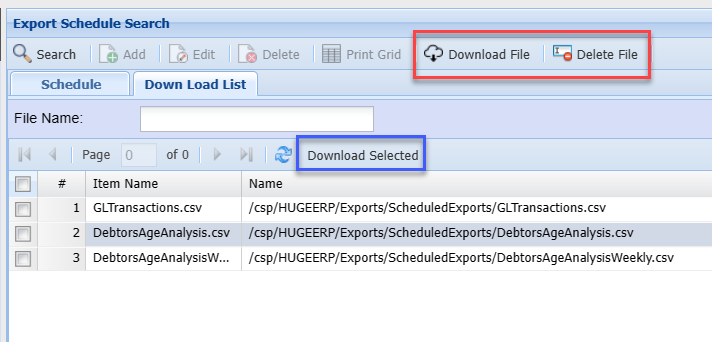
Export Schedule Maintenance
The export schedule allows you to setup multiple ways of exporting source data for review.
SQL queries can be gotten from your ERP consultant
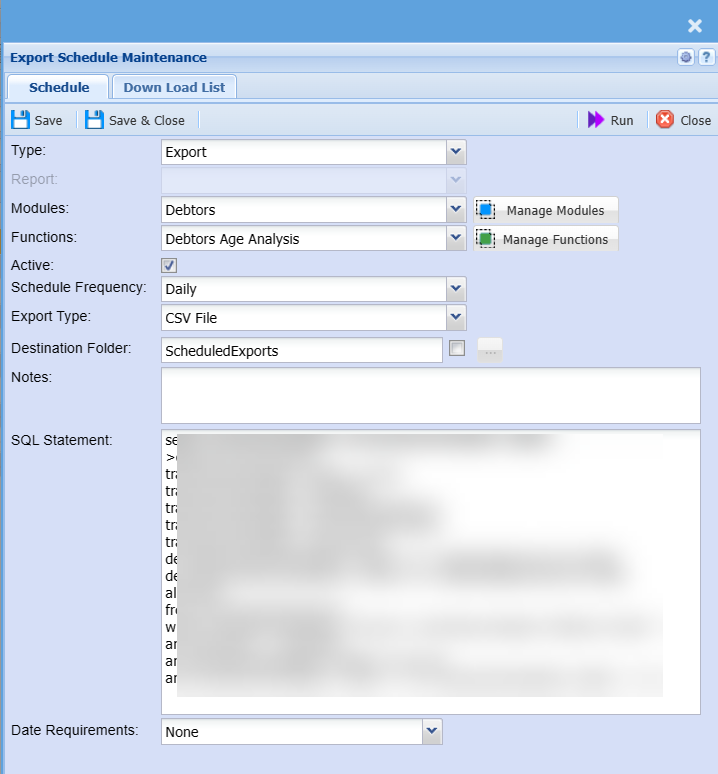
Schedule Tab
Fields defined
| Type |
Export - Exporting data type Report - Creating a report to export |
| Report | Reports predefined when Report type is selected |
| Modules | Select from a drop down menu where one has defined the module |
| Functions | Select from a drop down menu where one has been defined under the module |
| Active | Make the export or report active or inactive |
| Schedule Frequency | Select from a drop down menu for daily, weekly or monthly |
| Export Type | Specify CSV or XML |
| Destination Folder | Specify the default folder |
| Specific destination | Click on the button to set the path for files to be exported to. This is used for one drive for share point. When using this, the file will be inserted into this folder and the default folder |
| Notes |
Enter the notes of what the export is about Short description of export |
| SQL Statement |
Paste the SQL query |
| Date Requirements |
Only required when reports are run. SQL query works with a date |
Download List
Download the CSV or delete the file
Files are overridden each time the schedule runs
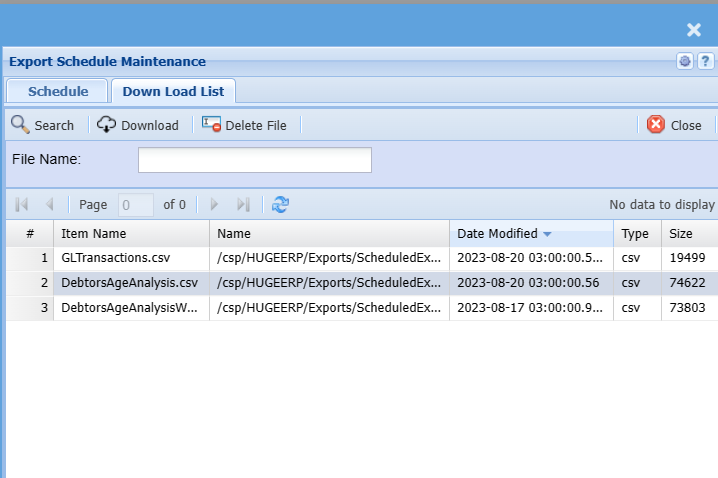
Manage Modules
Add Modules (Grouping of exports)
Using groups helps define the exports, works well to define monthly reports for certain users to receive
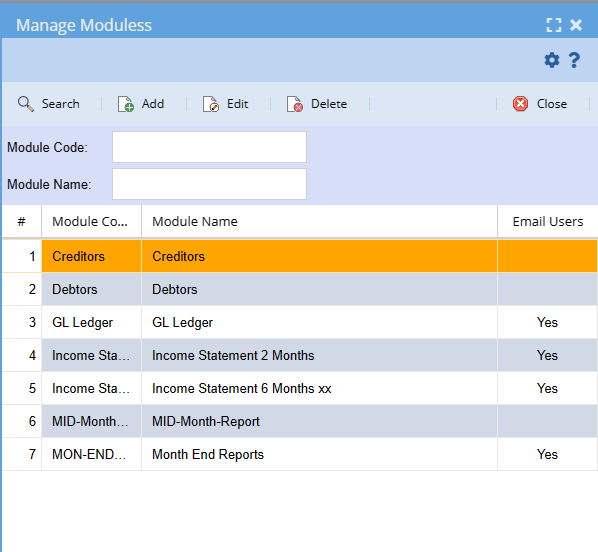
Module Add / Edit
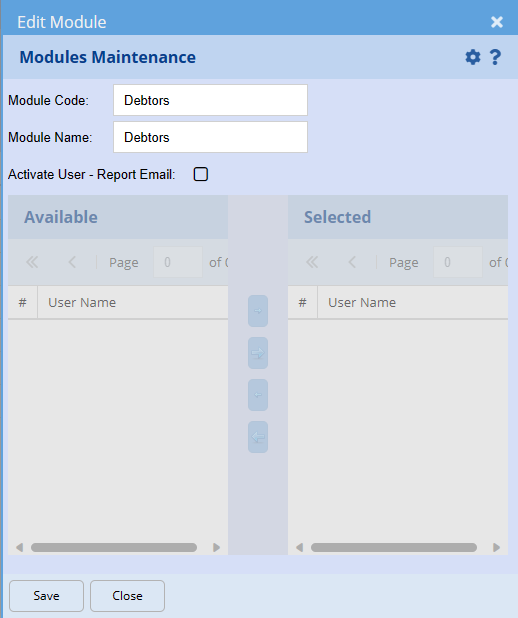
| Module Code | Create a unique code |
| Module Name | Enter a name |
| Activate User - Report Email | Activate to send a report |
| Available and Selected | Select emails to be sent the report |
Manage Functions
Add and Maintain Functions which are linked to the modules.
This defines what is been exported.
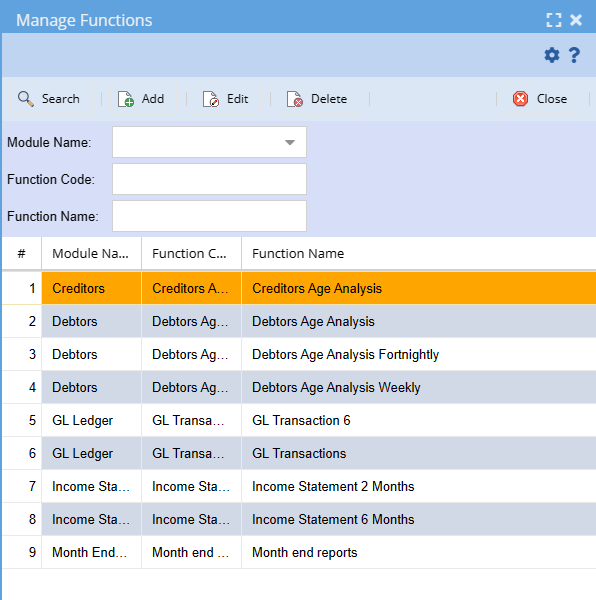
Add / Edit Function
| Module Name | Select the module the function will be linked to |
| Function Code | Add in a unique function code |
| Function Name | Enter a name to define the function |
POS Payment Setup
Setup Payment methods for POS and invoice
POS Setup
Setting up Till and payment methods for both POS and invoice payments
(POS in Huge is no longer in use, however this payment methods are used in invoice payments)
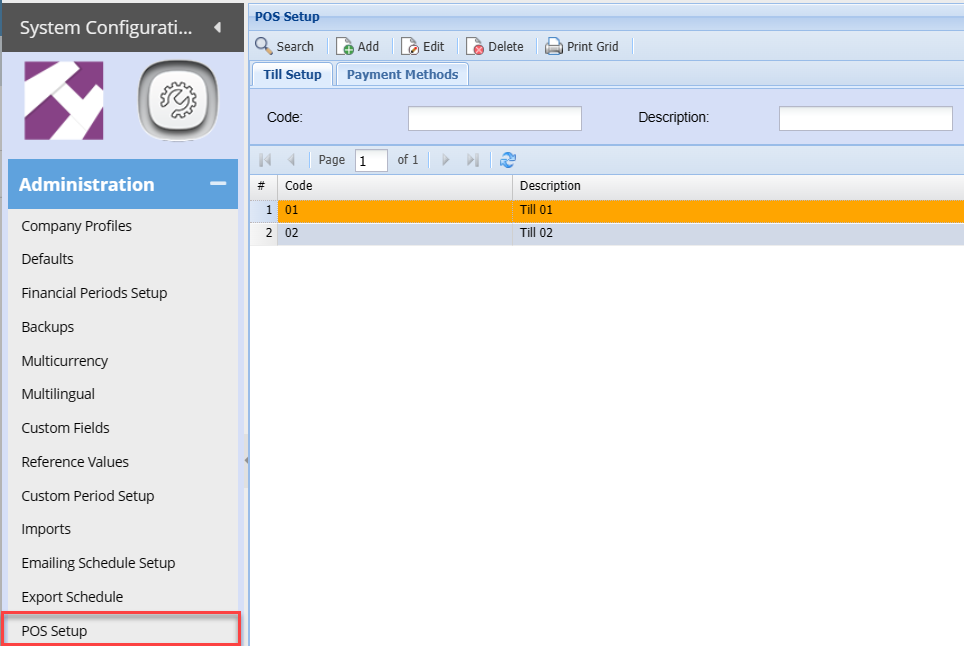
Till Setup
Setting up a Till and defining the payment methods
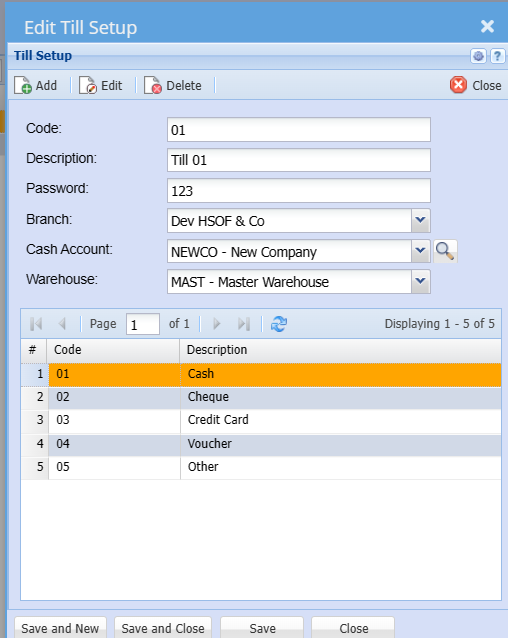
Payment Methods
Setup the various payment methods
Only one of the payment methods can be used as Is Credit Card
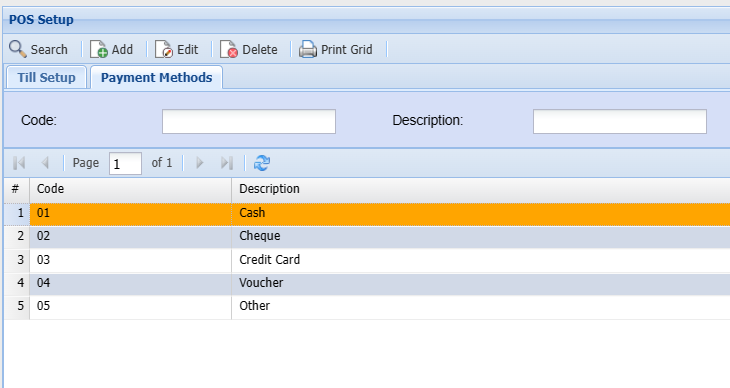
Adding or editing a payment method
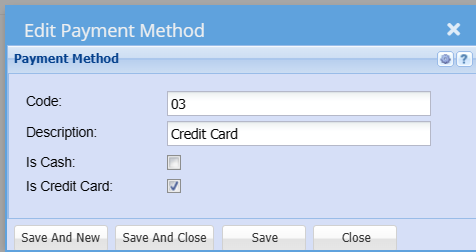
POS Payment GL Links
Setup links for each of the payment types
| 1 | Cash |
| 2 | Debit Card |
| 3 | Credit Card |
| 4 | Voucher |
| 5 | Other |
Cash Payment setup
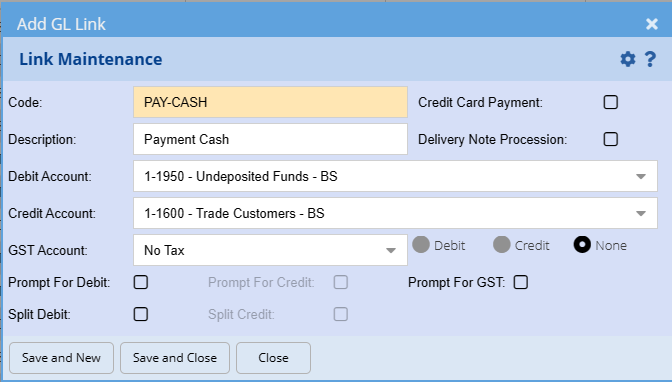
Group setup
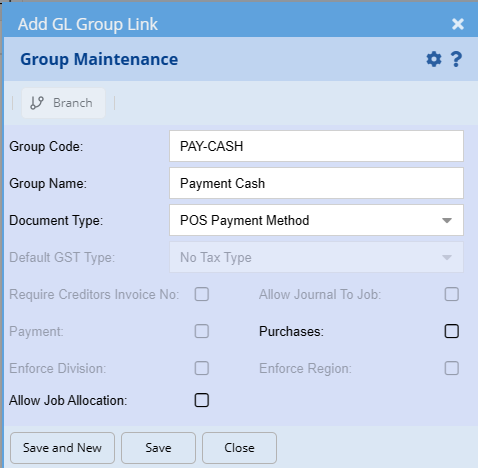
Link Payment and group
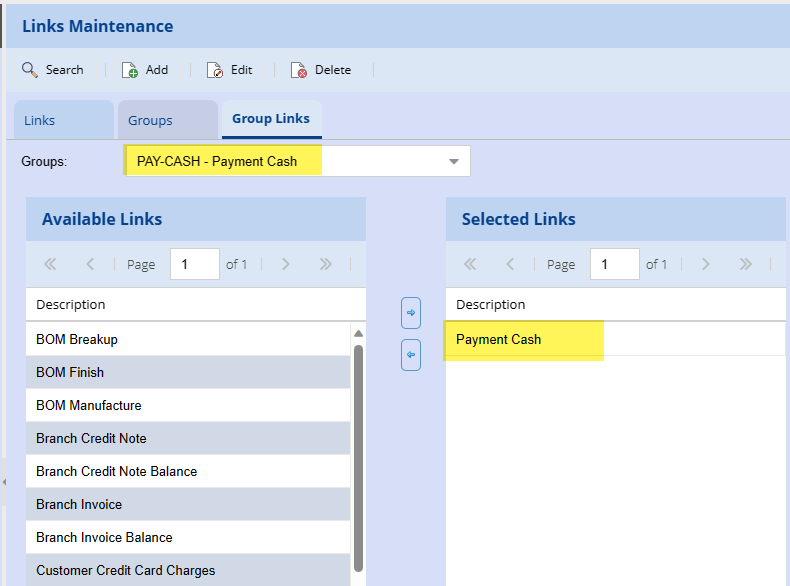
Debit Card Payment
Ensure you have a Bank clearing account.
This is to ensure that when the amount is imported from the bank, you don't double up but push to clearing account.
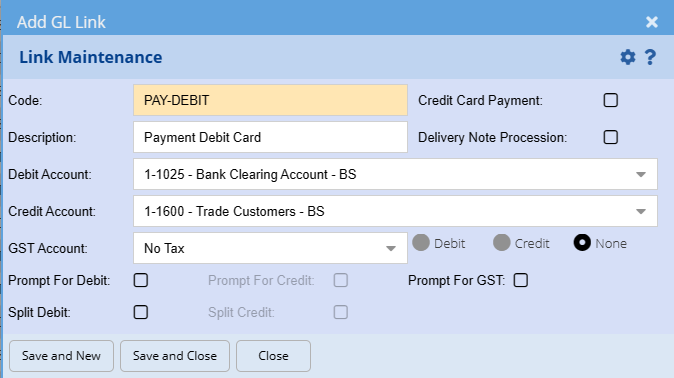
Group setup
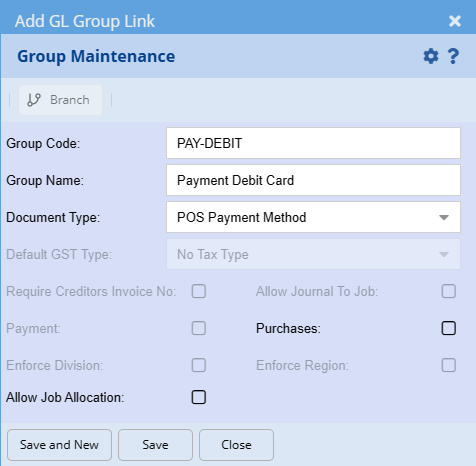
Link group and payment method
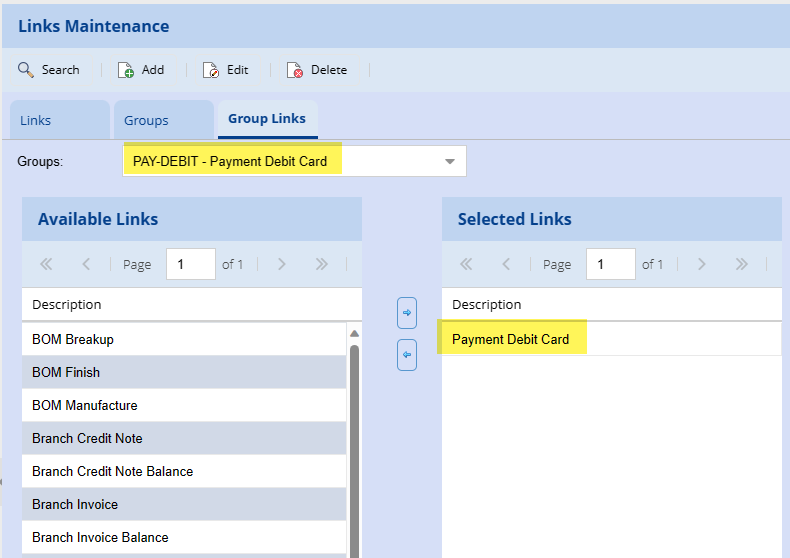
Credit Card Payment
Note that the credit card has an additional tick for chargers
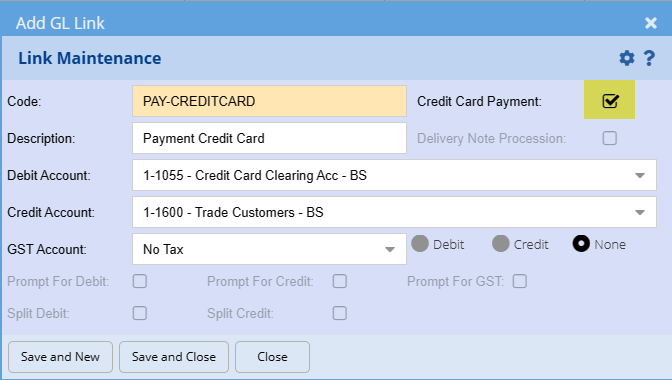
Group setup
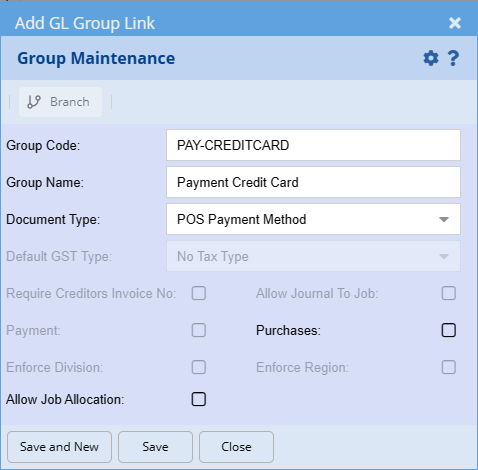
Link Group and payment method
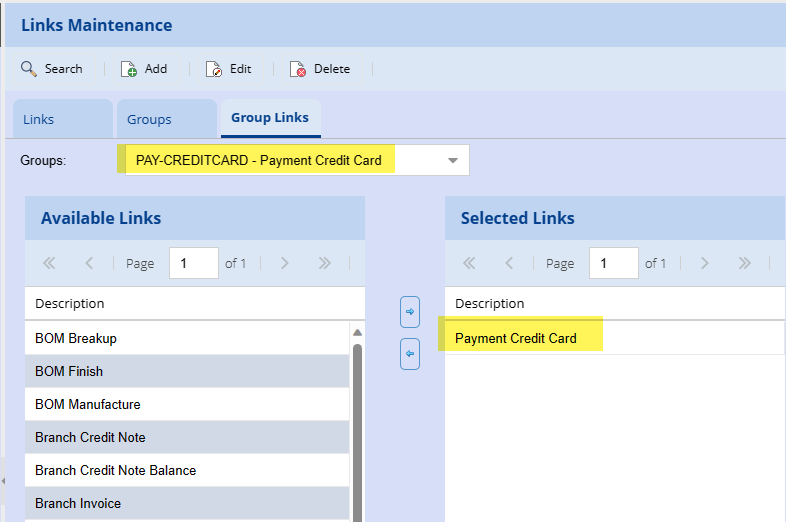
Payment Voucher
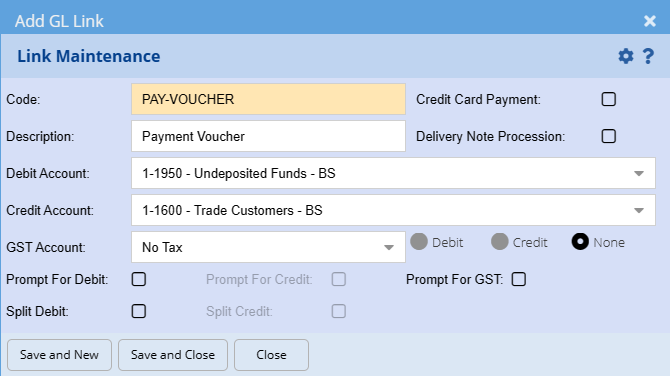
Payment Group
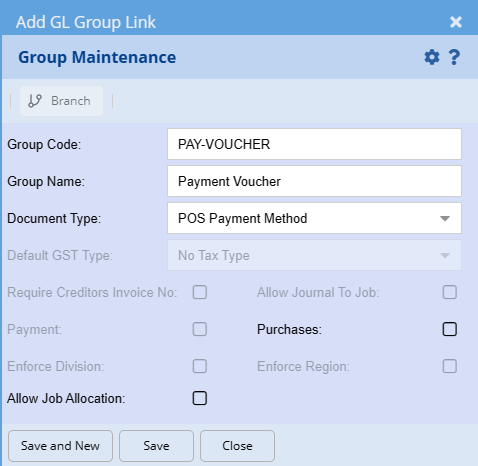
Link group and payment method
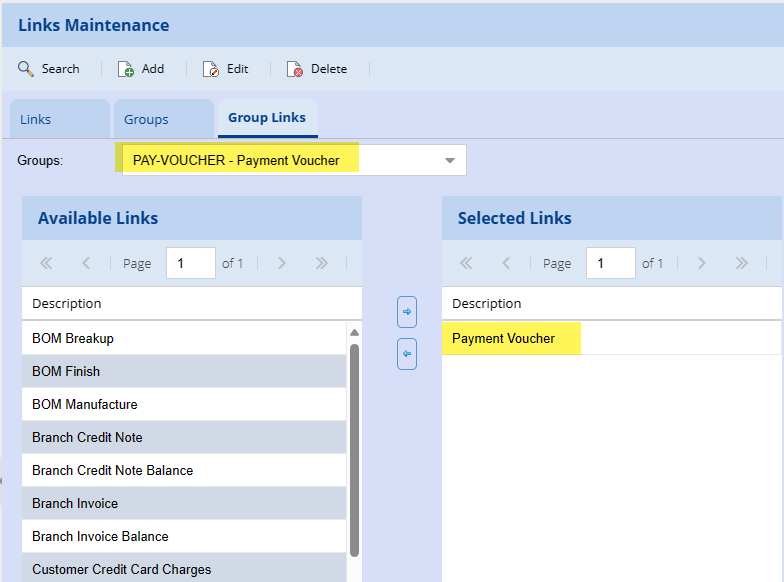
Payment Other
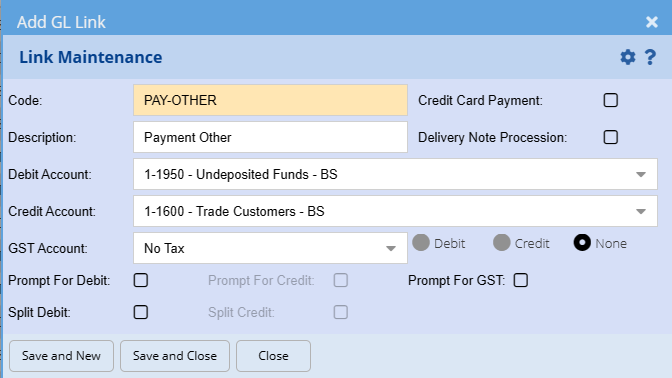
Payment Group
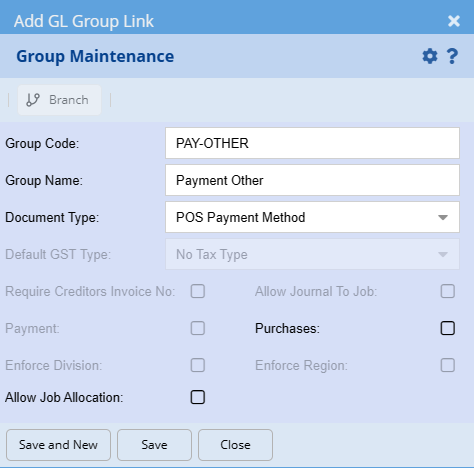
Link group and payment method

Once all payment methods setup in GL Links. Link these methods to each till for POS Payment
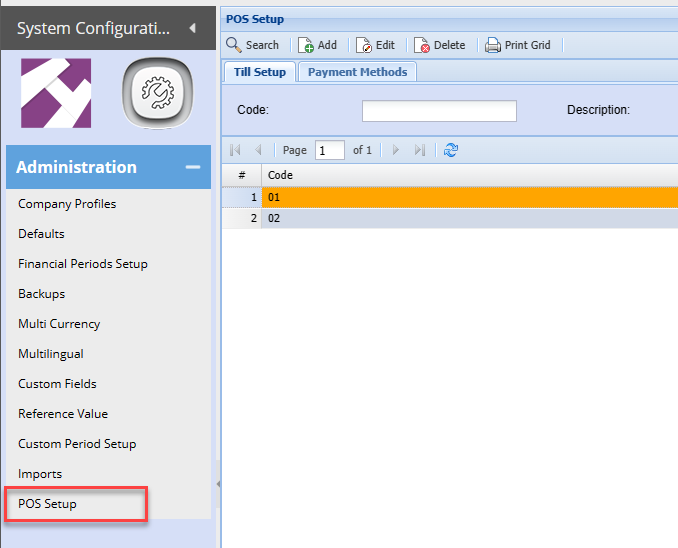
POS Payment Methods link till
Link Payment methods in GL Links to till
Each till is setup against the user to allow the various payment methods to be displayed.
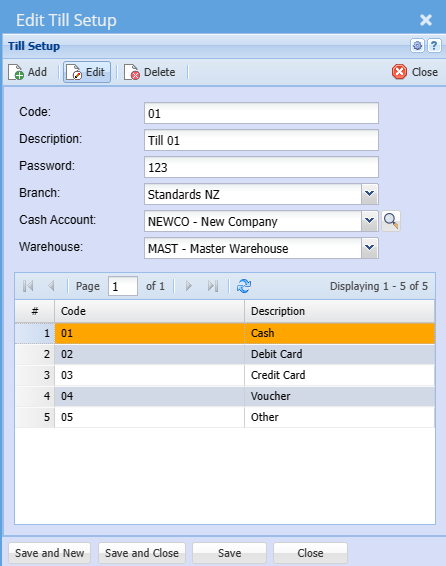
Link each payment method to GL Link created
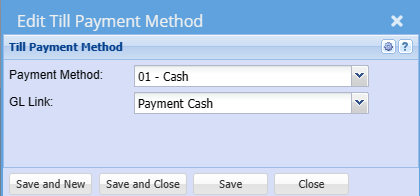
Link the till to the user setup
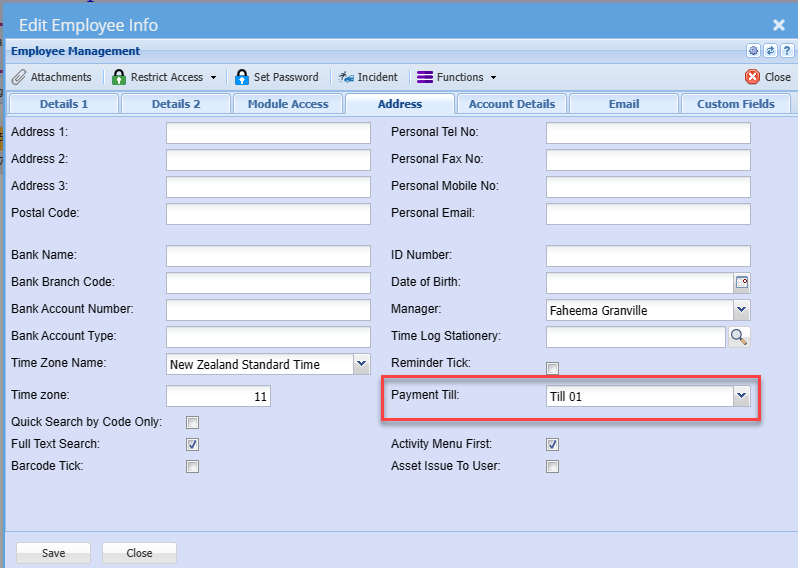
Courier Setup
Courier Setup
Courier Setup
Setting up the courier parameters