Defaults
Defaults
- Defaults
- System Defaults tab
- General Ledger Defaults Tab
- Debtors Defaults Tab
- Creditors Defaults Tab
- Inventory Defaults Tab
- Webatar Defaults Tab
- Job Costing Defaults Tab
- Email Defaults Tab
- Debtors Aging Letters
- Date Defaults Tab
Defaults
Defaults is found under System Configuration Module
Remember to Save your changes.
Settings here affect the system

System Defaults tab
System Config > Defaults > System Defaults
System Defaults tab have multiple sub functions
Leave Allocation: Time log Defaults
When a person turns leave into a time sheet, the system will use this as the default.
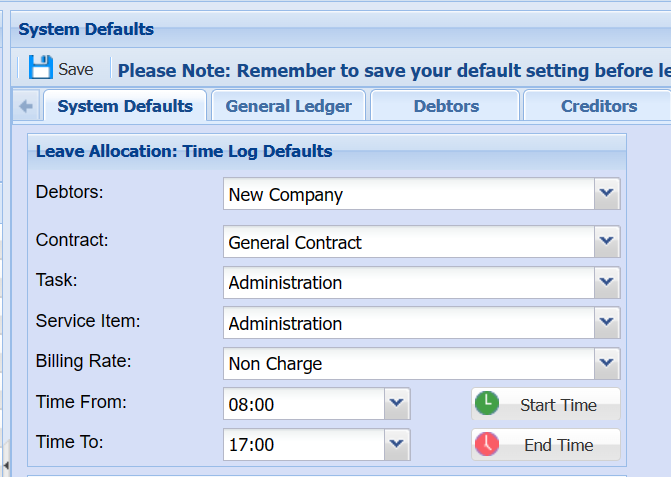
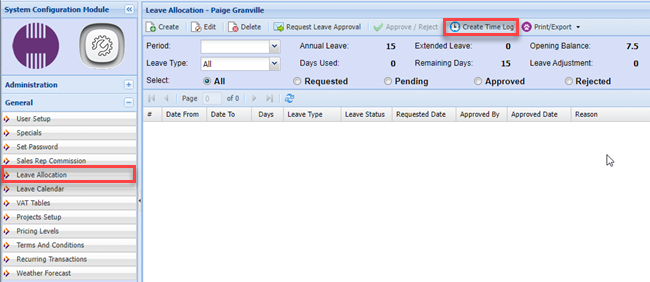
It works with Leave Allocations, when you go to create time log it uses the time log defaults.
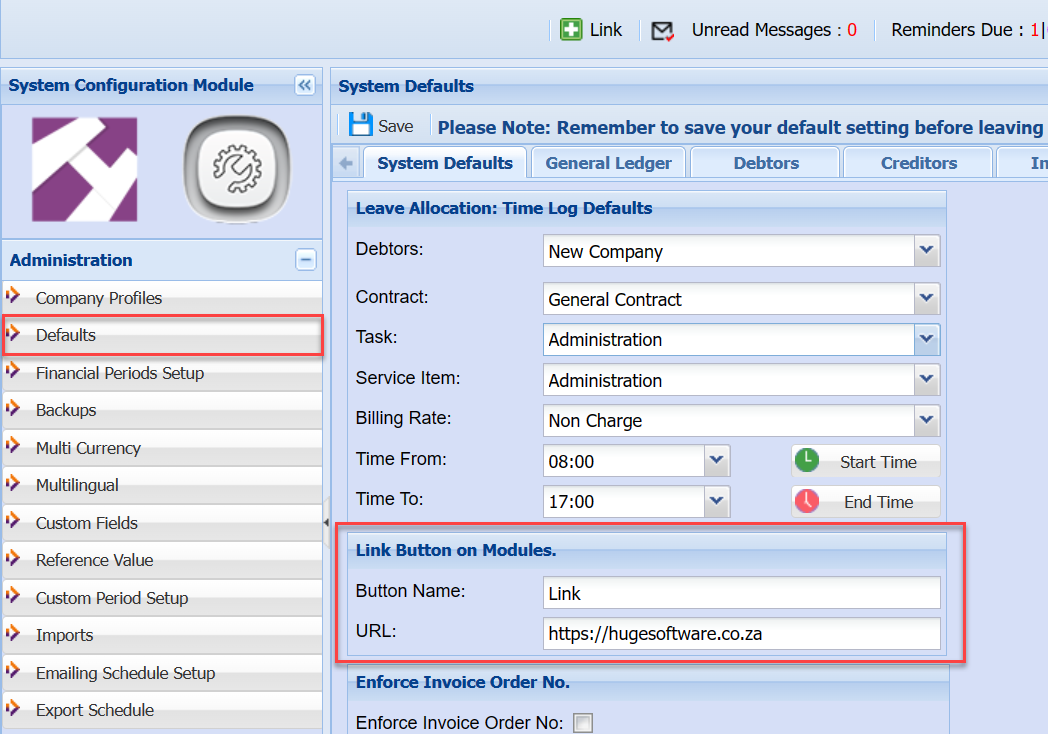
Link Button on Modules
This allows you to change the button name and URL
Create own manual for company

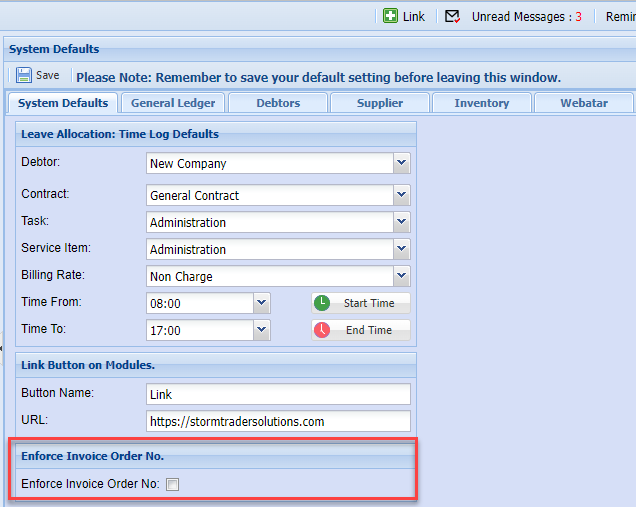
Enforce Invoice Order No
When creating a customer invoice, if the setting is on then it will ask you for an order number on invoice documents.
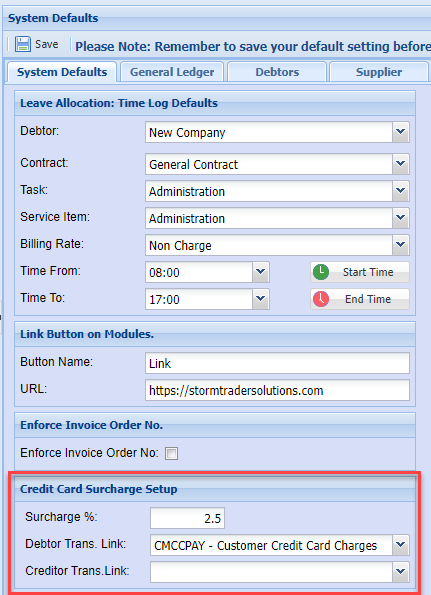
Credit Card Surcharge Setup
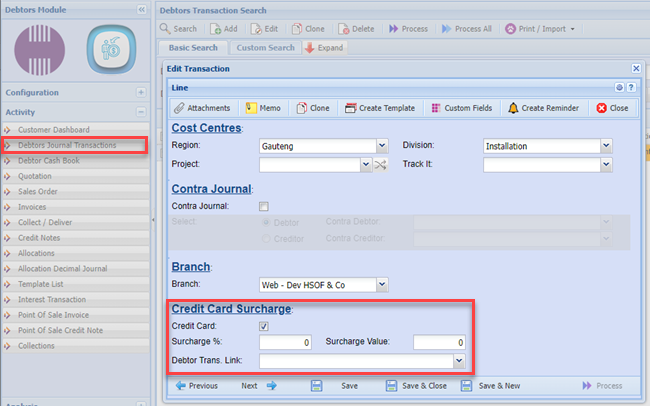
Credit card surcharge is used in the debtors / customer transaction journal.
When a customer makes a payment with a credit card, the system will work out the surcharge on top of the payment.
This will create and additional debtors transaction journal.
After you have saved the journal transaction, proceed to the next screen to view the credit card surcharge.
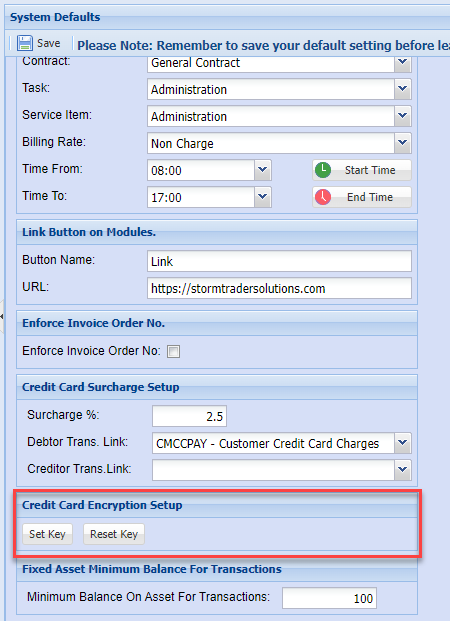
Credit Card Encryption Setup
This is used to set in encryption key to encrypt credit card numbers.
If you lose the key, ask support consultant to reset the key, all previous credit card details will be wiped out.
This is a security feature to ensure their client credit card details are not compromised.
Export Schedule Date Delay Setup
Set the days to be delayed until the scheduled reports for the new month.
Example: Setting the days at 10, means that up to the 10th of a month (using November)
The reports will still report on October month end, after this date it will start to report for November end month
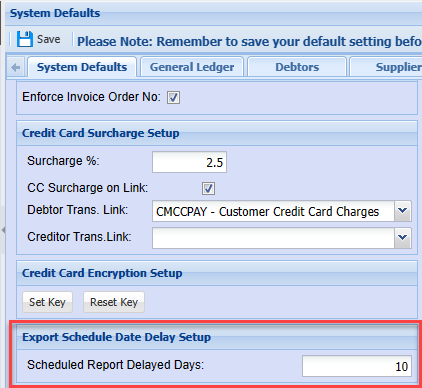
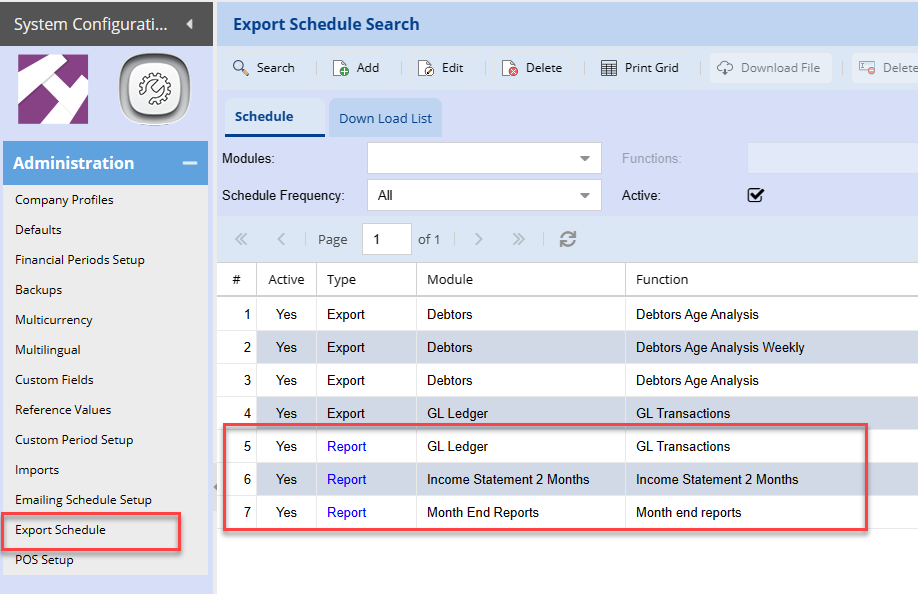
Used for Export schedule automatic reports
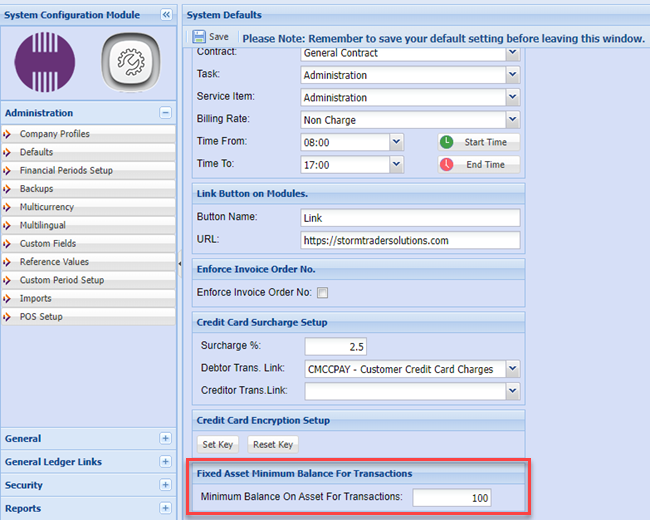
Fixed Asset Minimum Balance for Transactions
This is a value that you can set is the minimum value for fixed assets.
Once a fixed asset reaches this minimum value, it will NOT create a Depreciation journal.
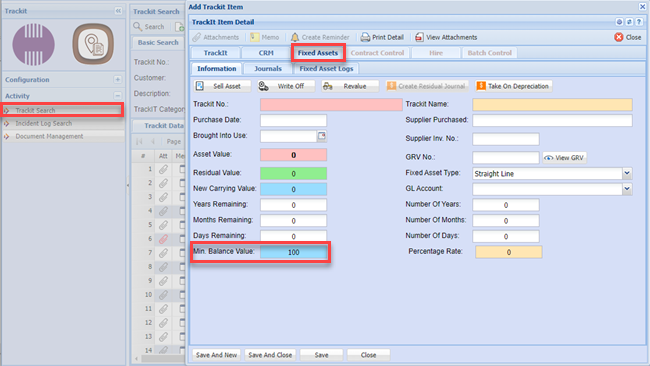
The value used here is used as the default value when setting up a new fixed asset item.
The value is populated in the TrackIT Module for fixed asset.
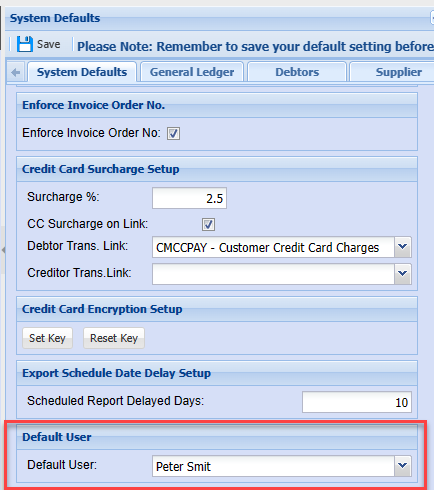
Default User
Used to set the user when it is blank
General Ledger Defaults Tab
System Config > Defaults > General Ledger
These defaults effect the General ledger module
Period Names
These fields are used in the financial performance report any specific to the farming industry.
You can set these for
Number of cows, number of litres produced in value of litres
.png)
Used in the Financial performance by period report
.png)
BankIT import Defaults
Bankit Import displaying the selected banks
Only set the banks that you require the user to view in the system.
By default the system shows all the banks supported.
It is better to only show the banks that you are using.
.png)
These banks are displayed in the drop down in Bankit feed
.png)
Bankit import start date is to ensure that when you import the bank statement that it does not import prior transactions to that date.
Used specifically when you are importing banks in the first couple of months
Set your start date so as not to allow previous bank transactions to be imported into the system
.png)
.png)
Setup the defaults that you want to populate when creating a cash book from the BankIt intelligence
.png)
Cashbook and Journal Types
When creating a cash book or journal, defaults populates the cash book or journal type so the user does not have to fill it in
.png)
.png)
Debtors Defaults Tab
System Config > Defaults > Debtors
COD Popup on Debtor Invoices
If a customer is marked as COD, it will give you a pop up to say its a COD client when creating a sales document.
Quote, sales order, invoice and credit note
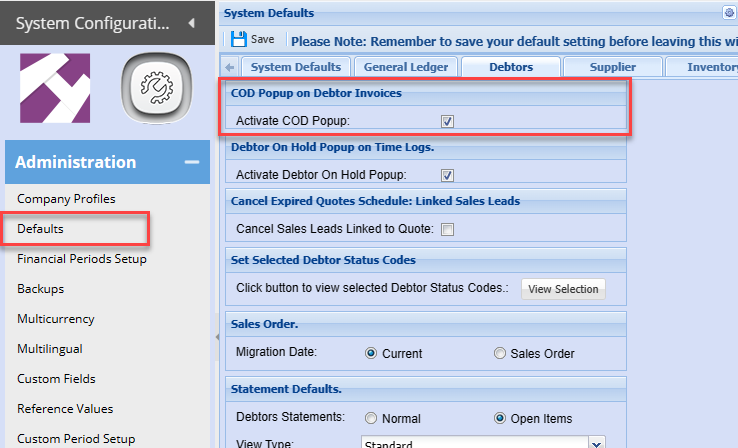
This will work with any customer that is marked as account terms equal to COD
.png)
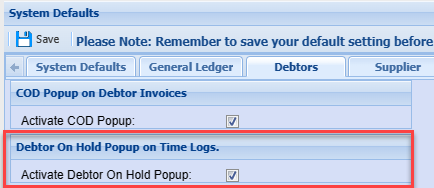
Debtor On Hold Popup on Time Logs
Activate this feature to enable a pop up on time sheets if the customer is on hold.
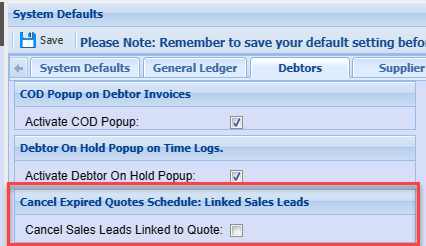
Cancel Expired Quotes Schedule: Linked Sales Leads
When the system runs the scheduled task to cancel expired quotes.
If the quote is expired it will automatically cancel the sales lead when enabled
Set Selected Debtor Status Codes
Use this function to limit the status drop down on sales documents like invoices.
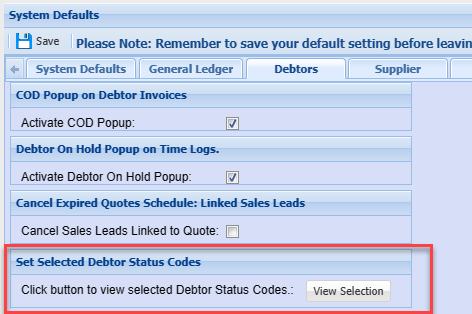
Click on the view selection button to select the status's you want shown
.png)
Invoice document limit status selection
.png)
Sales Order
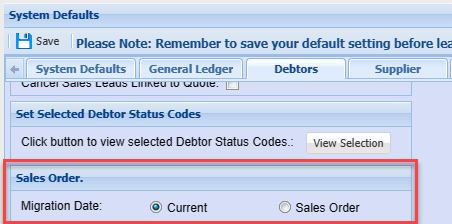
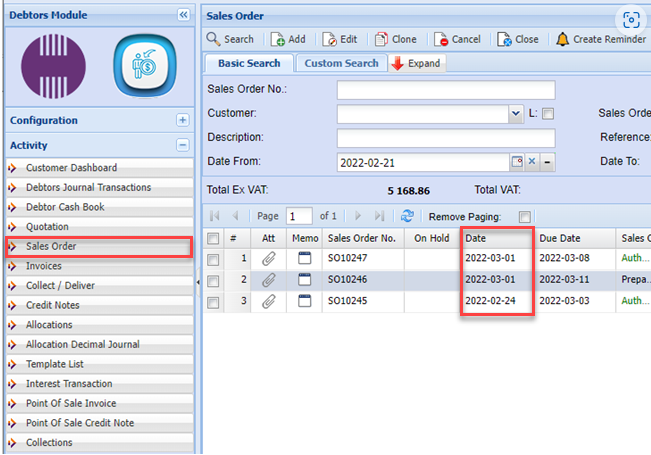
When migrating the sales order to an invoice.
Its either going to take the sales order date or its going to take the current date.
Statement Defaults
Set up statement and age analysis defaults.
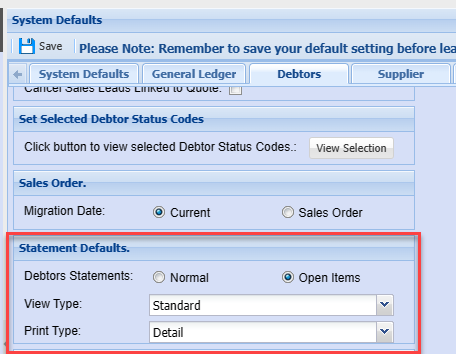
Statements
Sets the Type to Normal or Open item to Statements.
.png)
Debtors Age analysis
Sets the view type to either standard, invoice date or due date
Sets the print type to summary, basic or detail
.png)
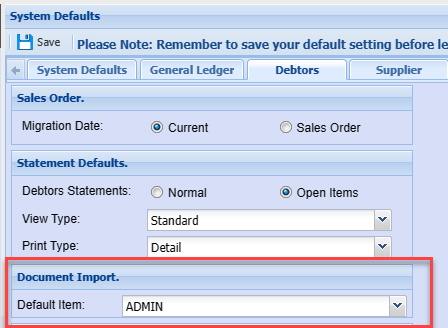
Document Import
When importing documents and the item code used is not recognized, it will use this as the default.
Log item brand against customer on Sales Order
When tick is on, on creating a sales order and authorise it, then the items on the sales order goes and checks all the brands and automatically populates the brands at the debtors setup.
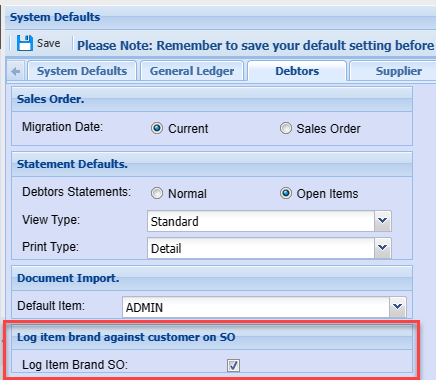
In customer setup, it will automatically select those brands that have been used in orders.
This helps maintain the different types of brands a customer is buying.
.png)
The purchase brands will be listed on the first page of the debtors set up
.png)
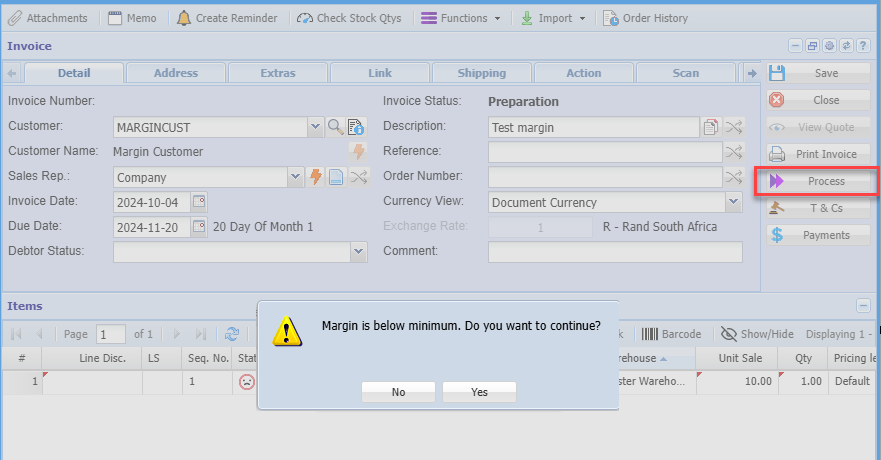
Sales Margin Check
This is used on debtors documents to check or enforce margins.
Setting is activated per customer
When a new customer is created, it will take these settings
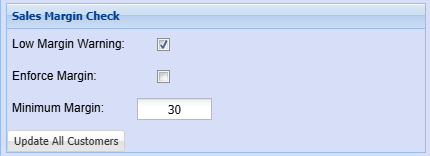
| Low Margin Warning |
If this is enable it will check low margin on adding an item to a sales document. It will check when invoice is processed, giving a warning to proceed or not |
| Enforce Margin | Will not allow an invoice to process if the user is not a margin supervisor |
| Minimum Margin | Enter value for checking margin percentage |
| Update all Customers | Update all customers with these settings |
Margin check is on each customer
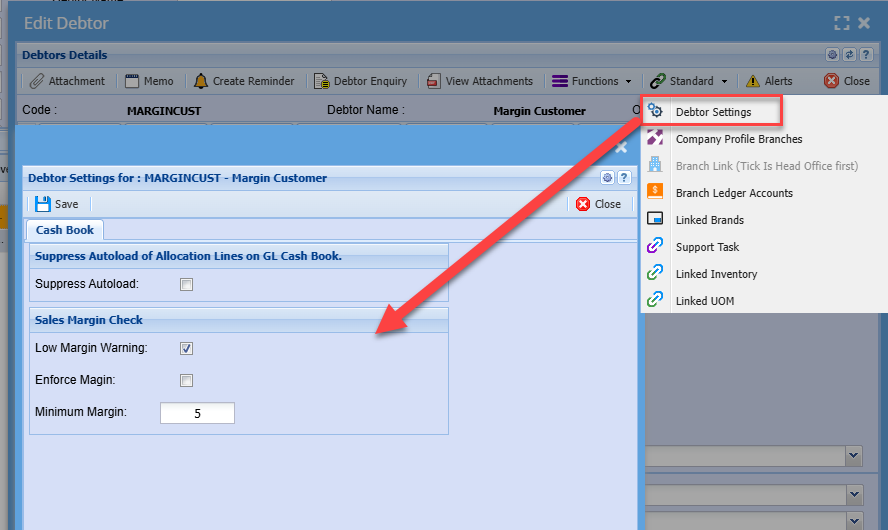
See more information on Margin checks -
Creditors Defaults Tab
System Config > Defaults > Supplier
Document Import
Set the defaults when importing PDF documents from Rossum and Typless, if the items are not found in the system.
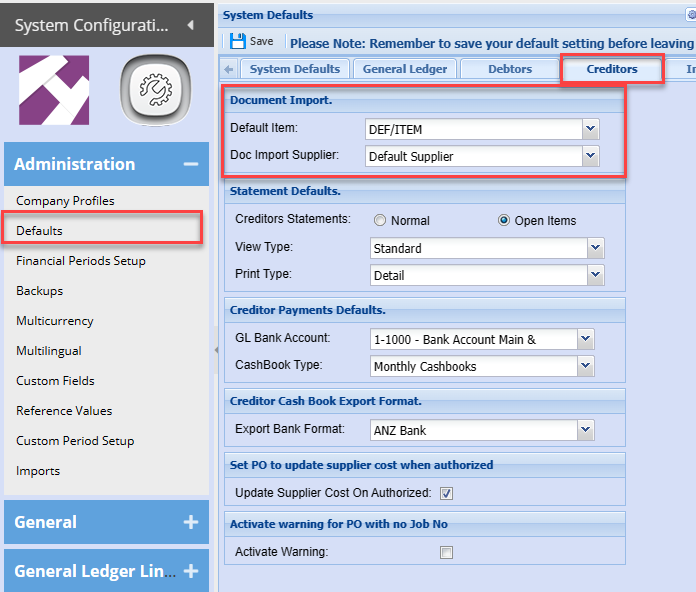
Used in Purchase Order and GRV imports
.png)
.png)
Statement Defaults
Auto set defaults on the creditors statements
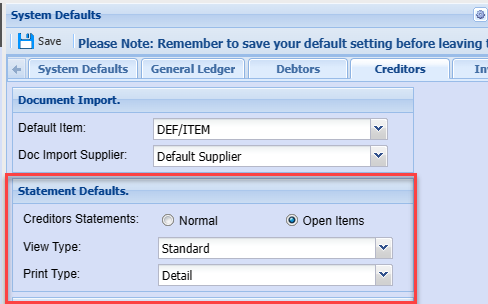
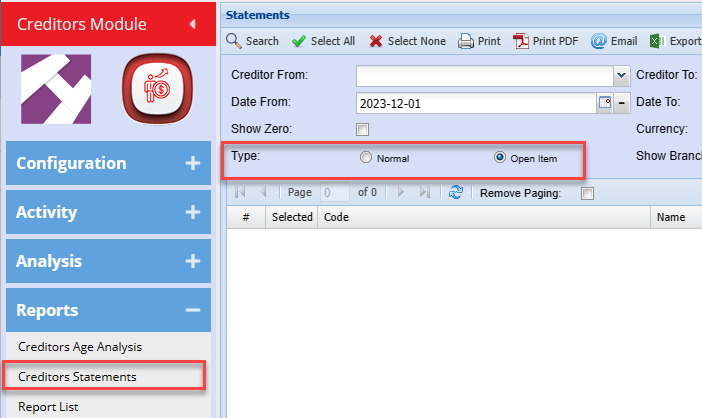
Statements
Set the type for statements
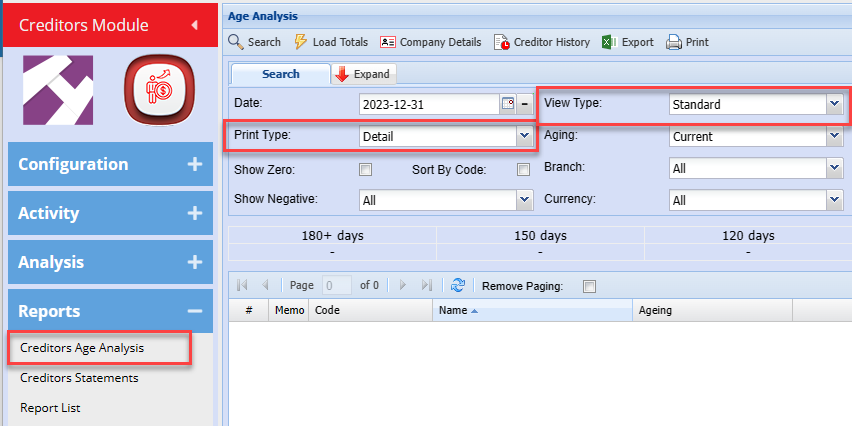
Creditors Age Analysis
Set the Print Type and View Type for Age analysis
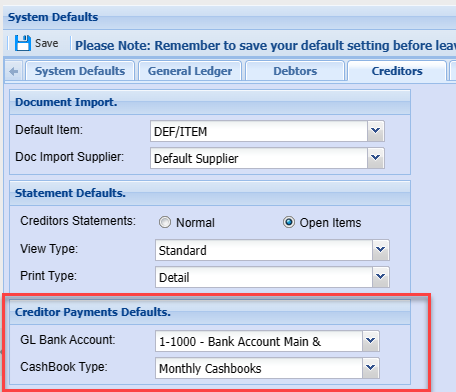
Creditor Payments Defaults
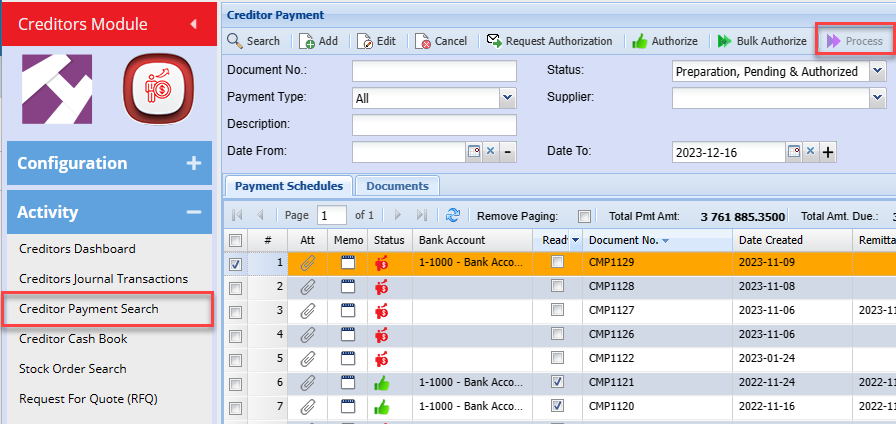
Set the payment defaults for Bank account and Cashbook type when promoting to a cashbook from Creditor Payment
When processing a Creditor payment supplier to a cashbook it will then create the Creditor Payments Defaults.
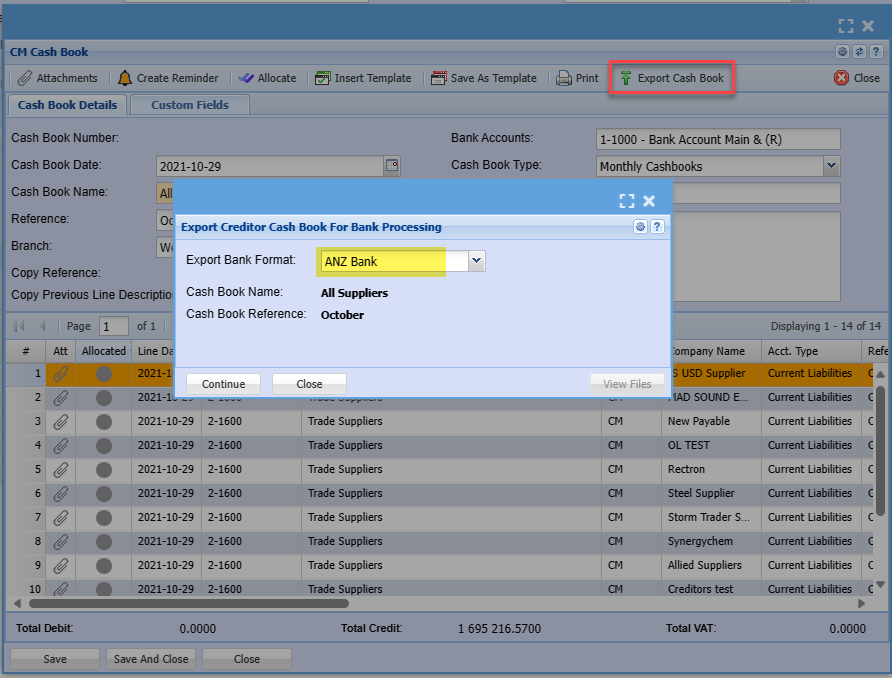
Creditor cashbook export format
Set the bank format when exporting the creditors payments to the bank
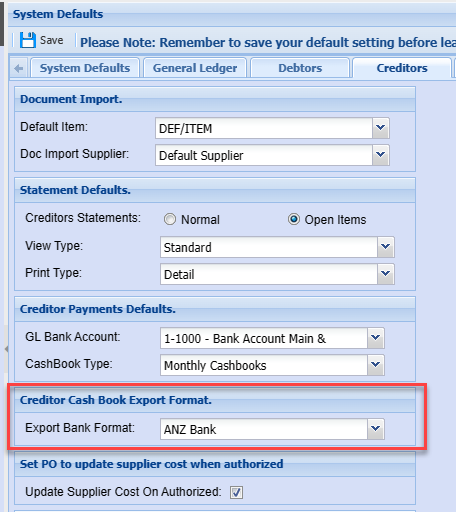
Sets the default for bank export
Set PO to update supplier cost when authorised
Use this to update the cost of the supplier before processing a delivery note or GRV
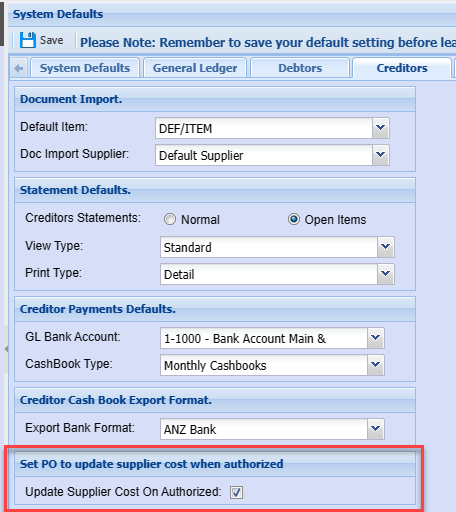
When creating a Purchase Order and authorise, the system will update the supplier cost price against the inventory item set.
.png)
Inventory item updated in the Supplier item cost price.
.png)
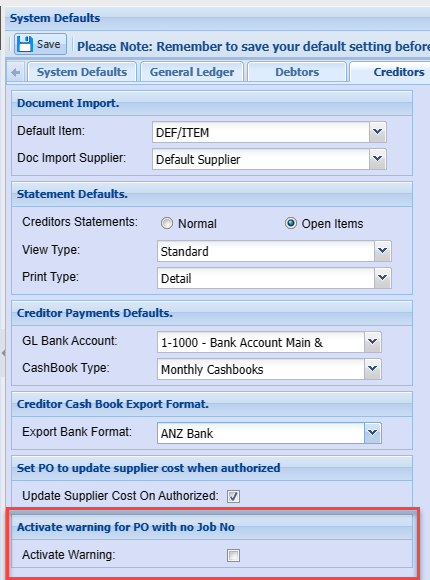
Activate warning for PO with no Job No
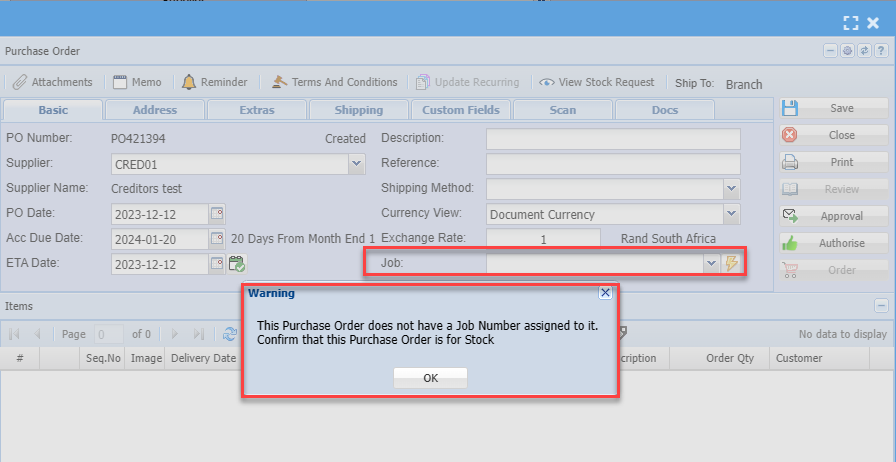
Activate a warning in Purchase Order save when Purchase Order does not have a Job number allocated.
Used to prevent purchase order lines from not having a job number allocated.
Warning appears on each save to check if job number is added to purchase order
Collect Button Text

Inventory Defaults Tab
System Config > Defaults > Inventory
Inventory Expenses Property allocations fix
Used to enforce a stock category to be selected on inventory setup save
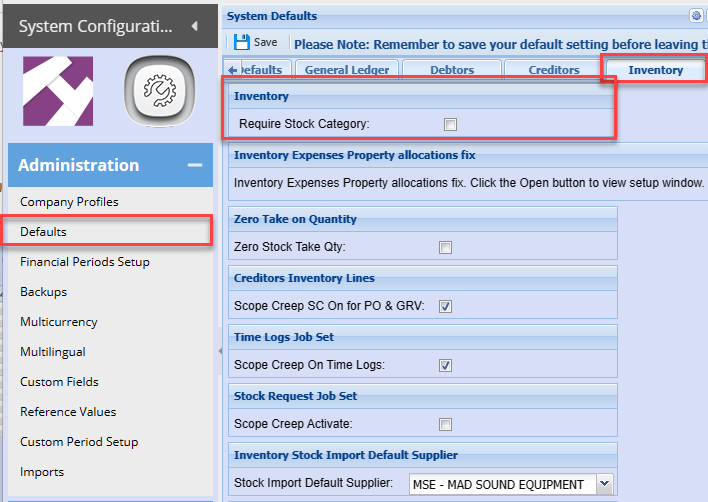
Set to enforce Stock category to be selected
.png)
Inventory Expenses Property allocations fix
Check all items without an expense property allocated with the Empty Expense Property Report
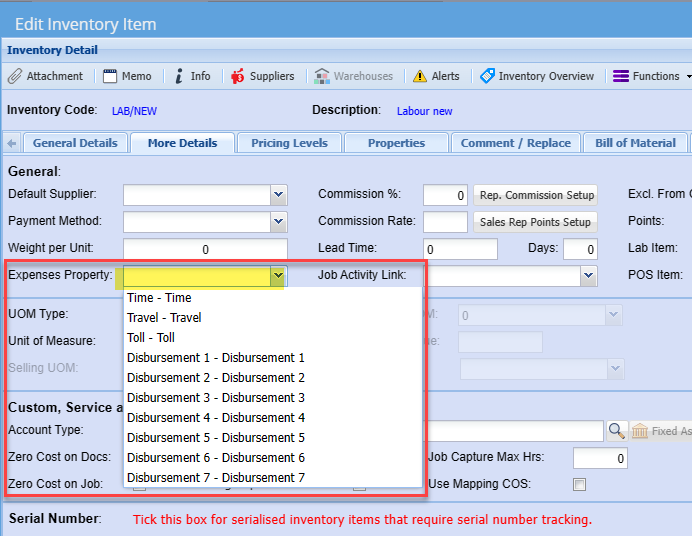
Appliable to Service and Custom type items
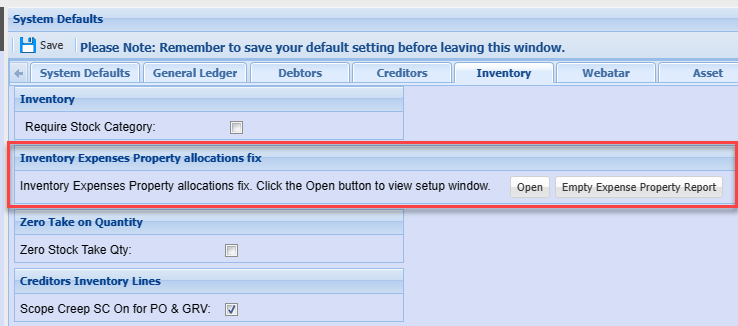
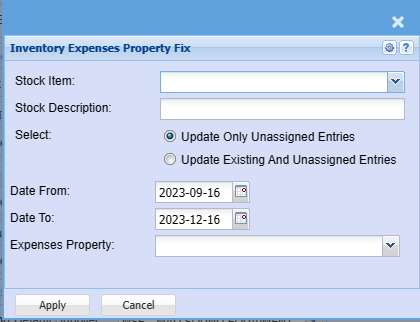
Custom and Service type items
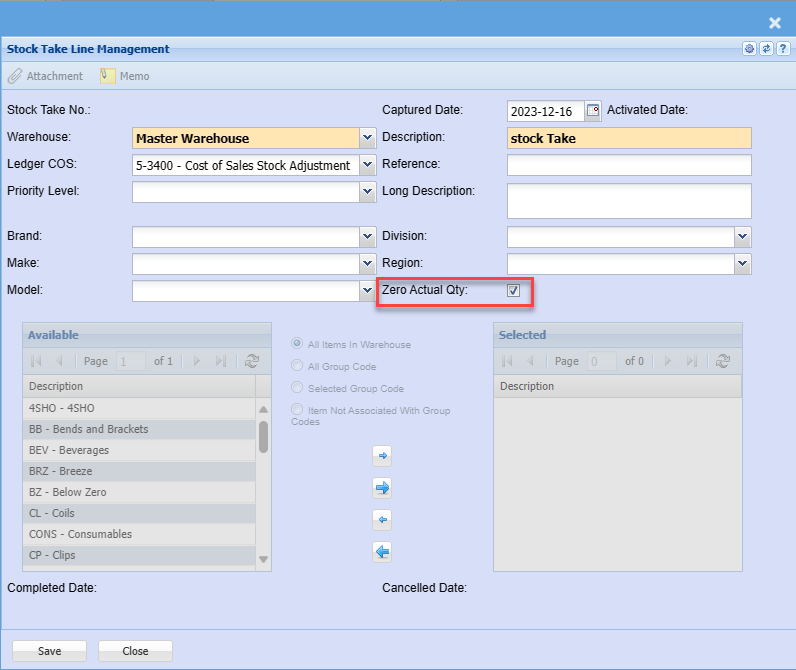
Zero Take on Quantity
Used this to set the tick for zero all items in a stock take

Sets the tick box on for every new stock take created
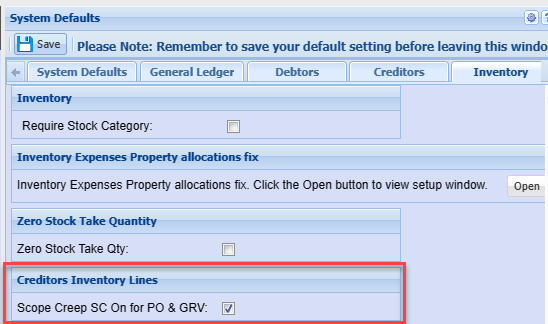
Creditors inventory items
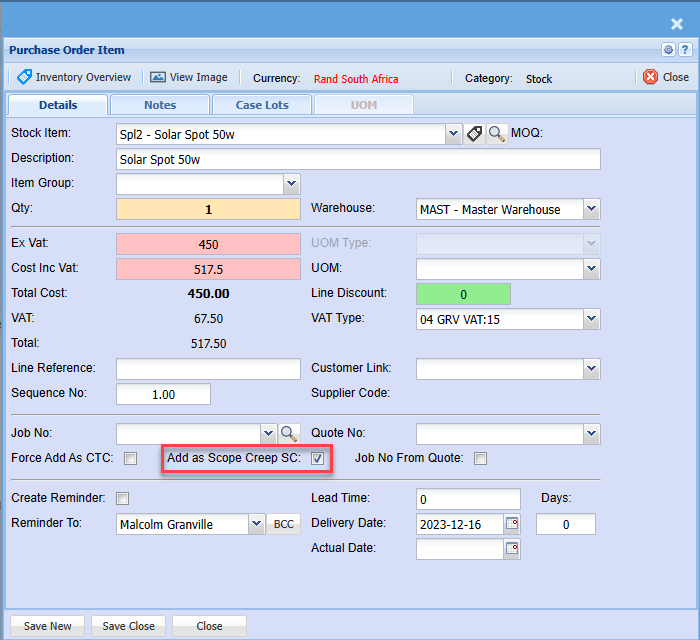
Enforce tick box on for Scope Creep (SC) on all Purchase order and GRV lines
Overrides rules on document ticks for Jobs Scope Creep
Document lines enforce tick
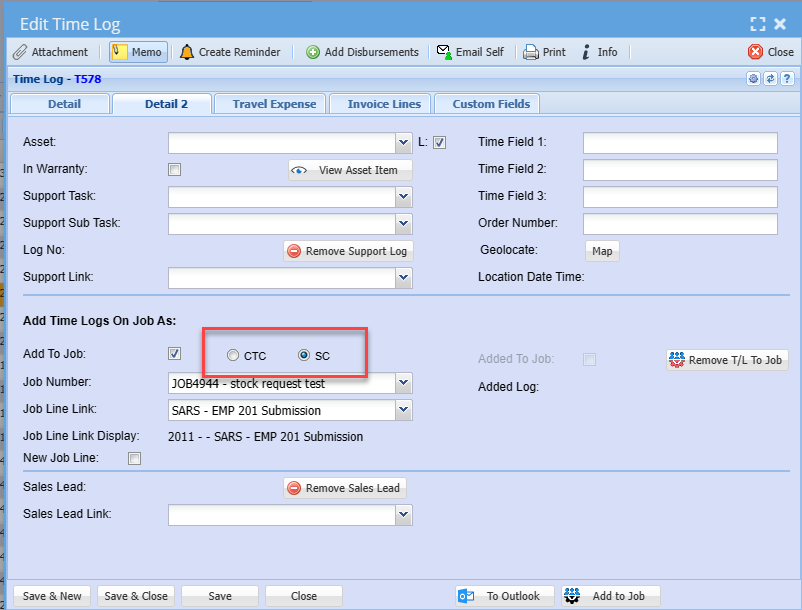
Time Logs Job Set
Set Scope Creep on Time Logs
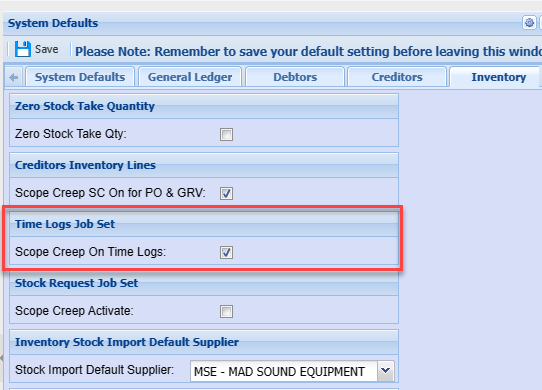
Sets the Job type to SC for time logs
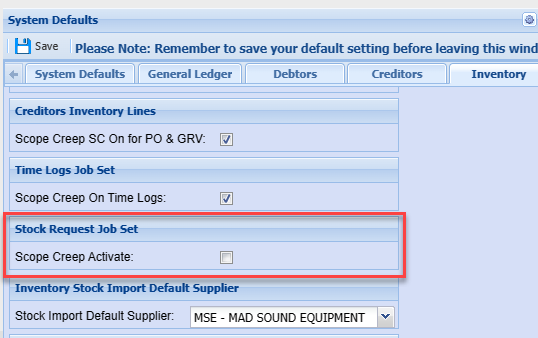
Stock Request Job set
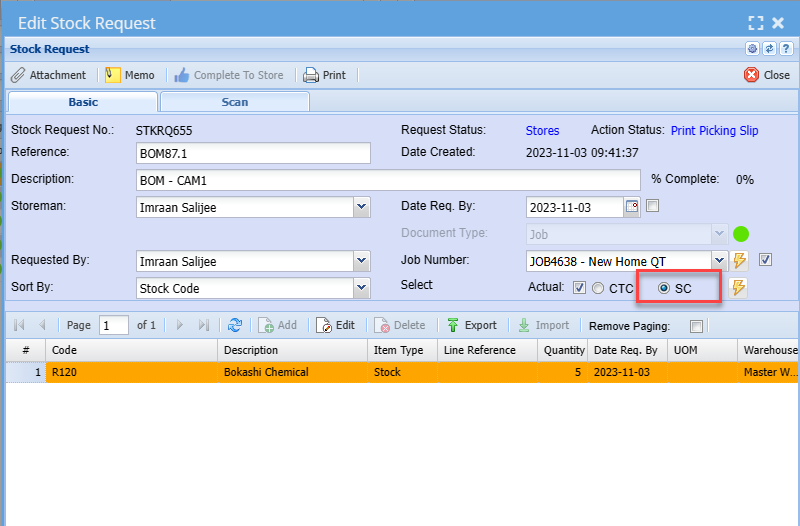
Enforce the Scope Creep on Stock Requests
Stock request set to Scope Creep
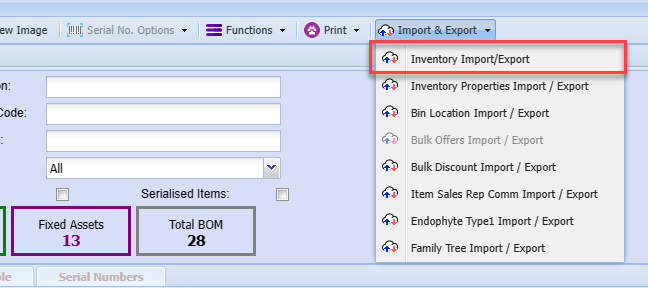
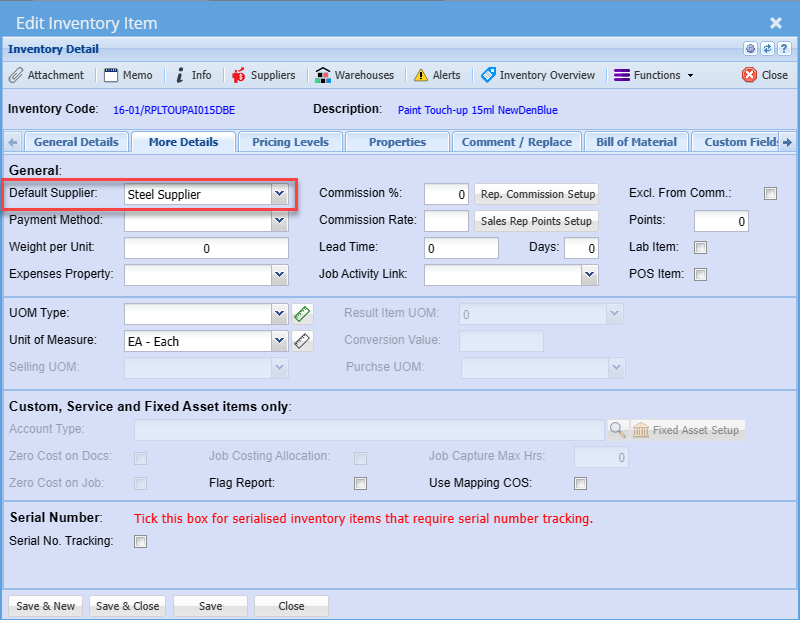
Inventory Stock Import Default Supplier
Set a default supplier when importing inventory items.
Useful when the field in the import file for the supplier is left blank, it sets this default supplier
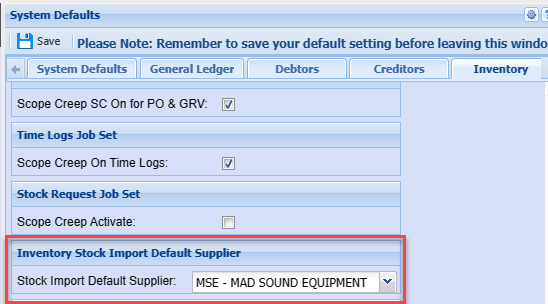
When importing stock
Sets and adds a default supplier when importing
Barcode Printing Style
Setting up Barcode printing from system to GoDex label printers
Print barcodes directly from
- Inventory
- Assets
- Asset Scan and Print
- Debtors Documents
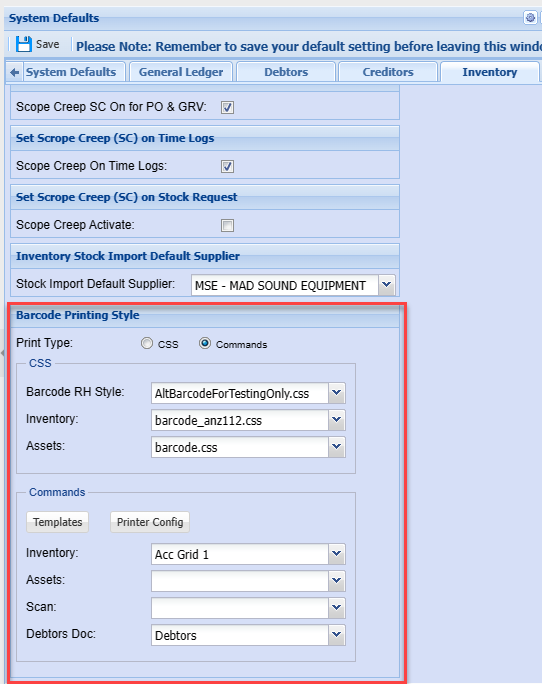
CSS Print Type
Setting a CSS is a predefined label layout (this is going to be discontinued by 2025)
Commands
Setting the templates via the GoLabel software
Templates button
Set various templates to use
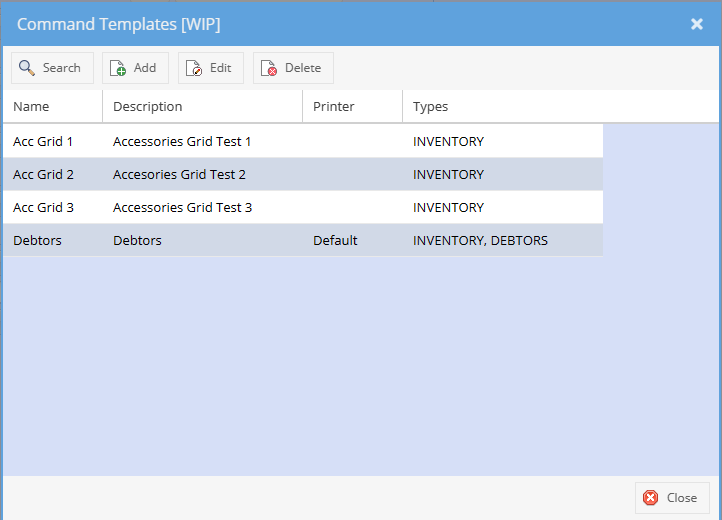
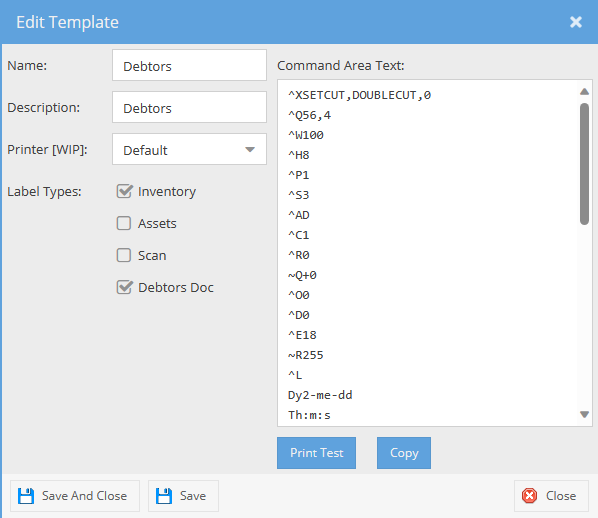
Edit Template
Copy command from GoLabel and paste into Command area
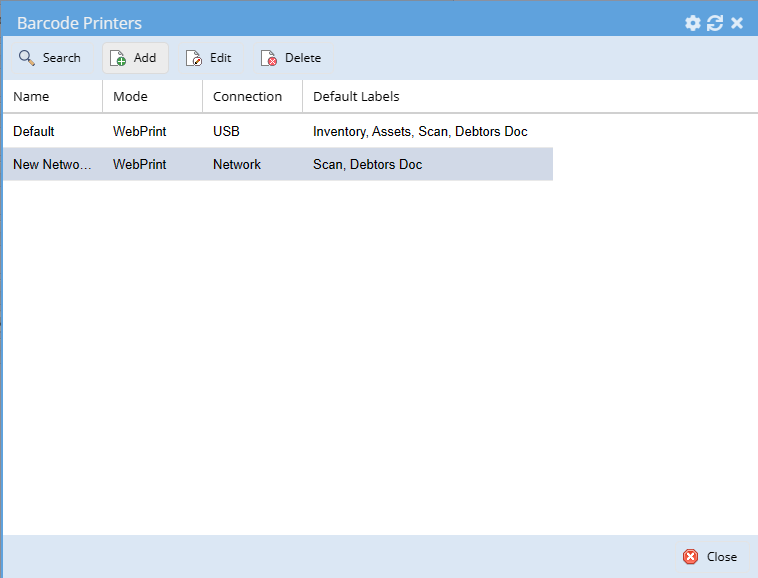
Printer Config Button
Setup how the printer is connected either by USB or Network
Set the Printer defaults
WebPrint it is best to use the port 16327 than 8080
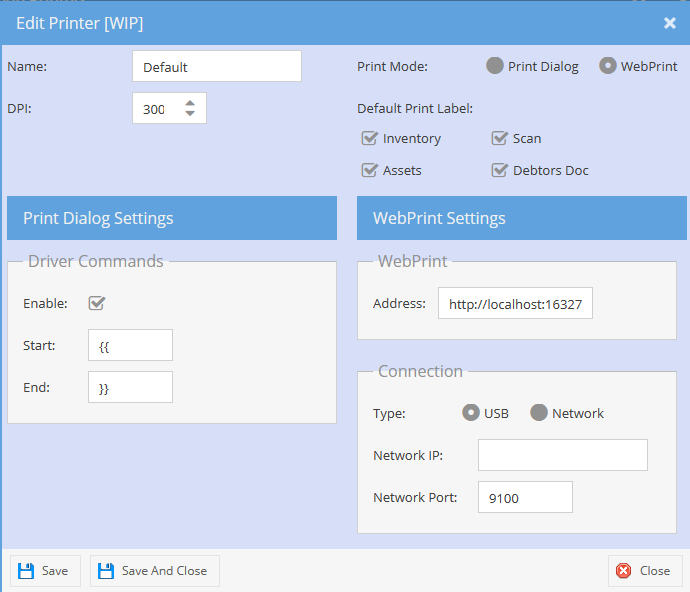
| Printer Name | Name the printer |
| DPI | Set the DPI of the printer 200 or 300 DPI |
| Print Mode: Print Dialog | Used for testing to see print command code to screen when printing |
| Print Mode: WebPrint | Use this as default to print to the printer via the WebPrint |
| Driver Commands | Set as seen above |
| WebPrint |
Setup the Address Use port 8080 or 16327 (best to use 16327 on secure network environments) |
| Connection |
Set USB or Network Enter IP address Enter Network port - usually 9100 |
Webatar Defaults Tab
System Config > Defaults > Webatar
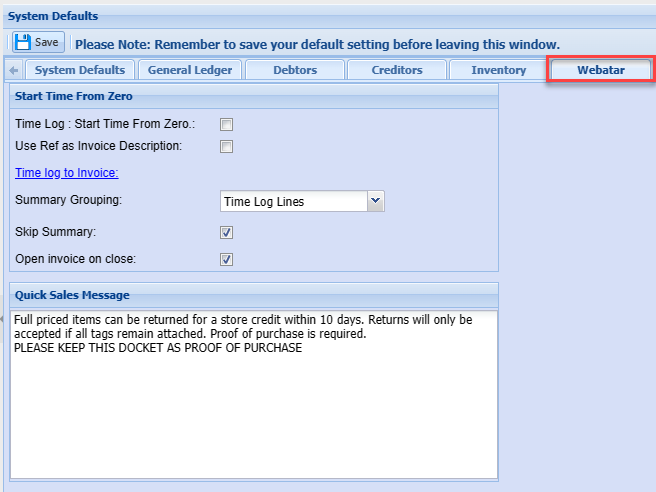
Start Time From Zero
When you put the tick on here this will then put your (Time from) and (Time to) to zero and the user will then only use the Bill Qty
.png)
.png)
Taking your time logs to invoice
.png)
Job Costing Defaults Tab
System Config > Defaults > Job Costing
Enforce Settings
.png)
.png)
Enforce Job number On
Enforce Job number on Stock Requests
.png)
Custom Inventory WIP Enforce
System Config > Defaults > Job Costing
This changes all custom items on Purchase Orders to force it to WIP
.png)
It will overrule this
.png)
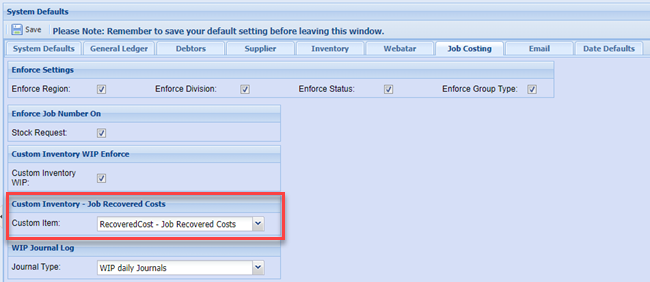
Custom Inventory - Job Recovered Costs
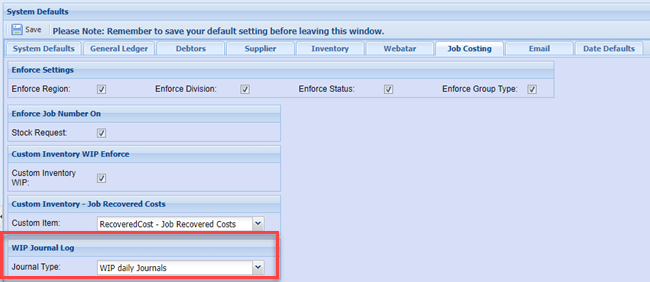
WIP Journal Log
System Config > Defaults > Job Costing
Job Scheduling Tasks
System Config > Defaults > Job Costing
The Job Schedule tasks have a few setups that can be set
| Task Type | Set the Task Type in the Job Schedule search filter as default |
| Task Split Edit |
Set the rule for splitting a task activity a. Value split and % zero - Split the value of the main task with 50% and 50% on split task. Leave % complete on main task as is and make split task start with zero percentage. b. Value zero and % zero - Keep the main task value and percentage the same. Make the split task value and percentage zero. |
| Disable sub and split task value | Disable the values fields of the sub and split tasks so that the user cannot edit |
| Disable sub and Split Task percentage | Disable the percentage fields of the sub and split tasks so that the user cannot edit. |
.png)
Task splits and disabling fields
.png)
Setting the Task Type search default
.png)
Email Defaults Tab
System Config > Defaults > Email
Setup default email messages when emailing customers
Debtors Documents
.png)
.png)
Creditors Documents
.png)
.png)
Debtors Aging Letters
Setup of Debtor Aging Letters
Allows for sending out emails to customers based on their aging. Included in the image below is a sample of what a letter could look like with the necessary tags and formats.
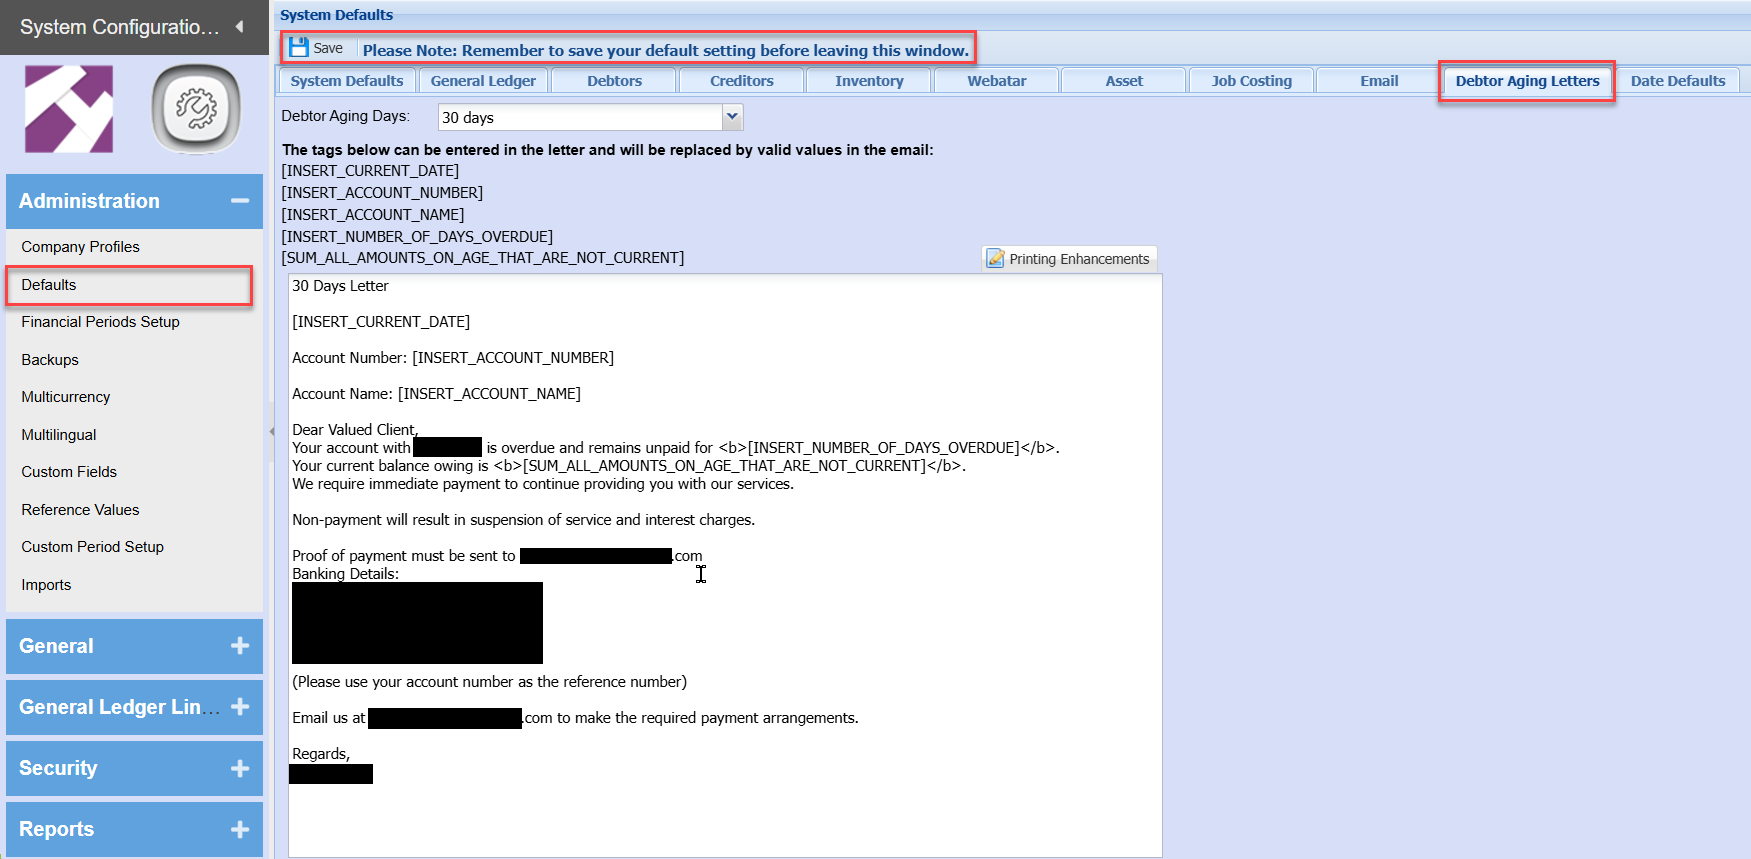
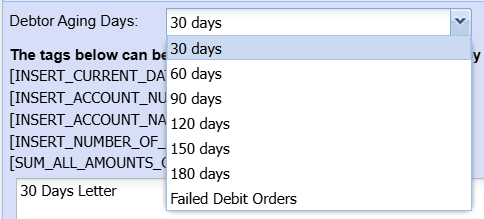
The setup makes allowance for seven different letters to be prepared.
When preparing the various letters the Printing Enhancements can be included into the body of the letter to emphasise pertinent points in the letter.
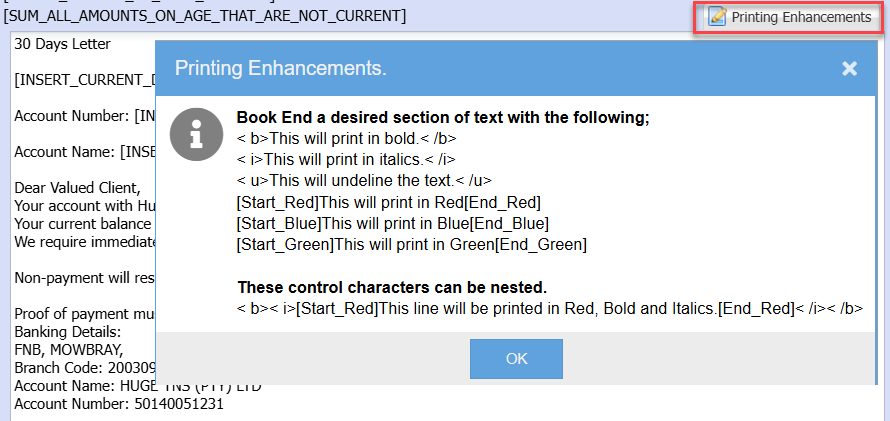
Please remember to save the changes before leaving this window.
Next step is to go to the System Config Module, open the Company Profile and upload these two jpg files as Attachments. The two images must be uploaded as LetterHeadHeader and LetterHeadFooter. When creating the Email and Preview Email the system will search the company profile attachment table for these two files. If the naming convention is not as indicated above the images will not be retrieved and the Email and Preview Email will not have the desired letter head appearance.
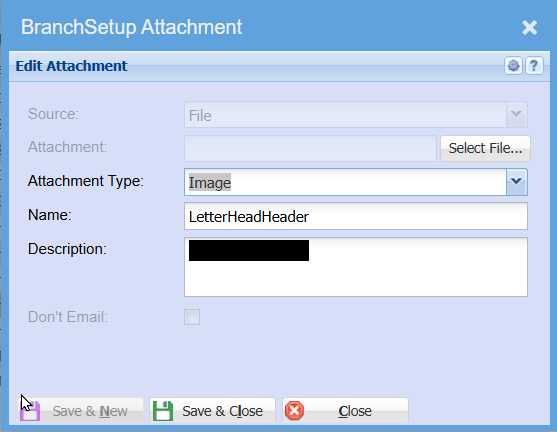
Preparing the data and sending out the Debtor Aging Letters email
Go to Debtors module then click on Reports followed by Debtor Aging Letter
To Create a new dataset click on Add
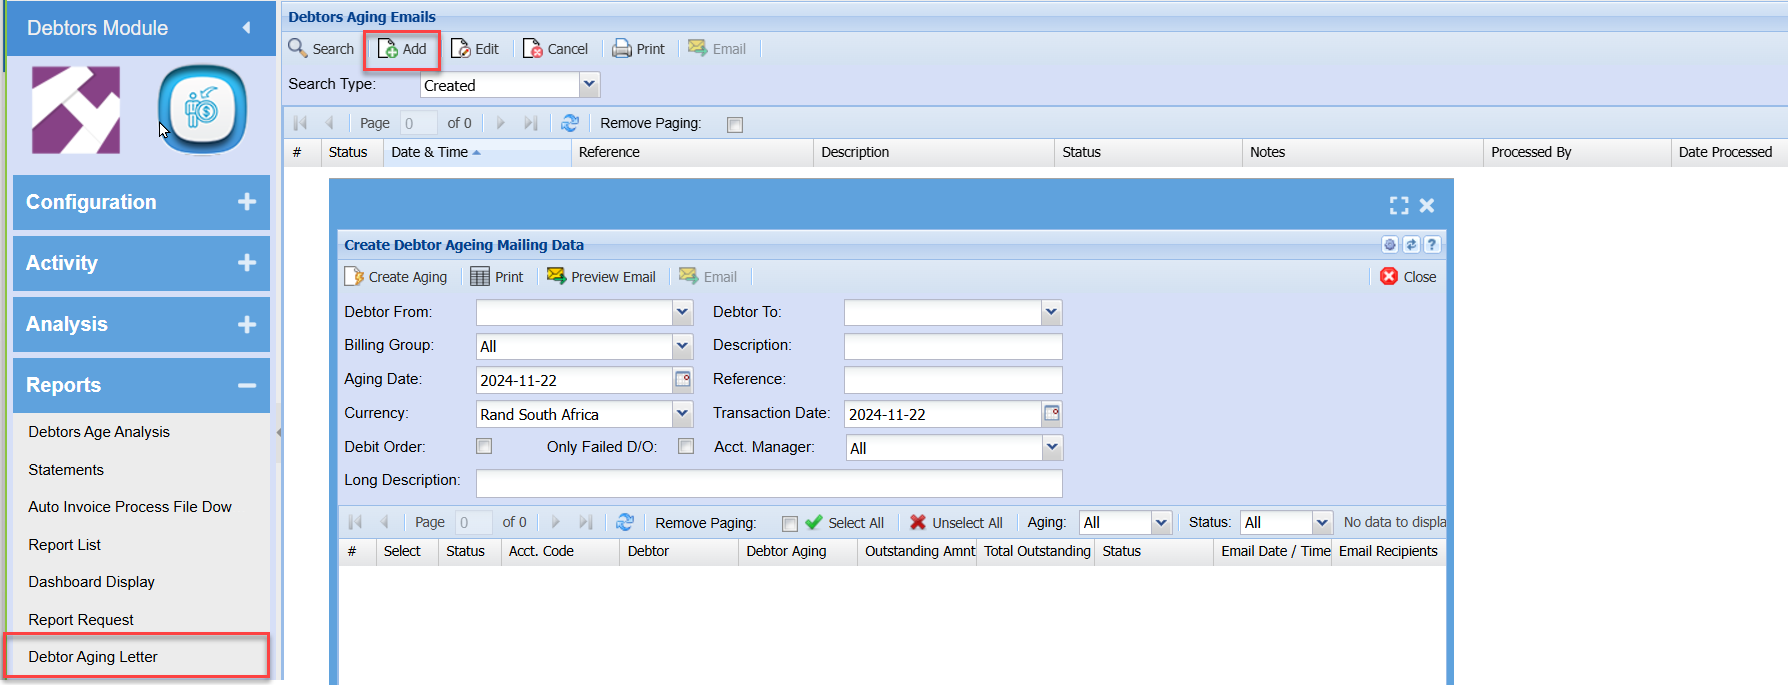
Enter the necessary requirements for this dataset.
Please note that if this is a dataset for Failed Debit Orders the Debit Order and Only Failed D/O tick boxes need to be ticked.
Once the required parameters have been entered click on the Create Aging button. Take note of the warning message. On completion of the create process the window will close and the grid will be updated with the new entry.
Select the newly created entry and then click on the Edit button. A window will appear displaying all the Debtor Aging Entries
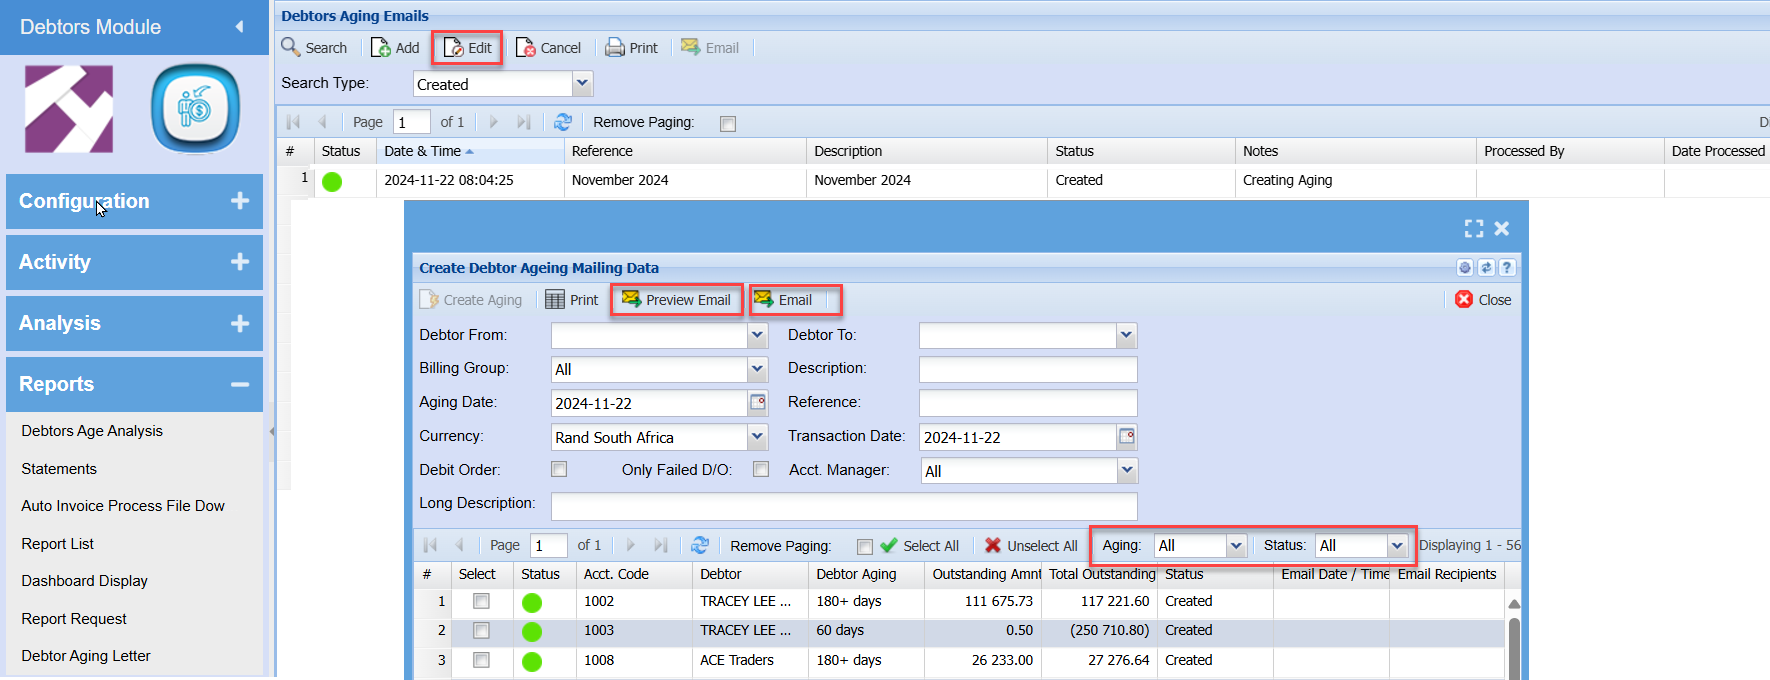
Once this window has opened we have a variety of options available.
- We can select a paticular record and click on Preview Email to see what the letter will look like that the debtor receives. If the letter is not satisfactory then we can go back to the setup to make the necessary changes to the letter.
- Filtering the entries in the grid can be managed by means of the Aging drop down and the Status drop down. Once the desired selection has been made, clicking Select All will select all the lines in the grid and place a tick in the Select tick box column.
- Selecting for example 180+ days will filter the grid to display only the applicable debtors and if the Preview Email was satisfactory then the Email button can be clicked.
- Only lines in the grid that have a tick in the Select column tick box and Debtor Contact Persons who are selected by means of a tick in the Statement Email tick box will be sent a Debtor Aging Letter.
- The emailing process is done on the serve and does not hold up the computer while the email processing is done. As each email is processed that debtor Status on the grid is changed from Created to Emailed and the date and time of the email as well as the recipients are recorded on the grid. Please Note : debtors marked as Emailed cannot be emailed again.
- The widow will close and will require that the record be selected again and the Edit button be clicked if additional emails are to be sent
- If no filtering seletions are made except for Select All and the Email button is clicked the system will automatically send the correct Debtor Aging letter to the Debtor Contact person who has a Tick in the Statement Email tick box. and who's Status on the grid is Created.
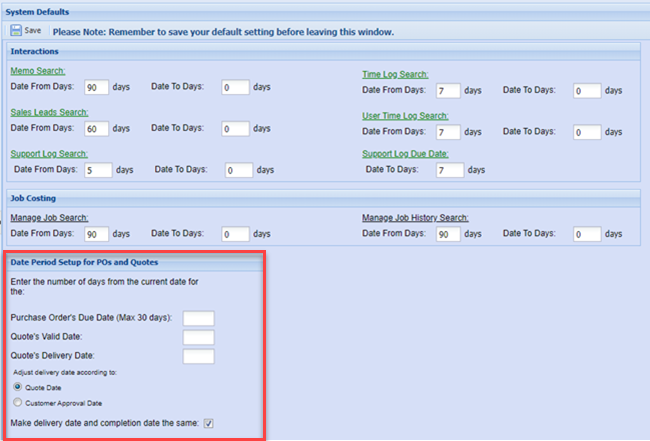
Date Defaults Tab
System Config > Defaults > Date Defaults
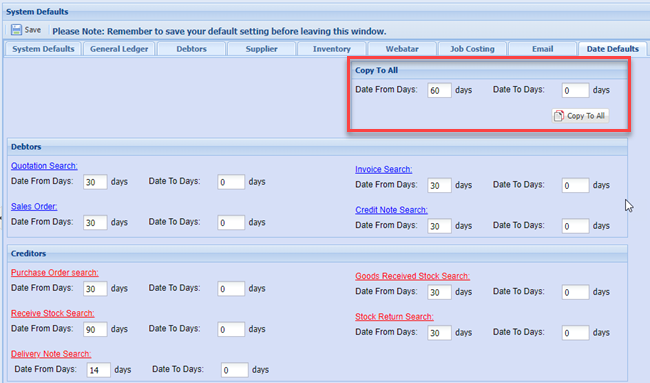
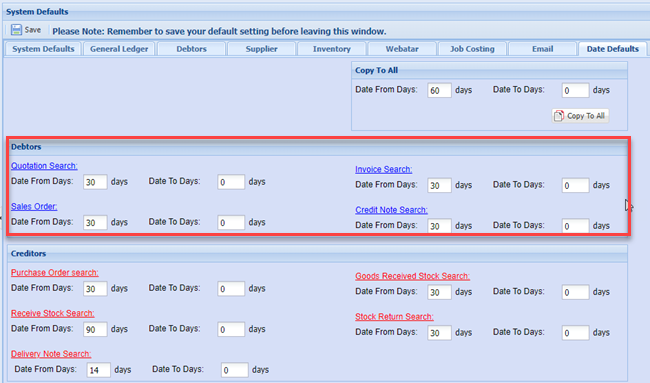
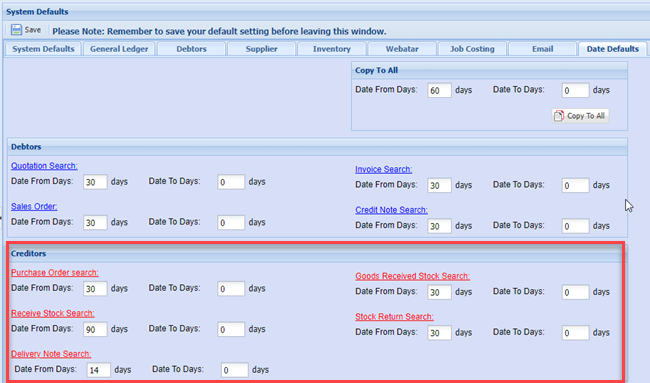
Set the date from and date to for document searches
Copy to All
Debtors searches
Creditors searches
CRM interactions searches
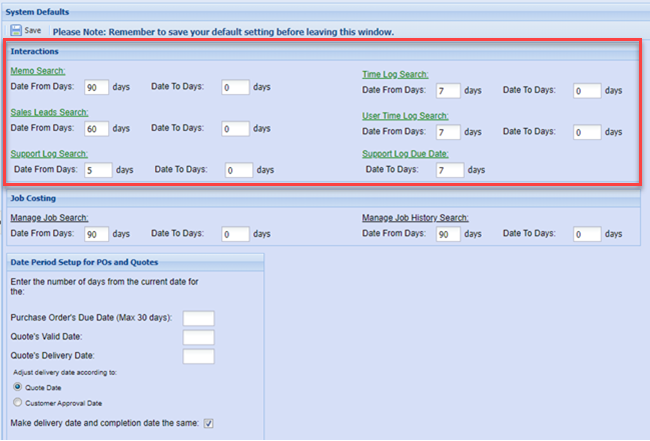
Job costing searches
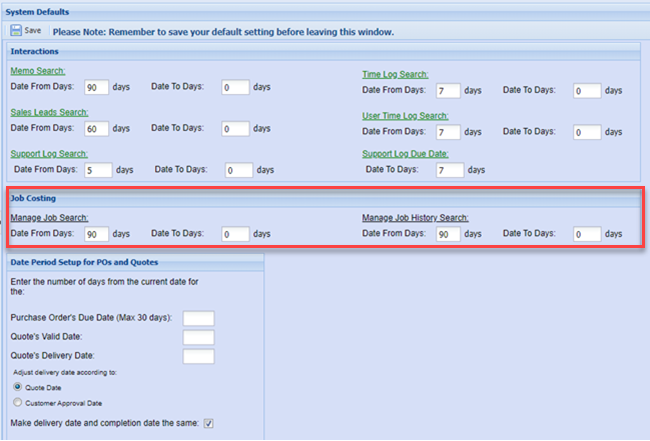
Date Period setup for POs and quotes