# API Connections

API Connections

# Shopify

Shopify

# Shopify Setup

<span class="ts0">Login to your online shopify account</span>

<span class="ts0">shopify.com</span>

<span class="ts0">Go to settings and Notifications</span>

<span class="ts0"> </span>![](https://hugeerp0.co.za/csp/webhelp/topics/images/image(2478).png)

<span class="ts0"> </span><span class="ts0">Scroll to the bottom of the page to find (Create Webhooks)</span>

<span class="ts0"> </span>![](https://hugeerp0.co.za/csp/webhelp/topics/images/image(2479).png)

<span class="ts0">Select Order Creation</span>

<span class="ts0">Enter this into the URL</span>

<span class="ts0">https://SERVER\_PATH/csp/NAMESPACE/api/shopify/orders/create</span>

<span class="ts0"> </span>![](https://hugeerp0.co.za/csp/webhelp/topics/images/image(2480).png)

<span class="ts0">Once you have created the webhook, you will be given a verification code which needs to be setup in Webaccounting.</span>

<span class="ts0"> </span>![](https://hugeerp0.co.za/csp/webhelp/topics/images/image(2482).png)

<span class="ts0">Go to the System &gt; Configuration Module &gt; Security &gt; API Setup</span>

<span class="ts0">Select Shopify Webhook for incoming orders from Shopify</span>

<span class="ts0">Paste the Webshop verification code into the password and save</span>

<span class="ts0">Ensure the Active tick box is ticked</span>

<span class="ts0"> </span>![](https://hugeerp0.co.za/csp/webhelp/topics/images/image(2481).png)

<span class="ts0">Now to setup the link from Webaccounting to Shopify</span>

<span class="ts0">We have to get the username and password from Shopify</span>

<span class="ts0"> </span>![](https://hugeerp0.co.za/csp/webhelp/topics/images/image(2484).png)

<span class="ts0"> </span><span class="ts0">Click on Create new private app</span>

<span class="ts0"> </span>![](https://hugeerp0.co.za/csp/webhelp/topics/images/image(2485).png)

<span class="ts0">Enter the App name</span>

<span class="ts0">Enter the developer email address - <peter@webaccounting.co.za></span>

<span class="ts0">Select Products and change to Read and write</span>

<span class="ts0">Open up inactive and find customers and change to read and write</span>

<span class="ts0"> </span>![](https://hugeerp0.co.za/csp/webhelp/topics/images/image(2486).png)

<span class="ts0">After you click save at the bottom of the screen, you will get a confirmation screen</span>

<span class="ts0"> </span>![](https://hugeerp0.co.za/csp/webhelp/topics/images/image(2487).png)

<span class="ts0">After you have created the app, there will an API key and Password</span>

<span class="ts0">You will need these two items for the Webaccounting setup</span>

<span class="ts0"> </span>![](https://hugeerp0.co.za/csp/webhelp/topics/images/image(2489).png)

<span class="ts0">Setup the outgoing Webaccounting to Shopify integration</span>

<span class="ts0">Select Shopify Admin API in dropdown</span>

<span class="ts0">Put in your store URL</span>

<span class="ts0">Put in your username and password from your Admin API private app that was setup</span>

<span class="ts0"> </span>![](https://hugeerp0.co.za/csp/webhelp/topics/images/image(2483).png)

<span class="ts0">Go to the functions tab to enable the Debtors and inventory</span>

<span class="ts0"> </span>![](https://hugeerp0.co.za/csp/webhelp/topics/images/image(2490).png)

<span class="ts0"> </span>

<span class="ts0"> </span>

<span class="ts0"> </span>

<span class="ts0"></span>

# Customer Setup

<span class="ts2">Customer setup to Shopfiy</span>

<span class="ts0">When you setup your customer and you tick the Sync to Webshop</span>

<span class="ts0">Then Webaccounting will create an account on Shopify with the default user.</span>

<span class="ts0">Shopify will then send out an email to create an account to the contact and then the client will verify their account</span>

<span class="ts0">Then Webaccounting will create the customer on Shopify with the following fields</span>

<table border="1" id="bkmrk-1-customer-code-2-cu" style="border-collapse: collapse; width: 40.2469%;"><colgroup><col style="width: 13.0662%;"></col><col style="width: 86.8902%;"></col></colgroup><tbody><tr><td class="align-center">**1**</td><td><span class="ts0">Customer Code</span></td></tr><tr><td class="align-center">**2**</td><td><span class="ts0">Customer name</span></td></tr><tr><td class="align-center">**3**</td><td><span class="ts0">Customer Address</span></td></tr><tr><td class="align-center">**4**</td><td><span class="ts0">Customer default contact person</span></td></tr><tr><td class="align-center">**5**</td><td><span class="ts0">Customer contact email address</span></td></tr><tr><td class="align-center">**6**</td><td><span class="ts0">Customer contact mobile number</span></td></tr></tbody></table>

<span class="ts0"> </span>![](https://hugeerp0.co.za/csp/webhelp/topics/images/image(2491).png)

# Inventory Setup

<span class="ts2">Inventory setup to Shopfiy</span>

<span class="ts0">When you setup your inventory item and you tick the Sync to Webshop</span>

<span class="ts0">Then Webaccounting will create the item on Shopify with the following fields</span>

<table border="1" id="bkmrk-1-inventory-code-2-d" style="border-collapse: collapse; width: 35.5556%; height: 236.8px;"><colgroup><col style="width: 13.2418%;"></col><col style="width: 86.6885%;"></col></colgroup><tbody><tr style="height: 29.6px;"><td class="align-center" style="height: 29.6px;">**1**</td><td style="height: 29.6px;"><span class="ts0">Inventory Code</span></td></tr><tr style="height: 29.6px;"><td class="align-center" style="height: 29.6px;">**2**</td><td style="height: 29.6px;"><span class="ts0">Description</span></td></tr><tr style="height: 29.6px;"><td class="align-center" style="height: 29.6px;">**3**</td><td style="height: 29.6px;"><span class="ts0">Long Description</span></td></tr><tr style="height: 29.6px;"><td class="align-center" style="height: 29.6px;">**4**</td><td style="height: 29.6px;"><span class="ts0">Group Code</span></td></tr><tr style="height: 29.6px;"><td class="align-center" style="height: 29.6px;">**5**</td><td style="height: 29.6px;"><span class="ts0">Default price structure</span></td></tr><tr style="height: 29.6px;"><td class="align-center" style="height: 29.6px;">**6**</td><td style="height: 29.6px;"><span class="ts0">Default cost price</span></td></tr><tr style="height: 29.6px;"><td class="align-center" style="height: 29.6px;">**7**</td><td style="height: 29.6px;"><span class="ts0">Default sell price</span></td></tr><tr style="height: 29.6px;"><td class="align-center" style="height: 29.6px;">**8**</td><td style="height: 29.6px;"><span class="ts0">Upload the primary image</span></td></tr></tbody></table>

<span class="ts0"> ![](https://hugeerp0.co.za/csp/webhelp/topics/images/image(2492).png)</span>

# Email Confirmation

<span class="ts2">Customer setup to Shopfiy</span>

<span class="ts0">After the customer has been created on Shopify, it will send an email to the customer to activate their account.</span>

<span class="ts0"> </span>![](https://hugeerp0.co.za/csp/webhelp/topics/images/image(2493).png)

# Mail Chimp

Mail Chimp

# Mail Chimp Email To

<span class="ts10">Video training manual 2019 - </span>[Click Here](https://vimeo.com/375556481)

<span style="color: rgb(45, 194, 107);">**<span class="ts11">Webatar &gt; Activity &gt; Email Mailing List</span>**</span>

<span class="ts0">In web accounting we allow for email mailing list out.</span>

<span class="ts0">Having created a central database in your customer setup files, you are able to create different mailing lists for targeted markets.</span>

<span class="ts0">You can use the web accounting system to email out to the clients as a bulk email out, however this is not as effective as MailChimp.</span>

<span class="ts0">Web accounting can send out the mailing list with attachments, but we do not keep a record of whether the recipient has read the Mail, opened it and whether that email address is valid.</span>

<span class="ts0">While MailChimp has all these advanced features, we have added a function to export to MailChimp.</span>

<span class="ts0">The exported file will have the name, surname, email address and the list name which you can use as a tag in MailChimp to email out.</span>

<span class="ts0">When you export out, check your file first to make sure that it is comma delimited and not semi colon delimited.</span>

<span class="ts0">Open the file app in notepad and replace all semi colons with commas.</span>

<span class="ts0">Log into your Mail chimp profile and import your new list. This will update existing email addresses and put a tag against those customers.</span>

<span class="ts0">MailChimp allows for multiple tags.</span>

<span class="ts0"> </span>![](https://hugeerp0.co.za/csp/webhelp/topics/images/image(2901).png)

<span class="ts0"></span>

# WooCommerce

WooCommerce

# Hawk GPS System (NZ and Australia)

Hawk GPS System (NZ and Australia)

# Rossum

Rossum

# Rossum Document Import

<span class="ts10">Rossum is a third-party application which allows the user to import PDF documents from suppliers into Purchase orders or Goods received vouchers.</span>

<span class="ts10">The free version allows for 300 pages per month to be imported into the system.</span>

<span class="ts10">Sign up is directly with Rossum</span>

<span class="ts10">https://elis.rossum.ai/</span>

<span class="ts35"> </span>![](https://hugeerp0.co.za/csp/webhelp/topics/images/image(2904).png)

<span class="ts10">Setup your API with your username and password</span>

<span class="ts35"> </span>![](https://hugeerp0.co.za/csp/webhelp/topics/images/image(2902).png)

<span class="ts0">GRV / Supplier invoice import</span>

<span class="ts0"> </span>![](https://hugeerp0.co.za/csp/webhelp/topics/images/image(2903).png)

# Typless

Typless

# Typless PDF Reader

<span class="ts10">Typless is a third-party application which allows the user to import PDF documents from suppliers into Purchase orders or Goods received vouchers.</span>

<span class="ts10">The signed-up version can be a pay as you go which allows for 50 free documents per month.</span>

<span class="ts10">Five free training documents</span>

<span class="ts10">Current pricing up to 2022-02-28 is as follows:</span>

<span class="ts0">Euro 0.14 per document (first 50 is free for month) line item document</span>

<span class="ts0">Euro 0.50 per training (first 5 is free)</span>

<span class="ts0">Other charges</span>

<span class="ts0">Only header and total, they charge Euro 0.07 (this is for information only)</span>

<span class="ts10">Sign up is directly with Typless</span>

<span class="ts0">https://typless.com/</span>

<span class="ts0">Sign up with Typless</span>

<span class="ts0"> </span>![](https://hugeerp0.co.za/csp/webhelp/topics/images/image(3600).png)

<span class="ts0">After the setup of Typless, find the token key and setup the API for Typless</span>

<span class="ts0"> </span>![](https://hugeerp0.co.za/csp/webhelp/topics/images/image(3601).png)

<span class="ts0"></span>

# Typless Training Doc Setup

<span class="ts0">Setup a new training document</span>

<span class="ts0"> </span>![](https://hugeerp0.co.za/csp/webhelp/topics/images/image(3602).png)

<span class="ts0">Select the Line item invoice option</span>

<span class="ts0"> </span>![](https://hugeerp0.co.za/csp/webhelp/topics/images/image(3603).png)<span class="ts0">Setup a new document type configuration</span>

<span class="ts0">Ensure that the name does not contain any spaces and no funny characters $!\*@? etc</span>

<span class="ts0"> </span><span class="ts0"> </span>

![](https://hugeerp0.co.za/csp/webhelp/topics/images/image(3605).png)

<span class="ts0"> </span><span class="ts0">Setup all the field names</span>

<span class="ts0"> </span>

![](https://hugeerp0.co.za/csp/webhelp/topics/images/image(3606).png)

<span class="ts0">Once all the fields have been setup, create document type</span>

<span class="ts0"> </span><span class="ts0"> </span>

![](https://hugeerp0.co.za/csp/webhelp/topics/images/image(3607).png)

<span class="ts0">After the document has been saved, click on Training room to train the document</span>

<span class="ts0"> </span>![](https://hugeerp0.co.za/csp/webhelp/topics/images/image(3608).png)

<span class="ts0">Setup the Metadata fields</span>

<span class="ts0"> </span>![](https://hugeerp0.co.za/csp/webhelp/topics/images/image(3609).png)

<span class="ts0"> </span>

<span class="ts0">Match fields from the document to the metadata</span>

<span class="ts0"> </span>![](https://hugeerp0.co.za/csp/webhelp/topics/images/image(3614).png)

<span class="ts0">Setup the line data</span>

<span class="ts0"> </span>![](https://hugeerp0.co.za/csp/webhelp/topics/images/image(3613).png)

<span class="ts0">Confirm all the changes</span>

<span class="ts0"> </span>![](https://hugeerp0.co.za/csp/webhelp/topics/images/image(3612).png)

<span class="ts0">Finalizing the document</span>

<span class="ts0"> </span>![](https://hugeerp0.co.za/csp/webhelp/topics/images/image(3615).png)

<span class="ts0">Click to train the document</span>

<span class="ts0"> </span>![](https://hugeerp0.co.za/csp/webhelp/topics/images/image(3618).png)

<span class="ts0">Go back into the training room to check if the document read the data correctly</span>

<span class="ts0"> </span>![](https://hugeerp0.co.za/csp/webhelp/topics/images/image(3619).png)

<span class="ts0">Train again</span>

<span class="ts0"> </span>![](https://hugeerp0.co.za/csp/webhelp/topics/images/image(3620).png)

<span class="ts0"> </span>

<span class="ts0"></span>

# Weather Forecast

Weather Forecast

# Weather Forecast

<span class="ts0">This API allows the system to fetch two weeks of weather information for specific region.</span>

<span class="ts0">It is used in job scheduling and viewed on header of pages.</span>

<span class="ts0">The weather API is free up to 1000 requests per day from Visual Crossing Weather</span>

<span class="ts0">The system collects the following:</span>

<table border="1" id="bkmrk-1-weather-type---rai" style="border-collapse: collapse; width: 51.8519%;"><colgroup><col style="width: 12.2196%;"></col><col style="width: 87.9407%;"></col></colgroup><tbody><tr><td class="align-center">**1**</td><td><span class="ts0">Weather type - Rain, sunny</span></td></tr><tr><td class="align-center">**2**</td><td><span class="ts0">Weather description</span></td></tr><tr><td class="align-center">**3**</td><td><span class="ts0">Minimum and Maximum </span><span class="ts10">temperature </span><span class="ts0">for the day</span></td></tr></tbody></table>

<span class="ts0">Before setting up the API, one needs to sign up for an account</span>

<span class="ts0">To access the weather website, go to Weather forecast or </span>[https://www.visualcrossing.com/](https://www.visualcrossing.com/)<span class="ts0"> to sign up.</span>

<span class="ts0"> </span>![](https://hugeerp0.co.za/csp/webhelp/topics/images/image(3572).png)

<span class="ts0">At the website - click on create new account or sign up</span>

<span class="ts0"> </span>![](https://hugeerp0.co.za/csp/webhelp/topics/images/image(3573).png)

<span class="ts0">Follow the steps</span>

<span class="ts0"> </span>![](https://hugeerp0.co.za/csp/webhelp/topics/images/image(3574).png)

<span class="ts0">Confirm your password</span>

<span class="ts0"> </span>![](https://hugeerp0.co.za/csp/webhelp/topics/images/image(3575).png)

<span class="ts0">Agree to the terms</span>

<span class="ts0"> </span>![](https://hugeerp0.co.za/csp/webhelp/topics/images/image(3576).png)

<span class="ts0">Enter a reason</span>

<span class="ts0"> </span>![](https://hugeerp0.co.za/csp/webhelp/topics/images/image(3577).png)

<span class="ts0">Sign into the account.</span>

<span class="ts0">The Key is very important as we will use this in the setup</span>

<span class="ts0"> </span>![](https://hugeerp0.co.za/csp/webhelp/topics/images/image(3578).png)

<span class="ts0">Go to System Configuration &gt; Security &gt; API setup</span>

<span class="ts0">Click on Add to add in Visual Crossing Weather API</span>

<span class="ts0"> </span>![](https://hugeerp0.co.za/csp/webhelp/topics/images/image(3579).png)

<span class="ts0">Fill in the information</span>

<span class="ts0">It is important to add in the Config the following</span>

<table border="1" id="bkmrk-%3Bcollection-key-%3D-.." style="border-collapse: collapse; width: 39.7531%;"><colgroup><col style="width: 100%;"></col></colgroup><tbody><tr><td><span class="ts0">;collection</span></td></tr><tr><td><span class="ts0">key = ........(paste key here from website signup)</span></td></tr></tbody></table>

<span class="ts0">Proceed to Weather Region setup manual - </span>[Access here](https://hugeerp0.co.za/csp/webhelp/topics/idh-topic11000.htm)

<span class="ts0"> </span>![](https://hugeerp0.co.za/csp/webhelp/topics/images/image(3580).png)

<span class="ts0"></span>

# Google Geo Locate

Google Geo Locate

# Google Geo Locate

<span class="ts0">Setting up Google Maps for geolocate is used for the debtors and creditors addresses.</span>

<span class="ts0">This function helps you find the longitude and latitude of the customer address which can be used in various systems.</span>

<span class="ts0">One of the areas that the geolocate is used for, is to push the Geo locate for a invoice to a Courier company so that they can deliver the package.</span>

<span class="ts0">The Google geolocate is a paid service from Google.</span>

<span class="ts0">You will have to set up an account and pay the charges directly to Google in order to use this feature.</span>

<span class="ts0">Go to [https://mapsplatform.google.com](https://mapsplatform.google.com)</span>

<span class="ts0">to setup your account</span>

<span class="ts0">Once you go to the web address, click on Get Started</span>

<span class="ts0"> </span>![](https://hugeerp0.co.za/csp/webhelp/topics/images/image(3715).png)

<span class="ts0">Enter all your information to sign up</span>

<span class="ts0"> </span>![](https://hugeerp0.co.za/csp/webhelp/topics/images/image(3716).png)

<span class="ts0">After you have filled in all the information on the sign up.</span>

<span class="ts0">There are a few settings that need to be set up in order to use the Google Maps.</span>

<span class="ts0">Click on APIs on left menu.</span>

<span class="ts0"> </span>![](https://hugeerp0.co.za/csp/webhelp/topics/images/image(3717).png)

<span class="ts0">There are certain APIs that we want to keep and the rest of them we are going to disable.</span>

<span class="ts0">See below image of the four APIs that we want to keep.</span>

<span class="ts0">We are going to start off with the first one to disable which is the directions API.</span>

<span class="ts0">Click on the details on the far right of the line to enter the screen so we can disable the API.</span>

<span class="ts0"> </span>![](https://hugeerp0.co.za/csp/webhelp/topics/images/image(3718).png)

<span class="ts0">Click on the disable button on the top right hand corner for that particular API that we are going to disable.</span>

<span class="ts0">Disable the API.</span>

<span class="ts0"> </span>![](https://hugeerp0.co.za/csp/webhelp/topics/images/image(3719).png)

<span class="ts0">Google will ask you each time to enable this function after you have disabled it.</span>

<span class="ts0">Just click on the back arrow button so that you can disable the next one.</span>

<span class="ts0"> </span>![](https://hugeerp0.co.za/csp/webhelp/topics/images/image(3720).png)

<span class="ts0">Find your API key in Google Cloud platform and copy</span>

<span class="ts0">Go to huge ERP &gt; Security and API setup.</span>

<span class="ts0">Click on add to create the Google geolocate API.</span>

<span class="ts0">Copy your API key in the API key section.</span>

<span class="ts0">You can enter the email address that you used to log in for your Google geolocating platform.</span>

<span class="ts0">This email address is not used, but it is useful to know which email account you used for the Geo location platform for Google.</span>

<span class="ts0"> </span>![](https://hugeerp0.co.za/csp/webhelp/topics/images/image(3721).png)

<span class="ts0">Geolocate is used in debtors and creditors addresses.</span>

<span class="ts0">It will capture two coordinates which is the GPS coordinates as well as the Google plus code for Geo location.</span>

<span class="ts0">They get coords button is used to use the API for Google in order to populate the GPS coordinates and the plus code coordinate.</span>

<span class="ts0">The look up coordinates button will open up the Google Maps and show you the location of the customer. </span>

<span class="ts0">The GPS coordinates and the plus code coordinates can be used for Courier company delivery address location.</span>

<span class="ts0"> </span>![](https://hugeerp0.co.za/csp/webhelp/topics/images/image(3722).png)

<span class="ts0"></span>

# Ship Logic - The Courier Company

Ship Logic - The Courier Company

# Ship Logic

<span class="ts0">This API is used for the courier company link up allowing one to automatically create a shipping document on the courier company system.</span>

<span class="ts0"> </span>

<span class="ts0">There are a few steps one needs to do in order for this to work.</span>

<span class="ts0">Create the API to Ship Logic</span>

<span class="ts0"> </span>![](https://hugeerp0.co.za/csp/webhelp/topics/images/image(3769).png)

<span class="ts0"> </span><span class="ts0">Get your codes from Ship logic website</span>

<span class="ts0">The access key ID to be entered in the API key field</span>

<span class="ts0">The secret access key to be entered in the password field</span>

<span class="ts0">Enter your email address that you use to access the Ship logic website</span>

<span class="ts0"> </span>![](https://hugeerp0.co.za/csp/webhelp/topics/images/image(3770).png)

<span class="ts0"> </span><span class="ts0">Go to Debtors / Creditors additional properties to setup shipping methods</span>

<span class="ts0">This is where we link the courier supplier company to the delivery method</span>

<span class="ts0"> </span>![](https://hugeerp0.co.za/csp/webhelp/topics/images/image(3771).png)

<span class="ts0"> </span><span class="ts0"> </span><span class="ts0">Go to the Creditors / supplier setup to link the supplier to the Courier API for Ship logic API</span>

<span class="ts0"> </span>![](https://hugeerp0.co.za/csp/webhelp/topics/images/image(3772).png)

<span class="ts0"> </span><span class="ts0"> </span><span class="ts0">This will all integrate with the shipping information on the invoice</span>

[Check out more details](https://hugeerp0.co.za/csp/webhelp/topics/idh-topic11900.htm)

<span class="ts0"> </span>![](https://hugeerp0.co.za/csp/webhelp/topics/images/image(3773).png)

<span class="ts0"> </span>

<span class="ts0"> </span>

<span class="ts0"> </span>

<span class="ts0"> </span>

<span class="ts0"></span>

# Ship Logic Courier Delivery Setup and Usage

<span class="md-plain md-expand">To view instructions on creating a shipment from an Invoice without an overview of the relevant form components, click [here](https://hugeerp0.co.za/hsofdocs/link/129#bkmrk-creating-a-shipment). </span>

## <span class="md-plain md-expand">Set Up</span>

### <span class="md-plain md-expand">Ship Logic Account</span>

<span class="md-plain">From the Account Settings page in Ship Logic, click the Create API Key.</span>

[![image.png](https://hugeerp0.co.za/hsofdocs/uploads/images/gallery/2024-07/scaled-1680-/3Ltimage.png)](https://hugeerp0.co.za/hsofdocs/uploads/images/gallery/2024-07/3Ltimage.png)

Copy the API Key to the clipboard and store it somewhere safe.

[![image.png](https://hugeerp0.co.za/hsofdocs/uploads/images/gallery/2024-07/scaled-1680-/DRLimage.png)](https://hugeerp0.co.za/hsofdocs/uploads/images/gallery/2024-07/DRLimage.png)

### API Setup

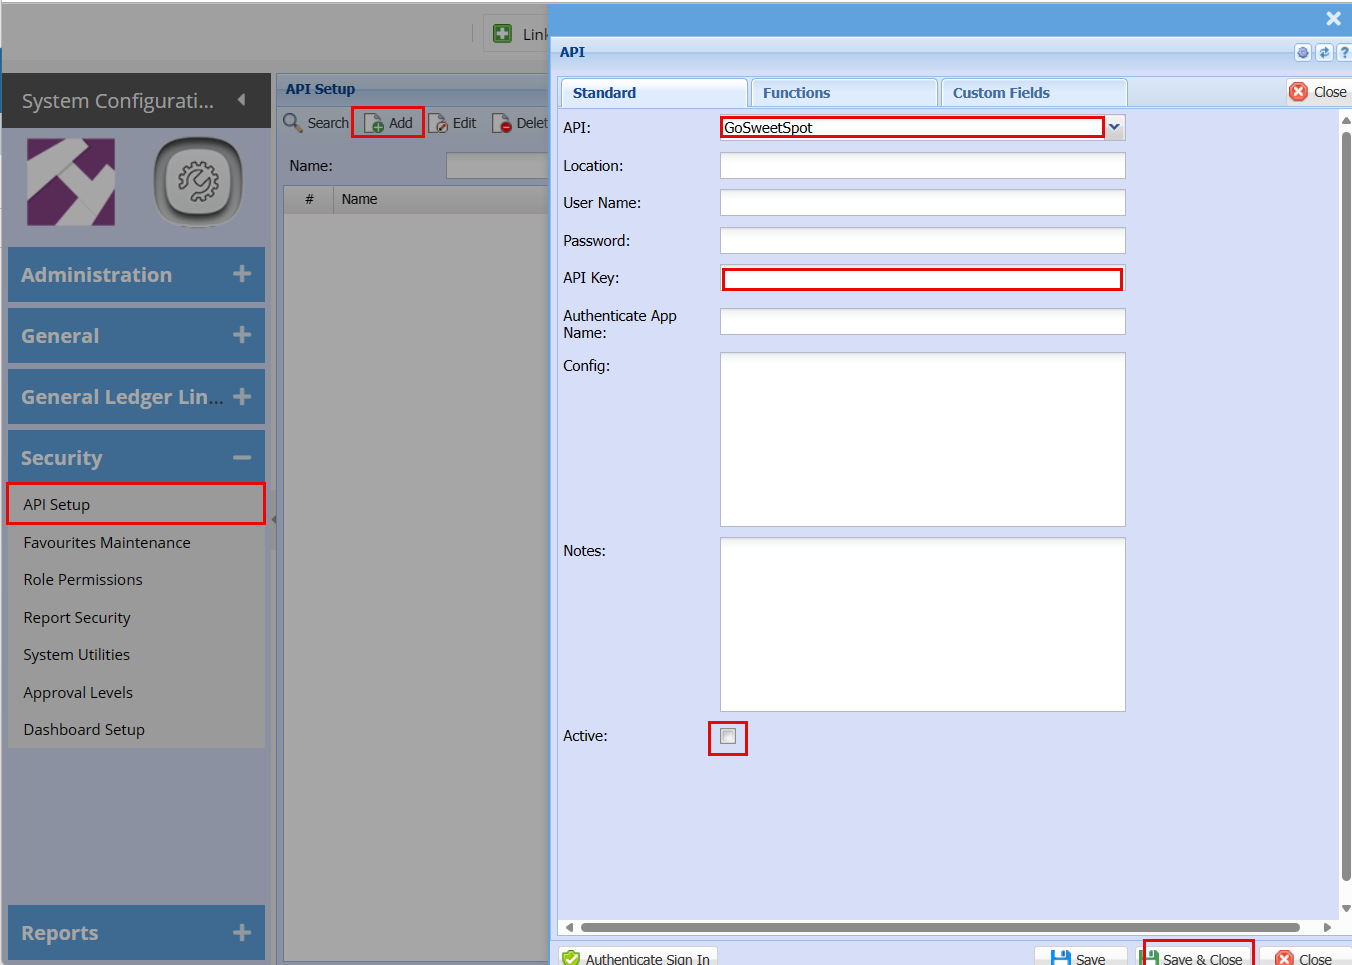
Return to Huge ERP and navigate to API Setup in the SCM module under Security.

Click the Add button in the top toolbar.

Select Ship Logic API from the API combo box in the Add form.

[![image.png](https://hugeerp0.co.za/hsofdocs/uploads/images/gallery/2024-07/scaled-1680-/3feimage.png)](https://hugeerp0.co.za/hsofdocs/uploads/images/gallery/2024-07/3feimage.png)

In the Location field enter "api.shiplogic.com" without the quotes.

In the User Name field enter the email address used to log into Ship Logic.

Copy the API Key copied from the Ship Logic Account Settings page to the API Key field.

In the config field enter "bearer" without the quotes.

Make sure the Active checkbox is checked.

Click Save when done.

[![image.png](https://hugeerp0.co.za/hsofdocs/uploads/images/gallery/2024-07/scaled-1680-/Cn9image.png)](https://hugeerp0.co.za/hsofdocs/uploads/images/gallery/2024-07/Cn9image.png)

### Creating a Delivery Company

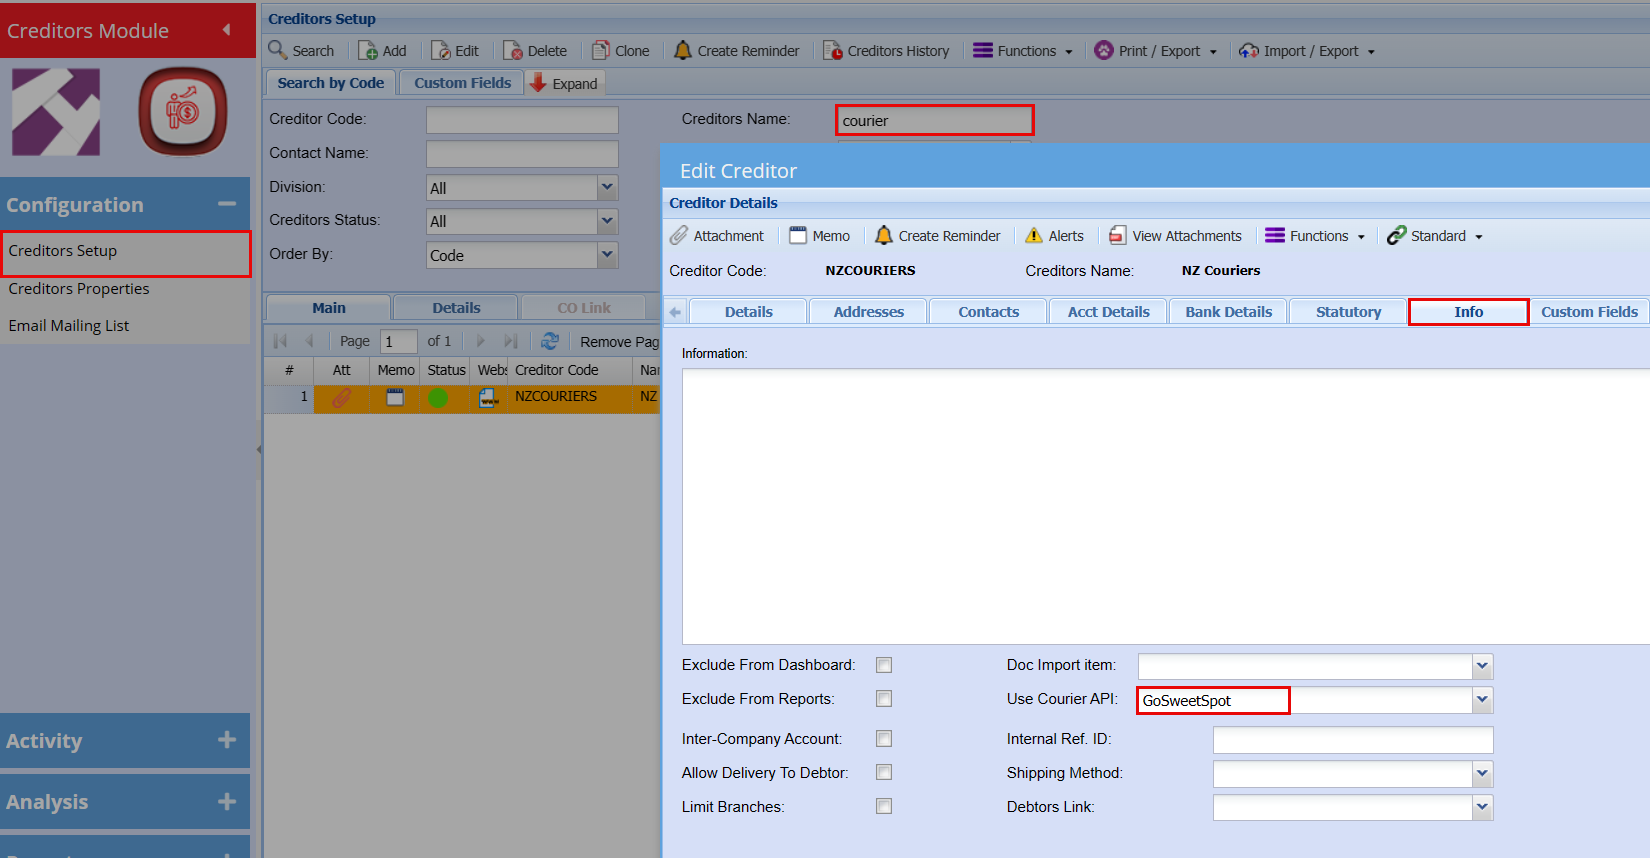
To select Ship Logic as the API for courier delivery for an Invoice or other applicable document, it first needs to be added as a Delivery Company in Creditors Setup in the Creditors Module under Configuration.

Click the Add button in the top toolbar.

In the Details tab fill in the Credit Code, Name and Short Name fields for the Delivery Company. Other information in this tab is optional.

[![image.png](https://hugeerp0.co.za/hsofdocs/uploads/images/gallery/2024-07/scaled-1680-/R2mimage.png)](https://hugeerp0.co.za/hsofdocs/uploads/images/gallery/2024-07/R2mimage.png)

Save the form by clicking the Save button, and then switch to the Info tab.

In the Use Courier API combo box select Ship Logic API, then save the form again. The form can now be closed.

[![image.png](https://hugeerp0.co.za/hsofdocs/uploads/images/gallery/2024-07/scaled-1680-/x8Uimage.png)](https://hugeerp0.co.za/hsofdocs/uploads/images/gallery/2024-07/x8Uimage.png)

### Shipping Terms

In addition to creating a Delivery Company for Ship Logic, Shipping Terms need to be created for selecting the Delivery Company from an Invoice form.

Navigate to Additional Debtor Properties in the Debtor module under Configuration. Switch to the Shipping Terms tab.

[![image.png](https://hugeerp0.co.za/hsofdocs/uploads/images/gallery/2024-07/scaled-1680-/AHiimage.png)](https://hugeerp0.co.za/hsofdocs/uploads/images/gallery/2024-07/AHiimage.png)

Click the Add button in the top toolbar.

In the Shipping Method form enter a Code and Description in the respective fields. Select Delivery for the Ship Type combo box and External for the Delivery By combo box.

The Delivery Company combo box should be enabled after selecting External for the Delivery By combo box. Select the created Delivery Company for the combo box.

Make sure the Active checkbox is checked, and then click Save &amp; Close.

[![image.png](https://hugeerp0.co.za/hsofdocs/uploads/images/gallery/2024-07/scaled-1680-/0aximage.png)](https://hugeerp0.co.za/hsofdocs/uploads/images/gallery/2024-07/0aximage.png)

It should now be possible to create shipments with Ship Logic from Invoice forms.

### Optional - Service Types

Optionally Service Types can be created to populate the Service Type combo box in the Shipping tab of the Invoice form. To do this navigate to Courier Setup in the SCM module under Administration.

[![image.png](https://hugeerp0.co.za/hsofdocs/uploads/images/gallery/2024-07/scaled-1680-/4CFimage.png)](https://hugeerp0.co.za/hsofdocs/uploads/images/gallery/2024-07/4CFimage.png)

Service Types can be added, edited and deleted from this panel. The selected API should be Ship Logic API and the Code should be unique for Ship Logic. The codes should correspond to valid Service Type codes for Ship Logic. Service Types available for a delivery can be viewed as described by clicking the Courier API or Get Rates button in the Shipping tab of the Invoice form, as described in the next section.

### Optional - Predefined Parcel Sizes

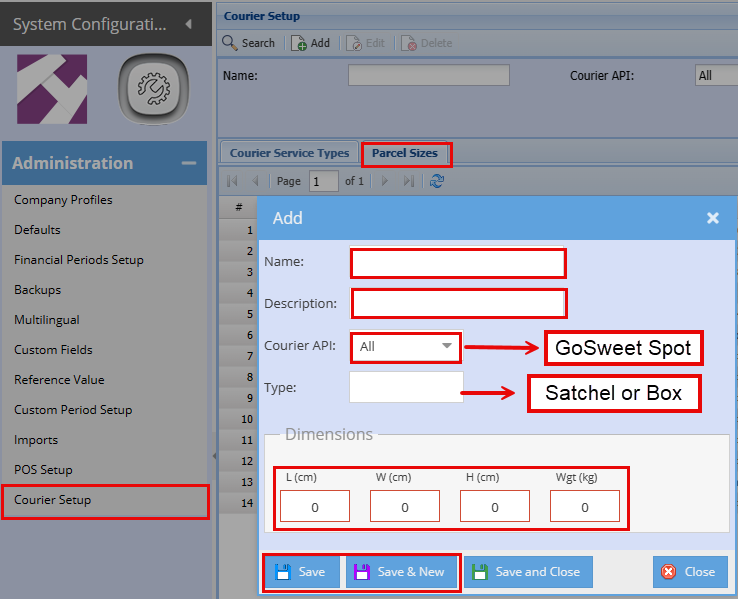
Predefined parcel sizes can be created in the Courier Setup panel in the Parcel Sizes tab, or in the Defaults tab in the Parcel Selection grid, which is described in the next section. Predefined parcel sizes can be used as templates to create new parcel entries with the same values for a new shipment from the Parcel Selection for an Invoice. The selected API should be Ship Logic and the name should be unique. The dimensions and weight should all be provided.

[![image.png](https://hugeerp0.co.za/hsofdocs/uploads/images/gallery/2024-07/scaled-1680-/Aadimage.png)](https://hugeerp0.co.za/hsofdocs/uploads/images/gallery/2024-07/Aadimage.png)

## <span class="md-plain">Using Ship Logic to Create Shipments</span>

<span class="md-plain">Shipments can be created from the document types:</span>

- <span class="md-plain">Invoice</span>
- <span class="md-plain">Sales Order</span>
- <span class="md-plain">Sales Order Confirm</span>
- <span class="md-plain">Dispatch Stock Documents </span>

<span class="md-plain">The process to create a shipment is identical for all document types, however the delivery status can only be updated automatically from Invoice documents at this point.</span>

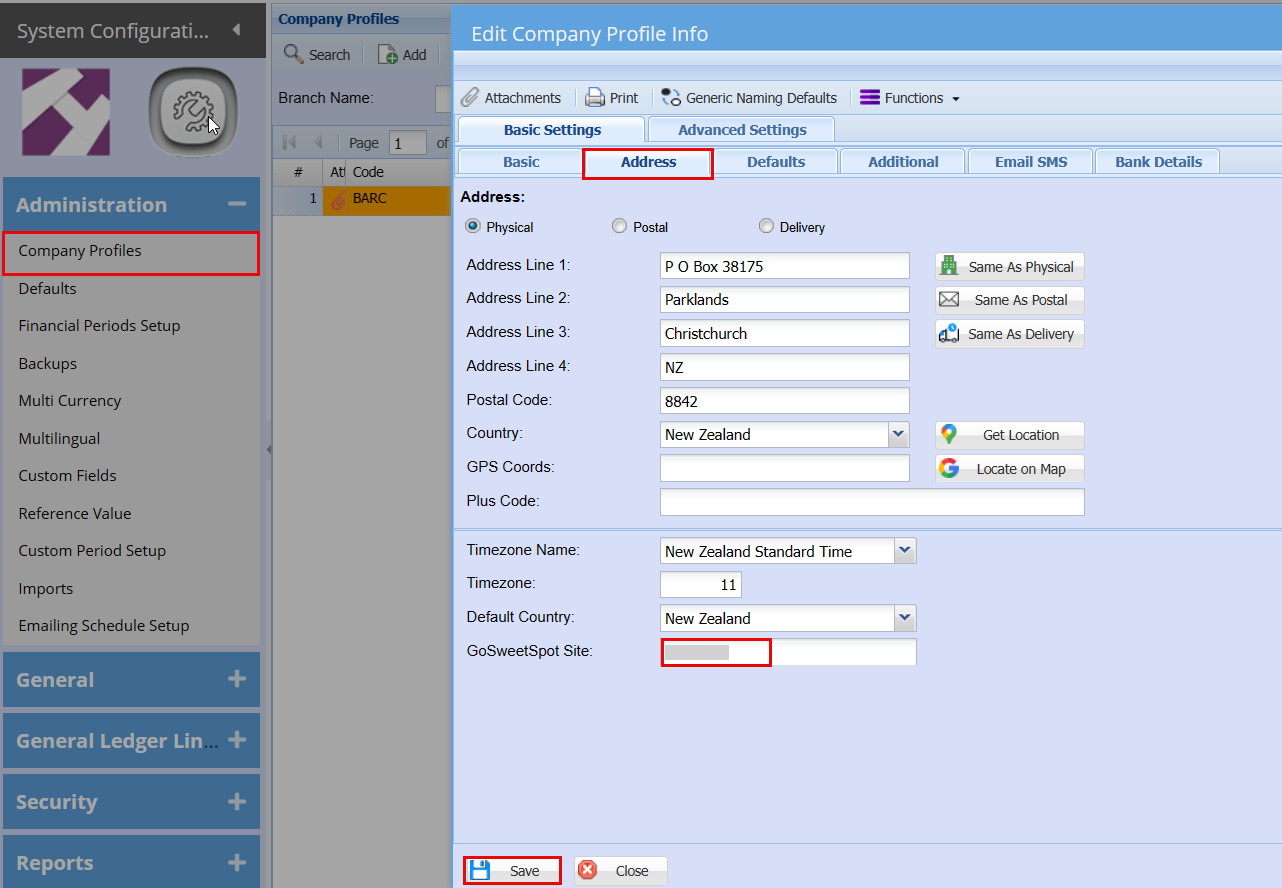
<span class="md-plain">Outside of the document form, the Collection address is retrieved from the Company Profile Info form in SCM. Currently only the physical address fields are selected.</span>

<span class="md-meta-i-c  md-link">[<span class="md-image md-img-loaded" data-src="https://hugeerp0.co.za/hsofdocs/uploads/images/gallery/2024-07/scaled-1680-/RmDimage.png">![image.png](https://hugeerp0.co.za/hsofdocs/uploads/images/gallery/2024-07/scaled-1680-/RmDimage.png)</span>](https://hugeerp0.co.za/hsofdocs/uploads/images/gallery/2024-07/RmDimage.png)</span>

#### <span class="md-plain">Address Fields</span>

<figure class="md-table-fig table-figure" id="bkmrk-field-description-ex"><table class="md-table"><thead><tr class="md-end-block"><th><span class="td-span"><span class="md-pair-s ">**<span class="md-plain">Field</span>**</span></span></th><th><span class="td-span"><span class="md-pair-s ">**<span class="md-plain">Description</span>**</span></span></th><th><span class="td-span"><span class="md-pair-s ">**<span class="md-plain">Example</span>**</span> </span></th></tr></thead><tbody><tr class="md-end-block"><td><span class="td-span"><span class="md-plain">Address Line 1</span></span></td><td><span class="td-span"><span class="md-plain">The street address</span></span></td><td><span class="td-span"><span class="md-plain">1188 Lois Avenue</span></span></td></tr><tr class="md-end-block"><td><span class="td-span"><span class="md-plain">Address Line 2</span></span></td><td><span class="td-span"><span class="md-plain">The suburb, or local area</span></span></td><td><span class="td-span"><span class="md-plain">Menlyn</span></span></td></tr><tr class="md-end-block"><td><span class="td-span"><span class="md-plain">Address Line 3</span></span></td><td><span class="td-span"><span class="md-plain">The city</span></span></td><td><span class="td-span"><span class="md-plain">Pretoria</span></span></td></tr><tr class="md-end-block"><td><span class="td-span"><span class="md-plain">Address Line 4</span></span></td><td><span class="td-span"><span class="md-plain">The region or province</span></span></td><td><span class="td-span"><span class="md-plain">Gauteng</span></span></td></tr><tr class="md-end-block"><td><span class="td-span"><span class="md-plain">Country</span></span></td><td><span class="td-span"><span class="md-plain">The selected country, defaults to South Africa</span></span></td><td><span class="td-span"><span class="md-plain">South Africa</span></span></td></tr><tr class="md-end-block"><td><span class="td-span"><span class="md-plain">GPS Coords</span></span></td><td><span class="td-span"><span class="md-plain">Optional GPS coordinates, comma separated latitude then longitude</span></span></td><td><span class="td-span"><span class="md-plain">-25.7863272, 28.334732</span></span></td></tr></tbody></table>

</figure>### <span class="md-plain">Creating Shipments from an Invoice</span>

<span class="md-plain">An Invoice to create a shipment from can be in Preparation or Posted Status. If in Posted status, only the fields in the Shipping tab can be edited. </span>

<span class="md-plain">At a minimum, outside of the Shipping tab fields, the Customer, Internal Contact and Contact Person fields are required.</span>

<span class="md-plain">Components and fields that may be used are marked red in the screenshots, and the fields that are not used are marked purple. Buttons that are optionally used are marked yellow. </span>

<span class="md-meta-i-c  md-link">[<span class="md-image md-img-loaded" data-src="https://hugeerp0.co.za/hsofdocs/uploads/images/gallery/2024-07/scaled-1680-/UC6image.png">![image.png](https://hugeerp0.co.za/hsofdocs/uploads/images/gallery/2024-07/scaled-1680-/UC6image.png)</span>](https://hugeerp0.co.za/hsofdocs/uploads/images/gallery/2024-07/UC6image.png)</span>

#### <span class="md-plain">Detail Tab components</span>

<figure class="md-table-fig table-figure" id="bkmrk-component-used-requi"><table class="md-table" style="width: 100%;"><thead><tr class="md-end-block"><th style="width: 18.0425%;"><span class="td-span"><span class="md-pair-s ">**<span class="md-plain">Component</span>**</span></span></th><th style="width: 10.0099%;"><span class="td-span"><span class="md-pair-s ">**<span class="md-plain">Used</span>**</span></span></th><th style="width: 10.3812%;"><span class="td-span"><span class="md-pair-s ">**<span class="md-plain">Required</span>**</span></span></th><th style="width: 61.5417%;"><span class="td-span"><span class="md-pair-s ">**<span class="md-plain">Description</span>**</span></span></th></tr></thead><tbody><tr class="md-end-block"><td style="width: 18.0425%;"><span class="td-span"><span class="md-plain">Customer</span></span></td><td style="width: 10.0099%;"><span class="td-span"><span class="md-plain">Yes</span></span></td><td style="width: 10.3812%;"><span class="td-span"><span class="md-plain">Yes</span></span></td><td style="width: 61.5417%;"><span class="td-span"><span class="md-plain">Used for Delivery Address and Delivery Contact. Required to save a new Invoice. The delivery address used is the Customer address for the Address Type selected in the Shipping tab. The numbered address fields are required to be for the same address components as the Branch Address, e.g. Address Line 1 is for the Street Address. If a Contact Person is not selected from the Address tab then the Delivery Contact is obtained from the selected customer instead. The first name, last name, email and mobile number of is used, with the name and either the email or mobile number being required. </span></span></td></tr><tr class="md-end-block"><td style="width: 18.0425%;"><span class="td-span"><span class="md-plain">Sales Rep</span></span></td><td style="width: 10.0099%;"><span class="td-span"><span class="md-plain">No</span></span></td><td style="width: 10.3812%;"> </td><td style="width: 61.5417%;"> </td></tr><tr class="md-end-block"><td style="width: 18.0425%;"><span class="td-span"><span class="md-plain">Reference</span></span></td><td style="width: 10.0099%;"><span class="td-span"><span class="md-plain">Yes</span></span></td><td style="width: 10.3812%;"><span class="td-span"><span class="md-plain">No</span></span></td><td style="width: 61.5417%;"><span class="td-span"><span class="md-plain">Becomes the customer reference for the delivery if set</span></span></td></tr><tr class="md-end-block"><td style="width: 18.0425%;"><span class="td-span"><span class="md-plain">Internal Contact</span></span></td><td style="width: 10.0099%;"><span class="td-span"><span class="md-plain">Yes</span></span></td><td style="width: 10.3812%;"><span class="td-span"><span class="md-plain">Yes</span></span></td><td style="width: 61.5417%;"><span class="td-span"><span class="md-plain">Used for the Collection Address and Collection Contact. The collection address becomes the Physical Address of the Branch the user belongs to. The first and last name, and email and mobile number are used, with the email or mobile number being required as with the Delivery Contact.</span></span></td></tr></tbody></table>

</figure>#### <span class="md-plain">Address Tab components</span>

<span class="md-meta-i-c  md-link">[<span class="md-image md-img-loaded" data-src="https://hugeerp0.co.za/hsofdocs/uploads/images/gallery/2024-07/scaled-1680-/q42image.png">![image.png](https://hugeerp0.co.za/hsofdocs/uploads/images/gallery/2024-07/scaled-1680-/q42image.png)</span>](https://hugeerp0.co.za/hsofdocs/uploads/images/gallery/2024-07/q42image.png)</span>

<figure class="md-table-fig table-figure" id="bkmrk-component-used-requi-1"><table class="md-table" style="width: 100%; height: 337.4px;"><thead><tr class="md-end-block" style="height: 36.8px;"><th style="width: 15.6945%; height: 36.8px;"><span class="td-span"><span class="md-pair-s ">**<span class="md-plain">Component</span>**</span></span></th><th style="width: 7.29225%; height: 36.8px;"><span class="td-span"><span class="md-pair-s ">**<span class="md-plain">Used</span>**</span></span></th><th style="width: 9.51447%; height: 36.8px;"><span class="td-span"><span class="md-pair-s ">**<span class="md-plain">Required</span>**</span></span></th><th style="width: 67.474%; height: 36.8px;"><span class="td-span"><span class="md-pair-s ">**<span class="md-plain">Description</span>**</span></span></th></tr></thead><tbody><tr class="md-end-block" style="height: 36.2px;"><td style="width: 15.6945%; height: 36.2px;"><span class="td-span"><span class="md-plain">Address Type</span></span></td><td style="width: 7.29225%; height: 36.2px;"><span class="td-span"><span class="md-plain">No</span></span></td><td style="width: 9.51447%; height: 36.2px;"> </td><td style="width: 67.474%; height: 36.2px;"><span class="td-span"><span class="md-plain">Address that when selected will populate the address fields in this tab.</span></span></td></tr><tr class="md-end-block" style="height: 63.2px;"><td style="width: 15.6945%; height: 63.2px;"><span class="td-span"><span class="md-plain">Address Fields</span></span></td><td style="width: 7.29225%; height: 63.2px;"><span class="td-span"><span class="md-plain">No</span></span></td><td style="width: 9.51447%; height: 63.2px;"> </td><td style="width: 67.474%; height: 63.2px;"><span class="td-span"><span class="md-plain">Currently is not used. Instead the unedited customer address for the selected customer in the Detail Tab and address type in the Shipping Tab is used for the delivery address. </span></span></td></tr><tr class="md-end-block" style="height: 46.4px;"><td style="width: 15.6945%; height: 46.4px;"><span class="td-span"><span class="md-plain">Contact Person</span></span></td><td style="width: 7.29225%; height: 46.4px;"><span class="td-span"><span class="md-plain">Yes</span></span></td><td style="width: 9.51447%; height: 46.4px;"><span class="td-span"><span class="md-plain">No</span></span></td><td style="width: 67.474%; height: 46.4px;"><span class="td-span"><span class="md-plain">Overrides the default contact person for the Customer if selected. The name and email or mobile number of the Contact Person is required.</span></span></td></tr><tr class="md-end-block" style="height: 38px;"><td style="width: 15.6945%; height: 38px;"><span class="td-span"><span class="md-plain">View Button</span></span></td><td style="width: 7.29225%; height: 38px;"><span class="td-span"><span class="md-plain">N/A</span></span></td><td style="width: 9.51447%; height: 38px;"><span class="td-span"><span class="md-plain">No</span></span></td><td style="width: 67.474%; height: 38px;"><span class="td-span"><span class="md-plain">Can be used to edit the details for the selected Contact Person.</span></span></td></tr><tr class="md-end-block" style="height: 46.4px;"><td style="width: 15.6945%; height: 46.4px;"><span class="td-span"><span class="md-plain">Contact No</span></span></td><td style="width: 7.29225%; height: 46.4px;"><span class="td-span"><span class="md-plain">Yes</span></span></td><td style="width: 9.51447%; height: 46.4px;"><span class="td-span"><span class="md-plain">No</span></span></td><td style="width: 67.474%; height: 46.4px;"><span class="td-span"><span class="md-plain">If set then this Contact Number is used instead of the Mobile Number for the selected Contact Person or default Debtor Contact Person.</span></span></td></tr><tr class="md-end-block" style="height: 36.2px;"><td style="width: 15.6945%; height: 36.2px;"><span class="td-span"><span class="md-plain">Region</span></span></td><td style="width: 7.29225%; height: 36.2px;"><span class="td-span"><span class="md-plain">No</span></span></td><td style="width: 9.51447%; height: 36.2px;"> </td><td style="width: 67.474%; height: 36.2px;"><span class="td-span"><span class="md-plain">Is unrelated to the Region given in the addresses. </span></span></td></tr><tr class="md-end-block" style="height: 34.2px;"><td style="width: 15.6945%; height: 34.2px;"><span class="td-span"><span class="md-plain">Branch</span></span></td><td style="width: 7.29225%; height: 34.2px;"><span class="td-span"><span class="md-plain">No</span></span></td><td style="width: 9.51447%; height: 34.2px;"> </td><td style="width: 67.474%; height: 34.2px;"><span class="td-span"><span class="md-plain">The branch address is from the branch the Internal Contact belongs to.</span></span></td></tr></tbody></table>

</figure>#### <span class="md-plain">Shipping Tab components</span>

<span class="md-plain">All of the components in the main area, that are not marked purple in the screenshot are required or are used for Courier Delivery related functions with Ship Logic. The components that are required to create a Shipment are marked red.</span>

<span class="md-meta-i-c  md-link">[<span class="md-image md-img-loaded" data-src="https://hugeerp0.co.za/hsofdocs/uploads/images/gallery/2024-07/scaled-1680-/Iq2image.png">![image.png](https://hugeerp0.co.za/hsofdocs/uploads/images/gallery/2024-07/scaled-1680-/Iq2image.png)</span>](https://hugeerp0.co.za/hsofdocs/uploads/images/gallery/2024-07/Iq2image.png)</span>

<figure class="md-table-fig table-figure" id="bkmrk-component-used-requi-2"><table class="md-table" style="width: 100%; height: 1346px;"><thead><tr class="md-end-block" style="height: 63.2px;"><th style="width: 21.9947%; height: 63.2px;"><span class="td-span"><span class="md-pair-s ">**<span class="md-plain">Component</span>**</span></span></th><th style="width: 8.40568%; height: 63.2px;"><span class="td-span"><span class="md-pair-s ">**<span class="md-plain">Used</span>**</span></span></th><th style="width: 10.8749%; height: 63.2px;"><span class="td-span"><span class="md-pair-s ">**<span class="md-plain">Required</span>**</span></span></th><th style="width: 58.6999%; height: 63.2px;"><span class="td-span"><span class="md-pair-s ">**<span class="md-plain">Description</span>**</span></span></th></tr></thead><tbody><tr class="md-end-block" style="height: 88.4px;"><td style="width: 21.9947%; height: 88.4px;"><span class="td-span"><span class="md-plain">Shipping Terms</span></span></td><td style="width: 8.40568%; height: 88.4px;"><span class="td-span"><span class="md-plain">Yes</span></span></td><td style="width: 10.8749%; height: 88.4px;"><span class="td-span"><span class="md-plain">Yes</span></span></td><td style="width: 58.6999%; height: 88.4px;"><span class="td-span"><span class="md-plain">Required to populate the Delivery Company combo box and then select the Courier Company for Ship Logic. For more information view the </span><span class="md-meta-i-c  md-link">[<span class="md-plain">Set Up section</span>](https://hugeerp0.co.za/hsofdocs/link/129#bkmrk-set-up)</span><span class="md-plain">. </span></span></td></tr><tr class="md-end-block" style="height: 46.4px;"><td style="width: 21.9947%; height: 46.4px;"><span class="td-span"><span class="md-plain">Collect / Ship Date</span></span></td><td style="width: 8.40568%; height: 46.4px;"><span class="td-span"><span class="md-plain">No</span></span></td><td style="width: 10.8749%; height: 46.4px;"> </td><td style="width: 58.6999%; height: 46.4px;"><span class="td-span"><span class="md-plain">Currently not used for Ship Logic, but could be used to schedule the collection date and time. </span></span></td></tr><tr class="md-end-block" style="height: 63.2px;"><td style="width: 21.9947%; height: 63.2px;"><span class="td-span"><span class="md-plain">Shipping Options - email</span></span></td><td style="width: 8.40568%; height: 63.2px;"><span class="td-span"><span class="md-plain">Yes</span></span></td><td style="width: 10.8749%; height: 63.2px;"><span class="td-span"><span class="md-plain">No</span></span></td><td style="width: 58.6999%; height: 63.2px;"><span class="td-span"><span class="md-plain">If checked then delivery updates are sent to the Collection contact by email or SMS.</span></span></td></tr><tr class="md-end-block" style="height: 63.2px;"><td style="width: 21.9947%; height: 63.2px;"><span class="td-span"><span class="md-plain">Shipping Options - other</span></span></td><td style="width: 8.40568%; height: 63.2px;"><span class="td-span"><span class="md-plain">No</span></span></td><td style="width: 10.8749%; height: 63.2px;"> </td><td style="width: 58.6999%; height: 63.2px;"><span class="td-span"><span class="md-plain">These shipping options do not apply to Ship Logic. <span style="background-color: rgb(191, 237, 210);">\[NEW\]</span></span></span></td></tr><tr class="md-end-block" style="height: 46.4px;"><td style="width: 21.9947%; height: 46.4px;"><span class="td-span"><span class="md-plain">Pickup Instructions</span></span></td><td style="width: 8.40568%; height: 46.4px;"><span class="td-span"><span class="md-plain">Yes</span></span></td><td style="width: 10.8749%; height: 46.4px;"><span class="td-span"><span class="md-plain">No</span></span></td><td style="width: 58.6999%; height: 46.4px;"><span class="td-span"><span class="md-plain">Special instructions for the delivery driver when collecting the shipment. <span style="background-color: rgb(191, 237, 210);">\[NEW\]</span></span></span></td></tr><tr class="md-end-block" style="height: 46.4px;"><td style="width: 21.9947%; height: 46.4px;"><span class="td-span"><span class="md-plain">Delivery Instructions</span></span></td><td style="width: 8.40568%; height: 46.4px;"><span class="td-span"><span class="md-plain">Yes</span></span></td><td style="width: 10.8749%; height: 46.4px;"><span class="td-span"><span class="md-plain">No</span></span></td><td style="width: 58.6999%; height: 46.4px;"><span class="td-span"><span class="md-plain">Special instructions for the delivery driver when delivering the shipment. <span style="background-color: rgb(191, 237, 210);">\[NEW\]</span></span></span></td></tr><tr class="md-end-block" style="height: 52px;"><td style="width: 21.9947%; height: 52px;"><span class="td-span"><span class="md-plain">Delivery Company</span></span></td><td style="width: 8.40568%; height: 52px;"><span class="td-span"><span class="md-plain">Yes</span></span></td><td style="width: 10.8749%; height: 52px;"><span class="td-span"><span class="md-plain">Yes</span></span></td><td style="width: 58.6999%; height: 52px;"><span class="td-span"><span class="md-plain">Required to select the Courier Company that has for its Courier API field Ship Logic set. For more information view the </span><span class="md-meta-i-c  md-link">[<span class="md-plain">Set Up section</span>](https://hugeerp0.co.za/hsofdocs/link/129#bkmrk-set-up)</span><span class="md-plain">. </span></span></td></tr><tr class="md-end-block" style="height: 46.4px;"><td style="width: 21.9947%; height: 46.4px;"><span class="td-span"><span class="md-plain">Address Type</span></span></td><td style="width: 8.40568%; height: 46.4px;"><span class="td-span"><span class="md-plain">Yes</span></span></td><td style="width: 10.8749%; height: 46.4px;"><span class="td-span"><span class="md-plain">No</span></span></td><td style="width: 58.6999%; height: 46.4px;"><span class="td-span"><span class="md-plain">The type of customer address such as Physical, Delivery or Postal. If unselected then the Delivery address is used.</span></span></td></tr><tr class="md-end-block" style="height: 46.4px;"><td style="width: 21.9947%; height: 46.4px;"><span class="td-span"><span class="md-plain">Validate Button</span></span></td><td style="width: 8.40568%; height: 46.4px;"><span class="td-span"><span class="md-plain">No</span></span></td><td style="width: 10.8749%; height: 46.4px;"><span class="td-span"><span class="md-plain">No</span></span></td><td style="width: 58.6999%; height: 46.4px;"><span class="td-span"><span class="md-plain">Validating address is unsupported by Ship Logic. Click this button will show an error indicating this. <span style="background-color: rgb(191, 237, 210);">\[NEW\]</span></span></span></td></tr><tr class="md-end-block" style="height: 64px;"><td style="width: 21.9947%; height: 64px;"><span class="td-span"><span class="md-plain">Update Customer Address </span><span class="md-meta-i-c  md-link">[<span class="md-image md-img-loaded" data-src="https://hugeerp0.co.za/hsofdocs/uploads/images/gallery/2024-07/scaled-1680-/6eLimage.png">![image.png](https://hugeerp0.co.za/hsofdocs/uploads/images/gallery/2024-07/scaled-1680-/6eLimage.png)</span>](https://hugeerp0.co.za/hsofdocs/uploads/images/gallery/2024-07/6eLimage.png)</span></span></td><td style="width: 8.40568%; height: 64px;"><span class="td-span"><span class="md-plain">No</span></span></td><td style="width: 10.8749%; height: 64px;"><span class="td-span"><span class="md-plain">No</span></span></td><td style="width: 58.6999%; height: 64px;"><span class="td-span"><span class="md-plain">Requires address validation to be supported. <span style="background-color: rgb(191, 237, 210);">\[NEW\]</span></span></span></td></tr><tr class="md-end-block" style="height: 63.2px;"><td style="width: 21.9947%; height: 63.2px;"><span class="td-span"><span class="md-plain">Parcel Dimensions display field</span></span></td><td style="width: 8.40568%; height: 63.2px;"><span class="td-span"><span class="md-plain">No</span></span></td><td style="width: 10.8749%; height: 63.2px;"><span class="td-span"><span class="md-plain">No</span></span></td><td style="width: 58.6999%; height: 63.2px;"><span class="td-span"><span class="md-plain">Displays the information about the current parcel selection for the shipment to be created. If blank then there is no parcel selection. If faded then the shipment was created for the parcel selection.</span></span></td></tr><tr class="md-end-block" style="height: 69.8px;"><td style="width: 21.9947%; height: 69.8px;"><span class="td-span"><span class="md-plain">Custom Parcel Dimensions button </span><span class="md-meta-i-c  md-link">[<span class="md-image md-img-loaded" data-src="https://hugeerp0.co.za/hsofdocs/uploads/images/gallery/2024-07/scaled-1680-/5kWimage.png">![image.png](https://hugeerp0.co.za/hsofdocs/uploads/images/gallery/2024-07/scaled-1680-/5kWimage.png)</span>](https://hugeerp0.co.za/hsofdocs/uploads/images/gallery/2024-07/5kWimage.png)</span></span></td><td style="width: 8.40568%; height: 69.8px;"><span class="td-span"><span class="md-plain">N/A</span></span></td><td style="width: 10.8749%; height: 69.8px;"><span class="td-span"><span class="md-plain">Yes</span></span></td><td style="width: 58.6999%; height: 69.8px;"><span class="td-span"><span class="md-plain">Clicking on this opens the Parcel Selection window, which is required for specifying information about the parcels for the shipment. This is explained in the next section. </span></span></td></tr><tr class="md-end-block" style="height: 46.4px;"><td style="width: 21.9947%; height: 46.4px;"><span class="td-span"><span class="md-plain">Service Type </span></span></td><td style="width: 8.40568%; height: 46.4px;"><span class="td-span"><span class="md-plain">Yes</span></span></td><td style="width: 10.8749%; height: 46.4px;"><span class="td-span"><span class="md-plain">No</span></span></td><td style="width: 58.6999%; height: 46.4px;"><span class="td-span"><span class="md-plain">Is now used to pre-select a rate from the list of available rates retrieved from ShipLogic that are presented when the Courier API button is clicked.</span></span></td></tr><tr class="md-end-block" style="height: 46.4px;"><td style="width: 21.9947%; height: 46.4px;"><span class="td-span"><span class="md-plain">Tracking No</span></span></td><td style="width: 8.40568%; height: 46.4px;"><span class="td-span"><span class="md-plain">No</span></span></td><td style="width: 10.8749%; height: 46.4px;"> </td><td style="width: 58.6999%; height: 46.4px;"><span class="td-span"><span class="md-plain">Displays the last Tracking Number that is assigned to the Invoice. This can be edited and be related to shipping functions outside of ShipLogic.</span></span></td></tr><tr class="md-end-block" style="height: 63.2px;"><td style="width: 21.9947%; height: 63.2px;"><span class="td-span"><span class="md-plain">Tracking No buttons</span></span></td><td style="width: 8.40568%; height: 63.2px;"><span class="td-span"><span class="md-plain">No</span></span></td><td style="width: 10.8749%; height: 63.2px;"> </td><td style="width: 58.6999%; height: 63.2px;"><span class="td-span"><span class="md-plain">These buttons can be used to add a new Tracking Number to the Invoice or view the list of existing Tracking Numbers for the Invoice. The tracking numbers do not need to have been created with Ship Logic.</span></span></td></tr><tr class="md-end-block" style="height: 63.2px;"><td style="width: 21.9947%; height: 63.2px;"><span class="td-span"><span class="md-plain">Delivery Status display field.</span></span></td><td style="width: 8.40568%; height: 63.2px;"><span class="td-span"><span class="md-plain">Yes</span></span></td><td style="width: 10.8749%; height: 63.2px;"><span class="td-span"><span class="md-plain">No</span></span></td><td style="width: 58.6999%; height: 63.2px;"><span class="td-span"><span class="md-plain">Displays the current shipping status for the last shipment created with Ship Logic.</span></span></td></tr><tr class="md-end-block" style="height: 60px;"><td style="width: 21.9947%; height: 60px;"><span class="td-span"><span class="md-plain">Update Delivery Status  
</span><span class="md-meta-i-c  md-link">[<span class="md-image md-img-loaded" data-src="https://hugeerp0.co.za/hsofdocs/uploads/images/gallery/2024-07/scaled-1680-/6eLimage.png">![image.png](https://hugeerp0.co.za/hsofdocs/uploads/images/gallery/2024-07/scaled-1680-/6eLimage.png)</span>](https://hugeerp0.co.za/hsofdocs/uploads/images/gallery/2024-07/6eLimage.png)</span></span></td><td style="width: 8.40568%; height: 60px;"><span class="td-span"><span class="md-plain">Yes</span></span></td><td style="width: 10.8749%; height: 60px;"><span class="td-span"><span class="md-plain">No</span></span></td><td style="width: 58.6999%; height: 60px;"><span class="td-span"><span class="md-plain">Clicking this button will perform an API request with Ship Logic to update the Delivery Status display field.</span></span></td></tr><tr class="md-end-block" style="height: 63.2px;"><td style="width: 21.9947%; height: 63.2px;"><span class="td-span"><span class="md-plain">Auto checkbox</span></span></td><td style="width: 8.40568%; height: 63.2px;"><span class="td-span"><span class="md-plain">Yes</span></span></td><td style="width: 10.8749%; height: 63.2px;"><span class="td-span"><span class="md-plain">No</span></span></td><td style="width: 58.6999%; height: 63.2px;"><span class="td-span"><span class="md-plain">Having this checked will cause the Delivery Status display field to be updated when the Invoice is opened and there is a shipment created with Ship Logic for it.</span></span></td></tr><tr class="md-end-block" style="height: 96.8px;"><td style="width: 21.9947%; height: 96.8px;"><span class="td-span"><span class="md-plain">Courier API button </span><span class="md-meta-i-c  md-link">[<span class="md-image md-img-loaded" data-src="https://hugeerp0.co.za/hsofdocs/uploads/images/gallery/2024-07/scaled-1680-/pvNimage.png">![image.png](https://hugeerp0.co.za/hsofdocs/uploads/images/gallery/2024-07/scaled-1680-/pvNimage.png)</span>](https://hugeerp0.co.za/hsofdocs/uploads/images/gallery/2024-07/pvNimage.png)</span></span></td><td style="width: 8.40568%; height: 96.8px;"><span class="td-span"><span class="md-plain">Yes</span></span></td><td style="width: 10.8749%; height: 96.8px;"><span class="td-span"><span class="md-plain">Yes</span></span></td><td style="width: 58.6999%; height: 96.8px;"><span class="td-span"><span class="md-plain">This button is required to be clicked on before a shipment for the Invoice can be created with Ship Logic. If there is a selection of parcels created, and the other requirements are met, a window with a list of available shipping rates, or services types, will be presented, of which one can be selected and a shipment created. <span style="background-color: rgb(191, 237, 210);">\[NEW\]</span></span></span></td></tr><tr class="md-end-block" style="height: 67.8px;"><td style="width: 21.9947%; height: 67.8px;"><span class="td-span"><span class="md-plain">Details  
</span><span class="md-meta-i-c  md-link">[<span class="md-image md-img-loaded" data-src="https://hugeerp0.co.za/hsofdocs/uploads/images/gallery/2024-07/scaled-1680-/rVVimage.png">![image.png](https://hugeerp0.co.za/hsofdocs/uploads/images/gallery/2024-07/scaled-1680-/rVVimage.png)</span>](https://hugeerp0.co.za/hsofdocs/uploads/images/gallery/2024-07/rVVimage.png)</span></span></td><td style="width: 8.40568%; height: 67.8px;"><span class="td-span"><span class="md-plain">No</span></span></td><td style="width: 10.8749%; height: 67.8px;"> </td><td style="width: 58.6999%; height: 67.8px;"><span class="td-span"><span class="md-plain">For unrelated shipping functions. The Pickup and Delivery instructions may also be set in the form that opens after clicking the button, but it is unnecessary when these fields already exist in the current form. </span></span></td></tr><tr class="md-end-block" style="height: 80px;"><td style="width: 21.9947%; height: 80px;"><span class="td-span"><span class="md-plain">Save Shipping </span><span class="md-meta-i-c  md-link">[<span class="md-image md-img-loaded" data-src="https://hugeerp0.co.za/hsofdocs/uploads/images/gallery/2024-07/scaled-1680-/rHsimage.png">![image.png](https://hugeerp0.co.za/hsofdocs/uploads/images/gallery/2024-07/scaled-1680-/rHsimage.png)</span>](https://hugeerp0.co.za/hsofdocs/uploads/images/gallery/2024-07/rHsimage.png)</span></span></td><td style="width: 8.40568%; height: 80px;"><span class="td-span"><span class="md-plain">Yes</span></span></td><td style="width: 10.8749%; height: 80px;"><span class="td-span"><span class="md-plain">Yes</span></span></td><td style="width: 58.6999%; height: 80px;"><span class="td-span"><span class="md-plain">Is required to save the Shipping Tab fields if the Invoice Save button is disabled as it is when the Invoice status is Posted. The Customer, Internal Contact and Reference fields are not saved. The Shipping Tab fields are also saved automatically when the Courier API button is clicked.</span></span></td></tr></tbody></table>

</figure>### <span class="md-plain">Parcel Selection Grid</span>

<span class="md-plain">The Parcel Selection Grid is opened in a new modal window by clicking the Custom Parcel Dimensions button </span><span class="md-meta-i-c  md-link">[<span class="md-image md-img-loaded" data-src="https://hugeerp0.co.za/hsofdocs/uploads/images/gallery/2024-07/scaled-1680-/aVgimage.png">![image.png](https://hugeerp0.co.za/hsofdocs/uploads/images/gallery/2024-07/scaled-1680-/aVgimage.png)</span>](https://hugeerp0.co.za/hsofdocs/uploads/images/gallery/2024-07/aVgimage.png)</span><span class="md-plain"> next to the Parcel Dimensions field. It is required to have at least one parcel created before a new shipment can be created with Ship Logic.</span>

<span class="md-plain"> When there is one or more parcel for the new shipment, the Parcel Diminsions field in the Shipping tab of the Invoice form will be updated to reflect this. In this case the text is coloured black. If the parcel dimensions are greyed out, then the parcels the dimensions are for have been assigned to the last created shipment, and for to create a new shipment new parcel dimensions will need to be added <span style="background-color: rgb(191, 237, 210);">\[NEW\]</span>.</span>

<span class="md-meta-i-c  md-link">[<span class="md-image md-img-loaded" data-src="https://hugeerp0.co.za/hsofdocs/uploads/images/gallery/2024-07/scaled-1680-/ceEimage.png">![image.png](https://hugeerp0.co.za/hsofdocs/uploads/images/gallery/2024-07/scaled-1680-/ceEimage.png)</span><span class="md-plain"> Example of Parcel Dimensions created for the next shipment.</span>](https://hugeerp0.co.za/hsofdocs/uploads/images/gallery/2024-07/ceEimage.png)</span>

<span class="md-meta-i-c  md-link">[<span class="md-image md-img-loaded" data-src="https://hugeerp0.co.za/hsofdocs/uploads/images/gallery/2024-07/scaled-1680-/RY7image.png">![image.png](https://hugeerp0.co.za/hsofdocs/uploads/images/gallery/2024-07/scaled-1680-/RY7image.png)</span><span class="md-plain"> Example of Parcel Dimensions assigned to the last created shipment.</span>](https://hugeerp0.co.za/hsofdocs/uploads/images/gallery/2024-07/RY7image.png)</span>

<span class="md-plain">The Parcel Selection Grid is used for several purposes:</span>

- <span class="md-plain">As indicated before, to add and edit the required information about the parcel sizes for a new shipment</span>
- <span class="md-plain">Editing predefined parcel sizes to use instead of having to reenter the same values each time.</span>
- <span class="md-plain">Keeping a record of past shipments <span style="background-color: rgb(191, 237, 210);">\[NEW\]</span></span>
- <span class="md-plain">Viewing and updating the tracking information for parcels that have been assigned to a shipment <span style="background-color: rgb(191, 237, 210);">\[NEW\]</span></span>

#### <span class="md-plain">Editing Parcel Dimensions</span>

<span class="md-plain">For a shipment to be created with Ship Logic the dimensions and weight need to be specified. The quantity is optional and can be used instead of copying a parcel with the same dimensions and weight for the value of quantity.</span>

##### <span class="md-plain">Selection Grid </span>

<span class="md-meta-i-c  md-link" style="background-color: rgb(191, 237, 210);">[<span class="md-image md-img-loaded" data-src="https://hugeerp0.co.za/hsofdocs/uploads/images/gallery/2024-07/scaled-1680-/A2Limage.png">![image.png](https://hugeerp0.co.za/hsofdocs/uploads/images/gallery/2024-07/scaled-1680-/A2Limage.png)</span>](https://hugeerp0.co.za/hsofdocs/uploads/images/gallery/2024-07/A2Limage.png)</span>

<figure class="md-table-fig table-figure" id="bkmrk-component-descriptio"><table class="md-table" style="width: 100%;"><thead><tr class="md-end-block"><th style="width: 21.75%;"><span class="td-span"><span class="md-pair-s ">**<span class="md-plain">Component</span>**</span> </span></th><th style="width: 78.2253%;"><span class="td-span"><span class="md-pair-s ">**<span class="md-plain">Description</span>**</span> </span></th></tr></thead><tbody><tr class="md-end-block"><td style="width: 21.75%;"><span class="td-span"><span class="md-plain">Search button</span></span></td><td style="width: 78.2253%;"><span class="td-span"><span class="md-plain">Clicking this will reload the grid from the server</span></span></td></tr><tr class="md-end-block"><td style="width: 21.75%;"><span class="td-span"><span class="md-plain">Add </span></span></td><td style="width: 78.2253%;"><span class="td-span"><span class="md-plain">Clicking this opens a dialog to add a new parcel</span></span></td></tr><tr class="md-end-block"><td style="width: 21.75%;"><span class="td-span"><span class="md-plain">Edit</span></span></td><td style="width: 78.2253%;"><span class="td-span"><span class="md-plain">When one row is selected and is for a parcel without a shipment, the same dialog that is opened with the Add button is opened to edit information for the selected row.</span></span></td></tr><tr class="md-end-block"><td style="width: 21.75%;"><span class="td-span"><span class="md-plain">Delete</span></span></td><td style="width: 78.2253%;"><span class="td-span"><span class="md-plain">When at least one row is selected and the rows do not include rows for created shipments, the rows will be deleted without confirmation. Multiple rows are selected by holding down the control key and clicking on the rows to add to the selection.</span></span></td></tr><tr class="md-end-block"><td style="width: 21.75%;"><span class="td-span"><span class="md-plain">Include Tracked <span style="background-color: rgb(191, 237, 210);">\[NEW\]</span></span></span></td><td style="width: 78.2253%;"><span class="td-span"><span class="md-plain">To include parcels with a shipment in the grid this checkbox is checked. To only show the parcels for the next shipment, it is unchecked. </span></span></td></tr><tr class="md-end-block"><td style="width: 21.75%;"><span class="td-span"><span class="md-plain">Name column</span></span></td><td style="width: 78.2253%;"><span class="td-span"><span class="md-plain">The name given to the parcel. This is not required by Ship Logic but is necessary if created from a parcel template.</span></span></td></tr><tr class="md-end-block"><td style="width: 21.75%;"><span class="td-span"><span class="md-plain">Shipment column <span style="background-color: rgb(191, 237, 210);">\[NEW\]</span></span></span></td><td style="width: 78.2253%;"><span class="td-span"><span class="md-plain">This column is hidden by default. To unhide it, open the menu for the column and check the box for it in the "Columns" submenu. If there is a shipment number associated with the parcel then it is shown in the row. If there is not shipment number but there is tracking number then "Unavailable" is shown To group the rows by this column, open the menu for the column and click "Group by this field". </span></span></td></tr><tr class="md-end-block"><td style="width: 21.75%;"><span class="td-span"><span class="md-plain">Shipment Created <span style="background-color: rgb(191, 237, 210);">\[NEW\]</span></span></span></td><td style="width: 78.2253%;"><span class="td-span"><span class="md-plain">This column is hidden by default and needs to be enabled in the Columns submenu. If a shipment was created that includes the parcel this column will show the date and time it was created if this information is available.</span></span></td></tr><tr class="md-end-block"><td style="width: 21.75%;"><span class="td-span"><span class="md-plain">Dimensions (L x W x H)</span></span></td><td style="width: 78.2253%;"><span class="td-span"><span class="md-plain">Show the length, width and height of the parcel in centimeters </span></span></td></tr><tr class="md-end-block"><td style="width: 21.75%;"><span class="td-span"><span class="md-plain">Wgt</span></span></td><td style="width: 78.2253%;"><span class="td-span"><span class="md-plain">The weight in kilograms</span></span></td></tr><tr class="md-end-block"><td style="width: 21.75%;"><span class="td-span"><span class="md-plain">Qty</span></span></td><td style="width: 78.2253%;"><span class="td-span"><span class="md-plain">The number of parcels with the same dimensions and weight in the shipment</span></span></td></tr><tr class="md-end-block"><td style="width: 21.75%;"><span class="td-span"><span class="md-plain">Close button</span></span></td><td style="width: 78.2253%;"><span class="td-span"><span class="md-plain">Closes the window. When the window is closed the Parcel Dimensions field in the Shipping tab of the Invoice form will be refreshed from the server.</span></span></td></tr></tbody></table>

</figure>##### <span class="md-plain">Add / Edit dialog</span>

<span class="md-plain">Opened by clicking the Add or Edit buttons</span>

<span class="md-meta-i-c  md-link">[<span class="md-image md-img-loaded" data-src="https://hugeerp0.co.za/hsofdocs/uploads/images/gallery/2024-07/scaled-1680-/D5ximage.png">![image.png](https://hugeerp0.co.za/hsofdocs/uploads/images/gallery/2024-07/scaled-1680-/D5ximage.png)</span>](https://hugeerp0.co.za/hsofdocs/uploads/images/gallery/2024-07/D5ximage.png)</span>

<span class="md-plain">The Parcel combo box can be used to select a parcel template created in the Defaults grid and prefill the remaining fields. </span>

##### <span class="md-plain">Defaults grid</span>

<span class="md-plain">Lists predefined parcel dimensions that can be selected and added to the Selection grid for the next shipment.</span>

<span class="md-meta-i-c  md-link">[<span class="md-image md-img-loaded" data-src="https://hugeerp0.co.za/hsofdocs/uploads/images/gallery/2024-07/scaled-1680-/CHnimage.png">![image.png](https://hugeerp0.co.za/hsofdocs/uploads/images/gallery/2024-07/scaled-1680-/CHnimage.png)</span>](https://hugeerp0.co.za/hsofdocs/uploads/images/gallery/2024-07/CHnimage.png)</span>

<span class="md-plain">To select more than one row, hold down the Control key before clicking on the next row. </span>

<span class="md-plain">When one or more rows are selected the Add Selected button becomes enabled. Clicking on it will create new parcel dimensions, with the values of the selected rows, in the Selection grid for the next shipment. When the new rows are added successfully, the tab is automatically switched to the Selection grid.</span>

#### <span class="md-plain">Editing Predefined Parcel Dimensions</span>

<span class="md-plain">To add and edit predefined parcel dimensions click the add and edit button respectively. A row needs to be selected before it can be edited. Multiple rows can be deleted together by selecting more than one by holding the Control key, and then clicking the Delete button. </span>

##### <span class="md-plain">Add / Edit Dialog</span>

<span class="md-meta-i-c  md-link">[<span class="md-image md-img-loaded" data-src="https://hugeerp0.co.za/hsofdocs/uploads/images/gallery/2024-07/scaled-1680-/358image.png">![image.png](https://hugeerp0.co.za/hsofdocs/uploads/images/gallery/2024-07/scaled-1680-/358image.png)</span>](https://hugeerp0.co.za/hsofdocs/uploads/images/gallery/2024-07/358image.png)</span>

<span class="md-plain">Entering a name is required and if a Courier API is selected then it is required to be unique for the selected API. The name will appear in the combo box in the add/edit dialog for the parcel selection grid. The dimensions and weight are required fields for Ship Logic. </span>

#### <span class="md-plain">Viewing Past Shipments</span>

<span class="md-plain">In the parcel selection grid, created shipments can be viewed by checking the Include Tracking checkbox. If a shipment was created with Ship Logic then the parcels for it should have the Shipment number assigned to it, the Shipment Created column will have the date and time the shipment was created and there should be a distinct tracking number for each parcel in the Tracking Number column. A column for the Tracking URL of each parcel in the shipment is also available. </span>

<span class="md-plain">If a parcel has a quantity greater than one, then in the Tracking Number and Tracking URL columns there will be a new line for each of the parcels that make up the quantity.</span>

<span class="md-plain">These columns are hidden by default and will need to be unhidden. </span>

<span class="md-meta-i-c  md-link">[<span class="md-image md-img-loaded" data-src="https://hugeerp0.co.za/hsofdocs/uploads/images/gallery/2024-07/scaled-1680-/K6Fimage.png">![image.png](https://hugeerp0.co.za/hsofdocs/uploads/images/gallery/2024-07/scaled-1680-/K6Fimage.png)</span>](https://hugeerp0.co.za/hsofdocs/uploads/images/gallery/2024-07/K6Fimage.png)</span>

<span class="md-plain">Rows can be grouped by the Shipment number, but changing the sort order of groups is currently unsupported and the groups are always sorted in ascending order. To isolate to a single shipment, one can be selected from the Shipment combo box in the search panel. Available shipments are sorted by the time and date they were created in descending order.</span>

#### <span class="md-plain">Updating Tracking Information</span>

<span class="md-meta-i-c  md-link">[<span class="md-image md-img-loaded" data-src="https://hugeerp0.co.za/hsofdocs/uploads/images/gallery/2024-07/scaled-1680-/Xj2image.png">![image.png](https://hugeerp0.co.za/hsofdocs/uploads/images/gallery/2024-07/scaled-1680-/Xj2image.png)</span>](https://hugeerp0.co.za/hsofdocs/uploads/images/gallery/2024-07/Xj2image.png)</span>

<span class="md-plain">To update the Delivery Status for the parcels belonging to a shipment, select a row for a parcel with a Shipment number, then click the Status button in the top toolbar of the window. If successful then the columns API Status, API Parcel Status and Status Updated will be updated. The API Status column in the Delivery Status for the shipment, whereas the API Parcel Status is the delivery status of the parcel. The Status Updated column is the date and time the delivery status was last successfully updated. </span>

<span class="md-plain">If a parcel has a quantity greater than one, then in the API Parcel Status column there will be a new line for each of the parcelsthat make up the quantity.</span>

### <span class="md-plain">Creating a Shipment </span>

#### <span class="md-plain">Invoice Set up</span>

<span class="md-plain">A shipment is created Ship Logic from an Invoice by clicking on the Get Rates or Courier API button in the Shipping Tab when the required information has been saved to the Invoice and is correct. </span>

##### <span class="md-plain">Required Steps</span>

<span class="md-plain">To create a Shipment with Ship Logic from an Invoice document the following is required before clicking on the Get Rates or Courier API button in the Shipping Tab:</span>

- <span class="md-plain">The Invoice needs to have a Customer selected</span>
- <span class="md-plain">The address selected in the Address Type field needs to be valid for the Customer.</span>
- <span class="md-plain">An Internal Contact needs to be selected</span>
- <span class="md-plain">The Physical Address for the Branch the Internal Contact belongs to needs to be valid </span>
- <span class="md-plain">For an address to be valid it needs to be in the following format:</span>
    
    <figure class="md-table-fig table-figure"><table class="md-table"><thead><tr class="md-end-block"><th><span class="td-span"><span class="md-pair-s ">**<span class="md-plain">Field</span>**</span></span></th><th class=""><span class="td-span"><span class="md-pair-s ">**<span class="md-plain">Description</span>**</span></span></th><th><span class="td-span"><span class="md-pair-s ">**<span class="md-plain">Example</span>**</span> </span></th></tr></thead><tbody><tr class="md-end-block"><td><span class="td-span"><span class="md-plain">Address Line 1</span></span></td><td class=""><span class="td-span"><span class="md-plain">The street address</span></span></td><td><span class="td-span"><span class="md-plain">1188 Lois Avenue</span></span></td></tr><tr class="md-end-block"><td><span class="td-span"><span class="md-plain">Address Line 2</span></span></td><td class=""><span class="td-span"><span class="md-plain">The suburb, or local area</span></span></td><td><span class="td-span"><span class="md-plain">Menlyn</span></span></td></tr><tr class="md-end-block"><td><span class="td-span"><span class="md-plain">Address Line 3</span></span></td><td class=""><span class="td-span"><span class="md-plain">The city</span></span></td><td><span class="td-span"><span class="md-plain">Pretoria</span></span></td></tr><tr class="md-end-block"><td><span class="td-span"><span class="md-plain">Address Line 4</span></span></td><td class=""><span class="td-span"><span class="md-plain">The region or province</span></span></td><td><span class="td-span"><span class="md-plain">Gauteng</span></span></td></tr><tr class="md-end-block"><td><span class="td-span"><span class="md-plain">Country</span></span></td><td class=""><span class="td-span"><span class="md-plain">The selected country, defaults to South Africa</span></span></td><td><span class="td-span"><span class="md-plain">South Africa</span></span></td></tr><tr class="md-end-block"><td><span class="td-span"><span class="md-plain">GPS Coords</span></span></td><td class=""><span class="td-span"><span class="md-plain">Optional GPS coordinates, comma separated latitude then longitude</span></span></td><td><span class="td-span"><span class="md-plain">-25.7863272, 28.334732</span></span></td></tr></tbody></table>
    
    </figure>
- <span class="md-plain">The Customer needs to have a default contact person, or the Contact Person in the Address tab needs to be given.</span>
- <span class="md-plain">The contact person needs to have a name and a valid contact number or email</span>
- <span class="md-plain">If the Contact Number field in the Address tab is used, then this replaces the Contact Number for the Contact Person</span>
- <span class="md-plain">The Internal Contact needs have a name and a valid contact number or email.</span>
- <span class="md-plain">From the Parcel Selection grid accessed from the Shipping Tab, there needs to be at least one parcel created, with dimensions and a weight, and that has not been assigned a Shipping number or Tracking number.</span>
- <span class="md-plain">The API needs to be set up correctly</span>
- <span class="md-plain">In the Shipping Tab the Shipping Terms that apply to Ship Logic needs to be selected</span>
- <span class="md-plain">In the Shipping Tab the Delivery Company for Ship Logic needs to be selected</span>
- <span class="md-plain">The Invoice needs to be saved. Unsaved information is not sent to Ship Logic. If it is a processed Invoice then clicking the Save Shipping button in the Shipping Tab can be used, however the Customer and fields outside of the Shipping Tab will not be saved. </span>

##### <span class="md-plain">Optional Steps</span>

- <span class="md-plain">If the Email checkbox is checked in Shipping Options in the Shipping Tab, then delivery updates are sent to the Internal Contact via email or SMS.</span>
- <span class="md-plain">Special instructions for collection and delivery can be set from the Shipping Tab in the Pickup and Delivery Instructions fields.</span>
- <span class="md-plain">If the Reference field in the Detail Tab is set then this becomes the Customer Reference</span>
- <span class="md-plain">Selecting a Service Type from the Shipping Tab will preselect it when the Rates Selection List is presented, if it is available. Otherwise, if Economy is available then it will be selected. </span>

#### <span class="md-plain">Selecting from the Available Rates</span>

<span class="md-plain">When the Invoice is ready clicking the Get Rates or Courier API button in the Shipping Tab will present a new window with a list of the available rates or Service Types and their associated costs and other relevant information. By default the Economy rate, if it is available will be preselected, but if the Service Type selected from the Shipping Tab is available it will be preselected instead. Another rate can be selected by clicking on it. When a rate is selected the Select button in thet bottom toolbar will be enabled.</span>

<span class="md-meta-i-c  md-link">[<span class="md-image md-img-loaded" data-src="https://hugeerp0.co.za/hsofdocs/uploads/images/gallery/2024-07/scaled-1680-/YD8CEeimage.png">![image.png](https://hugeerp0.co.za/hsofdocs/uploads/images/gallery/2024-07/scaled-1680-/YD8CEeimage.png)</span>](https://hugeerp0.co.za/hsofdocs/uploads/images/gallery/2024-07/YD8CEeimage.png)</span>

<span class="md-meta-i-c  md-link">[<span class="md-image md-img-loaded" data-src="https://hugeerp0.co.za/hsofdocs/uploads/images/gallery/2024-07/scaled-1680-/sKgimage.png">![image.png](https://hugeerp0.co.za/hsofdocs/uploads/images/gallery/2024-07/scaled-1680-/sKgimage.png)</span>](https://hugeerp0.co.za/hsofdocs/uploads/images/gallery/2024-07/sKgimage.png)</span>

<span class="md-plain">Clicking the Select button will create a shipment with Ship Logic with the selected option.</span>

<span class="md-plain">Clicking the Cancel button will close the window without creating a shipment. </span>

<span class="md-plain">If the Select button was clicked and a Shipment was created successfully with Ship Logic, then a success message with the tracking number will appear.</span>

<span class="md-meta-i-c  md-link">[<span class="md-image md-img-loaded" data-src="https://hugeerp0.co.za/hsofdocs/uploads/images/gallery/2024-07/scaled-1680-/Kgximage.png">![image.png](https://hugeerp0.co.za/hsofdocs/uploads/images/gallery/2024-07/scaled-1680-/Kgximage.png)</span>](https://hugeerp0.co.za/hsofdocs/uploads/images/gallery/2024-07/Kgximage.png)</span>

<span class="md-plain">The tracking number will also be added to the Invoice in the Tracking No field and to the Tracking Number list </span><span class="md-plain">opened by clicking the View Tracking Numbers button [![image.png](https://hugeerp0.co.za/hsofdocs/uploads/images/gallery/2024-07/scaled-1680-/Krjimage.png) ](https://hugeerp0.co.za/hsofdocs/uploads/images/gallery/2024-07/Krjimage.png)</span><span class="md-plain">next to it.</span>

<span class="md-plain">When the success message is dismissed, the Waybills or parcel labels will be automatically downloaded by the browser as a PDF file. The shipping documents, which include the labels, will be saved as attachments to the Invoice.</span>

<span class="md-meta-i-c  md-link">[<span class="md-image md-img-loaded" data-src="https://hugeerp0.co.za/hsofdocs/uploads/images/gallery/2024-07/scaled-1680-/qaaimage.png">![image.png](https://hugeerp0.co.za/hsofdocs/uploads/images/gallery/2024-07/scaled-1680-/qaaimage.png)</span>](https://hugeerp0.co.za/hsofdocs/uploads/images/gallery/2024-07/qaaimage.png)</span>

<span class="md-plain">The Parcel Dimensions field in the Shipping Tab will be greyed out to indicate that the parcels it references are assigned to a shipment.</span>

<span class="md-meta-i-c  md-link">[<span class="md-image md-img-loaded" data-src="https://hugeerp0.co.za/hsofdocs/uploads/images/gallery/2024-07/scaled-1680-/SyPimage.png">![image.png](https://hugeerp0.co.za/hsofdocs/uploads/images/gallery/2024-07/scaled-1680-/SyPimage.png)</span>](https://hugeerp0.co.za/hsofdocs/uploads/images/gallery/2024-07/SyPimage.png)</span>

<span class="md-plain">In the Parcel Selection window the Shipment combo box will show the Shipment number for the created shipment with the date and time it was created.</span>

<span class="md-meta-i-c  md-link">[<span class="md-image md-img-loaded" data-src="https://hugeerp0.co.za/hsofdocs/uploads/images/gallery/2024-07/scaled-1680-/Iydimage.png">![image.png](https://hugeerp0.co.za/hsofdocs/uploads/images/gallery/2024-07/scaled-1680-/Iydimage.png)</span>](https://hugeerp0.co.za/hsofdocs/uploads/images/gallery/2024-07/Iydimage.png)</span>

<span class="md-plain">The rows for the parcels belonging to the Shipment are updated as follows:</span>

- <span class="md-plain">The ID or number given to the Shipment by the Ship Logic will set in the Shipment column</span>
- <span class="md-plain">The Shipment Created column will be updated with date and time the Shipment was created</span>
- <span class="md-plain">The Status column will be updated to "In Transit"</span>
- <span class="md-plain">The API Status column is updapted with a description of the delivery status for the Shipment from the API</span>
- <span class="md-plain">The Tracking Numbers and Tracking URLs for each of the parcels will be set</span>

<span class="md-meta-i-c  md-link">[<span class="md-image md-img-loaded" data-src="https://hugeerp0.co.za/hsofdocs/uploads/images/gallery/2024-07/scaled-1680-/HY6image.png">![image.png](https://hugeerp0.co.za/hsofdocs/uploads/images/gallery/2024-07/scaled-1680-/HY6image.png)</span>](https://hugeerp0.co.za/hsofdocs/uploads/images/gallery/2024-07/HY6image.png)</span>

### <span class="md-plain">Attachments</span>

<span class="md-plain">The attachments created by Ship Logic can be viewed with other attachments for Invoice, in the Attachments window, opened by clicking the Attachments button in the top toolbar of the window for the Invoice.</span>

<span class="md-meta-i-c  md-link">[<span class="md-image md-img-loaded" data-src="https://hugeerp0.co.za/hsofdocs/uploads/images/gallery/2024-07/scaled-1680-/JACimage.png">![image.png](https://hugeerp0.co.za/hsofdocs/uploads/images/gallery/2024-07/scaled-1680-/JACimage.png)</span>](https://hugeerp0.co.za/hsofdocs/uploads/images/gallery/2024-07/JACimage.png)</span>

<span class="md-plain">The attachments added for the created shipment will include "ShipLogic" and the tracking number in their names.</span>

[![image.png](https://hugeerp0.co.za/hsofdocs/uploads/images/gallery/2024-07/scaled-1680-/Swfimage.png)](https://hugeerp0.co.za/hsofdocs/uploads/images/gallery/2024-07/Swfimage.png)

### <span class="md-plain">Delivery Status Updates</span>

The Delivery Status for the last created shipment belonging to the Invoice can be updapted by clicking the Update Delivery Status button [![image.png](https://hugeerp0.co.za/hsofdocs/uploads/images/gallery/2024-07/scaled-1680-/MvEimage.png) ](https://hugeerp0.co.za/hsofdocs/uploads/images/gallery/2024-07/MvEimage.png)next to the Delivery Status field in the Shipping Tab. To automatically update the delivery status when any Invoice is opened the Auto checkbox next to the button can be checked.

[![image.png](https://hugeerp0.co.za/hsofdocs/uploads/images/gallery/2024-07/scaled-1680-/3etimage.png)](https://hugeerp0.co.za/hsofdocs/uploads/images/gallery/2024-07/3etimage.png)

# Xero API

# Xero API

There are a few steps to setup Xero

Following this documentation in Xero Setup, click on link below

[Xero setup](https://hugeerp10.co.za/hsofmanual/books/xero "Xero")

# Xero API Link settings

#### Create application  


Visit this URL [App management – Xero](https://developer.xero.com/app/manage)  
Click the new app button

[![image.png](https://hugeerp0.co.za/hsofdocs/uploads/images/gallery/2024-01/scaled-1680-/image.png)](https://hugeerp0.co.za/hsofdocs/uploads/images/gallery/2024-01/image.png)

  
Application URL should be the web address of the server  
Redirect URI should be **https://{serverHostName}/csp/sys/oauth2/OAuth2.Response.cls**

Click on the app and then select the Configuration menu.

[![image.png](https://hugeerp0.co.za/hsofdocs/uploads/images/gallery/2024-01/scaled-1680-/FuOimage.png)](https://hugeerp0.co.za/hsofdocs/uploads/images/gallery/2024-01/FuOimage.png)

---

#### Server Settings

Go to System administration -&gt; Security -&gt; Client, in the management portal for the server.

[![image.png](https://hugeerp0.co.za/hsofdocs/uploads/images/gallery/2024-01/scaled-1680-/GSOimage.png)](https://hugeerp0.co.za/hsofdocs/uploads/images/gallery/2024-01/GSOimage.png)

Click the Create Server Description button.

[![image.png](https://hugeerp0.co.za/hsofdocs/uploads/images/gallery/2024-01/scaled-1680-/LJkimage.png)](https://hugeerp0.co.za/hsofdocs/uploads/images/gallery/2024-01/LJkimage.png)  
Issuer endpoint should be   
**https://login.xero.com/identity/connect**

  
An SSL config will be needed for this, which is selected as the SSL/TLS configuration

Click on Client Configurations for the server description just created

[![image.png](https://hugeerp0.co.za/hsofdocs/uploads/images/gallery/2024-01/scaled-1680-/d0bimage.png)](https://hugeerp0.co.za/hsofdocs/uploads/images/gallery/2024-01/d0bimage.png)

[![image.png](https://hugeerp0.co.za/hsofdocs/uploads/images/gallery/2024-01/scaled-1680-/wYximage.png)](https://hugeerp0.co.za/hsofdocs/uploads/images/gallery/2024-01/wYximage.png)

Click on the Create Client Configuration button.

[![image.png](https://hugeerp0.co.za/hsofdocs/uploads/images/gallery/2024-01/scaled-1680-/gszimage.png)](https://hugeerp0.co.za/hsofdocs/uploads/images/gallery/2024-01/gszimage.png)

For "Application Name", "Client name" and "Description" enter "**xero-{namespance}**".   
Client type should be "Confidential".  
Enter the servers host name into the "Host name" text box.

Click on the "Client Credentials" tab

[![image.png](https://hugeerp0.co.za/hsofdocs/uploads/images/gallery/2024-01/scaled-1680-/yFlimage.png)](https://hugeerp0.co.za/hsofdocs/uploads/images/gallery/2024-01/yFlimage.png)

Enter the details shown here in the configuration section of the Xero app that was created earlier.

[![image.png](https://hugeerp0.co.za/hsofdocs/uploads/images/gallery/2024-01/scaled-1680-/wiMimage.png)](https://hugeerp0.co.za/hsofdocs/uploads/images/gallery/2024-01/wiMimage.png)

---

#### API Huge ERP

<span style="color: rgb(45, 194, 107);">**<span class="ts0"> Configuration Module&gt; Security&gt; API Setup</span>**</span>

Add as shown below into the API setup in the SCM module   
"xero-hugeerp" should be replaced with "**xero-{namepsace}**"

[![image.png](https://hugeerp10.co.za/hsofmanual/uploads/images/gallery/2025-01/scaled-1680-/fFKimage.png)](https://hugeerp10.co.za/hsofmanual/uploads/images/gallery/2025-01/fFKimage.png)

Tick the functions that are needed to activate the link between Huge ERP and Xero

[![image.png](https://hugeerp10.co.za/hsofmanual/uploads/images/gallery/2025-01/scaled-1680-/O5Uimage.png)](https://hugeerp10.co.za/hsofmanual/uploads/images/gallery/2025-01/O5Uimage.png)

<table border="1" id="bkmrk-xero-sales-acc-here-" style="border-collapse: collapse; width: 100%;"><colgroup><col style="width: 21.4762%;"></col><col style="width: 78.6191%;"></col></colgroup><tbody><tr><td>Xero Sales Acc</td><td>Here you can specify which sales Xero items must go to </td></tr><tr><td>Xero COS Acc</td><td>Here you can specify which Cost of Sales Xero items must go to </td></tr><tr><td>Xero Division</td><td>Here you can set up your Xero Division as default </td></tr><tr><td>Xero Sales Rep</td><td>Here you can select a Sales Rep as a default </td></tr><tr><td>Set Xero Tenant</td><td>Once you have Authenticated your Debtors, Creditors and Inventory, you will need to set the Xero Tenant which is a once off setup.</td></tr></tbody></table>

Click "save" and then the "Authenticate sign in" button.

Enter the login details for your Xero company into the window that opens.

# Xero data files

When setting up Xero, the following master files need to be imported into Huge ERP

1. Customer list
2. Supplier list
3. Inventory list

The customer and supplier codes are usually the same as the company names in Huge ERP.

The codes in Huge ERP which is the company names are the codes in Xero.

<p class="callout warning">Make sure that the Debtors and Creditors codes are not duplicated in Huge ERP as Xero does not have separated databases for customers and suppliers. They are the contact list but marked as a customer and supplier. Having the the same code in debtors and creditors will cause problems in the sync.</p>

#### Procedure

1. Export customer, supplier and inventory lists from Xero
2. Fix data files for Huge ERP import
3. Import the data into Huge ERP
4. Link API to Xero
5. Verify codes for Customers
6. Verify codes for Suppliers
7. Verify codes for Inventory

---

#### Verify

##### Customers verify

<span style="color: rgb(45, 194, 107);">**<span class="ts0"> Debtors Module&gt; Configuration&gt; Debtors Setup</span>**</span>

Click Search all Debtors

Run this utility to check customers in Xero and Huge ERP.

When the utility finds the same customer, it will write an internal code from Xero into the tables of Huge ERP.

Whether the customer is updated, Huge ERP knows which customer to update in Xero.

[![image.png](https://hugeerp10.co.za/hsofmanual/uploads/images/gallery/2025-01/scaled-1680-/fzRimage.png)](https://hugeerp10.co.za/hsofmanual/uploads/images/gallery/2025-01/fzRimage.png)
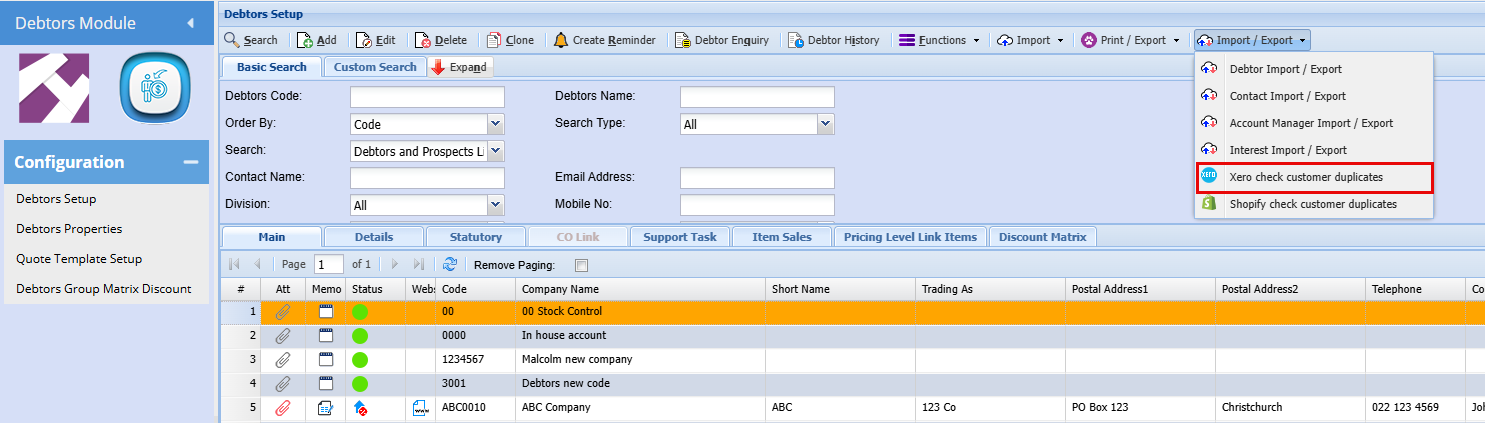
This is a once off setting that needs to be done, once this has been done and you Add a new debtor, it will automatically sync to Xero

---

##### Verify Creditors 

<span style="color: rgb(45, 194, 107);">**<span class="ts0"> Creditors Module&gt; Configuration&gt; Creditors Setup</span>**</span>

Clock search all Creditors

Run this utility to check suppliers in Xero and Huge ERP.

When the utility finds the same supplier, it will write an internal code from Xero into the tables of Huge ERP.

Whether the supplier is updated, Huge ERP knows which Supplier to update in Xero.

[![image.png](https://hugeerp10.co.za/hsofmanual/uploads/images/gallery/2025-01/scaled-1680-/PA1image.png)](https://hugeerp10.co.za/hsofmanual/uploads/images/gallery/2025-01/PA1image.png)
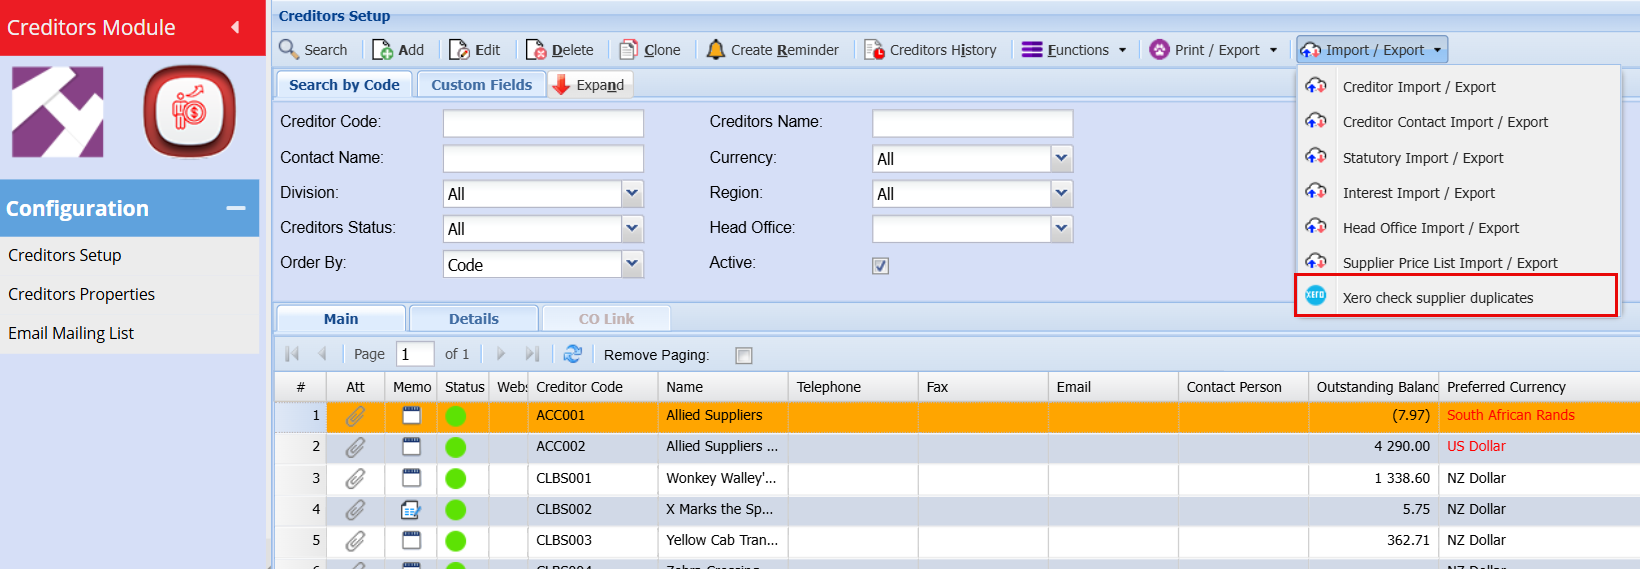
This is a once off setting that needs to be done, once this has been done and you Add a new Creditor, it will automatically sync to Xero

---

##### Inventory verify

<span style="color: rgb(45, 194, 107);">**<span class="ts0"> Inventory Module&gt; Configuration&gt; Inventory Setup</span>**</span>

Click Search all Items

Run this utility to check customers in Xero and Huge ERP.

When the utility finds the same inventory, it will write an internal code from Xero into the tables of Huge ERP.

Whether the inventory is updated, Huge ERP knows which item to update in Xero.

[![image.png](https://hugeerp10.co.za/hsofmanual/uploads/images/gallery/2025-01/scaled-1680-/lEWimage.png)](https://hugeerp10.co.za/hsofmanual/uploads/images/gallery/2025-01/lEWimage.png)

This is a once off setting that needs to be done, once this has been done and you Add a new Inventory item, it will automatically sync to Xero

---

#### Xero Sales and Cost of Sales for an Inventory Item

To set up a specific Sales and COS account for an inventory item, double click on the inventory item

Go the Comment/Replace Tab, here you can stipulate a specific account that this item must go to when adding this item to an invoice.

[![image.png](https://hugeerp10.co.za/hsofmanual/uploads/images/gallery/2025-01/scaled-1680-/571image.png)](https://hugeerp10.co.za/hsofmanual/uploads/images/gallery/2025-01/571image.png)
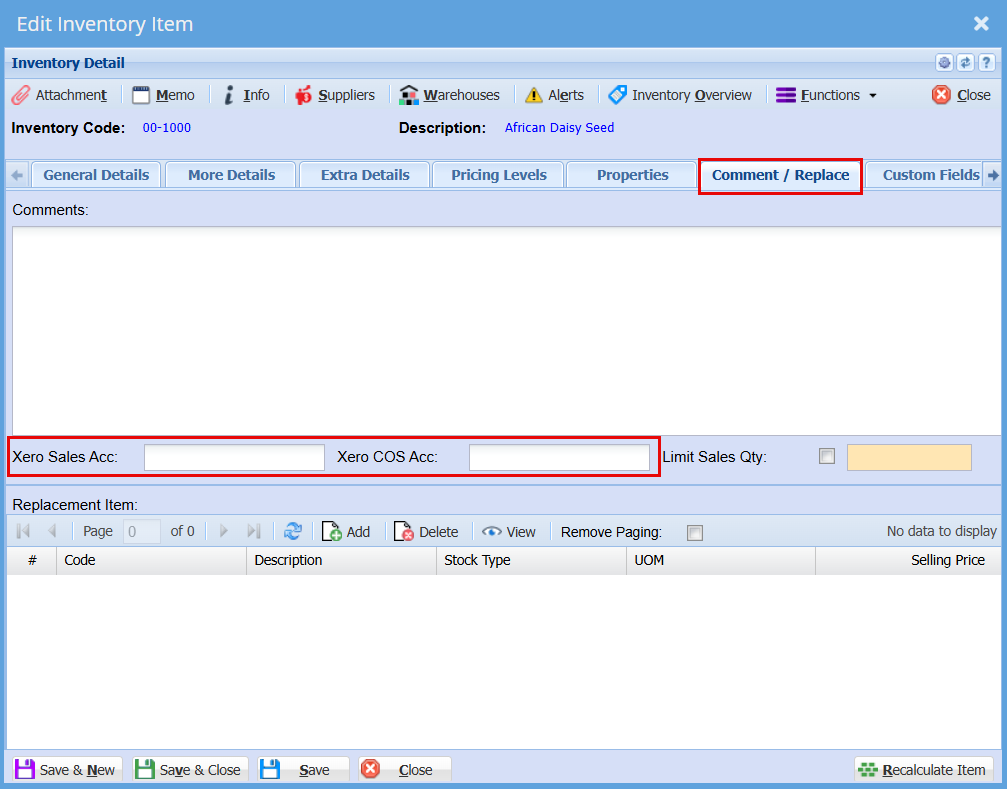
# Troubleshooting

#### Trouble Processing a Transaction

If you are trying to process an invoice, Credit Note, GRV or a Stock Return and you get an error, you can disconnect Huge ERP from Xero.

<span style="color: rgb(45, 194, 107);">**System Configuration &gt; Security &gt;API Setup**</span>

Click Search

Double click on Xero to open

[![image.png](https://hugeerp10.co.za/hsofmanual/uploads/images/gallery/2025-01/scaled-1680-/On7image.png)](https://hugeerp10.co.za/hsofmanual/uploads/images/gallery/2025-01/On7image.png)

Untick the Active Box and click save and close

[![image.png](https://hugeerp10.co.za/hsofmanual/uploads/images/gallery/2025-01/scaled-1680-/PPpimage.png)](https://hugeerp10.co.za/hsofmanual/uploads/images/gallery/2025-01/PPpimage.png)

---

#### Failed to post to Xero

##### Invoice

<span style="color: rgb(45, 194, 107);">**Debtors Module &gt; Activity &gt; Invoice**</span>

<span style="color: rgb(0, 0, 0);">When you have an invoice that Fails to push through to Xero, you can process this manually.</span>

<span style="color: rgb(0, 0, 0);">Open your invoice </span>

Click the "Action" Tab, you will see the button "Push to Xero" by clicking this button the transaction will be pushed to Xero.

[![image.png](https://hugeerp10.co.za/hsofmanual/uploads/images/gallery/2025-01/scaled-1680-/kT0image.png)](https://hugeerp10.co.za/hsofmanual/uploads/images/gallery/2025-01/kT0image.png)

##### Credit Note

<span style="color: rgb(45, 194, 107);">**Debtors Module &gt; Activity &gt; Credit Note**</span>

<span style="color: rgb(0, 0, 0);">When you have a Credit Note that Fails to push through to Xero, you can process this manually.</span>

<span style="color: rgb(0, 0, 0);">Open your Credit Note</span>

Click the "Action" Tab, you will see the button "Push to Xero" by clicking this button the transaction will be pushed to Xero.

[![image.png](https://hugeerp10.co.za/hsofmanual/uploads/images/gallery/2025-01/scaled-1680-/9ptimage.png)](https://hugeerp10.co.za/hsofmanual/uploads/images/gallery/2025-01/9ptimage.png)
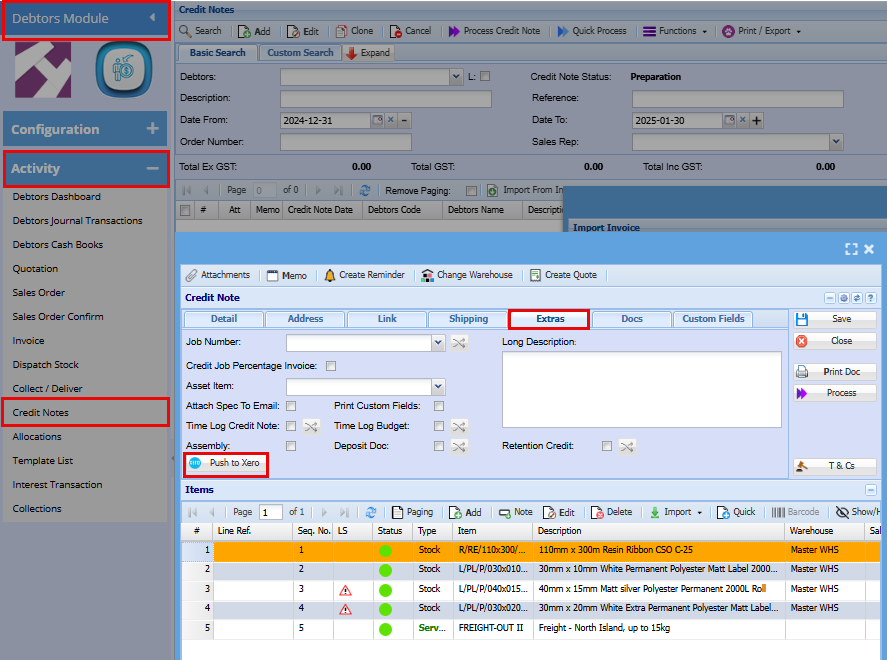
#####  

##### GRV

<span style="color: rgb(45, 194, 107);">**Creditors Module &gt; Activity &gt; Goods Received Note (GRV)**</span>

<span style="color: rgb(0, 0, 0);">When you have a GRV that Fails to push through to Xero, you can process this manually.</span>

<span style="color: rgb(0, 0, 0);">Open your GRV</span>

Click the "Extras" Tab, you will see the button "Push to Xero" by clicking this button the transaction will be pushed to Xero.

[![image.png](https://hugeerp10.co.za/hsofmanual/uploads/images/gallery/2025-01/scaled-1680-/JQyimage.png)](https://hugeerp10.co.za/hsofmanual/uploads/images/gallery/2025-01/JQyimage.png)

#####  

##### Stock Return

<span style="color: rgb(45, 194, 107);">**Creditors Module &gt; Activity &gt; Return to Supplier (RTS)**</span>

<span style="color: rgb(0, 0, 0);">When you have a Stock Return that Fails to push through to Xero, you can process this manually.</span>

<span style="color: rgb(0, 0, 0);">Open your Stock Return</span>

Click the "Action" Tab, you will see the button "Push to Xero" by clicking this button the transaction will be pushed to Xero.

---

#### View Posted and Non posted Transactions

##### Debtors

<span style="color: rgb(45, 194, 107);">**Debtors Module &gt; Analysis &gt;Debtors Document History**</span>

In the column "Posted to Xero" you will see either Yes which means it was posted to Xero or blank which means it has not been posted to Xero

[![image.png](https://hugeerp10.co.za/hsofmanual/uploads/images/gallery/2025-01/scaled-1680-/38Cimage.png)](https://hugeerp10.co.za/hsofmanual/uploads/images/gallery/2025-01/38Cimage.png)
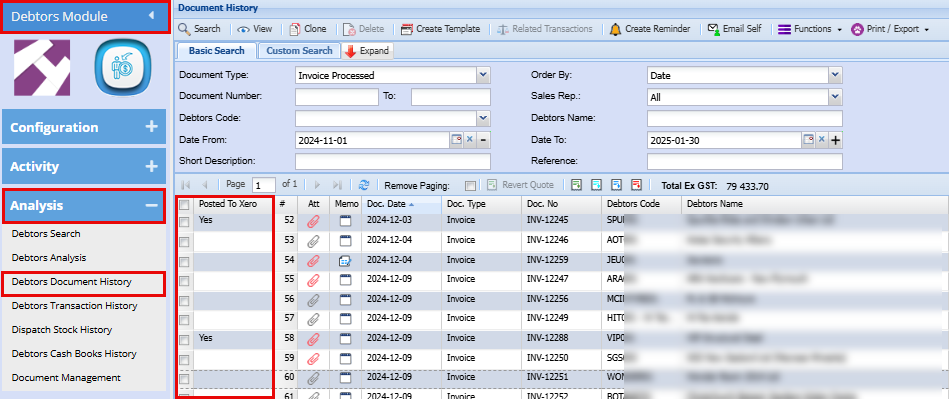
To post to Xero double click to open the transaction

Click the "Action" Tab, you will see the button "Push to Xero" by clicking this button the transaction will be pushed to Xero.

[![image.png](https://hugeerp10.co.za/hsofmanual/uploads/images/gallery/2025-01/scaled-1680-/lDZimage.png)](https://hugeerp10.co.za/hsofmanual/uploads/images/gallery/2025-01/lDZimage.png)

<p class="callout warning">Double check your transaction is not already in Xero as clicking this will duplicate the transaction if it was already posted</p>


##### Creditors

<span style="color: rgb(45, 194, 107);">**Creditors Module &gt; Analysis &gt;Creditors Document History**</span>

In the column "Posted to Xero" you will see either Yes which means it was posted to Xero or blank which means it has not been posted to Xero

[![image.png](https://hugeerp10.co.za/hsofmanual/uploads/images/gallery/2025-01/scaled-1680-/Yneimage.png)](https://hugeerp10.co.za/hsofmanual/uploads/images/gallery/2025-01/Yneimage.png)
To post to Xero double click to open the transaction

Click the "Extras" Tab, you will see the button "Push to Xero" by clicking this button the transaction will be pushed to Xero.

[![image.png](https://hugeerp10.co.za/hsofmanual/uploads/images/gallery/2025-01/scaled-1680-/JLdimage.png)](https://hugeerp10.co.za/hsofmanual/uploads/images/gallery/2025-01/JLdimage.png)

<p class="callout warning">Double check your transaction is not already in Xero as clicking this will duplicate the transaction if it was already posted</p>

# Shopify API

# Shopify

Creating the Shopify link with Huge ERP

Look into the setup of Shopify on the following internal link:

[Shopify setup](https://hugeerp10.co.za/hsofmanual/books/shopify "Shopify")

# Shopify Link

#### Shopify setup

Select the "Apps and sales channels" menu in settings

[![image.png](https://hugeerp0.co.za/hsofdocs/uploads/images/gallery/2024-01/scaled-1680-/qkximage.png)](https://hugeerp0.co.za/hsofdocs/uploads/images/gallery/2024-01/qkximage.png)

Click on the "Develop apps" button.

Click on the "Create an app" button.

[![image.png](https://hugeerp0.co.za/hsofdocs/uploads/images/gallery/2024-01/scaled-1680-/91qimage.png)](https://hugeerp0.co.za/hsofdocs/uploads/images/gallery/2024-01/91qimage.png)

Click on the "Configure Admin API scopes"

[![image.png](https://hugeerp0.co.za/hsofdocs/uploads/images/gallery/2024-01/scaled-1680-/WZNimage.png)](https://hugeerp0.co.za/hsofdocs/uploads/images/gallery/2024-01/WZNimage.png)

**Select the following options:**  
write\_assigned\_fulfillment\_orders, read\_assigned\_fulfillment\_orders, read\_customer\_events, write\_customers, read\_customers, write\_draft\_orders, read\_draft\_orders, write\_inventory, read\_inventory, write\_orders, read\_orders, write\_products, read\_products

Click the "Install app" button at the top.

---

#### Huge ERP setup

Add the following in the API setup

[![image.png](https://hugeerp0.co.za/hsofdocs/uploads/images/gallery/2024-01/scaled-1680-/r8Timage.png)](https://hugeerp0.co.za/hsofdocs/uploads/images/gallery/2024-01/r8Timage.png)

The keys are in the "API credentials" tab on the Shopify app.

[![image.png](https://hugeerp0.co.za/hsofdocs/uploads/images/gallery/2024-01/scaled-1680-/A50image.png)](https://hugeerp0.co.za/hsofdocs/uploads/images/gallery/2024-01/A50image.png)

Enter the "API key" as the user name and the "API secret key" into the API Key field

Select the required functions

[![image.png](https://hugeerp0.co.za/hsofdocs/uploads/images/gallery/2024-01/scaled-1680-/y2Ximage.png)](https://hugeerp0.co.za/hsofdocs/uploads/images/gallery/2024-01/y2Ximage.png)

# GoSweetSpot

# GoSweetSpot API Setup

##### Basic Instructions

Get API Key from GoSweetSpot account

[![image.png](https://hugeerp10.co.za/hsofmanual/uploads/images/gallery/2024-06/scaled-1680-/rN2image.png)](https://hugeerp10.co.za/hsofmanual/uploads/images/gallery/2024-06/rN2image.png)
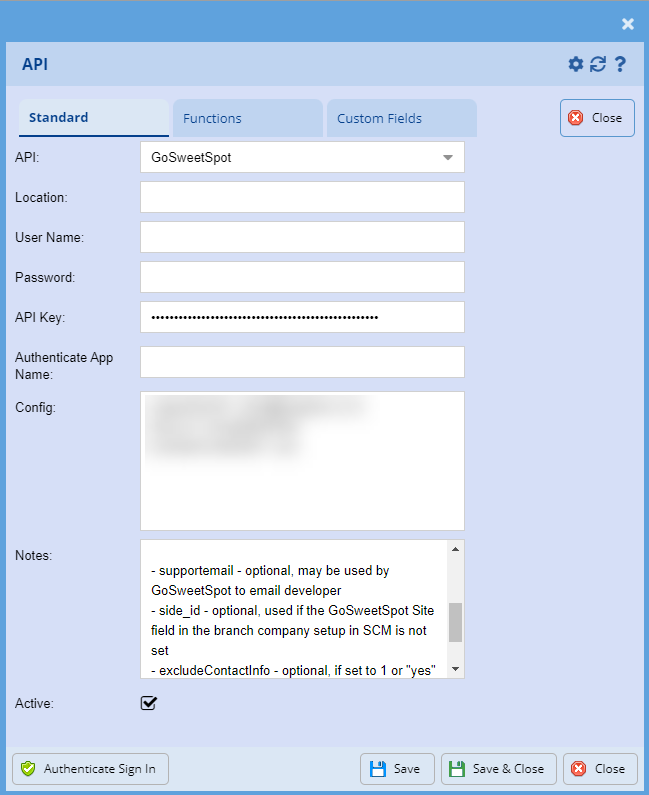
<p class="callout info">Notes  
</p>

\## Fields ##

Only the API Key is required; the optional config settings are entered in the config field (TBD)

\## Config items ##

\*\*ini formatted text\*\*

\- supportemail - optional, may be used by GoSweetSpot to email developer   
\- side\_id - optional, used if the GoSweetSpot Site field in the branch company setup in SCM is not set  
\- excludeContactInfo - optional, if set to 1 or "yes" then contact information is not included when creating a shipment

# Setup of GoSweetSpot

Register your company with GoSweetSpot and login.

[![image.png](https://hugeerp10.co.za/hsofmanual/uploads/images/gallery/2024-04/scaled-1680-/v7rimage.png)](https://hugeerp10.co.za/hsofmanual/uploads/images/gallery/2024-04/v7rimage.png)
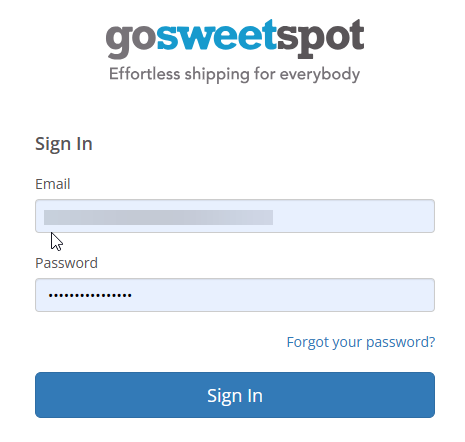
1. <span class="md-plain">Get the API Key from the GoSweetSpot account page in Administraton; Preferences &amp; Settings; Advanced Settings; API Key \[TODO screenshot\]</span>
2. <span class="md-plain">Copy it into the </span><span class="md-pair-s ">**<span class="md-plain">API Key</span>**</span><span class="md-plain"> field</span>

[![image.png](https://hugeerp10.co.za/hsofmanual/uploads/images/gallery/2024-04/scaled-1680-/eOWimage.png)](https://hugeerp10.co.za/hsofmanual/uploads/images/gallery/2024-04/eOWimage.png)

[![image.png](https://hugeerp10.co.za/hsofmanual/uploads/images/gallery/2024-04/scaled-1680-/Yauimage.png)](https://hugeerp10.co.za/hsofmanual/uploads/images/gallery/2024-04/Yauimage.png)
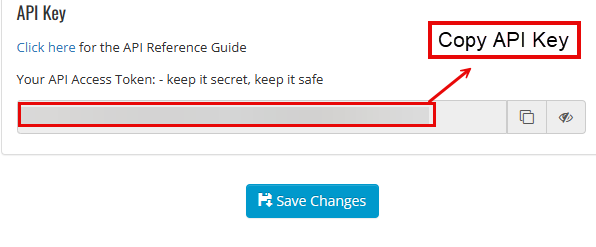
## <span style="text-decoration: underline;">**<span class="md-plain">API Setup</span>**</span>

1. <span class="md-plain">Log into the Huge ERP System</span>
2. <span class="md-plain">Go to the </span><span class="md-pair-s ">**<span class="md-plain">API Setup</span>**</span><span class="md-plain"> search grid in SCM</span> <span class="md-plain">User actions:</span> <span class="md-plain">SCM; Security; API Setup;</span>
3. <span class="md-plain">Click </span><span class="md-pair-s ">**<span class="md-plain">Add</span>**</span>
4. <span class="md-plain">In the </span><span class="md-pair-s ">**<span class="md-plain">API</span>**</span><span class="md-plain"> combo box select "GoSweetSpot" (Remove all other user name and passwords that may be populated )</span>
5. <span class="md-plain">Paste API Key in API Key field.</span>
6. <span class="md-plain">Tick **Activate**</span>
7. <span class="md-plain">Click **Save and close** </span>

[![image.png](https://hugeerp10.co.za/hsofmanual/uploads/images/gallery/2024-04/scaled-1680-/DxYimage.png)](https://hugeerp10.co.za/hsofmanual/uploads/images/gallery/2024-04/DxYimage.png)

1. <span class="md-plain">Create a Creditor for GoSweetSpot</span>

1. <span class="md-plain">User actions:</span> <span class="md-plain">Creditors; Configuration; Creditors Setup; Creditors Setup: Add;</span>
2. <span class="md-plain">Fill out fields in </span><span class="md-pair-s ">**<span class="md-plain">Details Tab:</span>**</span>
    
    
    1. <span class="md-pair-s ">**<span class="md-plain">Creditors Code</span>**</span> <span class="md-entity" data-content="–">–</span><span class="md-plain"> e.g. "GOSWEET"</span>
    2. <span class="md-pair-s ">**<span class="md-plain">Name</span>**</span> <span class="md-entity" data-content="–">–</span><span class="md-plain"> e.g. "GoSweetSpot"</span>
    3. <span class="md-pair-s ">**<span class="md-plain">Short Name</span>**</span> <span class="md-entity" data-content="–">–</span><span class="md-plain"> e.g. "GOSWEET"</span>
3. <span class="md-plain">Uncheck in </span><span class="md-pair-s ">**<span class="md-plain">Details Tab:</span>**</span><span class="md-plain"> (optional)</span>
    
    
    - <span class="md-pair-s ">**<span class="md-plain">Print Statement</span>**</span>
    - <span class="md-pair-s ">**<span class="md-plain">Email Statement</span>**</span>
    - <span class="md-pair-s ">**<span class="md-plain">Sync to Mobile</span>**</span>
4. <span class="md-plain">In the </span><span class="md-pair-s ">**<span class="md-plain">Info Tab</span>**</span><span class="md-plain"> select "GoSweetSpot" in the </span><span class="md-pair-s ">**<span class="md-plain">Use Courier API</span>**</span><span class="md-plain"> combo box field.</span>
5. <span class="md-plain">Click </span><span class="md-pair-s ">**<span class="md-plain">Save &amp; Close</span>**</span>

[![image.png](https://hugeerp10.co.za/hsofmanual/uploads/images/gallery/2024-04/scaled-1680-/t3Rimage.png)](https://hugeerp10.co.za/hsofmanual/uploads/images/gallery/2024-04/t3Rimage.png)

On GoSweetSpot get your site No. which you will find under **Support**

[![image.png](https://hugeerp10.co.za/hsofmanual/uploads/images/gallery/2024-04/scaled-1680-/xQoimage.png)](https://hugeerp10.co.za/hsofmanual/uploads/images/gallery/2024-04/xQoimage.png)
Add your Site No. to your company profile

1\. Company Profile<span class="md-plain">:</span> Search in SCM<span class="md-plain">; Administration; Company Profile; double click to edit Company Profile; Address; Add Site No. to GoSweetSpot field; **Save**</span>

[![image.png](https://hugeerp10.co.za/hsofmanual/uploads/images/gallery/2024-04/scaled-1680-/vAiimage.png)](https://hugeerp10.co.za/hsofmanual/uploads/images/gallery/2024-04/vAiimage.png)

## <span style="text-decoration: underline;">**Courier Setup**</span>

1\. Search in SCM<span class="md-plain">; Administration; Courier Setup; Click Add; Add Code, Courier API, Select GoSweetSpot; Add description, Click Default, Save</span>

[![image.png](https://hugeerp10.co.za/hsofmanual/uploads/images/gallery/2024-04/scaled-1680-/Vbdimage.png)](https://hugeerp10.co.za/hsofmanual/uploads/images/gallery/2024-04/Vbdimage.png)

## <span style="text-decoration: underline;">**<span class="md-plain">Parcel Setup</span>**</span>

<span class="md-plain">GoSweetSpot allows pre-defined parcel sizes to be referenced in new shipments.</span>

<span class="md-plain">you can find your standard parcel sizes in Go SweetSpot. </span>

[![image.png](https://hugeerp10.co.za/hsofmanual/uploads/images/gallery/2024-04/scaled-1680-/wfBimage.png)](https://hugeerp10.co.za/hsofmanual/uploads/images/gallery/2024-04/wfBimage.png)

To setup parcel sizes go to

1. <span class="md-plain">Go to the **Courier**</span><span class="md-pair-s ">**<span class="md-plain"> Setup</span>**</span><span class="md-plain"> search grid in SCM</span> <span class="md-plain">User actions:</span> <span class="md-plain">SCM; Administration; Courier Setup; Parcel Sizes</span>
2. <span class="md-plain">These can be added to reflect your personal box or satchel sizes.</span>

[![image.png](https://hugeerp10.co.za/hsofmanual/uploads/images/gallery/2024-04/scaled-1680-/Ncoimage.png)](https://hugeerp10.co.za/hsofmanual/uploads/images/gallery/2024-04/Ncoimage.png)

This is what it should look like once added in.

[![image.png](https://hugeerp10.co.za/hsofmanual/uploads/images/gallery/2024-04/scaled-1680-/sHQimage.png)](https://hugeerp10.co.za/hsofmanual/uploads/images/gallery/2024-04/sHQimage.png)
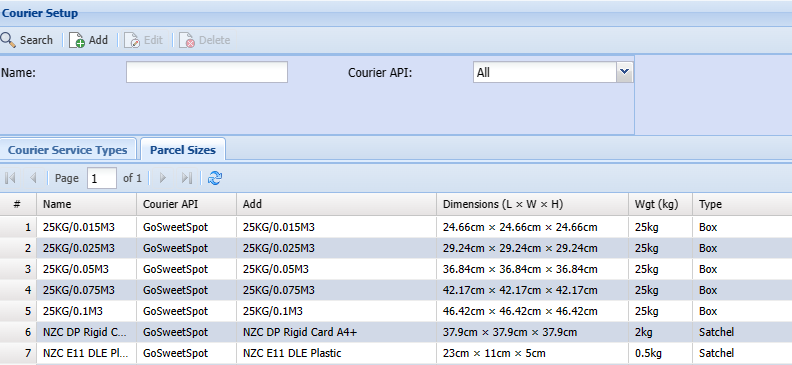
# GoSweetSpot Courier Delivery Setup and Usage

<span class="md-plain md-expand">To view instructions on creating a shipment from an Invoice without an overview of the relevant form components, click [here](https://hugeerp0.co.za/hsofdocs/link/131#bkmrk-creating-a-shipment). </span>

## <span class="md-plain md-expand">Set Up</span>

### <span class="md-plain md-expand">GoSweetSpot Account</span>

#### <span class="md-plain md-expand">Get the API Key</span>

<span class="md-plain">From the GoSweetSpot account navigate to the Preference &amp; Settings page by selecting from the Administration menu. </span>

[![image.png](https://hugeerp0.co.za/hsofdocs/uploads/images/gallery/2024-07/scaled-1680-/eytimage.png)](https://hugeerp0.co.za/hsofdocs/uploads/images/gallery/2024-07/eytimage.png)

Scroll down and click Advanced Settings to expand this section.

[![image.png](https://hugeerp0.co.za/hsofdocs/uploads/images/gallery/2024-07/scaled-1680-/P5timage.png)](https://hugeerp0.co.za/hsofdocs/uploads/images/gallery/2024-07/P5timage.png)

Scroll to the bottom of this section and copy the API Access Token to the clipboard.

[![image.png](https://hugeerp0.co.za/hsofdocs/uploads/images/gallery/2024-07/scaled-1680-/UpGimage.png)](https://hugeerp0.co.za/hsofdocs/uploads/images/gallery/2024-07/UpGimage.png)

#### Get the Site ID 

The Site ID is linked to the collection address that is used when creating an account with GoSweetSpot.

From the GoSweetAccount navigate to the Users &amp; Permissions page by selecting Manage Users from the Administration menu.

[![image.png](https://hugeerp0.co.za/hsofdocs/uploads/images/gallery/2024-07/scaled-1680-/FJMimage.png)](https://hugeerp0.co.za/hsofdocs/uploads/images/gallery/2024-07/FJMimage.png)

Copy the Site ID from the Site column that is linked to the collection address for courier shipments created from HugeERP. [![image.png](https://hugeerp0.co.za/hsofdocs/uploads/images/gallery/2024-07/scaled-1680-/AKTimage.png)](https://hugeerp0.co.za/hsofdocs/uploads/images/gallery/2024-07/AKTimage.png)

### API Setup

Return to Huge ERP and navigate to API Setup in the SCM module under Security.

Click the Add button in the top toolbar.

Select GoSweetSpot from the API combo box in the Add form.

[![image.png](https://hugeerp0.co.za/hsofdocs/uploads/images/gallery/2024-07/scaled-1680-/l4oimage.png)](https://hugeerp0.co.za/hsofdocs/uploads/images/gallery/2024-07/l4oimage.png)

Copy the API Key from GoSweetSpot to the API Key field.

Make sure the Active checkbox is checked.

The User Name and Password fields are not required and can be left blank.

The config field can specify optional settings. Each setting is required to be on a separated line and begins with the name of the setting followed by an equals sign and then the value for the setting. So far the available settings are as follows:

<table border="1" id="bkmrk-name-description-sid" style="border-collapse: collapse; width: 100%; height: 88.8px;"><colgroup><col style="width: 23.5062%;"></col><col style="width: 76.5926%;"></col></colgroup><tbody><tr style="height: 29.6px;"><td style="height: 29.6px;">**Name**</td><td style="height: 29.6px;">**Description**</td></tr><tr style="height: 29.6px;"><td style="height: 29.6px;">side\_id</td><td style="height: 29.6px;">The Site ID to use if it is missing from the Company Branch setup </td></tr><tr style="height: 29.6px;"><td style="height: 29.6px;">excludeContactInfo</td><td style="height: 29.6px;">If the value is "yes" without the quotes, then contact info for the delivery recepient, such as the name and phone number, is to be excluded when creating a shipment.</td></tr></tbody></table>

Click Save when done.

[![image.png](https://hugeerp0.co.za/hsofdocs/uploads/images/gallery/2024-07/scaled-1680-/v04image.png)](https://hugeerp0.co.za/hsofdocs/uploads/images/gallery/2024-07/v04image.png)

### Adding the Site ID to the Branch 

Navigate to Copy Profiles in SCM under Administration, and open the form for the company branch in which GoSweetSpot is to be used.

Switch to the Address tab, and copy the Site ID copied from GoSweetSpot into the GoSweetSpot Site field, then save and close the form.

[![image.png](https://hugeerp0.co.za/hsofdocs/uploads/images/gallery/2024-07/scaled-1680-/jNkimage.png)](https://hugeerp0.co.za/hsofdocs/uploads/images/gallery/2024-07/jNkimage.png)

### Creating a Delivery Company

To select GoSweetSpot as the API for courier delivery from an Invoice form or other document form, it first needs to be added as a Delivery Company in Creditors Setup.

Navigate to Creditors Setup in the Creditors Module under Configuration.

Click the Add button in the top toolbar.

In the Details tab fill in the Credit Code, Name and Short Name fields for the Delivery Company. Other information in this tab is optional.

[![image.png](https://hugeerp0.co.za/hsofdocs/uploads/images/gallery/2024-07/scaled-1680-/JwVimage.png)](https://hugeerp0.co.za/hsofdocs/uploads/images/gallery/2024-07/JwVimage.png)

Save the form by clicking the Save button and then switch to the Info tab.

In the Use Courier API combo box select GoSweetSpot then save the form again. The form can now be closed.

[![image.png](https://hugeerp0.co.za/hsofdocs/uploads/images/gallery/2024-07/scaled-1680-/8Bximage.png)](https://hugeerp0.co.za/hsofdocs/uploads/images/gallery/2024-07/8Bximage.png)

### Adding Shipping Terms

Shipping Terms need to be created for selecting the Delivery Company from an Invoice or other document form.

Navigate to Additional Debtor Properties in the Debtor module under Configuration. Switch to the Shipping Terms tab.

[![image.png](https://hugeerp0.co.za/hsofdocs/uploads/images/gallery/2024-07/scaled-1680-/AHiimage.png)](https://hugeerp0.co.za/hsofdocs/uploads/images/gallery/2024-07/AHiimage.png)

Click the Add button in the top toolbar.

The opened window may contain the title Shipping Methods but it is for creating and editing a Shipping Terms instance <span style="background-color: rgb(255, 255, 0);">\[TBC fix language tag\]</span>.

In the Shipping Method form enter a Code and Description in the respective fields. Select Delivery for the Ship Type combo box and External for the Delivery By combo box.

The Delivery Company combo box should be enabled after selecting External for the Delivery By combo box. Select the created Delivery Company for the combo box.

Make sure the Active checkbox is checked, and then click Save &amp; Close.

[![image.png](https://hugeerp0.co.za/hsofdocs/uploads/images/gallery/2024-07/scaled-1680-/b7Gimage.png)](https://hugeerp0.co.za/hsofdocs/uploads/images/gallery/2024-07/b7Gimage.png)

If the Default checkbox is checked, then when an Invoice or other document is first loaded the Shipping Terms from this form will be selected automatically.

It should now be possible to create shipments with GoSweetSpot from Invoice forms.

### Optional - Predefined Parcel Sizes

Predefined parcel sizes can be created in the Courier Setup panel in the Parcel Sizes tab, or in the Defaults tab in the Parcel Selection grid as described in the next section. Predefined parcel sizes can be used as templates to create new parcel entries with the same values for a new shipment from the Parcel Selection for an Invoice. The selected API should be GoSweetSpot and the name should be unique. The dimensions and weight should all be provided.

If there are no predefined parcel sizes created then when adding parcel sizes for a courier delivery from an Invoice form or other document form, the dimensions and weight values will need to be manually specified.

[![image.png](https://hugeerp0.co.za/hsofdocs/uploads/images/gallery/2024-07/scaled-1680-/Aadimage.png)](https://hugeerp0.co.za/hsofdocs/uploads/images/gallery/2024-07/Aadimage.png)

If the Name matches a pre-loaded stock size for GoSweetSpot, for instance "GSS-A1 SATCHEL" then the other fields will be ignored by GoSweetSpot and the rates for the delivery will be based on the stock size given by the name. The names have to match exactly. For more information see [GSS Satchel Specific Rates – Help Centre (gosweetspot.com)](https://support.gosweetspot.com/hc/en-us/articles/7668568138511-GSS-Satchel-Specific-Rates)

## <span class="md-plain">Using GoSweetSpot to Create Shipments</span>

<span class="md-plain">Shipments can be created from the document types:</span>

- <span class="md-plain">Invoice</span>
- <span class="md-plain">Sales Order</span>
- <span class="md-plain">Sales Order Confirm</span>
- <span class="md-plain">Dispatch Stock Documents </span>

<span class="md-plain">The process to create a shipment is identical for all document types, however the delivery status can only be updated automatically from the Invoice form at this point.</span>

### <span class="md-plain">Creating Shipments from an Invoice</span>

<span class="md-plain">An Invoice to create a shipment from can be in Preparation or Posted Status. If in Posted status only the fields in the Shipping tab can be edited. </span>

<span class="md-plain">At a minimum, outside of the Shipping tab fields, the Customer, Internal Contact and Contact Person fields are required in addition to the delivery address given in the address fields in the Address tab of the form. </span>

<span class="md-plain">Fields and other UI elements that are used for creating shipments with GoSweetSpot are marked red in the screenshots. Purple indicates that the field is not used.</span>

#### <span class="md-plain">Detail Tab</span>

[![image.png](https://hugeerp0.co.za/hsofdocs/uploads/images/gallery/2024-07/scaled-1680-/2CZimage.png)](https://hugeerp0.co.za/hsofdocs/uploads/images/gallery/2024-07/2CZimage.png)

<figure class="md-table-fig table-figure" id="bkmrk-component-used-requi"><table class="md-table" style="width: 99.6296%; height: 313.8px;"><thead><tr class="md-end-block" style="height: 29.6px;"><th style="width: 18.0425%; height: 29.6px;"><span class="td-span"><span class="md-pair-s ">**<span class="md-plain">Component</span>**</span></span></th><th style="width: 10.0099%; height: 29.6px;"><span class="td-span"><span class="md-pair-s ">**<span class="md-plain">Used</span>**</span></span></th><th style="width: 10.3806%; height: 29.6px;"><span class="td-span"><span class="md-pair-s ">**<span class="md-plain">Required</span>**</span></span></th><th style="width: 61.5423%; height: 29.6px;"><span class="td-span"><span class="md-pair-s ">**<span class="md-plain">Description</span>**</span></span></th></tr></thead><tbody><tr class="md-end-block" style="height: 173px;"><td style="width: 18.0425%; height: 173px;"><span class="td-span"><span class="md-plain">Customer</span></span></td><td style="width: 10.0099%; height: 173px;"><span class="td-span"><span class="md-plain">Yes</span></span></td><td style="width: 10.3806%; height: 173px;"><span class="td-span"><span class="md-plain">Yes</span></span></td><td style="width: 61.5423%; height: 173px;">Required to save the Invoice.

  
The address fields in the Address tab is populated with the address of the selected Customer.

  
<span style="background-color: rgb(255, 255, 0);">\[TODO\]</span> The default contact is used as the delivery contact if the contact person is not set in the Address tab. <span style="background-color: rgb(255, 255, 0);">\[TBC - check if the contact information from the Debtor Details form is still in use\]</span>

</td></tr><tr style="height: 35.2px;"><td style="width: 18.0425%; height: 35.2px;"><span class="td-span"><span class="md-plain">Reference</span></span></td><td style="width: 10.0099%; height: 35.2px;"><span class="td-span"><span class="md-plain">No</span></span></td><td style="width: 10.3806%; height: 35.2px;"><span class="td-span"><span class="md-plain">  
</span></span></td><td style="width: 61.5423%; height: 35.2px;"></td></tr><tr class="md-end-block" style="height: 29.6px;"><td style="width: 18.0425%; height: 29.6px;"><span class="td-span"><span class="md-plain">Order Number</span></span></td><td style="width: 10.0099%; height: 29.6px;"><span class="td-span"><span class="md-plain">Yes</span></span></td><td style="width: 10.3806%; height: 29.6px;"><span class="td-span"><span class="md-plain">No</span></span></td><td style="width: 61.5423%; height: 29.6px;"><span class="td-span"><span class="md-plain">Used as the reference for the shipment.</span></span></td></tr><tr class="md-end-block" style="height: 46.4px;"><td style="width: 18.0425%; height: 46.4px;"><span class="td-span"><span class="md-plain">Internal Contact</span></span></td><td style="width: 10.0099%; height: 46.4px;"><span class="td-span"><span class="md-plain">Yes</span></span></td><td style="width: 10.3806%; height: 46.4px;"><span class="td-span"><span class="md-plain">Yes</span></span></td><td style="width: 61.5423%; height: 46.4px;">Used to get the Site ID from the Company Branch that the selected user belongs to.</td></tr></tbody></table>

</figure>#### <span class="md-plain">Address Tab</span>

[![image.png](https://hugeerp0.co.za/hsofdocs/uploads/images/gallery/2024-07/scaled-1680-/HDFimage.png)](https://hugeerp0.co.za/hsofdocs/uploads/images/gallery/2024-07/HDFimage.png)

<figure class="md-table-fig table-figure" id="bkmrk-component-used-requi-1"><table class="md-table" style="width: 100%; height: 628px;"><thead><tr class="md-end-block" style="height: 29.6px;"><th style="width: 22.2442%; height: 29.6px;"><span class="td-span"><span class="md-pair-s ">**<span class="md-plain">Component</span>**</span></span></th><th style="width: 10.257%; height: 29.6px;"><span class="td-span"><span class="md-pair-s ">**<span class="md-plain">Used</span>**</span></span></th><th style="width: 13.4701%; height: 29.6px;"><span class="td-span"><span class="md-pair-s ">**<span class="md-plain">Required</span>**</span></span></th><th style="width: 54.004%; height: 29.6px;"><span class="td-span"><span class="md-pair-s ">**<span class="md-plain">Description</span>**</span></span></th></tr></thead><tbody><tr class="md-end-block" style="height: 46.4px;"><td style="width: 22.2442%; height: 46.4px;"><span class="td-span"><span class="md-plain">Address Type</span></span></td><td style="width: 10.257%; height: 46.4px;"><span class="td-span"><span class="md-plain">Yes</span></span></td><td style="width: 13.4701%; height: 46.4px;"> </td><td style="width: 54.004%; height: 46.4px;"><span class="td-span"><span class="md-plain">Address that when selected will populate the address fields in this tab for editing.</span></span></td></tr><tr class="md-end-block" style="height: 46.4px;"><td style="width: 22.2442%; height: 46.4px;"><span class="td-span"><span class="md-plain">Address Lines 1-4</span></span></td><td style="width: 10.257%; height: 46.4px;"><span class="td-span"><span class="md-plain">Yes</span></span></td><td style="width: 13.4701%; height: 46.4px;"> </td><td style="width: 54.004%; height: 46.4px;">Line 1 is either a street address or building number. If it begins with a number then it is assumed to be a street address, otherwise the street address in contained in Line 2.

The lines following the street address line are for the suburb and city that order.

The address can be validated and corrected from the Shipping tab by clicking the Validate Address button.

</td></tr><tr style="height: 46.4px;"><td style="width: 22.2442%; height: 46.4px;"><span class="td-span"><span class="md-plain">Address Code</span></span></td><td style="width: 10.257%; height: 46.4px;"><span class="td-span"><span class="md-plain">Yes</span></span></td><td style="width: 13.4701%; height: 46.4px;">  
</td><td style="width: 54.004%; height: 46.4px;">The post code for the address.</td></tr><tr class="md-end-block" style="height: 147.2px;"><td style="width: 22.2442%; height: 147.2px;"><span class="td-span"><span class="md-plain">Contact Person</span></span></td><td style="width: 10.257%; height: 147.2px;"><span class="td-span"><span class="md-plain">Yes</span></span></td><td style="width: 13.4701%; height: 147.2px;"><span class="td-span"><span class="md-plain">Yes</span></span></td><td style="width: 54.004%; height: 147.2px;"><span class="td-span"><span class="md-plain">References the contact person for the delivery. The name, email and mobile or phone number of the contact person is included when the shipment is created, unless disabled in the API setup in the config field with the excludeContactInfo setting. </span></span>

<span class="td-span"><span class="md-plain"><span style="background-color: rgb(255, 255, 0);">\[TODO\]</span> Overrides the default contact person for the Customer if selected. The name and email or mobile number of the Contact Person is required. </span></span>

</td></tr><tr class="md-end-block" style="height: 46.4px;"><td style="width: 22.2442%; height: 46.4px;"><span class="td-span"><span class="md-plain">View Button </span></span></td><td style="width: 10.257%; height: 46.4px;"><span class="td-span"><span class="md-plain">Yes</span></span></td><td style="width: 13.4701%; height: 46.4px;"><span class="td-span"><span class="md-plain">No</span></span></td><td style="width: 54.004%; height: 46.4px;"><span class="td-span"><span class="md-plain">Can be used to edit the details for the selected Contact Person.</span></span></td></tr><tr class="md-end-block" style="height: 80px;"><td style="width: 22.2442%; height: 80px;"><span class="td-span"><span class="md-plain">Contact No</span></span></td><td style="width: 10.257%; height: 80px;"><span class="td-span"><span class="md-plain">Yes</span></span></td><td style="width: 13.4701%; height: 80px;"><span class="td-span"><span class="md-plain">No</span></span></td><td style="width: 54.004%; height: 80px;"><span class="td-span"><span class="md-plain"><span style="background-color: rgb(255, 255, 0);">\[TODO\]</span> If set then this Contact Number is used instead of the Mobile Number for the selected Contact Person or default Debtor Contact Person. </span></span></td></tr><tr class="md-end-block" style="height: 46.4px;"><td style="width: 22.2442%; height: 46.4px;"><span class="td-span"><span class="md-plain">Branch</span></span></td><td style="width: 10.257%; height: 46.4px;"><span class="td-span"><span class="md-plain">No</span></span></td><td style="width: 13.4701%; height: 46.4px;"> </td><td style="width: 54.004%; height: 46.4px;"><span class="td-span"><span class="md-plain">The branch address is from the branch the selected Internal Contact belongs to.</span></span></td></tr></tbody></table>

</figure>#### <span class="md-plain">Shipping Tab</span>

[![image.png](https://hugeerp0.co.za/hsofdocs/uploads/images/gallery/2024-07/scaled-1680-/6QPimage.png)](https://hugeerp0.co.za/hsofdocs/uploads/images/gallery/2024-07/6QPimage.png)

##### Components Used

Components inside the main panel of the Shipping tab which are not used currently or are redundant in creating shipments or for other API functions with GoSweetSpot are highlighted purple in the next screenshot.

[![image.png](https://hugeerp0.co.za/hsofdocs/uploads/images/gallery/2024-07/scaled-1680-/mDOimage.png)](https://hugeerp0.co.za/hsofdocs/uploads/images/gallery/2024-07/mDOimage.png)

<figure class="md-table-fig table-figure" id="bkmrk-component-used-requi-2"><table class="md-table" style="width: 100%; height: 1359.6px;"><thead><tr class="md-end-block" style="height: 63.2px;"><th style="width: 21.997%; height: 63.2px;"><span class="td-span"><span class="md-pair-s ">**<span class="md-plain">Component</span>**</span></span></th><th style="width: 8.40336%; height: 63.2px;"><span class="td-span"><span class="md-pair-s ">**<span class="md-plain">Used</span>**</span></span></th><th style="width: 10.8749%; height: 63.2px;"><span class="td-span"><span class="md-pair-s ">**<span class="md-plain">Required</span>**</span></span></th><th style="width: 58.6999%; height: 63.2px;"><span class="td-span"><span class="md-pair-s ">**<span class="md-plain">Description</span>**</span></span></th></tr></thead><tbody><tr class="md-end-block" style="height: 88.4px;"><td style="width: 21.997%; height: 88.4px;"><span class="td-span"><span class="md-plain">Shipping Terms</span></span></td><td style="width: 8.40336%; height: 88.4px;"><span class="td-span"><span class="md-plain">Yes</span></span></td><td style="width: 10.8749%; height: 88.4px;"><span class="td-span"><span class="md-plain">Yes</span></span></td><td style="width: 58.6999%; height: 88.4px;"><span class="td-span"><span class="md-plain">Required to populate the Delivery Company combo box and then select the Courier Company for GoSweetSpot. For more information view the </span><span class="md-meta-i-c  md-link">[<span class="md-plain">Set Up section</span>](https://hugeerp0.co.za/hsofdocs/link/131#bkmrk-set-up)</span><span class="md-plain">. </span></span></td></tr><tr class="md-end-block" style="height: 46.4px;"><td style="width: 21.997%; height: 46.4px;"><span class="td-span"><span class="md-plain">Collect / Ship Date</span></span></td><td style="width: 8.40336%; height: 46.4px;"><span class="td-span"><span class="md-plain">No</span></span></td><td style="width: 10.8749%; height: 46.4px;"> </td><td style="width: 58.6999%; height: 46.4px;"><span class="td-span"><span class="md-plain">Currently not used by GoSweetSpot</span></span></td></tr><tr class="md-end-block" style="height: 43.2px;"><td style="width: 21.997%; height: 43.2px;"><span class="td-span"><span class="md-plain">Shipping Options - Email</span></span></td><td style="width: 8.40336%; height: 43.2px;"><span class="td-span"><span class="md-plain">Yes</span></span></td><td style="width: 10.8749%; height: 43.2px;"><span class="td-span"><span class="md-plain">No</span></span></td><td style="width: 58.6999%; height: 43.2px;"><span class="td-span"><span class="md-plain">If checked then delivery updates are emailed to the delivery contact.</span></span></td></tr><tr class="md-end-block" style="height: 47.2px;"><td style="width: 21.997%; height: 47.2px;"><span class="td-span"><span class="md-plain">Shipping Options - Signature</span></span></td><td style="width: 8.40336%; height: 47.2px;"><span class="td-span"><span class="md-plain">Yes</span></span></td><td style="width: 10.8749%; height: 47.2px;">No</td><td style="width: 58.6999%; height: 47.2px;">If checked then a signature is required on delivery.</td></tr><tr style="height: 46.4px;"><td style="width: 21.997%; height: 46.4px;"><span class="td-span"><span class="md-plain">Shipping Options - Saturday</span></span></td><td style="width: 8.40336%; height: 46.4px;"><span class="td-span"><span class="md-plain">  
</span></span></td><td style="width: 10.8749%; height: 46.4px;">  
</td><td style="width: 58.6999%; height: 46.4px;"><span class="td-span"><span class="md-plain">If checked then delivery will be on a Saturday, increasing the rates. </span></span></td></tr><tr class="md-end-block" style="height: 46.4px;"><td style="width: 21.997%; height: 46.4px;"><span class="td-span"><span class="md-plain">Pickup Instructions</span></span></td><td style="width: 8.40336%; height: 46.4px;"><span class="td-span"><span class="md-plain">No</span></span></td><td style="width: 10.8749%; height: 46.4px;"><span class="td-span"><span class="md-plain">No</span></span></td><td style="width: 58.6999%; height: 46.4px;">Not used with GoSweetSpot when using the Site ID. </td></tr><tr class="md-end-block" style="height: 46.4px;"><td style="width: 21.997%; height: 46.4px;"><span class="td-span"><span class="md-plain">Delivery Instructions</span></span></td><td style="width: 8.40336%; height: 46.4px;"><span class="td-span"><span class="md-plain">Yes</span></span></td><td style="width: 10.8749%; height: 46.4px;"><span class="td-span"><span class="md-plain">No</span></span></td><td style="width: 58.6999%; height: 46.4px;"><span class="td-span"><span class="md-plain">Special instructions for the delivery driver when delivering the shipment.</span></span></td></tr><tr class="md-end-block" style="height: 52px;"><td style="width: 21.997%; height: 52px;"><span class="td-span"><span class="md-plain">Delivery Company</span></span></td><td style="width: 8.40336%; height: 52px;"><span class="td-span"><span class="md-plain">Yes</span></span></td><td style="width: 10.8749%; height: 52px;"><span class="td-span"><span class="md-plain">Yes</span></span></td><td style="width: 58.6999%; height: 52px;"><span class="td-span"><span class="md-plain">Required to select the Courier Company that has GoSweetSpot set as its Courier API. For more information view the </span><span class="md-meta-i-c  md-link">[<span class="md-plain">Set Up section</span>](https://hugeerp0.co.za/hsofdocs/link/131#bkmrk-set-up)</span><span class="md-plain">. </span></span></td></tr><tr class="md-end-block" style="height: 80px;"><td style="width: 21.997%; height: 80px;"><span class="td-span"><span class="md-plain">Validate Button</span></span></td><td style="width: 8.40336%; height: 80px;"><span class="td-span"><span class="md-plain">No</span></span></td><td style="width: 10.8749%; height: 80px;"><span class="td-span"><span class="md-plain">No</span></span></td><td style="width: 58.6999%; height: 80px;"><span class="td-span"><span class="md-plain">Clicking this button will validate the address set in the Address tab and open a window with the result and options to update the address. For more information view the [Validating the Delivery Address section](https://hugeerp0.co.za/hsofdocs/link/131#bkmrk-validating-the-deliv).</span></span></td></tr><tr class="md-end-block" style="height: 80px;"><td style="width: 21.997%; height: 80px;"><span class="td-span"><span class="md-plain">Update Customer Address </span><span class="md-meta-i-c  md-link">[<span class="md-image md-img-loaded" data-src="https://hugeerp0.co.za/hsofdocs/uploads/images/gallery/2024-07/scaled-1680-/6eLimage.png">![image.png](https://hugeerp0.co.za/hsofdocs/uploads/images/gallery/2024-07/scaled-1680-/6eLimage.png)</span>](https://hugeerp0.co.za/hsofdocs/uploads/images/gallery/2024-07/6eLimage.png)</span></span></td><td style="width: 8.40336%; height: 80px;"><span class="td-span"><span class="md-plain">Yes</span></span></td><td style="width: 10.8749%; height: 80px;"><span class="td-span"><span class="md-plain">No</span></span></td><td style="width: 58.6999%; height: 80px;"><span class="td-span"><span class="md-plain">Opens a window to edit the Customer address selected in the Address tab. When saved the address will be saved to the customer. </span></span>

<span class="td-span" style="background-color: rgb(255, 255, 0);"><span class="md-plain">\[TBC - save to the document too\]</span></span>

</td></tr><tr class="md-end-block" style="height: 63.2px;"><td style="width: 21.997%; height: 63.2px;"><span class="td-span"><span class="md-plain">Parcel Dimensions display field</span></span></td><td style="width: 8.40336%; height: 63.2px;"><span class="td-span"><span class="md-plain">No</span></span></td><td style="width: 10.8749%; height: 63.2px;"><span class="td-span"><span class="md-plain">No</span></span></td><td style="width: 58.6999%; height: 63.2px;"><span class="td-span"><span class="md-plain">Displays the information about the current parcel selection for the shipment to be created. If blank then there is no parcel selection. If faded then the shipment was created for the parcel selection.</span></span></td></tr><tr class="md-end-block" style="height: 69.8px;"><td style="width: 21.997%; height: 69.8px;"><span class="td-span"><span class="md-plain">Custom Parcel Dimensions button </span><span class="md-meta-i-c  md-link">[<span class="md-image md-img-loaded" data-src="https://hugeerp0.co.za/hsofdocs/uploads/images/gallery/2024-07/scaled-1680-/5kWimage.png">![image.png](https://hugeerp0.co.za/hsofdocs/uploads/images/gallery/2024-07/scaled-1680-/5kWimage.png)</span>](https://hugeerp0.co.za/hsofdocs/uploads/images/gallery/2024-07/5kWimage.png)</span></span></td><td style="width: 8.40336%; height: 69.8px;"><span class="td-span"><span class="md-plain">N/A</span></span></td><td style="width: 10.8749%; height: 69.8px;"><span class="td-span"><span class="md-plain">Yes</span></span></td><td style="width: 58.6999%; height: 69.8px;"><span class="td-span"><span class="md-plain">Clicking on this opens the Parcel Selection window, which is required for specifying information about the parcels for the shipment. This is explained in the next section. </span></span></td></tr><tr class="md-end-block" style="height: 46.4px;"><td style="width: 21.997%; height: 46.4px;"><span class="td-span"><span class="md-plain">Service Type </span></span></td><td style="width: 8.40336%; height: 46.4px;"><span class="td-span"><span class="md-plain">No</span></span></td><td style="width: 10.8749%; height: 46.4px;"><span class="td-span"><span class="md-plain">No</span></span></td><td style="width: 58.6999%; height: 46.4px;">Is no longer necessary for creating shipments.</td></tr><tr class="md-end-block" style="height: 46.4px;"><td style="width: 21.997%; height: 46.4px;"><span class="td-span"><span class="md-plain">Tracking No</span></span></td><td style="width: 8.40336%; height: 46.4px;"><span class="td-span"><span class="md-plain">No</span></span></td><td style="width: 10.8749%; height: 46.4px;"> </td><td style="width: 58.6999%; height: 46.4px;"><span class="td-span"><span class="md-plain">Displays the last Tracking Number that is assigned to the Invoice. This can be edited and be related to shipping functions outside of the Courier API.</span></span></td></tr><tr class="md-end-block" style="height: 63.2px;"><td style="width: 21.997%; height: 63.2px;"><span class="td-span"><span class="md-plain">Tracking No buttons</span></span></td><td style="width: 8.40336%; height: 63.2px;"><span class="td-span"><span class="md-plain">No</span></span></td><td style="width: 10.8749%; height: 63.2px;"> </td><td style="width: 58.6999%; height: 63.2px;"><span class="td-span"><span class="md-plain">These buttons can be used to add a new Tracking Number to the Invoice or view the list of existing Tracking Numbers for the Invoice. The tracking numbers do not need to have been created with GoSweetSpot.</span></span></td></tr><tr class="md-end-block" style="height: 63.2px;"><td style="width: 21.997%; height: 63.2px;"><span class="td-span"><span class="md-plain">Delivery Status display field.</span></span></td><td style="width: 8.40336%; height: 63.2px;"><span class="td-span"><span class="md-plain">Yes</span></span></td><td style="width: 10.8749%; height: 63.2px;"><span class="td-span"><span class="md-plain">No</span></span></td><td style="width: 58.6999%; height: 63.2px;"><span class="td-span"><span class="md-plain">Displays the current shipping status for the last shipment created.</span></span></td></tr><tr class="md-end-block" style="height: 60px;"><td style="width: 21.997%; height: 60px;"><span class="td-span"><span class="md-plain">Update Delivery Status  
</span><span class="md-meta-i-c  md-link">[<span class="md-image md-img-loaded" data-src="https://hugeerp0.co.za/hsofdocs/uploads/images/gallery/2024-07/scaled-1680-/6eLimage.png">![image.png](https://hugeerp0.co.za/hsofdocs/uploads/images/gallery/2024-07/scaled-1680-/6eLimage.png)</span>](https://hugeerp0.co.za/hsofdocs/uploads/images/gallery/2024-07/6eLimage.png)</span></span></td><td style="width: 8.40336%; height: 60px;"><span class="td-span"><span class="md-plain">Yes</span></span></td><td style="width: 10.8749%; height: 60px;"><span class="td-span"><span class="md-plain">No</span></span></td><td style="width: 58.6999%; height: 60px;"><span class="td-span"><span class="md-plain">Clicking this button will perform an API request to update the Delivery Status display field.</span></span></td></tr><tr class="md-end-block" style="height: 63.2px;"><td style="width: 21.997%; height: 63.2px;"><span class="td-span"><span class="md-plain">Auto checkbox</span></span></td><td style="width: 8.40336%; height: 63.2px;"><span class="td-span"><span class="md-plain">Yes</span></span></td><td style="width: 10.8749%; height: 63.2px;"><span class="td-span"><span class="md-plain">No</span></span></td><td style="width: 58.6999%; height: 63.2px;"><span class="td-span"><span class="md-plain">Having this checked will cause the Delivery Status display field to be updated when the Invoice is opened and there is a shipment created.</span></span></td></tr><tr class="md-end-block" style="height: 96.8px;"><td style="width: 21.997%; height: 96.8px;"><span class="td-span"><span class="md-plain">Courier API button </span><span class="md-meta-i-c  md-link">[<span class="md-image md-img-loaded" data-src="https://hugeerp0.co.za/hsofdocs/uploads/images/gallery/2024-07/scaled-1680-/pvNimage.png">![image.png](https://hugeerp0.co.za/hsofdocs/uploads/images/gallery/2024-07/scaled-1680-/pvNimage.png)</span>](https://hugeerp0.co.za/hsofdocs/uploads/images/gallery/2024-07/pvNimage.png)</span></span></td><td style="width: 8.40336%; height: 96.8px;"><span class="td-span"><span class="md-plain">Yes</span></span></td><td style="width: 10.8749%; height: 96.8px;"><span class="td-span"><span class="md-plain">Yes</span></span></td><td style="width: 58.6999%; height: 96.8px;"><span class="td-span"><span class="md-plain">This button is required to be clicked on before a shipment for the Invoice can be created with GoSweetSpot. If there is a selection of parcels created, and the other requirements are met, a window with a list of available shipping rates, or services types, will be presented, of which one can be selected to create a shipment. </span></span></td></tr><tr class="md-end-block" style="height: 67.8px;"><td style="width: 21.997%; height: 67.8px;"><span class="td-span"><span class="md-plain">Details  
</span><span class="md-meta-i-c  md-link">[<span class="md-image md-img-loaded" data-src="https://hugeerp0.co.za/hsofdocs/uploads/images/gallery/2024-07/scaled-1680-/rVVimage.png">![image.png](https://hugeerp0.co.za/hsofdocs/uploads/images/gallery/2024-07/scaled-1680-/rVVimage.png)</span>](https://hugeerp0.co.za/hsofdocs/uploads/images/gallery/2024-07/rVVimage.png)</span></span></td><td style="width: 8.40336%; height: 67.8px;"><span class="td-span"><span class="md-plain">No</span></span></td><td style="width: 10.8749%; height: 67.8px;"> </td><td style="width: 58.6999%; height: 67.8px;"><span class="td-span"><span class="md-plain">For unrelated shipping functions. The Pickup and Delivery instructions may also be set in the form that opens after clicking the button, but it is unnecessary when these fields already exist in the current form. </span></span></td></tr><tr class="md-end-block" style="height: 80px;"><td style="width: 21.997%; height: 80px;"><span class="td-span"><span class="md-plain">Save Shipping </span><span class="md-meta-i-c  md-link">[<span class="md-image md-img-loaded" data-src="https://hugeerp0.co.za/hsofdocs/uploads/images/gallery/2024-07/scaled-1680-/rHsimage.png">![image.png](https://hugeerp0.co.za/hsofdocs/uploads/images/gallery/2024-07/scaled-1680-/rHsimage.png)</span>](https://hugeerp0.co.za/hsofdocs/uploads/images/gallery/2024-07/rHsimage.png)</span></span></td><td style="width: 8.40336%; height: 80px;"><span class="td-span"><span class="md-plain">Yes</span></span></td><td style="width: 10.8749%; height: 80px;"><span class="td-span"><span class="md-plain">Yes</span></span></td><td style="width: 58.6999%; height: 80px;"><span class="td-span"><span class="md-plain">Is required to save the Shipping Tab fields if the Invoice Save button is disabled as it is when the Invoice status is Posted. The Customer, Internal Contact and Reference fields are not saved. The Shipping Tab fields are also saved automatically when the Courier API button is clicked.</span></span></td></tr></tbody></table>

</figure>### Validating the Delivery Address

To validate and to correct the address that is entered into the address fields in the Address tab, click the Validate button [![image.png](https://hugeerp0.co.za/hsofdocs/uploads/images/gallery/2024-07/scaled-1680-/lBRimage.png) ](https://hugeerp0.co.za/hsofdocs/uploads/images/gallery/2024-07/lBRimage.png)in the Shipping tab. The address that is validated is the address as it is in the fields, not the saved address. After the address is validated by GoSweetSpot a window will open with named address fields and the validation result in the Log field. If a field has been corrected by GoSweetSpot then an asterisk will appear next to it.

[![image.png](https://hugeerp0.co.za/hsofdocs/uploads/images/gallery/2024-07/scaled-1680-/cPwimage.png)](https://hugeerp0.co.za/hsofdocs/uploads/images/gallery/2024-07/cPwimage.png)

After editing the address, validation can be performed again by clicking the Validate button [![image.png](https://hugeerp0.co.za/hsofdocs/uploads/images/gallery/2024-07/scaled-1680-/yJ6image.png)](https://hugeerp0.co.za/hsofdocs/uploads/images/gallery/2024-07/yJ6image.png) next to the Postcode field.

Clicking the Close button will close the window, without making any changes.

Clicking the Apply button [![image.png](https://hugeerp0.co.za/hsofdocs/uploads/images/gallery/2024-07/scaled-1680-/jqhimage.png) ](https://hugeerp0.co.za/hsofdocs/uploads/images/gallery/2024-07/jqhimage.png)will copy the address fields as they are to the address fields in the Address tab of the Invoice form.

Clicking the Inv Only or Doc Only button [![image.png](https://hugeerp0.co.za/hsofdocs/uploads/images/gallery/2024-07/scaled-1680-/1CHimage.png) ](https://hugeerp0.co.za/hsofdocs/uploads/images/gallery/2024-07/1CHimage.png)will also save the address as the address type selected in the Address tab, to the document.

Clicking the "Inv &amp; Cus" or "Doc &amp; Cus" button [![image.png](https://hugeerp0.co.za/hsofdocs/uploads/images/gallery/2024-07/scaled-1680-/qZZimage.png) ](https://hugeerp0.co.za/hsofdocs/uploads/images/gallery/2024-07/qZZimage.png)will copy the address to the form, save it, and save the address to the customer selected in the Detail tab as the address type selected in the Address tab.

### <span class="md-plain">Parcel Selection Grid</span>

<span class="md-plain">The Parcel Selection Grid is opened in a new window by clicking the Custom Parcel Dimensions button </span><span class="md-meta-i-c  md-link">[<span class="md-image md-img-loaded" data-src="https://hugeerp0.co.za/hsofdocs/uploads/images/gallery/2024-07/scaled-1680-/aVgimage.png">![image.png](https://hugeerp0.co.za/hsofdocs/uploads/images/gallery/2024-07/scaled-1680-/aVgimage.png)</span>](https://hugeerp0.co.za/hsofdocs/uploads/images/gallery/2024-07/aVgimage.png)</span><span class="md-plain"> next to the Parcel Dimensions field. It is required to have at least one parcel created before a new shipment can be created with GoSweetSpot.</span>

<span class="md-plain">When there is one or more parcel for the new shipment, the Parcel Dimensions field in the Shipping tab of the Invoice form will be updated to reflect this. In this case the text is coloured black. If the parcel dimensions are greyed out, then the parcels the dimensions for it have been assigned to the last created shipment. To create a new shipment, new parcel dimensions will need to be added.</span>

<span class="md-meta-i-c  md-link">[<span class="md-image md-img-loaded" data-src="https://hugeerp0.co.za/hsofdocs/uploads/images/gallery/2024-07/scaled-1680-/ceEimage.png">![image.png](https://hugeerp0.co.za/hsofdocs/uploads/images/gallery/2024-07/scaled-1680-/ceEimage.png)</span><span class="md-plain"> Example of Parcel Dimensions created for the next shipment.</span>](https://hugeerp0.co.za/hsofdocs/uploads/images/gallery/2024-07/ceEimage.png)</span>

<span class="md-meta-i-c  md-link">[<span class="md-image md-img-loaded" data-src="https://hugeerp0.co.za/hsofdocs/uploads/images/gallery/2024-07/scaled-1680-/RY7image.png">![image.png](https://hugeerp0.co.za/hsofdocs/uploads/images/gallery/2024-07/scaled-1680-/RY7image.png)</span><span class="md-plain"> Example of Parcel Dimensions assigned to the last created shipment.</span>](https://hugeerp0.co.za/hsofdocs/uploads/images/gallery/2024-07/RY7image.png)</span>

<span class="md-plain">The Parcel Selection Grid is used for several purposes:</span>

- <span class="md-plain">To add and edit the required information about the parcel sizes for a new shipment</span>
- <span class="md-plain">Editing predefined parcel sizes to use instead of having to reenter the same values each time.</span>
- <span class="md-plain">Keeping a record of past shipments</span>
- <span class="md-plain">Viewing and updating the tracking information for parcels that have been assigned to a shipment</span>

#### <span class="md-plain">Editing Parcel Dimensions</span>

<span class="md-plain">For a shipment to be created with GoSweetSpot the dimensions and weight need to be specified or the name needs to match with a name of the a pre-loaded stock size from GoSweetSpot. The quantity greateer than one is optional and can be used instead of copying a parcel repeatedly.</span>

##### <span class="md-plain">Selection Grid </span>

<span class="md-meta-i-c  md-link" style="background-color: rgb(191, 237, 210);">[<span class="md-image md-img-loaded" data-src="https://hugeerp0.co.za/hsofdocs/uploads/images/gallery/2024-07/scaled-1680-/A2Limage.png">![image.png](https://hugeerp0.co.za/hsofdocs/uploads/images/gallery/2024-07/scaled-1680-/A2Limage.png)</span>](https://hugeerp0.co.za/hsofdocs/uploads/images/gallery/2024-07/A2Limage.png)</span>

<figure class="md-table-fig table-figure" id="bkmrk-component-descriptio"><table class="md-table" style="width: 100%;"><thead><tr class="md-end-block"><th style="width: 21.75%;"><span class="td-span"><span class="md-pair-s ">**<span class="md-plain">Component</span>**</span> </span></th><th style="width: 78.2253%;"><span class="td-span"><span class="md-pair-s ">**<span class="md-plain">Description</span>**</span> </span></th></tr></thead><tbody><tr class="md-end-block"><td style="width: 21.75%;"><span class="td-span"><span class="md-plain">Search button</span></span></td><td style="width: 78.2253%;"><span class="td-span"><span class="md-plain">Clicking this will reload the grid from the server with the search results.</span></span></td></tr><tr class="md-end-block"><td style="width: 21.75%;"><span class="td-span"><span class="md-plain">Add </span></span></td><td style="width: 78.2253%;"><span class="td-span"><span class="md-plain">Clicking this opens a dialog to add a new parcel</span></span></td></tr><tr class="md-end-block"><td style="width: 21.75%;"><span class="td-span"><span class="md-plain">Edit</span></span></td><td style="width: 78.2253%;"><span class="td-span"><span class="md-plain">When one row is selected and is for a parcel without a shipment, the same dialog that is opened with the Add button is opened to edit information for the selected row.</span></span></td></tr><tr class="md-end-block"><td style="width: 21.75%;"><span class="td-span"><span class="md-plain">Delete</span></span></td><td style="width: 78.2253%;"><span class="td-span"><span class="md-plain">When at least one row is selected and the rows do not include rows for created shipments, the rows will be deleted without confirmation. Multiple rows are selected by holding down the control key and clicking on the rows to add to the selection.</span></span></td></tr><tr class="md-end-block"><td style="width: 21.75%;"><span class="td-span"><span class="md-plain">Include Tracked</span></span></td><td style="width: 78.2253%;"><span class="td-span"><span class="md-plain">To include parcels with a shipment in the grid this checkbox is checked. To only show the parcels for the next shipment, it is unchecked. </span></span></td></tr><tr class="md-end-block"><td style="width: 21.75%;"><span class="td-span"><span class="md-plain">Name column</span></span></td><td style="width: 78.2253%;"><span class="td-span"><span class="md-plain">The name given to the parcel. If the name matches a pre-loaded stock size from GoSweetSpot, then this stock size is used by GoSweetSpot when creating a shipment. </span></span></td></tr><tr class="md-end-block"><td style="width: 21.75%;"><span class="td-span"><span class="md-plain">Shipment column</span></span></td><td style="width: 78.2253%;"><span class="td-span"><span class="md-plain">This column is hidden by default. To unhide it, open the menu for the column and check the box for it in the "Columns" submenu. For a parcels that are new it will show "Not Created". If there is a shipment number for the parcel then it is shown. If there is not shipment number but there is tracking number then "Unavailable" is shown.   
  
To group the rows by this column, open the menu for the column and click "Group by this field". </span></span></td></tr><tr class="md-end-block"><td style="width: 21.75%;"><span class="td-span"><span class="md-plain">Shipment Created</span></span></td><td style="width: 78.2253%;"><span class="td-span"><span class="md-plain">This column is hidden by default and needs to be enabled in the Columns submenu. If a shipment was created that includes the parcel this column shows the date and time it was created.</span></span></td></tr><tr class="md-end-block"><td style="width: 21.75%;"><span class="td-span"><span class="md-plain">Dimensions (L x W x H)</span></span></td><td style="width: 78.2253%;"><span class="td-span"><span class="md-plain">Show the length, width and height of the parcel in centimeters </span></span></td></tr><tr class="md-end-block"><td style="width: 21.75%;"><span class="td-span"><span class="md-plain">Wgt</span></span></td><td style="width: 78.2253%;"><span class="td-span"><span class="md-plain">The weight in kilograms</span></span></td></tr><tr class="md-end-block"><td style="width: 21.75%;"><span class="td-span"><span class="md-plain">Qty</span></span></td><td style="width: 78.2253%;"><span class="td-span"><span class="md-plain">The number of identical parcels in the shipment</span></span></td></tr><tr class="md-end-block"><td style="width: 21.75%;"><span class="td-span"><span class="md-plain">Close button</span></span></td><td style="width: 78.2253%;"><span class="td-span"><span class="md-plain">Closes the window. When the window is closed the Parcel Dimensions field in the Shipping tab of the Invoice form will be refreshed from the server.</span></span></td></tr></tbody></table>

</figure>##### <span class="md-plain">Add / Edit dialog</span>

<span class="md-plain">Opened by clicking the Add or Edit buttons</span>

<span class="md-meta-i-c  md-link">[<span class="md-image md-img-loaded" data-src="https://hugeerp0.co.za/hsofdocs/uploads/images/gallery/2024-07/scaled-1680-/D5ximage.png">![image.png](https://hugeerp0.co.za/hsofdocs/uploads/images/gallery/2024-07/scaled-1680-/D5ximage.png)</span>](https://hugeerp0.co.za/hsofdocs/uploads/images/gallery/2024-07/D5ximage.png)</span>

<span class="md-plain">The Parcel combo box can be used to select a parcel template created in the Defaults grid and prefill the remaining fields. </span>

##### <span class="md-plain">Defaults grid</span>

<span class="md-plain">Lists predefined parcel dimensions that can be selected and added to the Selection grid for the next shipment.</span>

<span class="md-meta-i-c  md-link">[<span class="md-image md-img-loaded" data-src="https://hugeerp0.co.za/hsofdocs/uploads/images/gallery/2024-07/scaled-1680-/CHnimage.png">![image.png](https://hugeerp0.co.za/hsofdocs/uploads/images/gallery/2024-07/scaled-1680-/CHnimage.png)</span>](https://hugeerp0.co.za/hsofdocs/uploads/images/gallery/2024-07/CHnimage.png)</span>

<span class="md-plain">To select more than one row, hold down the Control key before clicking on the next row. </span>

<span class="md-plain">When one or more rows are selected the Add Selected button becomes enabled. Clicking on it will create new parcel dimensions from the selected rows in the Selection grid that are to be included in the next shipment. When the new rows are added successfully, the tab is automatically switched to the Selection grid.</span>

#### <span class="md-plain">Editing Predefined Parcel Dimensions</span>

<span class="md-plain">To add or edit predefined parcel dimensions click the add or edit buttons. A row needs to be selected before it can be edited. Multiple rows can be deleted together by selecting more than one by holding the Control key, and then clicking the Delete button. </span>

##### <span class="md-plain">Add / Edit Dialog</span>

<span class="md-meta-i-c  md-link">[<span class="md-image md-img-loaded" data-src="https://hugeerp0.co.za/hsofdocs/uploads/images/gallery/2024-07/scaled-1680-/358image.png">![image.png](https://hugeerp0.co.za/hsofdocs/uploads/images/gallery/2024-07/scaled-1680-/358image.png)</span>](https://hugeerp0.co.za/hsofdocs/uploads/images/gallery/2024-07/358image.png)</span>

<span class="md-plain">Entering a name is required and if a Courier API is selected then it is required to be unique for the selected API. The name will appear in the combo box in the add/edit dialog for the parcel selection grid. The dimensions and weight are required by GoSweetSpot if the name does not match with the name of a pre-loaded stock size. </span>

#### <span class="md-plain">Viewing Past Shipments</span>

<span class="md-plain">In the parcel selection grid created shipments can be viewed by checking the Include Tracking checkbox. If a shipment was created with the parcel then the Shipment, Shipment Created, Tracking Number and Tracking Number columns will contain values for shipment. </span>

<span class="md-plain">These columns are hidden by default and will need to be initially unhidden. </span>

<span class="md-meta-i-c  md-link">[<span class="md-image md-img-loaded" data-src="https://hugeerp0.co.za/hsofdocs/uploads/images/gallery/2024-07/scaled-1680-/K6Fimage.png">![image.png](https://hugeerp0.co.za/hsofdocs/uploads/images/gallery/2024-07/scaled-1680-/K6Fimage.png)</span>](https://hugeerp0.co.za/hsofdocs/uploads/images/gallery/2024-07/K6Fimage.png)</span>

<span class="md-plain">Rows can be grouped by their Shipment numbers or Shipment Created dates, but while grouped are not able to be sorted in descending order <span style="background-color: rgb(255, 255, 0);">\[TBD - find out if this can be fixed\]</span>. To only show the parcels for a single shipment, one can be selected from the Shipment combo box in the search panel. Available shipments in the drop down list are sorted by the time and date they were created in descending order.</span>

#### <span class="md-plain">Updating Tracking Information</span>

<span class="md-meta-i-c  md-link">[<span class="md-image md-img-loaded" data-src="https://hugeerp0.co.za/hsofdocs/uploads/images/gallery/2024-07/scaled-1680-/Xj2image.png">![image.png](https://hugeerp0.co.za/hsofdocs/uploads/images/gallery/2024-07/scaled-1680-/Xj2image.png)</span>](https://hugeerp0.co.za/hsofdocs/uploads/images/gallery/2024-07/Xj2image.png)</span>

<span class="md-plain">To update the Delivery Status for all the parcels belonging to a shipment, select a row for a parcel with a Shipment number, then click the Status button in the top toolbar of the window. If successful then the columns API Status, API Parcel Status and Status Updated will be updated. The API Status column is the Delivery Status for the shipment, whereas the API Parcel Status is the delivery status of the consignment the parcel is part of, if the shipment was split into multiple consignments. The Status Updated column is the date and time the delivery status was last successfully updated. </span>

<span class="md-plain">If a parcel has a quantity greater than one, then in the API Parcel Status column there will be a new line for each of the parcels that make up the quantity.</span>

### <span class="md-plain">Creating a Shipment</span>

#### <span class="md-plain">Invoice Set up</span>

<span class="md-plain">A shipment is created with GoSweetSpot from an Invoice by first clicking on the Get Rates or Courier API button in the Shipping Tab when the required information has been saved to the Invoice and is correct, and then when the GoSweetSpot Delivery Options window is opened, ,clicking on the Select button in the Action column of the grid for the chosen option.</span>

##### <span class="md-plain">Required Steps</span>

<span class="md-plain">To create a Shipment with GoSweetSpot from an Invoice form the following is required before clicking on the Get Rates or Courier API button in the Shipping Tab:</span>

- <span class="md-plain">The API needs to be set up correctly. See the [Set Up section](https://hugeerp0.co.za/hsofdocs/link/131#bkmrk-set-up).</span>
- <span class="md-plain">The Invoice needs to have a Customer selected</span>
- The address in the Address tab needs to be valid. It can be validated by Validate button in the Shipping tab.
- <span class="md-plain">An Internal Contact needs to be selected.</span>
- <span class="md-plain">The Site ID for the Branch the Internal Contact belongs to needs to be valid. </span>
- <span class="md-plain">A Contact Person needs to be selected, even if contact info is to be excluded. <span style="background-color: rgb(255, 255, 0);">\[TODO - disable this check if contact is not required by GoSweetSpot\]</span></span>
- <span class="md-plain">For an address to be valid it needs to be in the following format:</span>
    
    <figure class="md-table-fig table-figure"><table class="md-table" style="width: 95.1743%; height: 207.2px;"><thead><tr class="md-end-block" style="height: 29.6px;"><th style="width: 15.0476%; height: 29.6px;"><span class="td-span"><span class="md-pair-s ">**<span class="md-plain">Field</span>**</span></span></th><th class="" style="width: 61.7676%; height: 29.6px;"><span class="td-span"><span class="md-pair-s ">**<span class="md-plain">Description</span>**</span></span></th><th style="width: 23.0475%; height: 29.6px;"><span class="td-span"><span class="md-pair-s ">**<span class="md-plain">Example</span>**</span> </span></th></tr></thead><tbody><tr class="md-end-block" style="height: 29.6px;"><td style="width: 15.0476%; height: 29.6px;"><span class="td-span"><span class="md-plain">Address Line 1</span></span></td><td class="" style="width: 61.7676%; height: 29.6px;"><span class="td-span"><span class="md-plain">The building name (Optional)</span></span></td><td style="width: 23.0475%; height: 29.6px;"><span class="td-span"><span class="md-plain">Unit 2</span></span></td></tr><tr class="md-end-block" style="height: 29.6px;"><td style="width: 15.0476%; height: 29.6px;">Address Line 2</td><td class="" style="width: 61.7676%; height: 29.6px;">The street address</td><td style="width: 23.0475%; height: 29.6px;">46 Bracken Place</td></tr><tr class="md-end-block" style="height: 29.6px;"><td style="width: 15.0476%; height: 29.6px;"><span class="td-span"><span class="md-plain">Address Line 3</span></span></td><td class="" style="width: 61.7676%; height: 29.6px;"><span class="td-span"><span class="md-plain">The suburb</span></span></td><td style="width: 23.0475%; height: 29.6px;"><span class="td-span"><span class="md-plain">Avonhead</span></span></td></tr><tr class="md-end-block" style="height: 29.6px;"><td style="width: 15.0476%; height: 29.6px;"><span class="td-span"><span class="md-plain">Address Line 4</span></span></td><td class="" style="width: 61.7676%; height: 29.6px;"><span class="td-span"><span class="md-plain">The city</span></span></td><td style="width: 23.0475%; height: 29.6px;"><span class="td-span"><span class="md-plain">Christchurch</span></span></td></tr></tbody></table>
    
    If the building name is ommitted then Line 1 becomes the street address and the other lines are moved up with it.
    
    </figure>
- <span class="md-plain">From the Parcel Selection grid accessed from the Shipping Tab, there needs to be at least one parcel created, with dimensions and a weight or a name matching a GoSweetSpot pre-loaded name, and without a tracking number or shipping number. </span>
- <span class="md-plain">In the Shipping Tab the Shipping Terms that apply to GoSweetSpot needs to be selected</span>
- <span class="md-plain">In the Shipping Tab the Delivery Company for GoSweetSpot needs to be selected</span>
- <span class="md-plain">Changes to the Invoice outside of the Shipping tab need to be saved. Unsaved information is not sent to GoSweetSpot. If it is a processed Invoice then clicking the Save Shipping button in the Shipping Tab can be used, however the Customer and fields outside of the Shipping Tab will not be saved. </span>

##### <span class="md-plain">Optional Steps</span>

- <span class="md-plain">If the Email checkbox is checked in Shipping Options in the Shipping Tab, then a tracking email will be sent to the email address of the delivery contact.</span>
- <span class="md-plain">If the Signature checkbox is checked, then the delivery is required to be signed for.</span>
- <span class="md-plain">If the Saturday checkbox is checked, then the delivery will be scheduled for Saturday, which may substantially increase the cost of delivery.</span>
- <span class="md-plain">Special instructions for delivery can be set from the Shipping Tab in the Delivery Instructions field.</span>
- <span class="md-plain">If the Order Number field in the Detail Tab is set then this becomes the reference printed on the label. </span>

#### <span class="md-plain">Selecting from the Available Rates</span>

<span class="md-plain">When the Invoice is ready clicking the Get Rates or Courier API button in the Shipping Tab will present a new window, GoSweetSpot Delivery Options, with a list of the available rates or Delivery Options and their costs and other relevant information. </span>

[![image.png](https://hugeerp0.co.za/hsofdocs/uploads/images/gallery/2024-07/scaled-1680-/5Ejimage.png)](https://hugeerp0.co.za/hsofdocs/uploads/images/gallery/2024-07/5Ejimage.png)

[![image.png](https://hugeerp0.co.za/hsofdocs/uploads/images/gallery/2024-07/scaled-1680-/xHJimage.png)](https://hugeerp0.co.za/hsofdocs/uploads/images/gallery/2024-07/xHJimage.png)

<span class="md-plain">Clicking a Select button will create a shipment with GoSweetSpot with the option for the row.</span>

<span class="md-plain">Clicking the Cancel button will close the window without creating a shipment. </span>

<span class="md-plain">If the Select button was clicked and a Shipment was created successfully with GoSweetSpot, then a success message with details for the created shipment will appear.</span>

[![image.png](https://hugeerp0.co.za/hsofdocs/uploads/images/gallery/2024-07/scaled-1680-/bnvimage.png)](https://hugeerp0.co.za/hsofdocs/uploads/images/gallery/2024-07/bnvimage.png)

<span class="md-plain">When the success message is dismissed, the parcel labels will be automatically downloaded by the browser as a PDF file. This file will also be saved as an attachment to the Invoice.</span>

[![image.png](https://hugeerp0.co.za/hsofdocs/uploads/images/gallery/2024-07/scaled-1680-/MKnimage.png)](https://hugeerp0.co.za/hsofdocs/uploads/images/gallery/2024-07/MKnimage.png)

<span class="md-plain">The Parcel Dimensions field in the Shipping Tab will be greyed out to indicate that the parcels it references are assigned to a shipment.</span>

[![image.png](https://hugeerp0.co.za/hsofdocs/uploads/images/gallery/2024-07/scaled-1680-/2xximage.png)](https://hugeerp0.co.za/hsofdocs/uploads/images/gallery/2024-07/2xximage.png)

<span class="md-plain">The tracking number will be added to the Invoice in the Tracking No field and to the Tracking Number list </span><span class="md-plain">opened by clicking the View Tracking Numbers button [![image.png](https://hugeerp0.co.za/hsofdocs/uploads/images/gallery/2024-07/scaled-1680-/Krjimage.png) ](https://hugeerp0.co.za/hsofdocs/uploads/images/gallery/2024-07/Krjimage.png)</span><span class="md-plain">next to it.</span>

[![image.png](https://hugeerp0.co.za/hsofdocs/uploads/images/gallery/2024-07/scaled-1680-/Jezimage.png)](https://hugeerp0.co.za/hsofdocs/uploads/images/gallery/2024-07/Jezimage.png)

<span class="md-plain">In the Parcel Selection window the Shipment combo box will show the Shipment number for the created shipment with the date and time it was created.</span>

[![image.png](https://hugeerp0.co.za/hsofdocs/uploads/images/gallery/2024-07/scaled-1680-/q7Mimage.png)](https://hugeerp0.co.za/hsofdocs/uploads/images/gallery/2024-07/q7Mimage.png)

<span class="md-plain">The rows for the parcels belonging to the Shipment are updated as follows:</span>

- <span class="md-plain">The ID or number given to the Shipment by GoSweetSpot will be set in the Shipment column</span>
- <span class="md-plain">The Shipment Created column will be updated with date and time the Shipment was created</span>
- <span class="md-plain">The Status column will be updated to "In Transit"</span>
- <span class="md-plain">The Tracking Number and Tracking URL for the shipment will be set.</span>
- <span class="md-plain">The API Status column remains empty but can now be updated by selecting a row and clicking the Status button.</span>

[![image.png](https://hugeerp0.co.za/hsofdocs/uploads/images/gallery/2024-07/scaled-1680-/CE2image.png)](https://hugeerp0.co.za/hsofdocs/uploads/images/gallery/2024-07/CE2image.png)

### <span class="md-plain">Attachments</span>

<span class="md-plain">The attachments created by GoSweetSpot</span><span class="md-plain"> can be viewed with the other attachments for the Invoice, in the Attachments window, opened by clicking the Attachments button in the top toolbar.</span>

[![image.png](https://hugeerp0.co.za/hsofdocs/uploads/images/gallery/2024-07/scaled-1680-/jD0image.png)](https://hugeerp0.co.za/hsofdocs/uploads/images/gallery/2024-07/jD0image.png)

<span class="md-plain"><span style="color: rgb(0, 0, 0); background-color: rgb(255, 255, 0);">\[TODO\] </span>The attachments added for the created shipment will include the name of the Courier Delivery company, for example "GoSweetSpot", and the tracking number in their names.</span>

[![image.png](https://hugeerp0.co.za/hsofdocs/uploads/images/gallery/2024-07/scaled-1680-/YNyimage.png)](https://hugeerp0.co.za/hsofdocs/uploads/images/gallery/2024-07/YNyimage.png)

### <span class="md-plain">Delivery Status Updates</span>

The Delivery Status for the last created shipment belonging to the Invoice can be updated by clicking the Update Delivery Status button [![image.png](https://hugeerp0.co.za/hsofdocs/uploads/images/gallery/2024-07/scaled-1680-/MvEimage.png) ](https://hugeerp0.co.za/hsofdocs/uploads/images/gallery/2024-07/MvEimage.png)next to the Delivery Status field in the Shipping Tab. To automatically update the delivery status when any Invoice is opened the Auto checkbox next to the button can be checked. This feature is currently only available from Invoice forms.

[![image.png](https://hugeerp0.co.za/hsofdocs/uploads/images/gallery/2024-07/scaled-1680-/psnimage.png)](https://hugeerp0.co.za/hsofdocs/uploads/images/gallery/2024-07/psnimage.png)