# Xero API

# Xero API

There are a few steps to setup Xero

Following this documentation in Xero Setup, click on link below

[Xero setup](https://hugeerp10.co.za/hsofmanual/books/xero "Xero")

# Xero API Link settings

#### Create application  


Visit this URL [App management – Xero](https://developer.xero.com/app/manage)  
Click the new app button

[![image.png](https://hugeerp0.co.za/hsofdocs/uploads/images/gallery/2024-01/scaled-1680-/image.png)](https://hugeerp0.co.za/hsofdocs/uploads/images/gallery/2024-01/image.png)

  
Application URL should be the web address of the server  
Redirect URI should be **https://{serverHostName}/csp/sys/oauth2/OAuth2.Response.cls**

Click on the app and then select the Configuration menu.

[![image.png](https://hugeerp0.co.za/hsofdocs/uploads/images/gallery/2024-01/scaled-1680-/FuOimage.png)](https://hugeerp0.co.za/hsofdocs/uploads/images/gallery/2024-01/FuOimage.png)

---

#### Server Settings

Go to System administration -&gt; Security -&gt; Client, in the management portal for the server.

[![image.png](https://hugeerp0.co.za/hsofdocs/uploads/images/gallery/2024-01/scaled-1680-/GSOimage.png)](https://hugeerp0.co.za/hsofdocs/uploads/images/gallery/2024-01/GSOimage.png)

Click the Create Server Description button.

[![image.png](https://hugeerp0.co.za/hsofdocs/uploads/images/gallery/2024-01/scaled-1680-/LJkimage.png)](https://hugeerp0.co.za/hsofdocs/uploads/images/gallery/2024-01/LJkimage.png)  
Issuer endpoint should be   
**https://login.xero.com/identity/connect**

  
An SSL config will be needed for this, which is selected as the SSL/TLS configuration

Click on Client Configurations for the server description just created

[![image.png](https://hugeerp0.co.za/hsofdocs/uploads/images/gallery/2024-01/scaled-1680-/d0bimage.png)](https://hugeerp0.co.za/hsofdocs/uploads/images/gallery/2024-01/d0bimage.png)

[![image.png](https://hugeerp0.co.za/hsofdocs/uploads/images/gallery/2024-01/scaled-1680-/wYximage.png)](https://hugeerp0.co.za/hsofdocs/uploads/images/gallery/2024-01/wYximage.png)

Click on the Create Client Configuration button.

[![image.png](https://hugeerp0.co.za/hsofdocs/uploads/images/gallery/2024-01/scaled-1680-/gszimage.png)](https://hugeerp0.co.za/hsofdocs/uploads/images/gallery/2024-01/gszimage.png)

For "Application Name", "Client name" and "Description" enter "**xero-{namespance}**".   
Client type should be "Confidential".  
Enter the servers host name into the "Host name" text box.

Click on the "Client Credentials" tab

[![image.png](https://hugeerp0.co.za/hsofdocs/uploads/images/gallery/2024-01/scaled-1680-/yFlimage.png)](https://hugeerp0.co.za/hsofdocs/uploads/images/gallery/2024-01/yFlimage.png)

Enter the details shown here in the configuration section of the Xero app that was created earlier.

[![image.png](https://hugeerp0.co.za/hsofdocs/uploads/images/gallery/2024-01/scaled-1680-/wiMimage.png)](https://hugeerp0.co.za/hsofdocs/uploads/images/gallery/2024-01/wiMimage.png)

---

#### API Huge ERP

<span style="color: rgb(45, 194, 107);">**<span class="ts0"> Configuration Module&gt; Security&gt; API Setup</span>**</span>

Add as shown below into the API setup in the SCM module   
"xero-hugeerp" should be replaced with "**xero-{namepsace}**"

[![image.png](https://hugeerp10.co.za/hsofmanual/uploads/images/gallery/2025-01/scaled-1680-/fFKimage.png)](https://hugeerp10.co.za/hsofmanual/uploads/images/gallery/2025-01/fFKimage.png)

Tick the functions that are needed to activate the link between Huge ERP and Xero

[![image.png](https://hugeerp10.co.za/hsofmanual/uploads/images/gallery/2025-01/scaled-1680-/O5Uimage.png)](https://hugeerp10.co.za/hsofmanual/uploads/images/gallery/2025-01/O5Uimage.png)

<table border="1" id="bkmrk-xero-sales-acc-here-" style="border-collapse: collapse; width: 100%;"><colgroup><col style="width: 21.4762%;"></col><col style="width: 78.6191%;"></col></colgroup><tbody><tr><td>Xero Sales Acc</td><td>Here you can specify which sales Xero items must go to </td></tr><tr><td>Xero COS Acc</td><td>Here you can specify which Cost of Sales Xero items must go to </td></tr><tr><td>Xero Division</td><td>Here you can set up your Xero Division as default </td></tr><tr><td>Xero Sales Rep</td><td>Here you can select a Sales Rep as a default </td></tr><tr><td>Set Xero Tenant</td><td>Once you have Authenticated your Debtors, Creditors and Inventory, you will need to set the Xero Tenant which is a once off setup.</td></tr></tbody></table>

Click "save" and then the "Authenticate sign in" button.

Enter the login details for your Xero company into the window that opens.

# Xero data files

When setting up Xero, the following master files need to be imported into Huge ERP

1. Customer list
2. Supplier list
3. Inventory list

The customer and supplier codes are usually the same as the company names in Huge ERP.

The codes in Huge ERP which is the company names are the codes in Xero.

<p class="callout warning">Make sure that the Debtors and Creditors codes are not duplicated in Huge ERP as Xero does not have separated databases for customers and suppliers. They are the contact list but marked as a customer and supplier. Having the the same code in debtors and creditors will cause problems in the sync.</p>

#### Procedure

1. Export customer, supplier and inventory lists from Xero
2. Fix data files for Huge ERP import
3. Import the data into Huge ERP
4. Link API to Xero
5. Verify codes for Customers
6. Verify codes for Suppliers
7. Verify codes for Inventory

---

#### Verify

##### Customers verify

<span style="color: rgb(45, 194, 107);">**<span class="ts0"> Debtors Module&gt; Configuration&gt; Debtors Setup</span>**</span>

Click Search all Debtors

Run this utility to check customers in Xero and Huge ERP.

When the utility finds the same customer, it will write an internal code from Xero into the tables of Huge ERP.

Whether the customer is updated, Huge ERP knows which customer to update in Xero.

[![image.png](https://hugeerp10.co.za/hsofmanual/uploads/images/gallery/2025-01/scaled-1680-/fzRimage.png)](https://hugeerp10.co.za/hsofmanual/uploads/images/gallery/2025-01/fzRimage.png)
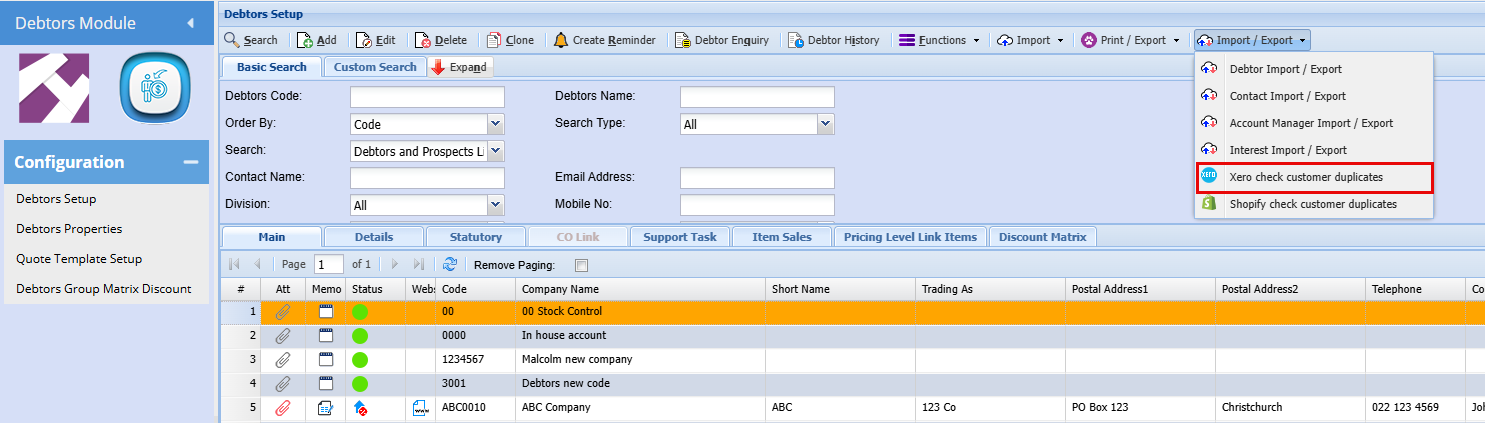
This is a once off setting that needs to be done, once this has been done and you Add a new debtor, it will automatically sync to Xero

---

##### Verify Creditors 

<span style="color: rgb(45, 194, 107);">**<span class="ts0"> Creditors Module&gt; Configuration&gt; Creditors Setup</span>**</span>

Clock search all Creditors

Run this utility to check suppliers in Xero and Huge ERP.

When the utility finds the same supplier, it will write an internal code from Xero into the tables of Huge ERP.

Whether the supplier is updated, Huge ERP knows which Supplier to update in Xero.

[![image.png](https://hugeerp10.co.za/hsofmanual/uploads/images/gallery/2025-01/scaled-1680-/PA1image.png)](https://hugeerp10.co.za/hsofmanual/uploads/images/gallery/2025-01/PA1image.png)
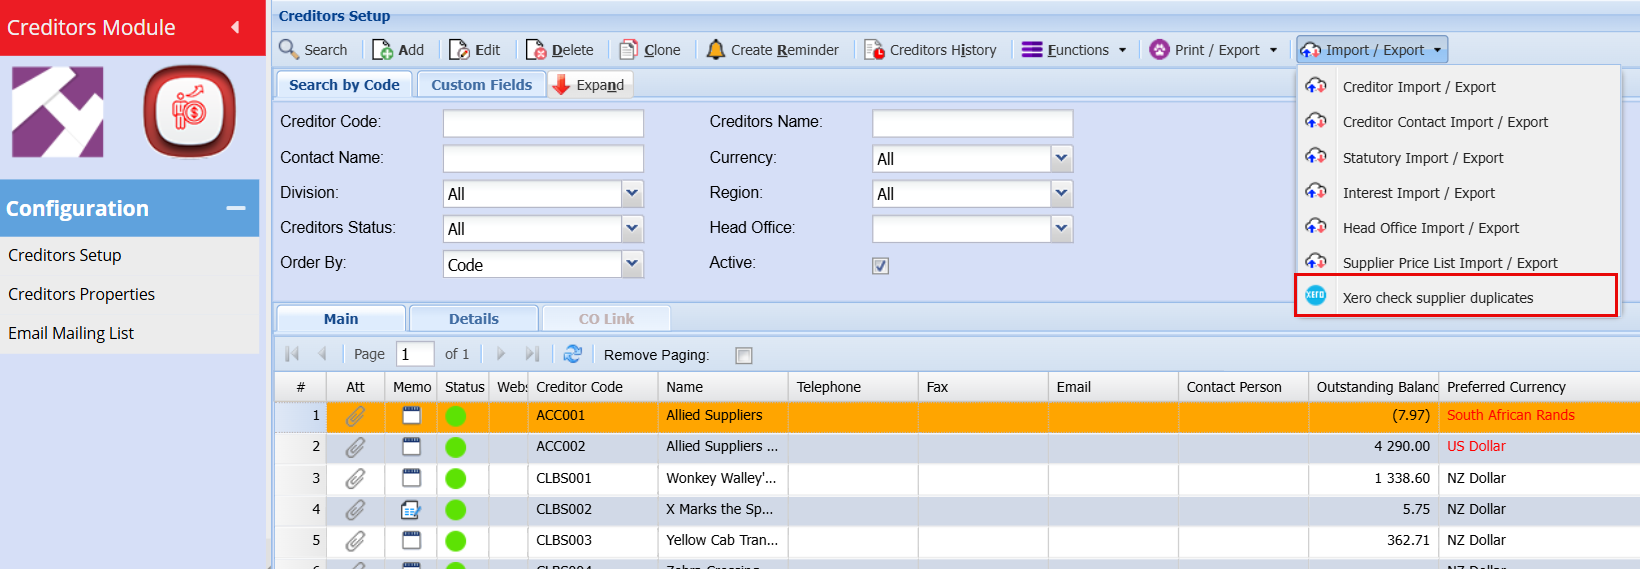
This is a once off setting that needs to be done, once this has been done and you Add a new Creditor, it will automatically sync to Xero

---

##### Inventory verify

<span style="color: rgb(45, 194, 107);">**<span class="ts0"> Inventory Module&gt; Configuration&gt; Inventory Setup</span>**</span>

Click Search all Items

Run this utility to check customers in Xero and Huge ERP.

When the utility finds the same inventory, it will write an internal code from Xero into the tables of Huge ERP.

Whether the inventory is updated, Huge ERP knows which item to update in Xero.

[![image.png](https://hugeerp10.co.za/hsofmanual/uploads/images/gallery/2025-01/scaled-1680-/lEWimage.png)](https://hugeerp10.co.za/hsofmanual/uploads/images/gallery/2025-01/lEWimage.png)

This is a once off setting that needs to be done, once this has been done and you Add a new Inventory item, it will automatically sync to Xero

---

#### Xero Sales and Cost of Sales for an Inventory Item

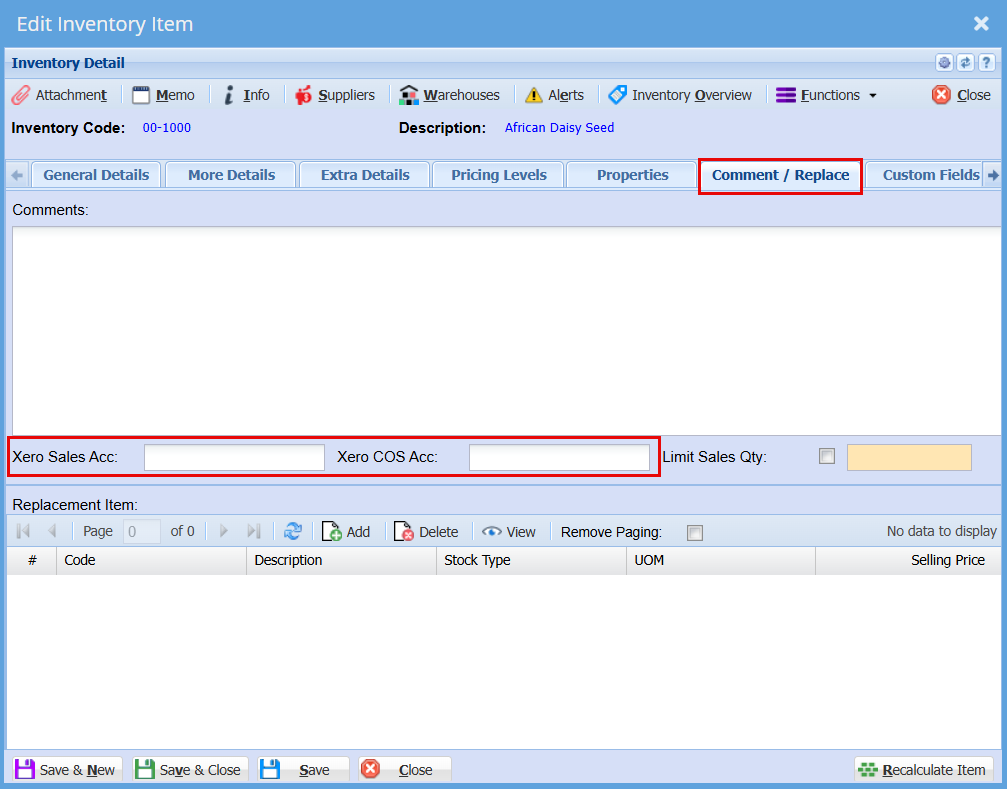
To set up a specific Sales and COS account for an inventory item, double click on the inventory item

Go the Comment/Replace Tab, here you can stipulate a specific account that this item must go to when adding this item to an invoice.

[![image.png](https://hugeerp10.co.za/hsofmanual/uploads/images/gallery/2025-01/scaled-1680-/571image.png)](https://hugeerp10.co.za/hsofmanual/uploads/images/gallery/2025-01/571image.png)
# Troubleshooting

#### Trouble Processing a Transaction

If you are trying to process an invoice, Credit Note, GRV or a Stock Return and you get an error, you can disconnect Huge ERP from Xero.

<span style="color: rgb(45, 194, 107);">**System Configuration &gt; Security &gt;API Setup**</span>

Click Search

Double click on Xero to open

[![image.png](https://hugeerp10.co.za/hsofmanual/uploads/images/gallery/2025-01/scaled-1680-/On7image.png)](https://hugeerp10.co.za/hsofmanual/uploads/images/gallery/2025-01/On7image.png)

Untick the Active Box and click save and close

[![image.png](https://hugeerp10.co.za/hsofmanual/uploads/images/gallery/2025-01/scaled-1680-/PPpimage.png)](https://hugeerp10.co.za/hsofmanual/uploads/images/gallery/2025-01/PPpimage.png)

---

#### Failed to post to Xero

##### Invoice

<span style="color: rgb(45, 194, 107);">**Debtors Module &gt; Activity &gt; Invoice**</span>

<span style="color: rgb(0, 0, 0);">When you have an invoice that Fails to push through to Xero, you can process this manually.</span>

<span style="color: rgb(0, 0, 0);">Open your invoice </span>

Click the "Action" Tab, you will see the button "Push to Xero" by clicking this button the transaction will be pushed to Xero.

[![image.png](https://hugeerp10.co.za/hsofmanual/uploads/images/gallery/2025-01/scaled-1680-/kT0image.png)](https://hugeerp10.co.za/hsofmanual/uploads/images/gallery/2025-01/kT0image.png)

##### Credit Note

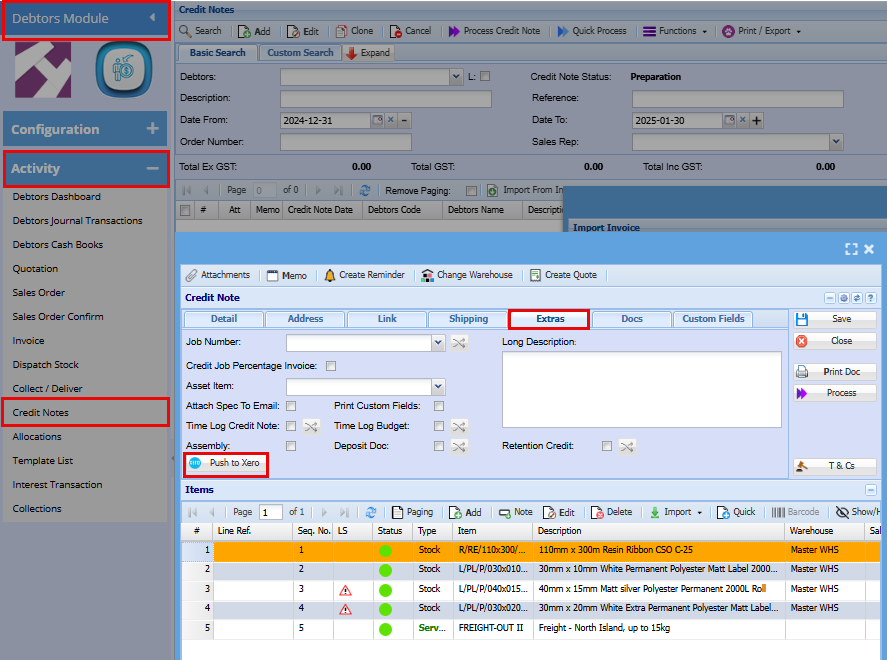
<span style="color: rgb(45, 194, 107);">**Debtors Module &gt; Activity &gt; Credit Note**</span>

<span style="color: rgb(0, 0, 0);">When you have a Credit Note that Fails to push through to Xero, you can process this manually.</span>

<span style="color: rgb(0, 0, 0);">Open your Credit Note</span>

Click the "Action" Tab, you will see the button "Push to Xero" by clicking this button the transaction will be pushed to Xero.

[![image.png](https://hugeerp10.co.za/hsofmanual/uploads/images/gallery/2025-01/scaled-1680-/9ptimage.png)](https://hugeerp10.co.za/hsofmanual/uploads/images/gallery/2025-01/9ptimage.png)
#####  

##### GRV

<span style="color: rgb(45, 194, 107);">**Creditors Module &gt; Activity &gt; Goods Received Note (GRV)**</span>

<span style="color: rgb(0, 0, 0);">When you have a GRV that Fails to push through to Xero, you can process this manually.</span>

<span style="color: rgb(0, 0, 0);">Open your GRV</span>

Click the "Extras" Tab, you will see the button "Push to Xero" by clicking this button the transaction will be pushed to Xero.

[![image.png](https://hugeerp10.co.za/hsofmanual/uploads/images/gallery/2025-01/scaled-1680-/JQyimage.png)](https://hugeerp10.co.za/hsofmanual/uploads/images/gallery/2025-01/JQyimage.png)

#####  

##### Stock Return

<span style="color: rgb(45, 194, 107);">**Creditors Module &gt; Activity &gt; Return to Supplier (RTS)**</span>

<span style="color: rgb(0, 0, 0);">When you have a Stock Return that Fails to push through to Xero, you can process this manually.</span>

<span style="color: rgb(0, 0, 0);">Open your Stock Return</span>

Click the "Action" Tab, you will see the button "Push to Xero" by clicking this button the transaction will be pushed to Xero.

---

#### View Posted and Non posted Transactions

##### Debtors

<span style="color: rgb(45, 194, 107);">**Debtors Module &gt; Analysis &gt;Debtors Document History**</span>

In the column "Posted to Xero" you will see either Yes which means it was posted to Xero or blank which means it has not been posted to Xero

[![image.png](https://hugeerp10.co.za/hsofmanual/uploads/images/gallery/2025-01/scaled-1680-/38Cimage.png)](https://hugeerp10.co.za/hsofmanual/uploads/images/gallery/2025-01/38Cimage.png)
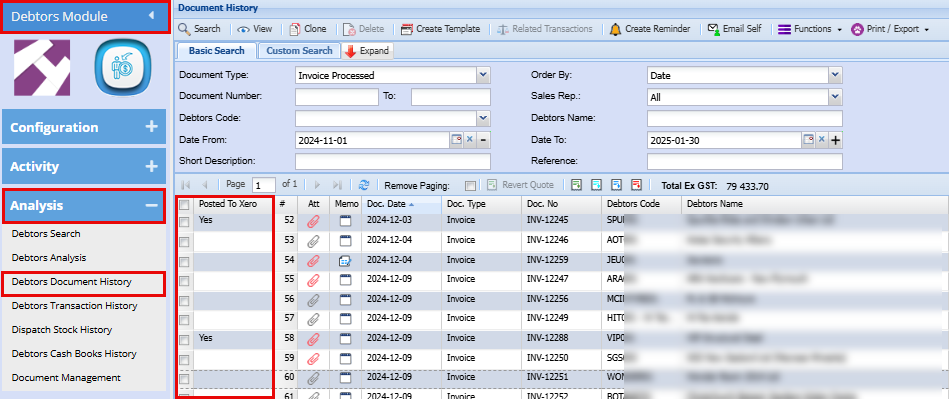
To post to Xero double click to open the transaction

Click the "Action" Tab, you will see the button "Push to Xero" by clicking this button the transaction will be pushed to Xero.

[![image.png](https://hugeerp10.co.za/hsofmanual/uploads/images/gallery/2025-01/scaled-1680-/lDZimage.png)](https://hugeerp10.co.za/hsofmanual/uploads/images/gallery/2025-01/lDZimage.png)

<p class="callout warning">Double check your transaction is not already in Xero as clicking this will duplicate the transaction if it was already posted</p>


##### Creditors

<span style="color: rgb(45, 194, 107);">**Creditors Module &gt; Analysis &gt;Creditors Document History**</span>

In the column "Posted to Xero" you will see either Yes which means it was posted to Xero or blank which means it has not been posted to Xero

[![image.png](https://hugeerp10.co.za/hsofmanual/uploads/images/gallery/2025-01/scaled-1680-/Yneimage.png)](https://hugeerp10.co.za/hsofmanual/uploads/images/gallery/2025-01/Yneimage.png)
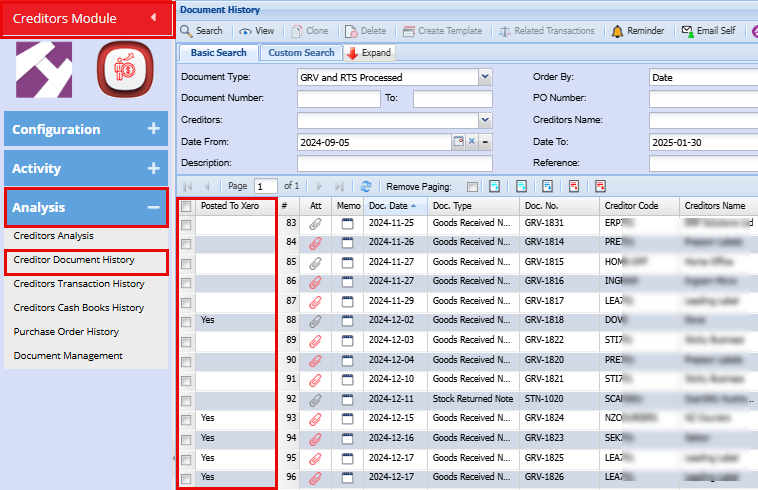
To post to Xero double click to open the transaction

Click the "Extras" Tab, you will see the button "Push to Xero" by clicking this button the transaction will be pushed to Xero.

[![image.png](https://hugeerp10.co.za/hsofmanual/uploads/images/gallery/2025-01/scaled-1680-/JLdimage.png)](https://hugeerp10.co.za/hsofmanual/uploads/images/gallery/2025-01/JLdimage.png)

<p class="callout warning">Double check your transaction is not already in Xero as clicking this will duplicate the transaction if it was already posted</p>