# Wastage

Track wastage items by creating a new wastage item and flagging it a wastage item.

<div class="x_elementToProof" id="bkmrk-wastage-item-is-acti">Wastage item is activated on an item or custom item</div><div class="x_elementToProof" id="bkmrk-">  
</div><div class="x_elementToProof" id="bkmrk-setup-the-wastage-it">Setup the Wastage Item in Inventory Setup</div><div class="x_elementToProof" id="bkmrk-tick-to-activate-was">Tick the Wastage item box to activate Wastage Item under the Extra Details Tab</div><div class="x_elementToProof" id="bkmrk-tick-the-boxes-of-th">Tick the boxes of the perimeters for your wastage item (Quantity, Length, Weight, Width, Height, Ratio)</div><div class="x_elementToProof" id="bkmrk-button-to-open-up-ne">Press the Wastage Item Button to open up new menu to show all linked wastage items</div><div class="x_elementToProof" id="bkmrk--1"></div>[![image.png](https://hugeerp10.co.za/hsofmanual/uploads/images/gallery/2025-01/scaled-1680-/iqfimage.png)](https://hugeerp10.co.za/hsofmanual/uploads/images/gallery/2025-01/iqfimage.png)

<div class="x_elementToProof" id="bkmrk-when-this-item-is-ad">When this item is added to a job, which is flagged as Wastage item.</div><div class="x_elementToProof" id="bkmrk-then-the-user-would-">Then the user would need to select which wastage item that is been used.</div><div class="x_elementToProof" id="bkmrk-a-formular-is-used-t">A formular is used to work out what quantity to use to log the item quantity.</div><div class="x_elementToProof" id="bkmrk-item-will-then-be-ma">Item will then be marked as status - Out, once used</div>---

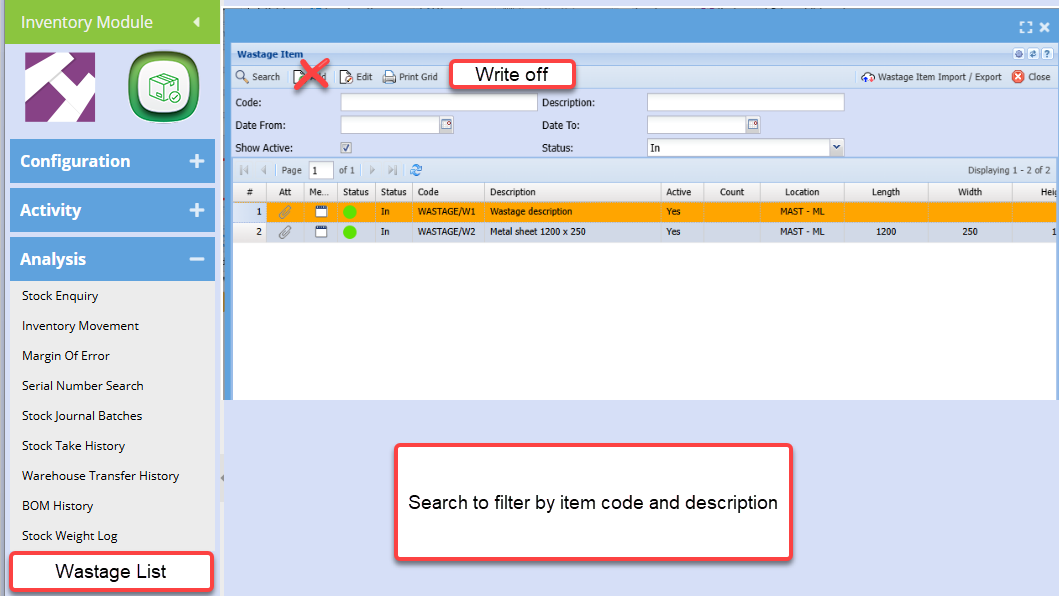
##### **Wastage List**

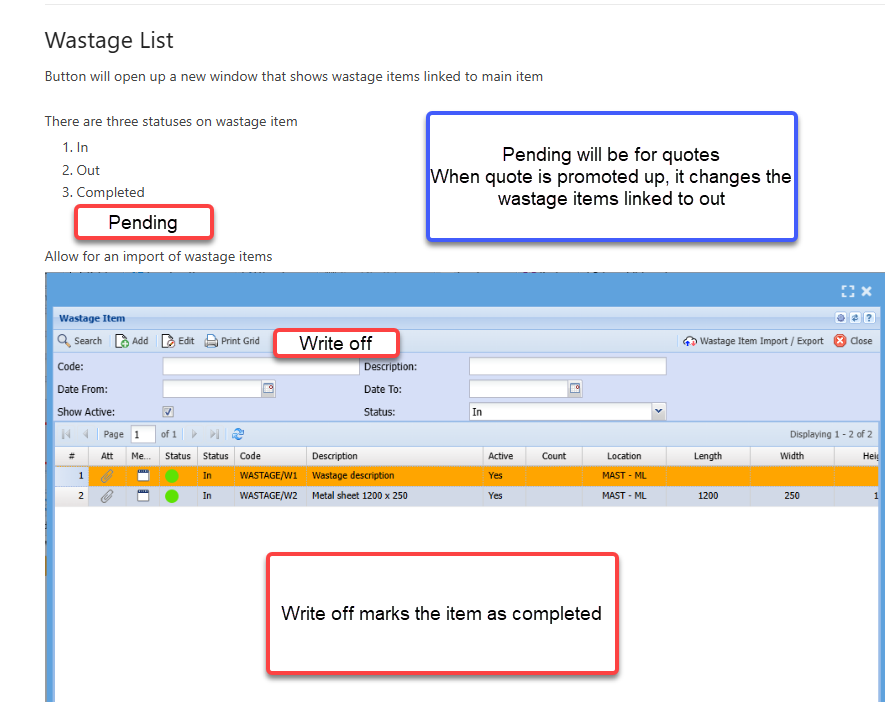
<div class="x_elementToProof" id="bkmrk-button-will-open-up-">Button will open up a new window that shows wastage items linked to main item</div><div class="x_elementToProof" id="bkmrk--5">  
</div><div class="x_elementToProof" id="bkmrk-there-are-three-stat">There are three statuses on wastage item</div>1. <div>In</div>
2. <div class="x_elementToProof">Out</div>
3. <div class="x_elementToProof">Completed</div>

<div class="x_elementToProof" id="bkmrk--6">  
</div><div class="x_elementToProof" id="bkmrk-allow-for-an-import-">Allow for an import of wastage items</div><div class="x_elementToProof" id="bkmrk--7"></div>[![image.png](https://hugeerp10.co.za/hsofmanual/uploads/images/gallery/2025-01/scaled-1680-/s5Vimage.png)](https://hugeerp10.co.za/hsofmanual/uploads/images/gallery/2025-01/s5Vimage.png)

---

<div class="x_elementToProof" id="bkmrk--13"></div>**Manually Adjust Quantity**

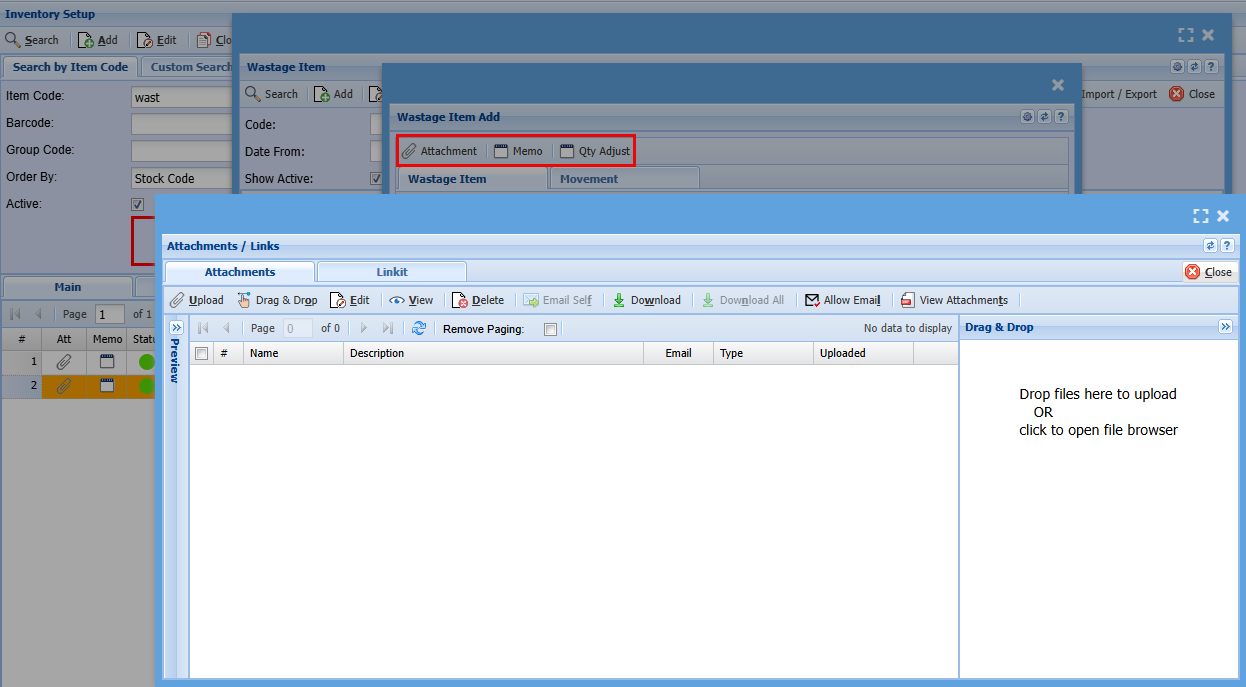
You can manually adjust the quantity of a specific item by clicking Qty Adjustment.

Select whether you are wanting to increase or decrease the quantity, add a quantity you are adjusting and click apply.

[![image.png](https://hugeerp10.co.za/hsofmanual/uploads/images/gallery/2025-01/scaled-1680-/vjkimage.png)](https://hugeerp10.co.za/hsofmanual/uploads/images/gallery/2025-01/vjkimage.png)

---


#####  

#### Bulk Wastage Items Import

<div class="x_elementToProof" id="bkmrk-allows-to-import-was">Allows to import Wastage items and link to items</div><div class="x_elementToProof" id="bkmrk--35"></div>[![image.png](https://hugeerp10.co.za/hsofmanual/uploads/images/gallery/2025-01/scaled-1680-/WwEimage.png)](https://hugeerp10.co.za/hsofmanual/uploads/images/gallery/2025-01/WwEimage.png)

Click Export to get the template for your import, transfer your data to this excel template.

[![image.png](https://hugeerp10.co.za/hsofmanual/uploads/images/gallery/2025-01/scaled-1680-/BUPimage.png)](https://hugeerp10.co.za/hsofmanual/uploads/images/gallery/2025-01/BUPimage.png)

When your data file (Excel Spreadsheet) is ready go back to the Wastage Import/Export Tab, select your File, Click Verify and then Import.

[![image.png](https://hugeerp10.co.za/hsofmanual/uploads/images/gallery/2025-01/scaled-1680-/n0Fimage.png)](https://hugeerp10.co.za/hsofmanual/uploads/images/gallery/2025-01/n0Fimage.png)

---

##### **Wastage Stock Level Adjustment and Adding New Wastage Item**

<span style="color: rgb(45, 194, 107);">**<span class="ts2">Inventory Module &gt; Activity &gt; Stock Level Adjustment</span>**</span>

Click Add

Add a Short Description for what you are adding e.g. Stock, off cuts, or be specific to the item being adjusted.

Then click Save

[![image.png](https://hugeerp.co.nz/manual/uploads/images/gallery/2025-02/scaled-1680-/image.png)](https://hugeerp.co.nz/manual/uploads/images/gallery/2025-02/image.png)

Once you click Save the Add, Edit and Delete buttons will become available.

[![image.png](https://hugeerp.co.nz/manual/uploads/images/gallery/2025-02/scaled-1680-/I22image.png)](https://hugeerp.co.nz/manual/uploads/images/gallery/2025-02/I22image.png)

1\. Click Add to add a new wastage item.

2\. Search for your wastage code in the drop-down menu.

3\. Add the total quantity of stock you are increasing by

4\. Click the Wastage Button

[![image.png](https://hugeerp10.co.za/hsofmanual/uploads/images/gallery/2025-02/scaled-1680-/jMUimage.png)](https://hugeerp10.co.za/hsofmanual/uploads/images/gallery/2025-02/jMUimage.png)

This window shows you all your existing wastage code that you currently have along with their quantities, but we are adding a new wastage item.

[![image.png](https://hugeerp10.co.za/hsofmanual/uploads/images/gallery/2025-02/scaled-1680-/m3nimage.png)](https://hugeerp10.co.za/hsofmanual/uploads/images/gallery/2025-02/m3nimage.png)

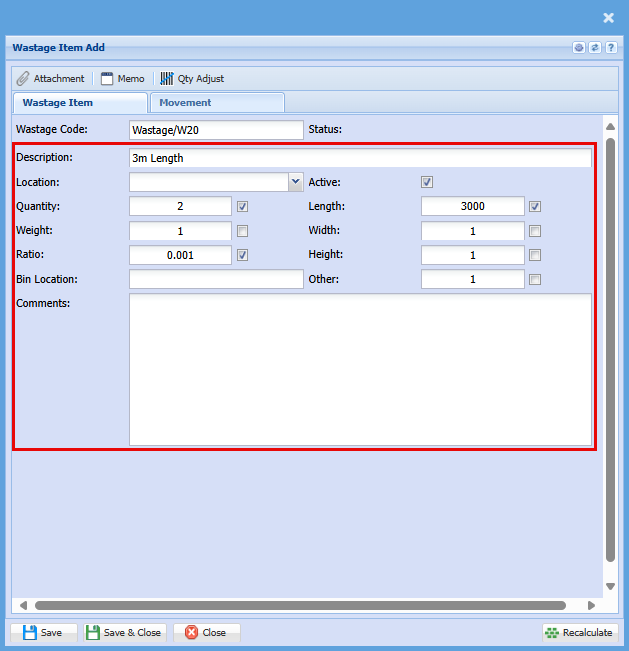
Click the Add button, a new window will open Called Wastage Item Add.

The wastage code will auto populate with the next code in sequence.

In this section you will add perimeters for your wastage item such as Quantity, Length, Weight, Width, Height, Ratio.

<p class="callout warning">Tick the box next to each of the perimeters you want to apply to this wastage item, or it will not be taken into account when you click save</p>

<p class="callout warning">Be specific in your Description as this will be what tells the next person what this item is.</p>

Once you happy with what you have added you can click "Save &amp; Close"

[![image.png](https://hugeerp.co.nz/manual/uploads/images/gallery/2025-02/scaled-1680-/2fZimage.png)](https://hugeerp.co.nz/manual/uploads/images/gallery/2025-02/2fZimage.png)

<table border="1" id="bkmrk-wastage-code-this-co" style="border-collapse: collapse; width: 100%;"><colgroup><col style="width: 13.2804%;"></col><col style="width: 86.6137%;"></col></colgroup><tbody><tr><td>Wastage Code</td><td>This code is Automatically added with the next numerical code.</td></tr><tr><td>Description</td><td>Make sure to add the detail needed to identify this item at a glance, add colour, size, product name etc.</td></tr><tr><td>Location</td><td>If you have locations set up you can add where one would find this item</td></tr><tr><td>Quantity</td><td>Add how many of this item you are adding</td></tr><tr><td>Weight</td><td>Add the weight if needed </td></tr><tr><td>Ratio</td><td>This feature is used to track and sell various lengths of your waste items. For instance, when managing stock and using different lengths of the stock item to achieve the total length needed for your project, knowing the length of each piece is crucial. You will input the length in millimeters, then tick the ratio, length, and quantity boxes (as shown in the above screenshot). This will display the length in meters on your invoice.</td></tr><tr><td>Bin Location </td><td>The bin location is a certain box that the wastage item may be in within the location it would be found.</td></tr><tr><td>Status</td><td>  
</td></tr><tr><td>Active</td><td>This tick will automatically be ticked, however if you would want this item to be inactive, untick this box</td></tr><tr><td>Length</td><td>Add the length of this item if needed </td></tr><tr><td>Width</td><td>Add the width of this item if needed </td></tr><tr><td>Hight </td><td>Add the height of this item if needed </td></tr><tr><td>Comments</td><td>This is a text box so any extra notes can be added here.</td></tr></tbody></table>

Once you have clicked Save &amp; Close you will see your item added to the previous screen with its quantity.

[![image.png](https://hugeerp.co.nz/manual/uploads/images/gallery/2025-02/scaled-1680-/myYimage.png)](https://hugeerp.co.nz/manual/uploads/images/gallery/2025-02/myYimage.png)

Click Close, you will then see the Add Stock Quantity Lines window, click Save &amp; Close

[![image.png](https://hugeerp.co.nz/manual/uploads/images/gallery/2025-02/scaled-1680-/2R2image.png)](https://hugeerp.co.nz/manual/uploads/images/gallery/2025-02/2R2image.png)

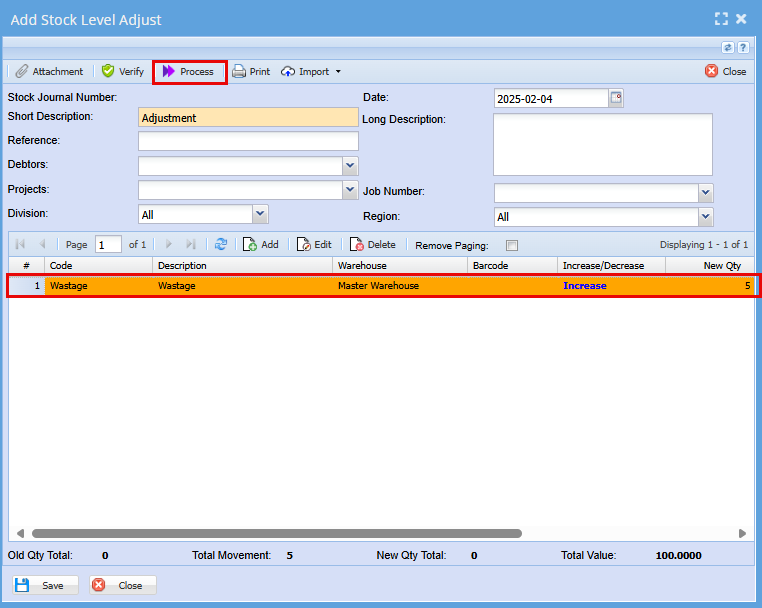
Once you have clicked save and Close, you will go back to the Add Stock Level Adjustment window, you will see the stock item you have added.

From here you can choose to add another stock item by repeating the above steps, or you can click the process button at the top of the screen to complete this process &gt;Refresh Status &gt; Close.

[![image.png](https://hugeerp.co.nz/manual/uploads/images/gallery/2025-02/scaled-1680-/OQaimage.png)](https://hugeerp.co.nz/manual/uploads/images/gallery/2025-02/OQaimage.png)

Now that you have processed your new Wastage item you can go see it In Inventory Setup

<span style="color: rgb(45, 194, 107);">**<span class="ts2">Inventory &gt;Configuration&gt; Inventory Setup</span>**</span>

Add your Wastage code to the Item Code Box and click "Search"

Double click on your Wastage Item, the Edit Inventory Item window will open.

Click on the Extra Details Tab

Click the "Wastage Item" button.

[![image.png](https://hugeerp.co.nz/manual/uploads/images/gallery/2025-02/scaled-1680-/7kZimage.png)](https://hugeerp.co.nz/manual/uploads/images/gallery/2025-02/7kZimage.png)

The Below window will open and here you will be able to see your new wastage item along with the quantity added.

[![image.png](https://hugeerp.co.nz/manual/uploads/images/gallery/2025-02/scaled-1680-/mWDimage.png)](https://hugeerp.co.nz/manual/uploads/images/gallery/2025-02/mWDimage.png)

---


##### **Wastage Stock Level Adjustment to an Existing Wastage Item**

Adding stock to an existing wastage item is a twostep process. First step is to add stock, and the second will be to allocate the stock.

**Step 1**

1\. Click Add to add a new wastage item.

2\. Search for your wastage code in the drop-down menu.

3\. Add a quantity to increase by.

<p class="callout info">This should be the total quantity, no matter the description as you will allocate the quantities to the specific items in the next step.</p>

At this point click the "Save and Close"

[![image.png](https://hugeerp.co.nz/manual/uploads/images/gallery/2025-02/scaled-1680-/AJLimage.png)](https://hugeerp.co.nz/manual/uploads/images/gallery/2025-02/AJLimage.png)

Click the "Process" button at the top of the screen to complete this process &gt;Refresh Status &gt; Close.

[![image.png](https://hugeerp.co.nz/manual/uploads/images/gallery/2025-02/scaled-1680-/xGFimage.png)](https://hugeerp.co.nz/manual/uploads/images/gallery/2025-02/xGFimage.png)

**Step 2**

Now that you have added stock to an existing wastage item you to allocate the stock to a specific wastage item

<span style="color: rgb(45, 194, 107);">**<span class="ts2">Inventory &gt;Configuration&gt; Inventory Setup</span>**</span>

1\. Add your Wastage code to the Item Code Box and click "Search"

2\. Double click on your Wastage Item, the Edit Inventory Item window will open.

3\. lick on the "Extra Details" Tab

4\. Click the "Wastage Item" button.

[![image.png](https://hugeerp.co.nz/manual/uploads/images/gallery/2025-02/scaled-1680-/7kZimage.png)](https://hugeerp.co.nz/manual/uploads/images/gallery/2025-02/7kZimage.png)
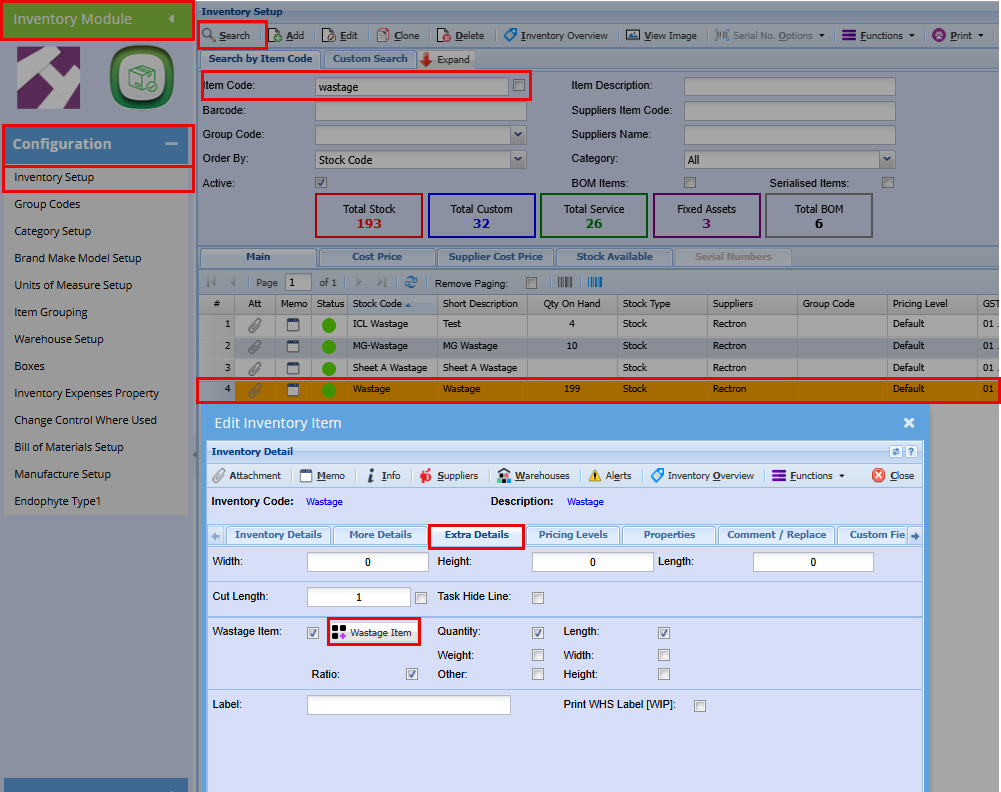
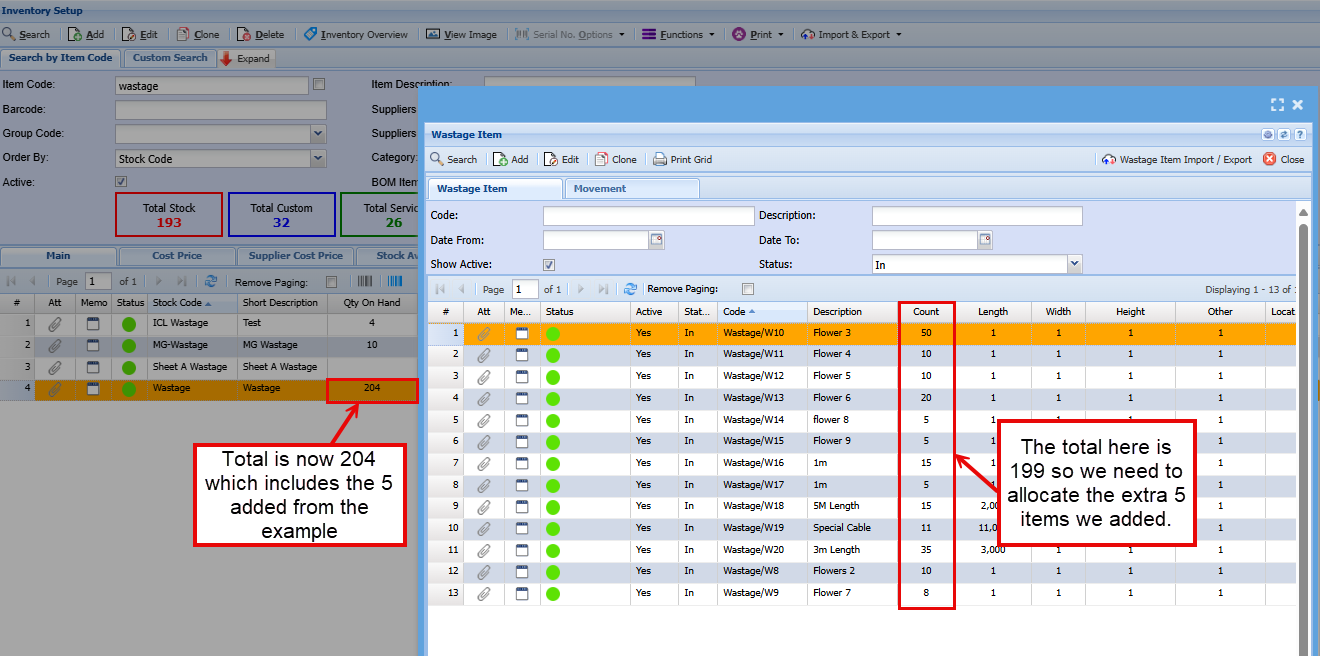
When click the wastage button the Wastage item window will open.

<p class="callout info">You will see that the quantity added will increase the Quantity on Hand but will be out by the quantity added when you see the total of the current allocated quantities. </p>

[![image.png](https://hugeerp.co.nz/manual/uploads/images/gallery/2025-02/scaled-1680-/zIUimage.png)](https://hugeerp.co.nz/manual/uploads/images/gallery/2025-02/zIUimage.png)

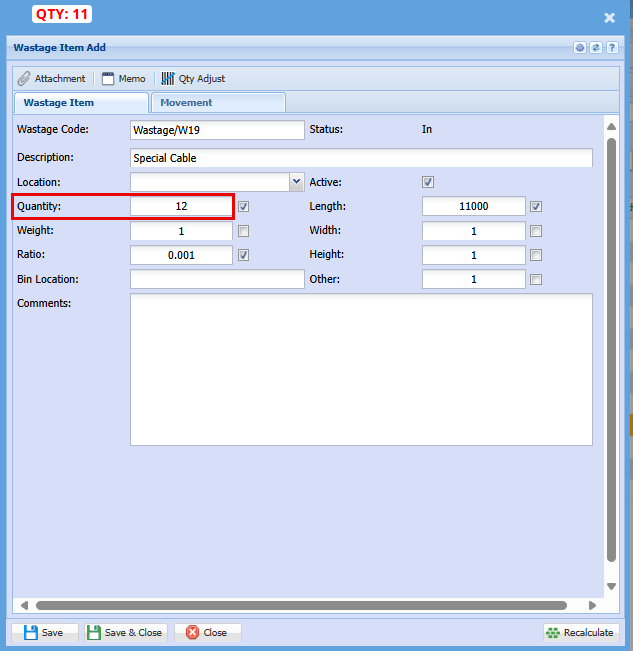
You now need to allocate the quantity that you processed in your stock level adjustment.

e.g.: if your Stock Level Adjustment quantity was 5:

2x is for Flowers 3  
2x is for 1m and   
1x is for Special Cable.

Double click on each of those items, make the adjustments and click "Save &amp; Close"

Your Quantity on hand and your count total should be the same.

[![image.png](https://hugeerp.co.nz/manual/uploads/images/gallery/2025-02/scaled-1680-/G5iimage.png)](https://hugeerp.co.nz/manual/uploads/images/gallery/2025-02/G5iimage.png)
<div class="x_elementToProof" id="bkmrk--33"></div>---

##### **Photos and memo notes**

Take photos of the wastage and make notes on wastage items

[![image.png](https://hugeerp10.co.za/hsofmanual/uploads/images/gallery/2025-01/scaled-1680-/1nyimage.png)](https://hugeerp10.co.za/hsofmanual/uploads/images/gallery/2025-01/1nyimage.png)
---

##### **Managing Wastage on Documents**

Wastage is managed on the following documents

1. Invoice out
2. Credit notes in
3. Manage job Scope Creep and Cost to Company - wastage out
4. Item setup - manage new wastage items marked as in

##### Invoice

Invoice lines activated for Wastage out

Add an invoice as normal, when you want to add a wastage item, select your wastage item from the Stock Item drop down, then click on the Wastage button as shown below.

Your Quantity will always default to 1

[![image.png](https://hugeerp10.co.za/hsofmanual/uploads/images/gallery/2024-09/scaled-1680-/FMoimage.png)](https://hugeerp10.co.za/hsofmanual/uploads/images/gallery/2024-09/FMoimage.png)
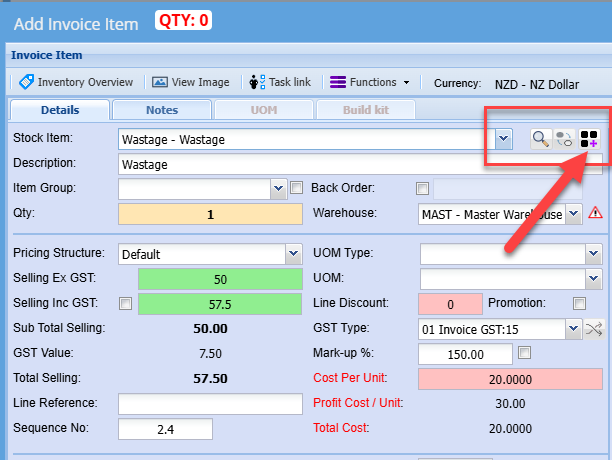
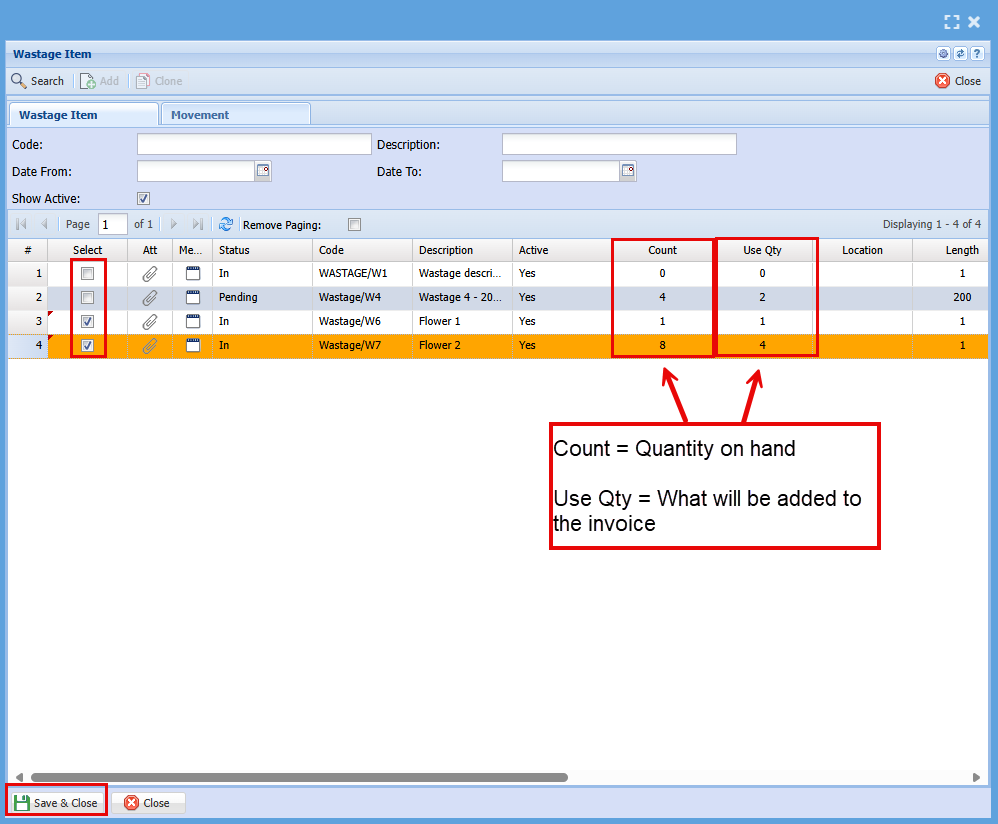
Select the item/Items you want to add to the invoice

You can manually change the quantity in the "Use Qty" column by clicking in the block and changing the quantity you want to add to the invoice.

Click Save &amp; Close

<p class="callout warning">Check your quantity ties up to the quantity of items you are adding to your invoice</p>

[![image.png](https://hugeerp10.co.za/hsofmanual/uploads/images/gallery/2025-01/scaled-1680-/L59image.png)](https://hugeerp10.co.za/hsofmanual/uploads/images/gallery/2025-01/L59image.png)

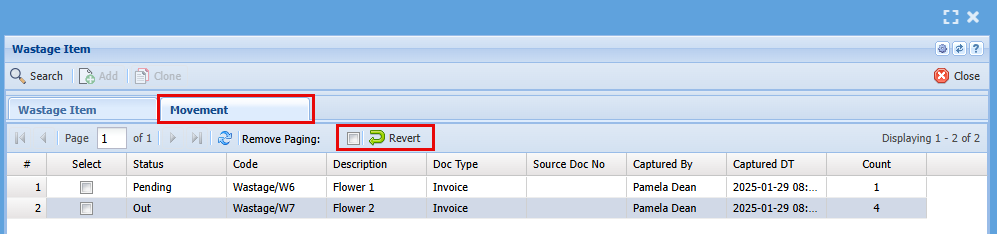
If you would like to see what was added to this invoice, click on the Movement tab

Here you can also remove any items by ticking the box of the specific item and then click Revert.

[![image.png](https://hugeerp10.co.za/hsofmanual/uploads/images/gallery/2025-01/scaled-1680-/7h2image.png)](https://hugeerp10.co.za/hsofmanual/uploads/images/gallery/2025-01/7h2image.png)
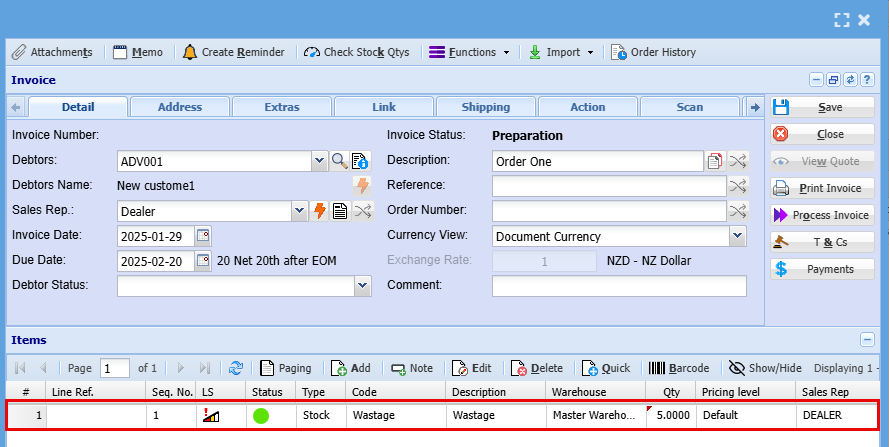
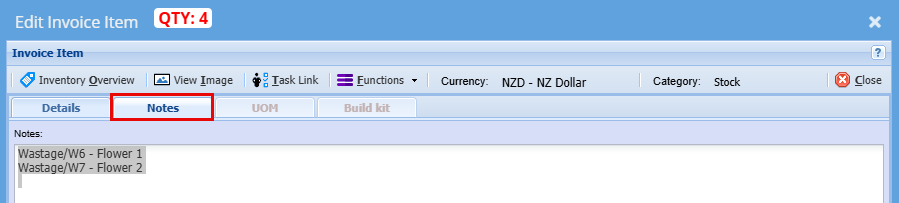
On your invoice you will see an item of wastage and a quantity however if you open the wastage item and go into the Notes tab, a description on the wastage item will be copied there.

[![image.png](https://hugeerp10.co.za/hsofmanual/uploads/images/gallery/2025-01/scaled-1680-/IzQimage.png)](https://hugeerp10.co.za/hsofmanual/uploads/images/gallery/2025-01/IzQimage.png)
[![image.png](https://hugeerp10.co.za/hsofmanual/uploads/images/gallery/2025-01/scaled-1680-/oNvimage.png)](https://hugeerp10.co.za/hsofmanual/uploads/images/gallery/2025-01/oNvimage.png)
---

##### Credit Notes

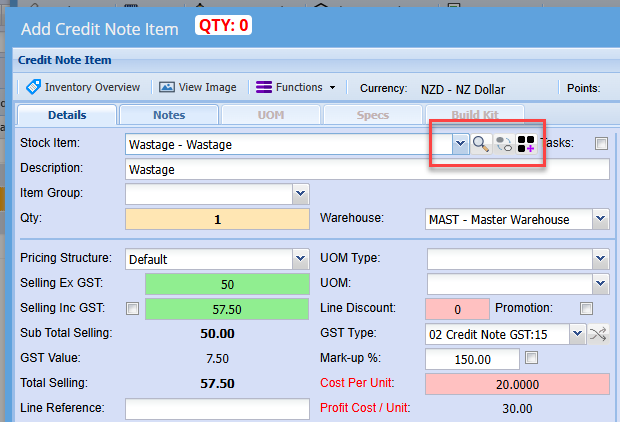
Credit note lines activated for Wastage in

[![image.png](https://hugeerp10.co.za/hsofmanual/uploads/images/gallery/2024-09/scaled-1680-/xNOimage.png)](https://hugeerp10.co.za/hsofmanual/uploads/images/gallery/2024-09/xNOimage.png)
##### Job lines SC and CTC

Manage wastage usage on jobs

[![image.png](https://hugeerp10.co.za/hsofmanual/uploads/images/gallery/2024-09/scaled-1680-/kTNimage.png)](https://hugeerp10.co.za/hsofmanual/uploads/images/gallery/2024-09/kTNimage.png)
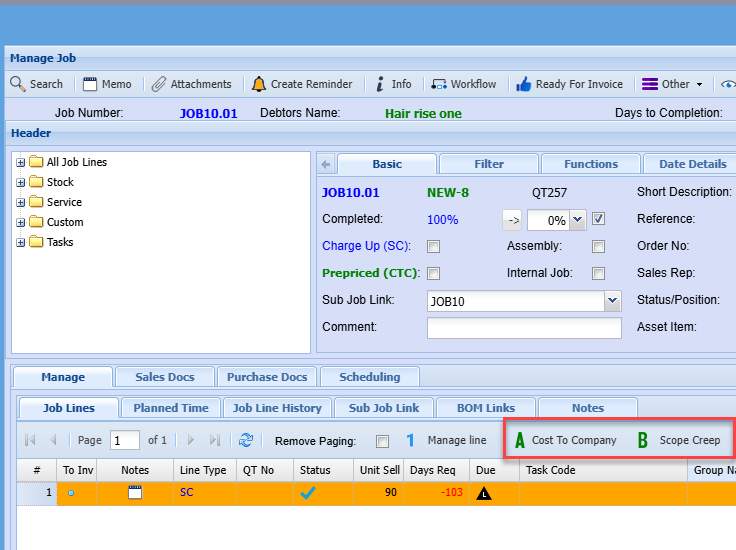
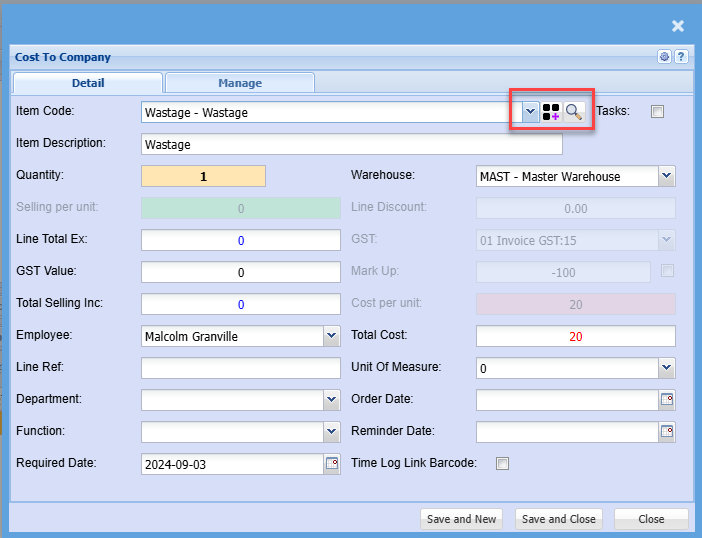
Adding a wastage line to a job

[![image.png](https://hugeerp10.co.za/hsofmanual/uploads/images/gallery/2024-09/scaled-1680-/NL4image.png)](https://hugeerp10.co.za/hsofmanual/uploads/images/gallery/2024-09/NL4image.png)
---

#### Selecting Wastage onto a document

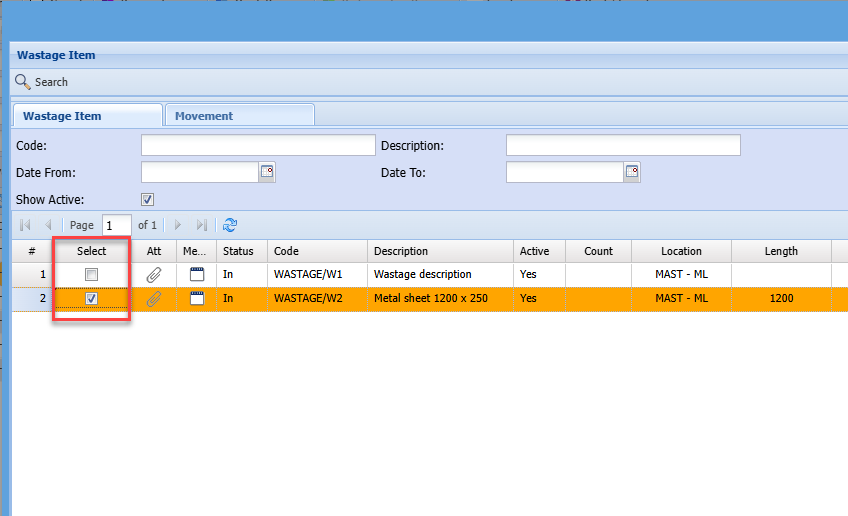
When selecting wastage onto a document, wastage looks at all wastage marked as In.

Select the wastage to be used.

On save and close, the wastage will automatically be assigned to the document or job.

The wastage item will be marked as Out and removed from list view.

[![image.png](https://hugeerp10.co.za/hsofmanual/uploads/images/gallery/2024-09/scaled-1680-/5e0image.png)](https://hugeerp10.co.za/hsofmanual/uploads/images/gallery/2024-09/5e0image.png)
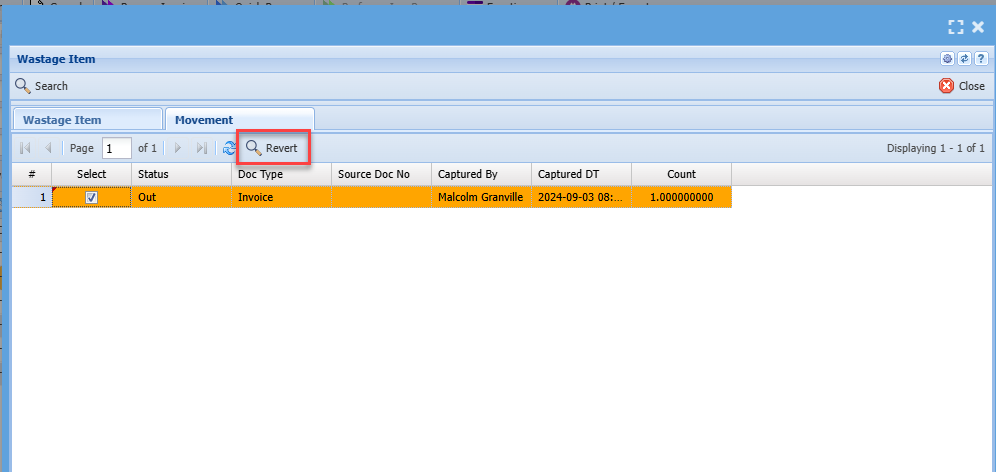
If wrong wastage item selected, then go to the movement tab to revert wastage back to In status.

Highlight the items to move back to In and click on Revert

[![image.png](https://hugeerp10.co.za/hsofmanual/uploads/images/gallery/2024-09/scaled-1680-/mrnimage.png)](https://hugeerp10.co.za/hsofmanual/uploads/images/gallery/2024-09/mrnimage.png)
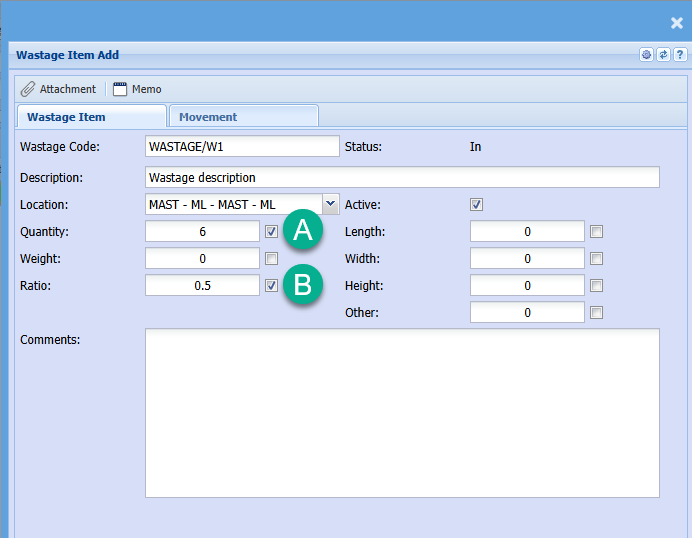
Quantity of wastage will be updated to quantity on item line based on tick calculations

In the example below, Quantity and Ratio is ticked, this means that A x B will make up the quantity to line item.

Quantity to be updated would be 3 because A- 6 x B- 0.5 = 3

This allows for square meters or linear meters etc to be tracked

[![image.png](https://hugeerp10.co.za/hsofmanual/uploads/images/gallery/2024-09/scaled-1680-/9Glimage.png)](https://hugeerp10.co.za/hsofmanual/uploads/images/gallery/2024-09/9Glimage.png)
---

#### **Future development**

Wastage on quotes to set status to Pending

[![image.png](https://hugeerp10.co.za/hsofmanual/uploads/images/gallery/2024-09/scaled-1680-/AJkimage.png)](https://hugeerp10.co.za/hsofmanual/uploads/images/gallery/2024-09/AJkimage.png)
Search list for all wastage items

[![image.png](https://hugeerp10.co.za/hsofmanual/uploads/images/gallery/2024-09/scaled-1680-/Z3uimage.png)](https://hugeerp10.co.za/hsofmanual/uploads/images/gallery/2024-09/Z3uimage.png)