# Bill Of Material Setup Add

<span style="color: rgb(45, 194, 107);">**<span class="ts23">Go to Inventory Module&gt; Configuration&gt; Bill of Materials Setup</span>**</span>

[![image.png](https://hugeerp10.co.za/hsofmanual/uploads/images/gallery/2024-08/scaled-1680-/kogimage.png)](https://hugeerp10.co.za/hsofmanual/uploads/images/gallery/2024-08/kogimage.png)

<span lang="EN-US" style="mso-ansi-language: EN-US;">Click Add</span>

<span lang="EN-US" style="mso-ansi-language: EN-US;">Enter a BOM code</span>

<span lang="EN-US" style="mso-ansi-language: EN-US;">Enter a Description</span>

<span lang="EN-US" style="mso-ansi-language: EN-US;">Select the BOM Resultant Item -<span style="mso-spacerun: yes;"> </span>this is the Stock item created in the previous step</span>

<span lang="EN-US" style="mso-ansi-language: EN-US;">Check the Active box is ticked</span>

<span lang="EN-US" style="mso-ansi-language: EN-US;">Click the Save button</span>

[![image.png](https://hugeerp10.co.za/hsofmanual/uploads/images/gallery/2024-08/scaled-1680-/b0Bimage.png)](https://hugeerp10.co.za/hsofmanual/uploads/images/gallery/2024-08/b0Bimage.png)

<span lang="EN-US" style="mso-ansi-language: EN-US;">You will notice the Add button becomes active</span>

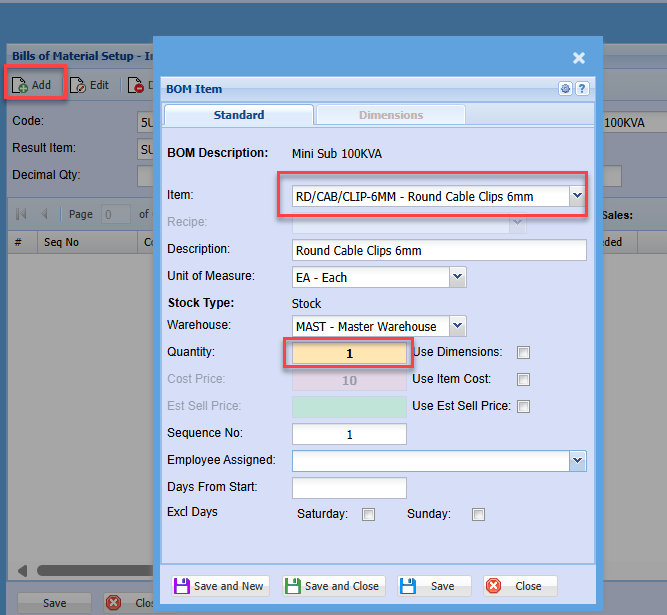
<span lang="EN-US" style="mso-ansi-language: EN-US;">Click Add to begin adding the components of the Bill of materials<span style="mso-spacerun: yes;"> </span>(BOM)</span>

<span lang="EN-US" style="mso-ansi-language: EN-US;">Select the Component item</span>

<p class="callout info"><span lang="EN-US" style="mso-ansi-language: EN-US;">Enter the required quantity, this is the quantity of the component required in the manufacture of<span style="mso-spacerun: yes;"> </span></span><span lang="EN-US" style="mso-ansi-language: EN-US;">one of the resultant item</span></p>

<span lang="EN-US" style="mso-ansi-language: EN-US;">Click Save and New to add the next component and quantity</span>

<span lang="EN-US" style="mso-ansi-language: EN-US;">Repeat this step until all components are added</span>

[![image.png](https://hugeerp10.co.za/hsofmanual/uploads/images/gallery/2024-08/scaled-1680-/2vbimage.png)](https://hugeerp10.co.za/hsofmanual/uploads/images/gallery/2024-08/2vbimage.png)

<span lang="EN-US" style="mso-ansi-language: EN-US;">Once you have added all the components, click Save and Close.</span>

<span lang="EN-US" style="mso-ansi-language: EN-US;">You will notice the components will be listed in the grid.</span>

[![image.png](https://hugeerp10.co.za/hsofmanual/uploads/images/gallery/2024-08/scaled-1680-/UD3image.png)](https://hugeerp10.co.za/hsofmanual/uploads/images/gallery/2024-08/UD3image.png)

<span lang="EN-US" style="mso-ansi-language: EN-US;">Click and Close</span>

---

#### <span lang="EN-US" style="mso-ansi-language: EN-US;">Setting up the Build item</span>

<span lang="EN-US" style="mso-ansi-language: EN-US;">The build item is always a Custom item</span>

<span style="color: rgb(45, 194, 107);">**<span lang="EN-US" style="mso-ansi-language: EN-US;">Go to Inventory Module&gt; Configuration&gt; Inventory Setup</span>**</span>

<span lang="EN-US" style="mso-ansi-language: EN-US;">Enter a Code and description</span>

<span lang="EN-US" style="mso-ansi-language: EN-US;">Select the Category as Custom</span>

[![image.png](https://hugeerp10.co.za/hsofmanual/uploads/images/gallery/2024-08/scaled-1680-/Qjfimage.png)](https://hugeerp10.co.za/hsofmanual/uploads/images/gallery/2024-08/Qjfimage.png)

<span lang="EN-US" style="mso-ansi-language: EN-US;">Click Save</span>

<span lang="EN-US" style="mso-ansi-language: EN-US;">You will be prompted to enter the cost and selling prices</span>

<span lang="EN-US" style="mso-ansi-language: EN-US;">Enter the Sell Price</span>

<span lang="EN-US" style="mso-ansi-language: EN-US;">Once again, the cost price will be the total of the BOM component's costs</span>

<span lang="EN-US" style="mso-ansi-language: EN-US;">Click Continue</span>

<span lang="EN-US" style="mso-ansi-language: EN-US;"> </span>

##### <span lang="EN-US" style="mso-ansi-language: EN-US;">Click the Properties Tab</span>

<span lang="EN-US" style="mso-ansi-language: EN-US;">Tick the Build Kit Box – this identifies this item as a build item</span>

<span lang="EN-US" style="mso-ansi-language: EN-US;">Select the BOM resultant Item</span>

<span lang="EN-US" style="mso-ansi-language: EN-US;">Select the BOM Recipe</span>

<span lang="EN-US" style="mso-ansi-language: EN-US;">Tick Update Qty Box – This allows you to edit the quantity of the builds when adding on sales documents or jobs.</span>

<span lang="EN-US" style="mso-ansi-language: EN-US;"> </span>

##### <span lang="EN-US" style="mso-ansi-language: EN-US;">Use Kit Parent Group</span>

<span lang="EN-US" style="mso-ansi-language: EN-US;">This will dictate the posting to the respective sales and cost of sales GL accounts using the group code selected on the parent which is the Stock item created above.</span>

<p class="callout info"><span lang="EN-US" style="mso-ansi-language: EN-US;">Each component of the recipe may have its own group code setup. If this box is not ticked, the postings will be based on the various groups on the individual components of the build (recipe).</span></p>

[![image.png](https://hugeerp10.co.za/hsofmanual/uploads/images/gallery/2024-08/scaled-1680-/VSHimage.png)](https://hugeerp10.co.za/hsofmanual/uploads/images/gallery/2024-08/VSHimage.png)

<span lang="EN-US" style="mso-ansi-language: EN-US;">Click Save and close</span>

<span lang="EN-US" style="mso-ansi-language: EN-US;">This concludes the Build Kit Setup</span>

<span lang="EN-US" style="mso-ansi-language: EN-US;">The Build can now be used on Sales documents and Jobs</span>

<span lang="EN-US" style="mso-ansi-language: EN-US;"> </span>

  
Old <span class="ts10">Video Training Manual 2019 - </span>[Click Here](https://vimeo.com/375561179)