ACR Configuration
- Check List Template Setup Menu
- Check Lists Groups Menu
- Check List Questions Menu
- Interactions Types Menu
- Website Support Groups Menu
- Website Support Forms Menu
- Support Log Ticket Setup Menu
- Contract Maintenance Menu
- Time Tracker Config Menu
- Check Sheet Template Setup Menu
- Expense Setup Menu
- Sales Leads Setup
- Email Template Letters
Check List Template Setup Menu
Check Sheet Template Setup Search
This application allows for the creation of Check Sheets which are used in the Job Costing Module.
Check Sheets are used to ensure that all the predefined steps in a standard job are completed.
Webatar > Configuration > Checklist Template
Video manual 2020 - Click Here
Video manual 2016 - Click Here
.png)
The following tasks can be actioned using this window
| Add | To add new Check Sheets input the new code and description. |
| Edit | Enter the Code or description to change |
| Delete | Enter the Code you wish to delete |
| Clone | You are able to copy the characteristics of an existing Check Sheet Template to a new Check Sheet Template |
| Print/Export | You are able to print the Check Sheet this can either be emailed or physically printed |
| Active | If this check box is ticked then the search will return all Active Check Sheets. If not ticked then the search will return all inactive Check Sheets. |
Add Check Sheet Template
This window is used to add Check Sheet Groups to the Check Sheet Template
Webatar > Configuration> Check Sheet Template Setup
.png)
| Standard | Use to add, edit or delete a Check Sheet Group within the Check Sheet template |
| Add Button | Insert a new Check Sheet Group |
| Edit Button | View/Edit a Check Sheet Group |
| Delete Button | Delete a Check Sheet Group |
| Print/Export Drop Down Menu |
Print the grid displayed win the window |
Overview button
Displays the list of created check sheet groups, tasks and questions
.png)
Print Button
Allows the user to print the selected Check list template
.png)
Check Lists Groups Menu
Check List Groups
Check sheet groups are the logical grouping of activities that are used in the Check Sheet Template to create a Check Sheet
CRM Module> Configuration> Check List Groups

| Code | Search for a check list/ Item grouping using the list code or part of it |
| Description | Search for check list group by description or part of description |
| Active |
If you search for check list with the tick on. I will recall all existing check list groups If you search for check list group with the tick off it will recall all inactive check list groups |
| Search | Allows you to search for one or multiple check list |
| Add | Allows you to create a new check list group |
| Edit | To edit or view an existing check sheet |
| Delete | Allows you to delete an existing Check sheet |
| Print/ Export | Allows you to print or export check sheets displayed on the Grid |
| Import | Allows you to bring in check sheets via a template into the system |
Add Check List
CRM Module> Configuration > Check list Groups
.png)
| Code | Enter the check list group code |
| Description | Enter the check list group description |
| Active |
Tick the active tickbox if the check list group is active Do not tick the tick box if the check list group is inactive |
Check List Questions Menu
Check list Questions
The function of this application is to enable a standard list of questions to be defined which will be used in the Check Sheet Templates where there are more than one selection options available. These options will be listed on the check sheet and the person using the check sheet can mark which option they used.
Webatar > Configuration > Check List Questions
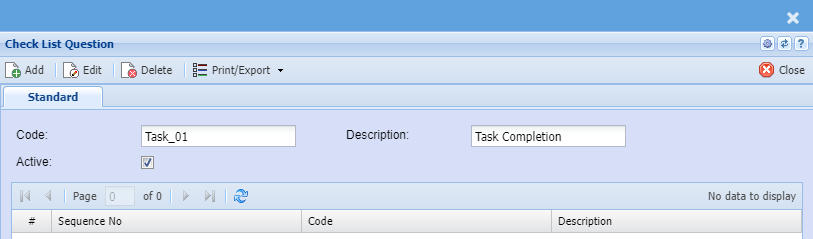
| Code | Add the code for the check list question |
| Description | Enter the description for check list of question |
| Active | Put a tick on if the check list question is active and do not put on a tick if the check list question is inactive |
Interactions Types Menu
Interactions Types Search
Video Training Manual 2016 - Click Here
This is where you search for an existing interaction type.
Webatar > Configurations > Interaction Types
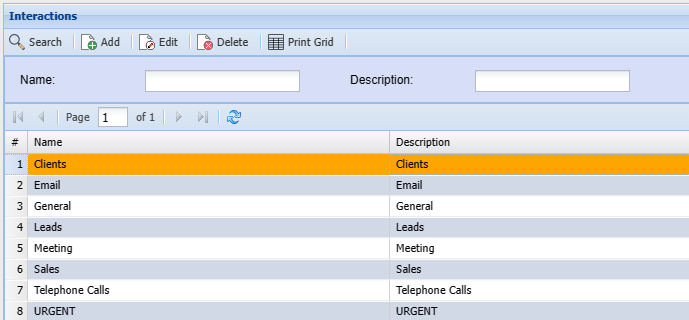
| Name | Search by interaction name |
| Description | Search by interaction description |
Add Interactions Types
Video Training Manual 2016 - Click Here
This is used to make notes of different types of customer interactions for example business meetings, telephone calls and support calls, etc.
You can add new or edit an existing interaction type here
The change in position of the interaction type from System Configuration to Webatar module
Webatar > Configuration >Interactions
(1).png)
| Name | Enter interactions name |
| Description | Enter interaction description |
Website Support Groups Menu
Website Support Groups
This is where the user creates a new Website Support Groups or search for an existing one.
CRM Module> Configuration> Website Support Groups.
If no filter options are selected all Website Support Groups records are displayed on the gird.
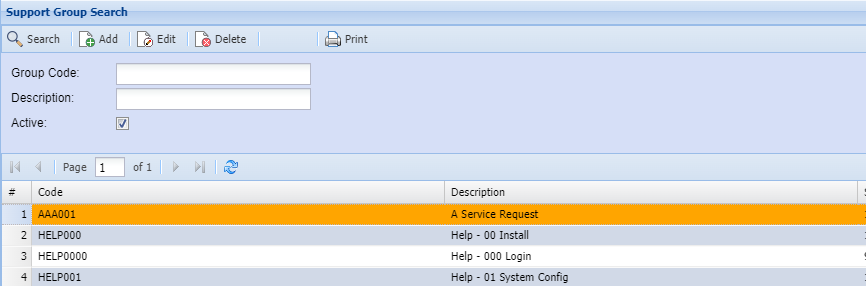
| Group Code | |
| Description | |
| Active | Searching for Active or Inactive Website Support Groups |
| Search | Search button allows a user to search using filter options. |
| Add | |
| Edit | to make changes to an existing Website Support Group. |
| Delete | to delete an existing Website Support Group. |
| print all the Website Support Group display on the gird |
Add Website Support Groups
This is where the user adds or edits a Website Support Group.
CRM Module> Configuration> Website Support Groups> Add/ Edit Button
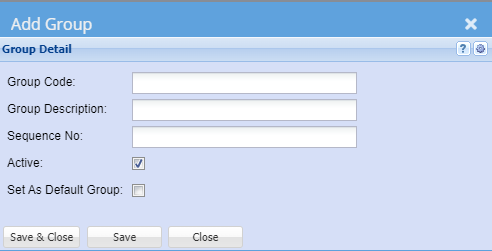
| Group Code | Enter Group Code |
| Group Description | Enter Group Description |
| Sequence No | Enter Sequence number of Group Detail |
| Active | Searching for Active or Inactive Website Support Groups |
| Set as Default Group |
Website Support Forms Menu
Support Form Search
This is where the user creates a new Website Support Form or search for an existing one.
If you don't put anything on the search criteria, all support forms will appear
Webatar > Configuration > Website Support Forms
Video training manual - Click Here
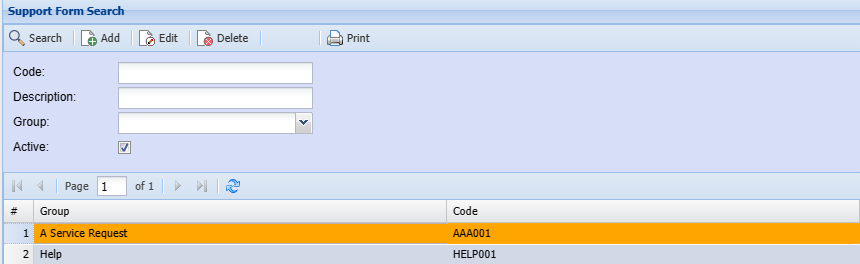
| Code | Search by code name or parts of the code if you know the code you are searching for |
| Description | Search by description/ name or park of the description of the support form if you know it |
| Group | Search by group |
| Active | Searching for Active or Inactive Support Forms |
Add Website Support Forms
This function allows you to Add/Edit or Deleted the Website Support Form
Webatar > Configuration > Website Support Forms
.png)
| Code | Enter Website Support Form Code |
| Description | Enter Website Support Form Code description |
| Sequence No | Enter in which order the code is to appear |
| Group | Select from drop down to which Website Support Group you want to associate this Support Form to |
| Attachment | You are able to attach a document or picture to the Support Form |
| Active | Searching for Active or Inactive Support Forms |
Support Log Ticket Setup Menu
Support Log Ticket Setup
CRM Module > Configuration > Support Log ticket Setup

| Search | Search the available list of created items |
| Add | Click Add to add a new support log ticket function |
| Edit | Click edit to amend the support log ticket item |
| Cancel | |
| Import Status Changes |
This import facility allows you to change the Status of a Support Log using importing status changes via a CSV file. |
Add Support Log Task
To edit or add a new support log task follow this path
CRM Module >Configuration >Support log Setup
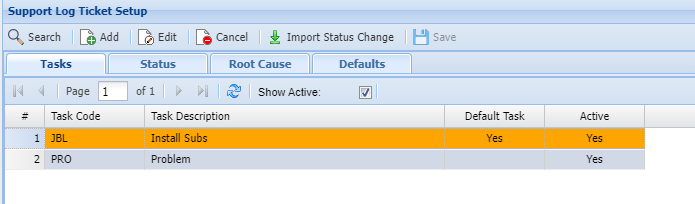
| Tasks | |
| Status | |
| Root Cause | |
| Defaults |
Add Sub Task
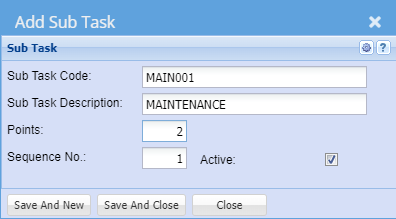
| Sub Task Code | Enter a Sub Task Code |
| Sub Task Description | Enter a Sub Task Description |
| Points | |
| Sequence No | |
| Active |
Status
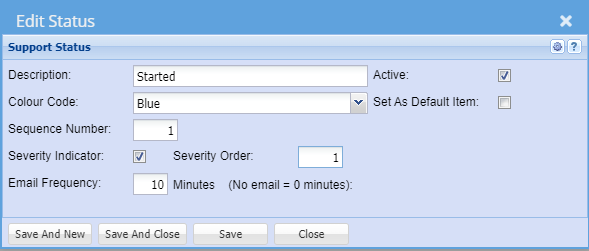
| Description | |
| Colour Code | |
| Sequence Number | |
| Severity Indicator | |
| Email Frequency | |
| Severity Order | |
| Active | |
| Set As Default Item |
Root Cause
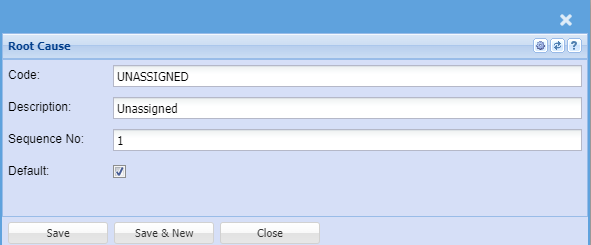
| Code | |
| Description | |
| Sequence No | |
| Default |
Defaults
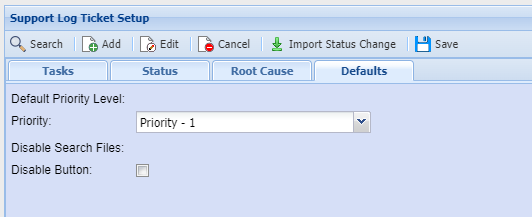
| Priority | |
| Disable Button |
Support Log Status
Webatar > Activity > Support logs
This is where the various statuses of the support log system is updated.
Statuses can be color coded and one of them can be set as a default
.png)
Status sections can be deactivated should you have historical statuses.
The description can be changed to your company needs
.png)
First Section
The Support status is split into two sections
First section has got to do with the actual status on the support logs
Description
Description of the type of Status you want shown
Active
This is to indicate that this status is active and will show on the drop down of the menus.
Take the tick off to deactive this status from the selection lists, but keeping the history of the support logs already shown.
Colour code
Colour indicate the font colour on the support log ticket grid for easier reading
Set As Default Item
There can only be one Default item in this list.
If the user wants another status to become a default status, then he would first have to unselect the default status from the other status item and then go back to the status item to select.
This is why the Set As Default Item is inactive when there is another status already active.
Sequence Number
This sequence is used in the workflow flow of the various statuses.
Second section
The green part of the status setup is reserved for the support log logging.
.png)
Severity Indicator
Active this tick box in order for the severity status to be shown up on the support request
Severity Order
This will give the order in which you want the severity status to be shown in order from 1 upwards
Email Frequency
The email frequency will send out emails to internal support indicated persons every X minutes until the logged support log ticket is looked at and assigned.
If you set to 30 minutes, the system will send the selected support people an email every 30 minutes until someone handles the log.
.png)
Import Status Change
This is assigned when a PO has been authorised by a manager and now can be ordered
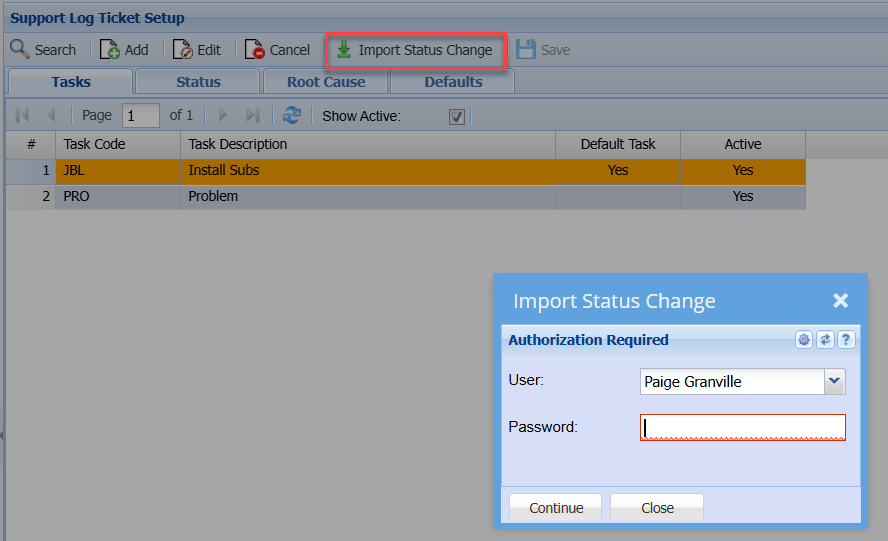
| User |
to select a user from the drop-down arrow for authorisation |
| Password |
to enter user’s password to allow the authorisation |
Contract Maintenance Menu
Contract Maintenance Setup
Video Training Manual 2016 - Click Here
The Time logging setup is done under the contract maintenance menu
There are 3 setups required:
- The contract
- The tasks
- Service items
- Billing Rates
Once these have been setup, you will need to link these to one another
CRM Module> Configuration> Contract Maintenance
Contract Task setup
Click the Contract Tab
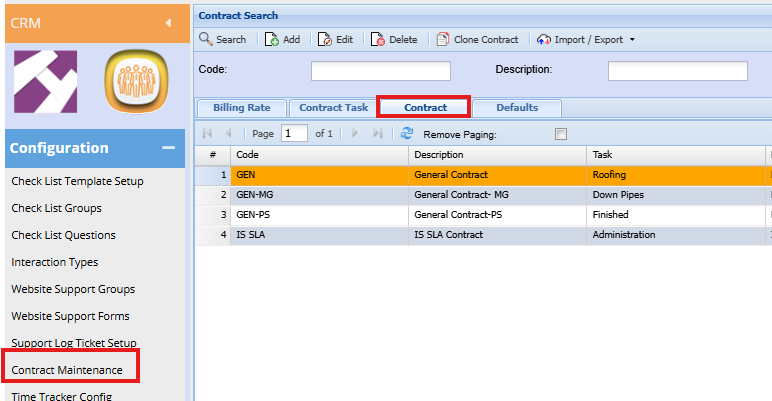
| Add | To create a new Contract |
| Edit | To edit existing contracts |
| Code | Enter a code for the Contract |
| Description | Enter a description for contract |
| Archived | This is used to flag obsolete contracts that are no longer in use. we do not allow them to be deleted due to audit trails and historic time logs that may have the contract linked |
Billing Rate Tab
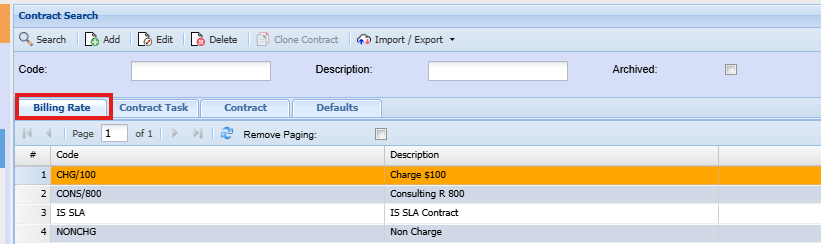
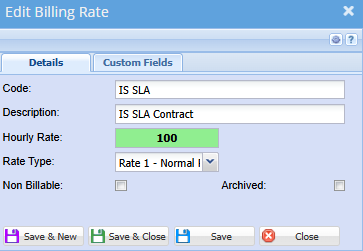
| Add | To add a new billing rate |
| Edit | To edit an existing rate |
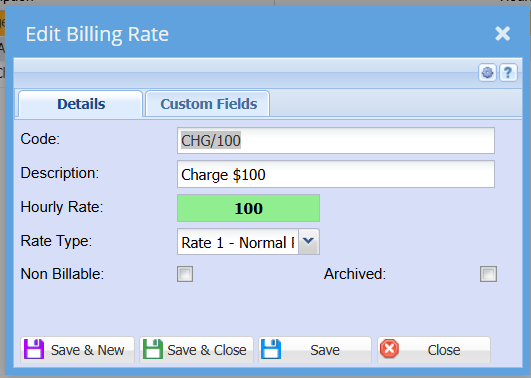
| Code | Enter SLA or billing rate code |
| Description | Enter brief description of SLA or billing rate |
| Hourly Rate | Enter the amount billed per hour |
| Rate Type | Select the billing rate tye on the drop down |
| Non Billable | Put a tick of an SLA is non billable |
| Archived | If the archived box is ticked, the billing rate will be achieved |
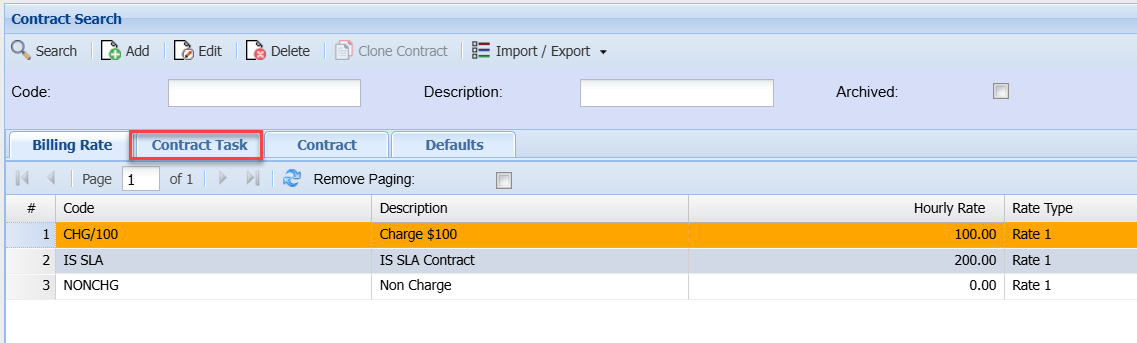
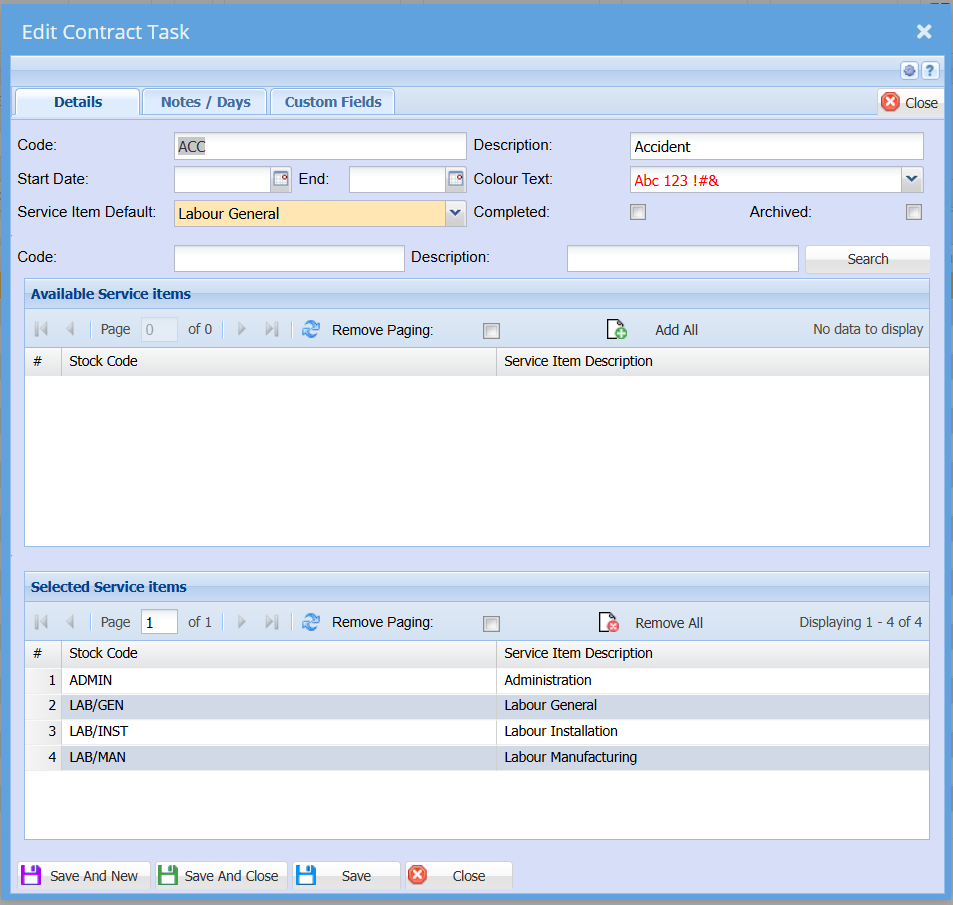
Contract Task Tab
Video training Manual 2016 - Click Here
Click the Contract Task Tab
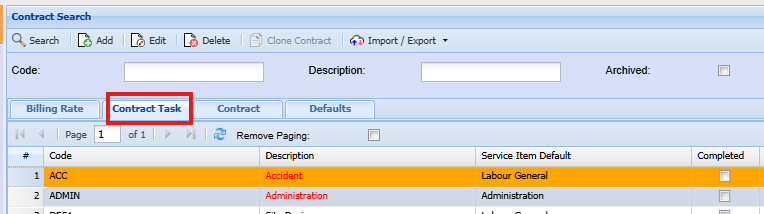
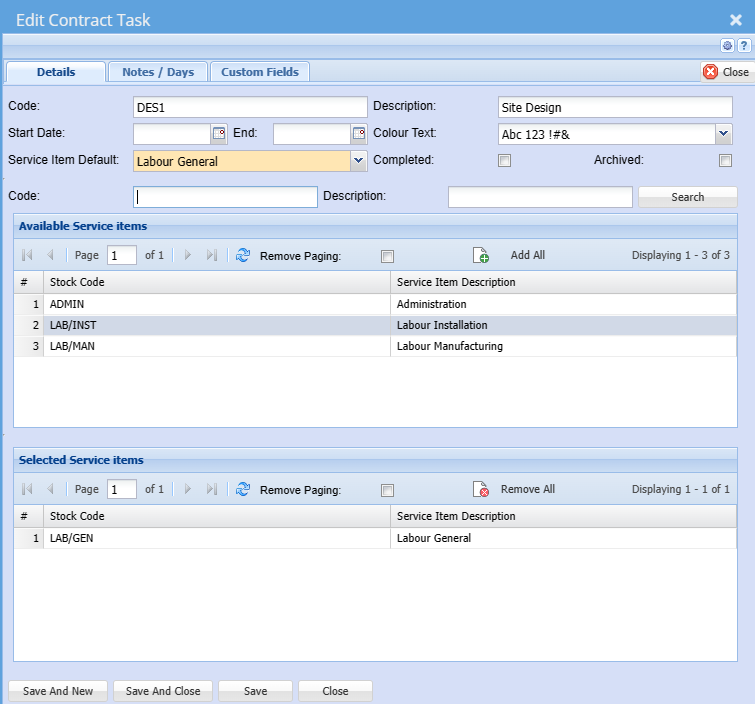
| Add | To add a new task |
| Edit | To edit an existing task |
| Code | Enter an code for the task |
| Description | Enter a task description or name |
| Start Date | The date could be set to a year if the tasks are to be reviewed yearly - Not mandatory |
| End | The date could be set to a year if the tasks are to be reviewed yearly - Not Mandatory |
| Colour Text | you can enter colour codes to differentiate the different tasks |
| Service Item Default | This field allows the default service to be chosen from the selected list |
| Completed | |
| Archived | If the archived box is ticked, the billing rate will be achieved |
| Code | This field allows the user to search for an existing service item code |
| Description | This field allows the user to search for an existing service using the description |
| Available Service Items Grid | These will be the available service items that can be selected to be used in the service item for billing purposes |
| Selected Service Items Grid | These are the service items selected from the above list that will be available for use |
The date could be set to a year if the tasks are to be reviewed yearly
| Search | Search button to populate the available service item list |
| Add All | Allows the user to add existing items |
| Remove All | Allows the user to remove all selected items |
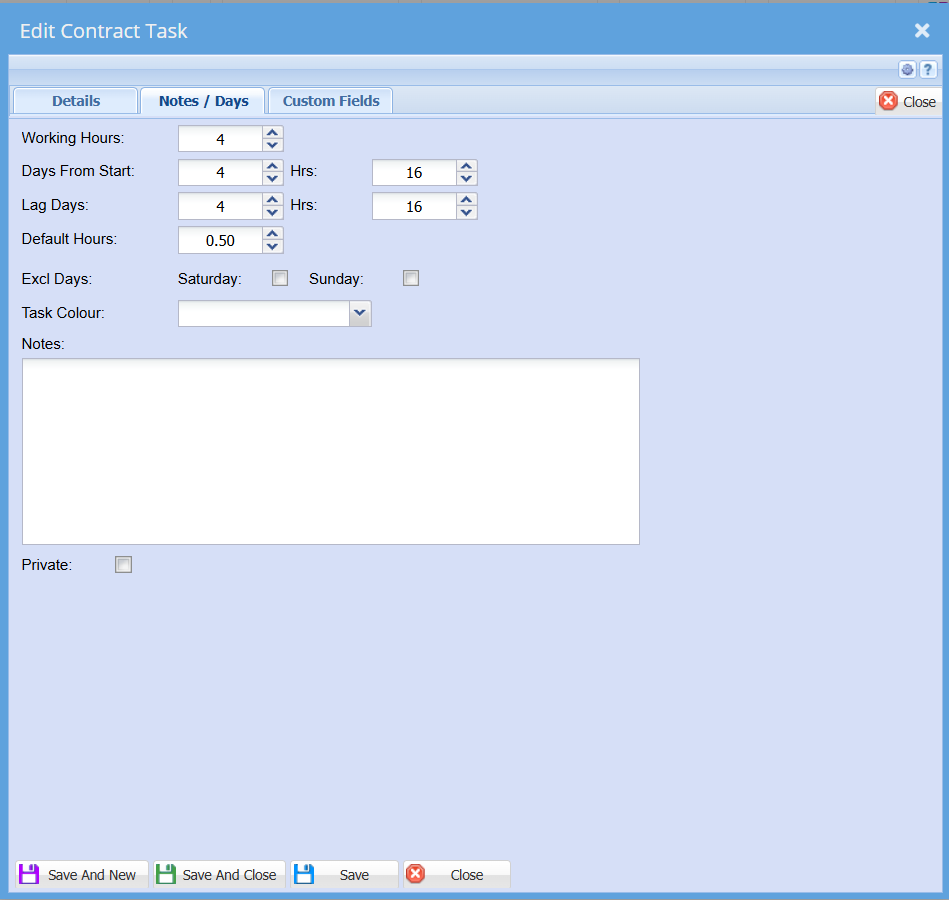
Note/Days
These fields define the working day hours
these details are not mandatory to complete. they are typically used for scheduling
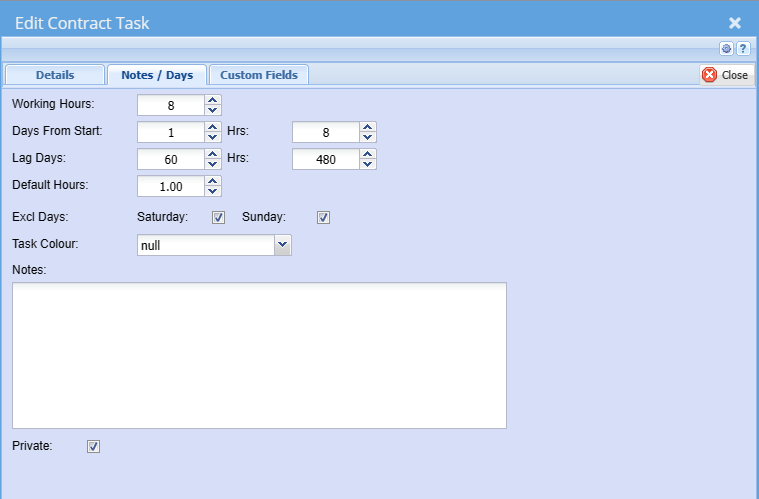
| Working Hours | |
| Days From Start | |
| Hrs | |
| Lag Days | |
| Hrs | |
| Default Hours | |
| Excl Days | |
| Text Colour | |
| Notes | Users can add notes for internal use |
| Private |
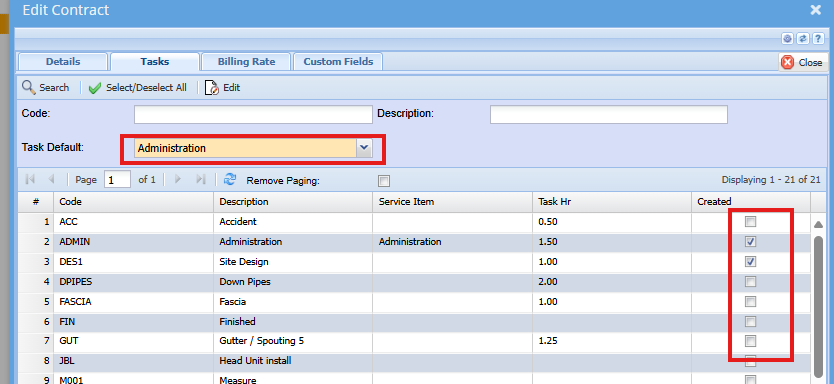
Link Contract to Tasks & billing rates
Click the Contract tab
Click edit to edit the contract
Click the task tab
Activate the relevant task for the specific contract
Select the default task
Save and close
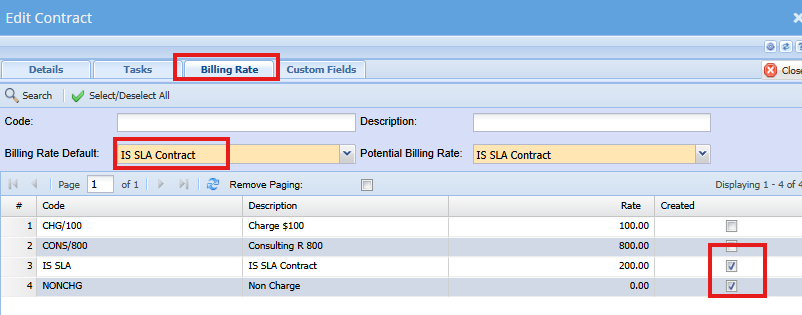
Click the Billing Rate tab
Activate the relevant rates for the task and select the default rate
Save and Close
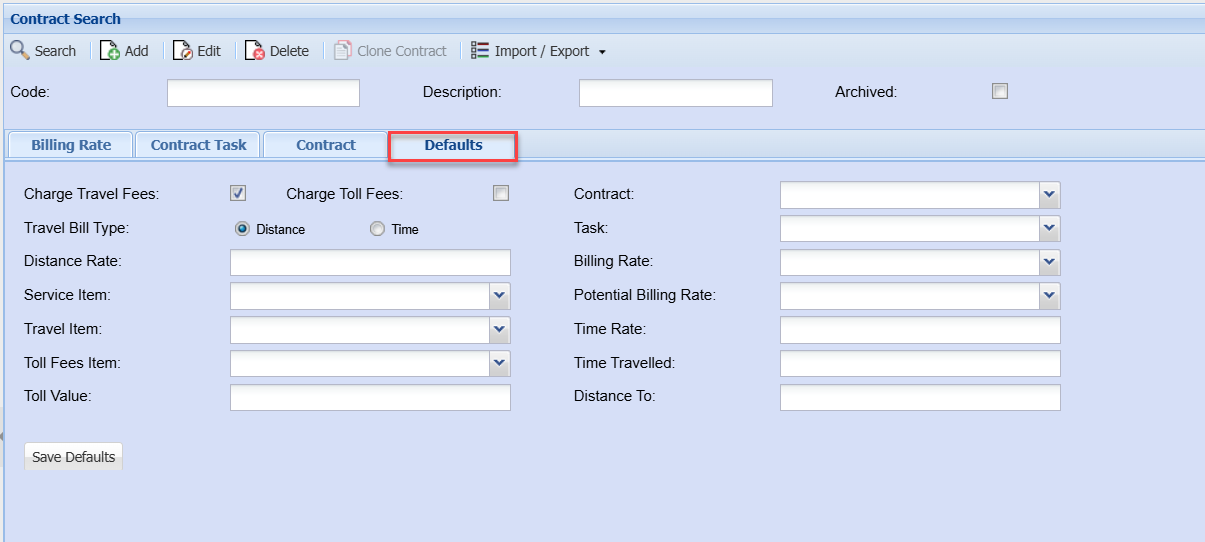
Defaults Tab
This tab allows one to set certain defaults, so the user does not have to complete all these fields when capturing the time logs.
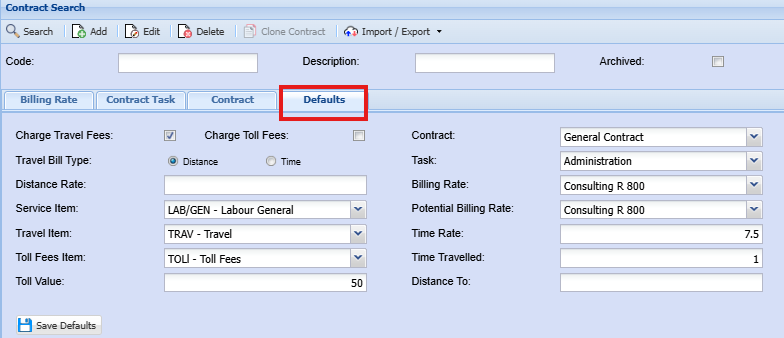
| Charge Travel Fees | This will set the default to always charge travel. Tick off will set default to off, indicating no travel charges. user can manually tick the box on time log capture if applicable. |
| Charge Toll Fees | This will set the default to always charge toll fees. Tick off will set default to off, indicating no toll fees charges. user can manually tick the box on time log capture if applicable. |
| Travel Bill Type | Sets the default to charge travel based on distance or time travelled |
| Distance Rate | Rate per kilometer |
| Service Item | this is the default service item related to the task selected for the contract |
| Travel Item | Service item for travel |
| Toll Fees item | Service item for toll fees |
| Toll Value | default Toll price |
| Contract | Default contract. this can be set per user on the user profile setup as well |
| Task | Default task related to the contract |
| Billing Rate | Default billing rate to pull through |
| Potential Billing Task | Default potential billing rate |
| Time Rate | Travel time default rate |
| Time Travelled | Travel time default, eg. 1 = 1 hour |
| Distance To |
Add Contract
Billing Rate
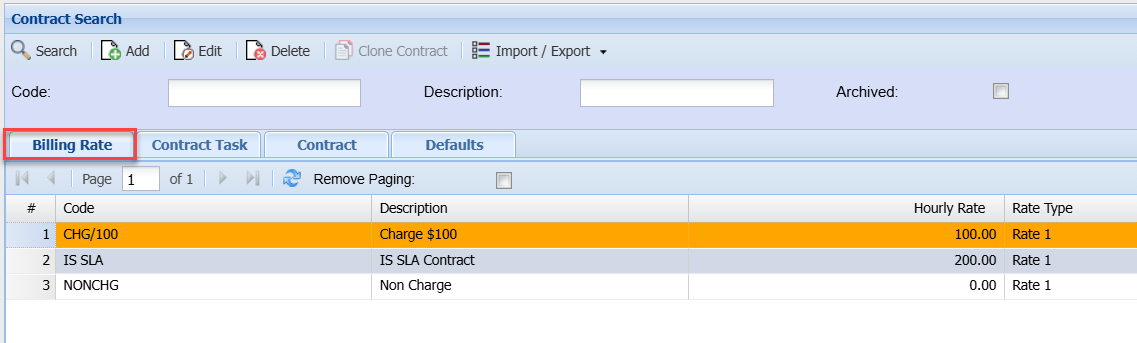
Adding Billing Rate
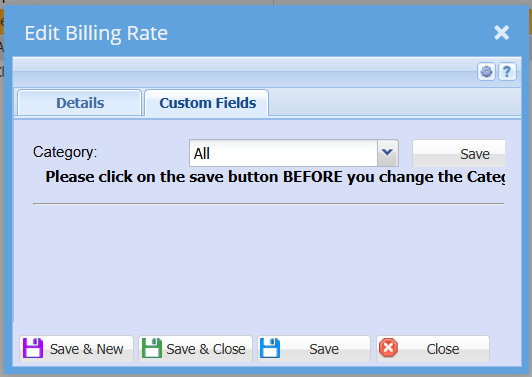
Contract Task
Adding Contract Task
Contract
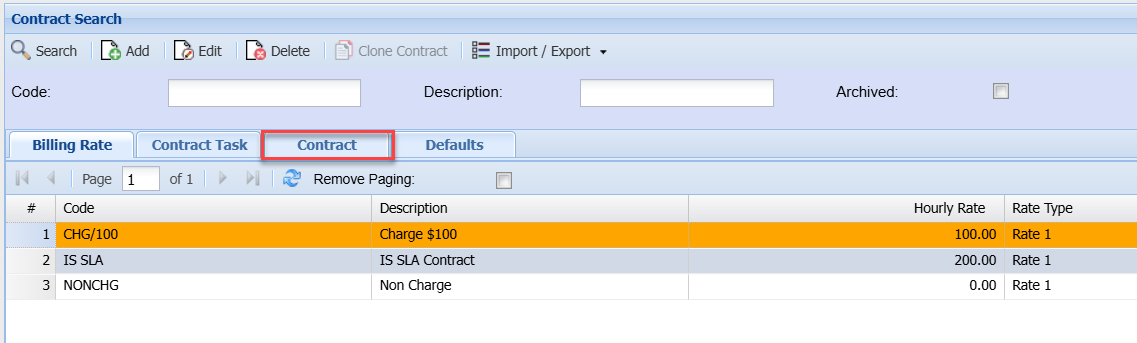
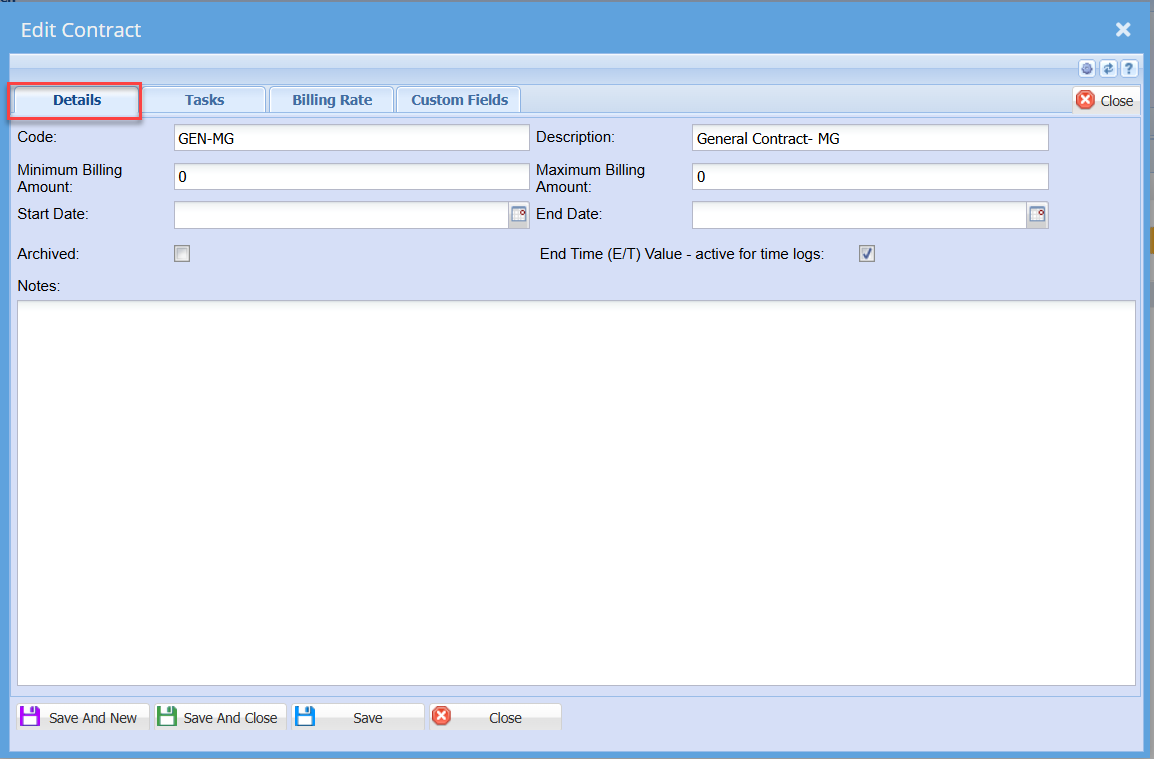
This is where the contract between the provider of a service and the user’ details is created.
It has five tabs and four buttons
Detail Tab – The code and description are important to fill in.
Code – Code of the SLA
Short Description – brief description of the SLA
Minimum Billing Amount – minimum amount the customer and the service provider agree upon
Maximum Billing Amount – maximum amount the customer and the service provider agree upon
Start Date – beginning of the SLA started
End Date – The end of SLA
Archived – SLA will go to archives if the box is ticked
Notes Tab – customer notes regarding SLA
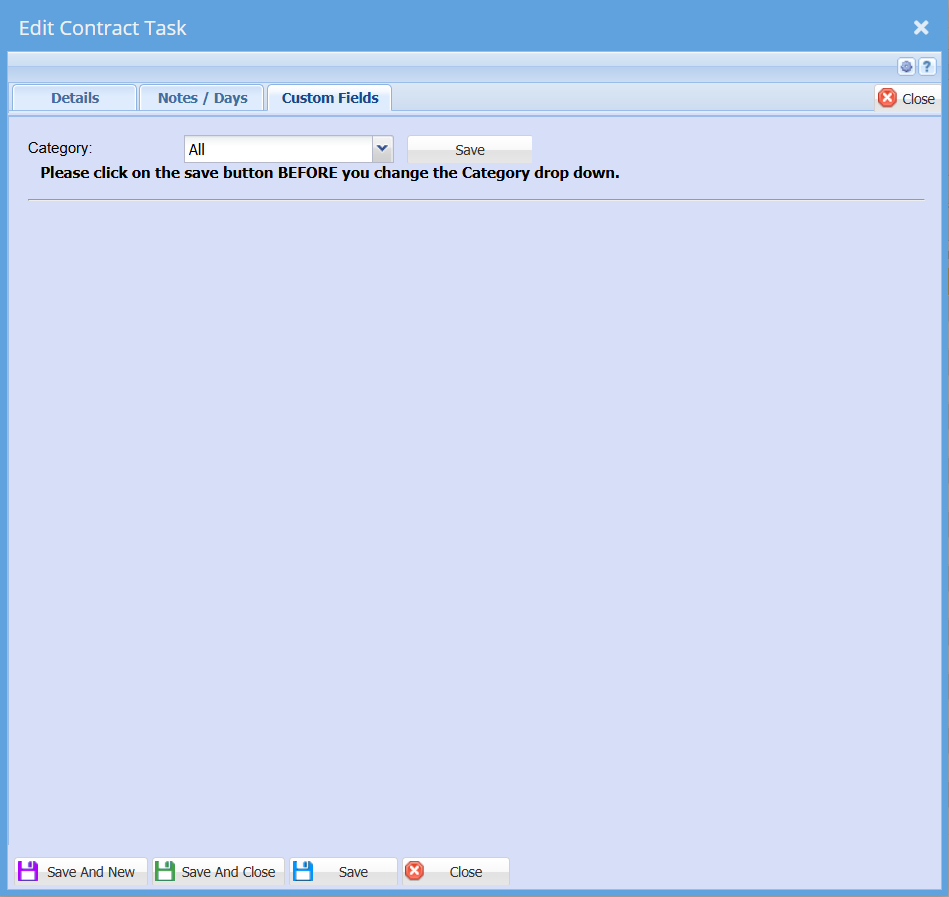
Custom Fields – a user can select from the category
Task Tab
This displays the list of tasks that can be selected for this user contract
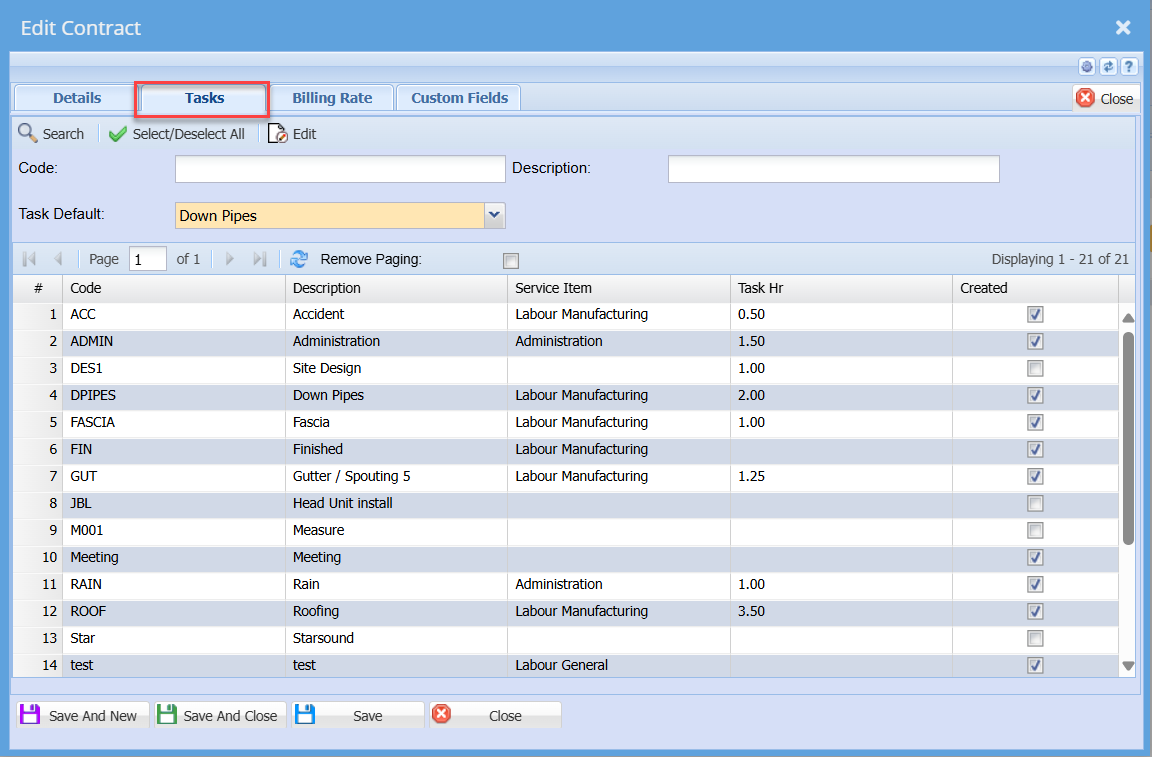
Select /Deselect All button – selects all available tasks or unselect all the tasks
Billing Rates Tab
SLA rates selection
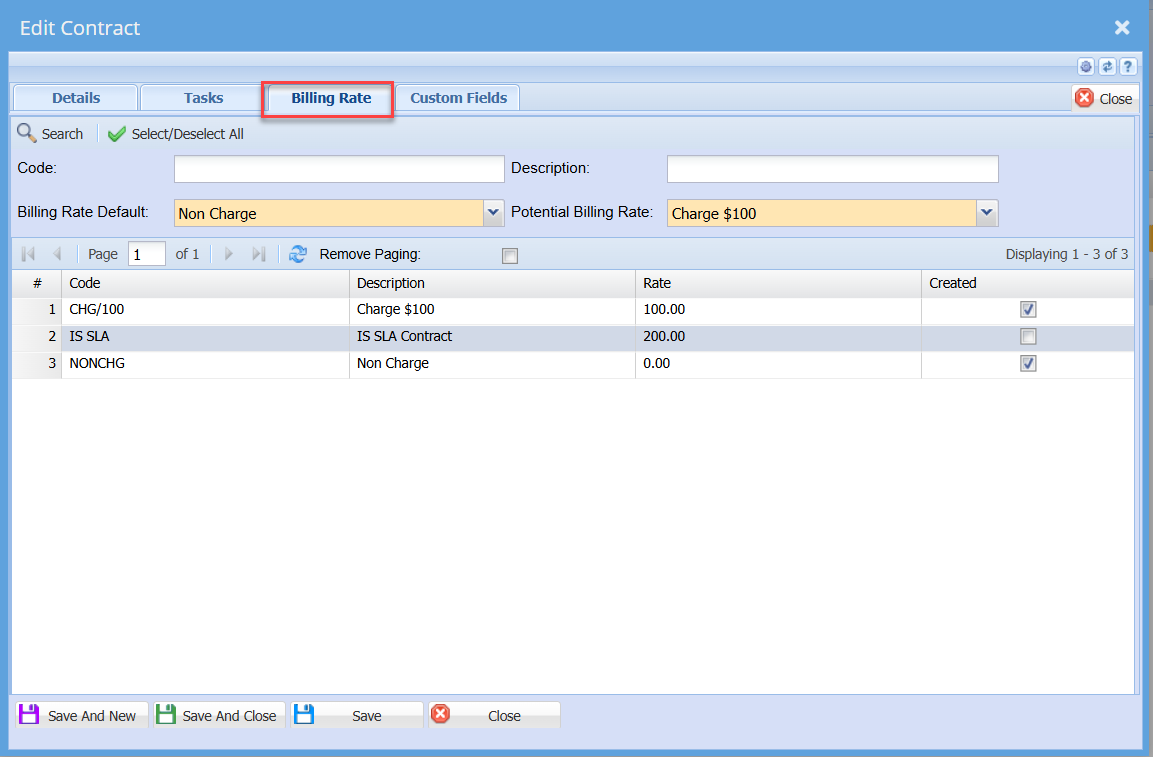
Select / Deselect All button – Selects all available billing rates or unselect all billing rates
Billing Rate Default - Select from the list the defaulting billing rate when this contract is selected
Potential billing rate - Select from the the list the defaulting potential billing rate when this contract is selected
Custom Fields Tab
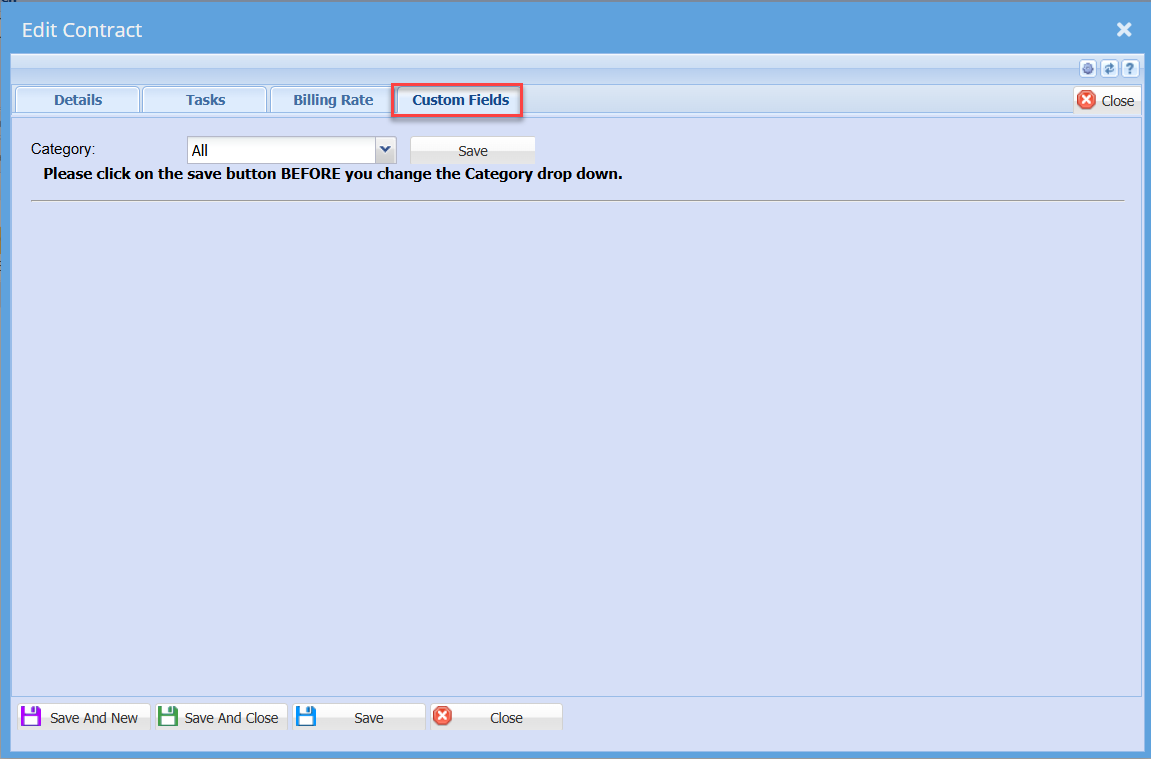
Defaults
Import /Export Contract
.png)
The file to be imported must be in a CSV format.
Click on the Select Files… button to open the navigate window allowing the user to navigate to the file to be imported.
Once the desired file has been located either double click on the file or click the Open button.
Now click on the Upload button. If the upload was successful a window will appear confirming that the upload was successful. Click Ok.
The Import button now becomes enabled allowing the user to click on the Import button to import the file.
An Import Report will open displaying any errors in the import or displaying the successful import status.
Please Note :
The column headings can be left in the import file providing that the heading are as per the sample below.
Import File Layout
All items in RED are required fields.
|
No |
Heading |
Value |
|
1 |
Code |
CONTRACT001 |
|
2 |
Description |
Contract Description 001 |
|
3 |
Minimum Billing Rate |
1000 |
|
4 |
Maximum Billing Rate |
3000 |
|
5 |
Start Date |
2015-09-11 |
|
6 |
End Date |
2016-09-11 |
|
7 |
Archived |
0 |
|
8 |
Notes |
This is a note |
|
9 |
Task Default |
Task Code |
|
10 |
Billing Rate Default |
Billing Rate Code |
|
11 |
Tasks List |
Task Code|Task Code|Task Code |
|
12 |
Billing Rate List |
Billing Rate Code| Billing Rate Code |
Time Tracker Config Menu
Time Tracker Config
Time Tracker
Allow the user to set up different start and end times for Lunch/tea.
Video training manual 2016 - Click Here
CRM>Configuration>Time Tracker Config> Time Tracker Tab
Time Tracker Configuration has moved from System Configuration module to CRM

| Day Start | The start of the day when the workers start to work. |
| Tea Start | The time that the work force stop working for tea. |
| Tea End | The time that the work force start working again. |
| Lunch Start | The time that the work force stop working for Lunch. |
| Lunch End: | The time that the work force start working again |
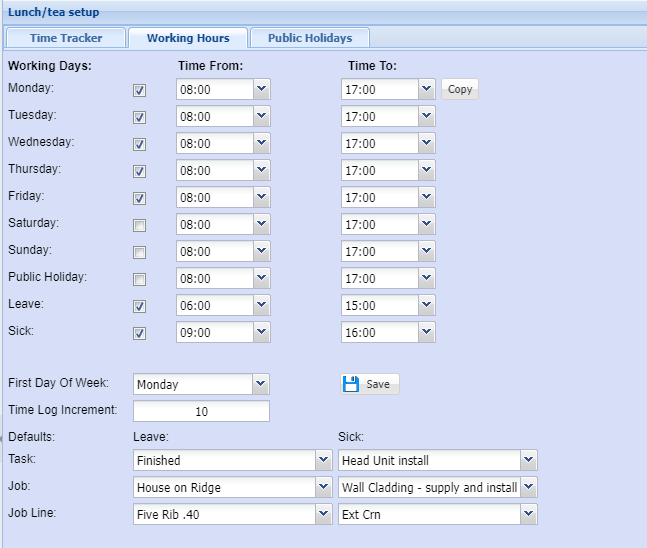
Working Hours
Setting the time log minutes
Publick Holidays
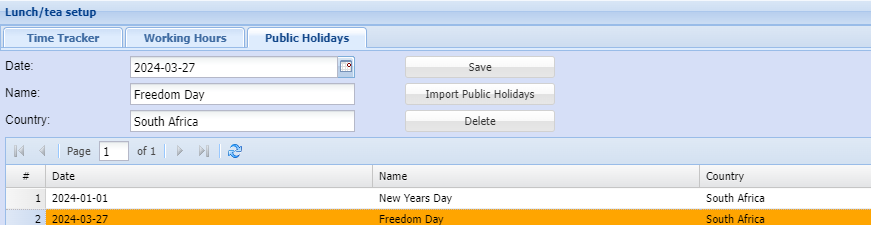
| Date | |
| Name | |
| Country | |
| Grid |
| Save | |
| Import Public Holidays | |
| Delete |
Check Sheet Template Setup Menu
Check Sheet Template Setup
Job Costing >Configuration>Check Sheet Template Setup
Before setting up a Check Sheet Templates; answer the following questions:
• What do you want to call the check sheet?
• List all the items for the check sheet
• Categorize the items you have listed.
• Sort items in order of priority.
• Assign questions to items as required. These should be multiple choice type questions.
Note: If question only has one answer rather create a Service Item Question.
Search button: If the Check Sheet Template Code or the Check Sheet Template Description is
left blank, all Check Sheet Templates listed in the system will be displayed.
By inputting in ether the Check sheet Code or Check sheet Description or part there of you can press the search button and all matches will be displayed on the grid.
If the cursor is placed on Description at the column head, this will sort the Description A-Z or Z-A as preferred.
.png)
Search button: the search function will return Check Sheet Template records based on the search criteria entered
Add button: allows you to create a Check Sheet Template
Edit button: allows you to change an existing Check Sheet Template details
Delete button: allows you to delete an existing Check Sheet Template details
Clone button: allows you to copy and existing Check Sheet Template.
Print/Export Drop down:
Print: prints the Check Sheet Template search grid this can either be emailed or physically printed
Refresh Grid Icon: refreshes the display grid
Check Sheet Template
New Check Sheet Templates can be created by:
Add a new Check Sheet Template
Clone a new Check Sheet Template from and existing Check Sheet Template
.png)
Search button: By inputting in ether the Check sheet Code or Check sheet Description or part there of you can press the search button and all matches will be displayed on the grid.
Active Tick Box: If this tick box is ticked then the search will return all Active Check Sheets. If not ticked then the search will return all inactive Check Sheets.
Note: To clone and existing Check Sheet Template you select the Check Sheet Template you wish to copy from the display grid and select the Clone Button. Input the new Check Sheet Template Code and Description and press the Clone button to create the copy Check Sheet Template
When you select a Check Sheet Template all the active Check Sheet Groups associated with the Check Sheet Template will be displayed on the display grid.
.png)
Two Tabs are available
Standard Tab: add the Check Sheet Groups to the Check Sheet Template
Question Tab: add Questions which are relevant to the Check Sheet Group
Add button: to insert a new Check Sheet Group.
Edit button: to view or edit an already added Check Sheet Group.
Delete button: to delete the currently selected Check Sheet Group.
Print/Export Dropdown button: prints the contents of the grid displayed this can either be emailed or physically printed
Save and New button: This will save the contents of the window and clear the window for new input.
Save and Close button: This will save the contents of the window and close the window.
Save button: This will save the contents of the window.
Close button: This will close the window and any changes made will not be saved.
Check Sheet Groups are the logical grouping of activities which are used in the Check Sheet Template to create a Check Sheet.
.png)
Add button: allows you to create a Check Sheet Template
Edit button: allows you to change an existing Check Sheet Template details
Delete button: allows you to delete an existing Check Sheet Template details
Save and New button: This will save the contents of the window and clear the window for new input.
Save and Close button: This will save the contents of the window and close the window.
Save button: This will save the contents of the window.
Close button: This will close the window and any changes made will not be saved
Group Item
This window allows you to edit the Check Sheet Group Item
There are three tab options:
Basic: Input the Group Item details
Question Setup: Add, change or delete questions linked to the group item
Item Choices: Only applicable if you tick the “Use Item Choices Tick Box under the Basic tab
Basic Tab
.png)
Item Code: the Item Code is selected form the drop down menu
Description: enter the Description of the Item Code
Qty: enter unit of measure taken to complete the Group Item
Department: select the Department required from the drop down menu
Sequence No: enter the sequence number in which the Group item is to appear in the Check Sheet Group
Use Item Choices: If ticketed it will enable the Item Choice Tab form
Save: this will save the contents of the window
Close: this will close the window and any changes made will not be saved
Note: Allow sufficient gaps in your sequence number range so that if you have to add another check sheet item there is space available without having to renumber the whole check sheet
Question Setup Tab
The function of this application is to enable a standard list of questions to be defined which will be used in the Check Sheet Templates where there are more than one selection options available. These options will be listed on the check sheet and the person using the check sheet can mark which option they used.
All Check Sheet Question linked to the Check Sheet Group Item will be displayed on display grid
Add button: to insert a new Check Sheet Question.
Edit button: to view or edit an already added Check Sheet Question.
Delete button: to delete the currently selected Check Sheet Question.
.png)
Company: Huge ERP Systems (Pty) Ltd Product: Webaccounting Tel: +27 861 webacc +27 86 193 2222 +27 11 603 6280 Fax: +27 86 603 3980 E-mail-general: contact@webaccounting.co.za E-mail-support: support@webaccounting.co.za Physical Address: First Floor • East Wing • 146a Kelvin Drive • Woodmead •2191 Postal Address: P.O. Box 4555 • Edenvale • 1610 Page 8 of 12
Question Setup Tab
The function of this application is to enable a standard list of questions to be defined which will be used in the Check Sheet Templates where there are more than one selection options available. These options will be listed on the check sheet and the person using the check sheet can mark which option they used.
All Check Sheet Question linked to the Check Sheet Group Item will be displayed on display grid
Add button: to insert a new Check Sheet Question.
Edit button: to view or edit an already added Check Sheet Question.
Delete button: to delete the currently selected Check Sheet Question.
Save: This will save the contents of the window
Close: This will close the window and any changes made will not be saved
Check List Question Options
This window allows you to add, edit and delete Check Sheet Questions
.png)
Add button: to insert a new Check Sheet Group.
Edit button: to view or edit an already added Check Sheet Group.
Delete button: to delete the currently selected Check Sheet Group.
Print/Export Dropdown button: option the Print Grid which prints the contents of the grid displayed
Window to describe the Check Sheet Question options
.png)
Code: input Question Code
Description: input Question condition
Sequence No: input sequence number of question option
Active: tick the Active tick box is this question option is active
Save and New button: this will save the contents of the window and clear the window for new input.
Save and Close button: this will save the contents of the window and close the window.
Save button: this will save the contents of the window.
Close button: this will close the window and will not save changes
.png)
Item Choices Tab
.png)
Add edit or delete
.png)
Stock Code: select stock code from drop down menu options drawn from the Inventory Master
Description: description as per Inventory Master; you can change this description
Sequence No sequence number of the item choice
Save and Close button: this will save the contents of the window and close the window.
Save button: this will save the contents of the window.
Close button: this will close the window and will not save changes
Print/Export Drop down Menu
Example of a Check Sheet Template Print
.png)
Pre Inspection Check Sheet - JC
JOB Costing Pre Inspection Check Sheet
This manual describes how to create and maintain a Pre Inspection Checksheet.
The Pre Inspection Checksheet is created from the Check Sheet Template
.png)
Search button: selects all existing Pre Inspection Checksheets on the system. If no search filter criteria is not specified when searching.
The search results displayed on the display grid will depend on the filter criteria you select.
Add button: to insert a new Pre Inspection Checksheet.
Edit button: to view or edit an already added Pre Inspection Checksheet.
Delete button: to delete the currently selected Pre Inspection Checksheet
Print button: to print the selected Pre Inspection Checksheet.
Process Drop down Menu:
Job Quote:
Debtor Quote:
Security Icon: Manage form security
Refresh Grid Icon: Refreshes the display grid
.png)
Add a new Pre Inspection Checksheet
This function will create a new Pre Inspection Checksheet from the available Check Sheet Templates.
.png)
Template: select a Check Sheet Template from the available templates in the drop down list
Description: give your Pre Inspection Checksheet a name
Customer: select the customer from the drop down list
Assign To: select the responsible person for the Pre Inspection Checksheet
Save and Close button: this will save the Pre Inspection Checksheet and return you to the Pre Inspection Checksheet window
Check Sheet Window
There are four tabs
Standard tab: this tab allows you to link actions to the Pre Inspection Checksheet
Questions tab: this tab allows you to link questions to the Pre Inspection Checksheet
Notes tab: this tab allows you to link notes to the Pre Inspection Checksheet
Custom Fields tab: this tab allows you to use custom fields to the Pre Inspection Checksheet
Standard tab
This tab allows you to link actions to the Pre Inspection Checksheet
Standard tab
This tab allows you to link actions to the Pre Inspection Checksheet
.png)
Questions tab
This tab allows you to link questions to the Pre Inspection Checksheet
.png)
Notes tab
This tab allows you to link notes to the Pre Inspection Checksheet
.png)
You first need to add a note then save the note
Custom Fields tab
This tab allows you to use custom fields to the Pre Inspection Checksheet
.png)
Example of the printed Pre Inspection Checksheet
.png)
Expense Setup Menu
Expense Add
Expense setup allows you to create expenses to be used by your team for GRV and Journal transactions
CRM Module> Configuration> Expense Setup
Expense Category
Expense category allows you to create a main group for the expense
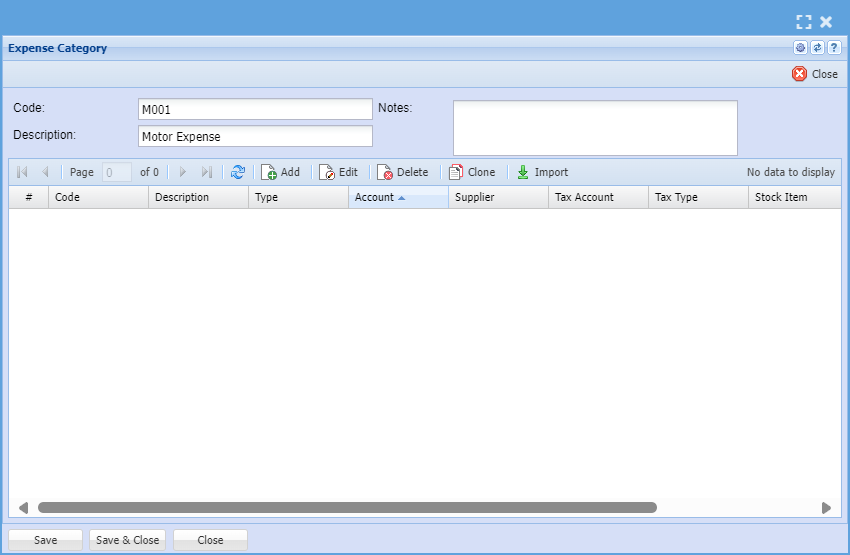
| Code | |
| Description | |
| Notes | |
| Grid |
Expense Subcategory
This allows you to add all expenses related to the expense category

| Type | |
| Code | |
| Description | |
| Journal Transaction | |
| Stock Item | |
| Journal Admin | |
| Account | |
| Tax Account | |
| Tax Type | |
| Division | |
| Region | |
| GRV Type |
Expense Setup Search
This screen allows you to search for a expense set up
If you don't put filter your search this will bring up expenses
CRM Module> Configuration> Expense Setup
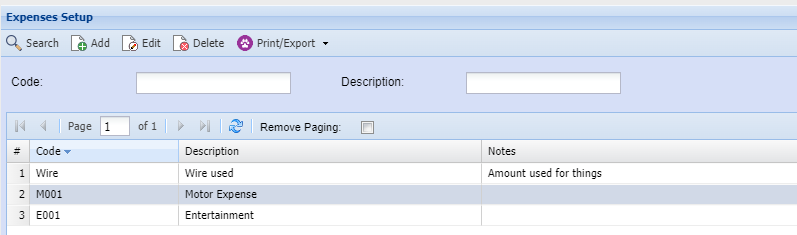
| Code | |
| Description | |
| Print/ Export |
To add a new expense category or to edit an existing one click here
Sales Leads Setup
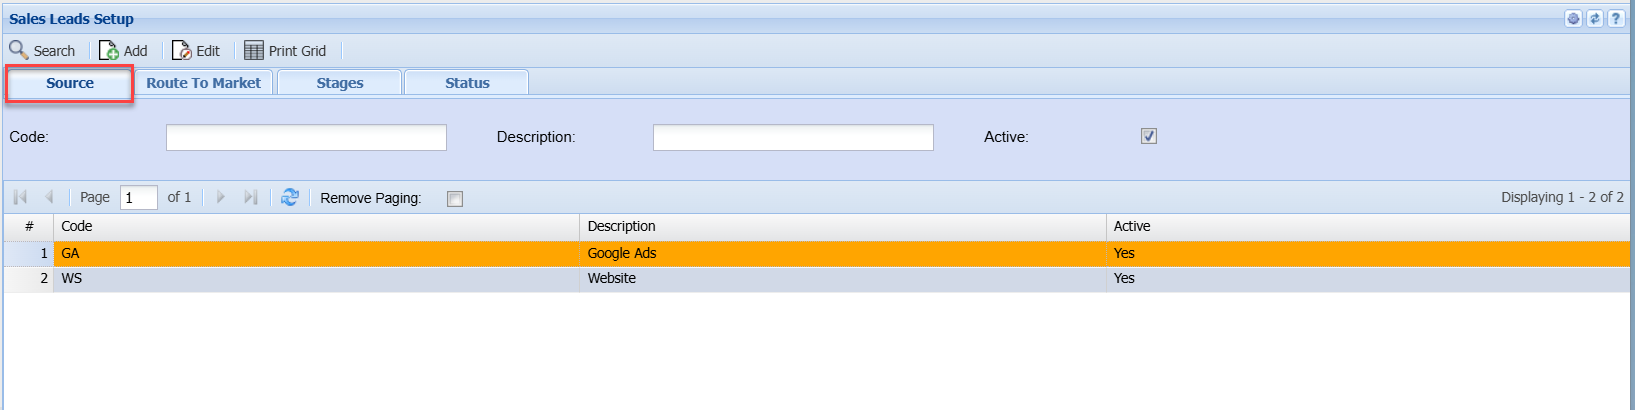
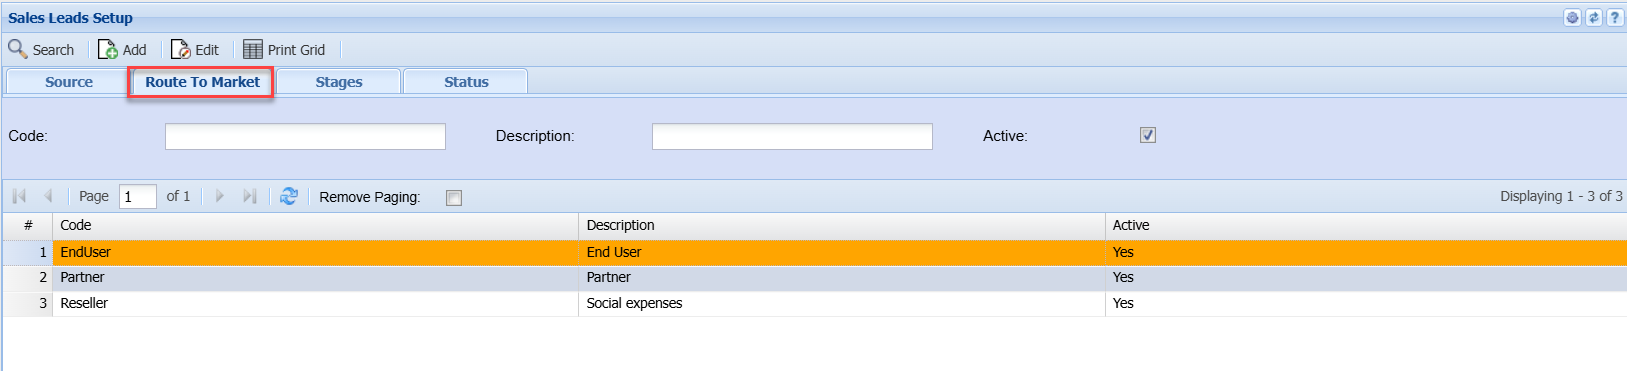
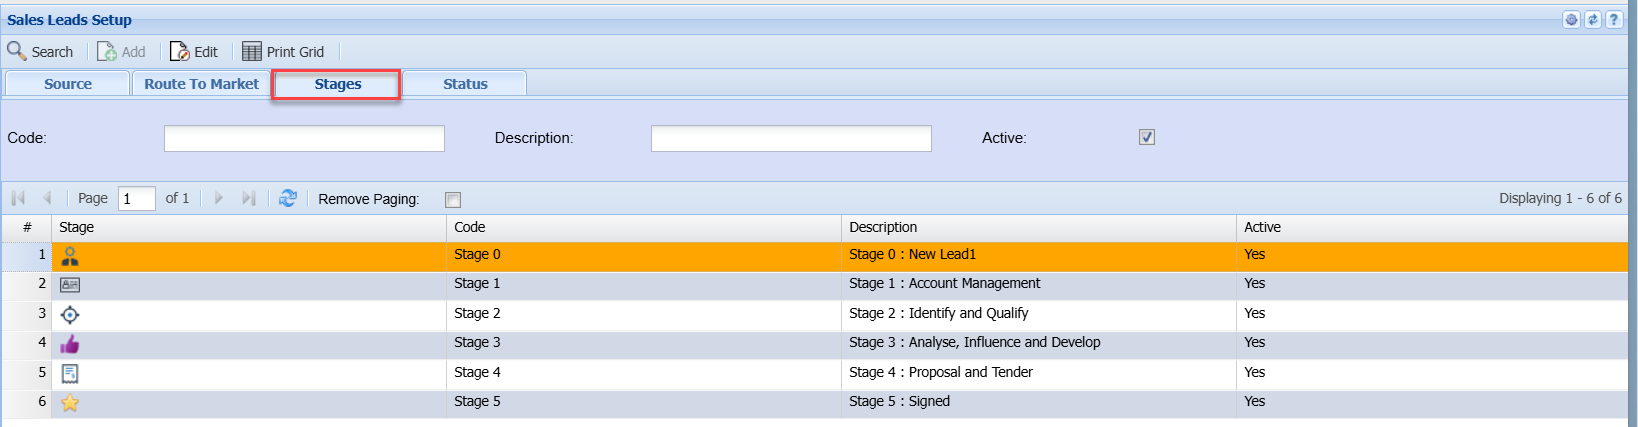
Sales Leads Search
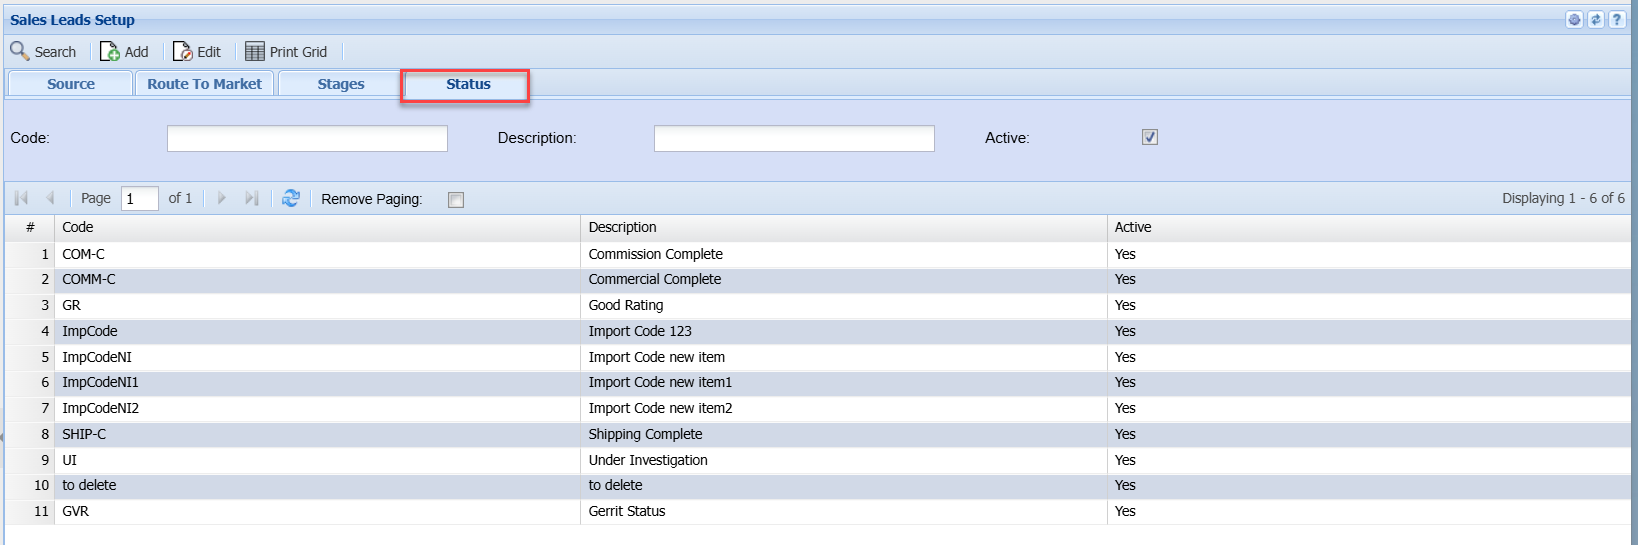
Sales Leads Setup Add
Source Tab Add
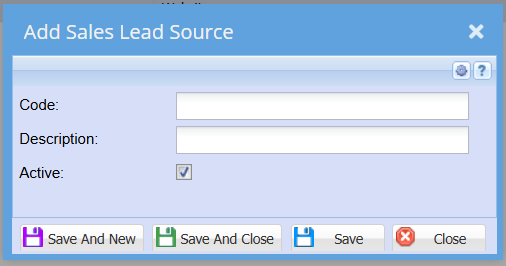
Route To Market Tab Add
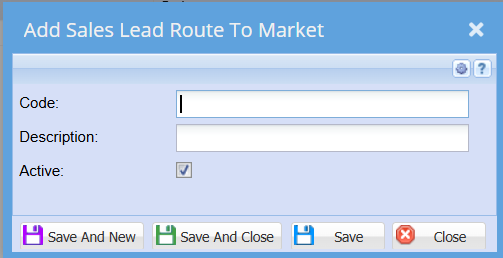
Stages Tab Add
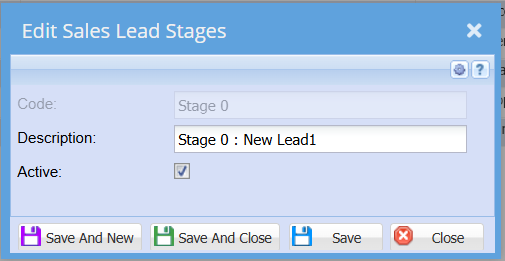
Status Tab Add

Email Template Letters
Email Template Letter Setup
Email templates are set up and maintained by the customer. The system does not provide pre‑configured content. Customers are responsible for creating, updating, and approving all email wording, layout, using the appropriate placeholders.
There are Five email template options, each used for a different part of the system.
CRM > Configuration > Email Template
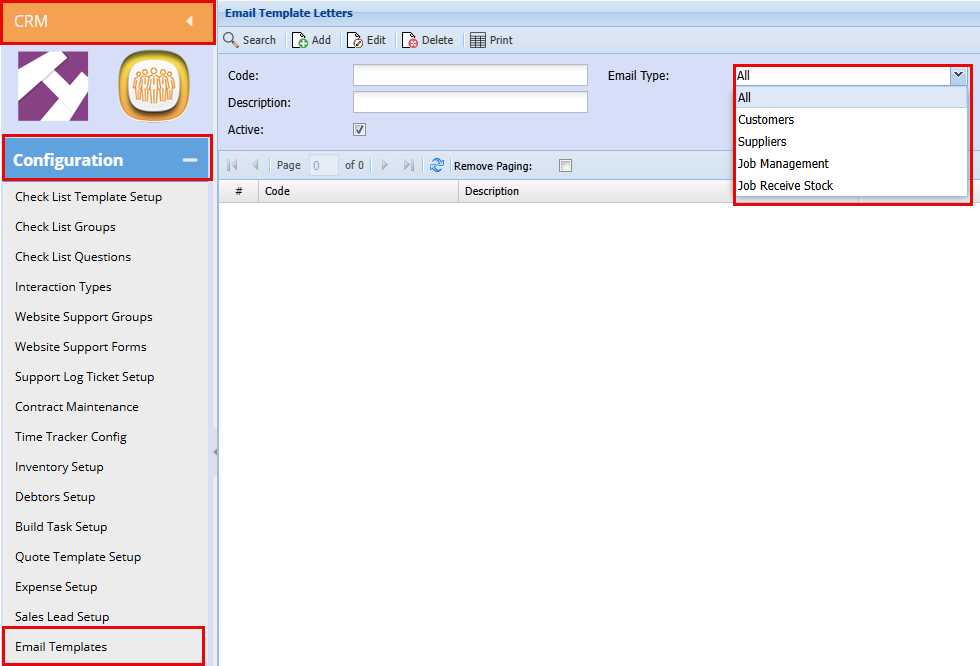
1: Customers:
This option is used for Customer Batch Email Out.
Email templates for Customer mail‑outs are designed, created, and managed in the CRM Module
- Customer mail‑outs uses a customer contact list that can also be customized.
2: Suppliers
This option controls emails sent to suppliers.
Email Template Setup
Email templates for Supplier mail‑outs are designed, created, and managed in the same location as customer Emails within the system and for email type you will select Suppliers.
Uses a separate template specific to supplier communication
3: Job Management
This option is used for emails generated through the Job Management and are designed, created, and managed in the CRM Module.
4: Job Receive Stock
- This email is triggered when stock is received against a job
5: Asset Email Out:
This option is used for Asset Email Out via the Webatar App
Asset Tracker > Configuration > Email Letter Template
These emails can be Scheduled as needed for Asset Allocation, Service dates, Return dates etc.
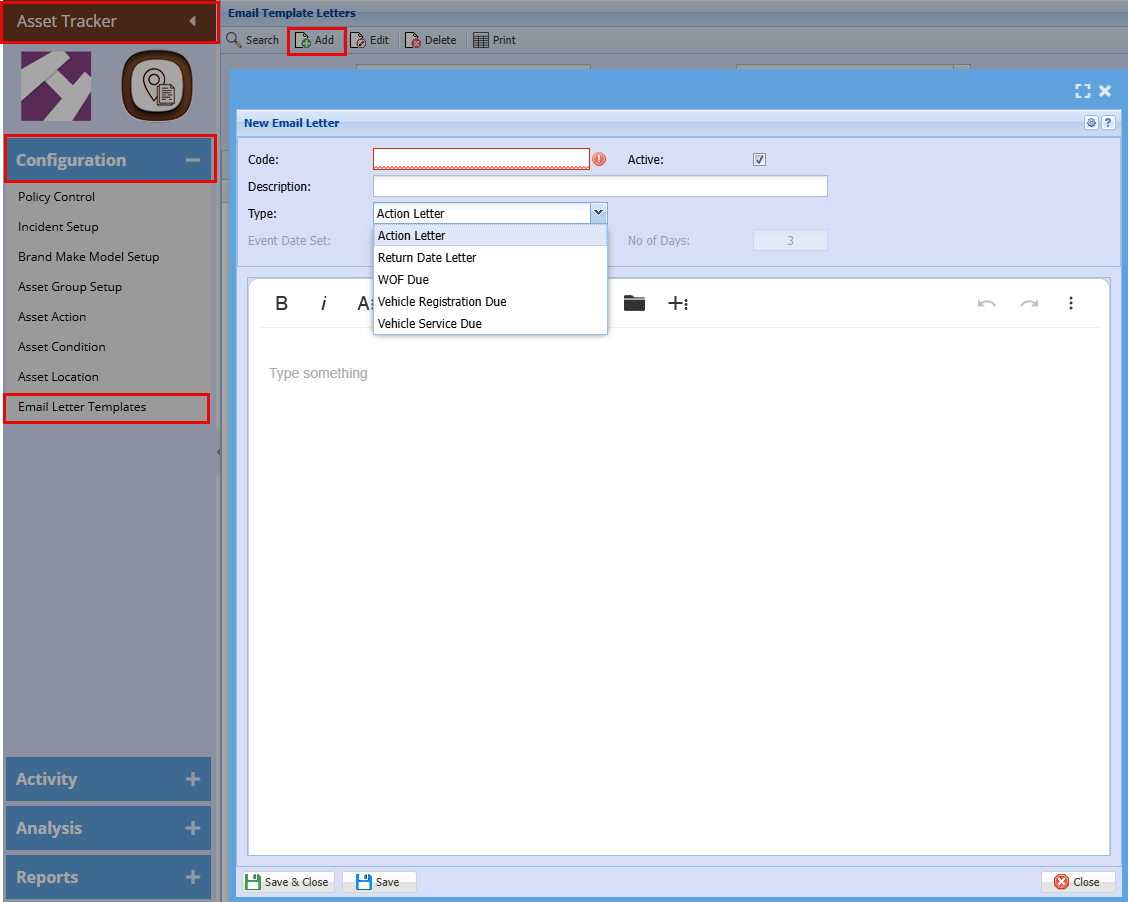
-
Asset mail out are sent to the specific staff member being allocated the asset through the Webatar App.
- To activate the Mail out for each item the “Return Date Email” checkbox needs to be ticked at bottom of the Asset Information page, tick the “Return Date Email” checkbox to activate this mail‑out.
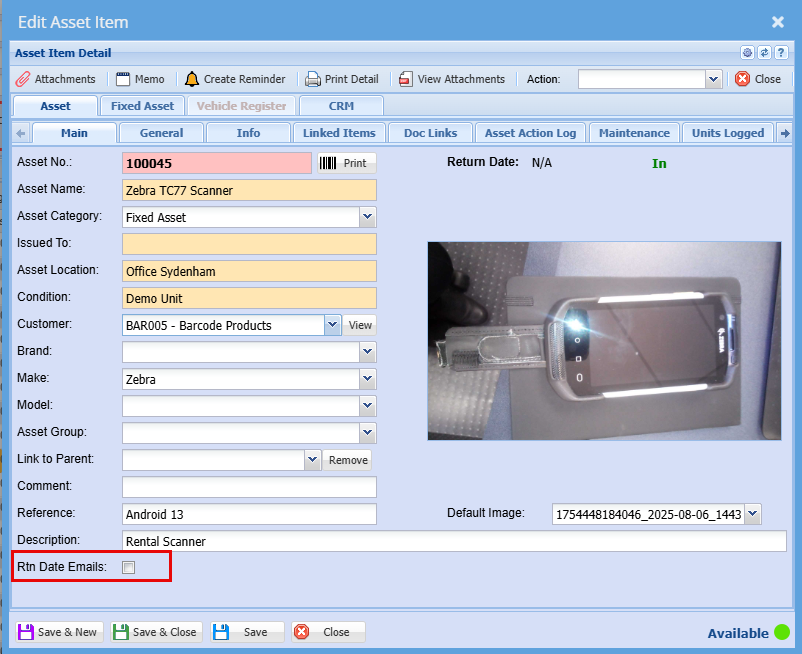
Email Template Letter Place Holders
Place holders used in Email Template
Customer Bulk emails
Supplier Bulk emails
Manage Job
Job Receive stock email
Job Checklist email assign to
| Assign to employee | |
| Job Description | |
| Asset Number | |
| Asset Name | |
| Checklist Number | |
| Checklist Description |